Straightliner59
-
Posts
5,808 -
Joined
-
Last visited
Content Type
Profiles
Forums
Events
Gallery
Everything posted by Straightliner59
-
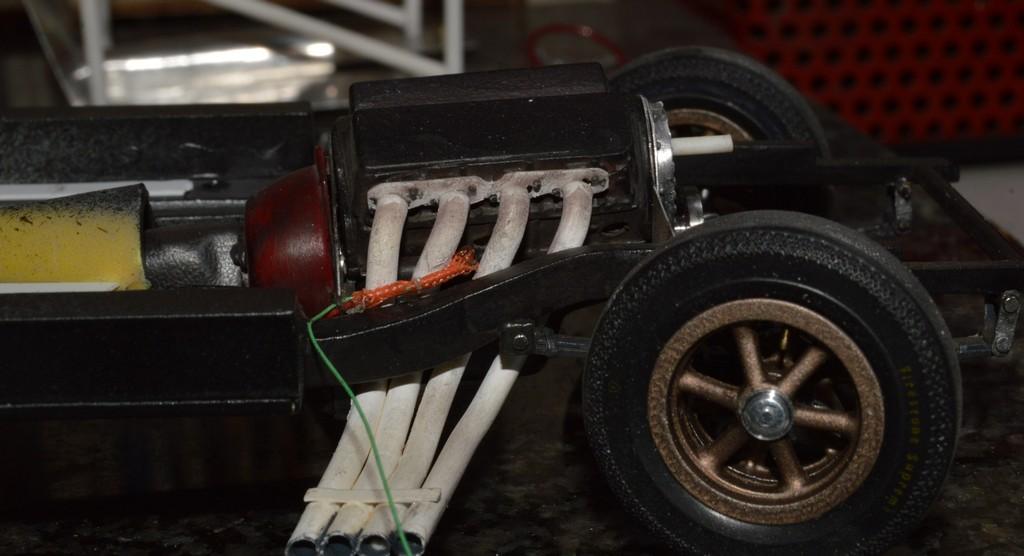
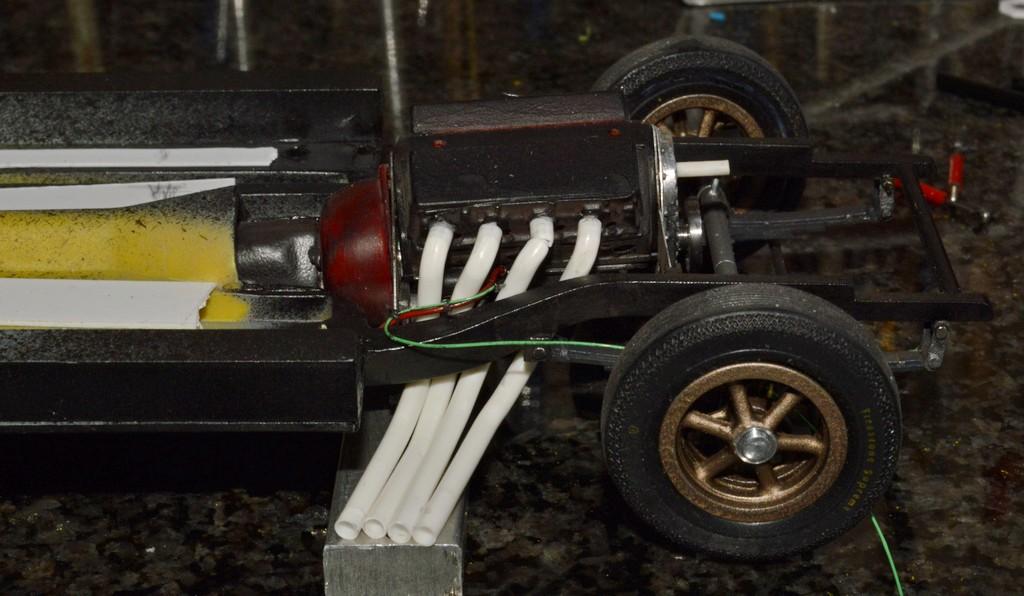
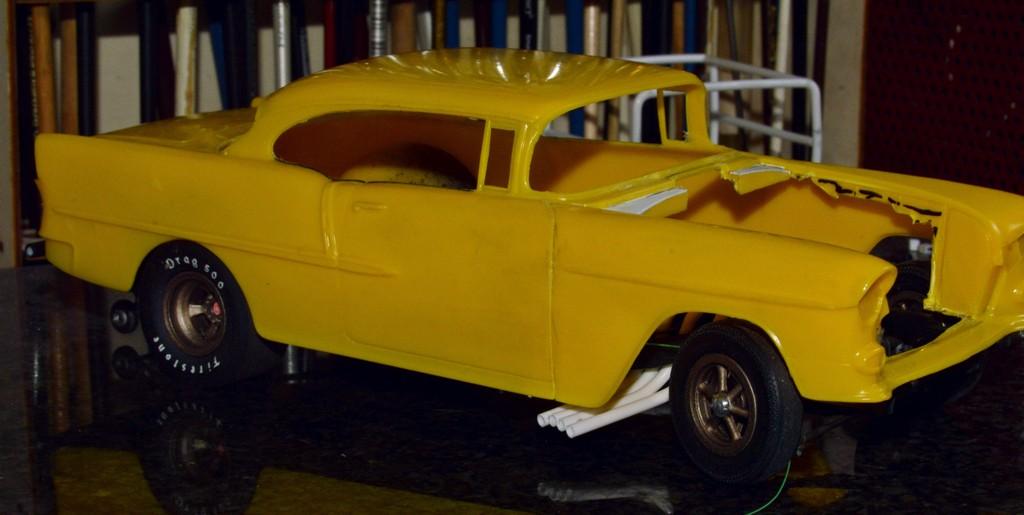
I finally got the right-side headers where I like them, and did a little weathering, to them. When I went to touch up the white, I discovered that I don't have any flat white. I ended up using some Humbrol gloss. I'm waiting on the flat coat to dry, then I will go over those spots with the pastels, again. About then, I realized that I hadn't left enough slack in the wiring to get it safely away from the header pipe, so, I snipped the wires, and slid a sheath of braided, weighted fishing line to represent heat resistant shielding. I couldn't find anything else that would fit, and look halfway right. It looks better, since I flowed some Vallejo dark grey wash into it, but I'm still not crazy about it. I'm really looking forward to starting the other side...unless I'm not! I am really happy with their positioning, though. Thanks for looking!

-
I don't need to tell you that I love and enjoy sheet metal work. That's beautiful!
-

Billy the Kid Demon Pro Stock
Straightliner59 replied to dragcarz's topic in WIP: Drag Racing Models
Thanks for posting that article! It's always a bummer, when you find reference that shows you that all the reference you thought you had, was erroneous. That's what I'd do, at this point in a project--just go with it. It all looks great! -
I'm sure it's been said, ad nauseum, but newer, better versions of a Maverick, AMX, and a Hornet, and a better '70 Chevelle would be great!
-
Thank you, David! They did work out, pretty nicely. Getting those bent and fitted was a matter of install, study alignment, remove, bend, install...I must have done it a hundred times! Startup can't happen until I build the injection setup!?
-
Thanks, Robert! I enjoy working with it. And, it has thousands of uses! Thanks, Bob! Thank you, Tim! I agree--problem-solving is one of the best parts about scratchbuilding. In a case like this project, you're only bound by what could have been. If it would have worked in the real world, it's fair game, here! We're not bound by the expense of custom machine work on a 1:1 scale! Of course, guys like you and I, who have Sherline equipment and accessories know that even that stuff isn't cheap! The part I like absolutely best, is that, as long as I have raw materials, I never have to be without a part that I need! Thanks for your comments, my friend!
-
That's looking great, Tim! Goofy, or not, I'll be keeping this one in the "note book". While I use a fair amount of fixtures, this made me realize that I don't explore them deeply, enough. That's some good thinkin', right there!?there!?
-
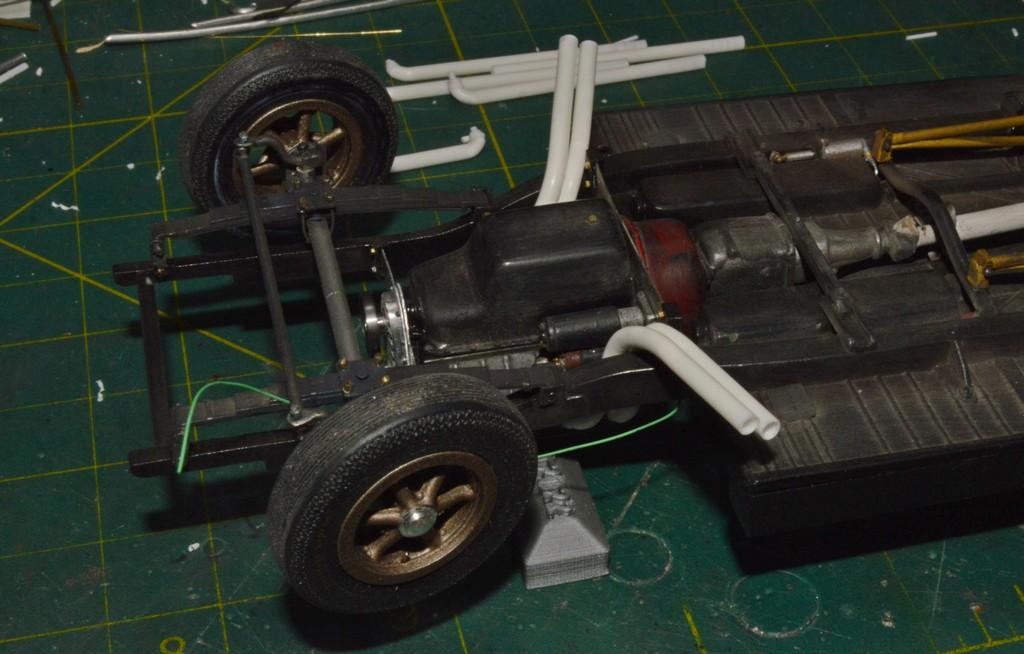
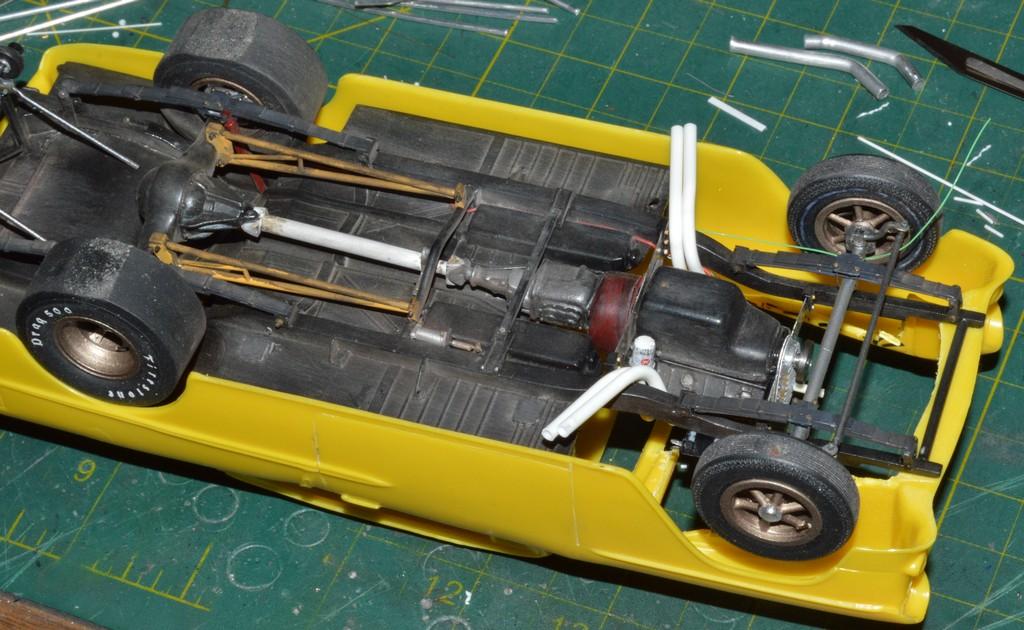
Thanks, David and Scott. I'll try to keep this thing moving along! I made header flanges, today. I used aluminum flashing that I had measured and folded over, then marked for drilling. Doubling the sheet, I got two for the price of one! I used files, sanding boards, and these Xuron photo-etch cutters to trim close work. I have really found them to be useful, for so many other tasks, involving thin sheet metal. I'll drill them for bolts, so I'm not just cementing them to the flat surface. I also need to remove the broken pipe, and replace it--hoping I can get it out, alone. That will make everything easier, to get it aligned with the existing pipes. I'm hoping to have the exhaust system finished in the next few days. Thanks for looking!
-
Excellent score! Those were designed by Tom West. He, of course was one of the major players in Aurora's Racing Scenes series. He also helped bring us the early-'80s MPC FCs.
-
Thank you, Bob! I got both sides bent and aligned (except the Tacky Glue allows them to sag, a bit). I think they should look pretty decent! I still need to trim the ends. I'll add some bracing, as well. Thanks for looking!
-
I've considered bare metal. I wouldn't do chrome--just not a fan, mostly. I really kind of want to do a VHT type paint...I think.?
-
I was working in a hobby wholesaler, when these came out. The two cases I bought never paid off!? I actually only bought a couple of kits. They're still pretty reasonable, on Ebay.
- 39,072 replies
-
- 1
-

-
- johan
- glue bombs
- (and 1 more)
-
Plugging away on the headers. All eight are bent mostly to shape. Currently, the right side of the car is how I want it. The left...meh. Not so much. It shouldn't take too long to get them all aligned, properly, however. I think it looks good for the overall theme, while, like I said, previously, harkening to its roots. Once those are done, I have to make a new pipe, for the right side, as I broke one, while re-bending it. I'll use the as-currently-installed headers to make spacing templates for the flanges. I'll probably smash some aluminum tube, to make them. I'm leaning "yellow" for the pipes, but would consider alternatives. They look good from the top, too! I wanted to post these, before I get back to work on fixing the left-hand side of the car. Thanks for looking!
-
That's cool! Nice work!
-
Just got in a trade
Straightliner59 replied to JerseeJerry55's topic in Model Building Questions and Answers
I would second Brian's suggestions. There were some AMT Parts Packs that had some that would have worked, as well (after cleaning off the sidewall printing), but they're hard-to-find, and expensive! -
Just got in a trade
Straightliner59 replied to JerseeJerry55's topic in Model Building Questions and Answers
What kind/class of drag car you want to build will dictate the tires you need. Is it a vintage racer? Dragster? Super Comp dragster or Top Fuel? Stock Class racer or Pro Stock? I'm not trying to be snarky, or anything, it's just that all those things determine what will be your proper slicks.? -
I'm up late, this morning, since it's my day (night) off. I've been bending "pipe". I have four bent, but my eyes need some rest. I'm going to pull these (again), and bend them a tad more, so they're closer to, and parallel with, the lower edge of the car. Their location, at least, will harken to Badman's roots, while providing something more realistic. I'm going to have to make the flanges, and paint and mount them, then slip the (painted) headers into place. I'll use some thick paint to dab in weld beads, to hide the joints. I haven't decided what color I am going to paint them. The VHT paint (or similar) was available in a fair amount of colors. I don't really want to use white, because I used it on my Chevy II. That leaves yellow as the most obvious choice. The day-glo orange might be interesting.? I think they'll look pretty cool! The further along I get, with this project, the more I wish I'd gotten rid of the exhaust system! Oh, well--I think I'm still going to like it! Thanks for looking!
-
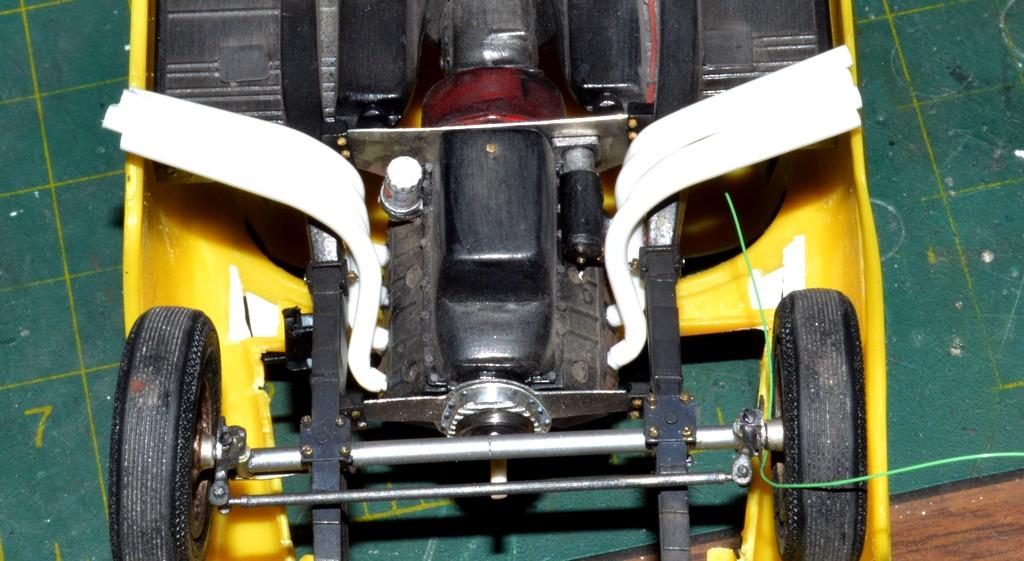
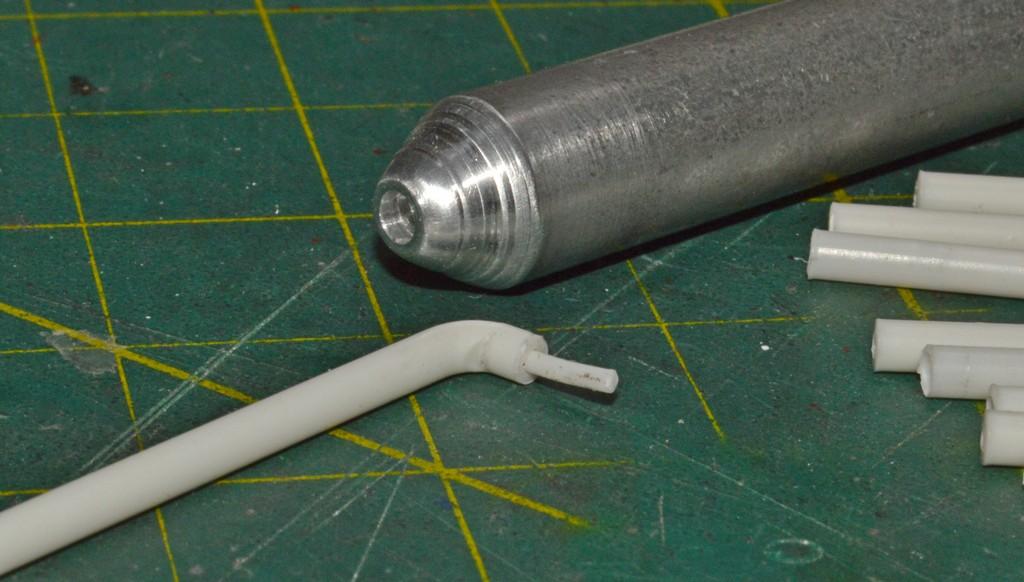
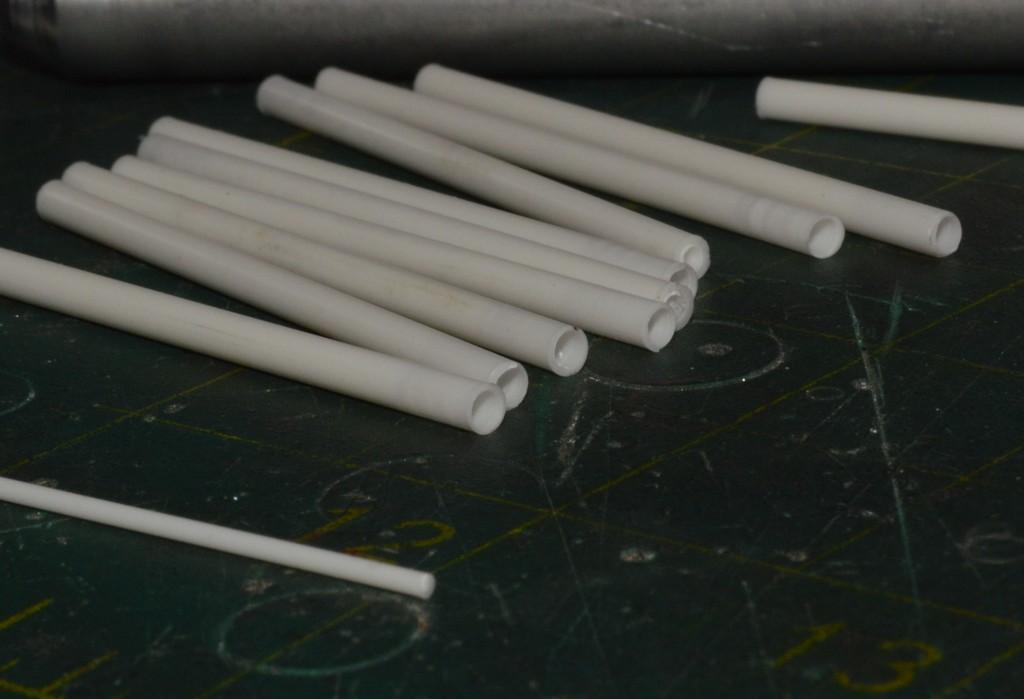
I have some solder that is close enough, but it's rosin core. I've been buying aluminum armature wire (for sculpting, not electric motors.?), but couldn't find it in the appropriate size. .090" is 2.25" in scale, which is what Chevy recommended in the performance manual. I think this plastic will work out, well. Since I want open pipes, with no collector, they need to be open, with a thin wall. I think the #47 bit left me with .003"-.005" walls. It looks pretty good. To your point, though--anytime I see wire that I don't have, it usually comes home with me! It's one of those things you can never have too many different sizes or types of!
-
It should work out. I think? I have to align the pin with the hole, then roll it in, so that the pipe clears the frame rails. It's a tight squeeze, in there!
-
Nice work with the engine. I really like the tones and the finishes.
-
Zolatone!
-
Good to see you back, Tim! Sounds like it'll look just right! I'm still blown away by that grille, too!
-
Dig the altered wheelbase car!
-
That's why mine has aluminum interior panels!?
-
I've been solving the headers. I have some .093", bendable plastic rod I got in a bulk assortment, on Ebay. Chevrolet Performance recommends a 2.25" tube, 34" long, for the headers. .093" scales to roughly 2.375". I hope nobody notices the 1/8"!? In order to make uniform, short, sharp bends, I drilled the end of a piece of aluminum rod with a #43 bit, to a depth of .1". I then cut an angle, so that I could bend the rod past 90 degrees, and it would "relax" back to 90. Once I was satisfied that I could create consistent bends, I cut the plastic rod to length (1.36", I think). Next, I chucked each length in my lathe and "divoted" one end with a .9mm bit, to guide hand-drilling, later, and the other using a #47 bit, to create the open end of the pipe. Next, I bent each piece on the divoted end, then hand-drilled each to accept a pin that inserts into the holes I had previously drilled for the headers. The next step will be to bend each pipe to fit its location, and have them all end up in the right place! It will involve a lot of trial and error, and fitting and refitting, but it will be a big step in really moving along with the project. Questions and comments are always appreciated. Thanks for looking!