Straightliner59
-
Posts
5,809 -
Joined
-
Last visited
Content Type
Profiles
Forums
Events
Gallery
Everything posted by Straightliner59
-
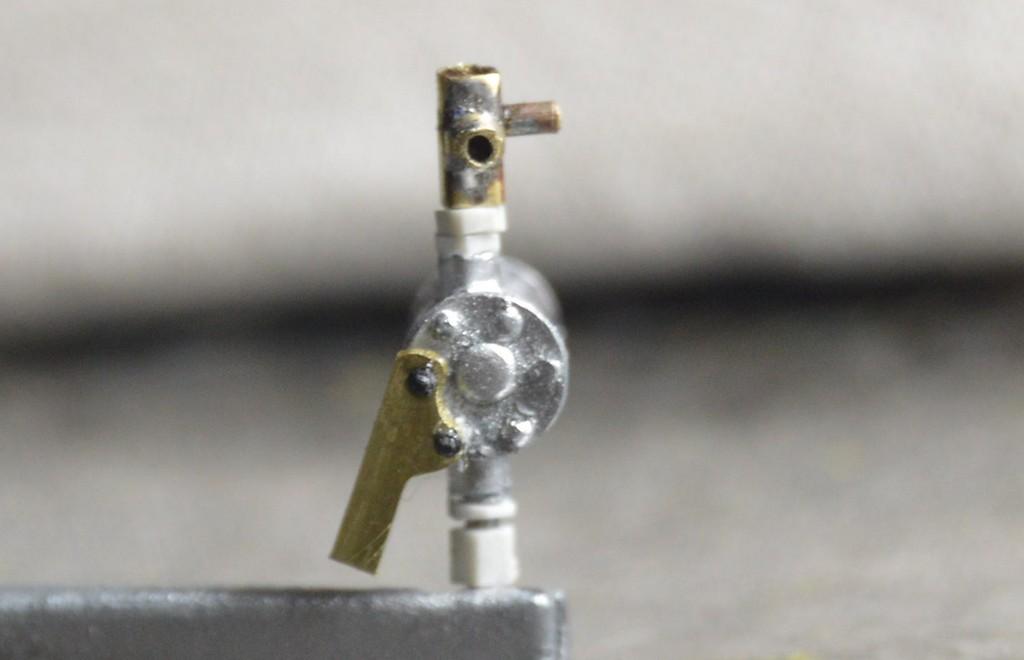
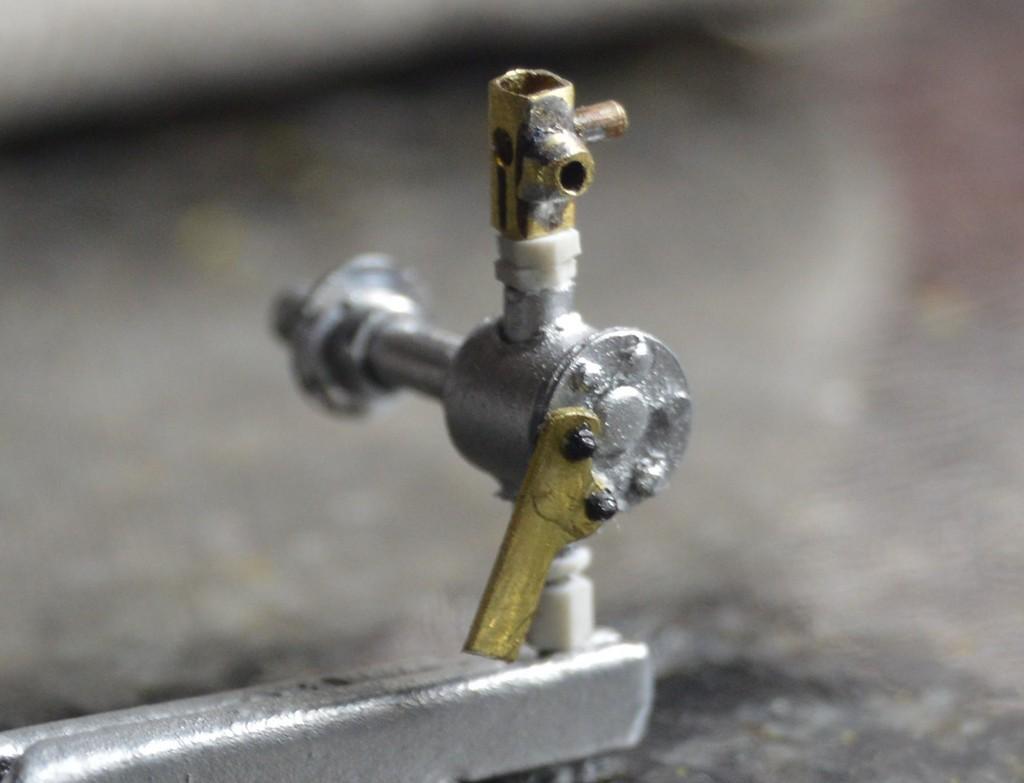
 Fuel pump and shutoff valve progress. I have detail paint to do, along with the arm on the shutoff and painting of that component. The thick hex on the inlet side (bottom) of the pump is the return for the pump saver loop. The other end goes to the side of the shutoff valve.
-
Thank you. I like it--looks very close!
-
Working on fuel system components. I originally made the fuel control valves from brass, but I decided that they were too big. I didn't have smaller material to use, so they're now plastic. The brass wire is one piece, through the valve body. That should provide plenty of strength to keep the fuel lines in place. The other brass valve is the fuel shutoff. It should be fine. I found a pretty nice casting of my old Enderle barrel valve (K-valve). It's cleaned up an ready to go. The short lengths of brass tube will be check valves, once I'm done with them. I still need to remove the bolts and re-drill the holes so that I can mount the cable bracket for the shutoff (DUH!). The aluminum material will become valve levers. Your comments are always welcome. Thanks for looking!
-
Those look really nice, Ian! What did you use for the lines?
-
I think that's a good call. Neat piece!
-
They are materials for tying artificial flies, for fishing. There are quite a lot of those materials that lend themselves well, to modelling. Lead foil and small diameter soft wire are two that come to mind, immediately.
-
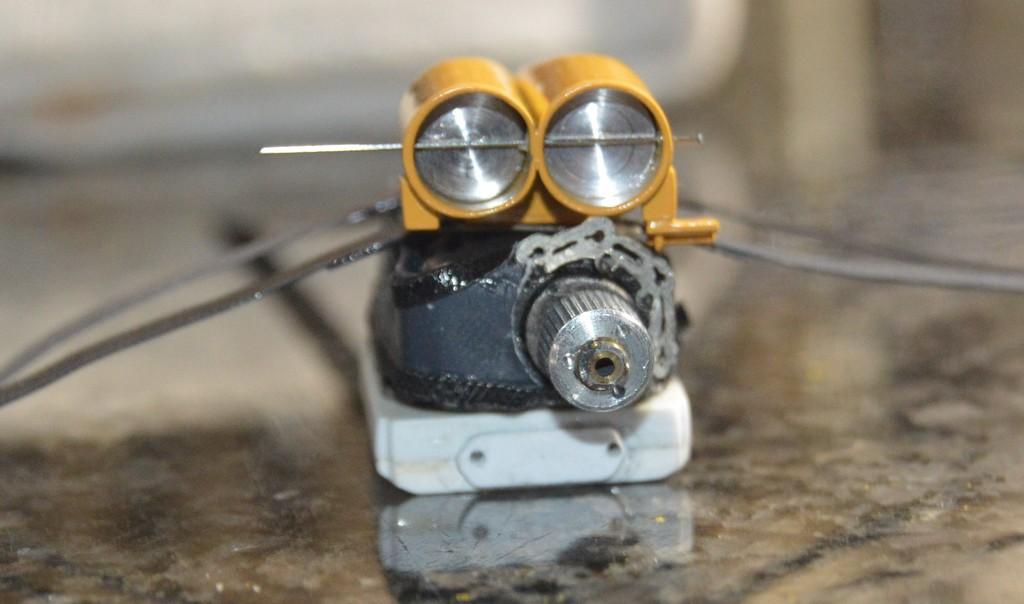
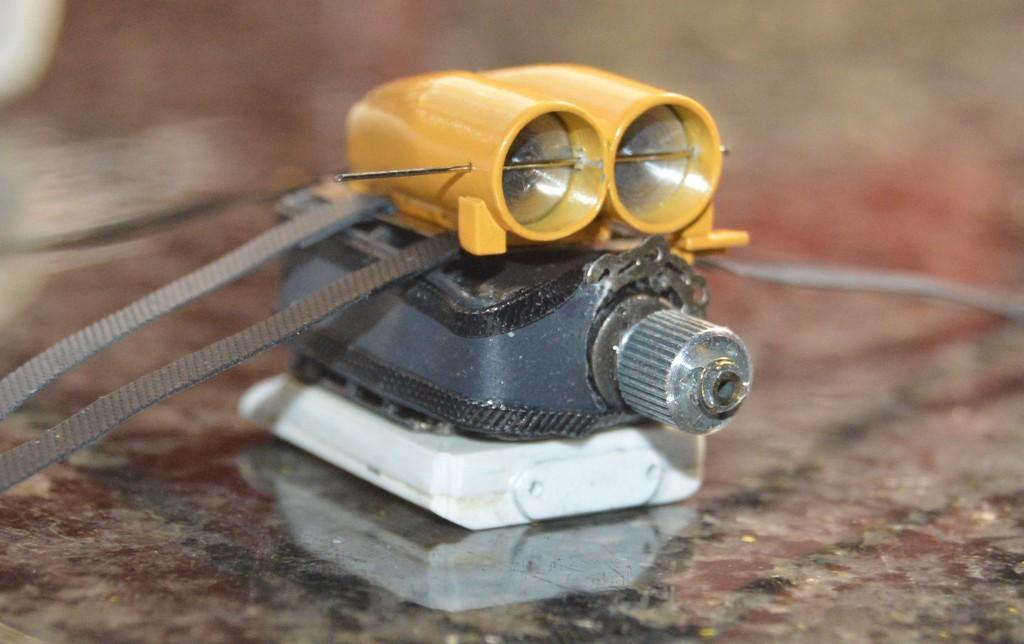
Thank you, Francis. I just keep plugging at it!? I'm getting into the fuel system, now. I have two more valves to build, now. I got the main body of the shutoff valve built. That one's a three-way valve. The other two will be straight on-off valves, for the hi-lo idle control and the manual hi-speed. This is the schematic I'll be using. The only thing I'll be changing is the return from the pump to the tank will become a pump saver loop, and feed back into the system at the pump inlet. That keeps fuel circulating in the pump, as long as the camshaft is revolving. I'm still debating choices as to how I'll set up the return lines, downline from the other two valves. Not sure if one or both of them will enter the tank. I might use a three-way fitting to join them, then run only one into the tank, and make a plug, for the other hole. I think that might be a little more interesting. Glad you are temporarily back! Thanks for checking in, my friend! Thank you, Ian! I think that foam rubber really worked out, well for the butterflies. I am thinking of painting the tank an aluminum/silver color, with the idea that either would help keep the fuel cooler than the black. I like the black, though! I'm getting pretty excited about putting the blower bet on. I think it'll look pretty neat!
-
It might be worth looking into fly tying supplies.
-
Shirley Shahan’s Hornet Pro Stock
Straightliner59 replied to dragcarz's topic in WIP: Drag Racing Models
Ain't that the way she goes?! ? -
Shirley Shahan’s Hornet Pro Stock
Straightliner59 replied to dragcarz's topic in WIP: Drag Racing Models
Love this project, Roger. It's coming along beautifully! Nice work! -
’72 Dodge Demon Drag Racer 1/25 scale
Straightliner59 replied to AmericanMuscleFan's topic in WIP: Drag Racing Models
Agreed on all counts! Those little cars with those big engines were very cool! -
Is it actual rubber, or just soft vinyl? I have some vinyl tubing that is soft, and looks and feels very much like rubber. I'm unsure where it came from, as I constantly pick up unique-looking materials for scratchbuilding. Finding rubber that small would be a cool thing! Sorry, not much help, I know.
-
Cutting Styrene Round
Straightliner59 replied to Horrorshow's topic in Model Building Questions and Answers
These are essential, if you're a scratchbuilder. I also have a set that screw into a handle, similar to these. I have an old Waldron punch and the Micro Mark set with the plexiglas guide. I also have a few I've made. Different punches work better for different purposes. -
That's what I use. I'll try the Ivory, since I keep a bar for annealing aluminum sheet. It makes perfect sense.
-
Oh, man. Those are gorgeous!
-
Looks good! I think experimentation is a lot of fun. I've learned a lot of stuff, just by messing around at the workbench.
-
’72 Dodge Demon Drag Racer 1/25 scale
Straightliner59 replied to AmericanMuscleFan's topic in WIP: Drag Racing Models
I second Ian's sentiment! Looking forward to what's next! What's Next? is also the name of an album by Canada's own Mahogany Rush. It has a pretty cool album cover!
-
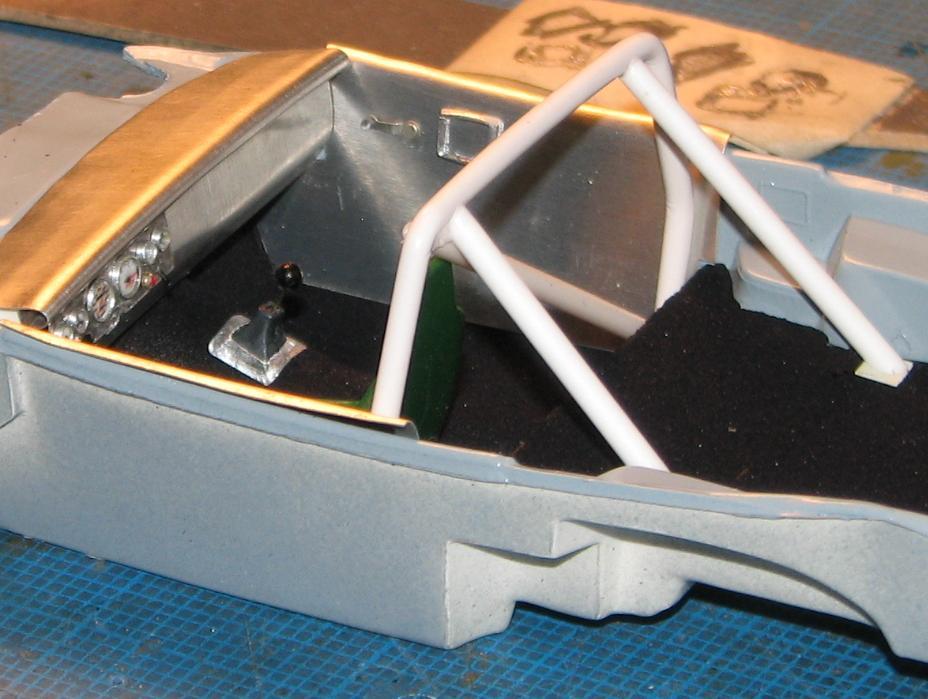
Quick update, before bed...I milled a slot in each of the butterflies, because I figured that to be easier than trying to flatten stainless wire. I airbrushed them with Tamiya clear orange lacquer--the same that will go over the body's colored "panels". I cut tiny chunks of foam rubber to place behind the butterflies. These provide pressure to hold the butterflies against the cross shaft, eliminating the need for any adhesive. I'll pop them out, one last time, to paint the inside of the hat some aluminum color. I've also been messing around with the fuel tank. Comments are welcomed and appreciated. Thanks for looking!
-
Such a cool, little ride, Jim! Very nice work!
-
Best Results for Flocking
Straightliner59 replied to ncbuckeye67's topic in Tips, Tricks, and Tutorials
I'm firmly in the Embossing Powder camp. Unlike others have stated, I use a similarly-colored paint, for adhesive. I just feel it has a more realistic appearance. It's also easier to work with.
-
I got the blower redone. I like it! I have a little touchup to do. I'm considering "anodizing" the butterflies with the clear orange. Any thoughts regarding that? Thanks for your comments and thanks for looking!
-
And, wouldn't you know, I bought my COE Transtar about four years before they redid it?!?
-
A lot easier than cleaning up kit parts, for sure! Better results, too.
-
That one is from '74, I think. Definitely the original release. Almost fifty years old. I wouldn't exactly call it a Spring chicken. I have a very nice cabover, which was Ertl's first venture into model trucks, in '73(?). Both of these have been relatively scarce, through the years, until the COE was redone, recently.
-
You'll do fine, John. Just make it a point to try something new, or concentrate on making a particular aspect better, that you think needs work on each new project. Wanting to is the biggest part of improving our skills! Thanks for your kind words! Thanks, Andy!


.jpg.745a681e3ddd89ac4551547b26e19a50.jpg)