Straightliner59
-
Posts
5,809 -
Joined
-
Last visited
Content Type
Profiles
Forums
Events
Gallery
Everything posted by Straightliner59
-
 It's too bad the exchange and shipping are so prohibitive. I've got to where I would go straight to Fireball, for carbs, as long as he has what I needed. I can't imagine they could be any better, from anywhere.
 -
I really like their Mr. Metal Color line. It's my favorite replacement for Model Master metalizers, so far.
-
It is still well-deserved. I've always felt that large scale models should be completely separate. As much as you and I would like to think, otherwise, we can't realistically put quite the amount of details that can be installed in anything 1/12 or 1/8 scale, or even 1/16. It's not a level playing field. Anyway, you may be right that they were "spreading the wealth", so to speak, but it in no way diminishes the accomplishment, in my eyes. On another note, I am dangerously close to impulsively purchasing one of Fernando's 166s. "What the heck? It's only $150 bucks, or so!"
-
Strange Result Stripping Chrome
Straightliner59 replied to Olderisbetter's topic in Model Building Questions and Answers
I've considered straight lye, but I need to get through this gallon of Super Clean, first! As far as I have found, it's pretty efficient at removing most everything except flat black, for some reason. -
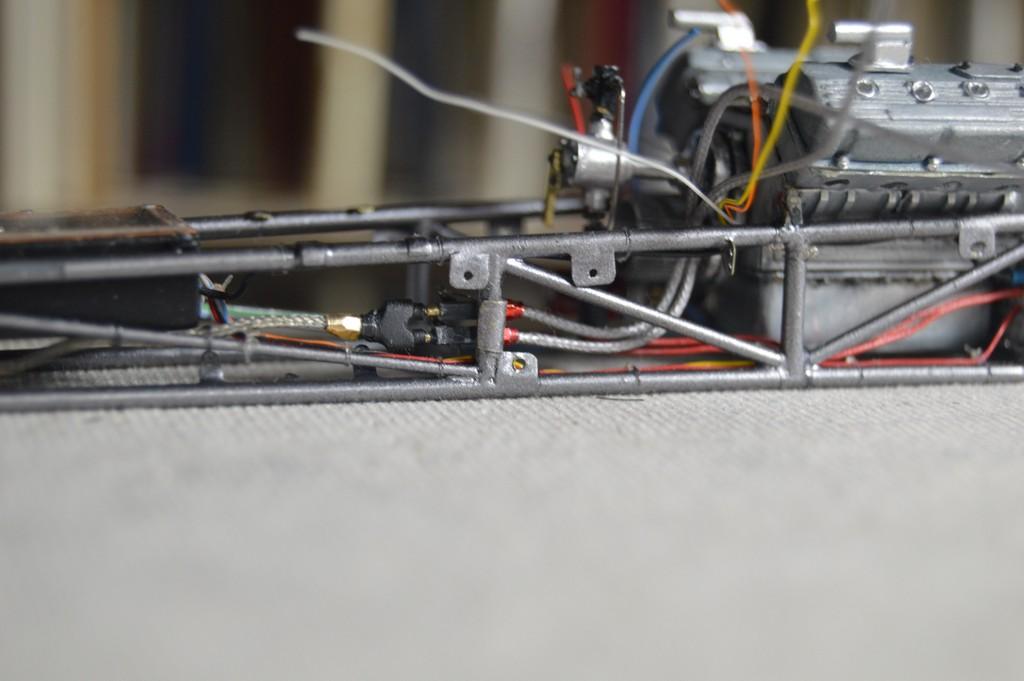
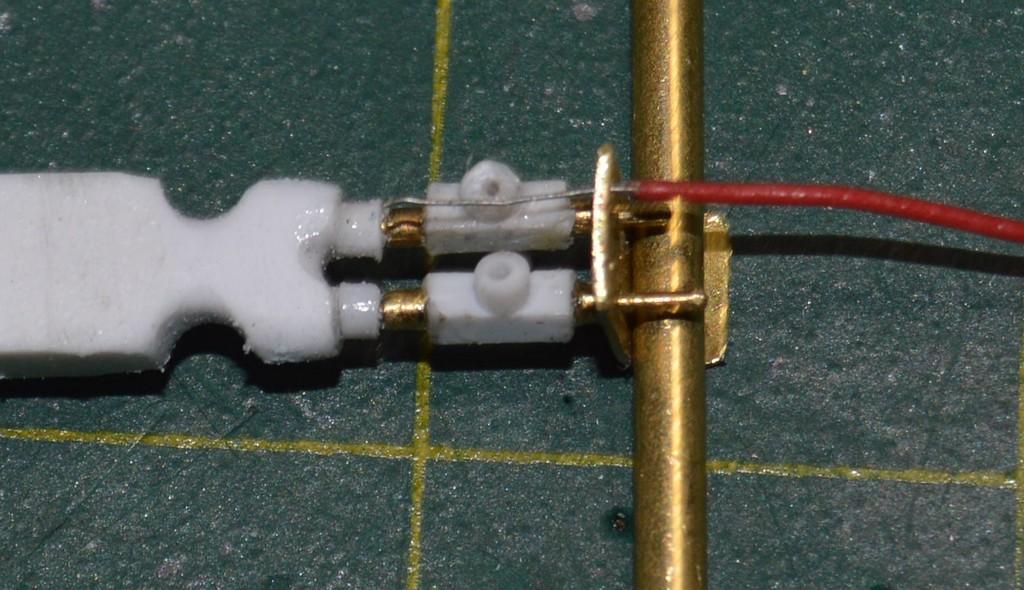
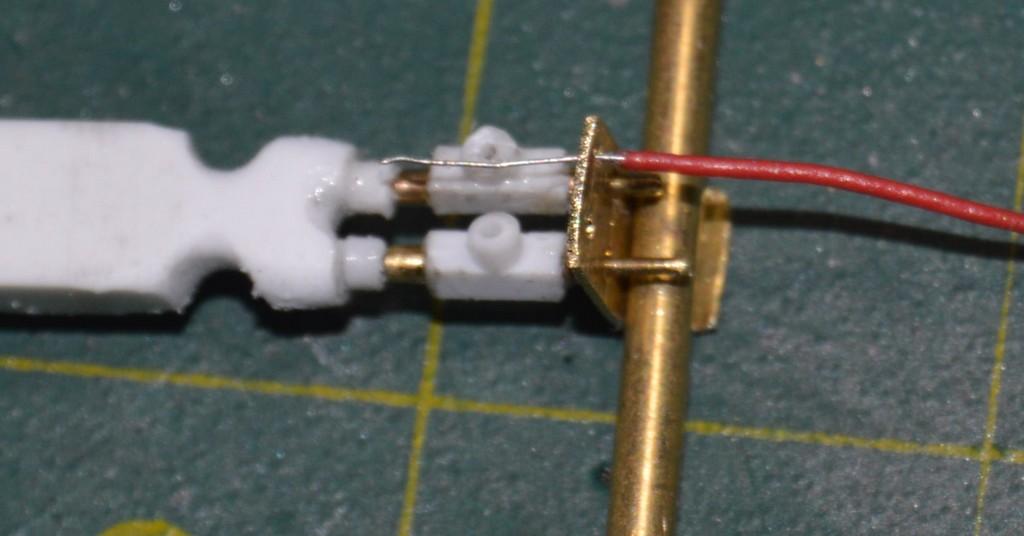
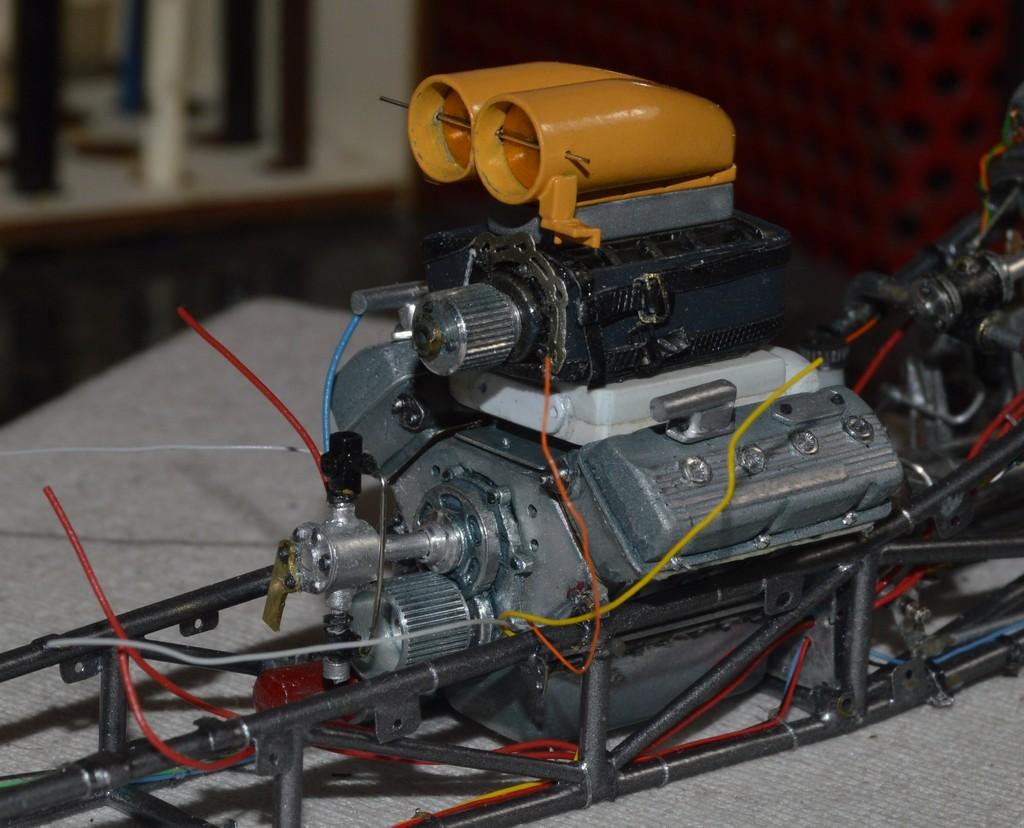
I've hooked up the actuator cables to the linkages. Also got the return to tank hooked up. I've started working on the main fuel line to the pump. I need to make a fitting for the tank end of that, and make and install the other two hose clamps on the pump end. I'm up about three hours past my normal bedtime, but, I'm going to get a nap, and hope to make some real progress, later today, and overnight! Comments are always welcomed. Thanks for looking!

-
Mica powder as flocking. Lessons learned.
Straightliner59 replied to Bills72sj's topic in Tips, Tricks, and Tutorials
I see what you did, there. Very punny!? -
Strange Result Stripping Chrome
Straightliner59 replied to Olderisbetter's topic in Model Building Questions and Answers
For stripping chrome, I've found nothing that works better than Super Clean. It strips the chrome and the lacquer undercoat. I usually toss the parts in, overnight. If they stay longer, no problem! Super Clean will eat aluminum parts, though. -
And, they're both gorgeous! I've begun work on a Chaparral, but, something else needed to get finished!?
-
1964 Pontiac Bonneville Convertible.
Straightliner59 replied to StevenGuthmiller's topic in WIP: Model Cars
Floor mats are killer! -
Thank you, Pierre. Every time I think I am about finished with something, more stuff comes up!? Thanks for your kind comments! Getting there!
-
I managed to get the valve assembly installed. Prior, I had to install the actuator levers. Since these photos were shot, I connected the return line to the tank. I had to make a new fitting, as the first one disappeared into the great void, with a "tick" of the tweezers. I still need to connect the cable ends to the fuel control valves. Then, I can finish installing the tank, and main fuel line. Thanks for looking!
-
It's looking sweet! Nice work with the paint and decals. I have a promo and an AMT '67 Mustang chassis, for it that I'll be doing something with.
-
I'm sure I've commented on this, before, but...I'm glad you were able to repair it. It's a real beauty! The work you've done, here is fantastic.
-
This is some very fine work, Mr. Sapiro! It's illustrative of why you won the Wingrove. Congratulations, my friend! I'm looking forward to the day this one's ready to leave a pair of gleaming, alloy aircars stranded at a one-lane bridge.
- 565 replies
-
- 1
-

-
- quarterman
- fisher
- (and 1 more)
-
I just downloaded Randy's build book. I imagine there'll be some useful stuff, in there!
-
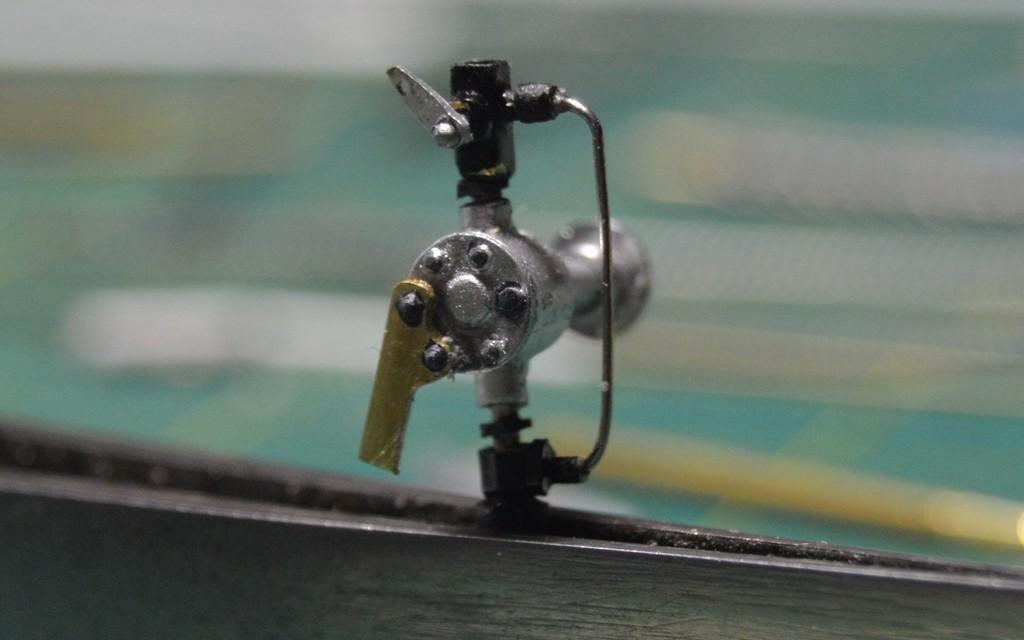
Thank you, Ian. I appreciate your explanation. It makes sense to at least have a manual back-up--and an added measure of safety. Thank you for that, as well. Now I'll have to think about which approach to go with. It's not likely I'd ever have to explain it, anyway!? Most people don't even know about that kind of stuff, much less think about it enough to notice it! The return is complete, except for the fitting for the tank end and the levers. I ended up machining a brass fitting for the tank return, because I didn't have anything else the right size. Next, I'll finish the hard line from the tank that the braided line will connect to, and its fittings, and the levers for the valves, then, this can be mounted to the chassis, and connected on the tank side. I really love the way the braided trolling line looks. I'm going to look for other weights of it. Questions, comments, critiques and clarifications are welcomed. Thanks for looking!
-
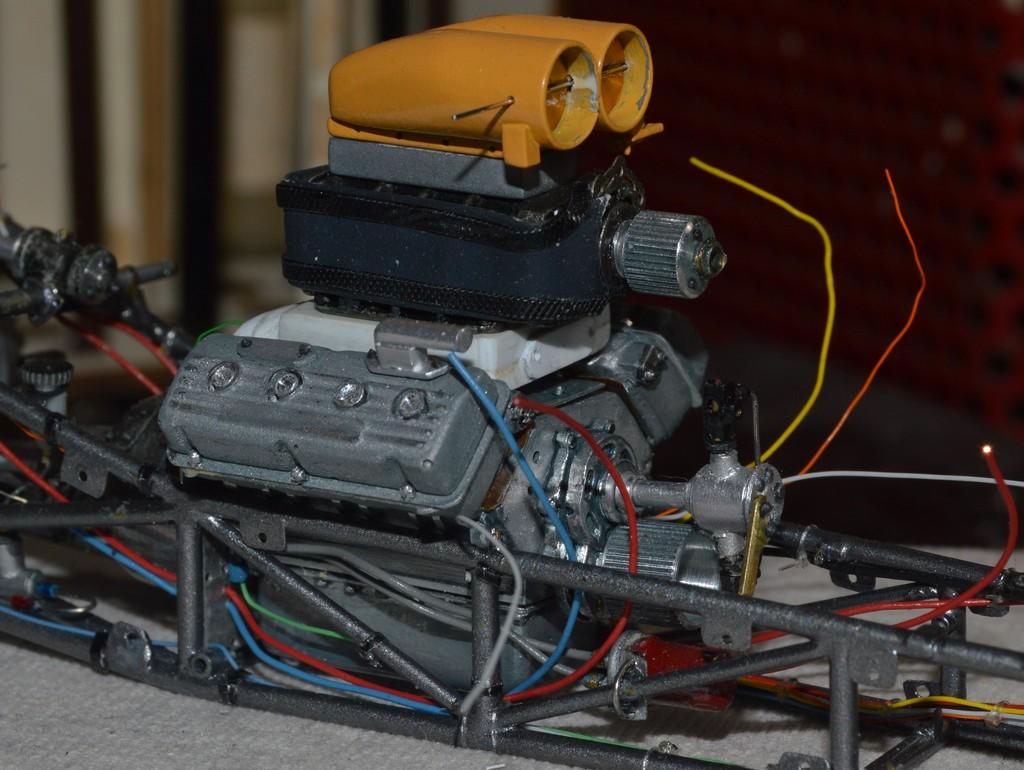
The engine looks great! The Moroso valve covers just set it off!
-
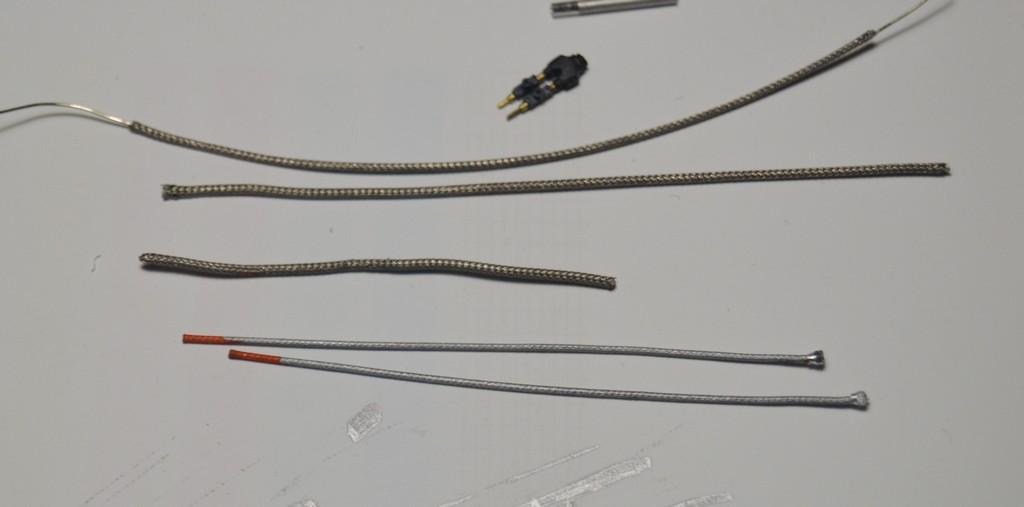
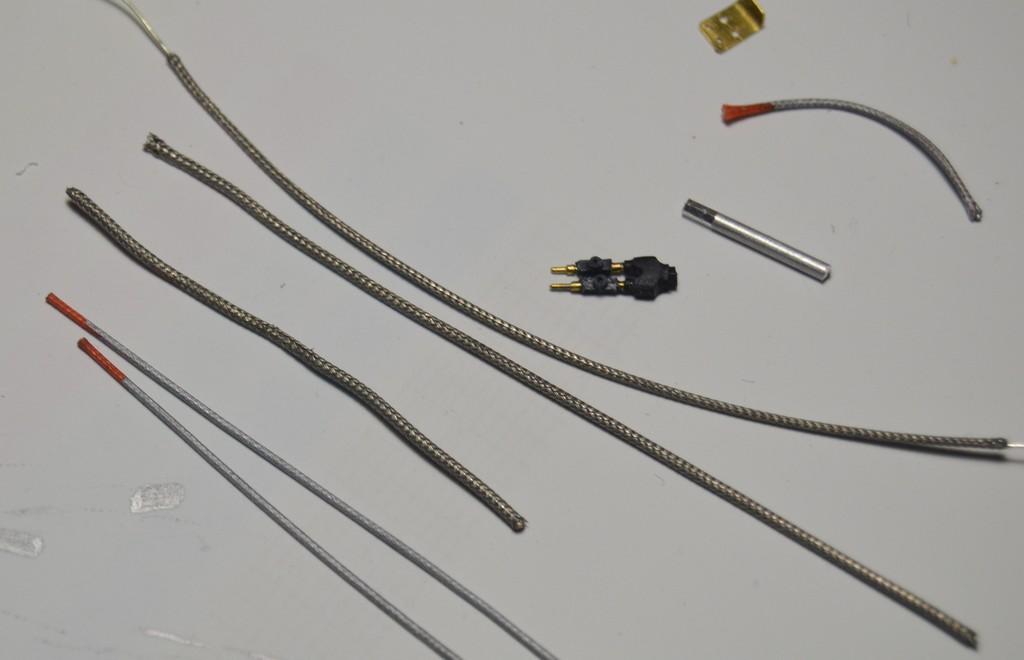
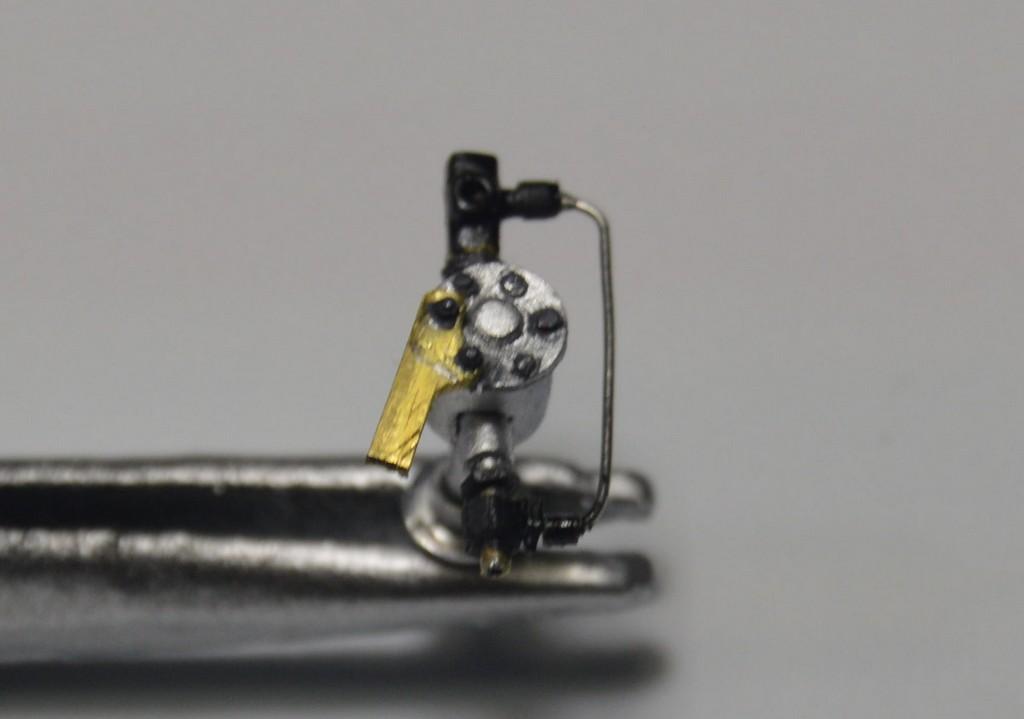
I've been digging for fuel line materials. The two returns will be weighted trolling line. I made the fittings on the mill, using 1/16" aluminum tube, then tapered them on the lathe. They're the first decent ones I've made! The trolling line is colored using a silver Sharpie. The Sharpie ink dries rapidly, is thin, so it doesn't obscure the braided detail, and pulling the line between my fingers doesn't smear it. That's a winnah! Also pictured are three variants of the material I'm using for the main line to the barrel valve from the pump. It's some 37 year-old MSC Model Products Multi Braid I. At the bottom is the line, as it's packaged. Above that is the braid, removed from its original inner wire, and installed over some .020" lead-free wire for weighting hand-tied trout flies. Finally, at the top, I used it to cover some .015" lead-free wire. I really like the way this stuff "feels" over the soft fly-tying wire! You can also see the return line valves and manifold assembly. If things go right, I'm hoping to have this assembly installed by the time I go to bed, in the morning. Thanks for looking!
-
Francois, first off, welcome back to this wonderful pursuit! Even having never really left the hobby, in fifty years, your point, here, is one of the things I am most astonished by. The availability of good reference. Sometimes, thinking back, I wonder how we anal-retentive types ever built anything (I am referring only to myself, here, although I am surely not the only one who would identify himself, that way)!?
-
Thank you, Ian. In talking with a friend of mine with a long history around fuel racing I learned that this car shouldn't have a manual control for the idle control. Those are pretty much check valve, and an adjustment by the crew chief, at the last second. Since mine's already installed, I plan to connect and install the valve, as it is, but connect it so that it looks perpetually "off", which renders the driver control inoperable. I'll explain the control and the valve as a dummy with no guts that is only there to mess with people in true "Surfers" tradition, to go along with the "Thanks to: Tom Jobe" lettering on the yellow scoop! What do you think? That way, I can do it right, even though it's wrong, with no extra work!?
-
The bracket for the fuel controls, and the "Y" manifold that reduces the number of return lines to the tank to one. These parts are painted, now. I'll be selecting the fuel line material, next. Thanks for looking!
-
The fuel pump is done! I still need to make and install the control lever for the shutoff. I'm happy with the pump saver. I see by the photos that I need to straighten a fitting. I test fitted it (again) into the front cover. It slipped right in! I'm having to carefully plan order of assembly, to avoid any major omissions...and subsequent reconstruction. I think my next order of business will be the fuel tank, return lines and main fuel line. At that point, I will be able to hook up the shutoff cable and the control cables. She's coming along! Questions, critiques and comments are welcomed. Thanks for looking!
-
It is true, the earlier ones are a tad more sparse! At least I'm on the fuel system, now. That's mostly familiar territory!
-
Let me tell you...dragsters aren't always so easy, either! Hahaha Definitely easier than door cars, though.
-
1969 Nova F/SA NHRA Stock Eliminator
Straightliner59 replied to R. Thorne's topic in WIP: Drag Racing Models
Aluminum tubing also works well for axle shafts. It's coming along very nicely, Ron! I second Roger's sentiment on the CalTracs.