peteski
-
Posts
9,226 -
Joined
-
Last visited
Content Type
Profiles
Forums
Events
Gallery
Everything posted by peteski
-
What a sad "face". Looks like it was just scolded, and it's on the way to stand in a corner. Why do designers come up with such sad looking cars. Who wants to buy a pouting car? Happy looking cars sell better!
-
Many of its body lines look very "Jaguaresque".
-
 A passenger version of the Lanchester was also kitted (in 1"32 scale). It was made by Airfix and also Life-Like (Pyro?). Simple, but nice model of thins unusual car.
 -
The issues with scratch building
peteski replied to IbuildScaleModels's topic in Tips, Tricks, and Tutorials
Yes, the editing of posts gets disabled, but I know that it is more than 12 hours. It might be few days. It was mentioned somewhere, but I don't remember the exact duration. -
The issues with scratch building
peteski replied to IbuildScaleModels's topic in Tips, Tricks, and Tutorials
You original post still has the mistake. It was only made 18 hours ago, so you could still edit it and correct the hailstorm. As for the nasty auto-correct problem, I don't own a tablet, but I suspect that you could disable auto-correct, and just make your own misteaks. -
Why? is that the next miracle home-cure for COVID-19?
-
Epoxy it a good adhesive for photoetch. But most photoetch is either brass or MCG uses nickel sliver. Both chan easily be soldered. Problem is to do this cleanly. If the photoetch is stainless steel then it doesn't solder as easily as brass.
-
The issues with scratch building
peteski replied to IbuildScaleModels's topic in Tips, Tricks, and Tutorials
You pretty much described my upgrade process. First major upgrade was a vertical column attachment to convert my lather into a small milling machine. Few year later I had the funds to buy the X-Y mill table. That, along with the vertical column I originally used with my lather gave me a full blown mill. I still only had one head-stock/motor between them until when I bought a second head-stock/motor. The last "luxury" item I bought was a DRO (digital readout). I only bought one head unit and enough handwheel sensors to equip both, the mill, and lathe. I switch the DRO between the lathe and mill, as needed. Of course, in between I bought multiple accessories, as I found them needed for the tasks at hand. For example a precision drilling attachment is one of them. So yes, over the 30+ years I owned Sherline equipment, I spent more money for the accessories/updates than I spent on my original lathe, but it was well worth it. What is really nice about the Sherline is the flexibility of its modular construction. the head-stock/motor can be easily swapped between lathe and mill (one Allen screw needs to be loosened). -
The issues with scratch building
peteski replied to IbuildScaleModels's topic in Tips, Tricks, and Tutorials
All the tooling accessories? You don't have to buy all the accessories, and there often are new accessories introduced. If you bought them all then yes, their price would surely exceed the cost of the bare tool. I started with the Sherline lathe, and a basic set of cutters over 30 years ago., Since that time I slowly added more and more accessories. Some of the accessories I bought were not required (I could do the job with what I had, but the new accessory would make the task easier). -
Vac-u-form clear sheets?
peteski replied to RancheroSteve's topic in Model Building Questions and Answers
The "good" sheets out there have holes drilled around the perimeter like the original sheets had. At least back few years ago I was able to buy that type of sheets on eBay. -
Not you - the entire forum site has been reshuffled and has bunch of new categories. I have not had any problems accessing the website for a long time, unless it is down for maintenance of course. Try clearing your browser cache and cookies.
-
I collected those over probably 20 years or more. I finally (around 5 years ago) decided to make a a holder for them to make them easier to find. I bought that "crow's foot" pair a while ago, but to be honest, I don; even remember last time I used them. Probably about 80% of the time I use the same favorite pair (front row, third from the left). Second most used are the self-closing ones, and sprue cutters. Maybe I have too many . . .
-
That works, but makes tweezers harder to close. Not good when handling delicate items. I have about a dozen tweezers, so I can usually find ones that will have wide enough span to use. But if needed, I just spread mine, and never had one come apart. YMMV

-
I usually look for bargains on eBay. I look for boxes of 50 for less than $20/box. Those bargains are out there, and I know that I will eventually brake those bits, so couple dozen spares is always nice to have.
-
Absolutely! I'm very offended by every religion - cults which brainwash people into believing their existence depends on some supreme being. Now, back on topic.
-
Yes, I have that same problem here. Although it seems to have stopped last week (well, because the weather was rainy). I think boredom makes them do it. But like you said, if I open the windows, and the wind is blowing the smoke in my direction, my house stinks like I was living in a smokehouse. Disgusting! So we have a COVID-19, which is a pulmonary disease which makes breathing difficult, and here we are polluting the breathable air with stinky smoke! There is no logic, for some people. If bored, build some models, not burn bonfires.
-
Enamel Thinner/Cleaners GONE???
peteski replied to zxturbo's topic in Model Building Questions and Answers
The Testor's thinner is very similar to mineral spirits. Those both are slow-drying thinners. Lacquer thinner (used by many modelers as airbrush thinner) also works and it dries much quicker. So, depending on what you need, you can choose which type of thinner to use. -
If you are looking for 1:43 scale items, there is a good chance that https://www.grandprixmodels.com/ will have it. Their search engine is not the greatest, but they carry oodles of 1:43 scale parts. I have bought from them in the past. They are in UK, but no problems shipping to USA.
-
Thar Ranger Technologies kit is not a typical plastic or resin kit. It requires some more advanced skills than just putting molded parts together. The resin parts are not Modelhaus quality. They are made in open molds. I bought mine about a year ago, and my kit had some inferior parts. But Tim was very helpful and took care of all the problems. He even ended up redesigning some parts (like wheels and tires) to make them better. I did have to wait for the replacement part for about a year, but I finally have them. As an added bonus, Tim also added bunch of parts to the kit and he upgraded mine too. I was in no rush, so I didn't mind the wait. Hopefully the kits sold now contain all the modifications and additions. As mentioned, the kit needs a donor truck: Dodge Li'l Red Wagon. As I mentioned, Tim is a super-nice guy and very easy to deal with. I would recommend this kit to anybody with intermediate or advanced skills. No, I haven't yet build mine. I based my evaluation upon examining all the kit's parts and assembly instructions.
-
That is a face only a mother can love. I don't know why but it looks like lioness face to me. It also has lines of a car I'm familiar with, but it sure is an oddity. Very interesting.
-
Once I discovered the Tungsten-Carbide PC board drill bits, I use them almost exclusively for everything. Not only they are super hard, they have split point which bites into the material faster, and doesn't wonder. The common 1/8" shaft is also super handy (no need to keep changing collets in the pin vise, and easier to chuck into drill chucks. Yes, they are very brittle, but one can get used to be careful with them. Plus if you order bunch of extra bits, a broken bit does not stop you in your tracks. I used to get them on eBay, but nowadays you can pick them up from online vendors (like Charlie mentioned).
-
That is one cool piece of history. I'm glad you're restoring it to its original condition.
-
Several members on a model RR forum I frequent use Anycubic Photon printers, and they get some fantastic results with them (it is a mostly N scale forum, 1:160). That forum has a section dedicated to 3D printing: https://www.therailwire.net/forum/index.php?board=45.0 And a monster thread showing what a Photon is capable of: https://www.therailwire.net/forum/index.php?topic=45736.0
-
Over the years I've built some strange stuff........
peteski replied to Pete J.'s topic in The Off-Topic Lounge
Very creative and fun stuff everyone! Now I just wish that people would not quote posts with lots of large photos, just to add "this is what I hoped for", or "nice stuff". Come on, my finger is sore from spinning the scroll thumbwheel!! Plus, I just saw all those photos few posts earlier! Just like in the days of renting VHS tapes, remember "be kind, please rewind". Be kind, don't quote long posts, just to add a 1-liner. -
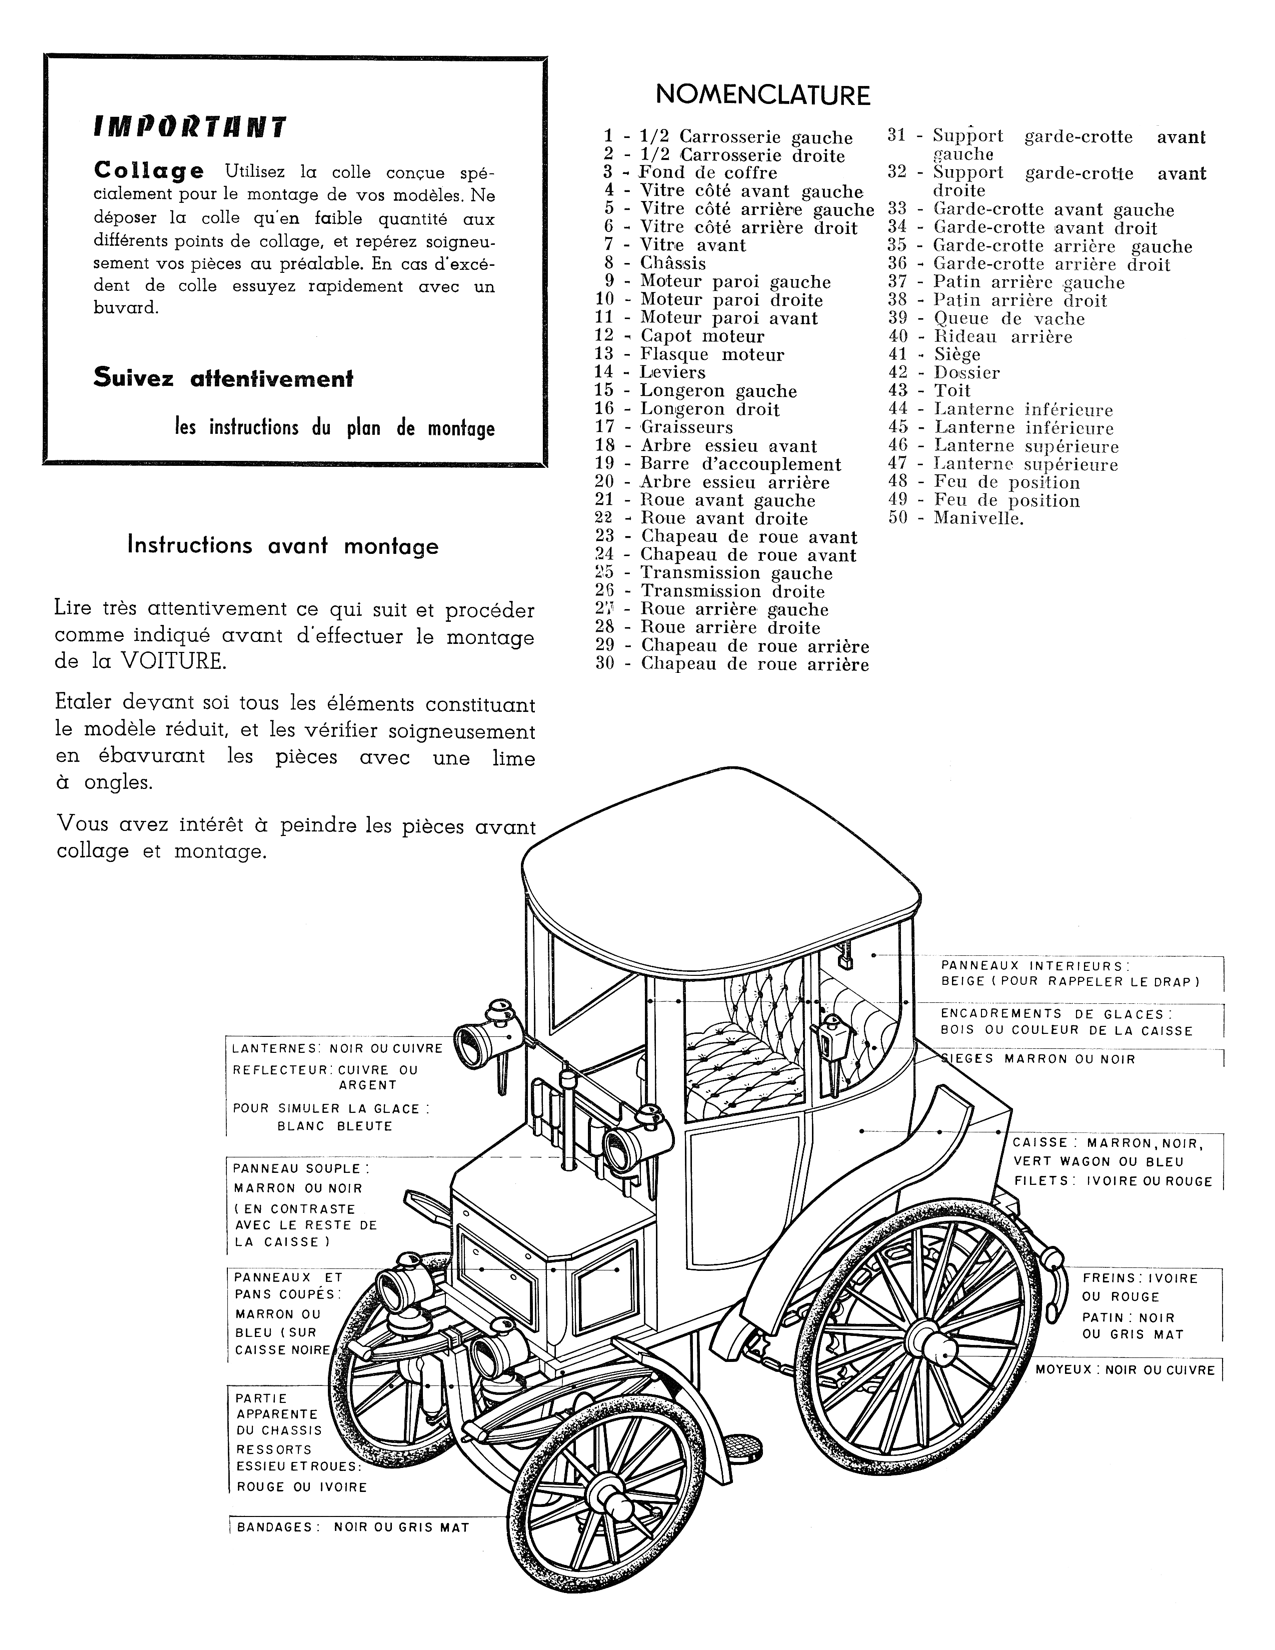
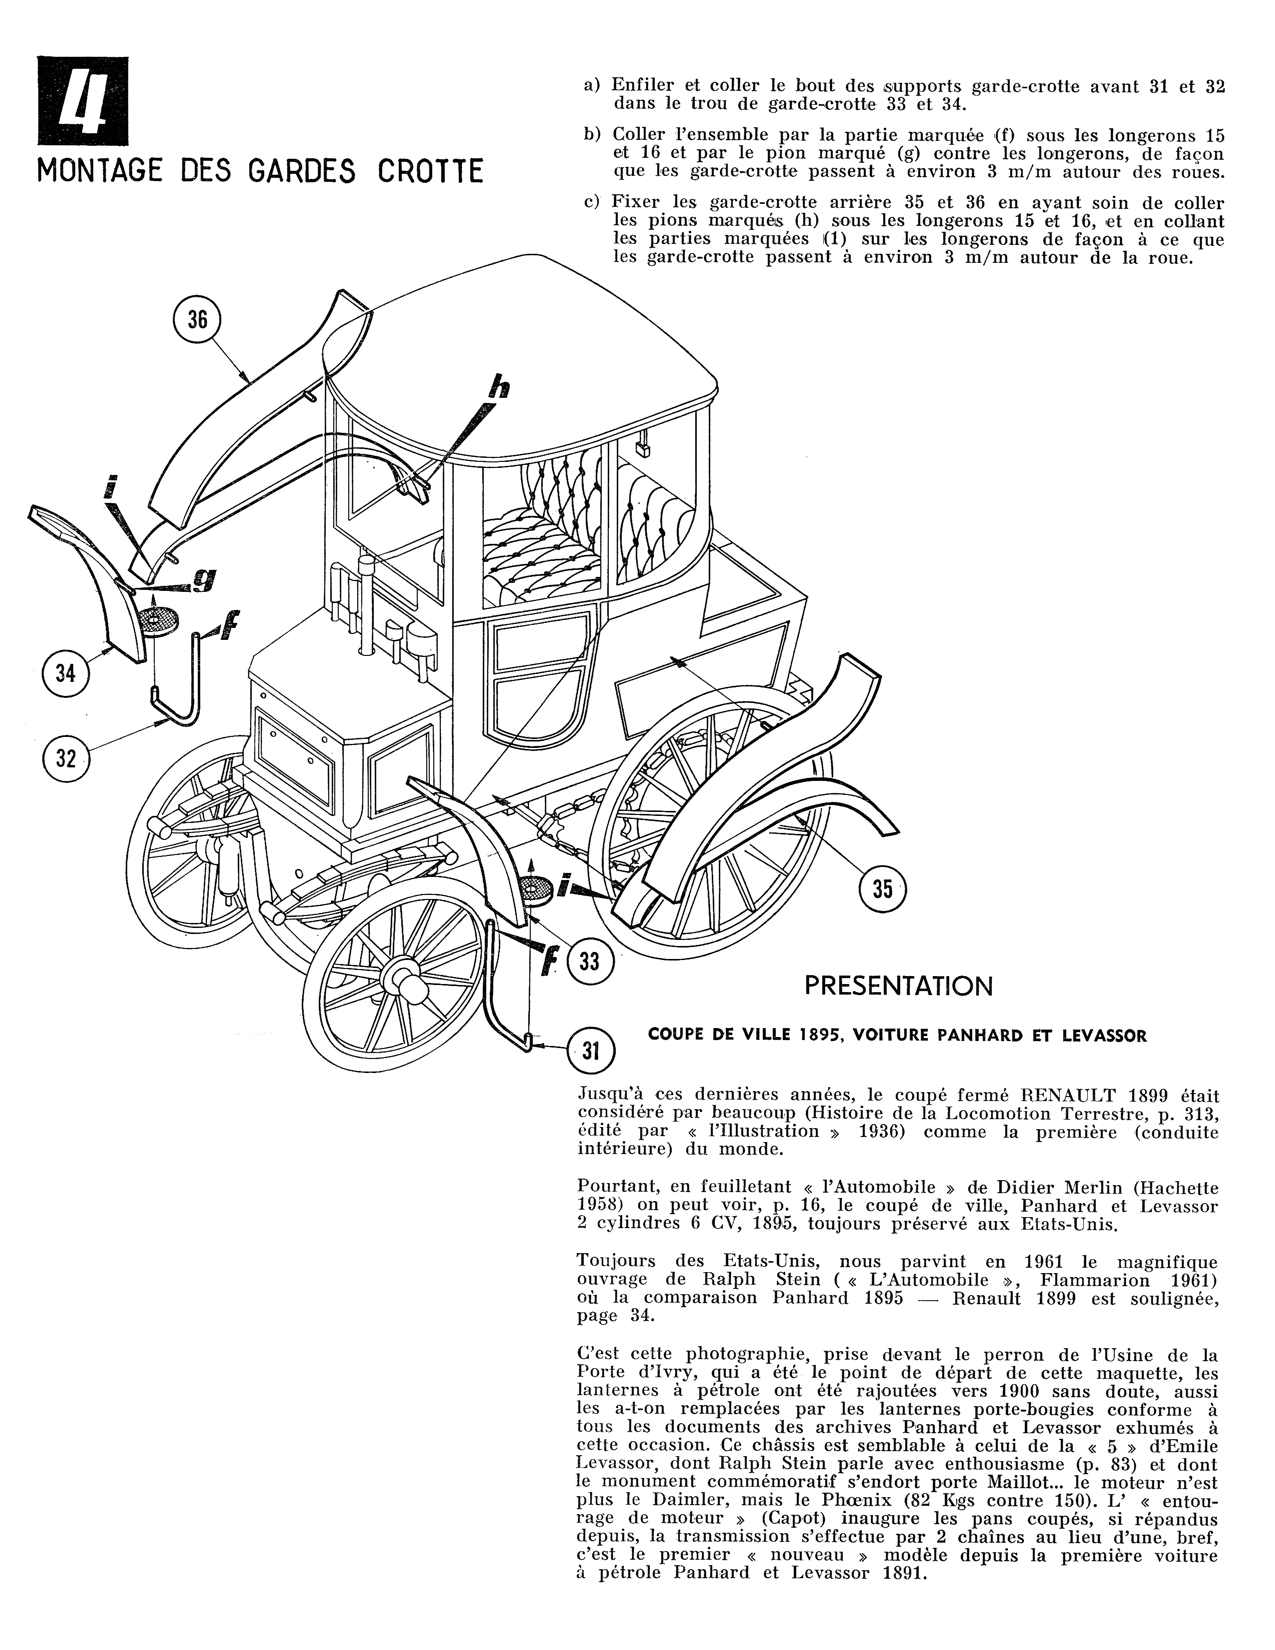
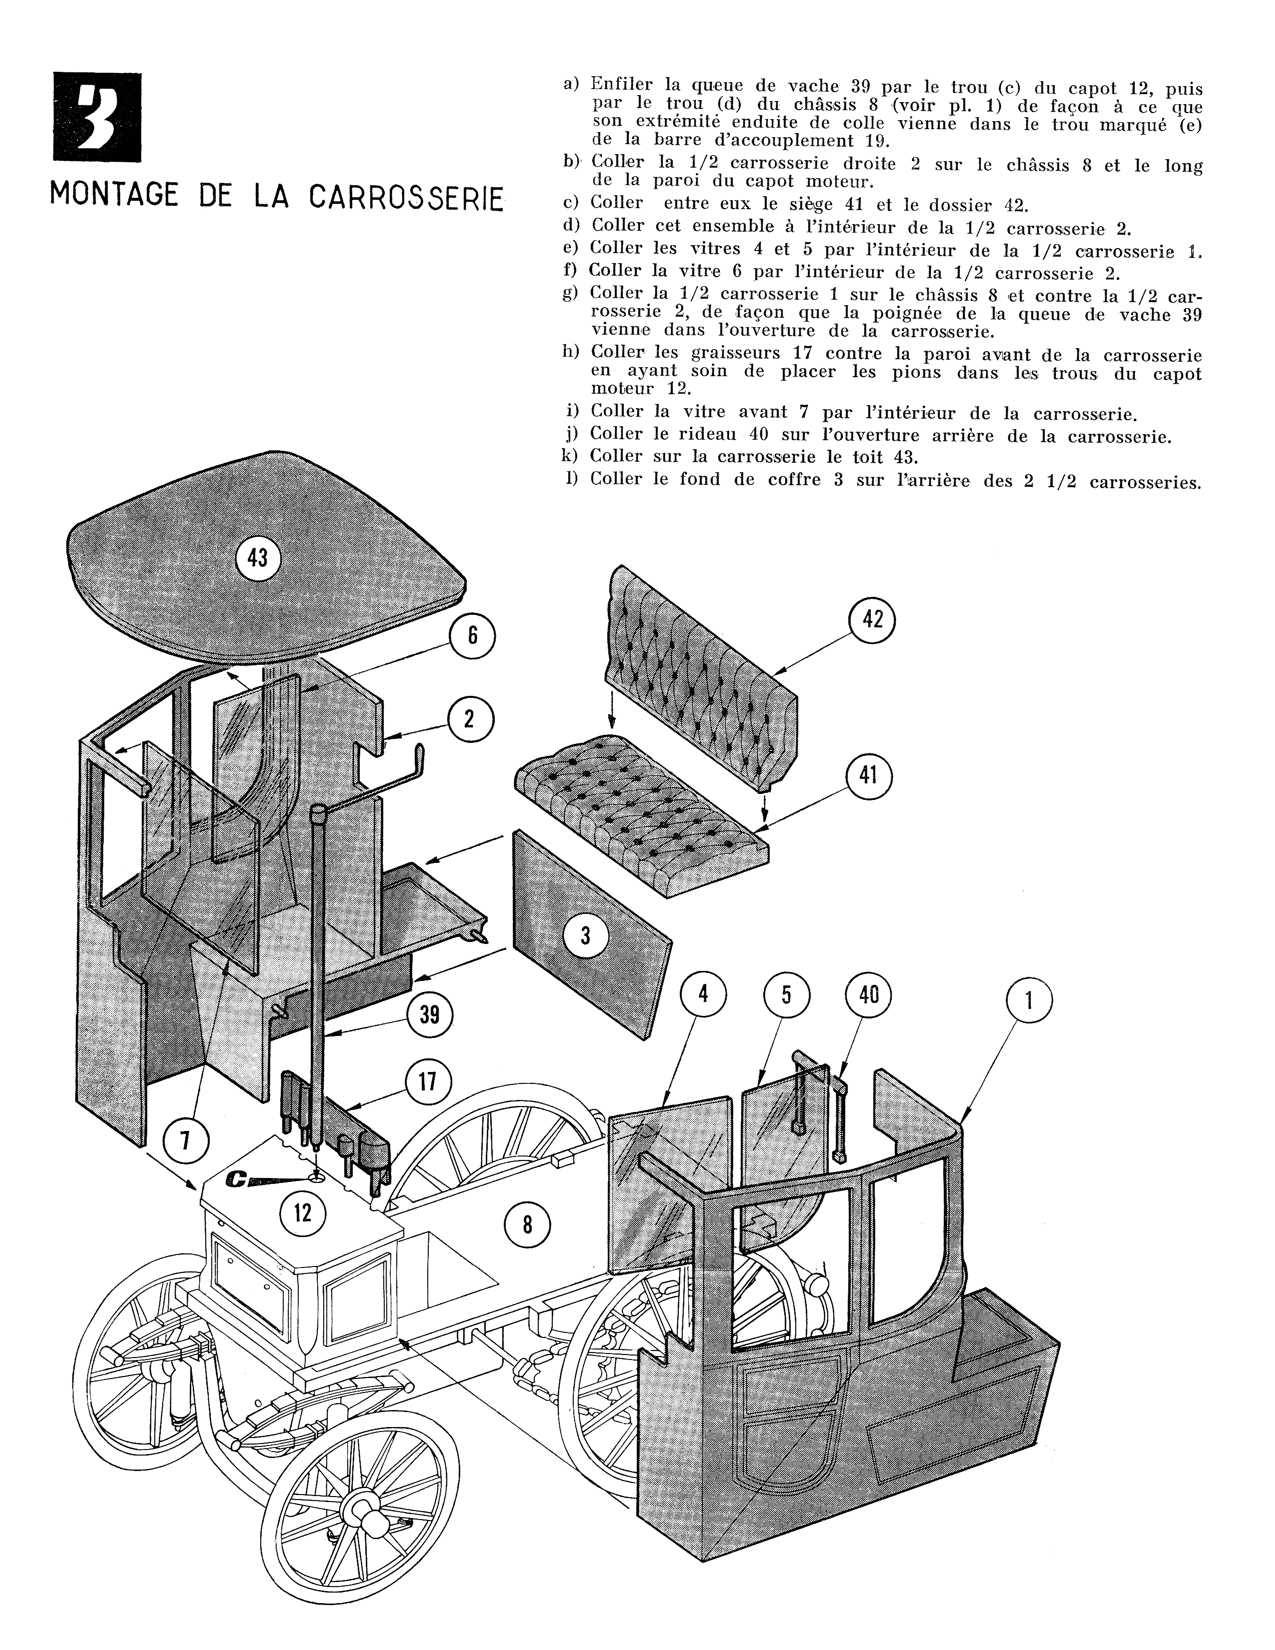
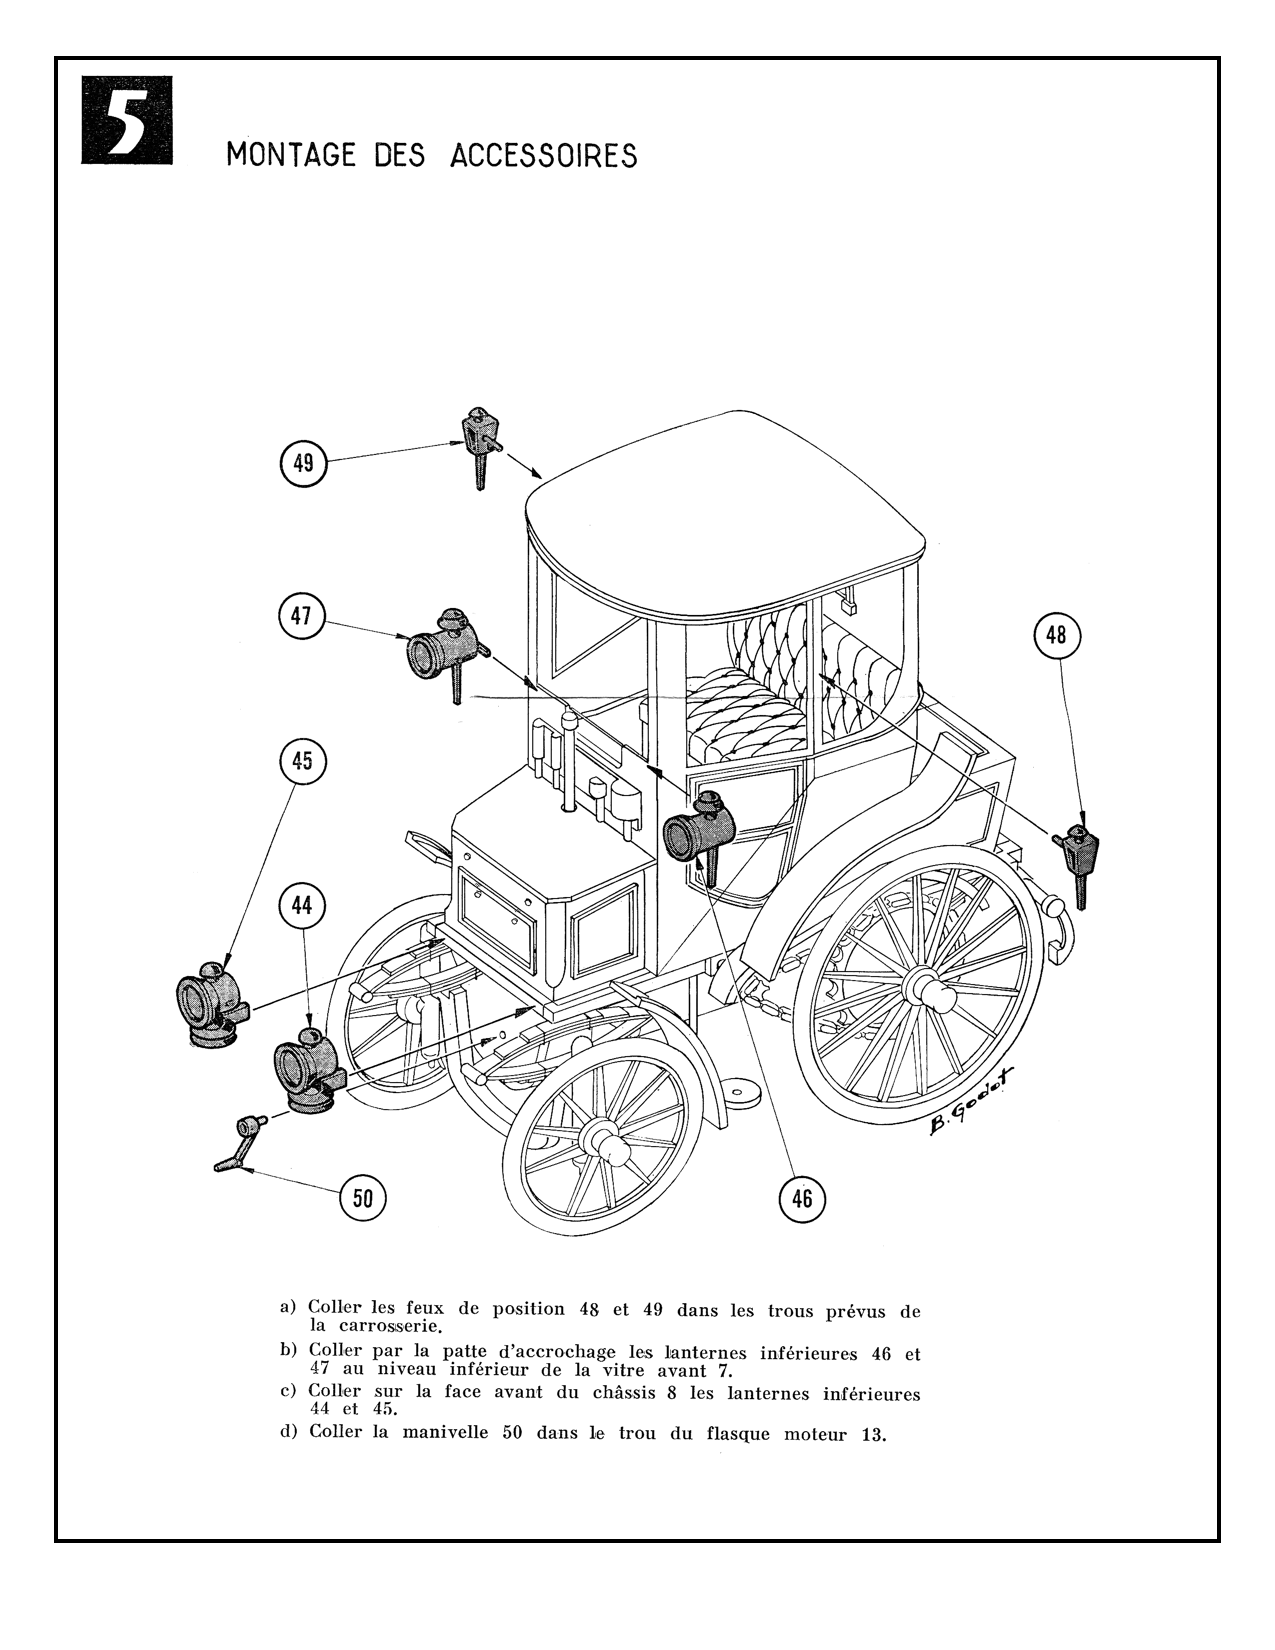
I received a PM from a fellow member asking if I could provide a copy of those instructions. I scanned them and converted from a large blueprint-type instructions to letter-page size instructions. Since I did all the work, I might as well post it here for everybody to have access to the scans. This is not a very popular kit (many modelers don't even now it exists), but then maybe someone else will need these instructions in the future. Enjoy!