SfanGoch
-
Posts
5,248 -
Joined
-
Last visited
Content Type
Profiles
Forums
Events
Gallery
Everything posted by SfanGoch
-
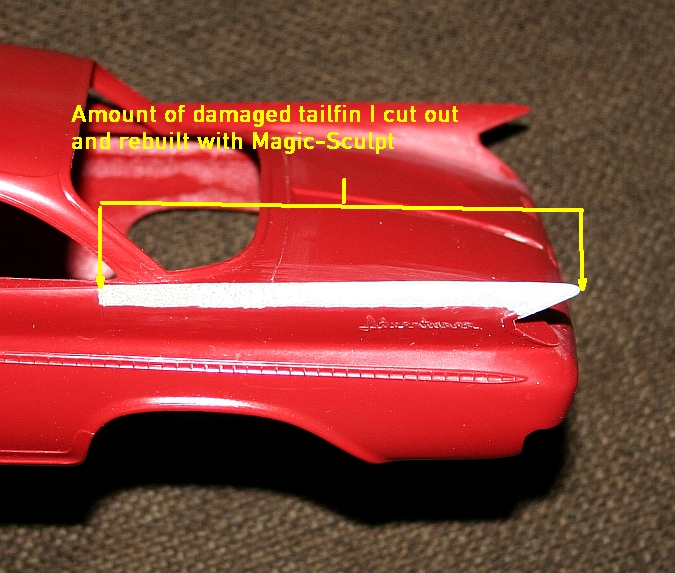
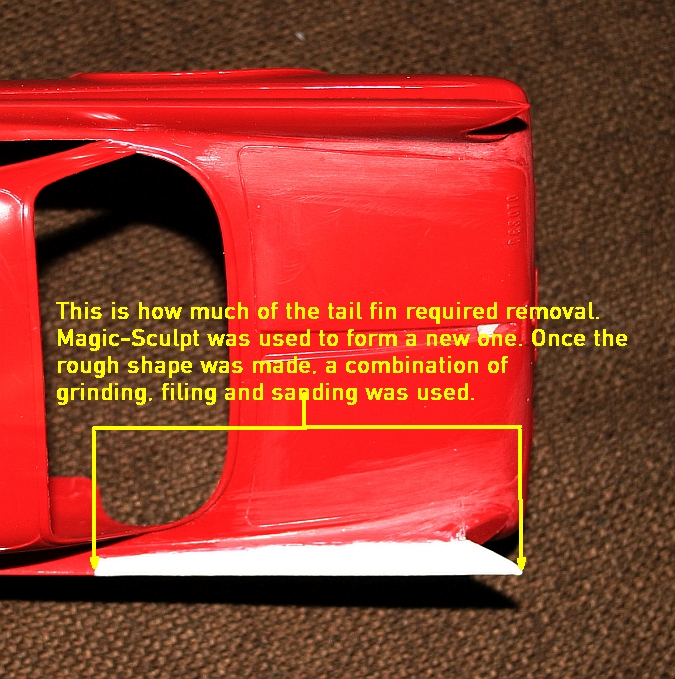
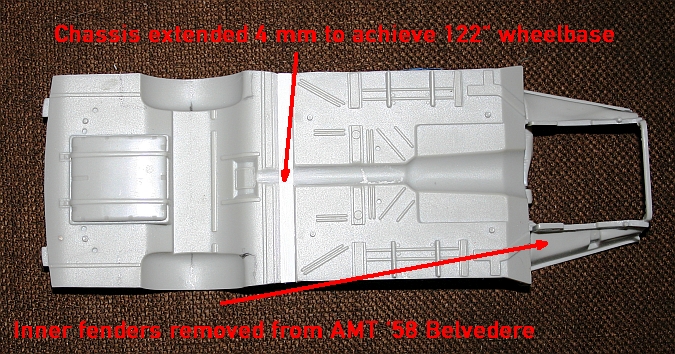
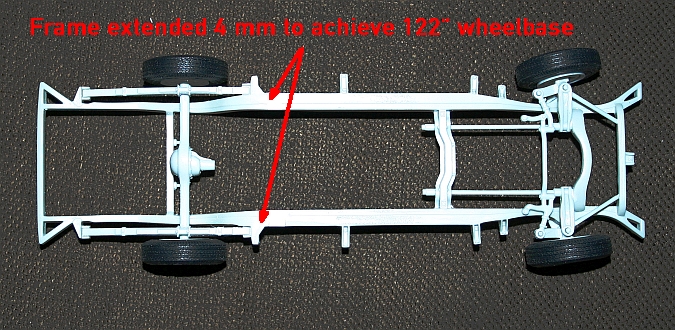
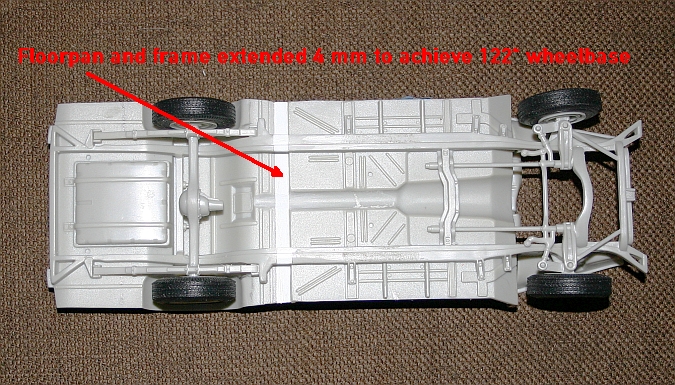
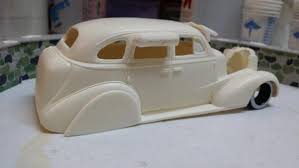
Okay, I performed what I think was some pretty successful reconstructive surgery, if I do say so myself, on the gekakt tailfin. I cut the damaged portion off from just in front of the C pillar, making a straight cut to just above the center of the tail light housing. I had to be careful to avoid damaging the script while doing this. I filled the opening with Magic-Sculpt on the underside of the body. Once that set, I built up the tailfin until I achieved a rough shape. Once that set, it was a matter of using diamond bits, filing and sanding to get the final contours, again being careful while working around the script. Somebody needs to make a PE set for this car. Sure, it's loon OOP. There are a number of MCG sets for other kits which are essentially in the unobtainium category so one more won't be a big deal. I still need to perform some finishing work; but, i'll call it done. I went to work on extending the floorpan and frame from the AMT '58 Belvedere to replace the Johan chassis plate. I thought I was clever until John Goschke was kind enough to remind me that Mopars, including Desoto, went to the UniBody construction beginning with the 1960 MY. That being the case, I'll have to pick up a couple Lindberg '64 Mopars to get the chassis and suspensions. These kits are a dime a dozen; so, having a couple around as donors for my other Johan and Revell '62-64 Dodges and Plymouths is a plus. Since I did all of the work on this and am basically stuck with it, I checked the 'net to find out which '57-'61 Mopars had a 122' wheelbase. Bingo! The 1957 Dodge Custom Royal Lancer used the same frame as the 122" wheelbase Chrysler Windsor! It just so happens that Jack at Model Roundup and Steve at Star models have the Hendrix Resin 1957 Royal Lancer kit. Now, I don't have to stare at this modded setup like a mook and can stuff it under the Hendrix body and interior tub. Anyway, here are some pics of the modified underbody components. Edit: I forgot to mention that I made contour templates of the right tailfin on an index card. I just flipped the template to mirror the left side and used it to check the shape.

-
I use Magic-Sculpt two-part epoxy putty to fill in the channels. Any other similar type (Apoxie, etc.) will work as well. There's no shrinkage and no possibility of any warpage resulting from solvent-type adhesives used to cement styrene in them. Plus, the epoxy can be smoothed with water to match the contours of the chassis tubes, eliminating any filing. A light sanding will be all that is required and there will be no visible seam on those areas.
-

Trumpeter Bonneville
SfanGoch replied to RichCostello's topic in Model Building Questions and Answers
That's because there aren't any. Never were included despite what the info on the box indicates. A lot of guys who actually build this kit will opt for a complete roof transplant, using an RM '59/'60 Impala roof. I went the other way. I just cut the Trumpeter roof, extended it by 2 mm and reworked the shape of the A and C pillars. Works for me and the result is more than acceptable. Another way to correct the Trumpeter roof is to measure off 25 mm from the edge of the windshield frame and make a cut at this point. Remove the rest of the roof/backlite, making a straight cut along the tulip panel along the rear window frame and 2-3 mm from the C pillars. If you have a 'RM '59 Impala body, mark off 26 mm, measured from the upper window trim toward the front, and make a cut along there. Make a straight cut along the edge of the lower window trim in the same manner as on the Trumpeter body. The reason for the 25 & 26 mm dimensions is that the roof length is supposed to be exactly 51 mm front-to-back. The RM roof section will essentially drop in. I prefer the '59 Impala roof over the '60 because the vents found along the bottom of the '60's rear window weren't found on the Bonneville and the '59 roof sheet metal was also used for the Pontiac. That location for the vent on the top of the '59 Impala's roof is a lot easier to fill in than trying to remove those vents at the base of the '60's rear window. -
Works for me, Marcos.
-
Oh well, I'm already Frankensteining this one and it doesn't look too bad. You wouldn't happen to still have the firewall and tail light lenses? I thought about modifying the tail lights from the 300 but they're not deep enough front-to back. As far as the firewall is concerned, I can't find an image of the Johan part clear enough to attempt scratching one. That's why I opted to use the Belvedere part. I appreciate the additional information, John. I don't know why I didn't remember that important detail. I read about the '60/'61 Chryslers at allpar.com and it was mentioned in the article. After reading your reply, I compared the Lindberg, Johan, AMT Belvedere, '68 Roadrunner/'68 GTX/'70 Superbee, Revellogram '67-'69 Charger and the '67 Coronet/GTX chassis. I've already planned to use Lindberg chassis under a Johan '62 Dodge Dart ragtop and '62 Fury HT. I'll do the same under the old Revell '62 Dodge Dart 4 Dr and Fury 2 Dr HT.I used a modified RM '68 Charger chassis under a Johan '68 Fury. I like the look of the RM chassis. Aside from some minor differences, like the size of the gas tank and underbody stampings on the floor pan, it's a toss-up between the two. The Coronet/GTX chassis have a different design as far as the gas tanks and floor pan detail go; but, they can be changed and the chassis stretched another 5 mm to fit the Desoto. Ditto with the AMT late '60s Mopar chassis; although details are a bit soft. Since this won't be a quick and simple job (yeah, a job. too much work required to be considered a leisure activity. ), I'll consider the new options on the table. I would sincerely appreciate any input from you guys as to the best way to approach this.
-
Where are the fancy Red Line tires mentioned in the product description?
-
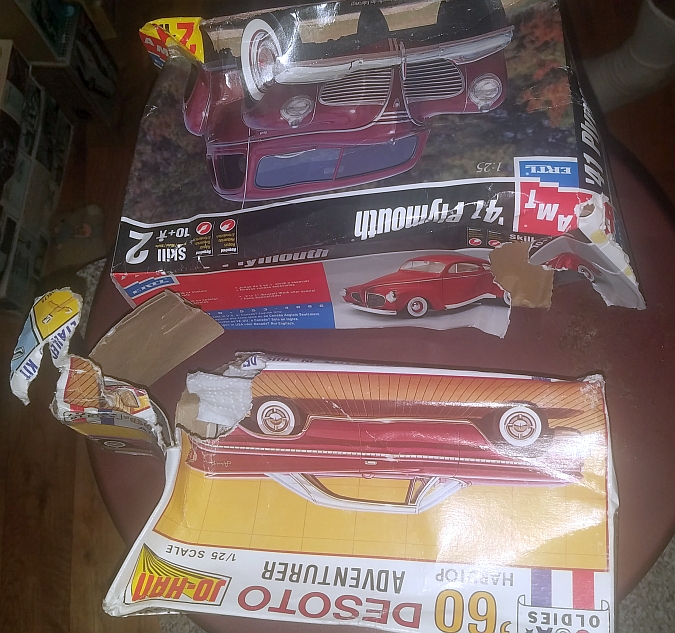
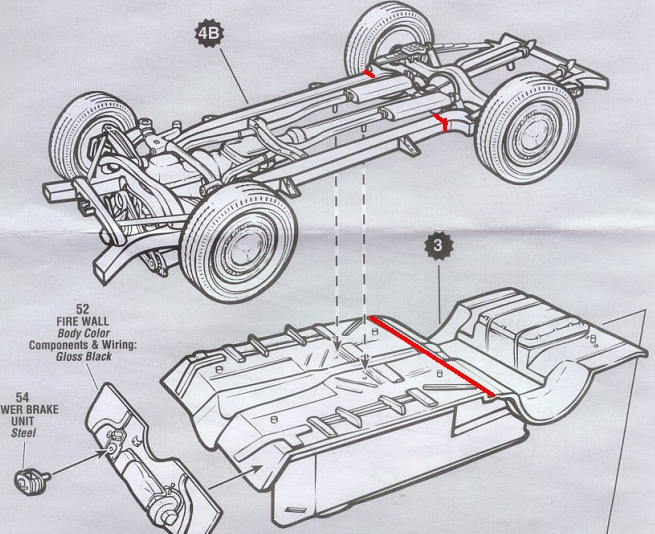
Some of you might remember this pic I posted of the Johan '60 Desoto Adventurer which UPS manage to destroy. What I didn't show was the crushed left tail fin. The entire top of the fin, from just past the C Pillar to the middle of the tail light, was pretty much destroyed. Fortunately, the "Adventurer" script is intact and undamaged. So, I'm looking it over and assessing the amount of damage and I say to myself, "Hey, you dope! You can rebuild it yourself." I started by cutting off the entire damaged portion of the fin. Now, the fun part starts, using Magic-Sculpt Two-Part Epoxy to reconstruct it. I'm using the undamaged right fin as a reference and built up the epoxy into roughly the same shape as the good fin. I'm taking my time to grind, file, sand and scrape this mess until it is replicates (mirrors) the right side. The chassis plate for this kit is the "standard" Mopar type found in all of the USA Oldies releases, including the Fury Police Pursuit Car: This is what the chassis plate originally found in the annual 3 in 1 kit looks like: Major difference here, guys. There are two possible candidates for a spiffy, 99.9999% accurate replacement for the cra_ppy Johan plate, those being the floor pan/frames from the AMT '57 Chrysler 300 and '58 Plymouth Belvedere. The '60 Desoto had a 122 in. wheelbase. The '57 300 was 126 in. but the surgery required in various areas, including shortening the frame and floor pan, would be too involved. Now, the '58 Belvedere is another story. It had a 118 in. wheelbase. The kit parts are almost identical to the Johan annual chassis plate in layout and appearance. I cut the '58 floor pan, and the corresponding points on the frame, at the joint under the rear seat. The red lines on the instruction sheet indicate the locations of the cuts: and extended both by 4 mm, giving a total length of 122 mm (which scales out to the correct full-size wheelbase). Since the Johan firewall was one of the parts lost during shipping, I used the Belvedere's. It's not identical; but, what the hey! It serves the purpose just fine. While I was at it, I also cut the Belvedere's inner fenders since they fit the firewall and literally press into place onto the frame. Interestingly, the desk guy in my building found the dashboard at the bottom of the parcel cage in the lobby the other day, making it one less part I'll need to source. I test fit the new chassis in the Desoto body and it was a perfect fit. I attached two pieces of 4x4 mm square tubing lengthwise on either side of the transmission hump of the new chassis to provide support for the Desoto's interior tub and give the body the proper clearances over the wheels. Sorry for the lack of detailed photos at this point. I'll take and post pics in the next week after I finish rebuilding the tailfin. Any and all comments, critiques, criticisms and invectives directed at me are always welcome and encouraged. Especially the invectives. It's the mark of a creative mind if you use any I've never heard or read before.
-
Yes, it is Canadian
SfanGoch replied to Richard Bartrop's topic in General Automotive Talk (Trucks and Cars)
Won't have to worry about bottoming out if you hit a pothole. -
Blvd resin / greaser alley
SfanGoch replied to 68shortfleet's topic in Car Aftermarket / Resin / 3D Printed
I've been comparing images of both the R&R and Blvd. Resin castings. I don't think it's an R&R recast. The Blvd. Resin version looks a lot cleaner and better detailed. R&R Blvd. Resin Seems like a lot of satisfied customers on Blvd. Resin's FB page.
-
The hood itself is 1 mm thick. The hood bulge is super thin, only 0.5 mm thick. You couldn't remove enough material to thin it down without damaging it in the process. The steps I provided are, in my experience, the only practical solutions to correct the floating hood. I found out by a lot of trial and error over the past 20+ years since this kit was released. I could write a book about the issues which I ran into with this particular kit. Incorrect inner fender shape and too shallow channels on the floorpan which contributes to body-to chassis attachment difficulties, the package tray is a bit too narrow causing a noticeable gap between the fuel filler tube and B pillar, the floating chassis-to-floorpan mounts and other minor, annoying but easily correctable issues are, to me, the biggest nits to pick. Once one takes care of these details, this builds up to an outstanding model. Getting the MCG multi-media detail set helps too.
-
I was wondering how long it would be before you encountered this.....uh......issue. Here is a solution. Up to you if you take the advice. The first thing to do is trim the motor mount tips just enough to allow the upper parts of the mounting points on the block to rest completely on top of them. Next, remove the oblong bump located on the front transmission mount, just ahead of the "D"-shaped locating hole. Using a grinding bit, remove 4mm of plastic, measured from the front of the crossmember that the tranny mount is attached and also remove plastic the width of the mount itself. The new channel should be flush with the top of the tranny mount. Cut off the stupid locating pin on the transmission. It's useless since it is impossible to get positive alignment of the engine when it is placed on the engine mounts. If you've followed the above steps, the engine will sit at the proper, slightly rearward angle, with the tops of the front carb trumpets barely visible above the top of the hood opening/fender, as was the case with the actual car. The hood will now have the proper clearance above the engine and won't sit directly on the manifold and carbs.
-
Blvd resin / greaser alley
SfanGoch replied to 68shortfleet's topic in Car Aftermarket / Resin / 3D Printed
Definitely not R&R. R&R never made a 1958 Cadillac of any type. Here's a link to the old R&R Resin gallery at Resin Realm and you can see for yourself. It might be a mod/bash of the ARII '58 Eldorado Biarritz or Seville with the roof from the AMT '58 Impala because it requires the glass from that kit. -
News of Revell molding preparing in US
SfanGoch replied to Jon Cole's topic in Car Kit News & Reviews
Hopefully, the Alfred E. Neuman molds didn't end up in China. -
News of Revell molding preparing in US
SfanGoch replied to Jon Cole's topic in Car Kit News & Reviews
I like the way you think, Roger. -
News of Revell molding preparing in US
SfanGoch replied to Jon Cole's topic in Car Kit News & Reviews
I have a RM 85-4295 Good Guys '55 Belair HT with two of the four stock tires melted/deformed, still attached to the vinyl sprue. I sent a request for replacements and was informed that the kit had been discontinued; so, no replacements were available. Really? These are the same tires included in the new tool (ca. 1990s) '55 Belair convertible and Show Rod issues of the HT. -
1988 - 1991 Ford LTD Crown Victoria Scratchbuild
SfanGoch replied to DEL's topic in Car Aftermarket / Resin / 3D Printed
Tom is one of the best police, fire and emergency vehicle modelers bar none. Unfortunately, his Fotki page is gone. You can still check out some of his models at copcar dot com's Fotki page in the Modeler's Bench folder. -
Well, mine did. The package I had sitting at ISC for almost three weeks was sent from the Czech Republic. Then, it was transferred to the Metro NY Distribution Center in the East New York section of Brooklyn before it finally made it to the P.O. in my neighborhood.
-
Try this: https://www.packagetrackr.com Did you receive a notice that your stuff is in the ISC at JFK? I had a package sitting there for almost three weeks. They're idiots.
-
need help locating Forest Service Green
SfanGoch replied to Oldmopars's topic in General Automotive Talk (Trucks and Cars)
The Federal Standard Number for Forest Service Green is 34350. A dead match to Forest Service Green in model paints is PollyScale New York Central Jade Green. Good luck finding any. Tru-Color TCP-043 New York Central Jade Green is your only option. You won't find any other hobby paint which is even remotely close. Why don't you just paint it Forest Service White? USFS stopped painting their equipment green because it cost 500 bucks per vehicle. -
Fred Sterns sent (by USPS. No more UPS for him ) me this Johan '62 Fury Hardtop as a replacement for the '60 Desoto UPS trashed. An A-No.1 standup guy , he is. Only took two days from Buffalo-Brooklyn. Hey UPS,
-
News of Revell molding preparing in US
SfanGoch replied to Jon Cole's topic in Car Kit News & Reviews
I got it, and a Sealab kit, out of a construction dumpster about 20 years ago. -
Since the first GTO was an option package for the '64 Tempest/LeMans hardtop/convertible/coupe, it isn't too much work to convert it into one.
-
The Trumpeter chassis, including the engine compartment, is nicely detailed. Aside from the roof and the too short and too wide hood spear, the body ain't so bad. The shape, proportions and overall appearance match up pretty well with the MCW body. I saw something on a car forum a while back where someone indicated that the bumpers and grille from the old AMT Craftsman '60 Bonneville fit the Trumpeter body. I did some re-constructive roof surgery on the one I'm building and it looks like it's supposed to. Another workaround I thought about is a less involved than a complete roof transplant, using a trashed '59/'60 Revellogram Impala donor. I'll add that bit of info in my WIP "Three Cars, One Roof".
-
'60 Pontiacs used an X-Frame. '61 and up used box`frames. That would include the '62 Catalina; plus, the '62 had a shorter wheelbase.
-
The MCW kit has a curbside chassis included. I've been thinking bout using the Trumpy chassis under one of these myself. I'm not into curbside builds, especially when it's a nice subject such as this.