SfanGoch
-
Posts
5,248 -
Joined
-
Last visited
Content Type
Profiles
Forums
Events
Gallery
Everything posted by SfanGoch
-

2 Chevys with the tops cut off
SfanGoch replied to ewetwo's topic in Model Building Questions and Answers
At least, they're cut off fairly neatly. My two cents on how to fix them.Your choice if you want to do it. First thing to do, if necessary, is to clean up and square the edges where the cuts were made. Leave the roof with the jagged cut as is; cut, test fit it to see if tht hoes together cleanly. I would use methylene chloride, like Plastruct Bondene, to reattach the roof sections, starting at the front, carefully aligning the parts. Make sure that there is no visible gap between the cuts and apply the solvent. It evaporates and sets in less time than regular liquid model cements and creates a very strong bond between surfaces. Next, bond the C pillars in place, again paying attention to the alignment with the body. On the underside, apply the solvent on and along the seams on the roof and C pillars. When dry, sand the seams flat. This next step will ensure that the roof will not break off and give you agita. Get a Bondo fiberglass repair kit with the resin and hardener. The included cloth will be too thick for use; so, grab one of those dryer cloths and cut one piece long enough to fit across the width of the roof, about 60-63 mm, and 10 mm wide. Also cut two pieces, 20 mm long by 10 mm wide, to be used on the C pillars. Mix the resin and hardener and, starting with the roof/window frame joint, place the long strip across it, leaving a small amount of overhang on one side. Use a piece of masking tape to secure the overhang onto the roof top. Using a flat piece of plastic, like one of those things found on bread ( great tip, Bill E. ), spread the resin in a thin coat along the cloth strip, making sure that the resin soaks through the material. Do the same with the C pillars, centering the cloth strips on the seam. When the resin is fully hardened, wet sand and/or grind the repaired areas until they are smooth. If you take your time, the repairs will blend in. The seams on the roof top and at the C pillar joints can be wet sanded smooth and any small imperfections filled with CA, coated with Tamiya putty and wet sanded again until the seams are no longer visible. The steps seem more involved than the actual work. You can knock off (pun intended ) both roofs in a couple of hours. I've used this technique on more than a few roofs and the results are worth the effort. -
Drilling holes in styrene rod
SfanGoch replied to Evil Appetite's topic in Model Building Questions and Answers
I use a compass needle tip, straight pin or a punch which I ground down to a super fine point to mark the center of styrene round/hex rods. Then, I start drilling a pilot hole with a #80 bit in a pin vise, increasing the bit size as needed. I've`drilled as deep. as 15 mm into a .040" hex rod with a #76 bit. It takes patience; but, it can be accomplished. -
Definitely a nice haul. David. If possible, can you take pics of the two Chevys and post them in the Model Building Questions and Answers section? I could offer some advice on reattaching the roofs once I can see the damage.
-
More Mopar Madness. All three for thirty bucks. Need the guts for my Revell and Johan kits. The Slant 6 from the Belvedere is heading for the '68 Fury NYPD RMP which needs it.
-
That's the way I see it, Steve. The Bonneville convertible was released first. I was looking at pics of '60 Bonneville/Catalina/Ventura ragtops and I noticed that the rear edge on the Trumpeter convertible is positioned too far back, creating a really short tulip panel. The lip should be in the same location as the bottom of the backlite on the HT. I butchered a '59 Impala convertible top before I found out. I think that an uptop wasn't included in the kit because there's no way that it could've remotely looked or fit correctly because of this discrepancy. Now, I need to research why some Bonnevilles only have three quarter side trim appliques as opposed to the standard four This might fall into the same mystery category as the allegedly custom seatcover pattern found in the Trumpeter ragtop.
-
Bought these two yesterday This one is pretty much in mint condition, relatively inexpensive and FREE SHIPPING! Of course, I only found it after I rebuilt the tailfin on the salvage project. This would've come in handy casting a new fin. But,what the hey! Now, I can make copes of the firewall and tail light lenses to use in that one. And this I already have one. One can never have too many. I love these early '60s Mopars. At least half of the people who owned cars on my block when I was a kid had early-mid '60s Darts. Furys and Valiants. I made an offer and it was accepted; so, i got this one at a great price as well. Plus, it's still sealed, which means I won't have to fish for replacement parts. Should be receiving both on Friday.
-
Thanks, Lloyd. Me, I just don't have anything better to do. A lot of guys on the 'net BMW about how "bad" the Trumpeter kit is. I didn't think so when I bought my first '60 Bonneville years ago; and, I still don't today. Sure, there are some inaccuracies; although, they're nothing that couldn't be fixed if one puts the time and effort into it. Hey, even the major car kit manufacturers have been guilty of producing some Grade A garbage. I'll tell you something. This kit is a jewel as far as the drivetrain and other related areas are concerned. I've never seen anything from AMTMPCRellogram which had such accurate underbody detail like this Trumpeter kit. Too bad Trumpeter got out of producing model cars when it did. I believe that, just like its armor, aircraft and ship kits, accuracy and fidelity to the real deal would have improved drastically in future automotive releases.
-
MPC Chrysler Hydro-Vee "Charger" Boat Kit and Other Boat Kits
SfanGoch replied to tim boyd's topic in Car Kit News & Reviews
The only thing on my mind regarding this thread, and the one about the MPC boat, is why they're even in the Car Kits & Reviews section in the first place. Shouldn't they belong in "Everything Else"? -
I doesn't get better than that. Those are amazingly detailed.
-
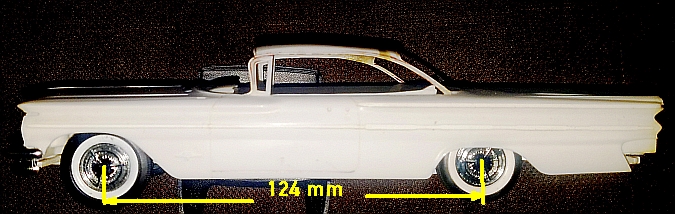
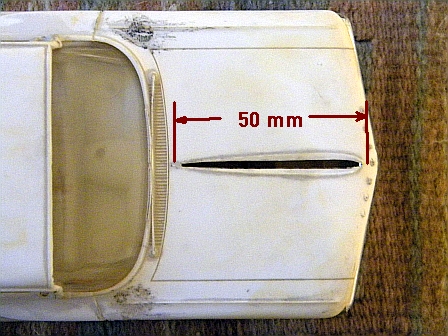
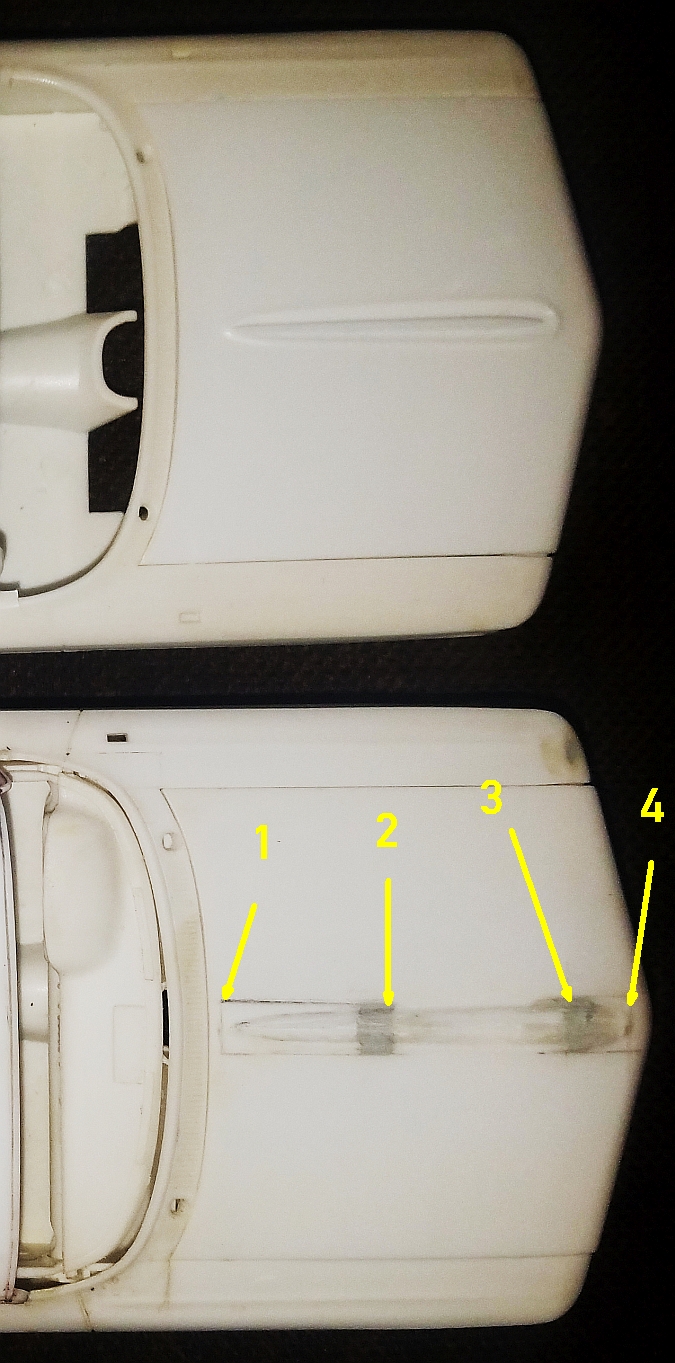
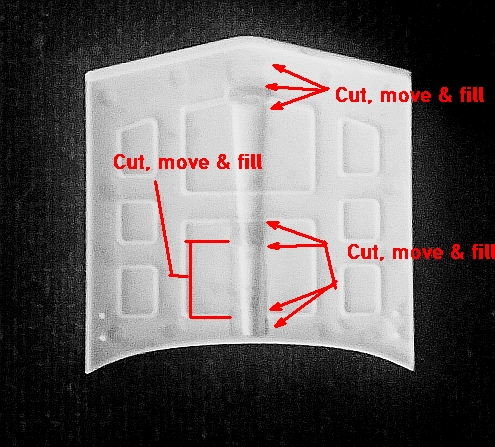
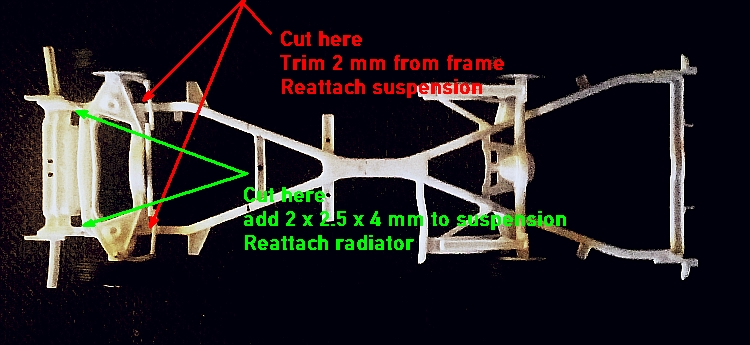
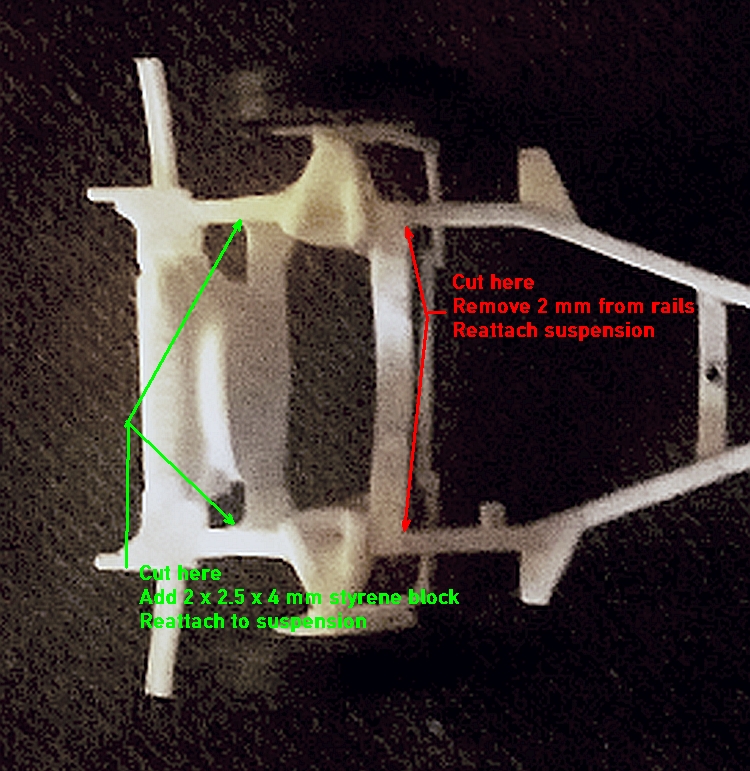
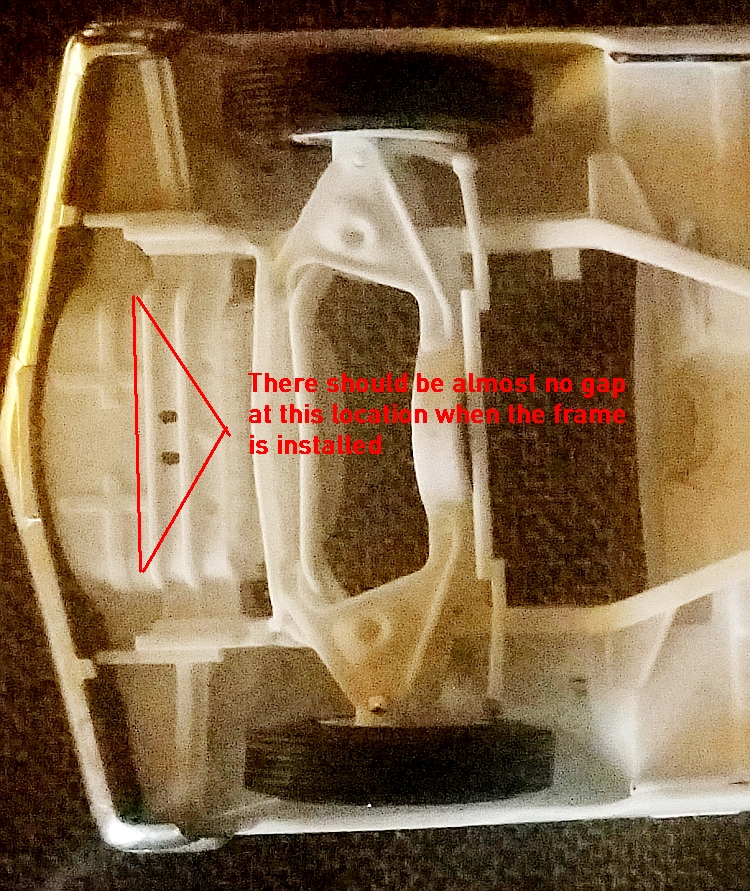
It's been a while since I updated this thread. I tweaked a couple things on the Trumpeter Bonneville: 1. the wheelbase 2. the hood spear The wheelbase of the '60 Bonneville is 124 inches. The wheelbase of the kit, when measured, is 126 scale inches. This explains why the kit's tires look as if they're positioned too far forward. What needs to be done is: 1. Cut the front suspension assembly off at the point where it attaches to the frame, directly behind the motor mounts. 2. Remove the radiator assembly by cutting the frame rails precisely at the point where the forward edge of the front suspension crossmember curves to meet the rails With the suspension and radiator assemblies separated, do the following: 1. Remove a 2 mm section of frame rail, measured from where the rear portion of the suspension was originally attached. 2. add 2 x 2.5 x 4 mm pieces of styrene to the cut-off points on the front of the suspension crossmember. This will ensure that the radiator is at the proper location in relation to the radiator support ( Part B52). 3. Reattach the suspension to the frame. I prefer to use a solvent like methylene chloride because, unlike CA, it welds the styrene and makes for a better bond. Make sure to carefully align the parts. 4. Once the suspension has been attached, attach the radiator to the suspension. It's a bit tricky because some adjustment to the joint will be required to blend this to the front cross member. The best way to attach this section is to install the frame on the floorpan and tack glue the radiator so that the front edge of the first crossmember abuts the (I don't know the correct name of this) the valance panel ahead of the inner wheel openings. This way, you can achieve a better alignment with the suspension and frame. New, corrected wheelbase: Note that the wheels/tires are no longer kissing the front of the wheel well. Next on the must do list was correcting the abysmal hood spear. Thanks to the pics Steve Guthmiller ( a swell guy in my book) posted of his AMT '60 Bonneville, I was able to scale them to exactly 1/25. The first photo is Steve's picture which I scaled to 1/25: The AMT hood is 54.5 mm L x 60 mm W; Trumpeter's is 56.5 x 60 mm. I wasn't really concerned with the additional 2 mm since the kit hood needs to fit the kit body and entails way too much surgery on both the body and hood to be worth the trouble. The spear on the AMT hood is actually 51 mm long. the "50" in the photo is a`typo which I didn't catch until after saving it. So, "51" is the magic number. A little bit of cosmetic surgery was required to fix the Trumpy spear. This is a photo of the OOB and modified hoods side-by-side: Let's start with No. 1 in the photo. Measuring 1 mm from the rear edge, I cut out a 4 x 7 mm chunk of plastic from the hood. 2. Make a cut here which corresponds to just behind the raised line on the hood's underside. Then, remove this part of the spear off the hood by making two parallel cuts along both sides. Slide this section all the way back to the rear and cement in place. There will now be a 4 mm gap between this section and the rest of the spear 3. Measuring exactly 11.5 mm from the tip of the hood, make a cut here. 4. Measuring exactly 4 mm from the tip, scribe and cut out a 2,5 x 7 mm chunk of plastic from the hood. Then, scribe a line on either side of the front of the spear (this should be 7 mm wide, line to line), slide the spear tip forward, adjust to fit, then cement in place. There will now be a 2.5 mm gap between the spear tip and the main part of the spear itself. Here is a photo of the hood's underside indicating the cut and fill locations: After all the cutting, sliding and cementing, time to do something about them holes you're left with. That's right......time to get out my favorite go-to stuff for situations like this......Magic-Sculpt. I used Scotch-Blue Painter's Tape on the underside, burnishing it along and around the raised areas and spear sides so it gave me the proper curvature at the gaps. The gaps were filled with Magic-Sculpt and the recess was shaped with the plastic tip from a mechanical pencil and water.I kept making adjustments as the Magic-Sculpt dried. After it dried, it was just a matter of some filing and sanding to achieve the final shape. The whole process was much easier than I anticipated and, if I do say so, the result is pretty good. Now, the hood is more or less correct, matching the AMT hood and real car. I still have to fabricate the trim piece that goes inside the spear from styrene strip.

-
My high school wood shop teacher, Mr. Romanowski, had one that he let us use in class. Nice tool.
-
But, can it core a apple? 400 bucks is a lot of dough, man.
-
Anybody have an AMT/SMP '60 Bonneville?
SfanGoch replied to SfanGoch's topic in General Automotive Talk (Trucks and Cars)
Thanks; but, I can't get accurate dimensions from those angles. The perspective is skewed. That's why I asked for an overhead photo of the model itself, like this: I cant use this one because it's a copy of the image from the Trumpeter instruction booklet and the blasted spear is absolutely wrong.. Edit: Thanks, Steve. Exactly what I needed. I was posting this reply at the same time yours went up.
-
I need a BIIIIIIIIIG favor. I need an direct overhead photo of this model's front end/hood. The shape and length of the spear on the Trumpeter kit's hood is annoying the heck out of me. I've been searching for photos of an actual hood so I can scale it to size and take measurements. Problem is, there aren't any pics available. I'd really appreciate it if anyone could provide me with such a photo.
-
That's just plain crazy. That grand could be used for something more important like a pair of mint, unused, still attached to the sprue JohanAMTMPCMomogramRevellBoysGirlsSwapMeet axles.
-
You can try here too. The shop is located in the Czech Republic.
-
Thanks, Lloyd. It was tedious; but, nothing that anyone with a bit of patience couldn't do. If I had another body, I could have made a fiberglass mold of the tailfin and slush cast an exact copy.
-
The shallow interior tubs bother me too, Tom. I did a little bit of interior surgery on the tub for the Johan '62 Dart ragtop. What I did was: 1. scribe the floors in front and back out of the tub 2. added a 6 mm styrene extension around the perimeter of the tub where the floor was removed 3. dropped the floor parts 5 mm (I also moved the front section 3 mm forward to get the proper legroom distance) to line up with the door panel lines 4. added styrene to the back of the front seats to extend them to the floor 5. did the same to the rear seat cushion and added a 5 mm strip under the front seat. All this work will allow the Lindberg chassis to fit under the Johan body at the correct depth. Of course, the Lindberg chassis requires some minor mods; but, it's fairly simple. As I mentioned previously, I'll be doing the same to the shallow interior tubs of the Revell '62 Dart 4 Door and Fury HT. Since I'm going to have to use an extended Lindberg chassis under the Desoto, it'll also get the deeper tub treatment.
-
The glass from the Revell '62 Fury HT fits; but, I'm not robbing Peter to pay Paul. I'd still be short a set of glass. If the Fury and/or the other remaining 1962 Mopar molds, are part of the haul, I'll be a happy camper.
-
Trumpeter Bonneville
SfanGoch replied to RichCostello's topic in Model Building Questions and Answers
Those are photos of three different cars, Bill, not a single example. If this was a "custom" pattern, I really don't think that one would find the same upholstery pattern in three different cars from three different locations. This particular pattern can be found in the 1960 Pontiac Color & Upholstery Dealer Album; but, I'm not going to waste $350 to corroborate this. I do know that it was available in Catalinas from that same period; so, it was obviously available for Bonnevilles too. I appreciate your automotive knowledge; but, you haven't seen all 17,082 '60 Pontiac Bonneville Convertibles manufactured. I'm not going to belabor the point because I'm not going to change your mind on this. How about looking through the 101 photos of the car in the second picture I posted? If you read through the overview, the following pretty much says it all: "Recently out of an extensive private collection where it was owned for 27 years, this car is in museum quality shape." This car wouldn't be described as such if it was customized in any way. Here are more shots of the interior. You couldn't ask for a better pictorial reference for this kit. Say what you want. The pictures don't lie. Trumpeter actually got it right, down to the last stitch. -
I hope he got those molds. I need the glass for a Revell '62 Dodge Dart 4 Dr. The glass in the box is for the Valiant V 200.
-
Trumpeter Bonneville
SfanGoch replied to RichCostello's topic in Model Building Questions and Answers
Bill, I've read the same thing about this kit at automotiveforums.com some years ago. If that was true, explain these photos I found. The interior for the convertible seems to have the correct pattern. I'm looking at the parts on Sprue "C" from the convertible and the photos below of actual cars, found on a couple of auction sites, with full bench seats. The kit upholstery and door panel patterns match the photos. The rear seat pattern can be easily adjusted to match the first picture. All three cars are restored to factory condition and not customs, BTW. -
Haven't heard from Ace Garage Guy for awhile
SfanGoch replied to High octane's topic in Where's Waldo?
Glad to see you back, Bill. You're dead on target with your comments. Too many sneaky cretins smiling in your face then complaining from under the table that they were "offended" about your, or other posters' comments. Grow up and act like adults. If you're so sensitive, and obviously lack anything remotely resembling a sense of humor, here's some advice.....stay off the internet, social media sites and lock yourself up in your house. Evidently, you aren't mentally or emotionally mature enough to interact with real adults in any type of social setting. This is how the real world operates. Yet, as you have pointed out, these are the same bums who have no problem insulting you directly and worse. I don't see them taking a board-mandated hiatus. I've said it before, and I'll repeat it ad nauseam, there is an elitist clique here, and at other fora. It's a small group which feels it has "earned" the right to get away with impugning another member's character and making disparaging remarks without fear of any penalties. We all know that occurs here. The number of posts questioning your knowledge, accusing you of acting as if you are smarter than anyone else in the room, etc. are more than enough proof of that "insider" attitude. I see remarks which imply that this site should be safe for younger members to feel comfortable . Younger members?!? Get real. The average member age is in the mid 40s. Even if there were teens, has anyone actually paid any attention to the way they talk? I was a soldier, truck driver and a teen at one time or another. I heard language from the Catholic Military Chaplain which would make your heads explode. I worked with female linehaul drivers who could make a friggin' longshoreman cringe when they snapped off some savory comments. You got a problem with somebody's sense of humor because it went over your head, don't reply to the post. Maybe listening to some Lenny Bruce, George Carlin, Don Rickles or Richard Pryor might teach you something about what funny is and the importance of the First Amendment. You don't have to agree with anything someone says or writes; but, you have to respect their right, not privilege, to either form of expression. -
I bought a pack of these for less than four bucks and cut them up into sizes compatible with model kit use. Lays the putty/epoxy/fiberglass resin down nice and smooooooooooth.
-
Thanks, guys. I thought this was worth the effort to save it.