
DRIPTROIT 71
-
Posts
7,190 -
Joined
-
Last visited
Content Type
Profiles
Forums
Events
Gallery
Everything posted by DRIPTROIT 71
-
White 7400 Daycab
DRIPTROIT 71 replied to DRIPTROIT 71's topic in WIP: Model Trucks: Big Rigs and Heavy Equipment
Thanks for all the comments guys!!! I got a little work done on the chassis today. The fuel tank is made from PVC pipe. IMG_1851 by Brian Smith, on Flickr IMG_1852 by Brian Smith, on Flickr -
My Chrysler A 318 poly head engine 3d printed at home
DRIPTROIT 71 replied to my66s55's topic in WIP: Model Cars
Looks great! I've been wanting one of these for a 66 project. Could this engine not be used in a 66 with the center valve cover bolt removed? -
Sourkrauts Model Trucks?
DRIPTROIT 71 replied to plastic trucker's topic in General Automotive Talk (Trucks and Cars)
Website is back up. -
Awesome build!!! I had something along the same lines in mind using the CJ-7 chassis.
-
1954 Maxim 750 Pumper
DRIPTROIT 71 replied to Chariots of Fire's topic in WIP: Model Trucks: Big Rigs and Heavy Equipment
WOW!!!! I'm at a lost for words. Just WOW!! -
Looking great!!
-
Brockway 758
DRIPTROIT 71 replied to KJ790's topic in WIP: Model Trucks: Big Rigs and Heavy Equipment
Very nice!! I like the tag axle idea. I'm planning a little different tag set up on the Highbinder that I hope to build next year. -
Freightliner auto carrier
DRIPTROIT 71 replied to crashtastic's topic in Model Trucks: Big Rigs and Heavy Equipment
Nice work!! -
Gino Bruzzese Jr. has passed away
DRIPTROIT 71 replied to Tesla's topic in General Automotive Talk (Trucks and Cars)
Gino will be missed. Praying for his family. -
Chevy Silverado 4x4 TrailTruck
DRIPTROIT 71 replied to deward's topic in Model Trucks: Pickups, Vans, SUVs, Light Commercial
Very Nice work!! Very Realistic!!! -
1/43 Peterbilt 350 on AMT Frame
DRIPTROIT 71 replied to Pete68's topic in Model Trucks: Big Rigs and Heavy Equipment
Very Nice! -
Kenworth cabover
DRIPTROIT 71 replied to Transtar2's topic in Model Trucks: Big Rigs and Heavy Equipment
Nice KW! -
Chevy Titan 90
DRIPTROIT 71 replied to Transtar2's topic in Model Trucks: Big Rigs and Heavy Equipment
Very Nice! -
Looks Great!!
-
Looking Great!!!
-
Truck-A-Thon 2017 'list is assembled'
DRIPTROIT 71 replied to tbill's topic in General Automotive Talk (Trucks and Cars)
Count me in too. 1955 IH Highbinder -
x2!! I was going to ask this very question for a project I hope to be starting in January. This is a help.
-
1966 Dodge Coronet/1966 Belvedere
DRIPTROIT 71 replied to RandyEarle's topic in Car Aftermarket / Resin / 3D Printed
I sure would like to have a 66 Satellite/ Belvedere grill, tail lights, and trunk panel. I had two 66 Satellites and would like to convert the 67 GTX kit into a replica of one of the cars that I had. -
1982 Dodge Ram 50 Beater
DRIPTROIT 71 replied to Chuck Most's topic in Model Trucks: Pickups, Vans, SUVs, Light Commercial
Nice work!! I like the Johnny Cash theme! "One piece at a Time" -
Nice work!! I like old vans, except when I had to work on them.
-
CLASSIFIEDS : 57 Chevy pickup
DRIPTROIT 71 replied to ranma's topic in Model Trucks: Pickups, Vans, SUVs, Light Commercial
Pretty nice truck for $28.15. Nice work!! Great subject!! I never thought of building this one. -
Excellent Work!!!!
-
Awesome work!!!
-
Purple Power 359
DRIPTROIT 71 replied to Dieselhead's topic in Model Trucks: Big Rigs and Heavy Equipment
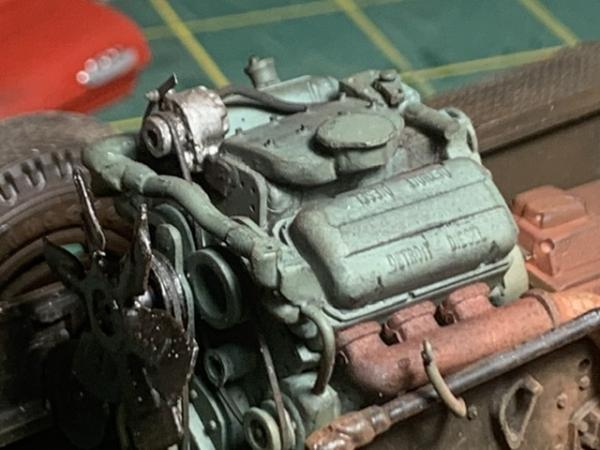
Nice work! That mean green Cummins looks right at home. -
Custom amt diamond reo
DRIPTROIT 71 replied to therealphil's topic in Model Trucks: Big Rigs and Heavy Equipment
Very nice!! I like the color!