swede70
-
Posts
727 -
Joined
-
Last visited
Content Type
Profiles
Forums
Events
Gallery
Everything posted by swede70
-
I just took delivery of an example of their Meyers Manx dune buggy in 1:18th. Maybe slightly less in quality versus something like a Norev, although far from hateful. Some finish choices and slightly underwhelming plastic 'glass' detract from an impression of quality, but at the price point these are good. All I remember of Solido from days of old was their extensive 1:43 diecast range and far less common and very French 1:18th scale efforts, typically of middling quality. It seems the new efforts simply share the name of what came before. Certainly the company seems to be coming on in relation to affording a fairly wide range of interesting topics and/or models that haven't been available for some time from other companies and that have commanded a price premium for long. In particular, if one has an interest in early BMW M3's and isn't willing to spend $100 plus to secure a sealed Ottomobile rendition or more still for past iterations by UT, Minichamps or AutoART, there isn't anything strictly comparable. Interesting to note that these aren't produced in China, but rather are offshored to new production facilities in Bangladesh. I imagine George Harrison would approve... Mike K./Swede70
-
Thanks for the kind comments and interest... About as modest as upgrades come, here I've added Goodyear Power Cushion Blue Dot sidewall 'dots' with paint applied for careful use of a length of small diameter plastic rod. The two-ply nylon tires were a feature of some Shelby American products of the period, as well as early Formula S Barracudas. Look close and one can make out the fire bottle installation fitted atop the fiberglass fill panel fitted in lieu of a rear seat. Thanks again... Mike K./Swede70

-
Handsome subject, nice and subdued presentation with the two-tone paint and quality finish. Thanks for sharing... Mike K./Swede70
-
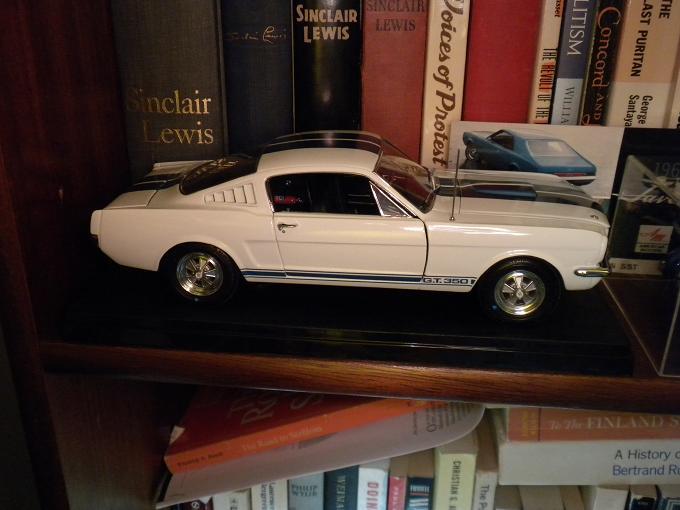
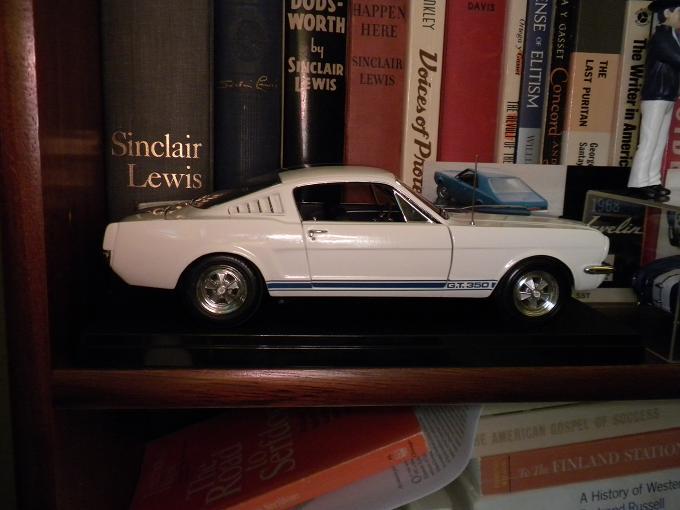
Greetings, Requiring some scrubbing and cleaning to look reasoned, this is a 1:20th scale Revell Creative Masters '65 Shelby GT350 that was picked up for $39.95 via eBay and having arrived in my hands the day this was posted. Both wipers were intact, the delicate radio antenna never installed and present within a bag, beat up but complete original packaging, etc. Odd scale, some paint rash along the flanks, but still one of the more honest representations of a topic that is often done poorly. Crammed inside a new low-rent 1:25th scale AMT plastic display case, it just fits complete with the aforementioned radio antenna insert. I might add the sidewall Goodyear Blue Dots to add some discreet visual interest, but in the main I'm happy with the model looking nice in proximity to a 1:25th Wix Cobra 427 S/C purchased some time ago. No great desire for their Cobra or Ford GT Gulf Mirage releases at present - I'm pleased with this low cost option just as-is. Thanks... Mike K./Swede70
-
These are neat models and quite convincing. They had the 1:24th diecast Pro Stock scene entirely to themselves and I'm surprised they didn't last longer than they did. Thanks for sharing... Mike K./Swede70
-
Looks like a quality item, while sometimes the stiffest test of things is whether a less expensive model can display nicely besides something comparatively dear by way of contrast. A nice acquisition this. Thanks for sharing... Mike K./Swede70
-
Looks very clean and convincing. Good work indeed. Thanks for sharing... Mike K./Swede70
-
Maybe a bore, but another wave of filing given I haven't a had a supply of sanding sticks to really thin the edges with aplomb. Pretty much done with the flares then. Thanks... Mike K./Swede70
-
That came out well - looks good. Thanks for sharing... Mike K./Swede70
-
Thanks for the interest and the comments... Trying to keep busy, although my sanding stick supply is at an end. Resin dust everywhere, sneezing nonstop for periods too. Oh gosh - seen below is work of another round of shaping and filing, and looking closer to finished - I hope! Material has come off the top of each rear flare, while the inside circumference of each has been opened a bit as well. Work of a day then. Race grid photo to come in time ... Mike K./Swede70
-
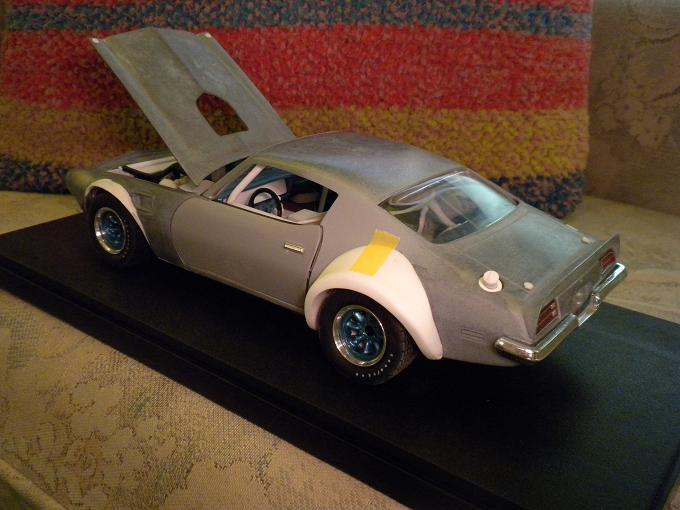
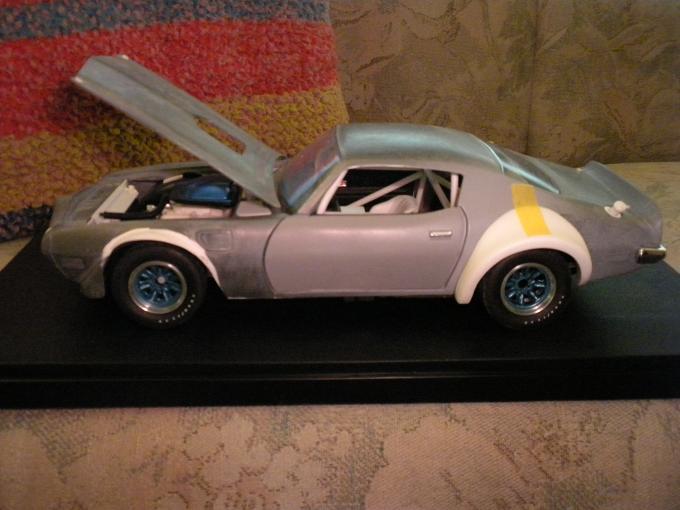
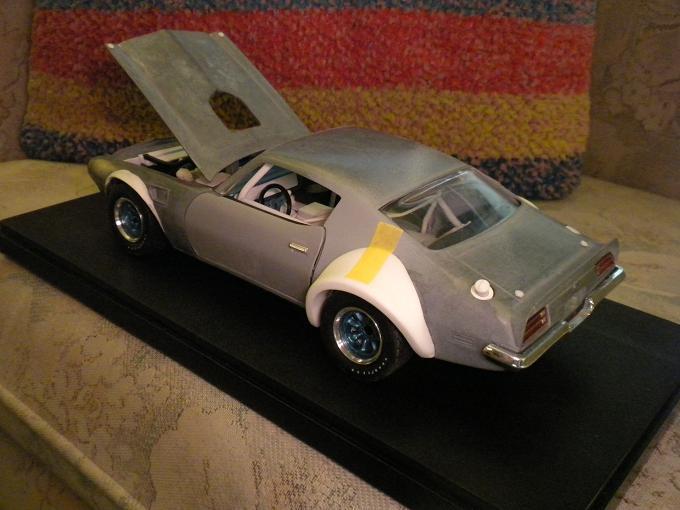
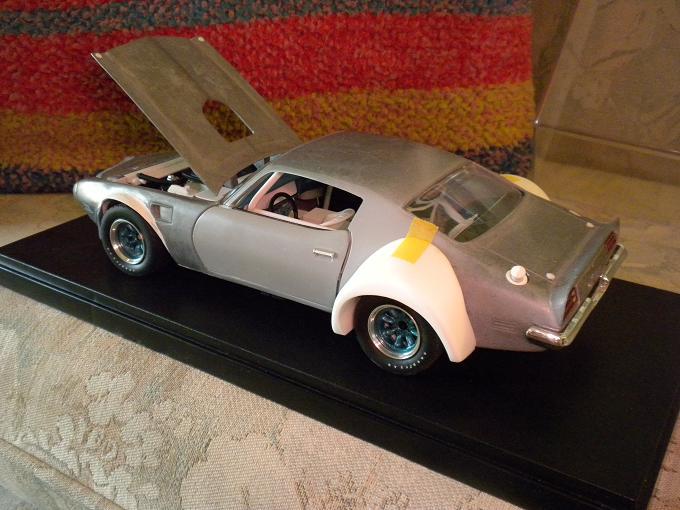
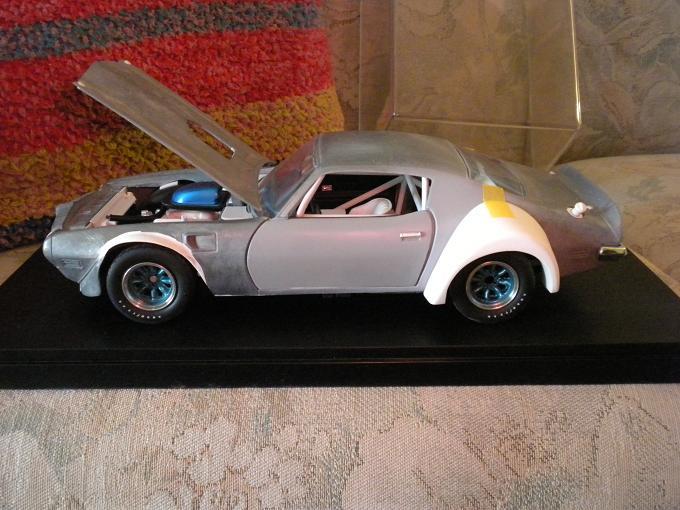
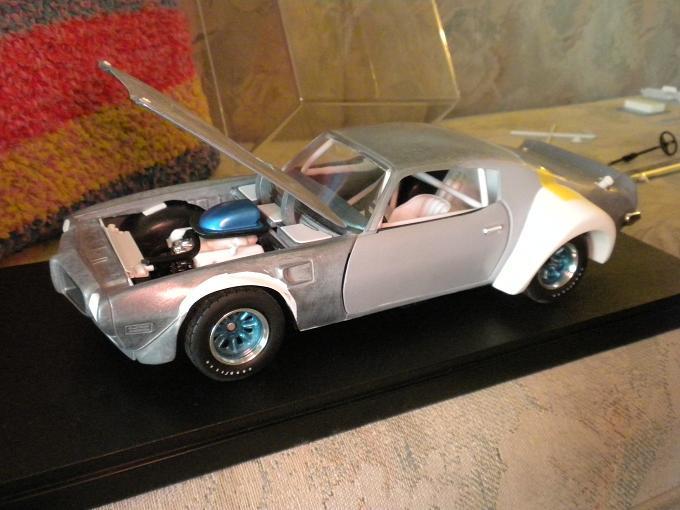
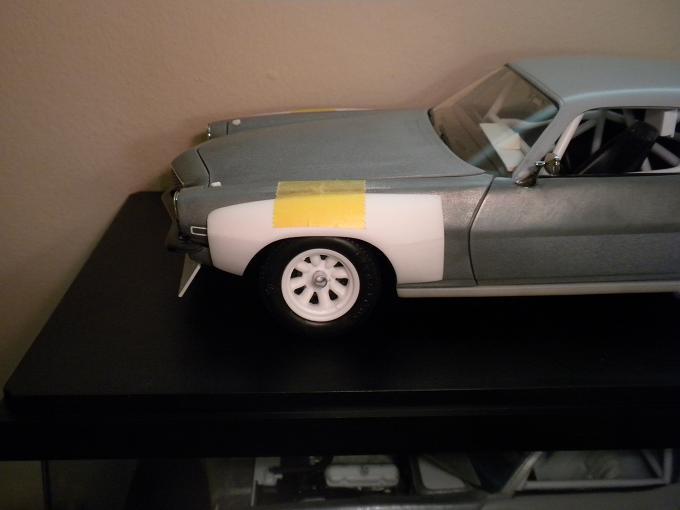
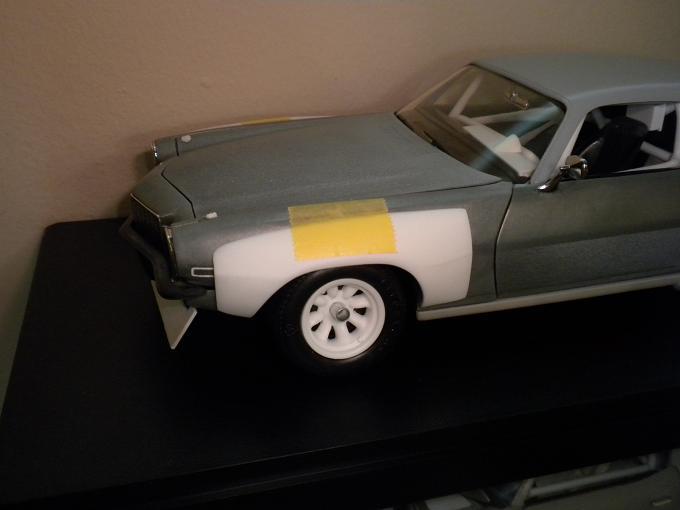
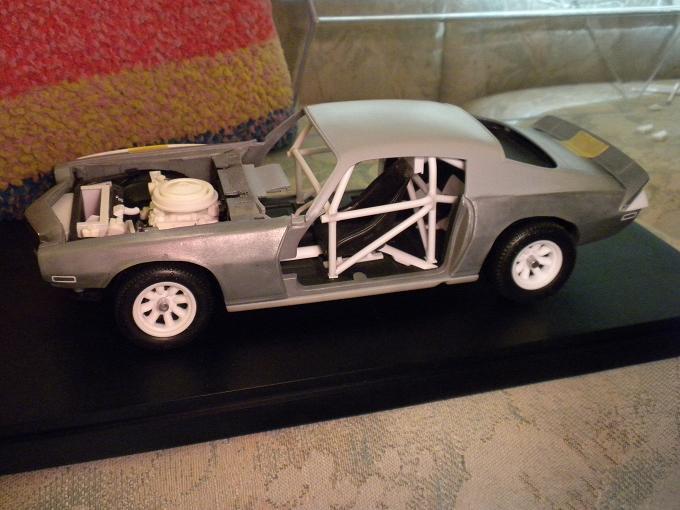
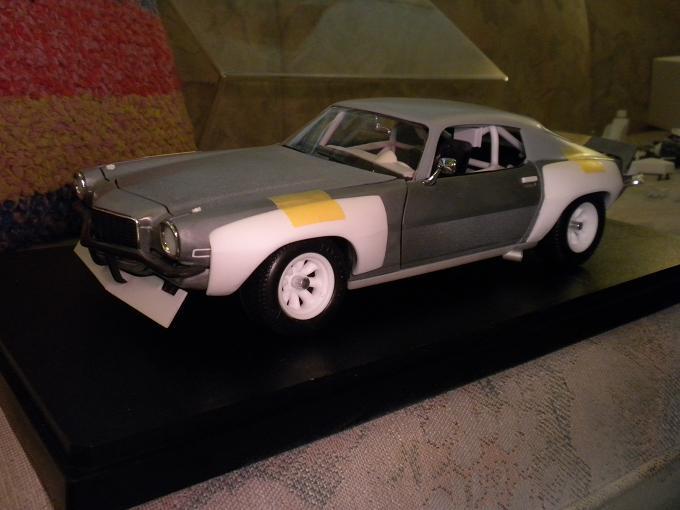
Greetings, Sort of marooned within the plastic works in progress section, this is a stitched-in thread relating work on a 1:18th ERTL-based 1970 T/G Racing Jerry Titus Firebird Trans Am SCCA Trans-Am racer. Staring down some very labor intensive projects across weeks given COVID-19 movement restrictions, I'm trying to step up to a few of them. Noticed will be the rear flares that have taken literal form across the past few days. A bit taste challenged in the wheel flare department, but in essence what I'm trying to reproduce. Still reducing the rear flare mass and subtly reshaping here and there, it's coming along. The front flares reflect older application, and constitute cast resin brows grafted into a filed out standard shell. The rain gutter trim has been ground off and flat, the cage is again scratch built. Happily the A-pillar roll cage members terminate forward of the dashboard, this fact easing the task of fabricating such. Drilling through a thick Zamac shell to help house the countersunk refueling ports was no fun at all. I applied stacked lengths of duct tape to prevent damage to the top surface when the drill bit used walked again and again. Hood pins are GMP '67-'69 Penske Trans-Am Camaro, the fuel cap a Hwy. 61 '68 340 Dart item. The instrument panel is incomplete, being a sheet plastic insert alone, while two steering wheels are combined given I had to grind off the honeycomb center trim while retaining the padded rim detail. As seen, ERTL plastic 'glass' can be polished up to a nice shine. In brief, a Lane '68 Firebird Pontiac 400 engine has been fitted and dressed to suit, the radiator is a GMP '70 GTO Judge item, while other additions can be made out in white including discreet upper control arm detail, a remote oil filter mount, and a coolant surge tank situated along the firewall. Thanks... Mike K./Swede70
-
After many successive waves of filing and sanding. It just takes a bit of time for things to appear correct. Thanks... Mike K./Swede70
-
Greetings, Long put off, for mulling matters I've opted to approach the task of rear flare fabrication on my '70 T/G Firebird Trans-Am in a different manner. Instead of adding successive layers of material to what I'd worked up before, seen are a pair of massive additions made up of of chunks of casting resin that had been poured directly onto each respective side of a spare shell before being removed and roughed out. Hardly aesthetic at present, in truth they'll not appear the height of taste even when complete! Everything looks a bit heavy at this point, although understand that my aim at this point is to have sufficient material to sculpt to shape across the intended area if nothing more. Certainly I'd much rather remove material to creep up to a final shape versus engage in the tedious practice of adding material to something evidencing inadequate bulk if my meaning is understood. Thanks for your review of this project update... Mike K./Swede70
-
They look really nice together. Thanks for sharing and hoping retirement is agreeing with you. Be and remain safe! Mike K./Swede70
-
Maybe an outcropping of tornados given the extent of the damage seen. Cars were literally tossed about like so many toys... Mike K./Swede70
-
Thank you both for your kind comments... It seems better to file the flares while they rest in place on the spare shell consistent with finishing them up. Here the edges of each are closer still, while if I had a two-part urethane supply to tap, I'd backstop my efforts for creating a mold for each now. They're mostly good... Thanks... Mike K./Swede70
-
Further refinements then... Here the front flares have been thinned along the area where they blend into the front valence, appearing somewhat lighter again. I wish I could do all I needed to with regards to shaping in a burst, although for practice only successive waves of shaping suffice. Thanks... Mike K./Swede70
-
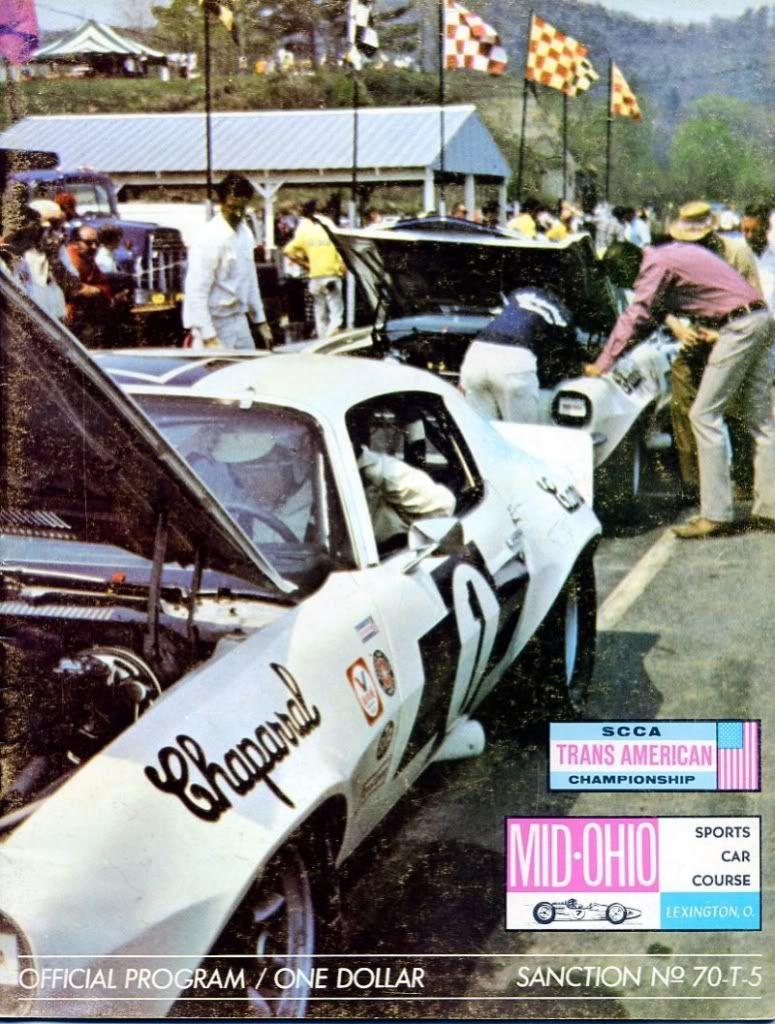
Thanks for the kind notice... Although hardly epic, seen below are images consistent with refining what has been worked up. Each flare has been thinned further, some putty applications made to the same, while the metal wheel arch openings have been filed out to allow outward adjustment of the track front and rear. In addition, some roll cage members have been replaced and the joins across this assembly improved somewhat. The model has been together and apart so many times up to this point it's a wonder it doesn't shatter. Looking a little strange and almost like a Firebird, the prominent wheel arch 'eyebrows' have been carved off. I tried to preserve the inner fender lip contour for filing the front arch profile at somewhat of an angle consistent with protecting the metal work situated further in... ...while the roll cage members leading from the main hoop into the trunk area enroute to terminating atop the subframe rails were redone given they frankly hung in space. It's frustrating to imagine that some aspects of the build have been appropriately seen to and then to discover it just isn't so... Seen above would be the event program cover image from the '70 Mid-Ohio race, with the degree to which the front and rear wheels and tires tuck in to the flares/panel work easily made out... ...and better now, especially for resting lower for non-interference of the wheels and tires with the aforementioned metal arch openings, plus wider front track which helps matters surely. It's starting to look pretty crisp. ...and pretty much invisible, some effort was made to clean up the rear bumper for sanding out subtle shape irregularities. So in total not very exciting! Thanks for your interest. Mike K./Swede70
-
Nicely done and certainly a service to those looking it. Good work! Mike K./Swede70
-
Swede Savage Trans Am AAR 'Cuda Hwy. 61 based project
swede70 replied to swede70's topic in Diecast Corner
Greetings, For some effort made the rear flares for the Swede Savage 'Cuda project were done across the past few days. Resin was poured into cordoned off areas on a spare shell, the resultant pucks removed, and the results filed and sanded to yield what is seen below. Thanks... A study of the topic at Watkins Glen '70. Subtle flaring indeed... ...pretty close, although my sanding stick supply is pretty much exhausted during these COVID-19 times. Refinements may have to wait. ...the rear wheels and tires stand to come out a bit as I adjust the track. First I must file out the standard wheel arch openings to allow such, hence the flares will serve as flares! Mike K./Swede70
-
It would be nice if someone did the late pressed steel wheels for the Crown Vic. in 1:18th. The Motor Max model is serviceable and could be updated, while the earlier and now expensive AutoART rendition of the topic might too benefit. Neat car... Mike K./Swede70
-
Swede Savage Trans Am AAR 'Cuda Hwy. 61 based project
swede70 replied to swede70's topic in Diecast Corner
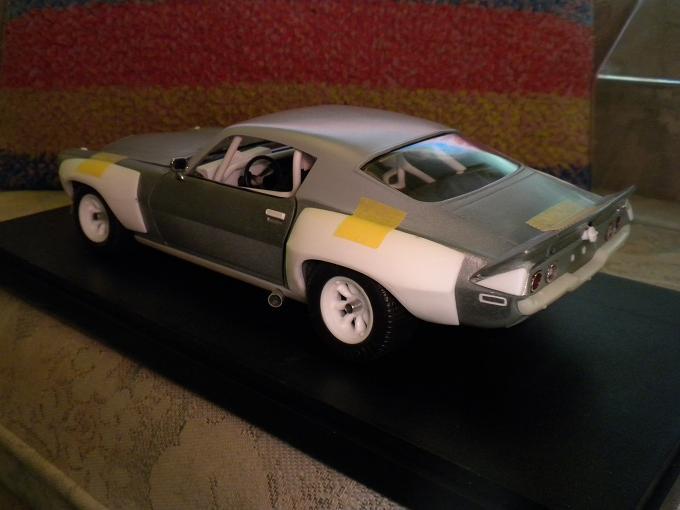
Greetings and another project dredged from the bottom of the Marianas trench... Here would be a mash of older assemblies put back on wheels. The interior panel work, half-done before, needed fettling to ensure everything would coexist when assembled. In particular, the large resin tire worked up for the more detailed Hwy. 61-based Swede Savage AAR 'Cuda required the creation of minitubs necessitating the sacrifice of a second chassis. ...the topic again, seen at Bridgehampton, NY. '70. Gary Larsen image. ...and my rendition, sporting a new shell and various new tool ACME bits very kindly afforded by ijb40. ...just the minitubs and interior panel work in-place looking aft. ...and the same basic stuff looking forward. Raw in some ways, but not awful. Rear flares done in the style of my '70 Chaparral Camaro are peculating and will be fashioned next. Kind thanks for your review of this project update. Mike K./Swede70
-
Looks neat. I always thought it would be fun to do a phantom factory-backed Holman & Moody '70 Cougar consistent with filling out the series given everyone else attended. A very clean conversion you've carried off here... Mike K./Swede70
-
That came out really well - nice work! Curious as to what decals you'll add. Thanks for sharing... Mike K./Swede70
-
Beautiful model and certainly grabbed on the right terms. Thanks for sharing your new acquisition... Mike K./Swede70