Daxman
-
Posts
214 -
Joined
-
Last visited
Content Type
Profiles
Forums
Events
Gallery
Everything posted by Daxman
-
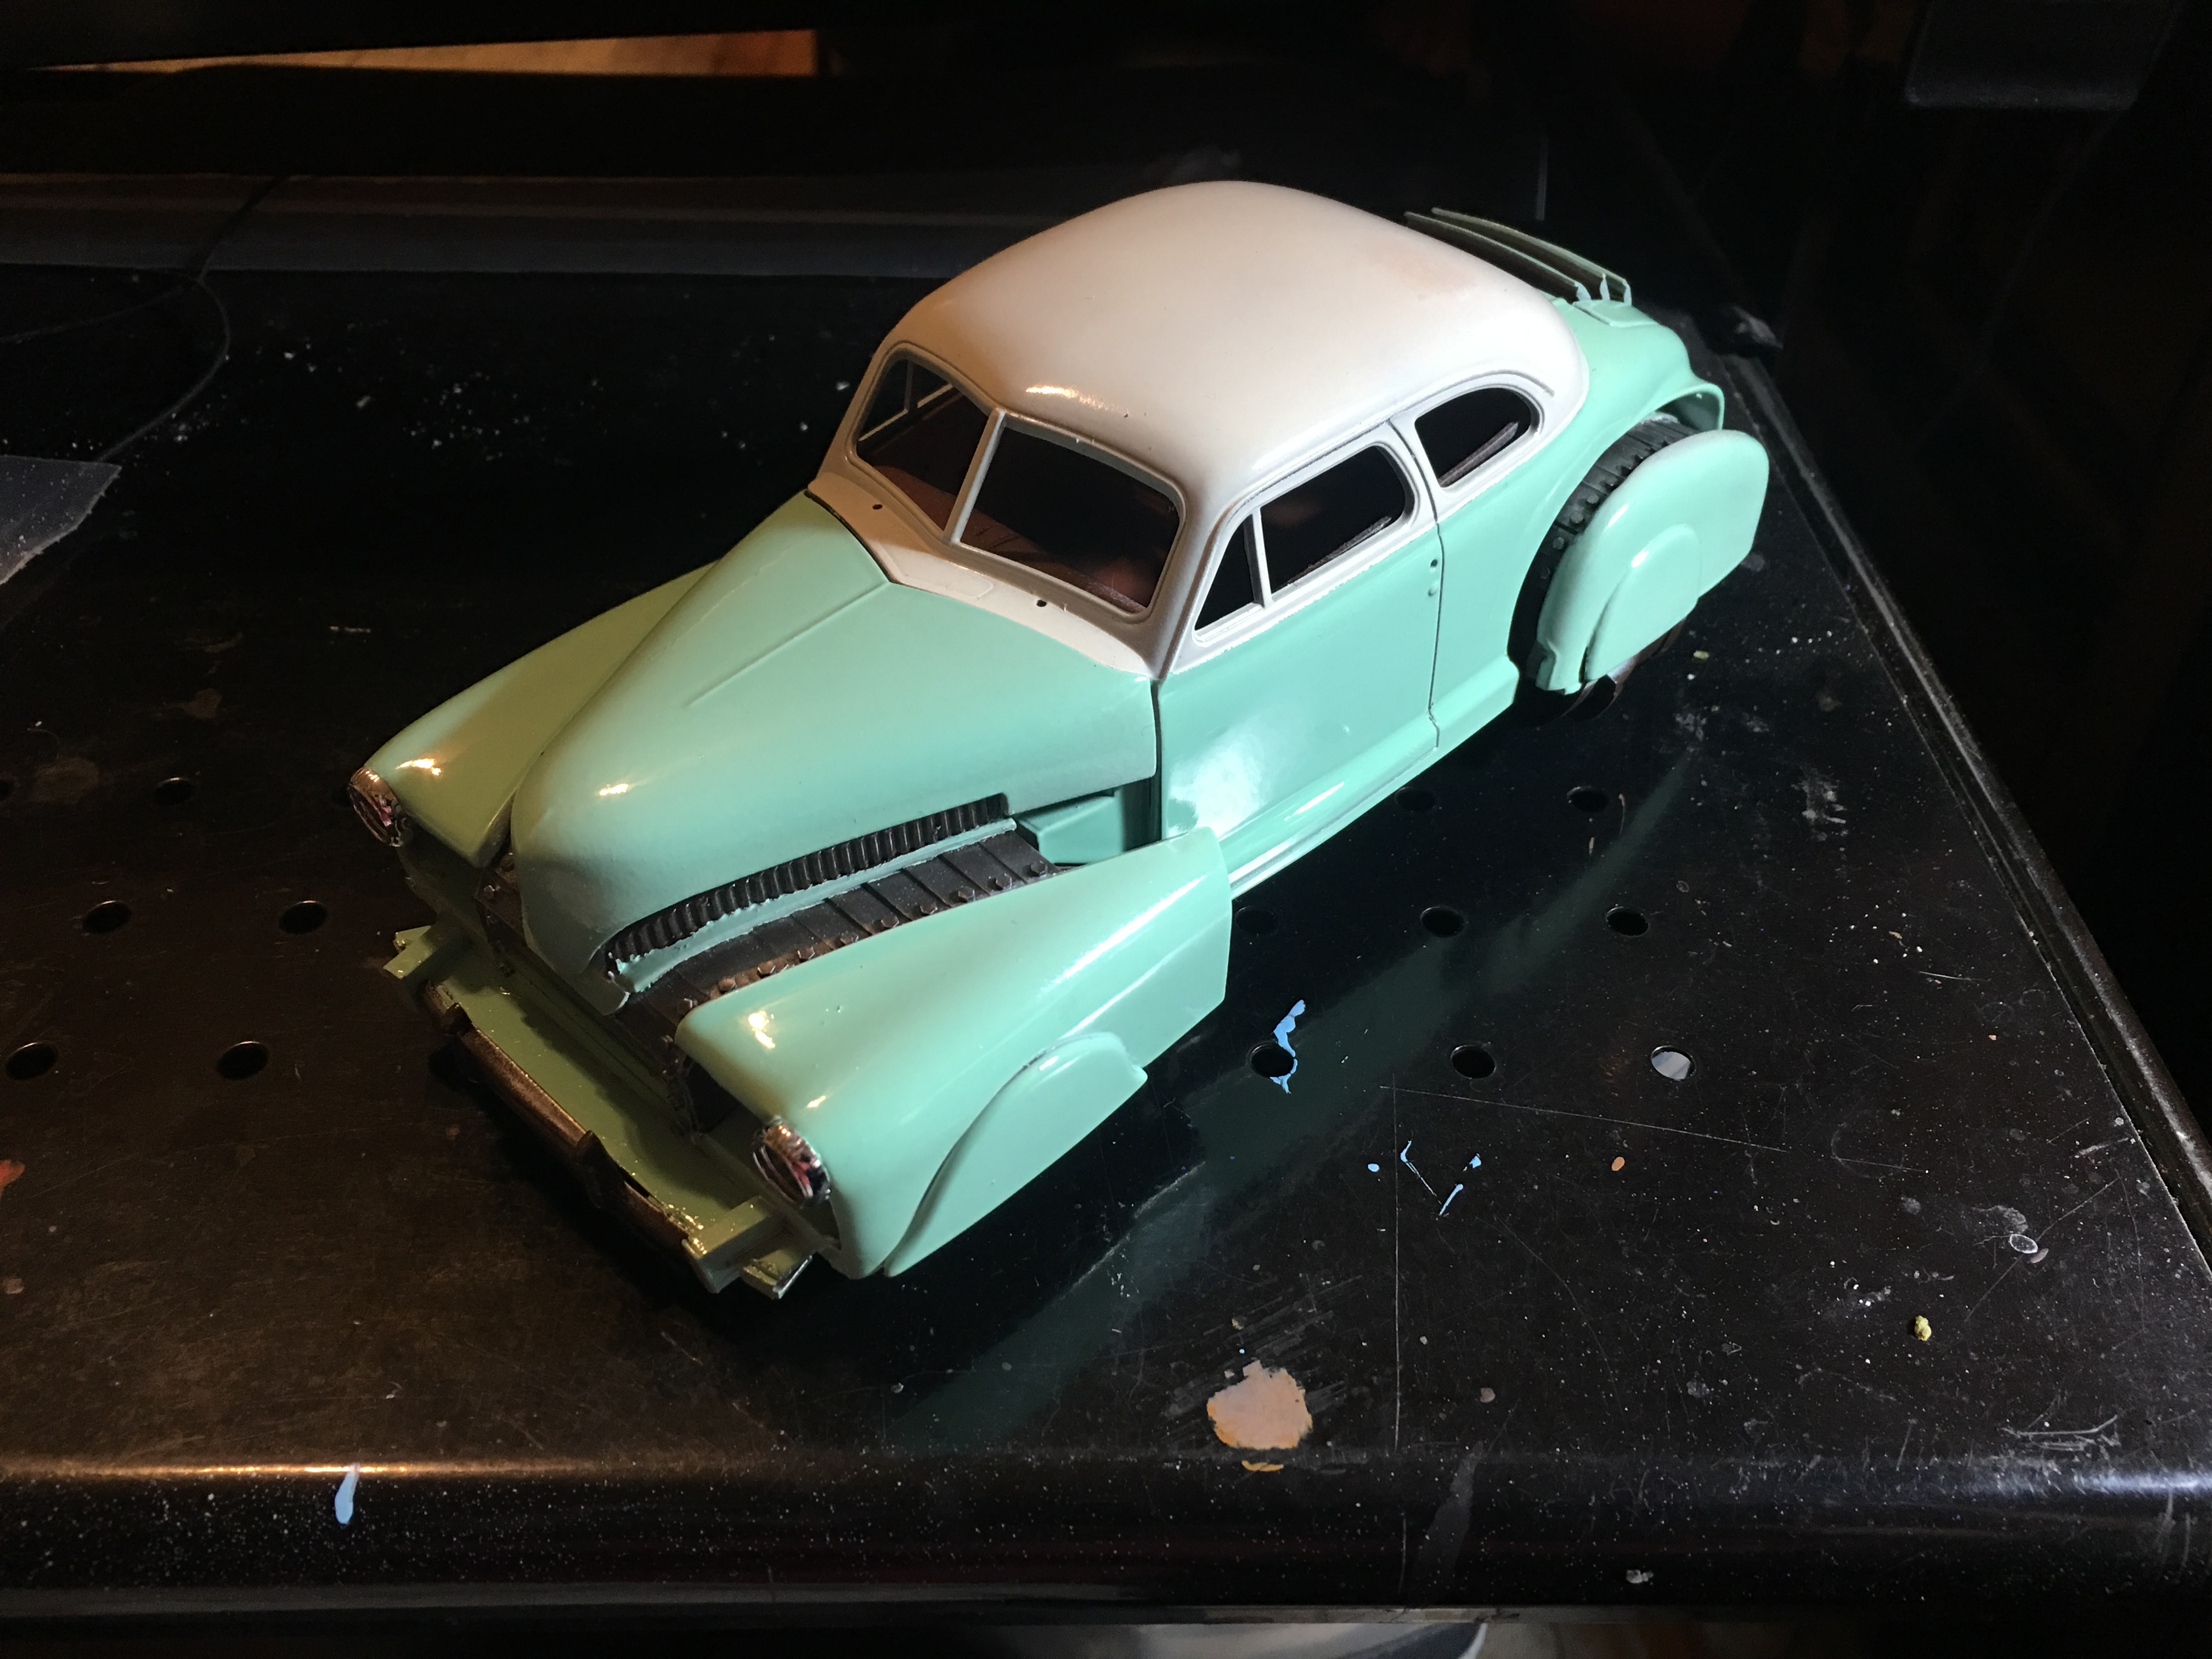
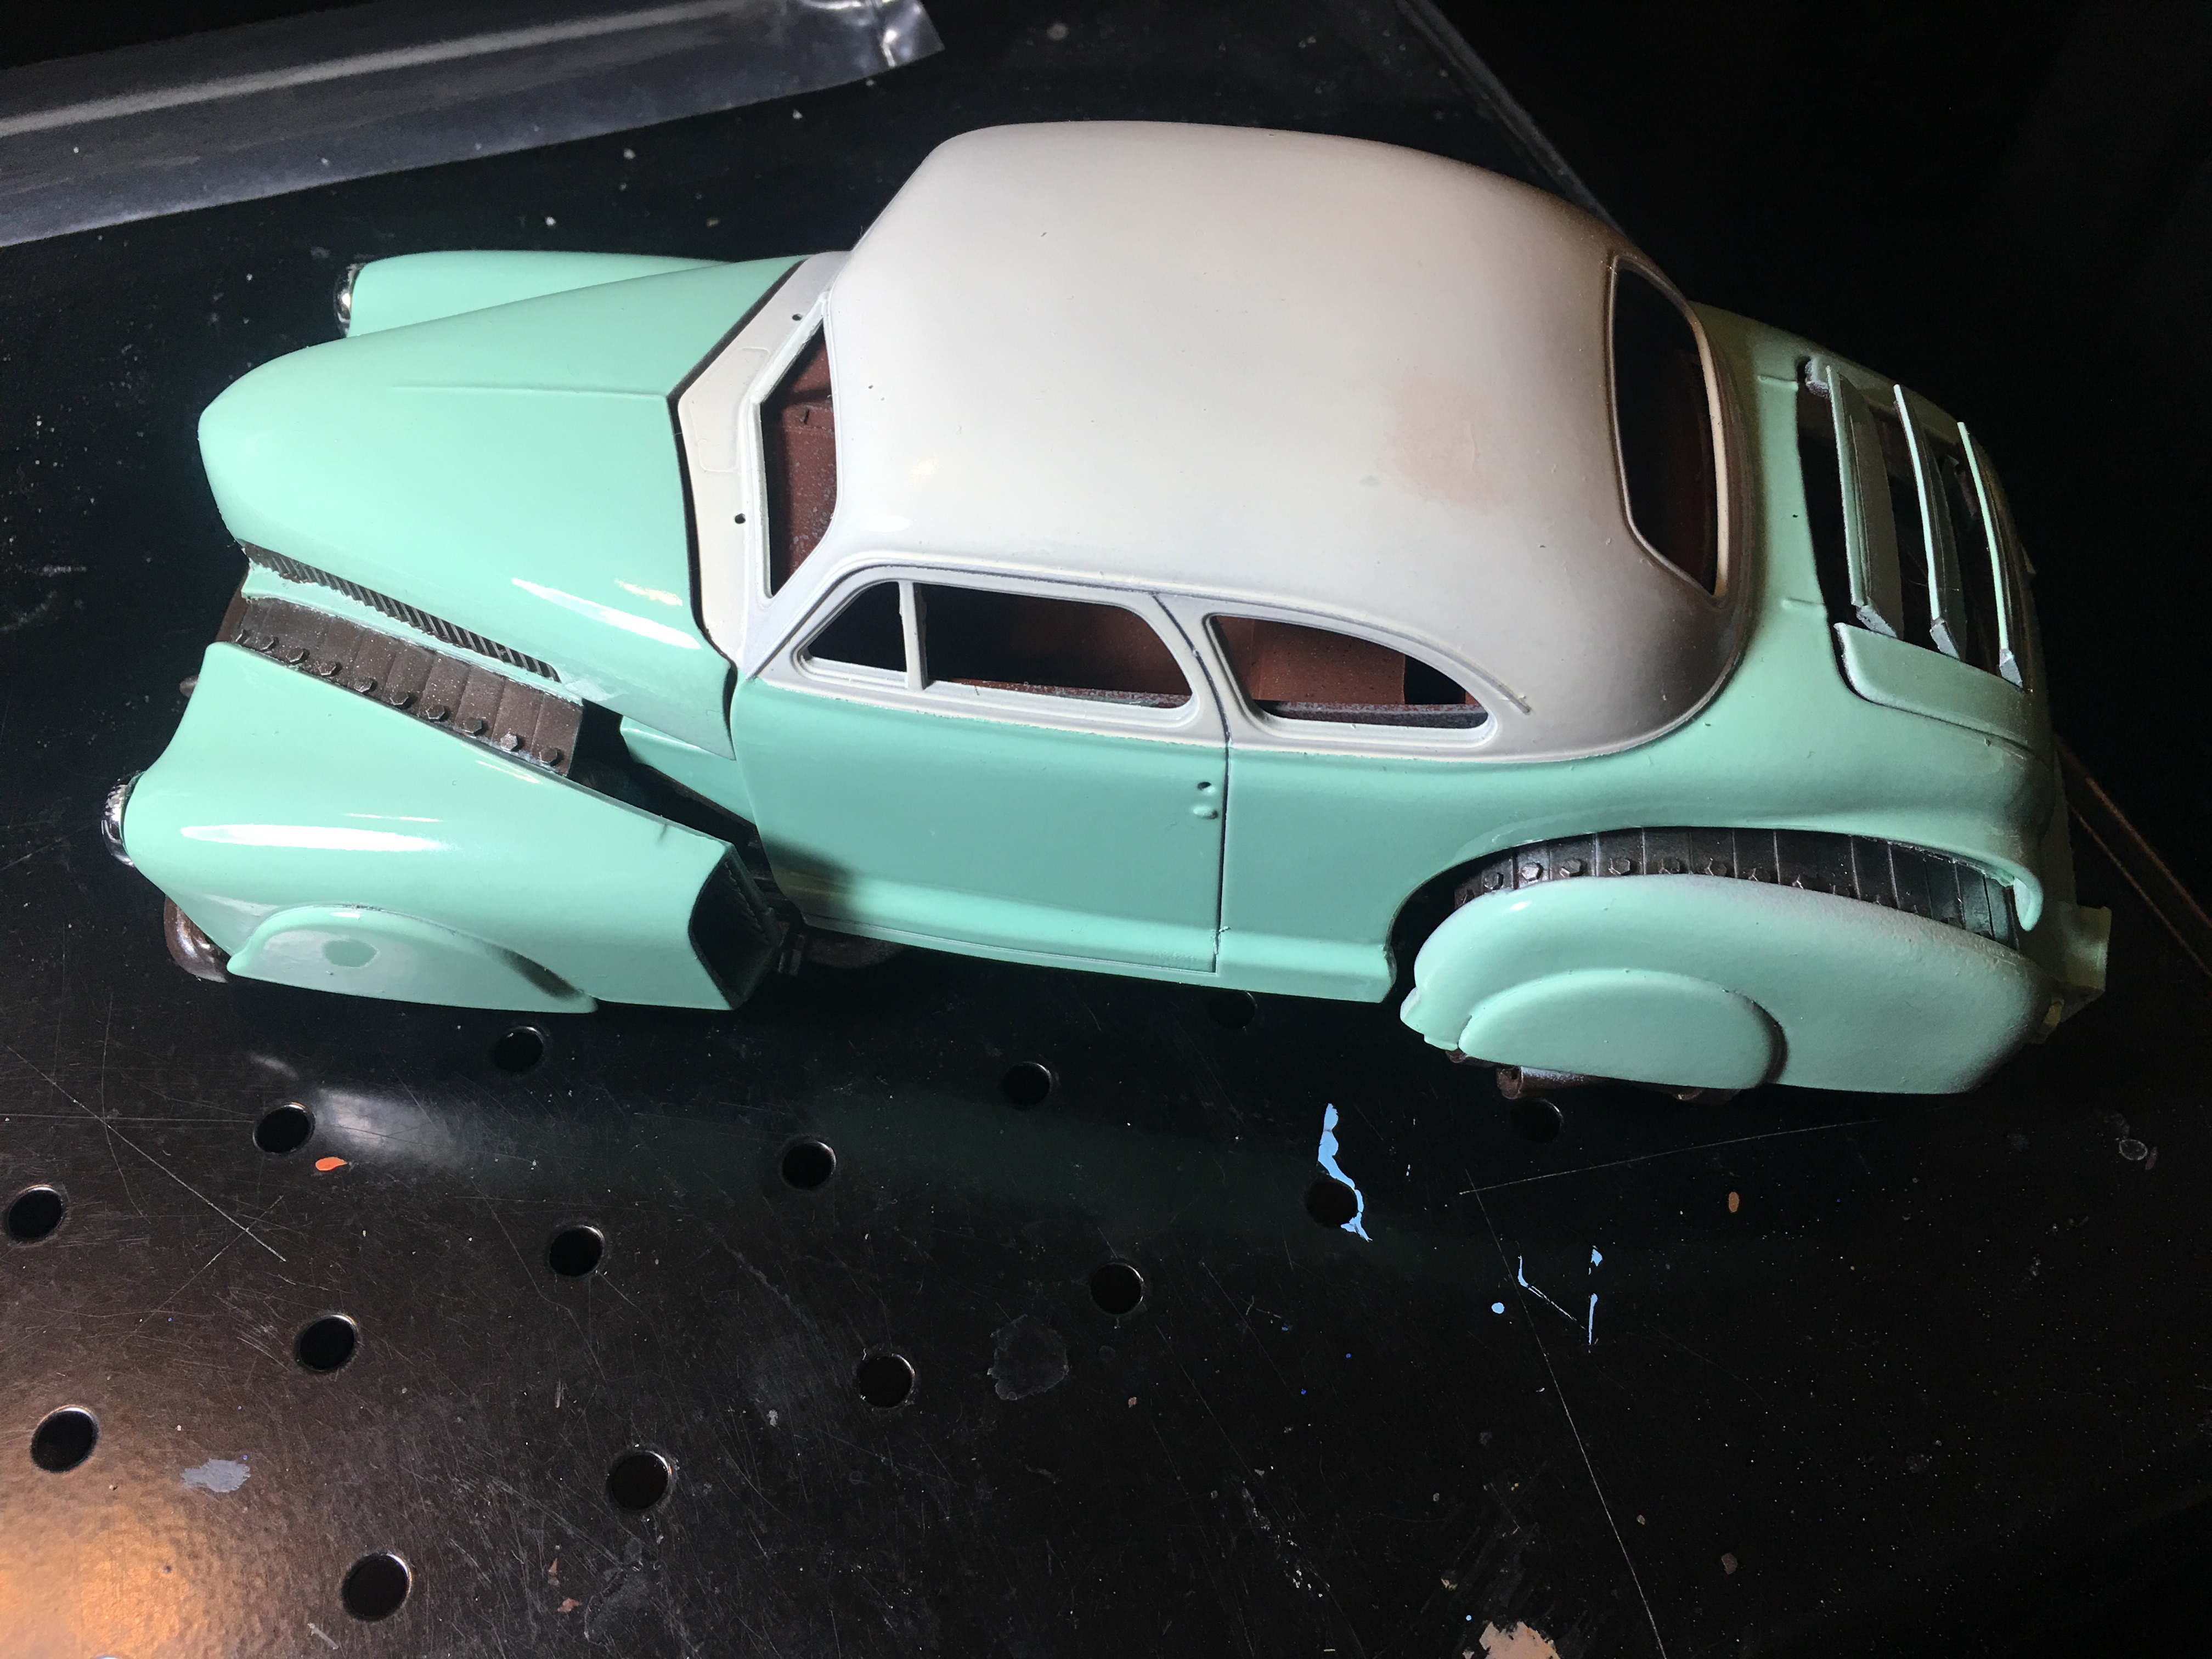
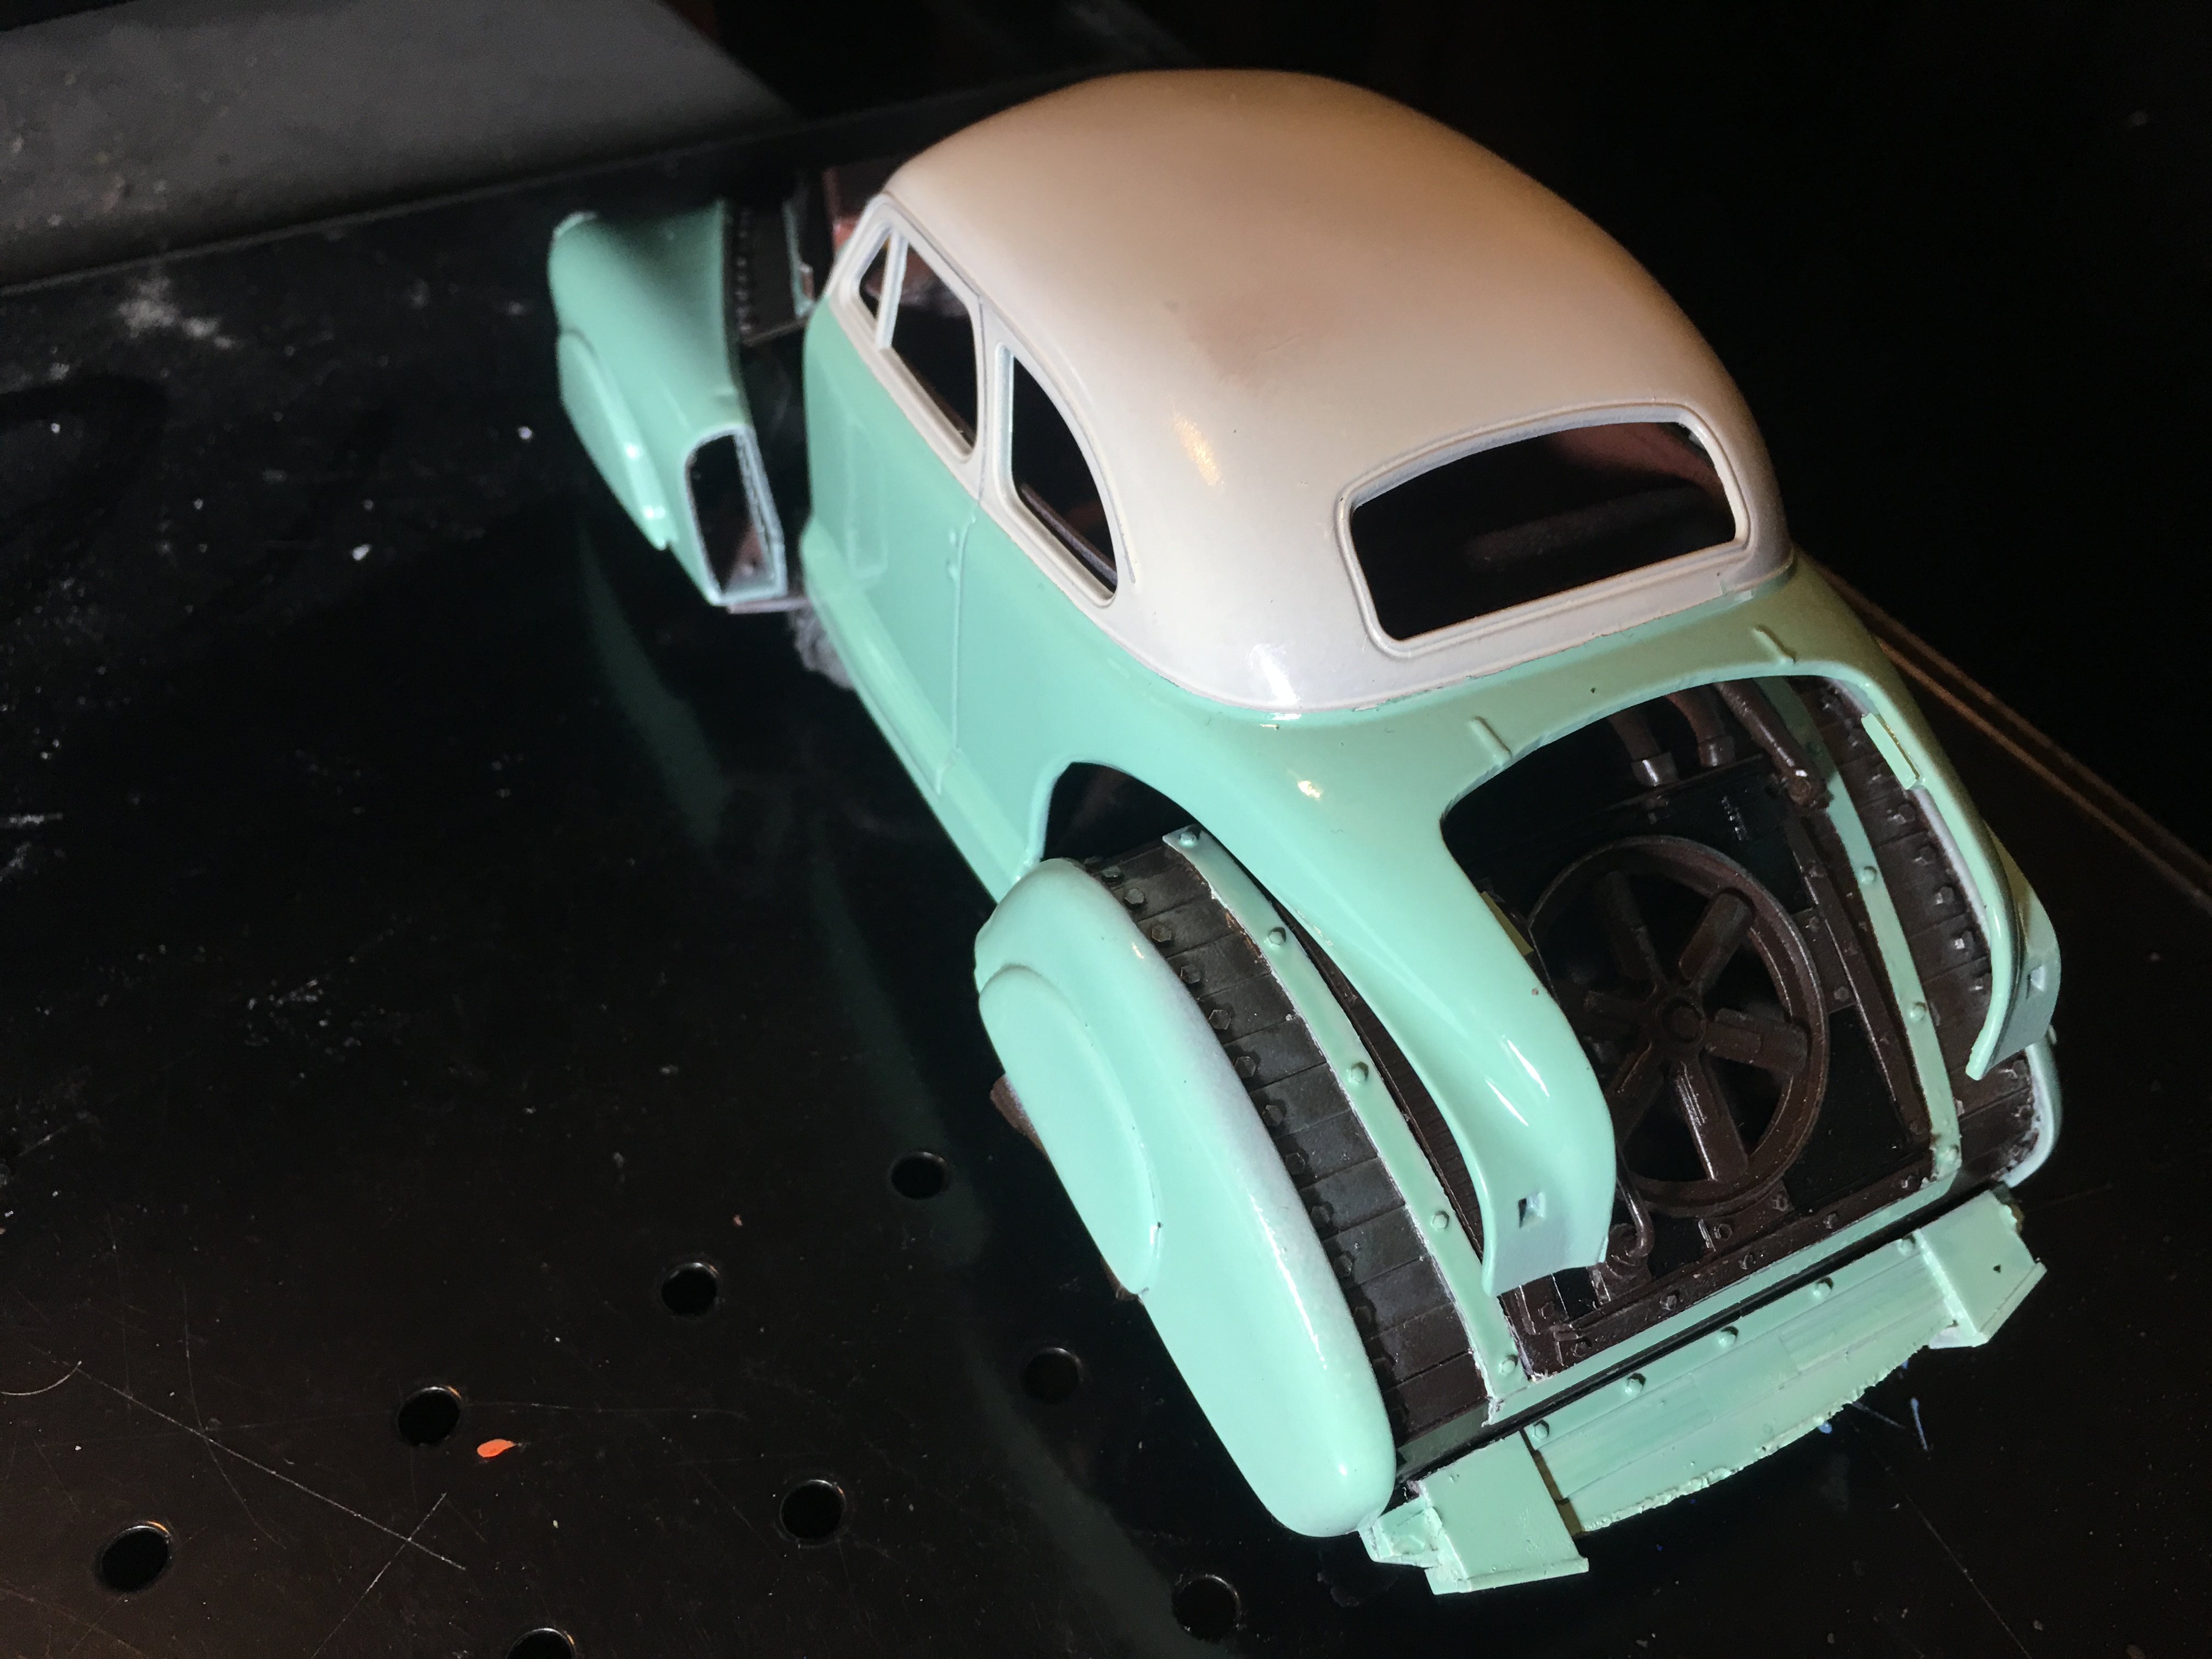
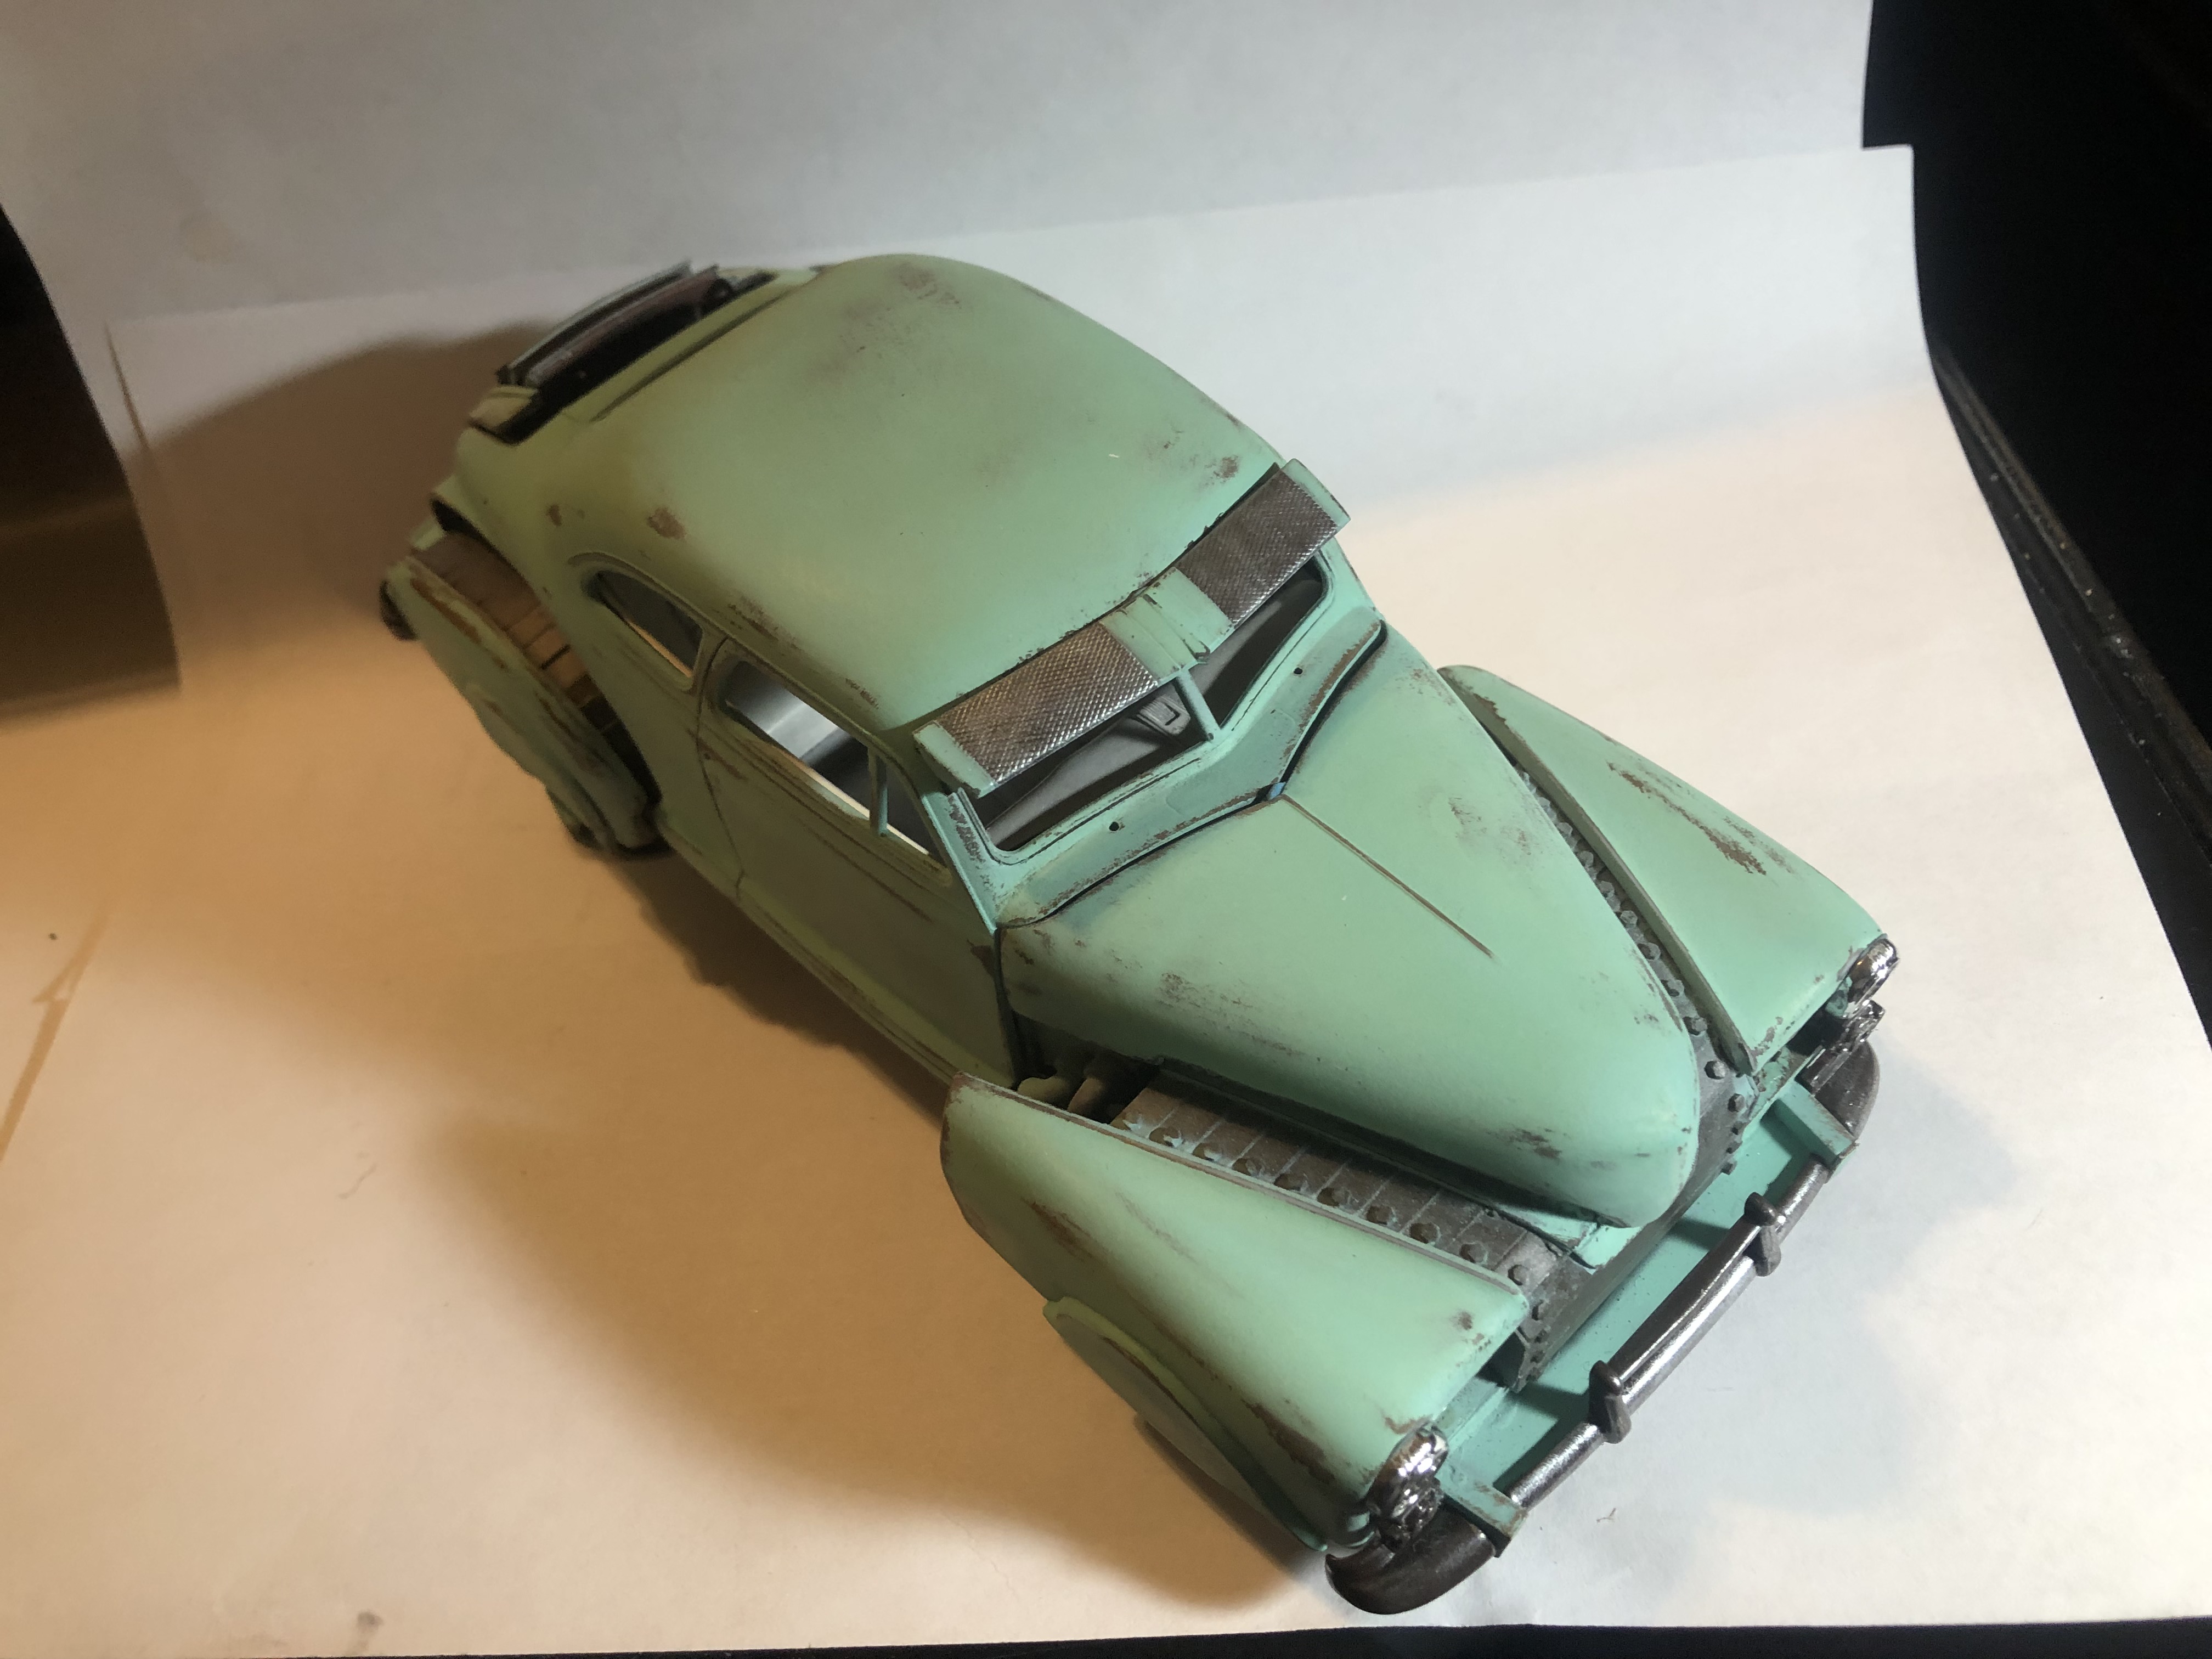
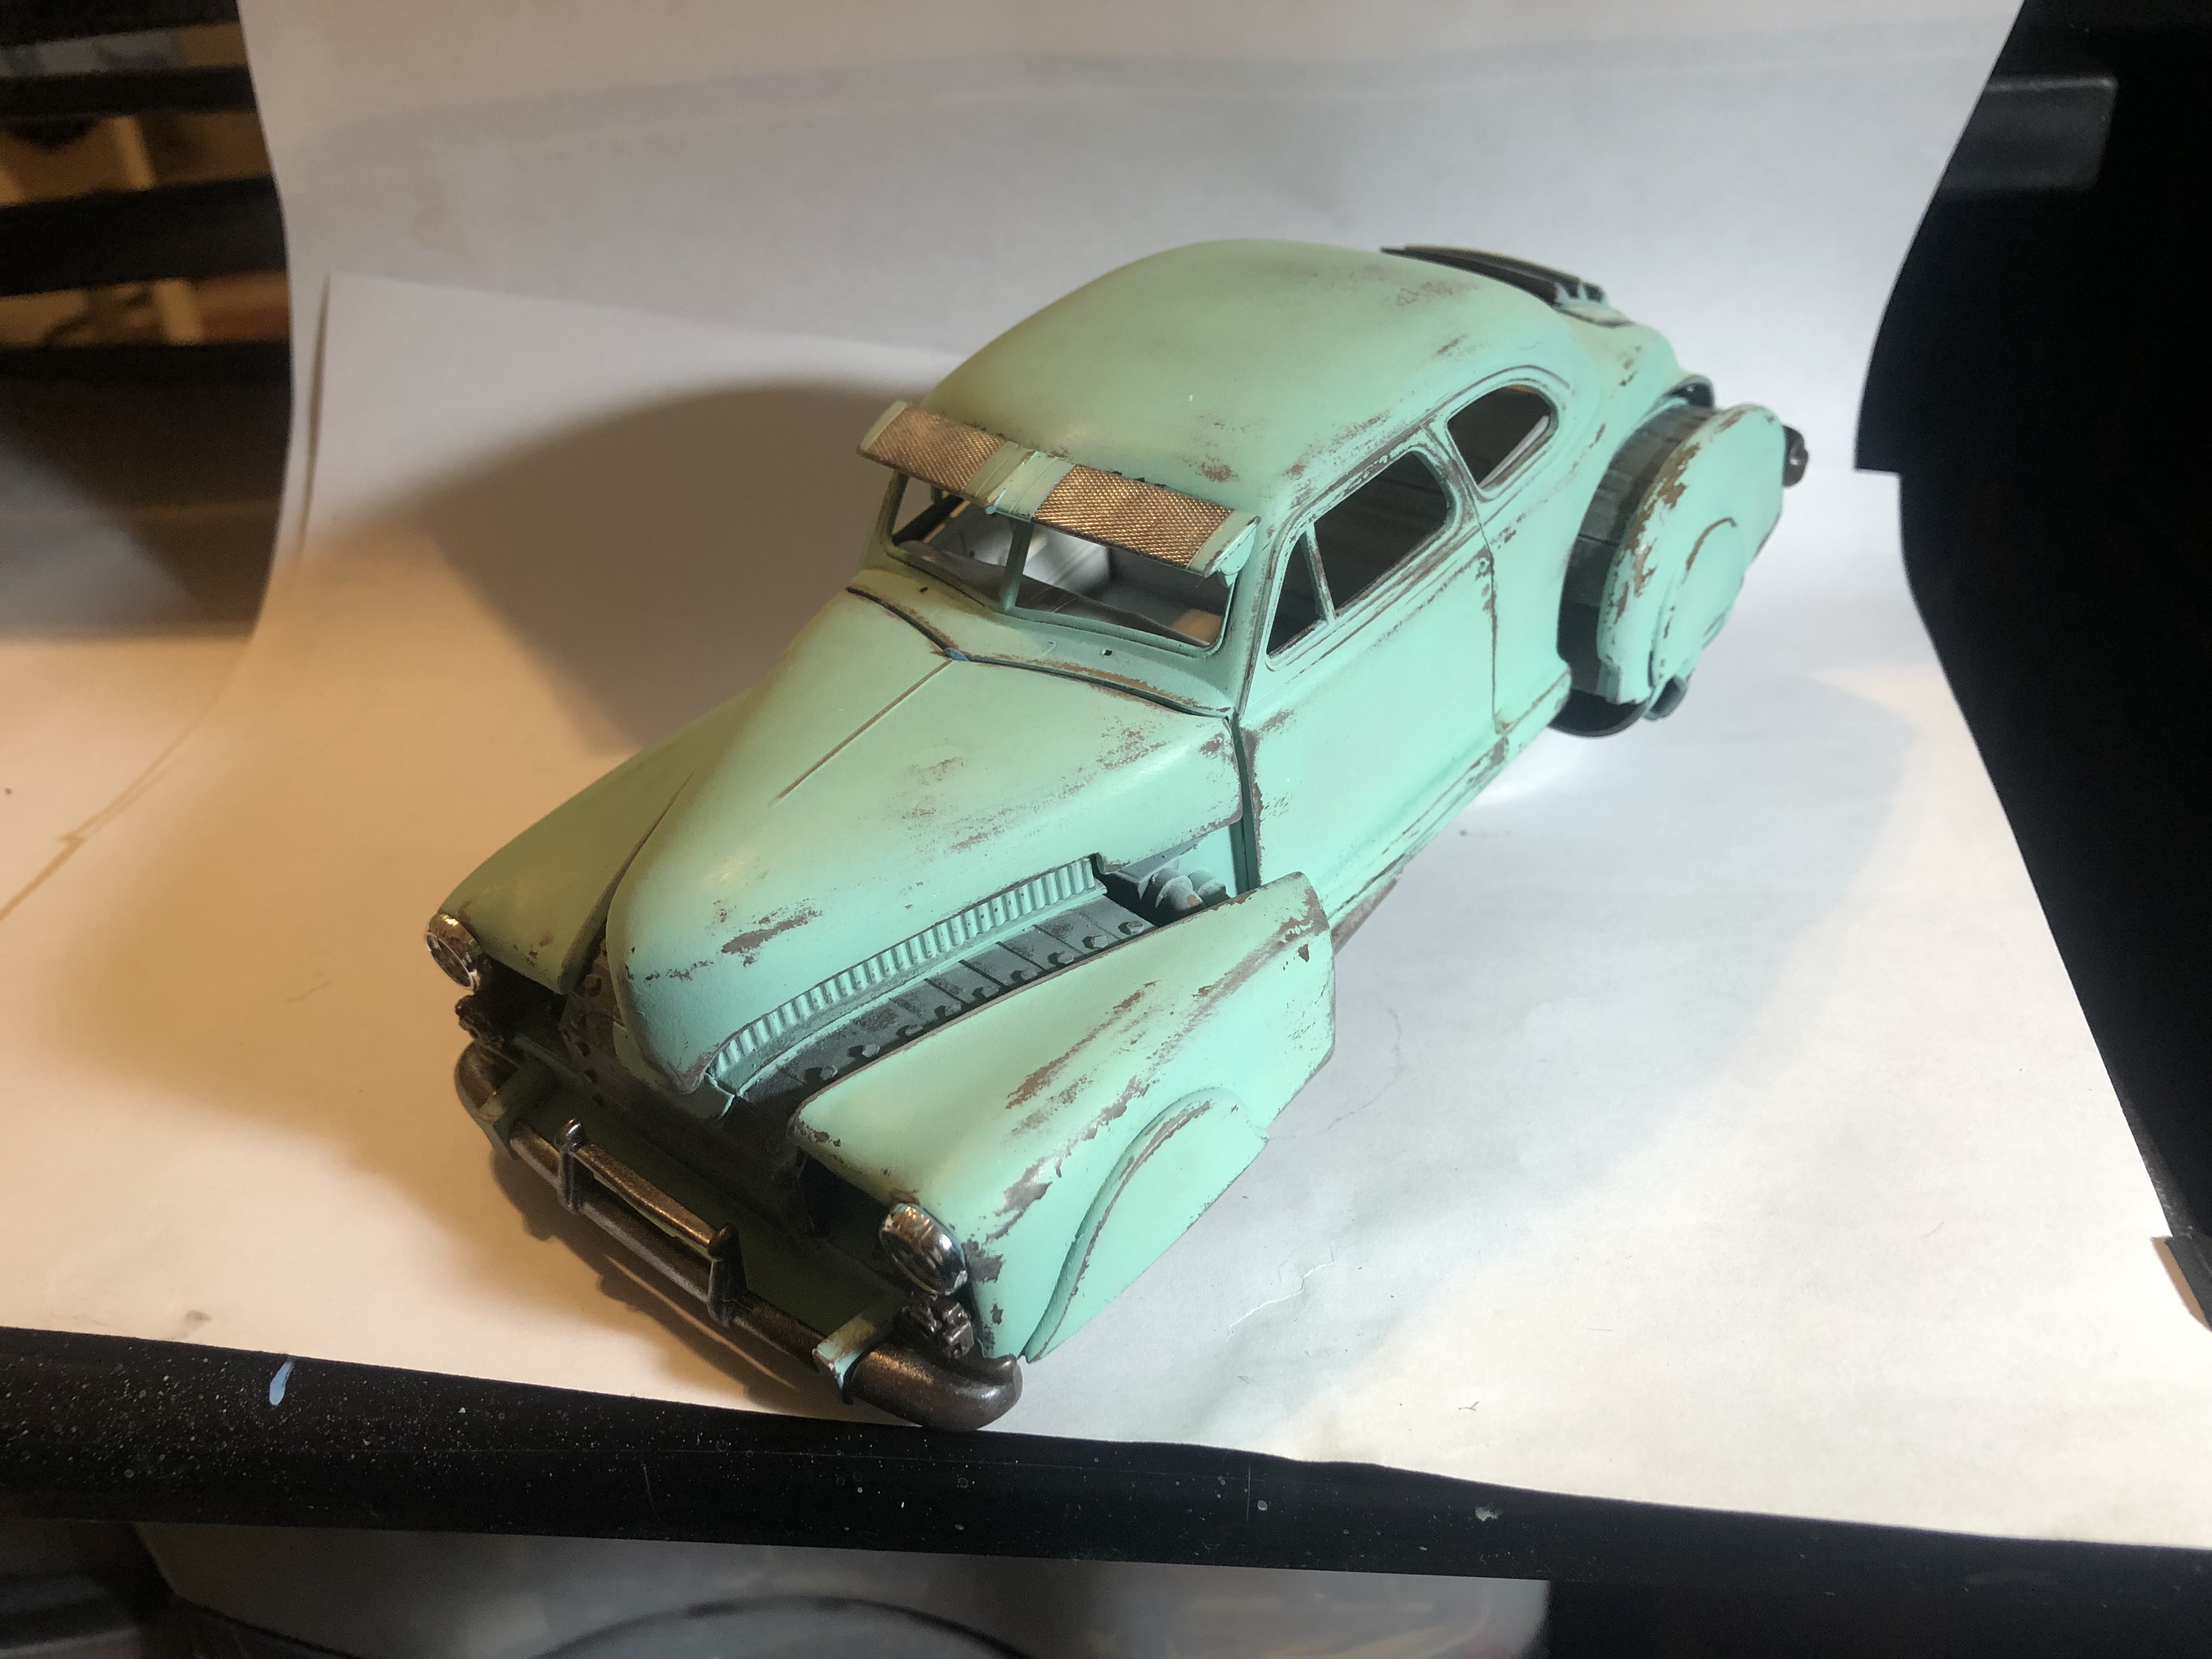
As usual for me, I had to try a few different colors before I was happy. I tried red and liked it, but didn't love it. I decided to remove the paint once again and go back to a retro green. I"m happy with the new body color, I will probably hit it with a satin or semi gloss clear coat when I'm finished with the weathering. I'm still debating on coloring the roof a cream color. I'm most likely going to do this. I love two tone as you can see by my previous jet cars. The area behind the front fenders, the jet exhaust port, will have an additional heat deflector as in the first photos. I just don't know exactly how they'll be mounted yet. I've added so many plumbing lines to the undercarriage. They all serve a purpose.....the purpose of looking cool! I have another few mock up pipes that go under the mid section and extend to the rear turbines. It makes the underside of the car look more balanced. They look great but I am fond of the look that this car has now. It appears that most of the weight of the car is under the front. It looks front heavy. I like it. My other jet cars all have most if the weight at the rear. Rear turbine extended. I have some of the engine covers painted body color. The engine bay will be dirty and I plan to add more hoses and wires of course. I love the visor that came with the kit. If I paint the roof cream, I'll integrate cream color into the visor. I'm excited to start weathering the internal parts. I think the slats with the bolt heads will look a lot different when I'm finished. I have a vision of what they'll look like, I just hope I can replicate it. I want them to look like oily weathered bare steel. Tom, I tried chipping when I painted it red. I need definitely need some practice. I ended up using acrylics and sandpaper. My favorite to work with as well. That's probably my favorite part of these builds. Going thru my huge scrap bin and trying to find anything that looks like it belongs. Bend some styrene rod and you have cool looking pipes to connect everything together. Thanks for looking!!!! I appreciate all of the feedback and comments!

-
I dig the wooden sub. Outstanding!
-
Very nice builds! Good work.
-
I am the absolute worst when it comes to picking a final color for my cars. I started over, I'm going with red now. I removed the old 50's Aqua color with Easy Off. I went to spray my primer coat of grey with my airbrush and found that it was broken. I ordered a new airbrush from Amazon. It's supposed to be here tomorrow. In the meantime, I've been adding bits and pieces to the undercarriage. Lots of styrene rod melted into various shapes and Gundam parts.
-
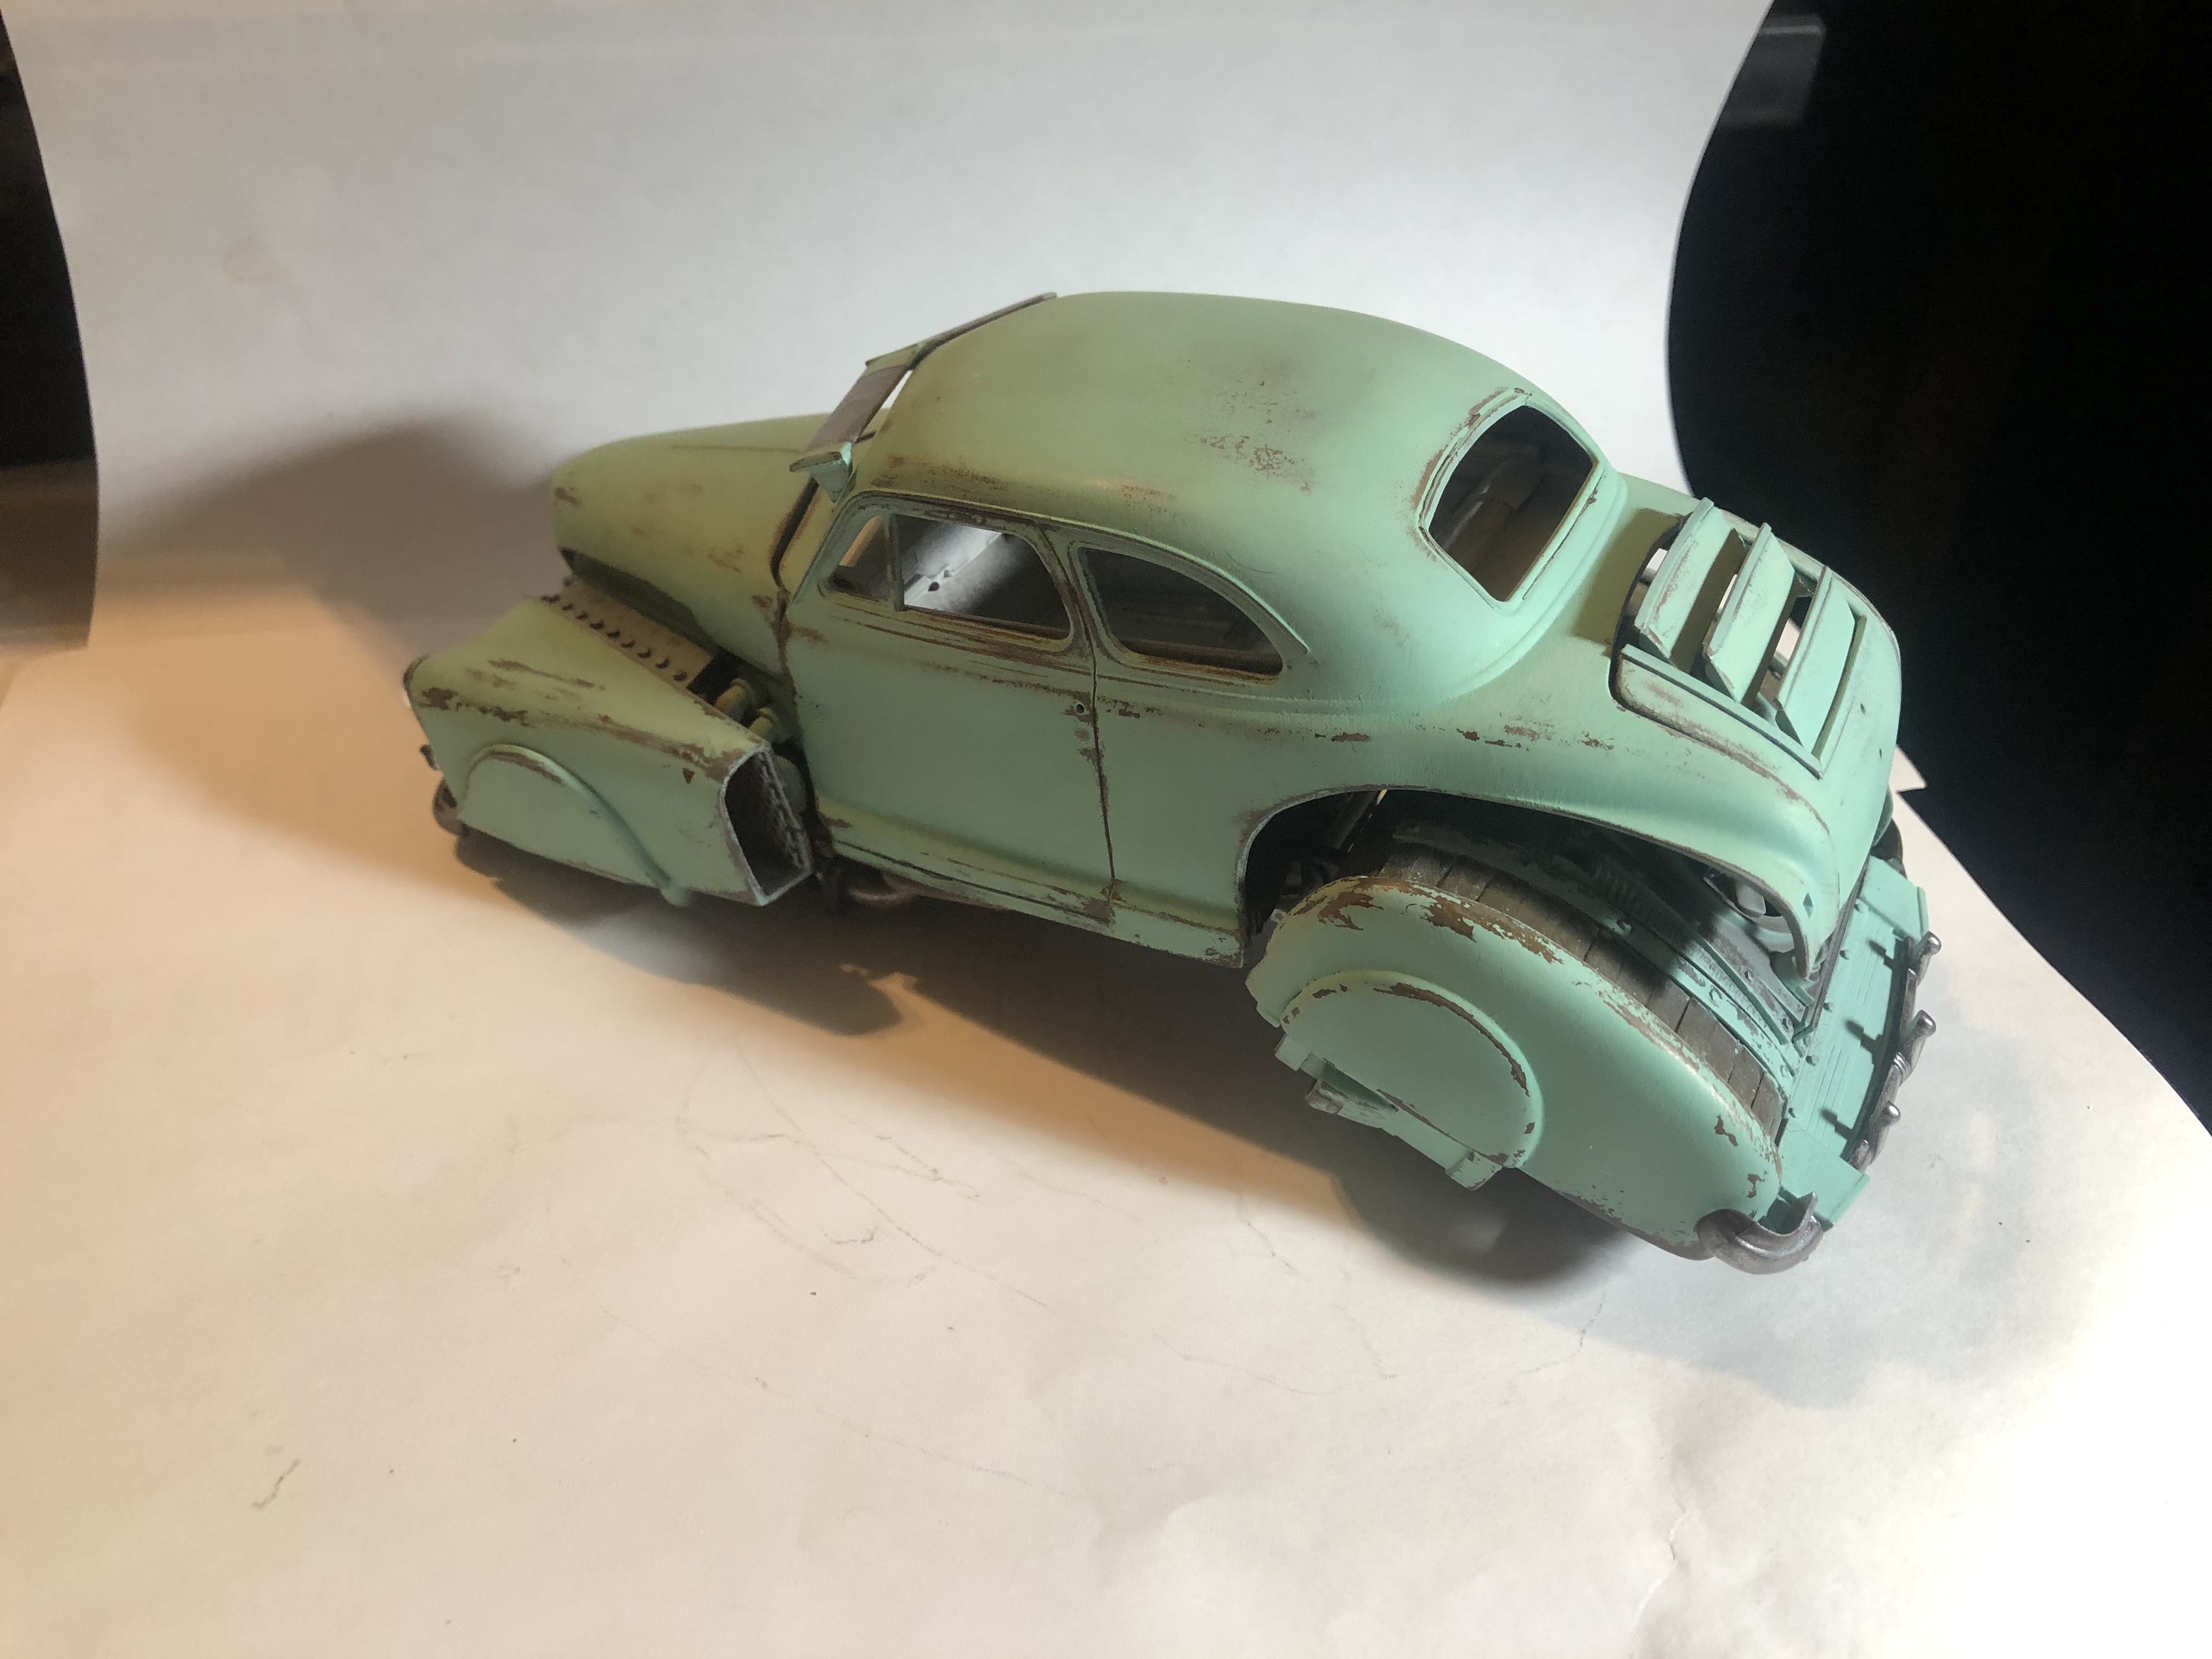
Thanks for the comments! It's going to be weathered. It's something I really enjoy doing. Plus I think it tells a story as well as gives it a little character. Thank you! Another kit that I've been eyeballing at the model shop is a 53 Hudson Hornet. It has nice lines for a hover car. I'm thinking about getting it next time I go. I'm in the process of stripping the paint and starting over. I had way too many flaws in the paint and that was really just a test to see what it was going to look like. It'll be the same blue on the body with a light cream color on the interior and the roof. I may do some other highlights with the cream color. The rust color inner workings will probably be a little lighter in color than the last photos. I hope to tie the whole car together with the weathering. I'm going to try to use the chipping technique for weathering on this one. I've tried it before without much luck. I just watched another video yesterday and I'm hopeful to try it again.
-
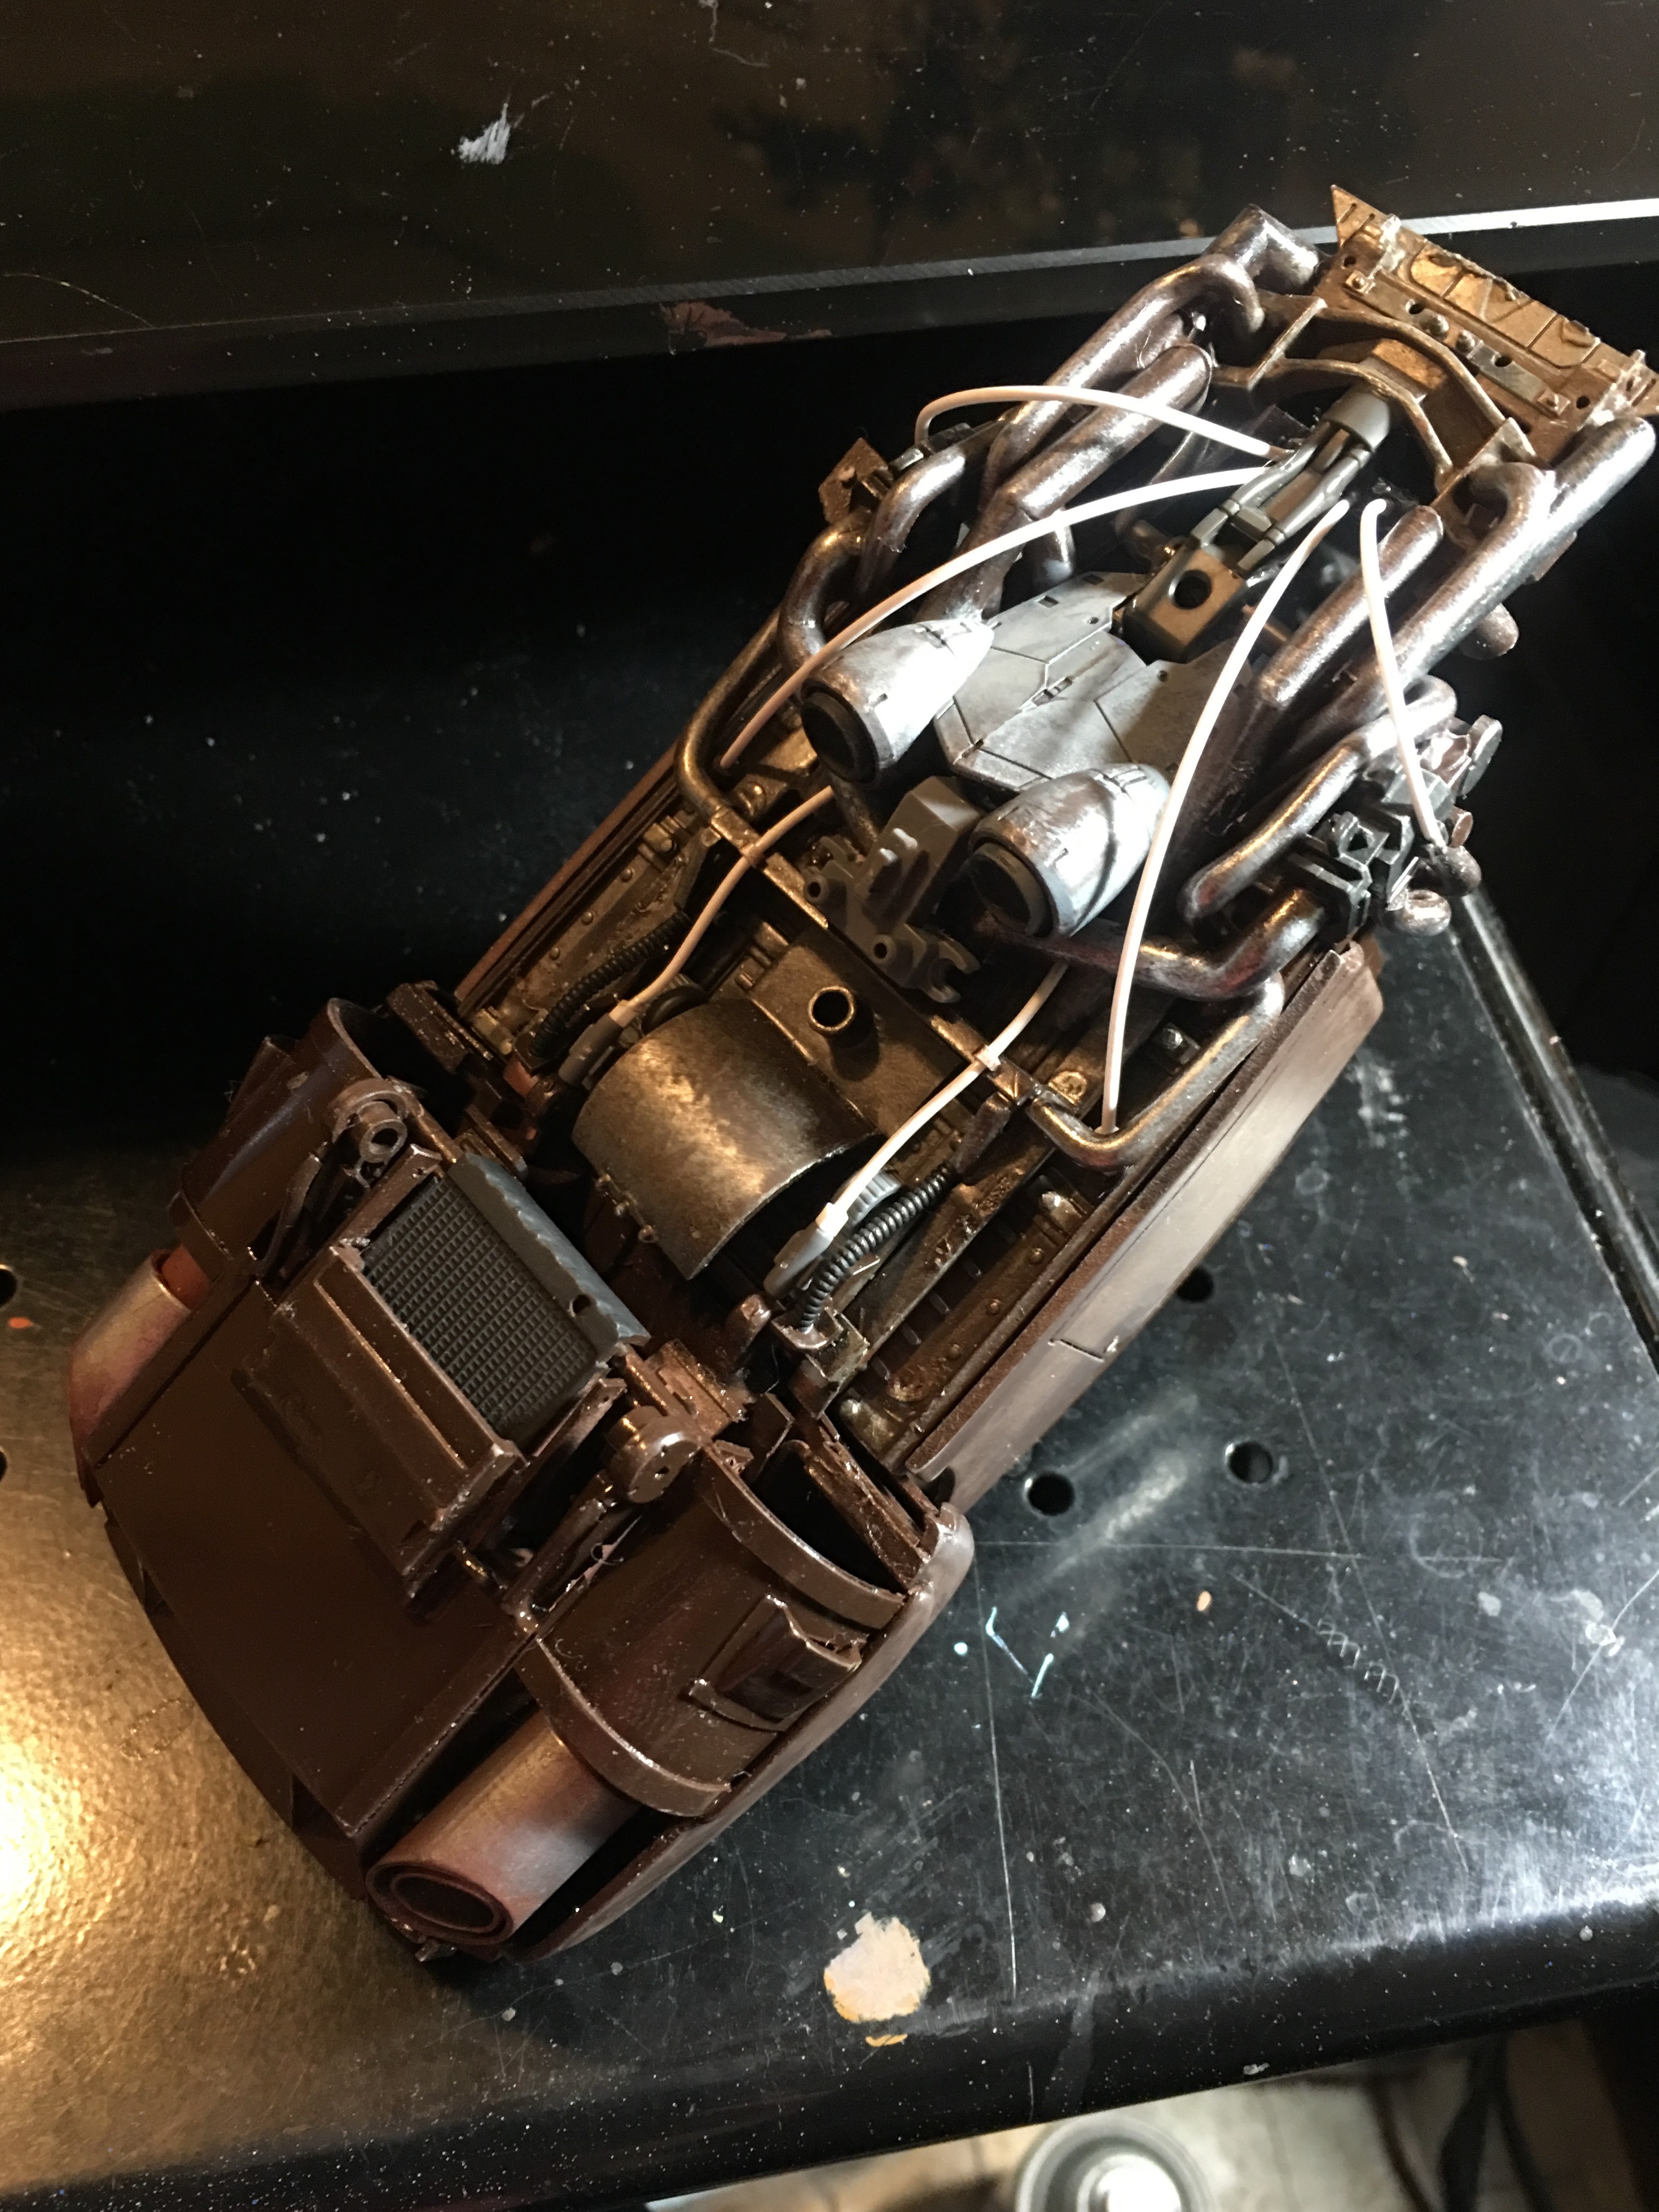
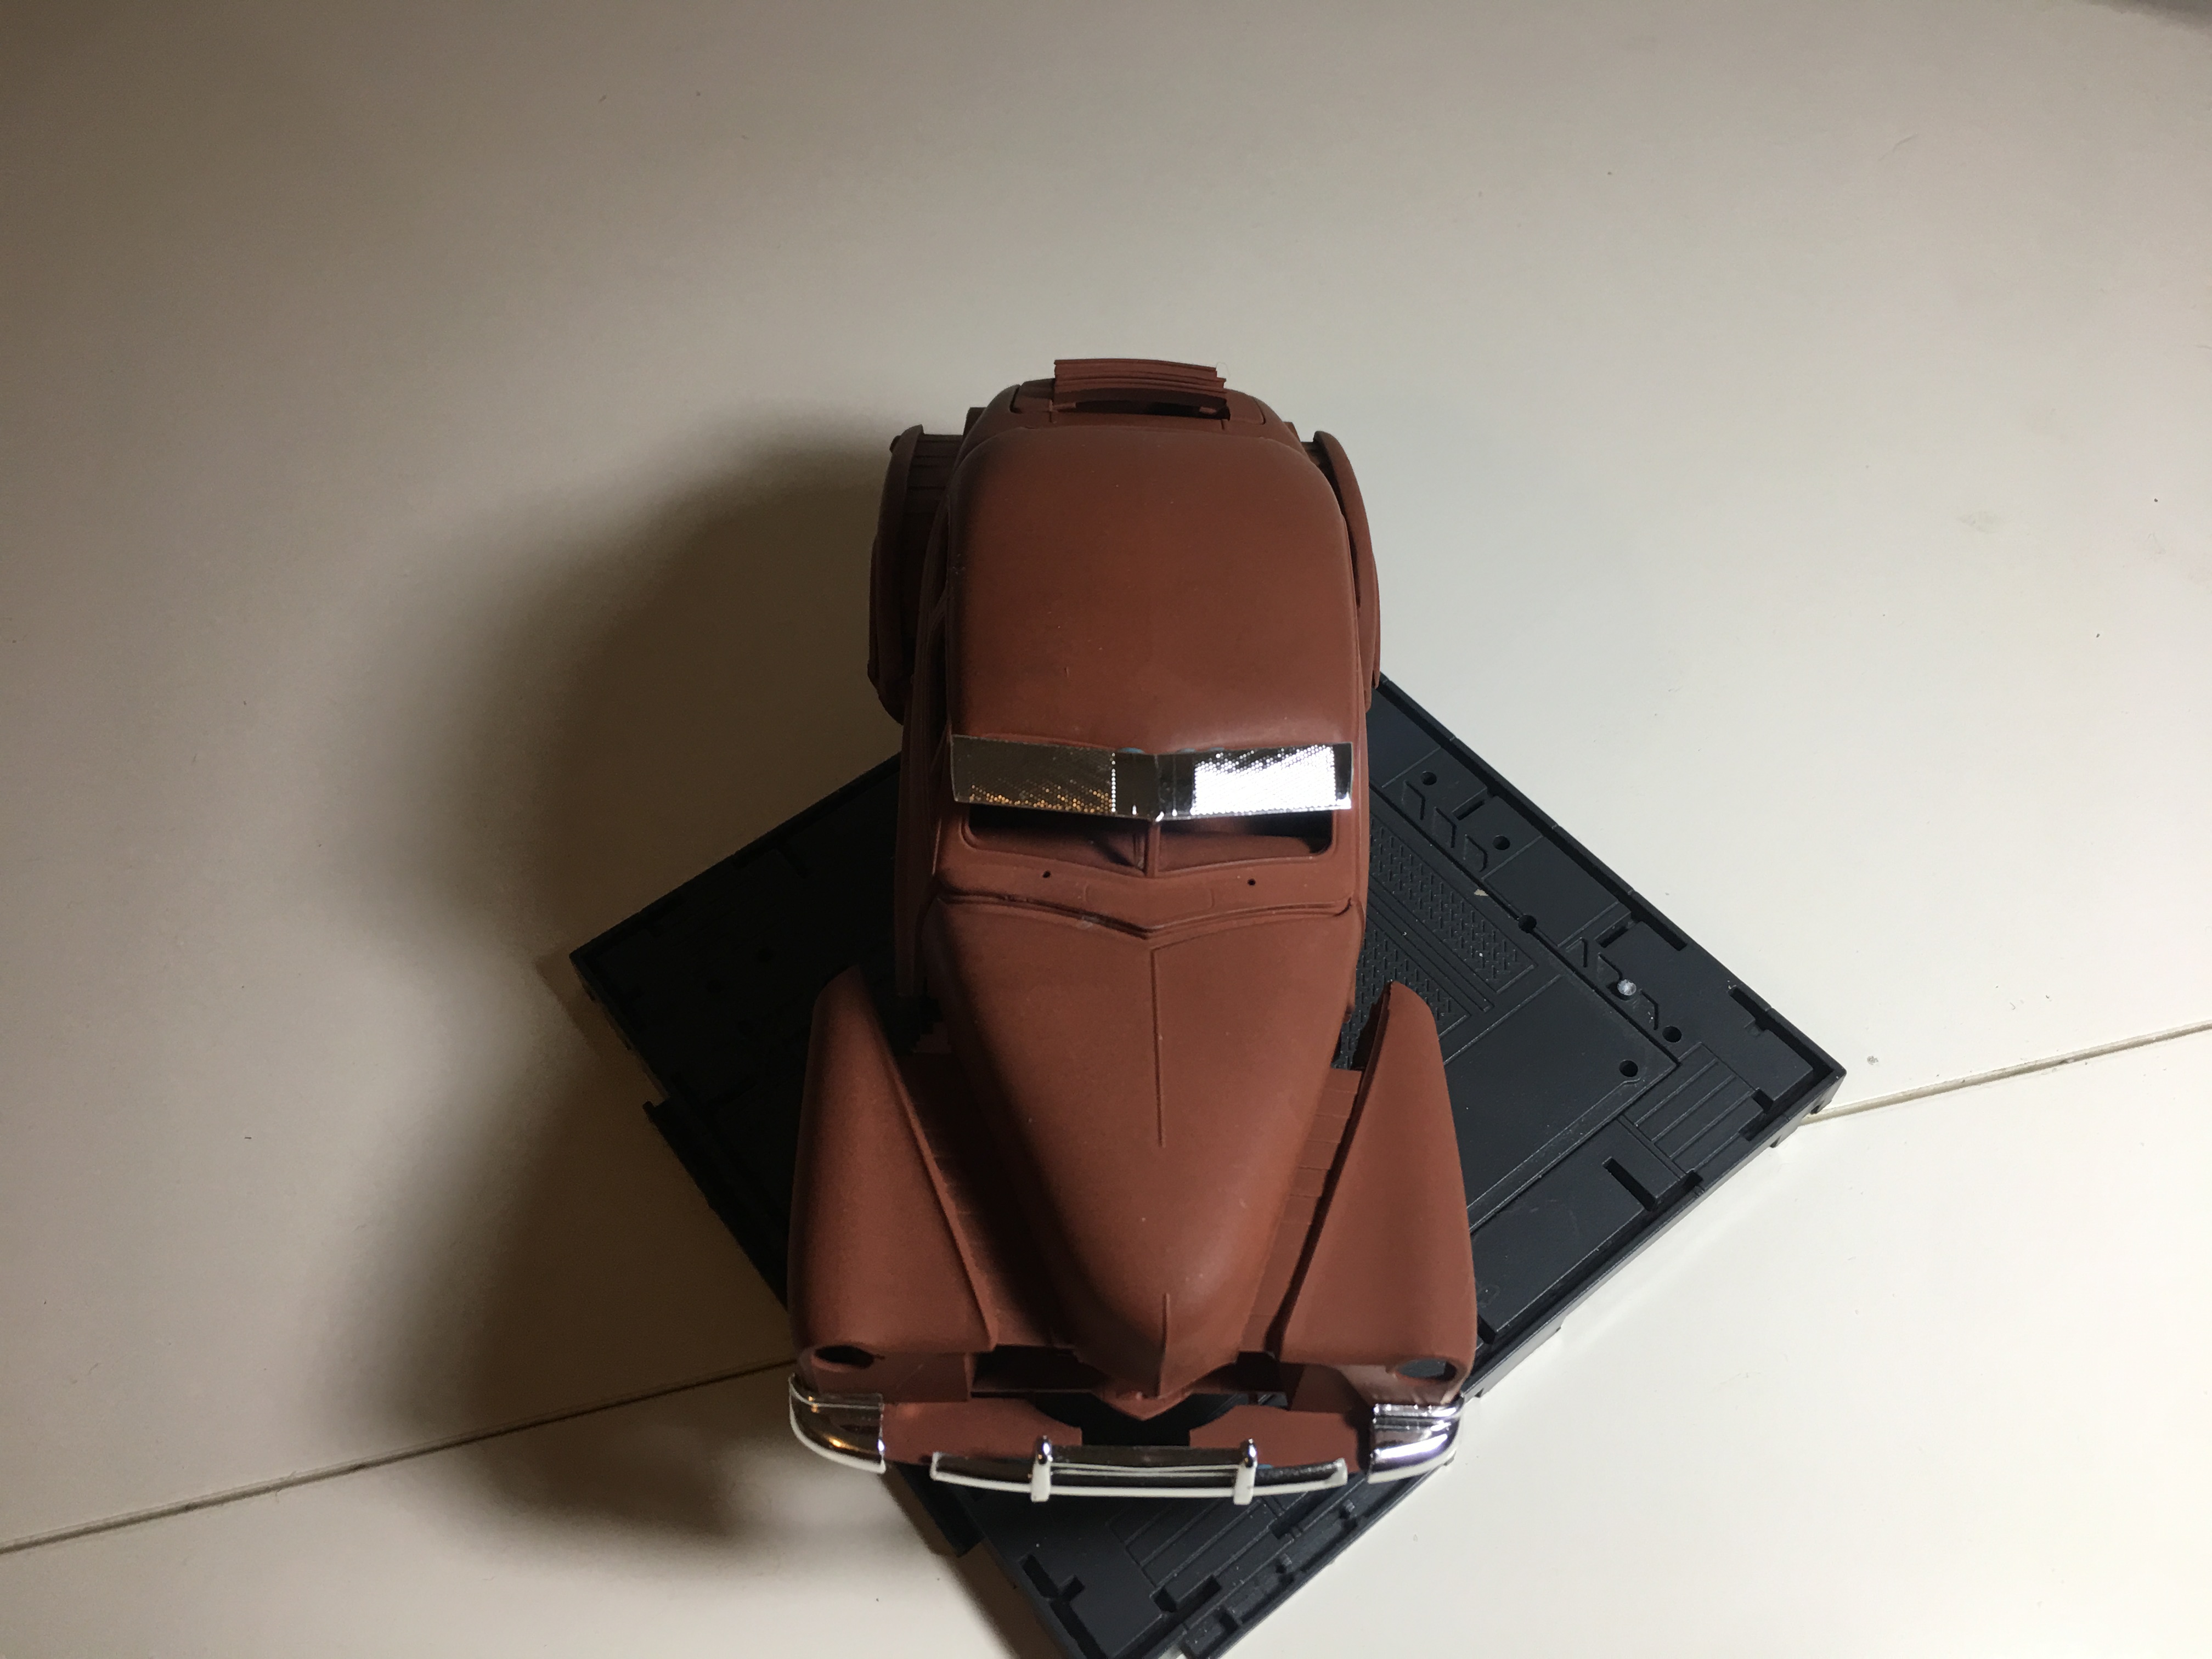
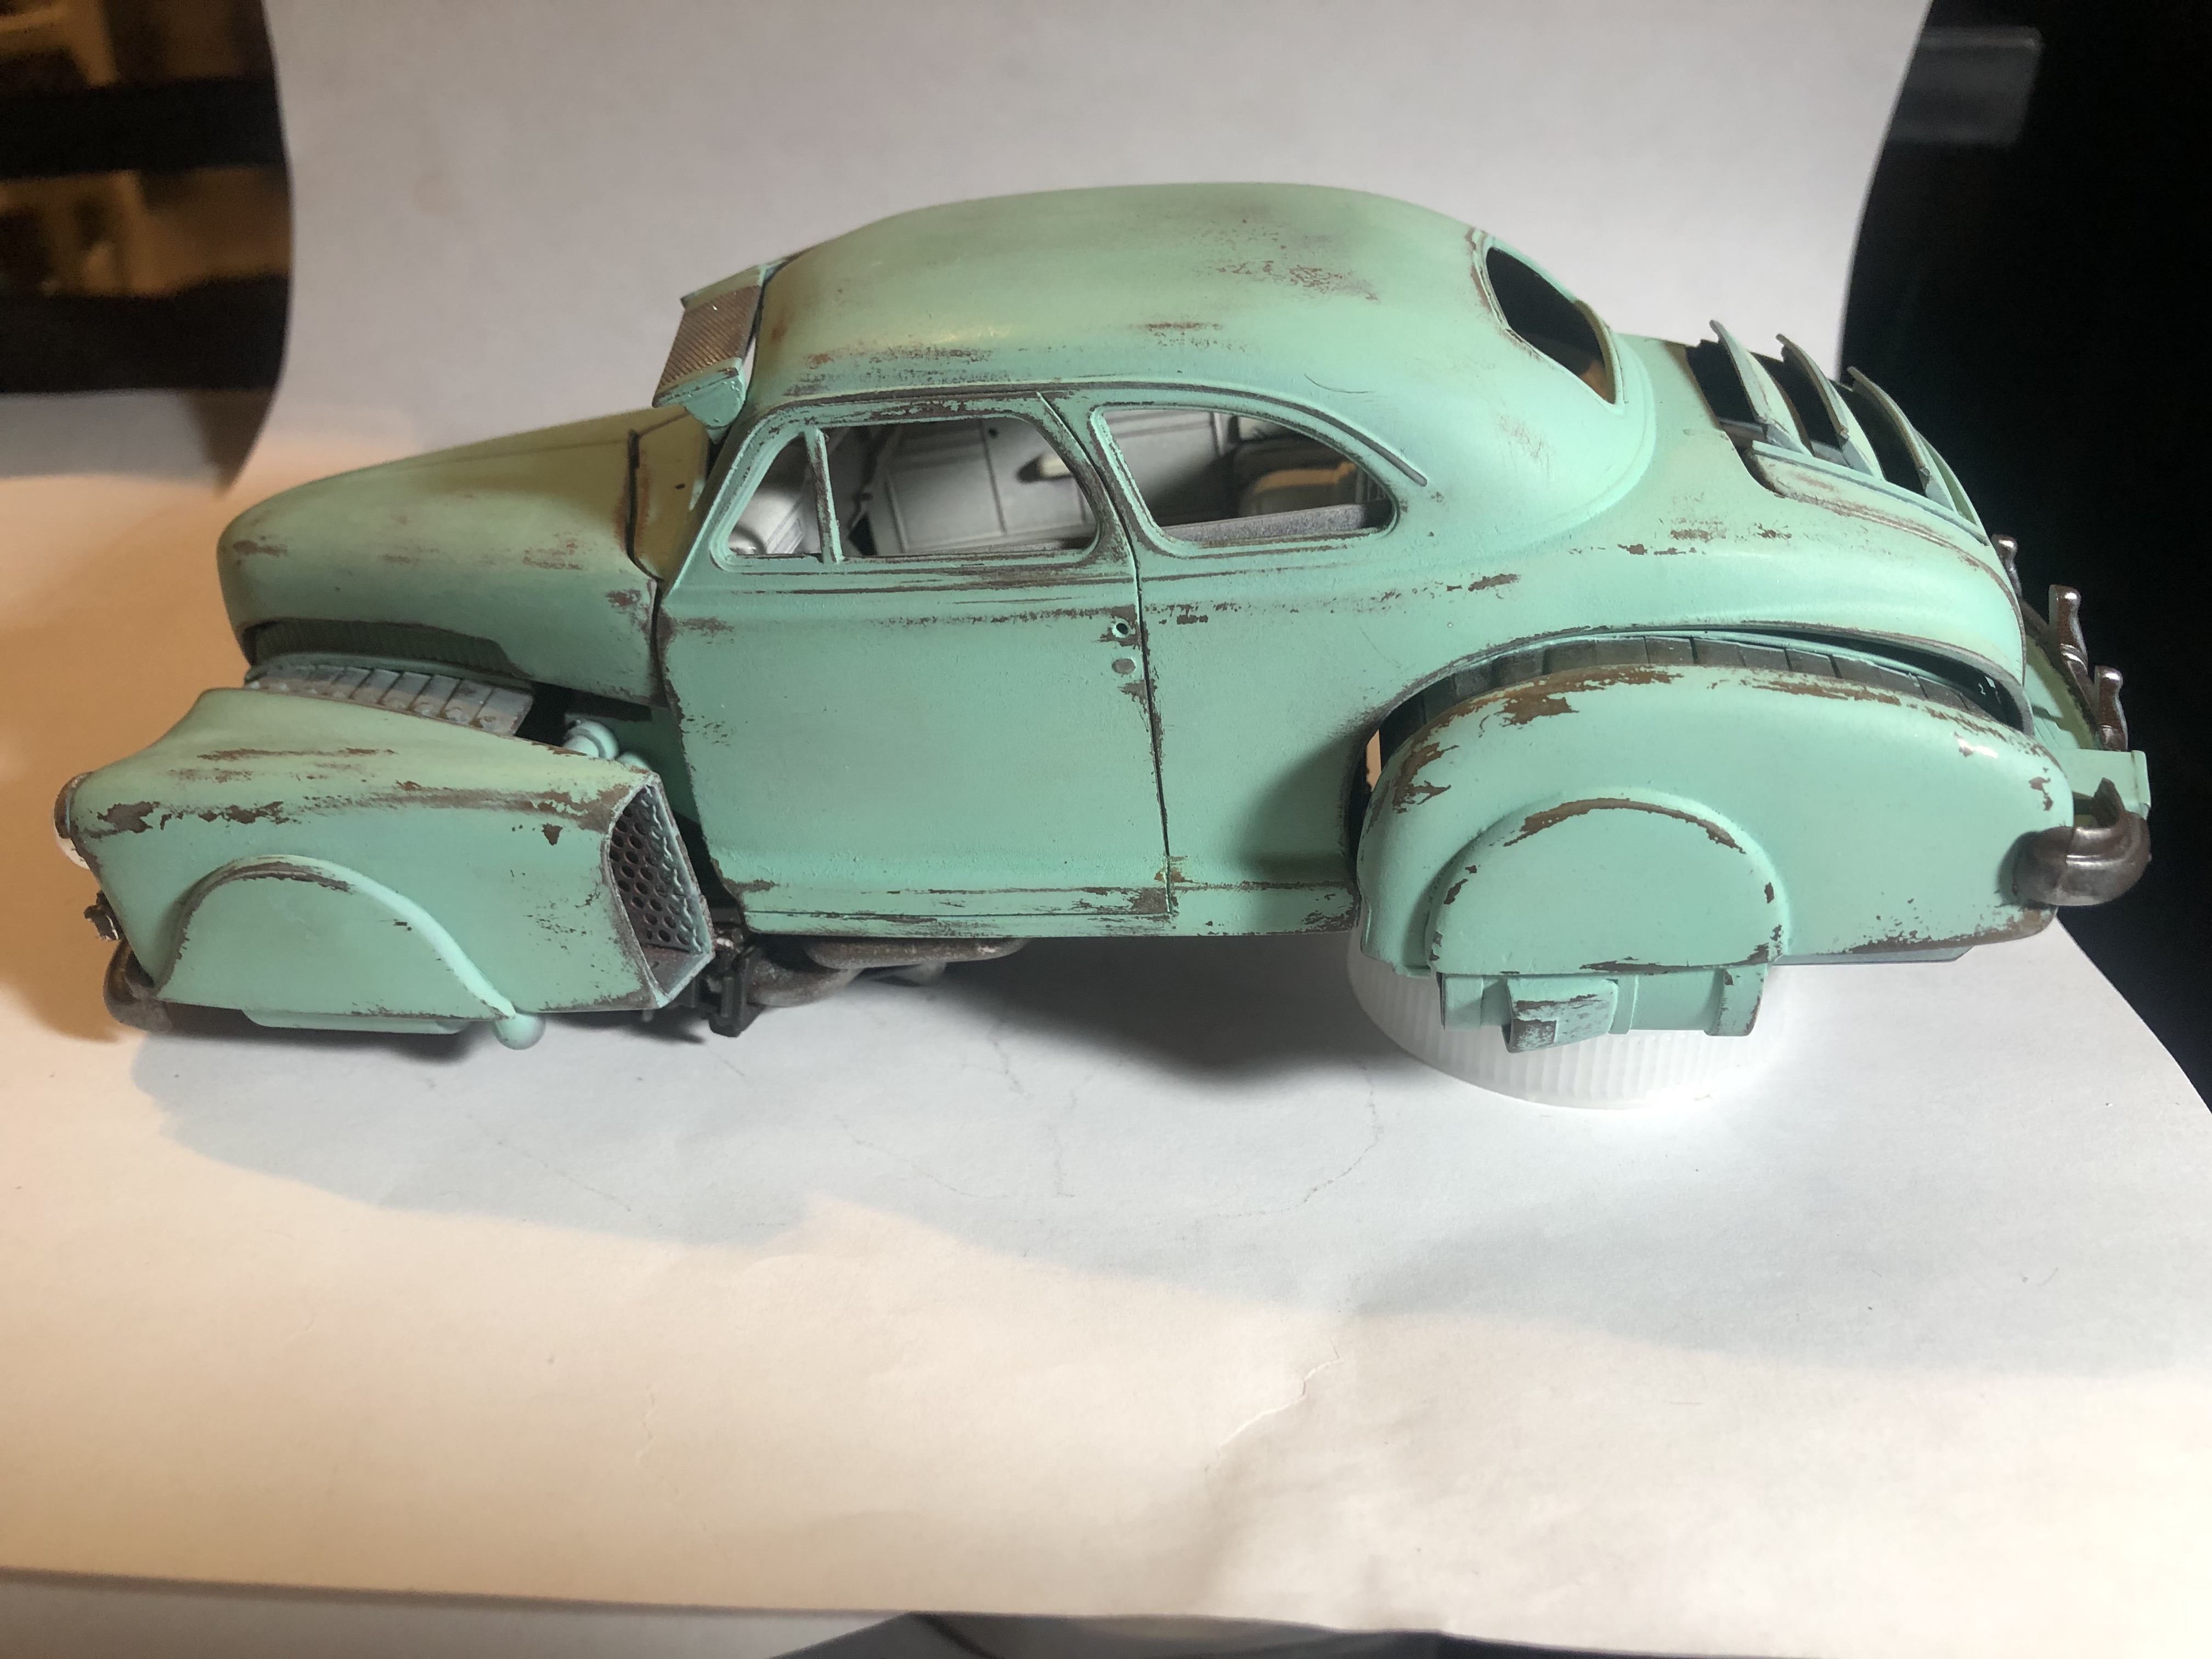
I painted the body with Fifties Aqua. I plan to paint the white on the roof over with a light cream color. I'll make the interior light cream as well. I love the aqua color. Unfortunately I'm not a professional with shiny paint jobs. There's a few flaws including a fingerprint. I can cover the flaws with some light sanding and weathering. I lowered the rear louvers slightly.
-
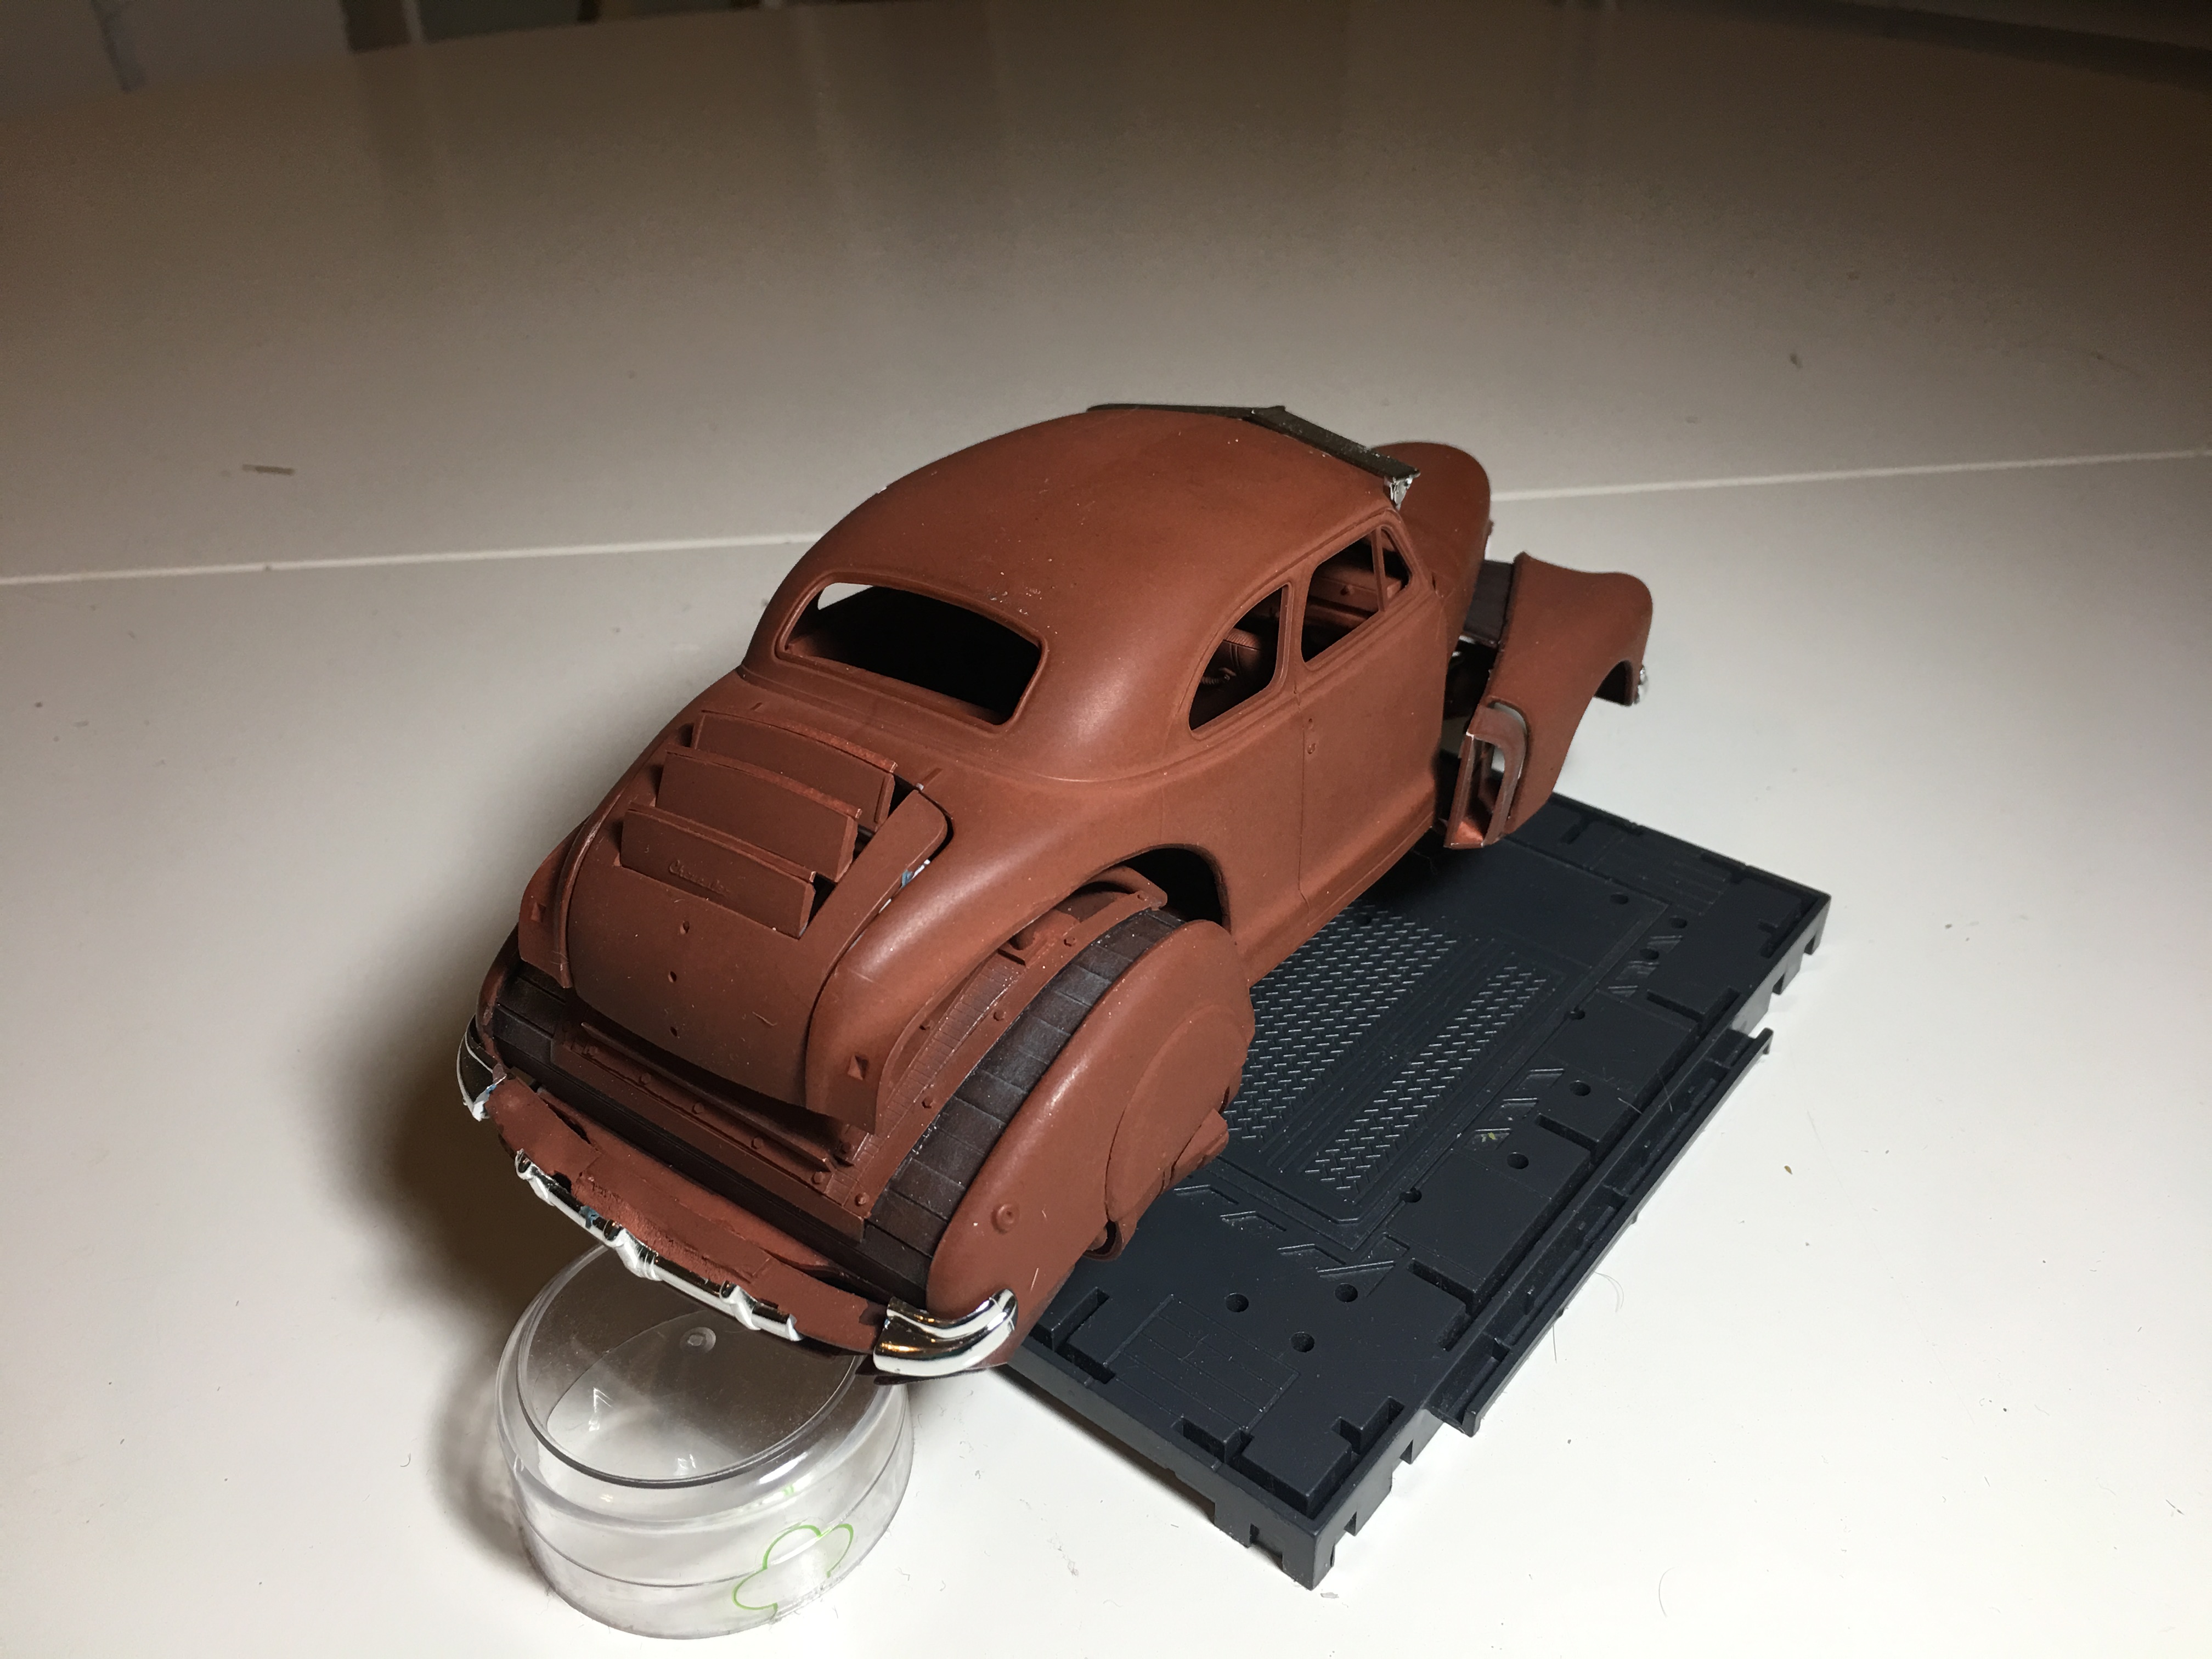
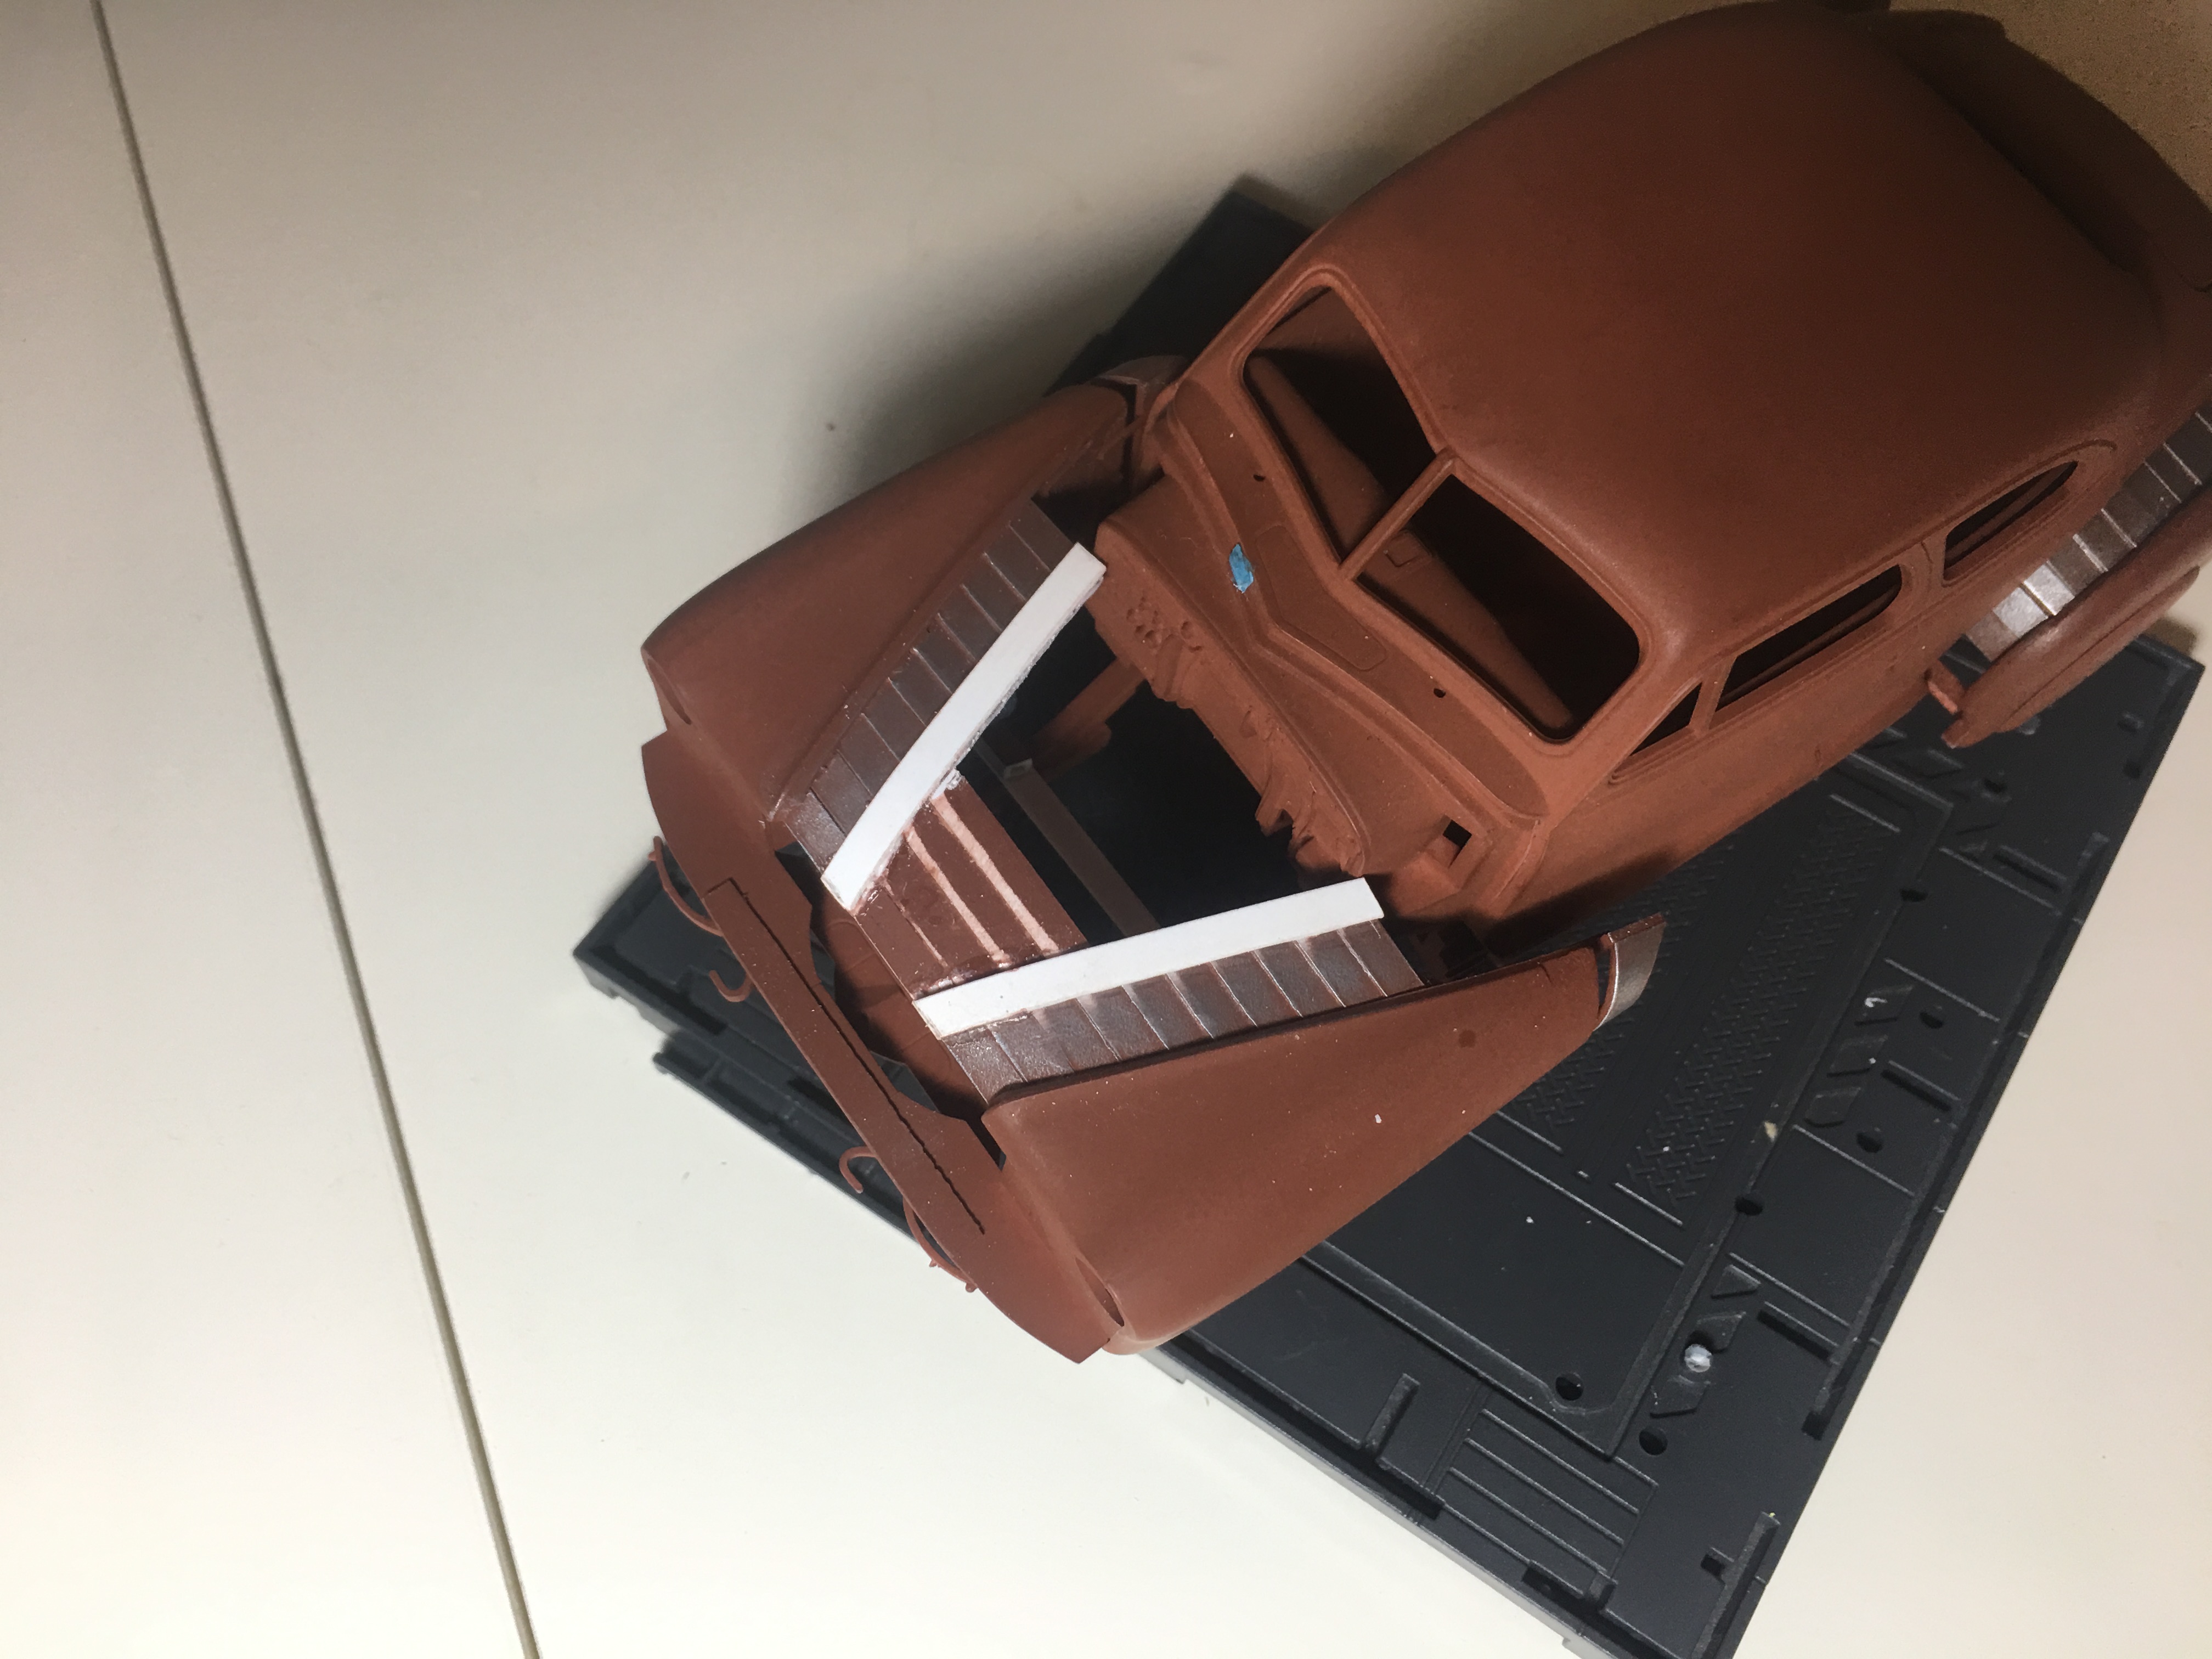
David, That 32 Ford coupe that I made last year really surprised me. I had a vision of what it would look like from the start, but I kept changing the model as I went. It turned out much better than I could have imagined. Definitely my favorite model I've ever built. It got me a first place trophy in the miscellaneous class at the Kansas City model show this year. Thank you for the kind words!!! I carved out the opening for a new grill. In the photos below, I added an experimental grill. I like the look. I'll need to clean it up and figure out how the headlights and turn signals will mount. I also made some front wheel well covers. There's a gap between the front fenders and the body where the metal slats end. I would like to put some hydraulics and plumbing lines in that space. There will also be mechanical parts hanging low from under the front fenders. I'm still not sure where I'm going with this car as far as color and weathering. I keep imagining the body as black with dark metallic bits and pieces. I added bolt heads to the metal slats. I think this area will be a good spot for weathering. Since I had to widen the body, I had to widen the bumpers front and rear. Working on the rear bumper tonight. Not a very good photo. It looks better directly from the rear. I think it'll look good after I clean it up. I need to remove some of the point at the very end of the hood. Then I'll continue the hood down to the bumper, splitting the grill.
-
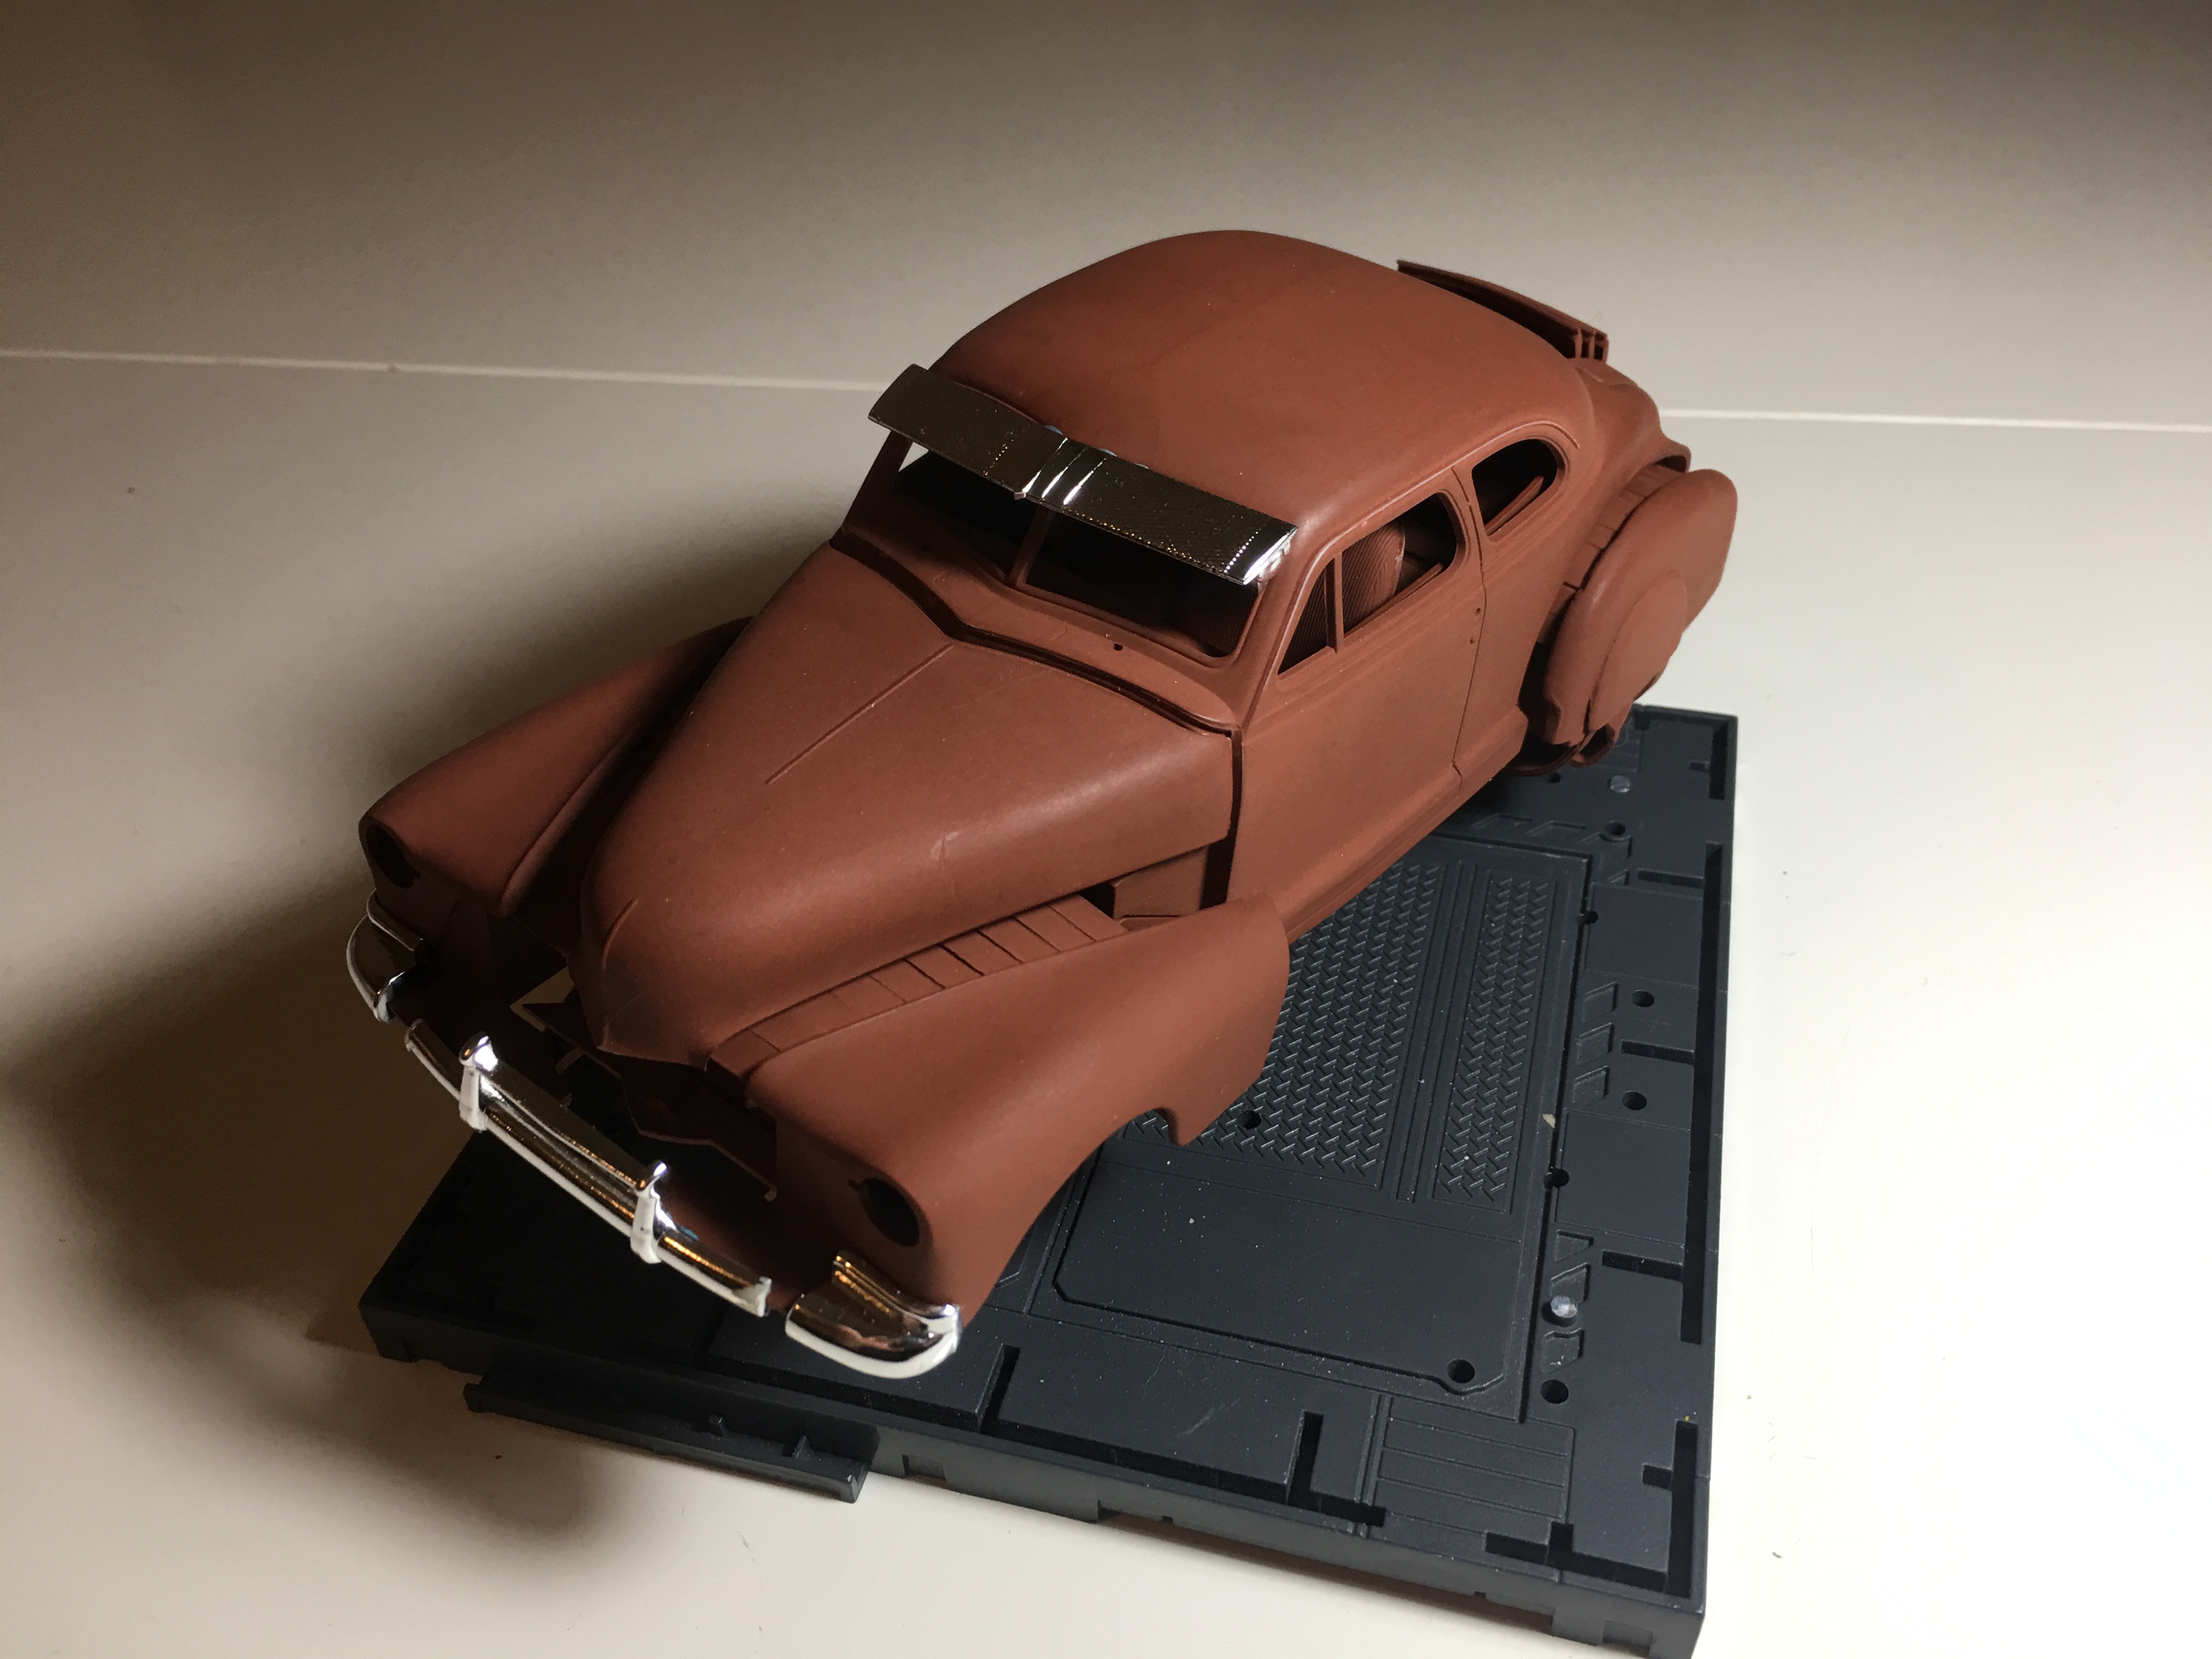
Thank you Mike, I appreciate it! One of the ideas that I try to stick to when I build one of these, is making them somewhat "realistic".....Using that term very, lightly here! Of course we will never have vintage flying cars with huge turbines spewing flames feet away from the pilot. It's absurd and highly impractical, but they sure look cool! There are little details that I try to put in, to make them appear as if they actually could fly. With 3+ turbines per vehicle, you need a ton of fuel for even a short flight. All of my jet cars have huge fuel tanks mounted under the hood. And to add to the Deiselpunk look, I usually make the fuel filler cap stick up thru the hood. They also have blast plates behind the front turbines. I figured that so much heat would melt the car body. They have heat deflectors or thick plates to help dissipate the heat. For the dieselpunk look, I try to add lots of thick and unnecessary steel pieces. I add visible hoses and plumbing under the car. I cut hexagonal styrene rod to make visible bolt heads. I like the bolt heads to show, so I use them generously. I will usually try to over-exaggerate the intake vents. Each of the jet cars have a unique intake for the rear turbine. I also try to keep the body lines and shapes to the original car.
-
I think this model will be a little cleaner than my previous jet cars. Not showroom clean by any means, but used with some soot and grease. I think I'll go light on the rust. I haven't decided on a color yet. I added a little detail under the hood. I needed something to fill the gap. I hope to add a linkage to the exhaust at the front fenders.
-
Barris '70 Impala (finished interior 16th December)
Daxman replied to geetee66's topic in WIP: Model Cars
Very nice! Such accuracy on those tiny lines. Impressive. -
Tamiya 1/24 Mazda Savanna RX-7 - 1st Generation Rotary Rocket
Daxman replied to Italianhorses's topic in WIP: Model Cars
I love the color! I've always wanted to wire up LED lights. I need to look into it. That looks amazing. -
Thanks David. I started making hover cars about three years ago. They're great fun to build. I suggest more people try it. I started a community build on these forums a while back. It would be great to see a few more people trying these out. Its a good way to clear out the bin of extra parts. http://www.modelcarsmag.com/forums/topic/129359-jet-rod-community-build/ This model kit is fantastic. As I said earlier, it was a bit expensive. I paid $48 at a local hobby shop. I usually pay around $25 max. It was worth it.
-
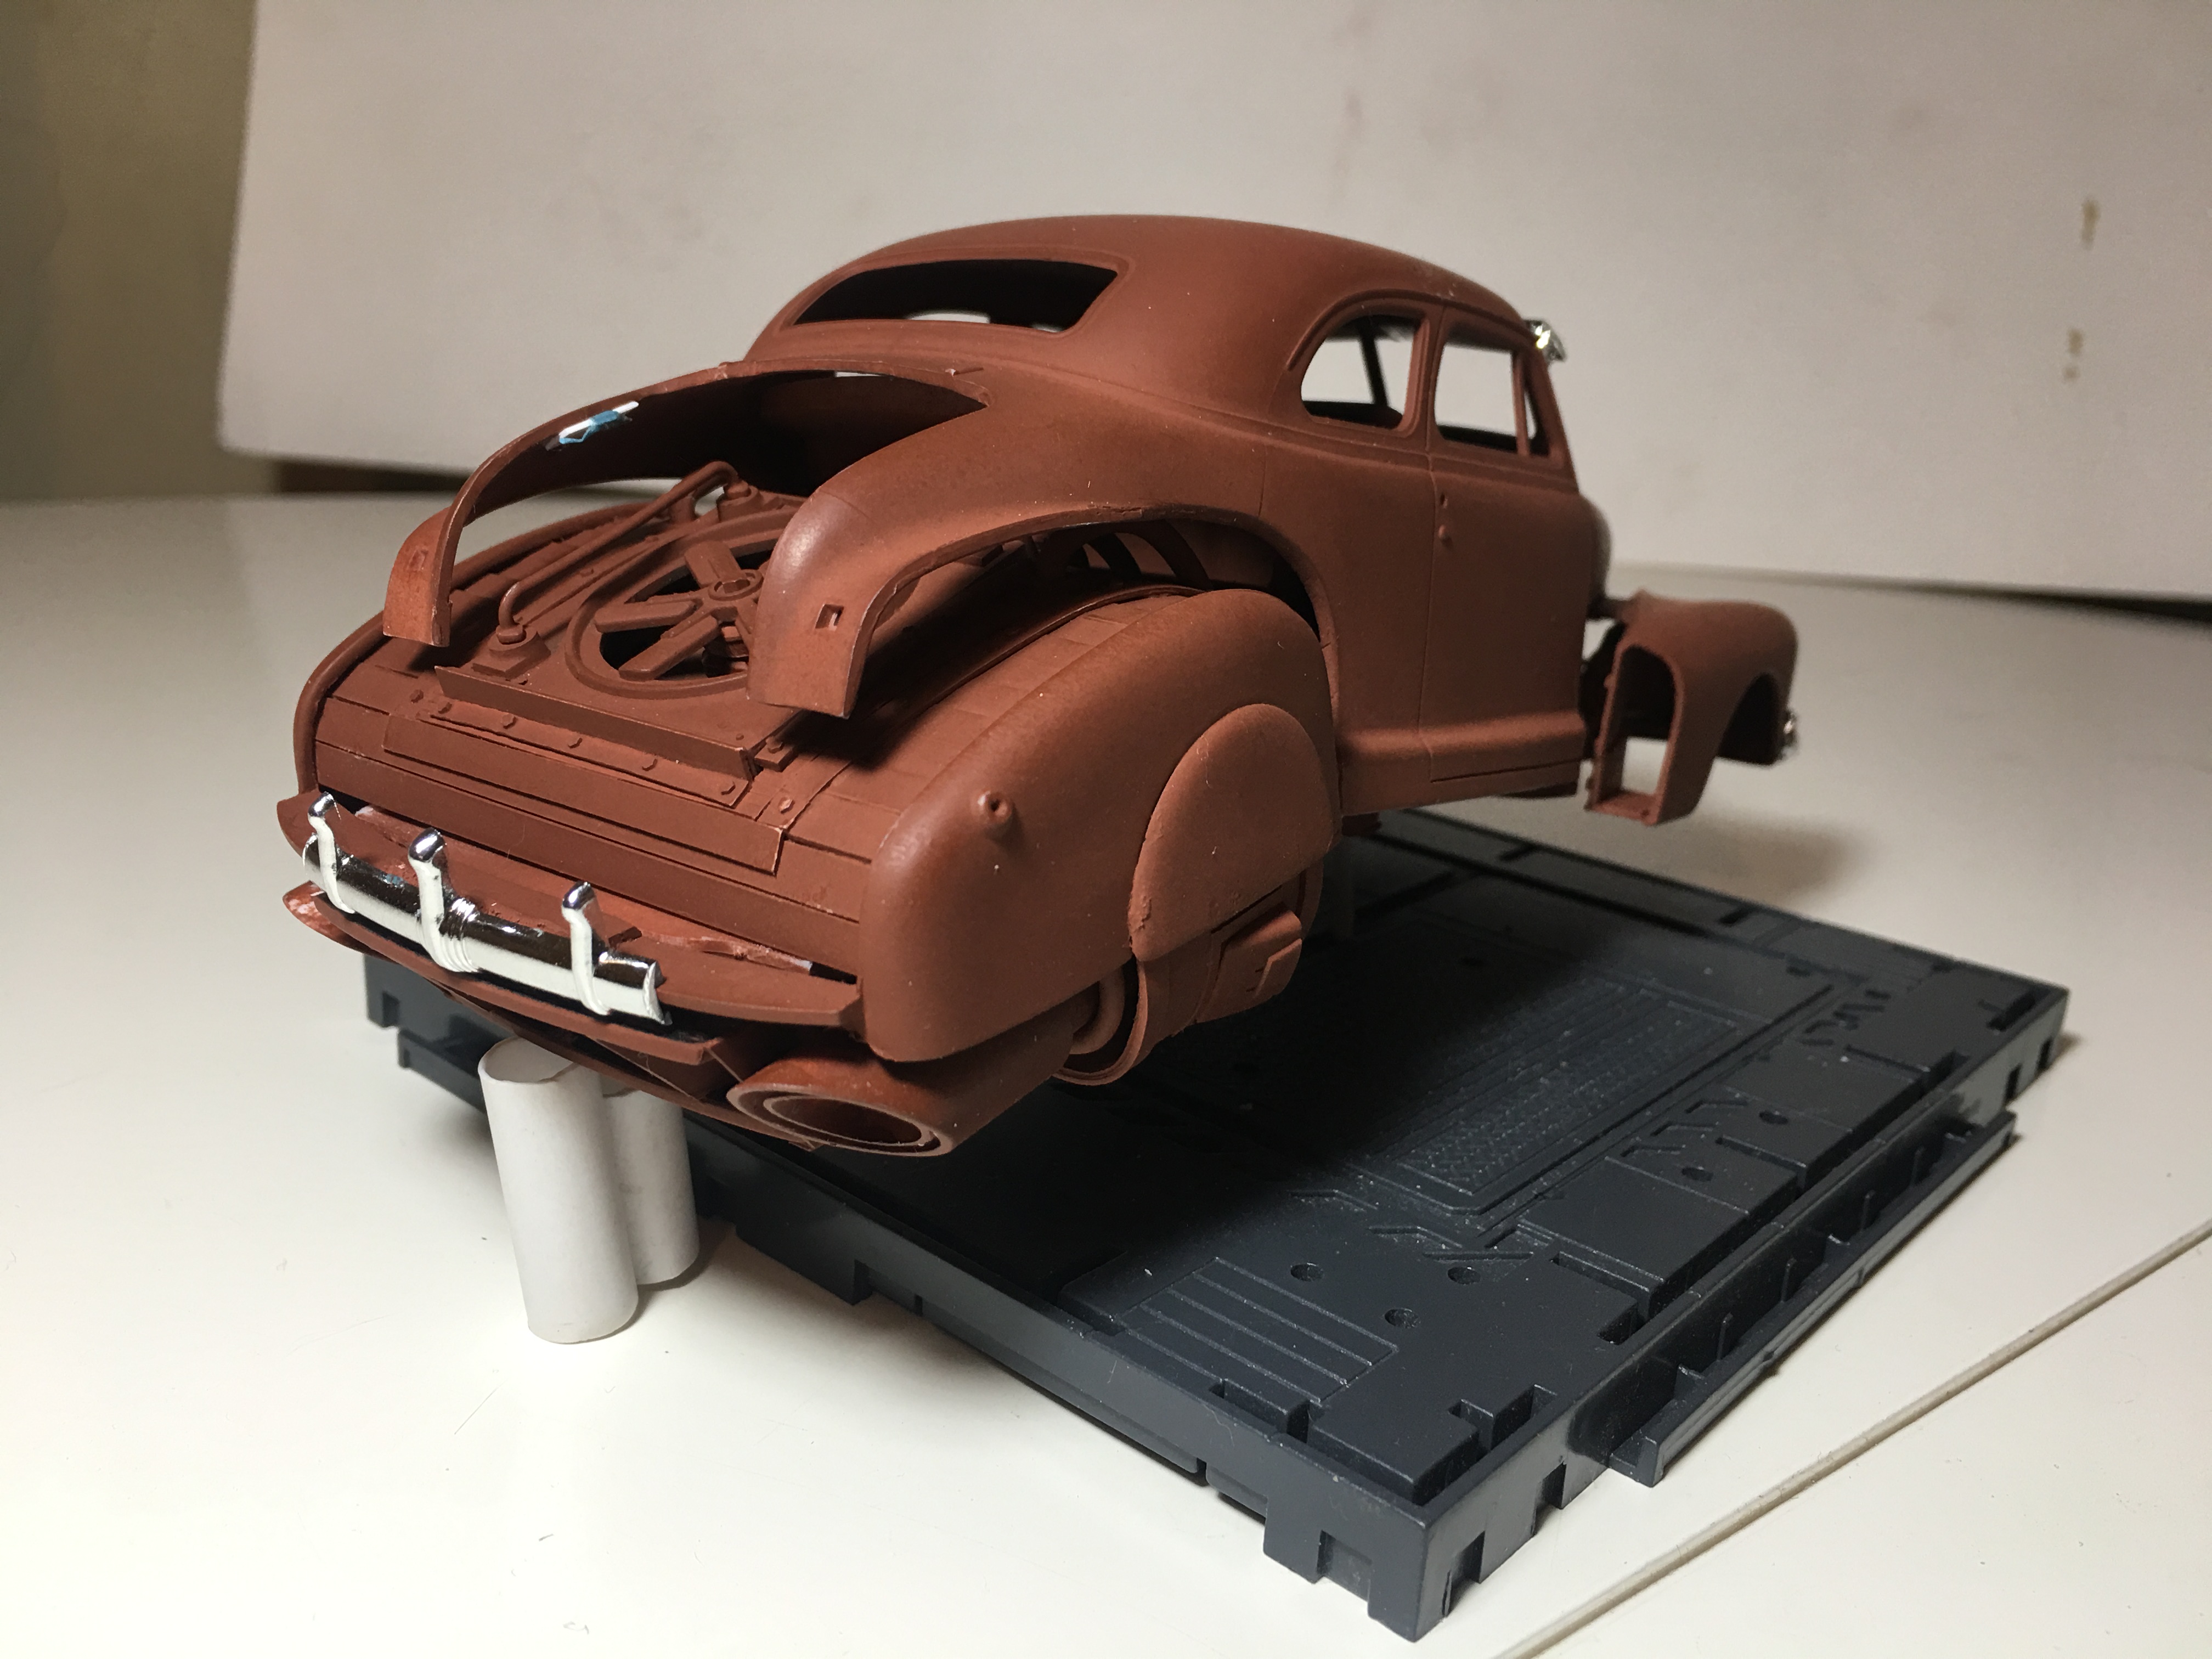
I made some progress over the Thanksgiving Holiday. I mostly worked on the rear thruster/turbine (I never know what to call it). I need to make front wheel well covers similar to the rear. The intake grill at the trunk...I may lower the louvers slightly. The angle seems too steep. I'd love to make these move, but that's too complicated for me right now. When I widened the front and rear, I had to cut the bumpers to take into account the extra width. I'll need to find a way to hide the gaps or make new bumpers. The rear trubine is hinged under the car at the frame. It'll have 2 stances. The above stance would be cruising speed. Liftoff or acceleration stance, the rear would pivot downward slightly . Here's a better look at the rear turbine. I took the intake fan off of a Peterbilt semi radiator. It gives it a good Dieselpunk feel. I'll try to add more wires, hoses and gadgets as I go. That's the fun part for me. The little extras. There's actually a 3rd stance. The Slow and Low stance. Miscellaneous Gundam parts on the undercarriage. Thanks for looking!! Sorry for the slow updates.
-
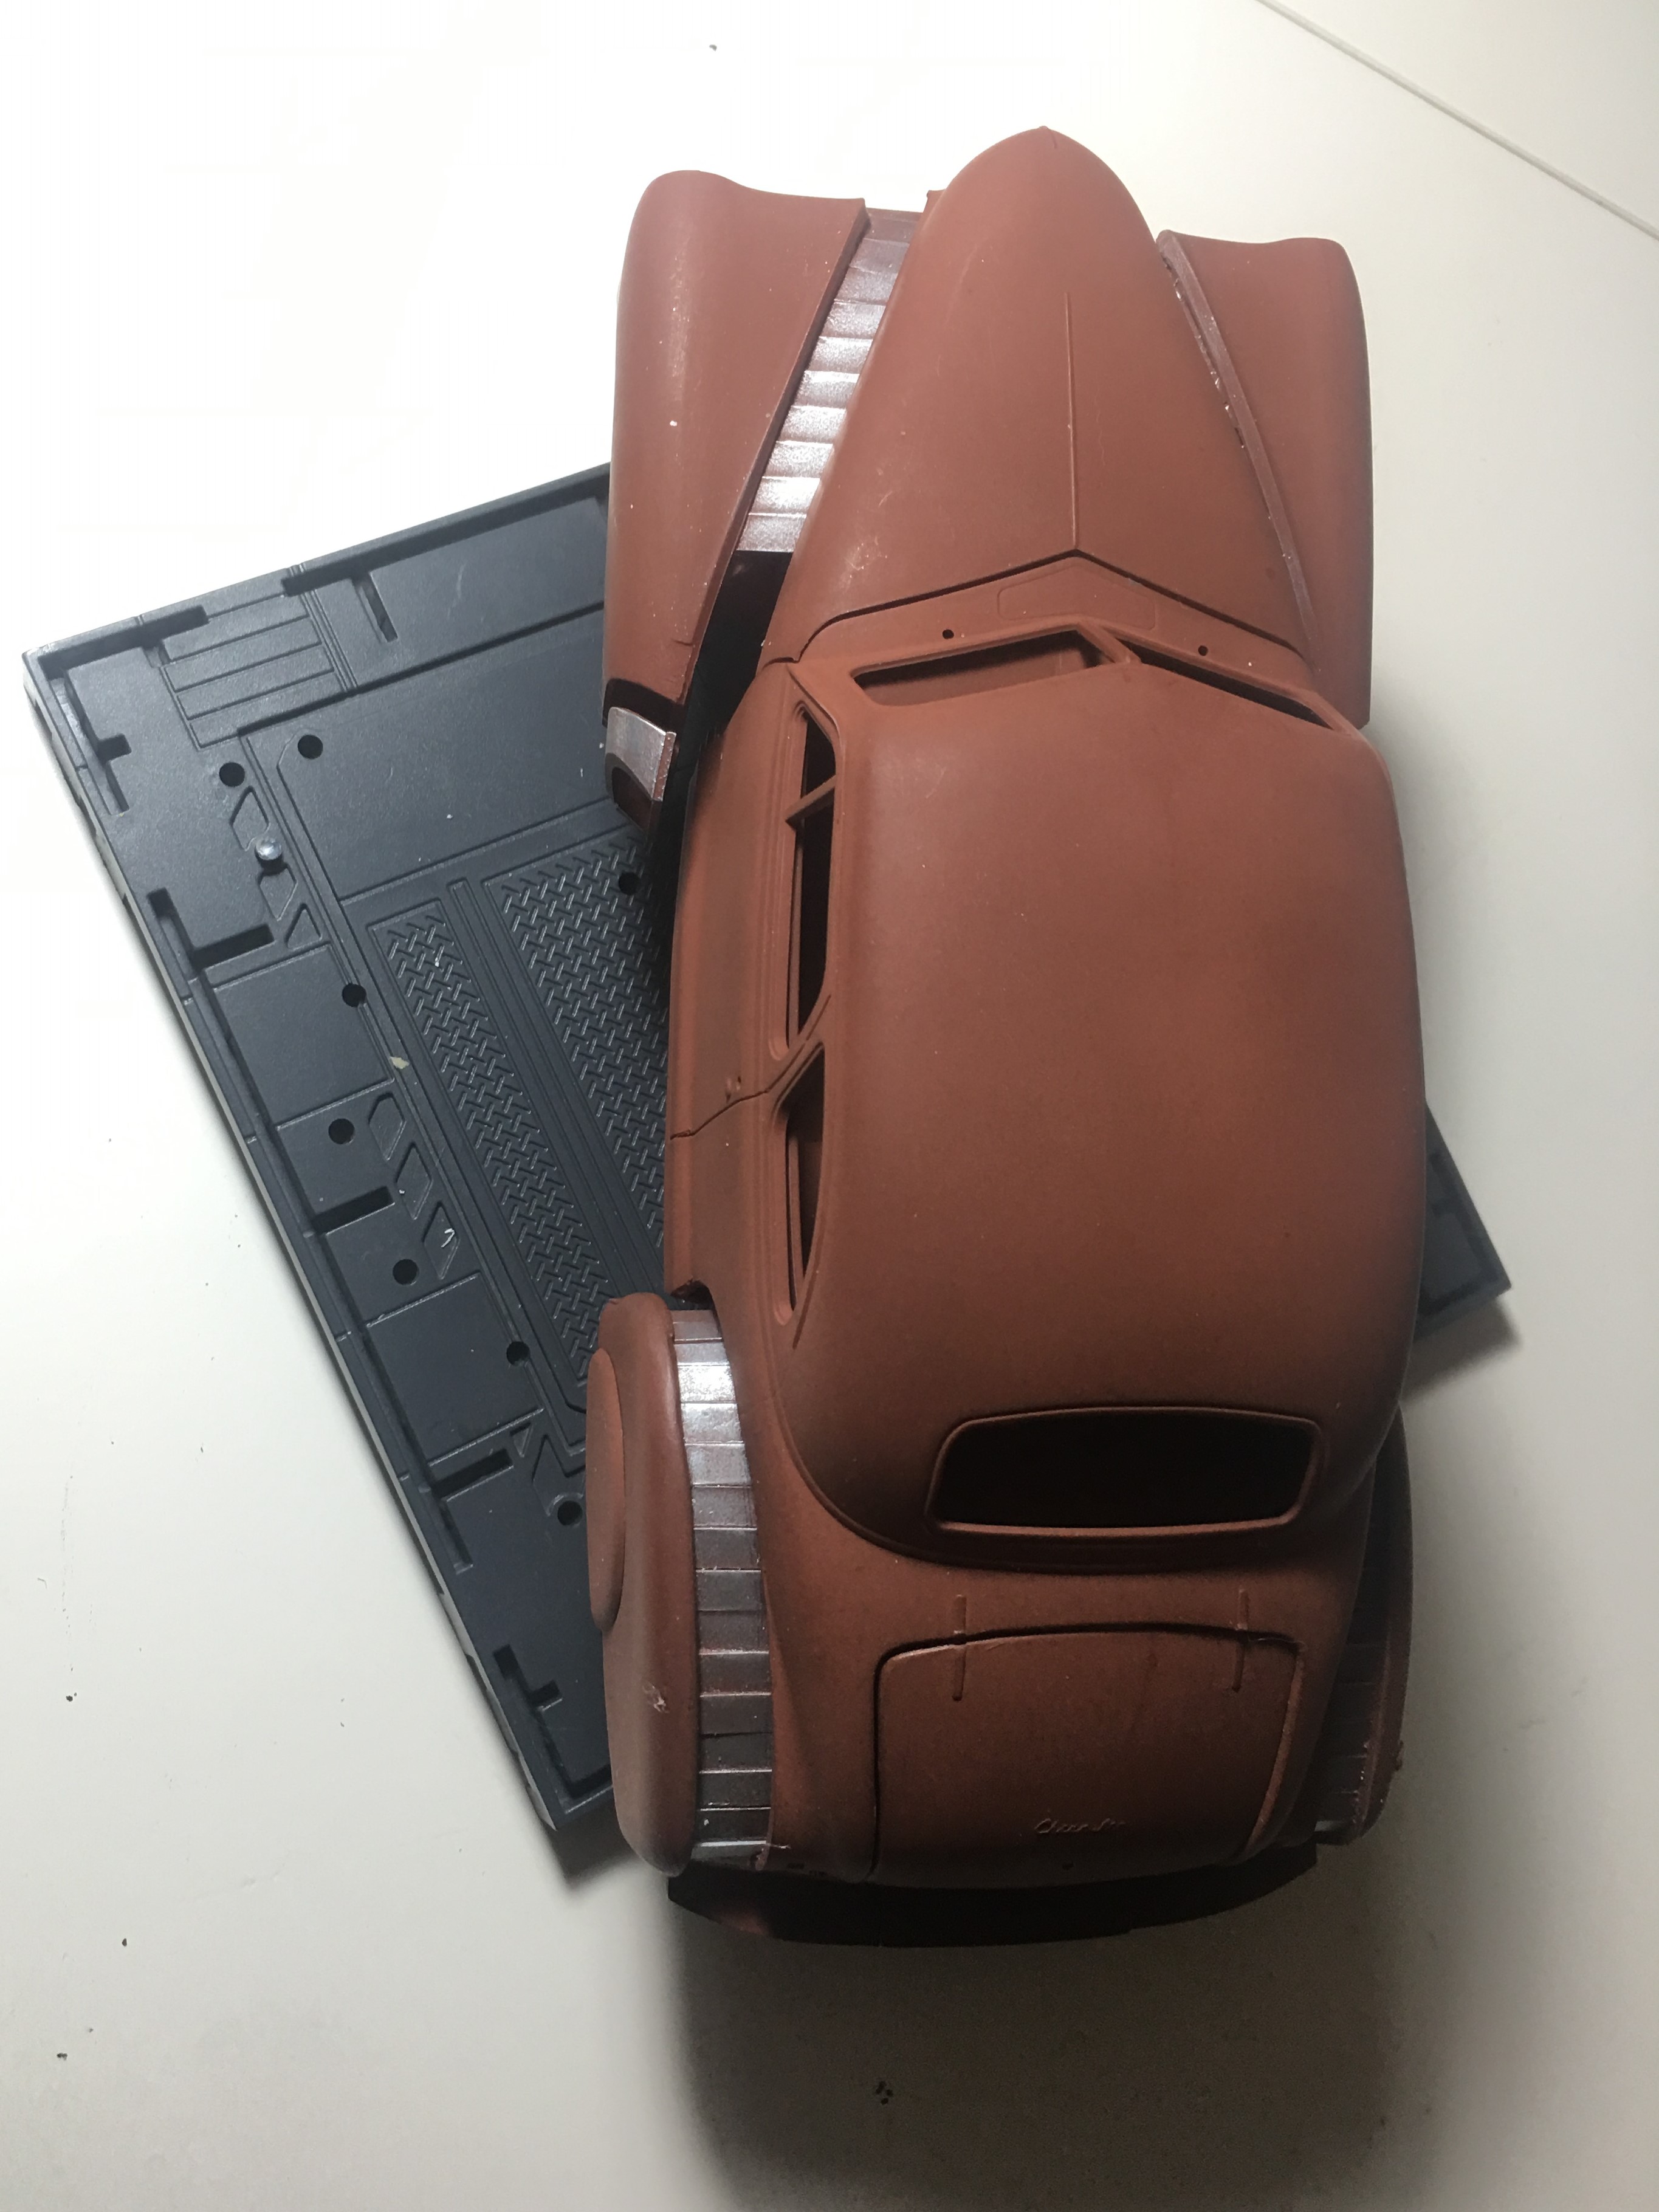
Thanks JC! I appreciate the support! This build really has me motivated. I have 2 other models at 90% complete that are now put on hold. I couldn't resist putting on some steel highlights. It now shows how far the fenders stick out from the body. I really like the look of the rear wheel well covers. Might have to make some for the front. Going to drop the fuel tank under the hood. Experimenting with the rear induction assembly. I'll have to add intake vents onto the trunk lid.
-
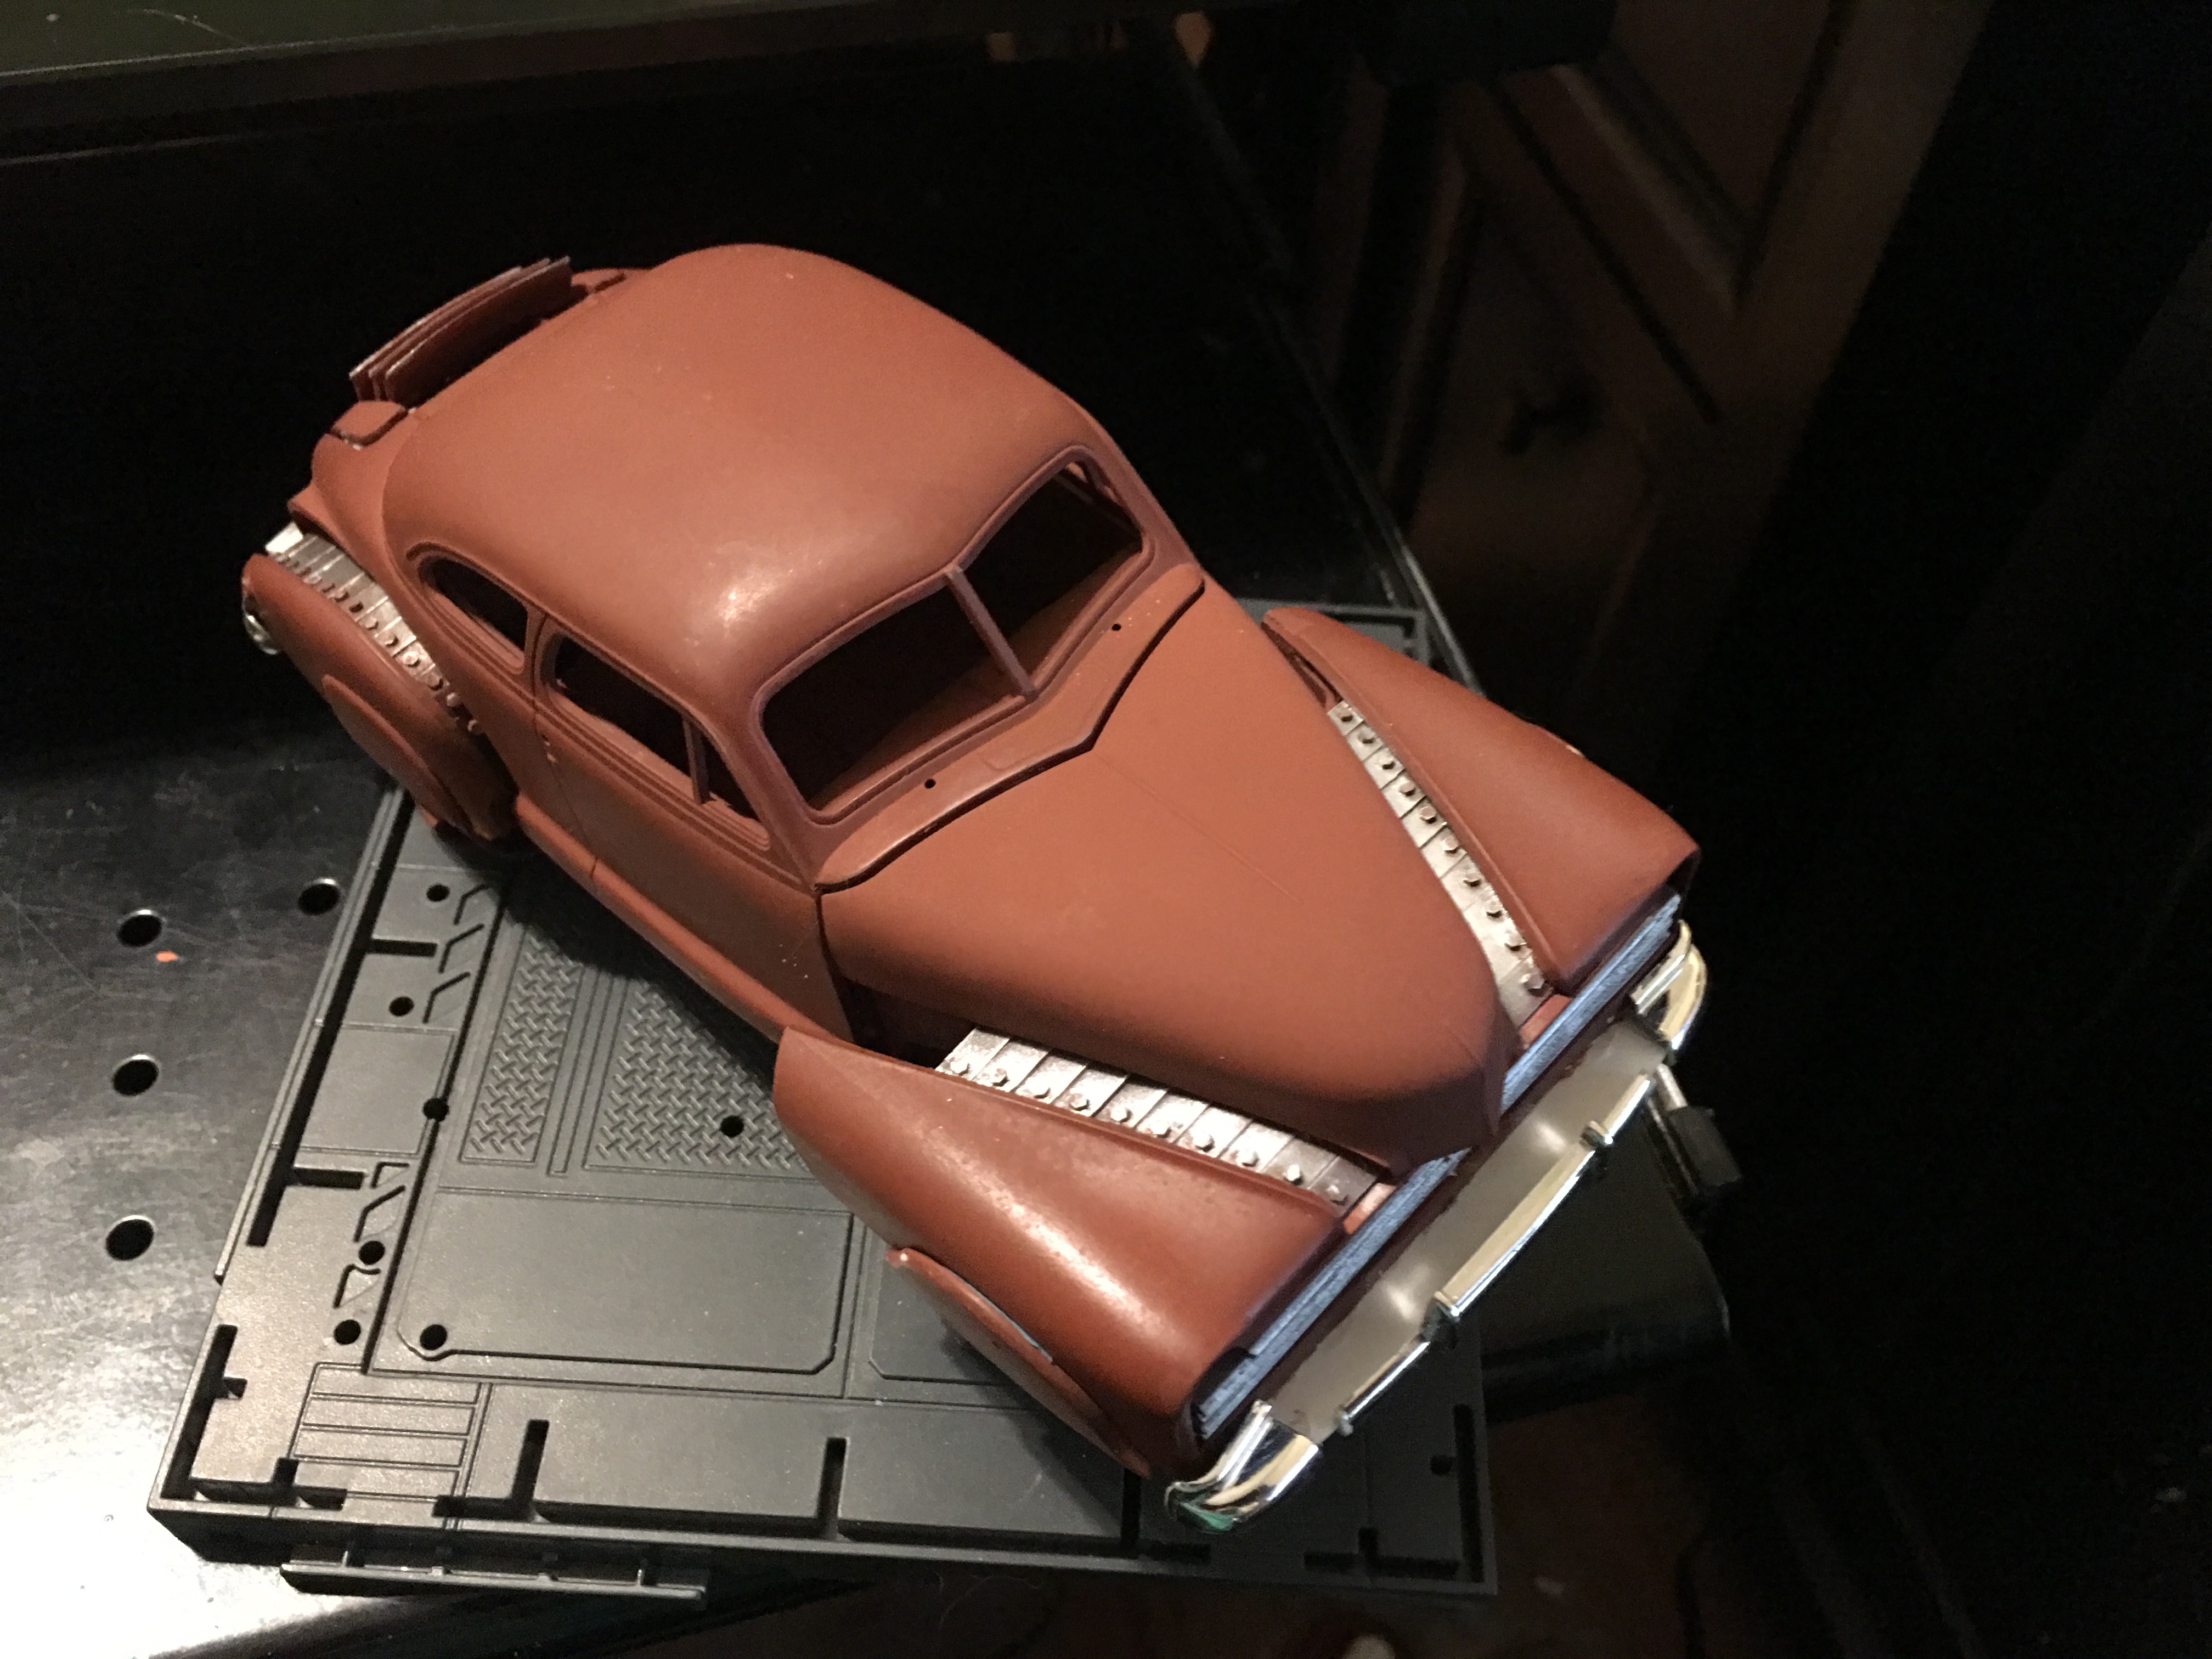
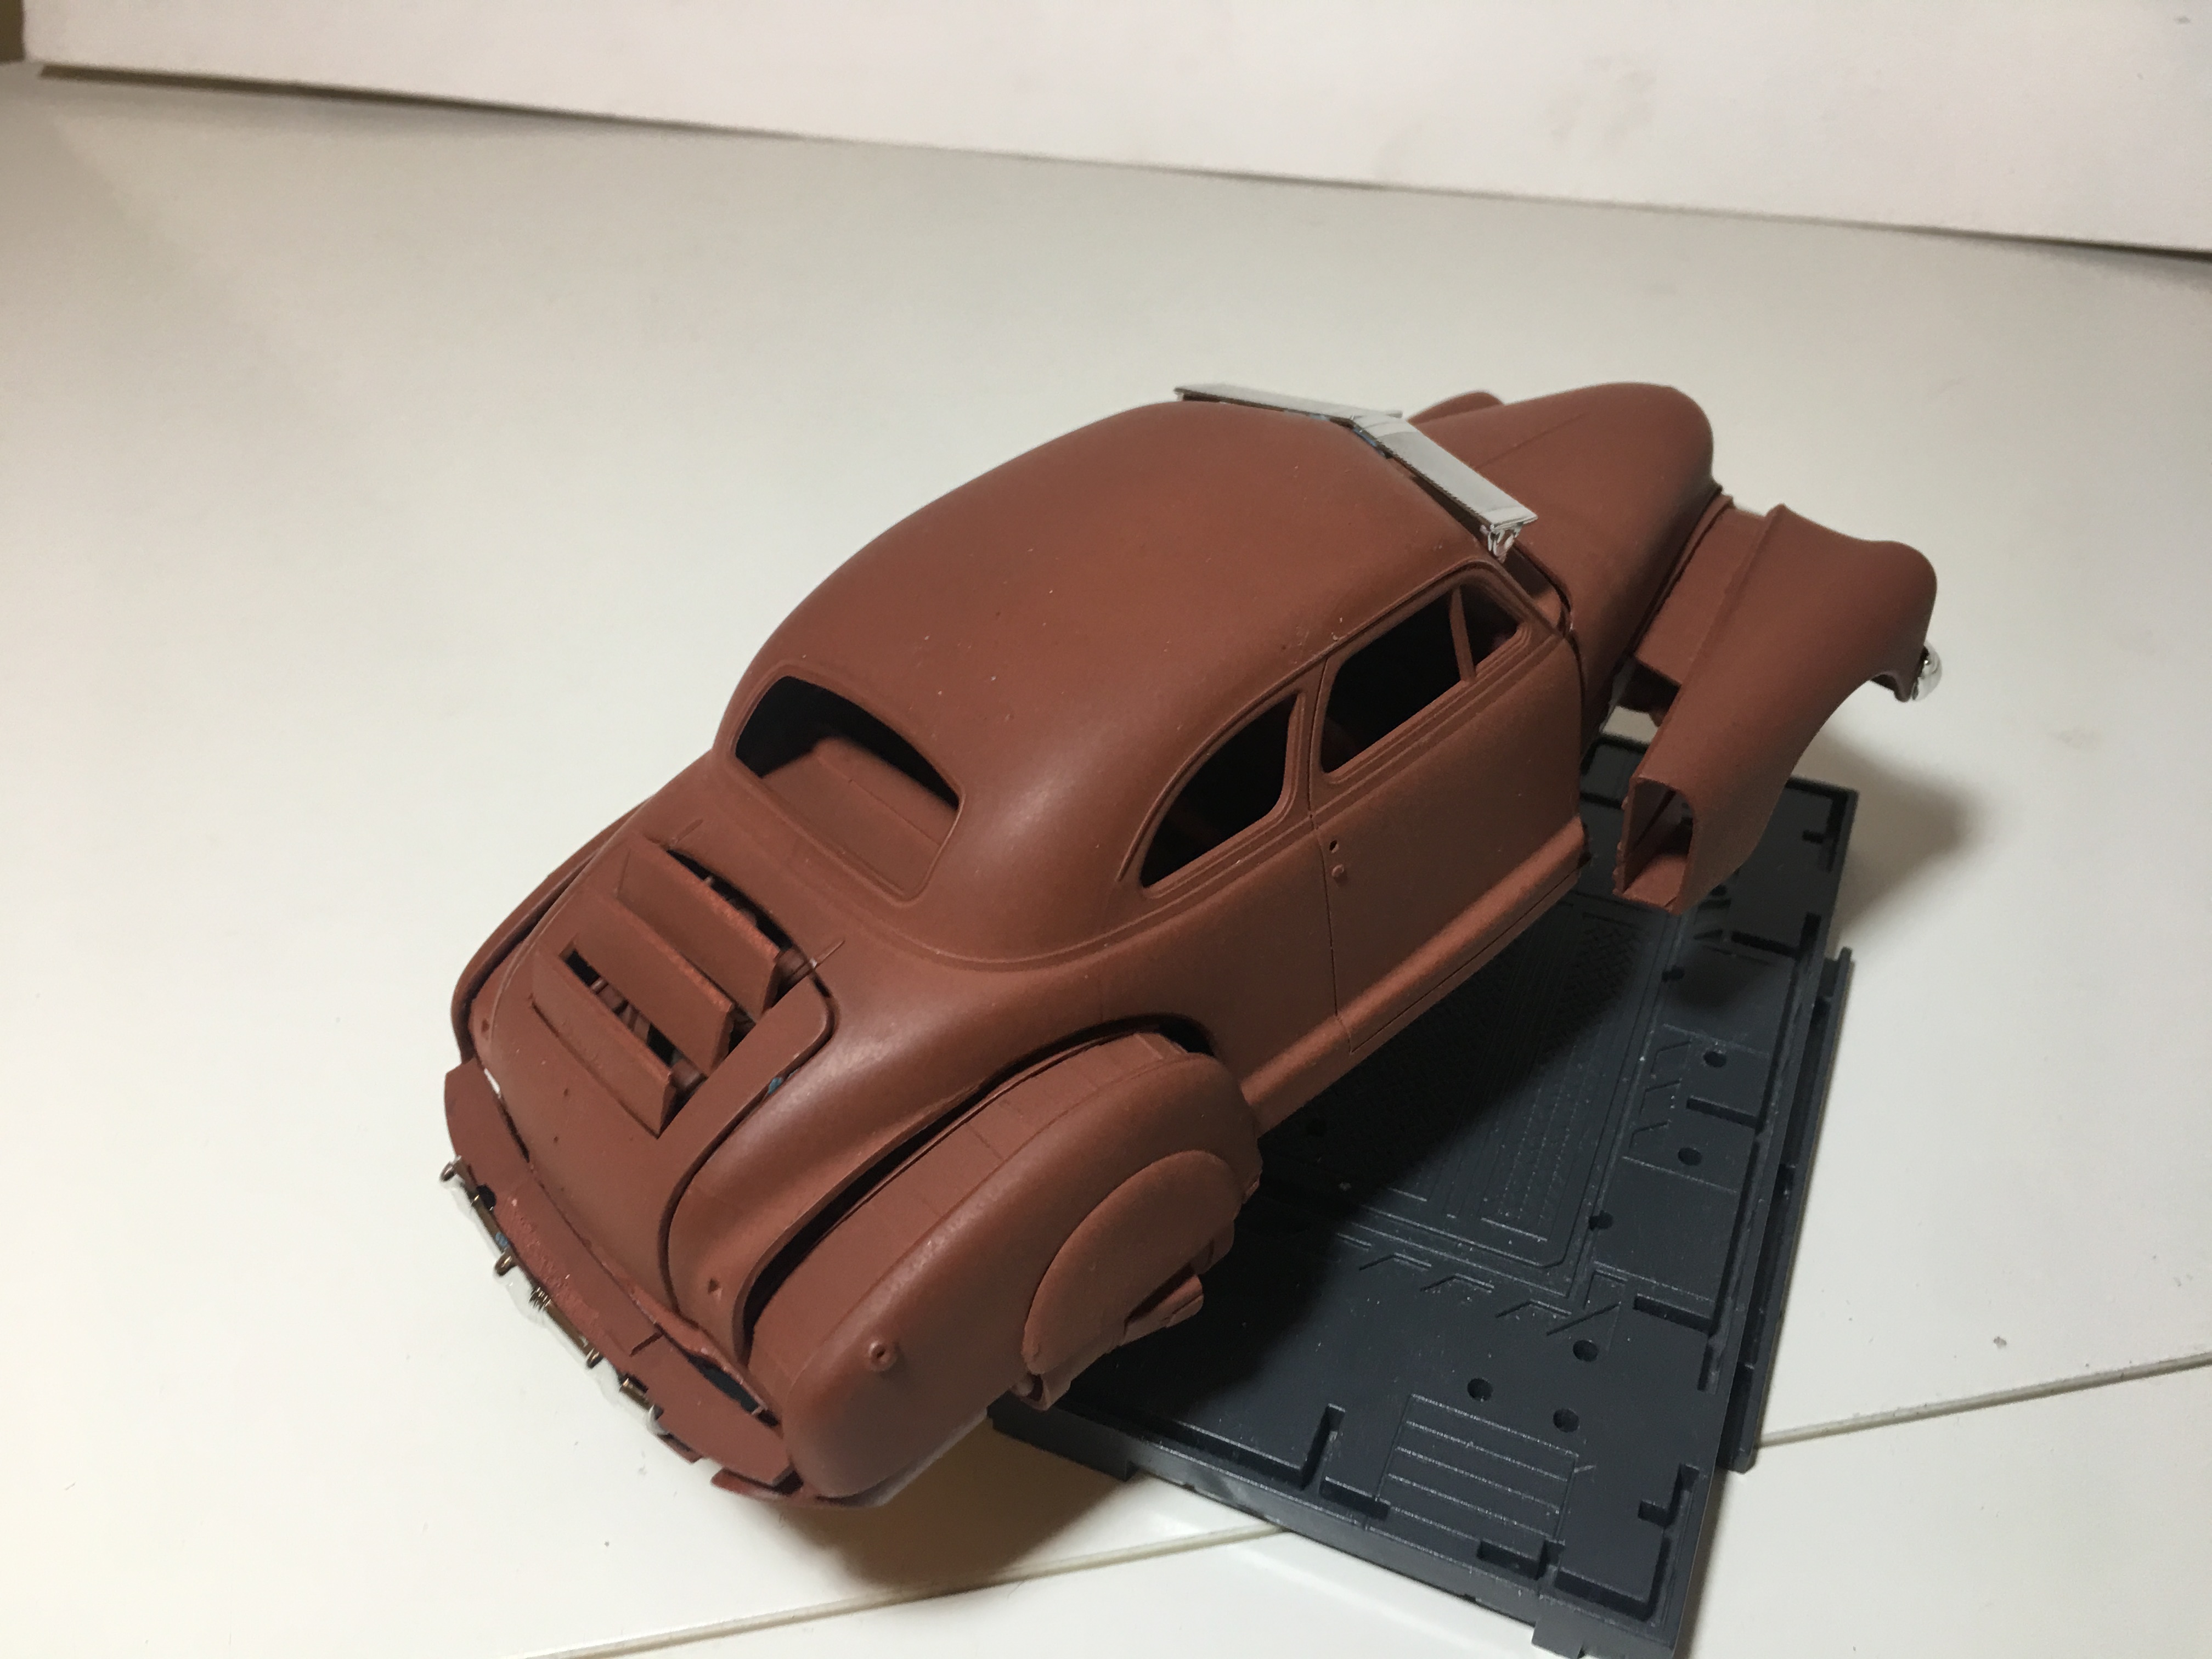
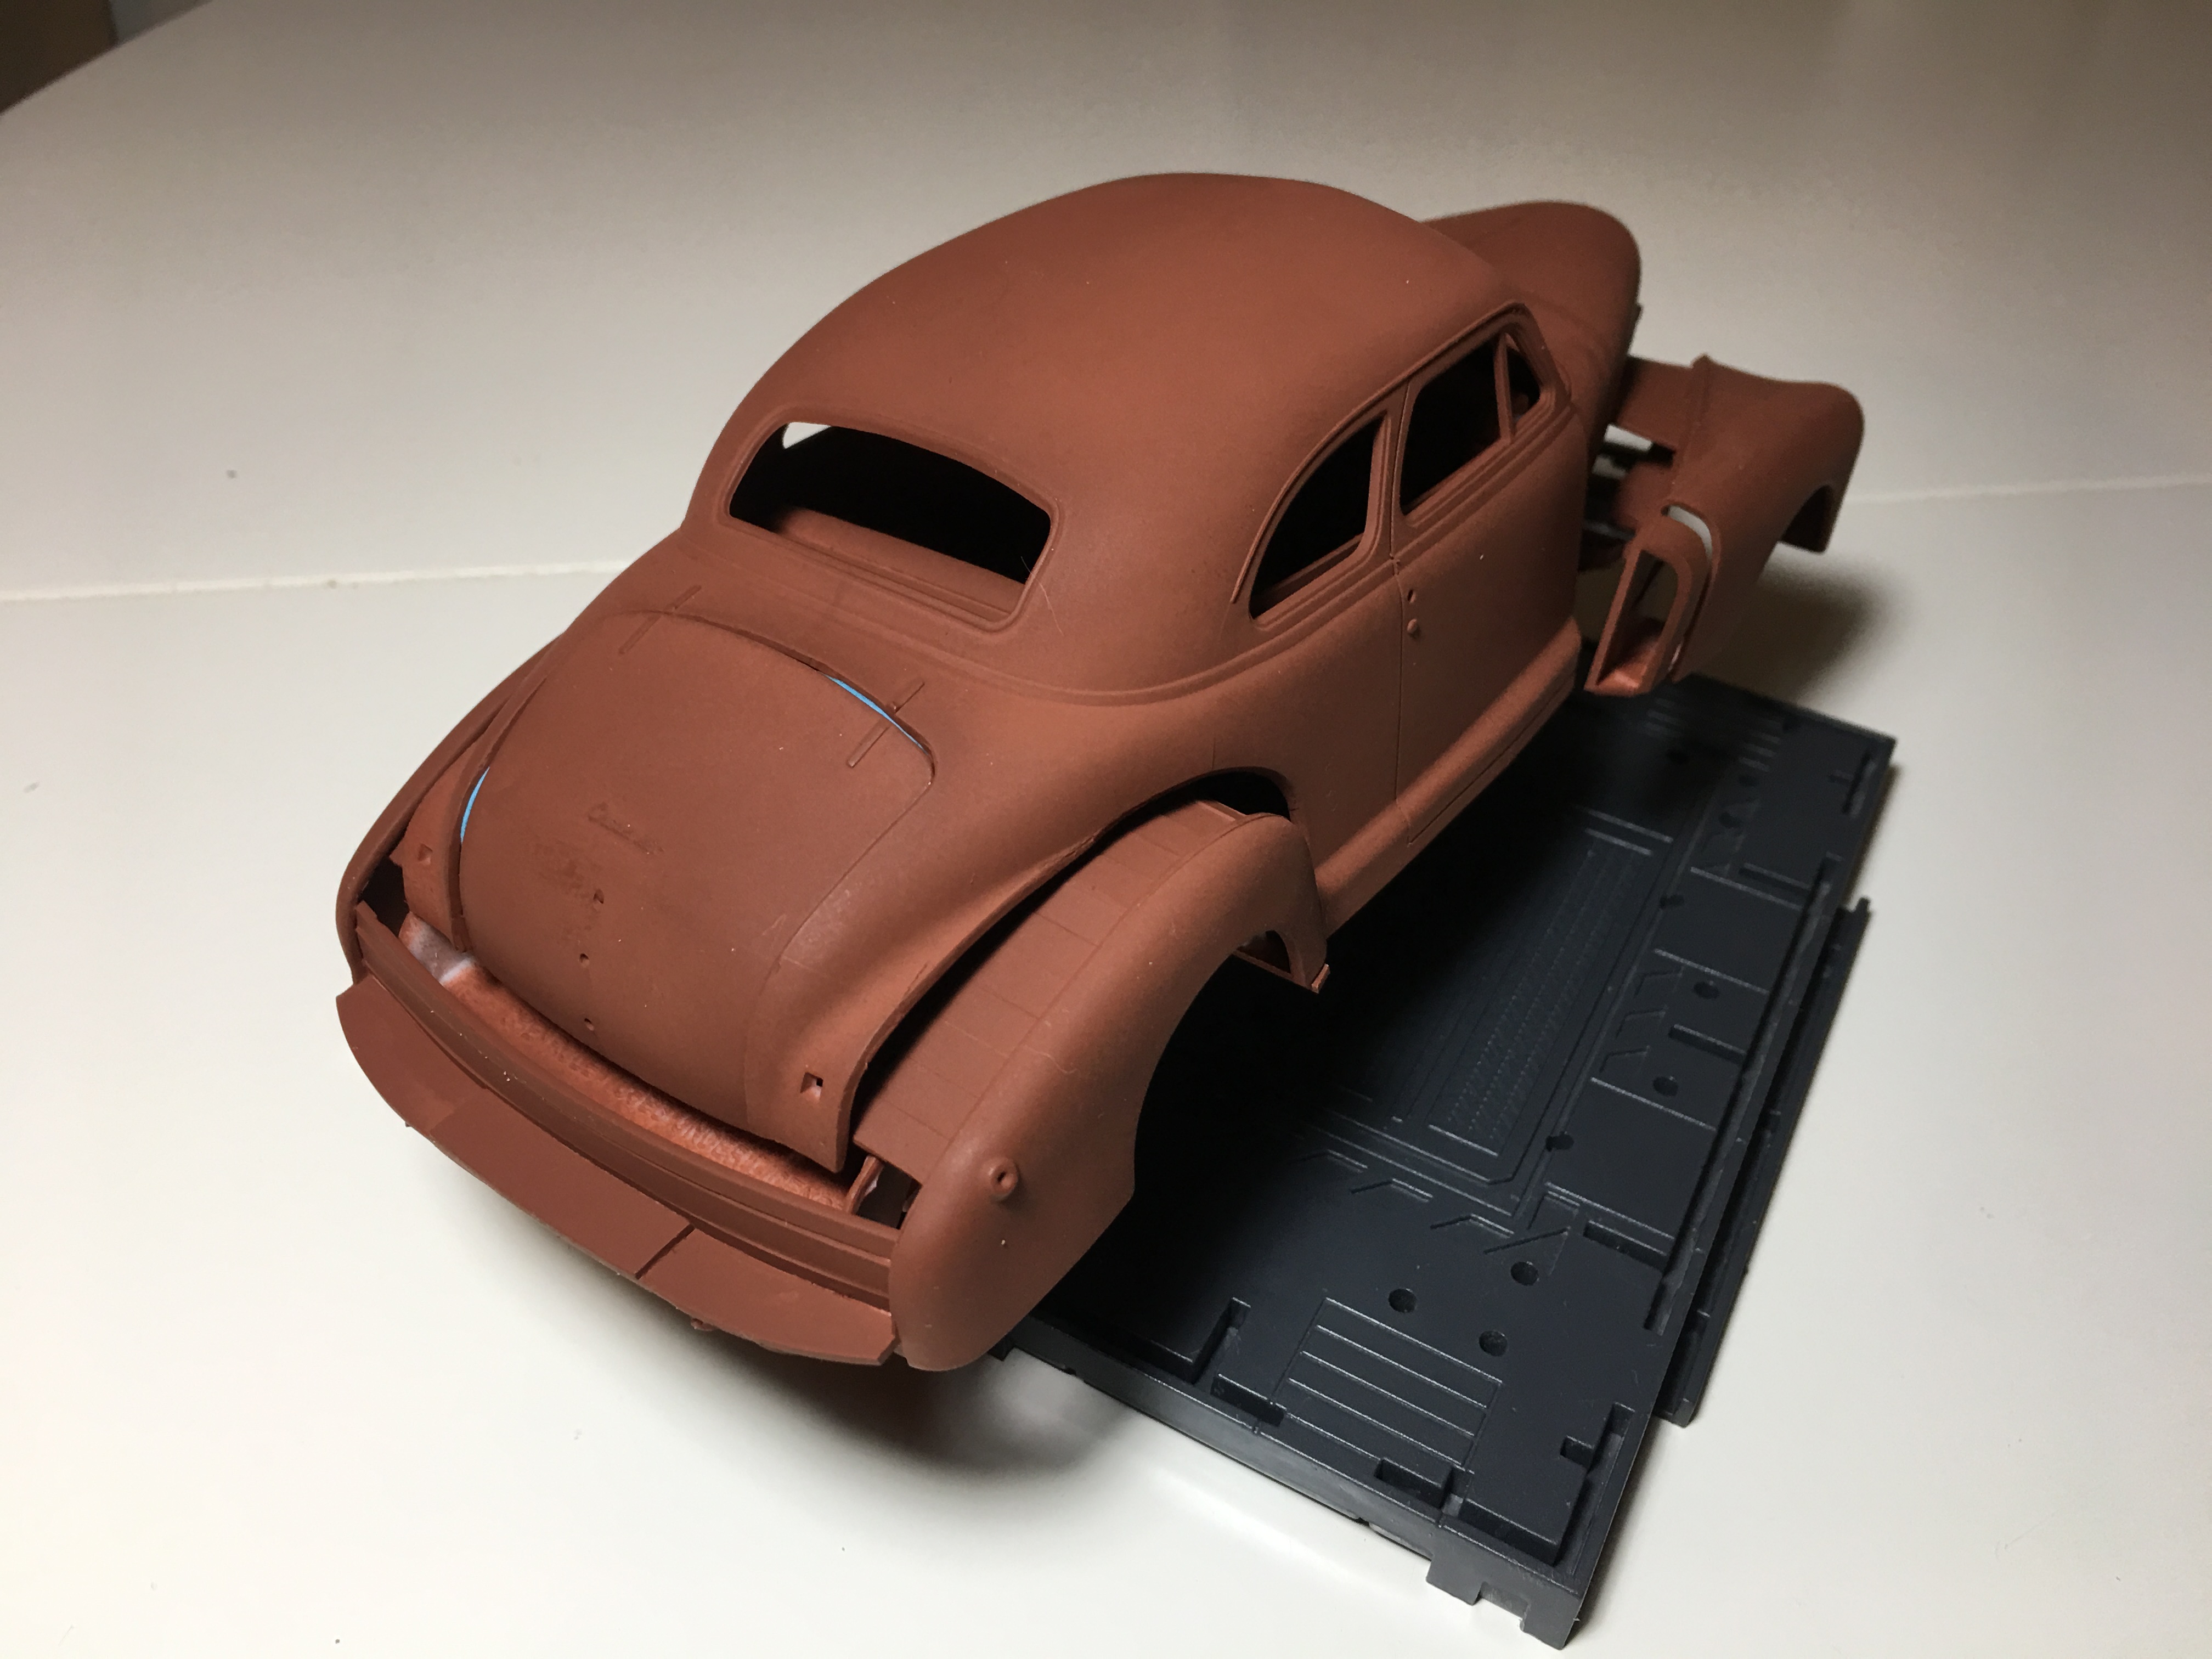
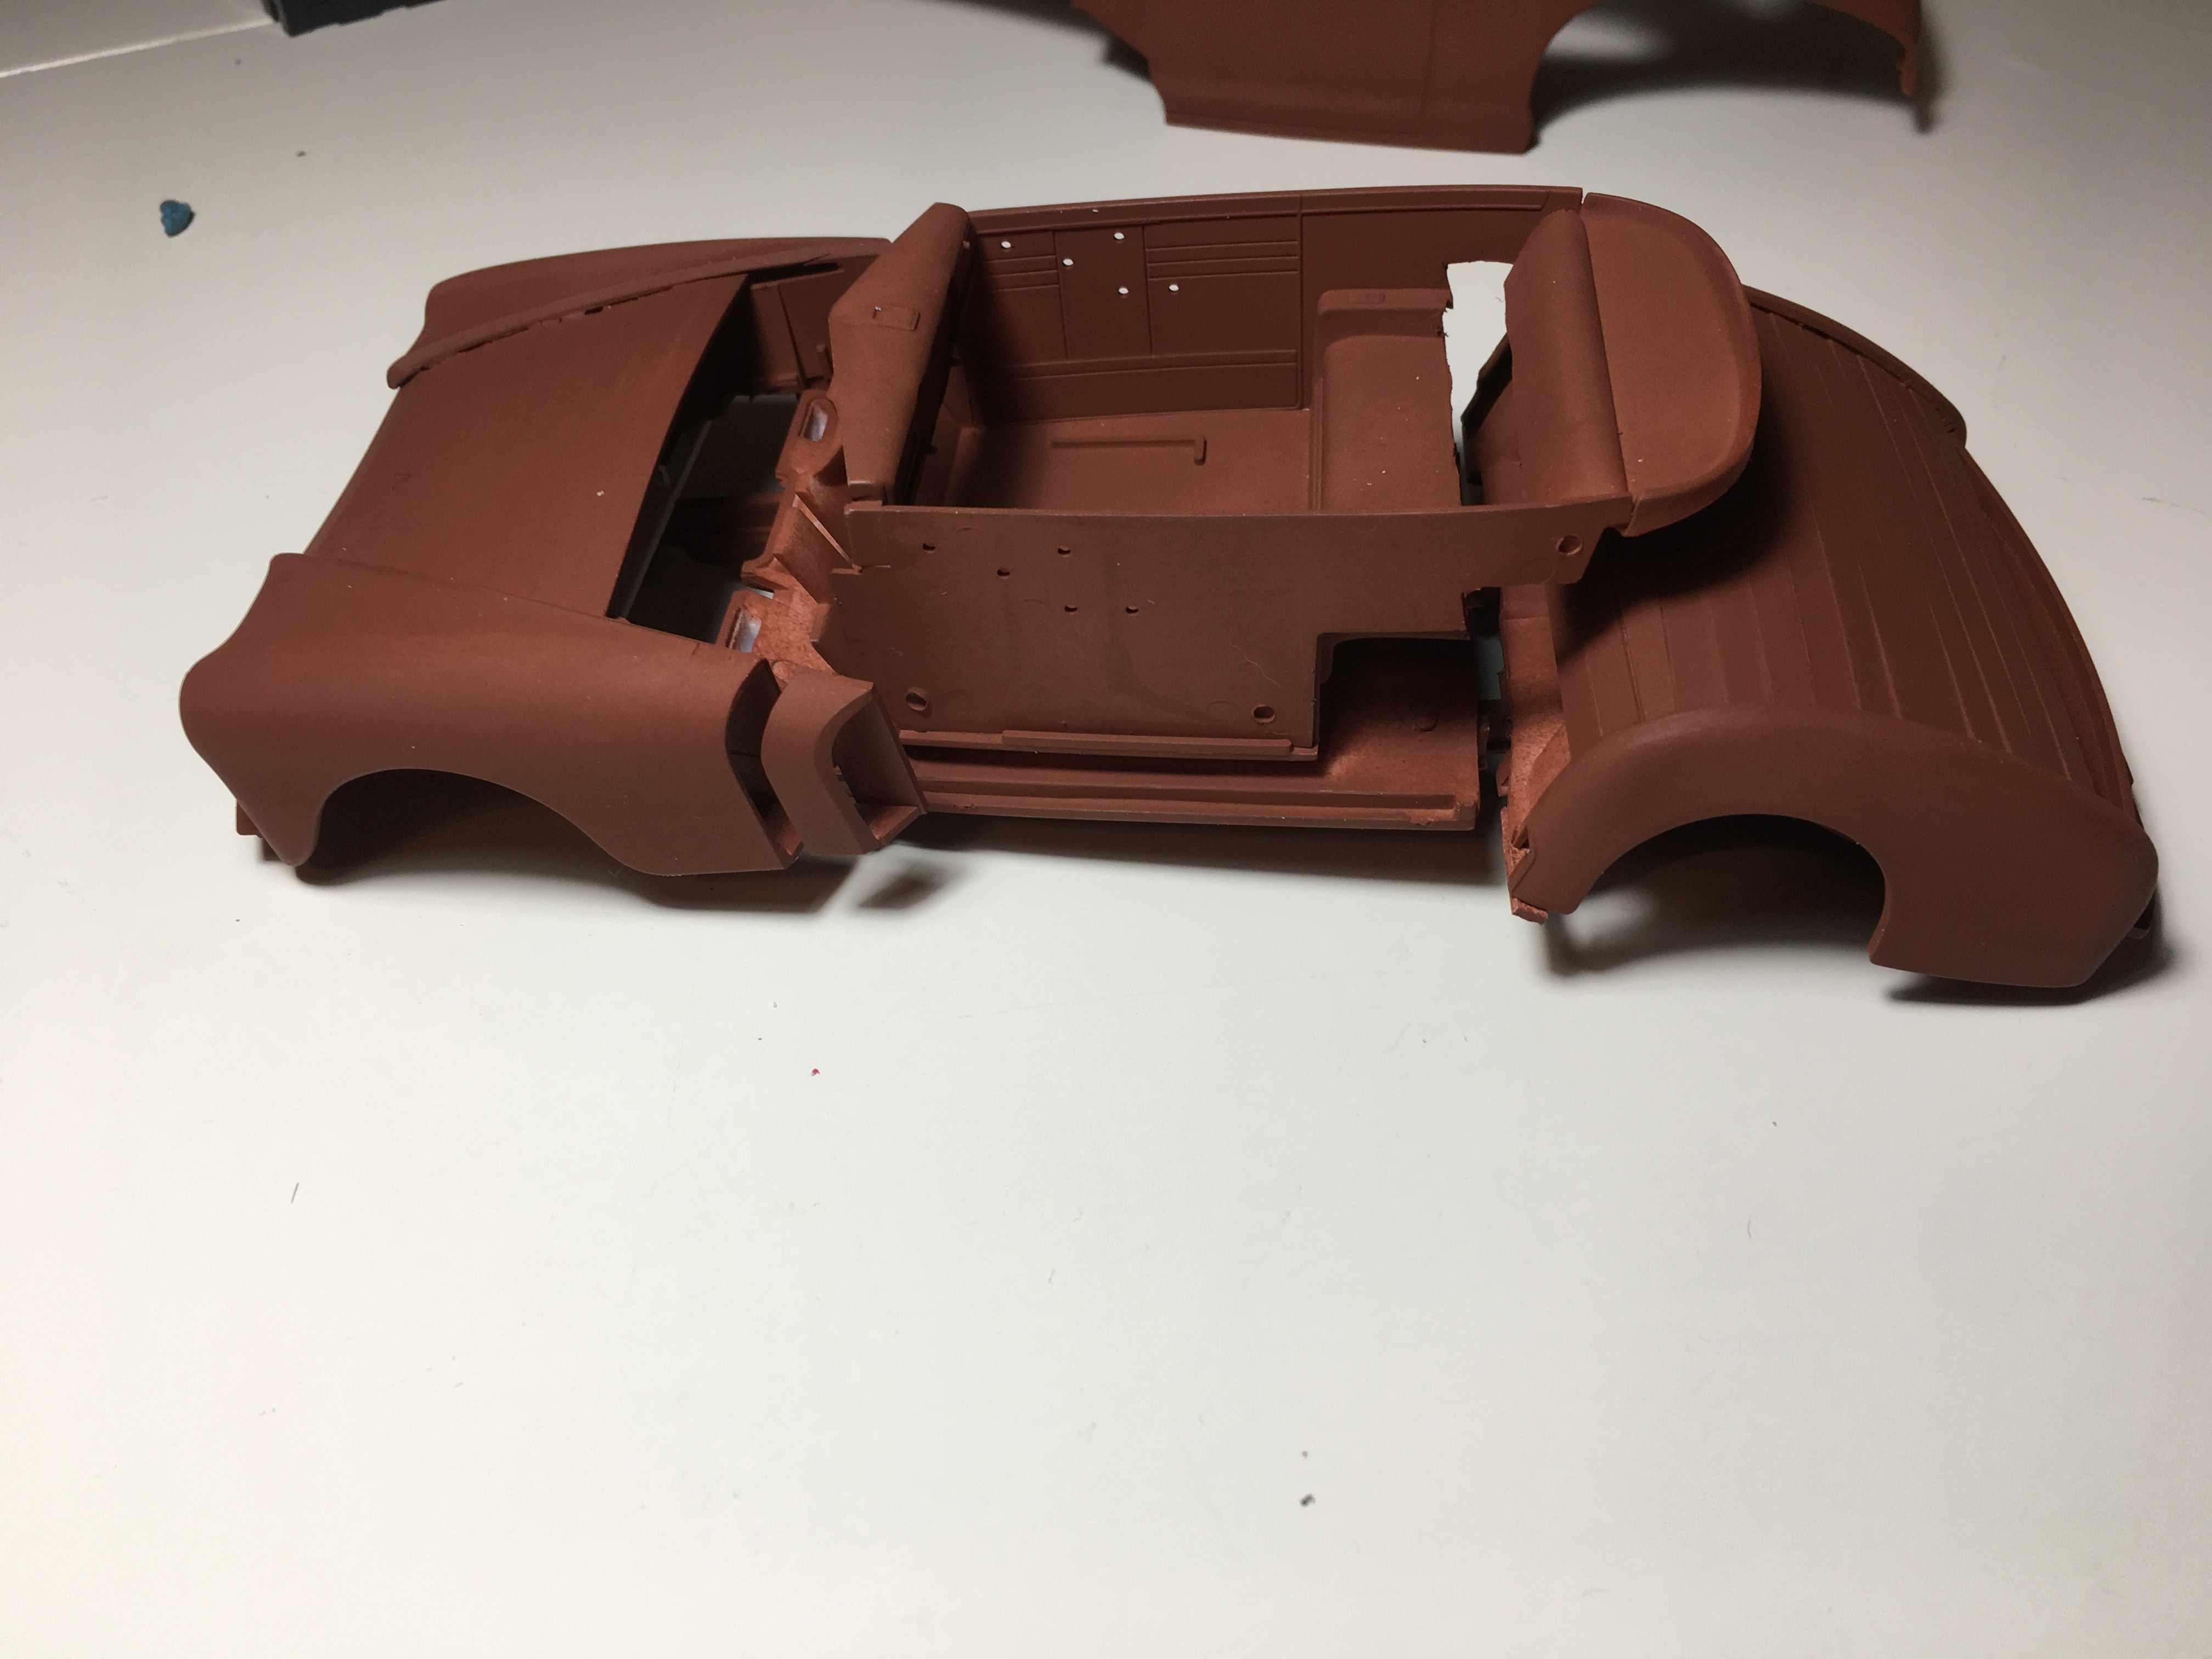
I started this model about a week ago. It's moving along fast and I'm really excited about it. I went to the local small hobby store looking for anything that I could turn into a hover car. I ran across this 47 Chevy Fleetmaster and I couldn't resist. The huge front fenders that extend past the door hinges look like they were meant to hold turbines. It's perfect for a Diesel Punk style hover car. The kit is by Galaxie and it appears to be very well made although it cost around twice what I would normally pay for a model. The photos below are what I've mocked up so far. I've removed the rear fenders from the body and made a hinged assembly that will hold the main thrust turbine. It pivots for take off and flight. Similar to the 1st jet car I built a few years ago. The segmented hose under the car is from a donated Gundam kit. My son gave me 2 complete kits to use for scrap parts. He also gave me the base. Yay me. Hydraulic lines, hoses and wires will be abundant. Along with some grease and weathering. The front and rear fenders have a much wider stance. I plan to add more mechanical parts in between the new spaces created. I may cover the wheel wells. I made the trunk lid removable so that you can see the inner workings. Thank you for looking!
-
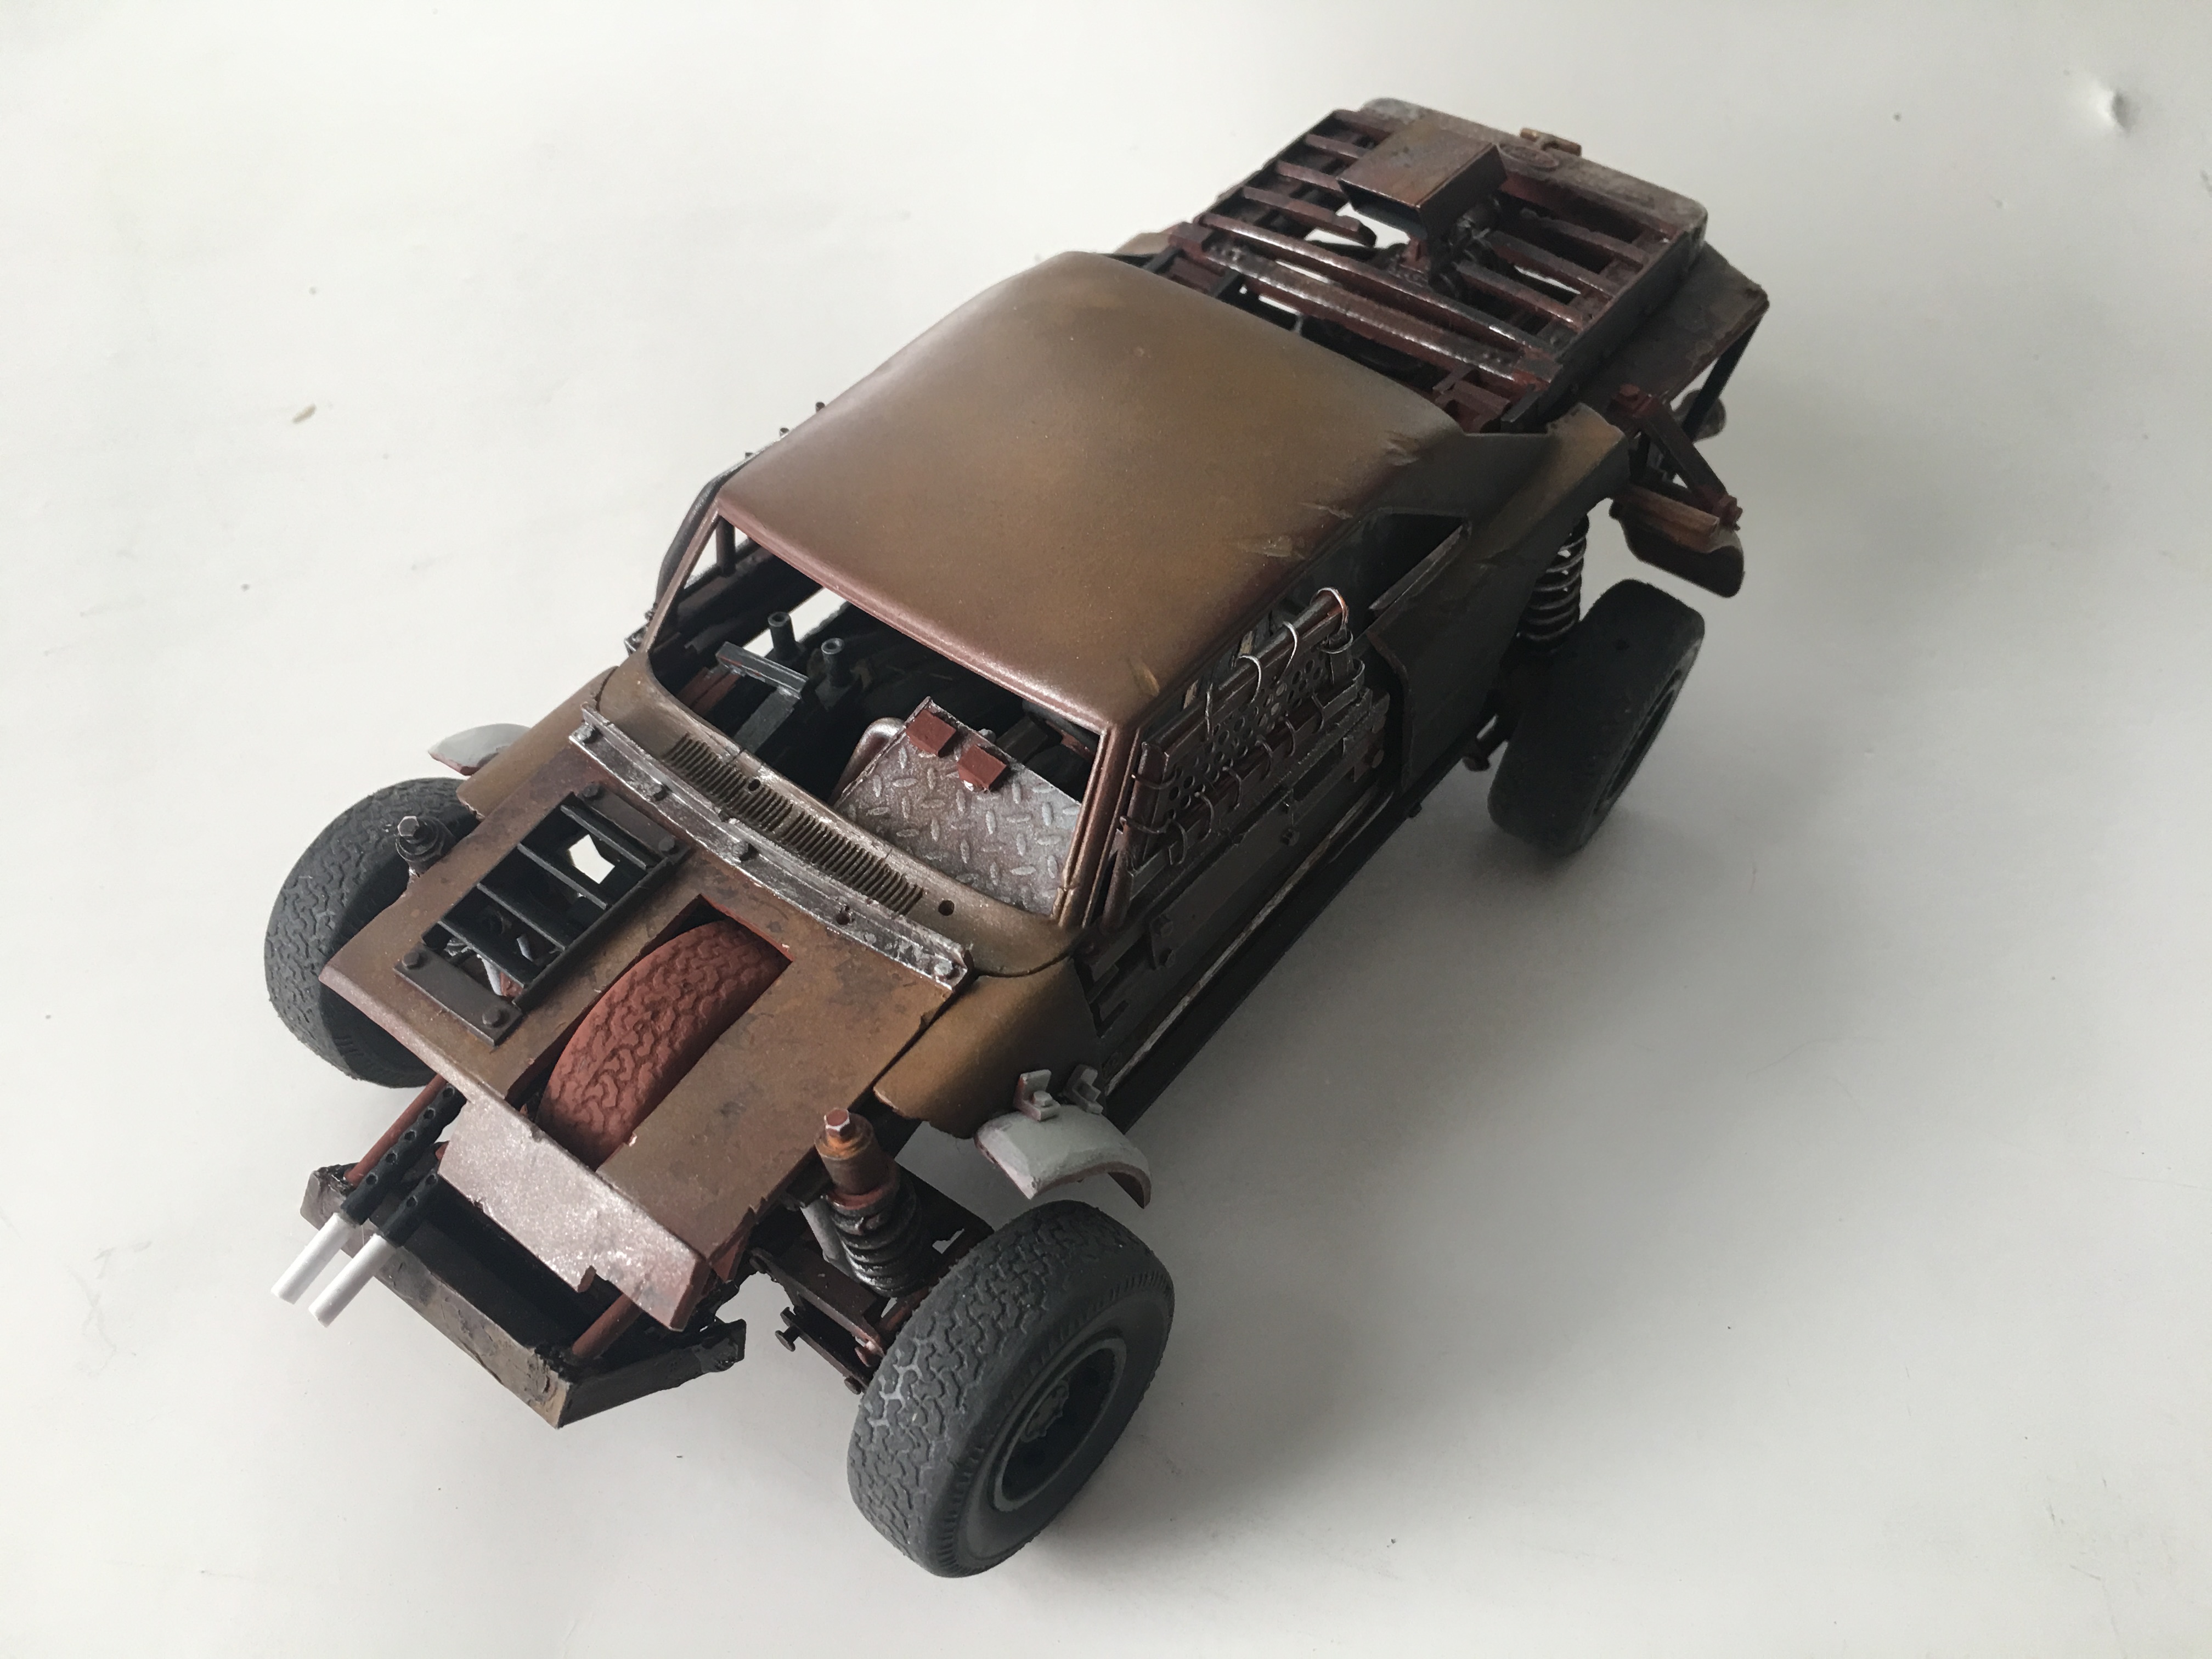
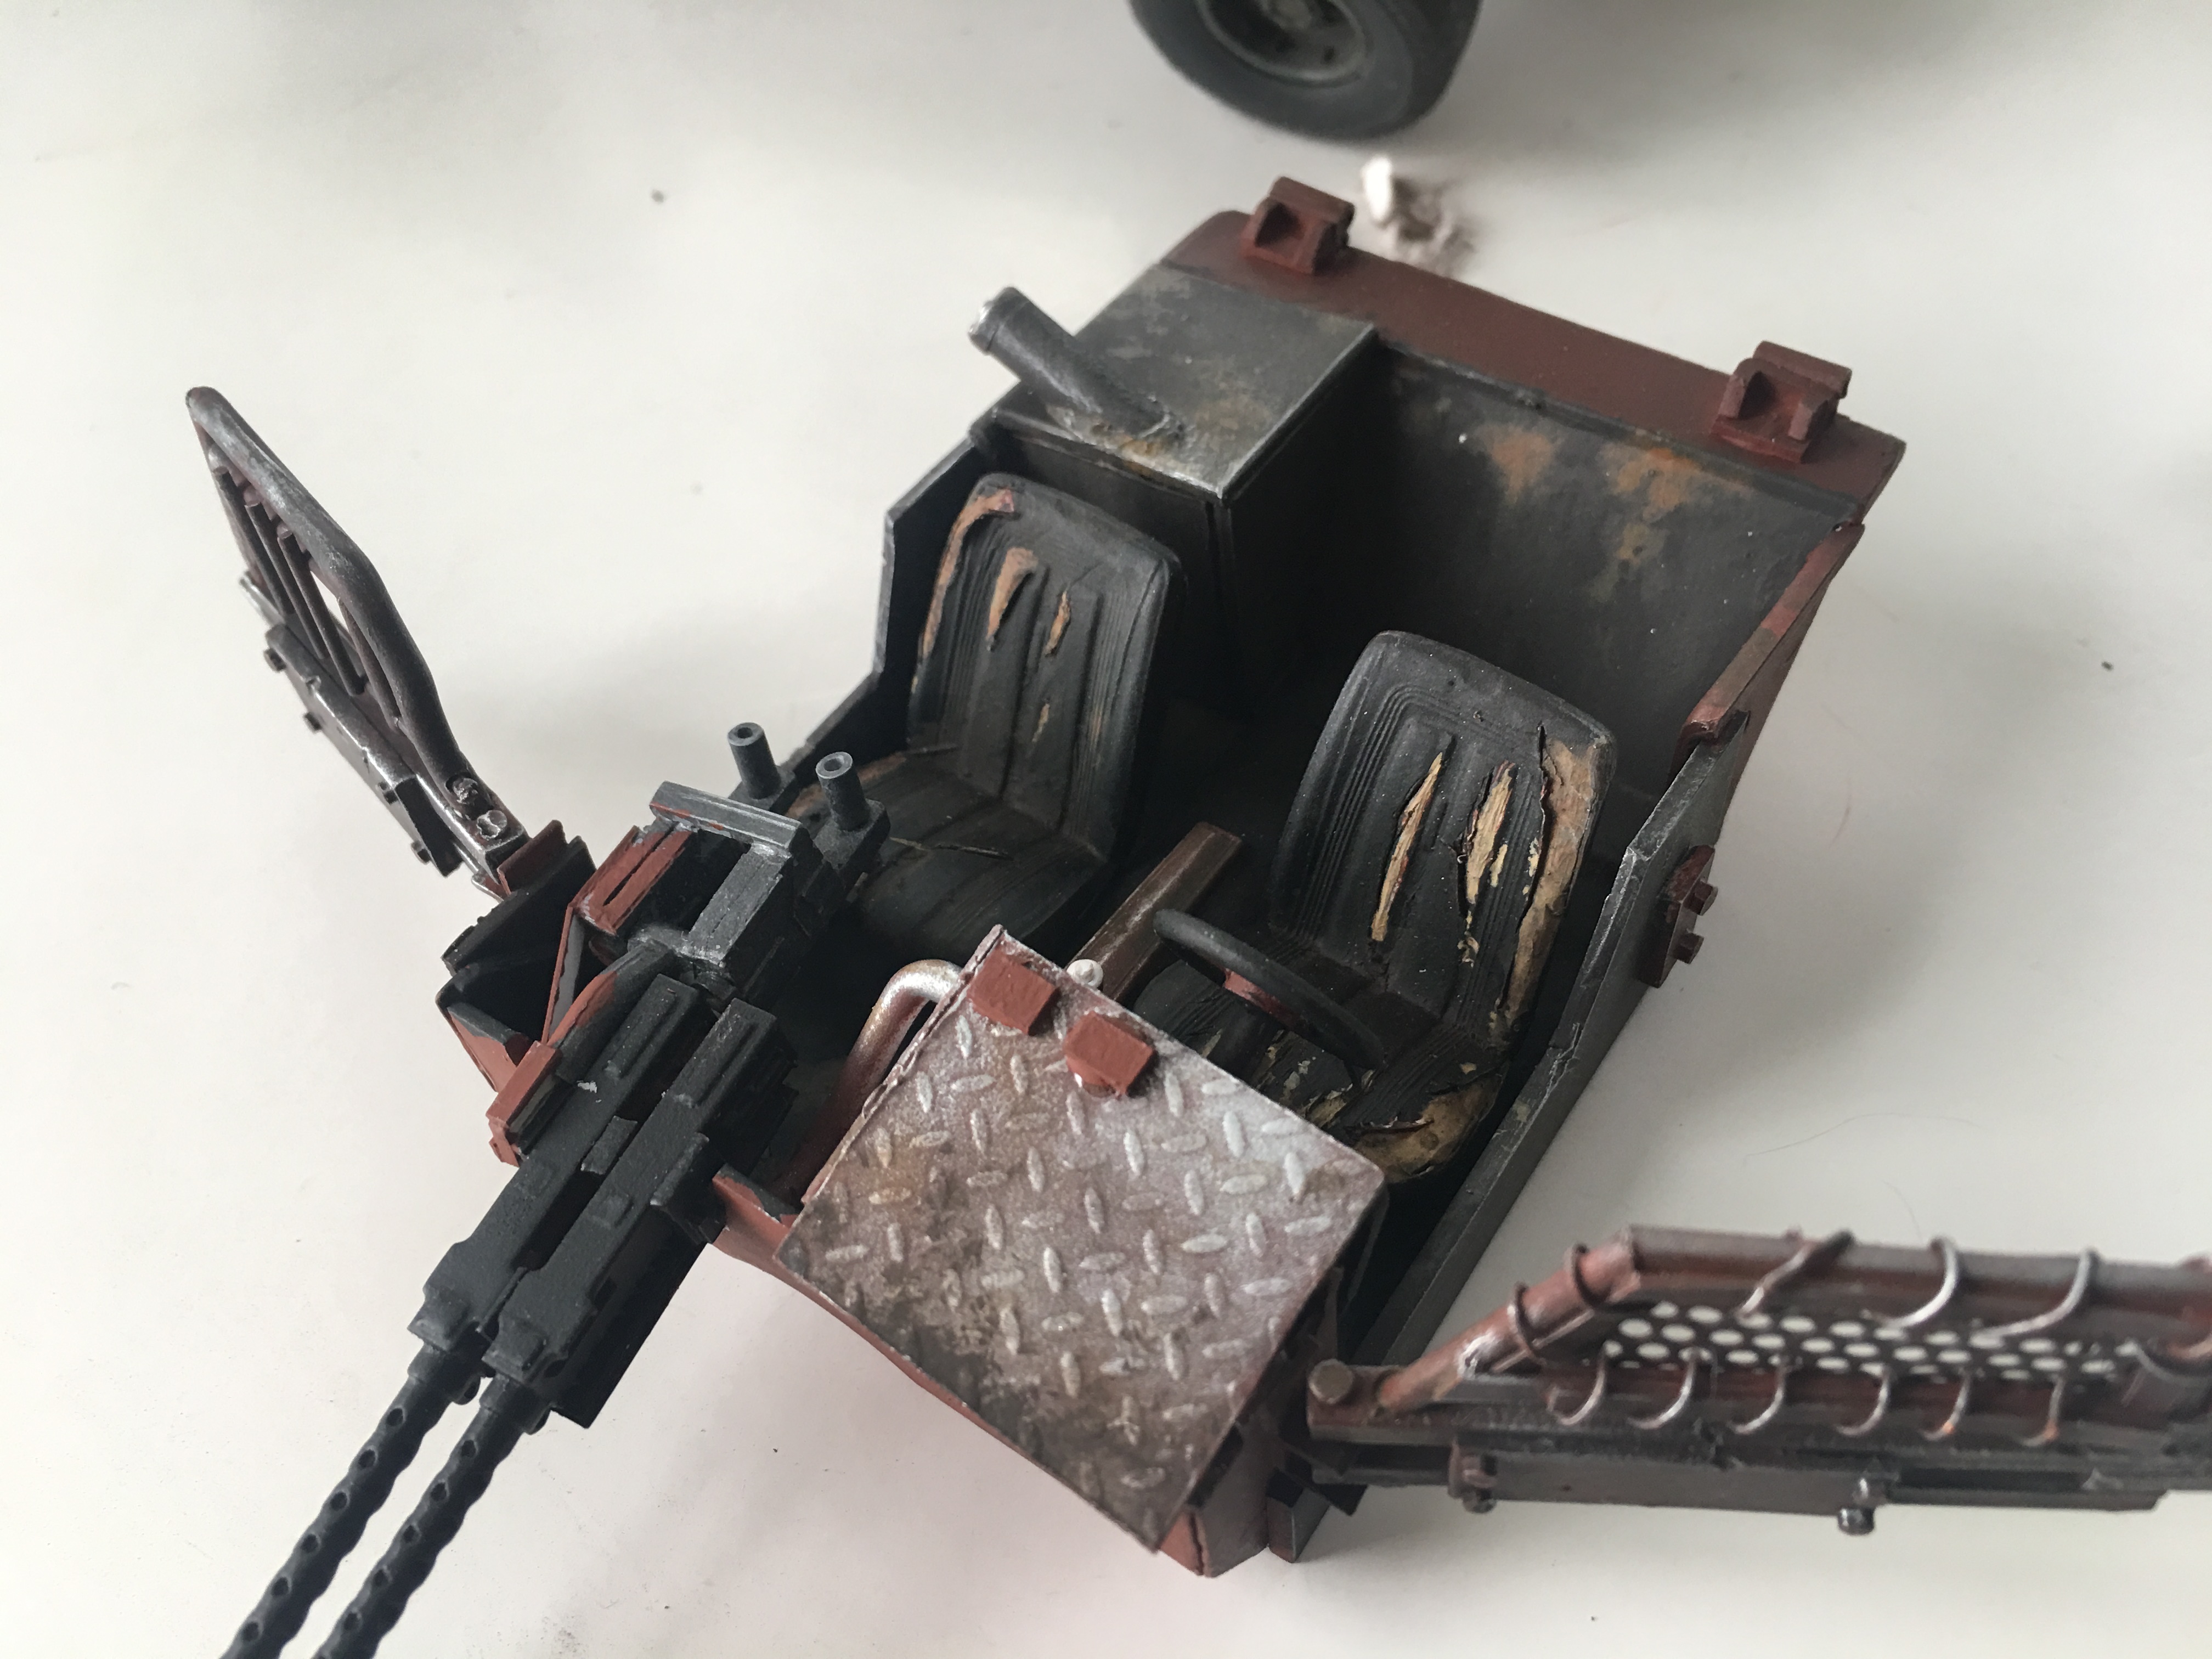
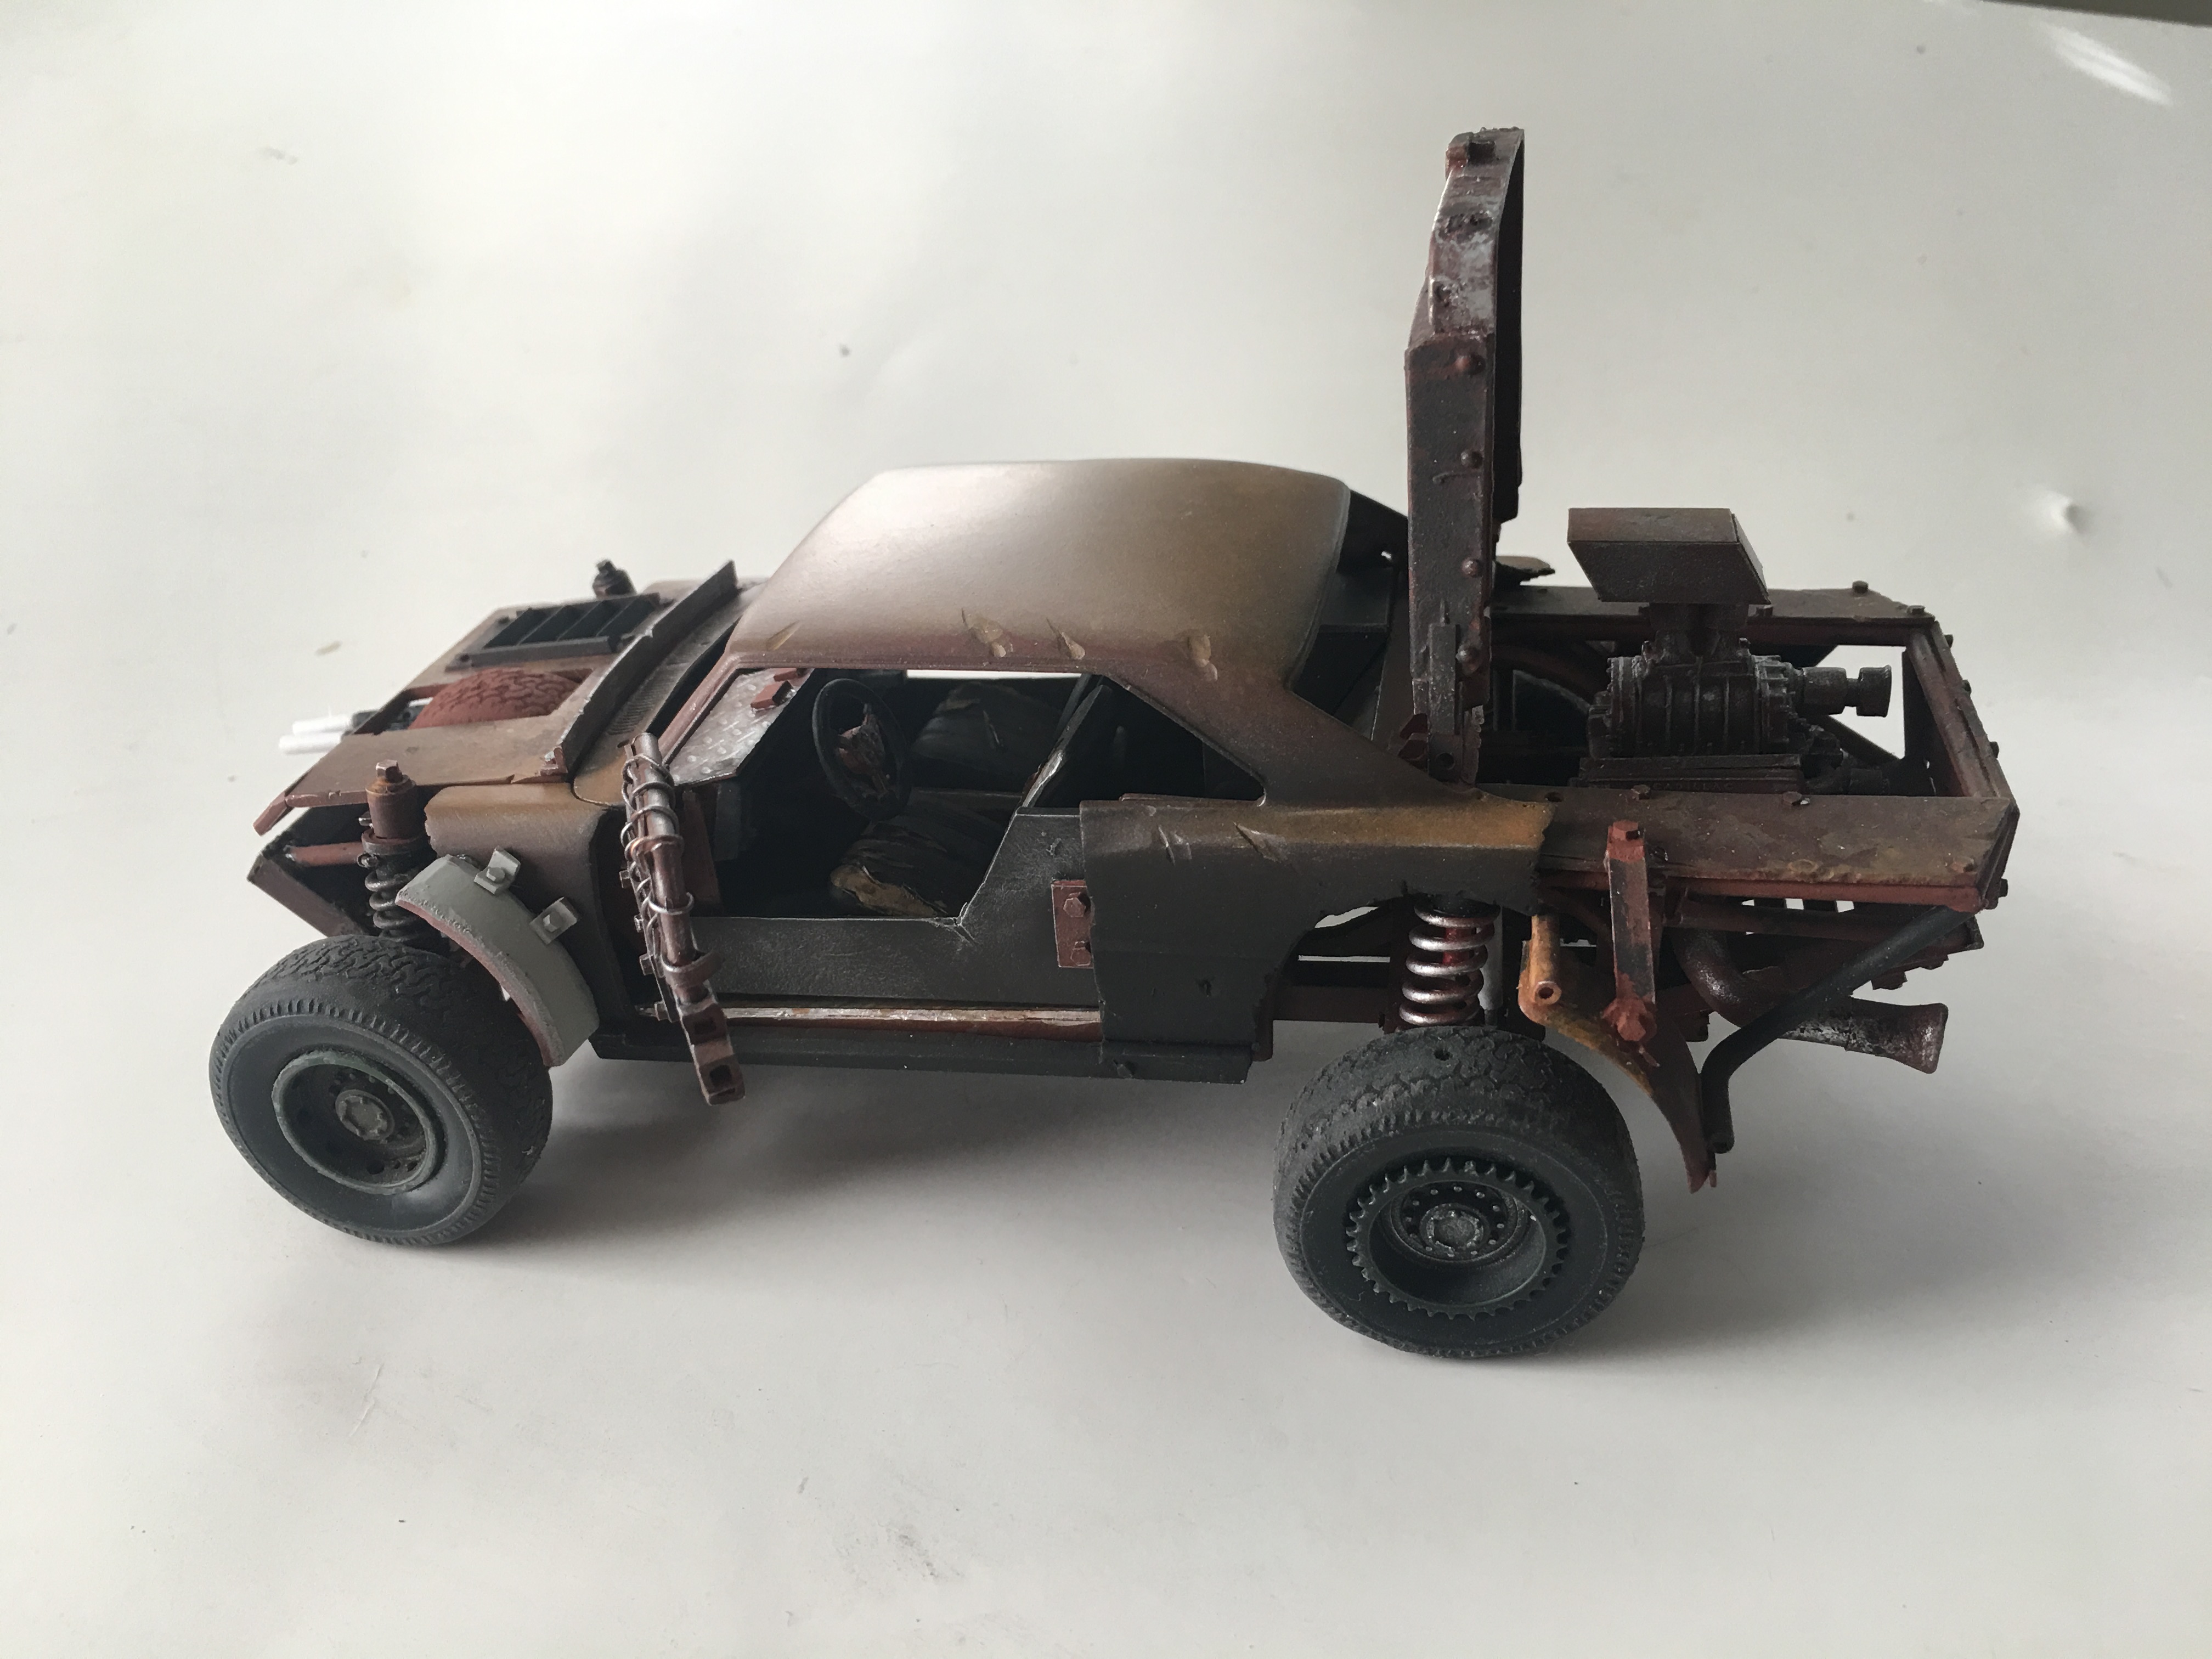
This was my first attempt at making seats appear to be torn and weathered. I was very surprised with the results! You just need a really sharp X-Acto blade and a steady hand. Cut into the plastic leaving a little visible flap on both sides of the tear. Then carve away where you would want the upholstery to appear missing. I used sand yellow to simulate the seat foam and a mud wash over the entire seat. I'll be doing a little more weathering on the seats. I would like the passenger foot-well to be full of shell casings from the 50 cal guns. I'd also like to make the belt feed that goes into the guns. All I can think of is to use a small diameter brass rod cut into segments. I've tried this before but wasn't 100% satisfied. If anyone has any suggestions I'm open. JC, That Peugeot needs some armor and a harpoon.
-
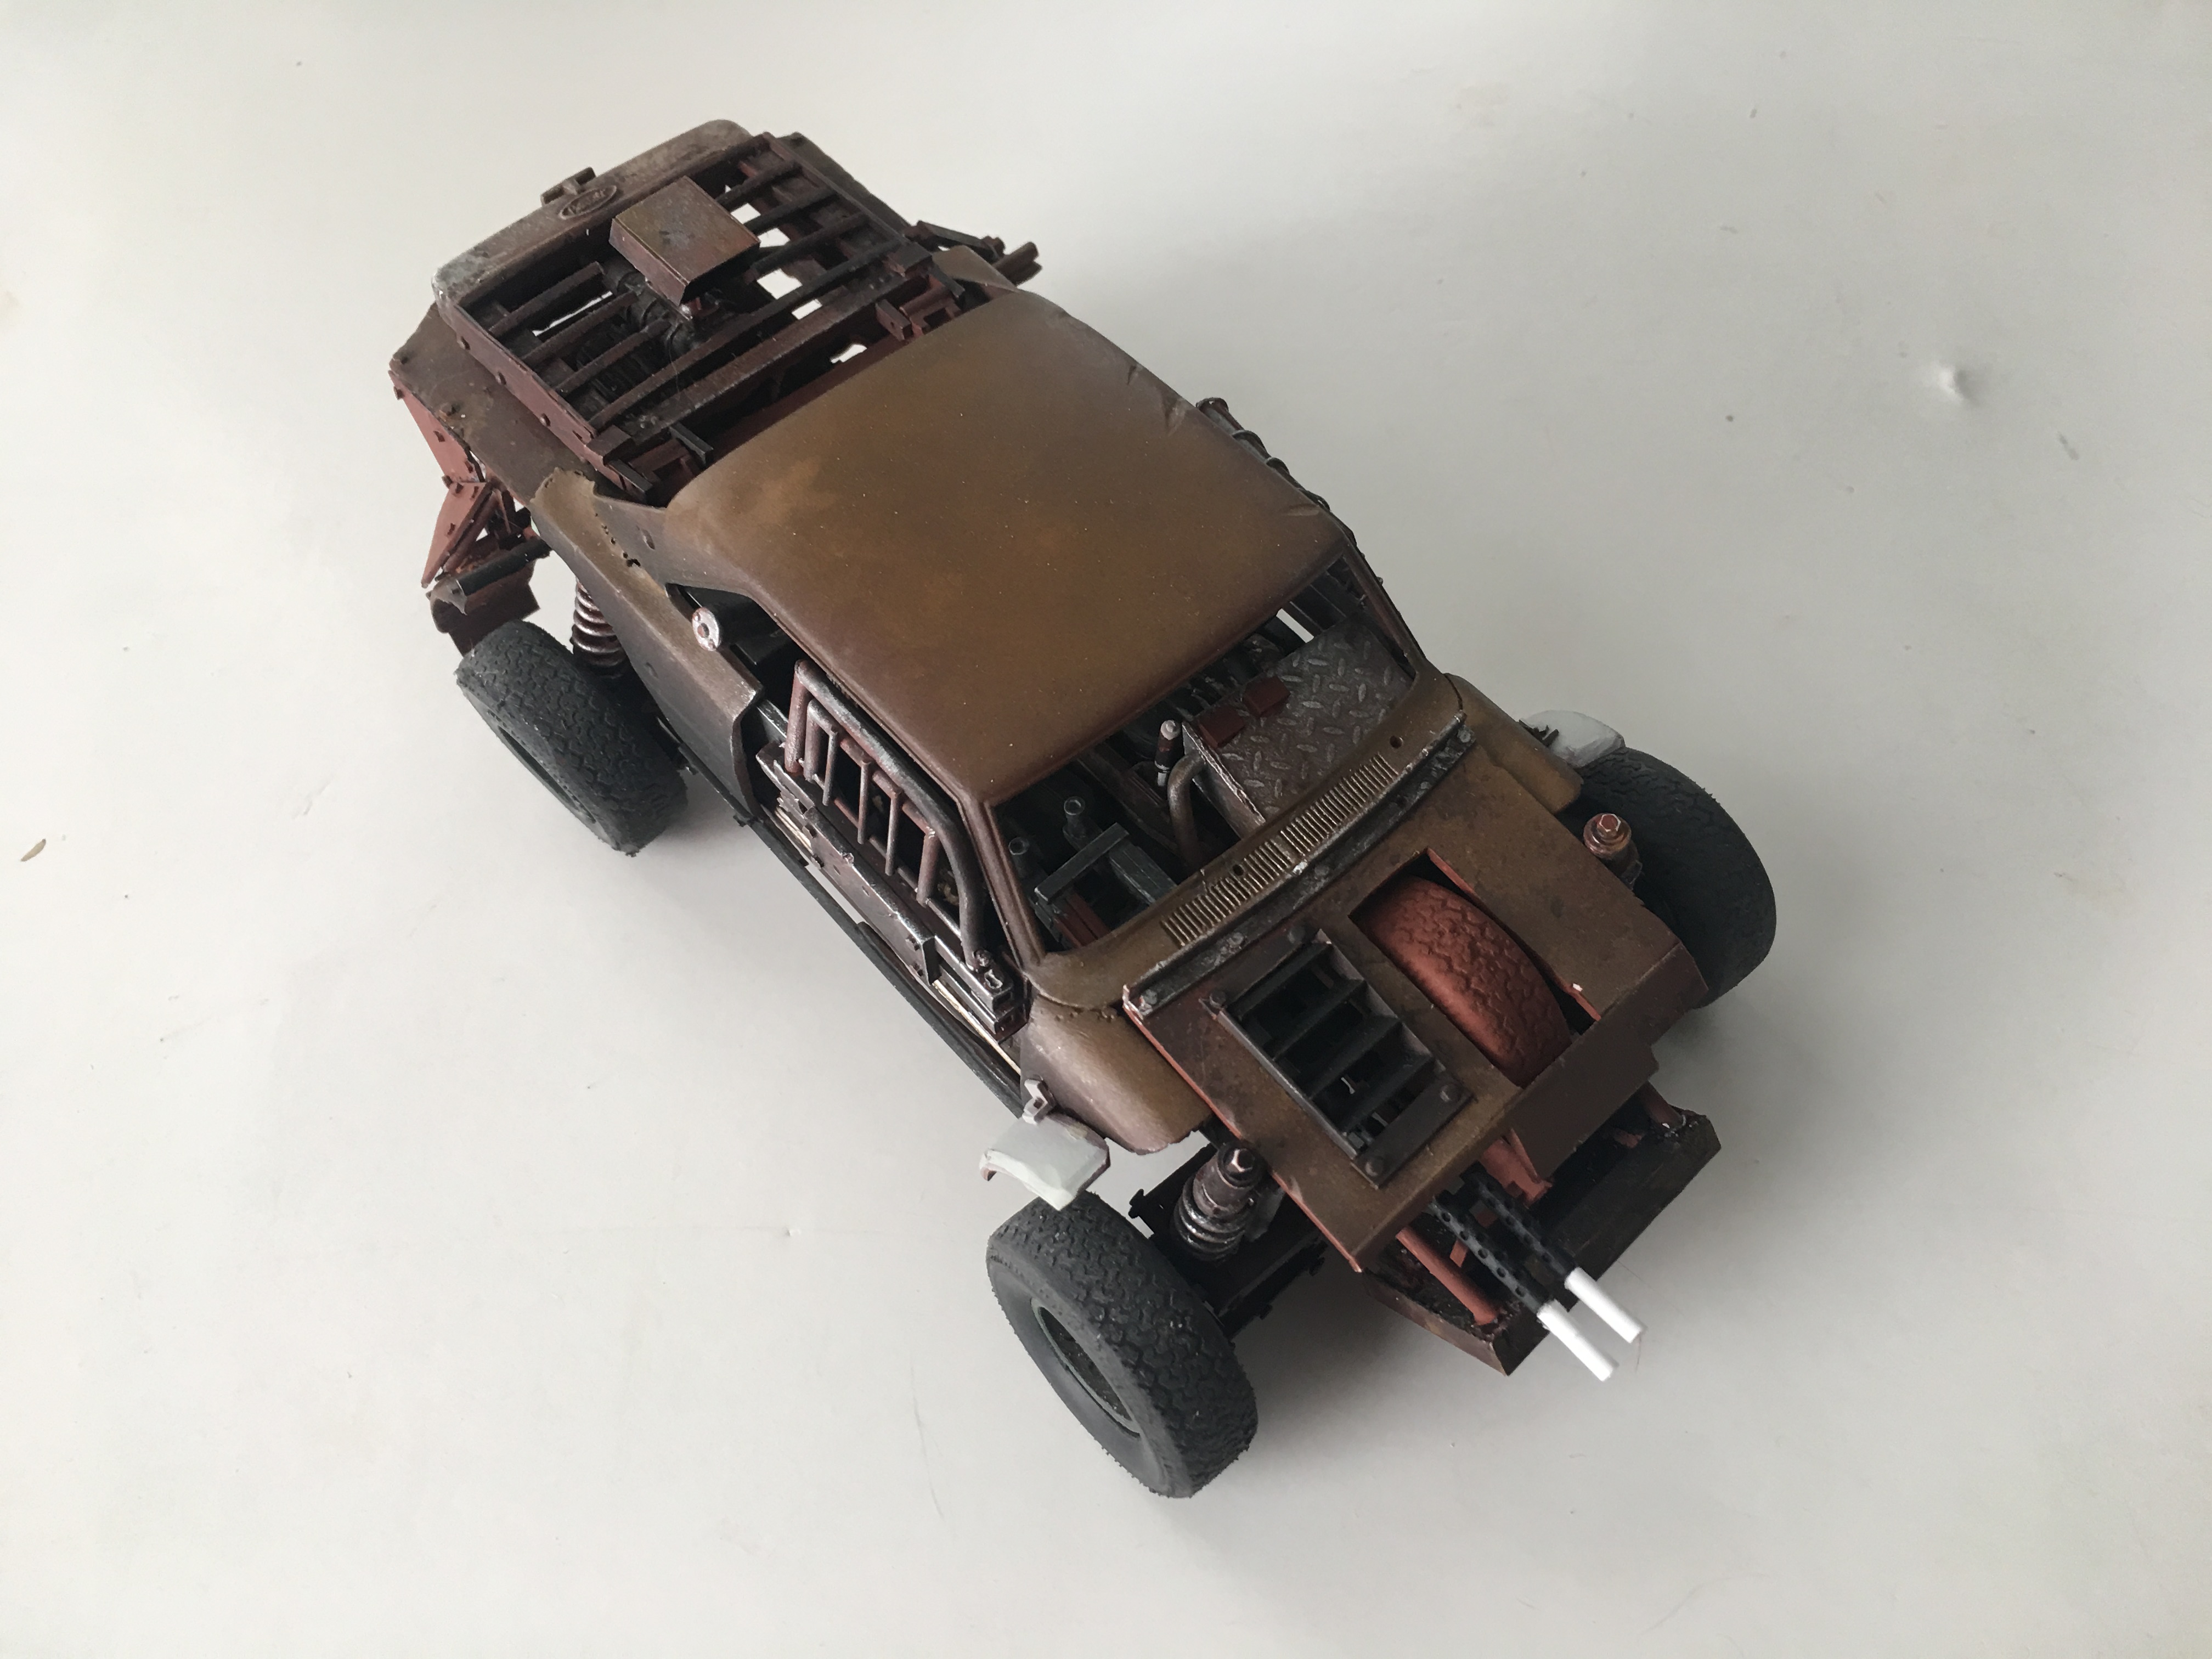
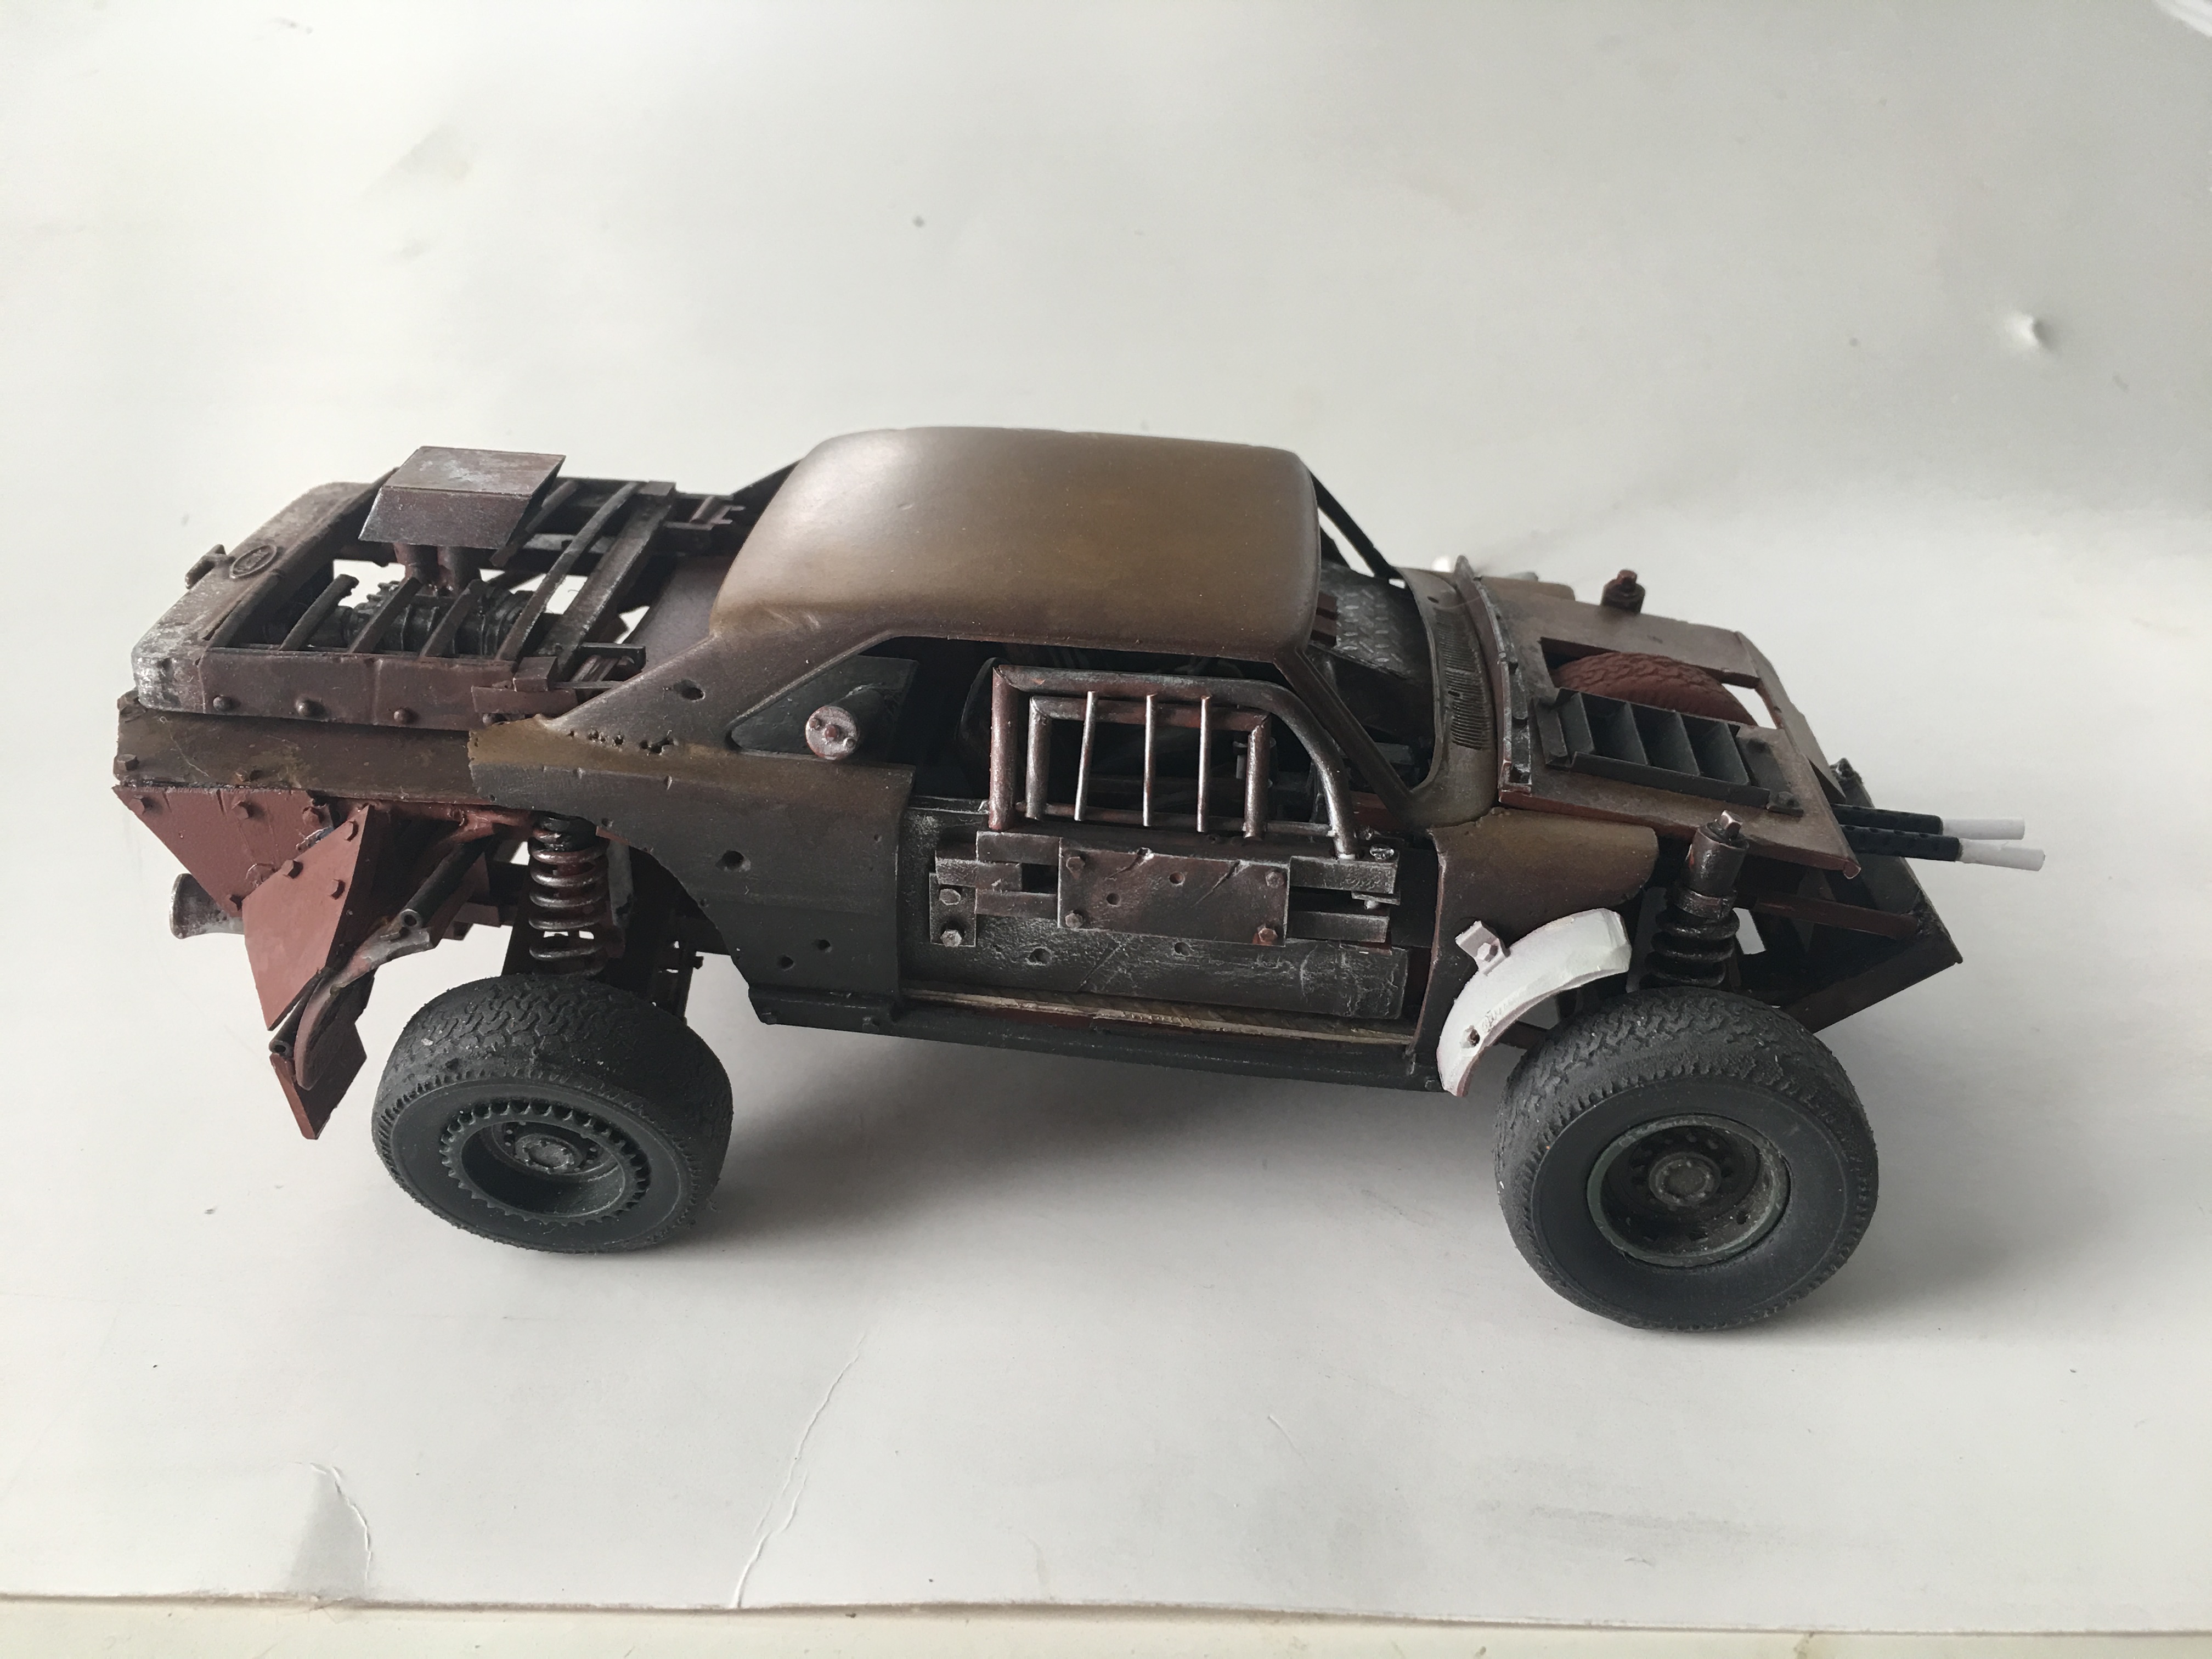
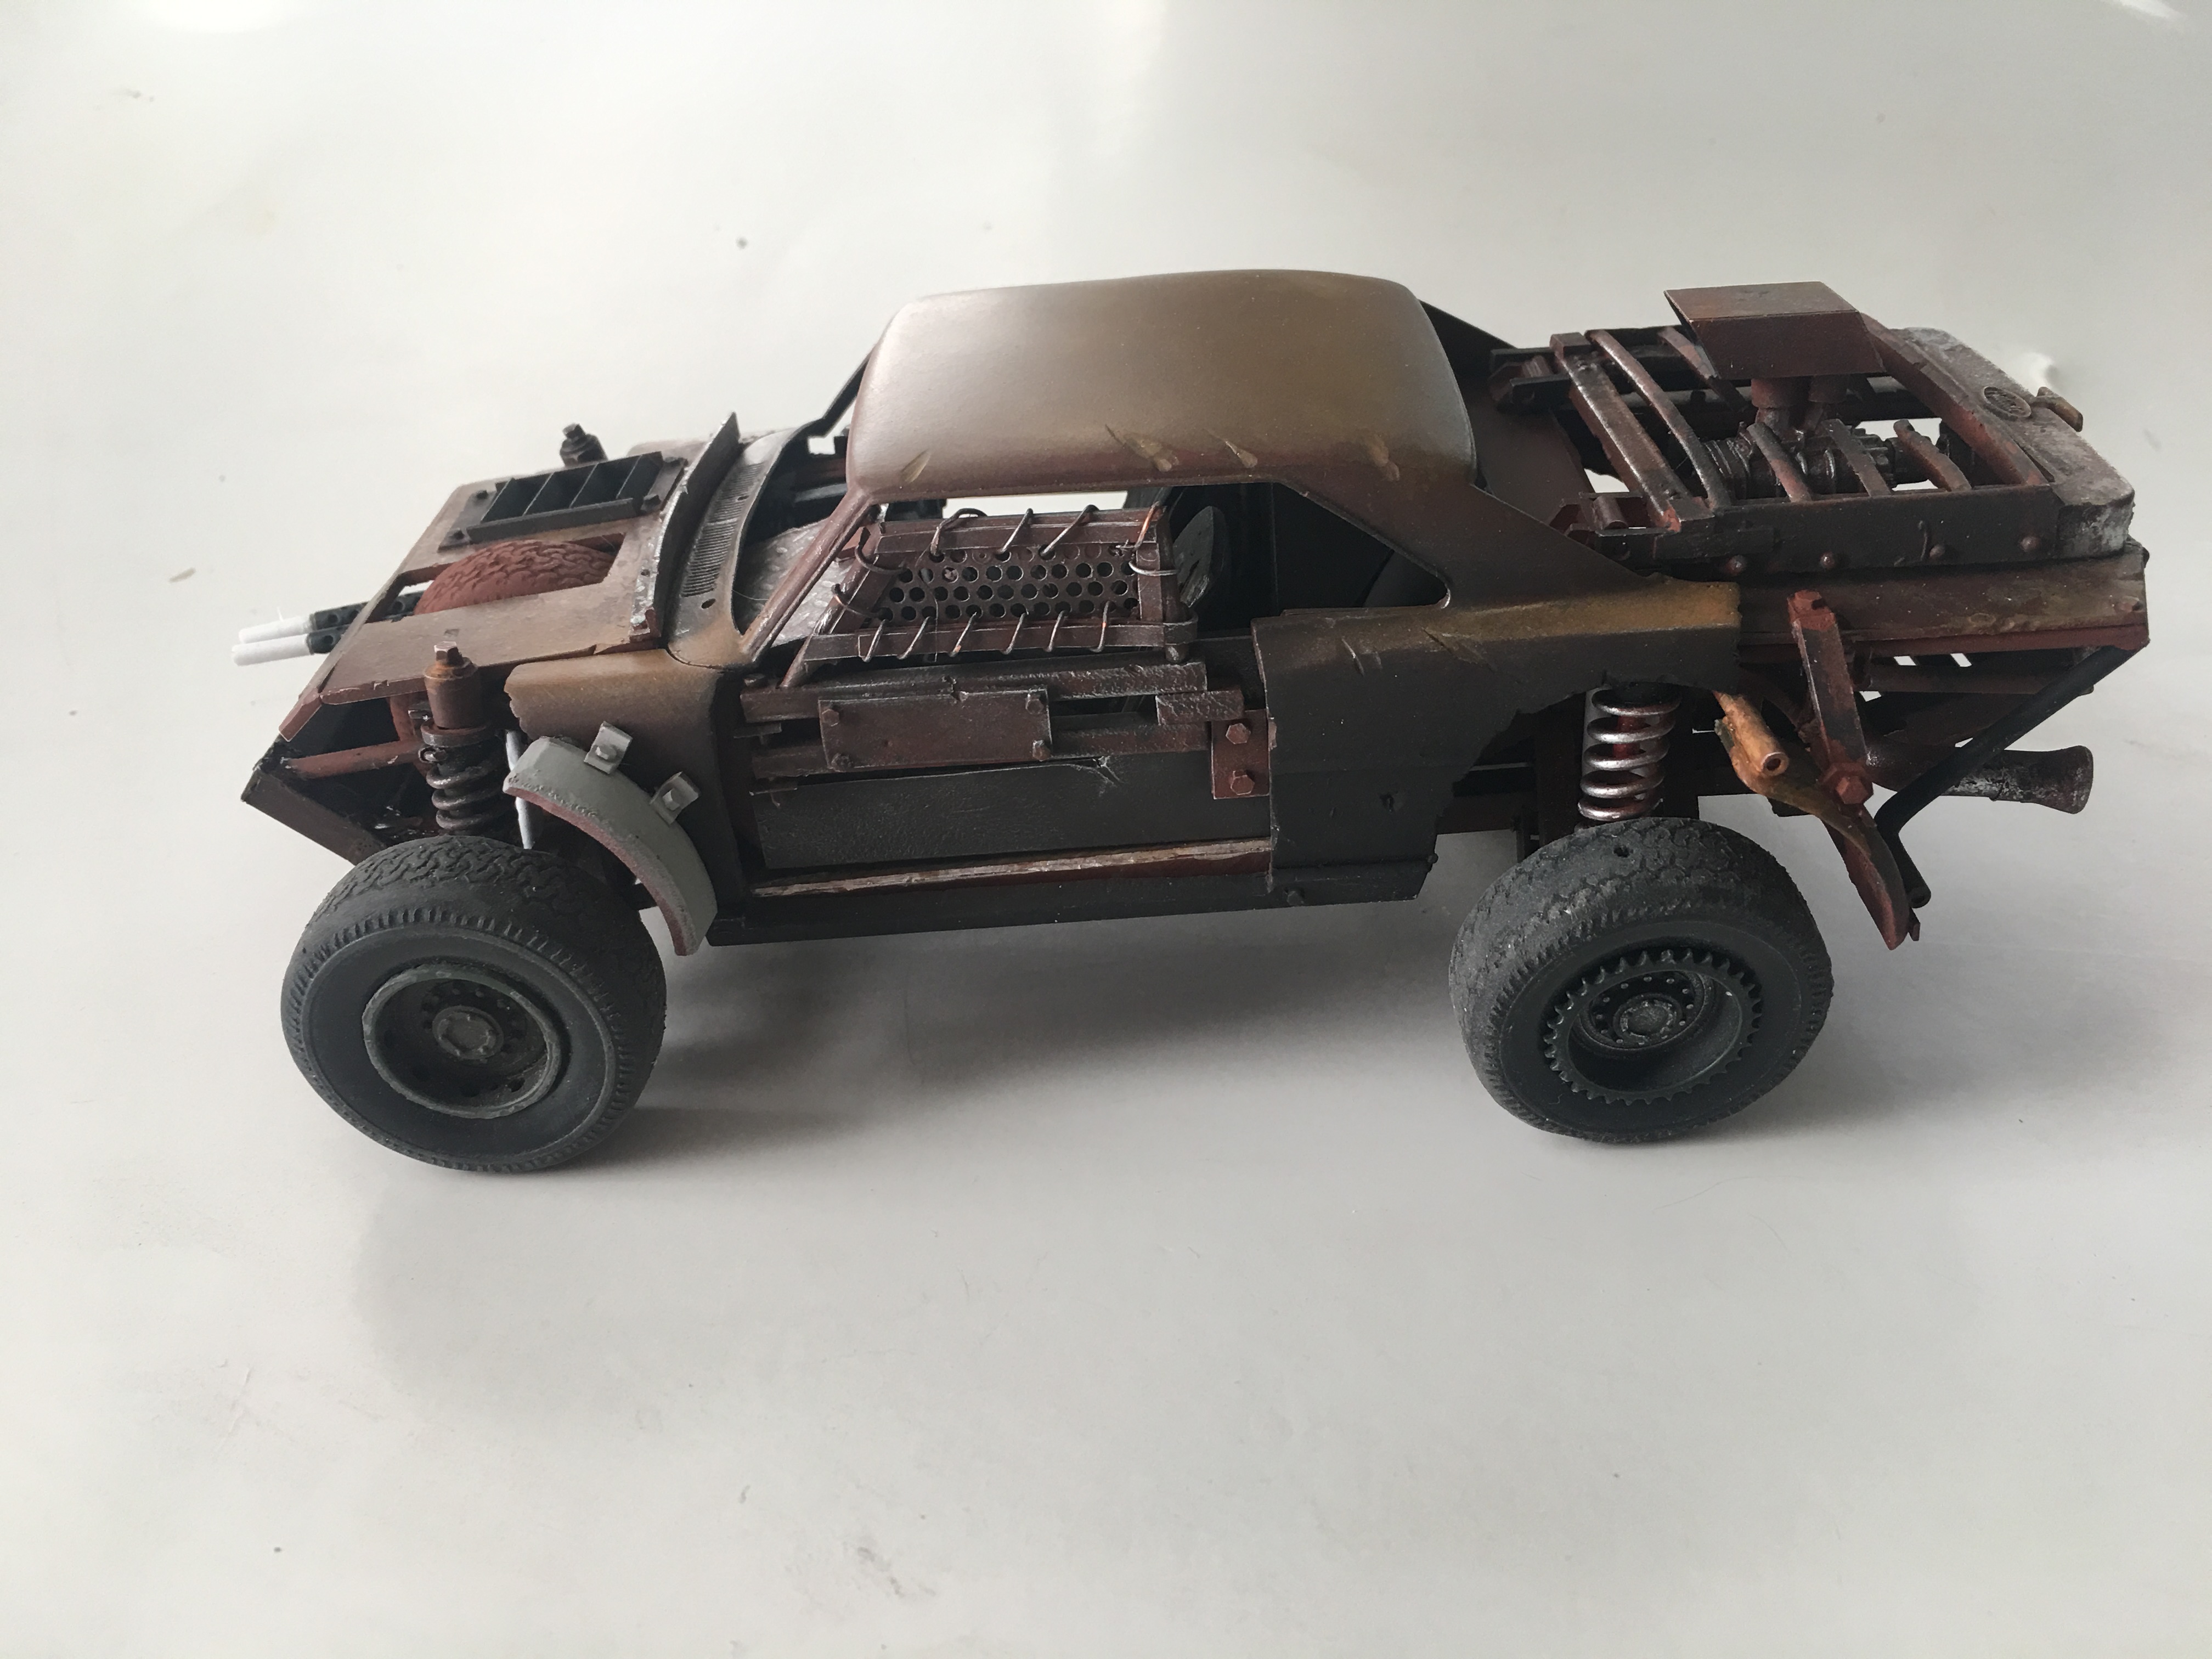
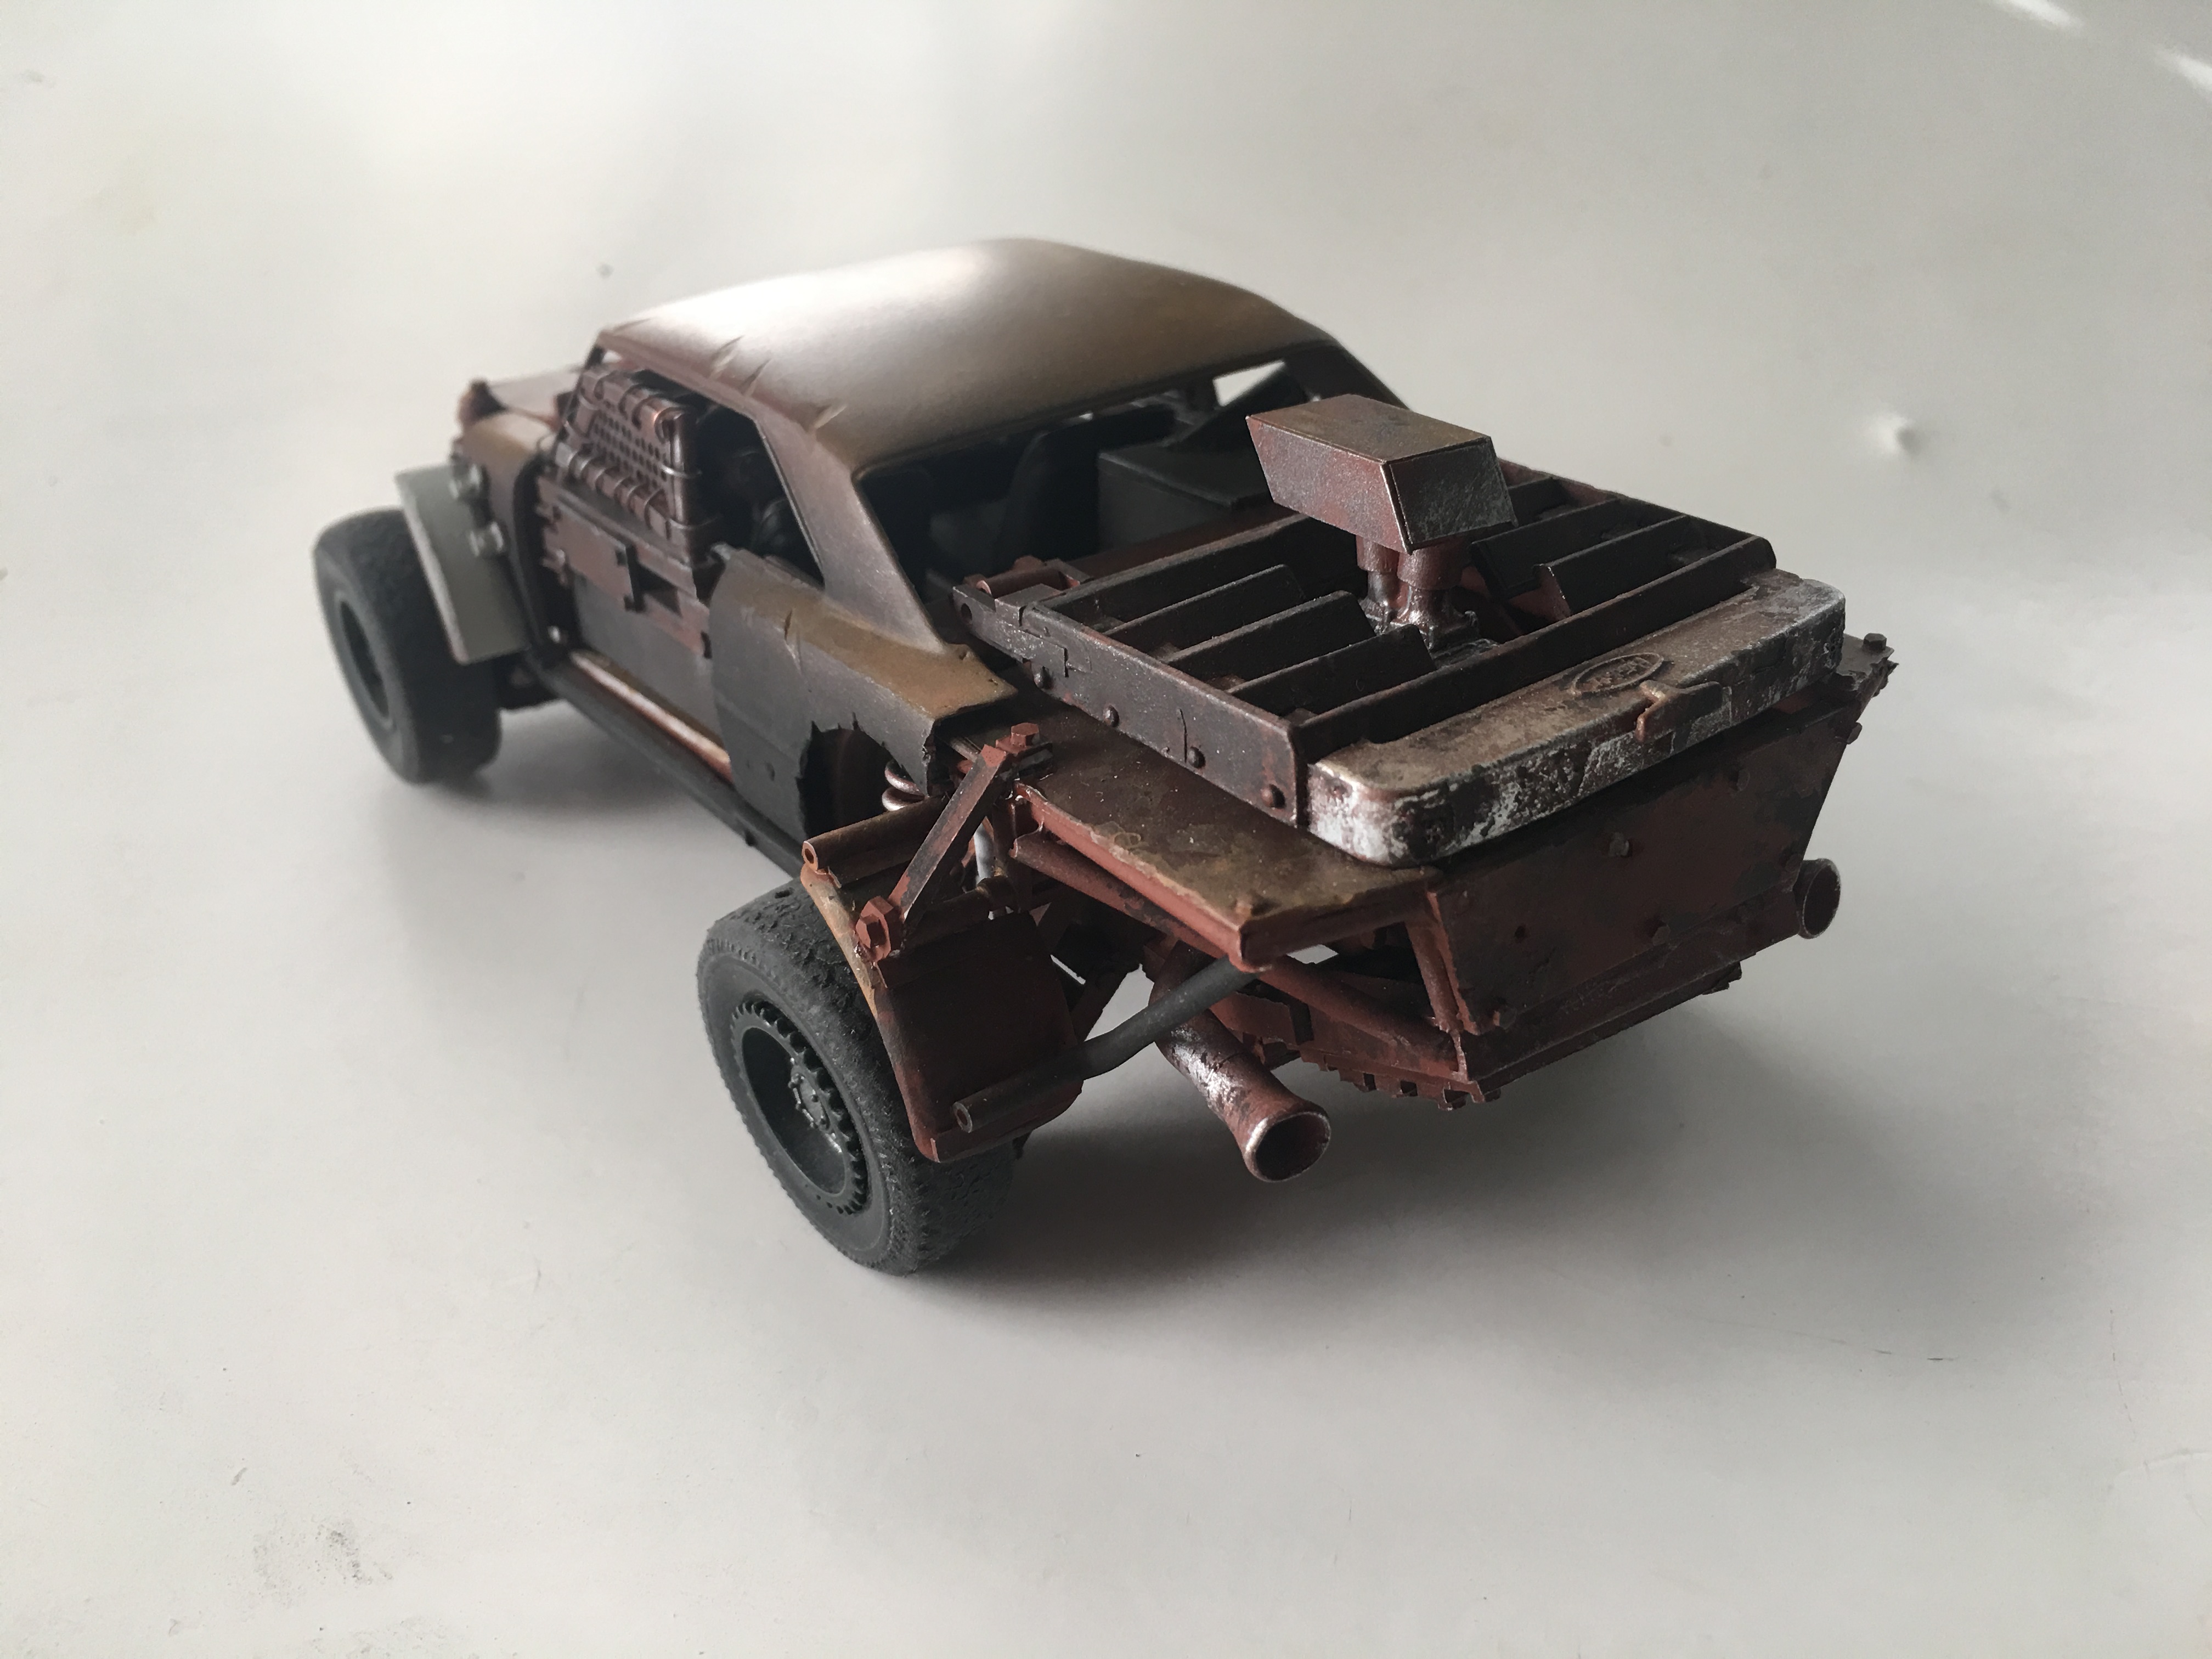
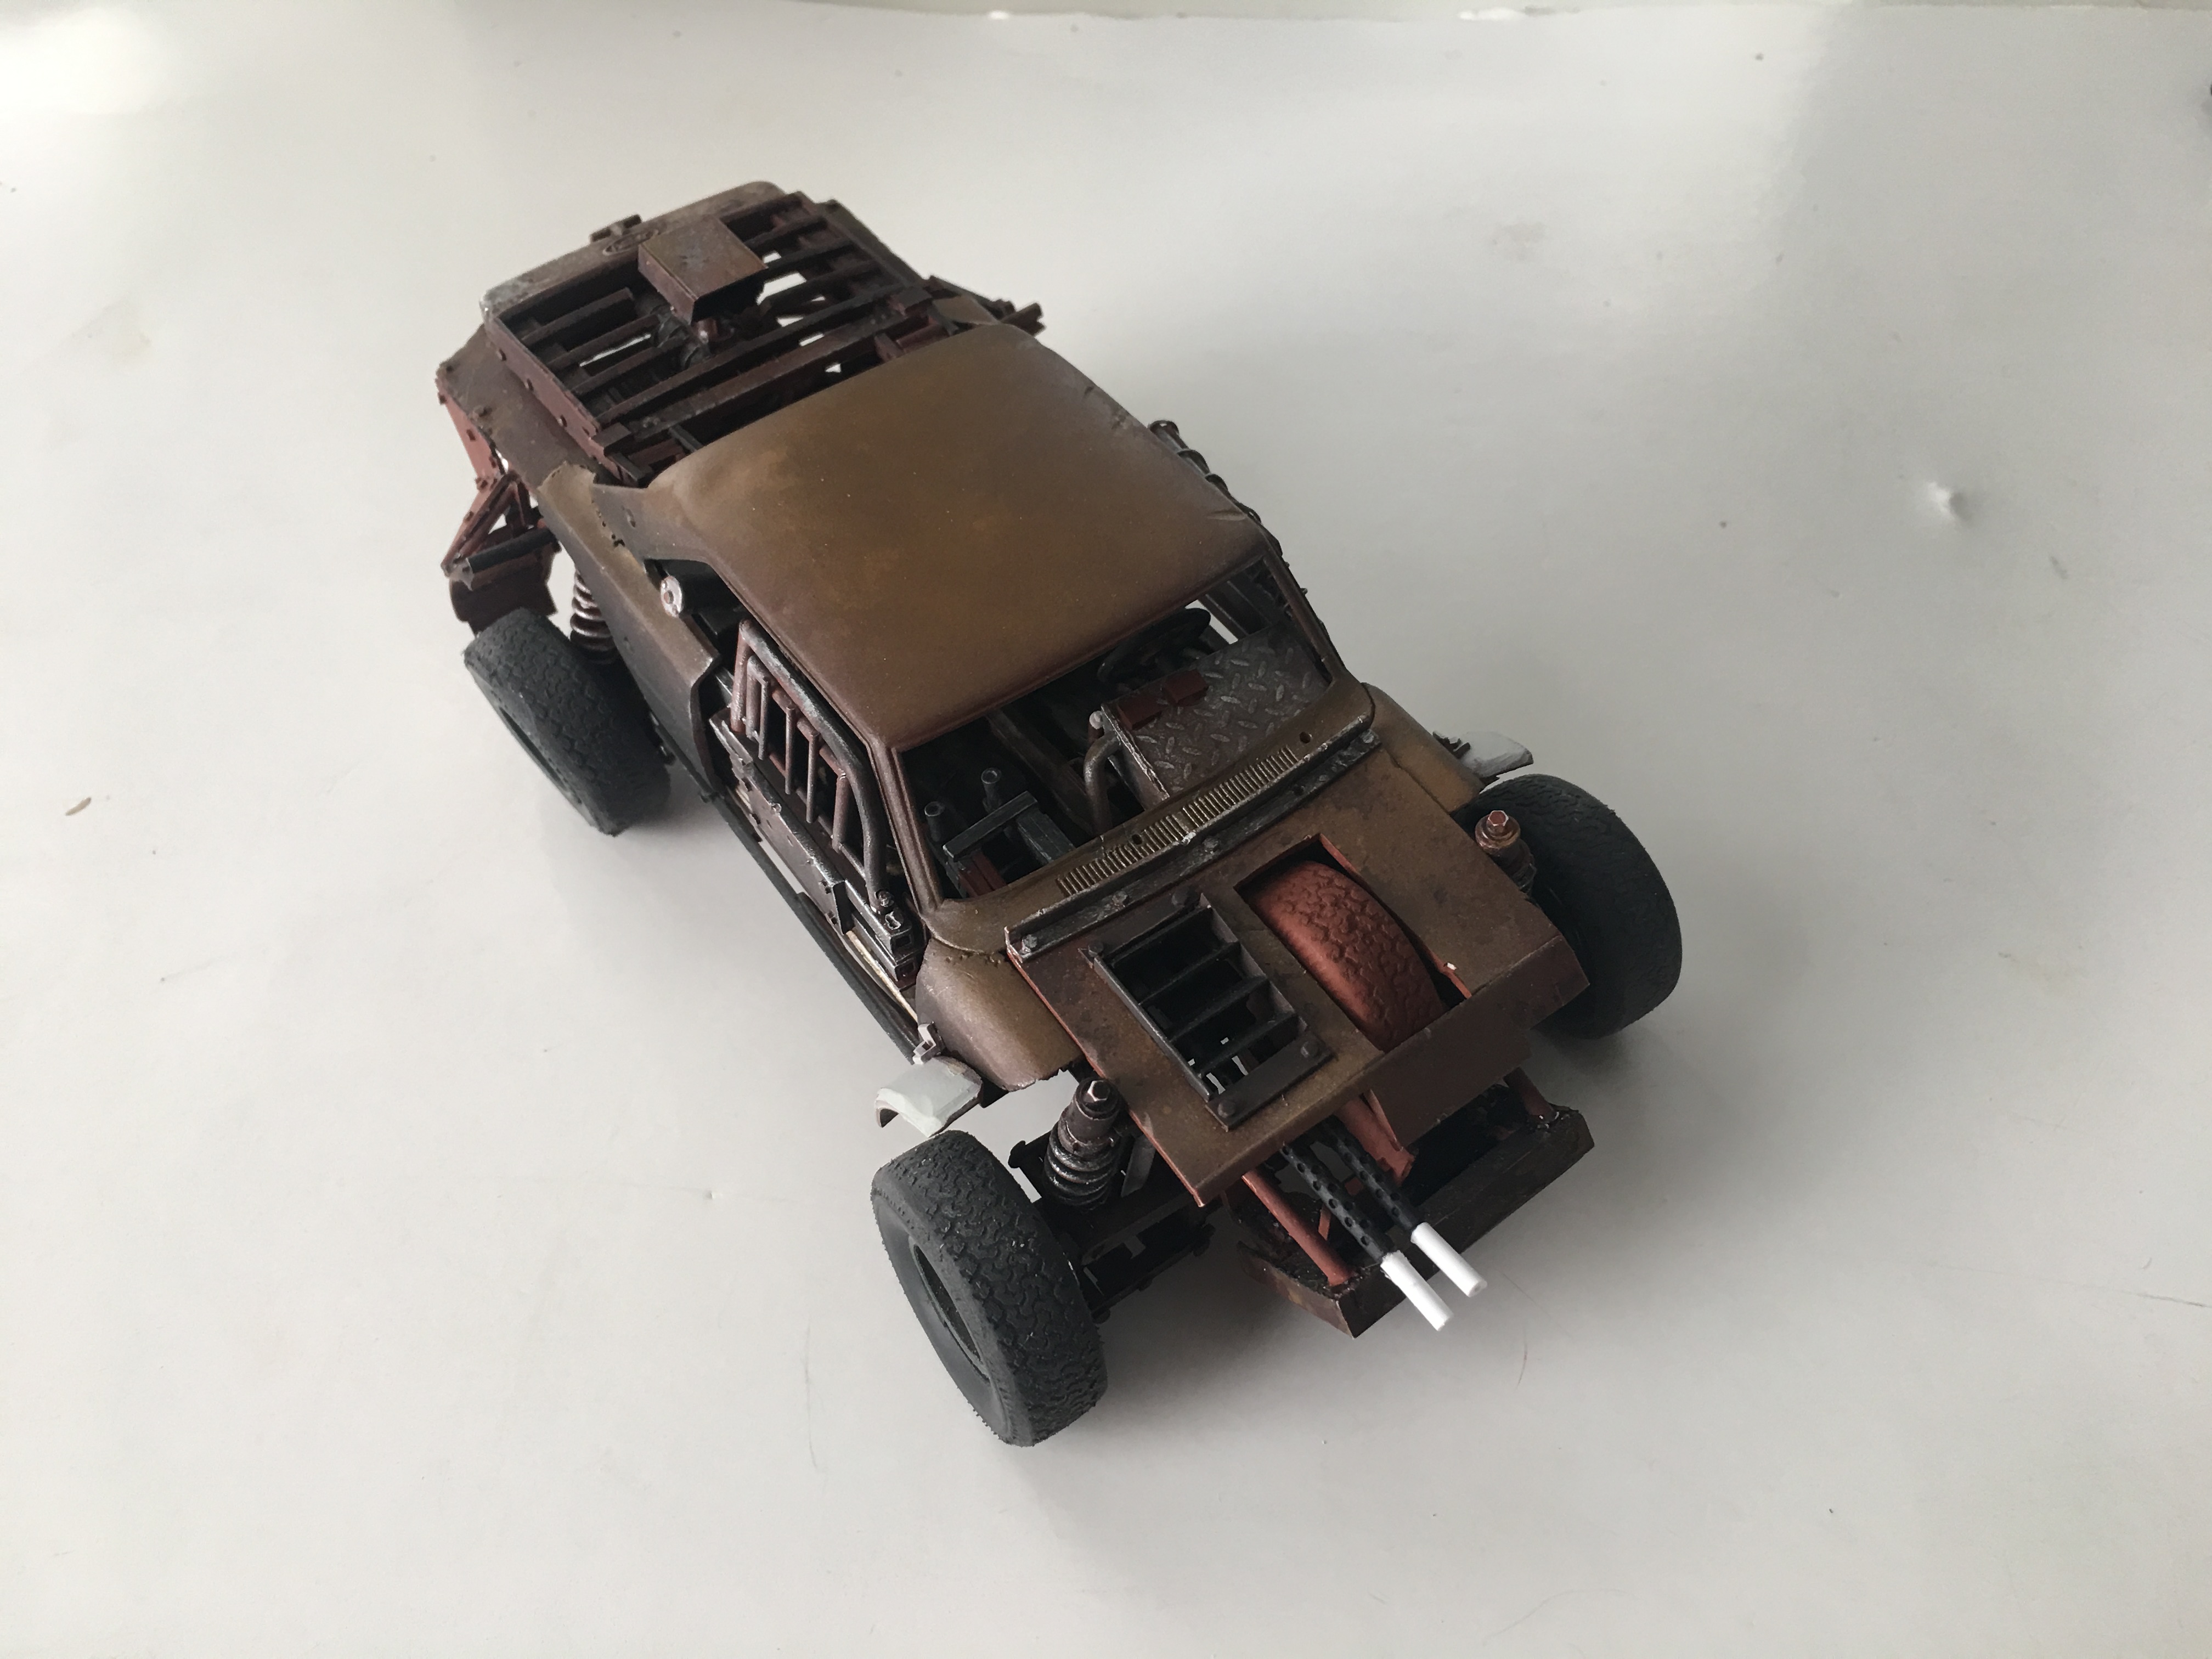
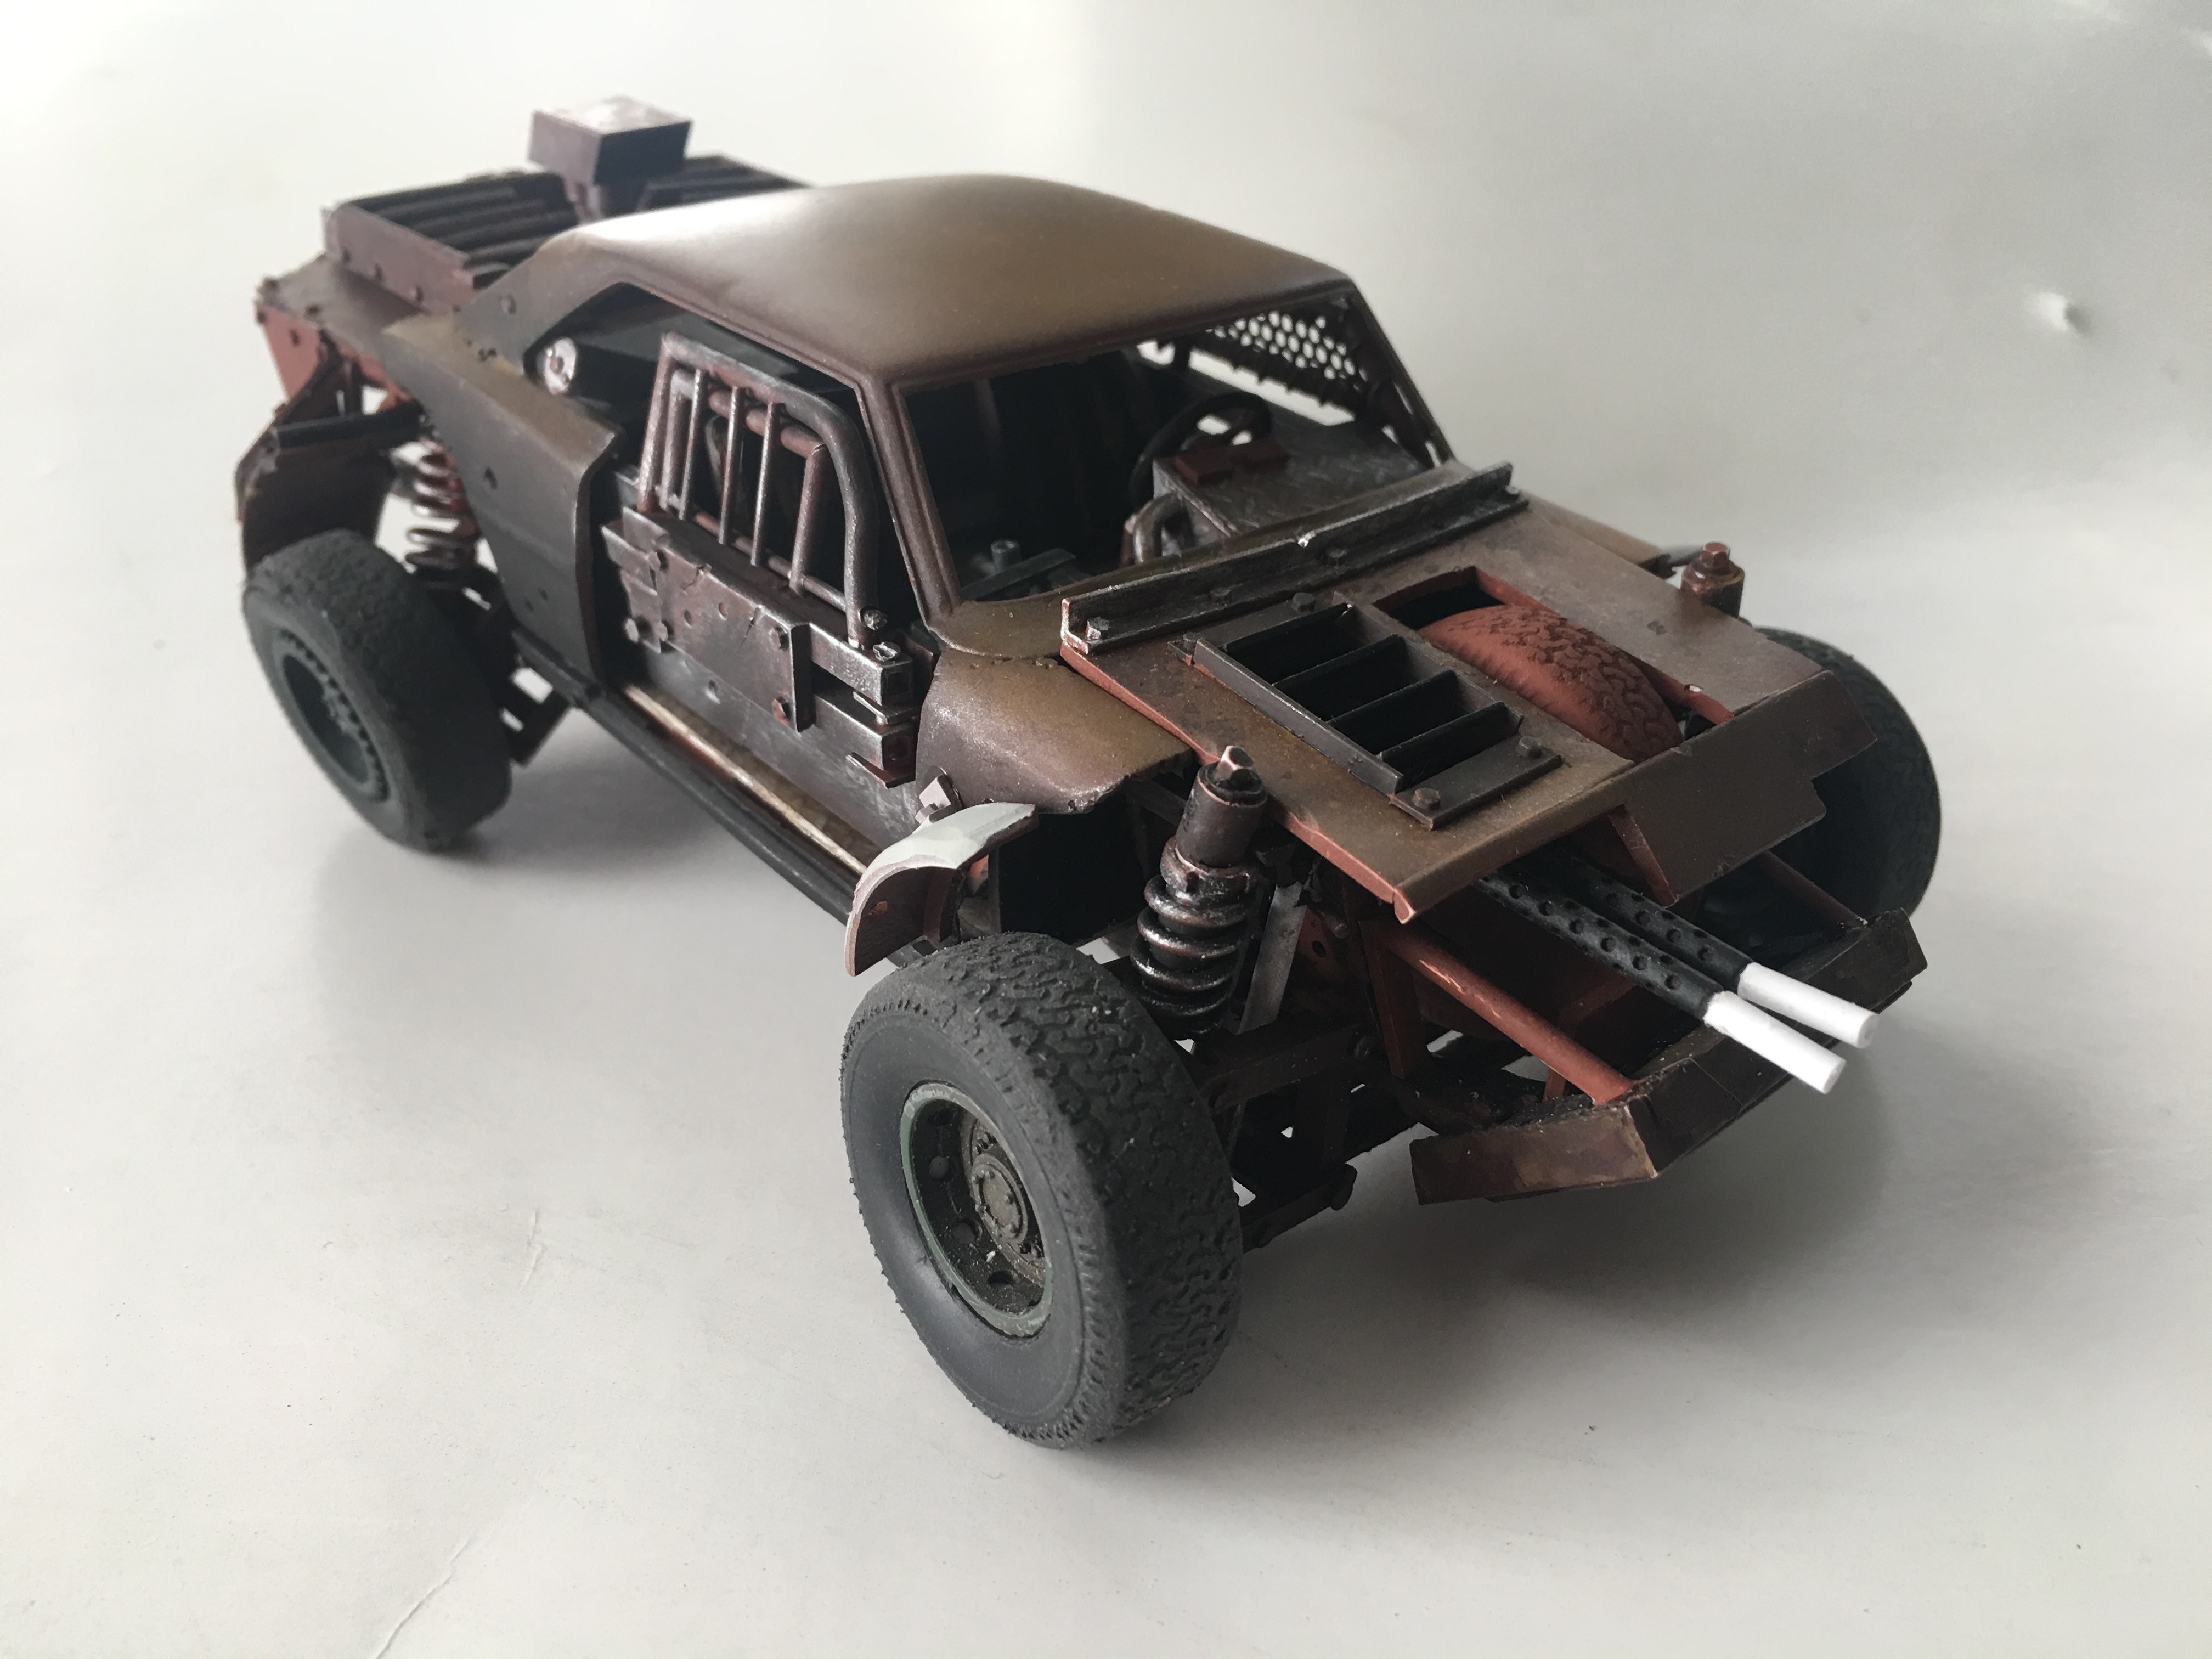
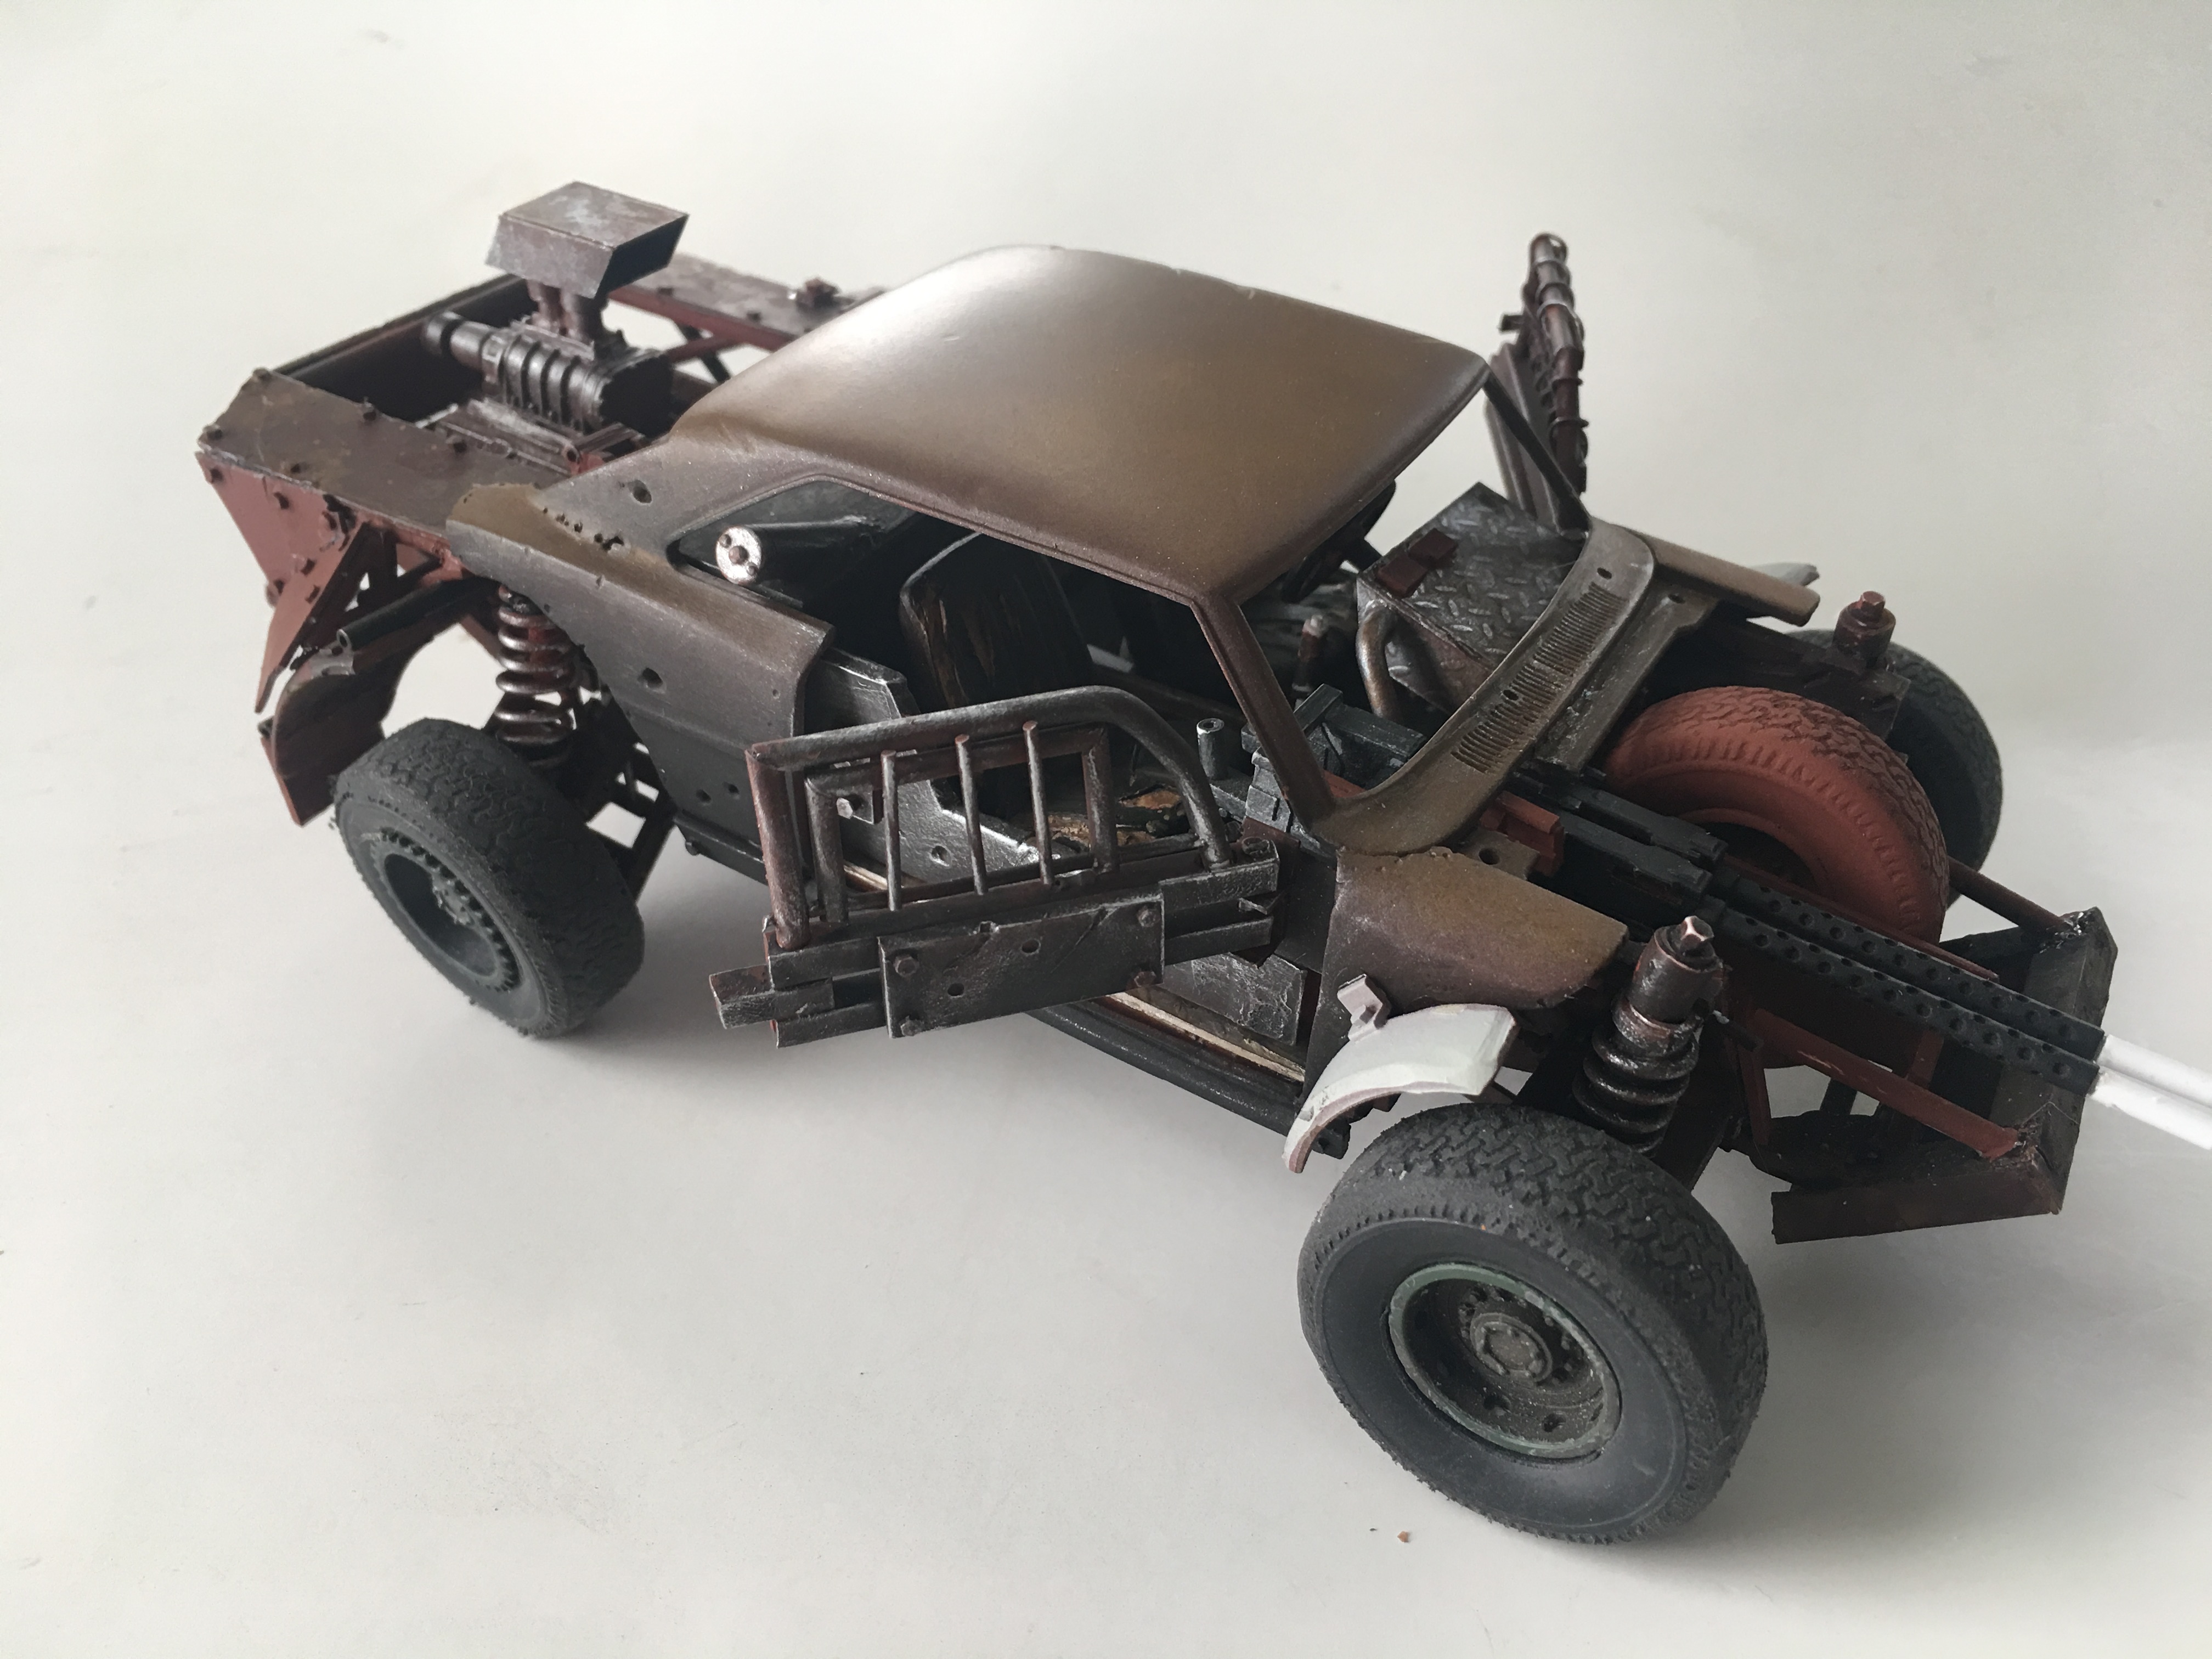
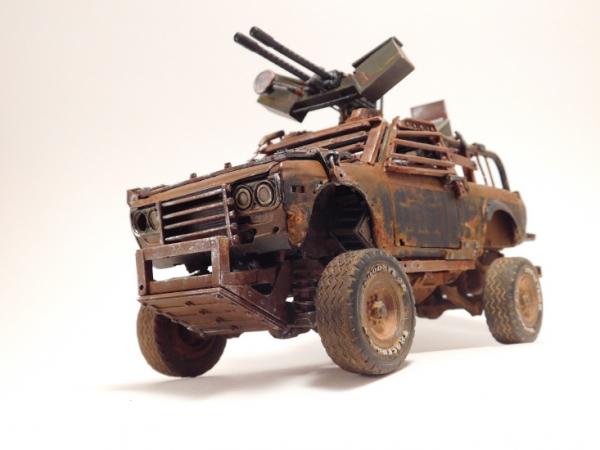
It's been a few years since my last post apocalypse vehicle. I had originally built this model back in the early 90's. It was sitting in a box in my basement for the past 20 years. It's been repurposed into a post apocalypse recon buggy. The engine is from a Cadillac El Dorado kit that was in the same box in the basement. Might as well use it! The engine cover is from a Peterbilt semi. I had 5 wheels and I really wanted the spare to be mounted and visible. It sticks through the hood next to the intake that cools the 50 caliber. The gas tank is behind the passenger seat. I got the 50 caliber guns from Shapeways a few years ago. It came with 2 sets of dual machine guns. This was the 1st time trying to weather seats to look torn. Thanks for looking!
-
2012 POST APOCALYPSE/ZOMBIE HUNTER COMMUNITY BUILD
Daxman replied to Dr. Cranky's topic in Community Builds
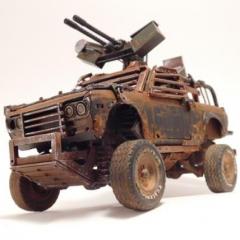
I had an old 67 Chevy Nova model that I had built back in the early 90's. I decided it was time to remove the shiny red paint and chrome. Time for a complete makeover. This is a work in progress. There's a lot going on up at the front of the car. Dual 50 caliber machine guns that run into the cabin for passenger use.. Intake to cool the guns. Exposed suspension. I had 5 wheels and I was determined to mount a spare somewhere on this car. The only place it would fit and be covered from stray bullets is under the front hood. The engine cover is from a Peterbilt semi. The engine rear mounted to make room for the front mounted guns.
-
1975 Datsun pickup
Daxman replied to Daxman's topic in WIP: Model Trucks: Pickups, Vans, SUVs, Light Commercial
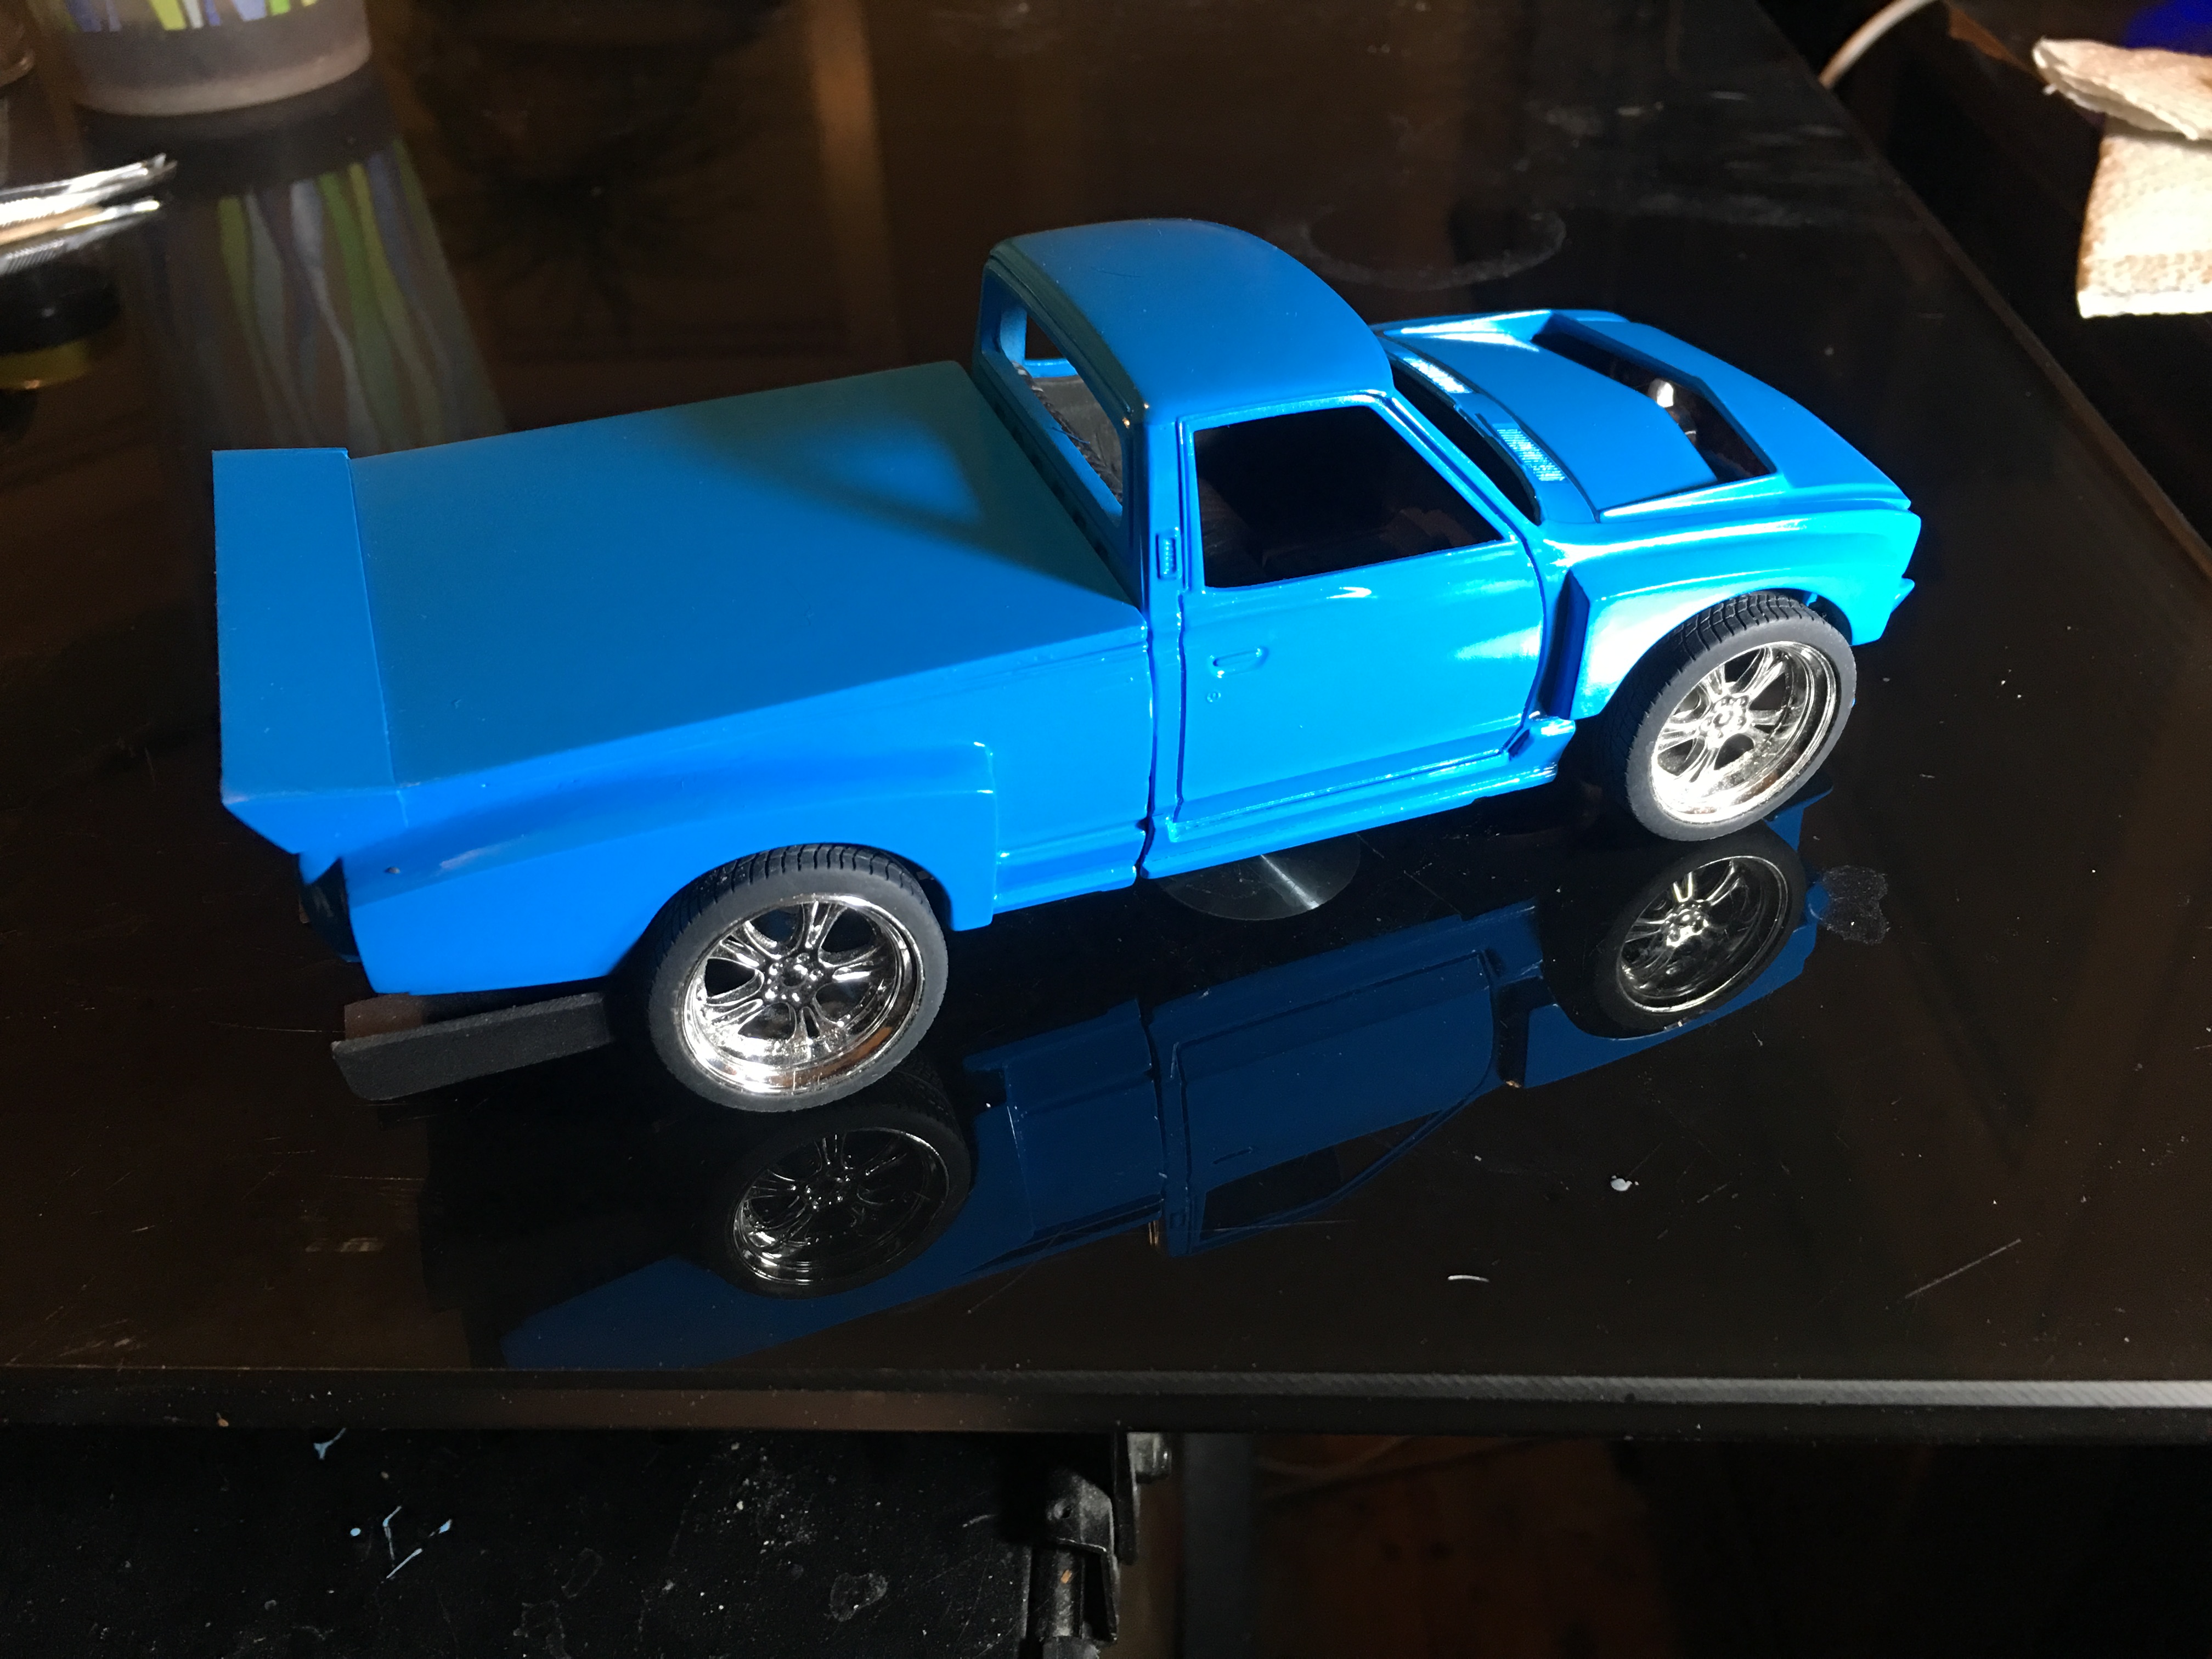
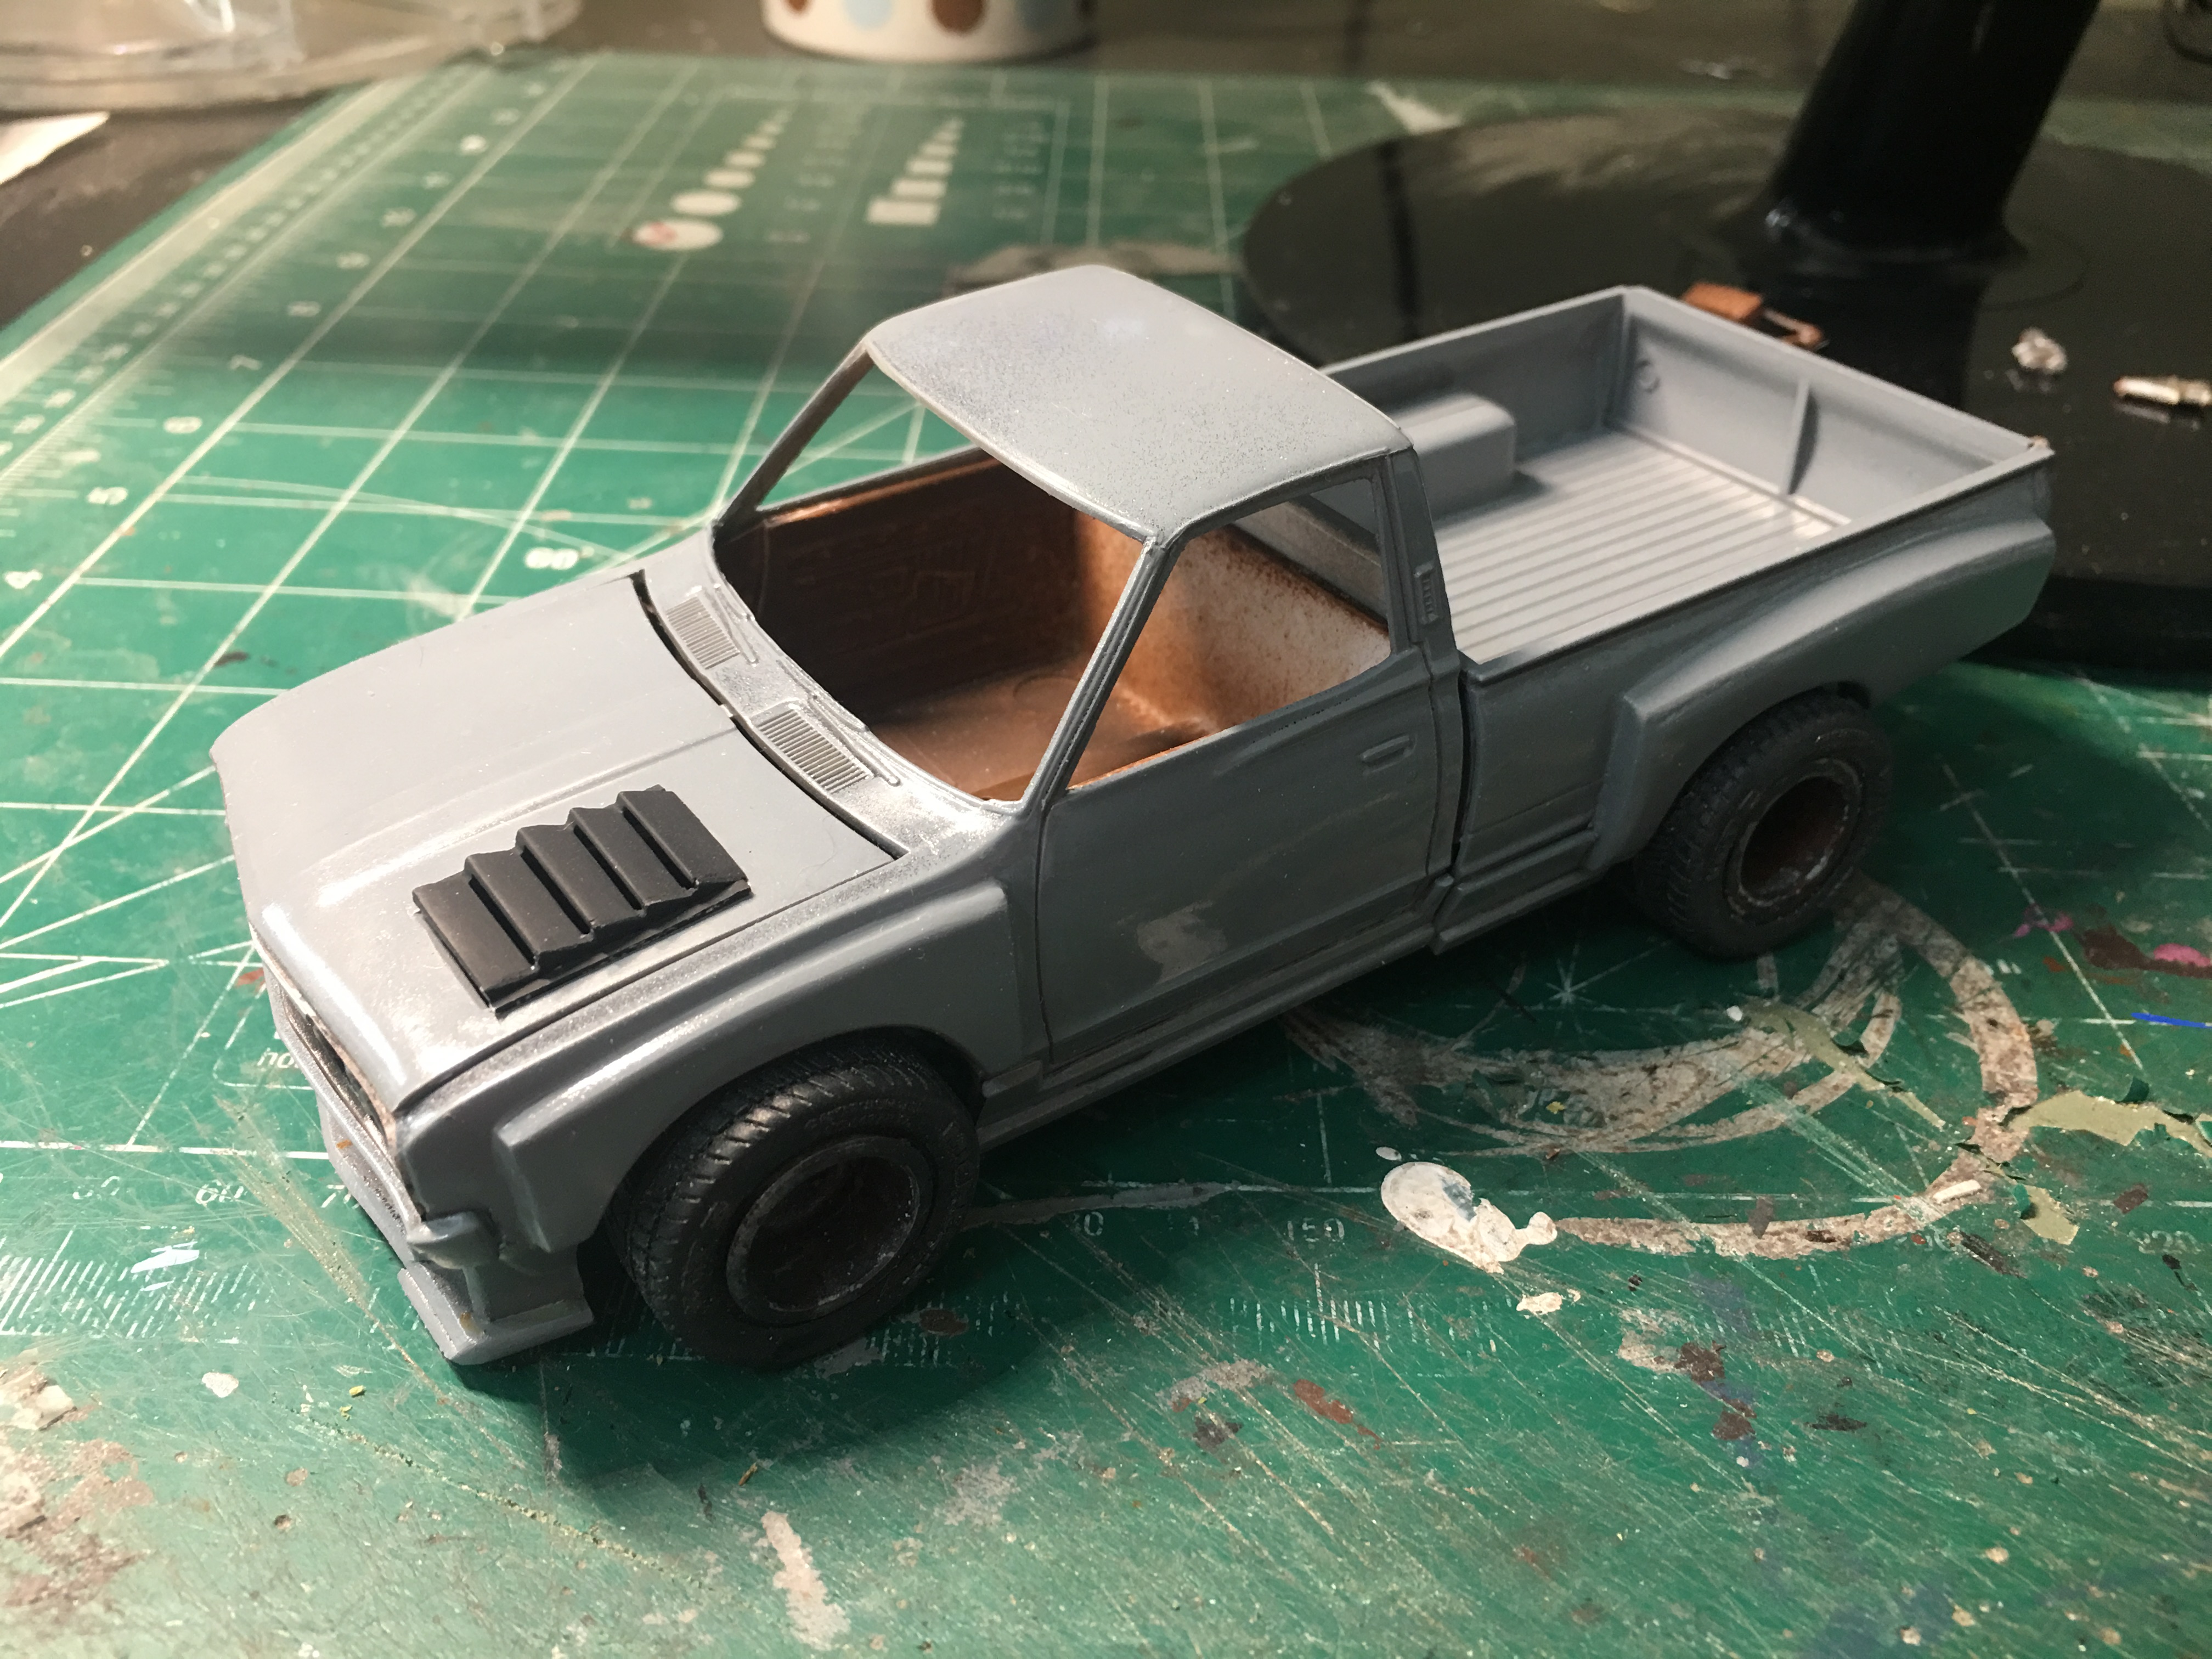
I added some color. Similar to the photo above. Tamaya TS 23 light blue. I plan to add a matte black graphics and ground effects.
-
1975 Datsun pickup
Daxman replied to Daxman's topic in WIP: Model Trucks: Pickups, Vans, SUVs, Light Commercial
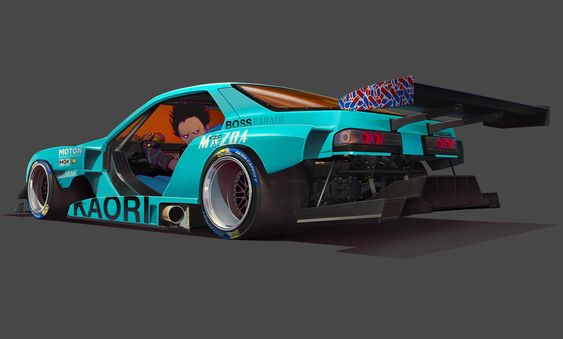
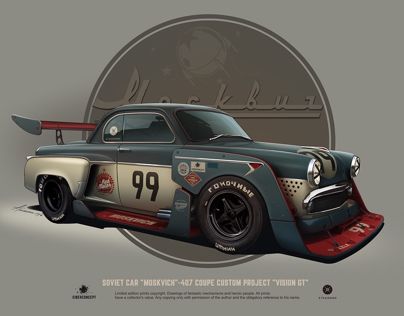
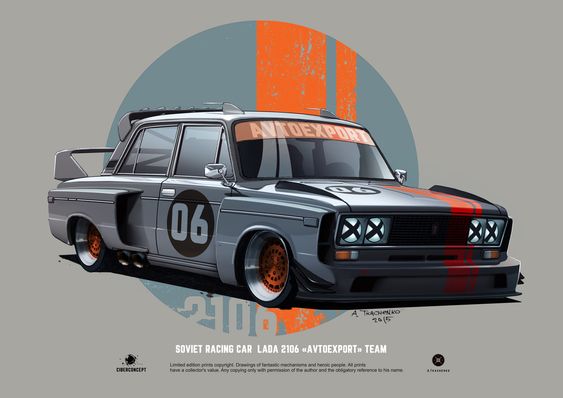
Just got back from a San Diego vacation and went right to work on the Datsun. I had an old custom hood from a late 60's Buick Riviera kit. I did a little trimming and bending and it fits just right. Although I believe the new hood is going to interfere with the valve cover... While on vacation, I found these amazing illustrations. Both artists below have some fantastic car designs. I hope to achieve a similar look with the Datsun.
-
1975 Datsun pickup
Daxman replied to Daxman's topic in WIP: Model Trucks: Pickups, Vans, SUVs, Light Commercial
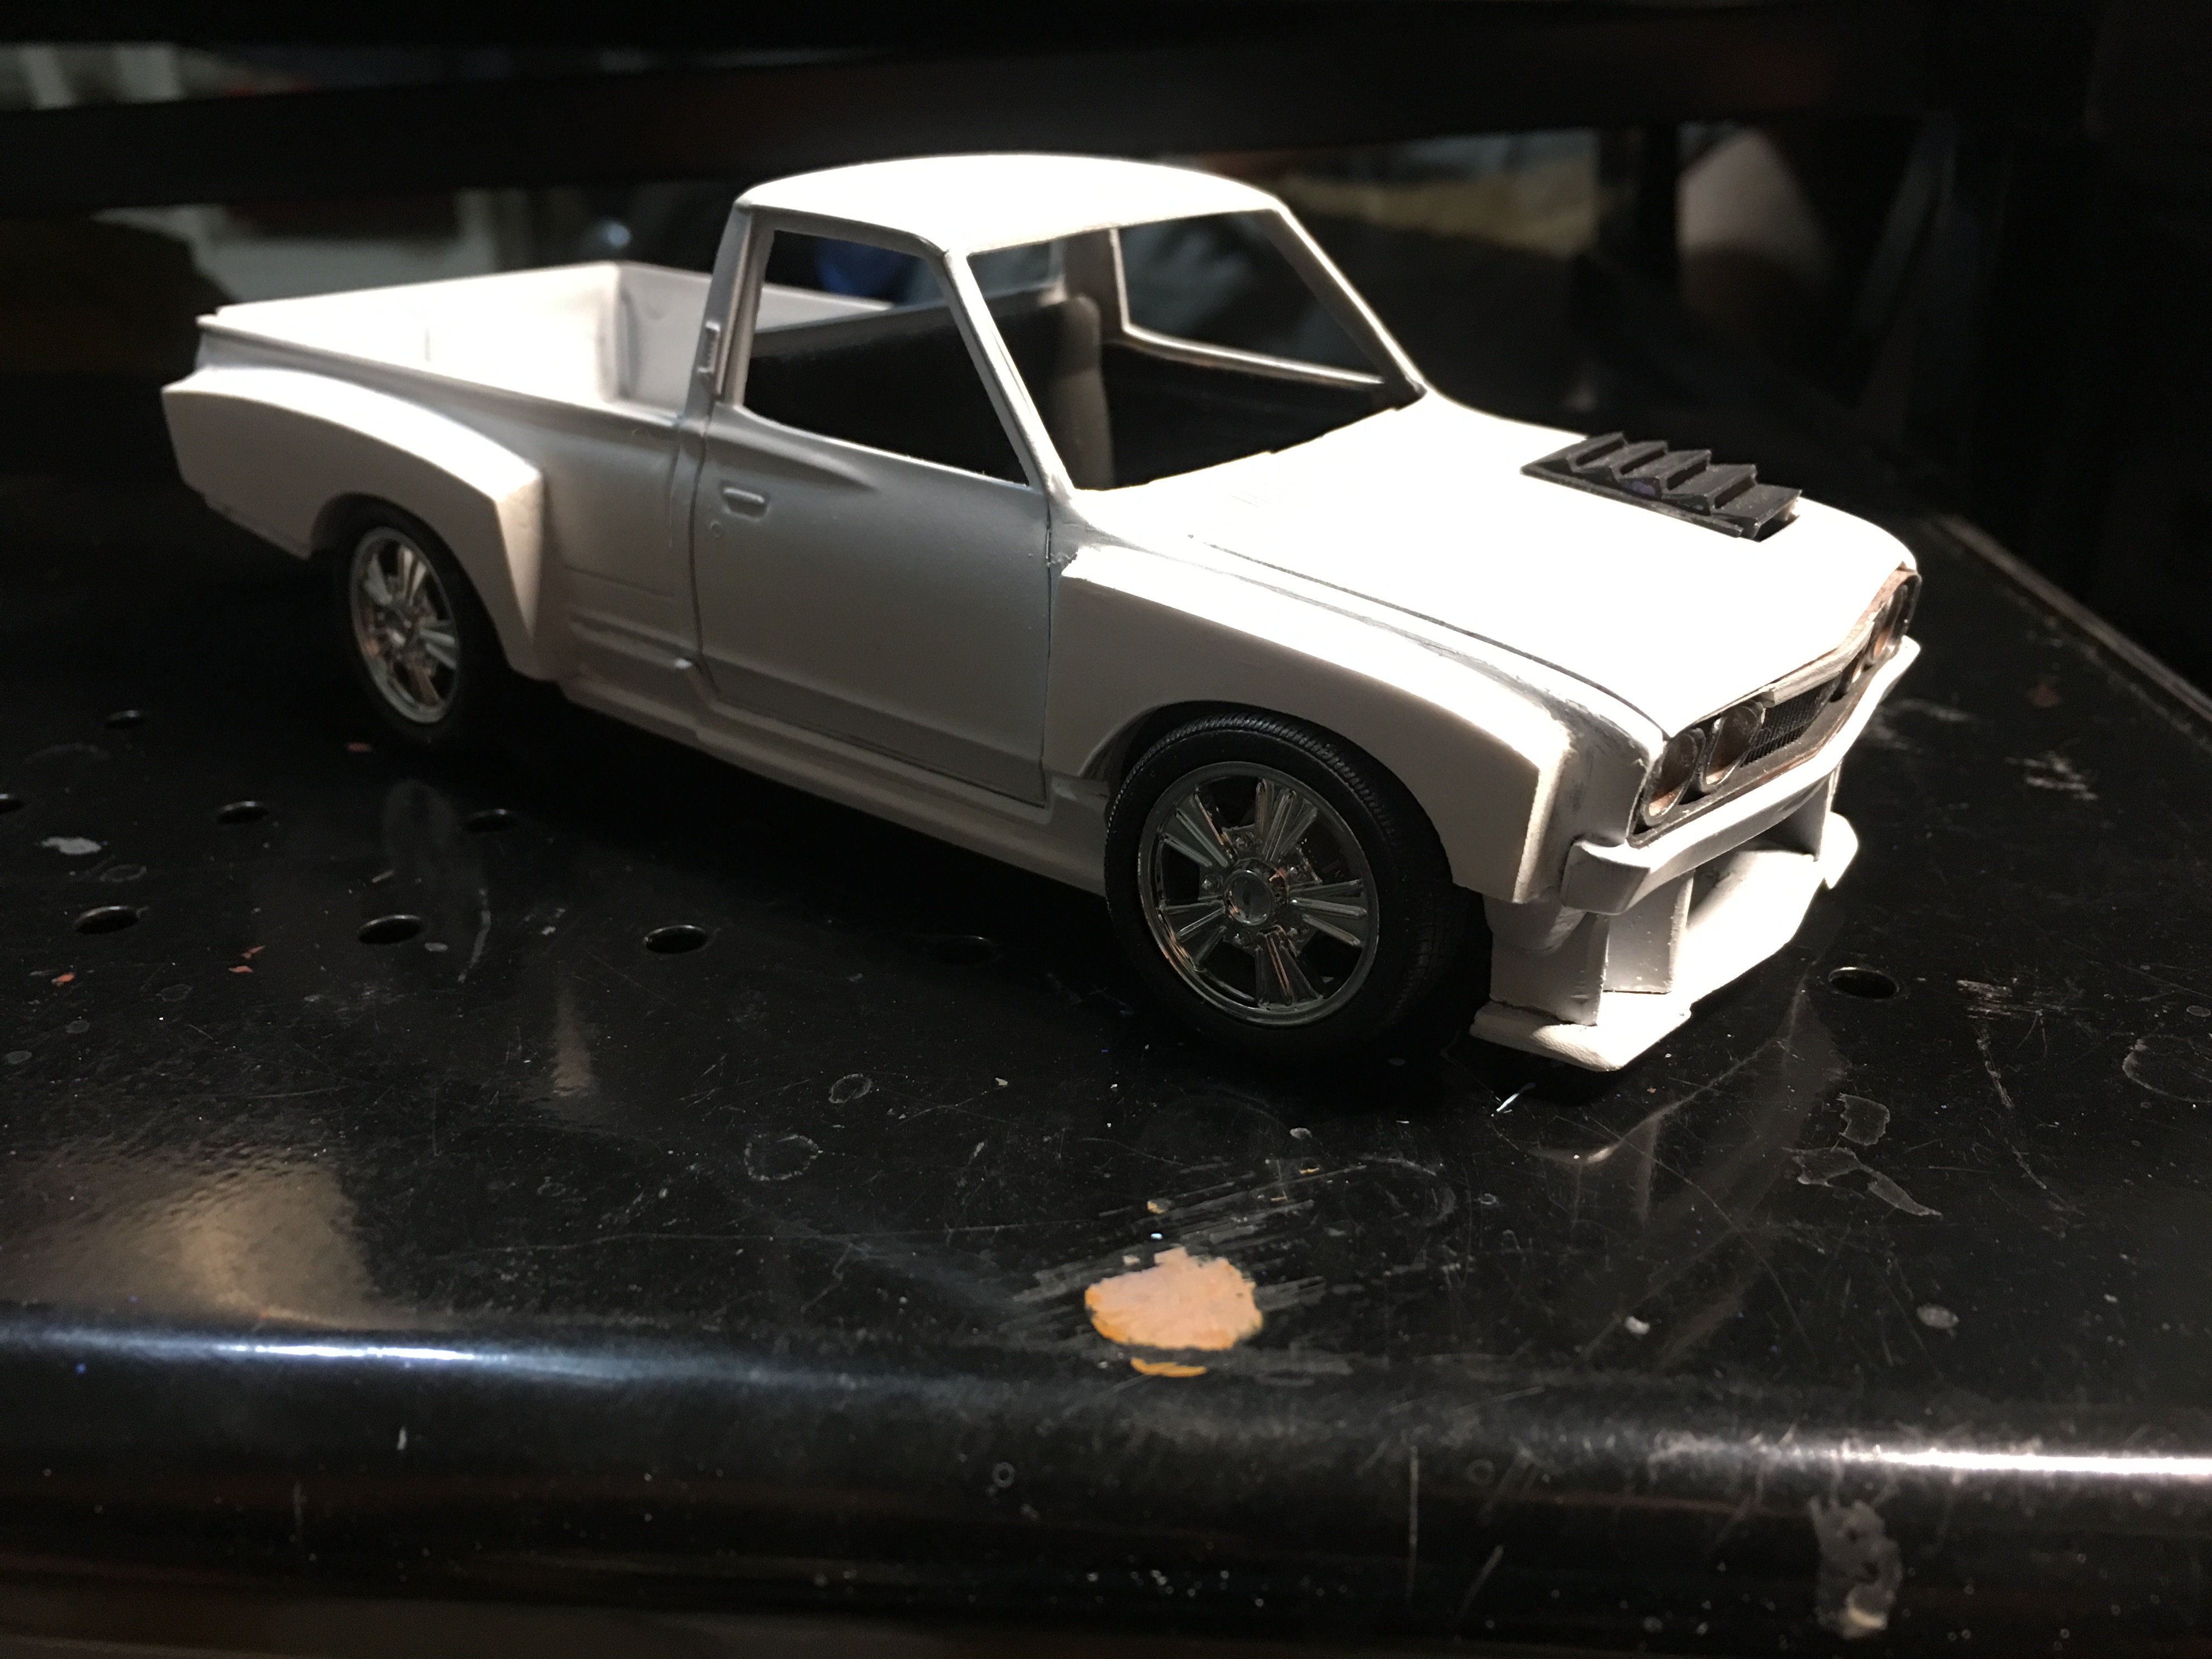
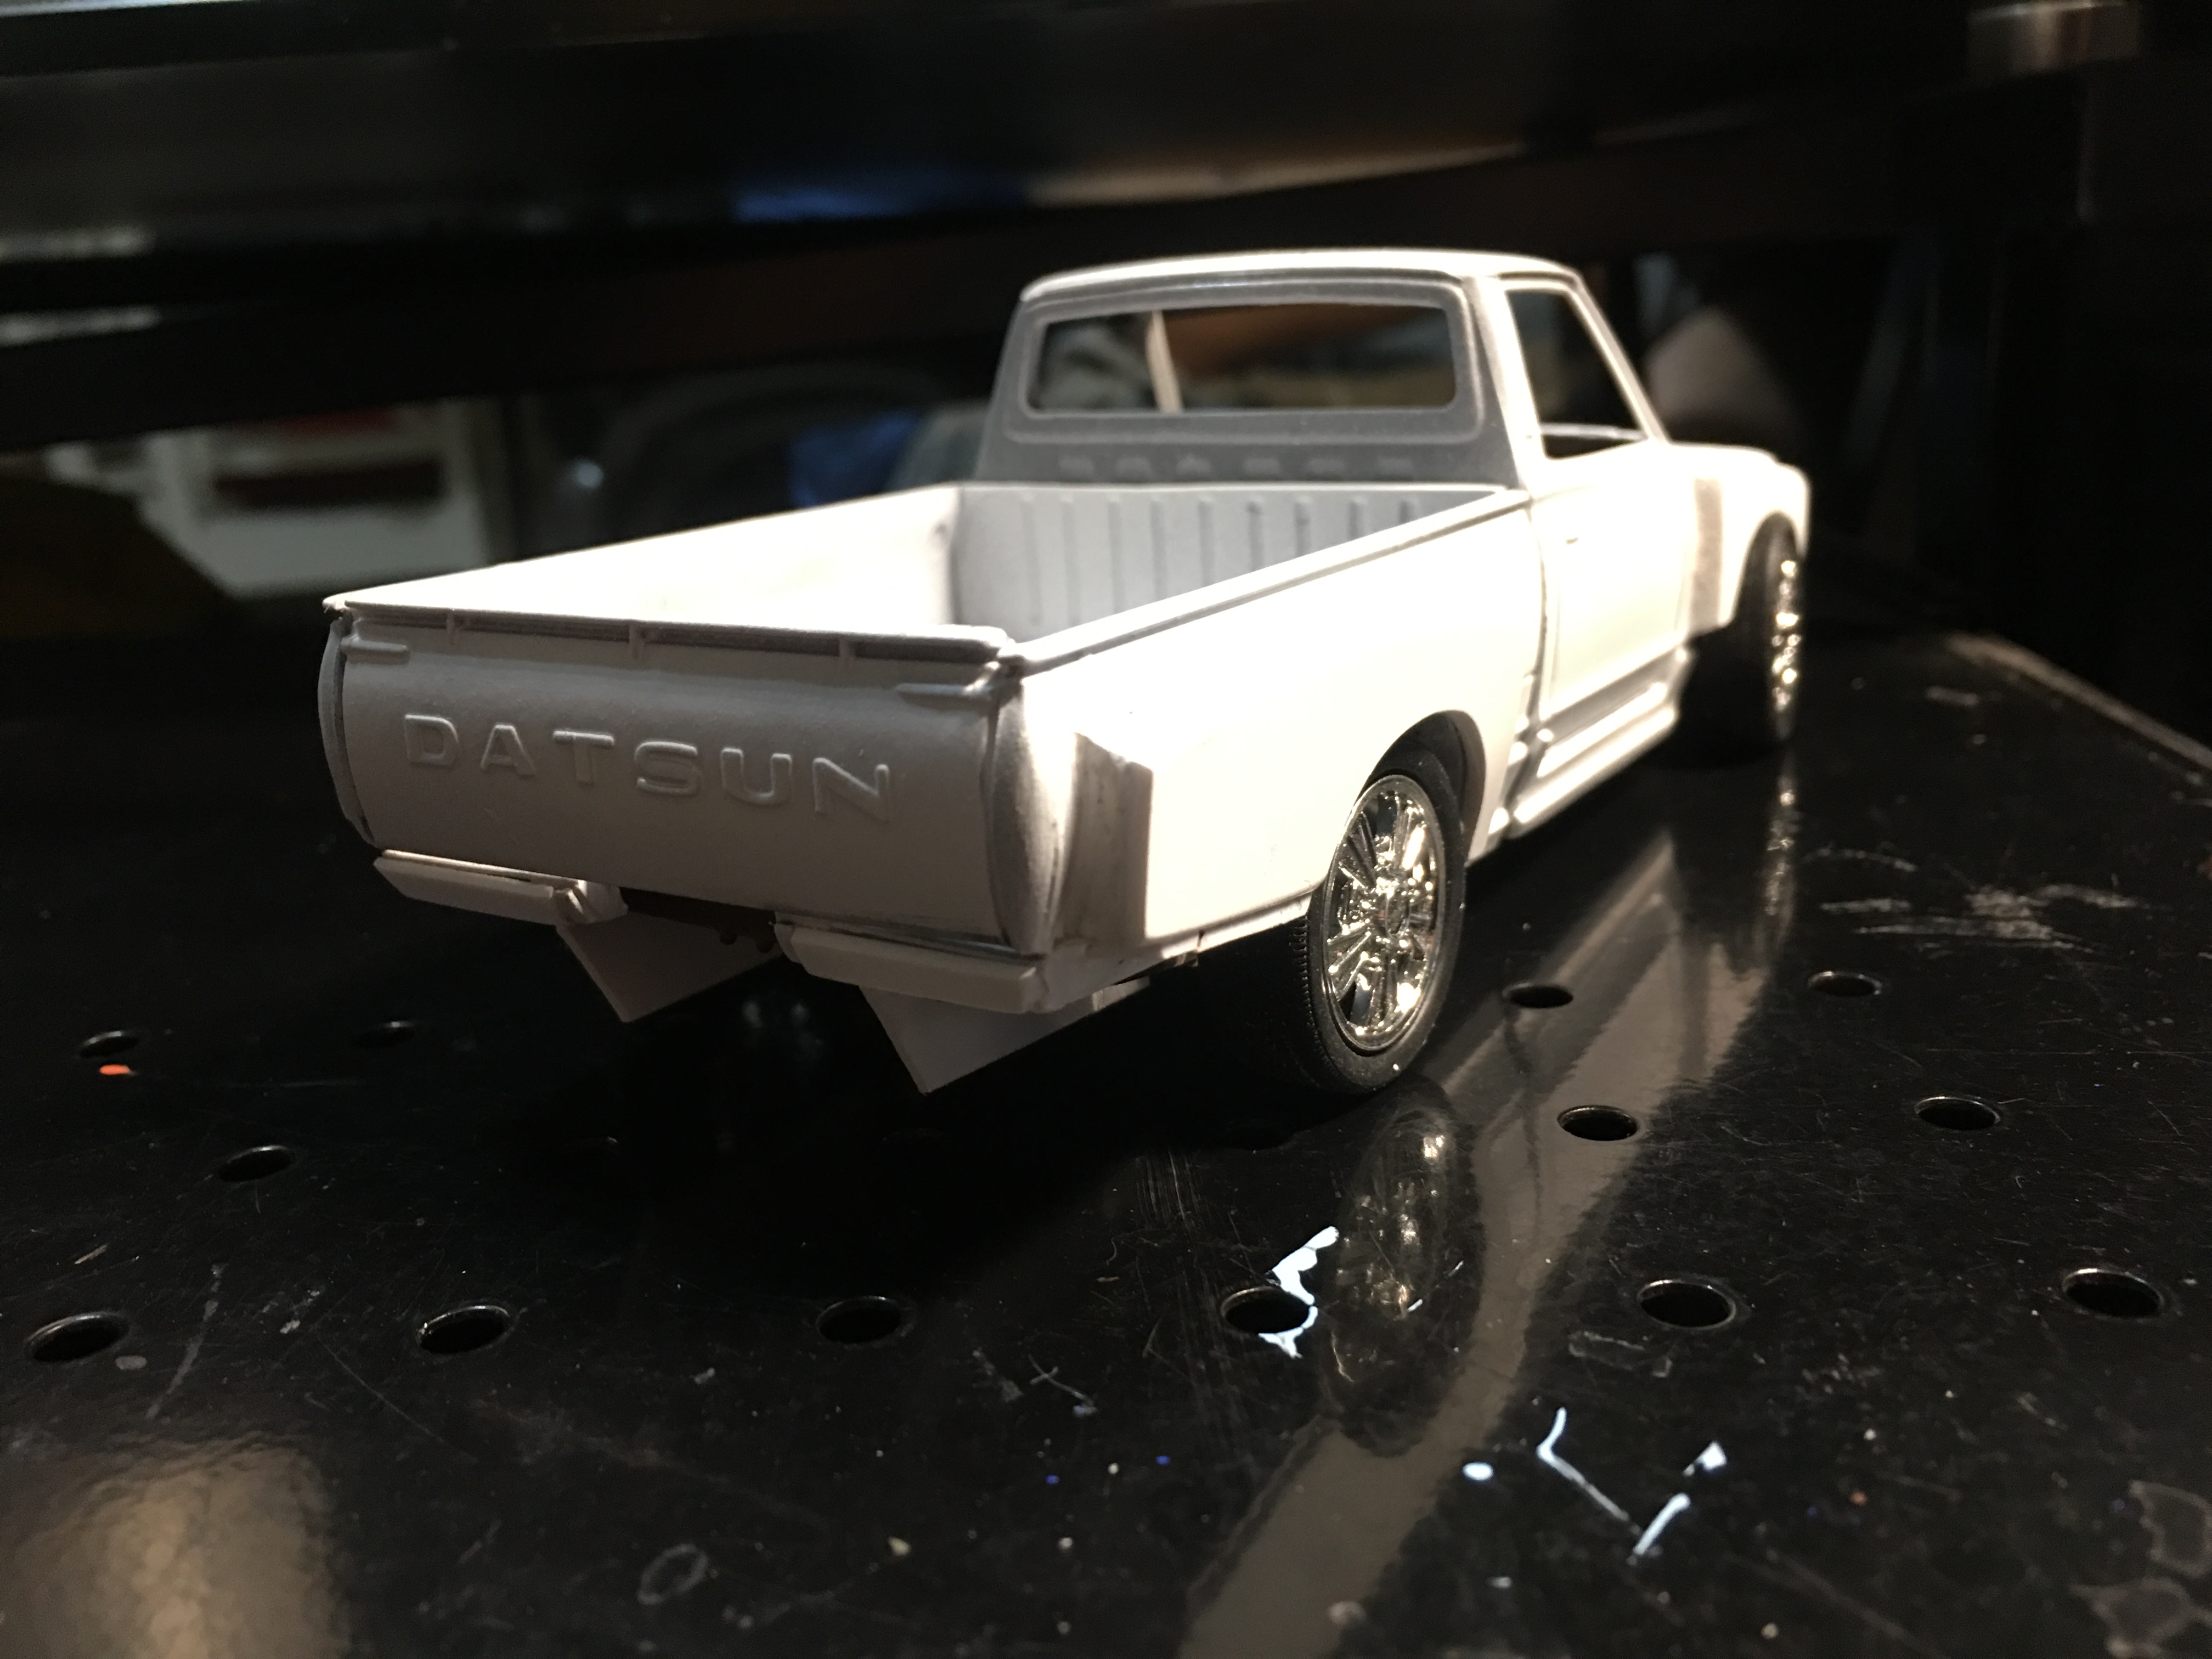
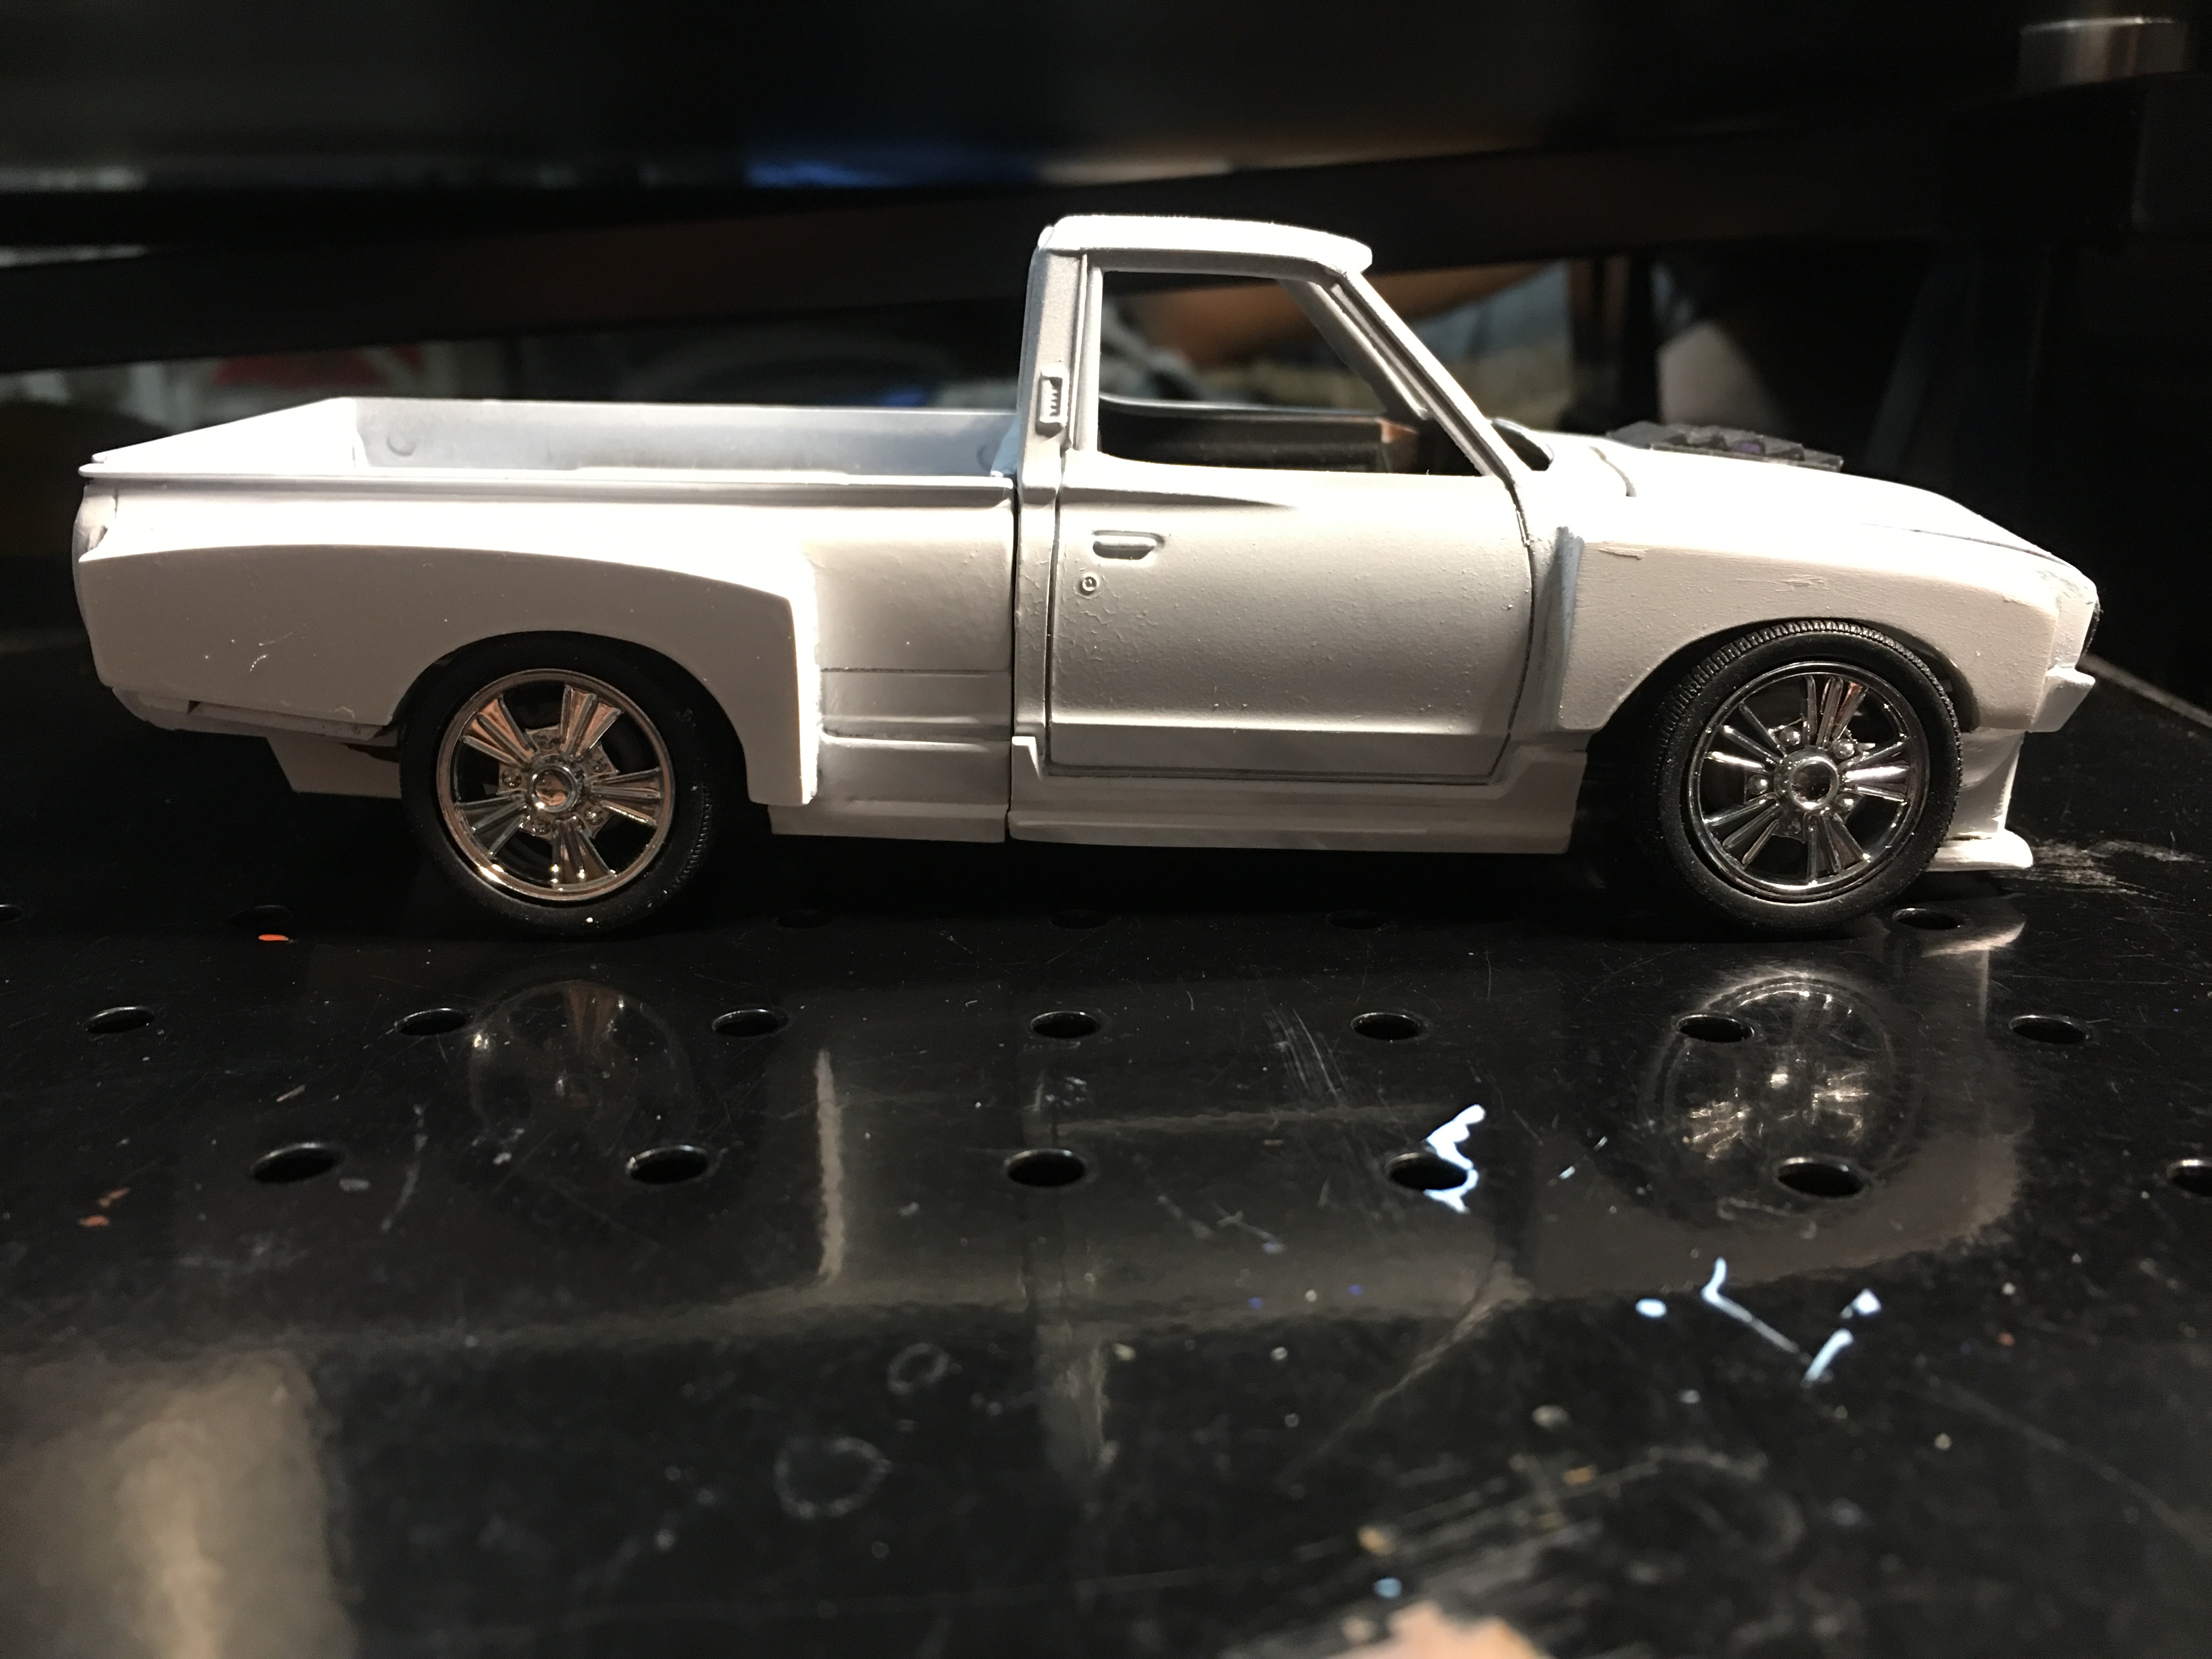
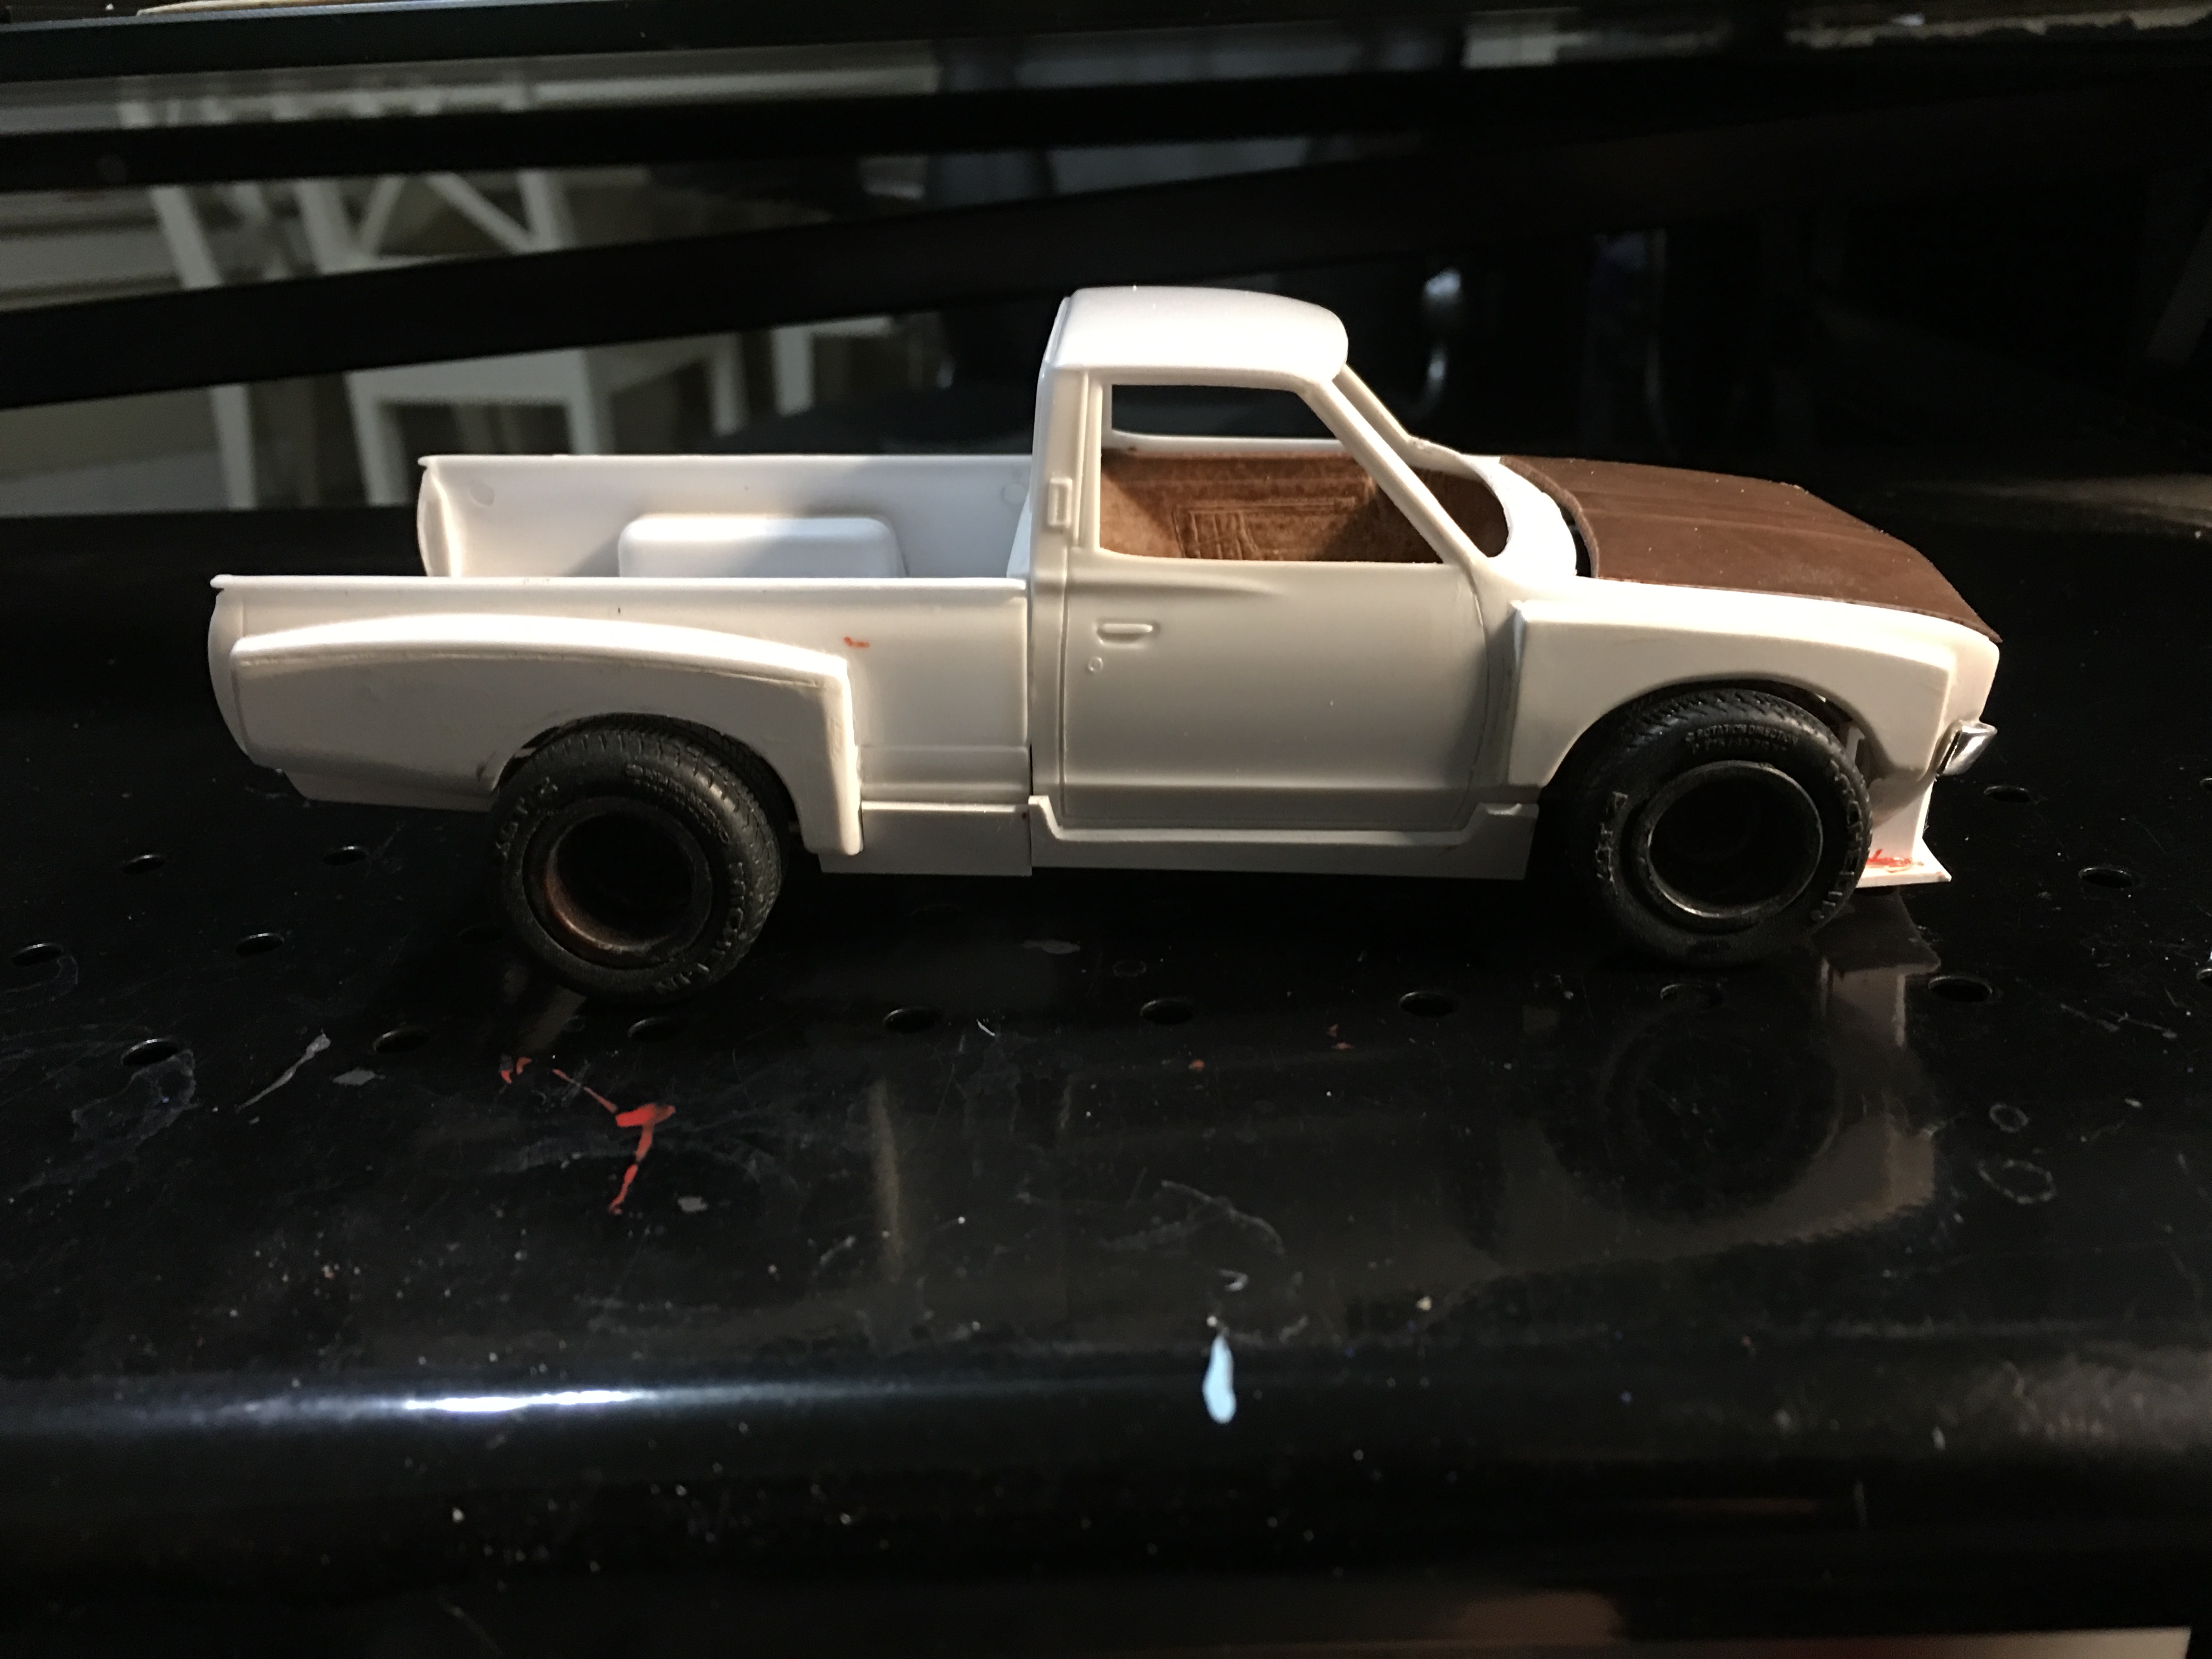
I went slightly wider with the flares and tried a different set of wheels. I like the stance! I have a general idea of what I want the final model to be. It's headed in the right direction. I will probably search for a new set of wheels that match the truck a little better.
-
1975 Datsun pickup
Daxman replied to Daxman's topic in WIP: Model Trucks: Pickups, Vans, SUVs, Light Commercial
-
1975 Datsun pickup
Daxman replied to Daxman's topic in WIP: Model Trucks: Pickups, Vans, SUVs, Light Commercial
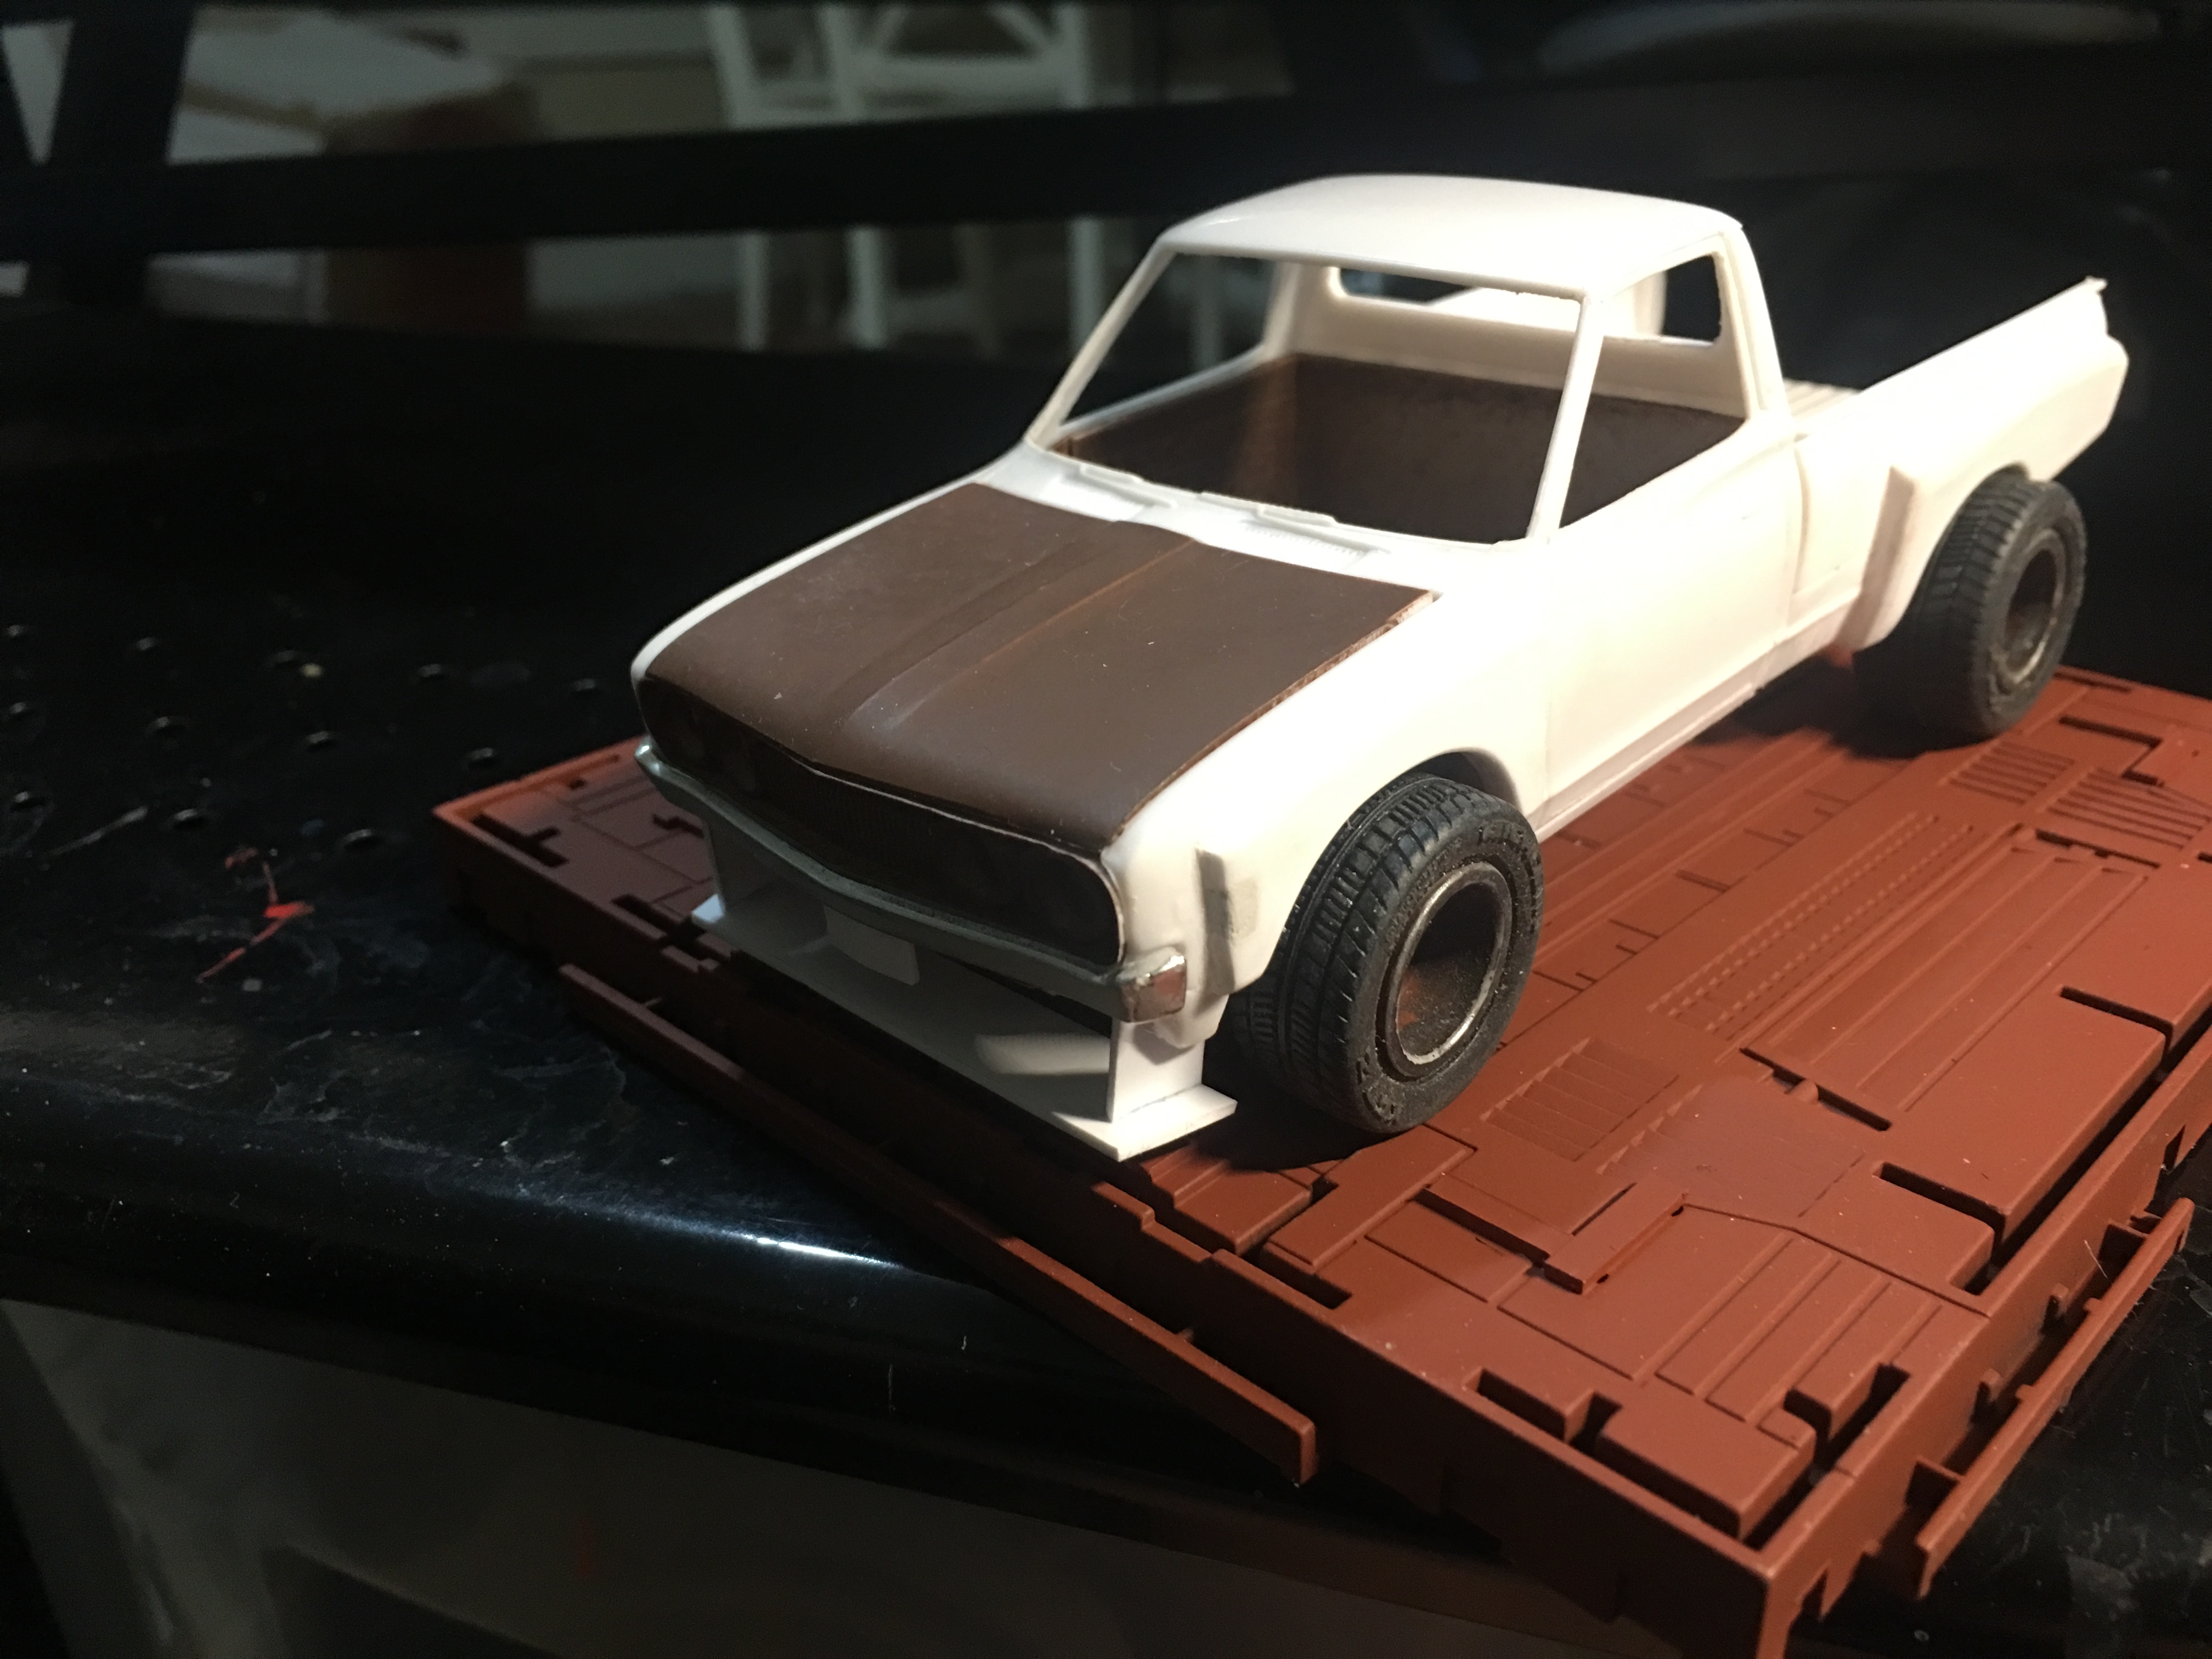
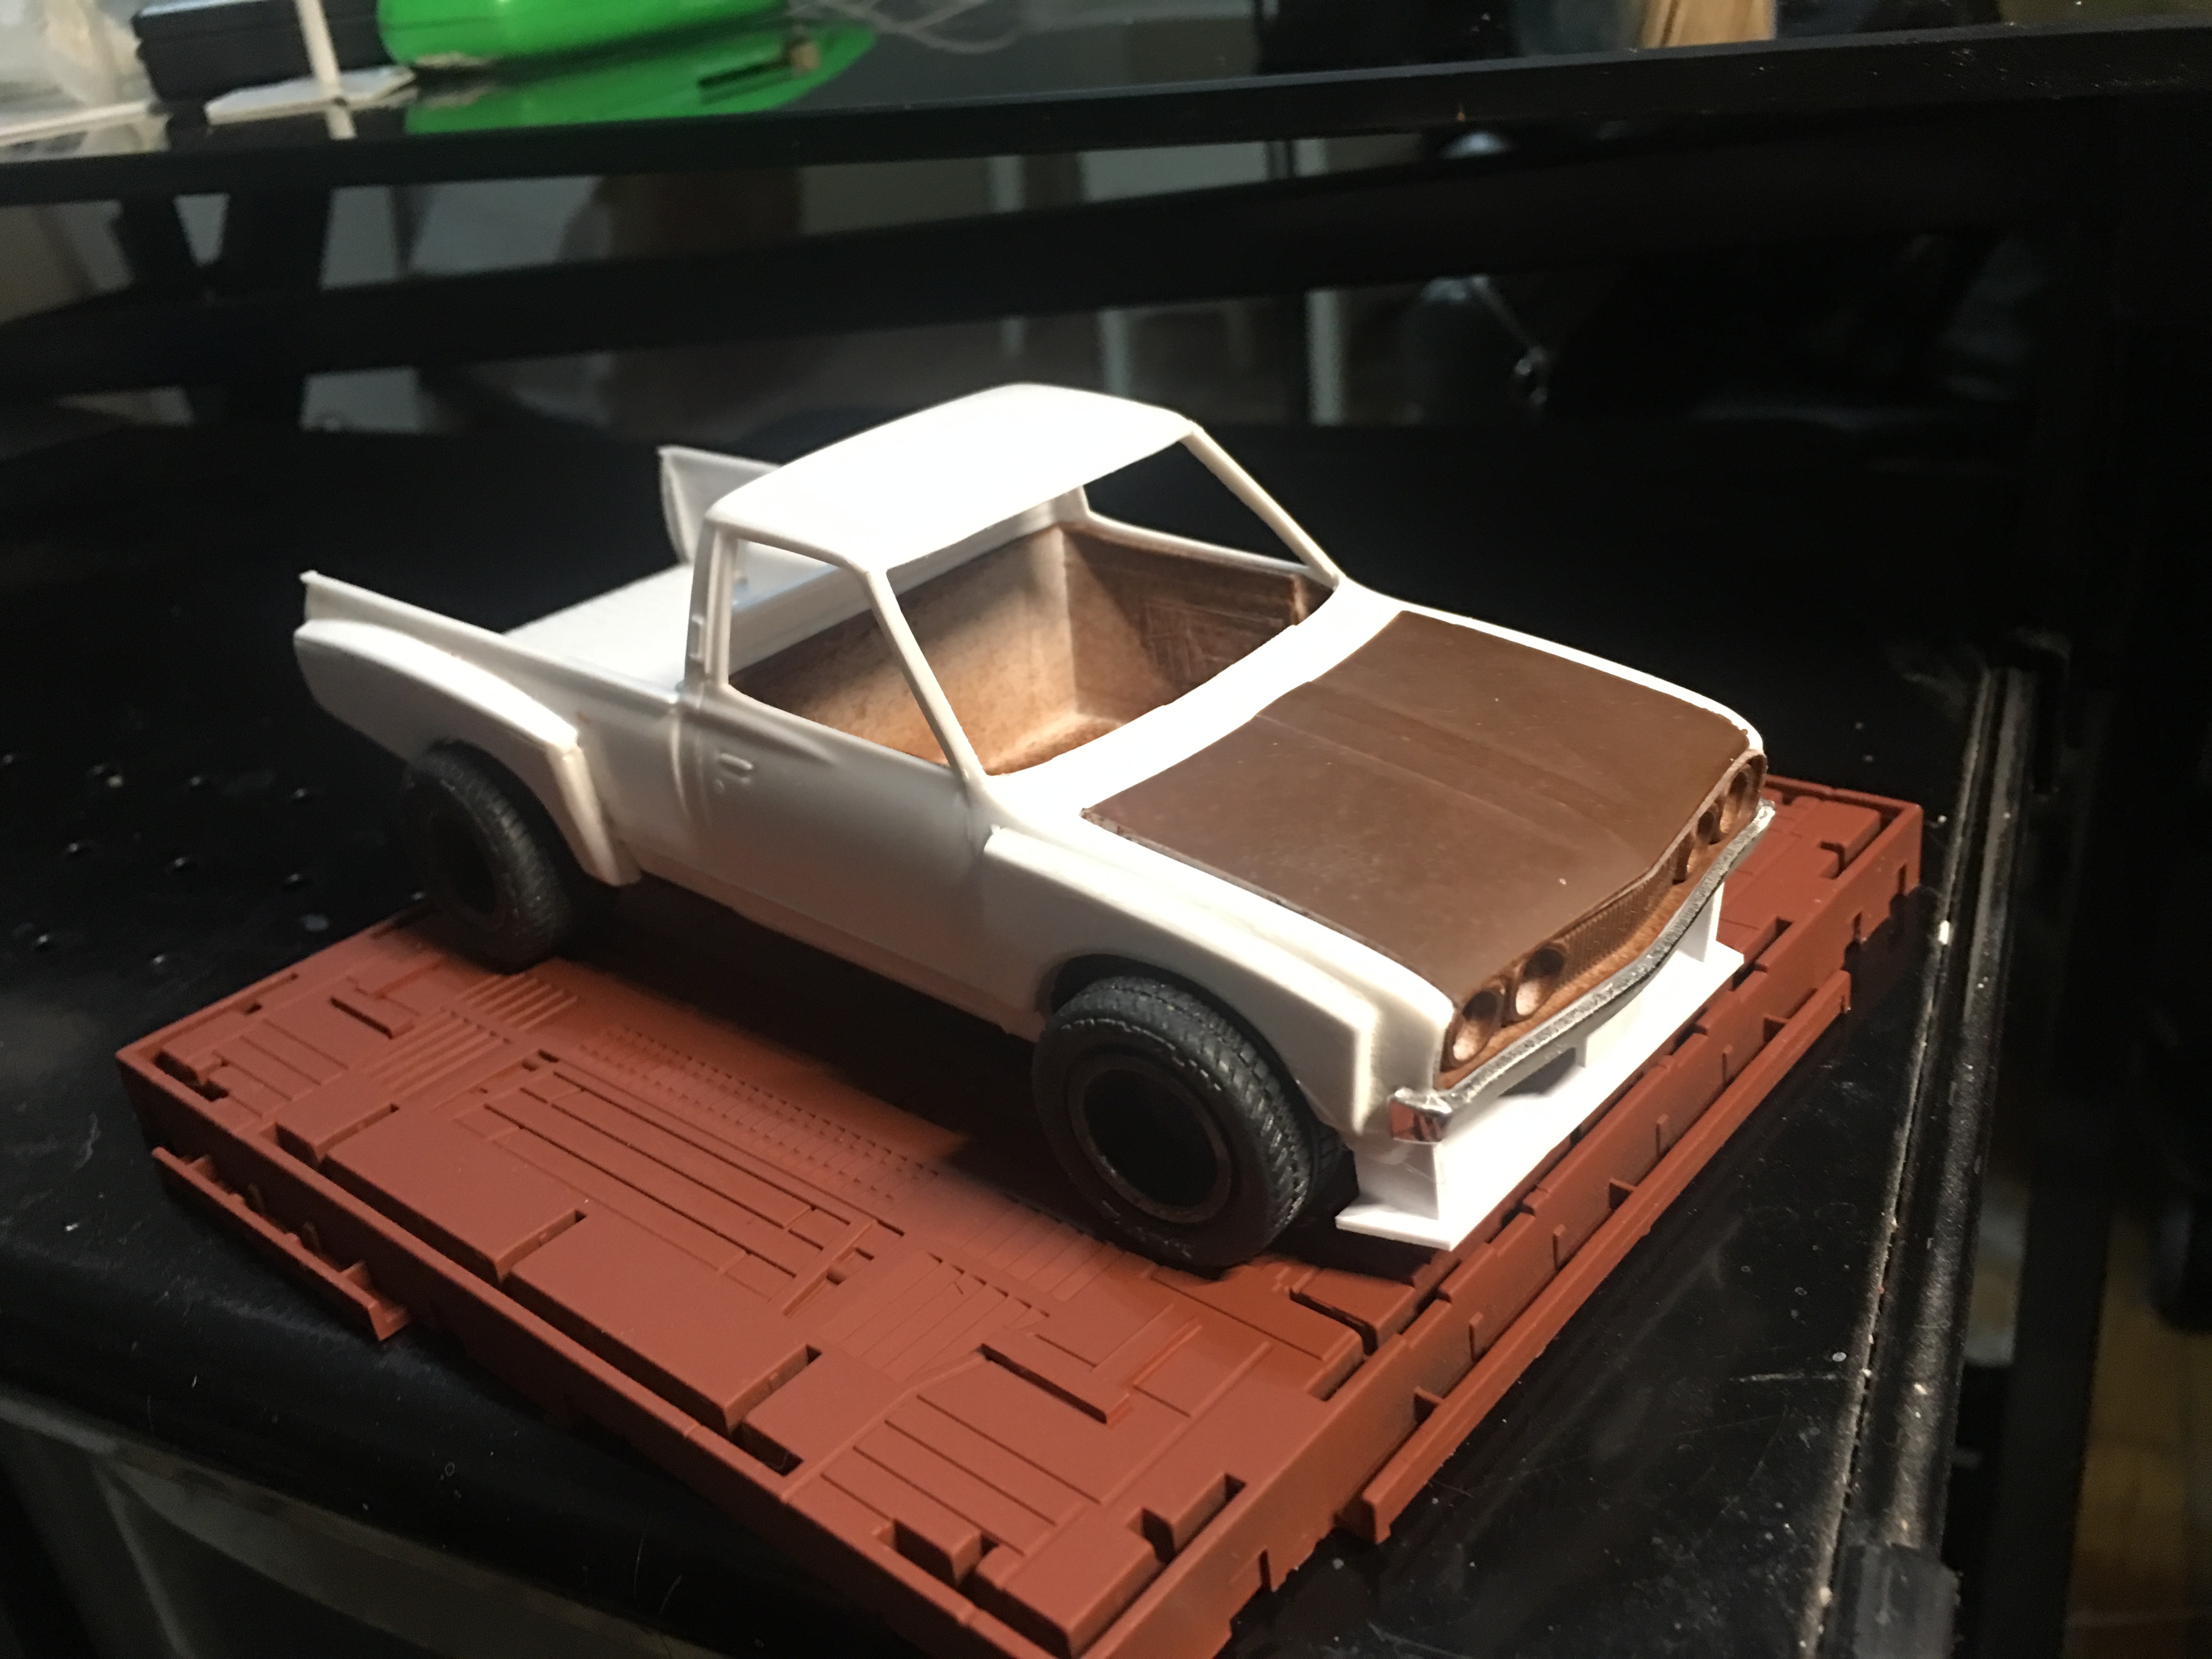
Trying out some ground effects for a lowered stance.
-
Excellent work! Very nice.
-
1975 Datsun pickup
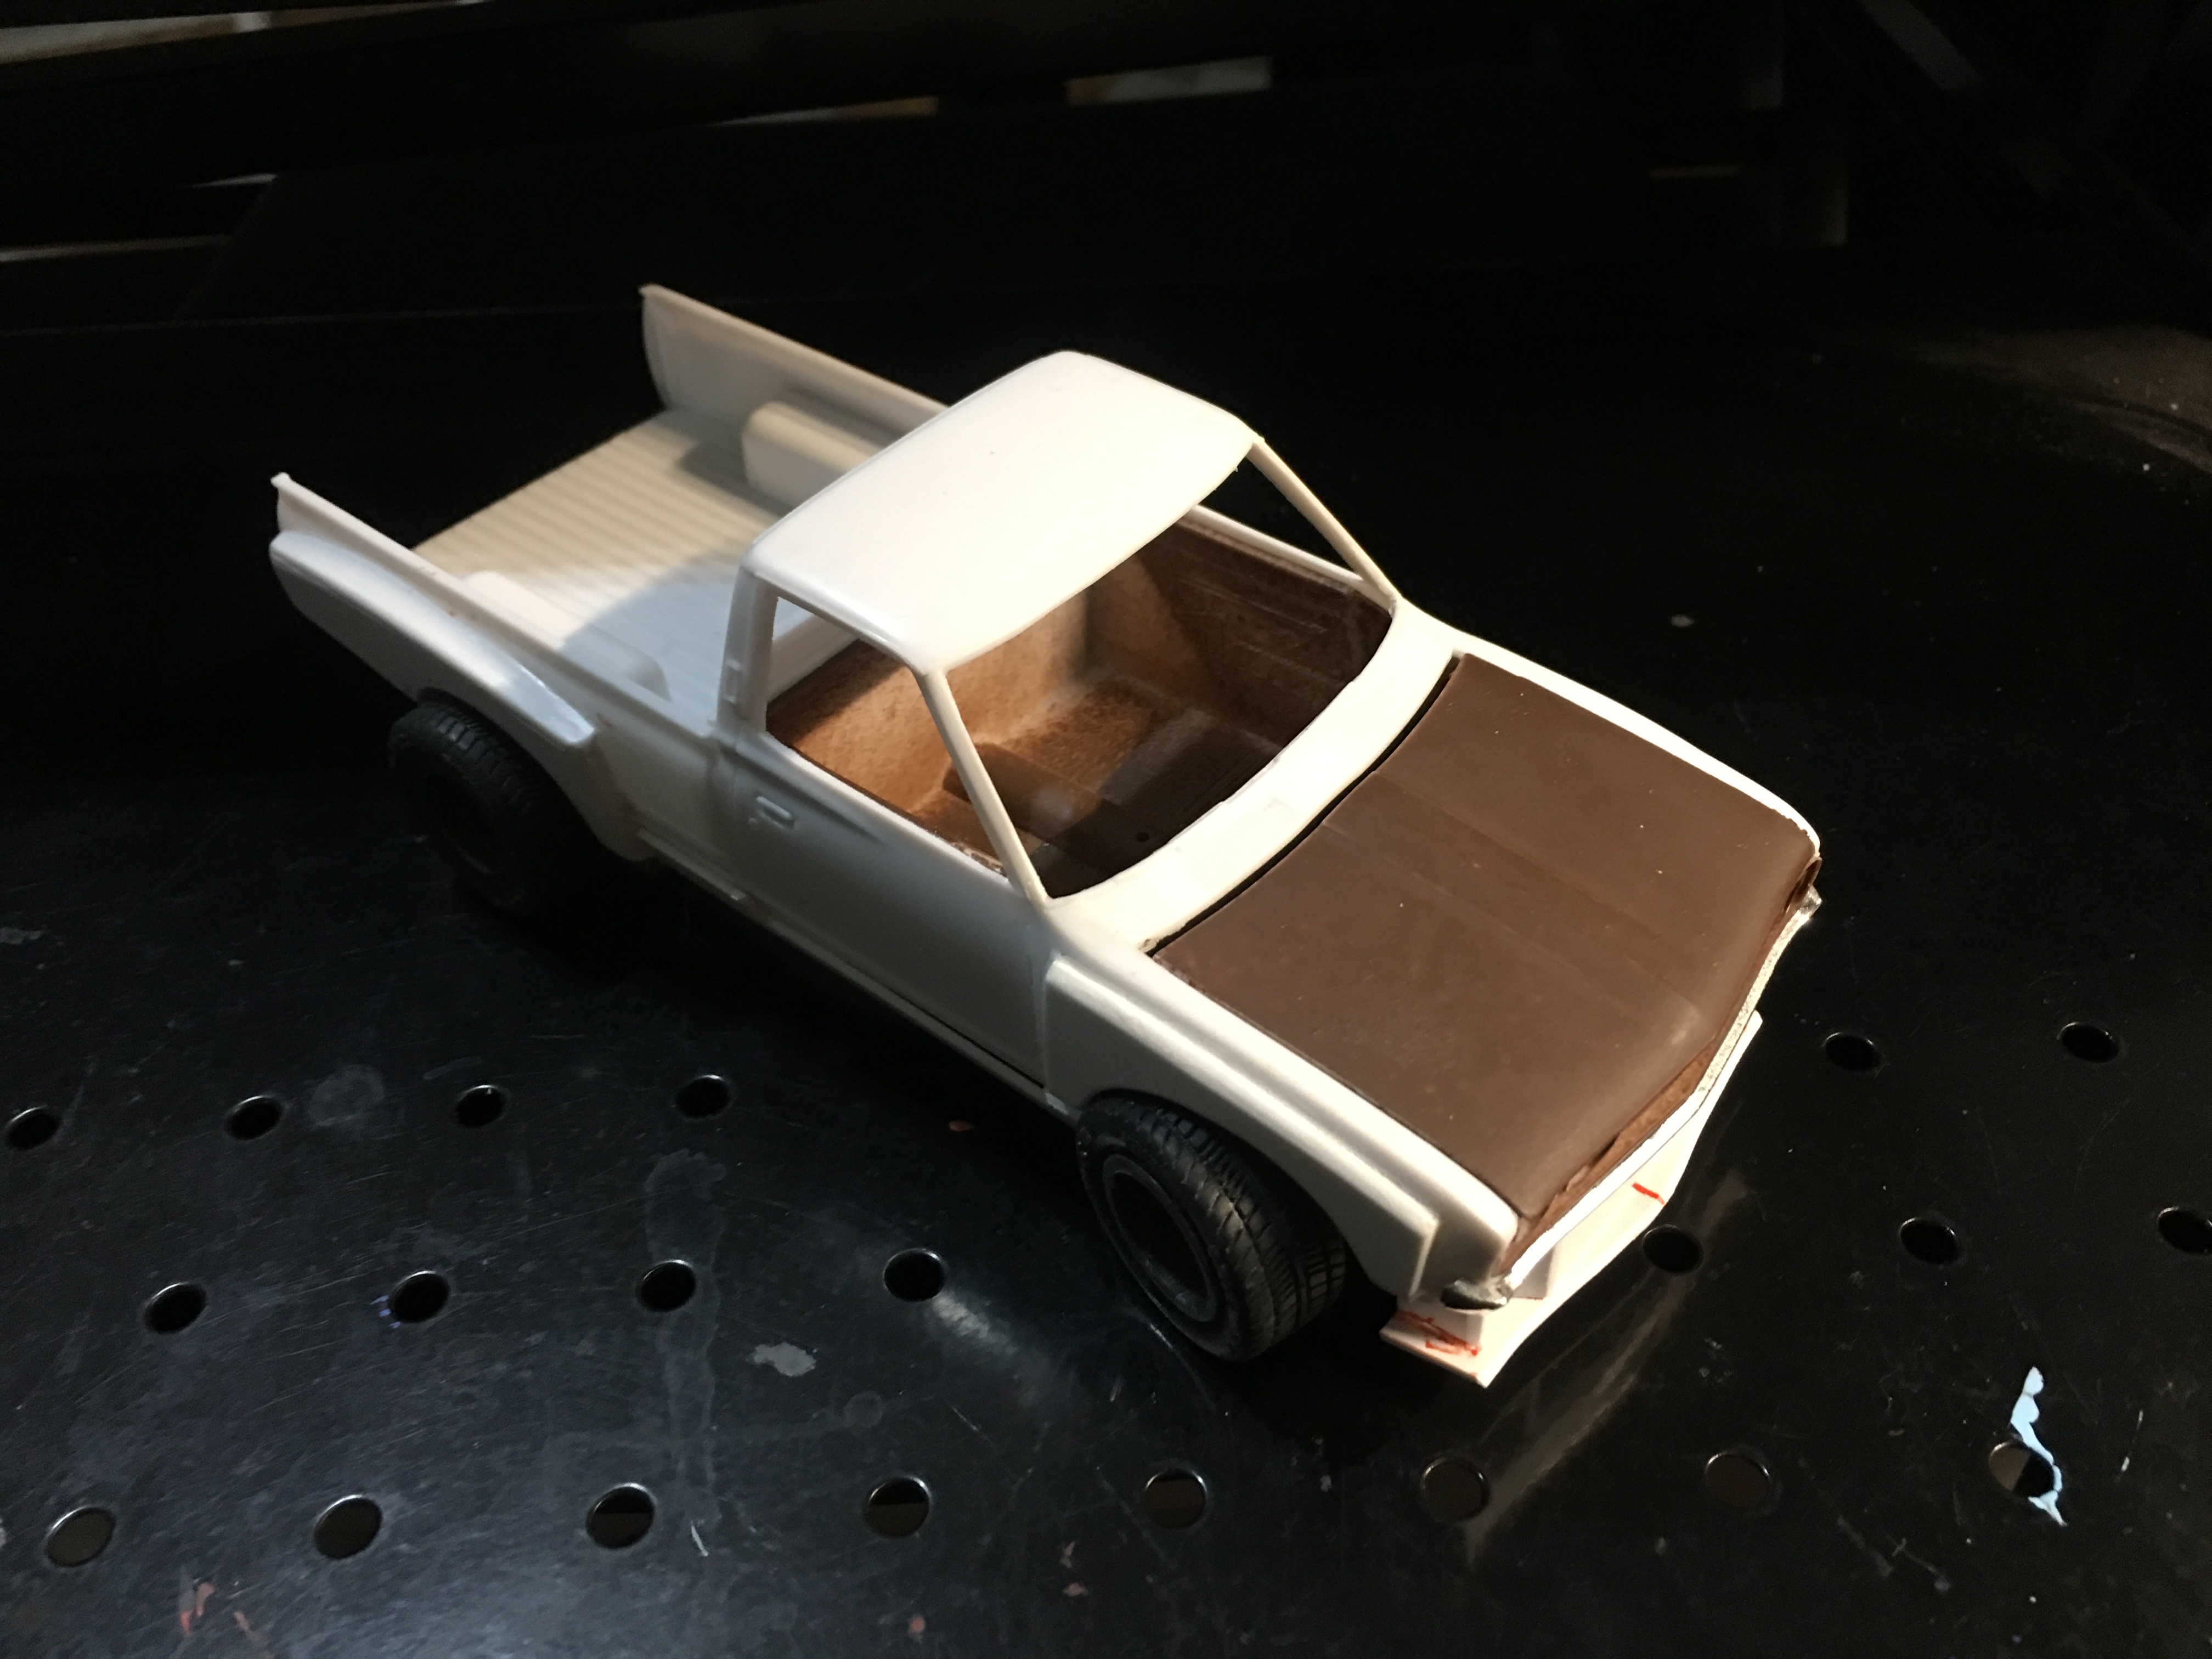
Daxman posted a topic in WIP: Model Trucks: Pickups, Vans, SUVs, Light Commercial
I'm working on a Datsun race truck. I've fashioned a wide body kit out of some thick Styrene. Here's my inspiration.


.JPG.13795acfb07101632f6f12ea585988f7.JPG)