Chariots of Fire
-
Posts
2,782 -
Joined
-
Last visited
Content Type
Profiles
Forums
Events
Gallery
Everything posted by Chariots of Fire
-

Bare metal foil small writing
Chariots of Fire replied to Ctmodeler's topic in Model Building Questions and Answers
I've done the foil under paint a number of times. It works. Cut the foil as close to the raised image as best you can with a new sharp Xacto blade. Make sure it is burnished down real good. It's true that the paint will hide the edges as it tends to collect some at the script. Take your time removing the paint. Remember you are basically just removing the surface and not right down to every little crevice. A couple of tries and the results will quickly show up nicely. -
Curving narrow styrene strips
Chariots of Fire replied to NOBLNG's topic in Model Building Questions and Answers
Try warming the pieces just a bit and wrapping it around a piece of tubing first, forming it with your fingers. It will take the stress out of it so when you go to bend it around what you need it works easier. The tubing best to use is either brass or aluminum. As to the warming part, you can put it in some warm water first. -
KW Dump
Chariots of Fire replied to tbill's topic in WIP: Model Trucks: Big Rigs and Heavy Equipment
Ok, now coat the inside bottom of the bed with asphalt residue and do the same to the bottom of the tailgate area. ? That's nice work! Thanks for sharing! -
If you want some really sharp but equally brittle small drill bits for pinning try Drill Bits Unlimited. He has all sorts of sizes right down to hair size. I say brittle because they will break if you put any out of line stress on them but they are the greatest small bits ever. It just takes getting used to. #72 and #74 are good sizes for common pins and small brass wire.
-
The issues with scratch building
Chariots of Fire replied to IbuildScaleModels's topic in Tips, Tricks, and Tutorials
You are onto something, Jim. A suggestion for the flare at the outside of the rim. Take the white plastic out if you can and then glue it to a flat plastic sheet. When it is dry cut out the middle and then leave just a thin lip around the outside. It can be rounded to shape. And I've had a Sherline lathe for ages. I'm no expert but it really works well for what I do. I've made tires, hubs, sirens, headlights and a few other things that I could then cast and make duplicates of. It's a great tool. -
1957 Reo Gold Comet
Chariots of Fire replied to Chariots of Fire's topic in WIP: Model Trucks: Big Rigs and Heavy Equipment
Wow! That one has seen some work! -
The issues with scratch building
Chariots of Fire replied to IbuildScaleModels's topic in Tips, Tricks, and Tutorials
What drove me to scratch build? I found out real quick that it became boring building the same ALF over and over with slight changes here and there. Fire apparatus over the years have been built by so many different outfits the decision was pretty easy. Scratch build or continue building the same old same old. It has allowed me to do some subjects that I otherwise would not have attempted. Along the way it has been an enjoyable experience trying different materials and methods. Soldering has been the greatest improvement in my building BUT I am no metal worker. Thank goodness for Evergreen stock, brass shapes and different sizes. Peteski said it best above when he mentioned just building with styrene was way too limited. I have to admit, though that without ACC I would be lost. That has been the best thing since sliced bread! Just to be clear, though, I didn't start out scratch building and I suspect most of us who do it started that way as well. I remember trying to scratch build a truck years ago but got way ahead of myself in the skill level. To make a long story short I destroyed a Smith Miller GMC dump truck in the process. It is a learning experience for sure and trying new approaches is just part of that experience. -
1957 Reo Gold Comet
Chariots of Fire replied to Chariots of Fire's topic in WIP: Model Trucks: Big Rigs and Heavy Equipment
Thank you Dr. K. Glad you are enjoying the builds. I find it a lot of fun to do. -
1957 Reo Gold Comet
Chariots of Fire replied to Chariots of Fire's topic in WIP: Model Trucks: Big Rigs and Heavy Equipment
Hi, Jeff. No I won't be casting the cabs but that doesn't mean that won't happen. Talking with someone else about doing that. But before I send it out I need to do some more work. Bumper, running boards, interior tub, seat, dashboard need to be made as well and that will take a little time. But stay tuned. I think it will happen. -
1957 Reo Gold Comet
Chariots of Fire replied to Chariots of Fire's topic in WIP: Model Trucks: Big Rigs and Heavy Equipment
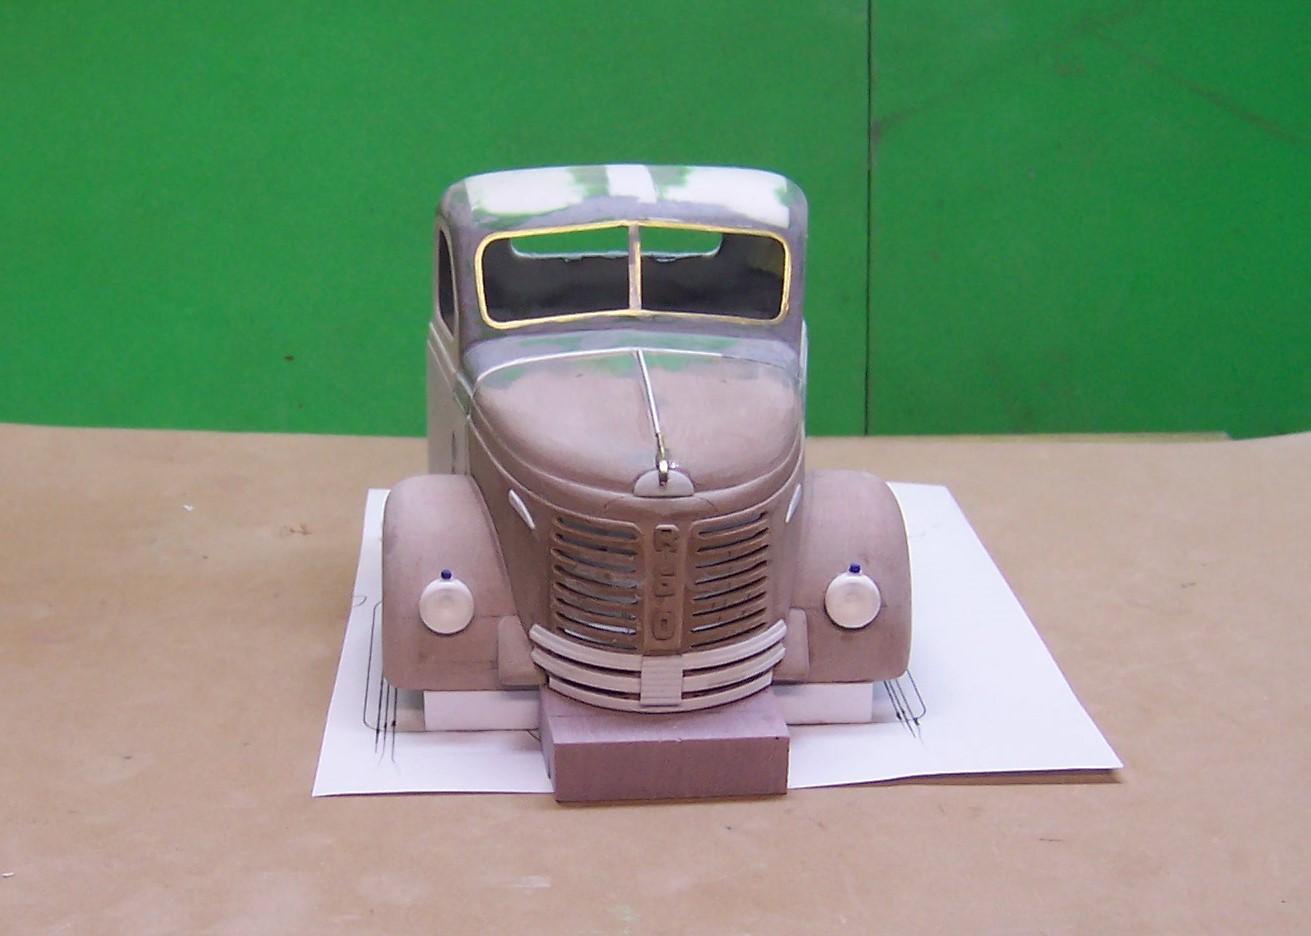
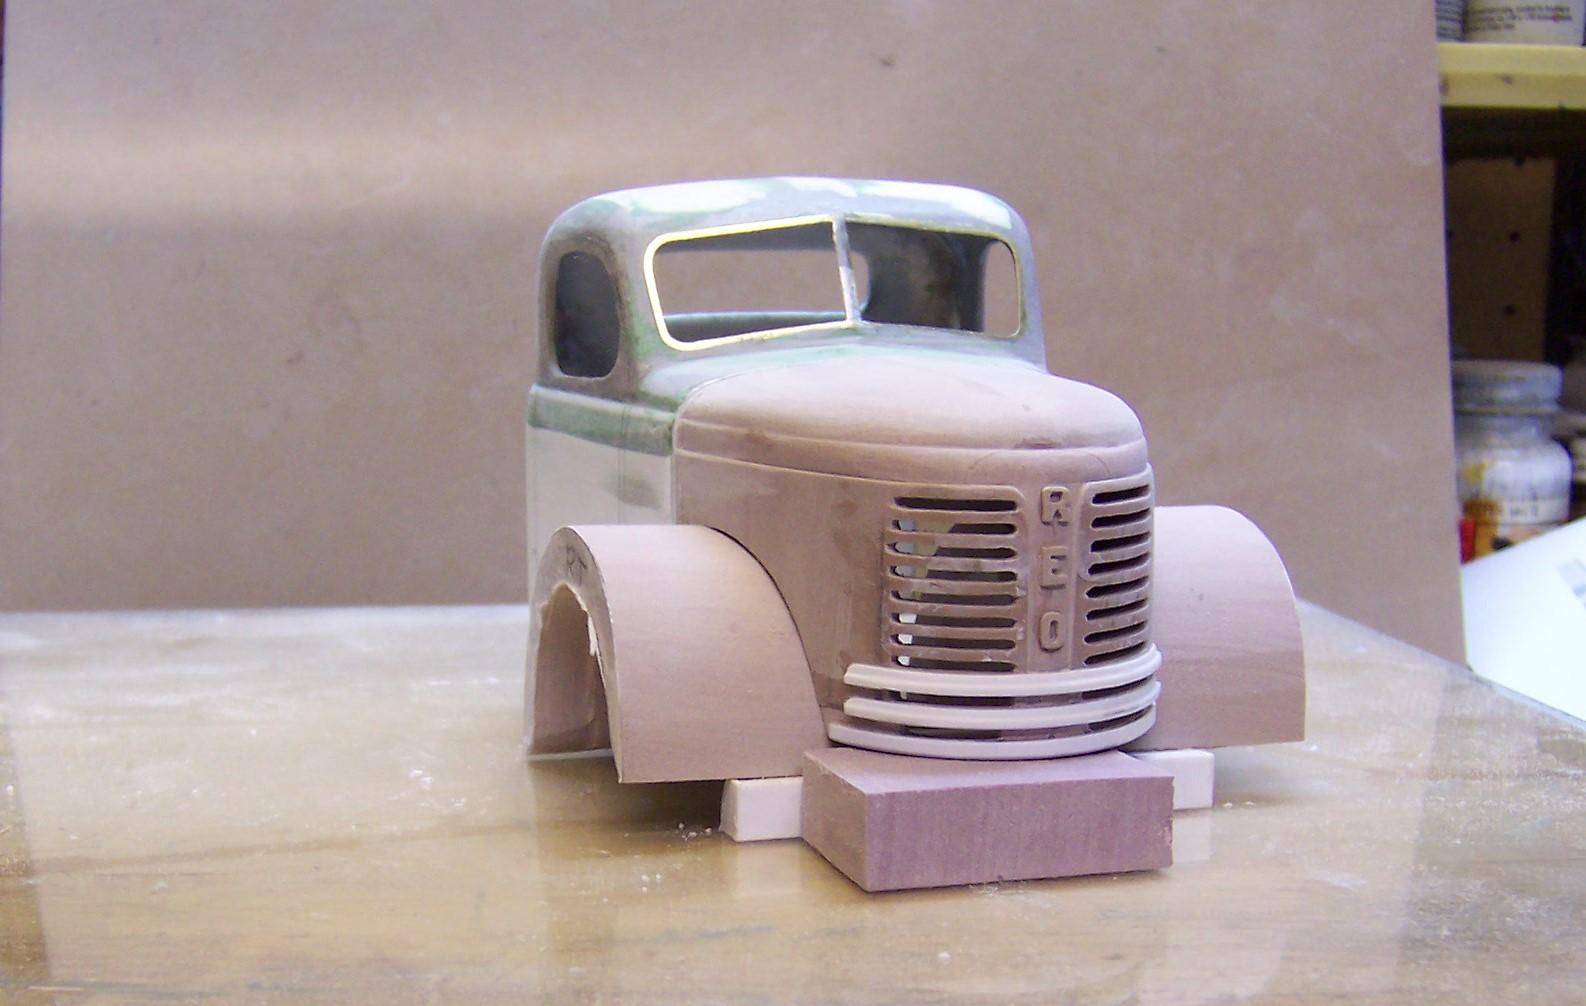
I got some additional work done on the nose. Added the Gold Comet badge to the sides, did up the headlights and added the hood ornament. I found that the right side grill openings were just a bit off so the outside edges were extended a tad and that required moving the Comet badge back a smidge as well. Small parking lights have been added to the top of the headlight buckets. These were taken before I adjusted the right side grill openings and the parts have since been given an initial coat of primer. It does wonders to bring out the flaws that need attention.
-
KW Dump
Chariots of Fire replied to tbill's topic in WIP: Model Trucks: Big Rigs and Heavy Equipment
I like! Frame pieces look nice and crisp! -
Electronic dreams
Chariots of Fire replied to misterNNL's topic in Model Building Questions and Answers
Any electric car I would buy would need to have a resonator that would impersonate a V-8 with glass pak mufflers.? -
The issues with scratch building
Chariots of Fire replied to IbuildScaleModels's topic in Tips, Tricks, and Tutorials
Thanks, Daniel. Appreciated. -
The issues with scratch building
Chariots of Fire replied to IbuildScaleModels's topic in Tips, Tricks, and Tutorials
You're right Daniel. I seldom use JB Weld but it certainly is a choice for different materials. I have forgotten about it. -
1957 Reo Gold Comet
Chariots of Fire replied to Chariots of Fire's topic in WIP: Model Trucks: Big Rigs and Heavy Equipment
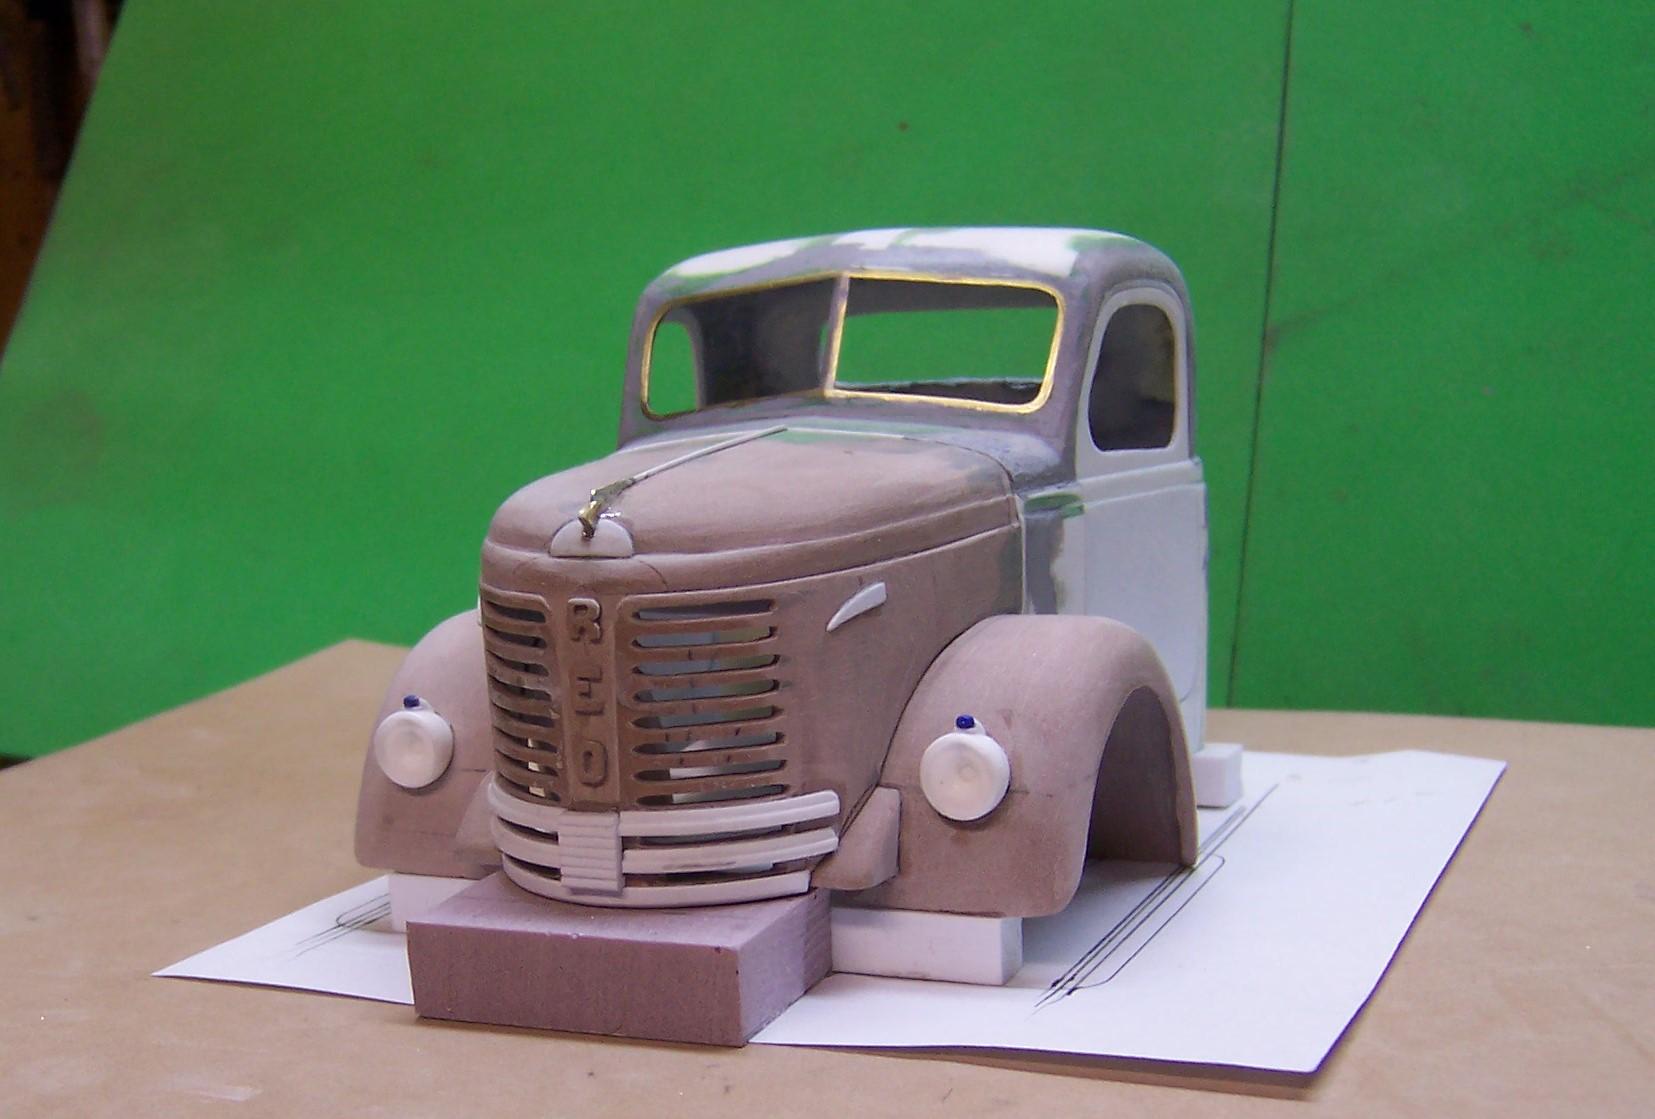
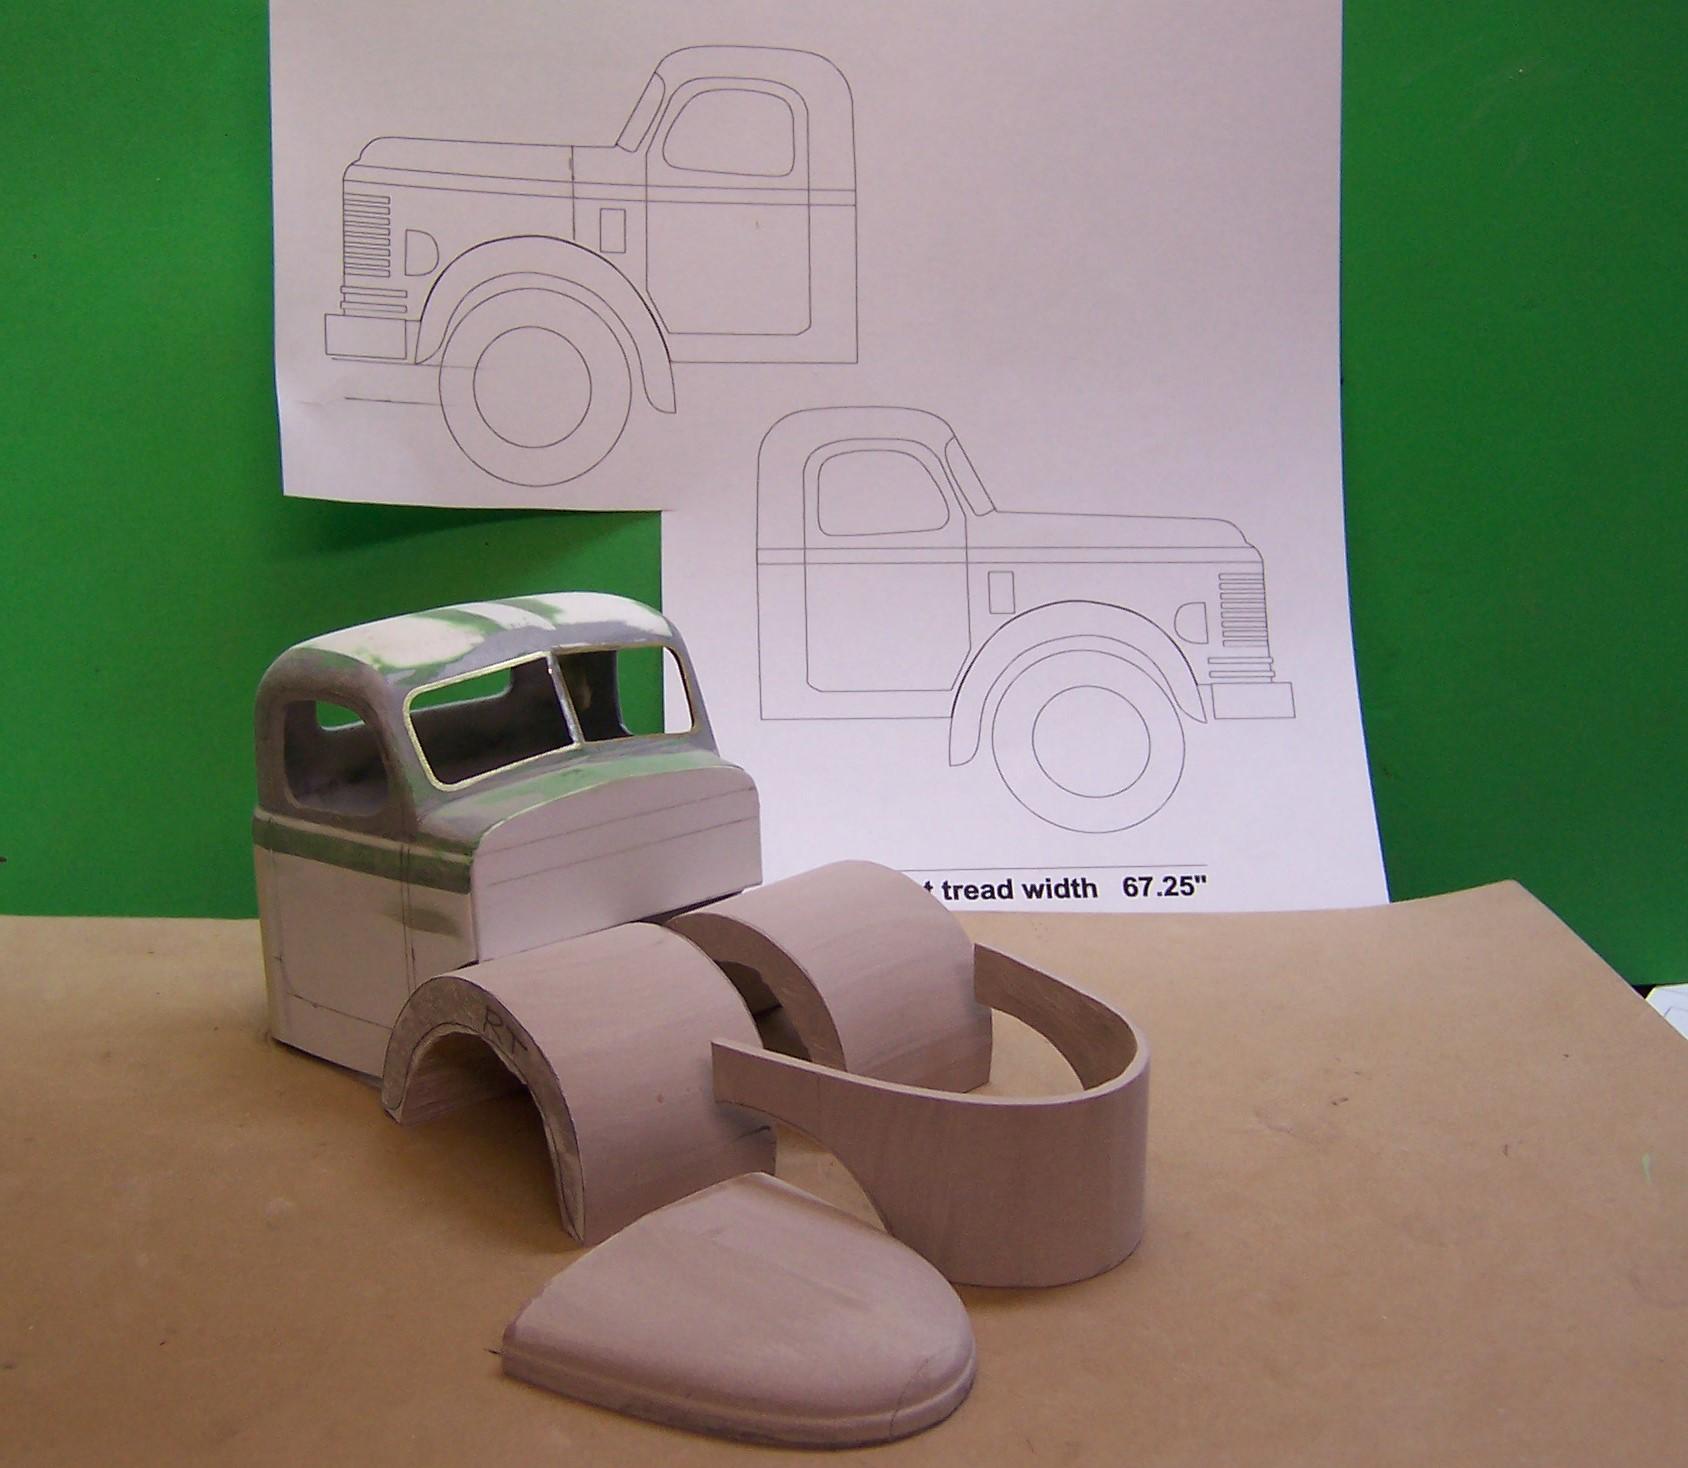
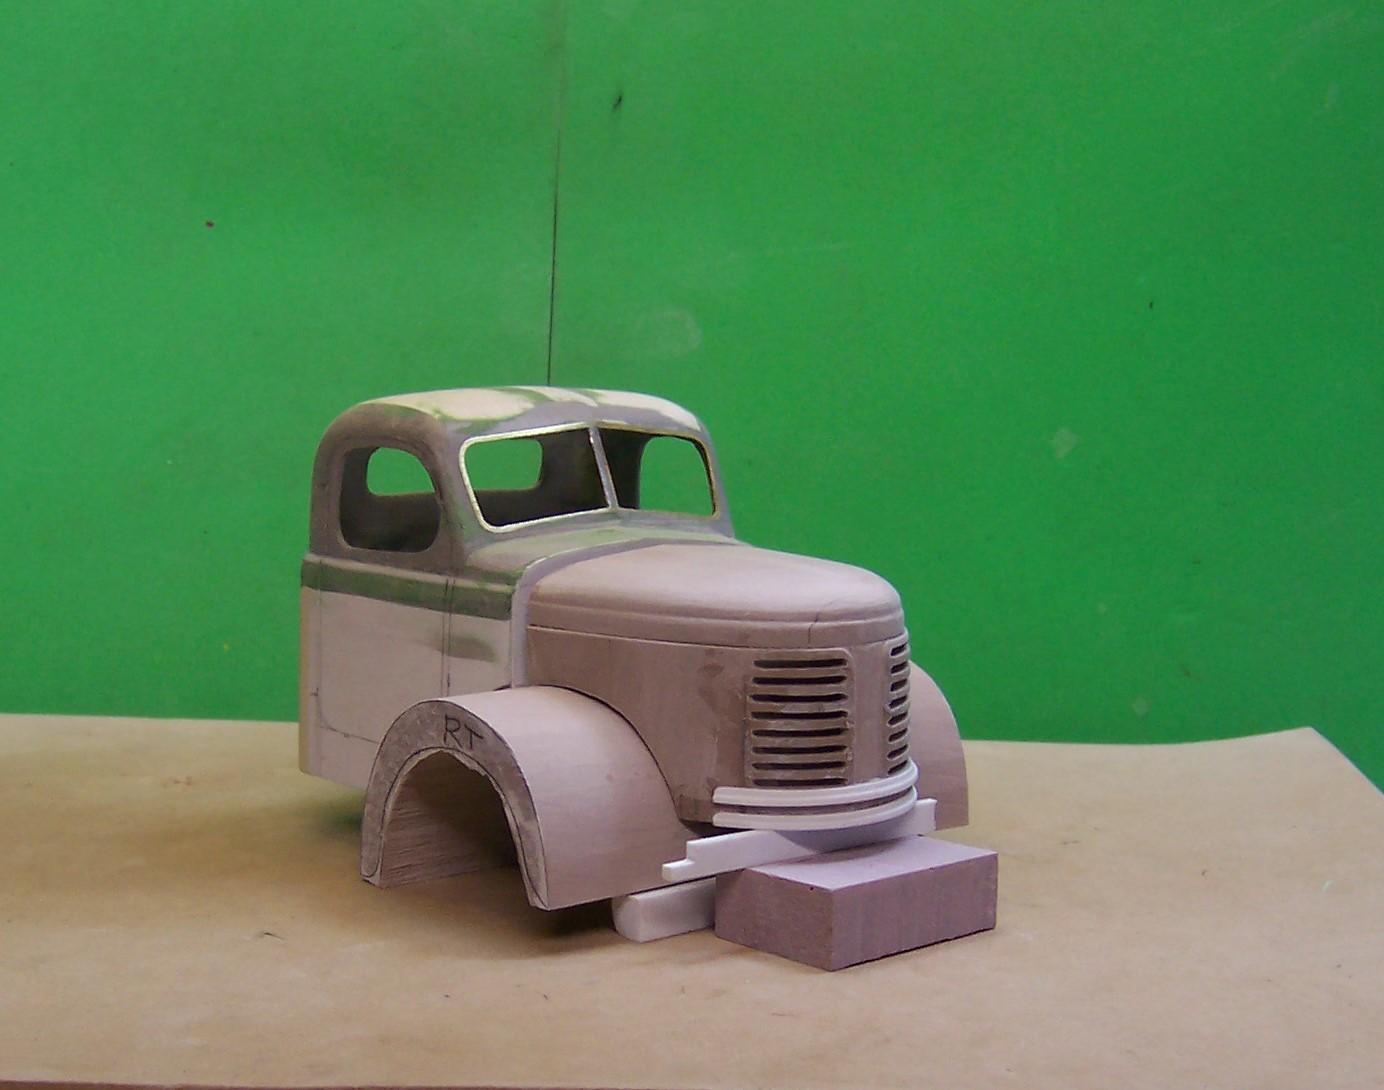
I watched the video. I really had my doubts that you were going to get that out of the woods with that little track machine. Like most things small there is persistence that pays off! Here's an update on the Reo. I know I said it is a 57 but it actually is a 53 that I am modeling. Not a lot of difference but it still should be accurate. Fenders are now hollowed out and rounded. Cab and hood fitting is coming along.
-
The construction artist is at it again! ☺️
-
BRBO IHC 2070
Chariots of Fire replied to redneckrigger's topic in WIP: Model Trucks: Big Rigs and Heavy Equipment
Coming right along, Tom! I'm glad to see so much going on these days to modify kit pieces and cobble things together to make unique models. Looks like scratch building is beginning to take hold pretty well! -
The issues with scratch building
Chariots of Fire replied to IbuildScaleModels's topic in Tips, Tricks, and Tutorials
Scratch building is what I enjoy most. An assortment of materials is always at hand including Evergreen, brass and aluminum sheet, brass and aluminum tubing and rod, copper sheet and tubing, Plastruct materials, common pins, craft wire, etc. Bonding dissimilar materials is always a problem. Aluminum and ACC just don't get along. Two part epoxy seems to work better to some extent. When it comes to small parts I use a lot of brass stock. Soldering is the best solution for a lot of it. I build trucks and when I'm doing one of those brush rigs that have lots of cages around them I like the brass rods. Where I attach it to plastic I grind away a small piece of the end of the rod to form a pin using a Dremel disc. Then I drill a hole in the plastic and insert the end of the brass rod. Works really well. In general pinning small parts with either craft wire or common pins is always a safe bet. I also do a fair amount of resin casting based on either kit masters or masters I make up myself. I always make a mold using RTV. If I need that part once, chances are I will need it again! -
1957 Reo Gold Comet
Chariots of Fire replied to Chariots of Fire's topic in WIP: Model Trucks: Big Rigs and Heavy Equipment
That's my goal, Brian. I'm a long way from that as you can see. I have a ton of photos of the 6 in my files to work from. The more I see of the nose the more refining it needs. Little things that will set if off need to be done to really clean up edges and smooth it out. Fiddly stuff but in the end it pays off. -
1957 Reo Gold Comet
Chariots of Fire replied to Chariots of Fire's topic in WIP: Model Trucks: Big Rigs and Heavy Equipment
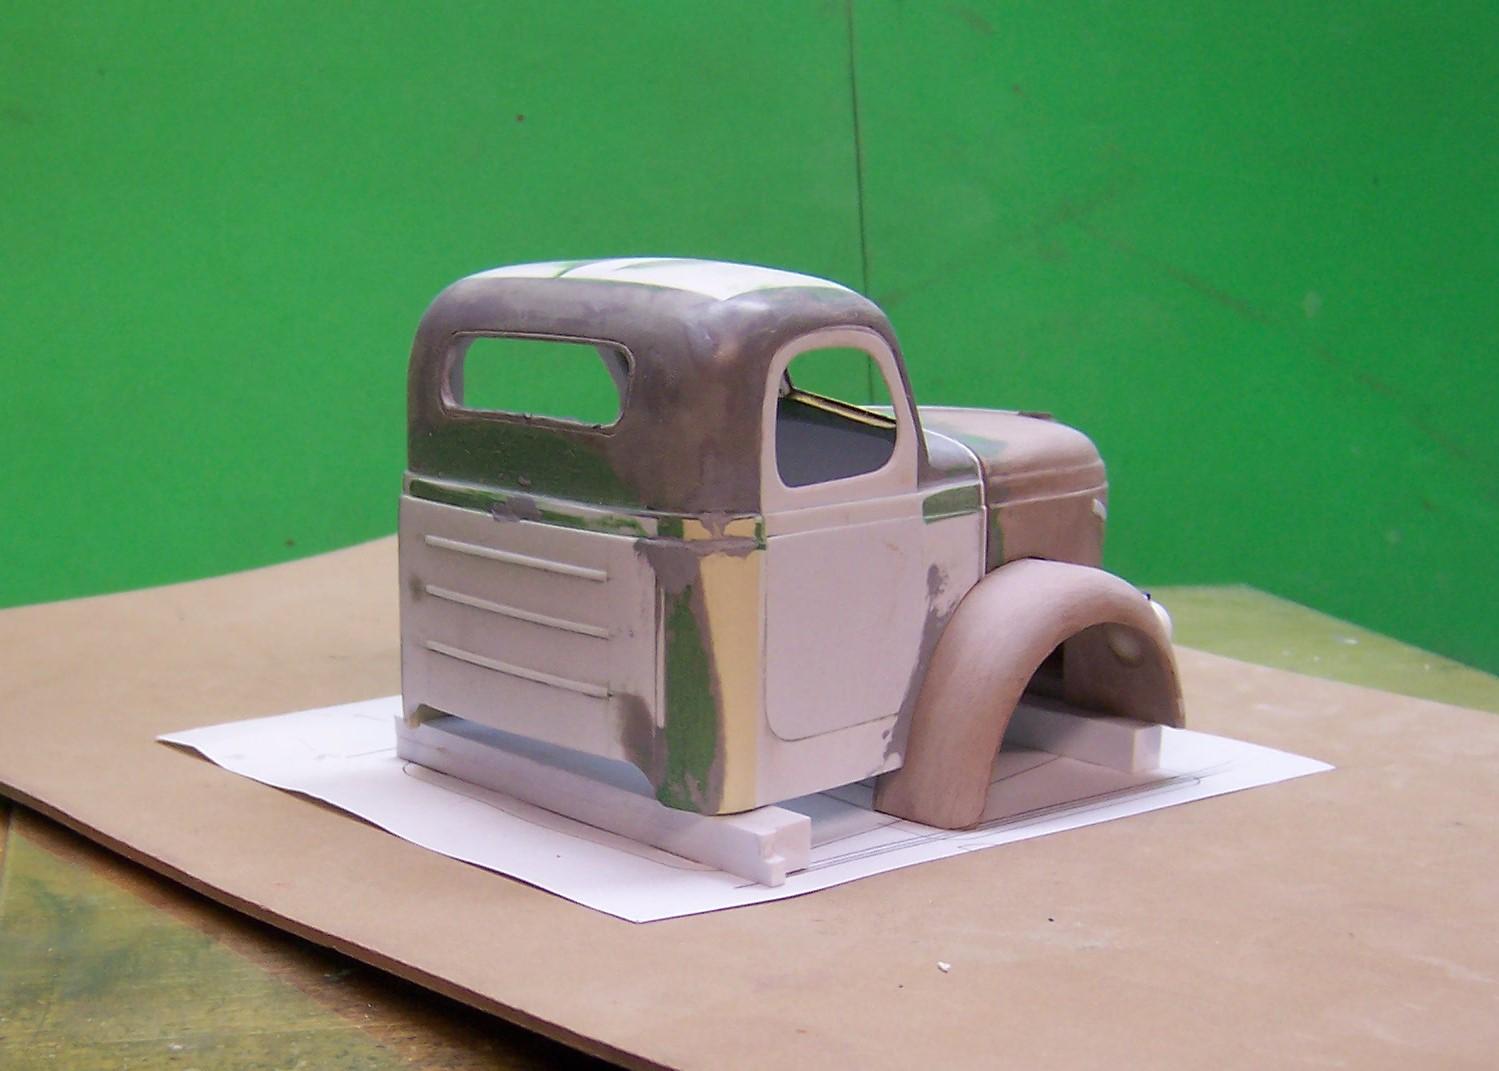
Here's an update. Next is to round off the fenders and begin to final fit the three pieces together.
-
1957 Reo Gold Comet
Chariots of Fire replied to Chariots of Fire's topic in WIP: Model Trucks: Big Rigs and Heavy Equipment
Yes to templates. It's easy to do once I have the drawing of one side. In the graphics program I can flip the image and it creates it automatically in the opposite view. That's what you see in the third picture up from here. -
Marmon COE
Chariots of Fire replied to The Brush's topic in WIP: Model Trucks: Big Rigs and Heavy Equipment
You must have a steady hand! The stripes are perfect! Nice work! -
1957 Reo Gold Comet
Chariots of Fire replied to Chariots of Fire's topic in WIP: Model Trucks: Big Rigs and Heavy Equipment
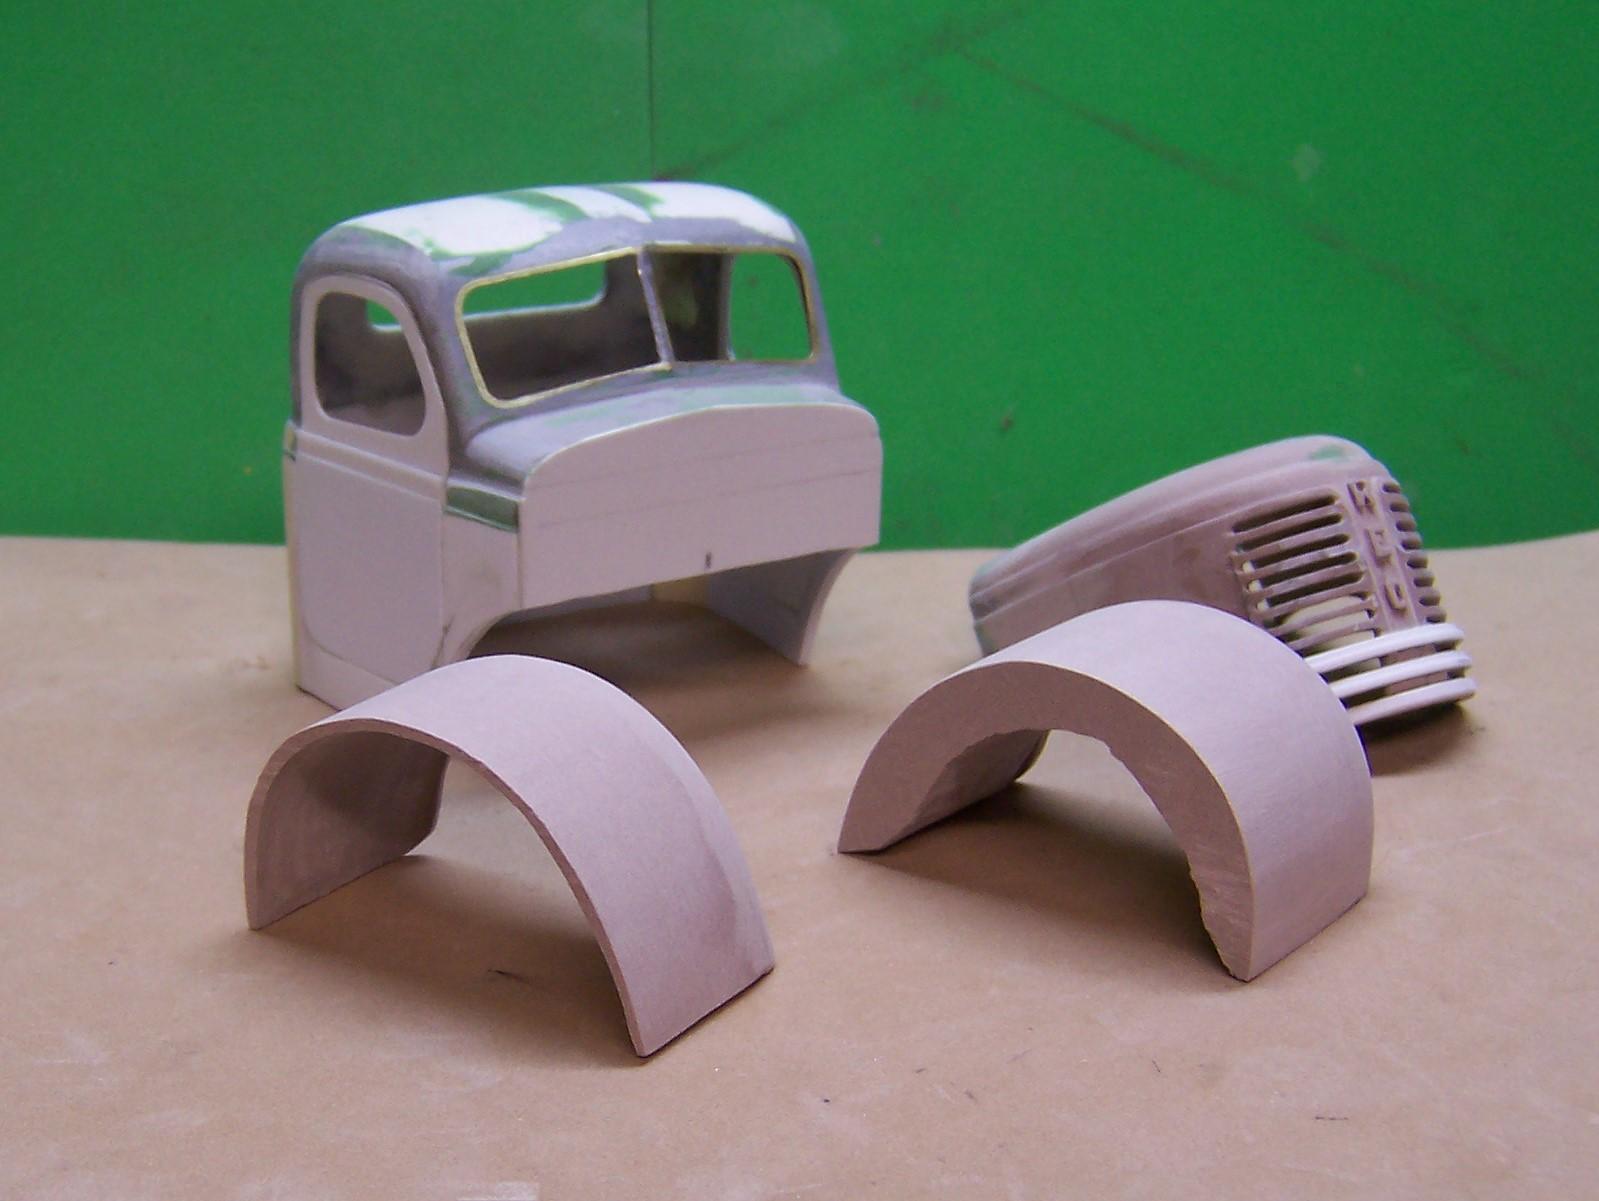
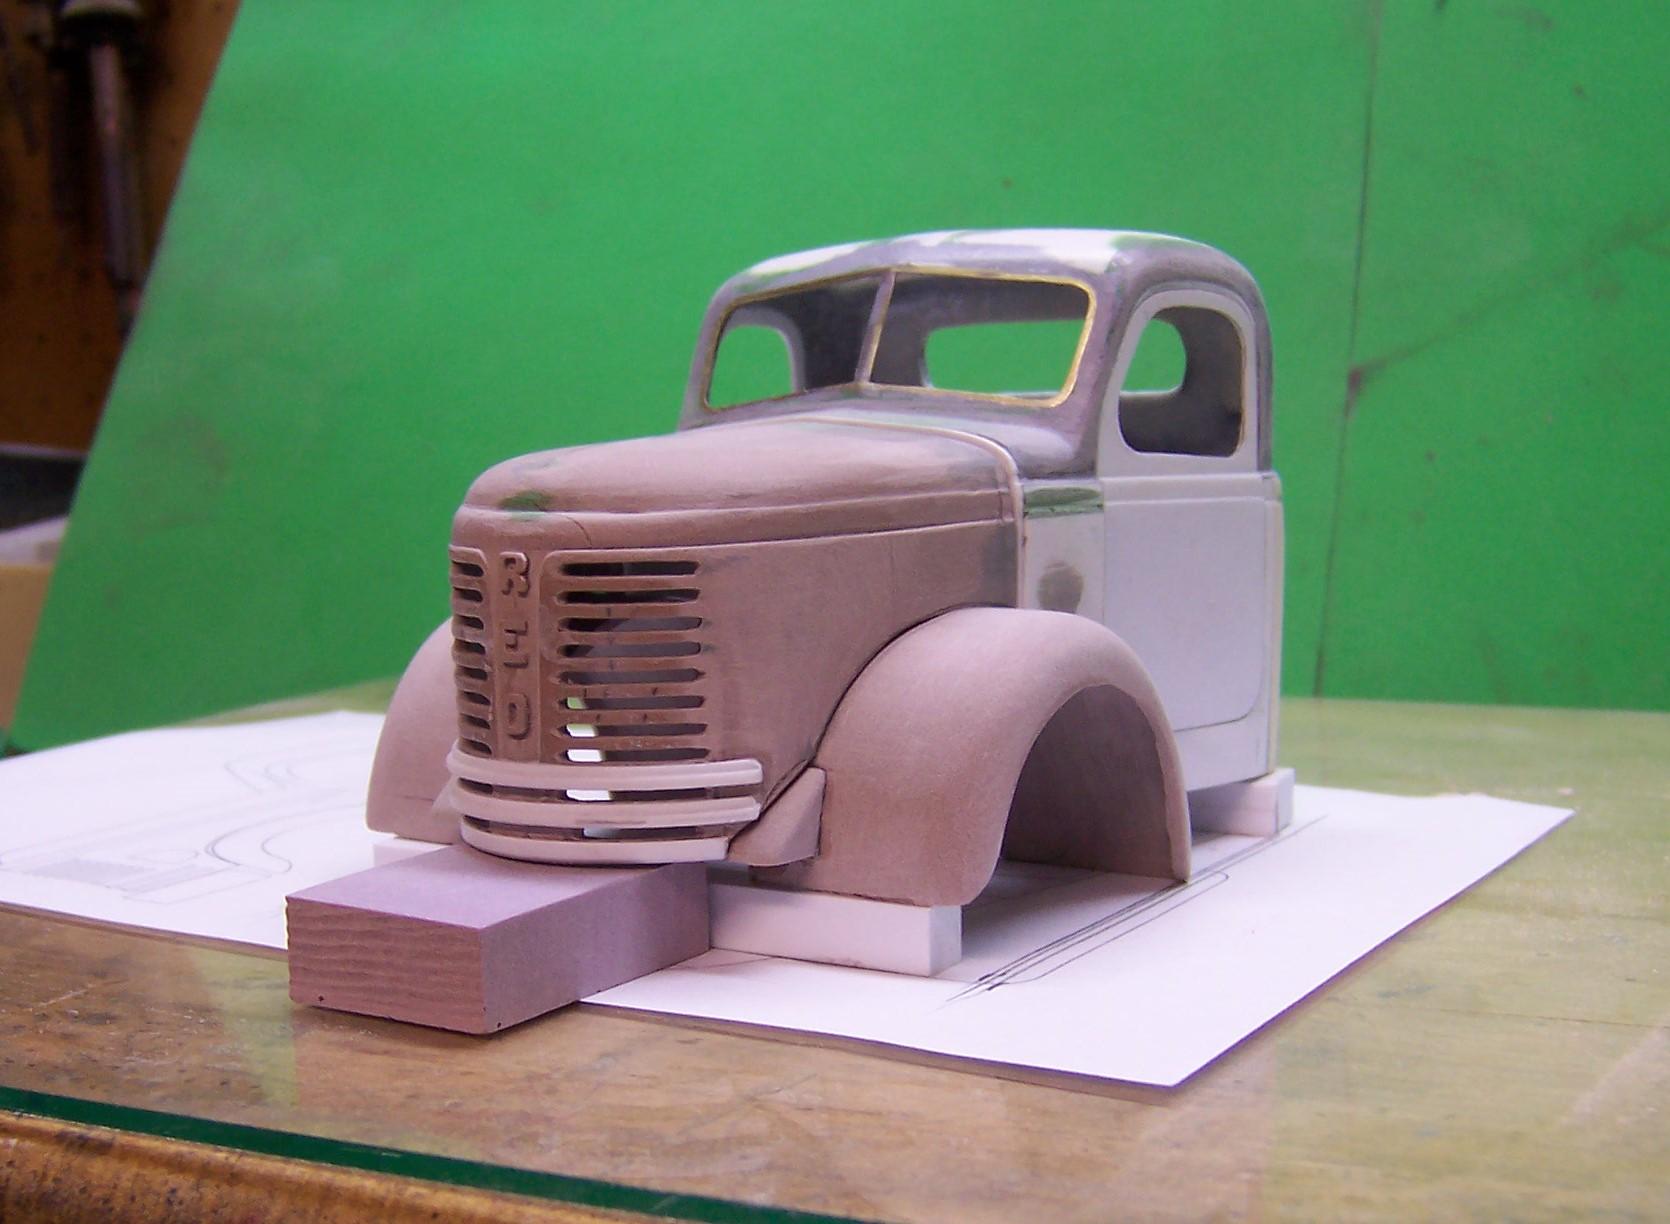
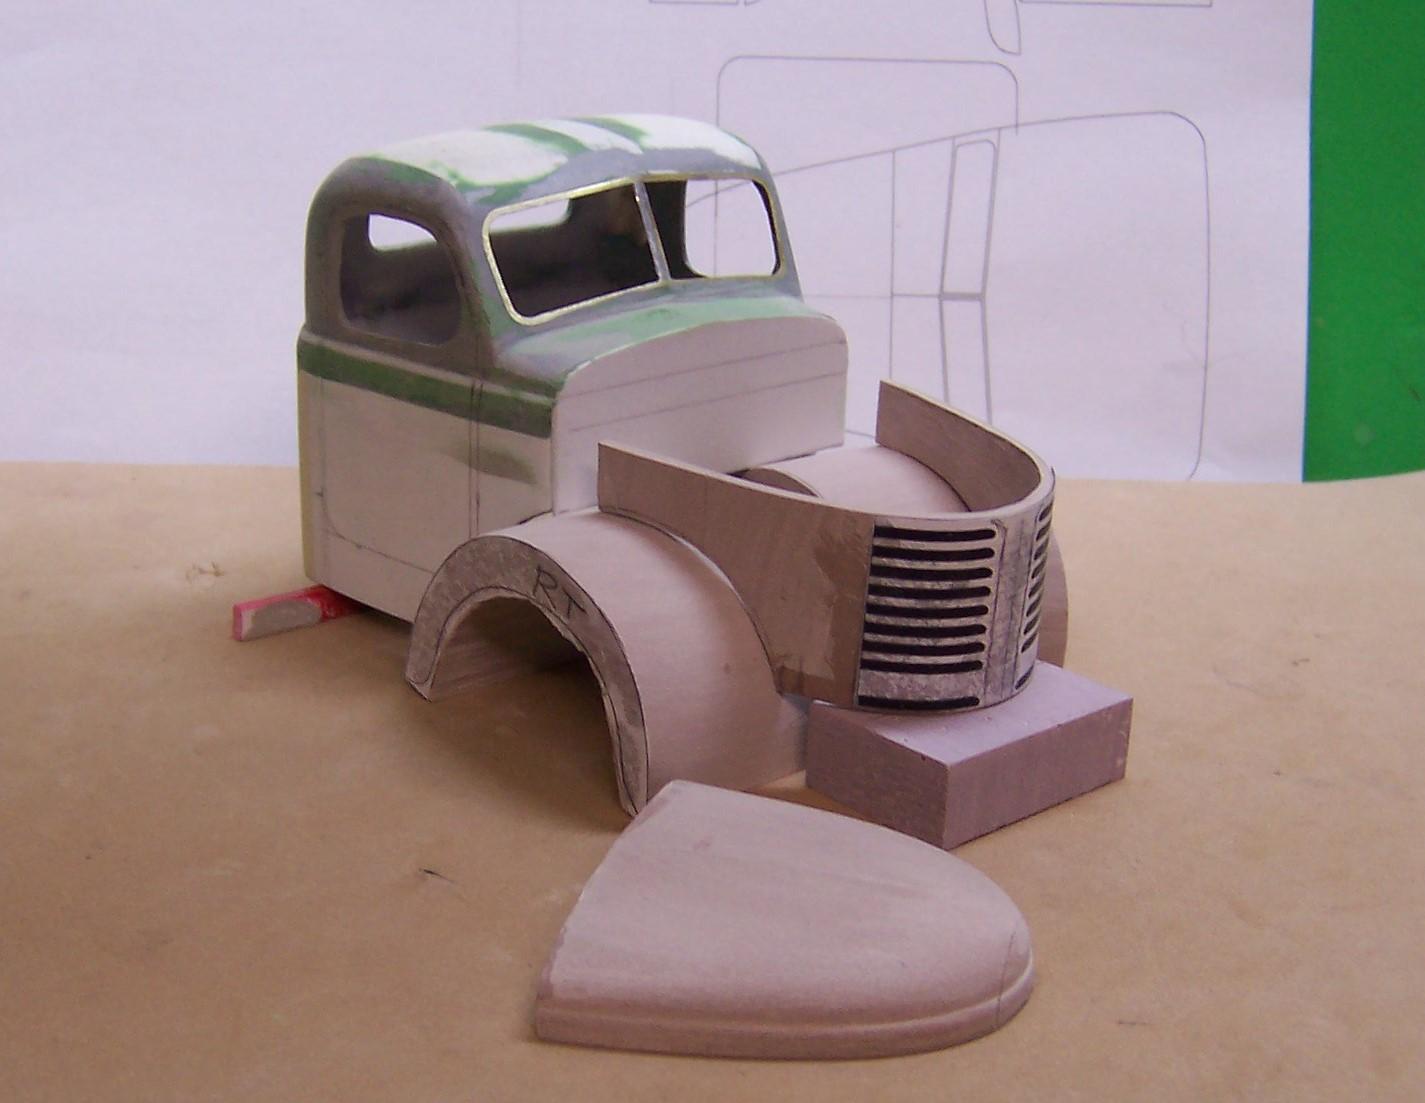
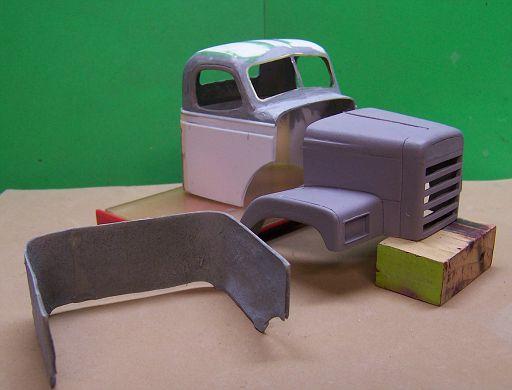
Not a lot going on today so there was more to do on the Reo. Hood was cut from Renshape the same as the fender blanks. The hood sides were also cut from that material which made it easy to shape the rounded front. Renshape is strong enough that I could cut out the grill area as well. The grill area was printed out on paper and glued to the nose. Then a cutting wheel was used to open up the slots. A small file was used to finish up the openings. There is still some fitting to do so that the cab and hood line up over the fenders. Next will be to round off the fenders on the outside and grind away the inner portion of the blanks to get the thinness of each fender.
-
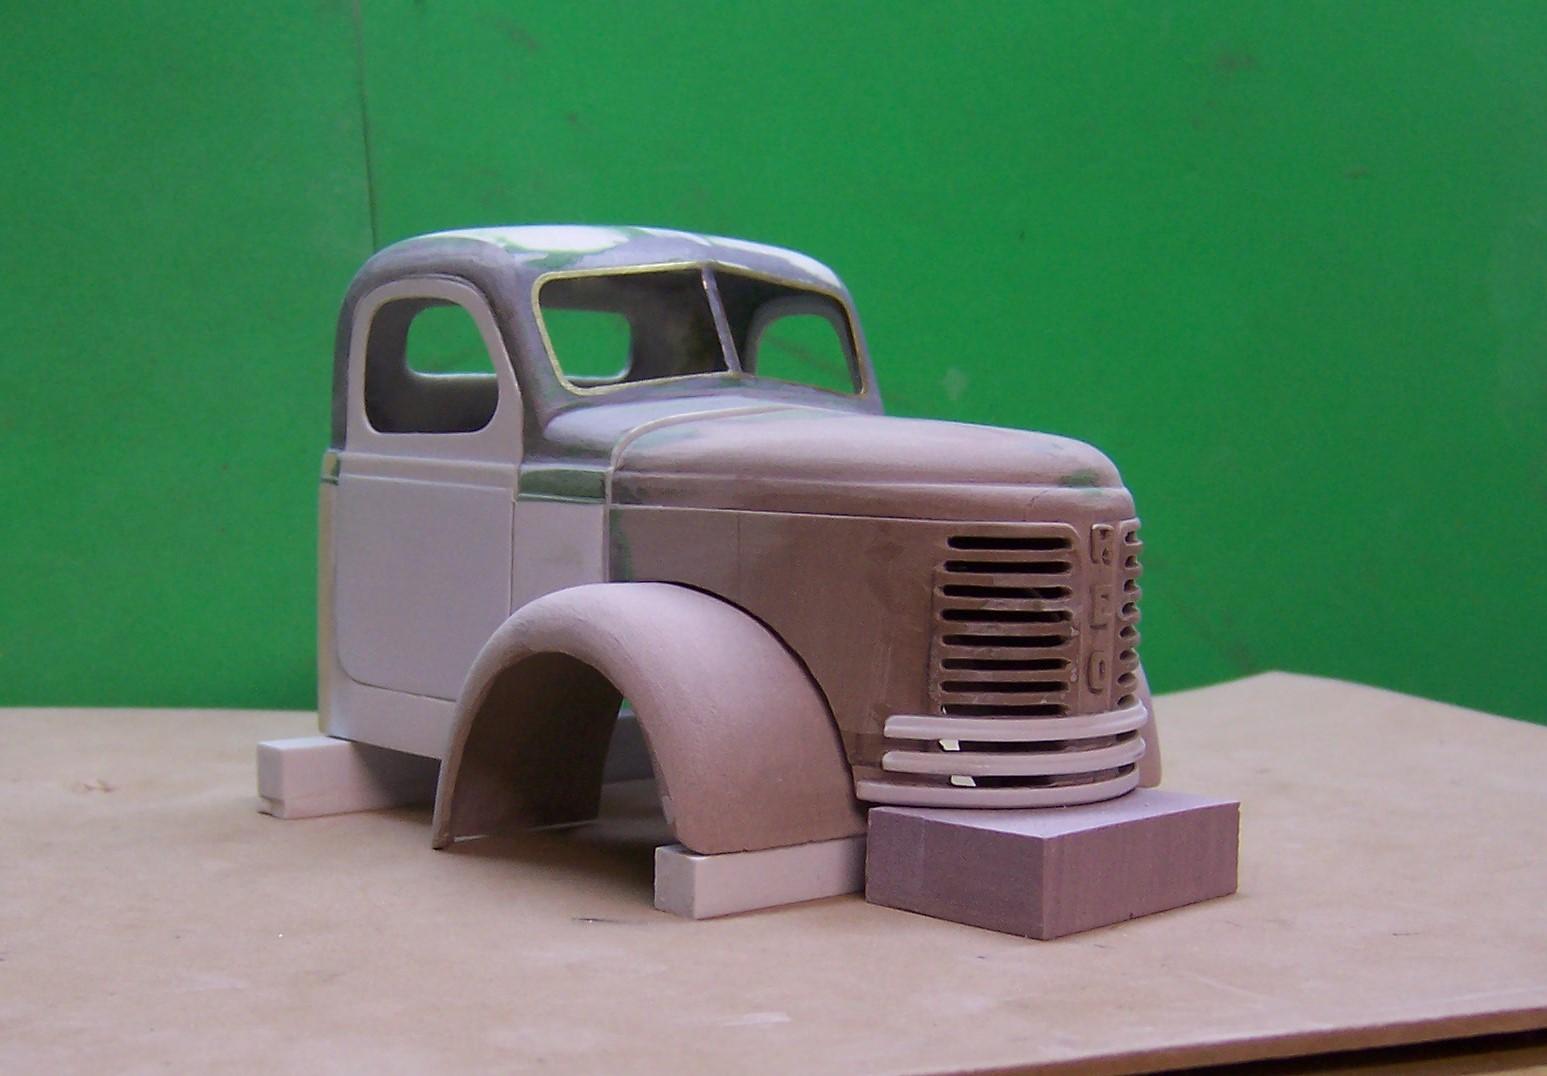
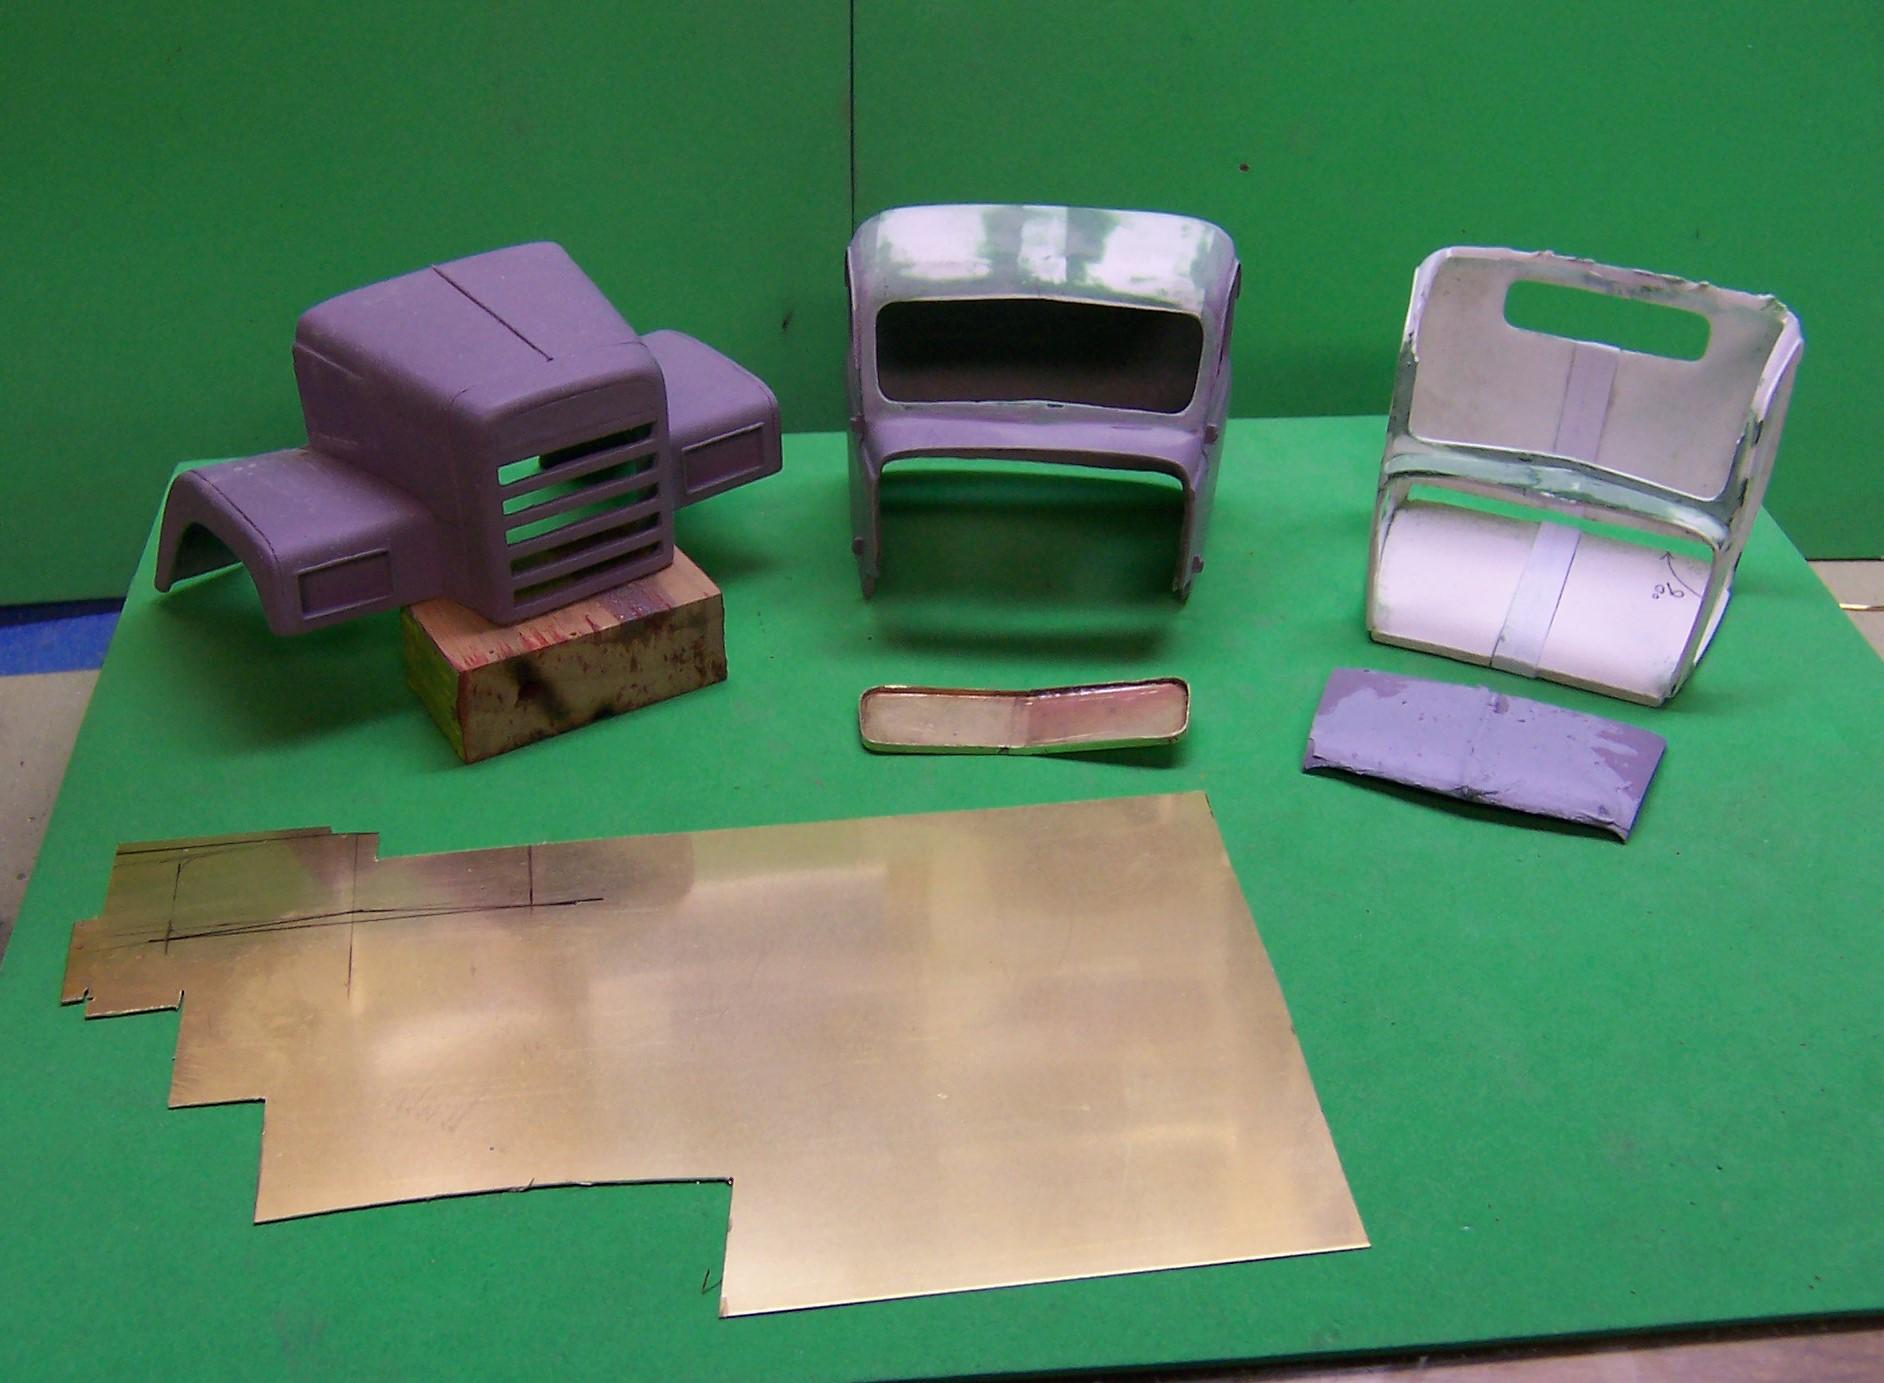
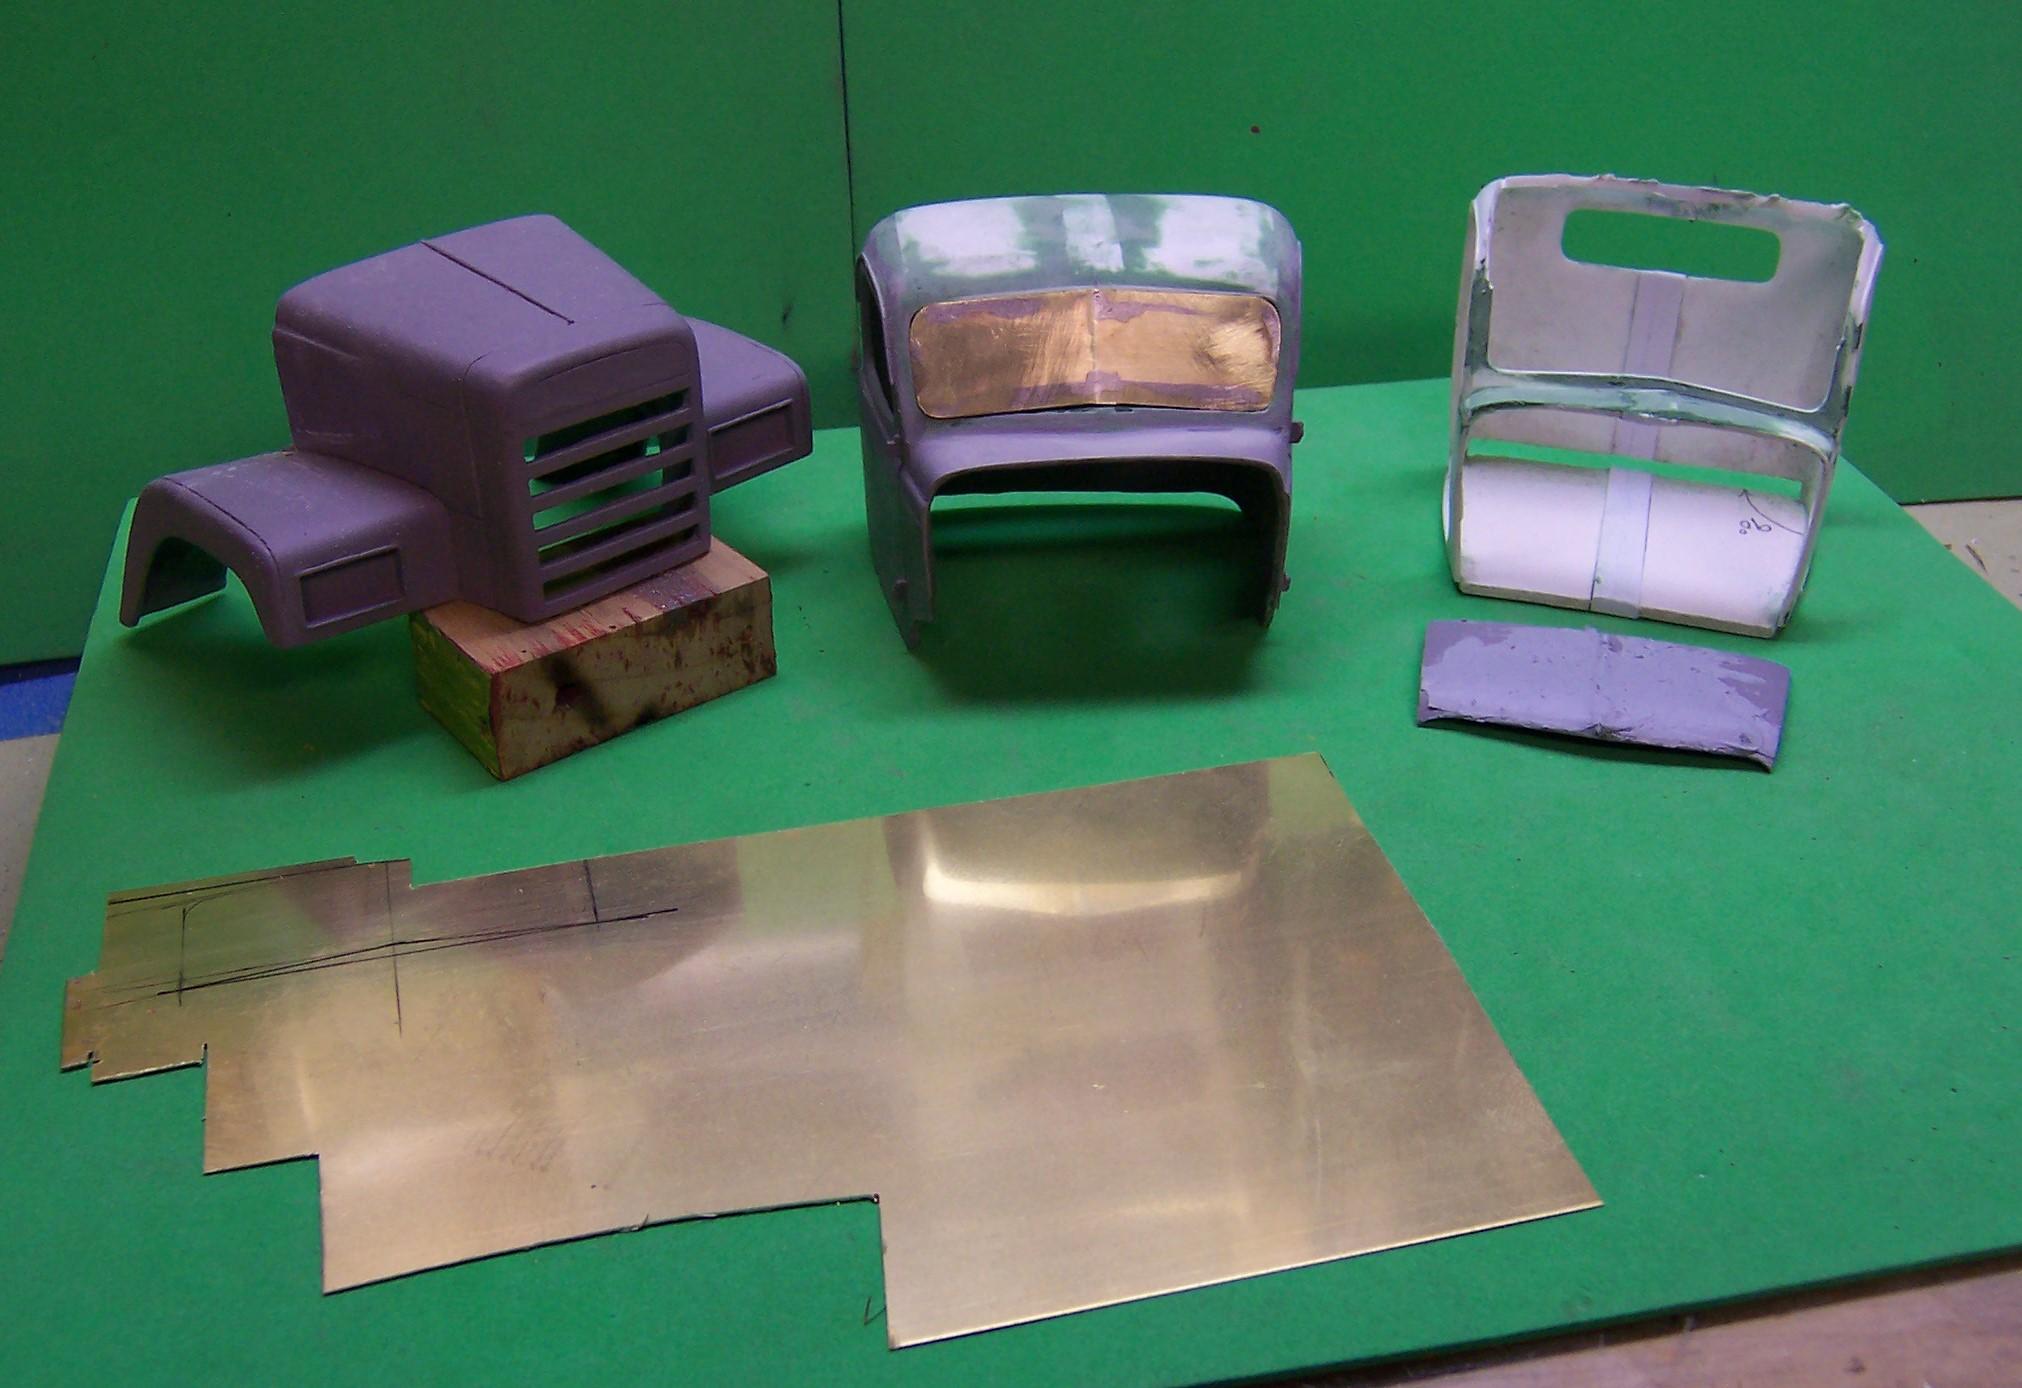
Now that the Mashpee rig is done I've gone back to a project that I introduced some time ago. It had me at a loss as to really go about rebuilding the casting because it was so poor. The time away from it gave me some added incentive to try again so here is the beginning. Here was the original casting. At this point the hood and fenders have been cut free and some modifications were begin on the location of the windshield. It was relocated more above the cowl and was given some V shape. To make a new windshield surround it was laid out on sheet brass, bent in the middle and a small strip of brass was soldered around the edge. The finished windshield surround is in the middle. The windshield was rough fit in the opening and then mounted securely with additional fitting and supergluing. Next was the lower cab sides. They were bowed in, very thin and not good to work with. So new sides were made up of plastic sheet stock and tubing. In the photo above the windshield has been opened up leaving in effect a brass angle completely around it. The angle will help hold the windshield glass in position. There are some relief sculpture lines on the cab but they are not quite as pronounced as what is in the photo. The lower ones need to be diminished quite a bit. The door panels have been filled in some and will be reshaped. The cowl is being reshaped with some putty and the fenders and hood have been roughed out. Renshape was used for the fenders and hood. It is great stuff to work with, having no grain, it sands and cuts easily in any direction but is very strong. I made paper templates of the hood and fenders and one of the fender templates is still in place on the right fender. The fenders were first cut out on a band saw and then sanded to the outer shape on a disk sander. The edges can be rounded by hand. The underside will be hollowed out using a Dremel and some sanding disks.
-
Ditto to what everyone else has said. Well done!