89AKurt
-
Posts
8,426 -
Joined
-
Last visited
Content Type
Profiles
Forums
Events
Gallery
Everything posted by 89AKurt
-
Nice to see someone build these! I got the kit from an estate, looked really good, but sold at the GSL show. Like the color choice!
-

Off Road BRAT
89AKurt replied to Chuck Most's topic in Model Trucks: Pickups, Vans, SUVs, Light Commercial
Get an air filter on that! I like the color choice. I know these were going for collector prices on eVilbay, funny they reissued it. -
Love it! I know the kit is lacking chassis detail, so this is a perfect use. You suspended the wheels perfect. When it's officially done, take it out to the woods for photos. LOL
-
Thanks! Avoids fretting over getting a perfect paint job. More like when gravel flies when drifting corners. I'm a non-conformist, thank you.
-
Yes with cotton
-
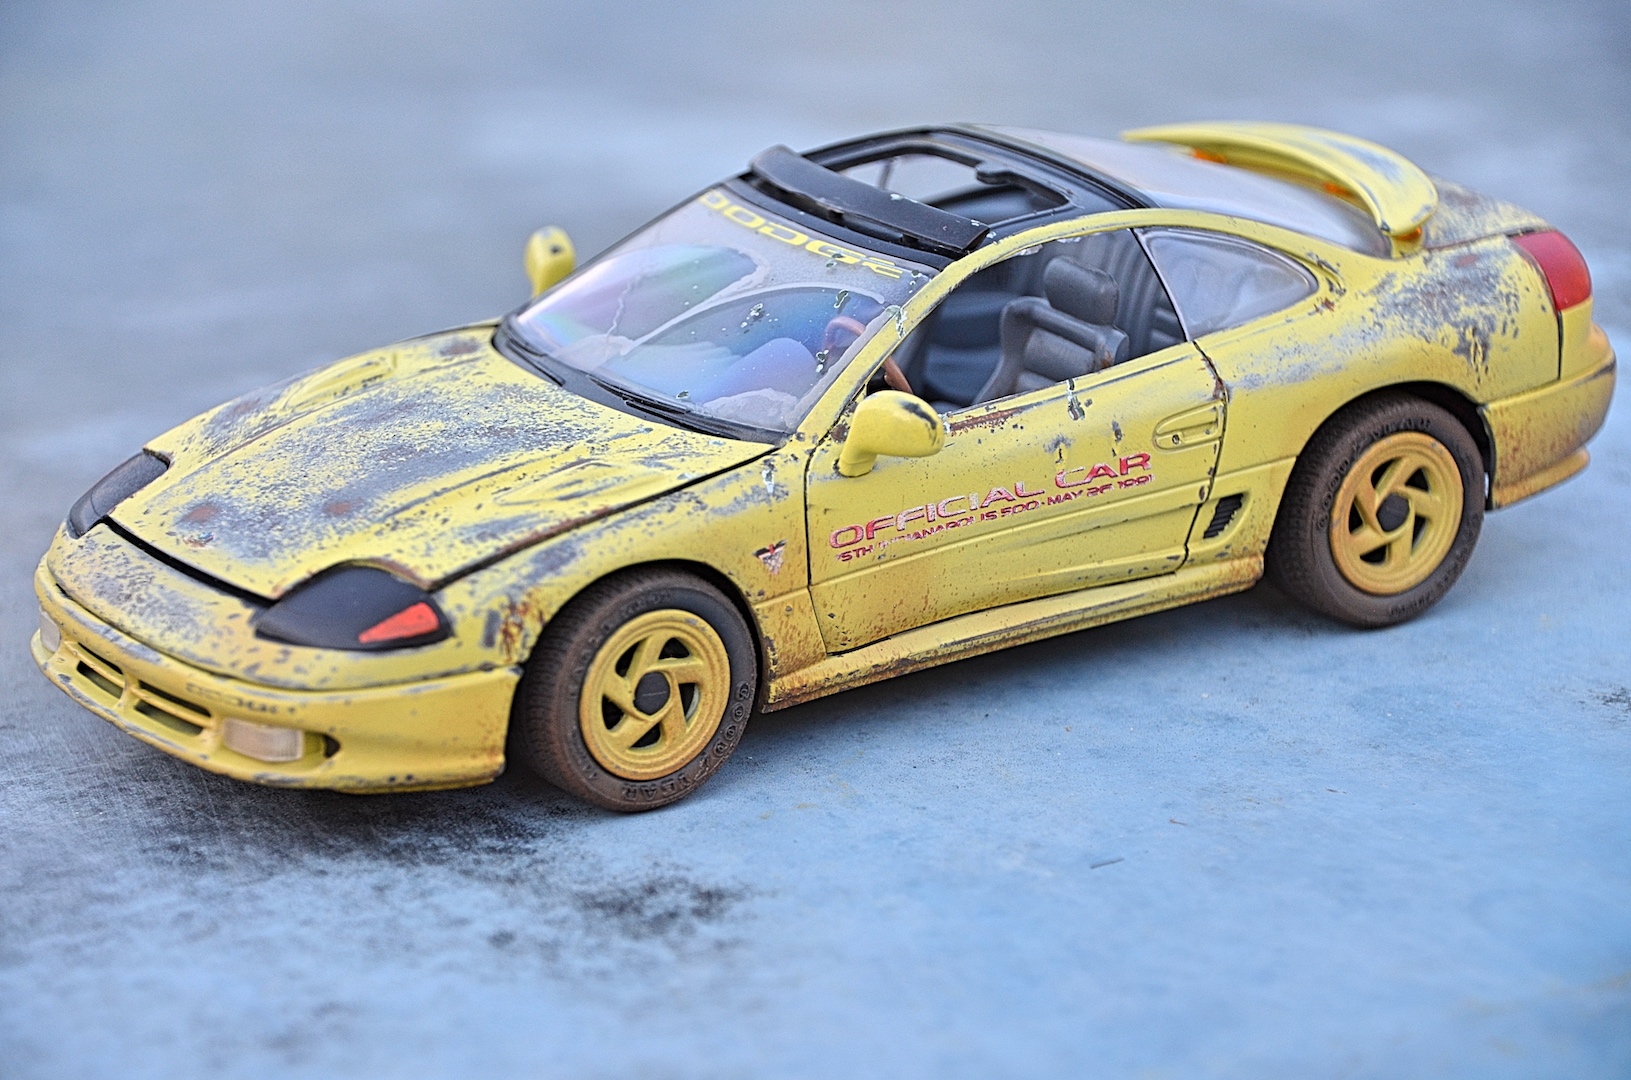
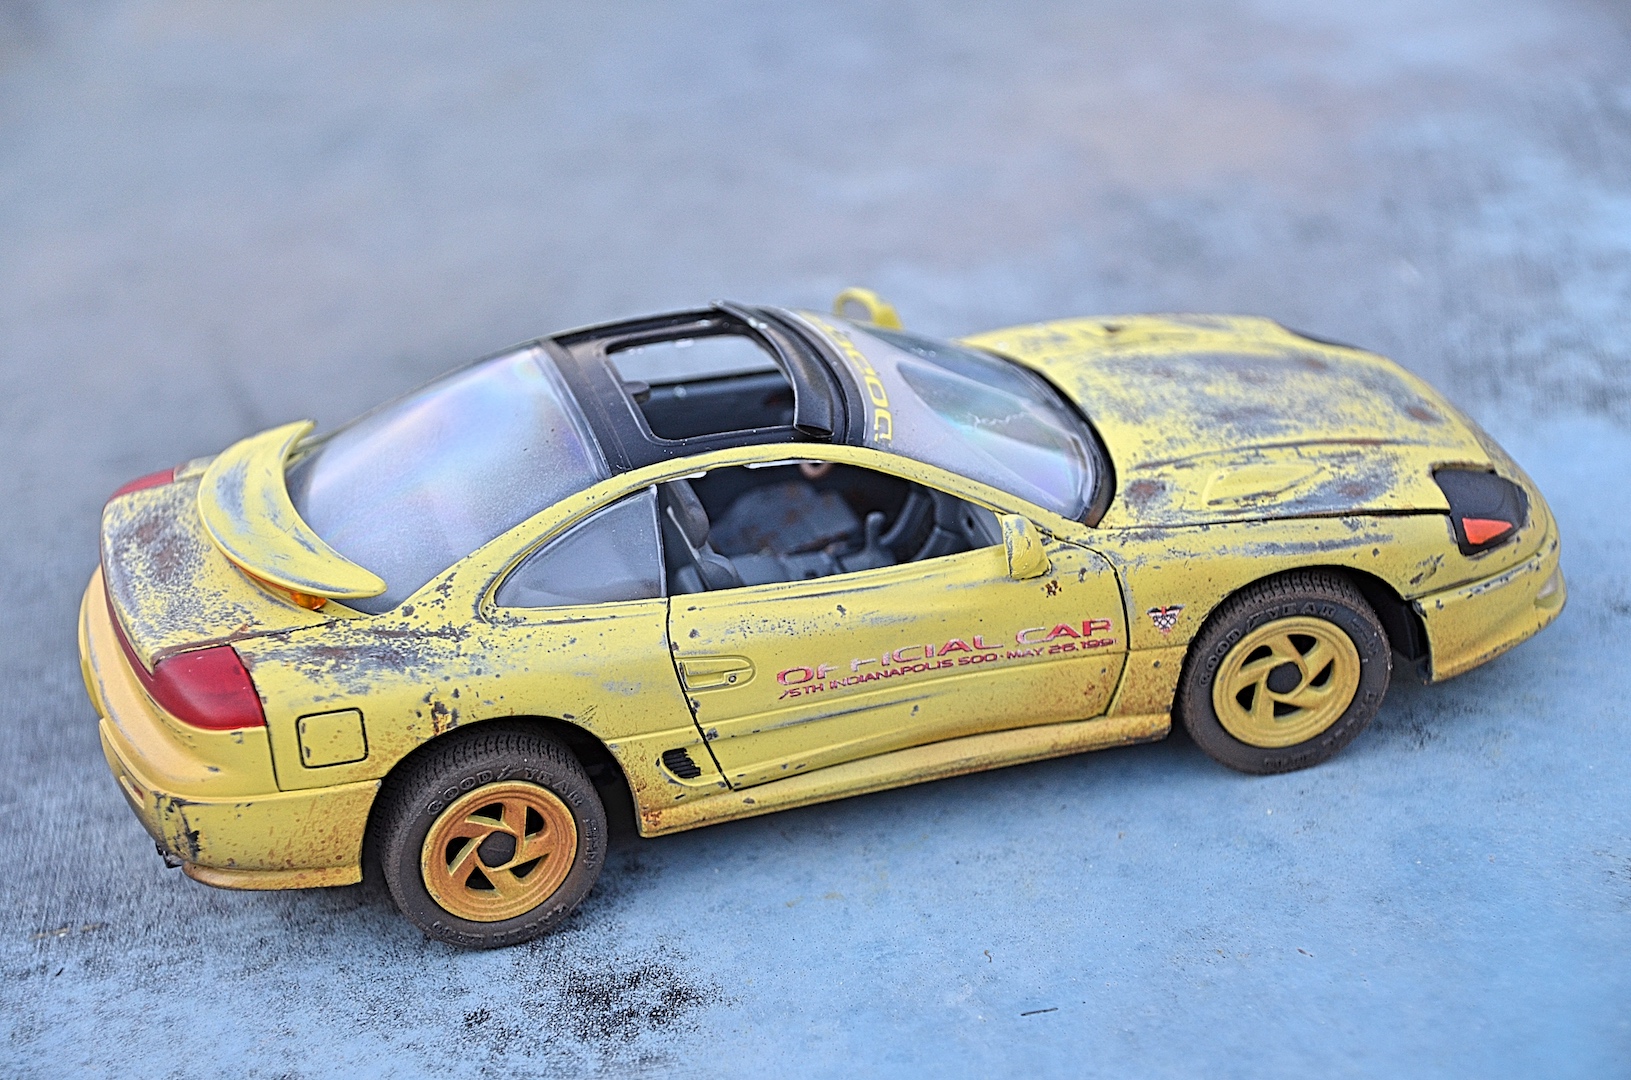
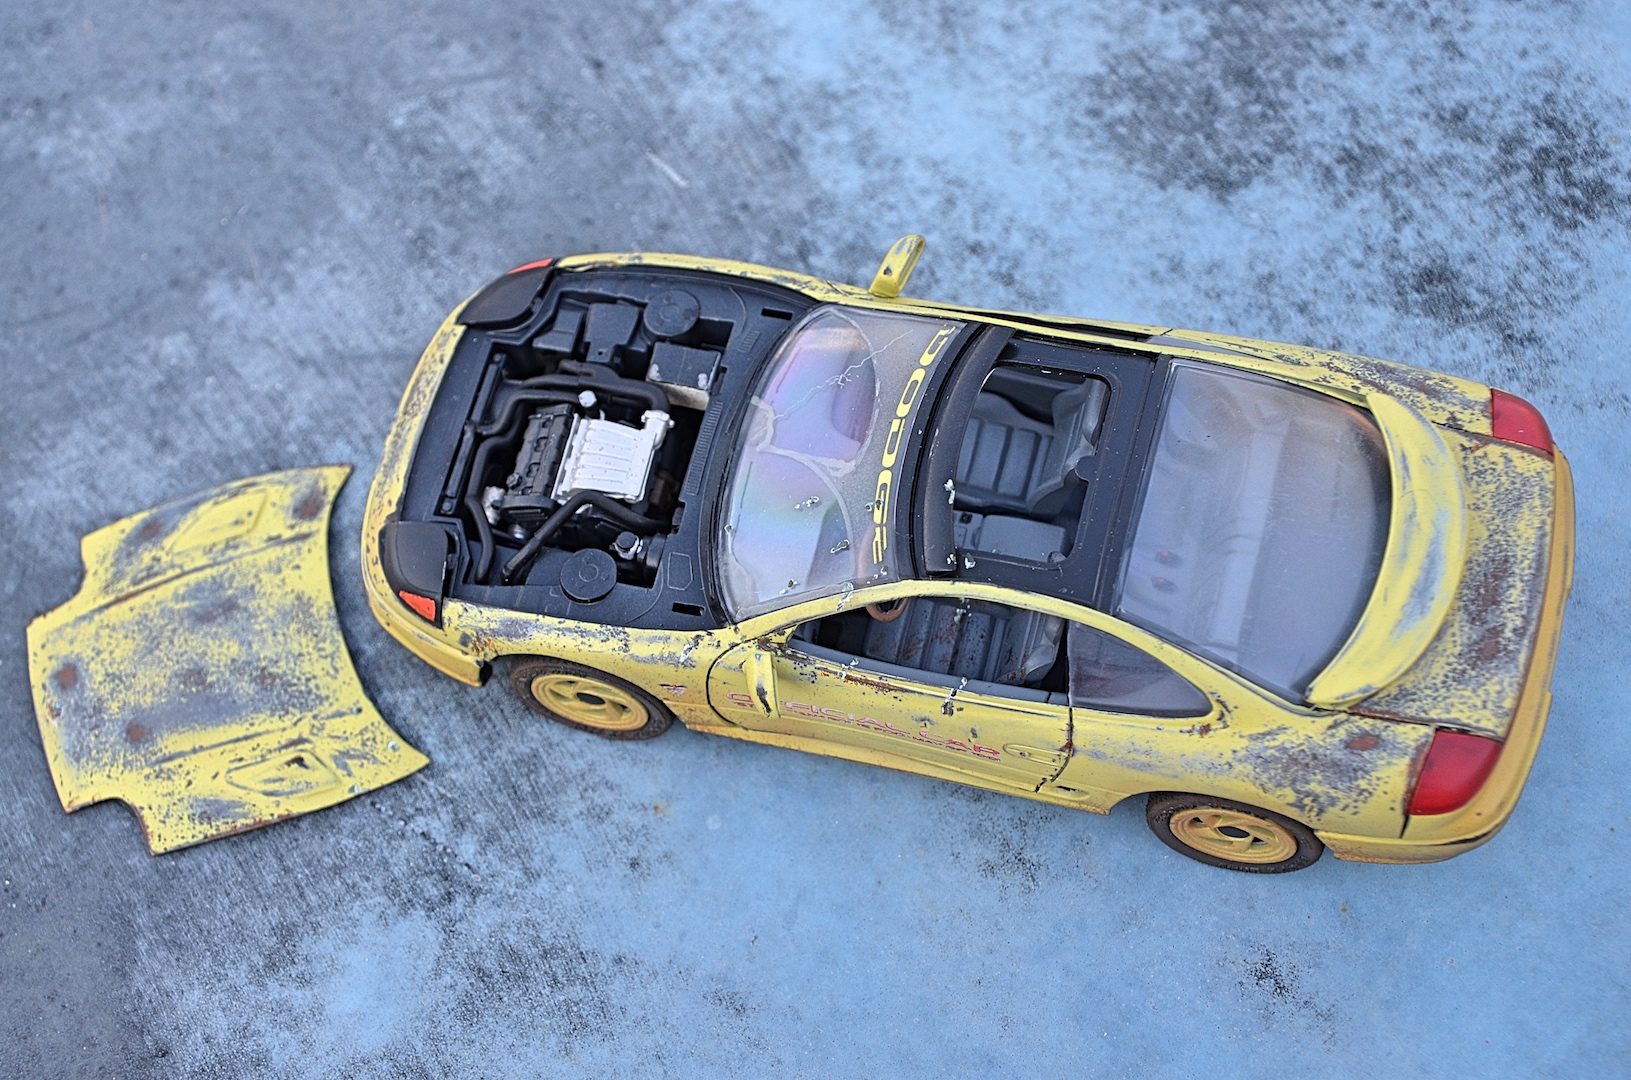
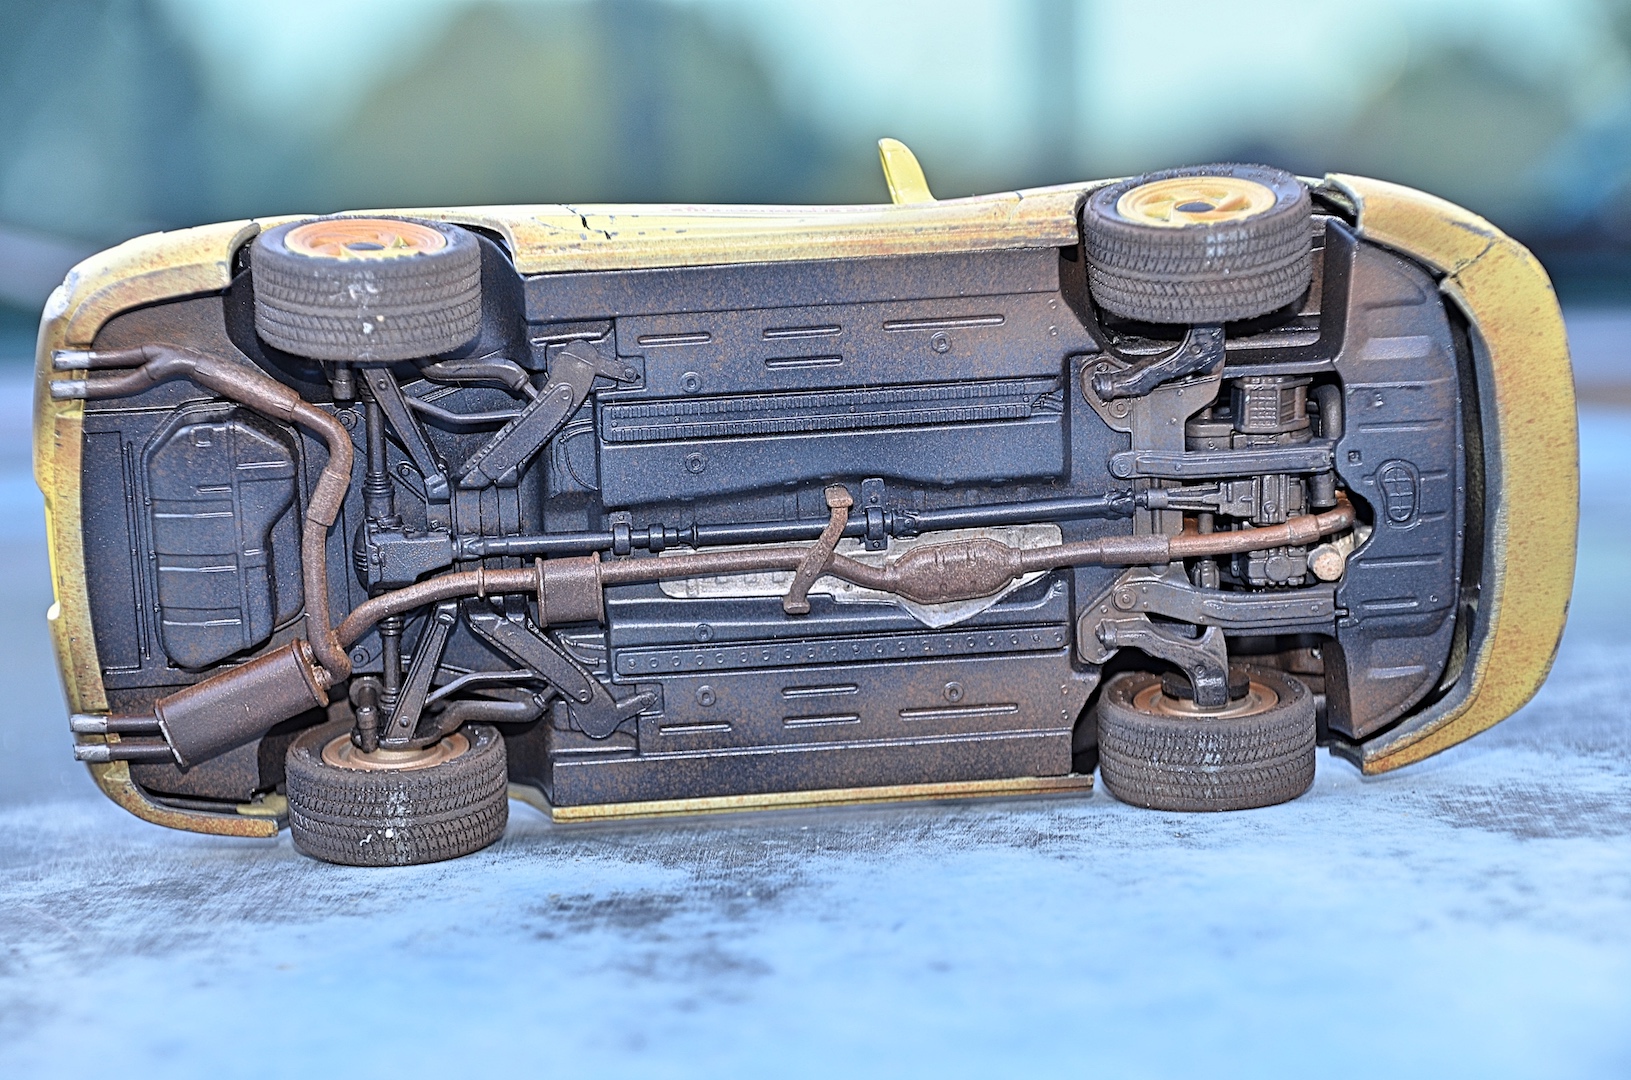
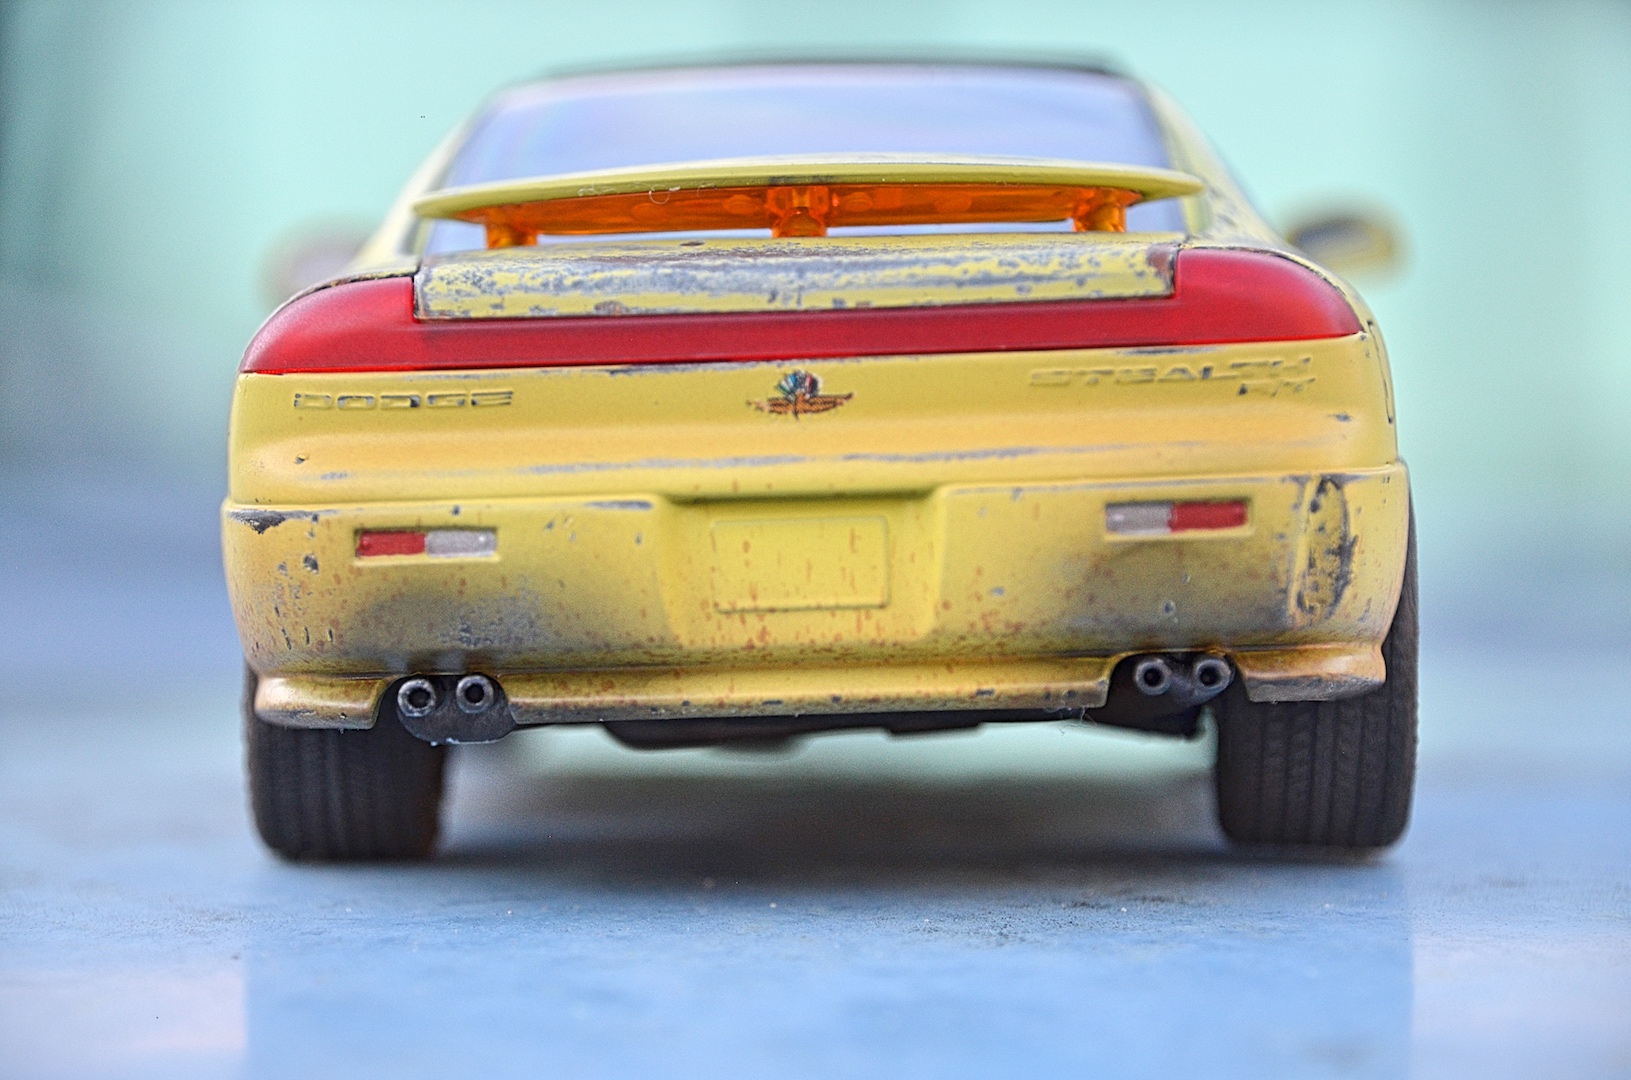
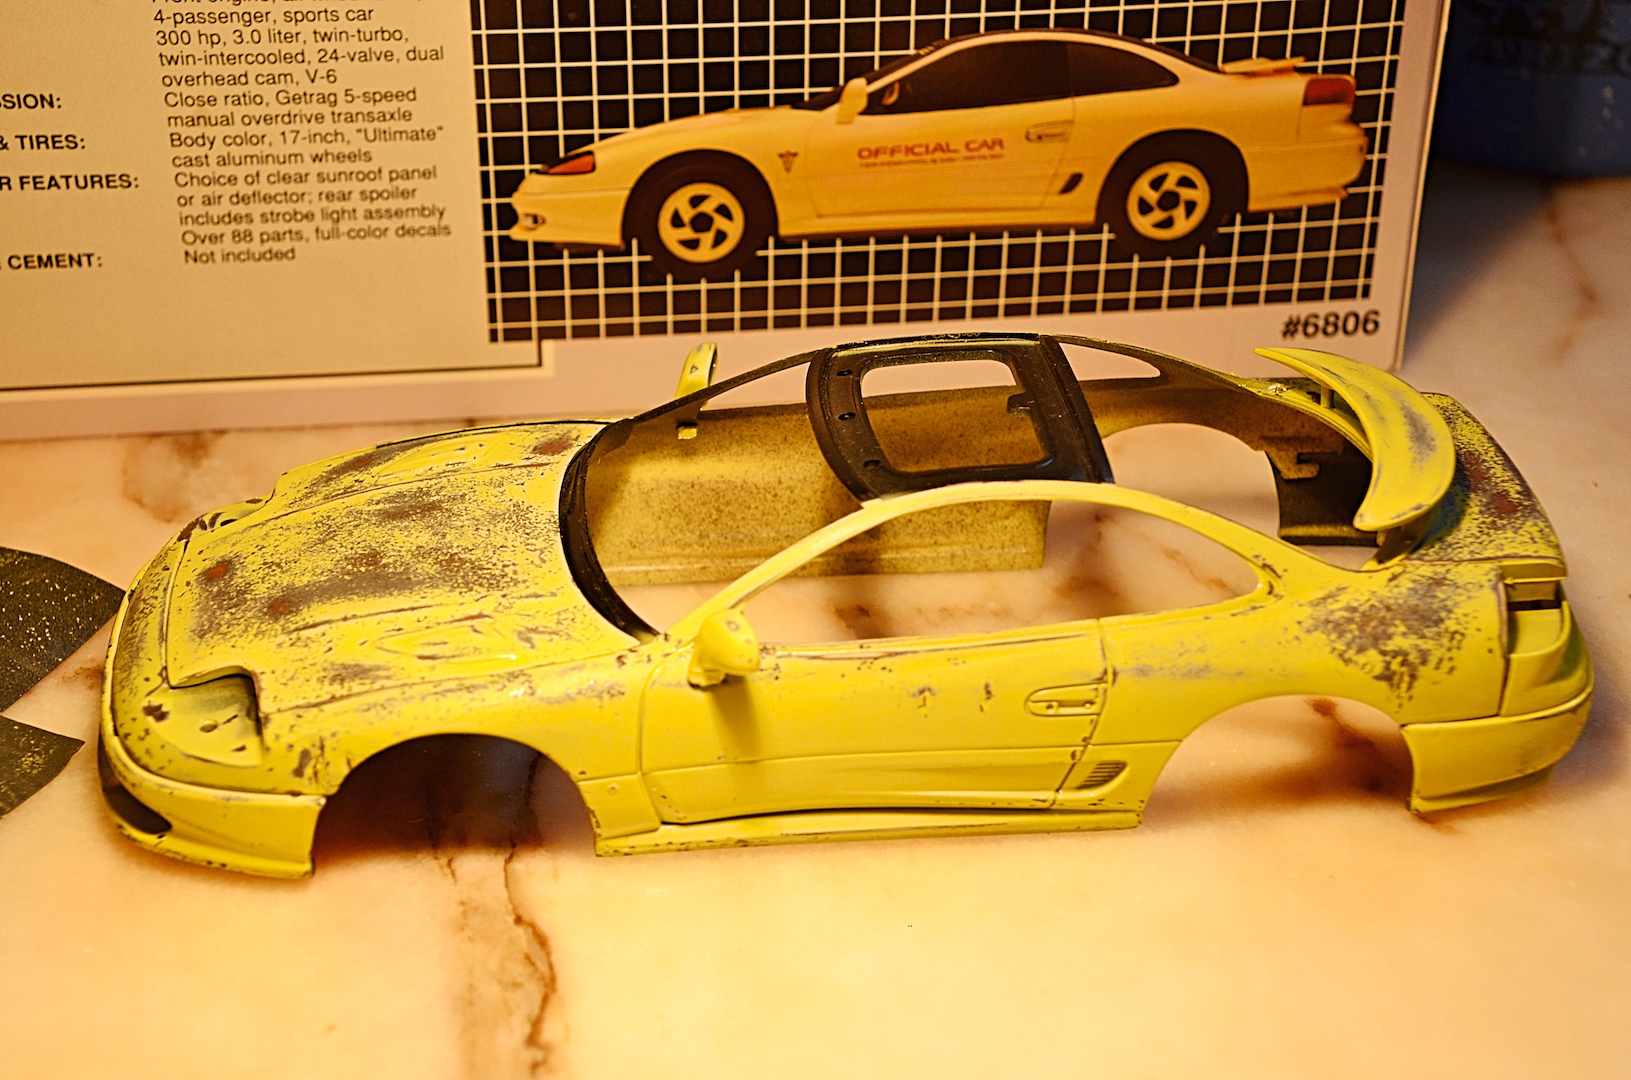
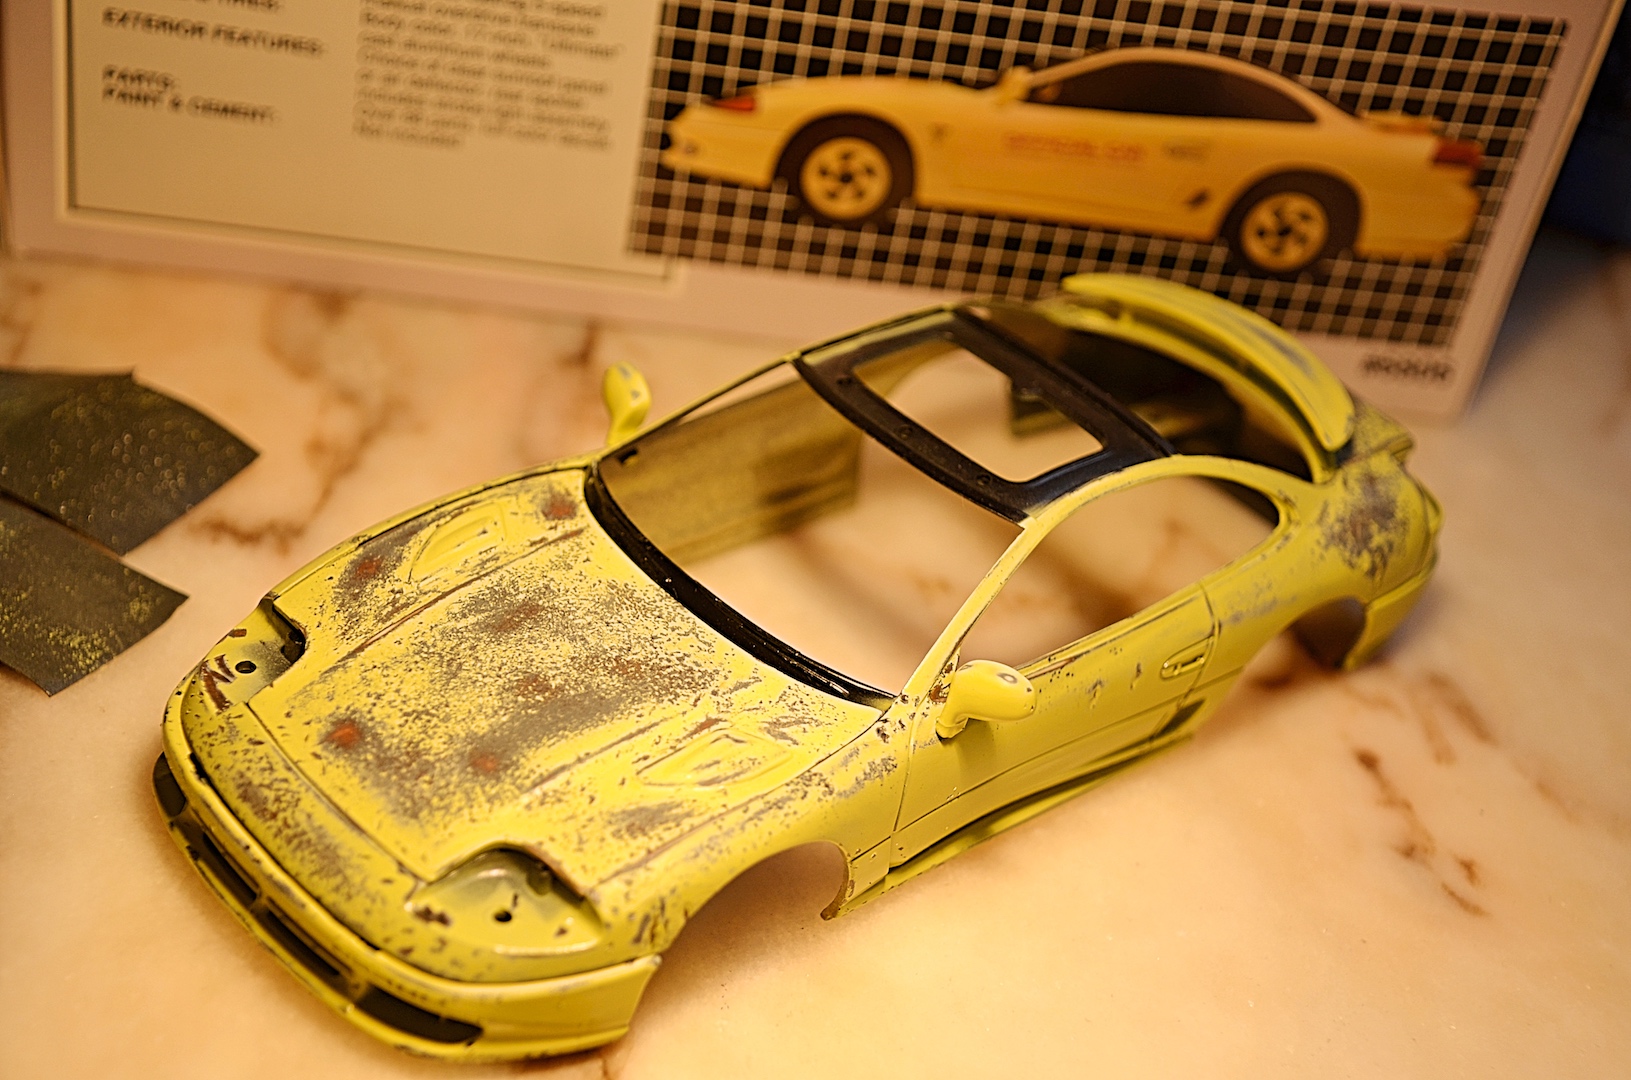
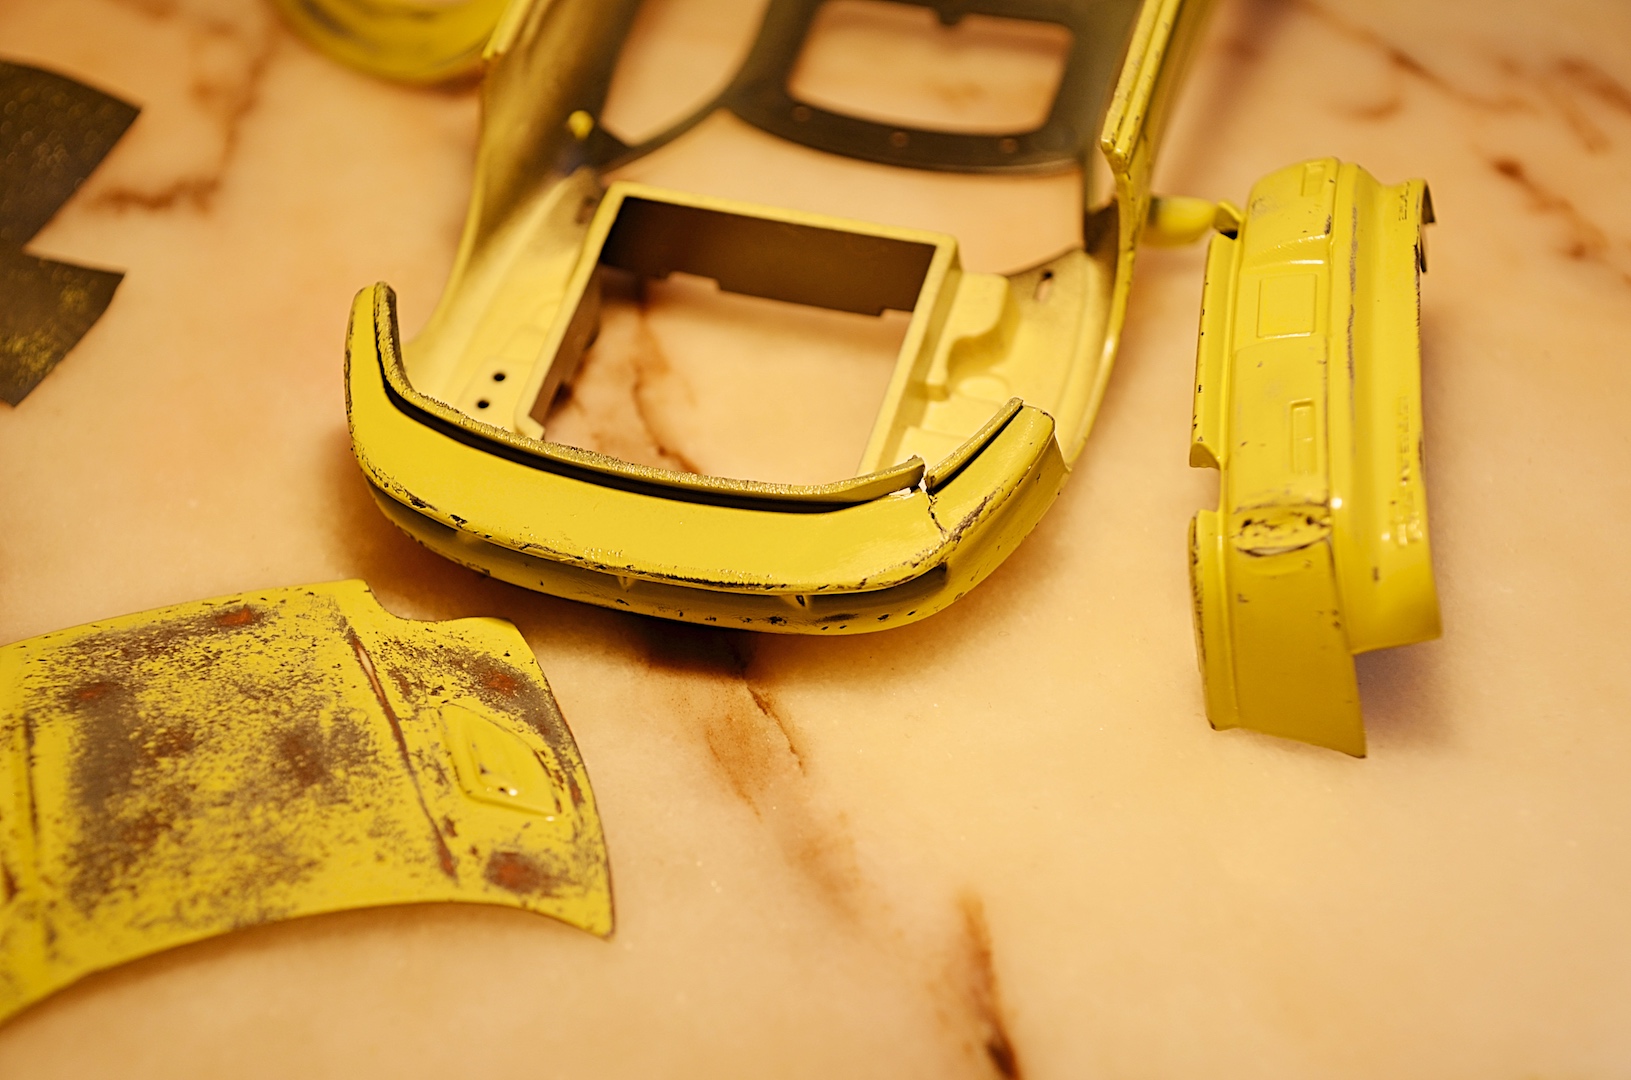
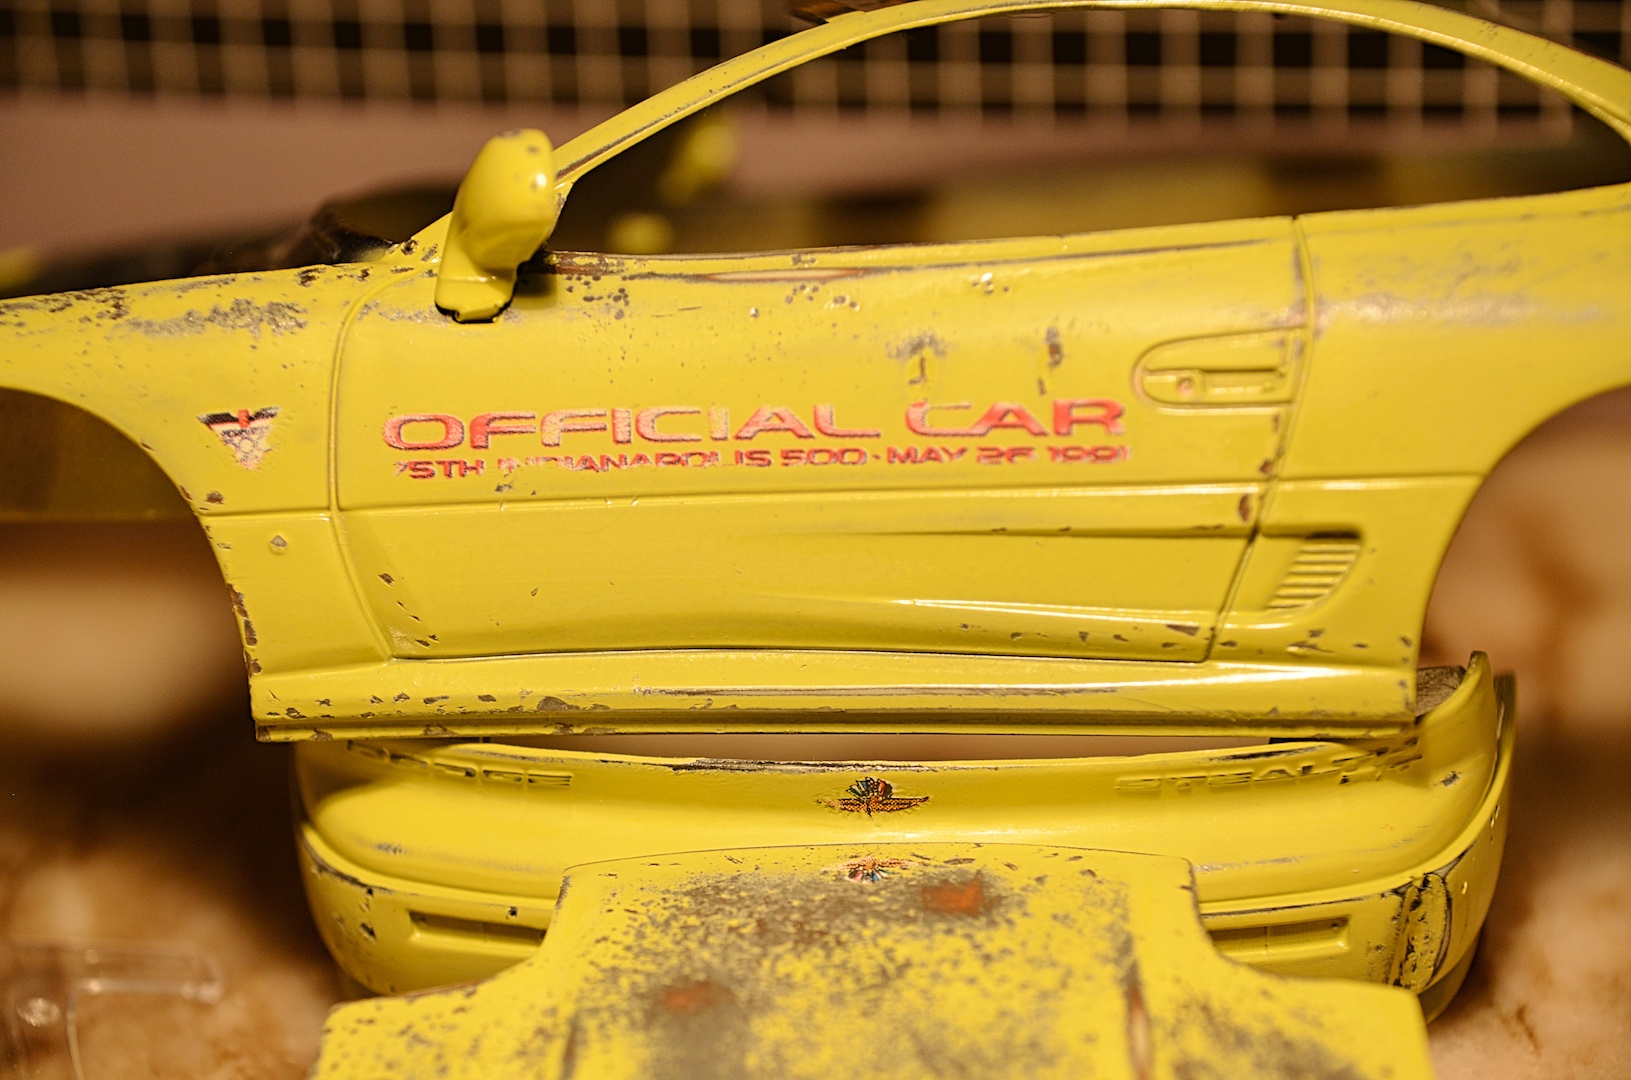
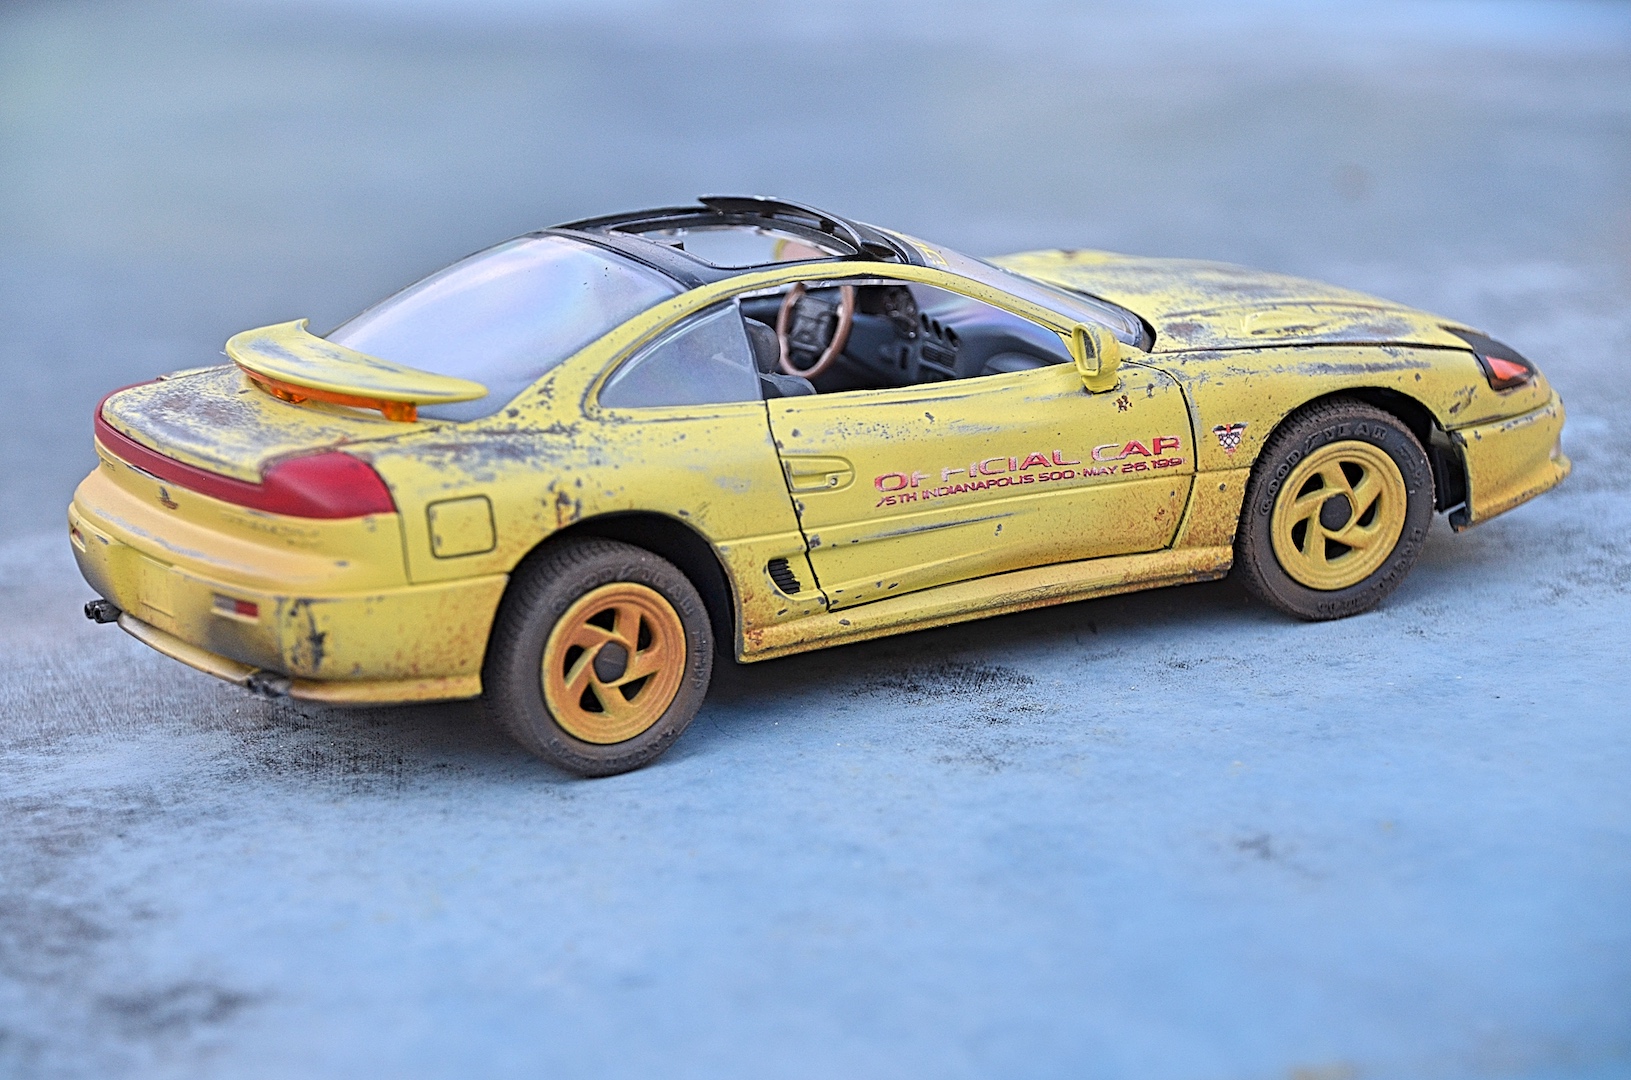
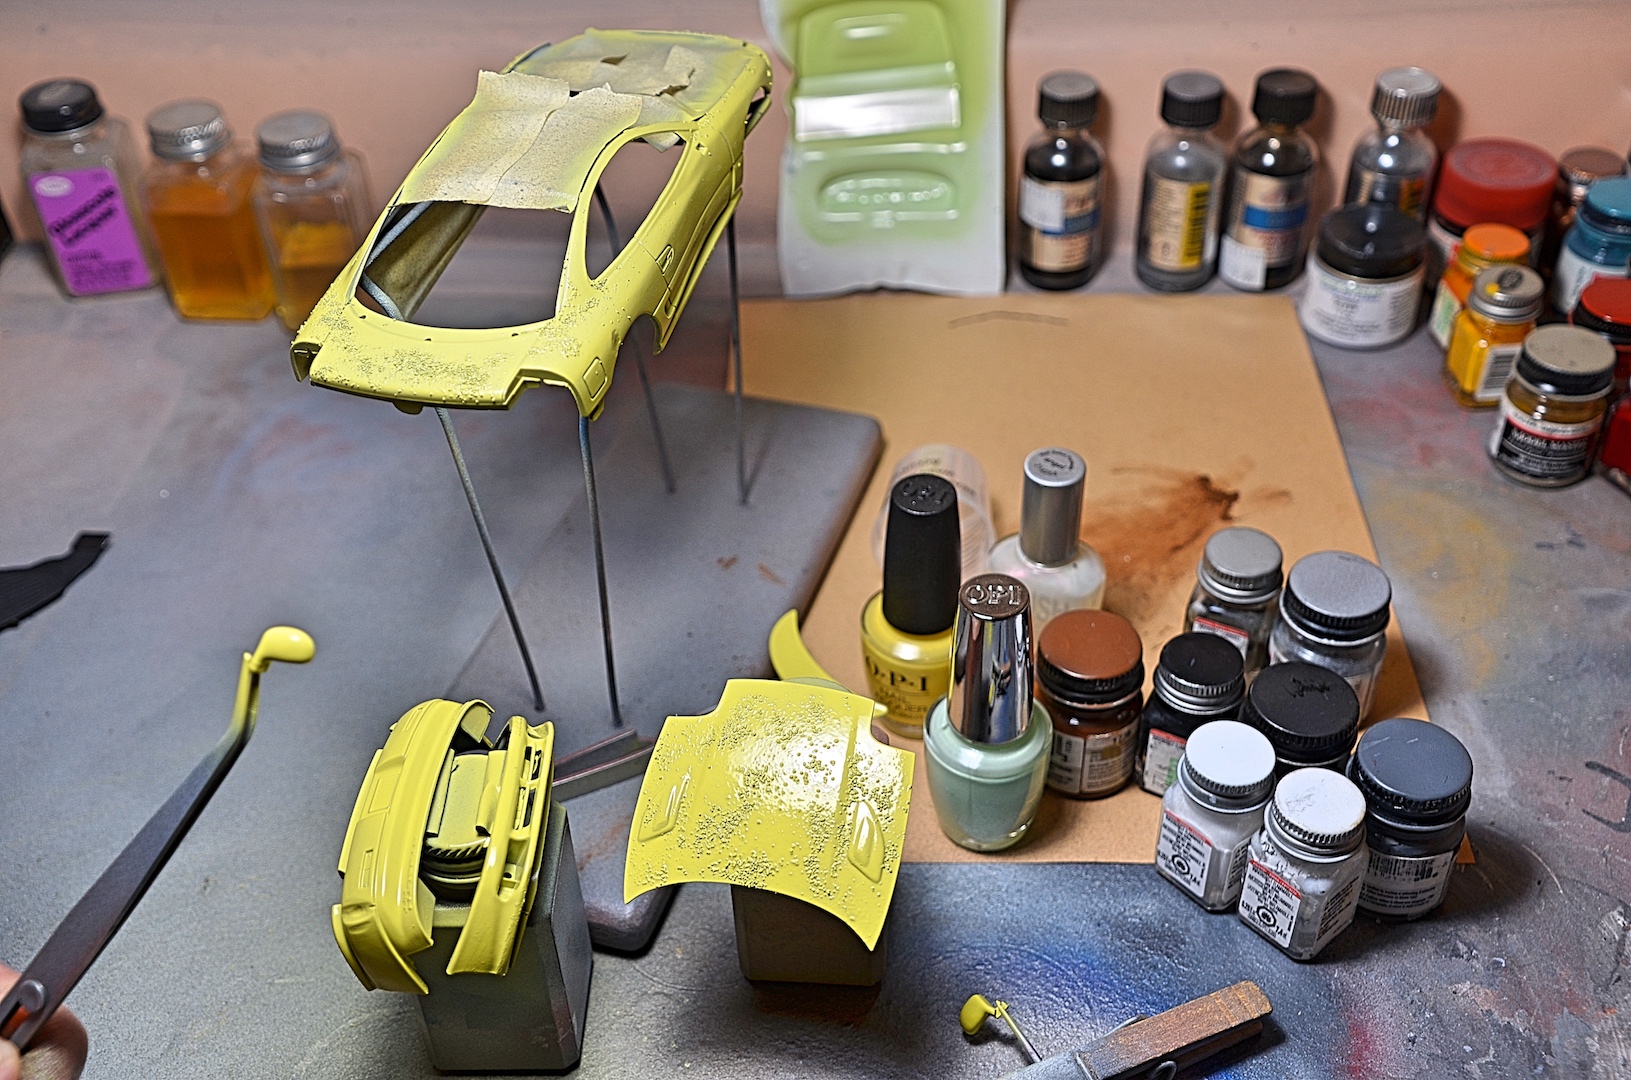
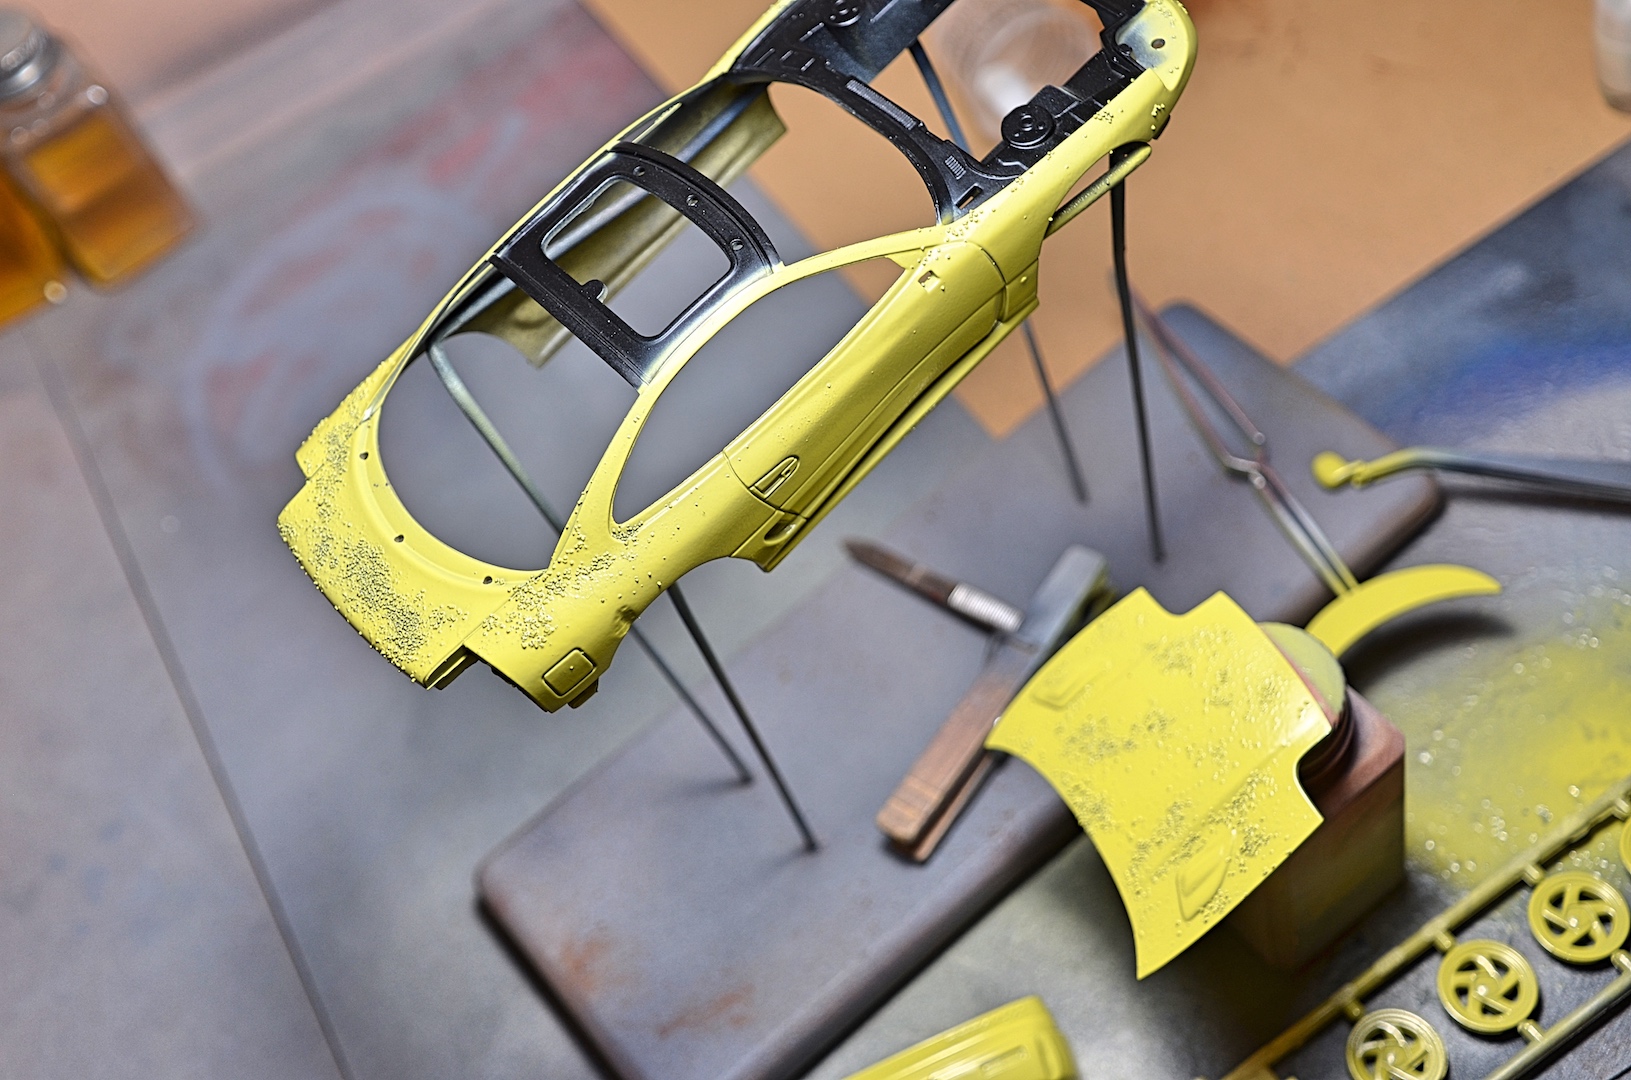
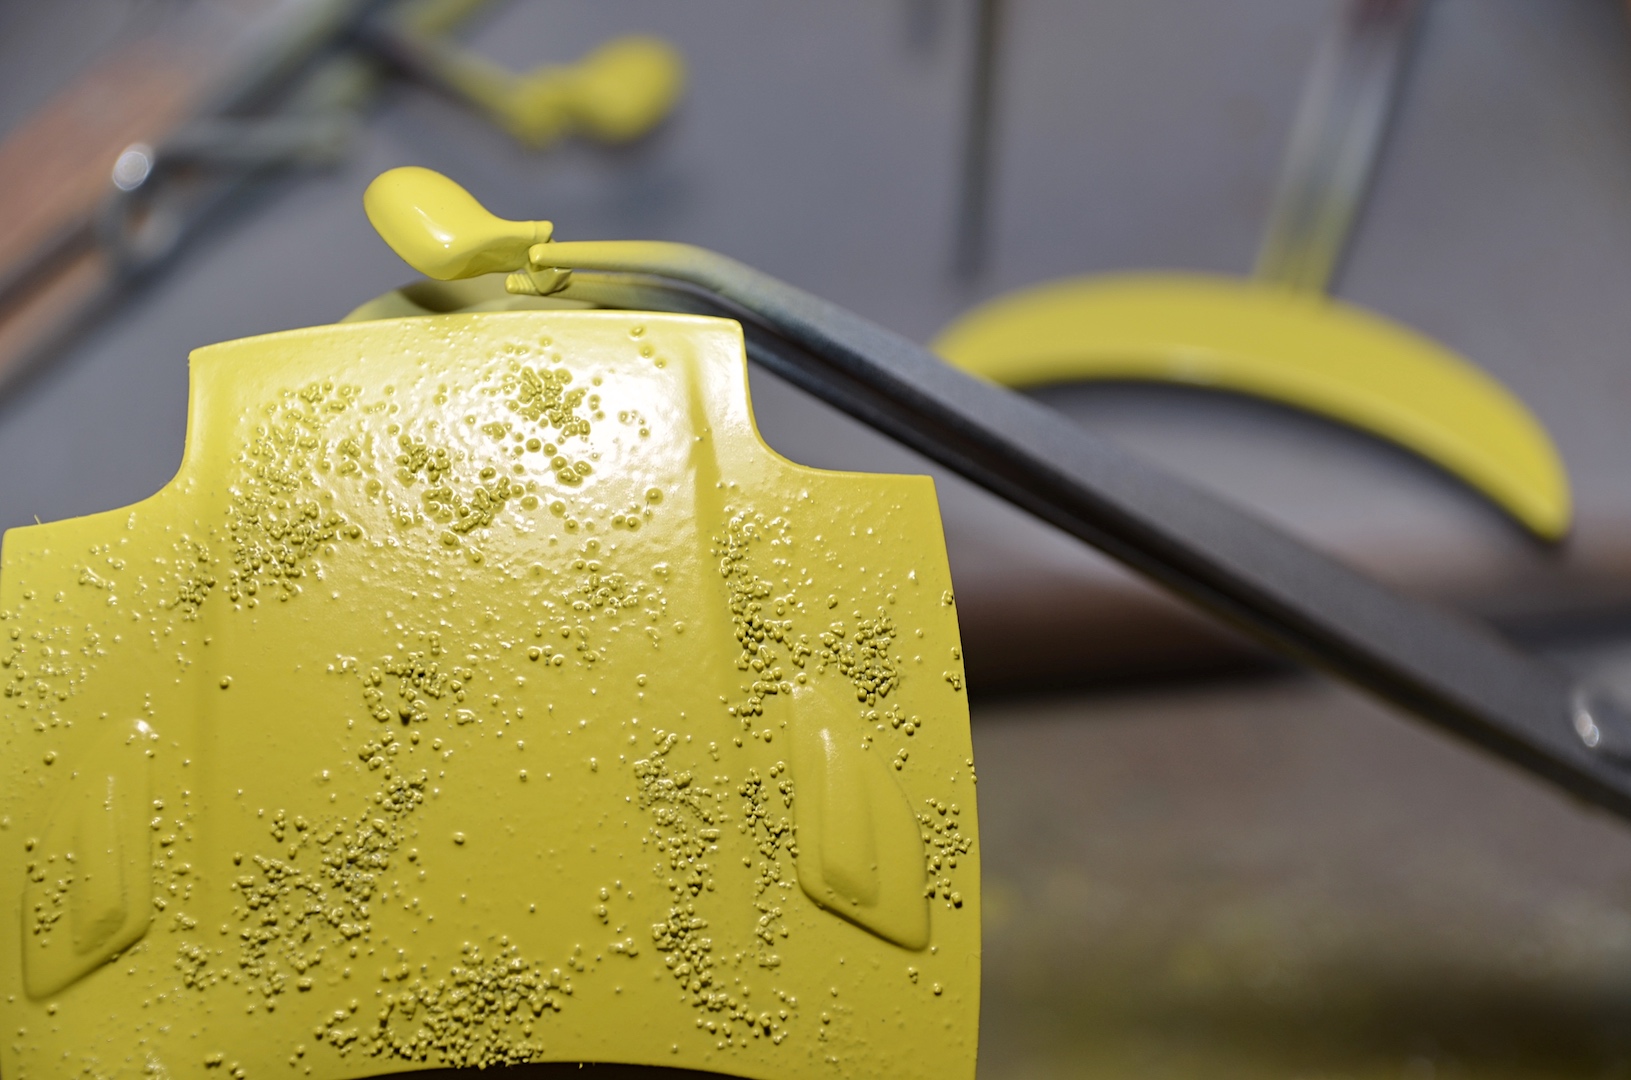
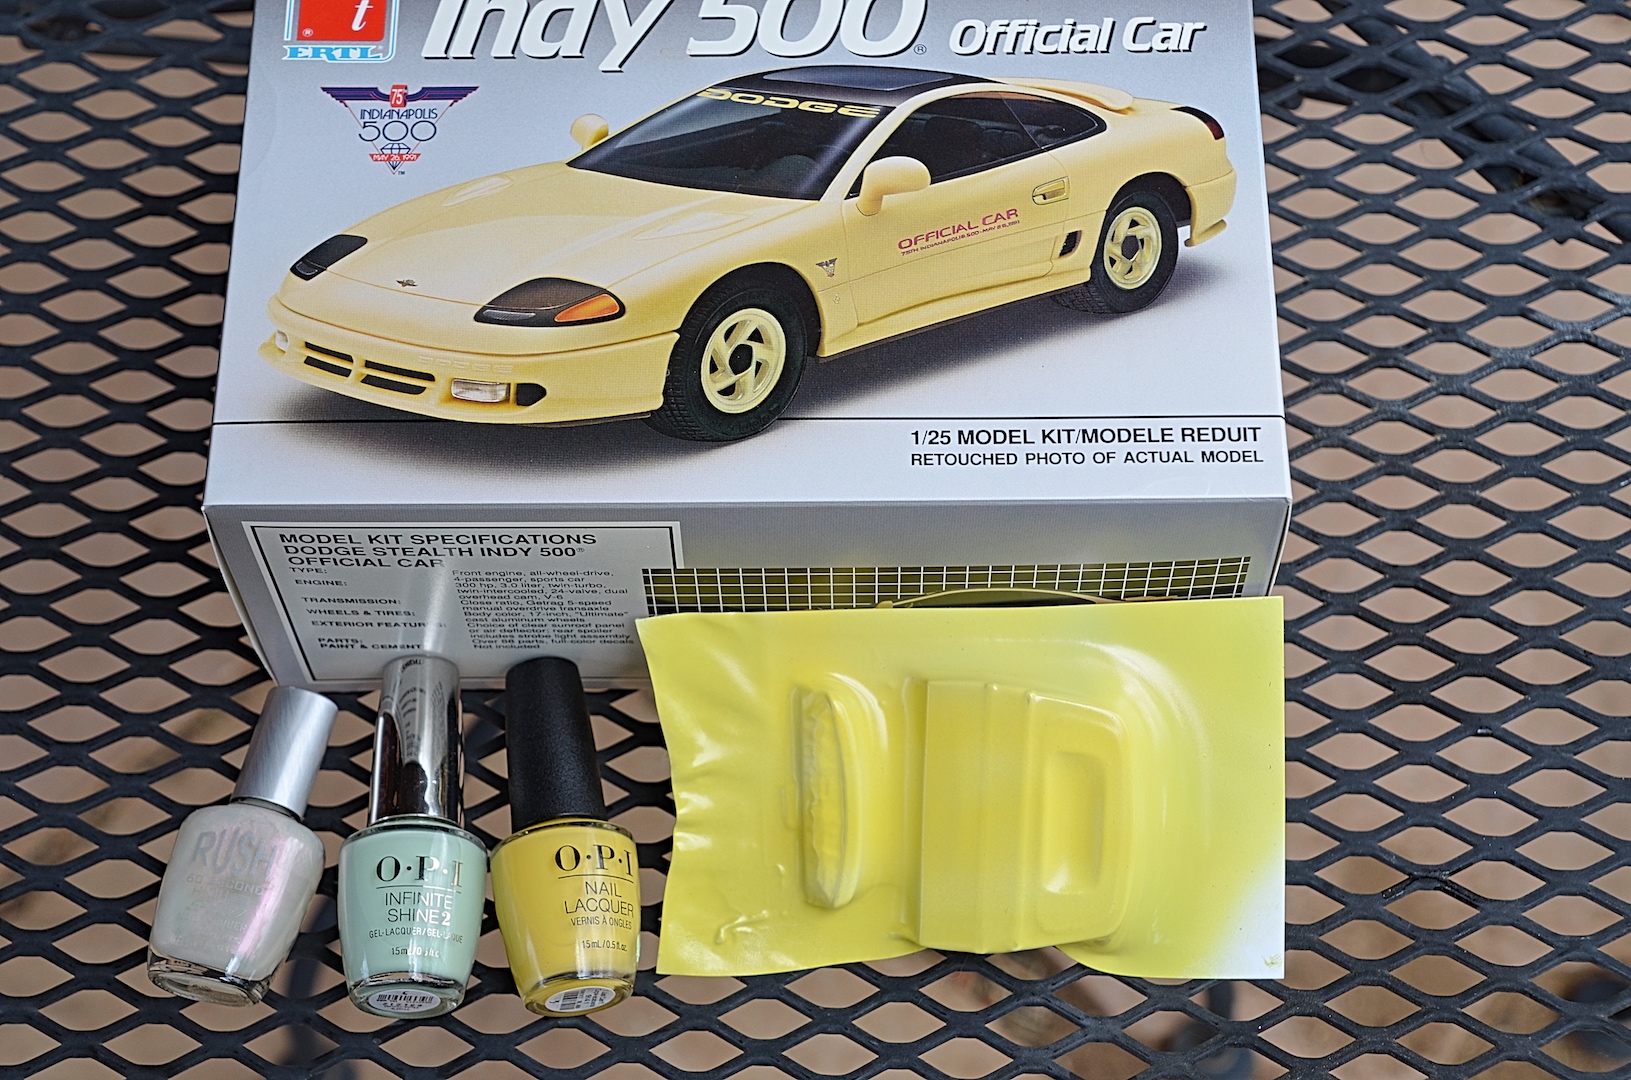
Built this for the Lee Iacocca memorial build, AMT kit (not snap-tite). Started July 11, 15.5 hours later on July 13 calling it done! Built Box Stock, no corrections, no added parts, not lowered. Used nail 'polish' for the paint, Bare Metal Foil used as light reflectors. For AMT, it was well done, the big problem was the turbo pipe from the back turbo to the left fender, that's why the hood does not close all the way. I bought this on sale for $8.10 when I heard the Union demanded it be pulled for Pace Car, hoped it would become a collector kit, you can buy one off eBay for $8-$9, so it didn't even keep up with inflation! I adapted what I read in the book Extreme Weathering, mainly dumping salt onto the wet primer coat of paint, then wet-sanded, also sanded the decals. Added some dents, and broken air dam. Other techniques are clear flat with Africa Korps and/or Leather added for weathering as dust or dirt. Circle template used to cut masking tape for the wiper tracks. Drilled exhaust tips, Molotow pen used for the tips. Bird droppings were the last detail. No license plate decal! It was a nice break from fuzting with the Paris-Dakar.

-
DONE!
-
AMT's Dodge Stealth Indy "official car" beater
89AKurt replied to 89AKurt's topic in WIP: Model Cars
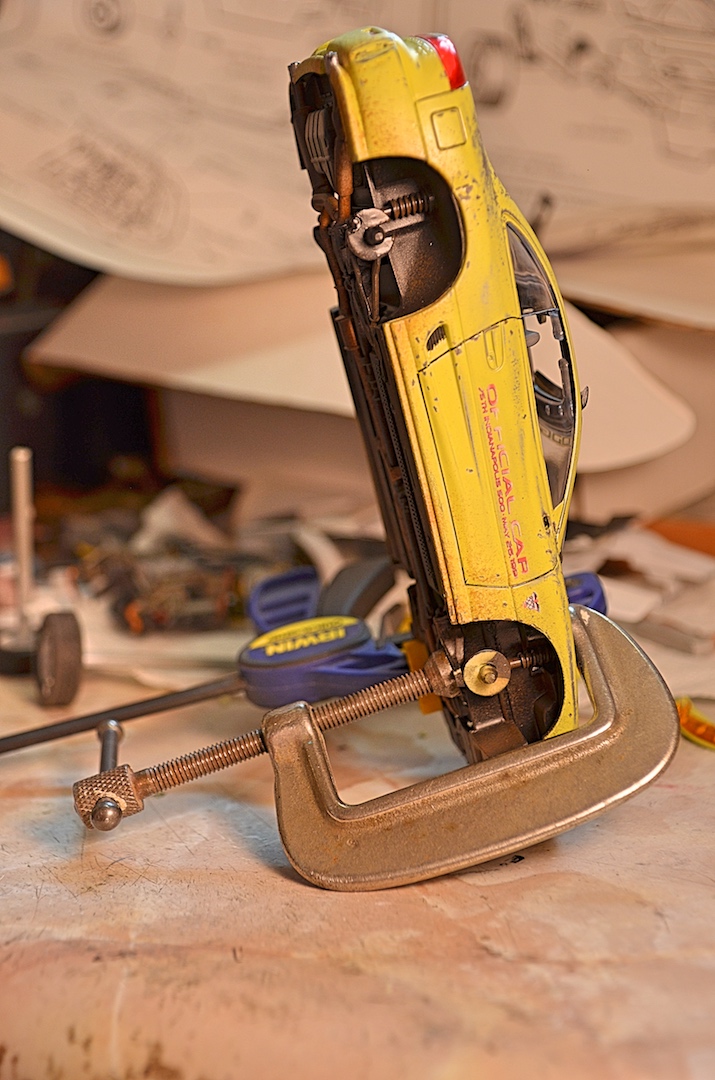
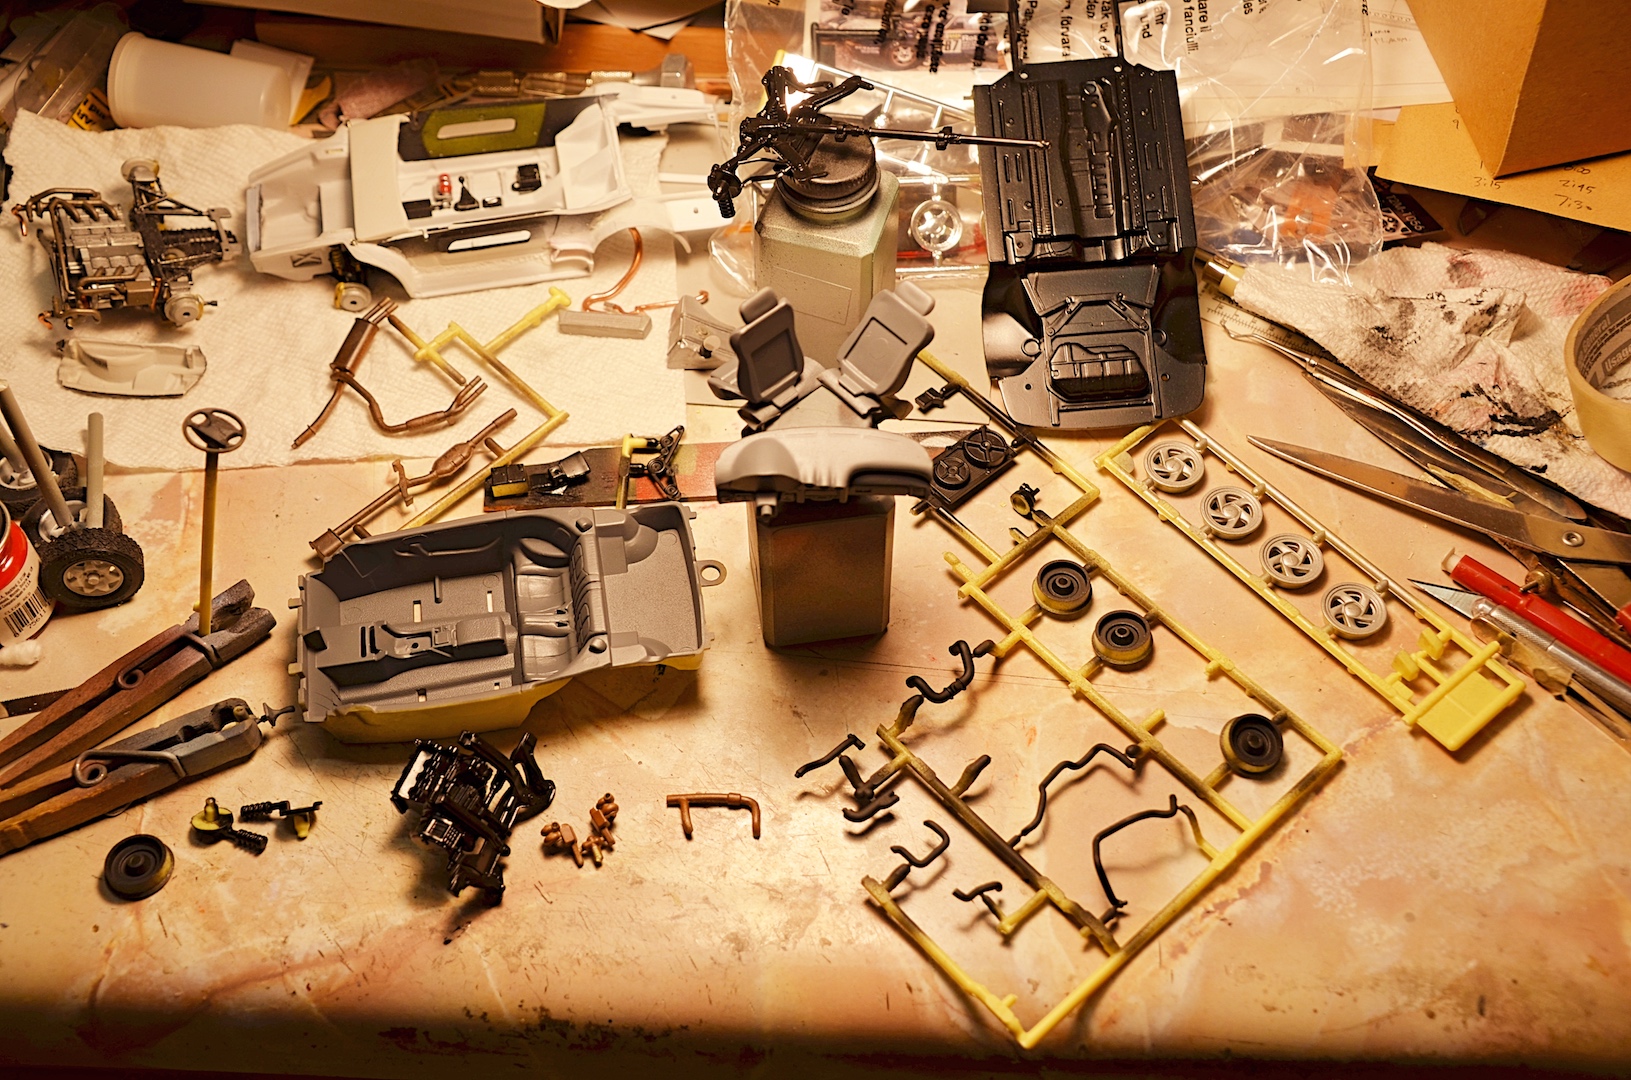
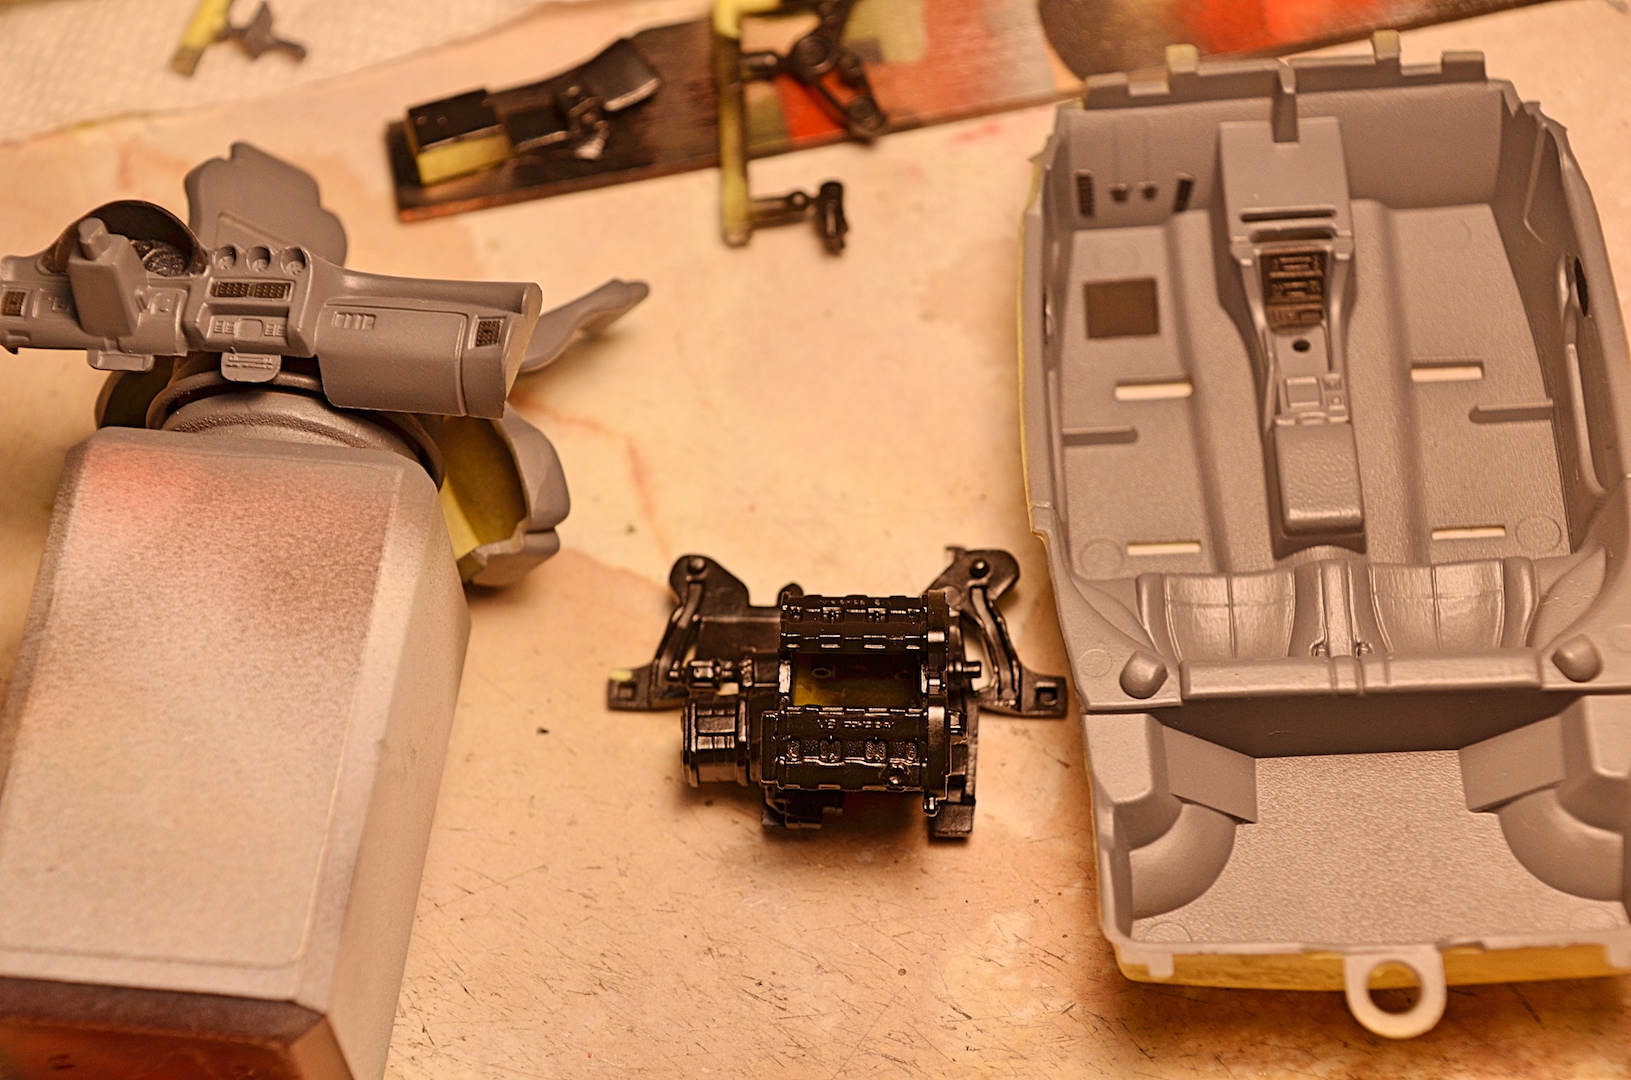
I practically wrecked it. Thanks. And it's done! This morning over coffee, did the wet-sanding process. The nail 'polish' is much harder than model paint, so once it cut through, had to reduce pressure. Also wet-sanded the decals, not under running water though. The stage before putting the interior in, and chassis pan on. Something was interfering, had to clamp. The biggest problem was the long turbo hose from the back turbo to the left side, it hardly fit at all, and the brake booster didn't have a locator pin, so of course it was in the wrong place. Lucky the plastic bent easily instead of breaking. The hood still won't go all the way down. This is the achilles heel of this kit! Airbrushed several steps of weathering. One more thing to do, is flatten the tires, it's on 3. Gotta eat dinner!!
-
For current plates, I go into the Arizona MVD website, chose which one (there are about 30 designs now), you can search to see if what you want is taken, then I take a screenshot. I take it to the copy shop, who uses PhotoShop to reduce to size, then print onto thicker quality paper using their professional printer. I spray clear after cutting out. Then I glue on with Water Effects, not Elmers or superglue. One project, I had them scan a real plate, then reduce. I don't dink around.
-
Shelby Ford Ranchero
89AKurt replied to cobraman's topic in WIP: Model Trucks: Pickups, Vans, SUVs, Light Commercial
Here, catch this monkey wrench.
-
AMT's Dodge Stealth Indy "official car" beater
89AKurt replied to 89AKurt's topic in WIP: Model Cars
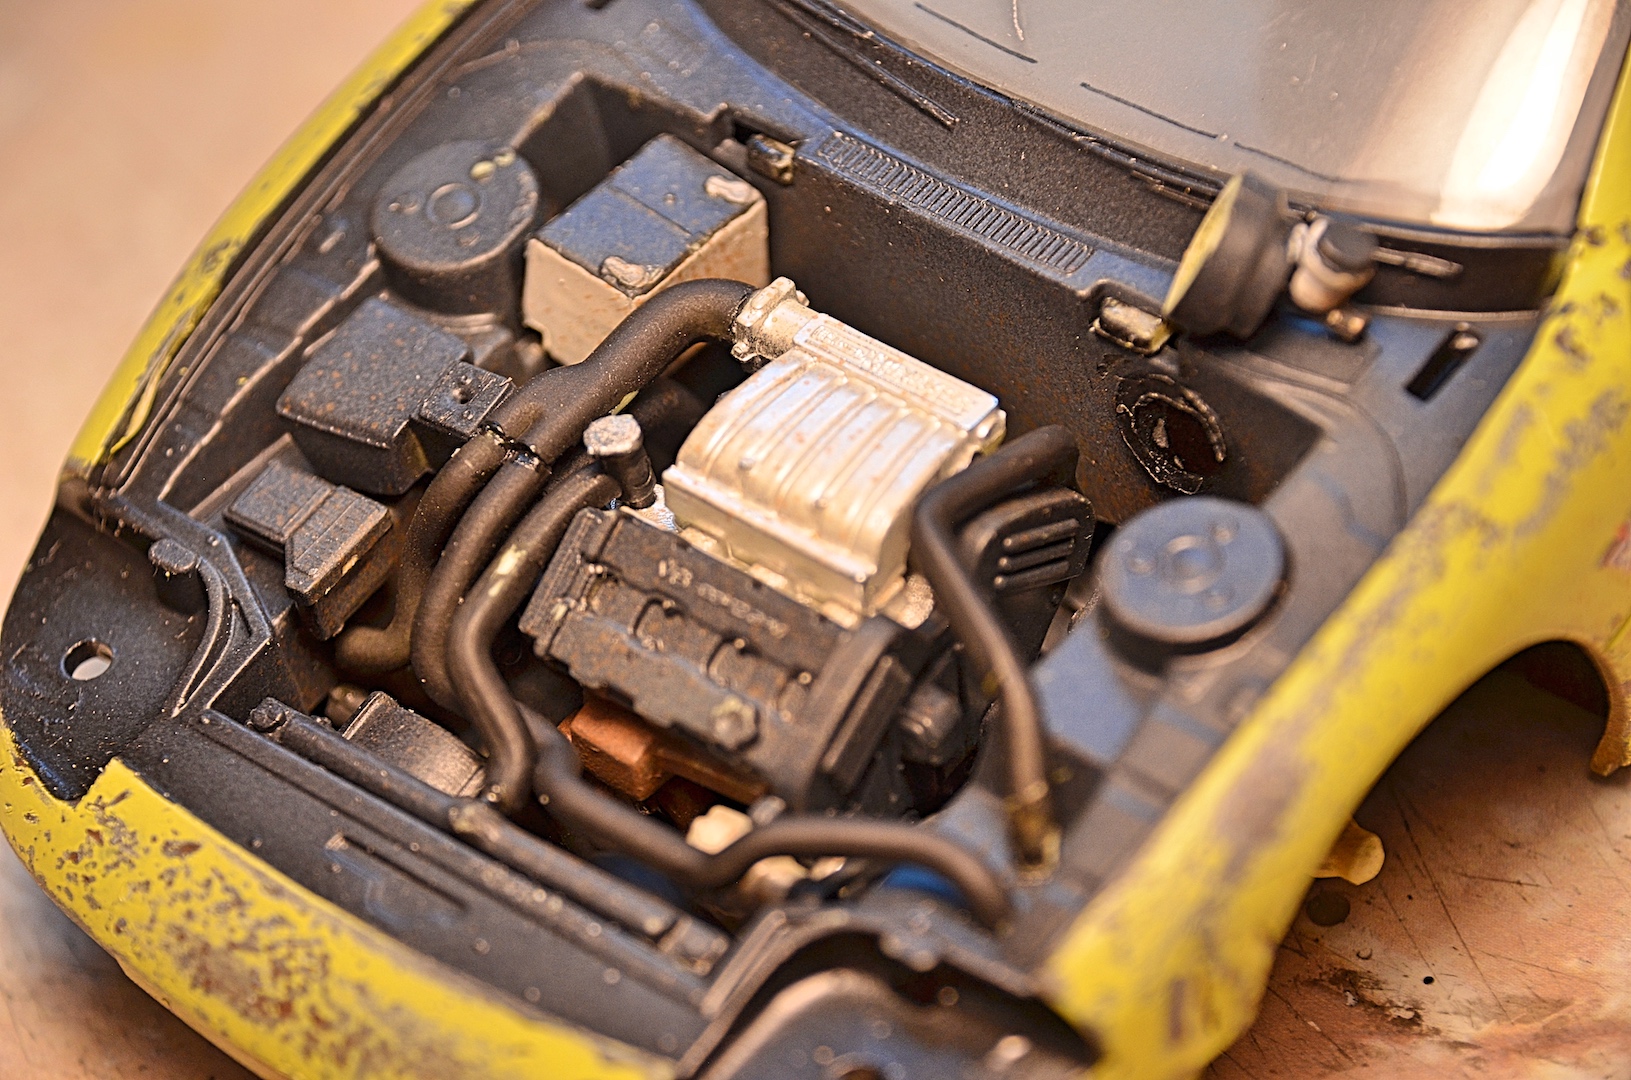
I see people are really excited to see a Stealth. I airbrushed everything today. The kit doesn't have many parts, the interior has only 6 parts. Since the paint isn't going to be Future worthy shiny, I fast-tracked the steps: 1. Black on plastic bumpers. 2. Brown on hood and body, rust added to wet paint. 3. Gray on all, salt added to wet paint. 4. Added flat white, then gloss white. 5. Nail 'polish', lots of coats. The interior and drivetrain got painted. Since everything on the engine is black, no aluminum, steel, colors, it was easier to pre-assemble. There are some chrome parts, and oil filter should be white. The interior has molded on pedals and handbrake, I masked a few details that got painted flat black first. I noticed that I didn't paint the wheels the 80s monochromatic yellow. Exhaust is steel, then rusted. Can hardly wait to wet-sand it!
-
I'm keeping it separate here, but can update with teaser pictures. For example had trouble keeping junk out of the paint.
-
I have that kit, always am daunted when I look at the contents. Good job!
-
Why isn't there anymore 2d SUV
89AKurt replied to youpey's topic in General Automotive Talk (Trucks and Cars)
Thanks for the correction. I keep forgetting the name of the two. All I know, when the cop asked why I didn't see him, I told him all the cops in Arizona drive Ford or Chevy SUVs, he smirked. Same goes for the MINI Coopers. I had a first and second generation two door, the 4 door versions are way too tight. Their Paceman SUV is not bad, it's 2 doors.
-
Lee Iacocca memorial community build: Dodge Stealth Indy official car. I bought this kit for $8.10 when it was new, was on sale, thought that since the real thing was cancelled at the last minute, it would become a collector's item. I didn't know AMT popped a billion of them, always see some at model swap meets, and on eBay some are selling for $8-9, so it didn't even keep up with inflation. I already built a Viper. I was glad the tires didn't melt on the windows. My plan is to make it look neglected, and driven like a rally car, but stick with Box Stock. Getting the nail 'polish' cost more than the freaking kit! The plastic has a hint of pearl, some photos of the real car seems to have a hint of green (the actual Pace Car is hideous). Started sub-assemblies tonight. One error in the instructions is the half shaft part through the rear differential, one side is shorter, not indicated, of course I got it wrong, had to break off and switch. Hardly any sink marks, putty on the muffler and mirrors was all, superglue and baking soda in the oil filter void. Minor mold seam under the headlights, otherwise AMT did a very good job with this kit. Did my usual scraping mold lines on everything, more than the usual amount of tubing because of the twin turbos. Next step, wash all the parts, and start painting! Funny thing, the Porsche 959 Paris-Dakar is also a 6 cylinder, twin turbo, AWD sports car. But I ain't taking years to get this puppy done!
-
~bump~ Started on my contribution tonight....
-
by Pony Express
-
Why isn't there anymore 2d SUV
89AKurt replied to youpey's topic in General Automotive Talk (Trucks and Cars)
Saw two of these at an auction several years ago. Think the body is based on the Mitsubishi Eclipse (the passenger cell), otherwise all custom made. Cool looking, fills a niche. -
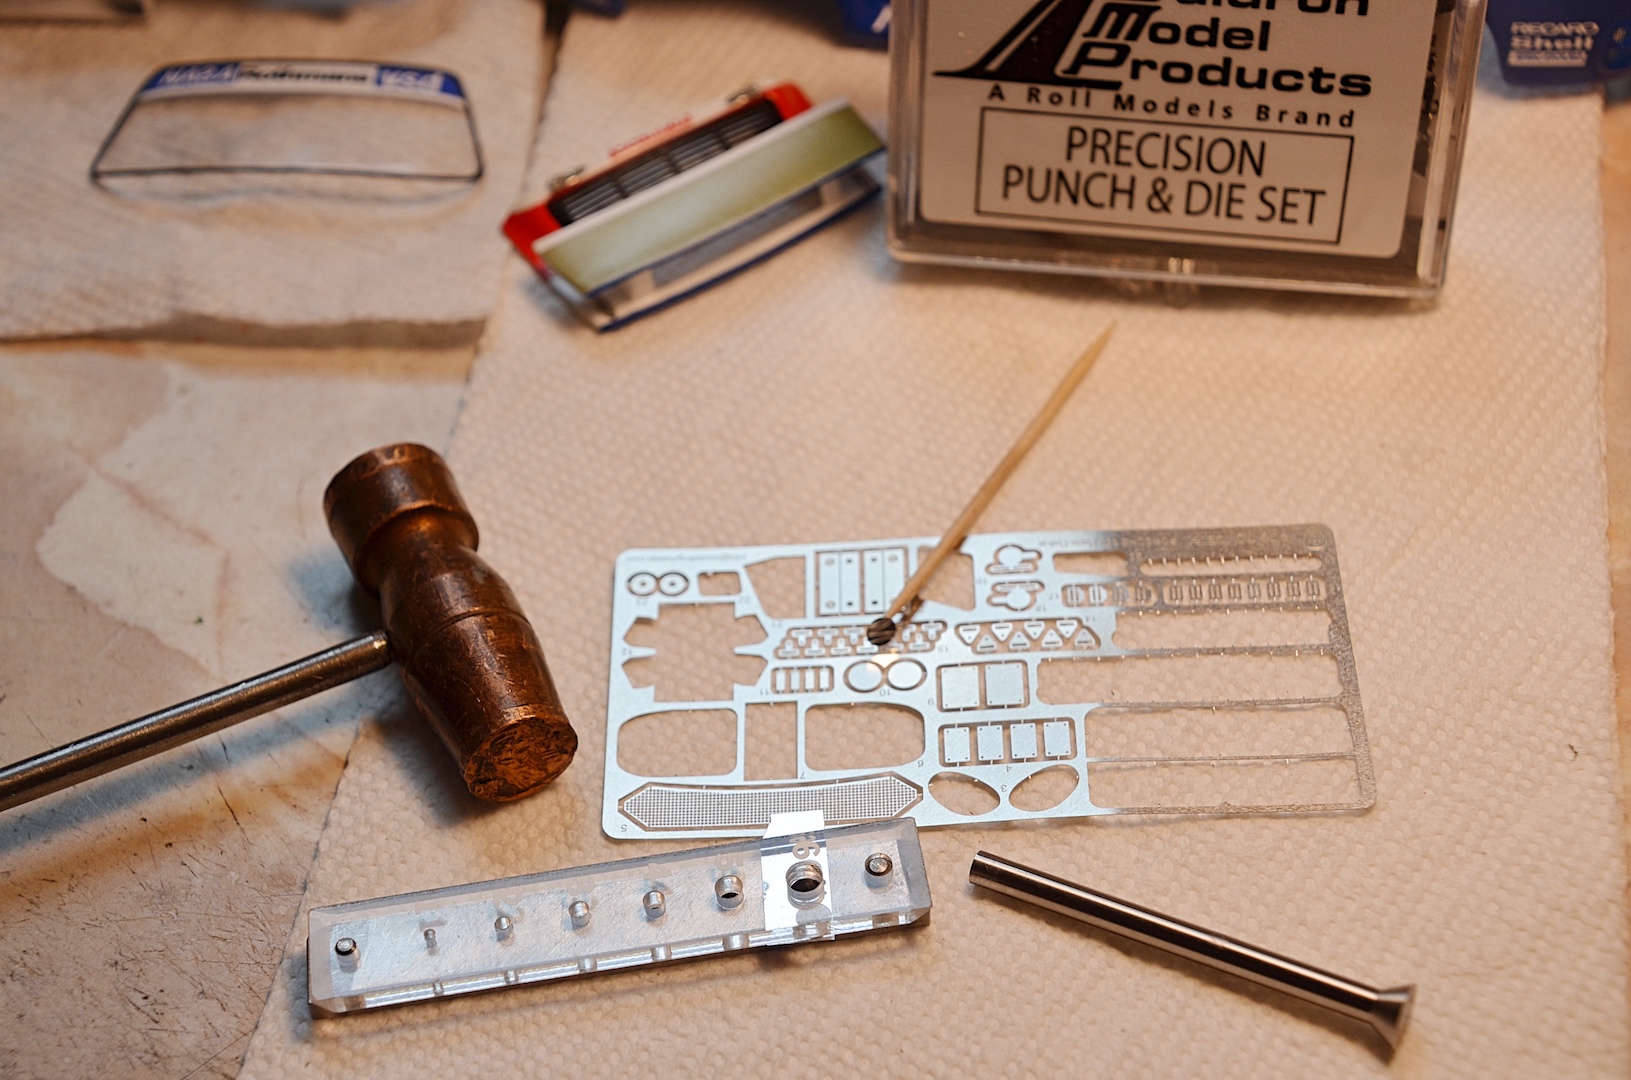
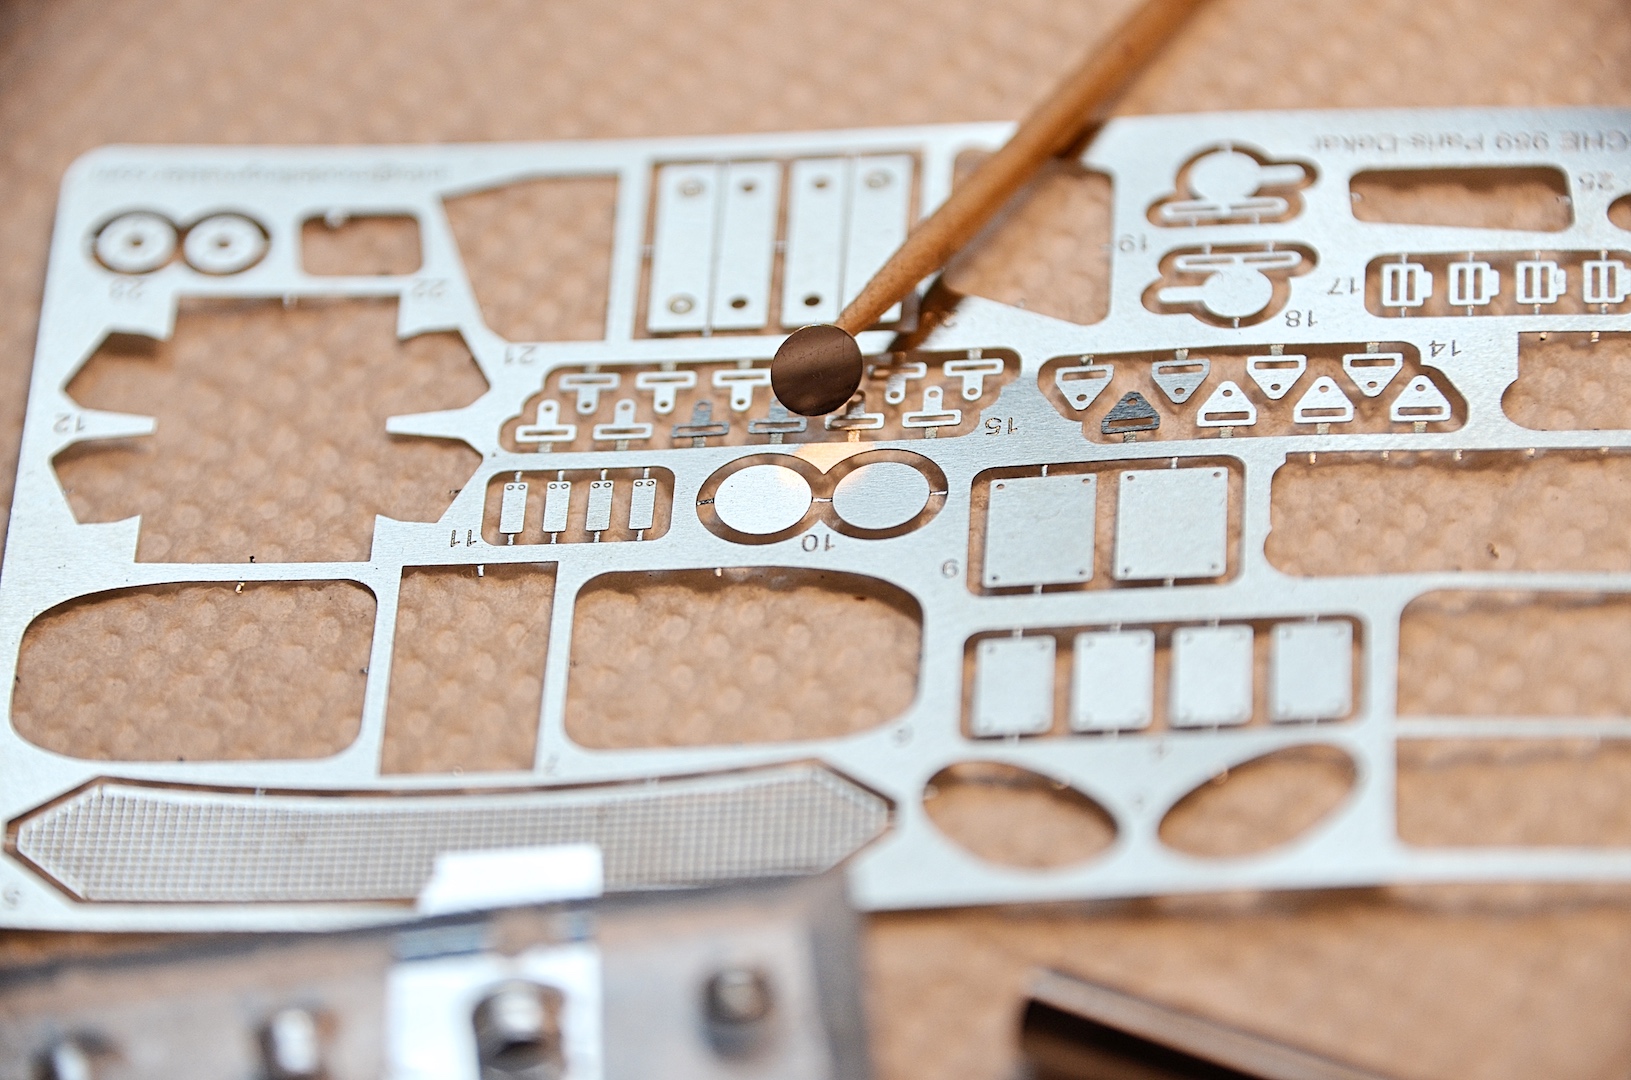
Thanks! I think that is less harsh on decals, when I've encountered delicate decals that melt with Solvaset, I use Microset. Neither can I, but I really REALLY need to face the challenge of the intercooler, before "weathering" it. But, I did glue on the photo-etch hood pins! The instructions show the two parts incorrectly, I studied the museum pictures to figure out how these work, and I still don't know, but I rotated the top part, and they look closer to the real thing. Pet peeve of mine, not realistic mirrors. I salvaged the mirror from a dead digital camera LCD. The Waldron punch had the perfect size. The Nikon 300MM lens has a very short depth of field, so can't tell it's really reflecting.
-
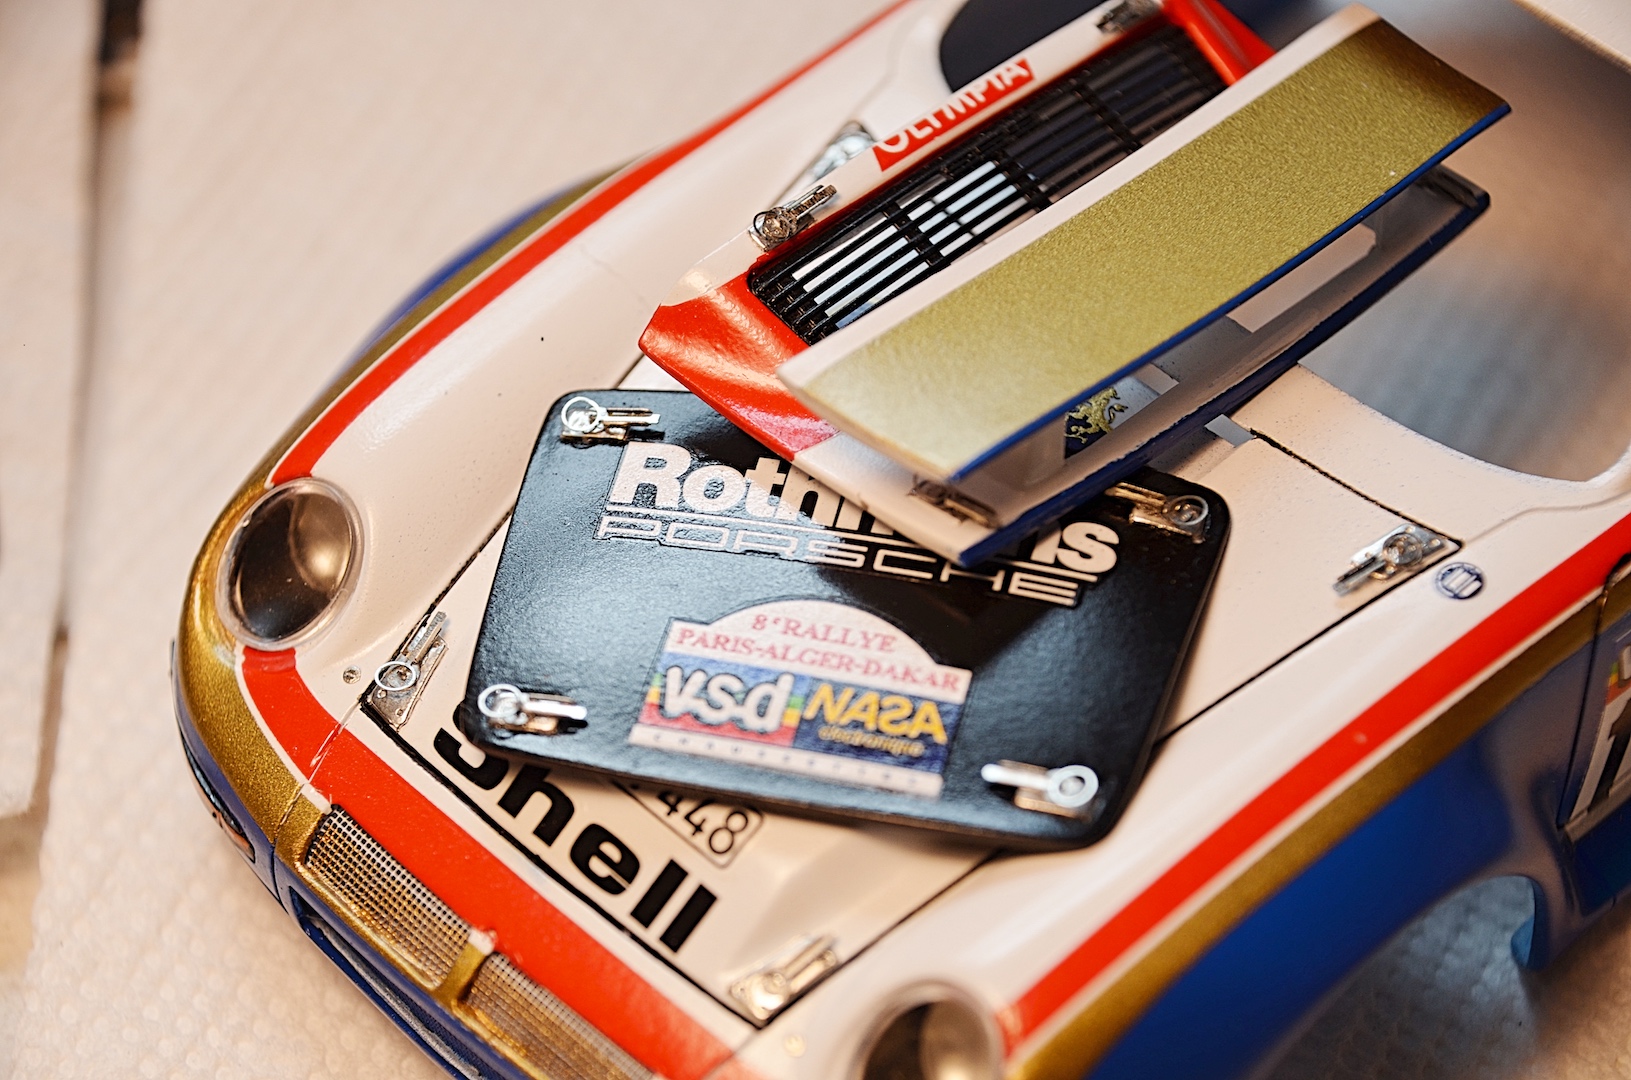
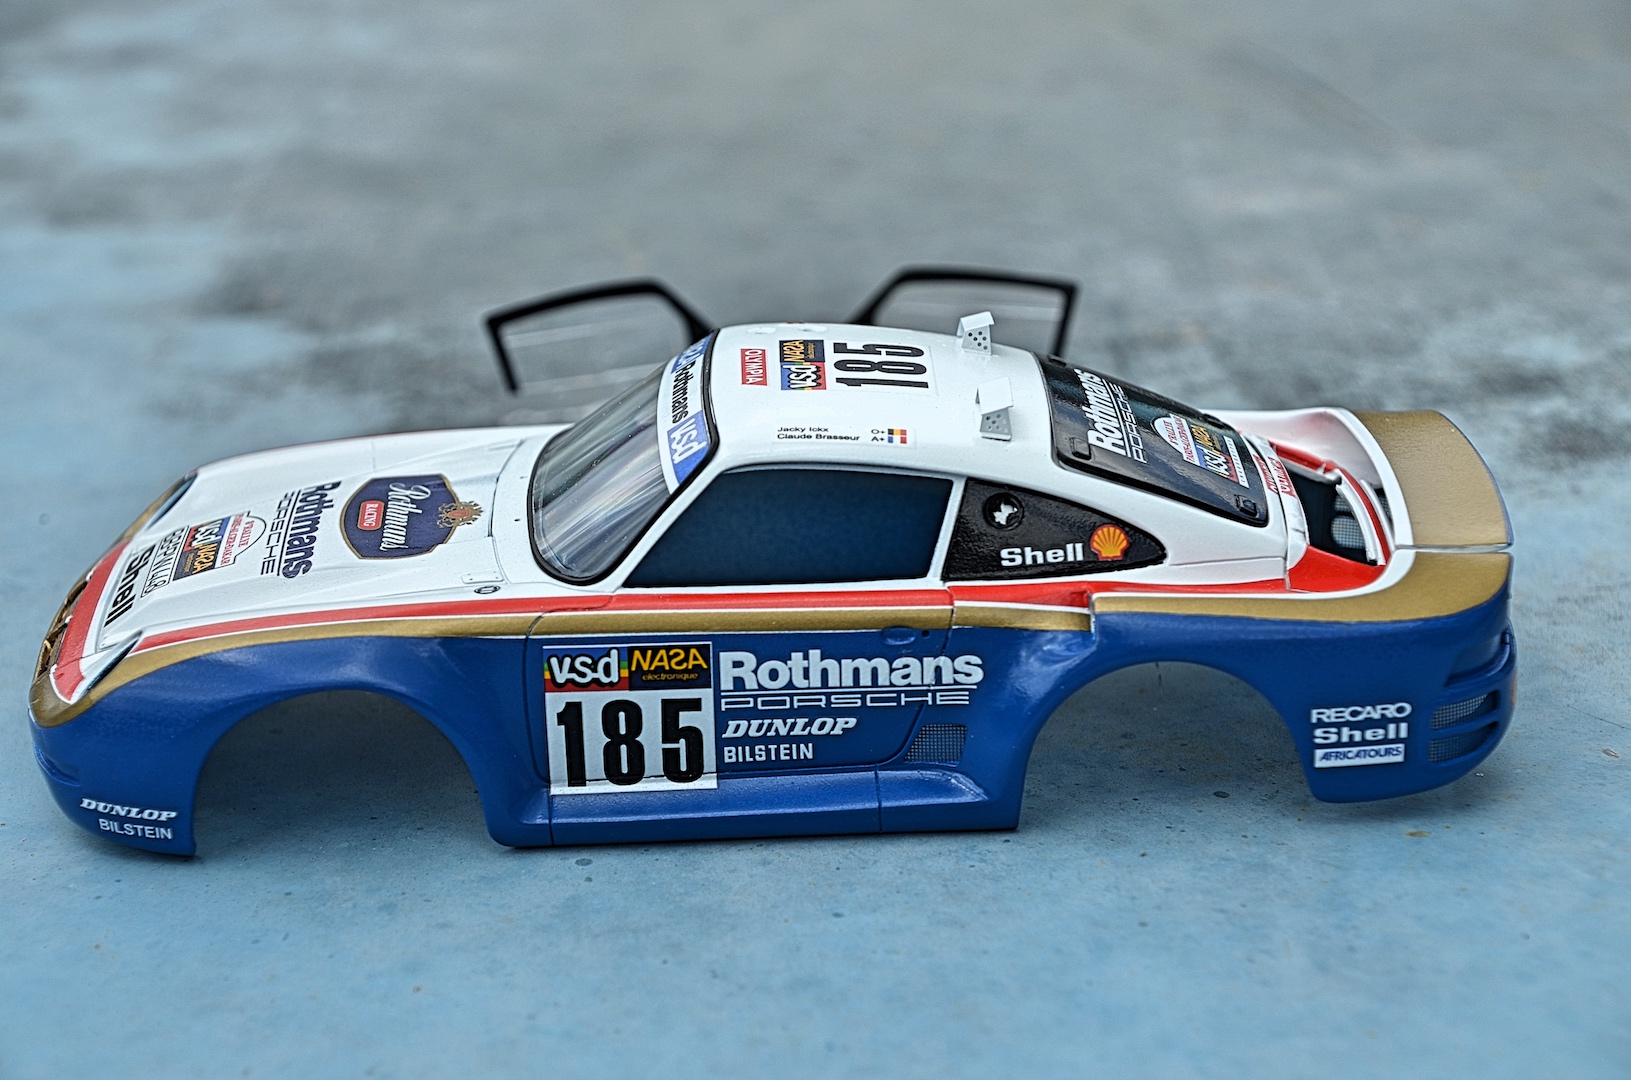
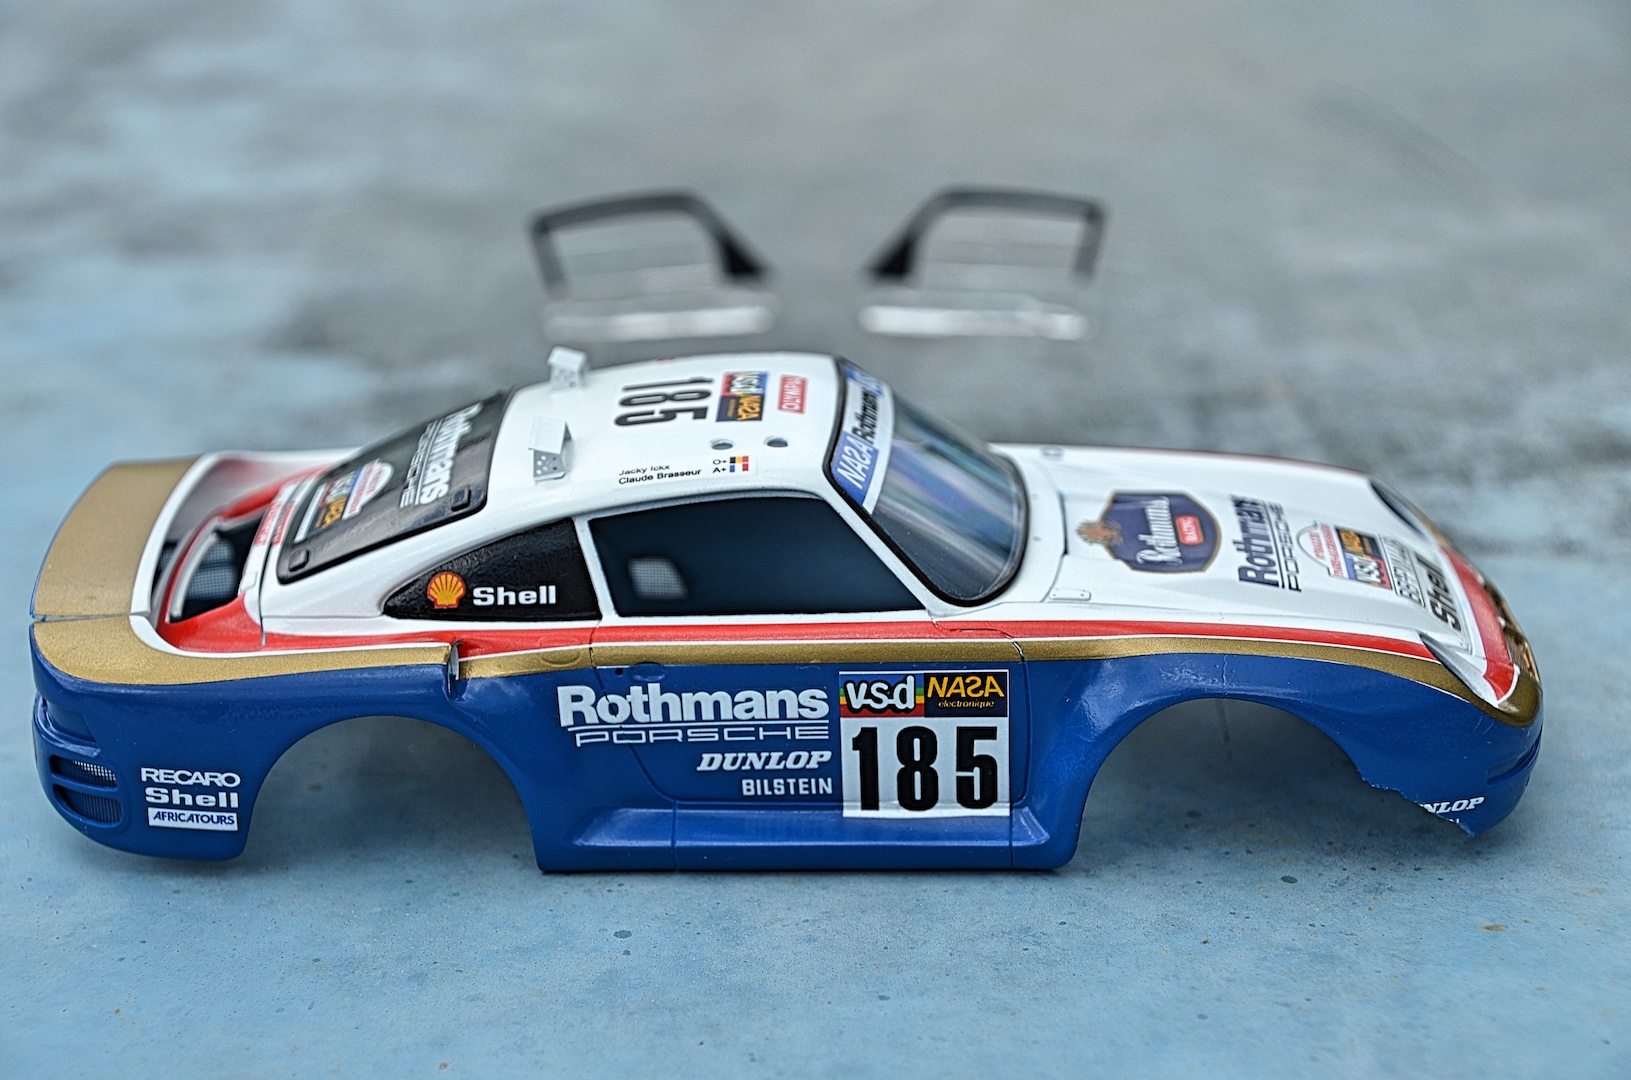
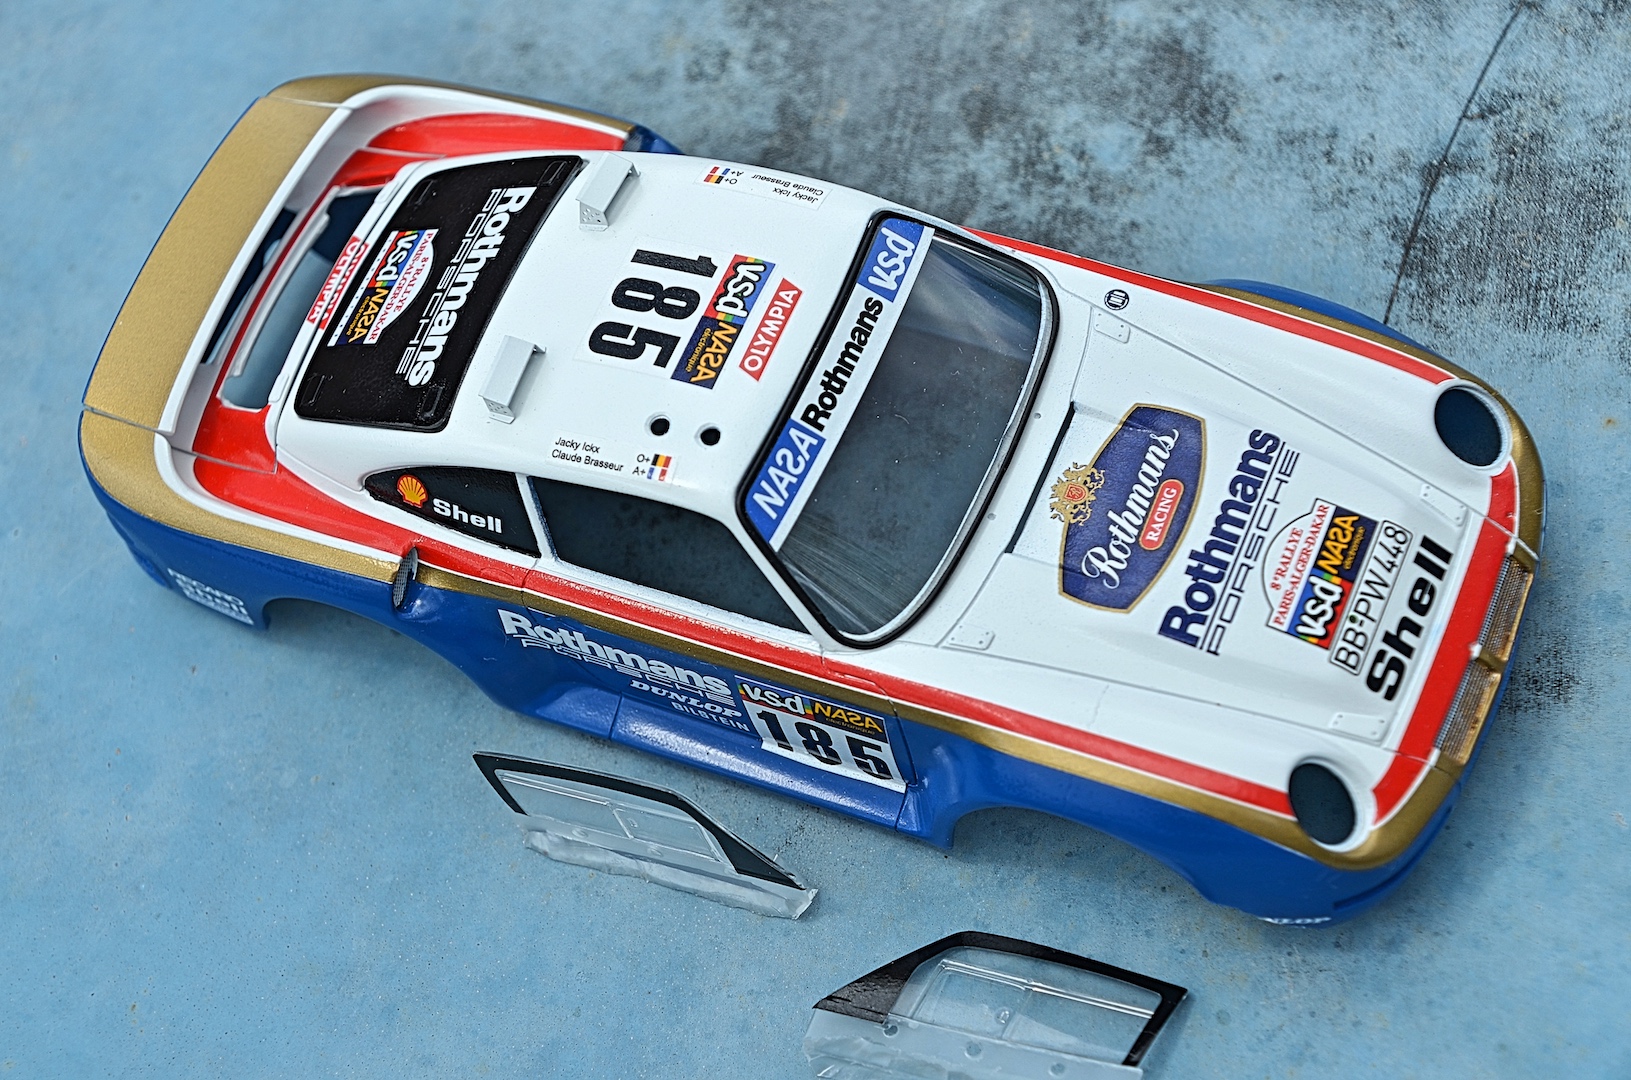
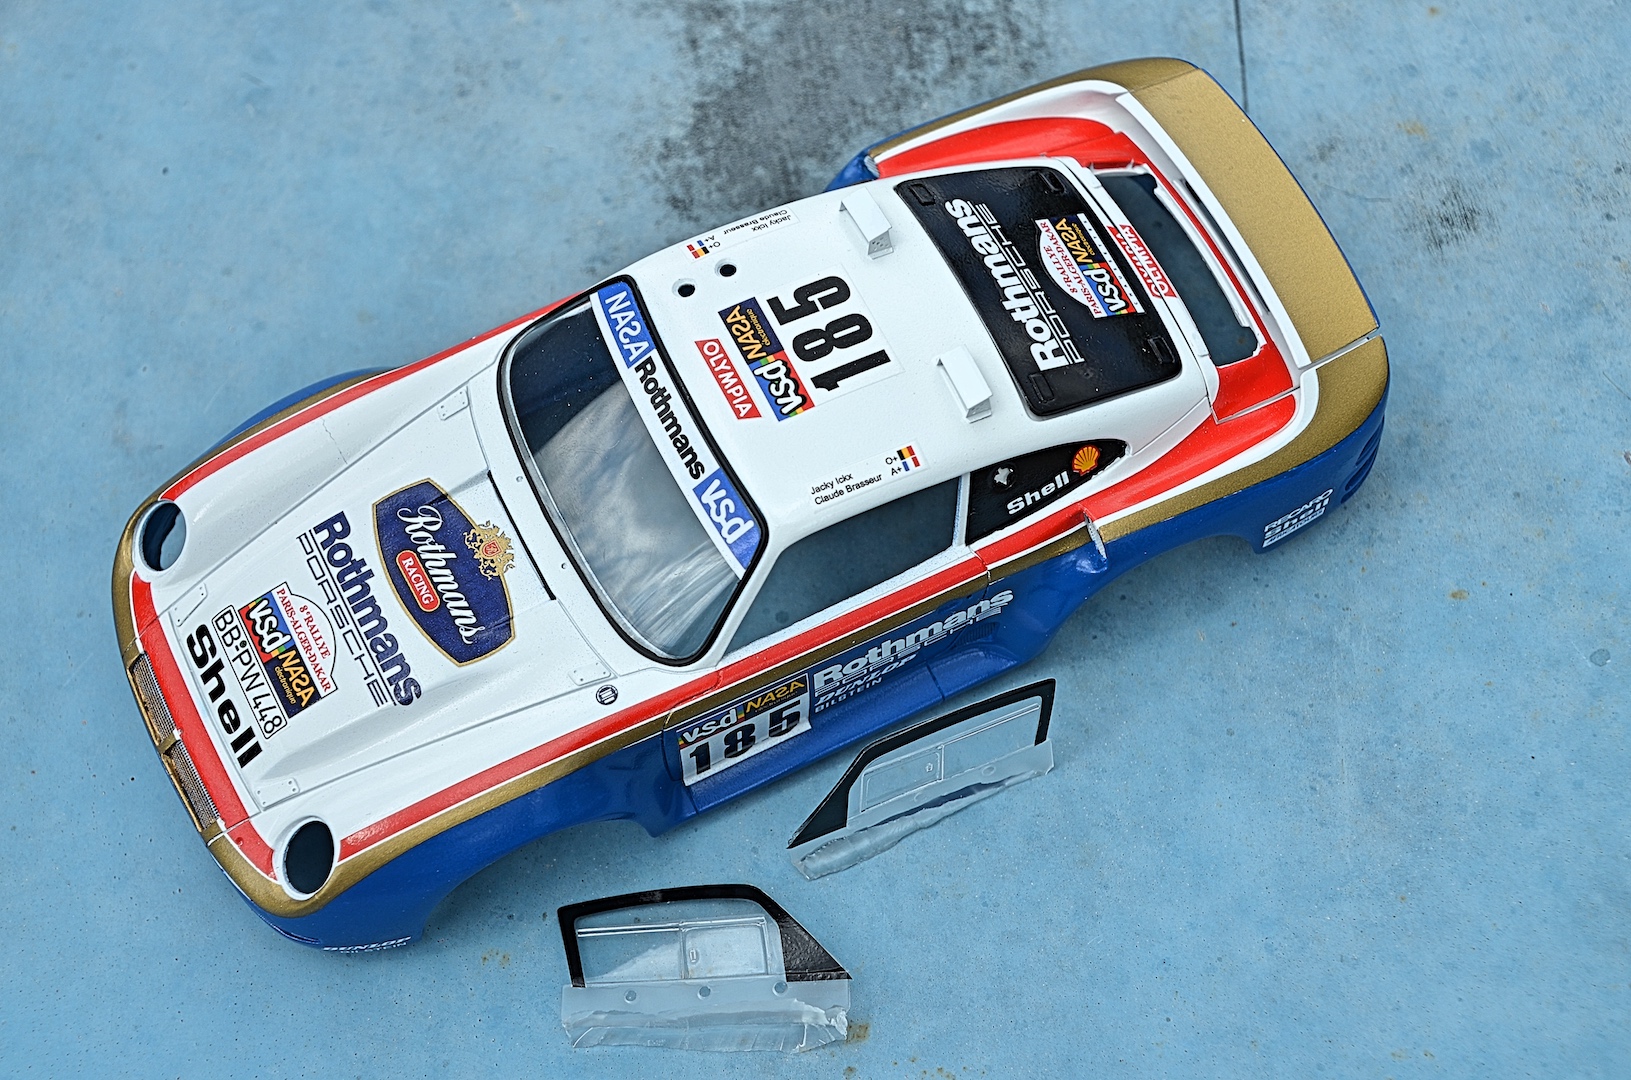
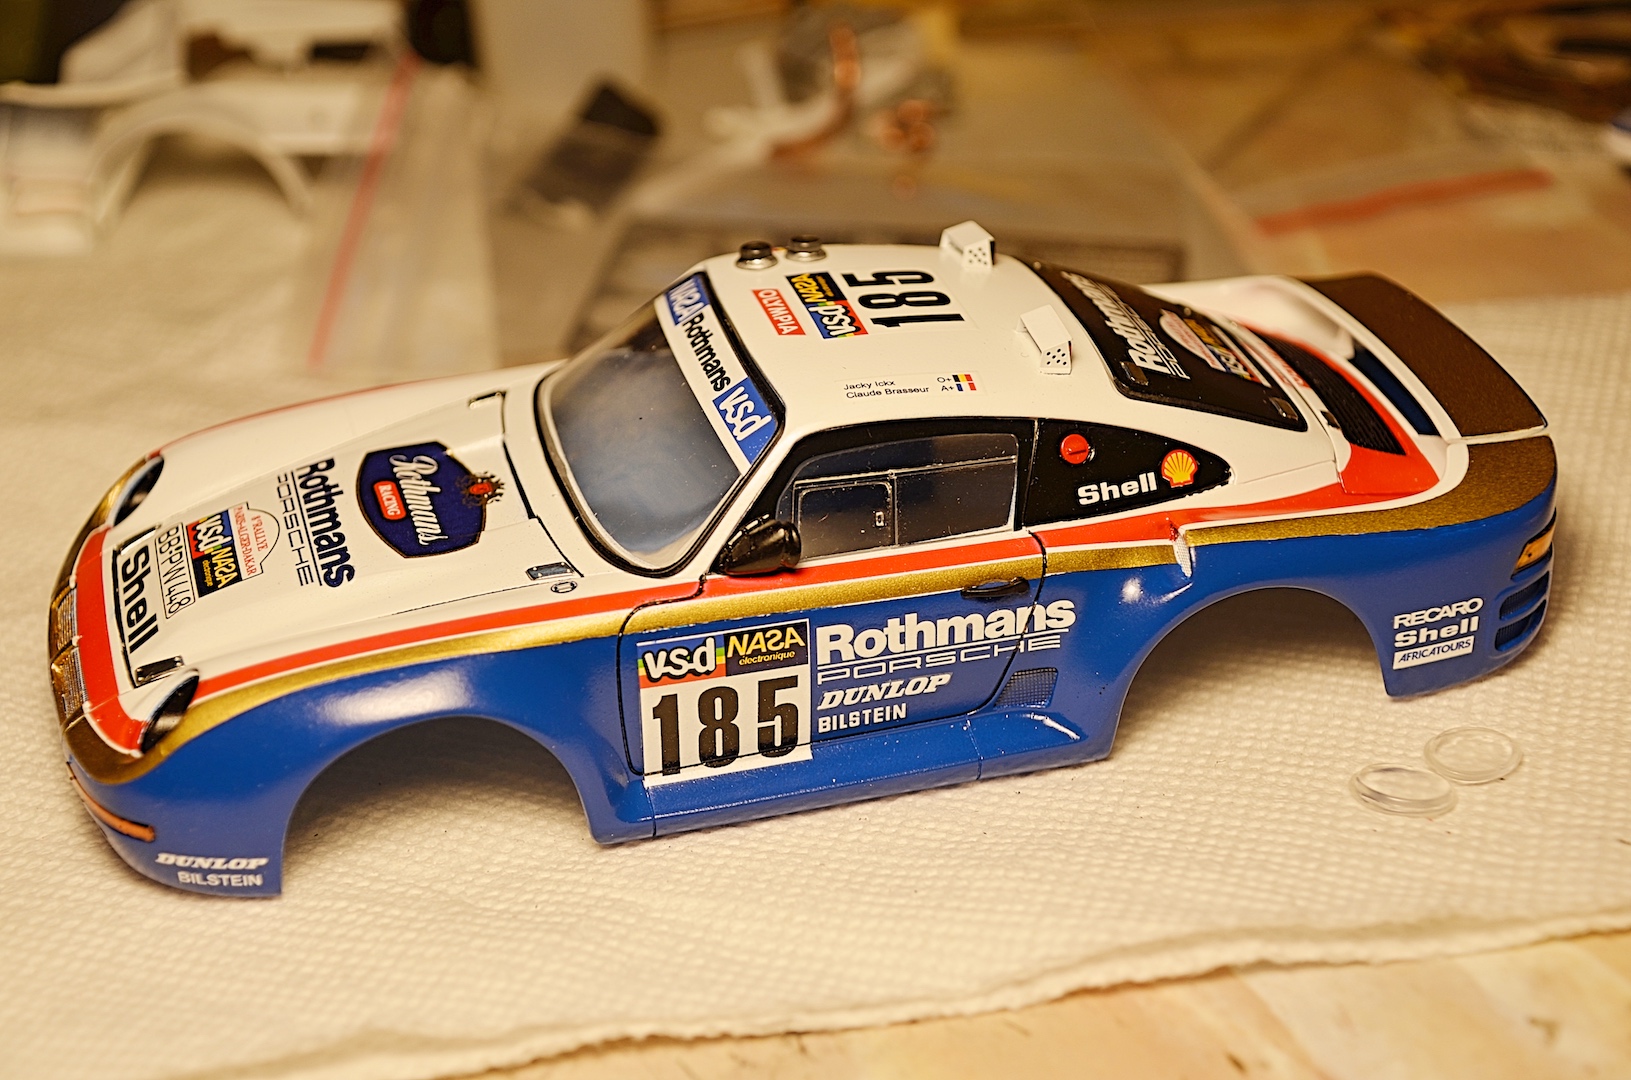
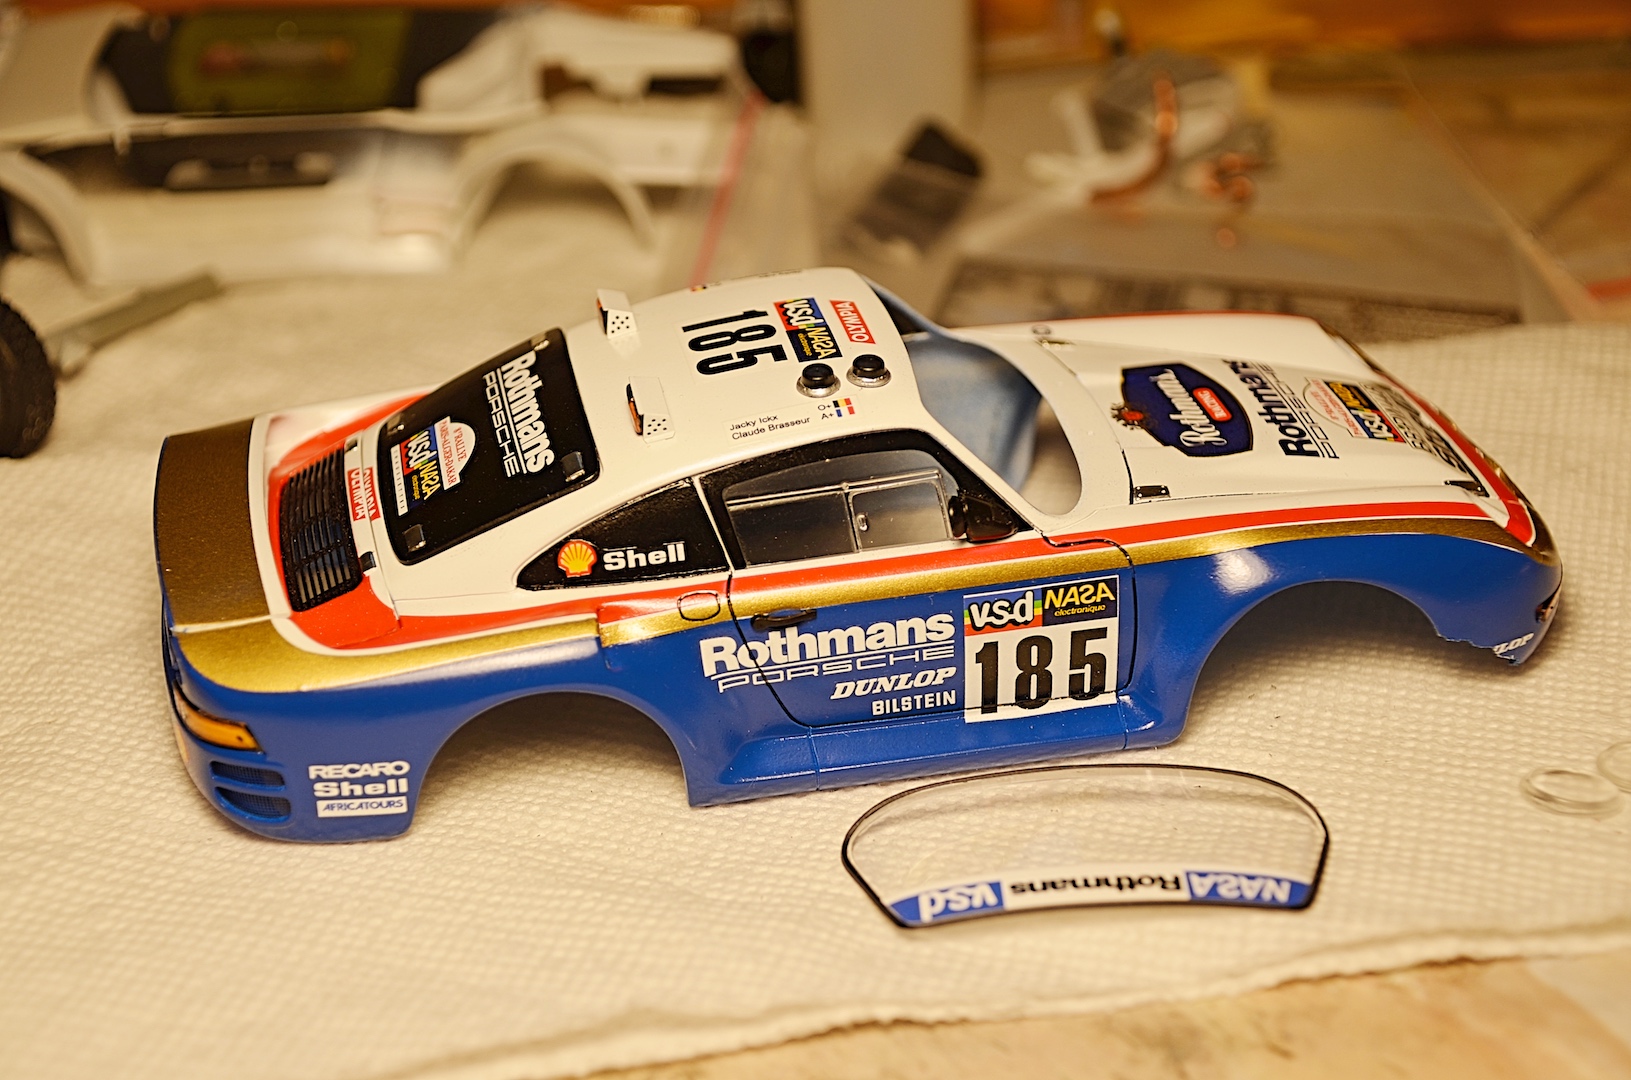
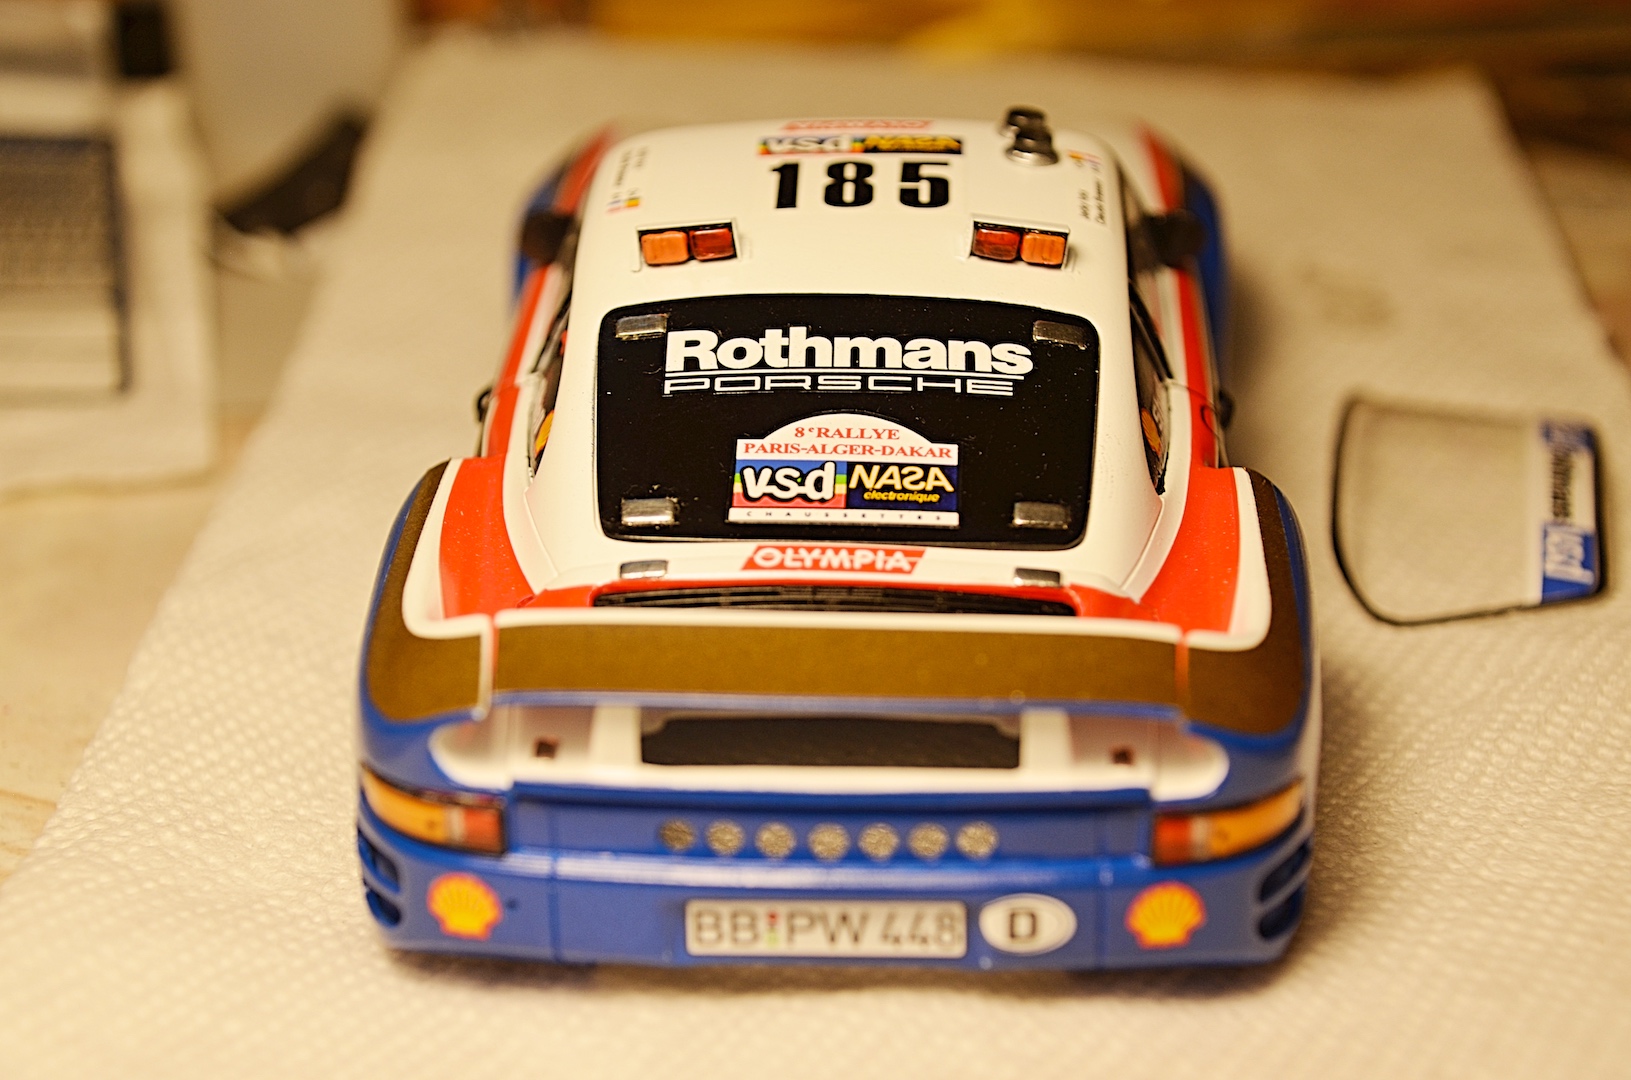
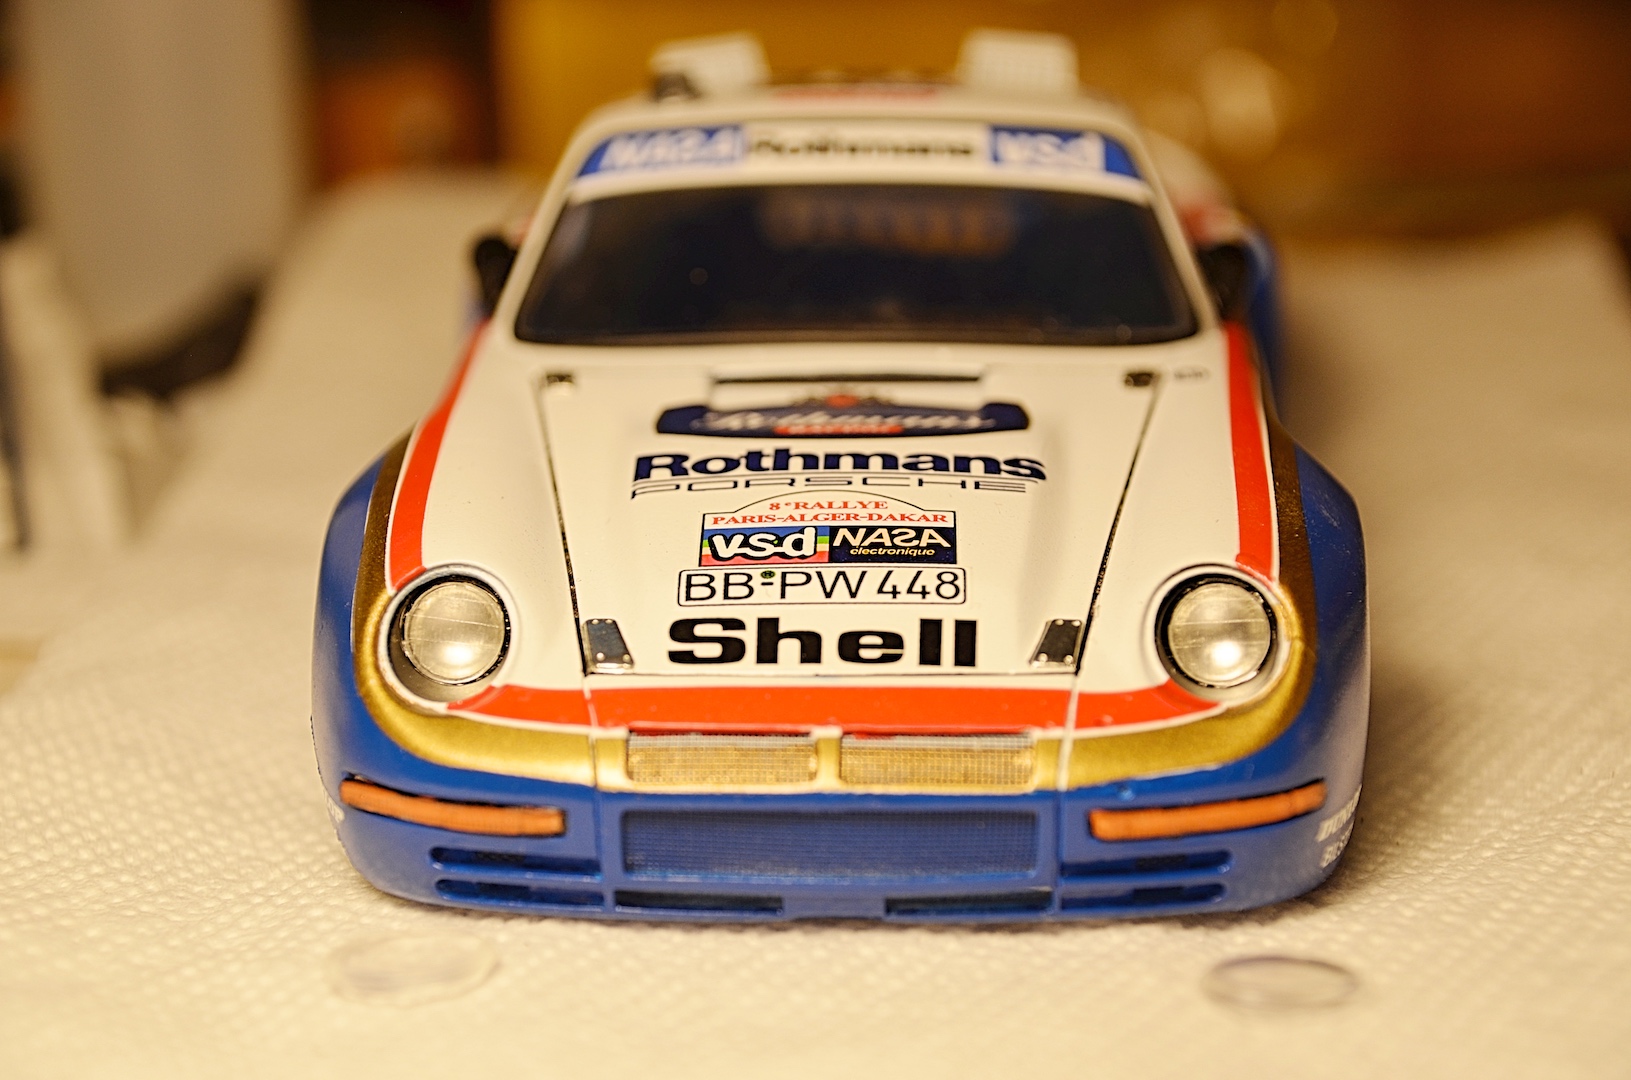
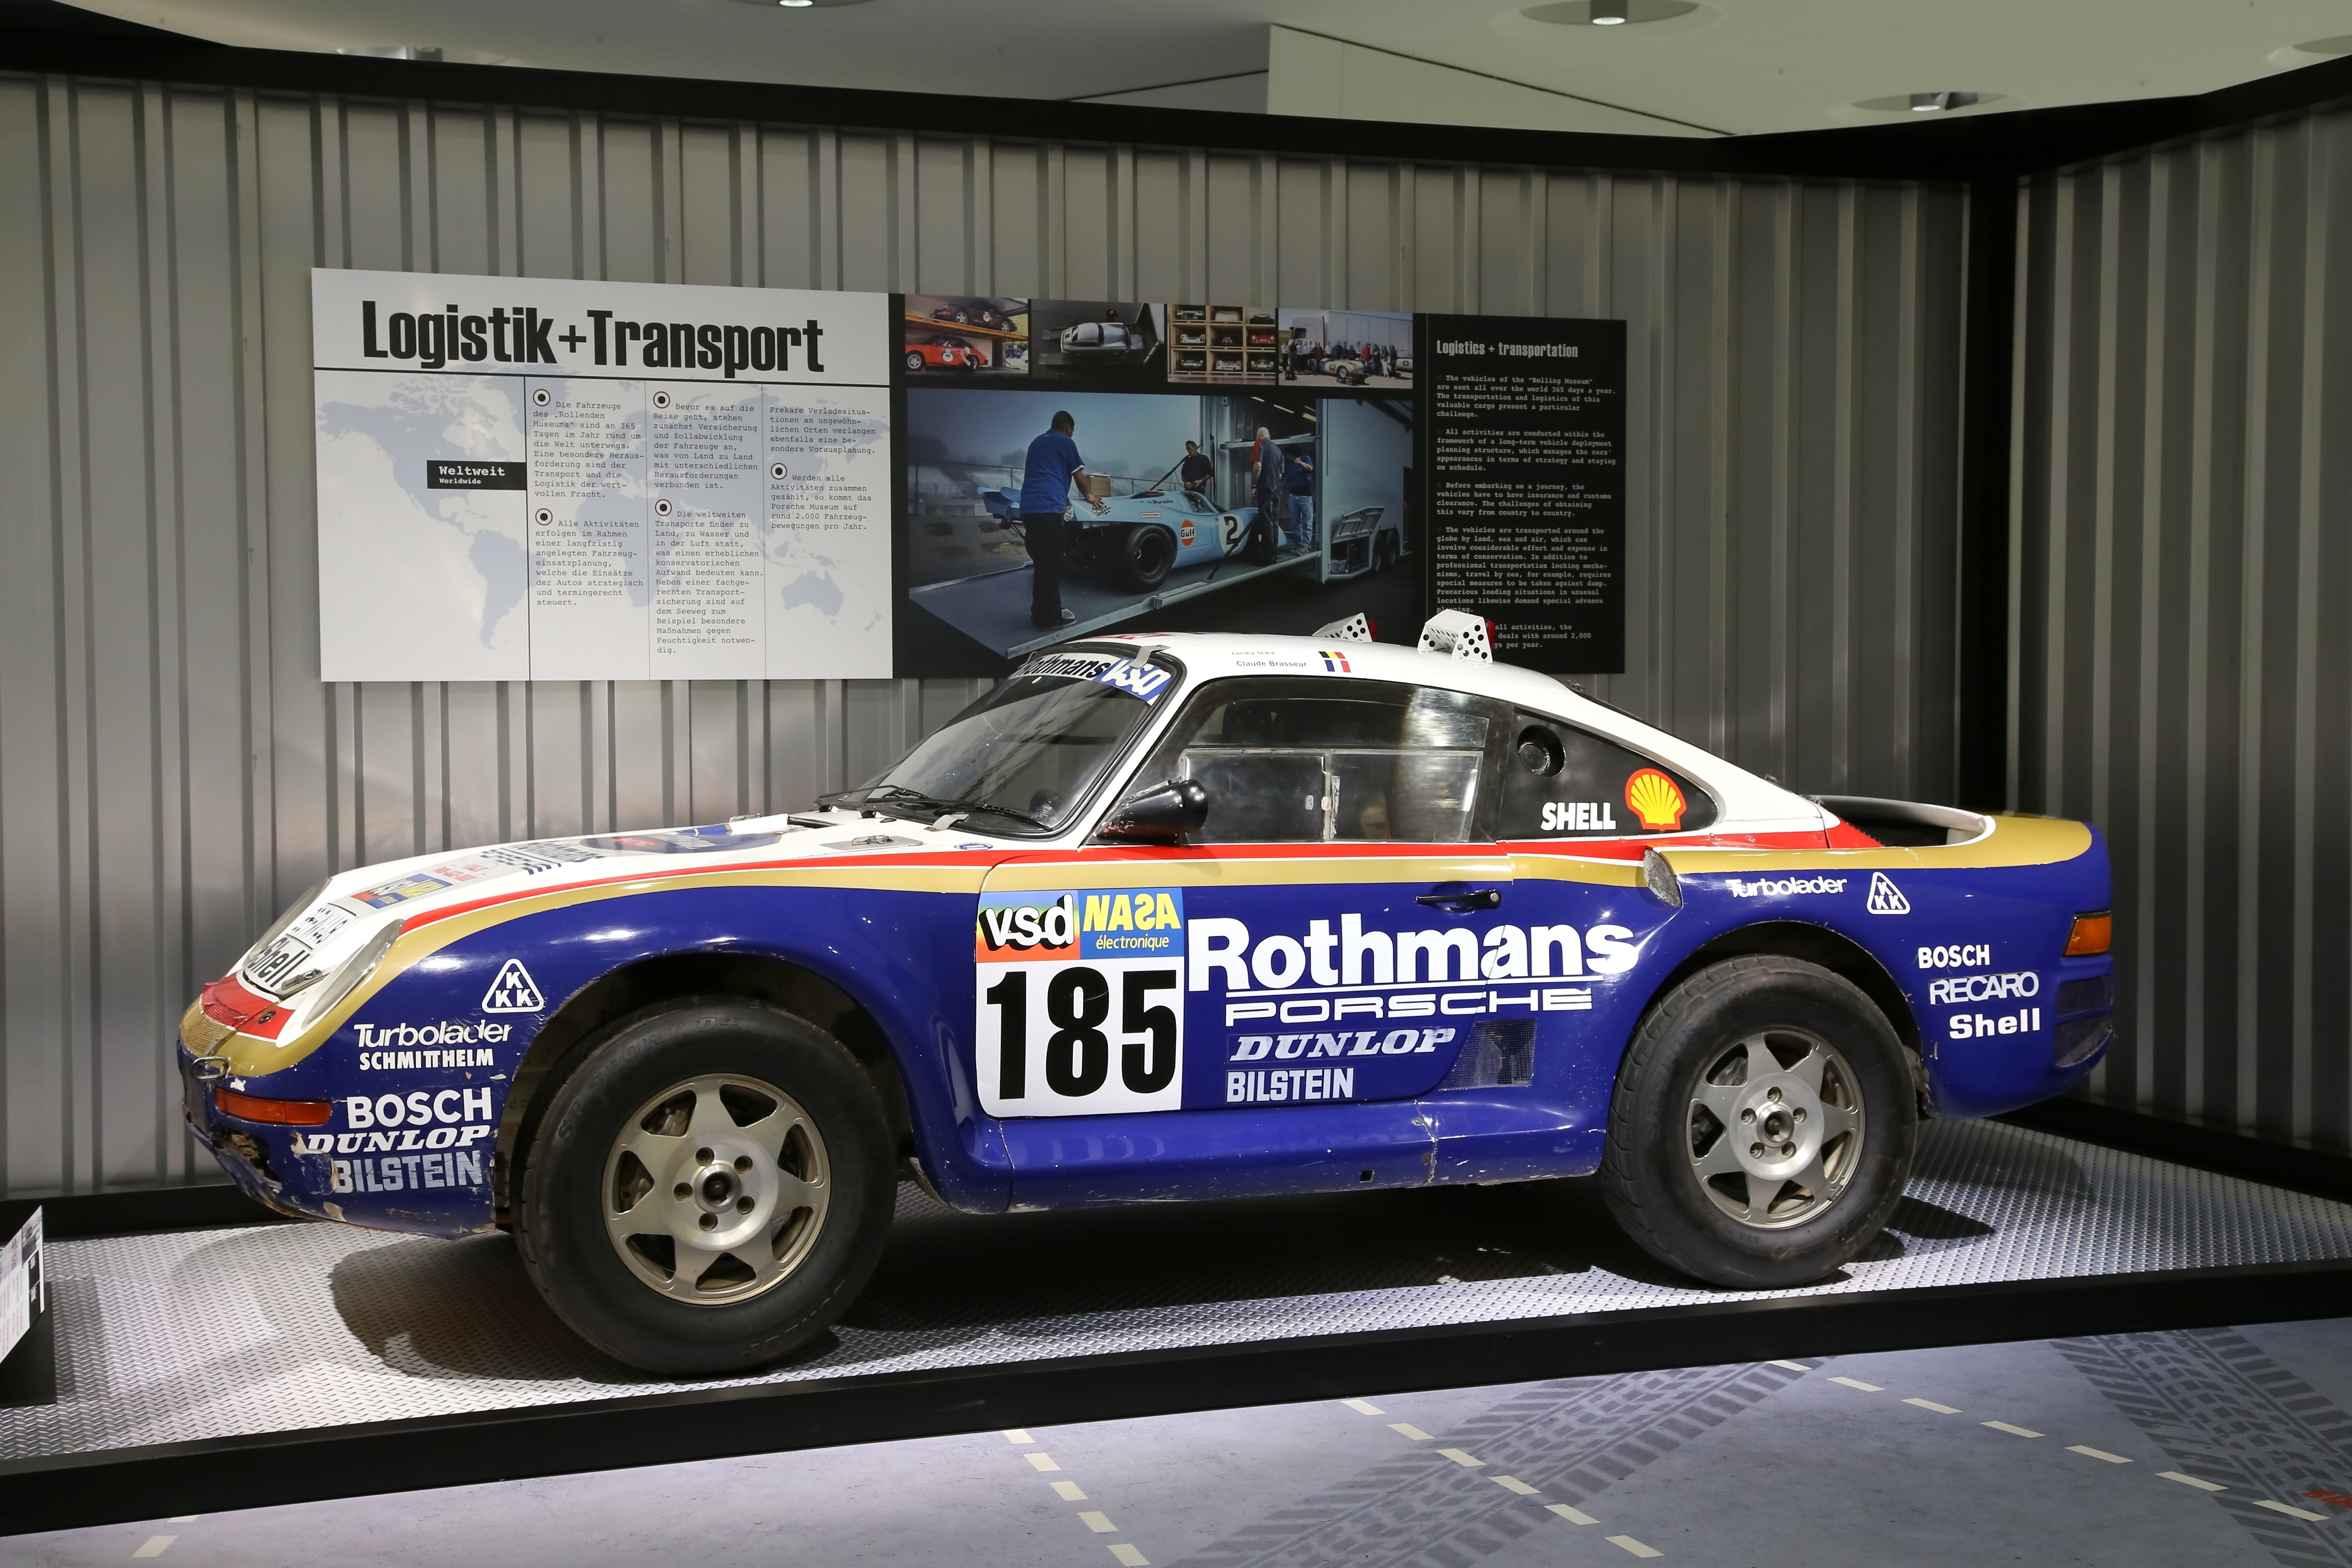
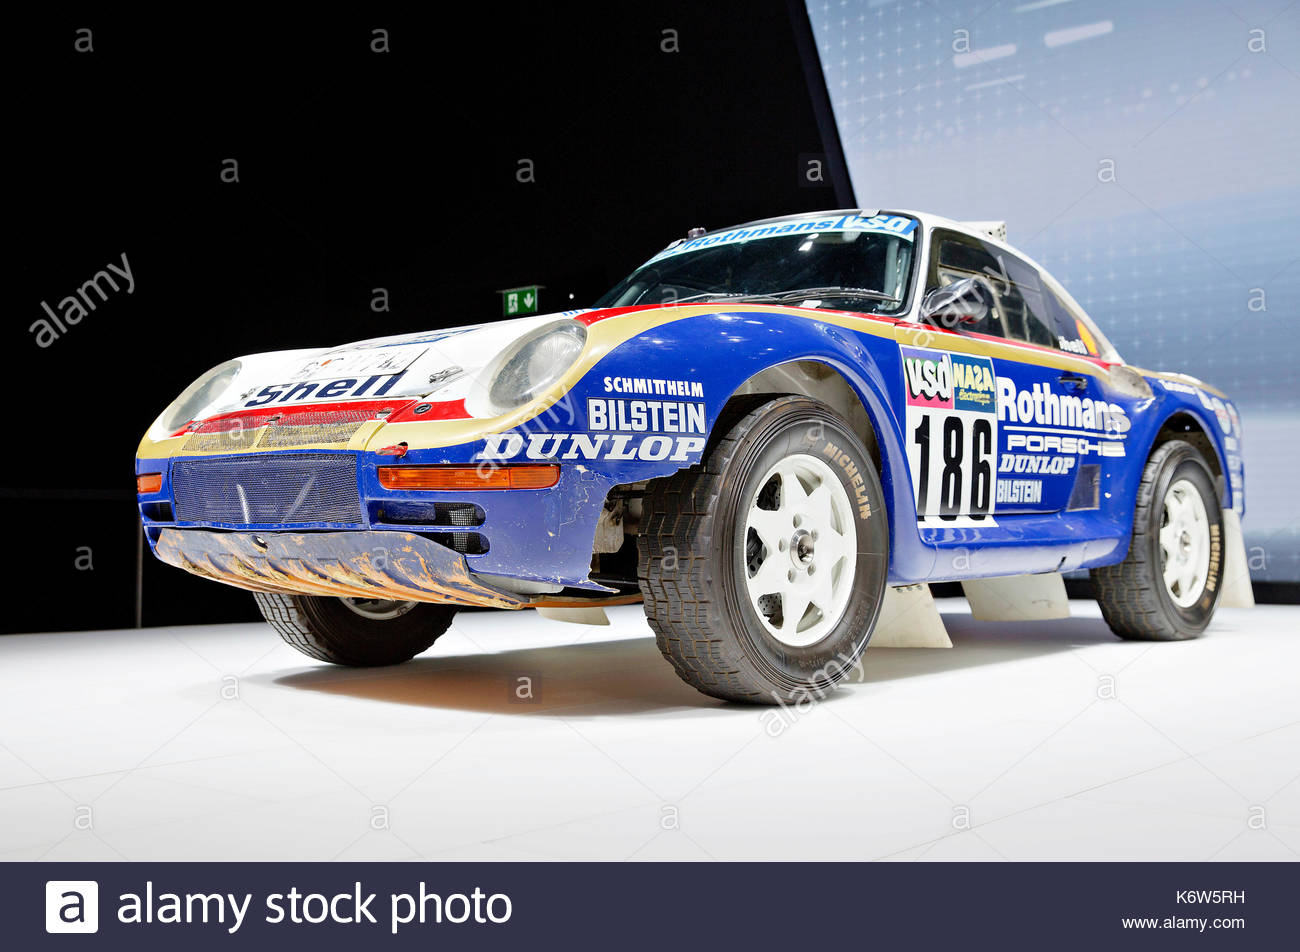
Hold yer' horses pardner, I ain't done yet! Got the last decals on the body today! I cut apart the piece on the engine lid at the grill, cut the long stripe at the headlights, and cut out the grill openings at the front, with 45° cuts so the edges would get covered. Really had to nurse these to get them to conform, Solvaset barely helped! The door windows are really high quality resin, hard to cut off, used the Dremel, then sanded the lower edge until it fit snug. I had wet-sanded slightly to get rid of dust bumps. Then I realized that I needed to get red paint, good thing Hobby Lobby is 10 minutes away. Touched up red, blue and gold spots. I airbrushed a quick coat of clear gloss, did not want shiny. Used a micro pen to do the jamb lines. Bare Metal Foil used on the latch plates, and light reflectors. Glued on everything but the windshield, headlight covers (want Elmers to completely dry). Photo-etch parts are next! So this is at museum condition, if I wanted to. But the next steps are going to be really fun! Going to grind the lower front valance, and especially the skid plates, into the street! Then going to stab a worn out paintbrush into acrylic paint mixed with tile grout, and go nuts on the bottom, then several layers of dust and dirt sprayed on. I can hardly wait! But really need to finish the engine next. Funny note: they did not have the KKK Turbolader Schmitthelm sponsor logos on during the race, only after Porsche kicked butt did they want it, and car 186 has Michelin tires mounted.
-
marathon, pumped up
-
Paint test. Once I glue something, will start a dedicated WIP topic.
-
choreographed by Nike
-
ChinaMart is avoided at all costs, need to be a truly desperate model builder to go there. I found the Sallys, they had relocated. Picked up two colors, will be experimenting.
-
AMT 1991 Dodge Stealth Indianapolis 500 Official Car
89AKurt replied to BradD81's topic in Model Cars
Dredging this up, because I'm ramping up to build this!