Rich Chernosky
-
Posts
2,108 -
Joined
-
Last visited
Content Type
Profiles
Forums
Events
Gallery
Everything posted by Rich Chernosky
-
Gary...that's a shame they missed all those important details. I have an Exoto MKIV ( the yellow Sebring version) so I would probably never bother getting a cheaper version. I got mine when the getting was good and was able to purchase it wholesale from my friends up in Vermont. Could never afford it now that I don't have a business. Hope you can fix some of those details.
-
Chassis and all the detail work (I'm gonna do) is done. Lots and lots of tiny PE fasteners electrical connections and a few parts to be made. Next step is fitting the upper bodywork and front wing. Then decals ands it is all done. This will be my first 1/12 kit in quite awhile. This has taken over a month of continous work so youi can see why I don't do too many. And i still have some 30+ 1/12 kits in the stash. On to the details. Check below the pictures for more information. Comments welcome. Here3 it is ready for the rest of the bodywork. Note the tiny stay wires on the rear wing. These took all day to do. Wheels and tires are for the picture only and are not fastened on. I will have to handle the chassis quite a bit and I don't want the risk of damaging the suspension. Did that once already. Had to fabricate these 3 electrical boxes from styrene. Connecters and tube form the perfect parts kit. Decals from the stash. Colored wires are thread coated with craft glue. Here are those three boxes installed. Hold down clamps are from the kit foil with very tiny PE screw heads. Where all those wires wind up at the front of the engine. Got a little crowded here. Some extra detailing done here. Those tiny electrical connecter are scratch built. Note the carb linkage. this was kit supplied. A nice touch you don't usually see in kits.

-
John.......Looks like a pretty straight forward resin kit. LeMans Minatures, from my experience, have been good quality. Once you get everything cleaned up and fitted it should be smooth sailing. As others have mentioned the decals will be you biggest challenge. A nice hi-gloss base will help them adhere . I find keeping the water warm greatly helps decals stick. What kind of shape are they in and how old are they. Never had a problem with their decals but my experience is limited. Hey....I am rooting for you on this one.
-
Thank you John for the compliment and the encouragement. I work about 6-7 hours a day on it. Some days it goes well (like today) and sometimes it is just tedious but I keep plugging away. I am retired and what else have I got to do. Your Matra WIP was one of the inspirations for mine. I am impressed with that too.
-
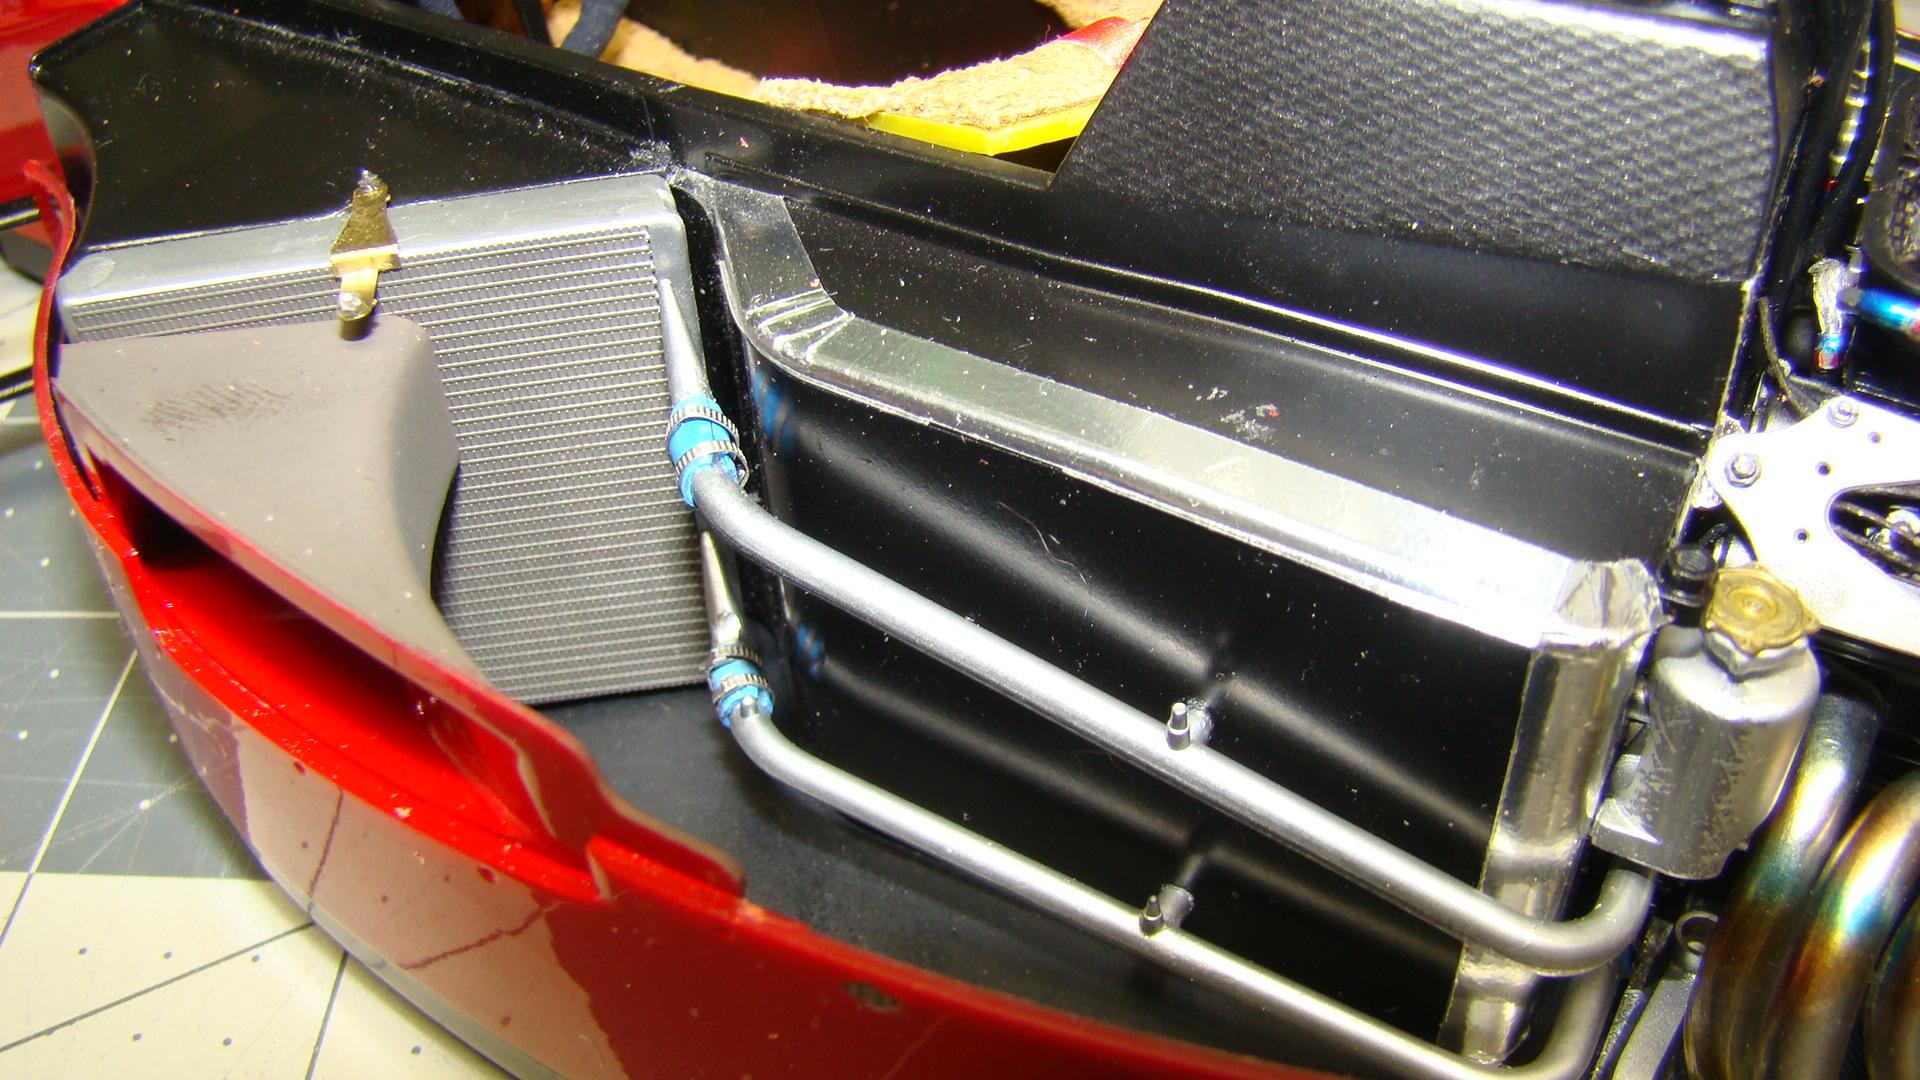
Good day on the bench. This model is nearing completion. Got more bodywork on, exhaust and water pipes. learned something with those hose clamps. Details below. Left side body, hoses and exhaust. Everything fit well with no fussing. Water pipes were very well engineered and fit like a charm. Not so much for the connecters and clamps. More info in the close up. Right side had more water pipes and the bodywork on this side was a little bit troublesome. Exhaust was done weeks ago and fit as advertised. The hose connectors are shrink tubing that came with the Perfect Parts pack. In the front it had to be slit down the middle and glued ion place, then heat (hair dryer) was applied to shrink it in place. The hose clamps were wrapped around a piece of rod to be formed. It bent easily but still sprung away a little. Just enough to be annoying. The trick here was to slip it over the connecter and glue half of it on. Then pull the rest of the clamp around and squeeze it in place with the two tabs. Took some time to figure this out but it finally worked. Left side detail. There are three electronic boxes that have to be scratbuilt and added in front of the radiator. Then wires run to the cockpit and along the sides. Don't know why Tamiya left out this detail. They pretty much thought of everything else.
-
Thankis Helmut. When this kit goes in the case all the bodywork will be on. But It can all be removed with screws and pins. Working on that now. If I ever take this to a show I will make a display with all the body work removed.
-
Watched these guys race in person. They were a dominate team at the time. Very nice model of their car. Nicely done.
-
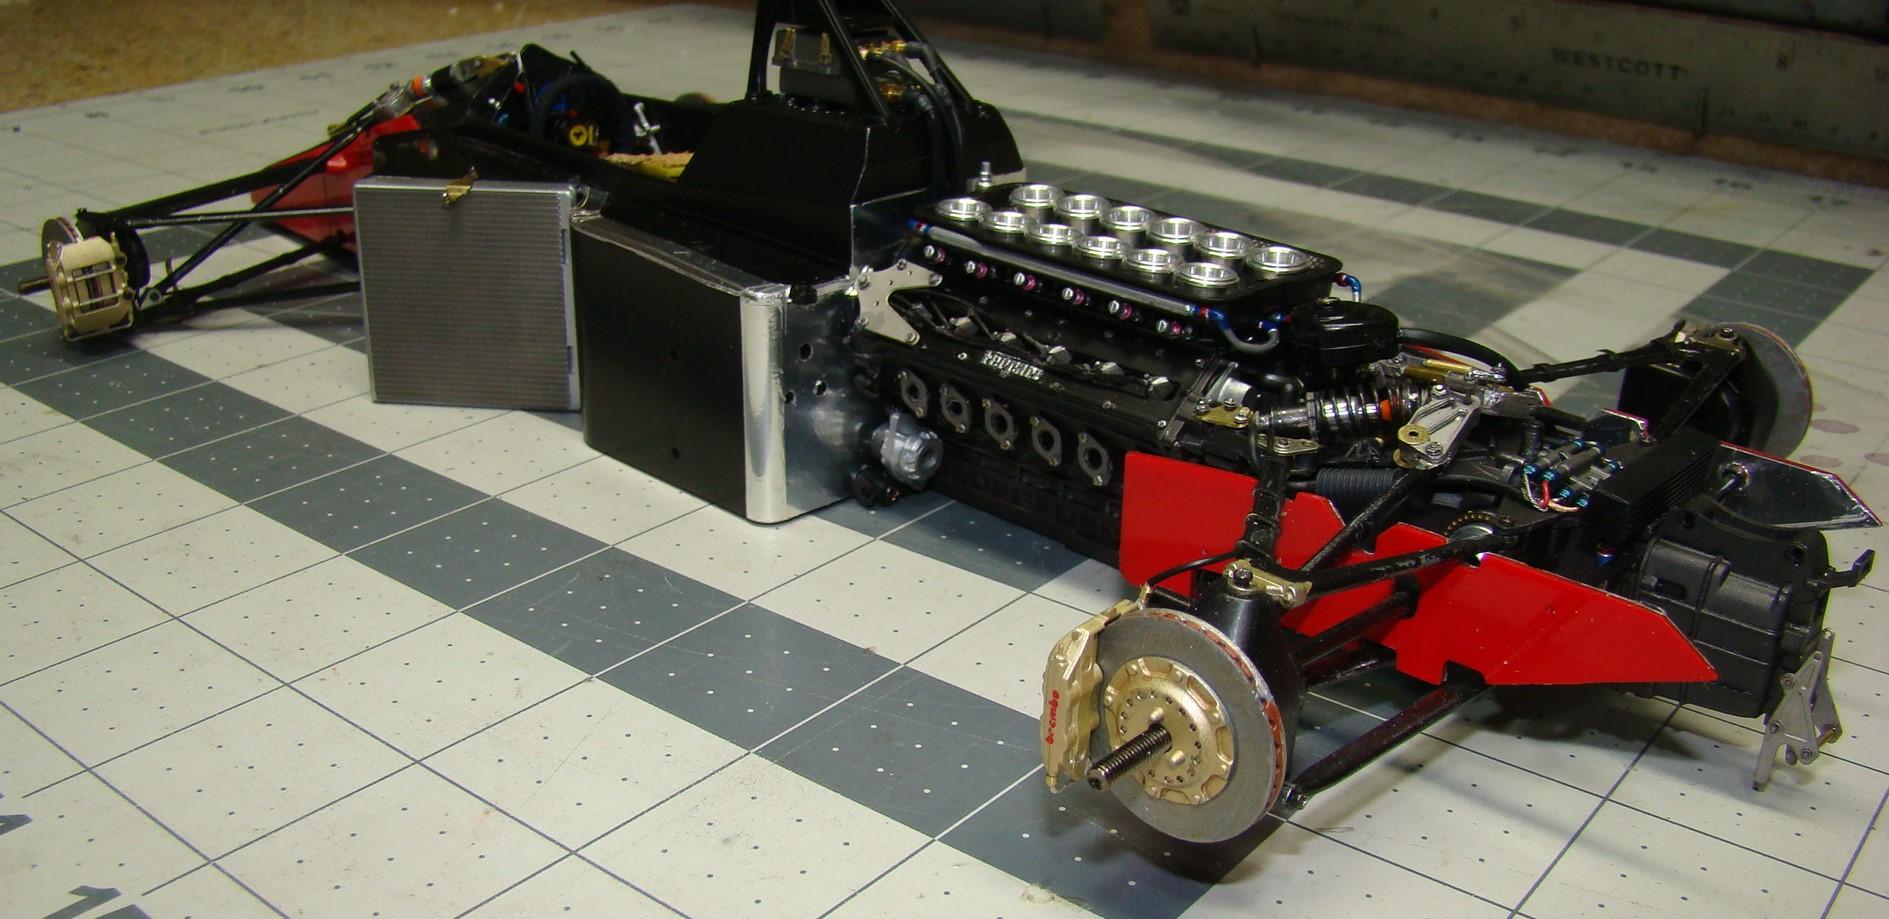
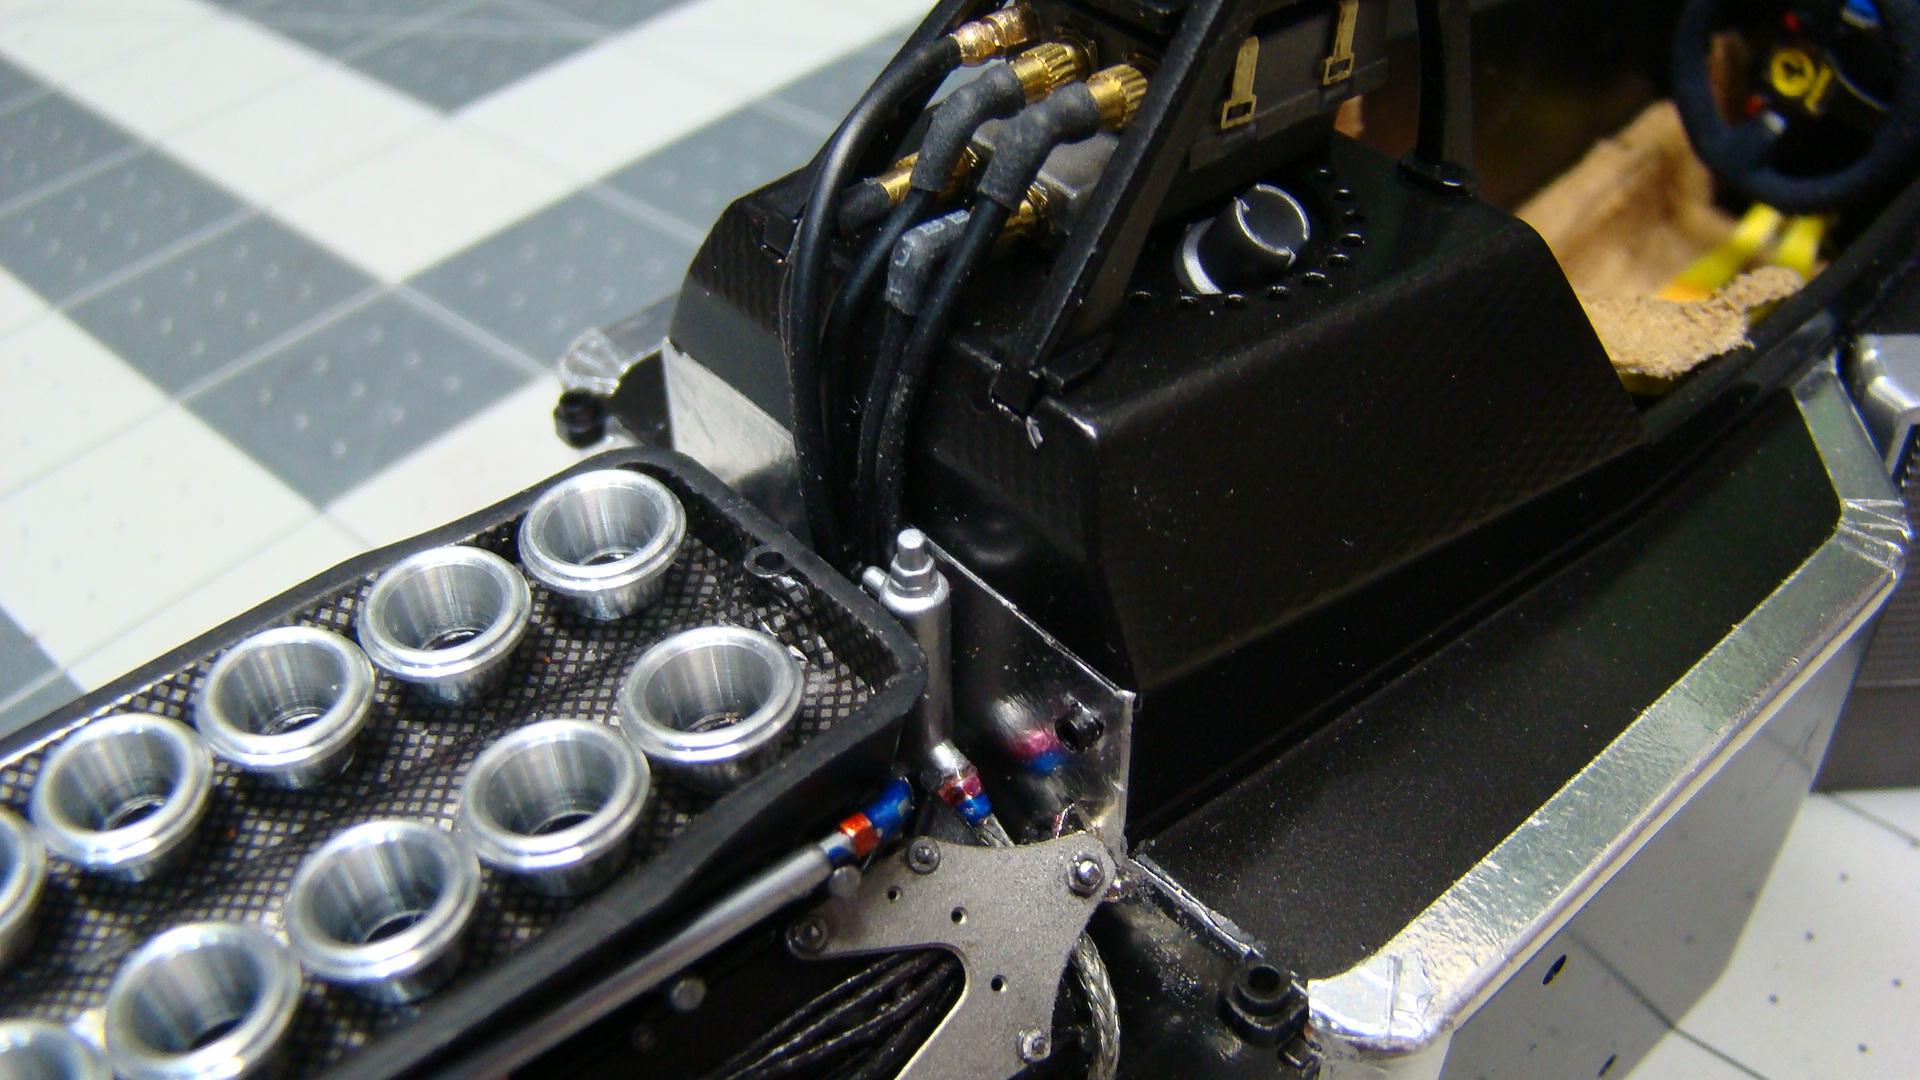
Big step in this project. When the engine meets the chassis. Soo far everything major is lining up well. Got this and the electronics box done yesterday and today. Now its on to the water pipes. Also finished the floor pan with carbon fibre and photo etch. A lot of the sub assemblies are done and ready to be installed. So this project should see completion soon. Now its on to the water pipes..the last of the serious fabrication. More info below. Here it is..chassis and engine together. Engine is held to chassis at four points. There are two long screws on the bottom that fasten into a subframe (kit part) that is behind the firewall. On top two more pins with nuts attached insert into the upper portion of this subframe. It a good solid assembly. A closeup of the electronics boxes and upper engine mount. The rubber ends are shrink tubing over kit vinyl tube. The brass connecters were Perfect Parts items that replaced the molded on connecters from the kit. Note the large bolt through the metal engine mount.
-
Thanks Brett. You know you are always welcome. Think you will enjoy the new house and workshop. Just let us know what your plans are.
-
SCCA Camaro Trans Am Set
Rich Chernosky replied to Scale-Master's topic in Other Racing: Road Racing, Salt Flat Racers
Masrk...thanks for doing this project and all the WIP work. It was most enjoyable to see the master at work. And you certainly did nail all three of them. Great job. -
Thank you Pierre. The nose and upper bodywork will be removable and I will take a picture of the final details. If I ever take this to a show I can make a display like that. I am planning on being at NNL East this coming spring.
-
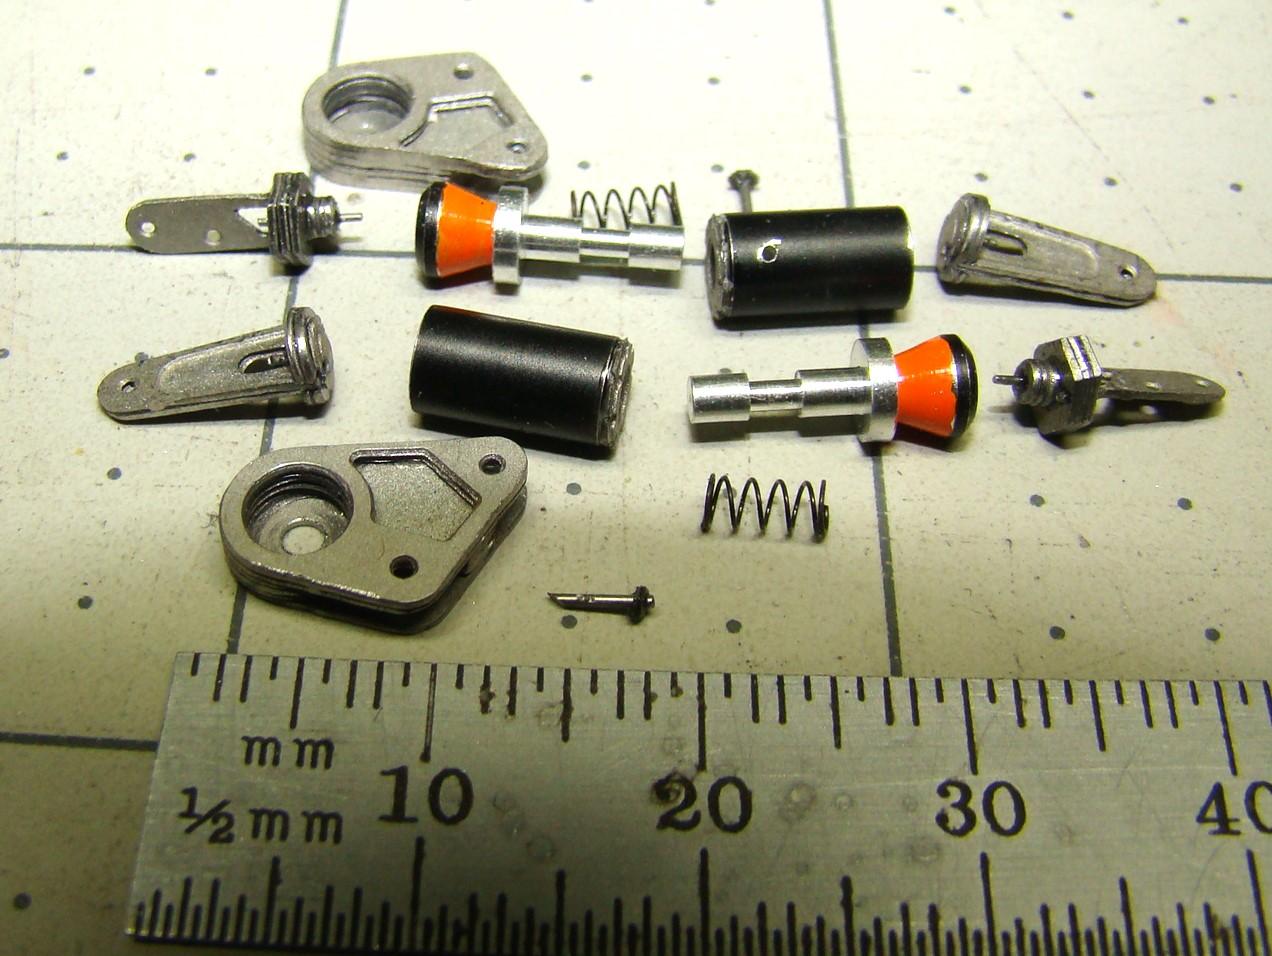
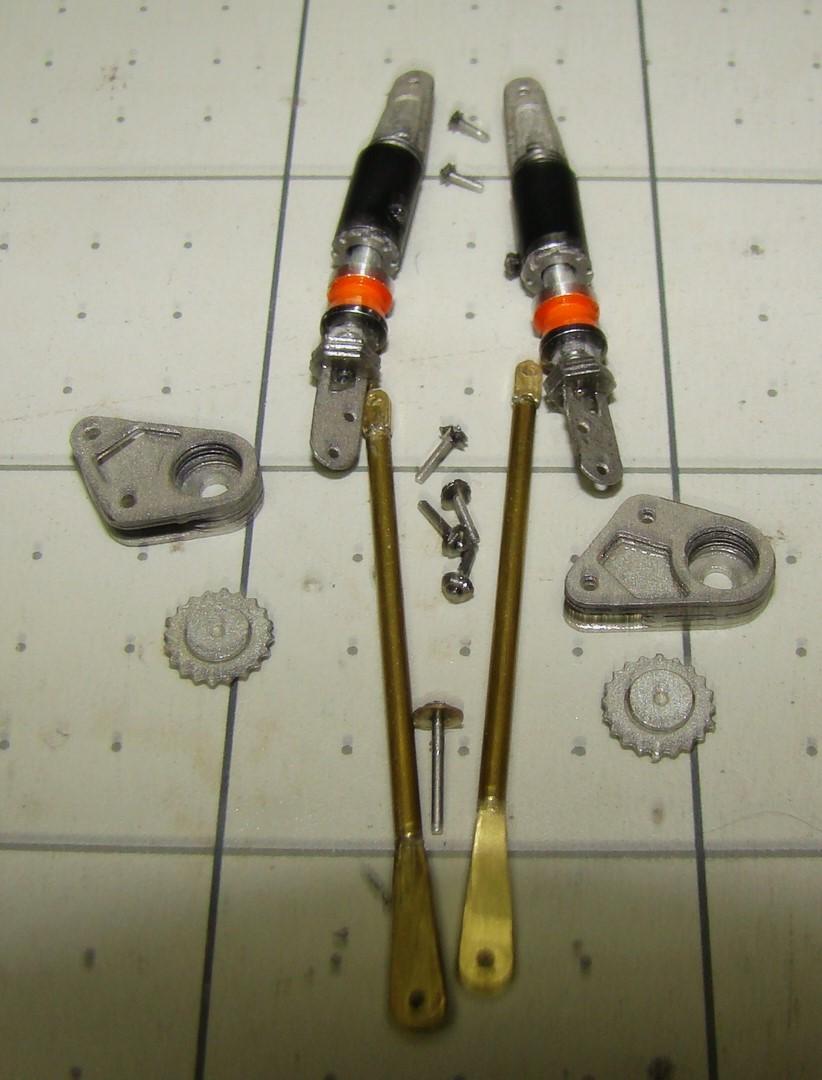
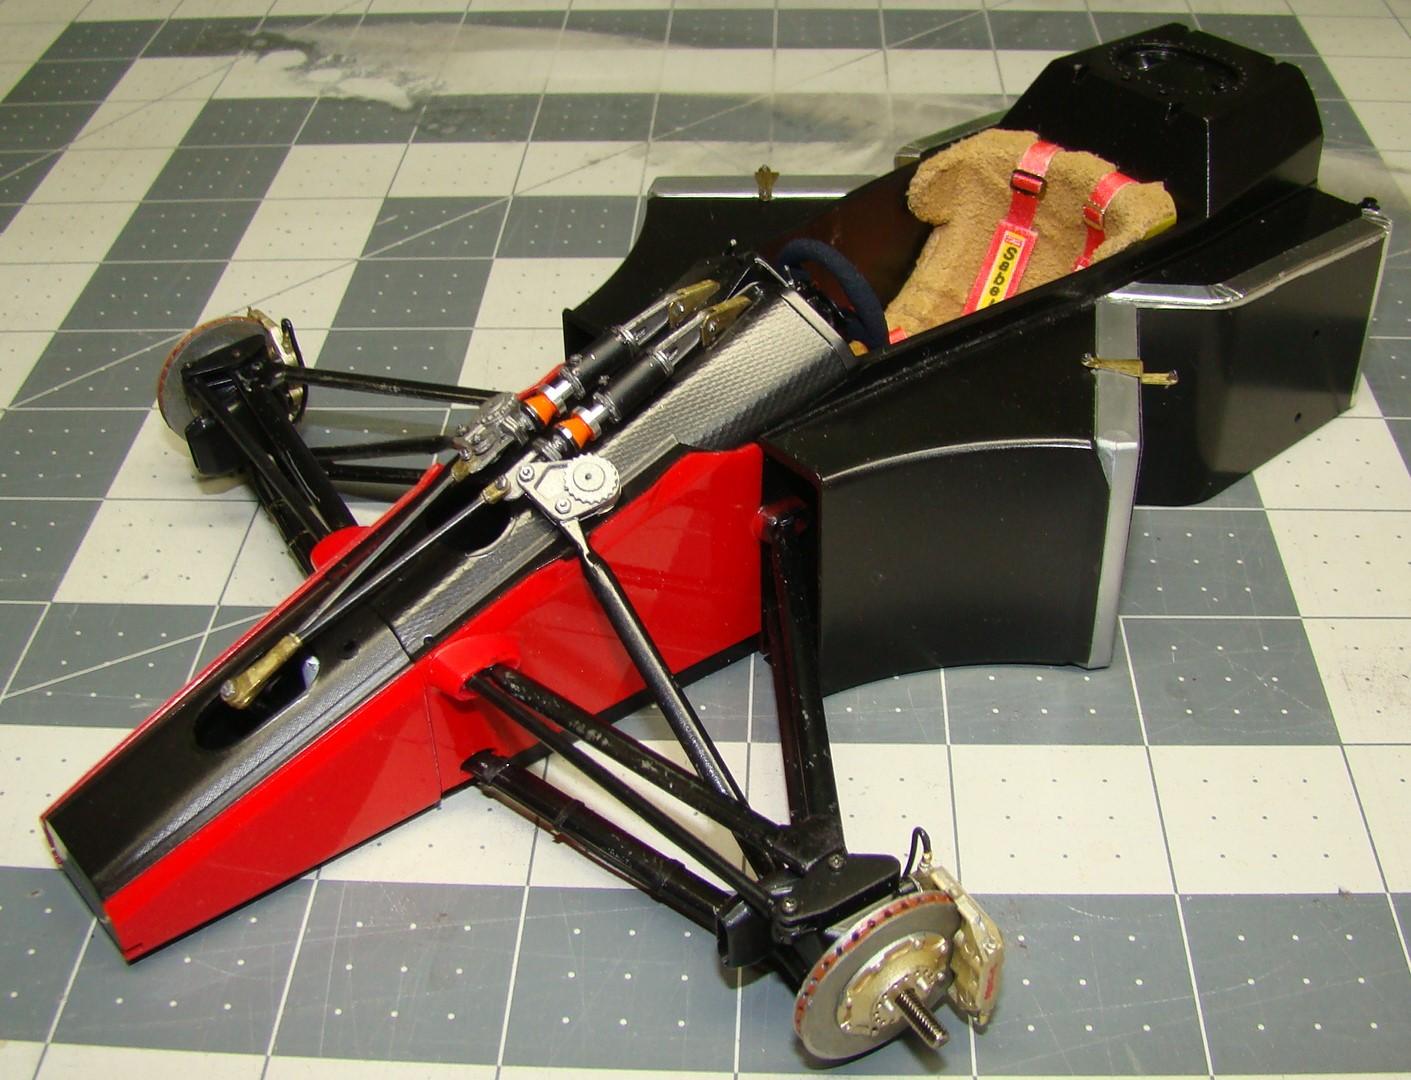
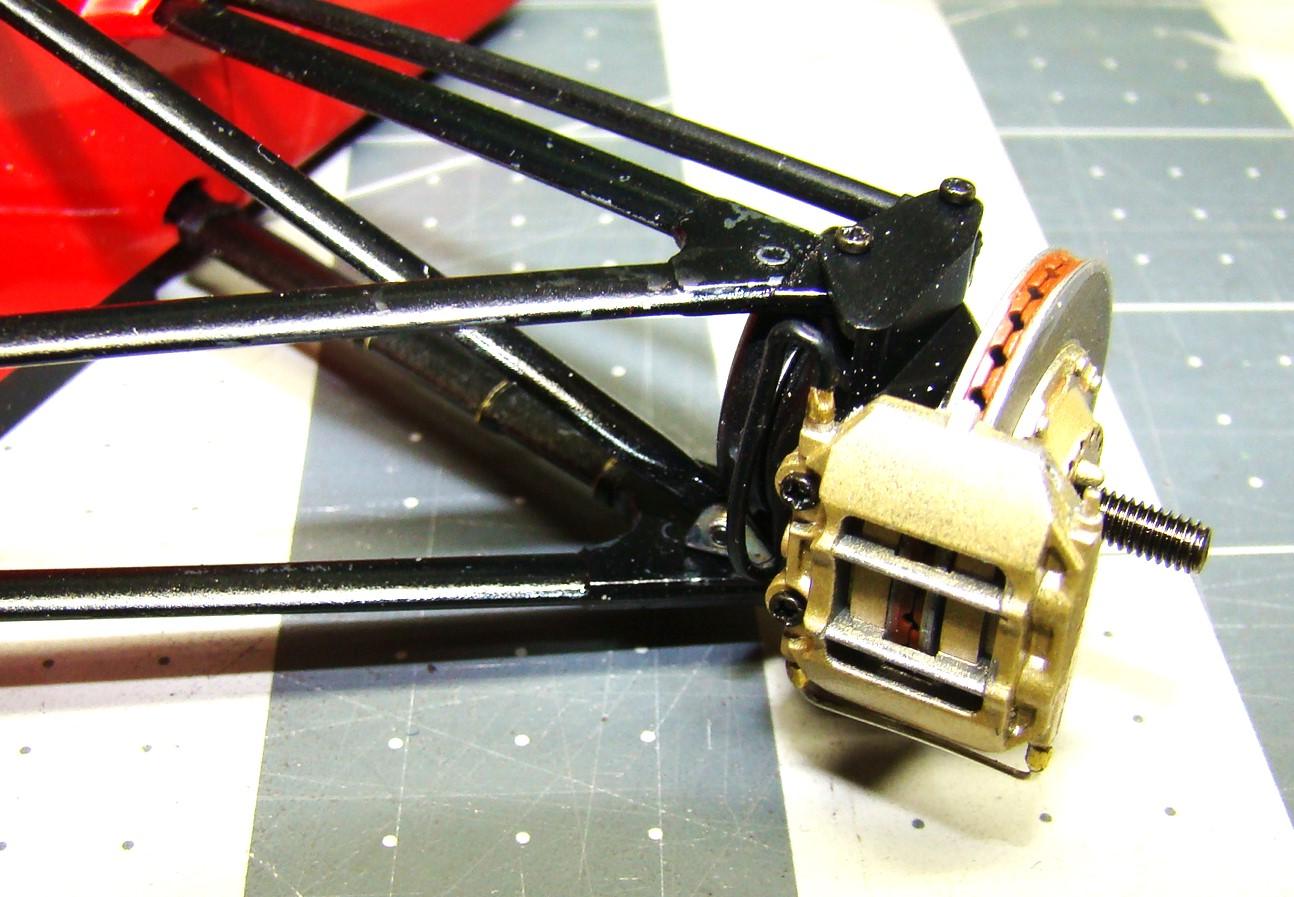
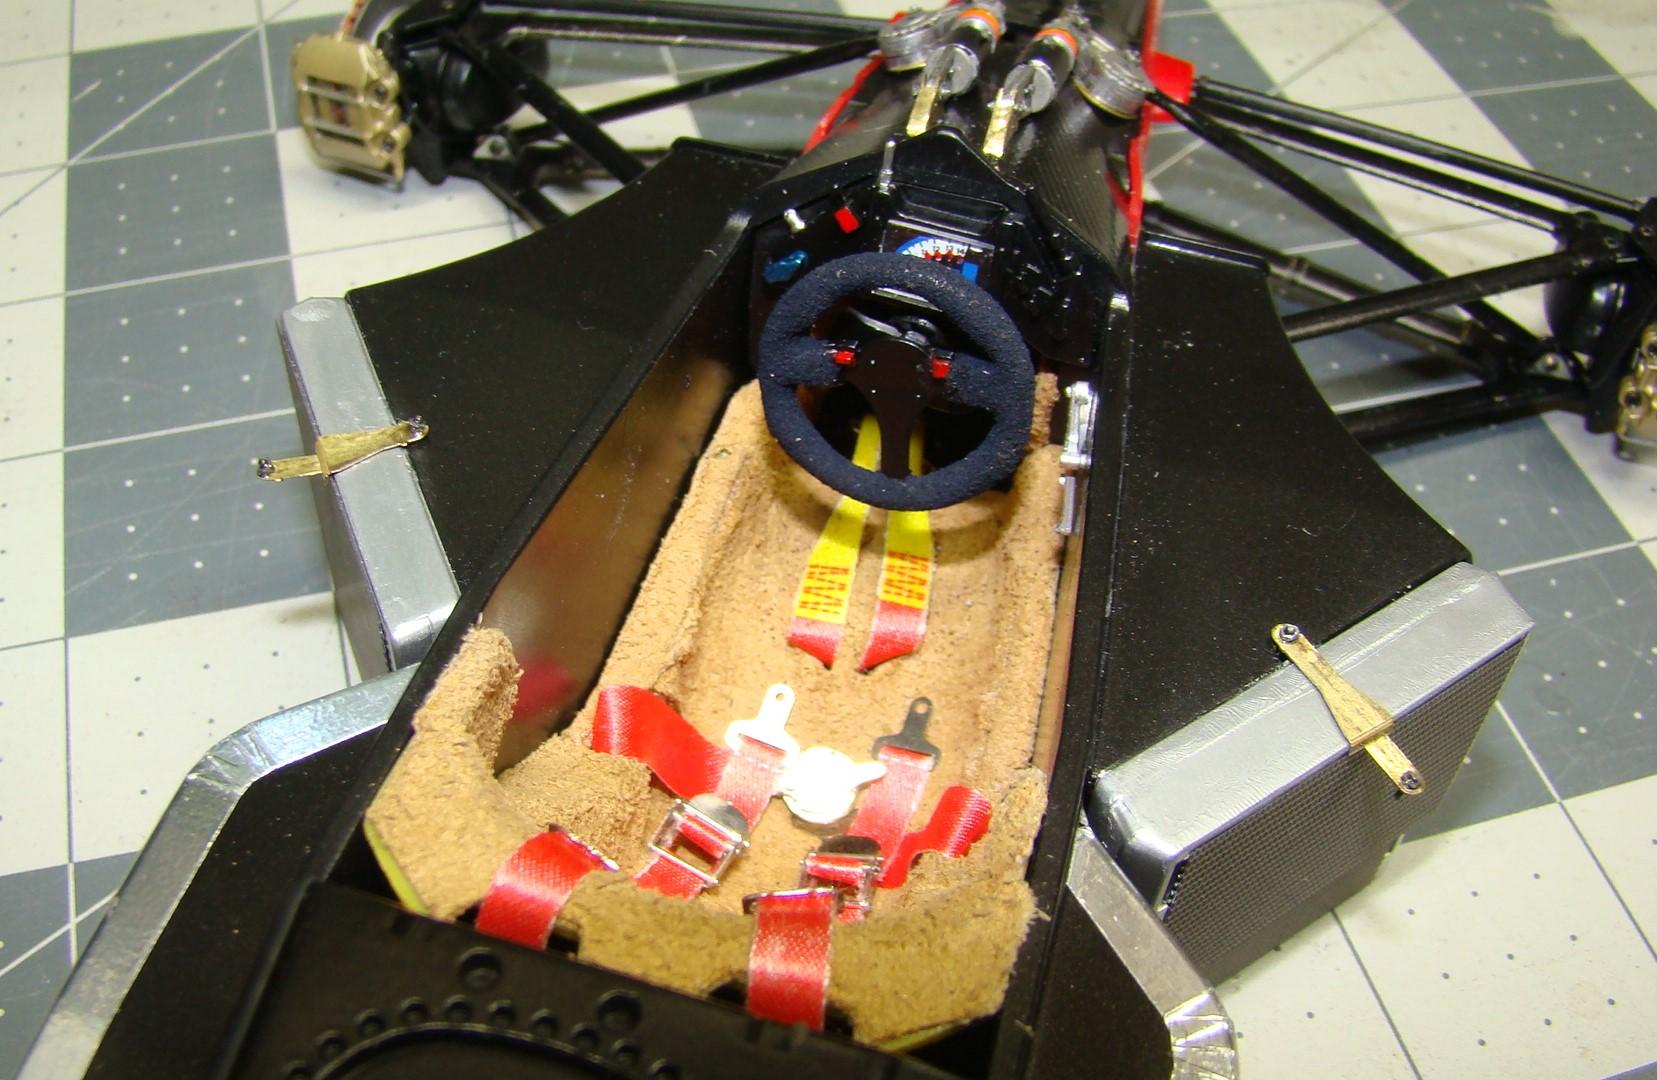
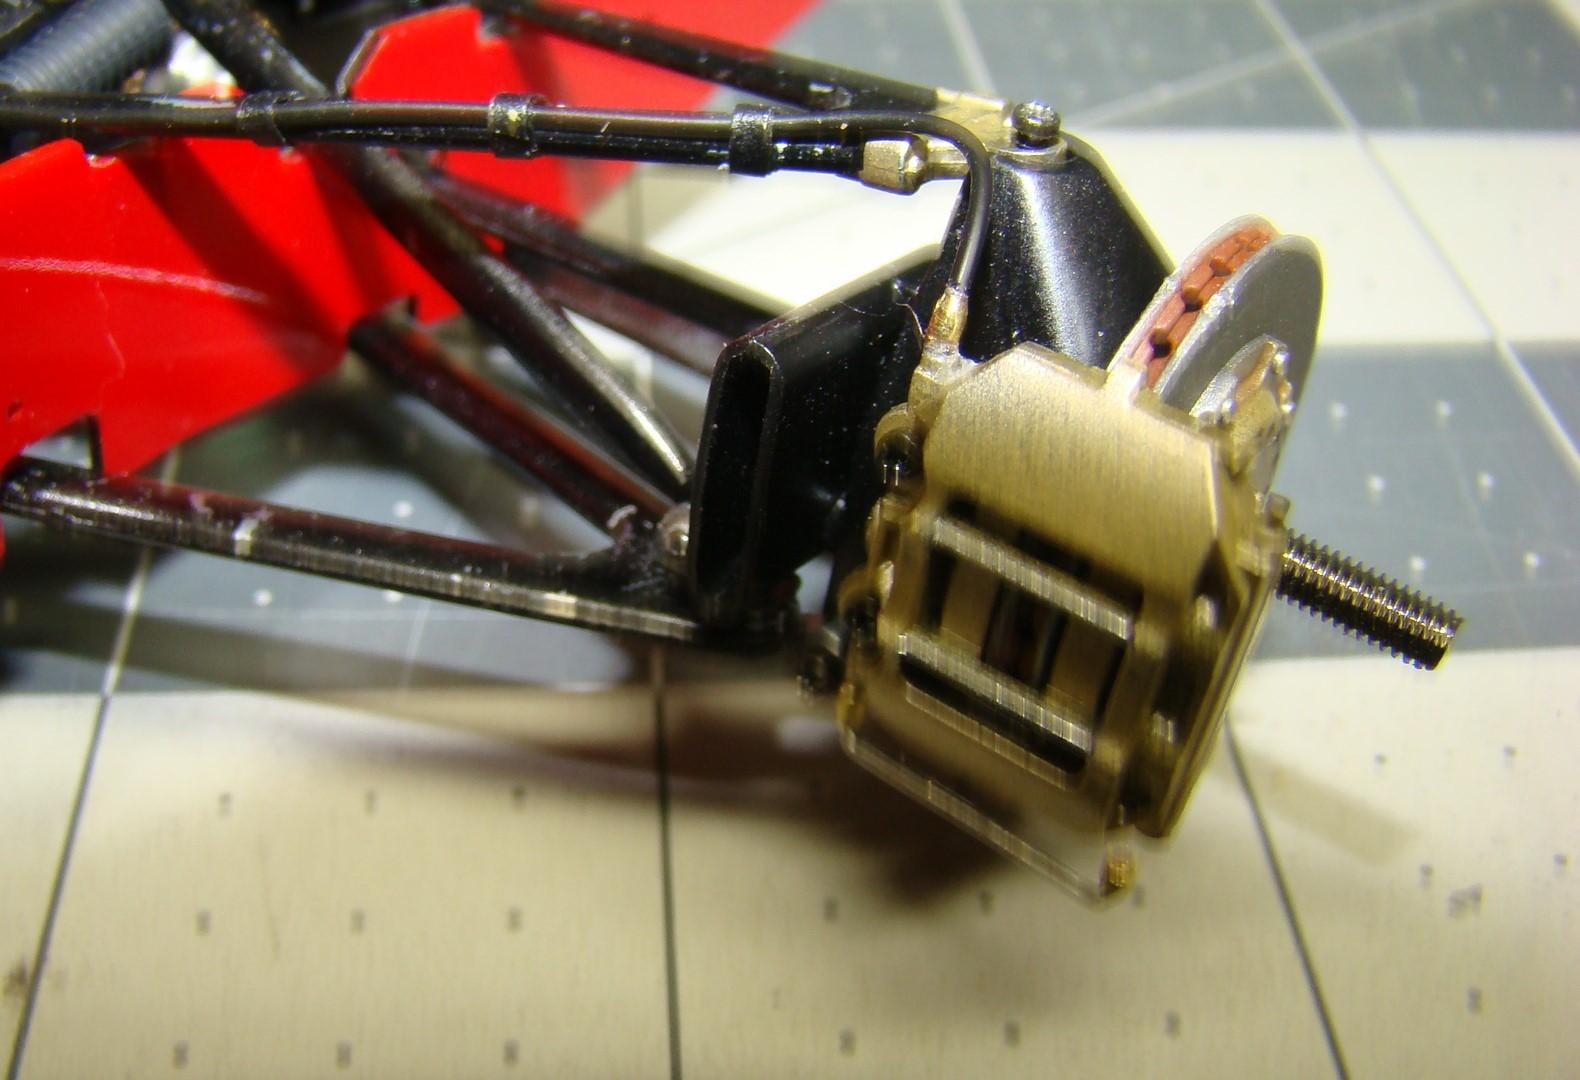
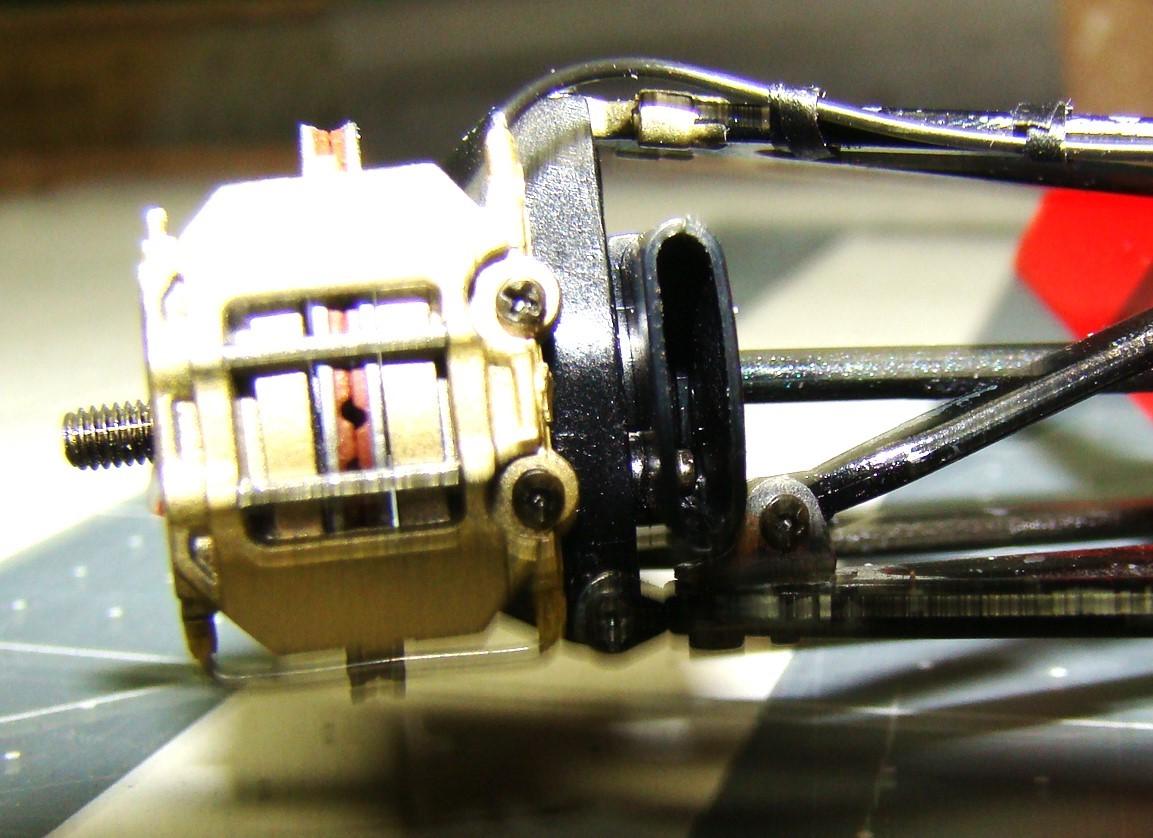
Major progress on this project. Several days of fiddly assembly. The most daunting part of this project , the front shocks and suspension is now behind me. Most of the chassis and interior are now done. Starting to see the light at the end of the tunnel. Plenty more information under the pictures. This was the better part of a couple days work. Each one of the shock units is 25 seperate piece. Many of them had to be machined. For a 1/12 kit therse are sure some tiny parts. Only kit part was the spring. The hole in the black shock tuber is for the tiny nut assembly to hold the strut in place. Shocks completed and all the necessary parts ready for assembly. The tensor rod body will be painted black. Hoping this goes better than the rear. Chassis ready with some of the components installed. The shock mounts at the top had to be carefully assembled and machined. Everything has to be checked for fit. Foil work on the chassis back was done with kit supplied foil which was a dream to use. Allthe kit suspension arms installed plus the previoulsy assembled braqke and front upright assembly. Seat slid in nicely and seat belts laid down. Some of the front body work was glued on with craft glu in case it had to be removed. It didn't. Suspension actually works. Radiators and side pods were also added. This was more of a pain than anticipated as the side pods can be glued on either side (which I did) Didn't realize this until I tried to fit the radiators. Side pods had to be removed and cleaned up then installed correctly. This took some time that could have been avoided. Front brake assembly with brake hose attached. Note the tiny brass fittings and crossover tube on the bottom. All this had to be hand made using a special jig. Interior mostly complete. Waiting for wiring and some detail decals to be added. After this the completed engine attaches to the rear of the chassis with four bolts. That's a major step and means this project is nearing completion.
-
Pierre...followed your WIP and I think you achieved what you set out to do. Some first rate modeling on display here. Well done.
-
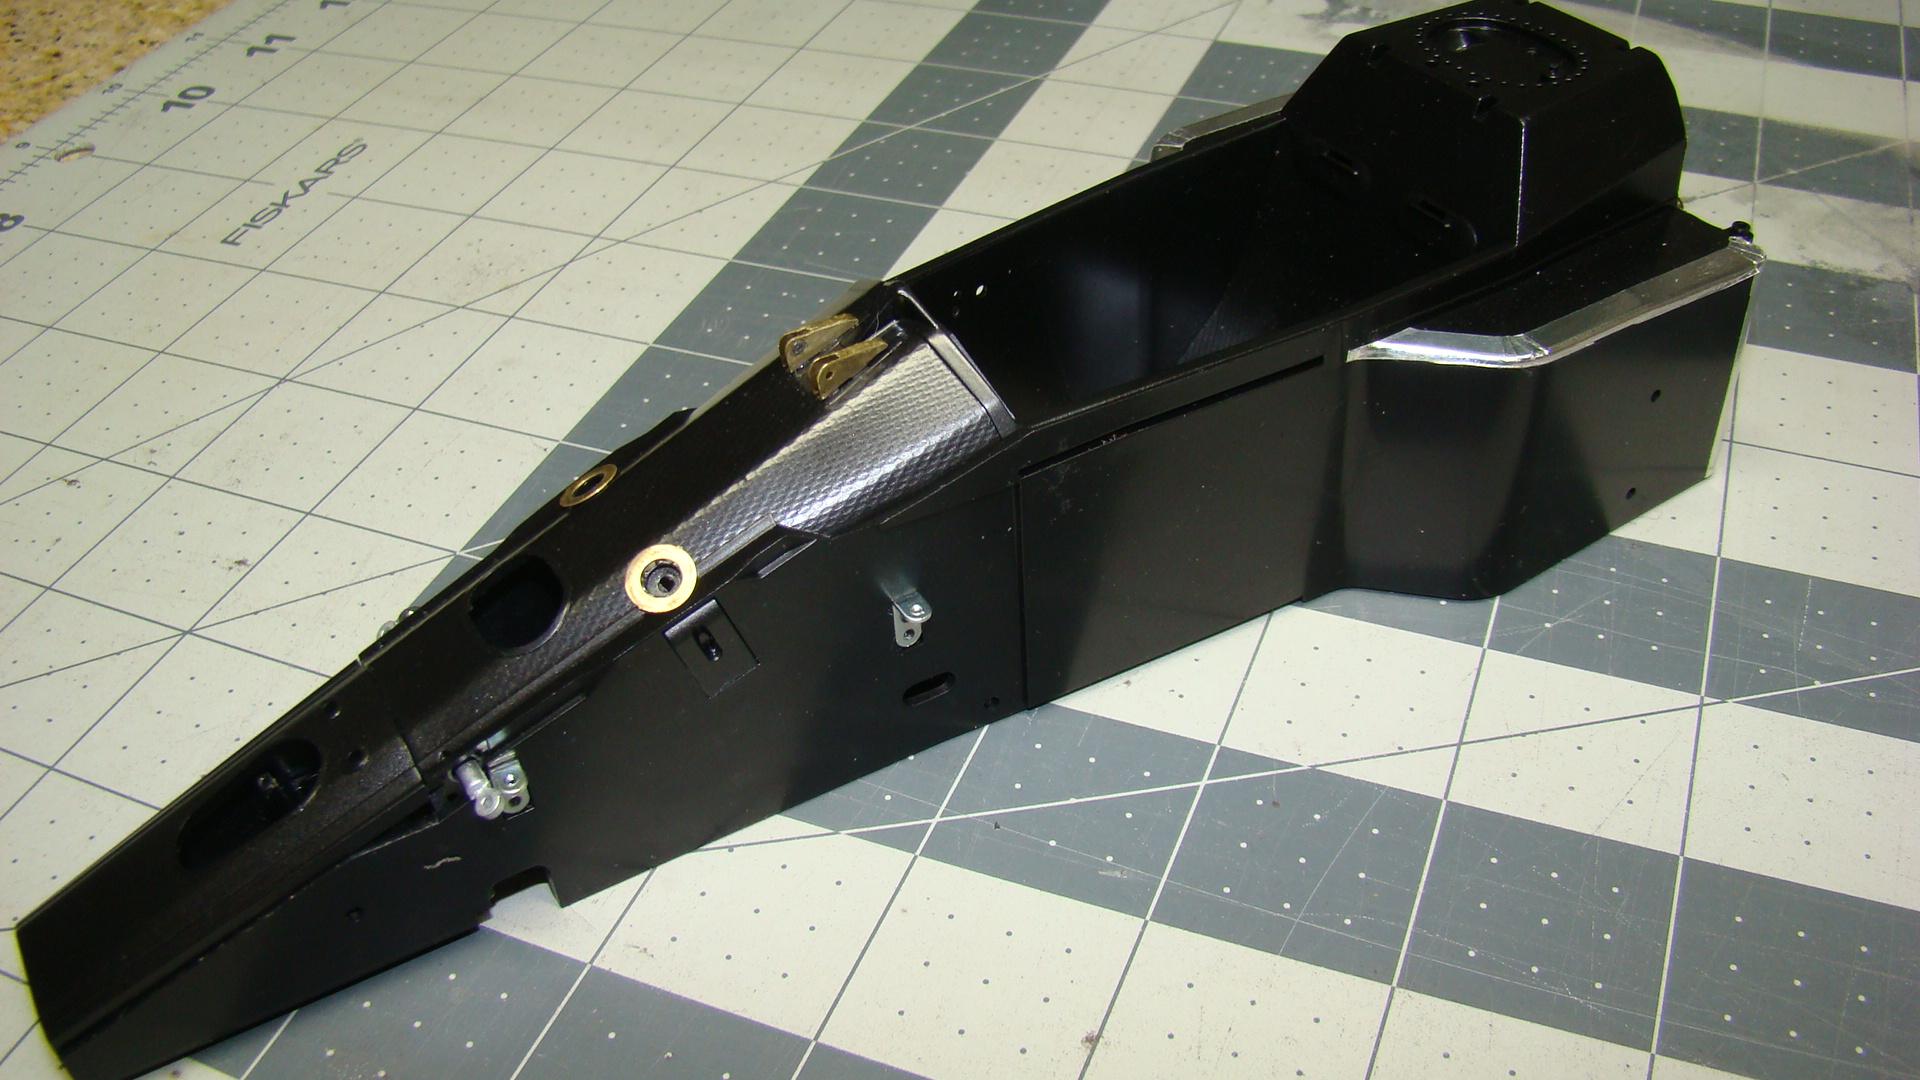
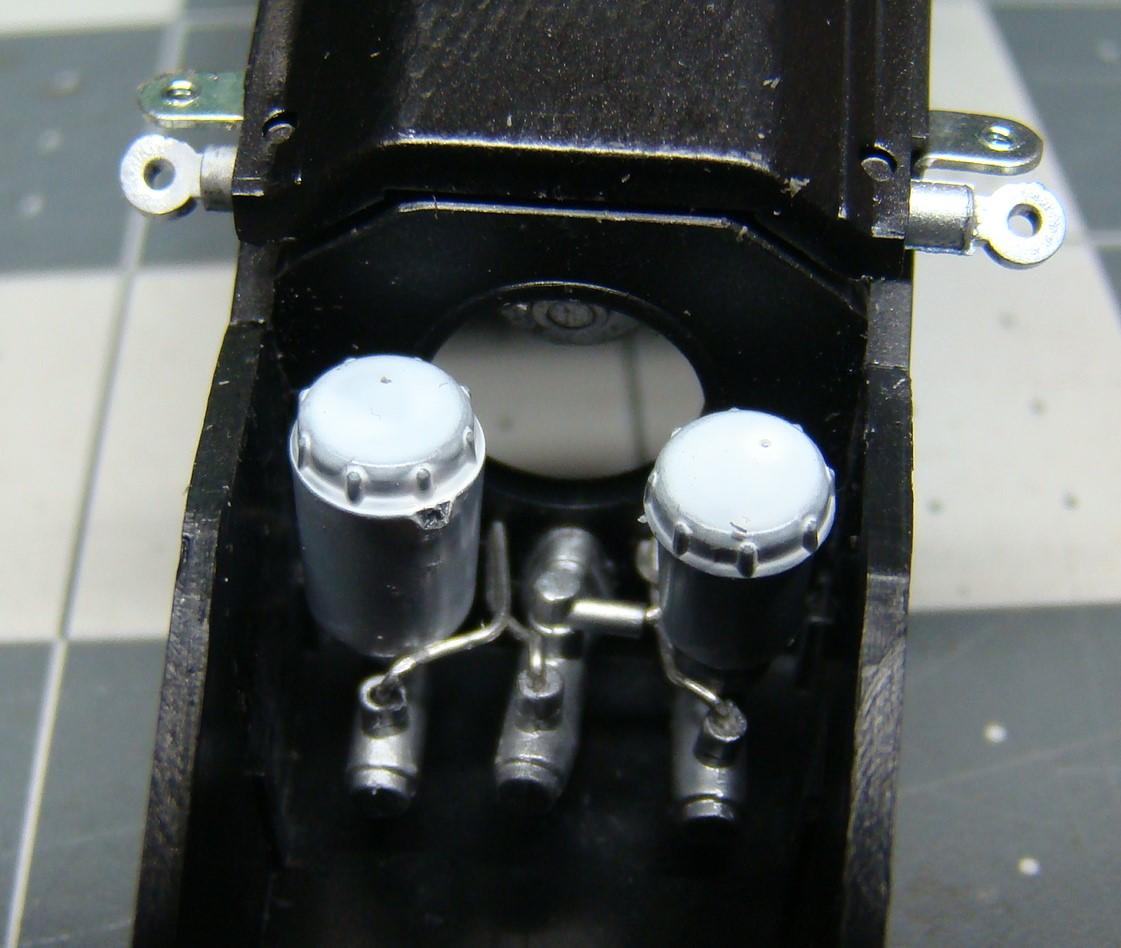
Small update. Started on the chassis today. Used the kit supplied foil for the engine attachment point and installed several of the front attachment points. Also installed the working rack and pinion. It works smooth. Several bulkheads installed including the brakes cylinders show below. Not its onto the shock and push rod assembly. Brake,clutch and gas pedal assembly installed and lines added. The wire is from some resistors I have. It bends very easily. Too bad all this will be covered over and barely seen. Oh well...at least its there.
-
Nice kit and nice Beemer. Well done
-
You can cut all kinds of tape down to the size you want. My "go to" is 3M vinyl tape. Lay a piece of tape on a piece of glass. I use a 6" metal straight edge. Lay the ruler on the tape to the width you want and hold down very firmly with one hand and use a sharp X-acto in one smooth cut. You can cut the vinyl tape hair thin and it will still stick. When you lay it on the model be careful not to stretch it. It can be moved slightly into position with a toothpick. It also holds very tight curves. Afterwards lay a thin wash of varnish on the tape to keep it in position. Its thicker than the paint but you barely notice it. I have been using this trick for many years. See below. The gold pinstripe on the side and hood are 1:1 gold pinstripe tape cut down to size. These stripes come to a point and this was done while still on the glass using a razor blade at a sharp angle. I will often use this technique when I have two large stripes and the space between them is very thin. This is difficult to mask without bleed under. The vinyl tape can be sprayed body color. Some might call this cheating but what works is what matters.
-
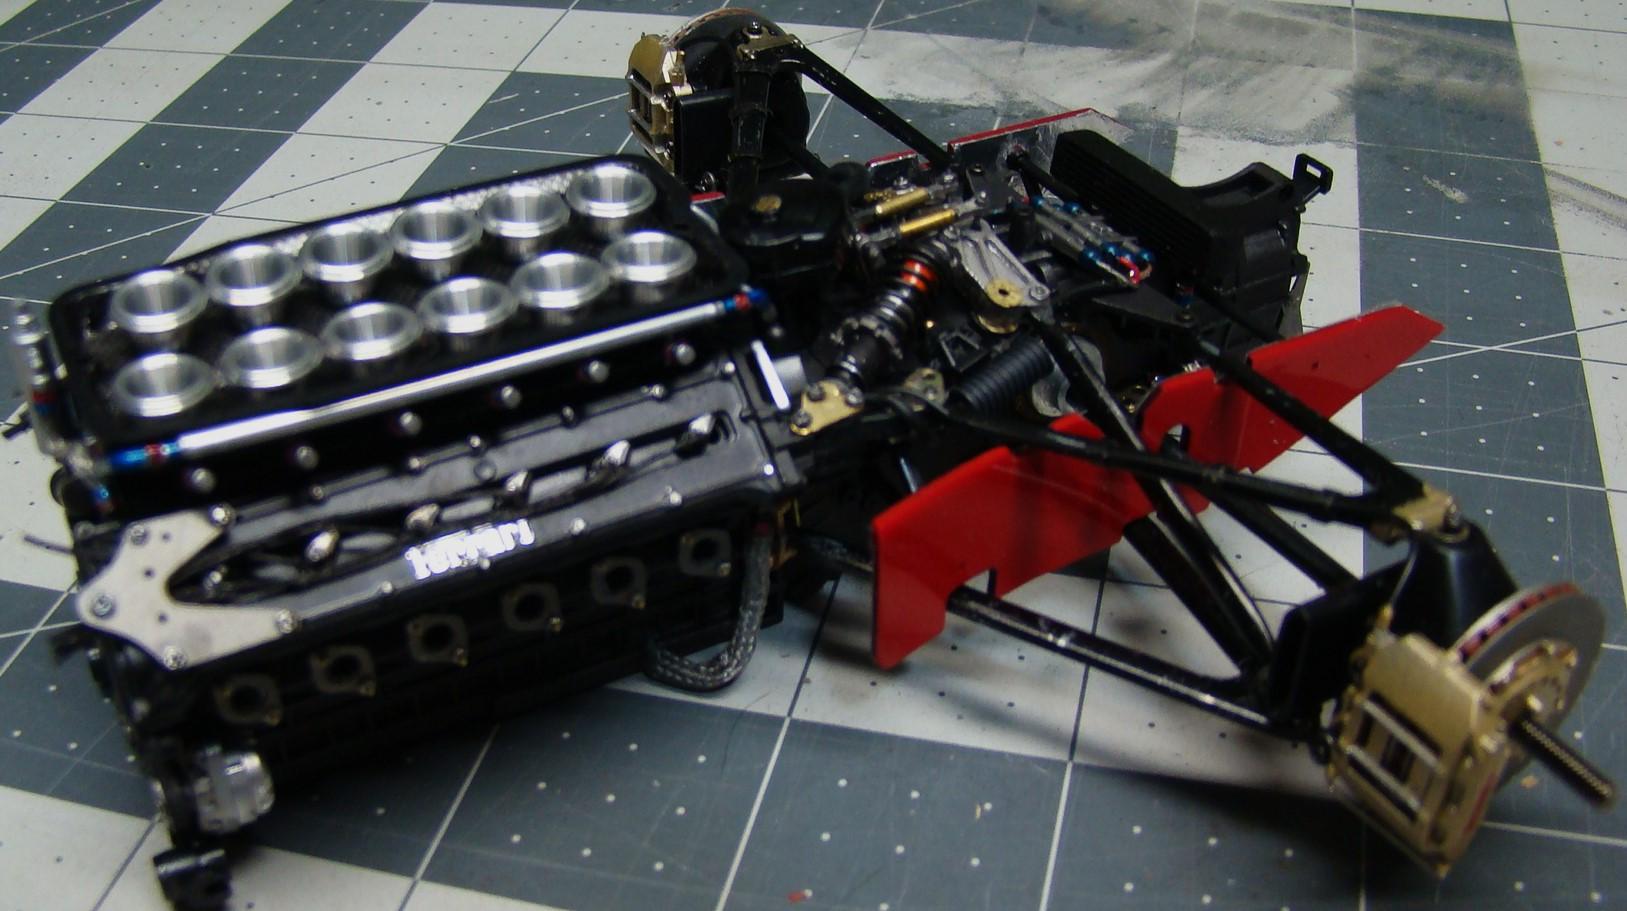
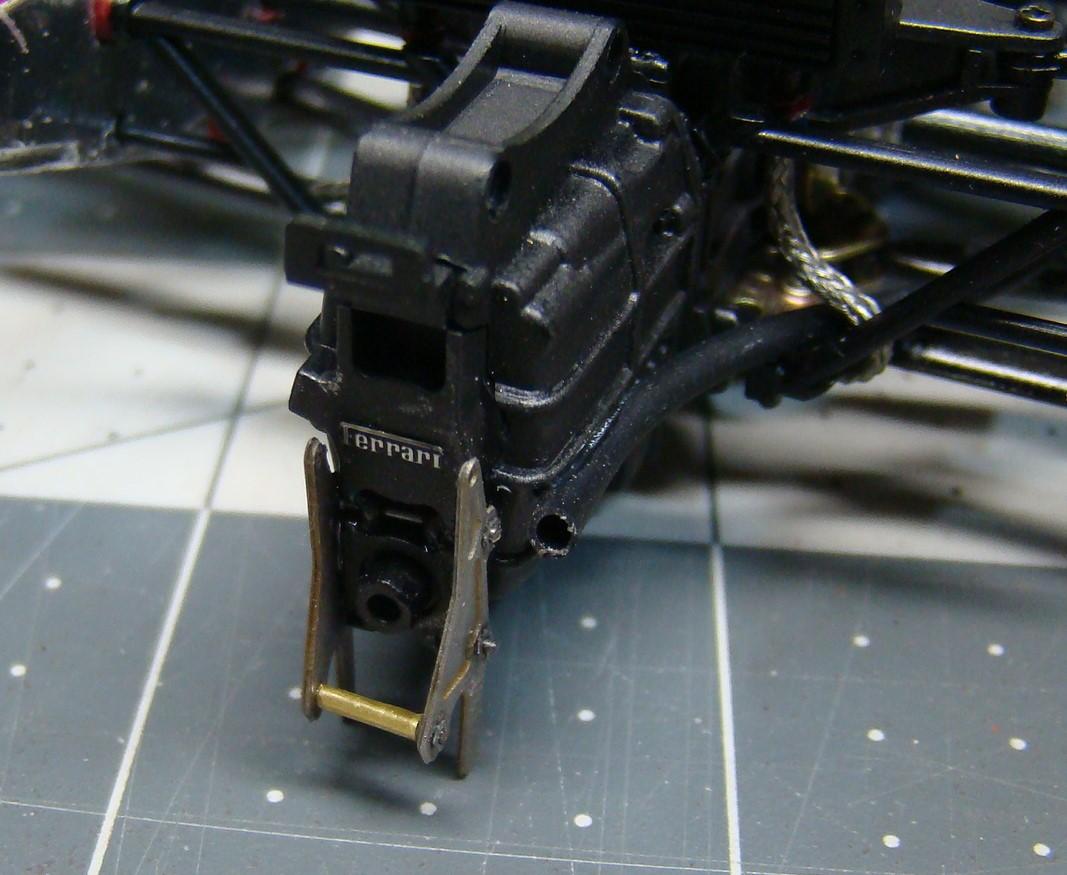
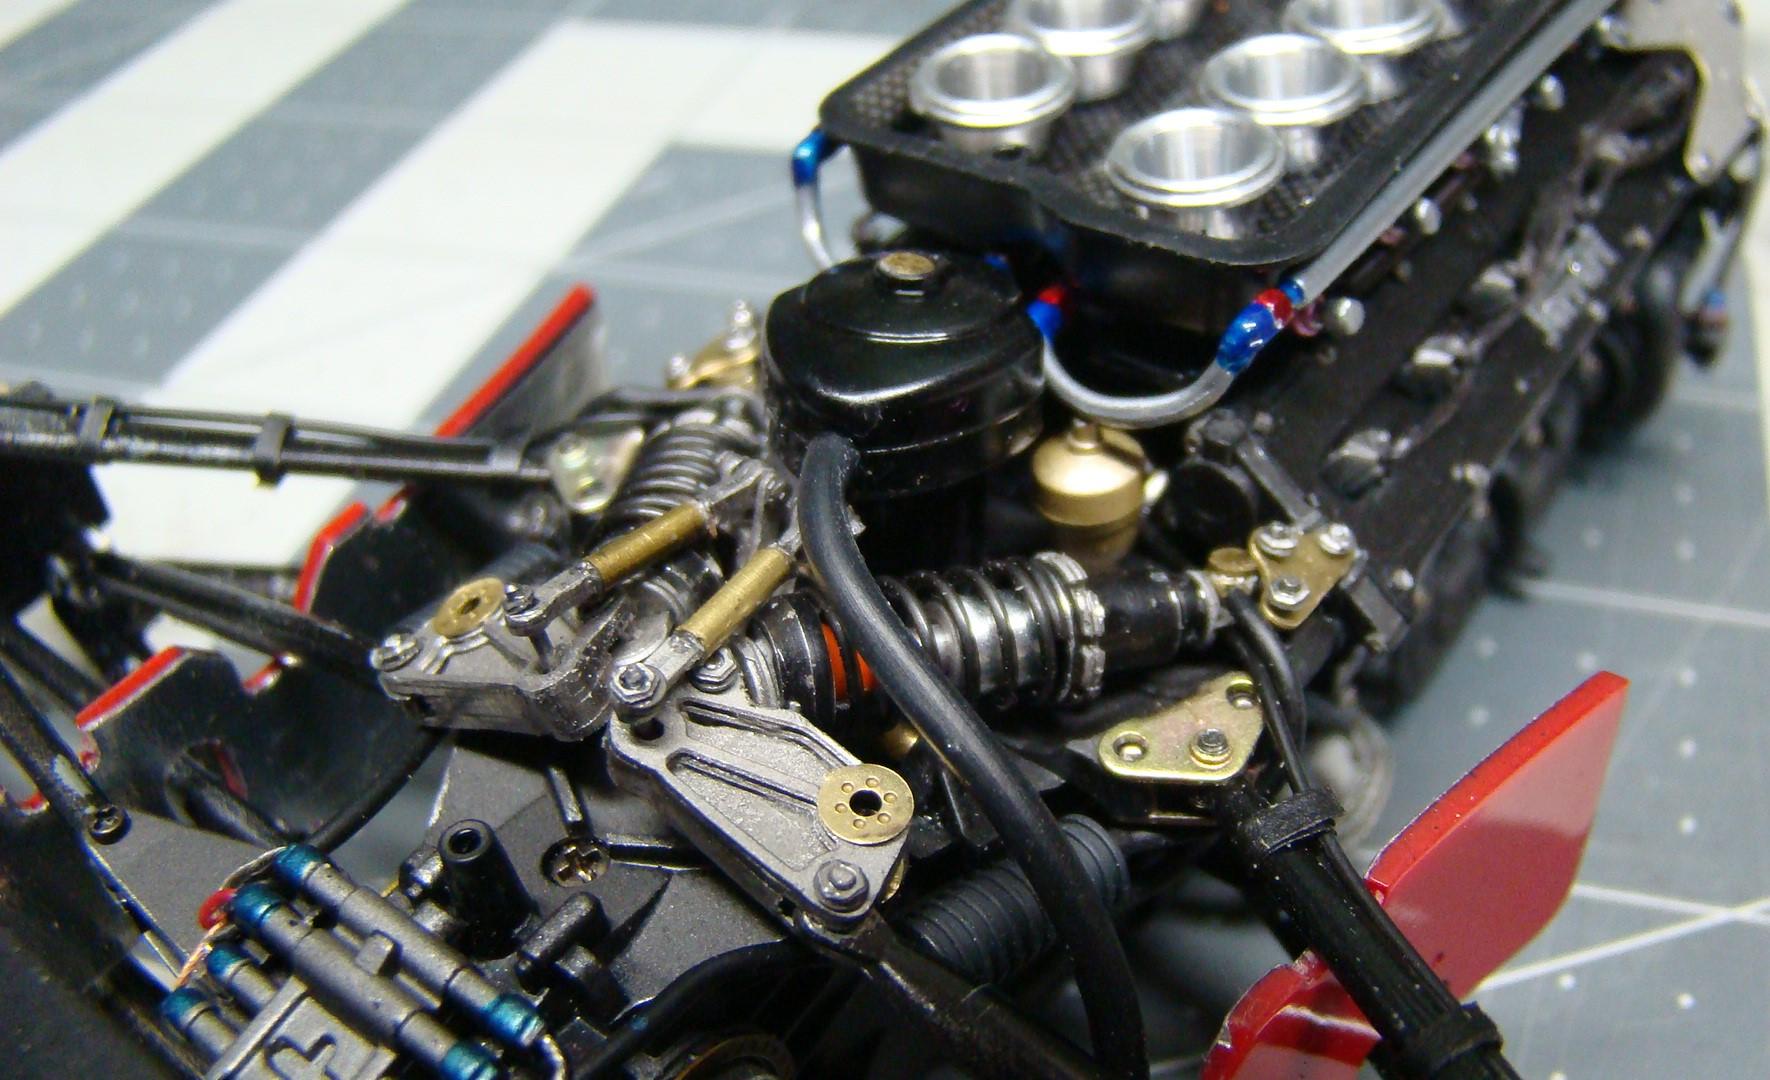
Engine mostly complete. Lots of detail work. More info under the pictures. Alll the suspension is now on. Fuel supply lines added. Carb linkage, fuel inlet manifold and those wonderful turned aluminium intake trumpets. Left side and more detail. Inside of the carb tray has been carbon fibred. Photo etch lift system on the transmission. Note the PE Ferrari logo Oil tank and overflow hose. Its getting crowed back here.
-
Hello All, Jorge From Colombia (Based in Germany)
Rich Chernosky replied to JarJar01's topic in Welcome! Introduce Yourself
Some nice builds you have there Jorge. Welcome to the forum. We have similar tastes in cars and scales. You really should try those 1/12 kits. Once you get into them they won't be so scary. -
Thanks Dave.....I m going to great lengths to make sure all the panels are removable. And when finished I will take a picture just like that. In the meantime I am also taking pictures of details that will be hard to see. Glad you are following and get to see them.
-
Thank you Pierre. I think I like the used look too. Most of the race cars I have been up close and personal to look this way. We have a tendency to model what we see and are comfortable with.
-
Thank you for the encouragement John
-
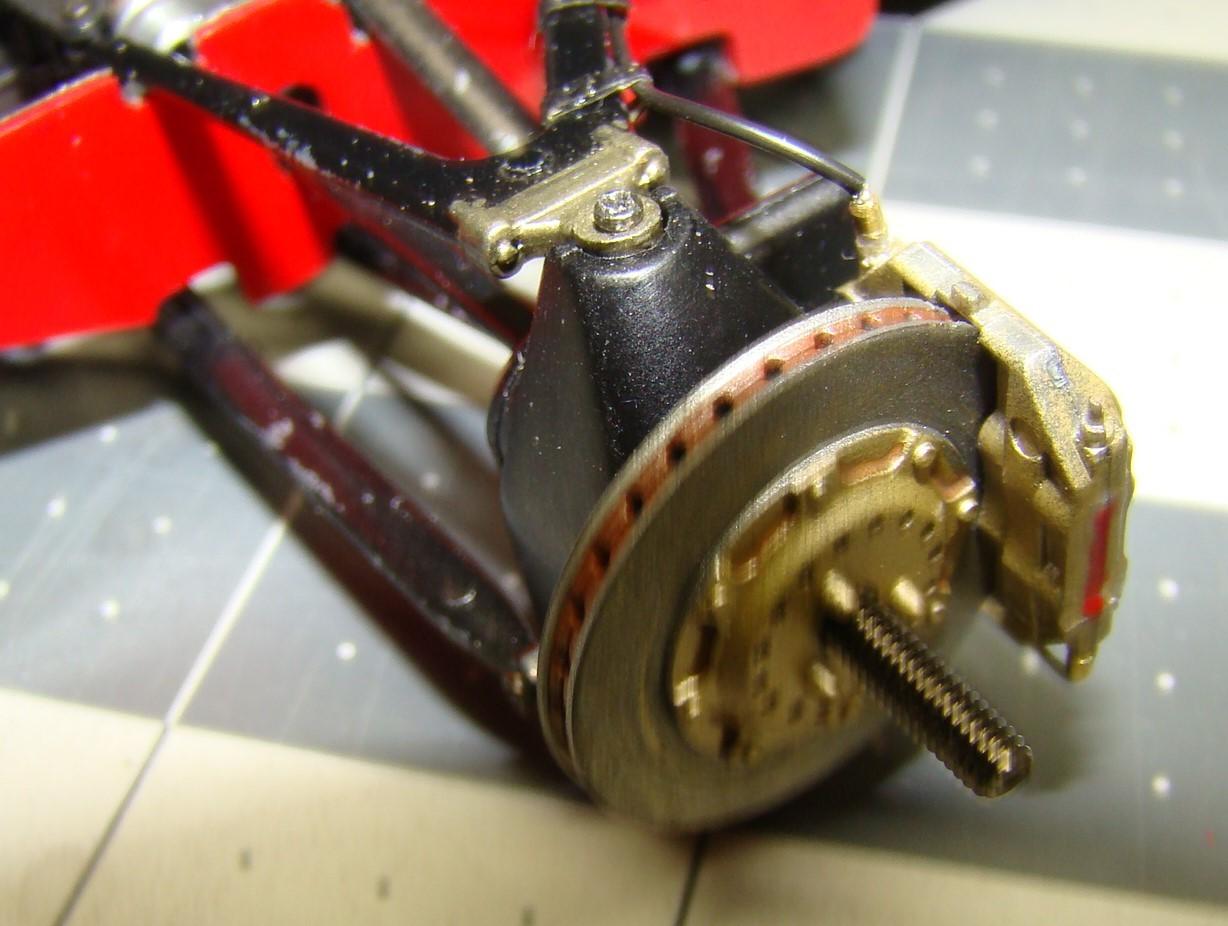
More progress. This project is starting to come together. This part went rather smoothly with one exception, details below. Rear brakes,half shaft and uprights installed. I discovered that I was missing apart for the hub assembly that would allow the halfshaft to be attached. Brake scoops are screwed on then the other half glued in place. The brake scoops had to be pried apart so I could add this piece. They came apart fairly easily but all of this could have been avoided fi I had paid attention to the instructions. Oh well, it ended OK That metal bracket that is screwed to the lower A-arm had to be removed and ground out to go around the brake scoop. Also the screw had to be shortened to clear. This was a design flaw of the kit. Unusual for Tamiya. Other side brake/upright assembly. Had to fabricate the brake lines and fittings. There is a metal line connecting the brake cylinders underneath the brakes that also had to be fabricated. (previous photo..not to clear) The tape holding the lines in place on the suspension arm is Tamiya tape cut down and sprayed flat black.
-
Ford C100 Group C Chassis #4
Rich Chernosky replied to Dave B's topic in Other Racing: Road Racing, Salt Flat Racers
Don't see this model very often ..if at all. Always a pleasure to see your creativity and mastery of this craft. Well done Dave. -
Testors (IMC) Ford Mk IV
Rich Chernosky replied to THarrison351's topic in Other Racing: Road Racing, Salt Flat Racers
Tim...considering the age of the molds I think you did a decent job on this. I built this kit when IMC first released it and needless to say it sits in the back of the case hidden behind some better builds. I have re-visited this kit and have one in the works. Its at the final assembly stage but will have to wait until I finish a project I am already deeply involved in. I like your version.