Rich Chernosky
-
Posts
2,108 -
Joined
-
Last visited
Content Type
Profiles
Forums
Events
Gallery
Everything posted by Rich Chernosky
-
1965 Ford GT40 Roadster
Rich Chernosky replied to Gramps46's topic in WIP: Other Racing: Road Racing, Land Speed Racers
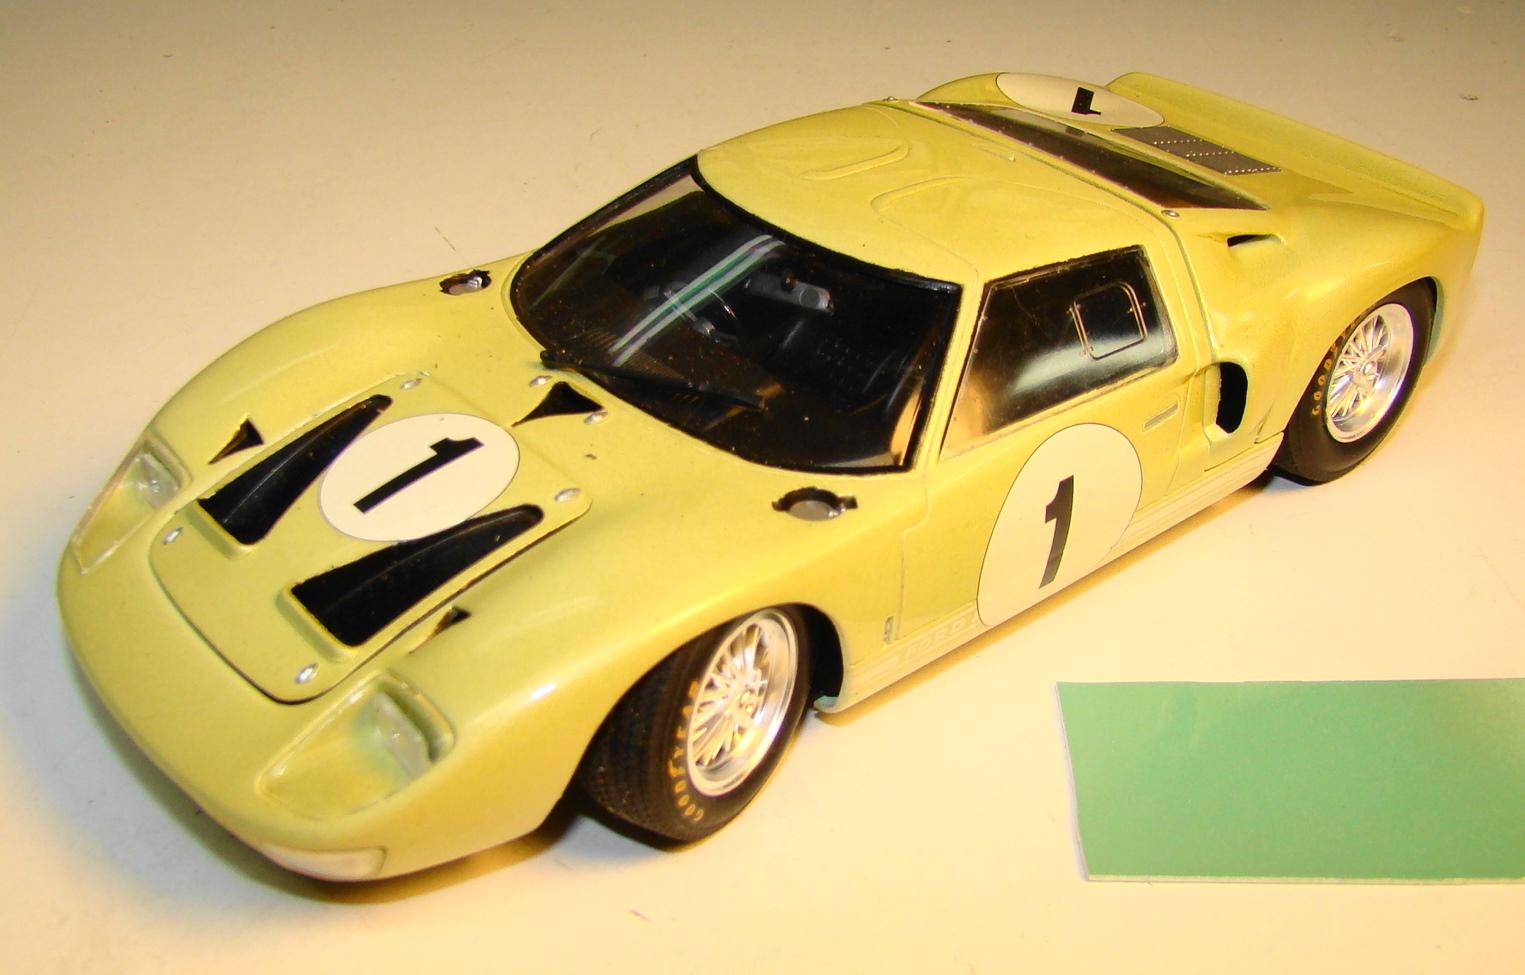
Gary..a long time ago...I built this Fujimi kit. At the time I was uncertain of the color so I asked for advice on "that other modeling site" I was told it was Linden Green but no one had a source for the color. So i used my judgement based on what pictures were available at the time. What I came up with was a light gray yellow green and as you can see it comes nowhere close to the sample of Tamiya TS-60 which is a light blue gray green. I happen to like the color of mine and still have the formula of what I mixed. Unfortunately it is buried right now as I am expecting a move shortly. I also have the Mini-exotics trans kit and a donor. I am in a quandry as to which way I should go on my trans kit. Your opine is welcome. To my eye this looks closer to the Jorgen Stendahl trans kit pictured above. ..???
-
Mathias...this is really , really cool. LED lighting is awesome and the paintwork very nice. Yah....I'm a Trekkie
-
Nissan R390 GT1 - 1/24 - Tamiya
Rich Chernosky replied to toled's topic in Other Racing: Road Racing, Salt Flat Racers
Super decal and paint work. Did you clearcoat the decals. What did you use...looks great. -
Fujimi/Testors 1/24 Dino 246GTS Spyder
Rich Chernosky replied to Justin Porter's topic in WIP: Model Cars
That looks great Justin. I have done this myself and know how painstaking it is. PE can be tough to master but you did it. -
McLaren MP4/6
Rich Chernosky replied to Scale-Master's topic in WIP: Other Racing: Road Racing, Land Speed Racers
The painting, the detail and assembly is so precise. Thanks for the update..its inspiring. And ...oh yah...I have been in the box on mine. -
Lotus 56B Turbine
Rich Chernosky replied to Scale-Master's topic in WIP: Other Racing: Road Racing, Land Speed Racers
Andy...I have the 1/12 Otaki kit. What do you want to know. Also have the 1/20 and a 1/24 resin. None of them built. -
Not an Iso A3/C
Rich Chernosky replied to Dave B's topic in Other Racing: Road Racing, Salt Flat Racers
A definite one of a kind, very skillfully done and special attention to detail. Congrats Dave on a job well done. -
McLaren MP4/6
Rich Chernosky replied to Scale-Master's topic in WIP: Other Racing: Road Racing, Land Speed Racers
Mark...you are just sailing through this one. Everything looks great so far. Almost makes me want to dig mine out. -
Porsche 908/2 1970 LeMans
Rich Chernosky replied to Rich Chernosky's topic in Other Racing: Road Racing, Salt Flat Racers
-
Steve...That is a tough paint job to master but you nailed it. Great job....engine and interior are pretty cool too. And to be there and see it run...priceless.
-
Porsche 356
Rich Chernosky replied to afx's topic in WIP: Other Racing: Road Racing, Land Speed Racers
-
Porsche 356
Rich Chernosky replied to afx's topic in WIP: Other Racing: Road Racing, Land Speed Racers
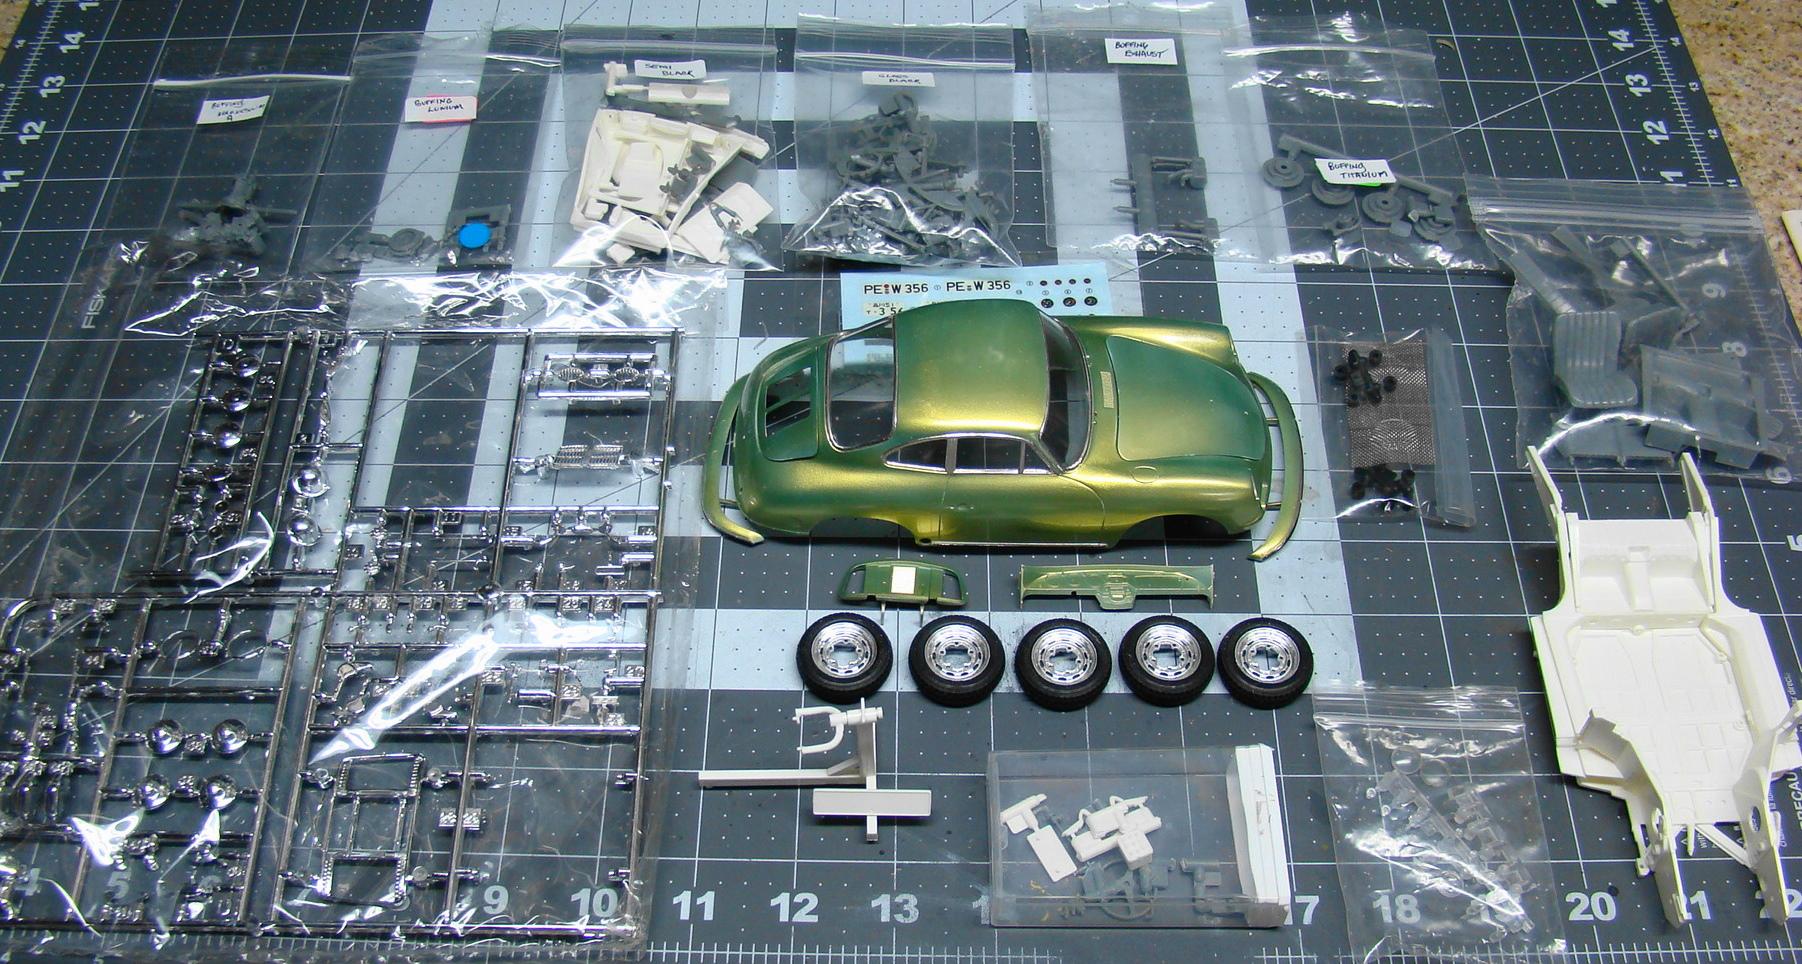
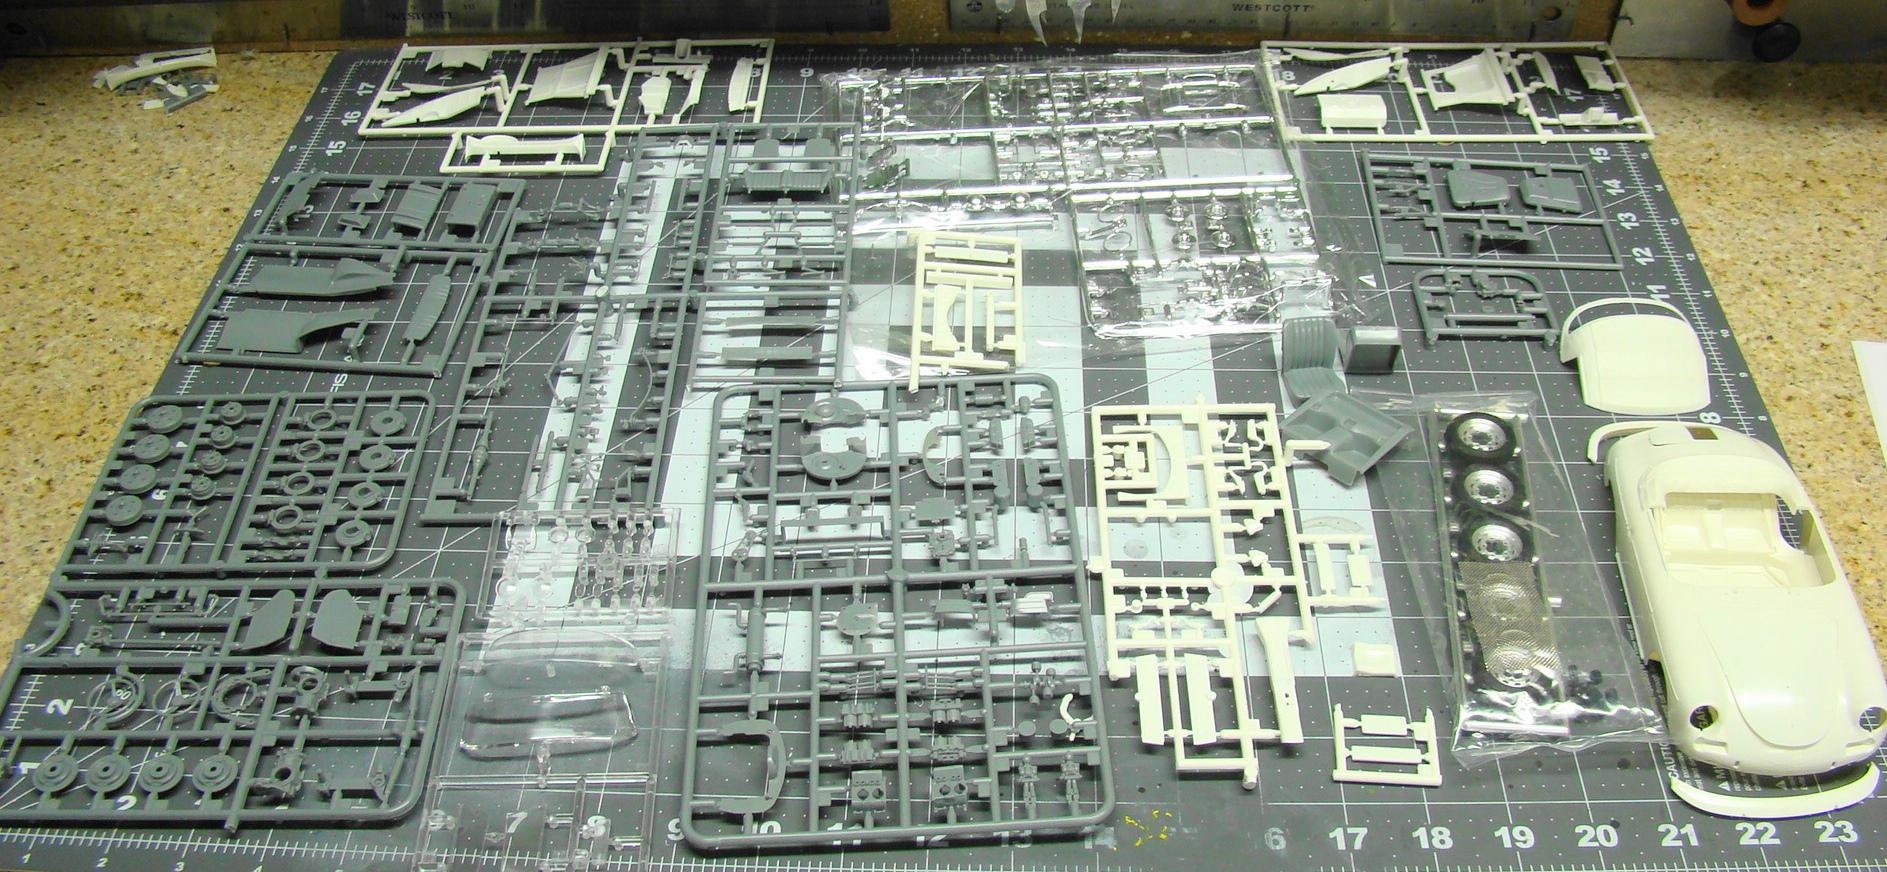
JC....your post has prompted me to dig out my 3 Fujimi 356 kits. They are the#27 356 B/c 2000GS cpe, #28 356 B/C 2000GS roadster, and #29 356 B/C 1600GS roadster. My approach to these kits is a little different and hopefully it will add to your wonderful WIP. I will be using some of your mods as they make sense but am only going so far with these kits as I don't want to step on your post. Explanation below both pictures. This is the Porsche 356 B/C 200GS coupe. Body was painted with nail polish in 2006 then foiled and polished . I recently de-sprued all the parts and sorted them into painting bags. The identifying numbers were left on for obvious reasons but also as something to hold onto while spraying. This process does two things. It helps to aquaint me with the assembly (some sub-assembly done) and stops a lot of the delicate parts from being broken on the sprue. And they are v-e-r-y delicate. I rarely lose parts. All of the parts still have to be cleaned before painting. That is also delicate work and will have to wait until my left hand heals from a bicycle accident. This is what you are up against with this kit. This one is the #29 Porsche 356 B/C 1600GS roadster. AS yet untouched. Amazing how much room there is in the box after you de-sprue everything and sort it. A lot less intimidating. There are some subtle differences between the 2000GS and the 1600GS. Mostly in the engine and body work. Several of the sprues are the same. There are lots of extra parts to do both the B and C versions. And some extra wheels that will find their way onto my Jimmy Flintsone spyder.
-
Will follow this one. Just picked mine up and gave it a good grok. Really like this one even if the doors don't open. Mine will be an orangish, brown , pearlescent. Still playing with the colors.
-
Ford J Car Le Mans April Trials
Rich Chernosky replied to Gramps46's topic in Other Racing: Road Racing, Salt Flat Racers
Gary....a very nice model of an iconic race car. All the little modifications really paid off. Enjoyed the WIP too. Great job. -
Porsche 908/2 1970 LeMans
Rich Chernosky replied to Rich Chernosky's topic in Other Racing: Road Racing, Salt Flat Racers
Dave....considering what you start with in resin and the beautiful models you turn out.....if you were to tackle an MFH kit I think you would breeze right through it. -
Tamiya 1/12 FW14B
Rich Chernosky replied to primabaleron's topic in Other Racing: Road Racing, Salt Flat Racers
This is truly a work of art. So much intricate work. A real marvel. Congratulations on a superb build Tomasz. Probably one of the finest and most detailed models I have ever seen. -
Jason....followed your WIP.....this really turned out spectacular. Even though I am a kinda red Ferrari guy...I really like this color on this model. Great job.
-
Very nice Mario. Looks good in that setting . I see you conquered the red surround on the headlights. Did you use the decal or something else. That was the hardest part of the kit in my opine.
-
I'm with Gary, Those wire wheels.....ooohh!. Once you get all the flash off scrub as much as you can with scouring powder then prime. If you use a grinder on any parts wear a mask....the dust is a lung irritant. Epoxy and super glues are the only thing that will hold parts together. Resin works pretty easily so pinning and drilling of small parts is also recommended. FPP kits can be turned into real masterpieces. Good luck with it.
-
Superb build, well worth the effort. Great job Peter.
-
Porsche 356
Rich Chernosky replied to afx's topic in WIP: Other Racing: Road Racing, Land Speed Racers
I have a couple of these kits in various forms of completion. Looking forward to seeing one of these done. -
Red Bull RB8 Formula One
Rich Chernosky replied to Rich Chernosky's topic in Other Racing: Road Racing, Salt Flat Racers
Bruce...yes I did get a kick out of this. 1/7 scale is a little unusual isn't it. Was this a kit or scratch built. This is huge. I have two 1/8 models (Pochers) and they had to have separate display case made for them. -
Decals wrinkled - can they be saved?
Rich Chernosky replied to atomicholiday's topic in Model Building Questions and Answers
Jeremy...there are always several solutions. If you really want a black stripe there that can easily be replicated with vinyl tape. Lay the tape on a piece of glass and cut it to size with a sharp blade and metal straight edge. It will have to be done in three pieces. Cut it as many times as needed to get it to look right. Once ( try not to stretch the tape) applied and you are satisfied give it a coat of Tamiay x-22 to hold it in place. I have done this many many times. -
Tamiya 2016 Mercedes-AMG GT3
Rich Chernosky replied to Jim B's topic in Other Racing: Road Racing, Salt Flat Racers
Jim...not sure how I missed this. Great job on this. The tire decals was a nice choice. Tamiya kits area dream to build...I agree. Yah...you should do another one. The second one always goes better than the first. -
Bruce...having done both the coupe and convertible I can really appreciate the work you put into this. Luv the color..it really suits this model and the interior and engine are just as sharp. Congrats on a job well done.