Rich Chernosky
-
Posts
2,103 -
Joined
-
Last visited
Content Type
Profiles
Forums
Events
Gallery
Everything posted by Rich Chernosky
-
Two Ford GT40's
Rich Chernosky replied to Rich Chernosky's topic in Other Racing: Road Racing, Salt Flat Racers
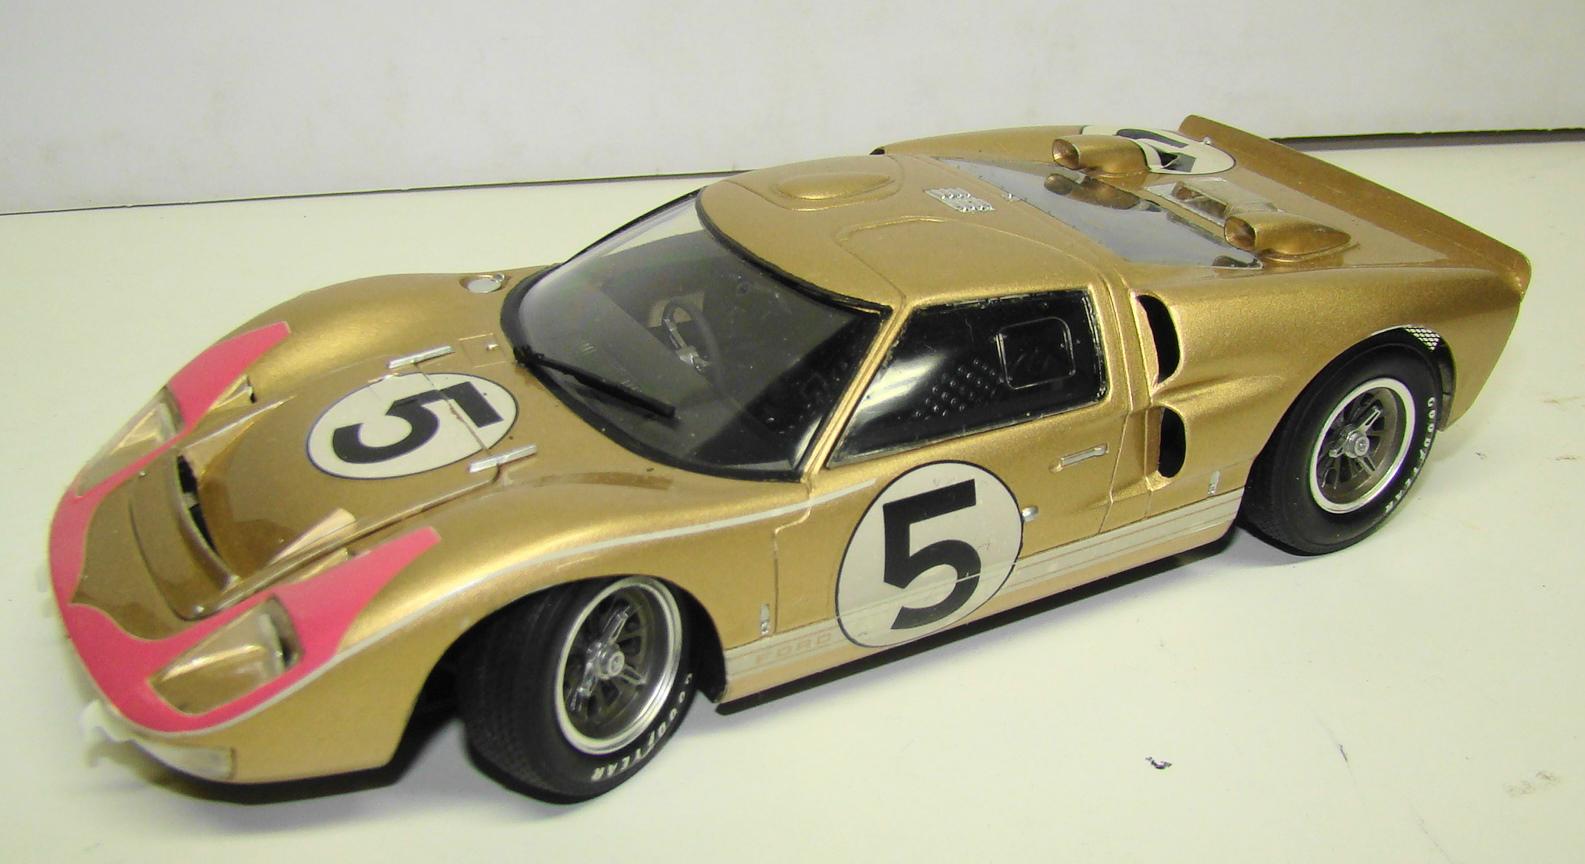
Josh...oh my..that is a beauty. I see a lot of differences between my model and this car in its current state. But race cars change over time. That is their nature. We as modelers have to decide which version we want to do. The decision is often subjective. Do we want to do a model car and build it to suit our taste or do we want a scale replica and build it to certain specifications. In my case I must have looked at 100's of photo's (all different) and finally decided on a gold "I" liked. I painted mine 4 times before I was happy. That pin stripe around the graphics can be replicated with vinyl tape cut down thin by the way. Would be impossible to paint on. -
Two Ford GT40's
Rich Chernosky replied to Rich Chernosky's topic in Other Racing: Road Racing, Salt Flat Racers
Josh....that's lookin real good. Should be a great model when done. Here is mine for comparison. It was done about 6-7yrs ago.
-
Two Ford GT40's
Rich Chernosky replied to Rich Chernosky's topic in Other Racing: Road Racing, Salt Flat Racers
Hi Josh...thanks for bringing this post to the front page. It got a lot of attention the first time I put it up. I use the india ink trick a lot. Get the kind that is water soluable when dry, that way you can wipe away excess anytime you want. I use it a lot for panel lines. A cheap nib pen is all you need and a steady hand. I have done the gold car and if I remember I spent a lot of time custom mixing that gold until I was happy. I may still have the formula somewhere if you are interested. I airbrushed mine. -
Revell Cobra 1/24
Rich Chernosky replied to Venom's topic in Other Racing: Road Racing, Salt Flat Racers
Excellent job, interior is top notch. Especially the steering wheel. -
Very nice build, this caught my eye. I used own a real one, road version of course.
-
Ferrari 275 GTS4 NART Spider 1/24 Italeri
Rich Chernosky replied to fazmodeller's topic in Model Cars
Gorgeous model, luv the wheels. -
I have recently sprayed several models with no problems. I don't use primer. First couple coats are sprayed at hi pressure and low nozzle. Let it dry at least 10min in between coats and once you have a fairly solid color you can lower the pressure and open the nozzle. The final two coats are wet. Splash does not dry to a very hi shine and often it looks like there are imperfections in the paint. 2K clear is the recommended clear coat and any imperfections in the paint disappear once the clear is applied.
-
Tamiya 1/20th Lotus 25
Rich Chernosky replied to Justin Porter's topic in WIP: Other Racing: Road Racing, Land Speed Racers
Turned out great Justin...you did a superb job. -
Ford GT40 GT/109
Rich Chernosky replied to Dave B's topic in Other Racing: Road Racing, Salt Flat Racers
Dave, I think this looks great. Great conversion work. I did something similar to this awhile back. Mine was the Targa Florio car. -
Porsche 956
Rich Chernosky replied to Ensis Ferrae's topic in Other Racing: Road Racing, Salt Flat Racers
Very nice job, who made the decal set. -
Martini Porsche 911GT3R
Rich Chernosky replied to Rich Chernosky's topic in Other Racing: Road Racing, Salt Flat Racers
Bruce...nope those came with the kit and were finished in satin. . Thanks for the compliment. -
Nice model, a good attention to detail. Liked the history...it was a nice touch.
-
Glad this re-surfaced. Beautiful build Dann. Ferrari's are my favorite and this one ranks right up there..... Yuda Mann
-
Great project Kurt. I remember seeing these in the auto magazines but never read the articles. I always thought they had a Lambo engine. Now it makes sense, since at the time Chrysler owned Lamborghini. The hellcat engine is a great choice and looks awesome, but if it were me I would go for a Lambo V-12...jus sayin'......<G>
-
Dave, Aoshima/Beemax are big into aircraft and have recently gotten into cars. What they have done is excellent and just below Tamiya as far as quality is concerned. What I really like about them are the PE kits they provide as alternatives to stock out of box builds. Etiher way they are a joy to build and make handsome additions to a collections. I am starting to see more of them on this forum.
-
Martini Porsche 911GT3R
Rich Chernosky replied to Rich Chernosky's topic in Other Racing: Road Racing, Salt Flat Racers
Thanks...I have always felt doing decals was an artform all to itself. Appreciate the compliment -
Matt...this is a wonderful kit to build and you are off to a great start. I see I am not the only one to use alligator clips mounted on sticks to hold and spray parts.
-
Martini Porsche 911GT3R
Rich Chernosky replied to Rich Chernosky's topic in Other Racing: Road Racing, Salt Flat Racers
I have 40+ models in my collection with the Martini livery....so you might say... I have some experience. Thanks for the kind words BTW -
Martini Porsche 911GT3R
Rich Chernosky replied to Rich Chernosky's topic in Other Racing: Road Racing, Salt Flat Racers
Thanks Dave, the Shadow is not far from my mind. But Martini cars are my favorite and when i get one they usually take precedence. -
It sure was....thanks for the compliment Thanks Thanks Yah it is..its a cool car Thanks for the compliment...and I agree with you
-
Martini Porsche 911GT3R
Rich Chernosky replied to Rich Chernosky's topic in Other Racing: Road Racing, Salt Flat Racers
Martini is my favorite, got a whole collection of em. -
Martini Porsche 911GT3R
Rich Chernosky replied to Rich Chernosky's topic in Other Racing: Road Racing, Salt Flat Racers
Thanks JC -
Martini Porsche 911GT3R
Rich Chernosky replied to Rich Chernosky's topic in Other Racing: Road Racing, Salt Flat Racers
Thanks Kurt, appreciate it -
Martini Porsche 911GT3R
Rich Chernosky replied to Rich Chernosky's topic in Other Racing: Road Racing, Salt Flat Racers
Thanks Brett, hope you get to see this in person. -
Martini Porsche 911GT3R
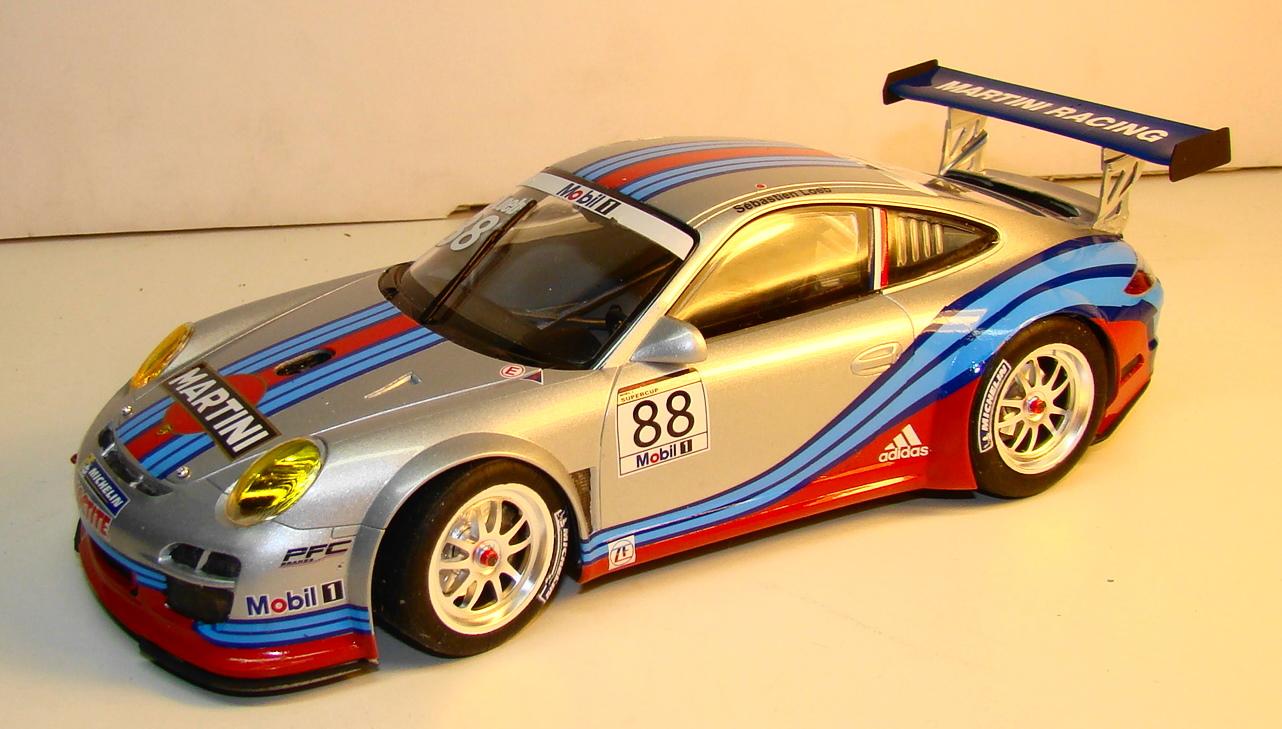
Rich Chernosky posted a topic in Other Racing: Road Racing, Salt Flat Racers
This is a Fujimi Porsche 911GT3R. This is the car Sebastion Loeb (the rally driver) drove in the Porsche Carrera Cup in 2013. Decals are from Studio 27 . The red had to be carefully matched to the decals and the sides are all painted on. The wing was matched to the darker blue. Overall this was a nice kit to do despite some of the fussy details. And it goes in quite nicely with my extensive Martini collection. One of the fussiest details was painting the clear red and blue on the center caps of the wheels. Those decals are 5 seperate pieces per side and didn't go on without a fight. Some Future varnish help hide a lot of the tiny wrinkles. The wheels steer in the kit but they fit in the wheel wells so tight, that they barely steer. Tires and brakes were nice.