Bills72sj
-
Posts
4,582 -
Joined
-
Last visited
Content Type
Profiles
Forums
Events
Gallery
Everything posted by Bills72sj
-
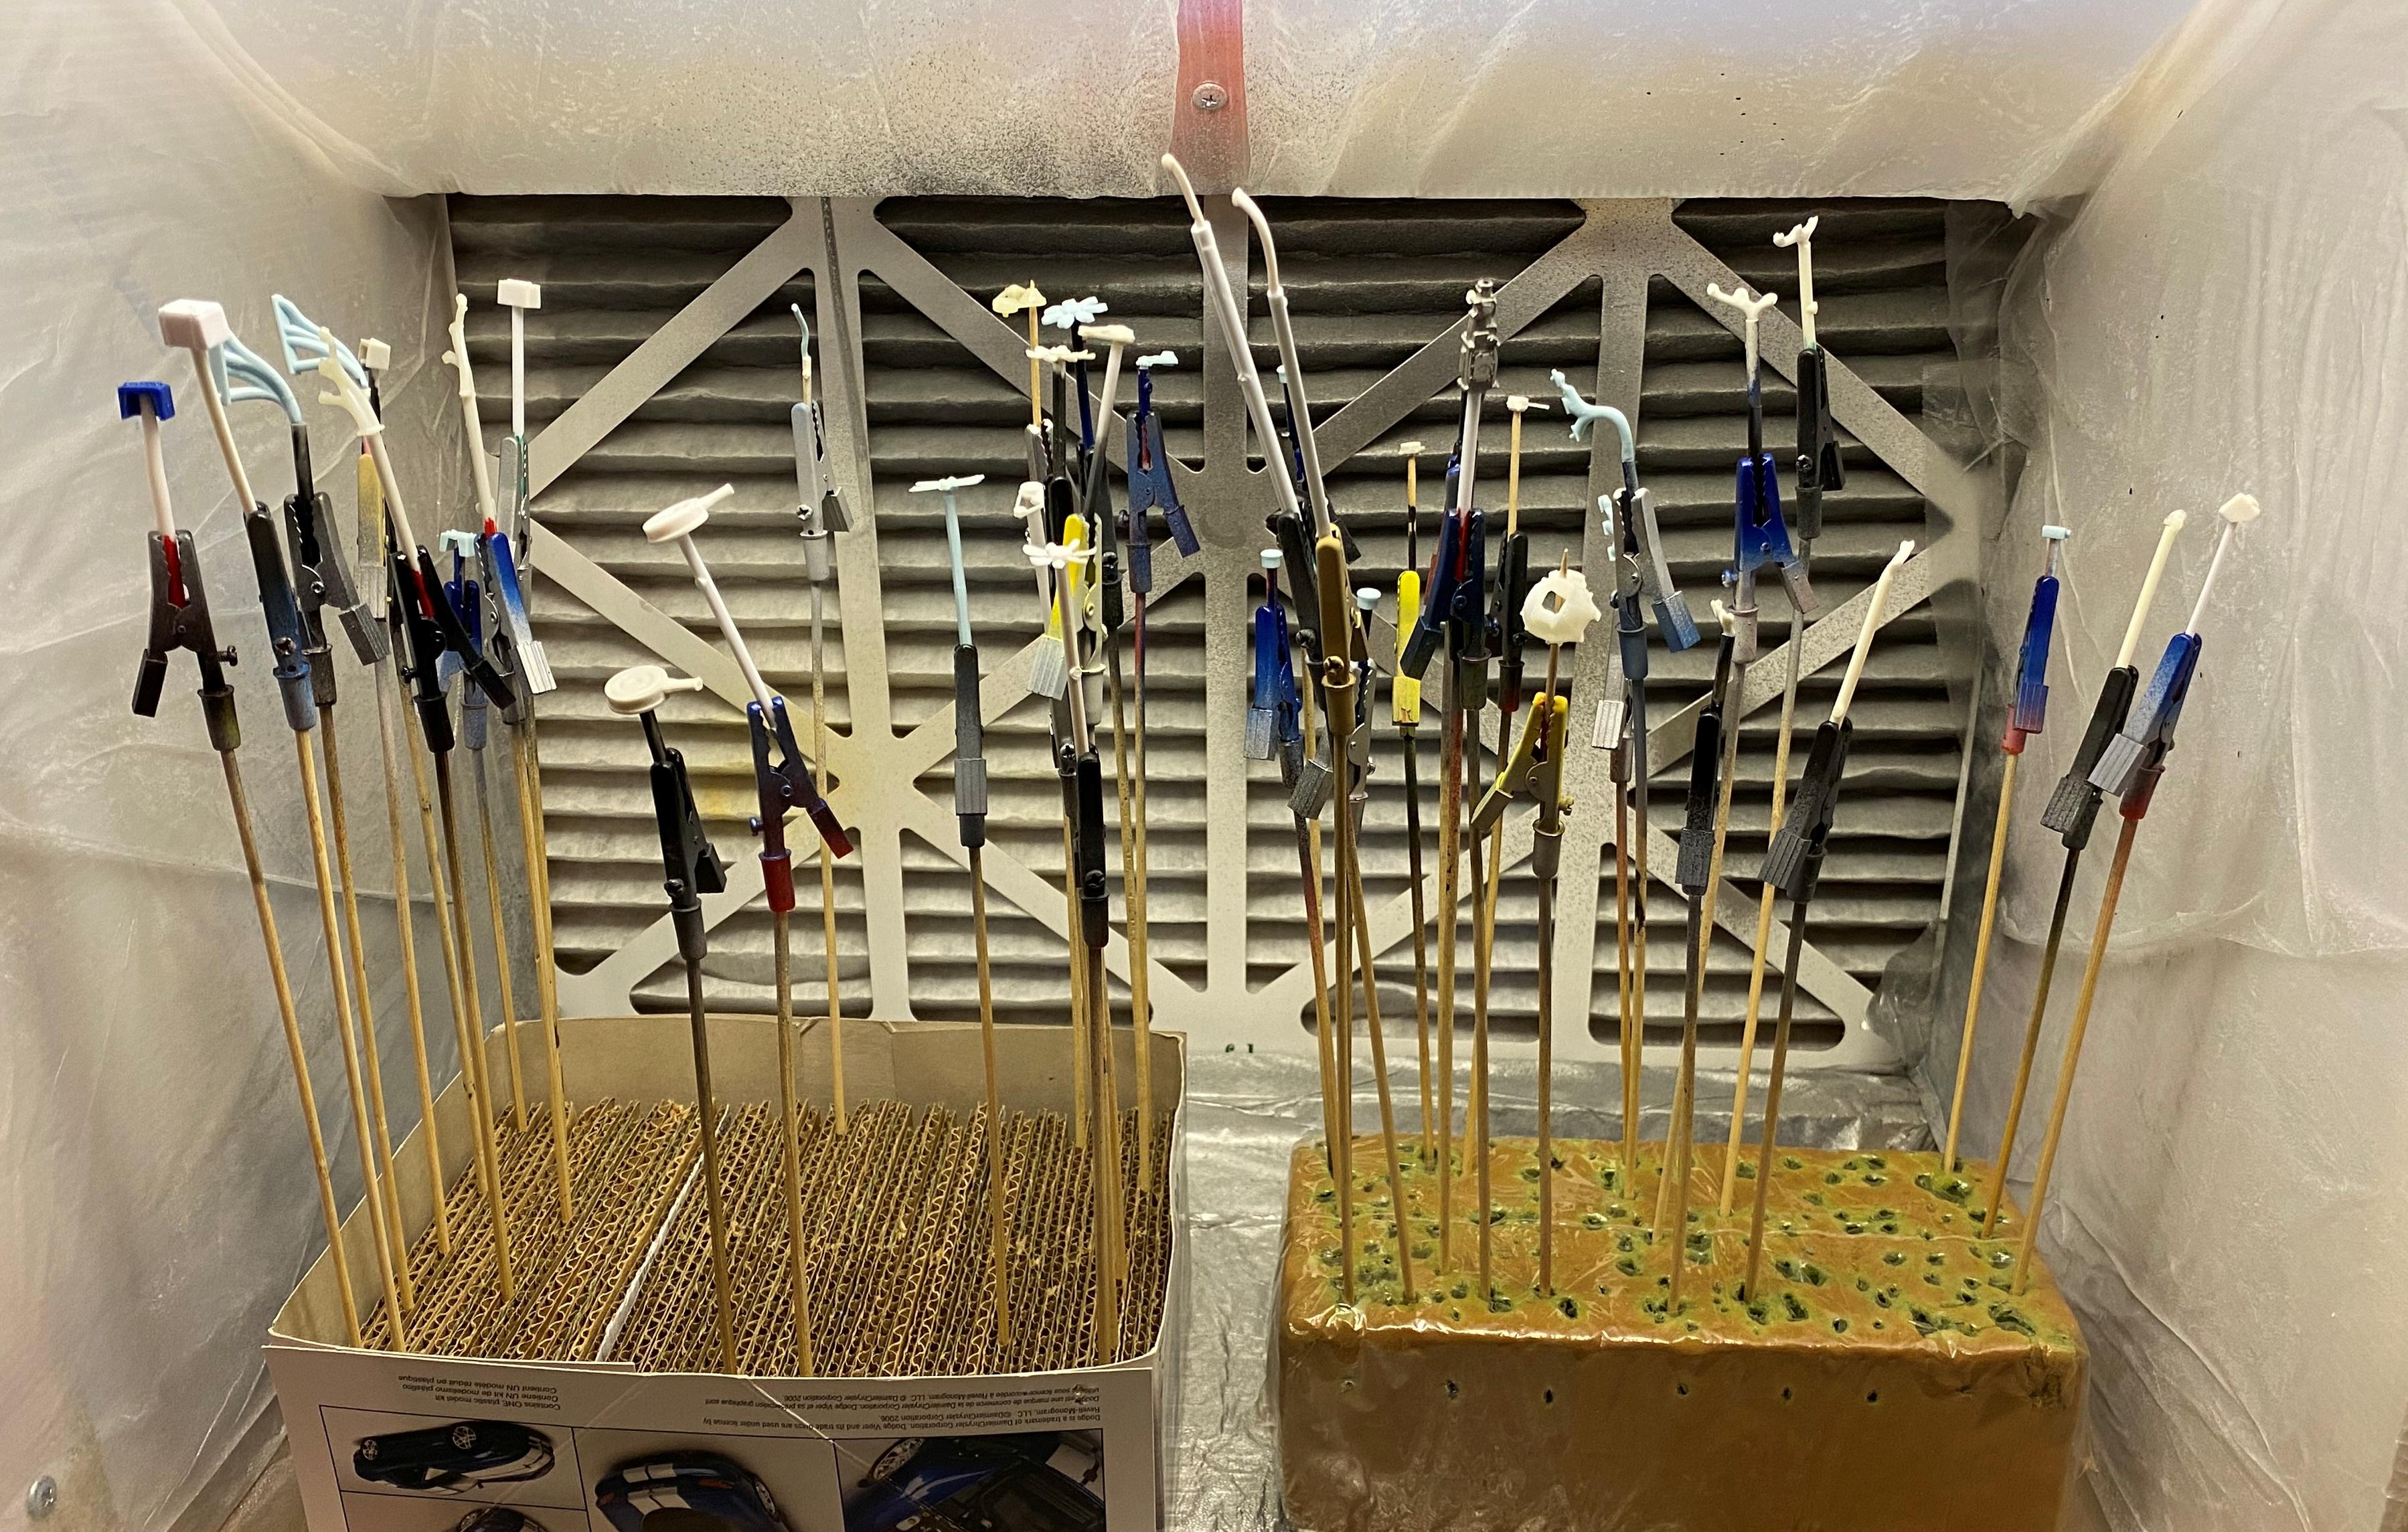
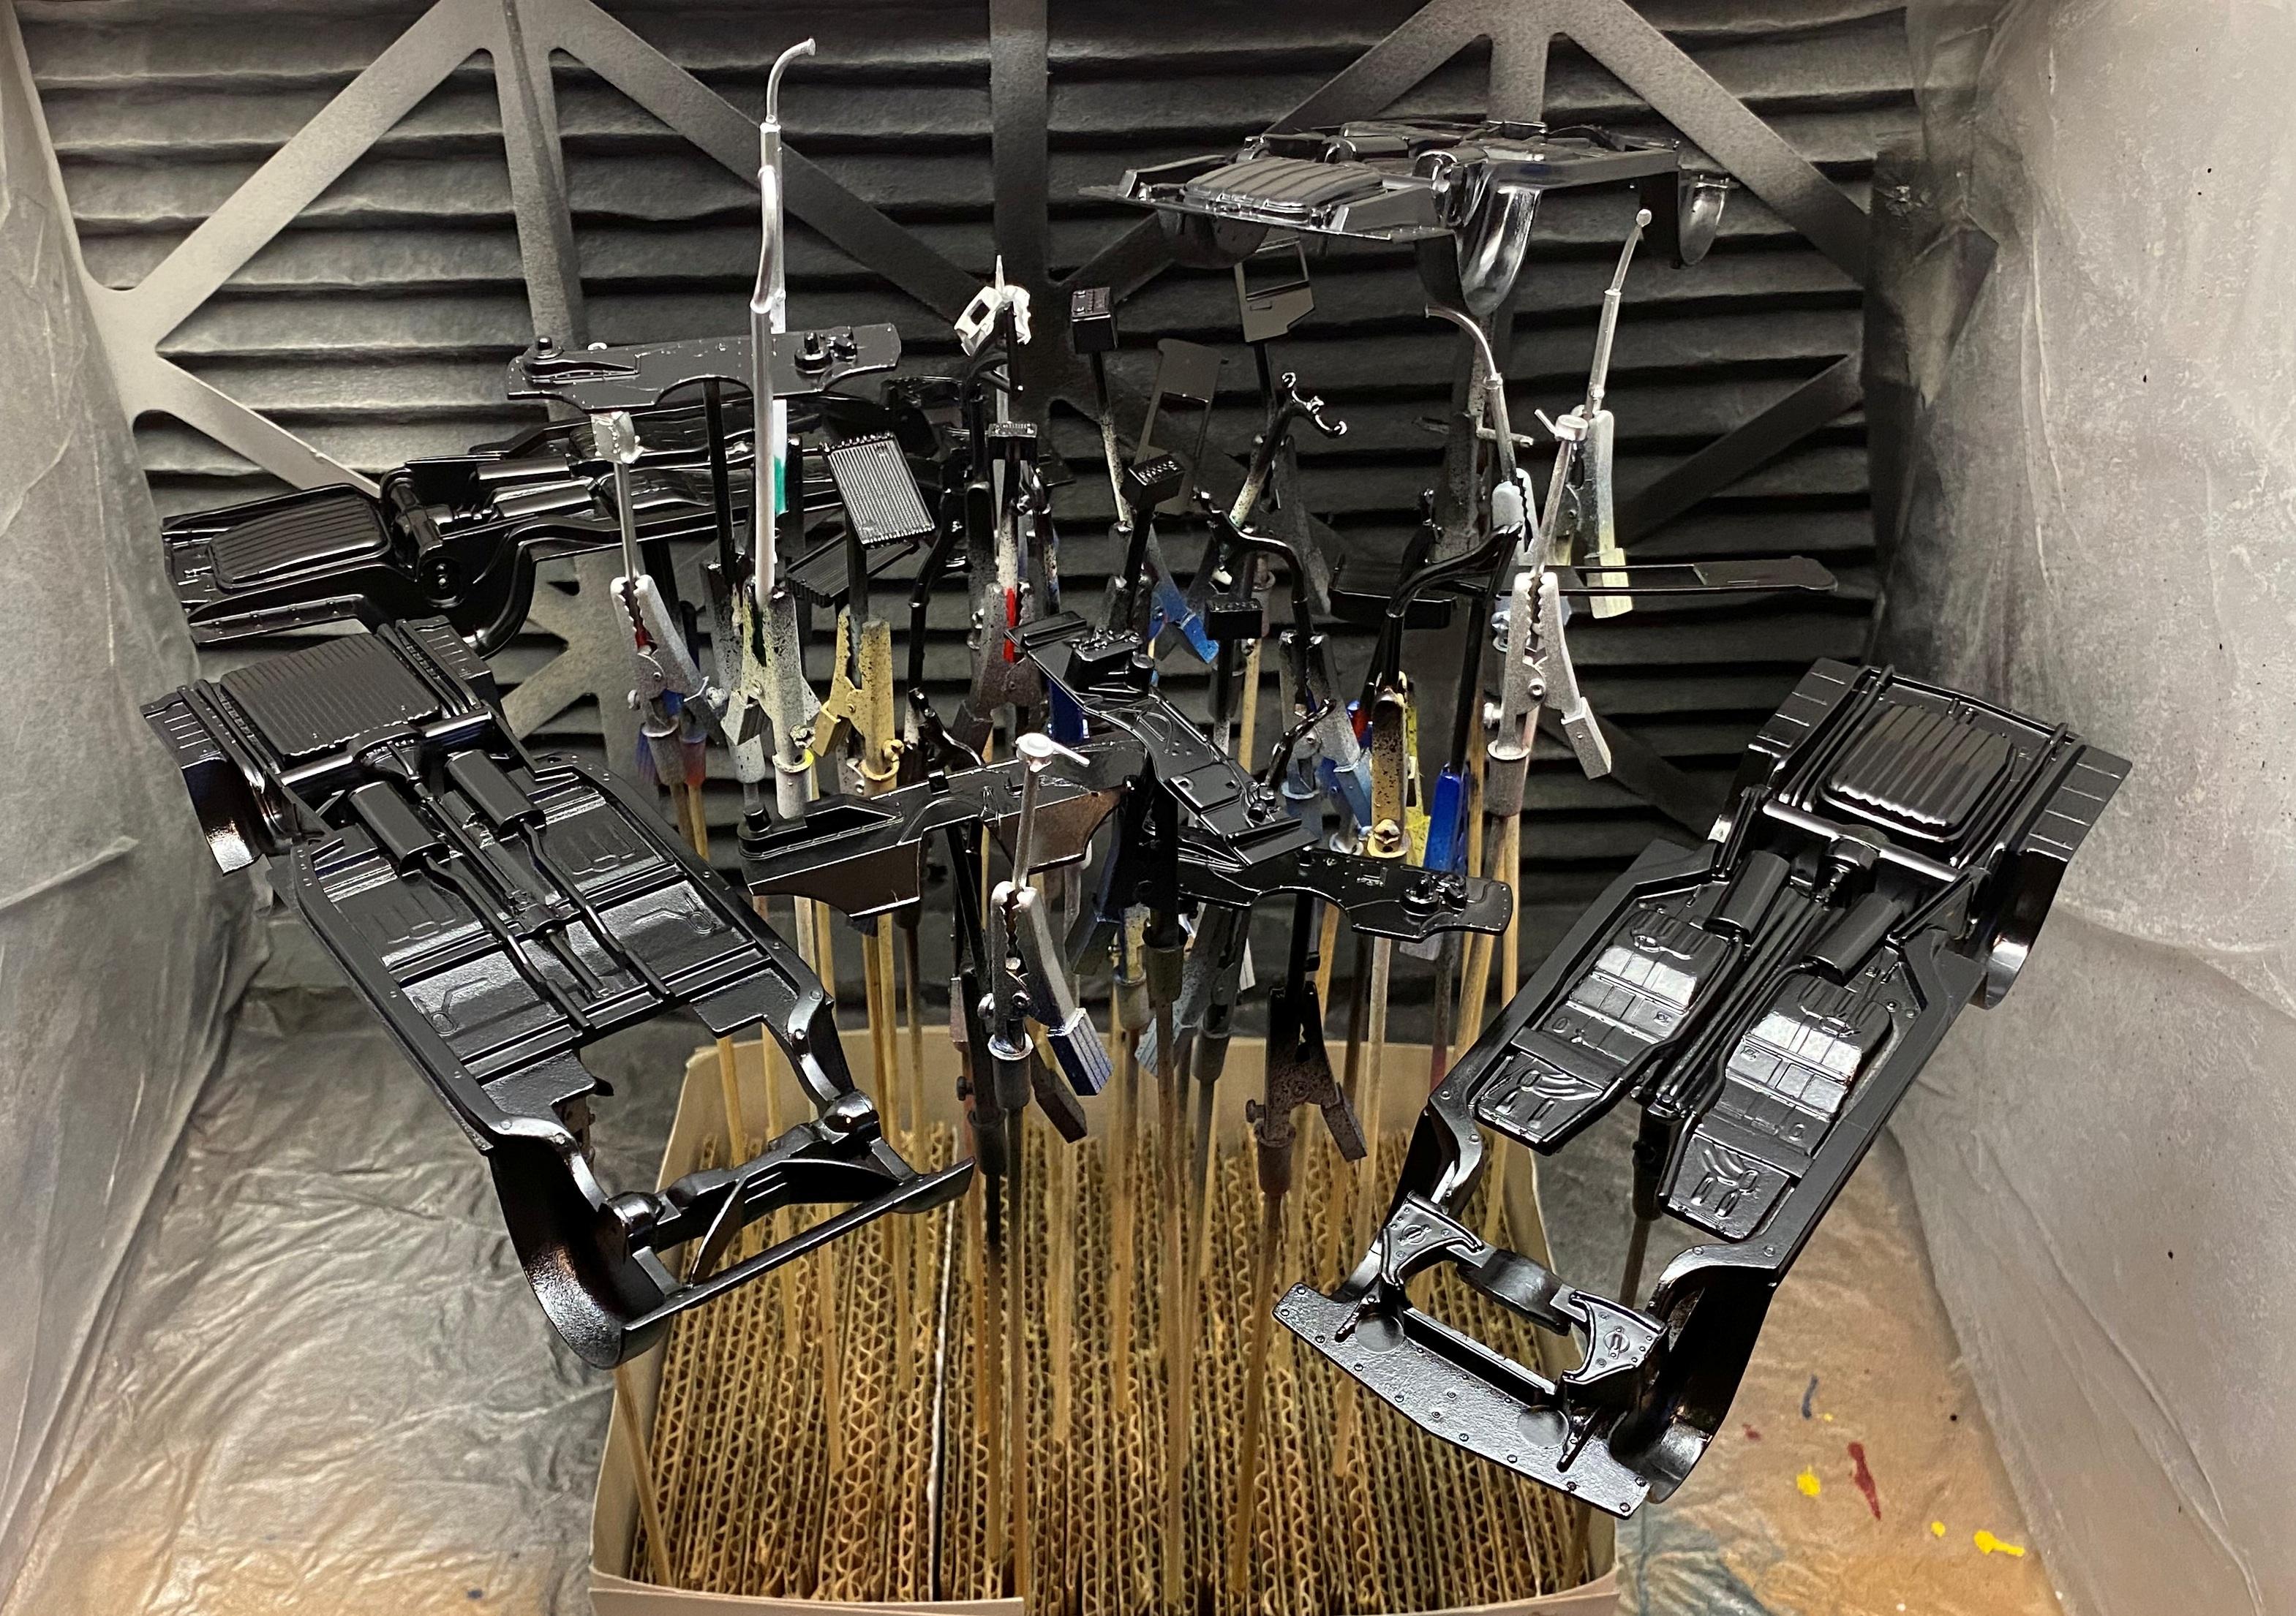
I got he privilege of painting today. Chassis and may engine bits painted satin black. Four engines painted in their correct year color. Got some primer on the hoods and beaks. Looking forward to body color, hopefully tomorrow.

-

Kenworth K100 Aerodyne
Bills72sj replied to TruckerAL's topic in Model Trucks: Big Rigs and Heavy Equipment
Very nice. Thanks for sharing the interior before it got hidden. Did you extend the frame? I like the two hole Budd wheels too. Is it me or is the front bumper a bit low? Nice touch with the curly cues. -
My sister took all the transparency slides that my Grandpa took starting in 1962 forward. I found these little gems while perusing the library.
-
Did you build it this year?
-
Been making more progress on all four of them. Dechromed the last of the engine bits that needed it and sprue-mounted all the little parts in anticipation of painting.
-
Never Say Never about old kits. "New Era Modeling"
Bills72sj replied to stavanzer's topic in Car Kit News & Reviews
I have some food for thought on files and the effort required to make one then get compensated for it. If you create a file and KEEP it, then make prints and sell those, your exclusivity can help you profit off of your design efforts. The OEMs lawyers may come after you for copyright infingement for their original design. If you create a file and then sell or permit downloads of the file, eventually someone one will sell the file to others for their own profit. Sooner or later, it will be free to find and anyone will be able to print it. This why model manufacturers will probably not pay the licensing fees to the OEMs just to have the file copied for free. I would be kind of like "free" music downloads available on the internet. This definitely not an area where involving the government to regulate such files would work out for anyone. If you create a file and open source share it, you profit not but, you may build a reputation for making new files on request as contracted work. -
Years ago, I would drive 45 minutes to work and paint in our unoccupied work shop because it was big and heated.
-
-
Paint sticker shock
Bills72sj replied to junkyardjeff's topic in General Automotive Talk (Trucks and Cars)
Little bottles of Testors paint is what I have gone to as well. You can still get them in bulk from ebay for $2.50 to $3.50 average per bottle. One 1/2 oz bottle mixed with 1/2 oz of hardware store lacquer thinner can airbrush an entire body no problem. Sprayed correctly it lays down like glass. Since it is enamel, when it is cured it is pretty tough. The metallics are gorgeous, especially Stop Light Red. If you have enough colors, you can mix your own brew to get the color you want. Warning to those of you with Testors Extreme Lacquer in rattle cans. I have caught 3 of them weeping clear blobs from the side seams. Break them out and shoot them while you still can. -
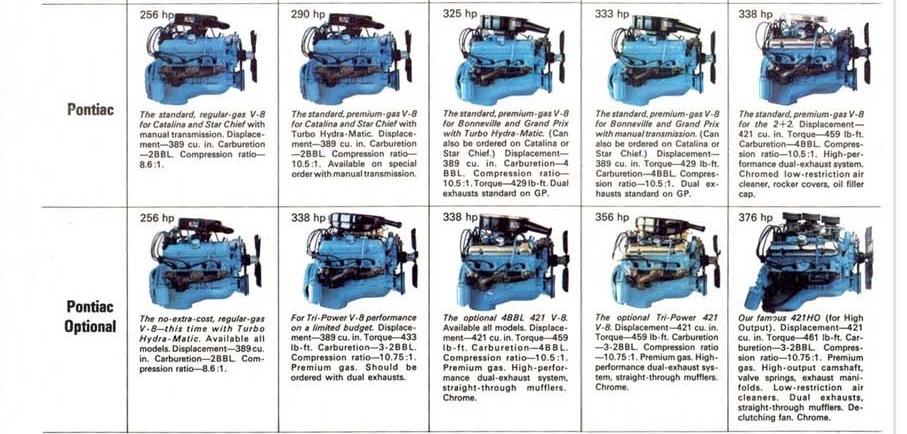
No pics but I made a lot of progress on these over the weekend. Deflashed all four chassis and did the same for all four of the engine's ancillaries. Determined that I have enough parts to do four 421 Tri-power engines. Two in the 356HP version and two in the 376HP version based on my supply of exhaust manifolds and air cleaners. Started to apply BMF to script lettering to be painted over and then revealed after paint. Finally selected a color for the 65 Bonneville. Boyd's Chezoom Teal Pearl. Surveyed which emblems will or will not need decals made for them. Manipilated some artwork files in the computer and made some test prints on paper to get the sizes correct. I am hoping the spray some paint over Thanksgiving weekend.
-
Very nice set of full size Chevys.
-
Thanks guys for letting me know. I am not sure I want to rob the Riviera kit just yet. I do not have the Wildcat kit.
-
Round2/ AMT '55 Chevy Nomad Wagon Kit Coming in 2023
Bills72sj replied to stavanzer's topic in Car Kit News & Reviews
I will definitely get this one. I did the El Camino version when it came out in 1973. -
Thank you Cliff. It was fun doing all the details. I wish I had space to make it bigger.
-
I missed this the 1st go around apparently. Nice build. That is one of my favorite color combos.
-
Very nice dio/background. I like the people in it. I need to get me some.
-
Those have some serious tread depth. I would not mind having some of those. I have quite a tire collection but have not seen any of those.
-
Masking tape experiment test
Bills72sj replied to 89AKurt's topic in Model Building Questions and Answers
I like Steve's results. I have a vinyl top build in my immediate future. -
Current building techniques
Bills72sj replied to Bobjernigan3's topic in General Automotive Talk (Trucks and Cars)
I am a muscle car and semi-truck guy through and through. Started in the late 60's paused in the mid 70's. Picked up a few kits in the 90's but did not build them. Once I had my own little work shop in 2001, my buying spree started. Kits and shipping were cheap then. I have been averaging 4-5 builds a year. My skill set has improved over the years mostly through getting a vision and seeing it through. Moving to an airbrush was a big step after too many rattle can failures. I love seeing tips and tricks others have done which then motivates me to try some of them out. A few years ago, I bought a mini-lathe for the express purpose of making my own custom aluminum wheel hoops. In the future I would like to have a 3D printer but I just don't have the space. I build for my enjoyment almost exclusively. I have been to a few local shows and win an award or two about half of the time. But that is not why I go. It is to see the builds of others and to share what I have built. Being recognized by your peers is cool but not in anyway a motivating factor. When ever I am building, if a task starts to transition into a chore, I walk away. Many days I do more thinking about a build than actually building. -
If you find that tape somewhere. I would like to know as well. I have used it on two builds and would like more.
-
International CO4070 Car Transporter
Bills72sj replied to dragstueck's topic in Model Trucks: Big Rigs and Heavy Equipment
Thanks for pulling this back out. Way cool rig!. I missed it somehow on the 1st go round. A friend in HS had a Scout with the decal package like the lower level middle vehicle. He hurt it 4-wheeling. I took a day off of work and helped him get back on the road again. -
You appear to be successful in your vision.
-
Italeri Ford LTL9000
Bills72sj replied to TruckerAL's topic in Model Trucks: Big Rigs and Heavy Equipment
Cool rig. Nice customization. -
Most impressive! (and imaginative)
-
That should work. I was to want pin stripes I would create them on my PC then print them on water slide decal paper. The tricky part would be getting the color right. However, with inkjets, gold is not an option.


.jpg.1b37d595ca678e7d37e1e4ecbc00e22c.jpg)
.jpg.b8d14558da55163c1eff8f1eb4a2314a.jpg)
.jpg.40e9cfc2c8a5dcb5a26b5676453745c9.jpg)
.jpg.14a4ece0f4e68748fd1f76cf0b869c32.jpg)
.jpg.cc313aef09b0c5cdf8194e1a2ce7e6d9.jpg)
.jpg.627c96a24e7ed10b46f9babadcc0cf8a.jpg)
.jpg.bc2fd765cfaa793c36b36b2e47216b90.jpg)