AmericanMuscleFan
-
Posts
3,058 -
Joined
-
Last visited
Content Type
Profiles
Forums
Events
Gallery
Everything posted by AmericanMuscleFan
-

64 Dodge D100 Pickup Pro Street
AmericanMuscleFan replied to AmericanMuscleFan's topic in WIP: Drag Racing Models
Thanks for stopping by Joe! Cheers, Francis Thanks Mark! I have this end mill in my toolbox for several years and I don't recall where I bought it but you can find these on eBay or Amazon among others. Cheers, Francis -
Great improvements from the original interior and body so far Steven! It's obvious that you do have a good eye for details sir! I will keep an eye on your progress... that's my kind of work!!! ?
-
WOW!!! Superb customizing work on this '62 Chrysler! The interior is superb and looks like a car that might be shown at SEMA! Nice to see a big block cross ram engine under the hood too! Great work Steeve!!!
-
64 Dodge D100 Pickup Pro Street
AmericanMuscleFan replied to AmericanMuscleFan's topic in WIP: Drag Racing Models
Thahks for the compliment Jim! Everything is done with traditional handwheels (no CNC or computerized tooling). I started by making a drawing of the valve covers on paper and everything started from there. I took me several hours to make the letters contour since the end mill was only 0.015''. Cheers, Francis Thanks again Scott! The next part will be the intake (Tunnel Ram). Take care, Francis -
64 Dodge D100 Pickup Pro Street
AmericanMuscleFan replied to AmericanMuscleFan's topic in WIP: Drag Racing Models
Thanks Dave! As stated I will post pictures of the final product when the anodisation (red) will be done. Take care, Francis -
64 Dodge D100 Pickup Pro Street
AmericanMuscleFan replied to AmericanMuscleFan's topic in WIP: Drag Racing Models
Thanks for the kind comments Mike! I had the same reaction (Huge smile) when I finished the engraving of the HEMI letters! Talking bolts heads, my main source is RB Motion and he is specialized in aluminum bolts (not threaded). Many sizes are available. Here is the web site: http://www.rbmotion.com/ Another source is Model Motorcars Ltd (formerly Scale Hardware). You can find both threaded or simulated brass or stainless steel bolts and nuts. Web site is: https://www.modelmotorcars.com/scalehardware/ The last source is T2M but I think they are discontinued but you still can find some on auction site like eBay. I would be very interested if you can share your own source, I'm always curious to check the other products available! Take care, Francis -
64 Dodge D100 Pickup Pro Street
AmericanMuscleFan replied to AmericanMuscleFan's topic in WIP: Drag Racing Models
Thanks Jason! Take care, Francis Thanks Force (Håkan)! Maybe it's looks like that but it's not! I just have too much respect of Tim work to be in competition with him and he's more an inspiration than a competitor, I think we appreciate the same kind of detailling! Take care, Francis -
64 Dodge D100 Pickup Pro Street
AmericanMuscleFan replied to AmericanMuscleFan's topic in WIP: Drag Racing Models
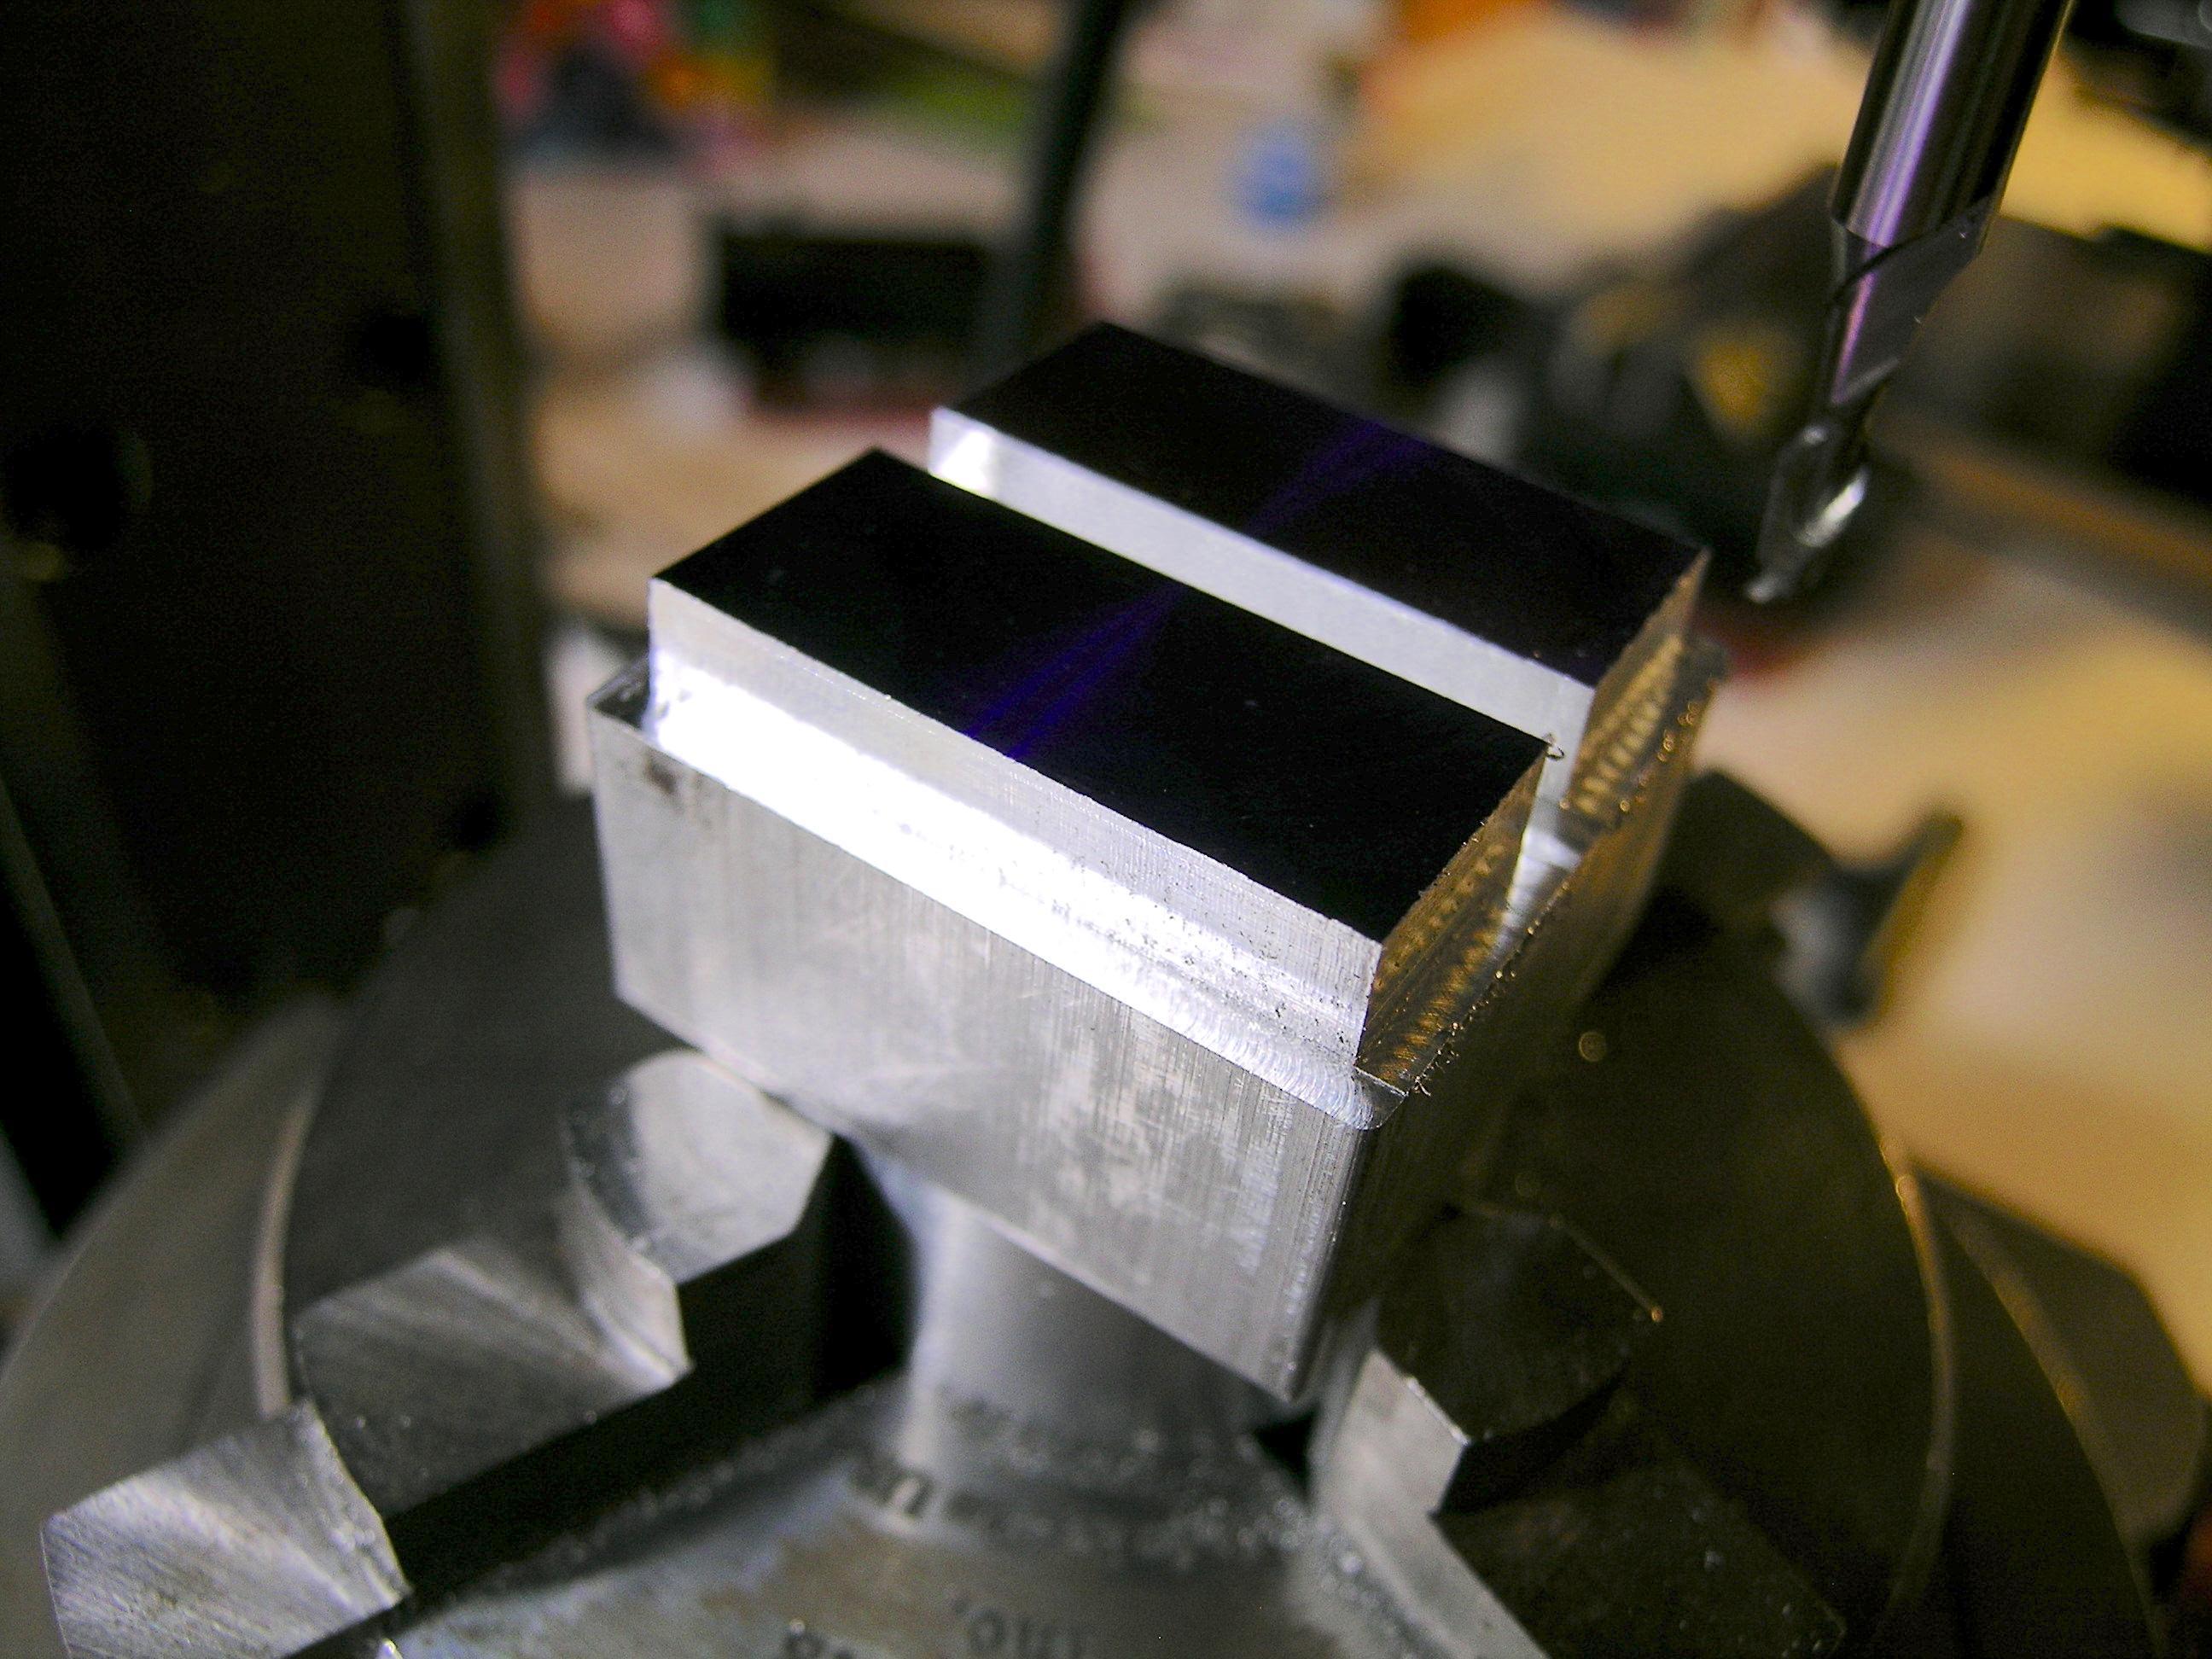
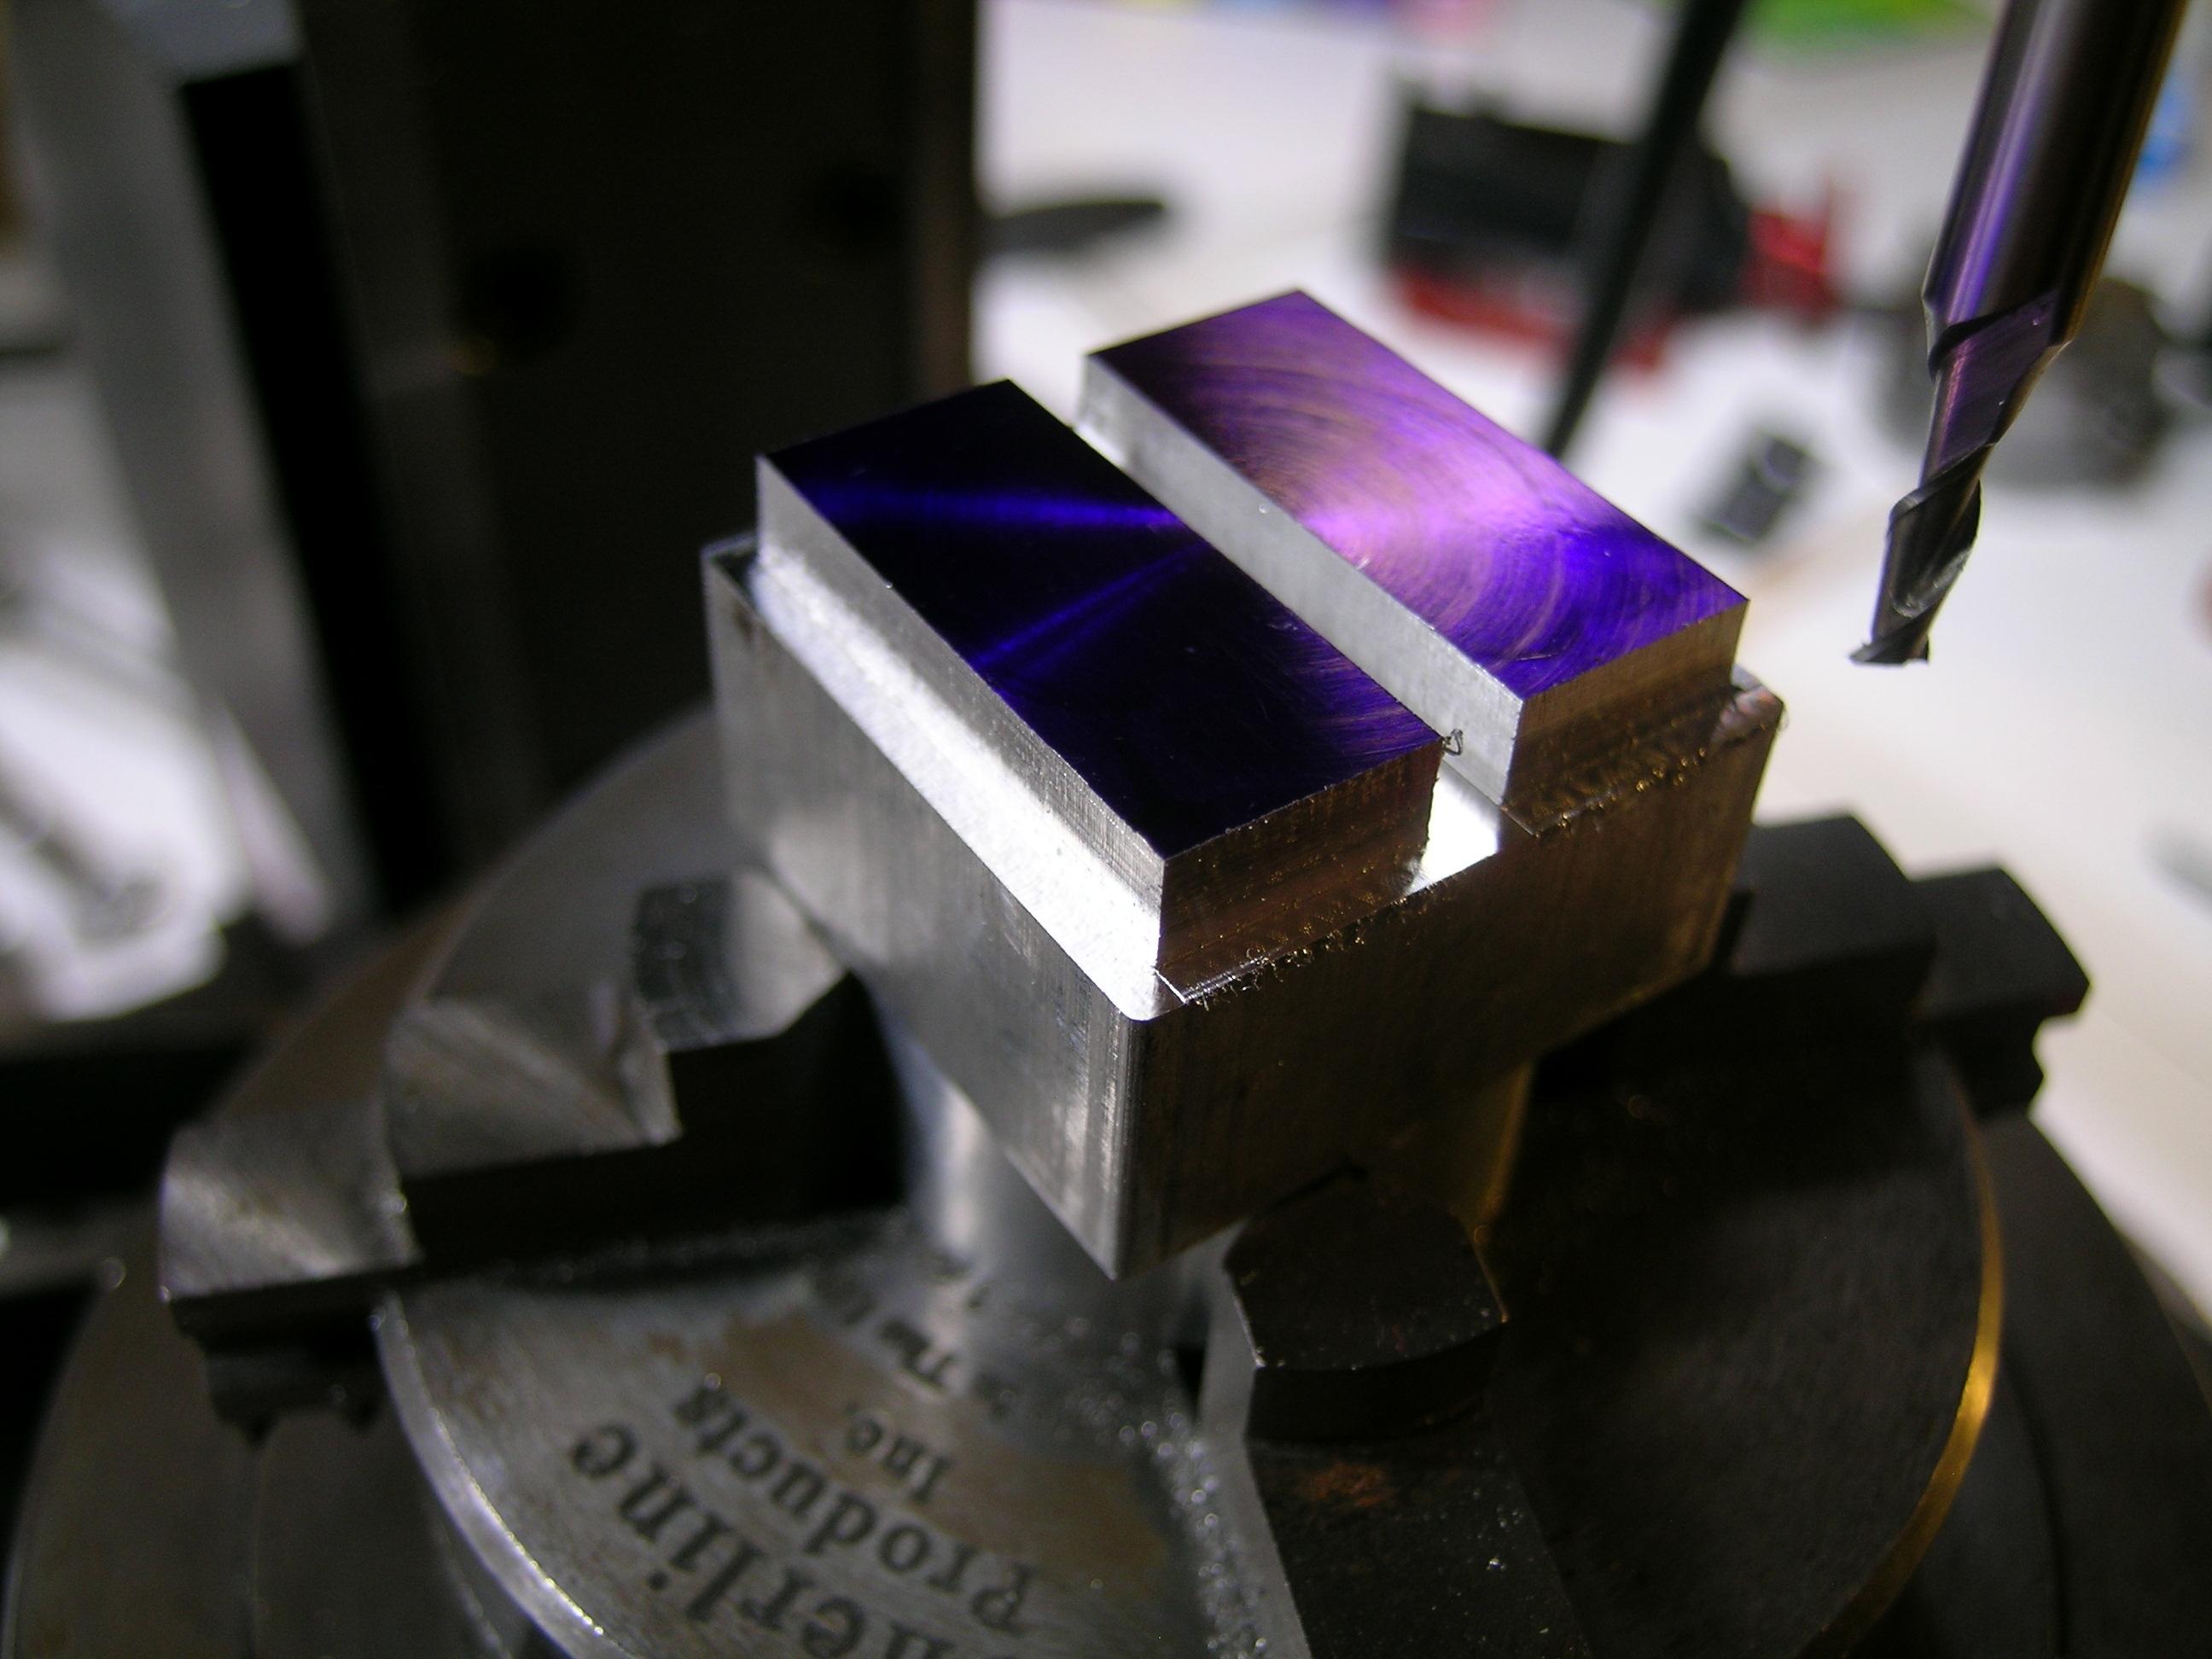
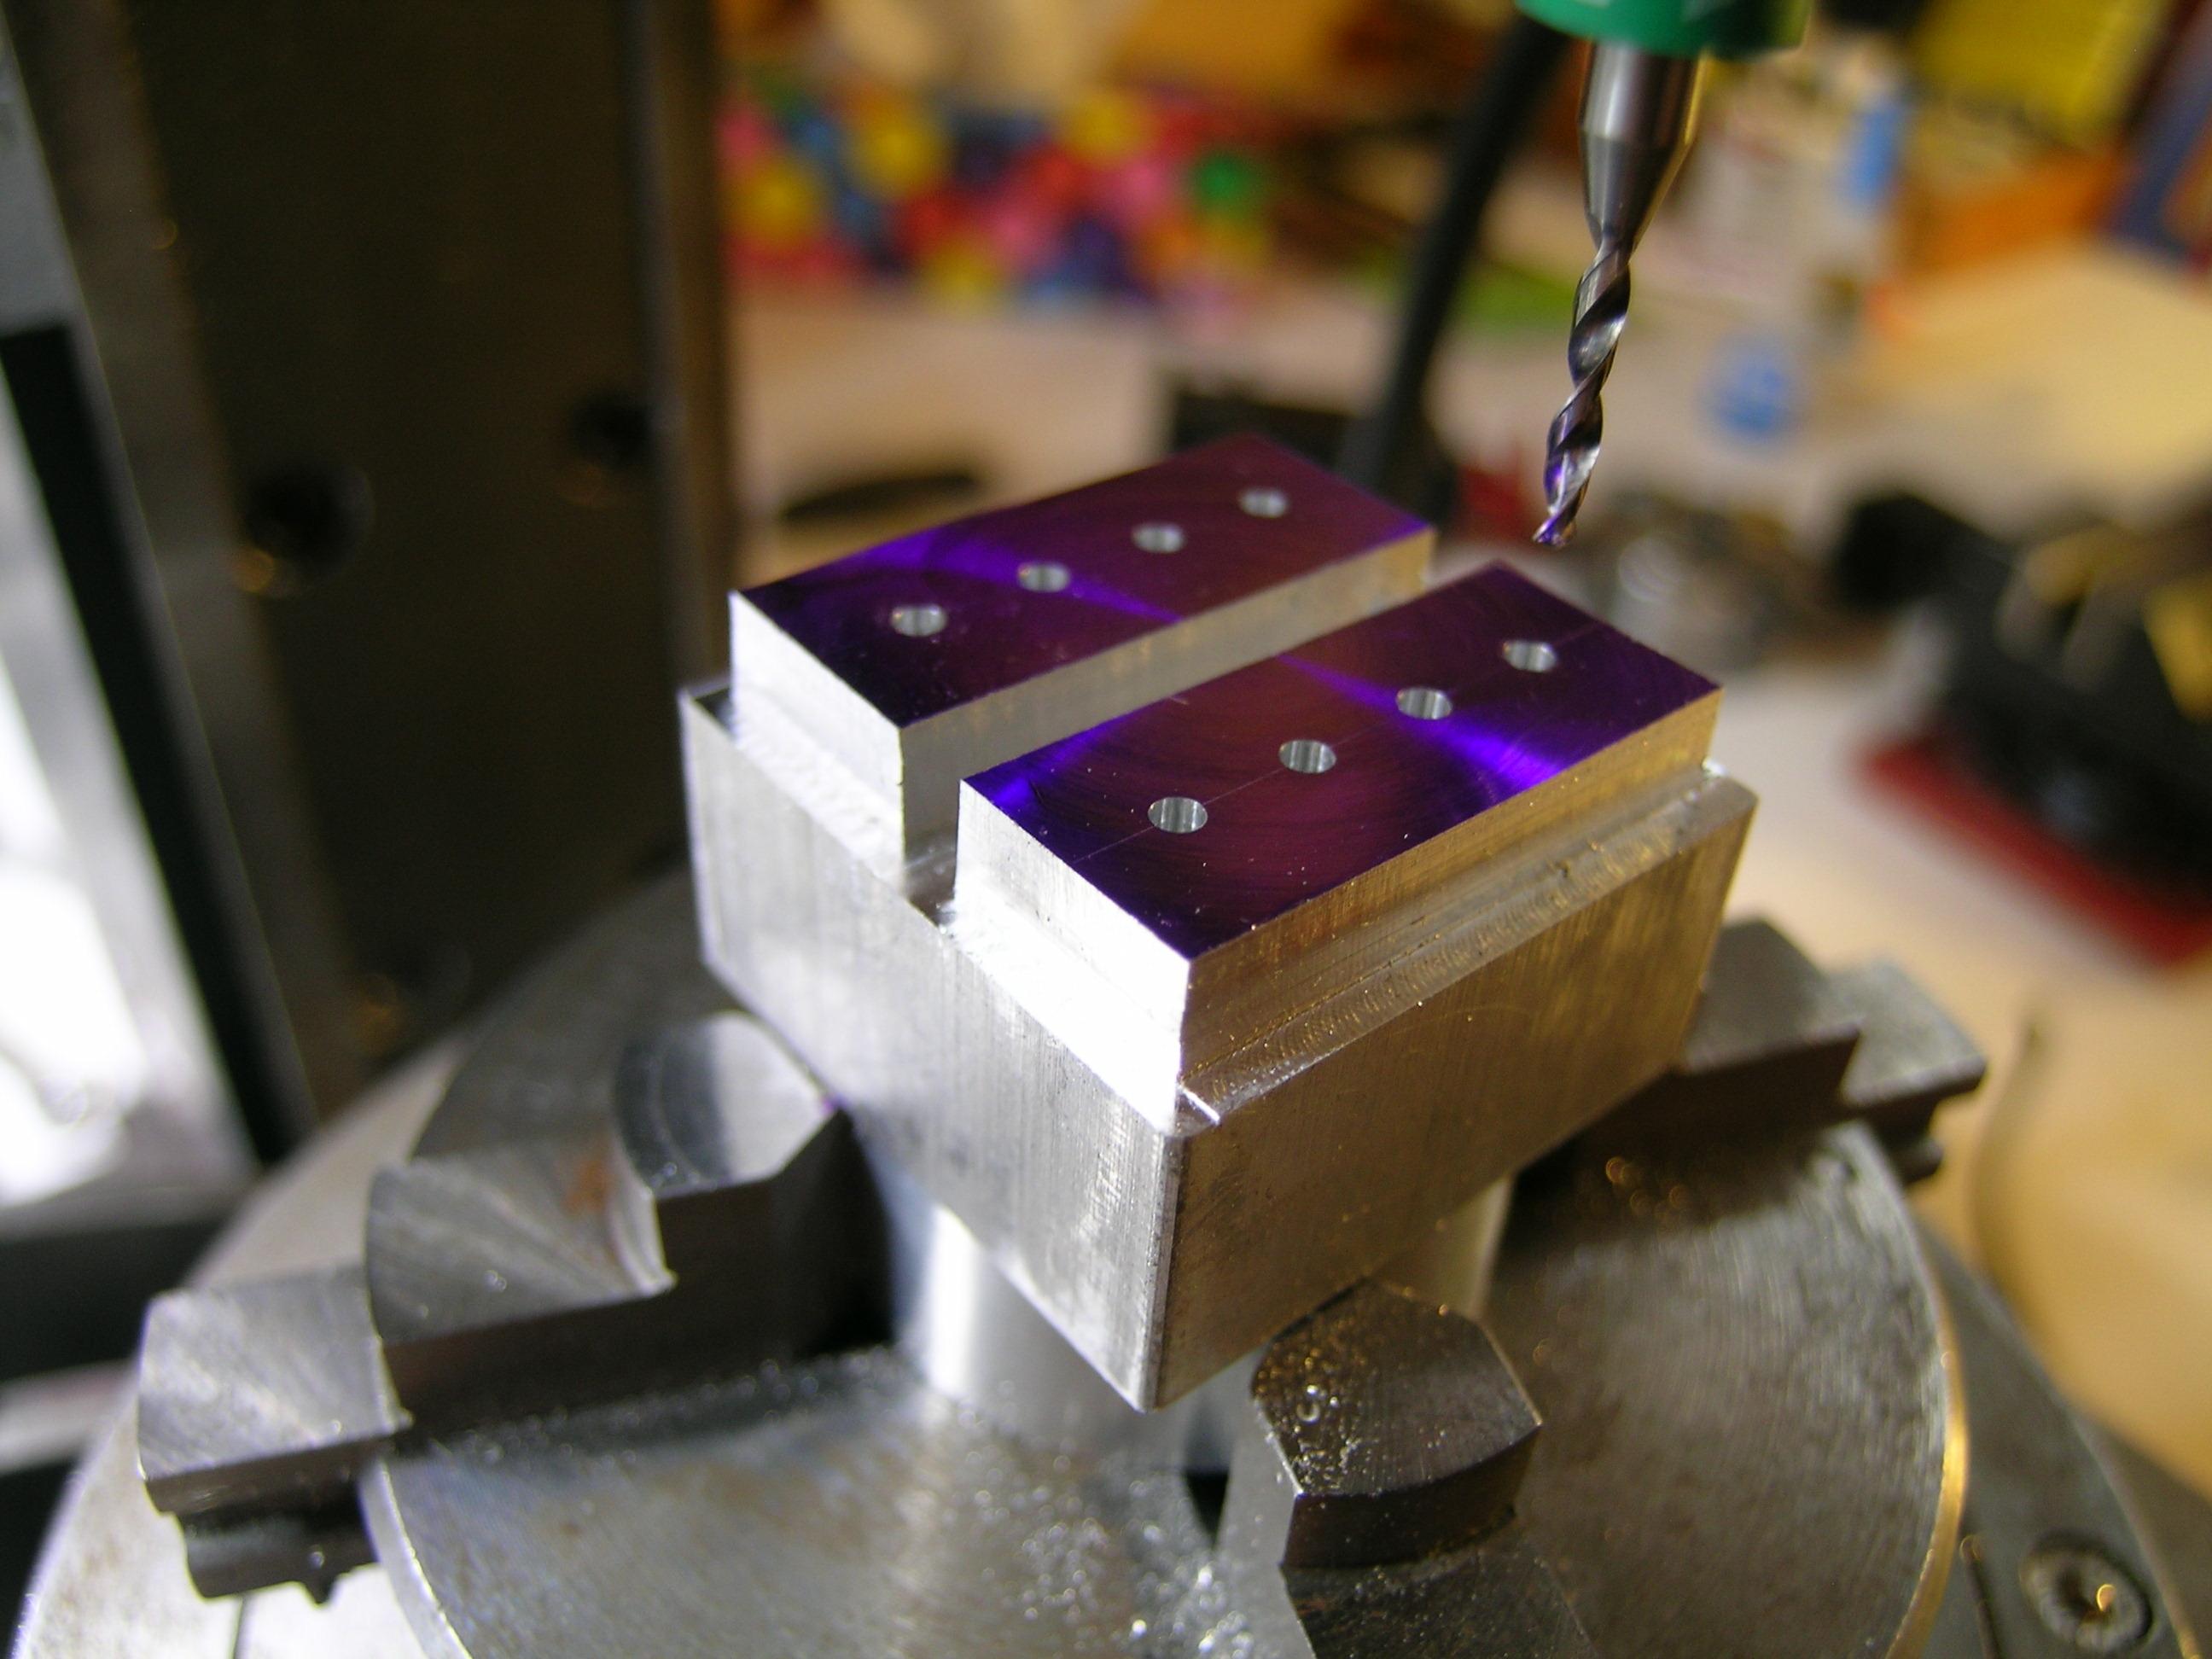
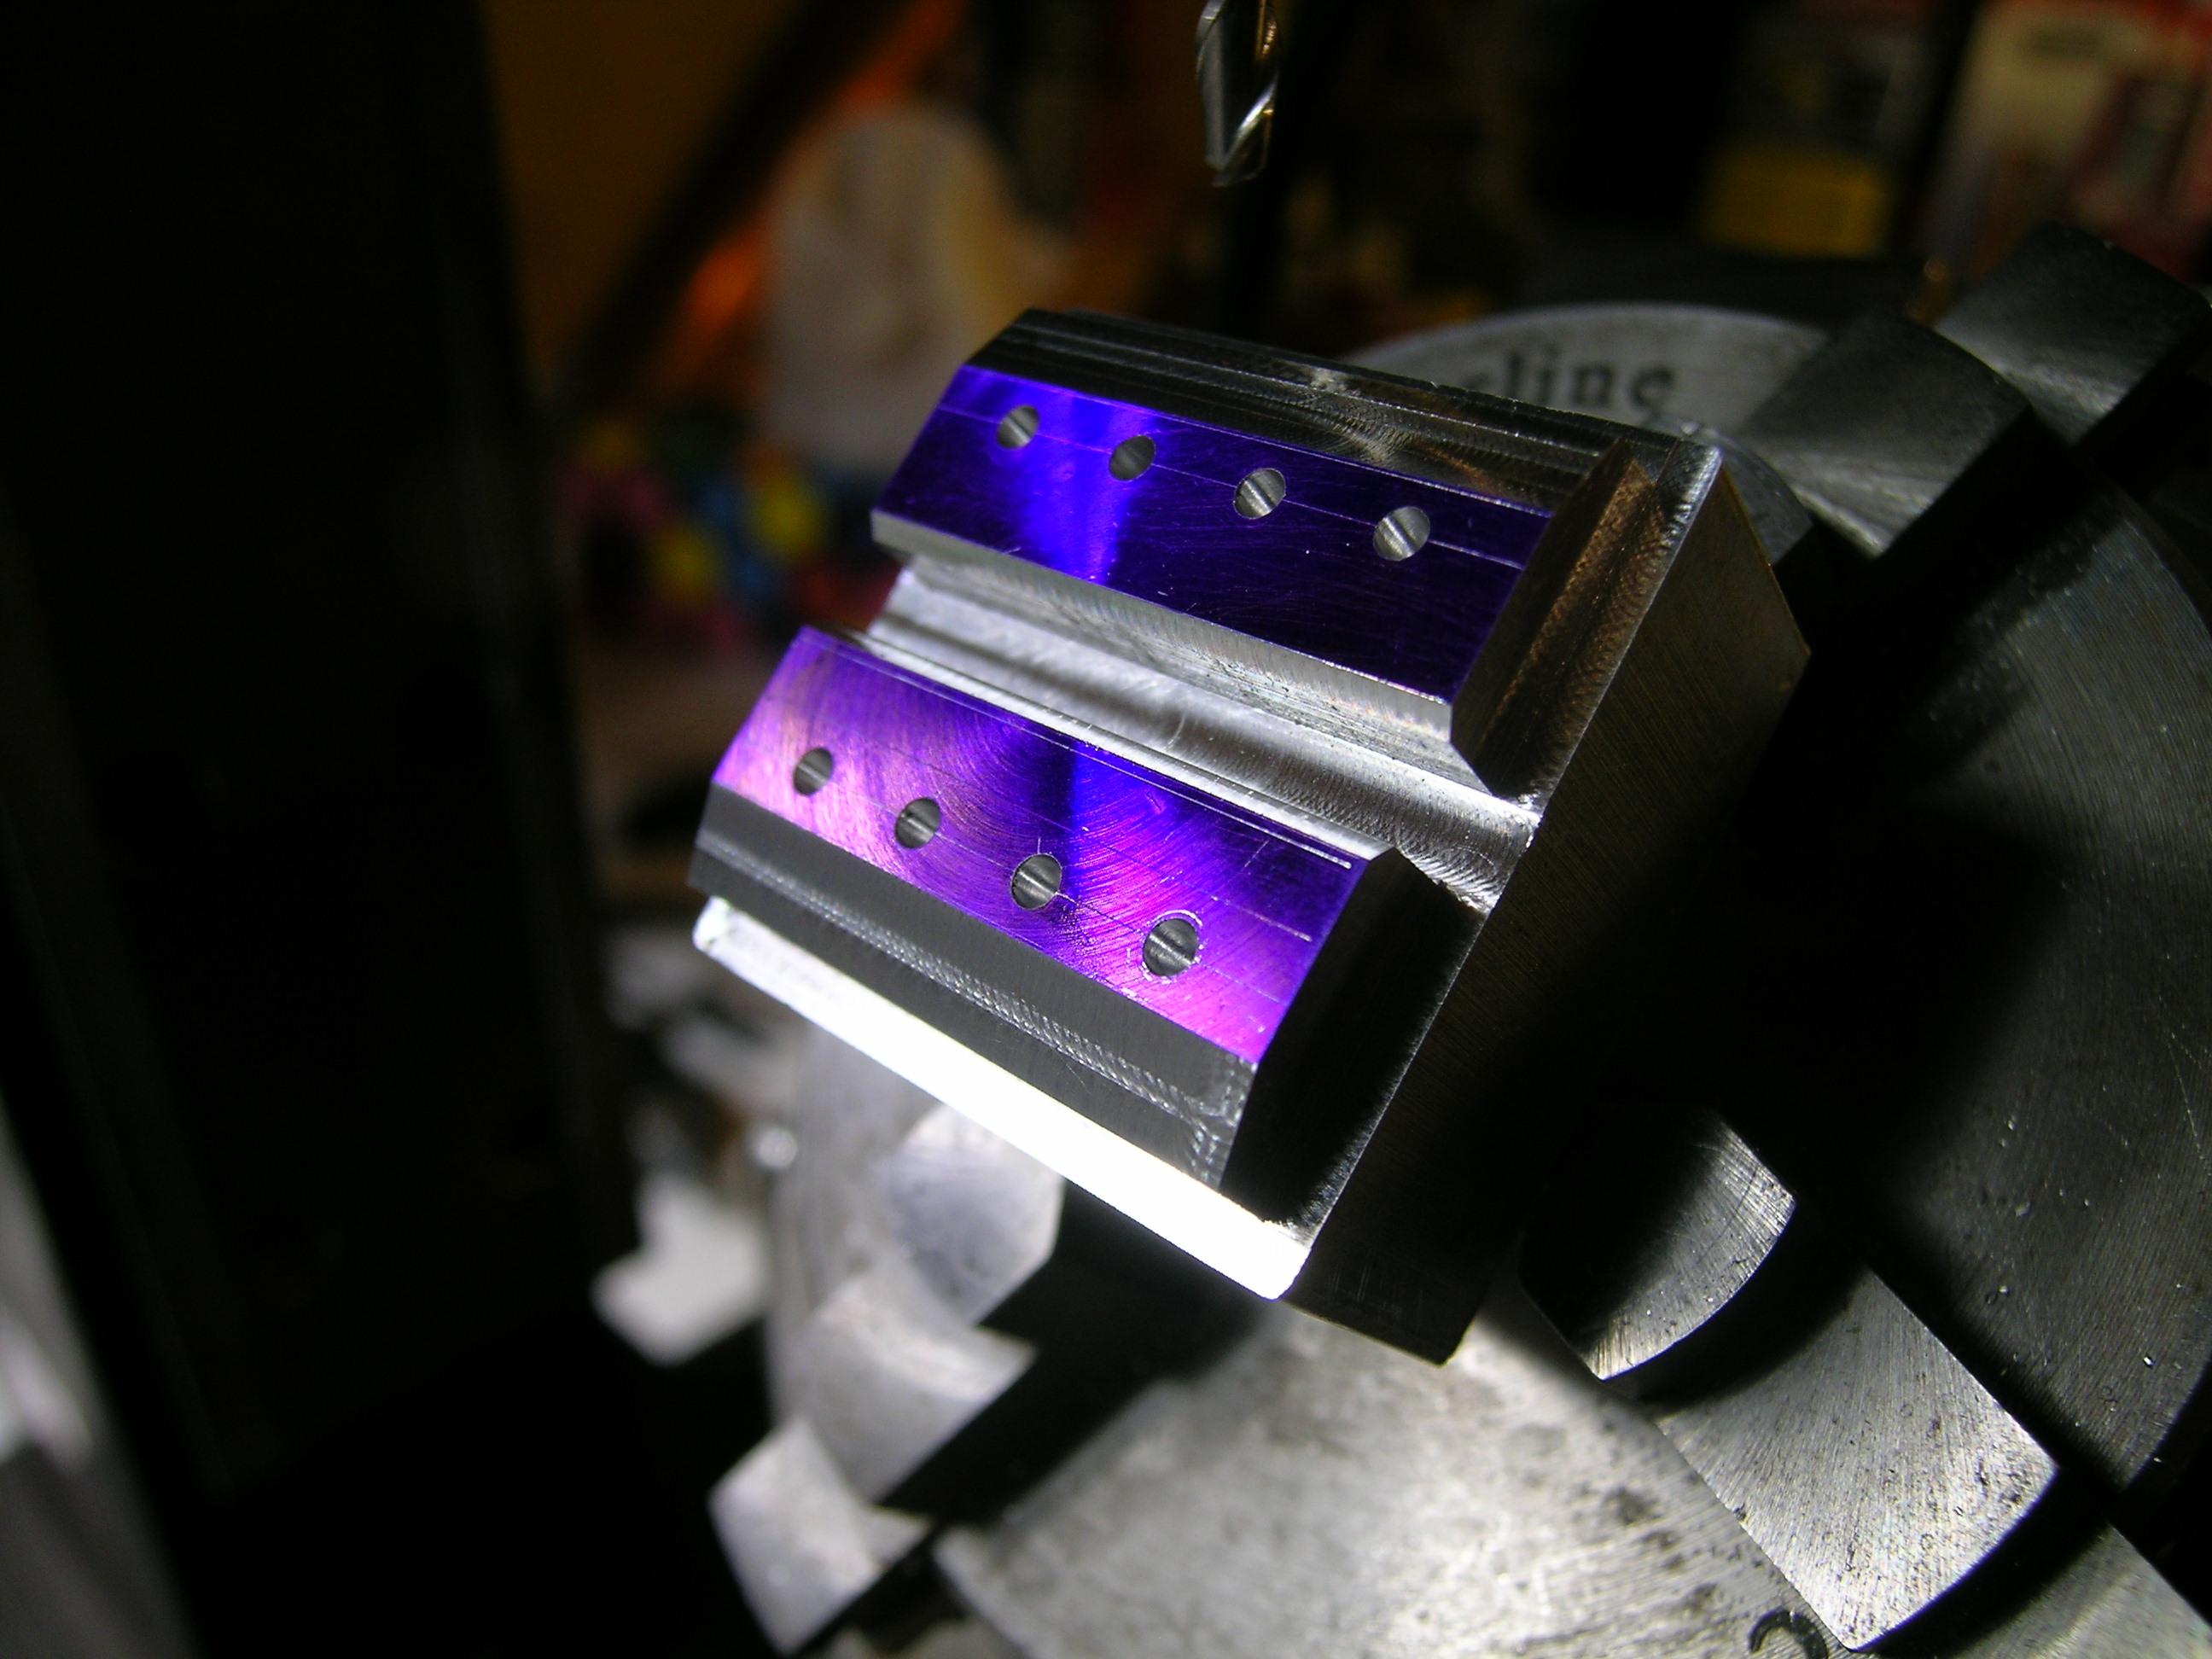
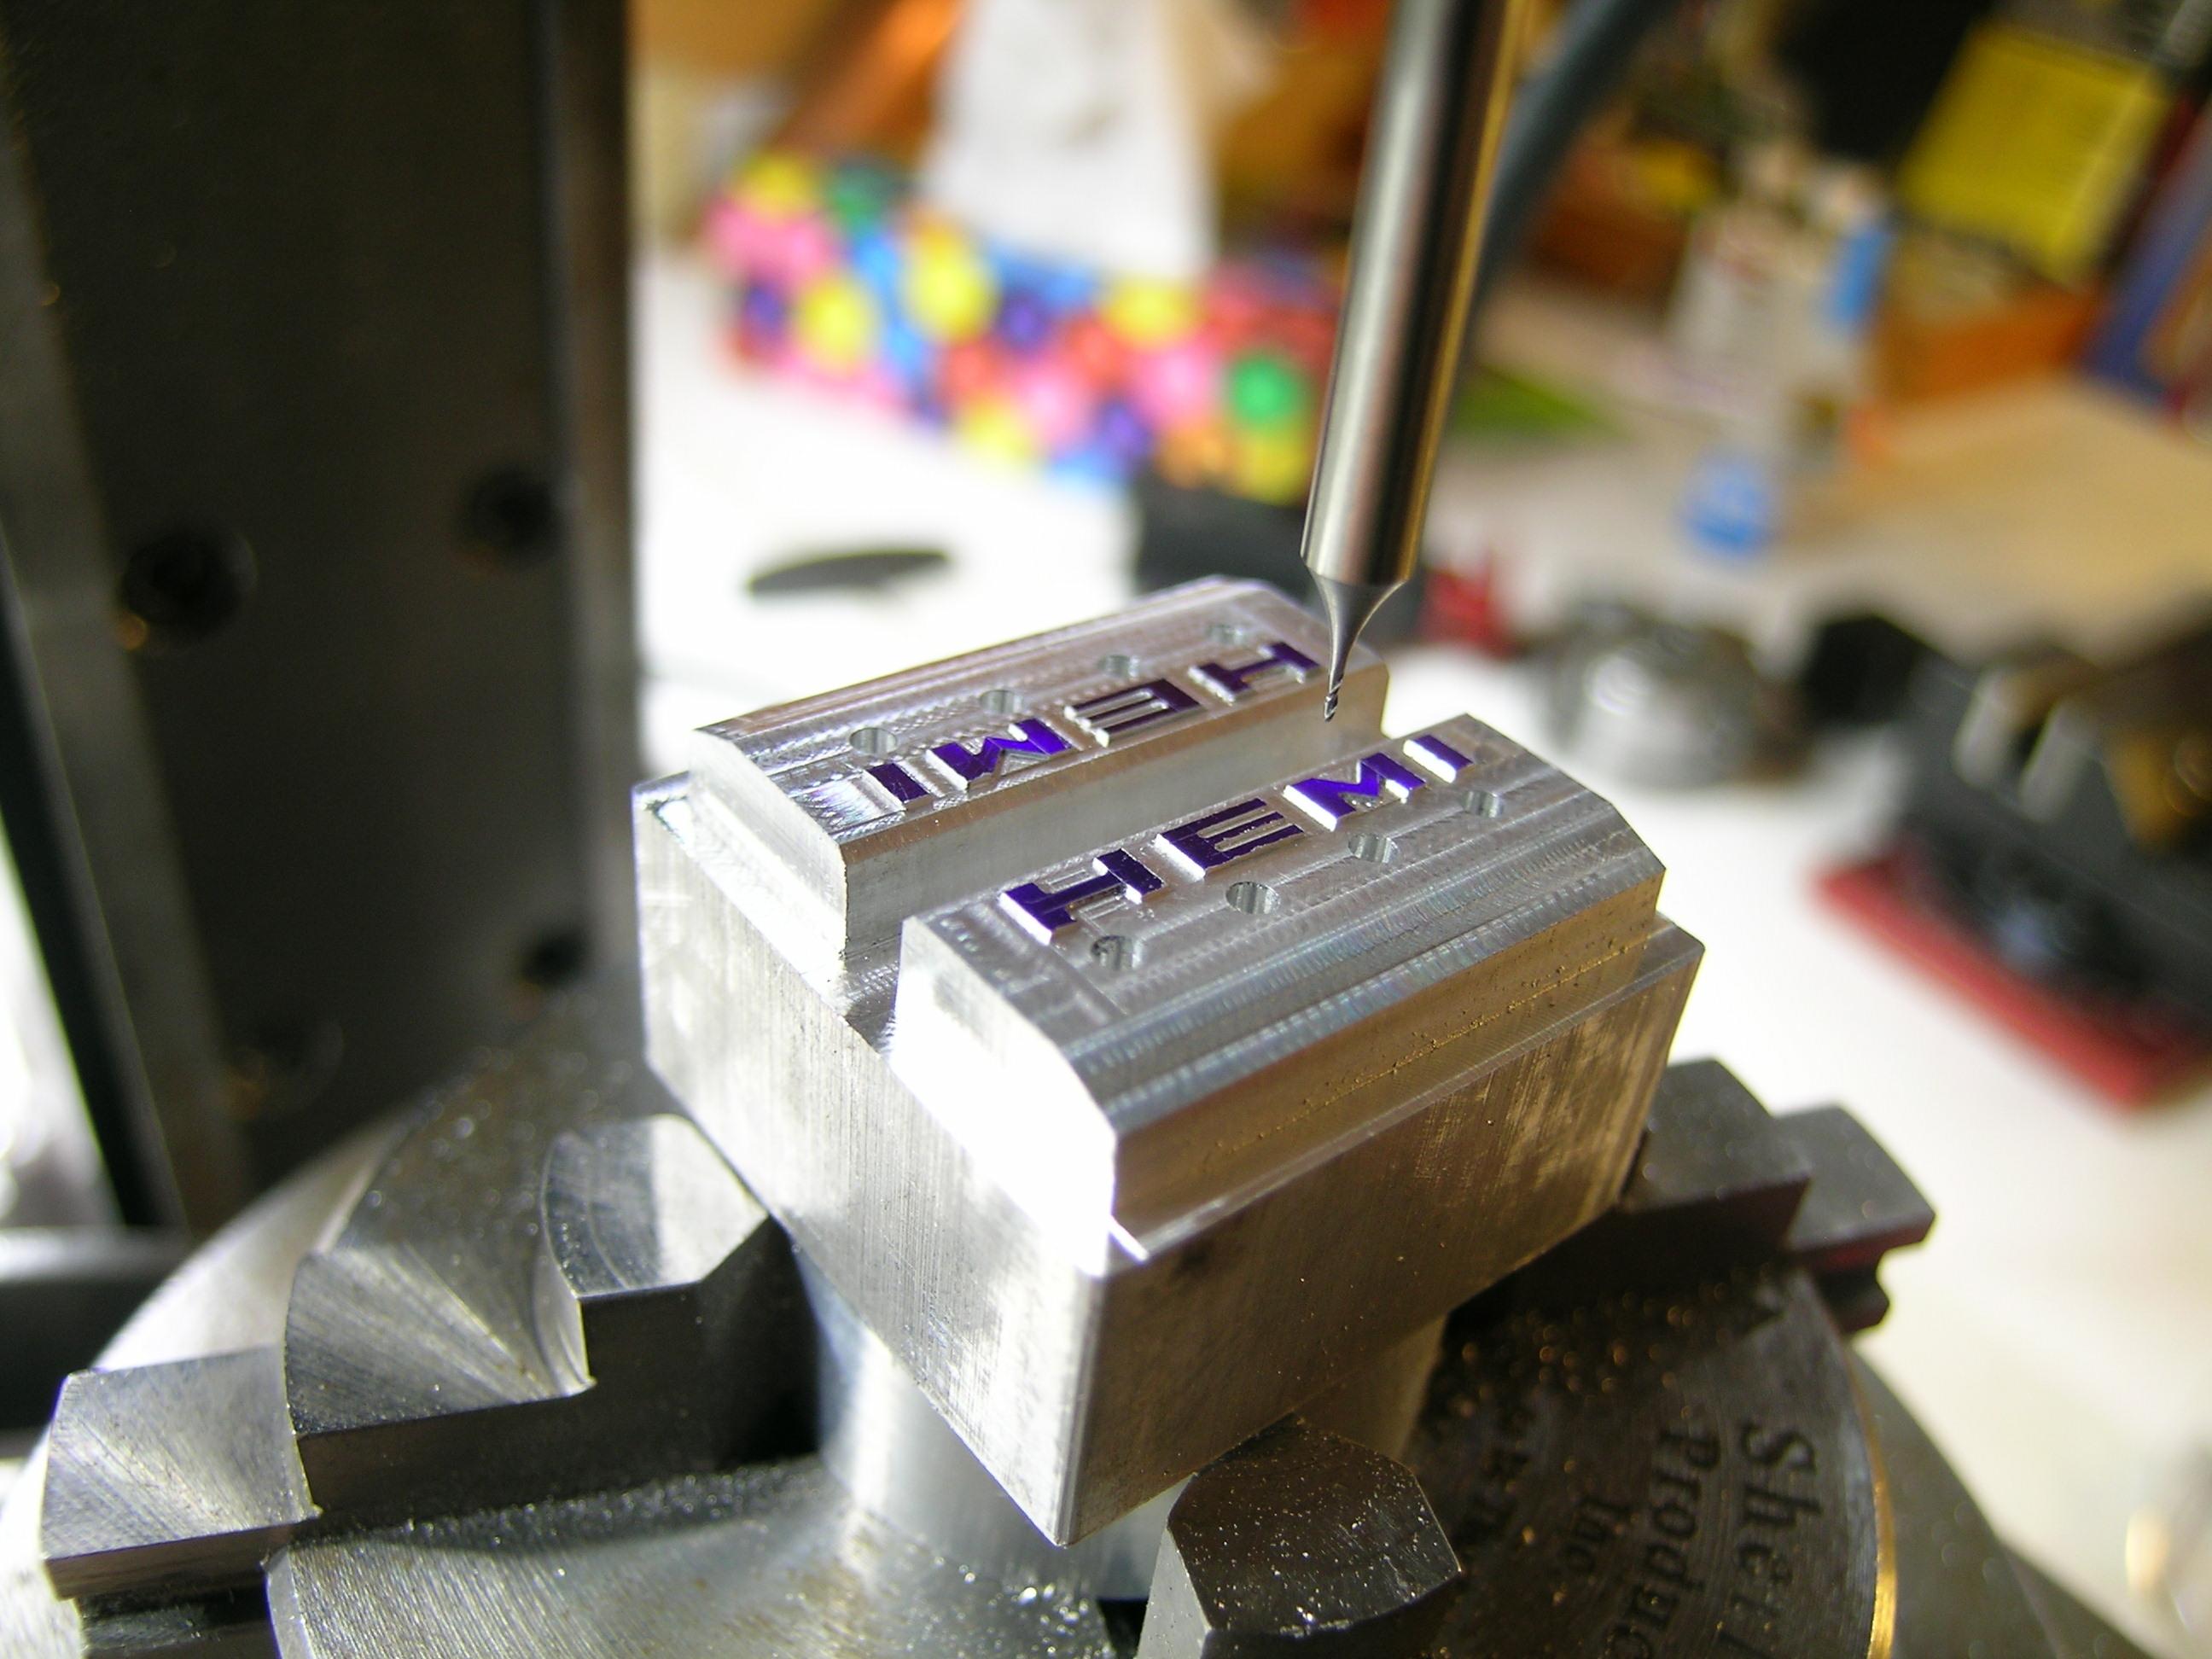
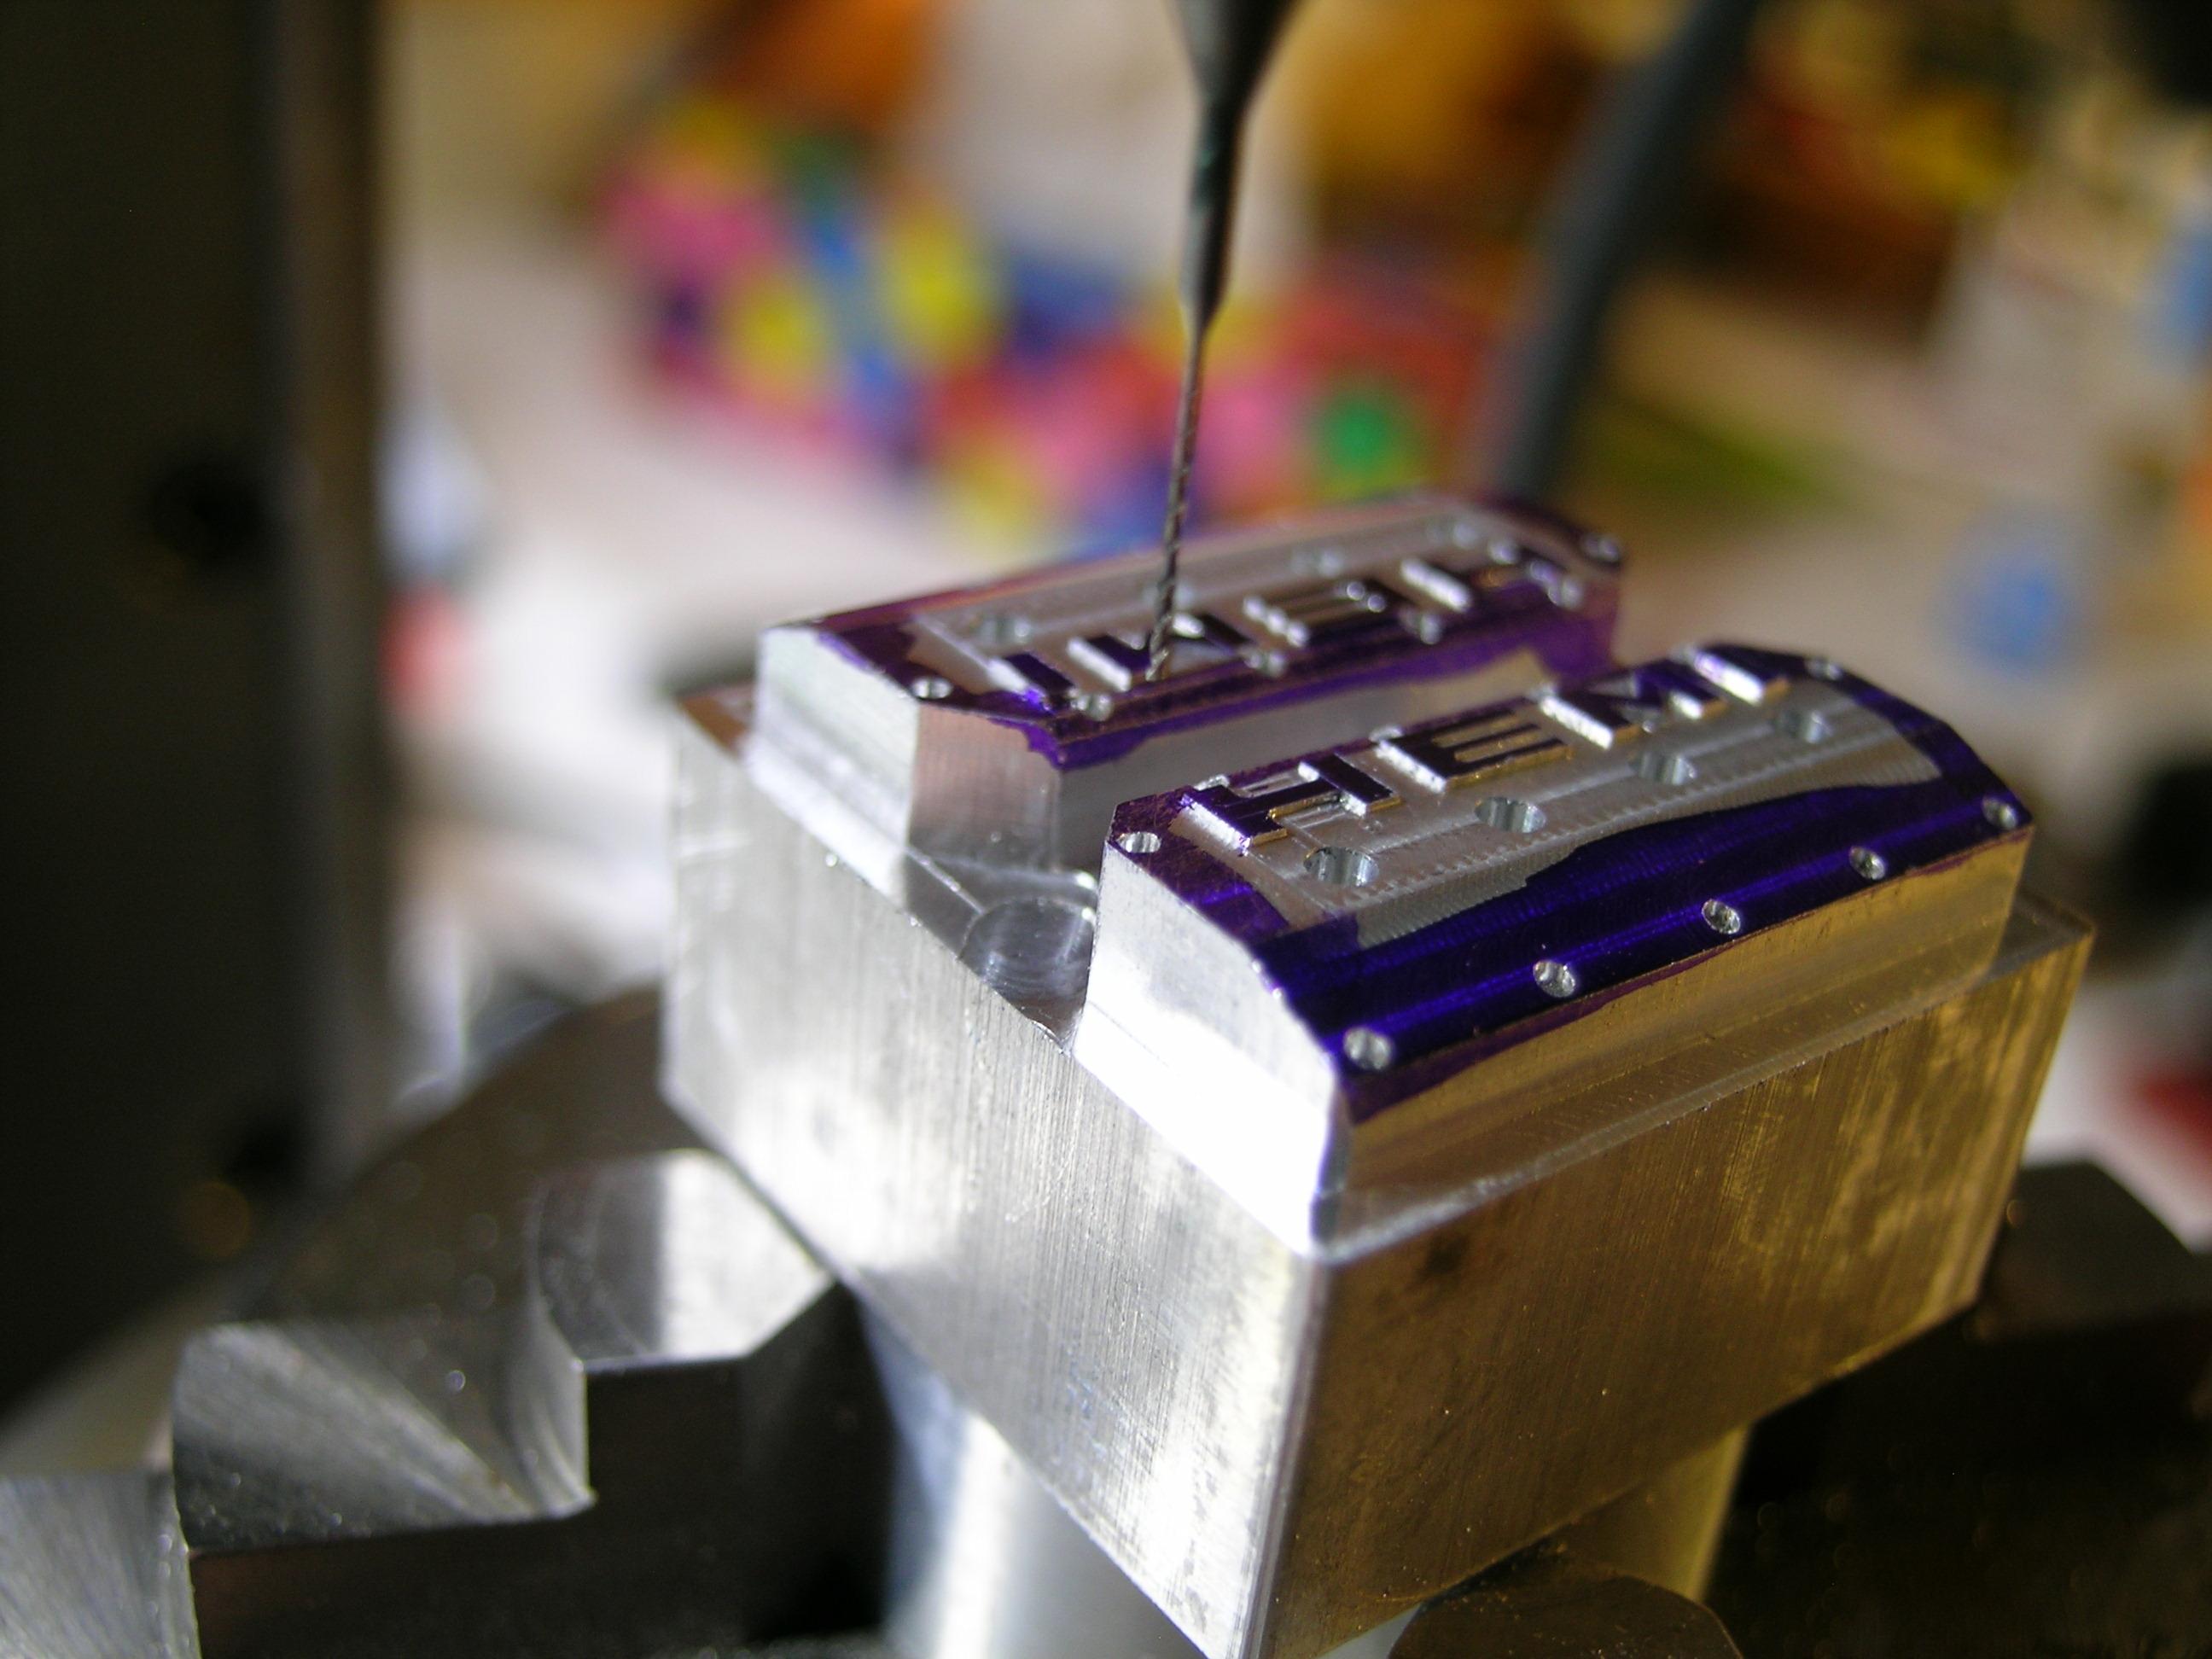
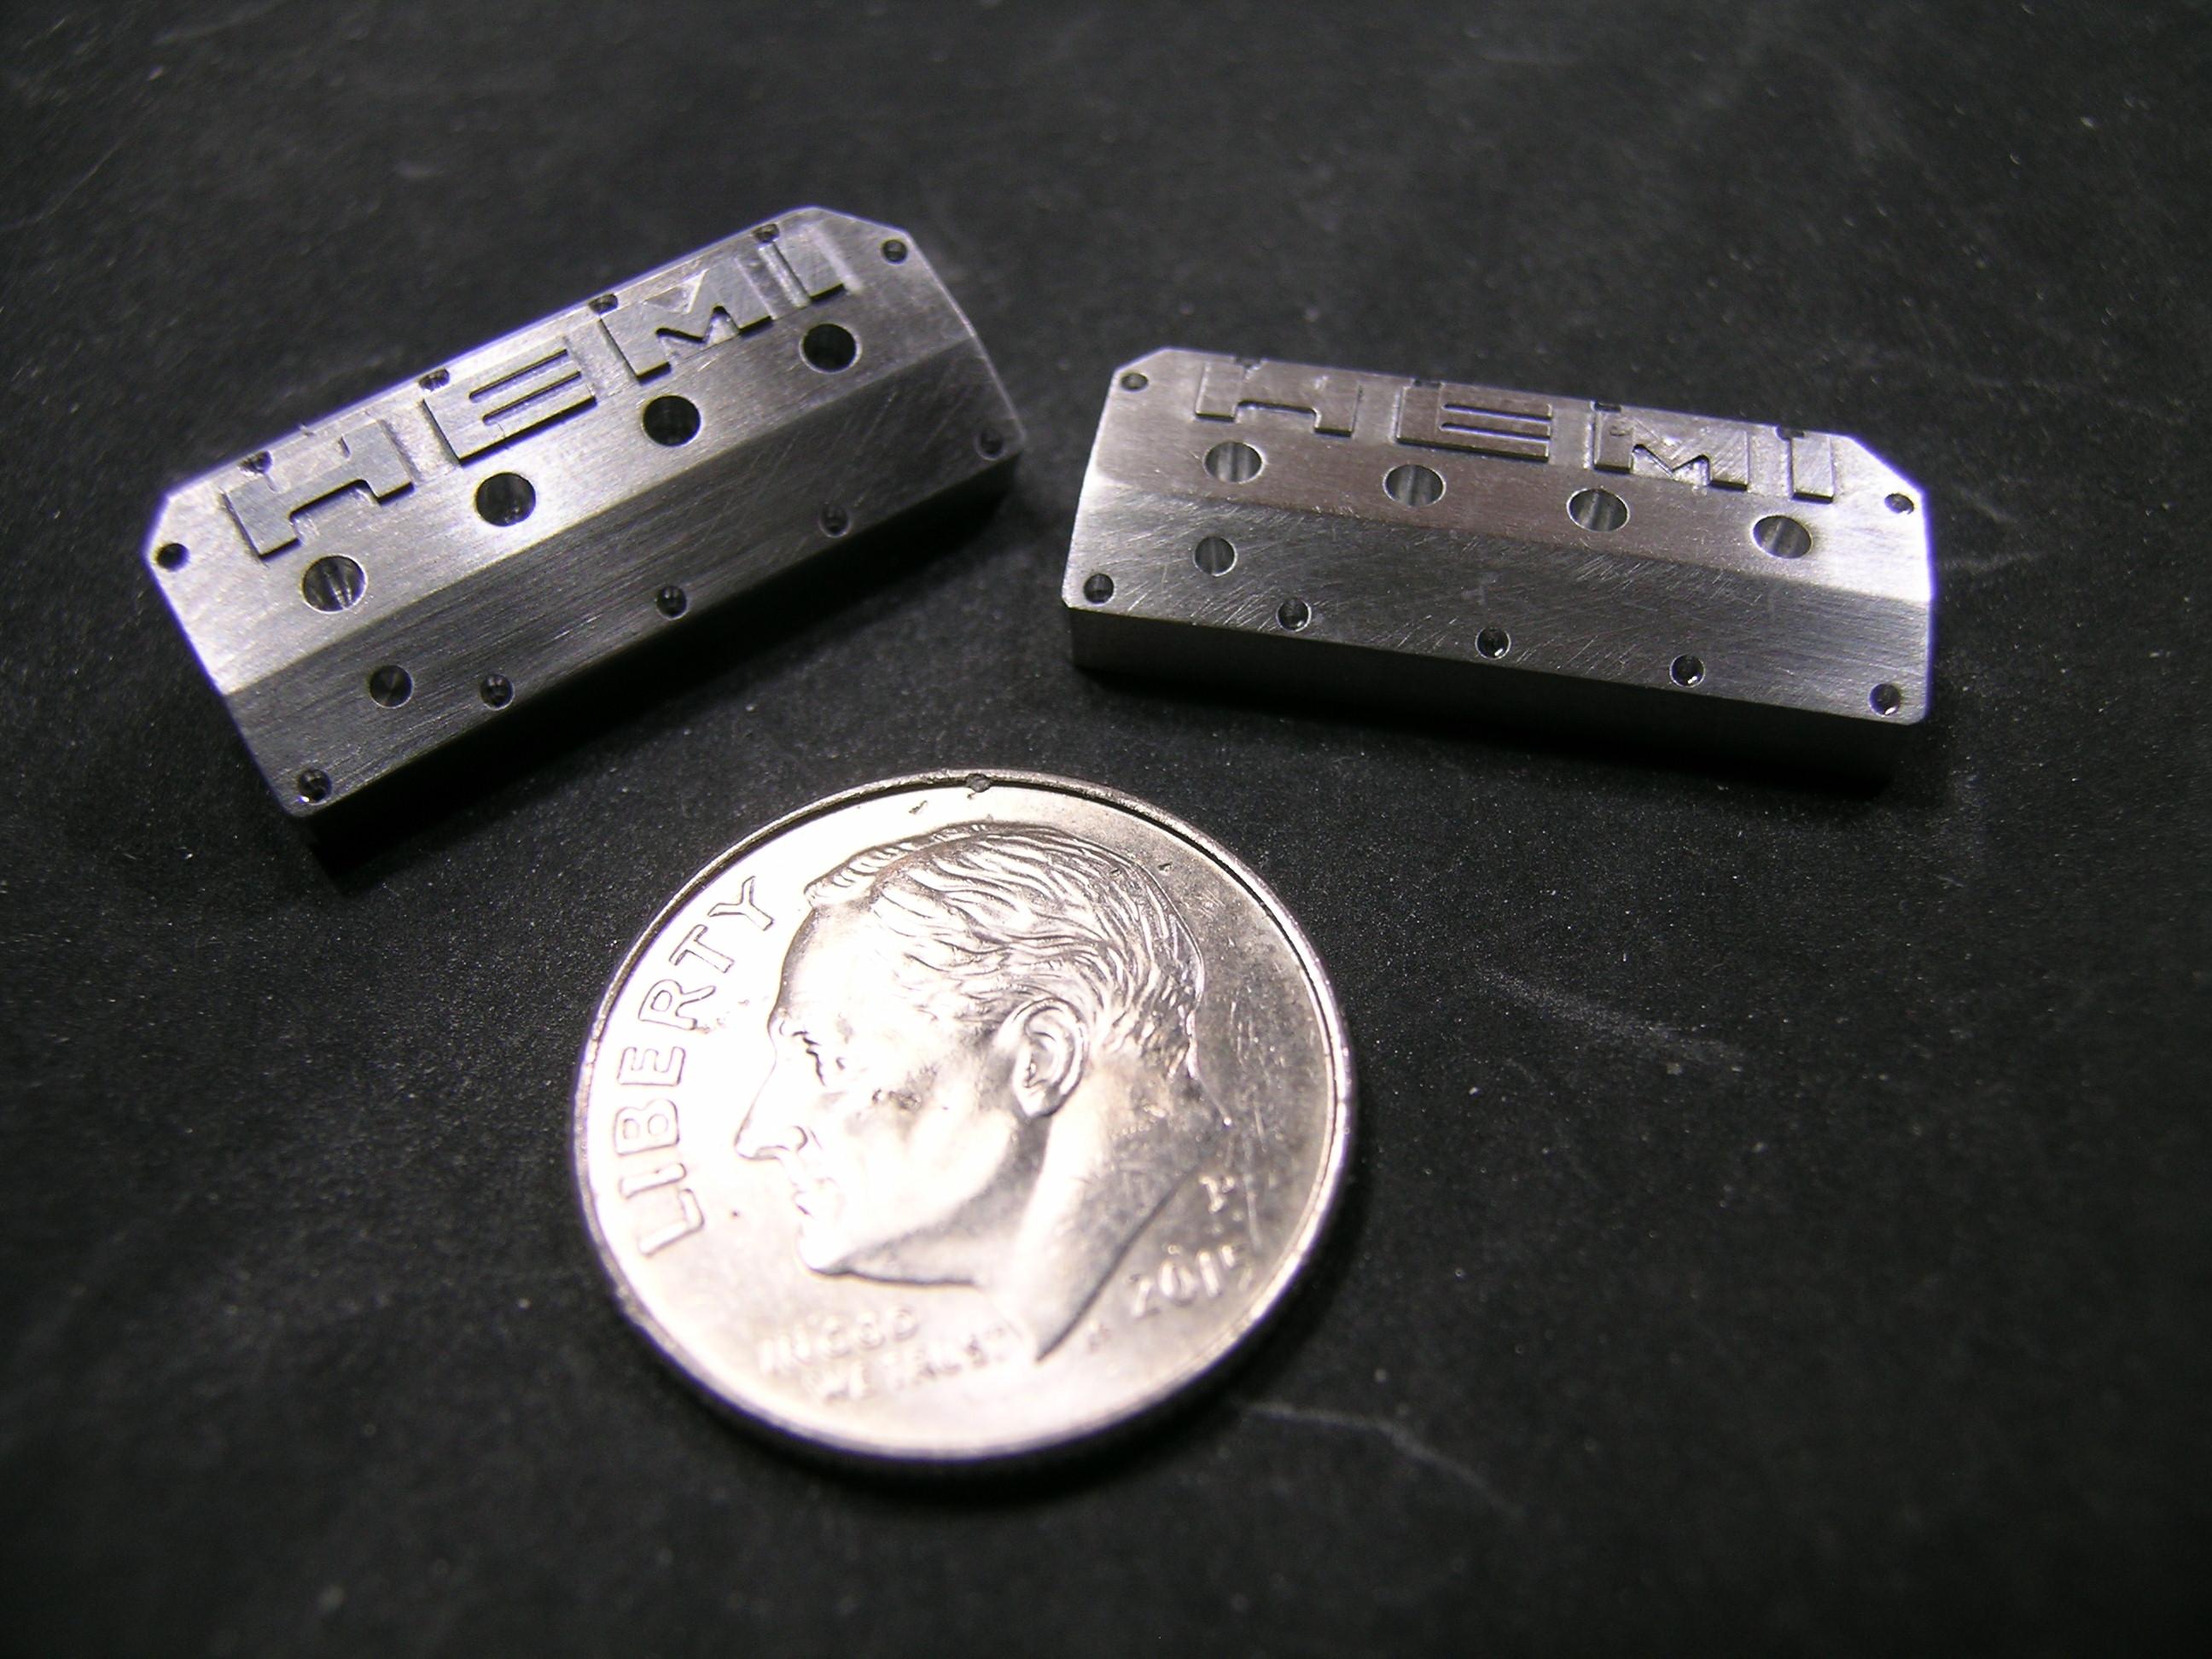
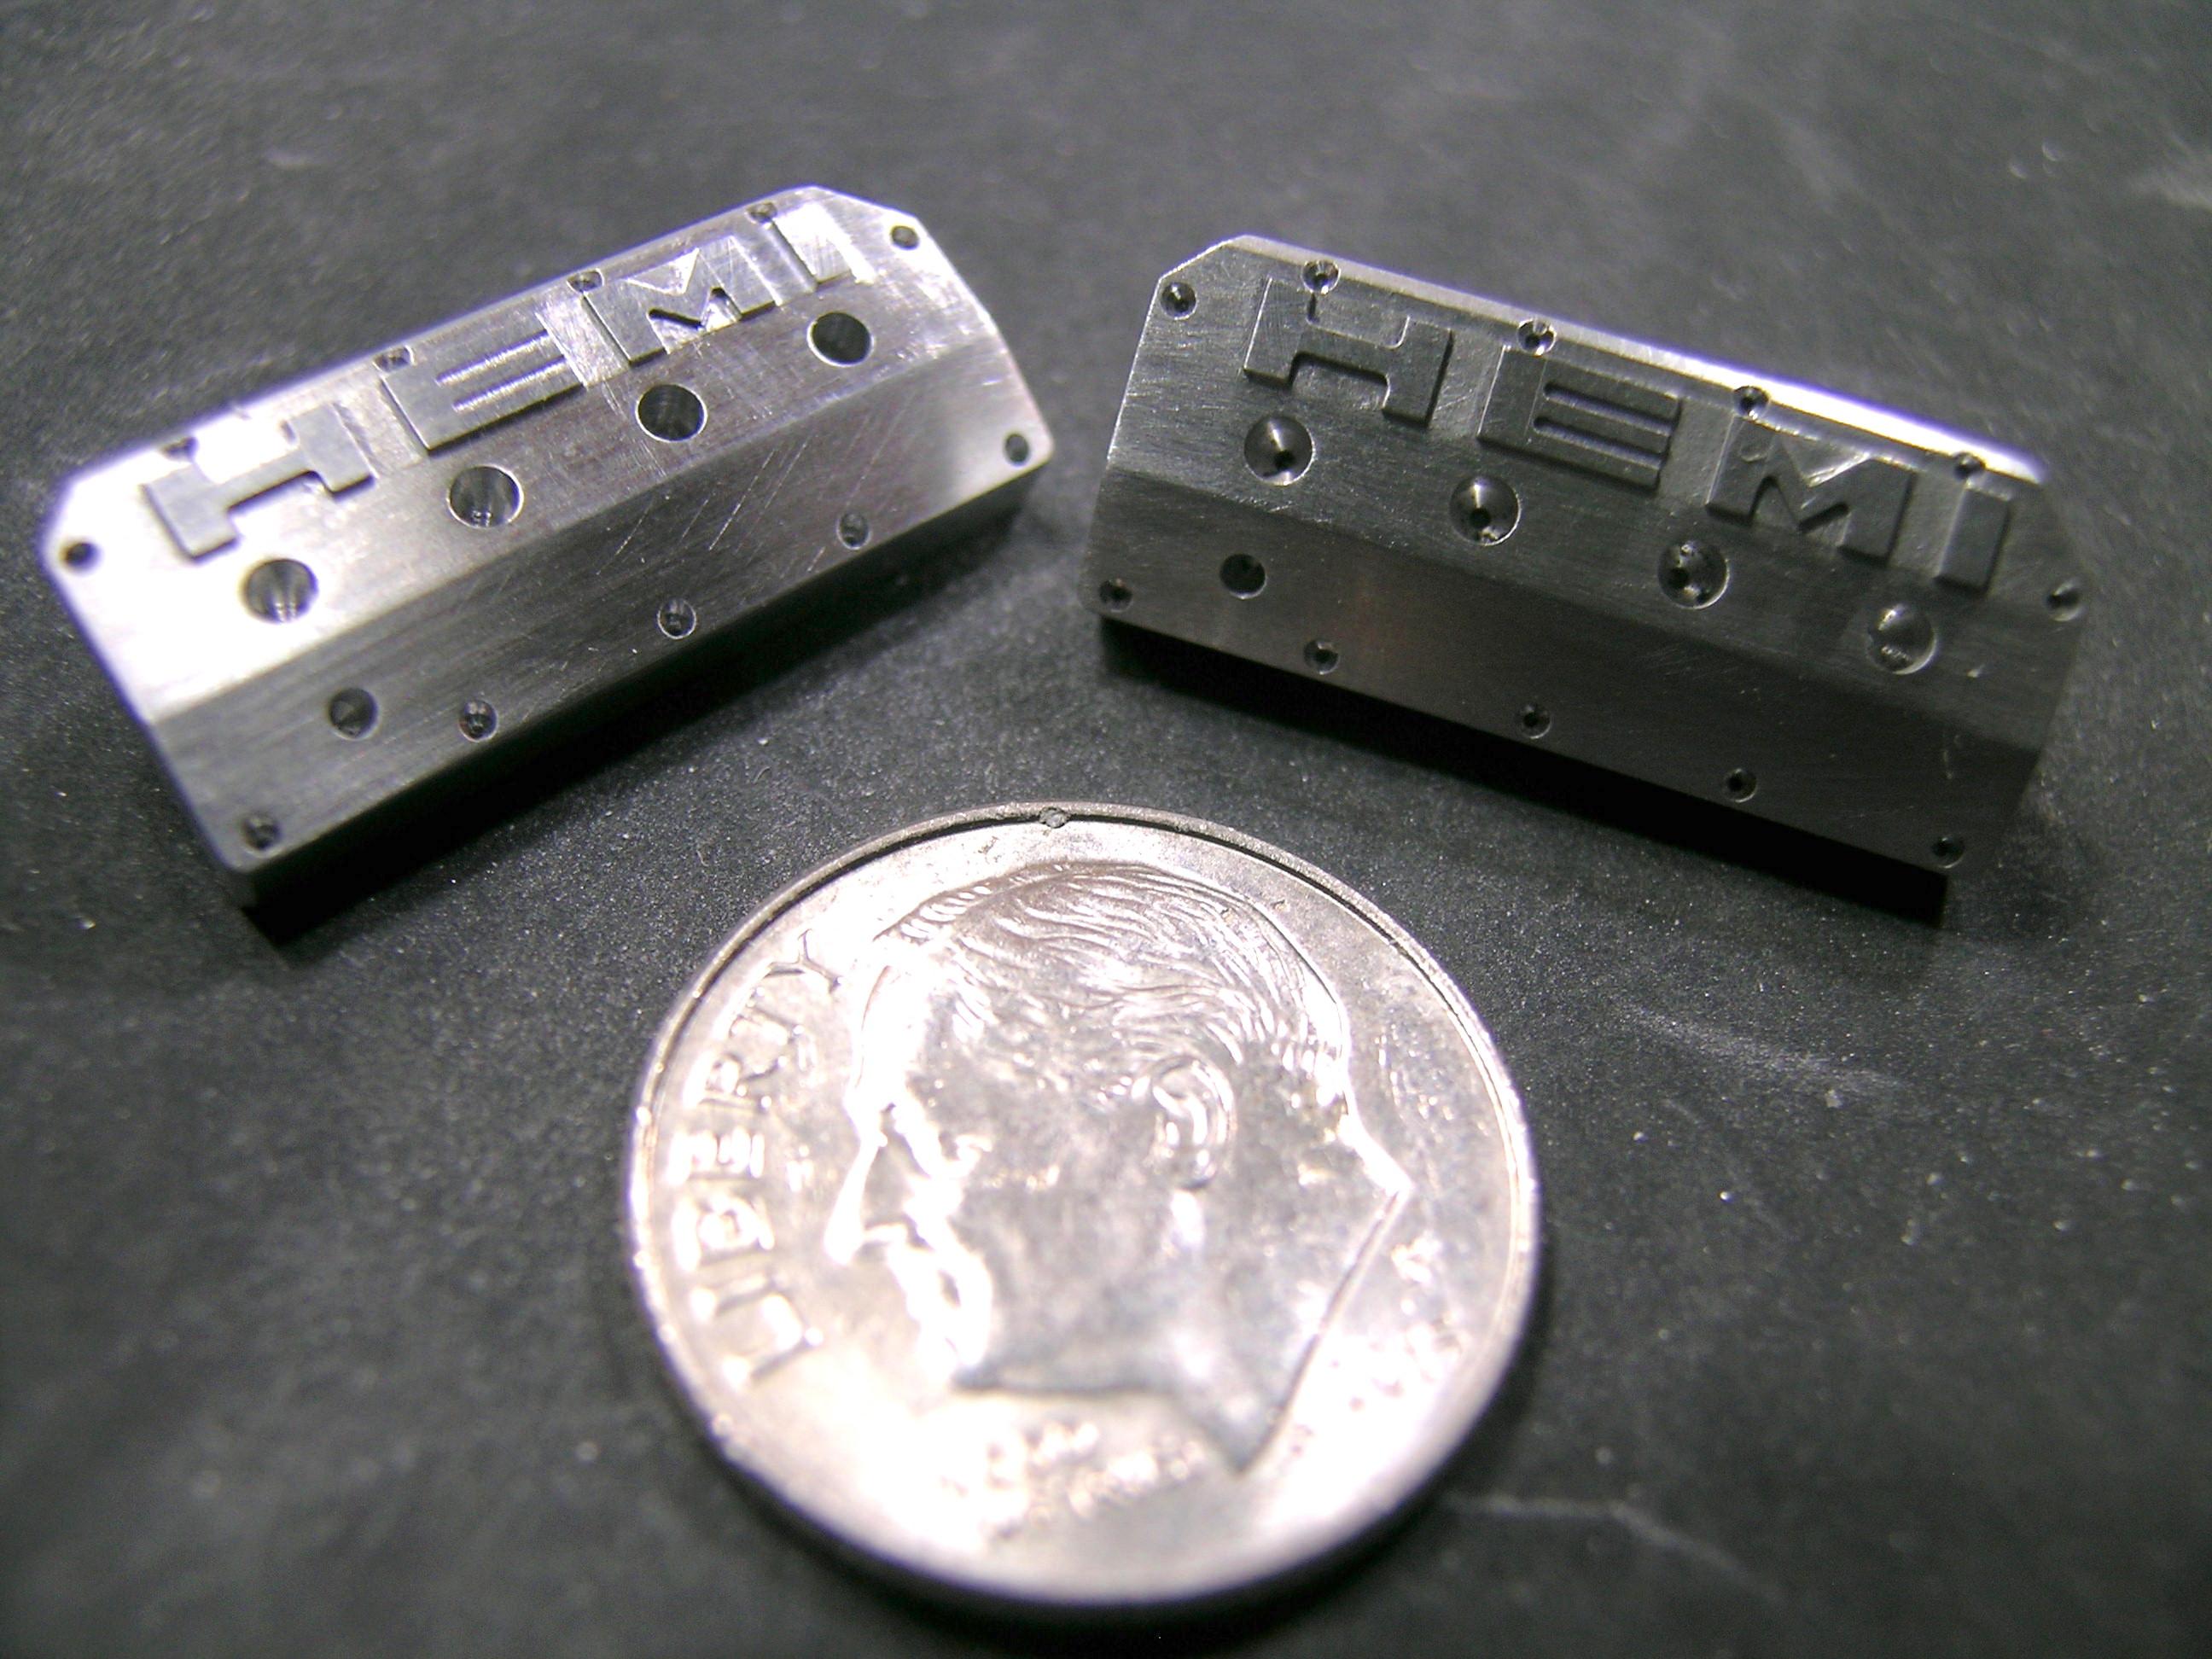
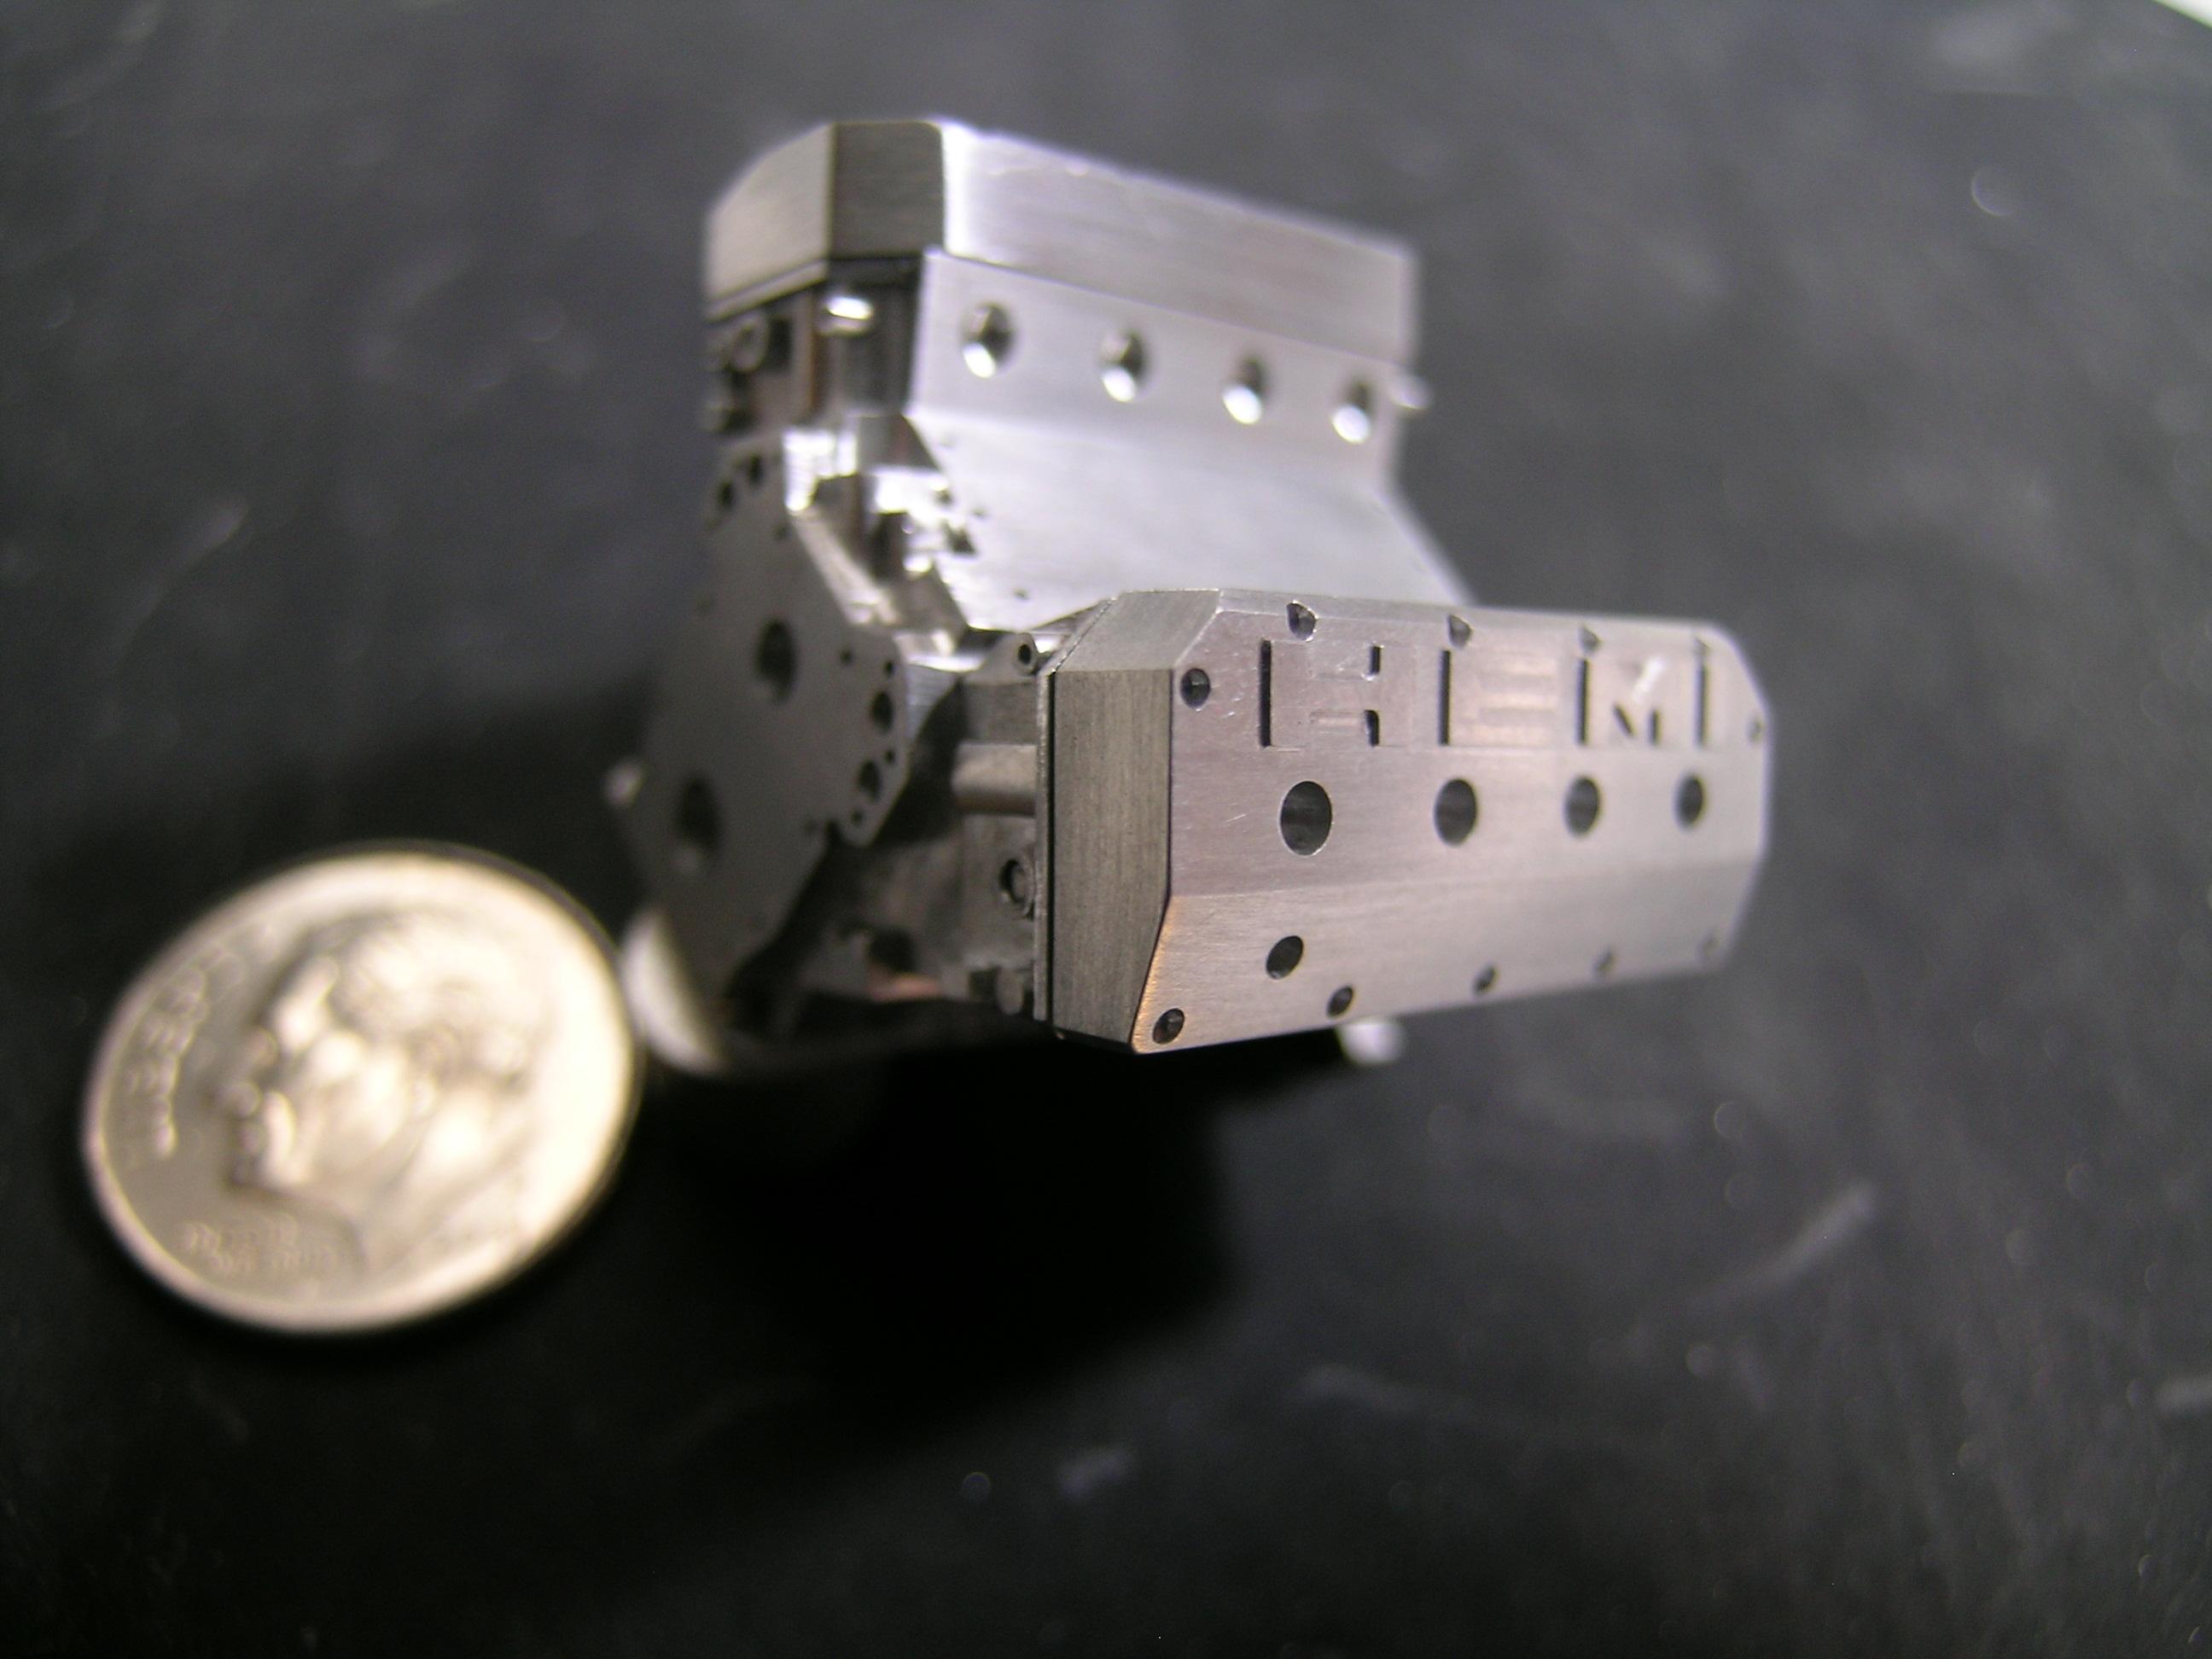
Hello to everyone! As promised the next update is for the valve covers. I built several Mopar models in the past and some of them where done with a HEMI engine under the hood. I tried to make them different each time but the design was similar with mainly just different finish or paint color. This time, I wanted to make them very different so I tried to reproduce a more modern look, something looking like the ones on recent Pro Stock engines. They are raw aluminum for now but I will anodize them in red and the HEMI letters will be buffed to remain aluminum finish so another update will come later to show you the final result. As final detail, RB Motion aluminum bolts heads will be inserted in perimeter holes so they will stands out from the red finish. Hope you'll like them... Take care of you and your relatives, Francis Valve covers on the milling at early stage. Same raw part from different angle. Spark plug holes drilled using a 0.062’’ drill dit. Front faces details in progress. HEMI letters engraved using a 0.015’’ end mill (the letters are raised by 0.007’’). Holes for mounting bolts are drilled using a 0.016’’ drill bit. Shallow holes (0.020’’) for bolts heads are drilled using a 0.031’’ square end mill. Valve covers final (hole below the first spark plug is for the oil fill cap that will be done later). Valve covers final closer view. Valve covers test fit on heads/block.
-
Jo-Han Maverick-Dyno Don's Ride
AmericanMuscleFan replied to mustang1989's topic in WIP: Drag Racing Models
Superb job on the detailing of the dashboard Joe! The details on the gauge faces was certainly challenging and you nailed it! Great!!! -
Glad to be the first one to make comments on your latest update and I must say that this big block (very big...) is simply fantastic! What else can I expect from you but these ultra clean and accurate parts! Magic still continue sir... I love it! Take care, Francis
-
Great job Patrick! That's really my favorite kind of work... improving by scratch building what was supposed to be done correctly right at the beginning by the manufacturer! Well done sir!
-
Vintage FED, 1:25, brass WIP, driveline
AmericanMuscleFan replied to Mike Williams's topic in WIP: Drag Racing Models
Hello Mike, As my friend Claude said, this is some good food for the soul and a delight to see how you master the art of welding and fabrication of body parts from aluminum. The rounded shape close to the driver just is perfect! Can't wait to see your next update! Masterpiece in the making... Cheers, Francis -
Jo-Han Maverick-Dyno Don's Ride
AmericanMuscleFan replied to mustang1989's topic in WIP: Drag Racing Models
Great paint job on the hood Joe and the gloss finish looks gorgeous! This Maverick is coming together nicely my friend! Well done! -
Orphaned makes, European and Asian engines by FTB
AmericanMuscleFan replied to landman's topic in Model Cars
At my actual pace it would take me 85 lives to make all of these... Outstanding Pat! -
Racing, Hot Rod, truck and aircraft engines by FTB
AmericanMuscleFan replied to landman's topic in Model Cars
Well, that's a mind bogging engine collection, all of each well built and documented! I can't figure out the amount of hours (days, months, years...) spent in this AMAZING collection... There's always someone to surprise us in this hobby! Thanks for sharing! -
Yes! this is the right one and they are pretty cool looking... isn't it? I thought that JoHan made one but you may be right. Would be a good challenge st make that intake manifold from scratch...
-
WOW Pat! That's an extremely nice collection of engines that shows obvious and extensive researches on colors and technical data. Would be fun to see a Chrysler 413 Cross Ram added to your collection... Maybe you have one already and I missed it... There so many and diverse kind in this thread!?! As other said, fantastic job on the equipments and every parts of the diorama too!!! Cheers, Francis
-
64 Dodge D100 Pickup Pro Street
AmericanMuscleFan replied to AmericanMuscleFan's topic in WIP: Drag Racing Models
Thanks again GoatGuy! Glad you liked them and find some inspiration for your build! I will make the valve covers next and I will try to make them different from the standard HEMI's looking by adding some extra details that I never attempted before... stay tuned for the next update! Take care, Francis -
64 Dodge D100 Pickup Pro Street
AmericanMuscleFan replied to AmericanMuscleFan's topic in WIP: Drag Racing Models
Besides tools, practice and perseverance are keywords Mark! Take care, Francis -
64 Dodge D100 Pickup Pro Street
AmericanMuscleFan replied to AmericanMuscleFan's topic in WIP: Drag Racing Models
You're welcome Daniel! Always happy if someone can find something usefull on my posts! Come back any time, Francis -
64 Dodge D100 Pickup Pro Street
AmericanMuscleFan replied to AmericanMuscleFan's topic in WIP: Drag Racing Models
Thanks Mike! It's always pleasant to push each of us to do better and keep this hobby alive! You're an incredible skillful builder and I will keep an eye on your dragster to add strings to my bow!!! Cheers, Francis -
64 Dodge D100 Pickup Pro Street
AmericanMuscleFan replied to AmericanMuscleFan's topic in WIP: Drag Racing Models
Well Tim, I'm most than honored to get compliments and support from a person that is in the main reason why I did jump in this forum! I am not pretentious for five cents and I learn from the work and good ideas of others like everyone else on this forum. There is always something to learn from others ... I do not say that to be complacent but you remain for me THE reference (without wanting to hurt anyone) and you push me to always do better! Thanks for being such an inspiration ... Thanks again, Francis -
70 Plymouth HEMI GTX 1/25 Scale
AmericanMuscleFan replied to AmericanMuscleFan's topic in WIP: Drag Racing Models
Thanks GoatGuy! I just saw you did it and I really appreciate your comments, inquiries and input! You are always welcome, Cheers, Francis -
Thanks GoatGuy! Yes, the front grill slots were opened using the back of an Xacto blade (#7) that I thinned slightly both side to minimize contacts with the teeth. Long and tedious process but I do think that the front grill must always get some improvement to make it credible and looking like the real one. The headers were done with soft aluminum craft wire. The gauge is just the right size at 0.080'' and equal to 2 inch in real life so it's the right size for big block engine. I see you know the subject regarding graphic art (32 years of experience for me). I bought an ALPS MD-1300 printer several years ago but I never used it. I know it's capable to print at 1200 x 600 dpi so it should be good but not as good as a Postscript RIP with a high-end Imagesetter on analogue film. I will try to figure-out a decent solution for my future gauge faces... Thanks again for your input! Take care, Francis
-
64 Dodge D100 Pickup Pro Street
AmericanMuscleFan replied to AmericanMuscleFan's topic in WIP: Drag Racing Models
Jim, you're absolutely right but I don't have any experience with mold making for resin parts. I would be forced to simplify some details (or omit them) to make parts removable from the mold because they are full of holes and undercut areas. Furthermore, I heard that ''some not too shy guys'' have made copies the hard work done by others and I would be angry if something like that happened to me... Thanks for the suggestion anyways, I consider this as a compliment! Cheers, Francis