Bainford
-
Posts
5,187 -
Joined
-
Last visited
Content Type
Profiles
Forums
Events
Gallery
Everything posted by Bainford
-
 Just found this thread. Your Chaparral is looking good. I built this kit a few years ago and found it an enjoyable build.
 -
Good looking Toyota. Nice work on pinning the mirrors.
-
Despite the troubles, you have built a beautiful model. A wonderful combination of brutish and beautiful. Very nice work, and the Mercs of this era were simply stunning. Such gorgeous lines. Very well done.
-
Beautiful model. Your paint finish is excellent. Very interesting car, never heard of it before. Every day is a school day. Very nicely done.
- 10 replies
-
- 1
-

-
- jiotto caspita
- v12
- (and 1 more)
-
Best spark plug wire size?
Bainford replied to V8tiger's topic in Model Building Questions and Answers
My reference to race engines was generally for modern NASCAR, drag racing, etc, where wires can measure 10 mm or larger (in the case of Top Fuel cars, much larger). I don't know what size wires F1 cars were using in the 70s, but I would think wires on engines such as the DFV would be about 8 mm (someone please correct this if they know otherwise). If so, the proper scale wire size for a 1/12 engine would be 0.67 mm (plenty close to 0.65 mm). If the size was indeed 10 mm, the scale size would be 0.83 mm. The proper scale sizes may look small. Many builders seem to find a slightly larger wire looks better. Nothing wrong with that, though personally I find 'in scale' always looks best. The 1 mm in your photo clearly looks too large. You bring up an excellent point regarding the surface finish on the wire. The vast majority of small wire sold today has a PVC or Teflon (PTFE) insulation which has a shiny surface and does not look right at all. The colours also often look somewhat translucent, and sometimes have a pearlescent effect to them which just looks wrong. The colours should be solid, with a slightly matt finish. Furthermore, this PVC or Teflon insulation is stiffer then the conventional vinyl insulation, which prevents it from draping in a natural way when installed. Lately, I have been finding it very difficult to find proper size wire (for 1/24 scale) in an acceptable colour and finish, and suitably supple. As for removing the paint from the FORD letters; is the cam cover painted black or just molded black plastic? If just black plastic, you may have some luck with the local application of a stripper (Castrol Super Clean, Easy-Off HD oven cleaner, or Easy Lift Off) with a small brush or cotton swab, though that sounds like a recipe for a mess. Silver is also one of the more difficult paints to remove. You might get better results painting over it with black. You can then re-do the letters in silver if you wish. Others may have better advice. -
That is one sweet coupe! Very cool. The side profile just rocks.
-
1/24 scratch built Alan Johnson Bicknell Dirt modified finished!
Bainford replied to Dirt Demon's topic in Model Cars
This is a scratch built model, not made from a kit. This model is built using the application of huge amounts of skill and knowledge to create an accurate replica from basic material stock. No small feat. -
They sure packed them tight together. Did you get Bunny Burkett's autograph?
-
Nice. Any issues so far, Pat? I just picked up one of these kits myself.
-
Holloman & McKinney 57 Chevy C/MP circa 1964
Bainford replied to R. Thorne's topic in WIP: Drag Racing Models
It's coming along nicely, Ron. Lots of details to keep track of. That is a good looking sheet of gauge decals. Is that an ebay purchase? -
"The 777" Tasca Ford '63 lightweight Galaxie
Bainford replied to customline's topic in WIP: Drag Racing Models
I really like what you've got going here, Jim. This is shaping up to be a fine build. I appreciate the sweating of the details. Very nice work. -
Welcome to the forum, Carlo. This is a great place for model cars. Enjoy.
-
Welcome to the forum, Josh. Some fine looking projects there. Cheers.
-
Welcome back Miles. I like where you are heading with the Vega modified.
-
Back to the hobby after 35 year absence
Bainford replied to jmk0303's topic in Welcome! Introduce Yourself
Welcome to the forum, Joe. Nice Galaxie. Perfect colours. -
What did you see on the road today?
Bainford replied to Harry P.'s topic in General Automotive Talk (Trucks and Cars)
Yes, mentally he is a five year old. -
Removing cast in wheel lug nuts.
Bainford replied to Brutalform's topic in Model Building Questions and Answers
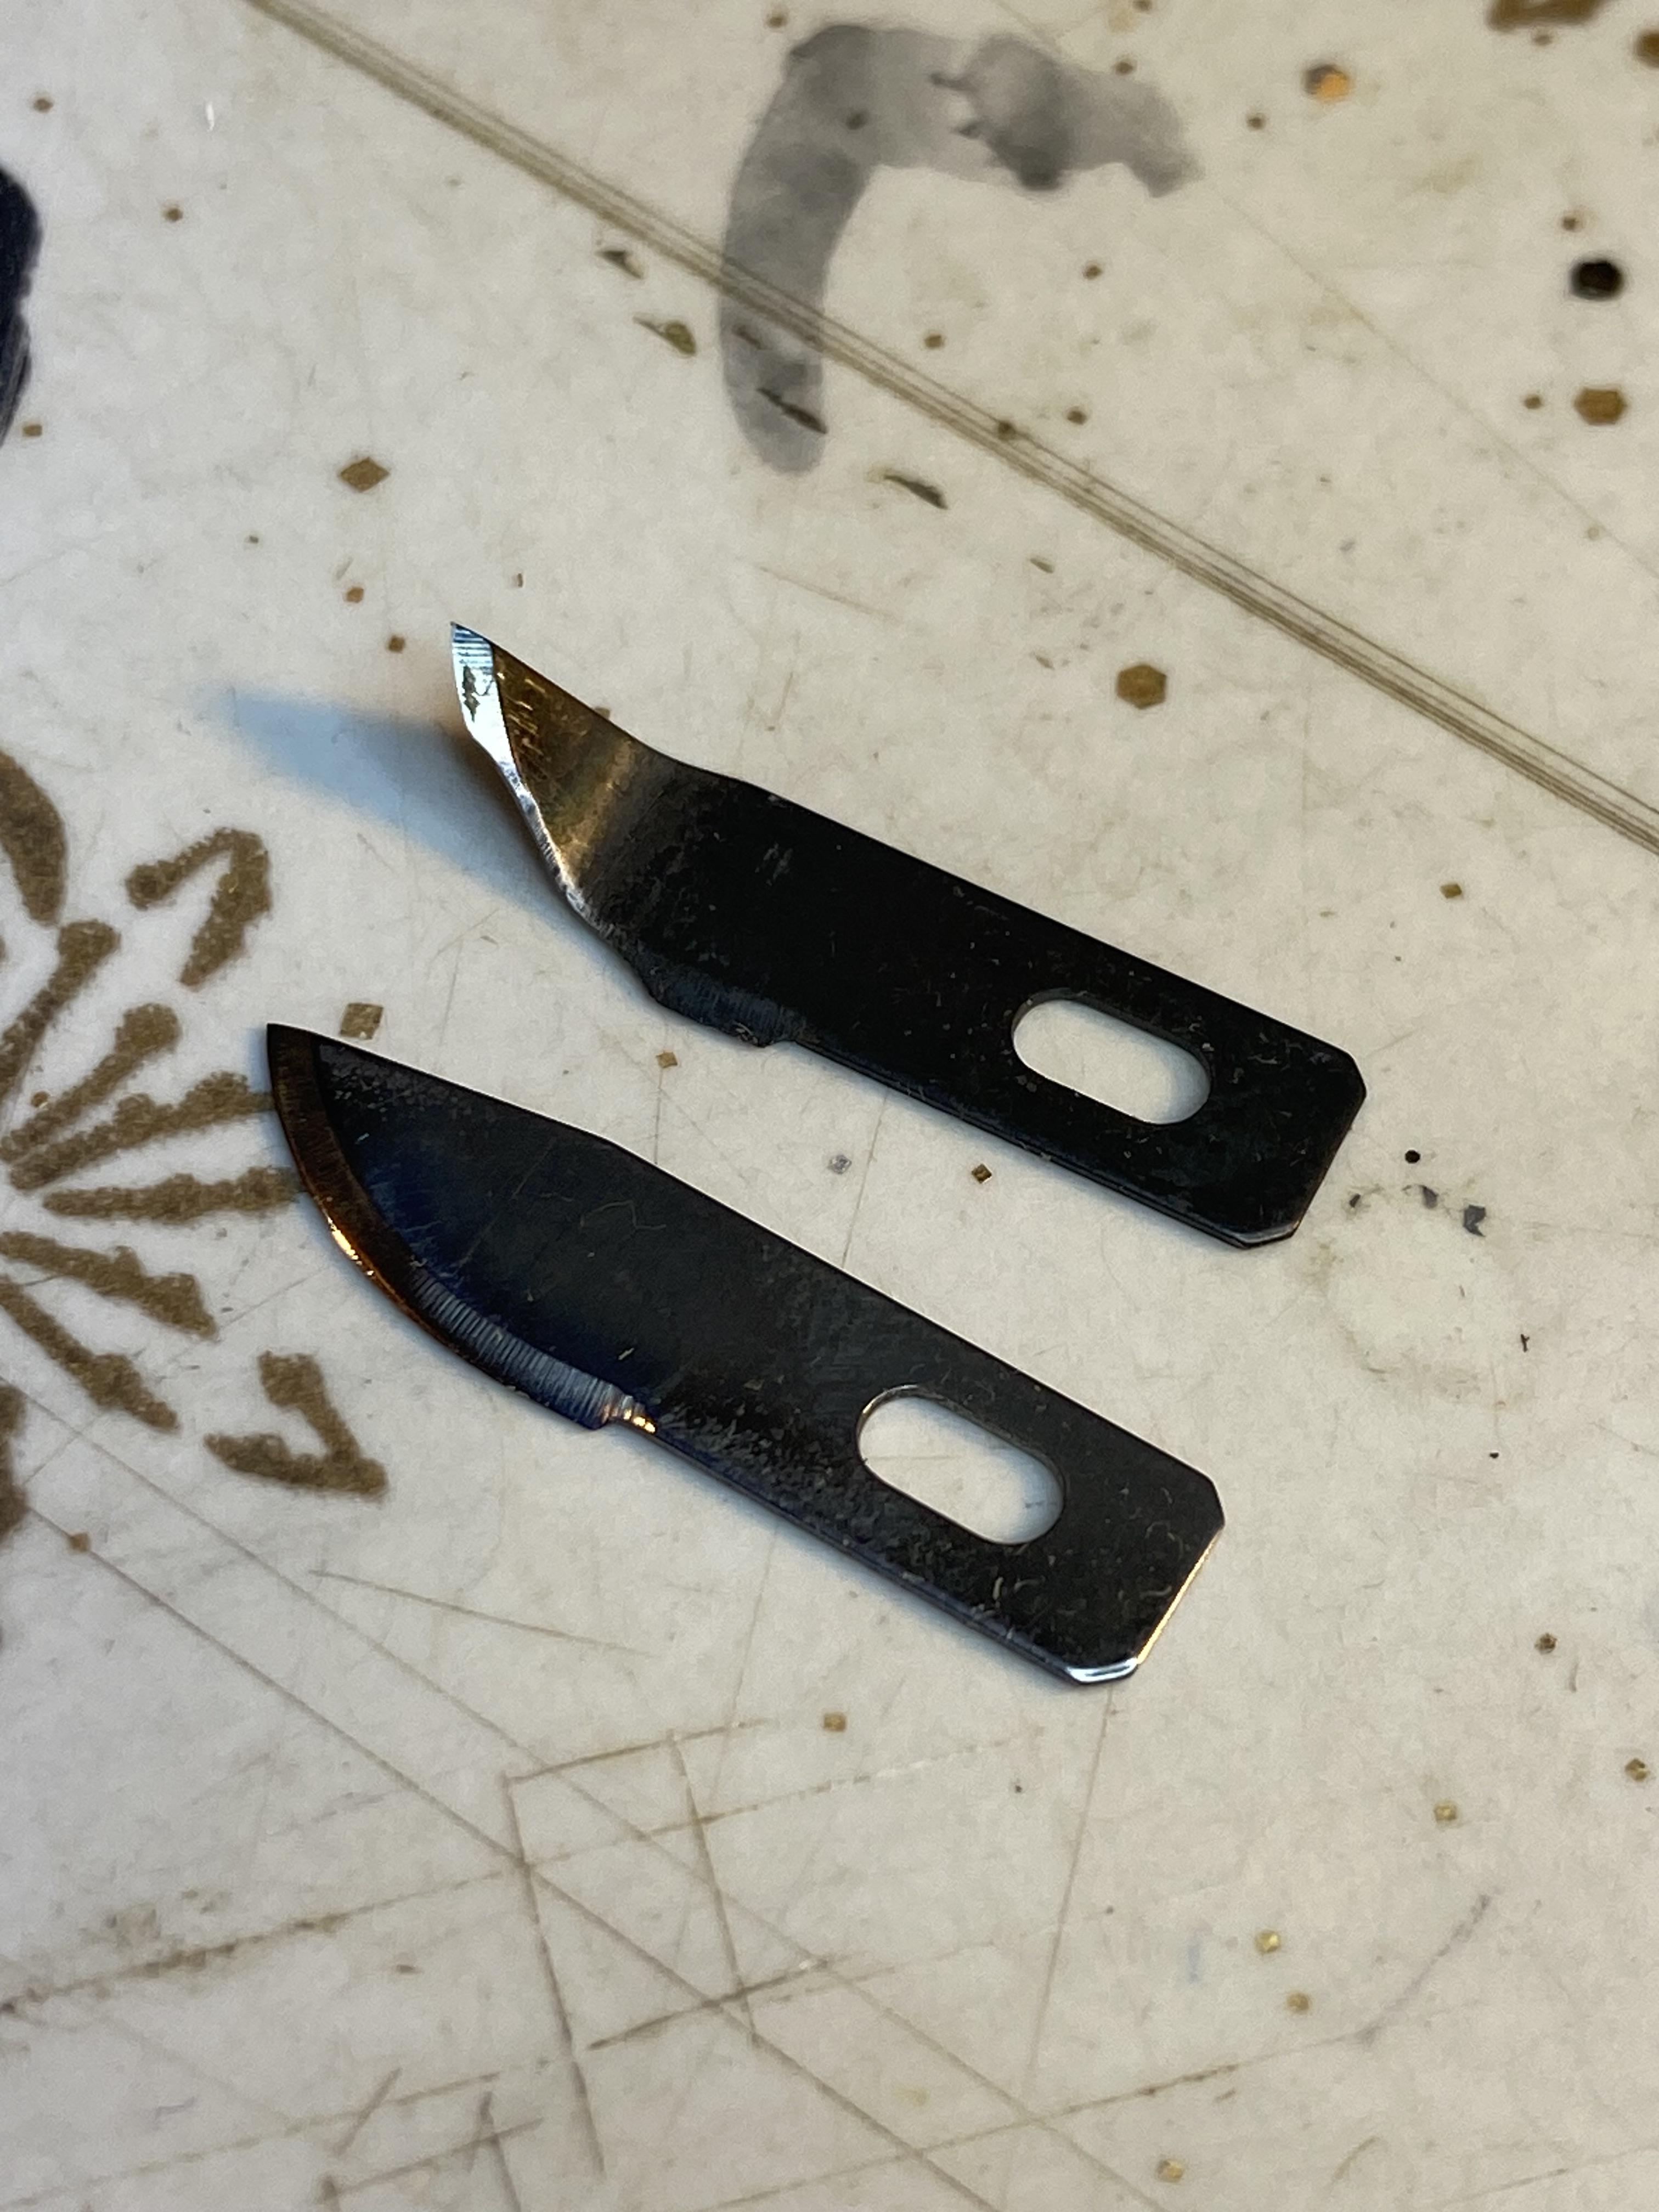
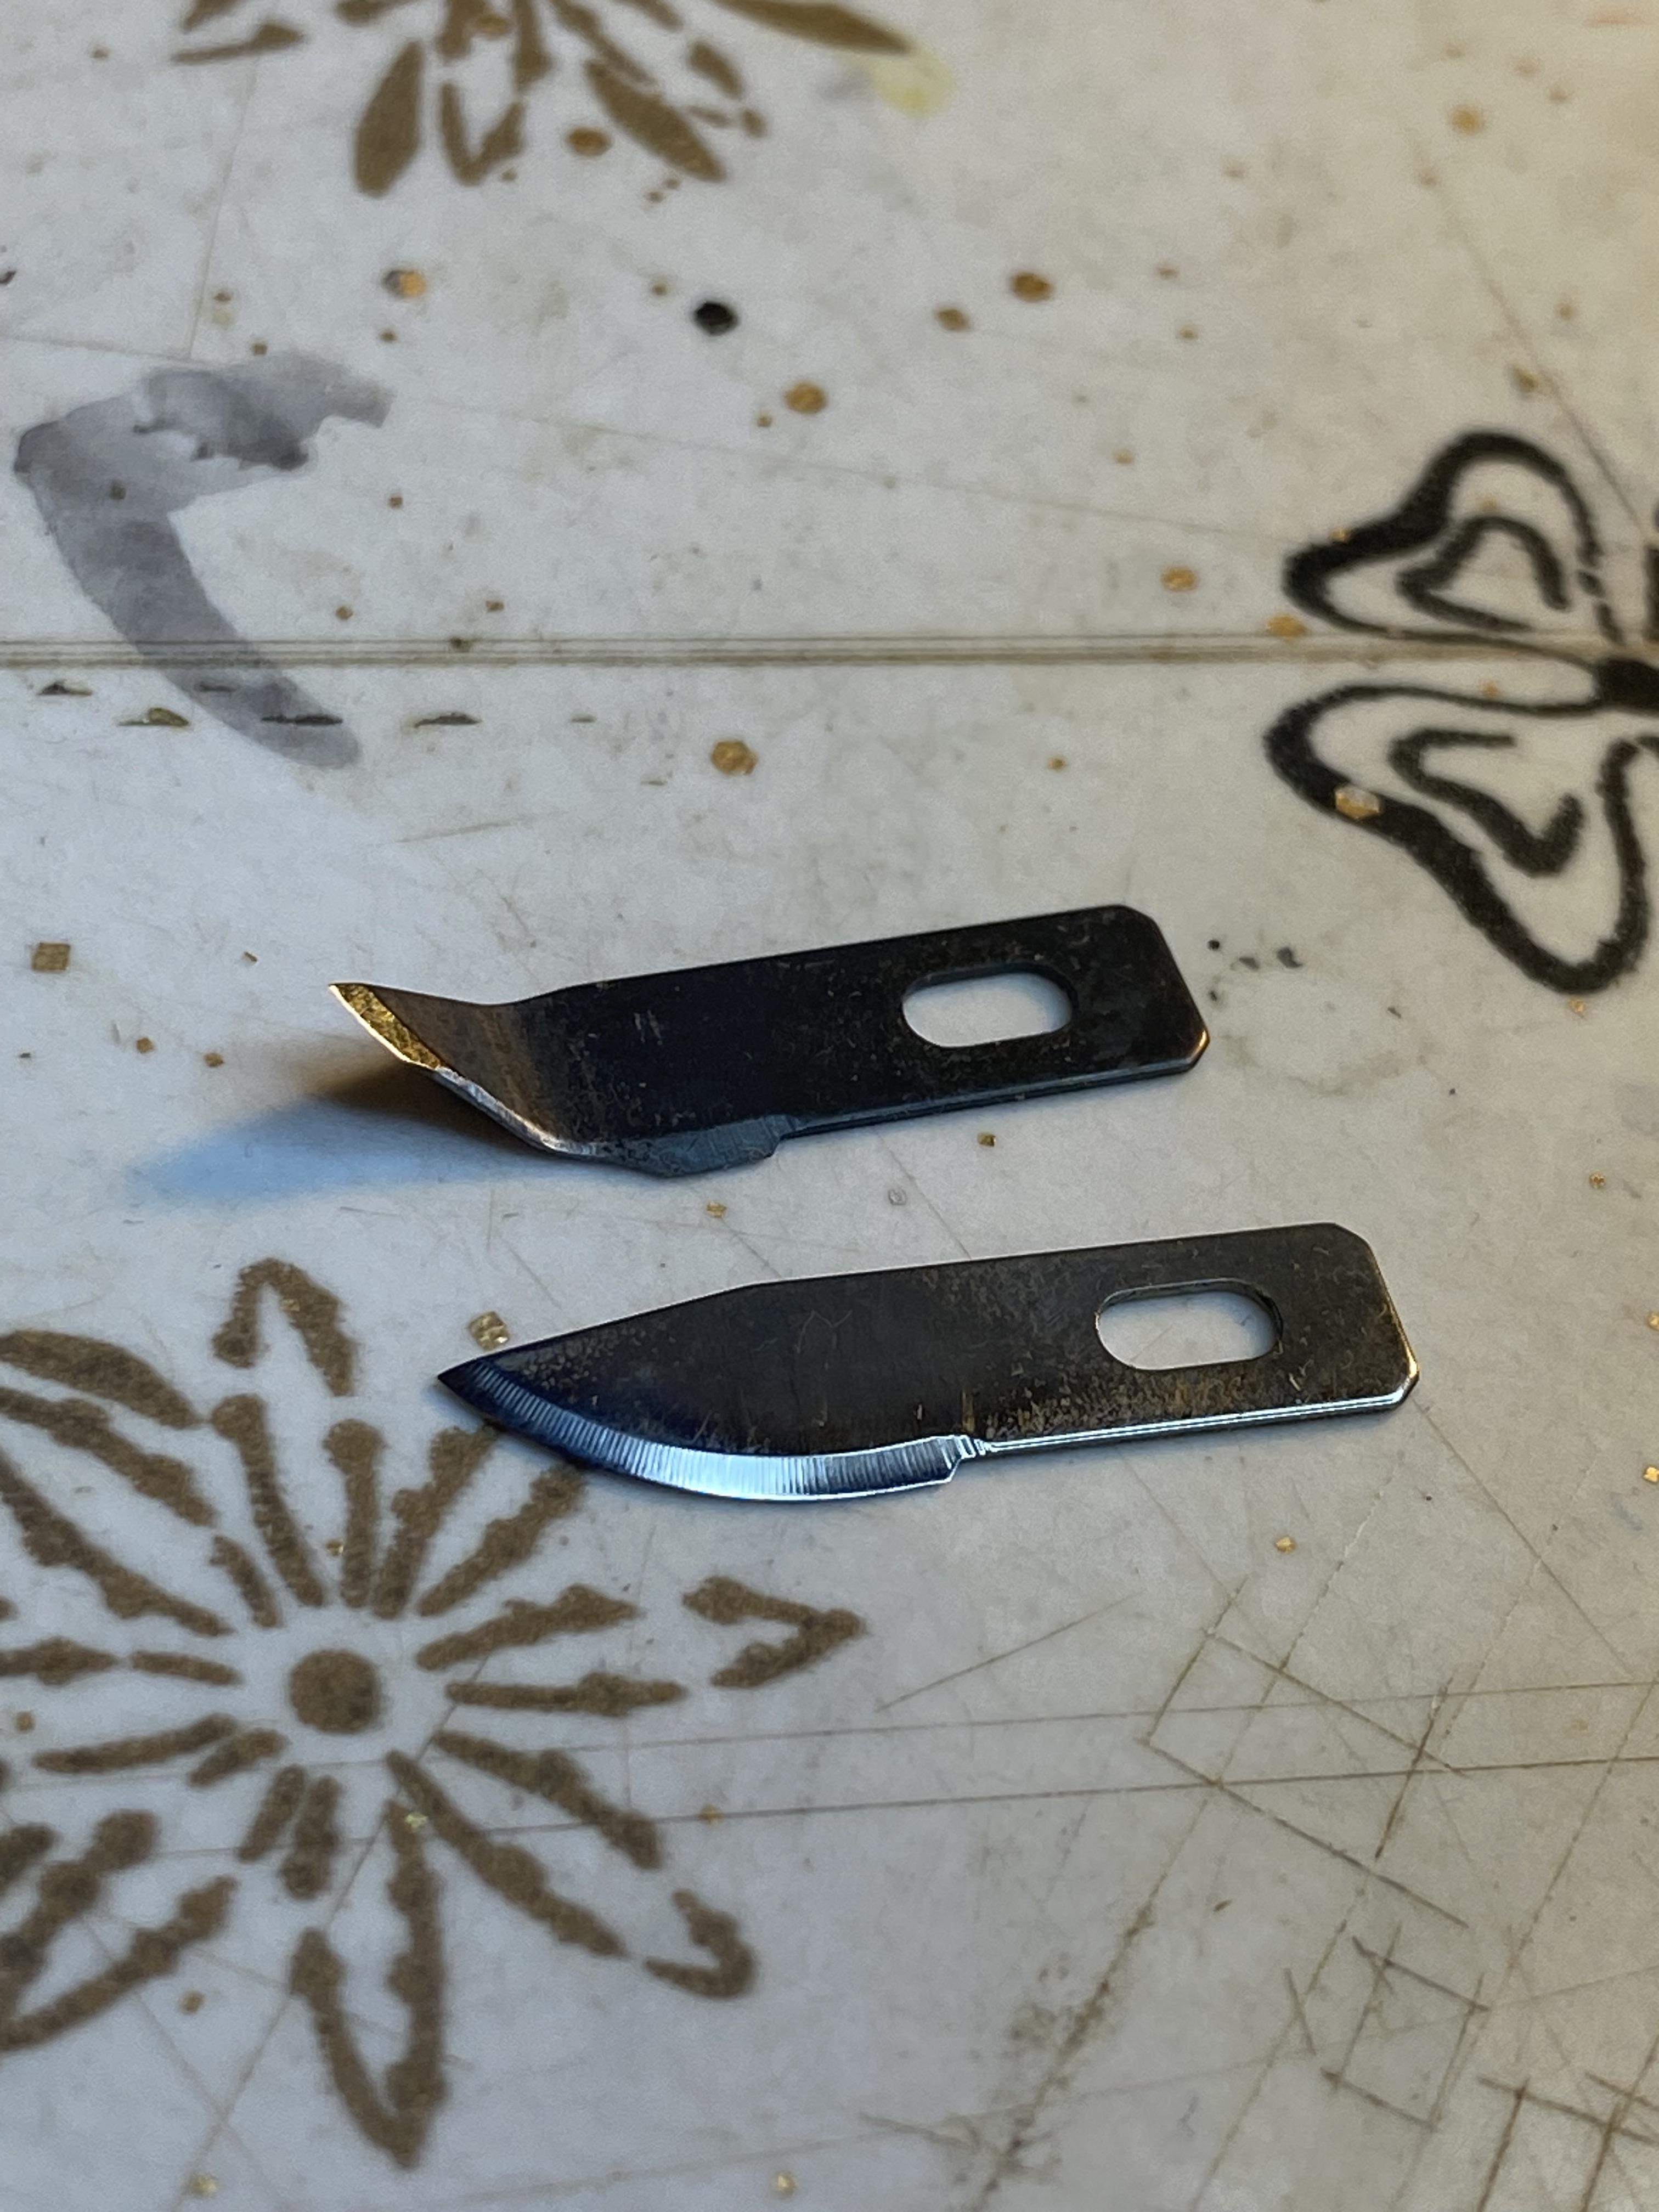
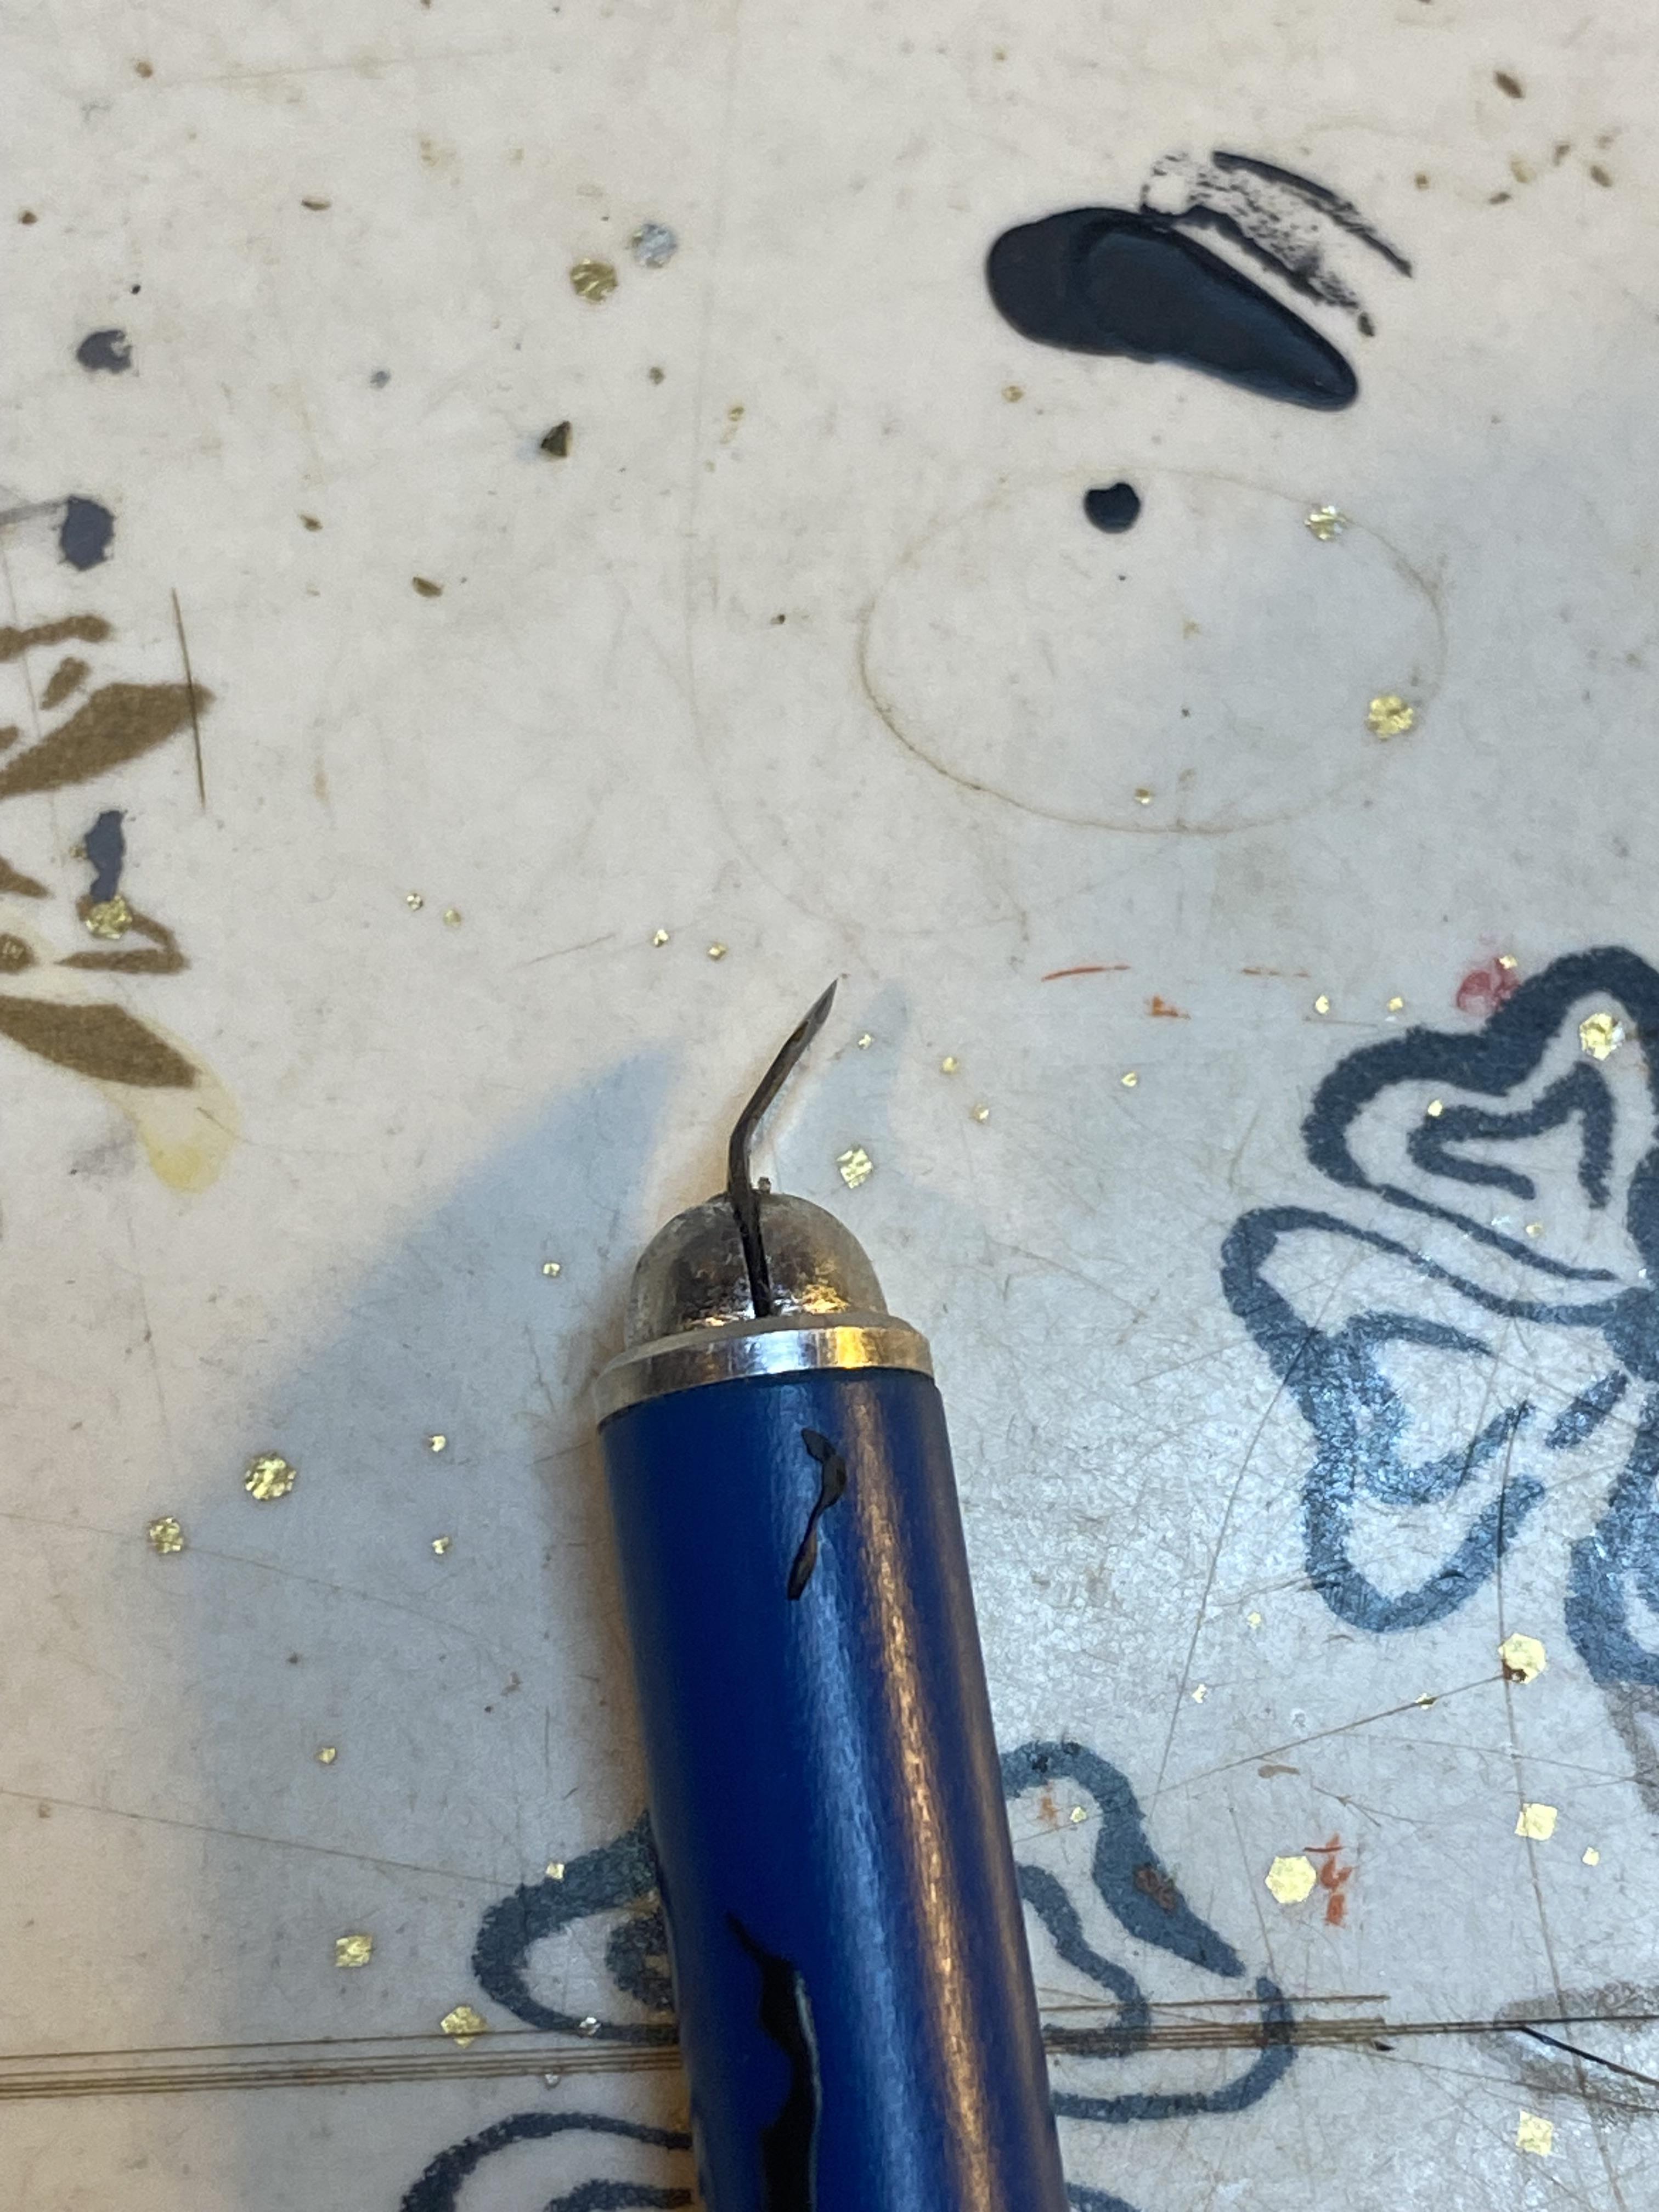
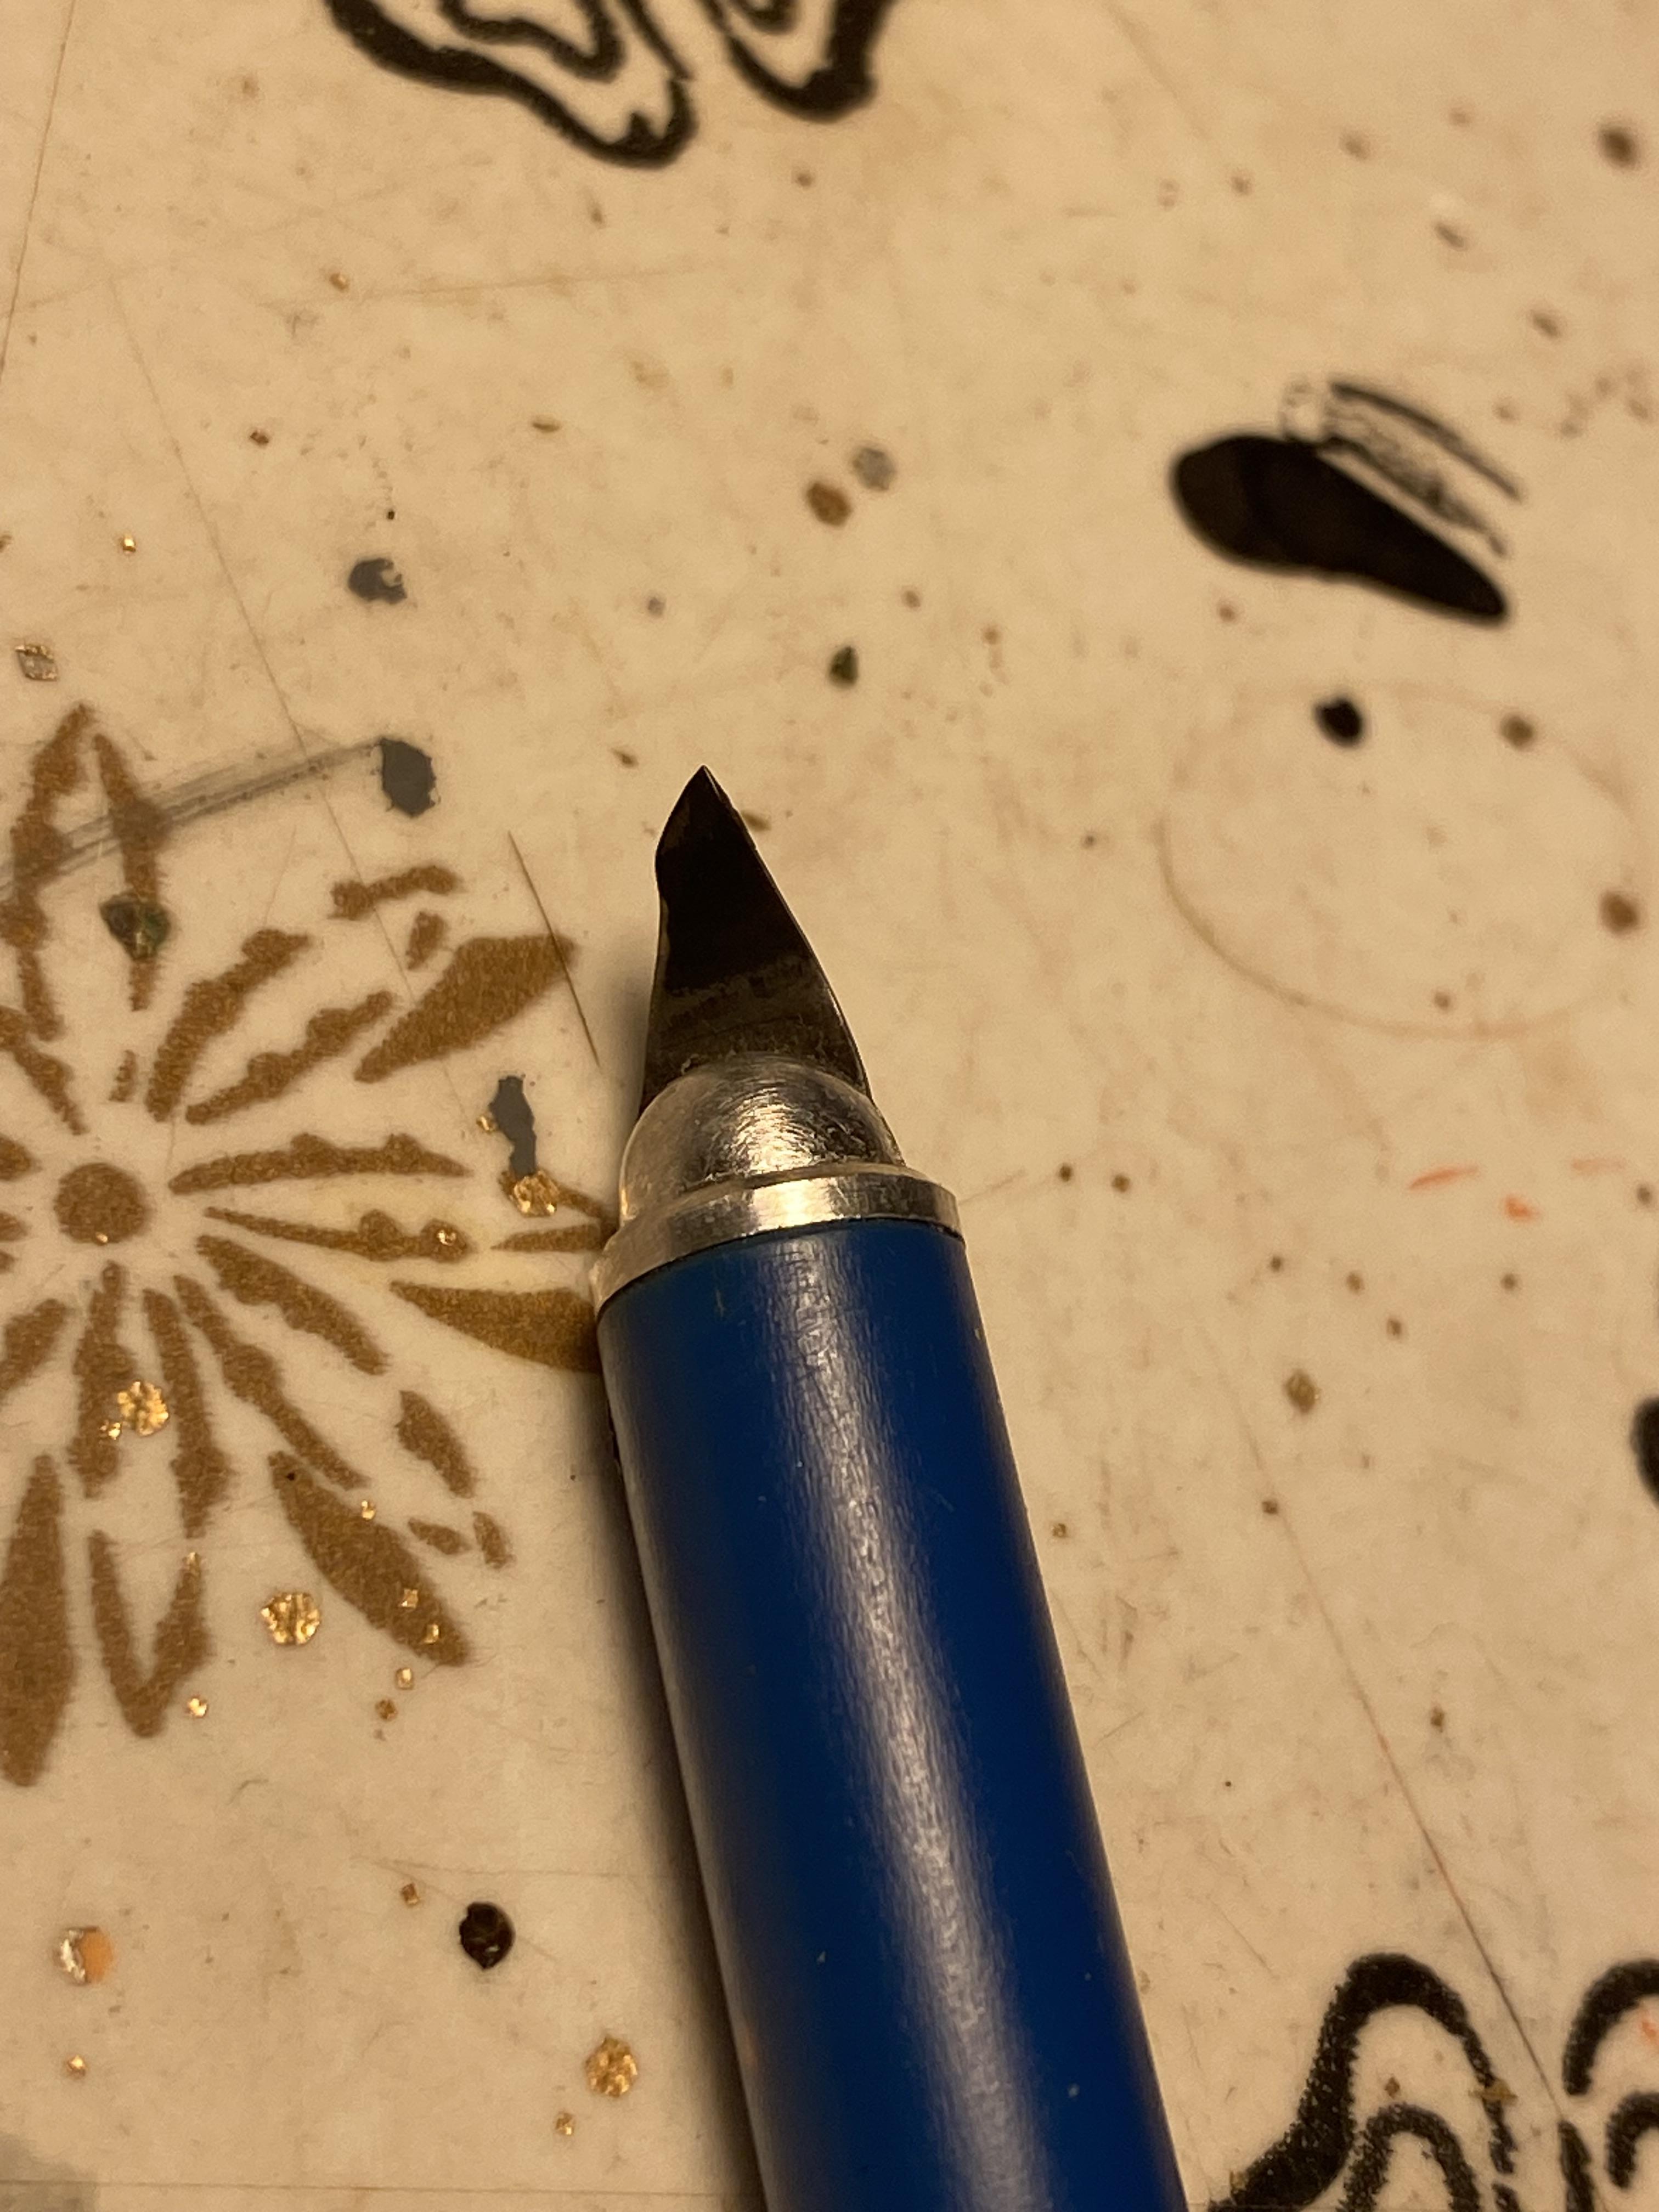
Sometimes when the lug nut is not too closely shrouded, a blade can be modified to do the trick. I took an Excell rounded blade and clamped the pointed end in a vice, heated it with a pen torch, and bent the blade at an angle. Then I ground away the cutting edge to make the blade less bulky and provide clearance, leaving just about 3/32" of cutting edge at the tip. This allows me to get the blade down into the wheel while keeping the cutting edge level with the surface on which the lug nut is molded. Be sure to clamp the cutting end of the blade in the vice when heating so the jaws can sink the heat and prevent the blade from losing its temper ( no one wants a blade with a bad temper ?). This modified blade has since been extremely handy around the bench, perfect for many hard to access trimming and scraping jobs.
-
Great! Looking forward to it. Lots of good stuff there. Intriguing kits, I've been interested in the Fords, and if they ever do the 6cyl Charger, I'd be all over that.
-
Very cool. Nice conversion.
-
Cool Nomad. I dig the vibe. One of my all time favourite kits, but you're right, the headers are no bueno.
-
USAC Roadrunner
Bainford replied to yellowsportwagon's topic in Stock Cars (NASCAR, Super Stock, Late Model, etc.)
Great looking stock car. Nice work. -
The Starliner is looking wicked. That's a lot of foiling.
-
If you build it, please post some photos. I've been curious about these kits.
- 38,864 replies
-
- 1
-
-
- johan
- glue bombs
- (and 1 more)
-
AMT Snap Corvette Built By My Granddaughter
Bainford replied to 69H.O.Firebird's topic in Model Cars
Super awesome! Great looking Vette. Well done Pap. Fun times. If she has a little free time, get her to put together a short tutorial on clear coating for the forum. -
Sold $9600