Dave Van
-
Posts
7,137 -
Joined
-
Last visited
Content Type
Profiles
Forums
Events
Gallery
Everything posted by Dave Van
-
Input on a kit (72 Torino)
Dave Van replied to SCRWDRVR's topic in General Automotive Talk (Trucks and Cars)
Thanks Sir! -
Input on a kit (72 Torino)
Dave Van replied to SCRWDRVR's topic in General Automotive Talk (Trucks and Cars)
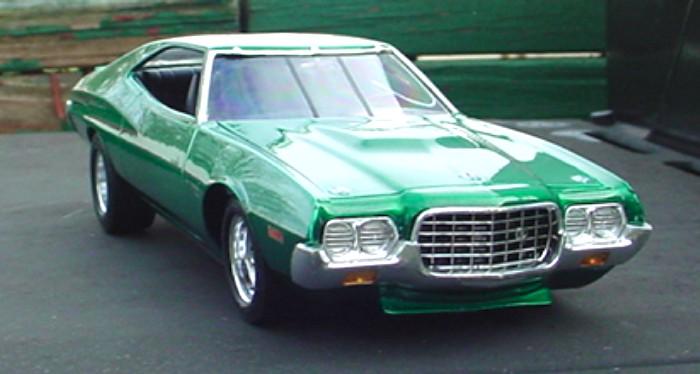
This is the Issac MPC body, JoHan Grille and JoHan interior and promo chassis......a Franken model!
-
Input on a kit (72 Torino)
Dave Van replied to SCRWDRVR's topic in General Automotive Talk (Trucks and Cars)
The AMT 72 Torino is the JoHan kit re-boxed. The MPC 72 Torino was cloned off the JoHan kit and modified. Hoods, bumper and grilles all swap. -
I like this show........the right size and I get to see many of my Ohio friends!!! Thanks
-
Input on a kit (72 Torino)
Dave Van replied to SCRWDRVR's topic in General Automotive Talk (Trucks and Cars)
Odd thing is the two models wheelbase is different.......in real life they are the same.......I had planned such a build. -
Input on a kit (72 Torino)
Dave Van replied to SCRWDRVR's topic in General Automotive Talk (Trucks and Cars)
Kit builds a NASCAR stocker without any issues. As stated the body, grille and bumpers are showroom stock. So if you build it as a racer you have to remove the body trim and emblems. The grille cover is correct but the headlight covers were illegal in NASCAR. Find photos of real 72 race Torino and you will see the difference. I just drill out the stock headlights and make covers from a paper hole punch and .010 plastic sheet. Overall chassis is correct but is missing the stamping a factory pan would have...not a huge issue but a flat/smooth pan would be illegal too. The Boss 429 is not correct for a NASCAR Cup car....nice motor.....but a 351 from a AMT 1989 Thunderbird kit is more correct. Mine.....Penngwen decals
-
I knew of the 71 'Suoerbird' but was ecited to think of a 70!!
-
MPC 70 Superbird kit???? I want to see!!!!!
-
My brother in law owned a JPS version many years ago. It was fun to drive as the power to weight ratio is good.........BUT....like many a Brit auto the electricals were not great. The power windows would fail shortly after each time we fix them.....and that black car with ZERO insulation got HOT fast! I'm 6'2" and I had to sit on the ground...put my legs up into the car and push myself in!!! But a fun car. Need to build my kit too!!!
-
I model O 1/48 scale. The reason for use of 1/43 vehicles is the VERY few 1/48 vehicles available. Even in the 50's there were plenty of 1/43. And trains are so big the difference was accepted. Today we are starting to see more 1/48 vehicles but they still way behind.
-
Nice Vitamin C Bird!!!! I have two built...I want to do each factory color.
-
Started a new master...
Dave Van replied to Repstock's topic in Truck Aftermarket / Resin / 3D Printed
Great pattern work! -
Round 2 December 2019 Product Spotlight
Dave Van replied to martinfan5's topic in Car Kit News & Reviews
Maybe the old MPC locomotive 'The General' kit with a box car full of Coca-Cola!!!! -
I need to jump in here as I started this....... I DO NOT feel any one connected to the NNL East has any fault of blame. I'm not mad at any one....any where. Part of it was on me. At the end of the show I made the rounds to say bye to the many folks I know and only see at shows. Boxes were packed and ready....did one walk off?? Did one get picked up in error? Does not matter any longer. I hope someone does have the stuff rather than it ended up in a landfill!!!! I DID take a huge financial loss that day. The 5 display samples where a big loss but there were a few high dollar resin kits in the box too. Among other items. But the biggest loss to me was that 1956 Ford short track build. I had started that build as a kid in 1976 as the real car I saw run weekly at Metrolina Speedway in Charlotte, NC. I didn't have the skill to finish the build and it sat for THIRTY FIVE YEARS until I had the skill and time to finish it. So it held a lot of personal value with little cash value. So between to $$$ loss and losing some of my favorite things......going back just opens up all that again. Maybe someday I'll get past it and see many of my friends again at the NNL......thx
-
Well I found one of these (no box) for $5 and issues and all bought it. If not for the short deck really not bad.....thanks for posting yours.
-
Very cool work!!!!! I have two of the kits and have thought about a detailed build.....using parts to make it more detail....like a motor etc.
-
Round 2 December 2019 Product Spotlight
Dave Van replied to martinfan5's topic in Car Kit News & Reviews
Yes....kinda a Life follows art thing!! -
Round 2 December 2019 Product Spotlight
Dave Van replied to martinfan5's topic in Car Kit News & Reviews
COKE is paying Amtrak on that one.........R2 pays Coke for the Coke model kits. But yes....Coke has some cash on hand! -
You are a fast draw.......was coming here to do the same
-
I like those kits.....you did well!!!
-
To bad about that rear deck......pretty easy to see something is wrong. I'd get me one if not.
-
Galion 12 1/2 ton Crane......DONE!
Dave Van replied to redneckrigger's topic in Model Trucks: Big Rigs and Heavy Equipment
Great craftsmanship!!!! -
Maybe lazy has something to do with it........but dealing with the morons that seem to be the majority of the public today have a bigger impact. Being permanently disabled and at times limited to my wheelchair the idiots I deal with are mind blowing. Once I was at a big box national chain and needed to visit the restroom. The restroom was empty other than someone in the handicap stall.....so I waited. After about 15 minutes this guy, without any visible issues, newspaper under arm. When he sees me sitting there in my wheelchair he gives me a 'sorryyyyyyyy'. Lots of jerks out there. Moore shutting has more to do with not competing with JoAnn and Hobby Lobby......my wife shops them all....Moore is not even up to JoAnn for selection......even less than HL. It's hard staying relevant and competitive.
-
I have been making decals since I hand painted my own on paper tape as a kid. My way...not the only way... Start with a clean and glossy surface. Use whatever method you like to get there. I like a clear spray like Testors gloss coat or Tamiya. Regardless of decal type here is how I apply decals. I cut the decal from the sheet as close to the image as possible. I have a small pair of scissors that are sharp and easy to cut around small images. Using tweezers I dip the decal in warm water for about 10 seconds. I place decal on a damp paper towel and allow the decal to ‘cook’ as its called. This can vary by decal paper maker. It can be anywhere from 30 seconds to a minute or two. When decal moves easily on paper backing it is ready to apply. On surface of model put two or three drops of water. With tweezers place decal on model body where you want to apply. With your finger move the decal image off the paper just enough to use your tweezers to pull the decal paper from under the decal image. This will keep as much air out from under the decal. Position the decal image in the exact spot you want it. With the slightly damp paper towel blot the water from the decal. Making sure the decal is positioned in the correct spot, make a squeegee from the damp paper towel and from the center of the decal out to the edge squeegee out all the water and some of the glue. This will keep the decal from turning yellow as it ages. IF needed I will use Walthers Solvaset decal solution. Go light as it is a strong solvent but works Well for me. After the decals dry for a day or two I apply a coat of Future Floor Shine with a 1 in wide soft sable brush that is only used for Future. Allow to dry overnight and all should be good!!!
-
You know I like the obscure.........but you are in the deep end of the obscure pool!!!! Fantastic build!!!!