Bill Eh?
-
Posts
1,250 -
Joined
-
Last visited
Content Type
Profiles
Forums
Events
Gallery
Everything posted by Bill Eh?
-

Tamiya spray cans banned in Canada!!!
Bill Eh? replied to Bullybeef's topic in General Automotive Talk (Trucks and Cars)
I guess we strive to top ourselves on the lack of common sense meter. A little while back our Ontario Provincial Police charged a a woman with assault with a weapon, when she accidentally shot a neighbour with a Nerf-style water gun. But this latest development definitely tops that! LOL -
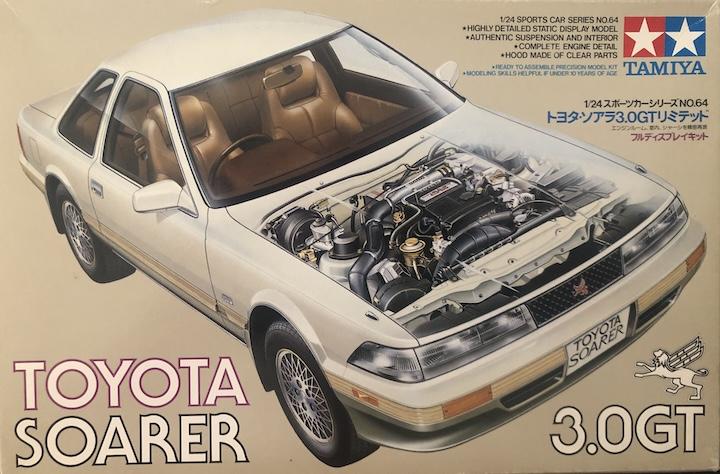
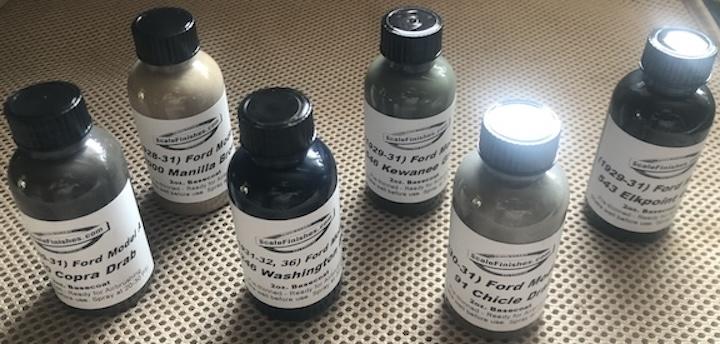
I don't think Tamiya has anything that comes close to 1957 Chevrolet 796 Harbor Blue metallic. I'm not sure about Mr Color, although the Mr Color palette is far broader than Tamiya. Scale Finishes: https://scalefinishes.com/1957Chevrolet.html
-
New trigger-style airbrush - suggestions?
Bill Eh? replied to atomicholiday's topic in Model Building Questions and Answers
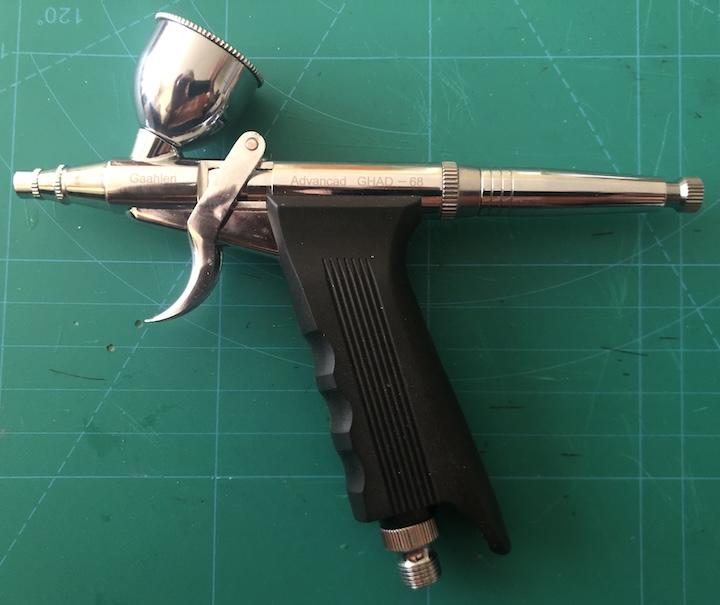
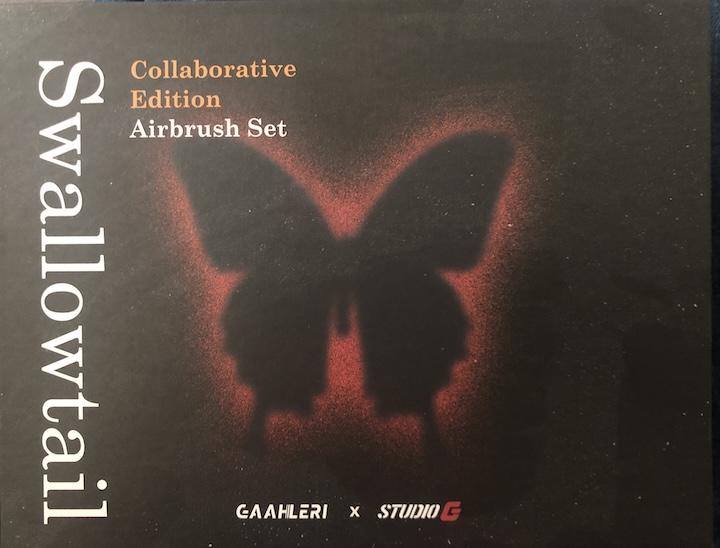
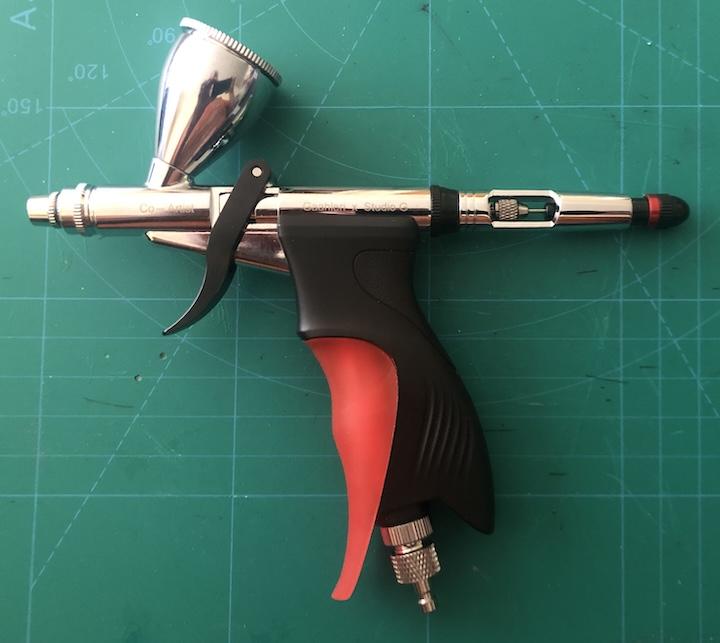
I use two trigger style from Gaahleri, the GHAD-68 and the Swallowtail. GHAD-68, 1/4 and 1/2 oz cup sizes, 0.38 and 0.5 mm needle nozzle sets, self-centering, drop in nozzle design, $64.99 Swallowtail, 1/3 and 2/3 oz cup sizes, 0.28, 0.5 and 0.7 mm needle nozzle sets, self-centering, drop in nozzle design, $119.99 I like them both. They have well machined parts. Available at gaahleri.com
-
Local to me, there is a major contest this Saturday, TORCAN. What do you do before a major contest with a large number of vendors? Check out your favourite Kijiji seller in London, ON, who will also be at TORCAN! So I bought these kits from John yesterday and I received the package in today's mail. The first four were the kits that I purchased. Two other kits of Nissan JDM goodness were included!
- 39,159 replies
-
- 7
-

-
- johan
- glue bombs
- (and 1 more)
-
Very nice GT-R!
-
If ever I saw a Bandai Gundam kit in a Canadian Michaels, I would buy it for the pure joy you usually experience in building a Bandai kit.
-
LHS, Dailey Hobbies, last Saturday and a Michaels today.
- 39,159 replies
-
- 6
-
-
- johan
- glue bombs
- (and 1 more)
-
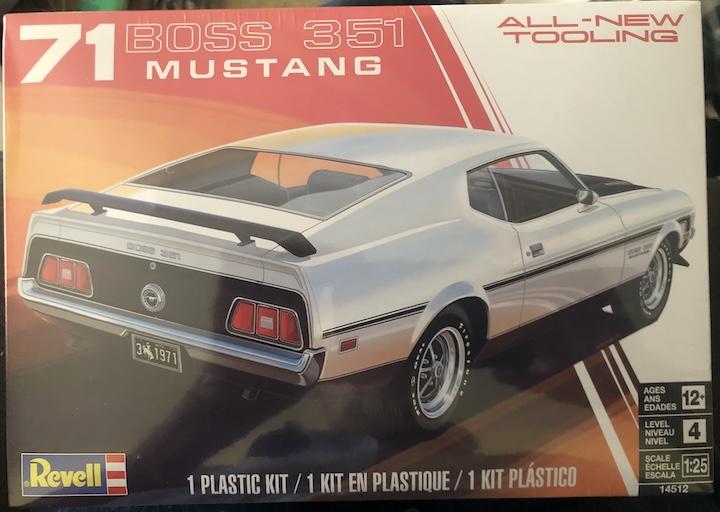
I have to extend a thanks to both Ken and Trevor. It has been quite a while since I have checked out a Michaels, mostly due to the decline in the model section. With a 40% coupon, I went for a visit. I was pleasantly surprised to find the new Revell '71 Boss 351 Mustang at $39.99. After taking off 40% and adding back tax, it was $27.11, which is a really good price these days.
-
Anyone recognise these 1/24 wire wheels?
Bill Eh? replied to Matt Bacon's topic in Model Building Questions and Answers
Matt, an excellent predicament to face. -
First time poster, long time lurker
Bill Eh? replied to Stuck Fingers's topic in Welcome! Introduce Yourself
The parents of a former student to mine, got in touch with me because their son had inadvertently super glued his fingers together. I told them fingernail polish remover or acetone would probably do the trick. LOL Welcome aboard Bill (Stuck Fingers)! -
Besides your over the top engine enhancement, I also really like the work on the interior.
-
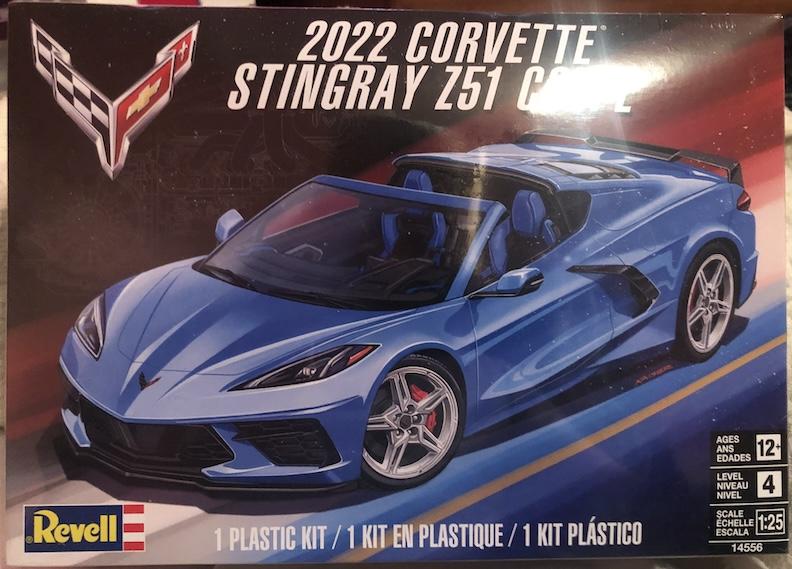
Revell 2022 Corvette Stingray C8 Z5
Bill Eh? replied to Luc Janssens's topic in Car Kit News & Reviews
Out of curiosity, what sort of 5-lug wheel design inspires you? Just an FYI, I do like to buy many of the Fujimi and Aoshima aftermarket wheel/tire sets. -
I use generic blue tac that I buy at Staples.
-
Thank you.
-
Your philosophy on tools in general might come into play. After all, an airbrush is a tool. There are two routes you can go. 1: You can buy an inexpensive, non-brand name, new or used. The quality may affect how easy it is to use, and either encourage or discourage you from airbrushing. Buying something other than a brand name airbrush, could mean questionable quality and spares availability. It may work, but for how long. If it doesn't work, you might as well write it off as lost money. 2: You can buy a brand name, new or used. Again it may or may not work. If it works, it will most likely continue to do so for some time, given proper care and maintenance. If it doesn't, you will have the assurance that spares are available. Wondering if the quality is long lasting usually does not come into play. How comfortable you are with replacing airbrush components is a different matter. My personal philosophy in buying tools, is to go with a brand name and mid to higher level quality. Preferred airbrush brands would include Badger, Paasche, Iwata, Harder & Steenbeck, or Mr. Hobby. I would also include Gaahleri as they have an established spares network.
-
Novus products are also good. Start with Novus 3 (Heavy Scratch Remover), then follow with Novus 2 (Fine Scratch Remover), and finish with Novus 1 (Polish).
-
I really like to follow the "tail that wags the dog" philosophy. I purchased two C1 transkits designed for the Fujimi Ferrari F12 Berlinetta. Did I have those kits? No, but that didn't stop me. Eventually I did give in and get two of those Ferraris. LOL
- 39,159 replies
-
- 1
-
-
- johan
- glue bombs
- (and 1 more)
-
Kate Bush appreciates your comment!
-
AMT Ford Falcon Wild Child 1:1 question
Bill Eh? replied to 64SS350's topic in Model Building Questions and Answers
What tow truck?
-
Don't worry Allison, you'll get the hang of the forum. Welcome aboard. Always feel free to ask questions.
-
Tamiya, in their LP line has a Flat Clear LP-23. Since this a synthetic lacquer, I'm thinking that there won't be an issue with yellowing.
-
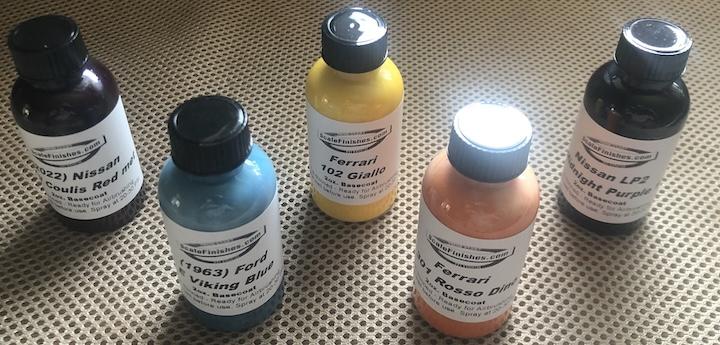
I'm blaming my '63 Ford Galaxie for this. After considering a Dupli-Color GM Metallic Blue and Tamiya TS-58 Pearl Light Blue, I finally opted to place an order with Scale Finishes for '63 Ford Viking Blue. You really have to make an order worthwhile in relation to shipping, so I had two friends, Peter and Ken join in the fun. It's amazing how meeting someone in person can have a lasting impression. At the GSL-XXVI, 2017, I had the privilege of meeting Jameston Kroon. I still have the Hot Wheeks handout from that most memorable of road trips. Normally I am not a factory stock person, but it seems that nostalgia has bitten me in the backside! LOL One of my purchased paints is Ferrari Rosso Dino. I did not do my research. I just assumed from the name that it would be the appropriate shade of red for the Fujimi Enthusiast Ferrari Dino kit! Whoops!
- 39,159 replies
-
- 4
-
-
- johan
- glue bombs
- (and 1 more)
-
James, Hasegawa sure is getting good mileage out of their 962C molds.
-
Completion, NOT Perfection – A DIY Structural Skeleton
Bill Eh? replied to Bill Eh?'s topic in The Off-Topic Lounge
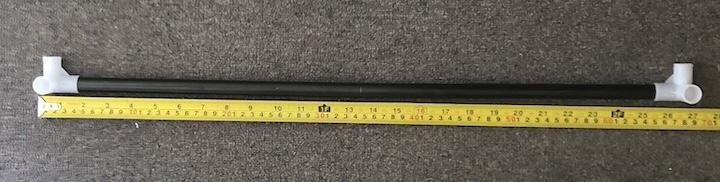
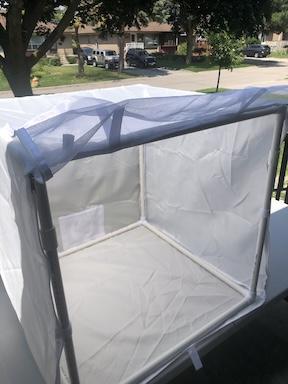
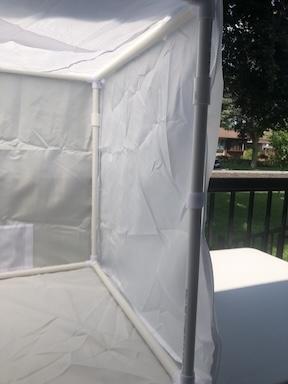
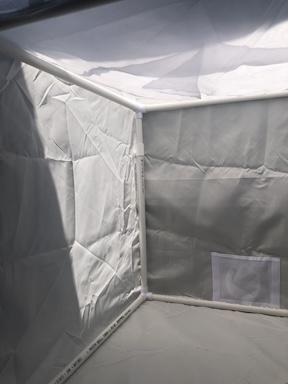
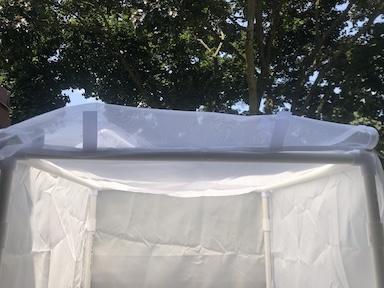
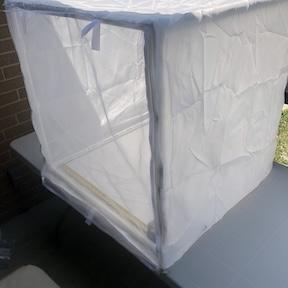
It's done. I have included a picture of one assembled piece of the frame from the original product. The metal tube is two pieces, held together by a spring loaded loop. The plastic corner pieces are very thin walled. They give you two spares, more than likely because they are easily broken. I used soft blows from a mallet to make sure the corners were thoroughly seated. The lack of quality is why I made my own frame. They say the interior working space is a 30" cube. That is not the case. The space between my 1/2" PVC is 26", which is more than enough. I am very pleased with the frame I constructed. It is more than rugged and up to it's intended purpose. There are velcro tabs located at the lower front edge and both of the sides. There is also a flap for the front opening that has zippers on both sides. There is an 8" x 6" opening, centered at the lower edge of the back panel. It is covered with a flap, but can be opened if you want to position an exhaust apparatus there. These are the final shots. I have to admit, I am proud of the this project. The degree of precision might not have been necessary, but I know it is there. Right now all of the frame pieces can be disassembled. I may take a look and see if some can be permanently glued together.
-
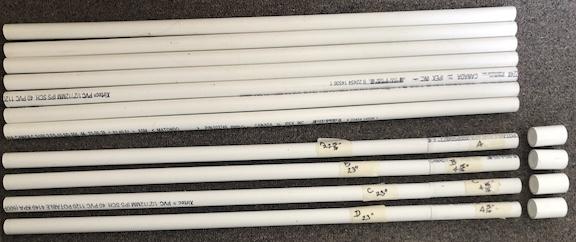
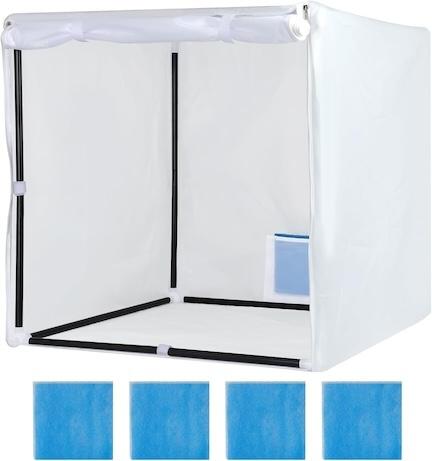
A model building website had the motto “Completion, not perfection”. The participants referred to themselves as The Nerd Herd. Those are hard words to abide by if you constantly set perfection as the bar to achieve. LOL I really like a YouTube website called Barbatos Rex. He does a lot of hobby product introductions and reviews. My problem is that as soon as he features something of interest, it becomes a “need” for me. Thankfully, he makes it easy to obtain by providing an Amazon link. And thus starts the “Siebwin Airbrush Paint Spray Booth, 30” x 30” x 30” Portable Spray Paint Booth” adventure. Even though it was listed on Amazon.com, I still got a reasonable delivered cost as there were two discounts available. These are pictures of the item as listed. These are the received contents laid out. I haven’t even looked at the enclosure material, nor the filters, as they did not concern me. It was the pieces used to construct the skeleton that did. The plastic corner pieces did not look substantial. The “spring-loaded” assembly of the two-piece tubes did not impress me either. What would I use to replace these? PVC tube and fittings came to mind. With PVC in mind, I started looking at the Home Depot website. I don’t know why, but my mind settled on ¾” PVC and fittings. Home Depot had no fittings that resembled the plastic corner pieces, for obvious reasons. I decided that I could mimic the corner piece by using a combination of T and Elbow fittings joined together for each corner. When I asked a Home Depot rep if there were pieces specifically made to join a T to an Elbow, they told me no. I had to cut up short lengths from a pipe to do this. With this information, I purchased 8 T’s, 8 Elbows and 4 x 10’ lengths. I was so happy with my purchased! Remember that perfection thing I mentioned at the beginning? To have the tent actually fit on my replacement skeleton, a certain degree of precision would be required. I am very much a visual person, so I drew scale pictures of the fittings involved. These would assist me in determining cut lengths of the PVC pipe pieces. I was well and truly happy with my progress. Then reality set in. Staring at the PVC pipe and fittings, I realized that ¾” was way more than overkill. From having gone to the store already, I knew there was a smaller size, ½” which would be more than adequate. So I took all of my purchases back to Home Depot for a refund, and purchased the corresponding pieces in 1/2” sizes. I also realized I could complete this with 3 x 10’ pieces instead of 4. Doing this cut my Home Depot expenditures by half! After getting all the new PVC home, replacement scale drawings were done for the fittings. Measurements of the fittings openings help me make length calculations. I also made notes as to how to apportion the cuts over the 3 x 10’ lengths. Some research was involved as to the best tool to cut PVC. You can cut PVC with many manual tools; a hacksaw / PVC pipe saw, a conventional pipe cutter or a ratcheting style pipe cutter to name a few. Using either type of saw was ruled out because of the challenge of getting a square cut. A square cut is a definite requirement when close to exact length cuts factor in. That left a conventional pipe cutter or a ratcheting type. Looking into ratcheting types, they definitely win in the ease of effort category. However, many are challenged to produce a square cut for many reasons. That is unless you are willing to spend $100 plus for a brand name piece. I opted for a Rigid brand conventional cutter. Little did I know the work/effort that would be required to complete all of the cuts. So I set to cutting all of the pieces. I think it took somewhere around five hours. After making the cuts, I wanted to test fit a small joining piece to see how well the pipe would fit into the T and Elbow fittings. Joining a T with an Elbow was a failure. The T did join with Elbow, but was off by 90 degrees. The fit was so tight that once they were together, the T could not be twisted the 90 degrees. On the up side, it showed me that the outside diameter on both ends of each pipe piece would need to be reduced to the point where the fit was still snug, and yet could still be disassembled. Why couldn’t Home Depot have had a single fitting for the corner? Why was I thinking that the only possibility was to MacGyver my own version? That’s when it occurred to me to take a peek at Amazon. Amazon had many, many vendors selling the ½” PVC corner piece. Now what do I do. Should I be stubborn/proud and not admit that my initial attempt was not optimal. There were so many offerings to choose from on Amazon. Would these corner fittings, designed for furniture etc. actually work with standard PVC pipe? The only thing that concerned me with most of them were the specifications listed. Inch dimensions were provided with decimals. Why not with fractions as is the normal custom? What the heck is 0.82 inches. I spent a lot of time on a website to do conversions. Eventually common sense won over pride and I placed an order. At the same time I ordered a pipe reamer, as I knew that reducing all pipe OD’s by filing, scraping or sanding would more than test my patience. With this change in structural design, a new problem came to light. When planning the cuts, 8 pieces needed to be 28”. These were for the pipes connecting horizontally and from front to back. The pipes connecting vertically were 23”. So I headed back to Home Depot (AGAIN!) and got a refund for 7 x T fittings and 7 x Elbow fittings. Remember, I prior failure left one of each unreturnable! LOL As I was driving to the store, my thought was that I would need to buy another 10’ length so as to make 4 more 28” pieces. While driving my thoughts went to the leftover off-cuts. Would there be enough to join to the 23” pieces to make them 28”? What were the offcuts – 8”, 8” and 16”! Yes, all I needed were 4 x connector pieces. Well my Amazon order was delivered today. I was happy and relieved to find that the reamer did the job well. Once reamed the pipe fit snugly into the newly arrived corner fittings. Also, from the off cuts, I cut four new pieces to extend the 23” ones to 28”. Well all of the peces have now been cut. They still have yet to be reamed with a test fit So back to that nagging perfection thing. When I make something, I want to do it to the best of my ability. That means taking the time to do calculations, take measurements and make cuts with precision. If I am getting finished dimensions within a 1/16” of accuracy, I am pleased. Like many things in life steps backward always seem to accompany steps forward. Onward and upward!


.jpg.667509fc59dfa77e69f01c2b8a9cff76.jpg)