MrObsessive
-
Posts
9,785 -
Joined
-
Last visited
Content Type
Profiles
Forums
Events
Gallery
Everything posted by MrObsessive
-
Back when the Superbird was new, I got to see one up close and personal practically every other week for a few years. A couple years after my Mom and Dad split up, my Dad started seeing a lady whose next door neighbor bought one not long after they were intro'd. If Dad had my sister and I for the weekend, we usually had Sunday dinner at her house and a lot of times the car would be parked literally in front of her door. I could sit and look at that car for what seemed like hours as I LOVED the high wing and the pointed nose. I don't know what was in the car............probably a 440. I do know it was a 4 speed car as I distinctly remember that pistol grip shifter. This one was white with the black vinyl roof and those Road Runner decals with it holding the helmet to my eyes are just CLASSIC auto art! Interesting enough, in the later '70's when I was about to get out of school, I happen to pick up a Road and Track mag and in the back of the magazine in the classified ad, I happen to see the car for sale. I was in high school in the Ft. Washington MD area at the time, and it was listed in the Harrisburg PA area and the person selling it.........his name sounded awfully familiar. I figured it HAD to be the same car as there were VERY few in the area back then and the car was described as white with the black vinyl roof. Asking price?? IIRC, he was selling it for $1800! If only I had a time machine!
-
Hee-Hee............that's why I went with a black stripe on mine! That always worried me about Revell's white decals.......the pigments they use are never tight enough to get rid of the opacity issue.
-
Cruz! Those two are GORGEOUS!! I looooove the shade of blue on that Daytona! (B5 blue?) Also, your hubcaps are more accurate than the ones I have on my Daytona! When that car was new (Daytona) I swear I NEVER saw one of those on the street till many years later. Superbirds I saw as I knew a family that owned one, but never the Daytona.
-
Well, it's FINALLY good to be able to sit down after over two months and get building again! The new house is a bit smaller than the last one so my model room is not as big. That's OK though as I'm still able to have the "essentials" with me in the room. The last time I posted was back in August which would make sense because it was very shortly afterwards I had finalized things to be moving roughly a month later. In a sense I'm glad some time had passed since I was working on this '55. When I was finally able to zero in which box this was packed in, I was able to see once again where the bodywork was going to rear its ugly head on the roof. So this time I got out the sanding block to sand away any "memory" of the plastic I had used and any imperfections were filled in with super glue. I'm not going to worry about any paint reaction with the super glue as this will be sealed with BIN Zinsser sealer. I highly recommend it for any extensive bodywork that will eventually be painted with hot automotive paints. So now here's where I am at this point............not a lot of progress, but considering trying to get things together in the new place and the shape the Ford is in, I'm liking where this is going so far. Since I had to take the body pretty much apart, I figured I may as well spend the time and redo the door structure. This involved thinning out the door jambs on the body a bit more by using a Moto tool and then checking to make sure both sides were equal using dial calipers. Whenever I need to build up door jambs for opening doors, I like to start with the corners. I'll take some round tubing of a particular size (varies) and cut it so that there's a nice radius for the bottoms of the doors. If you take a look at any 1:1 car, the door jambs for the most part do not have straight corners (there are exceptions......Studebaker comes to mind), but they do have a radius to them. I took some MEK and flowed it on and let it sit for a bit. Later on, I'll use super glue to reinforce the jamb around the perimeter for strength. Here's the door hinges for the driver's side so far. Originally, I had soldered up flat type gooseneck hinges as I was looking to make them more like the 1:1. Then I remembered what happened to the '59 Chevy when due to excessive handling/bending, one of them eventually snapped. Sooooo.............I want sturdiness this time around instead of 100% accuracy, so I went with .020 brass rod and bent it to shape to get the correct opening arc without any binding. The retainers on the inside of the door are glued in at the moment, but once again for strength they'll be superglued in so the rods can slide right in during final assembly, and then I'll epoxy those in so that there's no fore and aft movement of the door during opening and closing. Now that I have everything positioned where I want it, I can make the leading portion of the door jamb and then try to position the interior door panel. Hopefully the dimensions haven't changed too much so I don't have to redo those. With the hinges in place, the door fits in the opening nicely without excessively huge door shut lines. I may tighten up the leading edge of the door just a wee bit more, but I'll have to take in consideration paint buildup to ward off any binding/scraping. I'll be making new vent windows from H channel brass stock........pretty much like I did with the Shelby a while back. The previous ones were plastic and did not survive the tear down of the body. One thing I'm a real stickler about is how the doors appear when they are open. This is where your hinge support placement is critical. If the supports are mounted in any way too crooked and tilted, this will show up on the final assembly if pics are taken of the doors open. You want the supports as straight as possible from a dead on frontal view, and then from the sides you want them straight. So far from this shot here we can see the doors are opening pretty darn straight. You'll need to take into account any flexing outward (or inward) of the body when it's time for final assembly. Too much inward or outward flexing of the body will either have your doors hitting the curb, or looking like butterflies up in the air. Another consideration is the making of the hinges themselves. This is where trial and error come in as you need large enough radii of the hinges so that once again there's no binding and also to give the doors a wide enough opening "arc" to be realistic. So, with the driver's door out of the way as far as hinges, I get to now focus on the passenger side! So that's it for the time being! One thing I like about the house is the way it sits, the second floor is nearly somewhat level with the main road. It's interesting that it was built that way so I get to see some neat cars pass right by the window while I'm working. Directly in front of the house is a one way street and since I have a driveway, I don't have to worry about someone being silly and running into the car. It's interesting also that this is the only part of the street in town that's like that.......everyone else's place is level with the street. One potential drawback is that I can literally see the Susquehanna river right out the kitchen window and especially from the second floor in the bedroom. I'll have to ask one of the neighbors how high does the river have to get before we worry about flooding, but just the same, I'm keeping nothing of value in the basement. Been there and done that! Thanks for tuning in folks!
-

DM photo etch hood pin set ?
MrObsessive replied to Plowboy's topic in Model Building Questions and Answers
Hood pins can be a bit tricky as you'll need to plan on lining things up when it comes time for them to be "functional". When I was building my '69 Daytona hood pins were a must as every one of those I've ever seen had them. I used the DM ones and for the "cable" I used the shielding that's found in coax cable. Just a single strand ran through the clamp and a very tiny bead of epoxy to hold it on. Here are a few pics..........not very good as at the time I took these pics, I wasn't really focused on them. One side of the engine bay where the right side pin is mounted. In hindsight, there should be some sort of plate at the base of the pin. Overhead shot with the hood closed....... Nowadays I have to use tweezers to get them on and off, so most of the time the pins just stay off as I've already lost a couple of them from holding them too hard with the tweezers. -
Favorite Automotive Concept Artists?
MrObsessive replied to JollySipper's topic in General Automotive Talk (Trucks and Cars)
Maybe his vision is a bit further down the road than we'd like at the moment! I'm not a big fan of the whole SUV/CUV things either..........I'd like to see the market swing back to actual cars someday which it ultimately will. I kinda see today's trend as what tailfins were back in the late '40's through the early '60's. Just about everyone jumped on the bandwagon, but the public eventually tired of them and wanted something else. They won't ever completely go away as they are helpful when it comes to moving people and things.....I'm looking at the next wave of folks however that will be buying vehicles come the mid to late '20's. I don't think they'll want to be driving what they're parents are driving. They may rather want just the opposite which is an actual car. -
Favorite Automotive Concept Artists?
MrObsessive replied to JollySipper's topic in General Automotive Talk (Trucks and Cars)
Alan, thanks for the tip! That would seem to work well with other oddball shapes. That double bubble top on that illustration is just too cool to ignore............probably impractical for the street but sooooo nice to look at! -
Oh, that's OK! This is one I'd simply like to have as part of a collection. One project I've had in mind but I don't know if I'd ever get around to it is to make models of cars my Dad owned during the '60's. That '55 would have been the first of them, followed by a '57 Plymouth Belvedere, '60 Valiant and then at the end of the decade Dad had a '65 Dodge Dart GT convertible with the 273 and three on the column. I'd LOVE to do a model of that one especially!
-
Favorite Automotive Concept Artists?
MrObsessive replied to JollySipper's topic in General Automotive Talk (Trucks and Cars)
Syd Mead is right up there with me as one of the best, but I ABSOLUTELY LOVE Gary Campesi's work! Here's a couple I'd like to have on my work table someday.................. Now I've done vacuforming in the past and it's turned out well.........If I can just figure out a way to get that double bubble top formed. ? Meanwhile, I do have a rather derelict '60 Corvair just lying around..................... -
Why thanks Lee! Not too prolific lately............just moved to a new house and I'm now beginning to start work on the '55 Ford Victoria (again). I got the model room arranged the way I want it and hopefully by next weekend or so I can post some progress pics.
-
Thanks for the heads up Jim! That looks a lot like my Dad's car but IIRC, I think his might have been a hardtop. I once had pics of it, but they got lost over the years. Either which way, I'd like to find one of those as that is literally the first car I can remember seeing when I first knew what a car was, among other Finned Freeway Flyers.
-
Jo-Han '55 Pontiac and Olds parts
MrObsessive replied to Bucky's topic in Model Building Questions and Answers
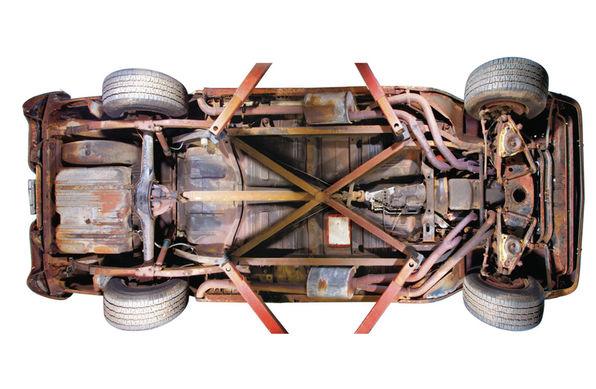
Wouldn't the chassis out of the '50 Olds kit make a suitable donor for the '56? Also, Chevy and Pontiac chassis' back in those days were quite similar. Here's the underside of a '55 Pontiac I've got on my hard disc........... The Pontiac would have been longer so you'd need to do some tweaking there, but I agree with Randy----I'd use the Revell '55 Chevy as good starting point for the Pontiac.
-
A shout out also to Scale Motorsports decals as I was trying to closely replicate the interior pattern in the '59 Buick I built years ago. Yes, they are thin, but if you work carefully they're no trouble at all to laying down without a lot of work.
-
Oh OK! Those wheels couldn't be beat for accuracy and it's a shame they discontinued them so soon. I was fortunate that I get a set when I did for my Green Hornet and I hear that Plamoz is trying to get the wheels back on sale before the end of the year. I hope so, as I'd like to grab another set for another future Shelby project.
-
Hmmm...........I'd kinda like a resin of a '55 Plymouth Savoy 2 door. That was the car I had my first ride in when I was brought home from the hospital once upon a time.
-
SUPER nice and clean and the stance is perfect! I had to do the same thing with my '67.......the back end "sagged" too much and that bugged me to the point I had to lift things up a bit.
-
One of the nicer '68's I've seen! ? Were the wheels from the kit? That was one thing I never liked about that. Those look very nice and look a lot like Plamoz's resin cast ones.
-
Nice start so far! This is one car I literally can't remember the last time I saw one on the road! ? I have the Tamiya kit (turbo) and I'm saving it for a future slump buster as I've never heard anything bad about the kit. This was a classic design for Nissan.......their latest ones just leave me cold with the way they look! ?
-
Here's my '66 Chevy II I built back around 1997-'98. The vinyl top was made using Detail Master's material, but it's a little worse for wear now. I'd use some type of textured paint these days as IMO it would hold up better over time. Magnets were used for the door latches and this is an earlier attempt at inward turning doors.
-
What did you see on the road today?
MrObsessive replied to Harry P.'s topic in General Automotive Talk (Trucks and Cars)
This morning on Rte 147 North just off of Rte 322 heading into Halifax (not far from where I live now) I had a red 1965 Ford Galaxie convertible right in front of me. He cut it loose on the straight away and whatever was in that was putting out some pretty strong exhaust as it seemed to be running rich. Perhaps a 390 in it as it was really strong sounding. No pics unfortunately and I'm not sure I could have taken 'em as we were moving along at a pretty good clip. -
Ooooooooh! Jeff that is soooooo nice! I can see why Bill Mitchell like that design so much he based B-O-C's 1961-'64 four door hardtop C bodies based on that design! Maybe I'll get lucky and snag one off the 'Bay or at a show. I'd definitely like to build that one sometime. As far as a chassis.............perhaps the Monogram '59 Caddy tweaked a bit? They were pretty much the same albeit shorter for the Brougham.
-
I bought and built one of those years ago and was reeeeeal nervous when I moved recently as resin doesn't move as well as plastic when it comes to packing 'em up. I was worried about snapping the fins on that as they are ooohhh so thin! It came out OK and I have it displayed in its case in my model room. I can kick myself as well though as I REALLY wanted their '60 Eldorado Brougham! At the time when they were about to close up shop it was a choice of that or the '76 Coupe DeVille. Tough choice as I ended up getting the '76 as I can remember that car very well from my high school days and at one time had a new car brochure for it. Still want that '60 Brougham though as that was such a unique car for its time.
-
Doner kit for resin 62 Ford kit ?
MrObsessive replied to cobraman's topic in Model Building Questions and Answers
For simplicity I'd go with the '63, but personally I like a lot more detail in the chassis so I'd picked the '60. Separate everything, nice details, you might have to do some tweaking as far as the chassis itself as I'm not familiar with the resin kit you got. Hope this helps Ray! -
I'd have to say this one.................. After nearly 20 years the model still looks as good as when I first painted it. Keeping it in a case 99.9% of the time is a BIG help. ALL four windows still work on it, although the driver's side rear window can "skip" at times.......kinda like the real deal! I was at first reluctant to try roll up windows on this as I had attempted this a couple years earlier on my '55 T-Bird. For the life of me I couldn't get that mechanism to work right at all, until I ran into Ken Hamilton (THE King of working features!) at a show and he gave me some tips of what I could do with the hardtop glass to make it work correctly. After several tries, his method worked especially for the front windows and I have to say that after all this time, it's still a cool model for all the working features that it has besides the windows. The '57 Corvette that followed this one comes in a close second, but I'd picked the Impala over that one due to some of the "firsts" on a model for me.
-
2020 Round2 Car Kit News & Announcements
MrObsessive replied to Casey's topic in Car Kit News & Reviews
Hmmm............it's been a while since I took a good look at my kit as far as the wheels. Now my curiosity is up and I'll have to dig it out and see for myself. With all the models I packed up when I moved (most will remain packed up), I have NO IDEA which box it's in though!