

Tom Geiger
-
Posts
18,967 -
Joined
-
Last visited
Content Type
Profiles
Forums
Events
Gallery
Everything posted by Tom Geiger
-
Very nice!
-
 Thanks Jeff. Yes, it's the Little Red Wagon kit. It was designed to be either the drag car or a stock pickup. It's missing a few details, like a gas filler on the left fender and the "Dodge" scripts on the doors. Otherwise it's all there in the kit! The van is a resin body sold by Jimmy Flintstone. It's only about $20 for the body and it fits onto the kit chassis.
 -
I have a little herd of six females that live in my neighborhood. There is one little one that's from 2017, and two that were born in 2018. They are so tame that they'll graze a few feet from our deck while we're sitting on it. I can walk out to the car and they won't even budge. Lately it's that season so there's some bucks around. They won't come anywhere near people and spook easy. No doubt they're from the deep woods.
-
Beetle Bailey Jeep
Tom Geiger replied to spencer1984's topic in WIP: Model Trucks: Pickups, Vans, SUVs, Light Commercial
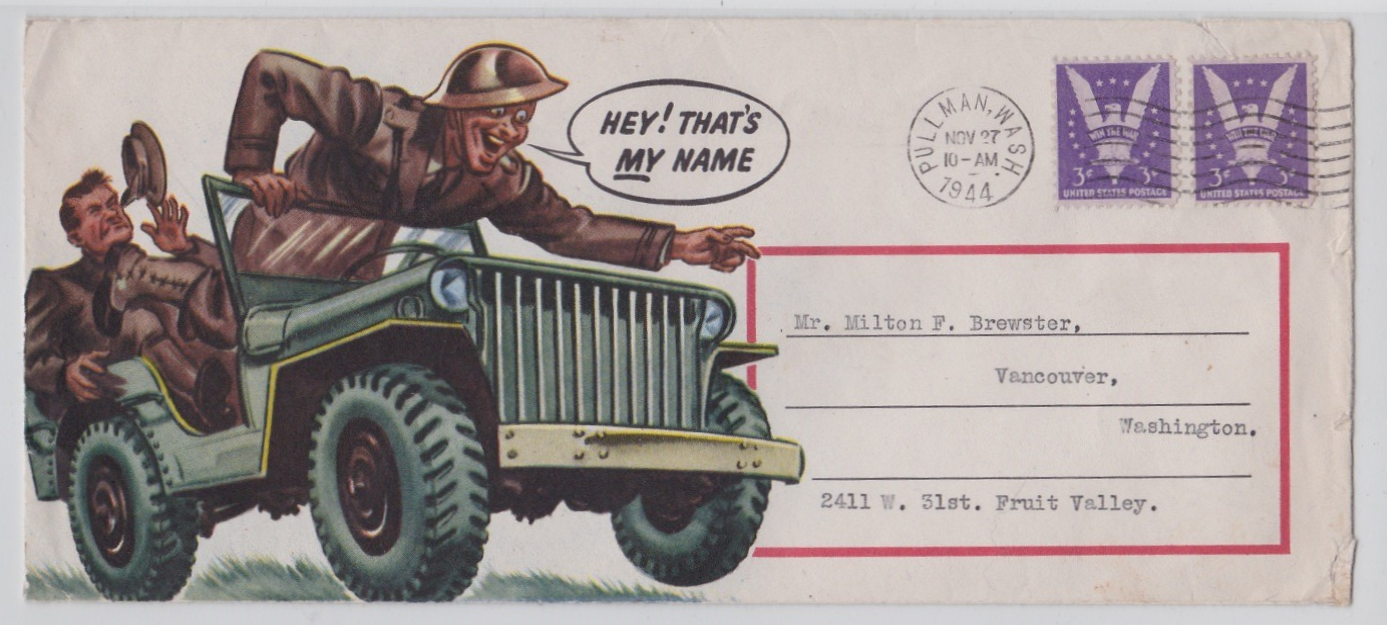
Your post reminded me of this cover I have in my stamp collection. A World War Two piece... of course I had to have it for the Jeep!
-
Oh, I'll tell my Beanie Baby story... Back in the day my daughters both were collecting these like every other kid they knew. I made sure they only got the cheap ones and explained to them how this "instant collectibles mania" worked. Still my eldest daughter wanted the Peace Bear. It was up around $200 at the time. We were at a flea market and she was crying when I wouldn't buy it, even when the dealer lowered his price to $160 for her! Tough lesson! Bad Daddy! Maybe 10 years ago I'm at a block long garage sale. At one of the houses there is a laundry basket full of Beanies and guess who is sitting right on top? Yup, ole Peace Bear! They were marked a quarter apiece. I held out a dollar and the lady didn't have change so I told her to just keep it. She then tried to sell me the entire basket, including the basket, for $5. Nope, I just needed this one. I went to the other sales on the street. Upon returning to my car, there was the basket sitting on the passenger seat of my Geo Tracker! They didn't want these Beanies that bad! So I took Peace Bear and wrapped him up like a present. We were sitting at a dinner table when I presented this to my daughter. I told her I wanted to make amends for something from her childhood, that I remembered all these years! She opened it up and we both laughed. I told her I bought it for a quarter and then presented her with the basket. She kept Peace Bear. The rest of the Beanies went to good use. She was a second grade teacher in a low income area. She used them as rewards for the children!
-
That is so cool! I love the idea of building something completely different from TD kits
-
in tender places
-
It's me! I finally buckled down and resolved to finish a lot of stuff that's been sitting at that 80--90% finished point. There's more to come!
-
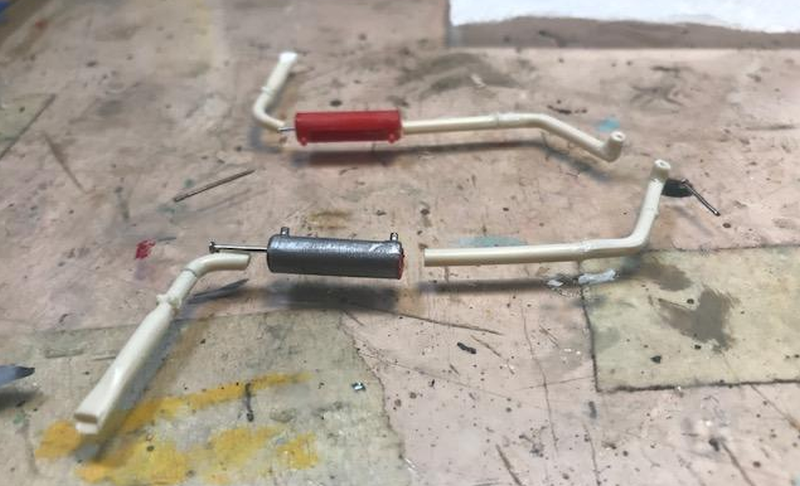
With all the excitement prior to the 24 Hour Build I literally forgot to take photos and post a model I had completed the year before! This was my 24 Hour Build project for 2014, that I didn't complete. In this photo you can see when I packed it in at 6:14 am on Sunday. There were things I didn't like about it, and knew I didn't want to finish it that way. One of the things you may notice are the HUGE almost working hinges in this kit. I had already built a Jimmy Flintstone resin van and he had correct hinges. So I did glue the doors shut and add ones the right size made from Evergreen round. For my Christmas Amnesty Project, I had made a commitment to myself to attack all those 80-90% finished models on my project shelf. I had completed the Model A TROG racer as my last build of 2018, and had moved right onto the Dodge D50 US Navy pickup as my first build for 2019. So this one is my second completion this year, and the 24 Hour Build Model A woody pickup is the THIRD. Me? With three completions in January? Unheard of! LOL Paint is Testors One Coat Flaming Orange because I absolutely love the color. I had painted my '65 Barracuda a similar color back in 1978. The paint laid perfectly. I don't believe I even clear coated it. That is the stock position for the spare tire. The kit doesn't have a stock gas filler so I drilled a hole and added one from my parts box. I think this one was from the AMT '53 Ford Pickup. Of course I can complicate anything, so I got the bright idea of replacing the kit's stock exhaust with duals. So I took two of the kit's stock mufflers (from two kits) and fabricated most everything else from pieces and parts of exhaust systems I keep in a shoe box for this purpose. The tail pipe ends are from the Revell Dart kits. I drill out the parts and assemble it all with bits of straight pin. I fit it tight so I can adjust the parts on the car before finalizing with glue, same way you'd do before clamping on a 1:1 car. I don't remember where I swiped the bucket seats from back in 2014. I did remember that I sprayed them with cheap spray paint that didn't dry during the 24 Hours! Now five years later, they are dry! I had to make seat bases for them to sit in the van. With no time constraints, I decided to add some seat belts. Model Car Garage buckles that I added depth to with Evergreen. And correct 1/16" ribbon for the belts. I bought a lifetime supply of seat belts on eBay (5 dif color rolls) for $10. I made a custom plate for the occasion. The bumpers are the same color as the interior. And here's the pair sitting together. Note how the hinges match now! I'm happy to have finished this one!
-
Everyone Bring In Their Brass Monkeys???
Tom Geiger replied to OldTrucker's topic in The Off-Topic Lounge
and bring in your outside dogs too! If it's too cold for you to be out there, it's too cold for him too! -
This is really cool! Keep it going!
-
Thanks Guys! The 24 Hour Build is a planning exercise, where you preplan everything so that you can continue to detail parts while assemblies and such are drying. Early on you focus on getting the body into primer, then into paint so it will dry. This was Duplicolor over Plastikote primer so it dried quickly. There is no clear coat. Things like the running board covers would have been taped off and sprayed on a serious build, I just taped them off and brush painted them to save time. And they came out acceptable! What I find is that I build more organized and systematically on my regular builds once I learned to plan for efficiency. And in the end, the irony is that the 24 Hour Builds don't look much worse than the ones you've fretted over for a long time! A learning exercise for sure! And you learn to have fun and not take it all too seriously.
-
I have been participating in the 24 Hour Build since 2013. There are years I finished, years I came close and years that I crashed and burned! Not ashamed to say it! This year I was successful! As board members will note, I've been on this Monogram Model A trip recently. So why not add vehicle number four? That had me choosing the Woody Wagon. And so it goes.... Early on I decided this wagon was a packing crate on wheels. This photo is a pregame taped mockup done early in the week to gain knowledge about how the kit assembles and get some inspiration. I had been burned in the past with kits where the body panels were to be finished before assembly.... think Heller Citroen Borden's milk truck, where things didn't pan out as planned. So I was leery! Also shown in this photo are seats I found in my parts box but still have not identified. They were used in this build. Also, the wheel set was chosen for my Model A chopped coupe build, then some board heroes came forward and gave me the stock cool wheel covers I actually used on that build, leaving this set for a future build. So here they went... they are the custom cap set from the AMT 41 Plymouth kit. > I decided I wanted to build a woody roadster pickup. I sat and stared at the mockup and came up with the plan. Later in the week I saw I should lower the bed one wood row lower to add interest, and mimic the one roadster pickup I had already completed. Since I had determined what I wanted to do, and that the modifications were essentially just cuts, here we were at 1:38pm. I taped up the panels for a fit and photo. I hadn't decided to add a top cap of Evergreen half round strip stock to the top of the bed sides at that point. They worked brilliantly to finish it off! By 6:45pm I had the chassis up on wheels. I had predetermined how I wanted to lower it... I left out the rear spring and cut down the front suspension mount. I also had to scratch build a drag link because the kit one was a lump. I also had the main body parts primed and color painted with Dupicolor by this time. This photo was taken at 9:30pm, when I had the first color done on the wood graining. The engine was ready to wire, with a prewired dizzy at that point. A lot of details happened into the wee hours of the morning. These photos were shot at 4:45 am. There were a few more coats of paint on body parts. I had detailed out the grill shell and headlights. The chrome was stripped on these before the build started, allowed in the rules. Engine was finalized by 5:30 am and I started final assembly. That didn't go without it's problems. Many of my issues were because of the speed of the build. Where I would've taken a break for things to dry, I had to keep moving forward. The nice dashboard fell into the interior. Left to dry over night it would've been fine. Things refused to assemble according to plan. New words were added to our dictionary in the wee hours. I learned a few things about this series of kits. I knew that the later versions had narrowed suspension parts to allow for wider tires. BUT I didn't know that the rear assembly had changed to allow for a longer engine assembly! I had used an older rear, and had to pry it off, prep and paint a later one and glue it in place. That took precious time! And because of my chassis lowering, the exhaust system didn't fit. We don't need no stinkin' exhaust, so I simply tossed it aside. I will modify and install it another day. My wife woke up and came into the model room about 8am. She left shortly thereafter because I was in the middle of fit issues! In the end, it was all worth it! I finished at 11am with an hour to spare! I took some photos, posted my completion on the site by 11:30am. Then I fell asleep in my chair! I slept most of the day! The rest of the photos don't need captions! Here's my two roadster pickups. I'd really love to own a 1:1! One of these days! And here's the whole set so far! I have not duplicated any details between them, it's a work in progress! I successfully completed the challenge. This isn't a contest, we're not seeing who can finish first. This is a personal challenge to see if you can build a credible model within the 24 hour time span. Cheating only cheats oneself from the accomplishment. And then there is the camaraderie of working with over 100 modelers around the USA, Canada, Europe and Australia! There is nothing like posting your progress photos in the middle of the night and instantly having people "Like" and comment! And of course seeing where everyone else was, and cheering them on to finish! Like with many races, there were people who had issues and had to bail out. There were people who just gave up and went to bed. There was one guy who decided to dry his painted body on top of bricks set on top of his wood stove. He ruined his body... did he quit? Nooooo, he went on to start a new kit in the middle of the night AND FINISHED! That's tenacity! This was a lotta fun for the past seven years, and I hope to participate until I can no longer hold an exacto! Not only was it a fun exercise, but you learn a lot about building overall. I've learned things that make my building more organized and systematic. I tried things I wouldn't have changed on a "serious" build that worked! Thanks to all Gary Kulchock for organizing this lunacy and to all who participated!
-
You'd think the smart TV technology would fix the volume issues! There are shows that I bring up the text captions to follow along.
-
-
TV is just as bad. Commercials at twice the decibels as the show. There was supposed to be a law enacted to curb this. Don't know what ever happened with that.
-
13th Annual 24hr of Daytona Build, Tamiya's Ford GT
Tom Geiger replied to Jhedir6's topic in WIP: Model Cars
Most folks build straight through. This is a fun event and we say it’s the annual opportunity to “Build like a sixth grader”. Pick a fairly simple kit that goes together well, something expendable, that you have multiple copies of. I was building a roll cage on a second chassis while paint dried on the first one. It’s a challenge to build a model in 24 hours, and satisfying when you succeed. And in the end you learn as a modeler. I find my building is now a bit more organized and systematic now. And the interesting thing is that the 24 hour model isn’t any worse than the ones we fret and sweat over! -
13th Annual 24hr of Daytona Build, Tamiya's Ford GT
Tom Geiger replied to Jhedir6's topic in WIP: Model Cars
I’ve been doing this build since 2013 and am psyched for this weekend! I will be doing the Monogram 1930 Woodie wagon to fit into my Model A line up. It’s a lotta fun with good company overnight. It’s cool being up all night knowing there are more than 80 modelers doing the same thing. And it’s fun to post 3am progress reports to the Facebook page and instantly people start commenting! -
That is so very cool. AMC had some wild interiors in the day. Way back I was at the Englishtown , NJ car show and a guy was selling one of these.. six cylinder, 4 speed with air. It was red, no wood and some factory cool wheels. He wanted $1500 and I agreed to buy it. We agreed to get together that week so I could drive it and complete the deal.... wouldn’t ya know, I lost his phone number! Ah, what could’ve been!
-
There was a model show ( not ours) where they moved a table, tilting it slightly and models rolled to their deaths!
-
Correct! I just checked a complete kit. Thanks!
-
Nice job Rich! It's good to see you back at the work bench! I use Norm's interior cranks on most everything myself. I saw him at a show a while back and bought all 5 packs he had with him! See you in April, my friend!
-
I purposely make my wheels NOT roll. I don't want them rolling off a table or shelf.
-
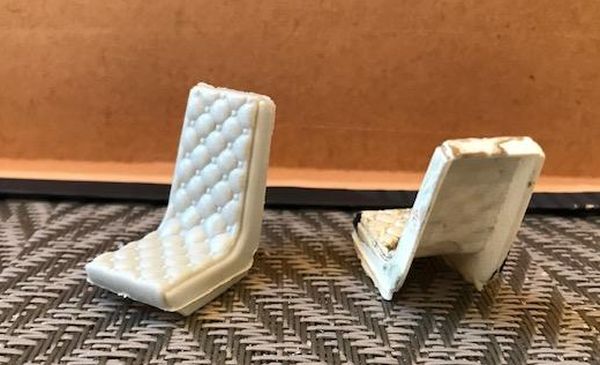
I have a shoe box full of bucket seats. I was going through them to pick an interesting seat or seats for my 24 Hour Build Monogram Model A Woody that I will be building this weekend. That led to sorting out the box and pairing up what I could. These all came from a lifetime of hoarding junk and purchasing parts bags at shows over time. It hit me that some of this stuff may be needed by someone, in this post Modelhaus era. So let's see if we can identify some of these? One piece interior molded in red. Seat One This pair is a extremely poor rendition of a seat. One is red plastic and one is white plastic, telling me the kit was issued more than once Seat Two Seat Three... kinda looks like a camping potty. Somehow I have six of these. Seat Four, an interior plate. No head. Seat Five - Gotta love the over spray job on these and the big sprue attachment point. Seat Six - Tuck and roll with buttons! Show car maybe? And some singles... Call these Seven, Eight and Nine Seven and eight are full seats. Nine is just a seat back or something. Many thanks if you can identify these! And if any of these is the last thing that's keeping you from finishing a model, let me know!
-
Complete bonuses in kits
Tom Geiger replied to BIGTRUCK's topic in General Automotive Talk (Trucks and Cars)
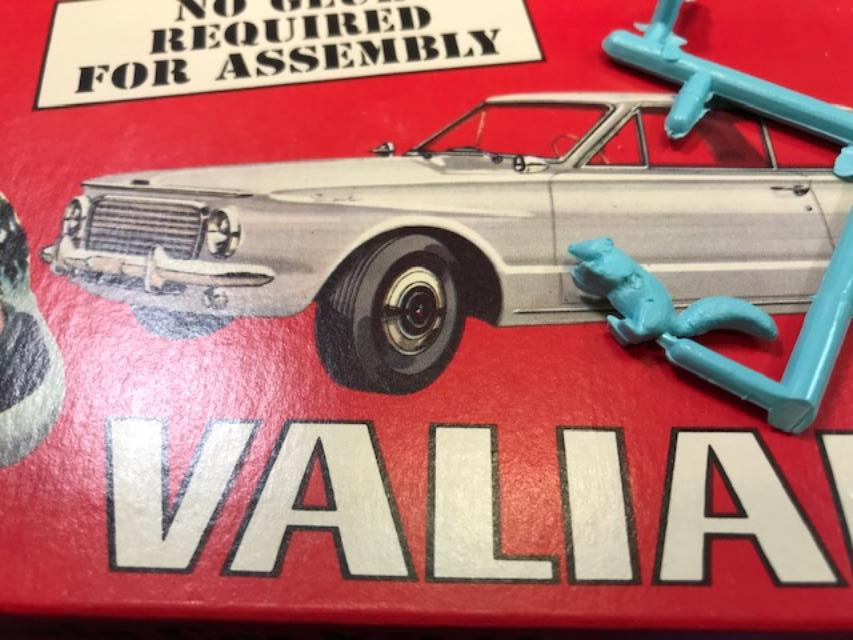
How about the little animals that came in early AMT kits? The dog from the '57 Ford. It's still in current releases of the kit Monkey, is in the 1962 Valiant kit, at least the Styleline customizing version. There was a squirrel in the 1963 and 1964 Valiant kit. It was also in the 1963 II Wagon kit. It's on it's own tree. The 1962 Chevy II appears to have had a panda in it, while the convertible had a mouse. Alligator from the 1957 Chevy kit I include them when I restore one of the old customs for that collection. The others??


until