Tom Geiger
-
Posts
18,967 -
Joined
-
Last visited
Content Type
Profiles
Forums
Events
Gallery
Everything posted by Tom Geiger
-
 Because people cheat… I remember a conversation about the parts requests.. like people saying their kits were missing the tires and chrome wheels! Or parts off different trees.. but still had rest of tree from sealed kits! Someone at Revell said that back when they released the Chevelle wagon with custom hood.. suddenly everyone said they were missing their ElCamino hoods..
 -
That is very nice! You kept the classic look but gave it modern power. I’d like to see that in 1:1!
-
Ollie's strike again
Tom Geiger replied to GLMFAA1's topic in General Automotive Talk (Trucks and Cars)
I these guys are on eBay, Amazon or at flea markets. Figure those $10 kits plus they probably used the 15% off coupon. If they are savvy, depends on the state, they could flash their sales tax exempt card. That brings that $10 kit down to $8.50. Wanna be first on line for the Ollie’s kits: This was in today’s email. Like everywhere’s else they’re desperate for help and hit their mailing list..
-
No, robot doll
-
Interior looks great. A good place to practice BMF since it will only be seen from side angles once it’s in the body. Keep working with the BMF and don’t get discouraged. One thing you need to know is not to use any where you have touched the glue. Finger grease does affect it. Also pulling it up and repositioning it hurts the glue. Cut pieces larger than needed so you pop it on once, then cut away the excess, including the areas where you touched the glue!
-
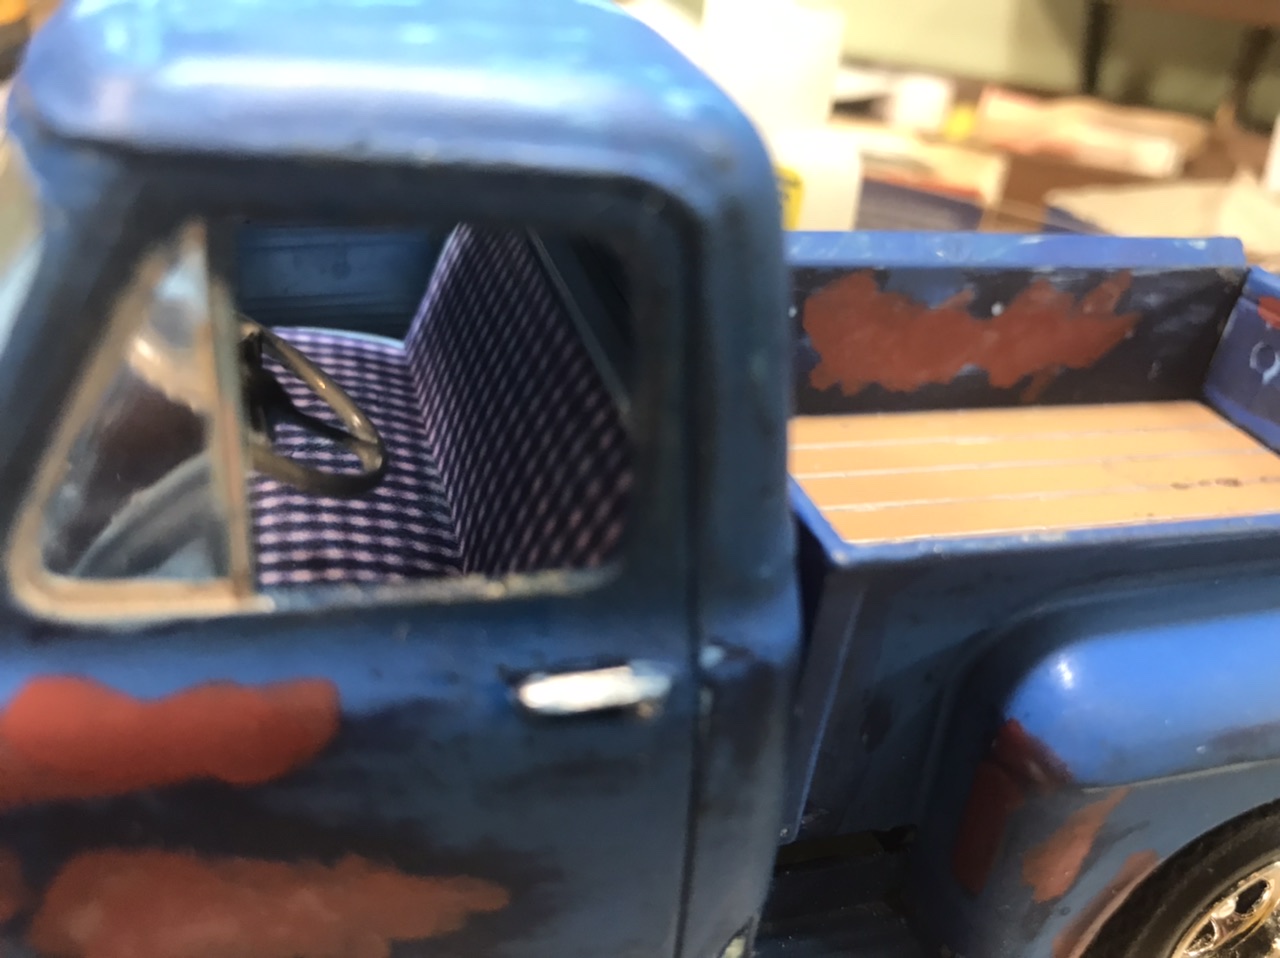
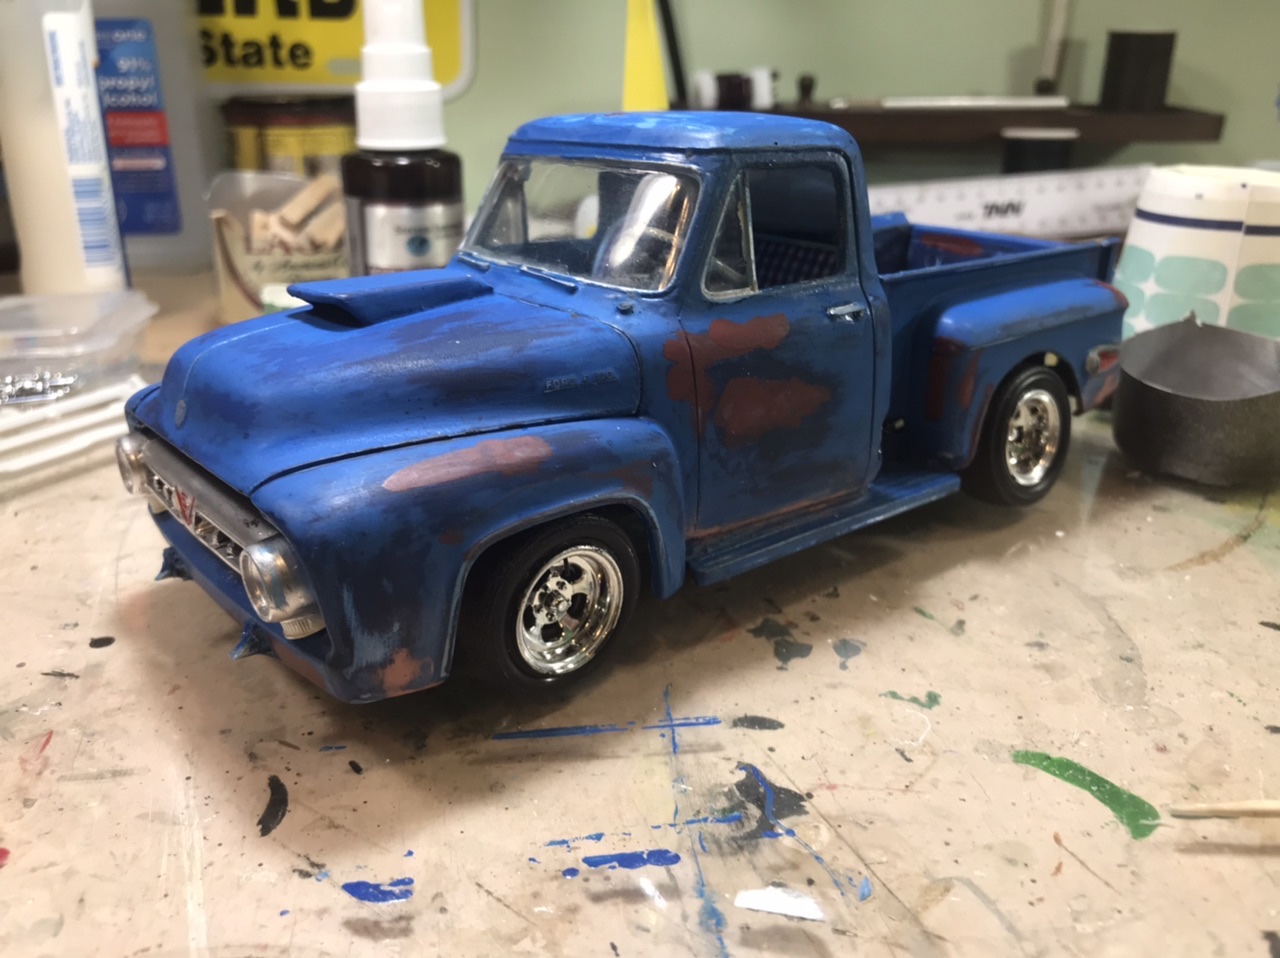
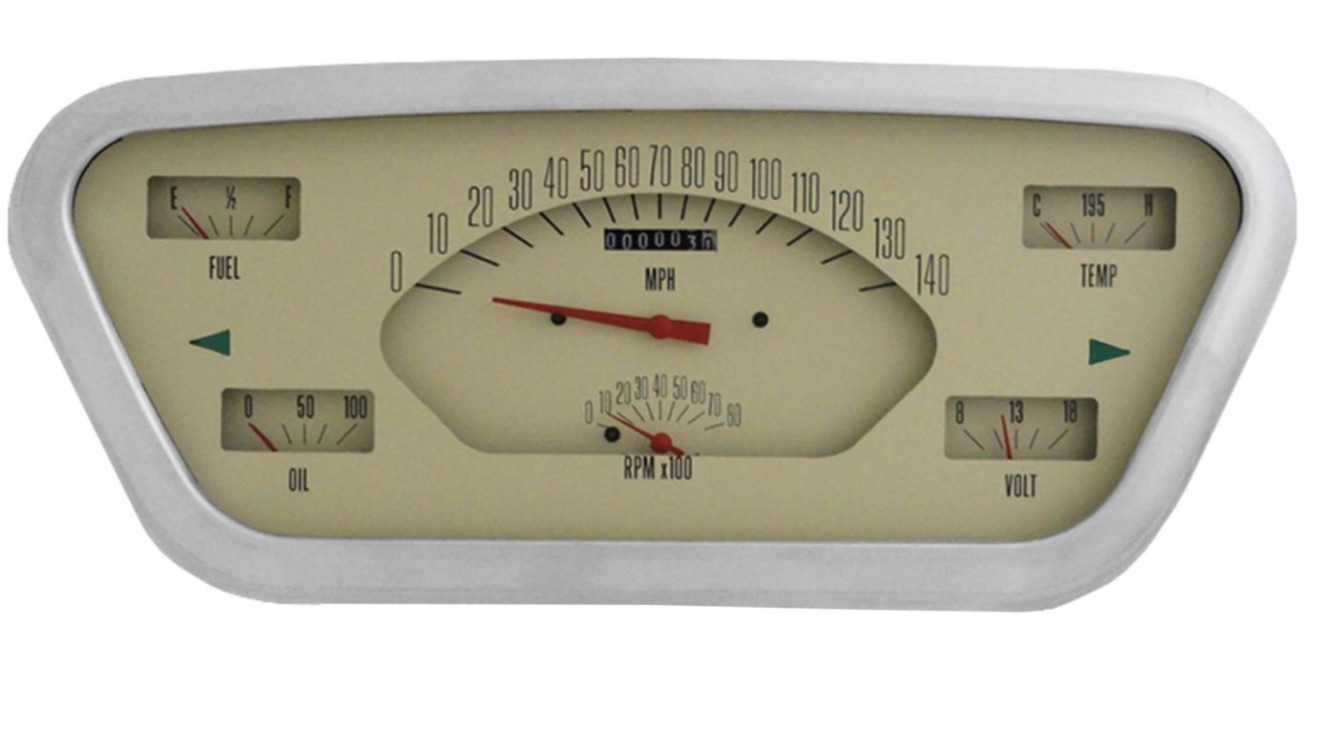
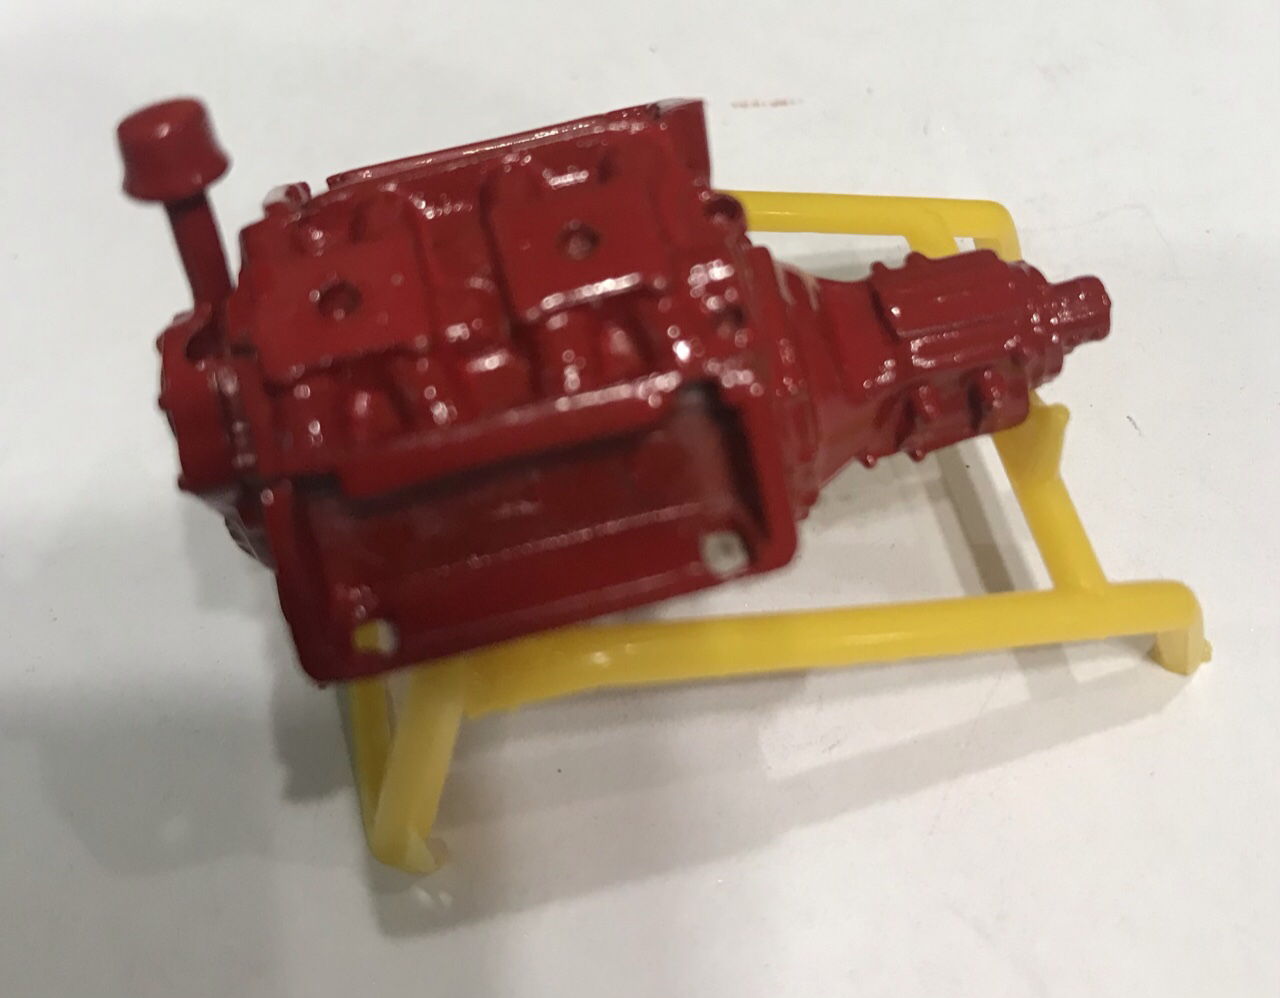
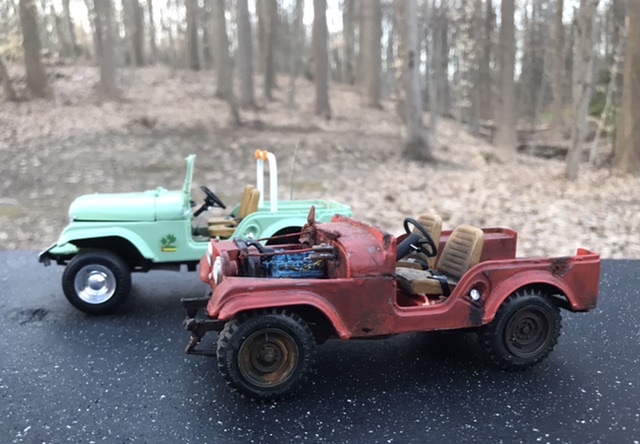
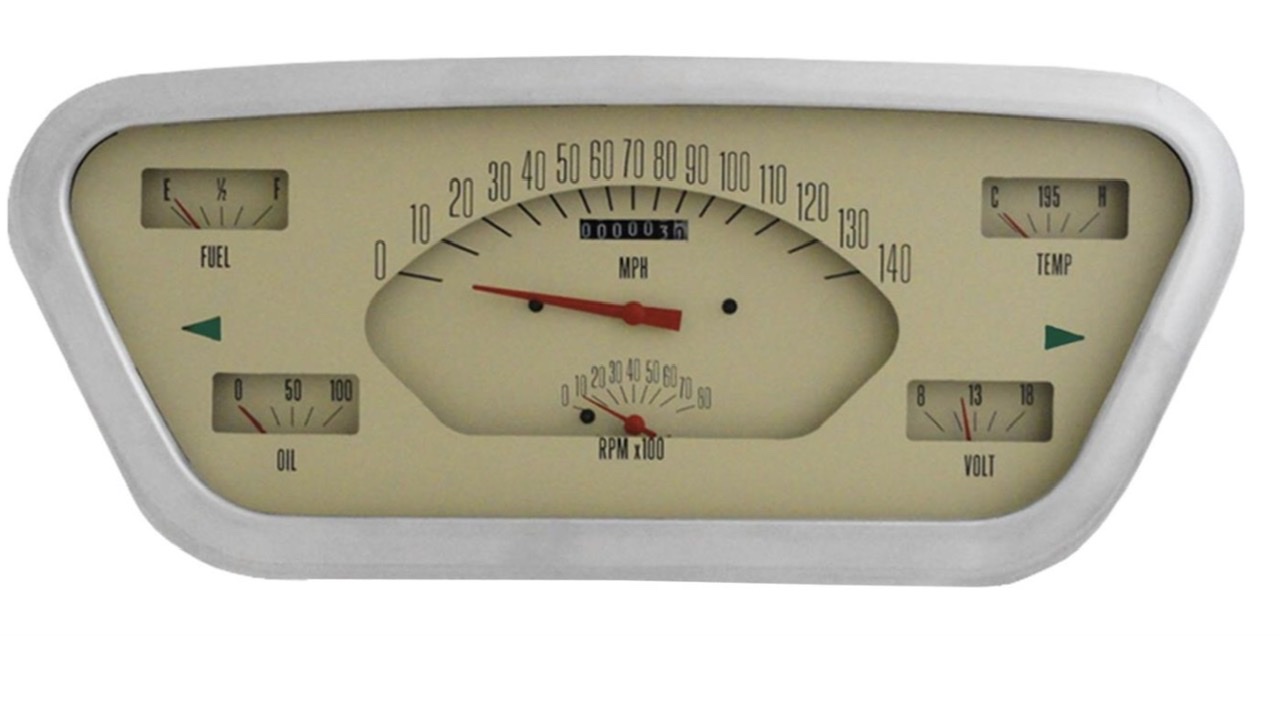
I know people are just sitting at their computer hitting refresh over and over in anticipation of my next post! ? I added a bit of red primer and some actual Bondo red finishing putty, but body isn’t done just yet. The model was first built without paint.. but had two different color coats on the body so it had already seen some redo’s in its long life. One issue was that the interior is permanently glue fused in there and was unpainted. It’s not all that visible in its finished form but still needed something. That became the “ship in the bottle” portion of this build. I painted the steering wheel white and added a chrome button to it. I chromed the dash knobs by flattening out the tip of a toothpick and putting Molotov on it to “stamp” color onto the knobs. The big improvement is the seat inserts.. here’s the tip.. go to Joann’s fabric store’s website. There are literally thousands of patterns! I queried “blue plaid” and picked this one. Save the photo as a jpg. Now you can reduce it to look right in scale, then string multiple pics together to get a larger piece. Print on white paper. I have multiple copies of this kit so I used a fresh one to trim the pieces. Then I covered the seat with white canopy glue with a Q-Tip. I then pulled the paper through the window and held it with tweezers from either side to center and place it. I got lucky and was successful first try. I did print much more than I needed just in case. I wasn’t as lucky with the gauge cluster. I scaled this to size using a spare dashboard. And I screwed up several copies trying to thread it behind the steering wheel. But it’s done. Image courtesy of eBay Motors parts section. Street Rod stock appearing gauge set. Note the 140 MPH speedo and that it has a tach. You cannot see that on the model. Now I’m working on the engine. My truck had the Desoto Hemi and I’m keeping it true to its roots. The original is glue fused with parts crooked, and since I do have multiple parts kits, I’ve opted to build a new engine. Instead of using the two custom options I found a manifold for two carbs in my junk collection and sanded it to fit. Onward!
-
On an ? island
-
Love the engine! Color contrasts really make it! Glad you left the red boots!
-
Where is Vanna?
-
Just use Johan Motor Oil.. specially formulated not to leak out the axle hole thru the oil pan!
-
worst commercials - i have to mute the tv
Tom Geiger replied to youpey's topic in The Off-Topic Lounge
Funny thing.. I took a short term consulting position last fall. I met everyone with masks on. It was very difficult to remember who everyone was.. for instance there were two young blonds I seriously thought were the same person! -
Your best bet when you are missing a small part is to ask here on this board. I have a couple Duster parts cars so if necessary I’d be happy to send you that part.
-
I was that guy in my family! Starting with my grandparents house where they lived more than 50 years. Neat and clean, but they never threw anything out! I found mint sealed model kits and other 1960s toys they hid in their basement and forgot to give us kids! Household products and Christmas decorations from the 1950s.. I did a booming business on eBay.. My parents had an abundance of stuff. Having lived in the military much of their adult lives, having to lighten up and move every few years, they never learned to voluntarily purge junk once they settled down. My father was that guy who’d stop on the street and pull the motor out of an old washer.. need a few dozen washer / dryer / furnace motors? We had them!
-
Same here in Pennsylvania! I gave up on mulching for a few days. It’s raining now, hopefully that will break the heat spell. Great excuse to hide in the model room! I accident retired due to Covid. Have no desire to get back to work. But pesky recruiters keep calling, so we will see!
-
And a bunch of other kits! Snow tires on Pacers and other cars of that era. Last issue of Hogan’s Jeep had five of them. Back in the day before there were a lot of choices, I’d seek them out for my light commercial projects. In the 1990s you couldn’t give away Pacer and Volare kits. I was buying them cheap just for those tires. At a show one time I bought 5 Pacer kits for $15. A dealer friend of mine was making fun of me! A while later someone fr the 1:1 scale Pacer club contacted him for models.. and he came begging! Here’s four of them on the red junker.
-
Being in it?
-
Ollie's strike again
Tom Geiger replied to GLMFAA1's topic in General Automotive Talk (Trucks and Cars)
Last go around I bought two Gremlins. Was surprised to find really cool tampo tires in them. I have enough AMT 57 Fords in one big parts bin to last a lifetime! -
worst commercials - i have to mute the tv
Tom Geiger replied to youpey's topic in The Off-Topic Lounge
Ya know.. I was watching TV for a break from Covid… then characters in every show and commercial were wearing masks ?! -
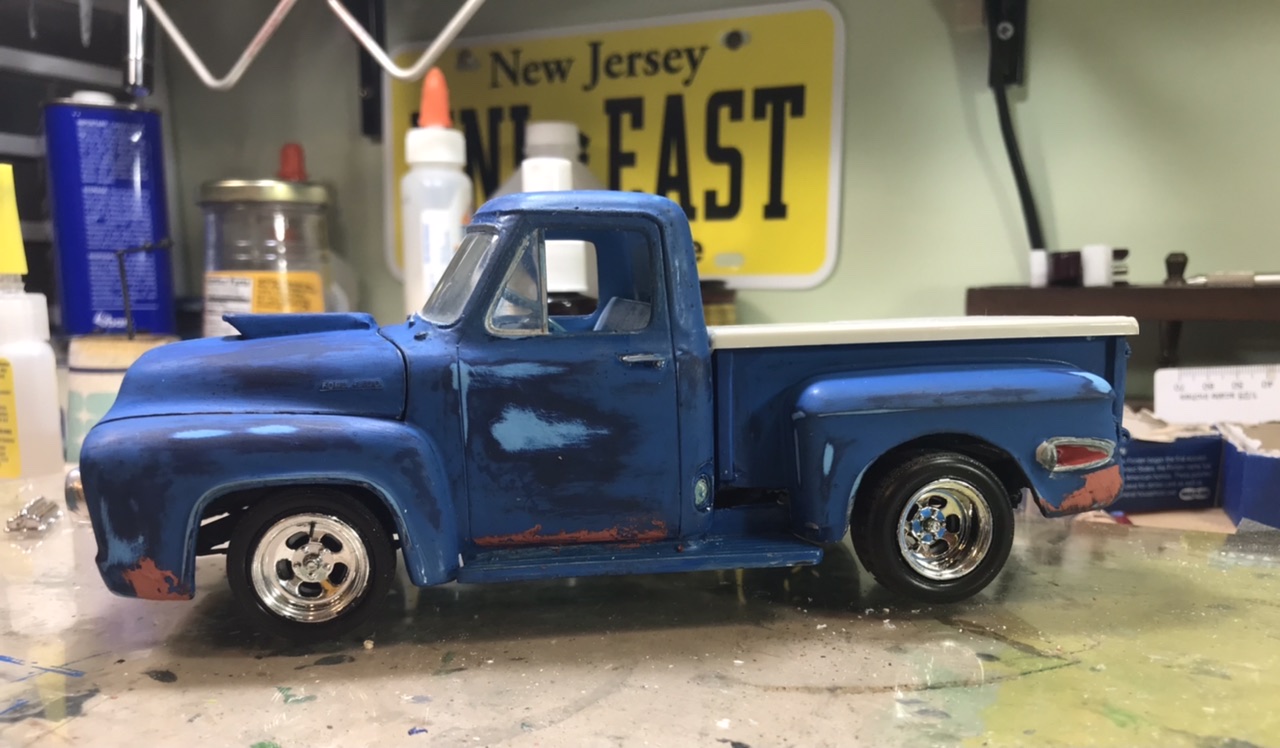
I’m building upon the old paint job for patina. As you see it here, it was wet sanded, and there’s a coat of Testors Dullcote over it. Since then I’ve added red primer into the big bare plastic areas, then comes the chalks!
-
Up on wheels! I’ve missed the model room for most of this week.. been gardening and spreading mulch. My twin granddaughters were christened on Sunday.. they’re nearly two but that pandemic thing held it up! It was 90 out today with humidity so I said “screw this” for going outdoors and hid in the model room. I finished building new suspension, and refitted the wheels I chose to fit the wire axle. Its supposed to be hot out again tomorrow so I may get more modeling done.
-
My mother had the yarn thing.. when she passed I brought it all to Good Will. I’m sure it was passed on to other women to add to their estate.
-
And salted rim
-
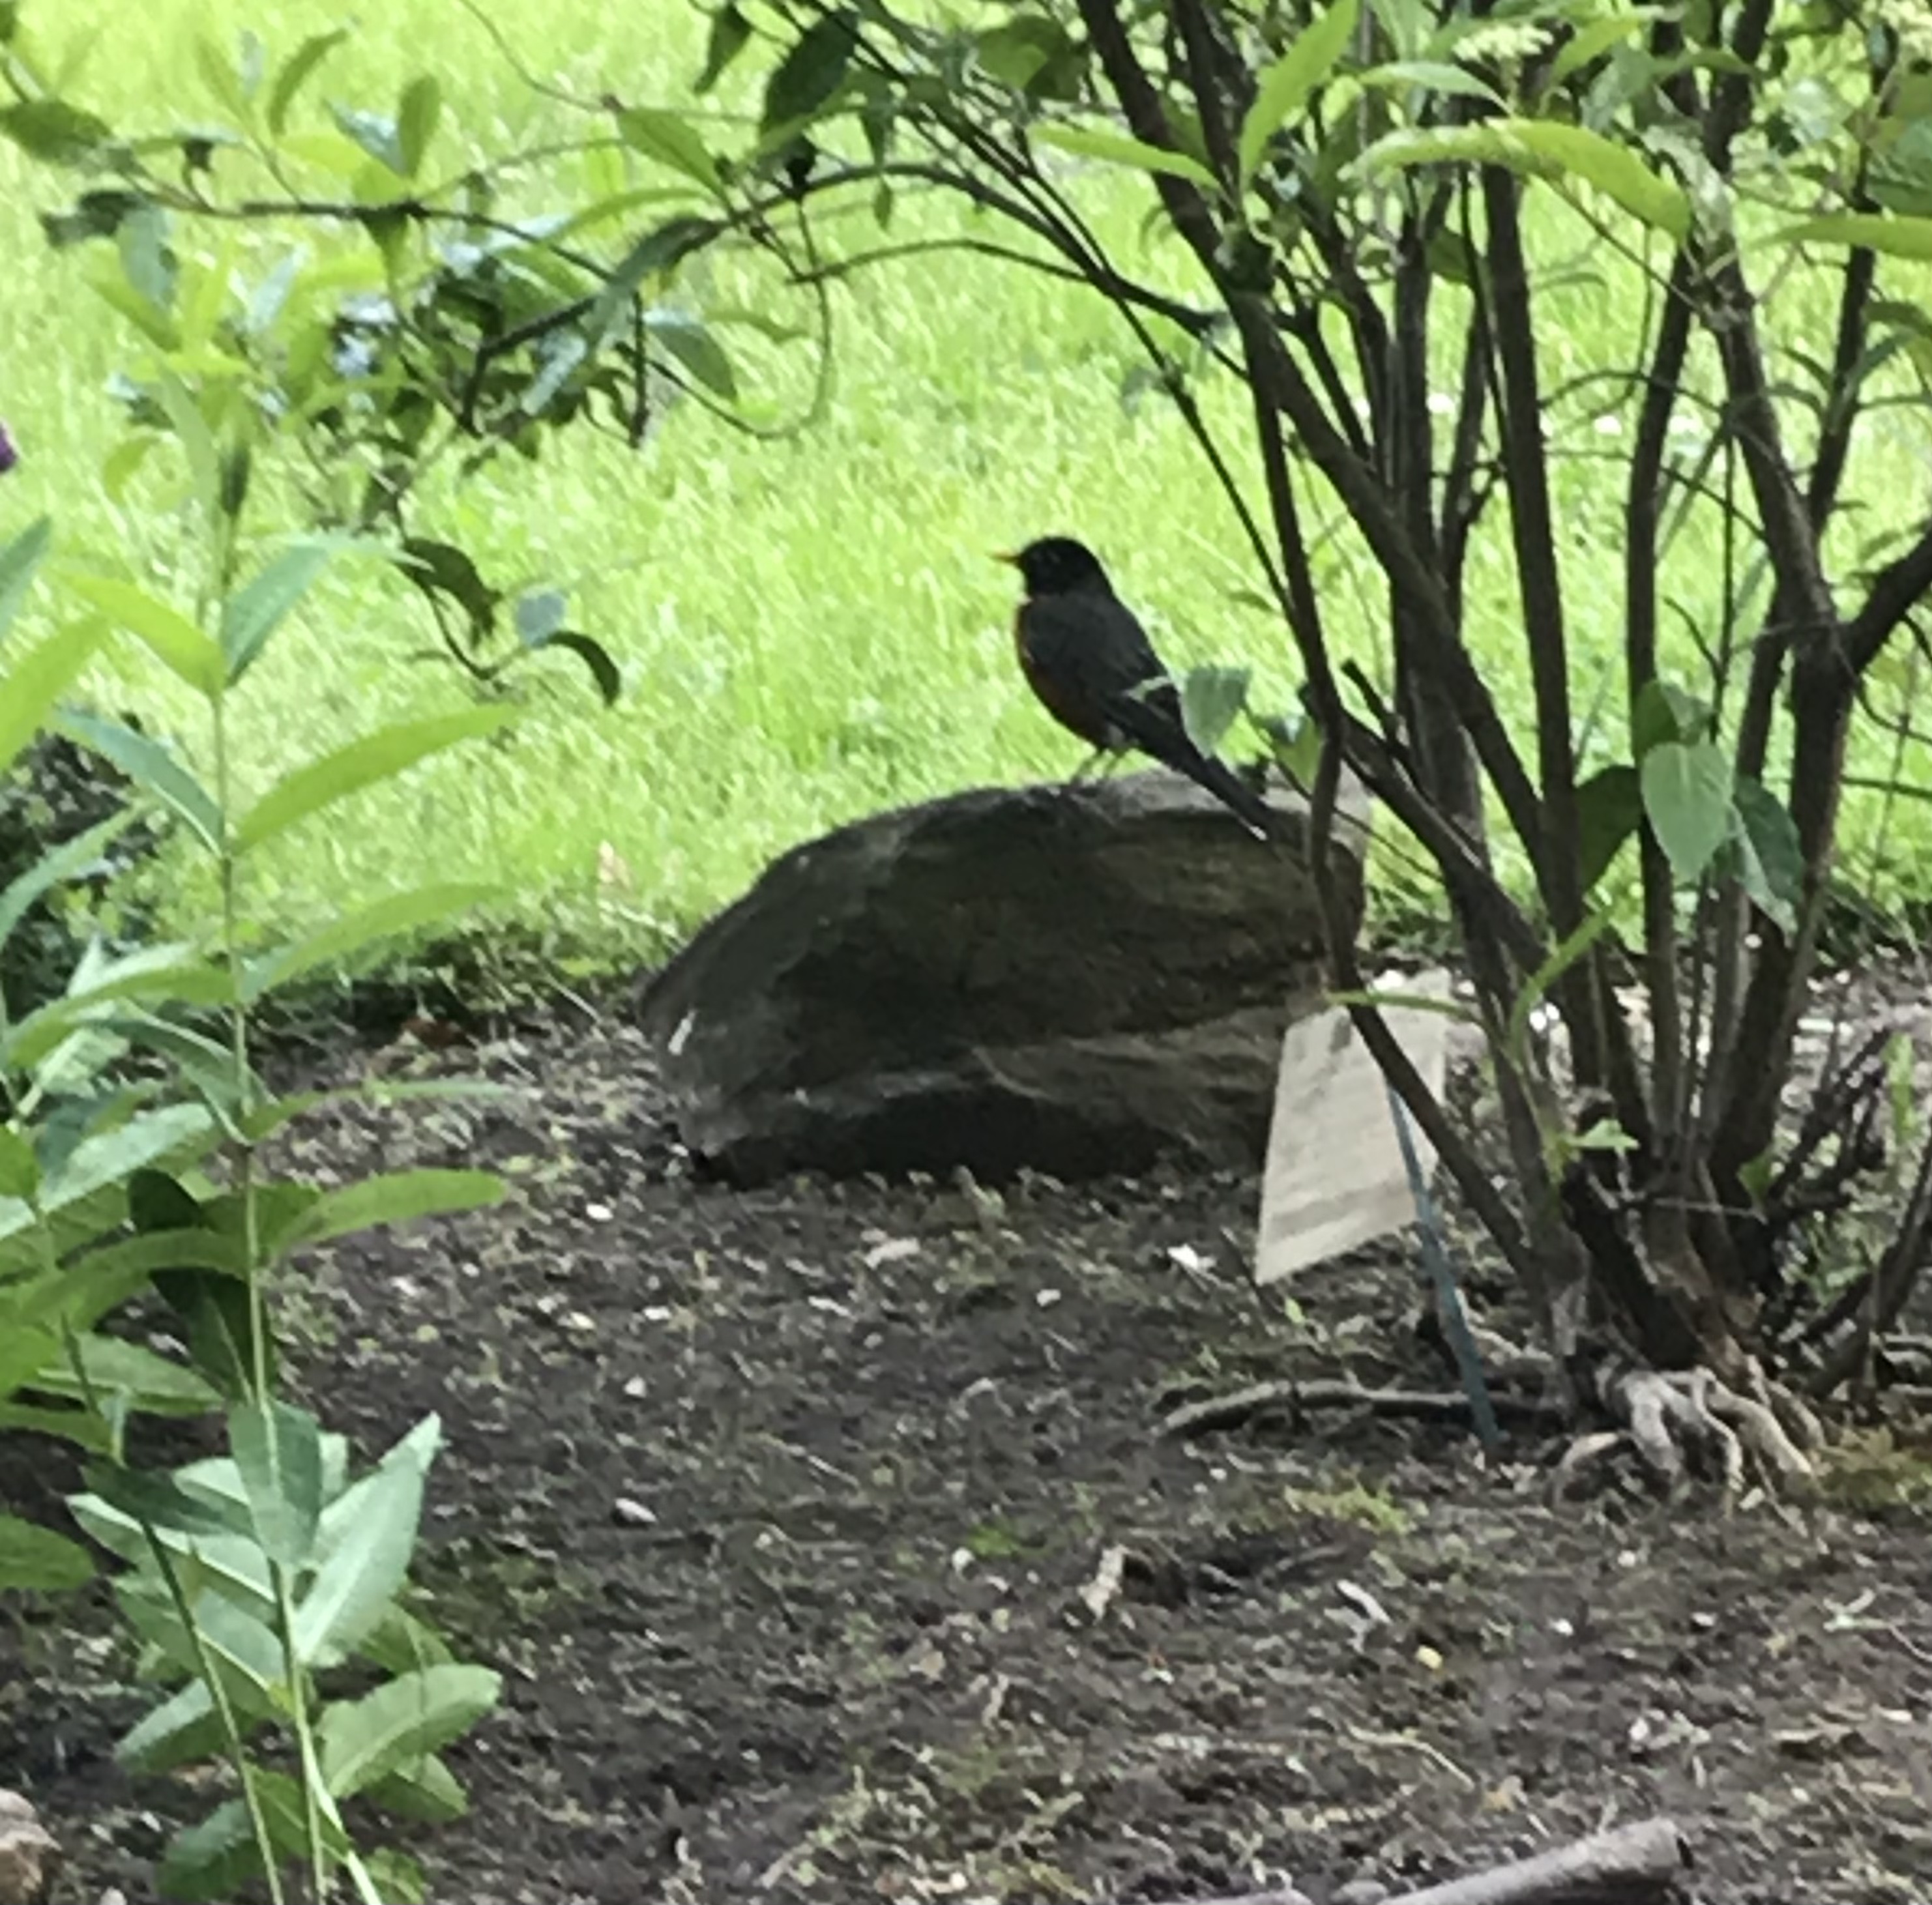
As I’m weeding my gardens, a robin notices I’m disturbing dirt and comes down to investigate. He’ll peck around in the freshly turned dirt. I do unearth worms, and I’ve started to put them in a paint cap that was handy. When the robin shows up, I toss him a worm. He’s realized I’m a friend and will patiently sit on a rock and watch me work and wait for treats.
-
Don’t trust anything
-
I find the correct images on the Internet. A good source is eBay Motors parts section for good head on photos of gauge clusters for sale. I copy the images and reduce them to 1:25 scale. I do my reductions in Word. I get an idea of the appropriate size I need and create a sheet where I reduce multiple images by 5% each image. Then I print and compare to my kit dashboard. One of my images will be the size I need, or I try again. Once I’ve got my image, I print multiple copies the right size on plain white paper, cut to size and glue in place with white glue. For instance.. here’s a 1953 Ford pickup unit I just found for my current project.