Search the Community
Showing results for tags 'Ford'.
-
Hi Guys I am a brazilian modeler and new in the car modeling universe. I´d like to build the 1979 Ford Bronco as seen in the 240 Robert TV show. I am using the 1/24 Monogram ´80 Ford Bronco 2 ´n 1 model kit but the tires and wheels are not accurate. Could you please tell me where to get the correct set? Many Thanks in advance

-
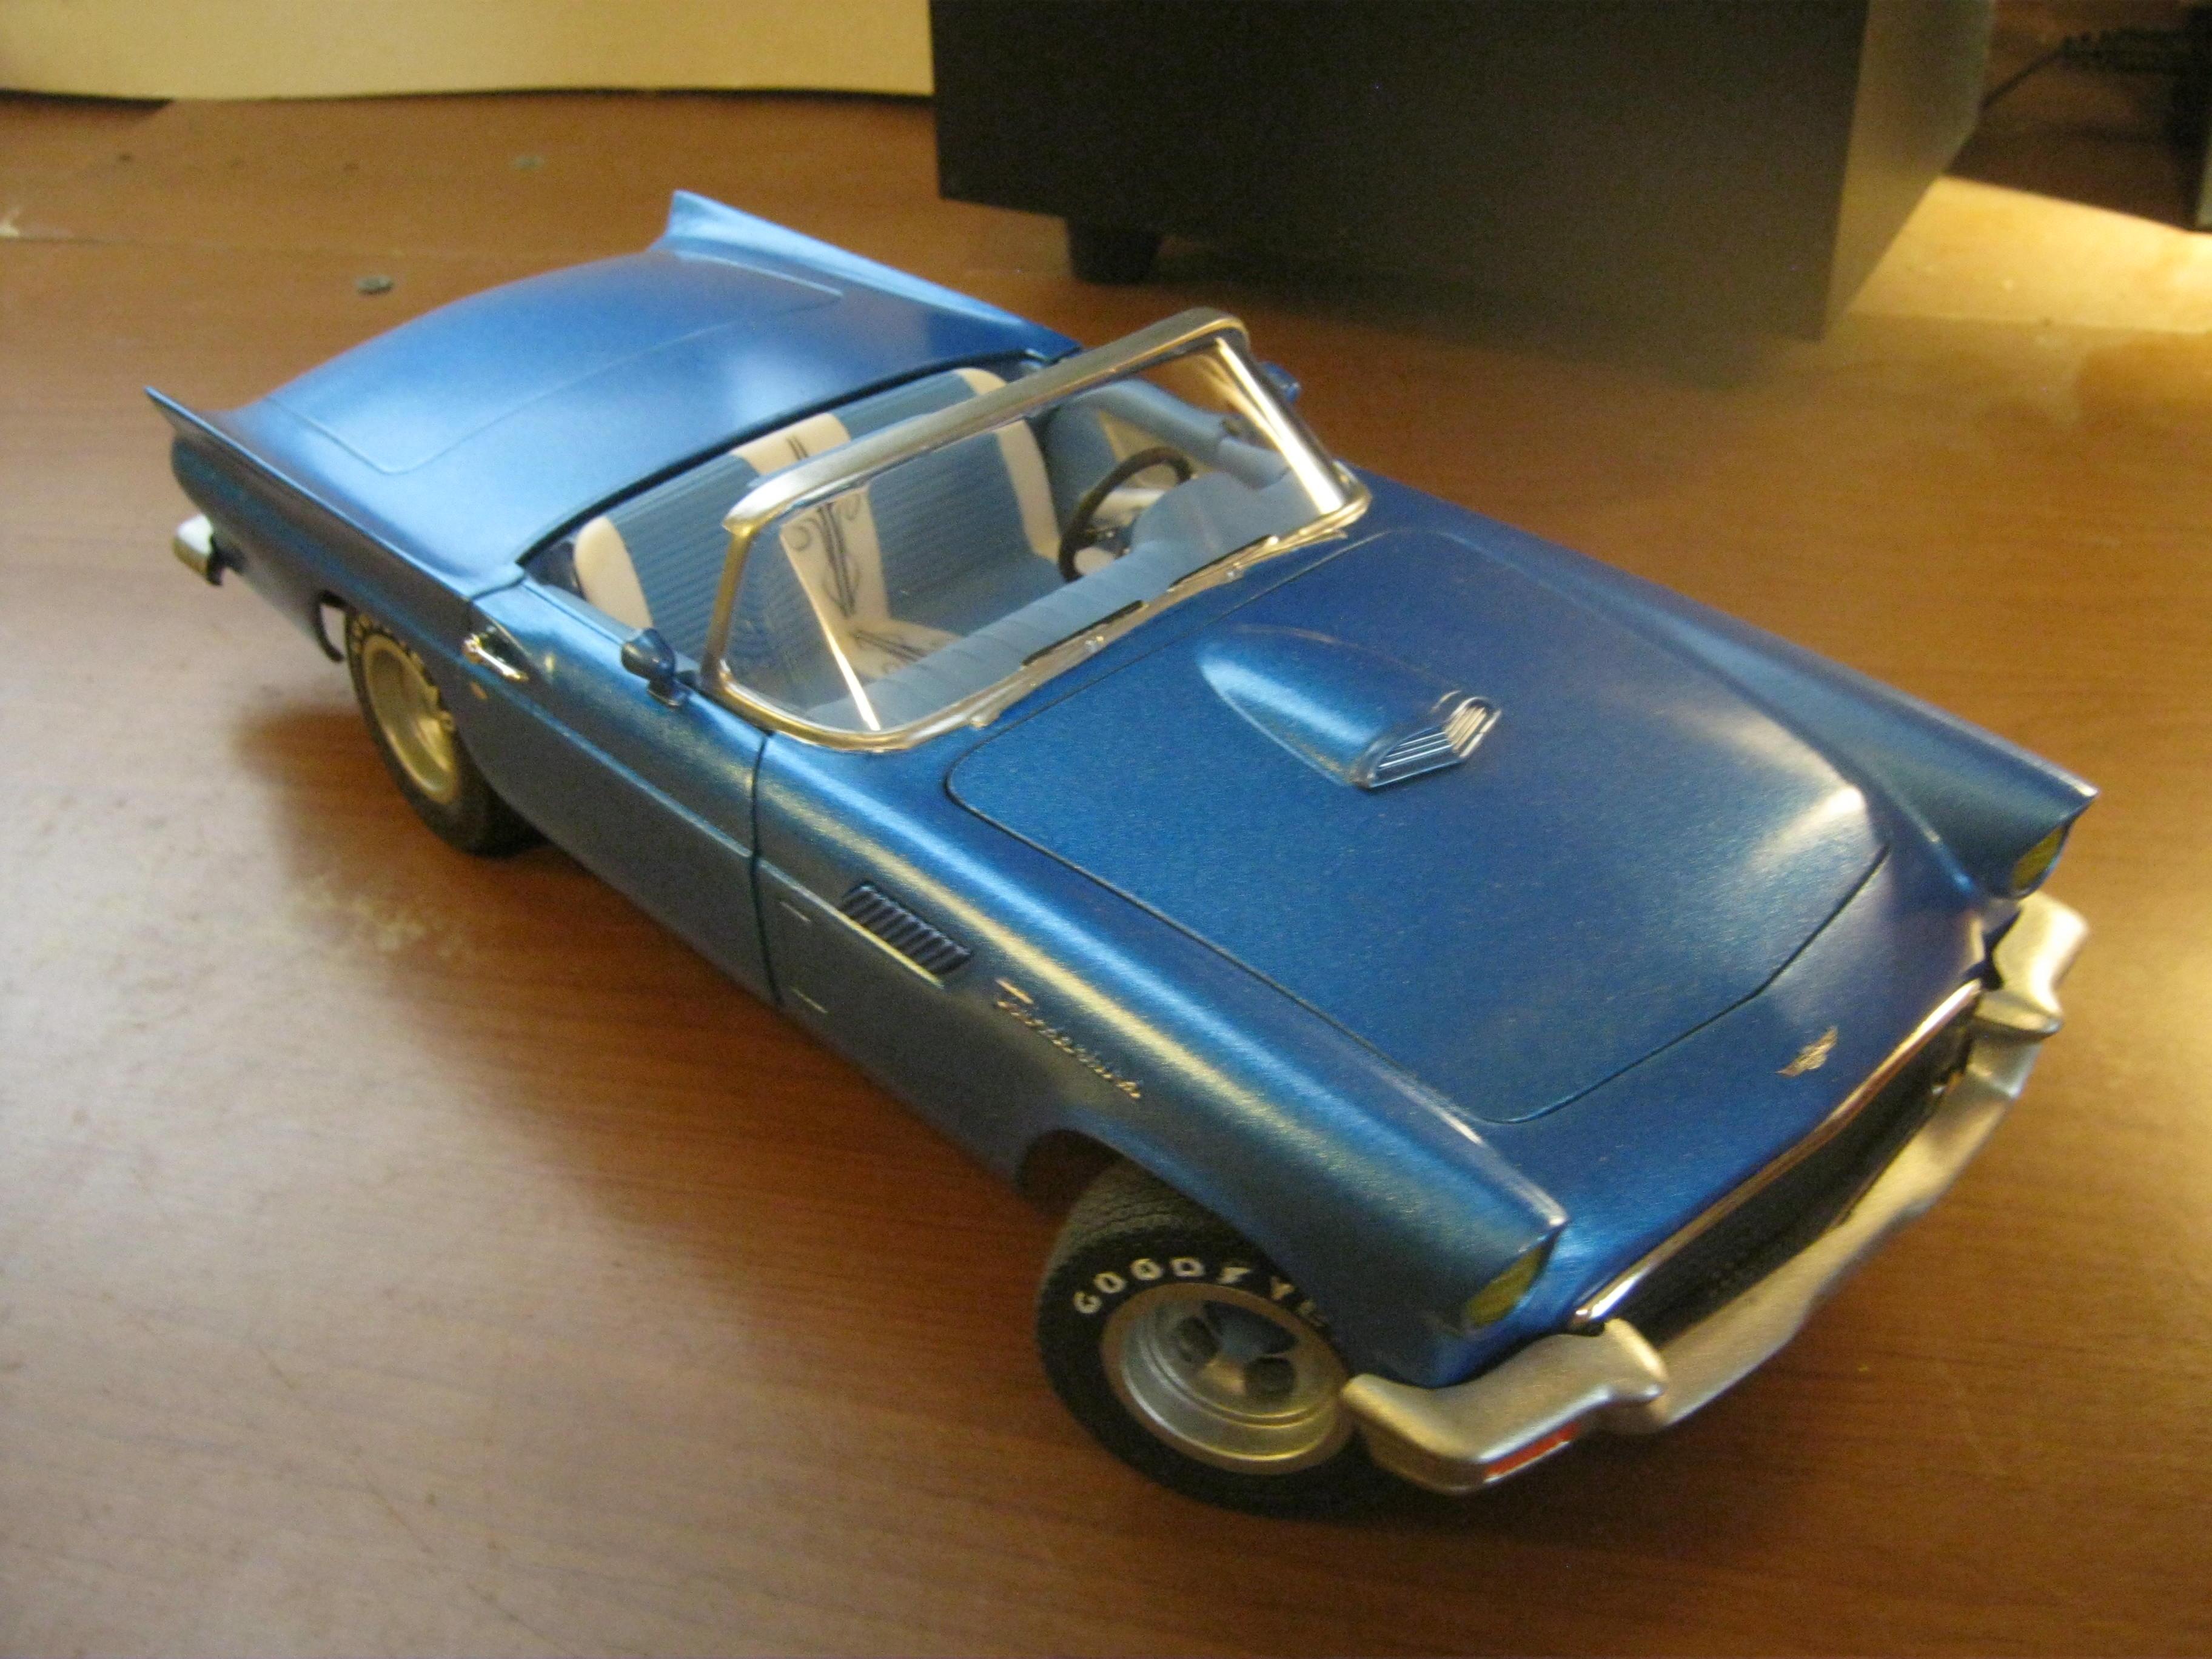
This is a rebuild from a built up I got from ebay last year. First pictures of how I got it and the last is how it looks today. Here it is rebuilt - Not perfect but I feel a bit better than when I got it. Painted Testors' Revving Red with wet look clear. The bubble rear window and custom roof came from another 63 Galaxie I have. The engine block came in the model but I used new chrome from one of the many 63 Ford kits I have to freshen it up. I also used new custom parts from the various 63 Galaxie kits I have. The spotlights are from the AMT 62 Buick kit. Thanks for looking, all comments welcomed.
-
Happy 2021 all,,glad to see 2020 in my rearview mirror. recently finished this AMT 1/16th kit,,added a few x-tras over the holidays. Used testors quikdry blue,,hand painted the rest. As always the large AMT kits go together well,,for the most part,,and look pretty good when done. Wishing you all the best for 2021. S
-
 Found these listed on Stevens International website today: AMT-1230 - 1/25 Miller Beer GMC Astro 95 Semi Tractor Cab AMT-1238 - 1/24 Ford LTL9000 Semi Tractor Cab
-
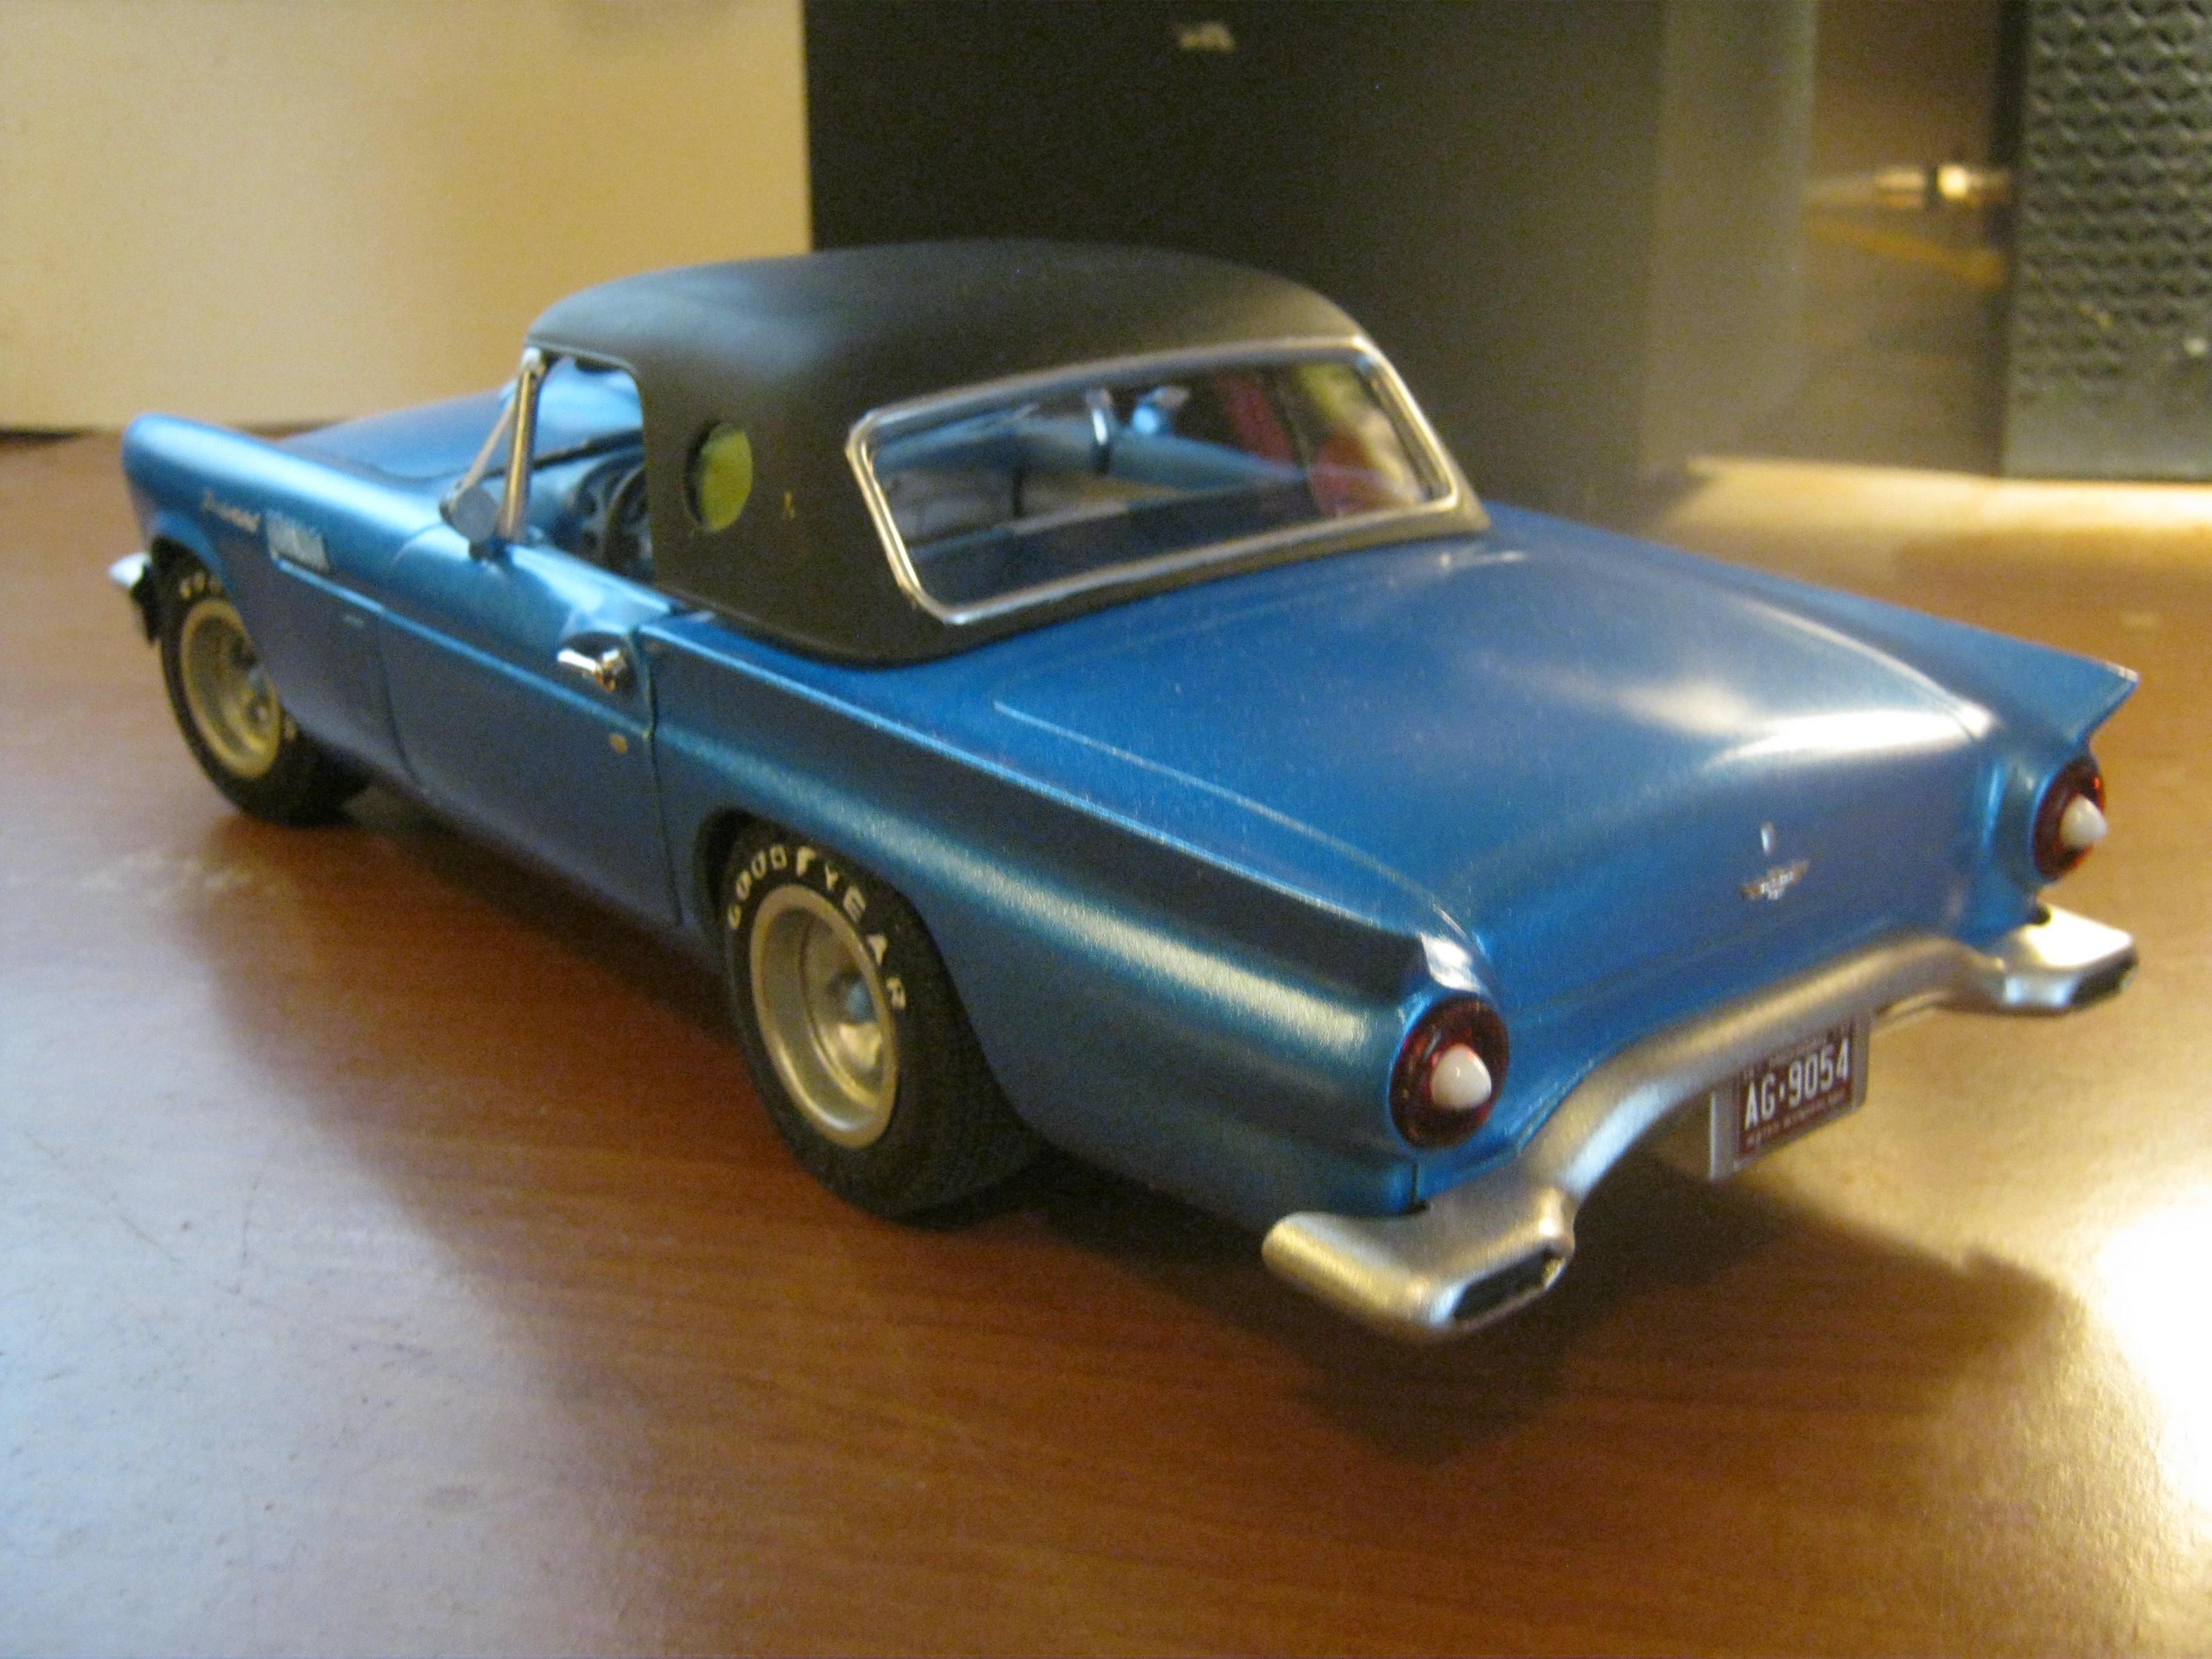
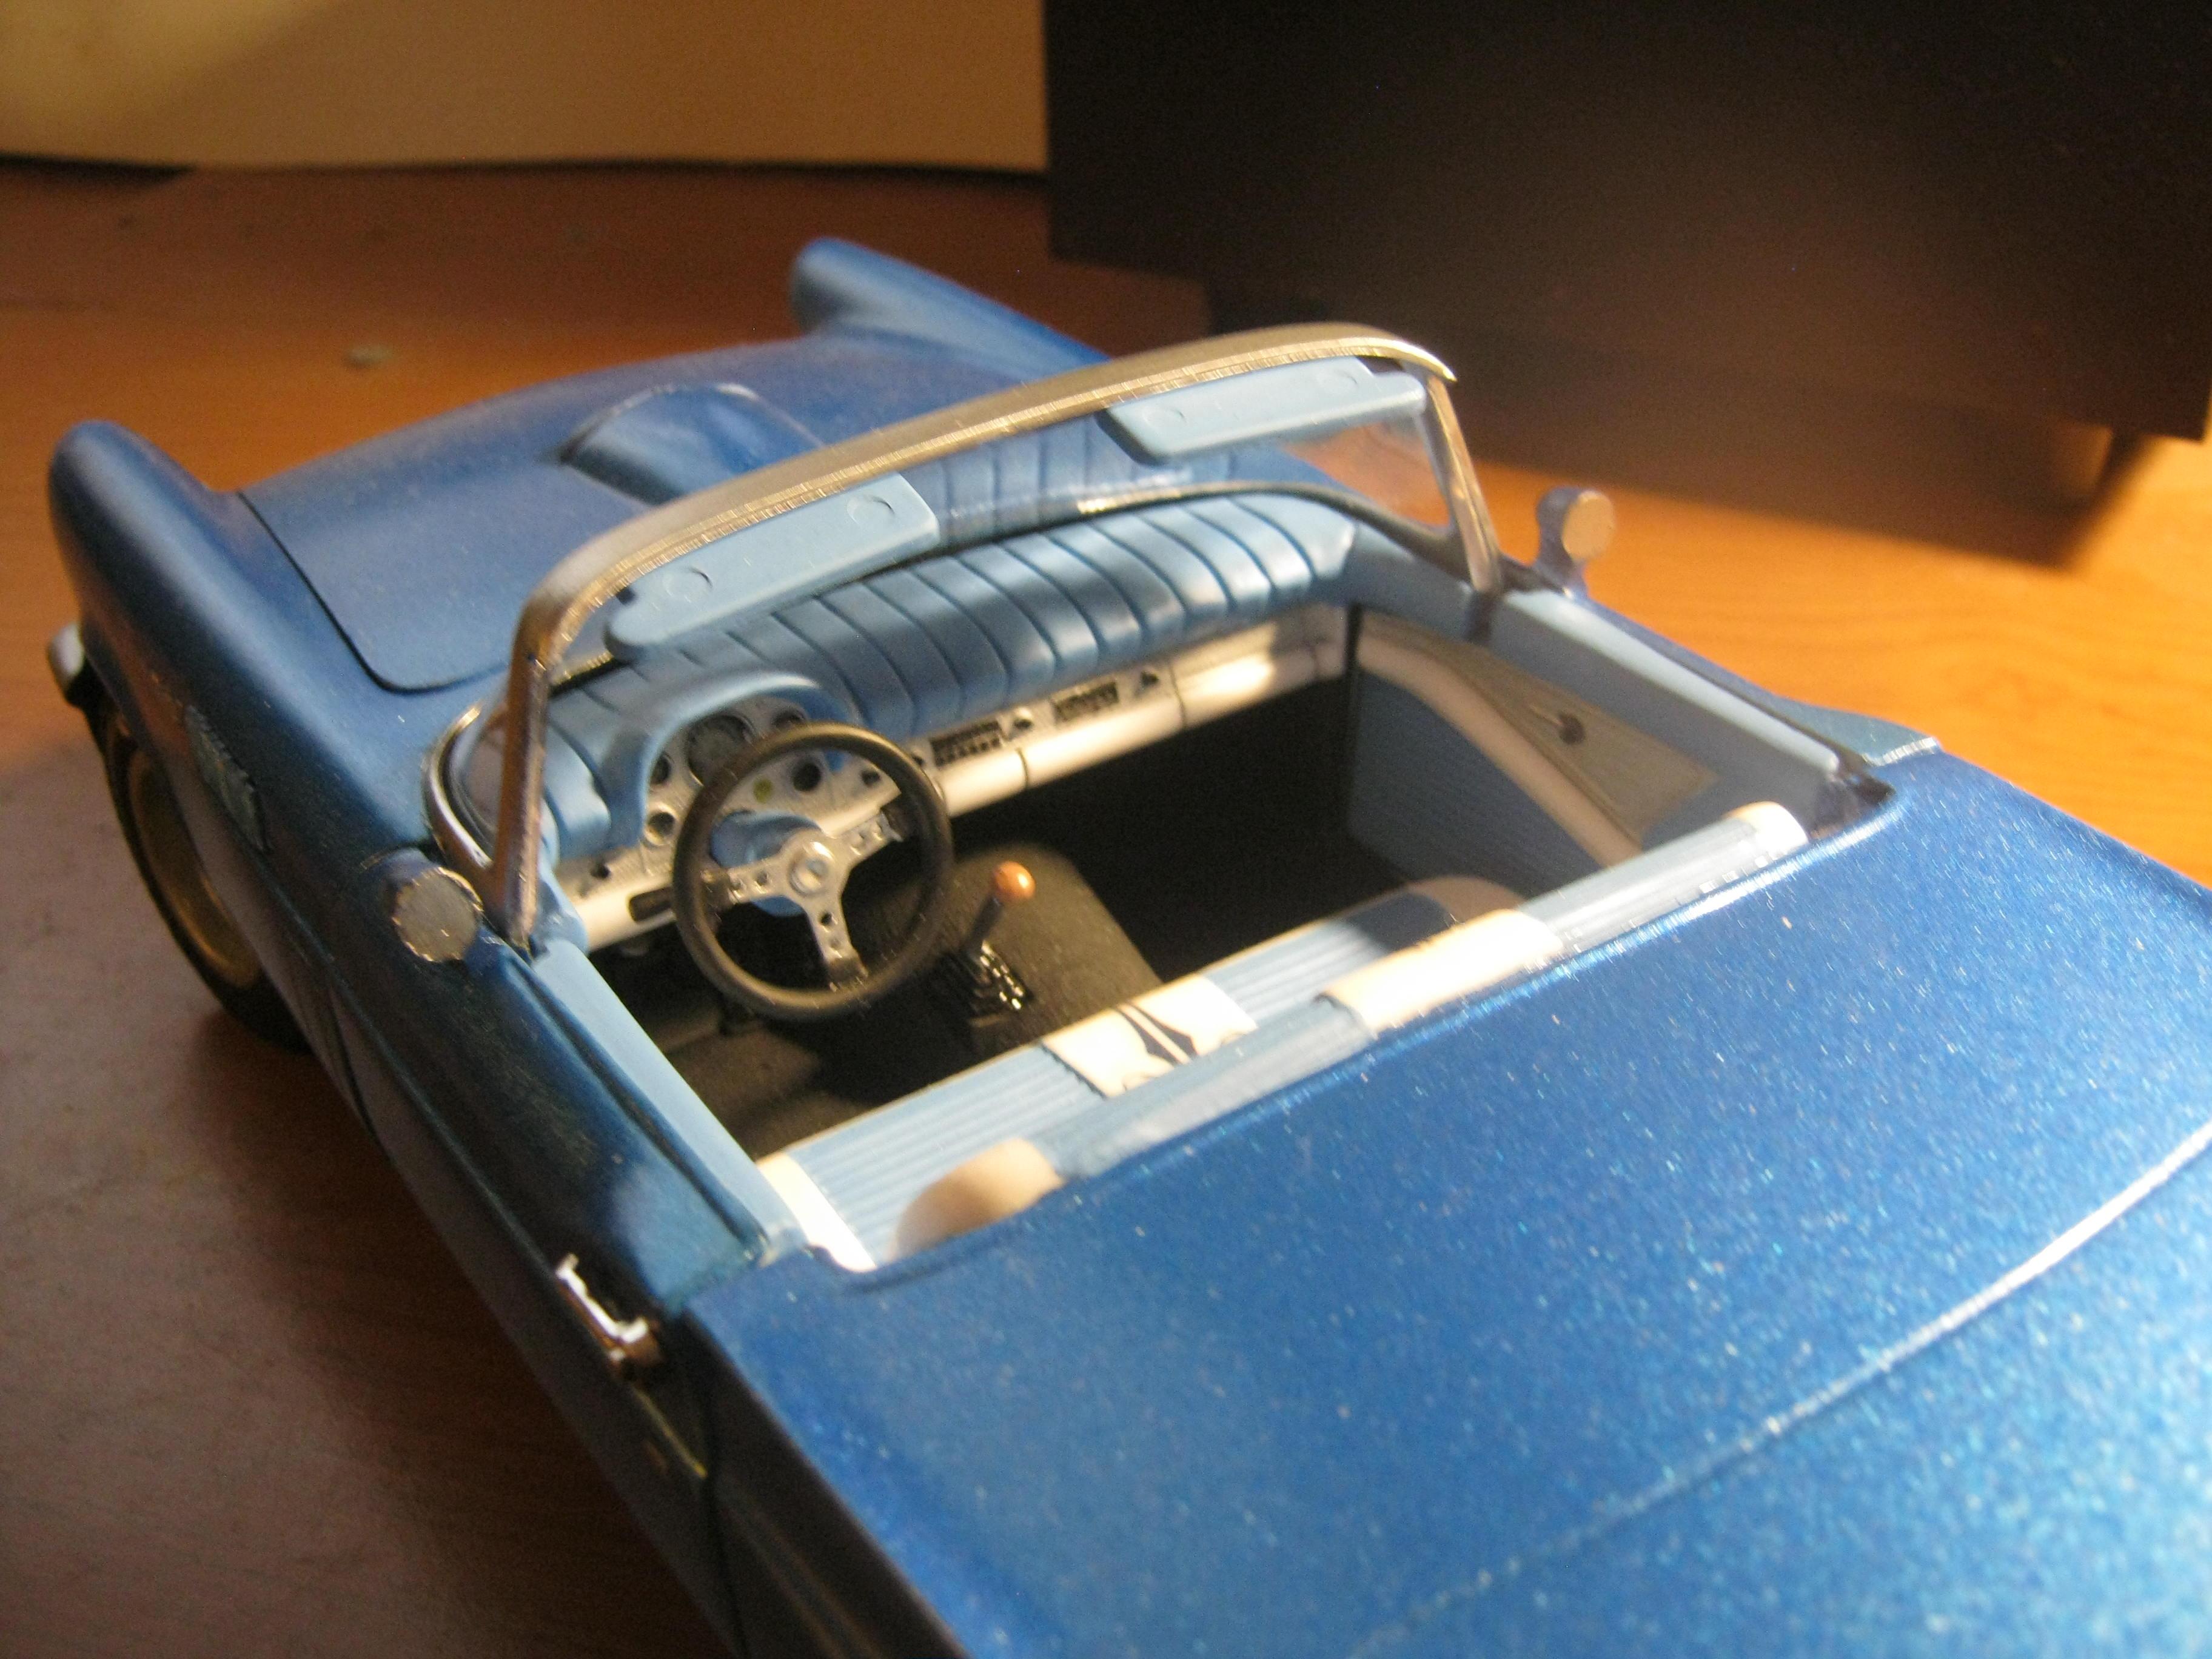
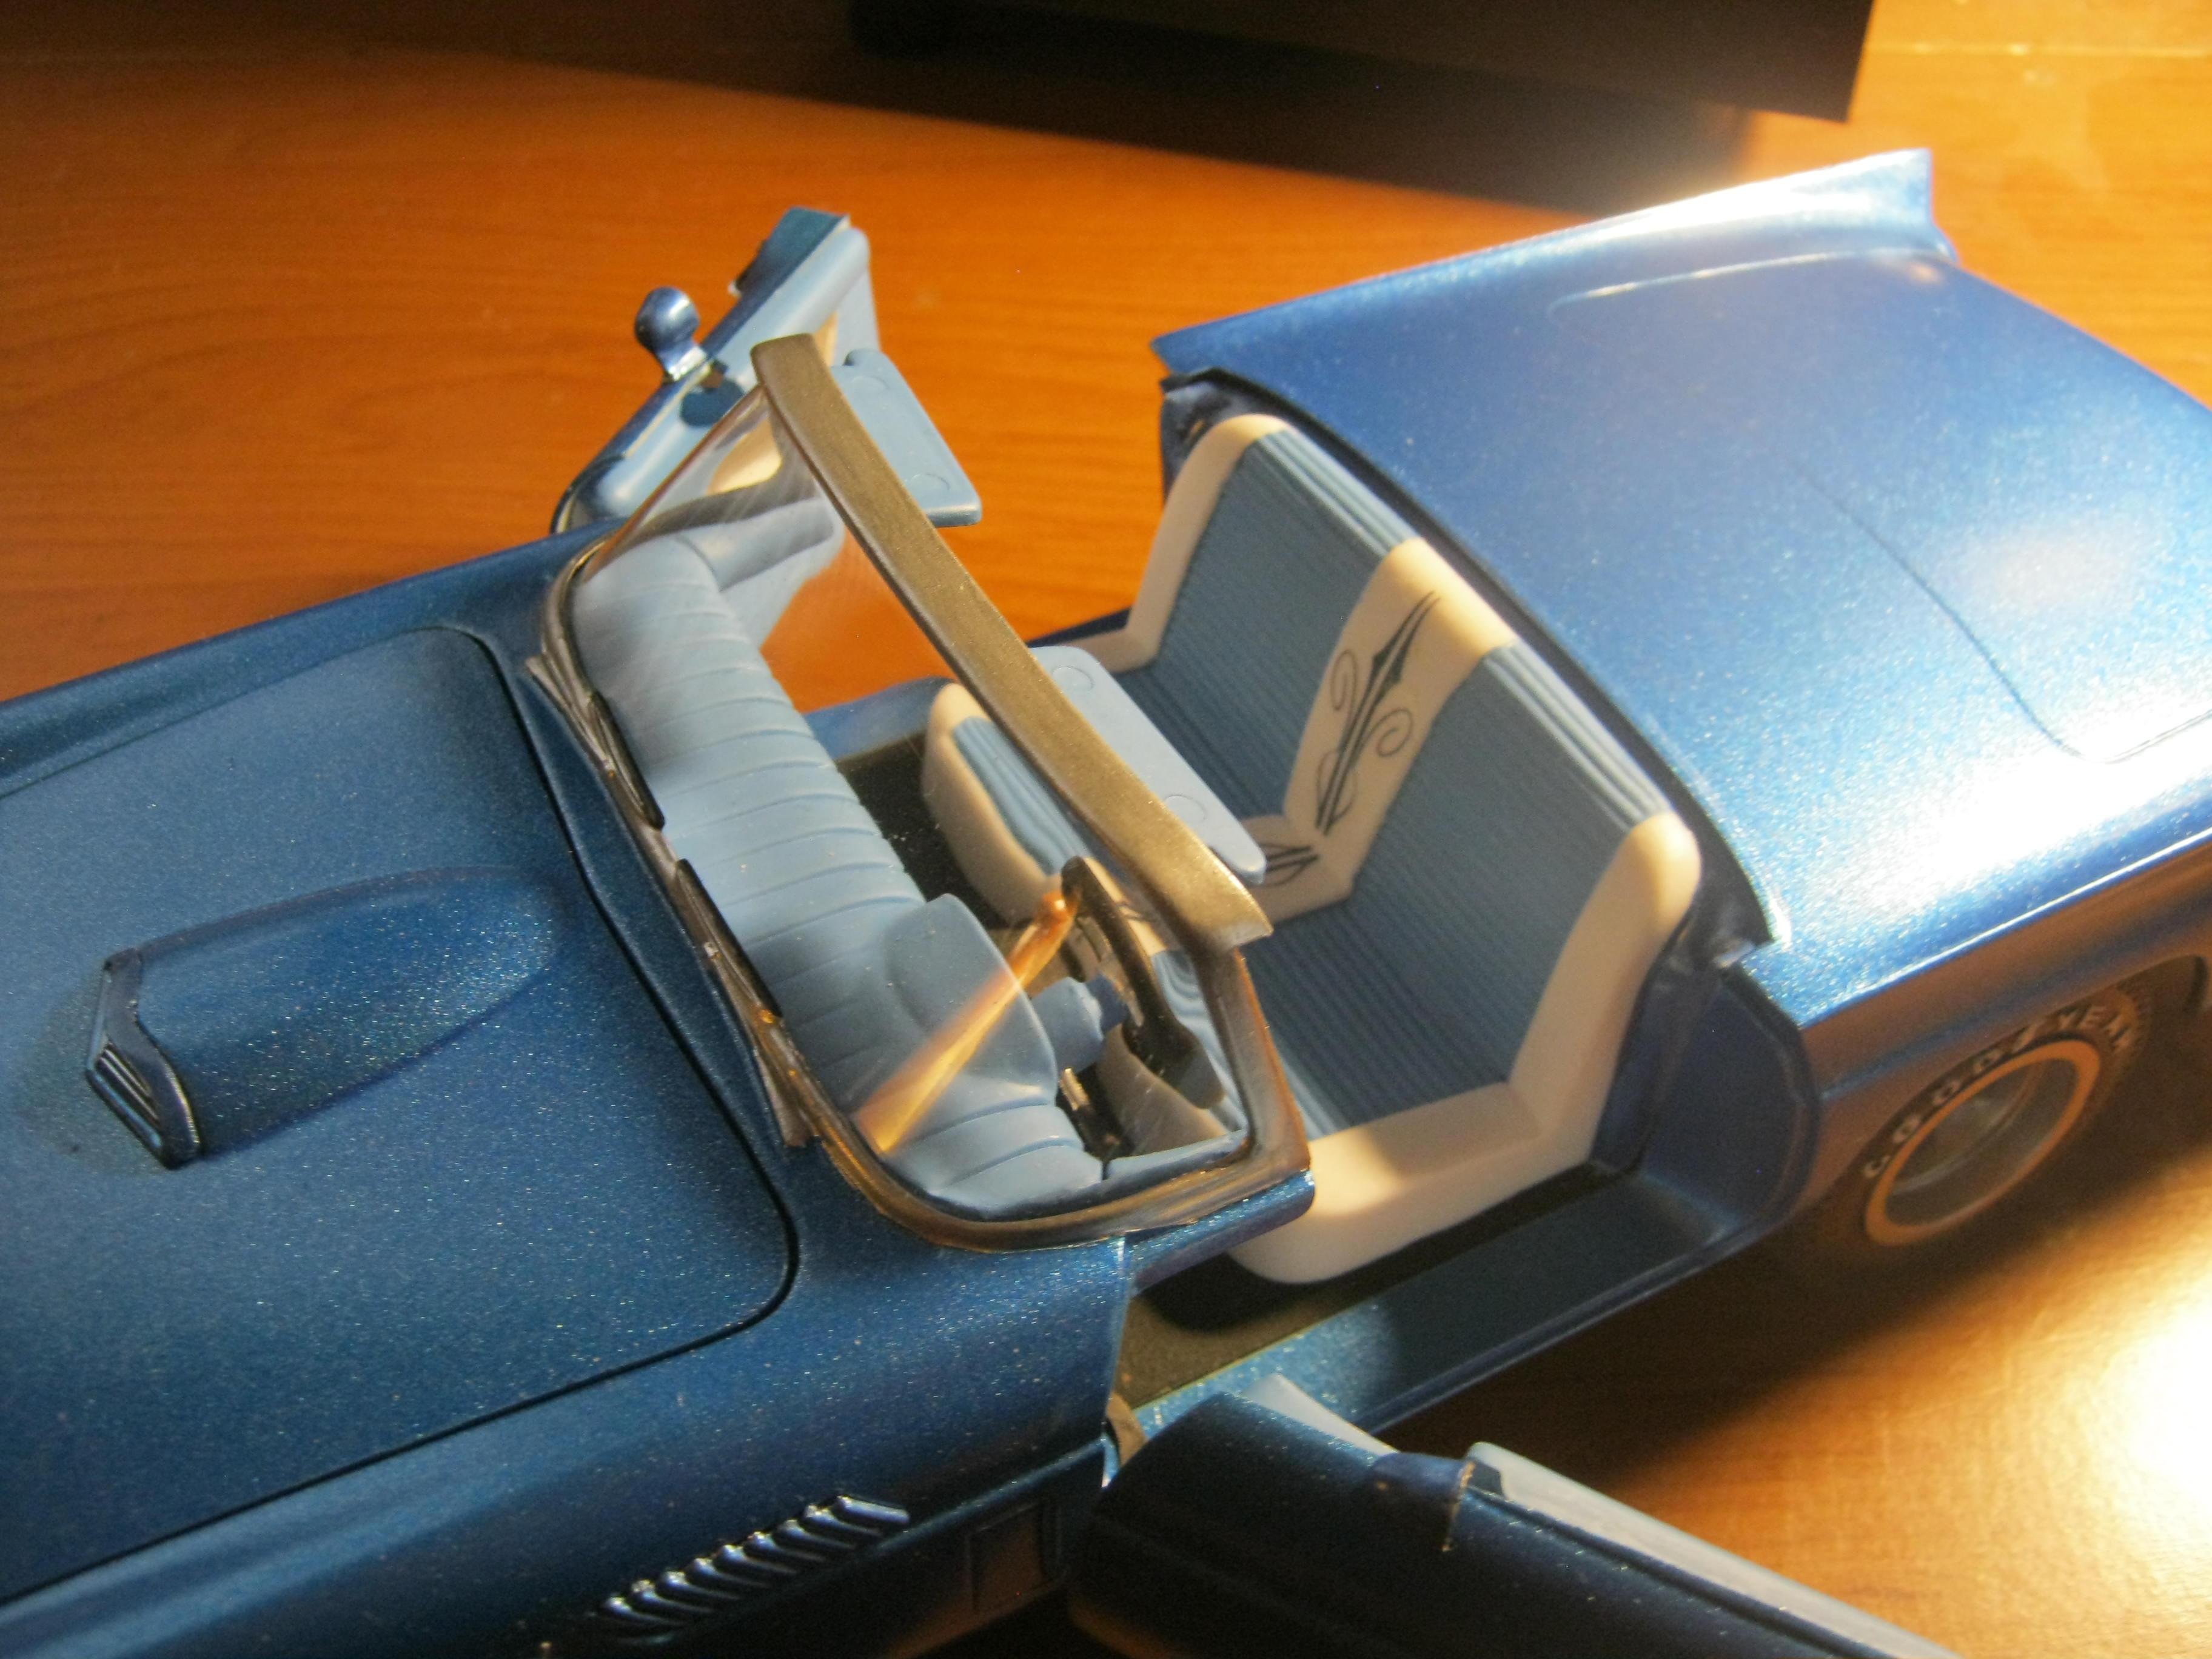
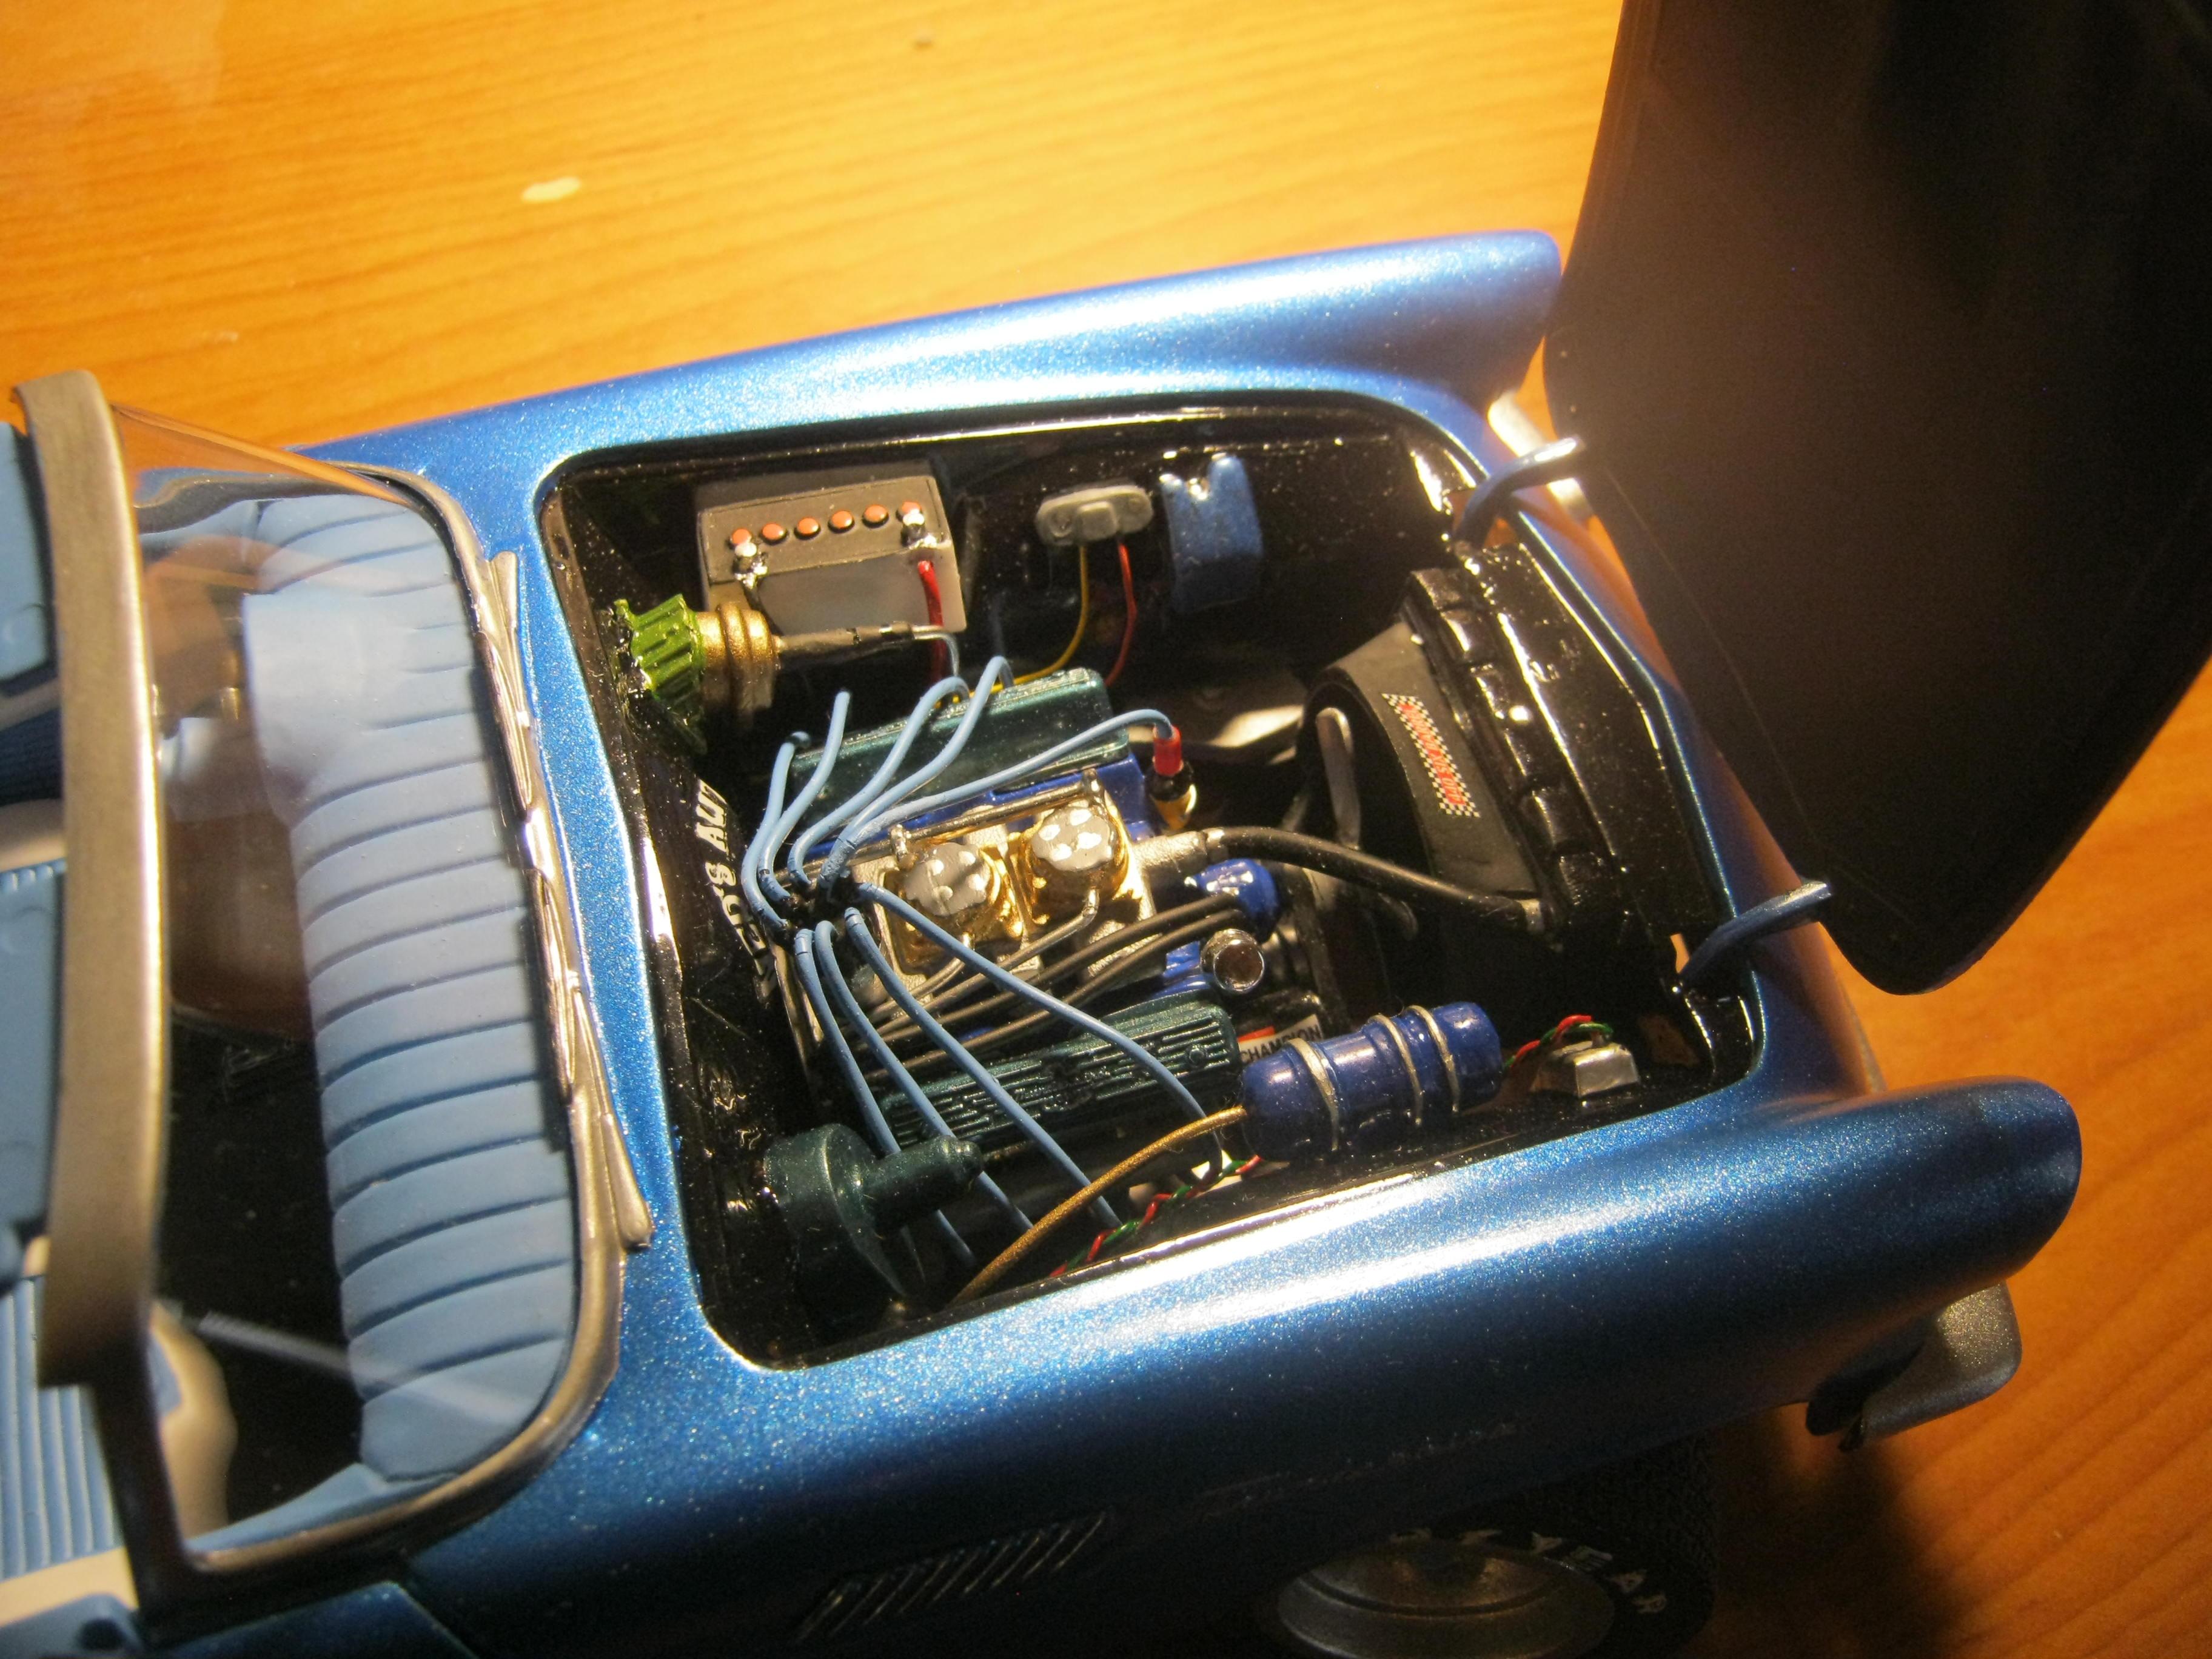
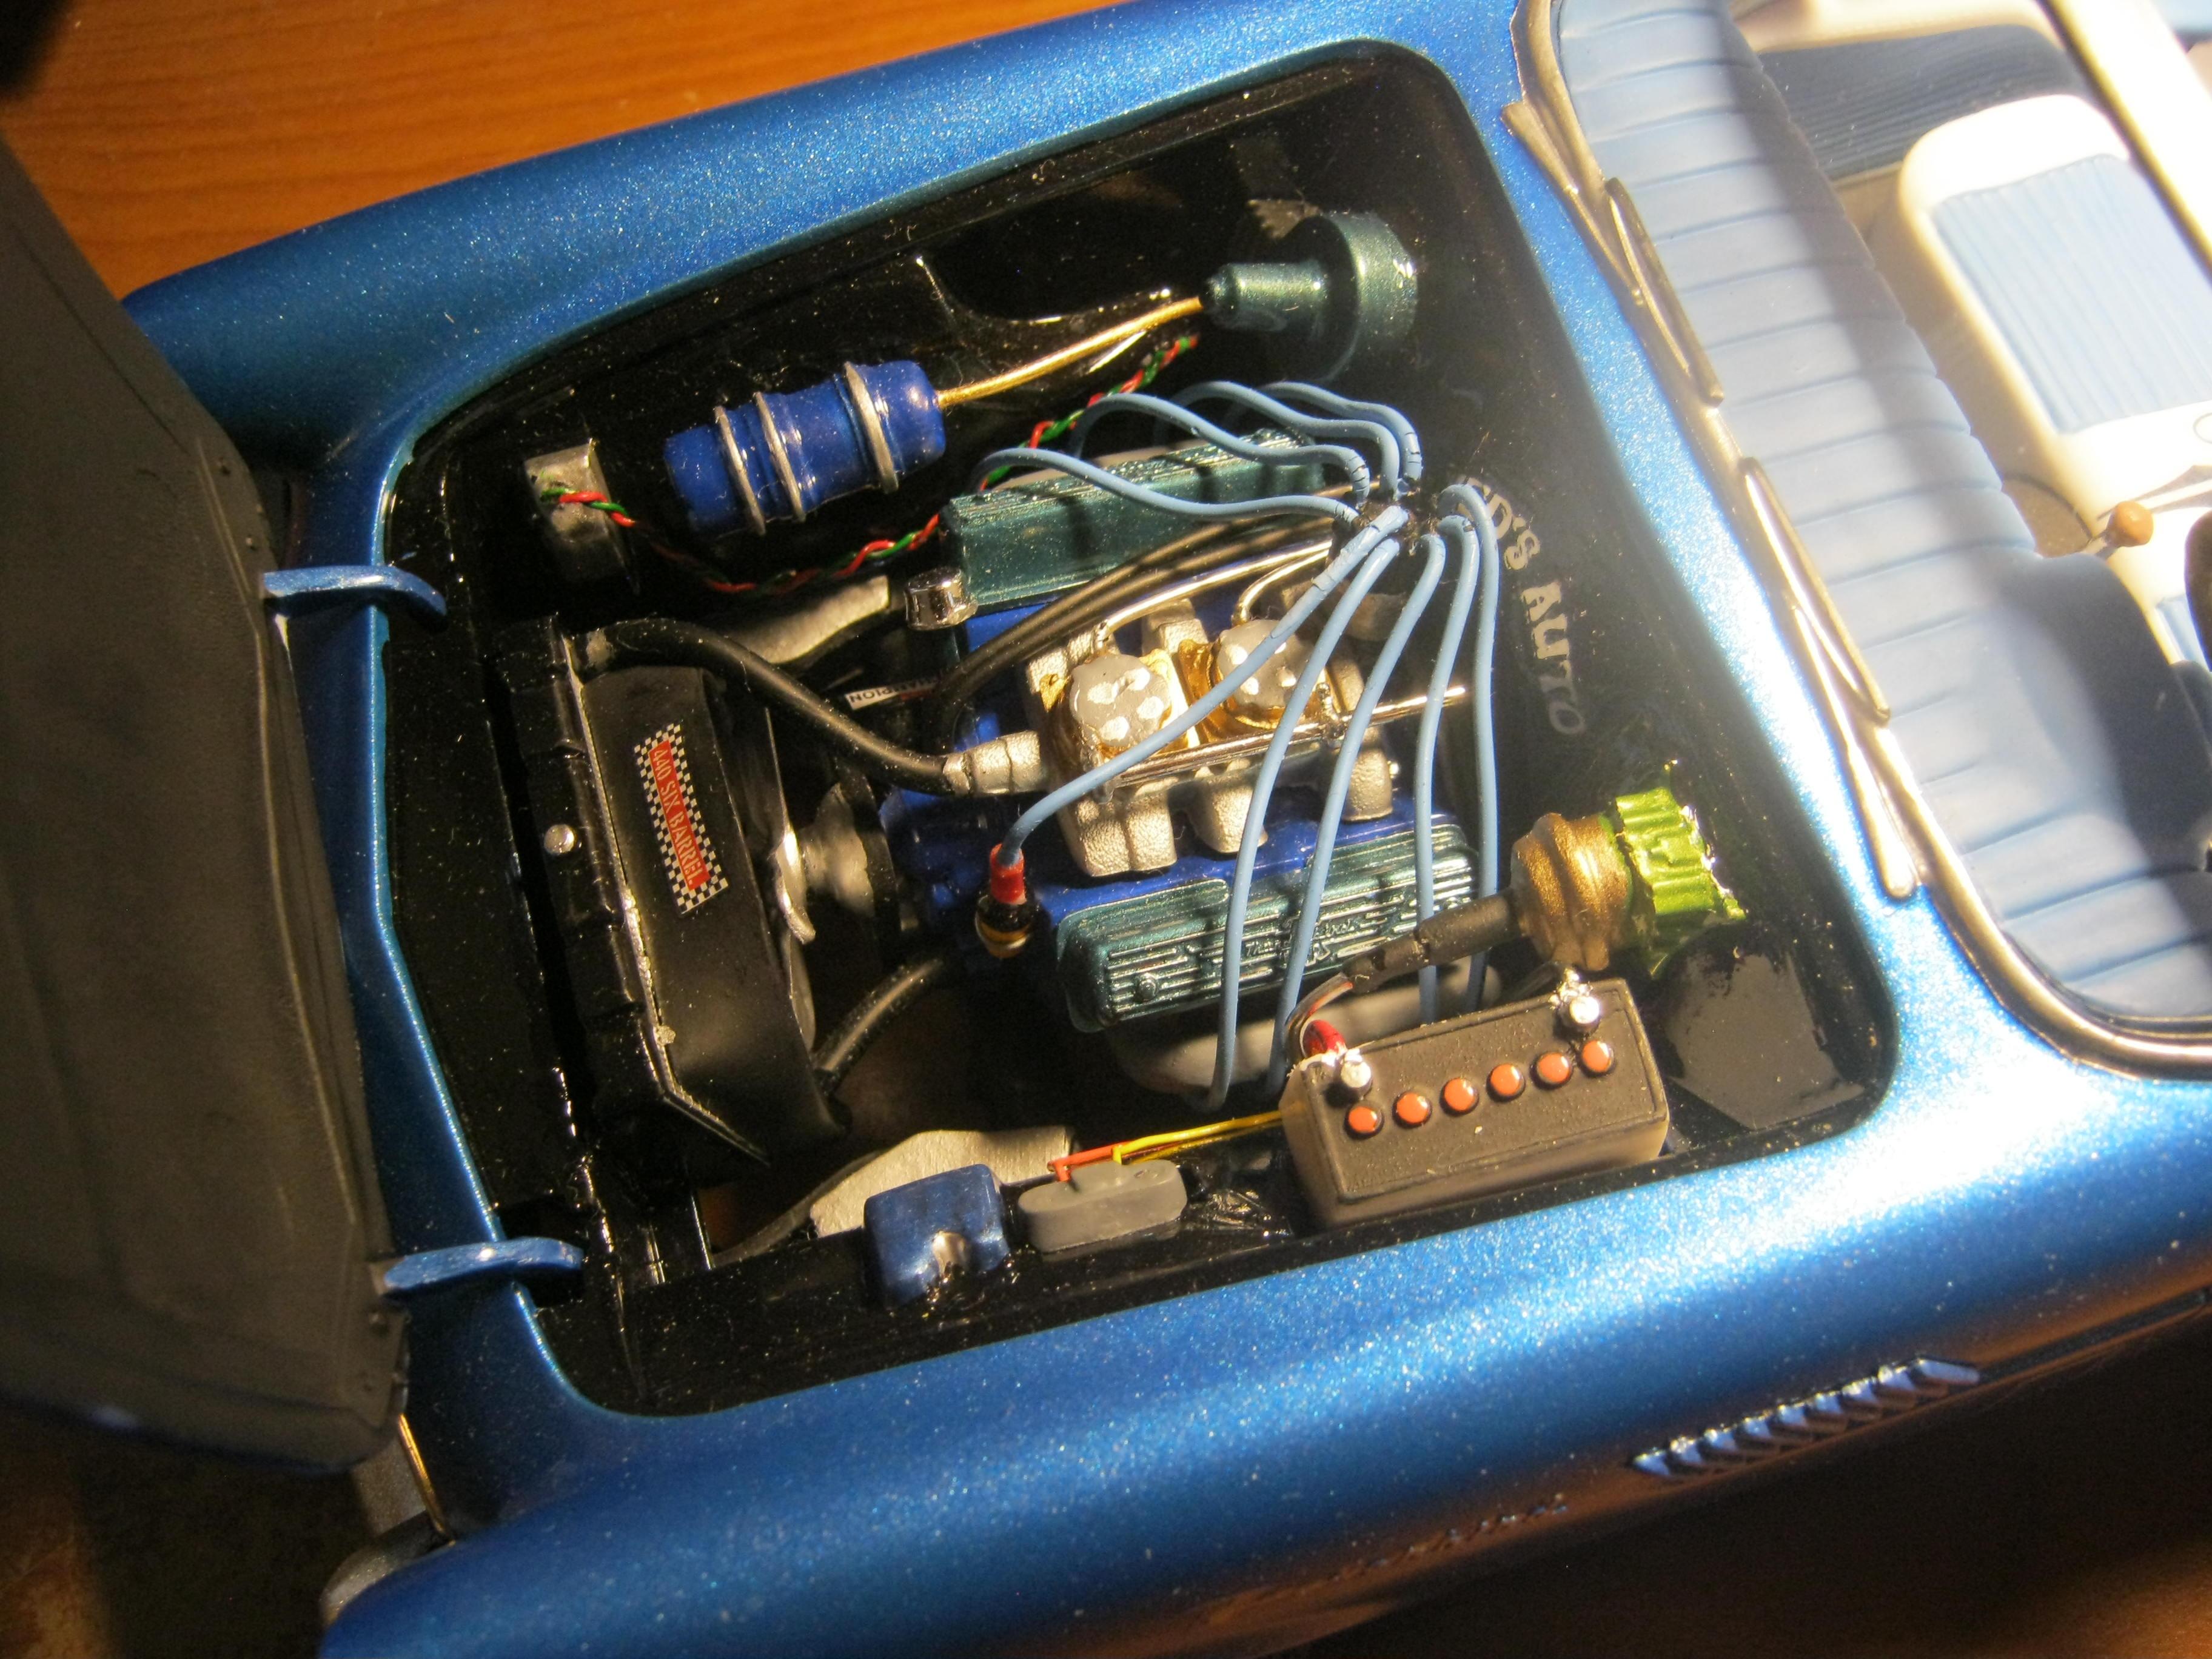
I finished up the interior today and got half of the side chrome done. Dash, center console arm rest, and custom steering wheel painted Testors' Revving Red. Rear seat backs highlighted with Testors' 1204 red. Flooring done with Kens fuzzy fur maroon flocking. The chrome was done with a molotow chrome pen. Dash buttons gloss white and gauge faces done with semi-gloss black. The custom roof panels and rear glass came from another 63 Galaxie convertible I have. Body is also painted Testors' Revving Red with wet look clear. I'll be using the flip upside glass on this. The custom rear treatment comes from about three different custom treatments that came in the kit. Kit supplied big bullet tail lights are glued to smaller round filler lights that have been BMF'd. It's came a long way from when I first got it eh? Thanks for looking, all comments welcomed.
-
Lindberg kit I picked up with a gift card. It's a pretty easy build, however, a few of the parts are mislabeled. Also, it says there are side mirrors, but the kit does not have any. SAM_0128 by Eric Lucas, on Flickr SAM_0129 by Eric Lucas, on Flickr SAM_0130 by Eric Lucas, on Flickr SAM_0131 by Eric Lucas, on Flickr
-
Pictures of box, box contents, and instructions here Thank you and enjoy!
-
I loved the kit and thought about buying another one to make a Mach 1. After all, I remembered the kit having the scoops in it. Well I started to cut out the holes to put the scoops in when I noticed; the scoops are from the GT-500 kit, not the Mach 1! So, now I have a red 302 and a yellow. Couldn't find my decal setting solution, so I was kinda angry I couldn't get the hood right. SAM_0122 by Eric Lucas, on Flickr SAM_0123 by Eric Lucas, on Flickr SAM_0124 by Eric Lucas, on Flickr SAM_0125 by Eric Lucas, on Flickr SAM_0126 by Eric Lucas, on Flickr SAM_0127 by Eric Lucas, on Flickr SAM_0450 by Eric Lucas, on Flickr SAM_0451 by Eric Lucas, on Flickr
-
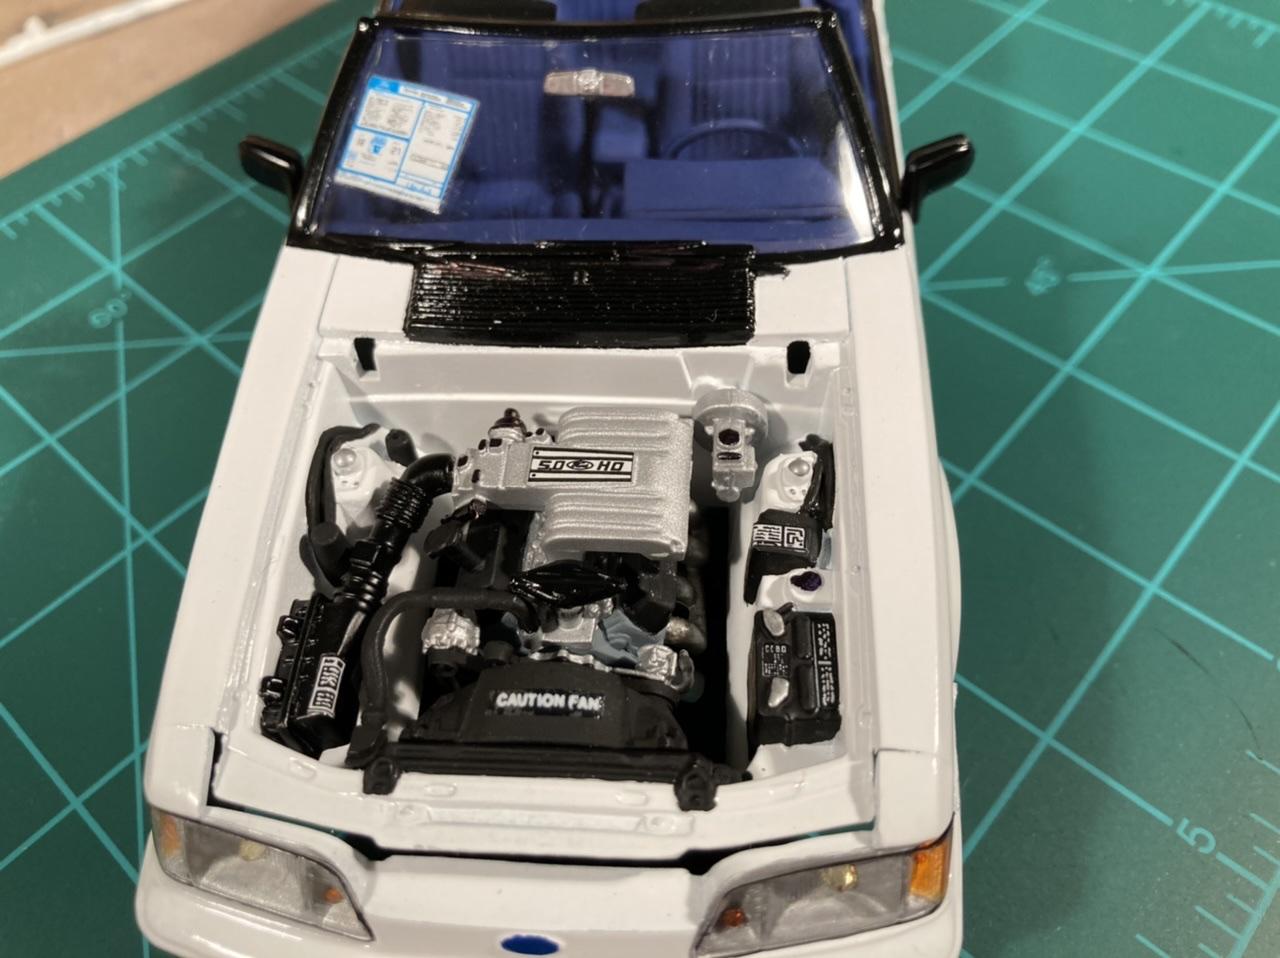
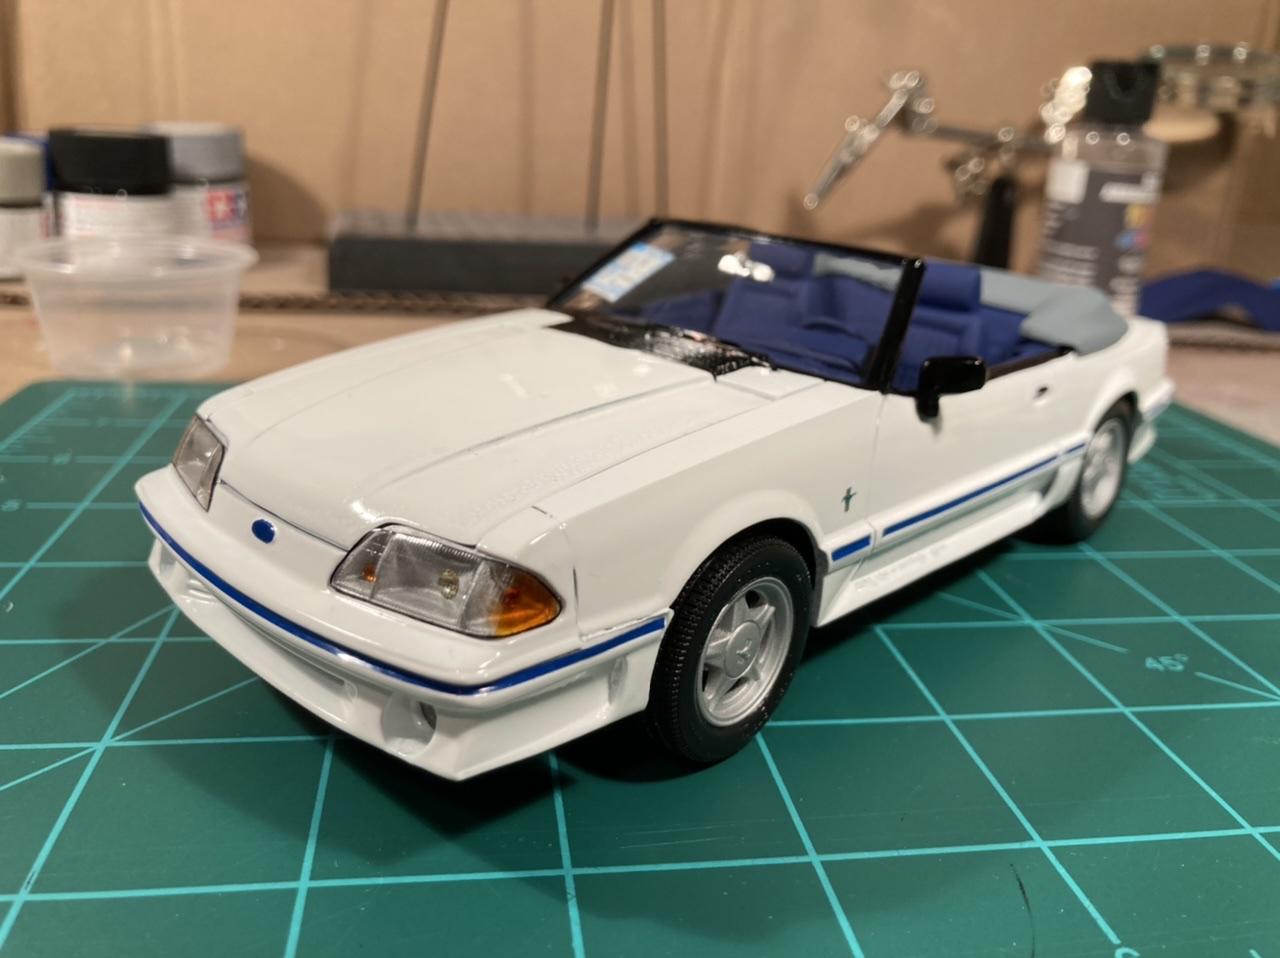
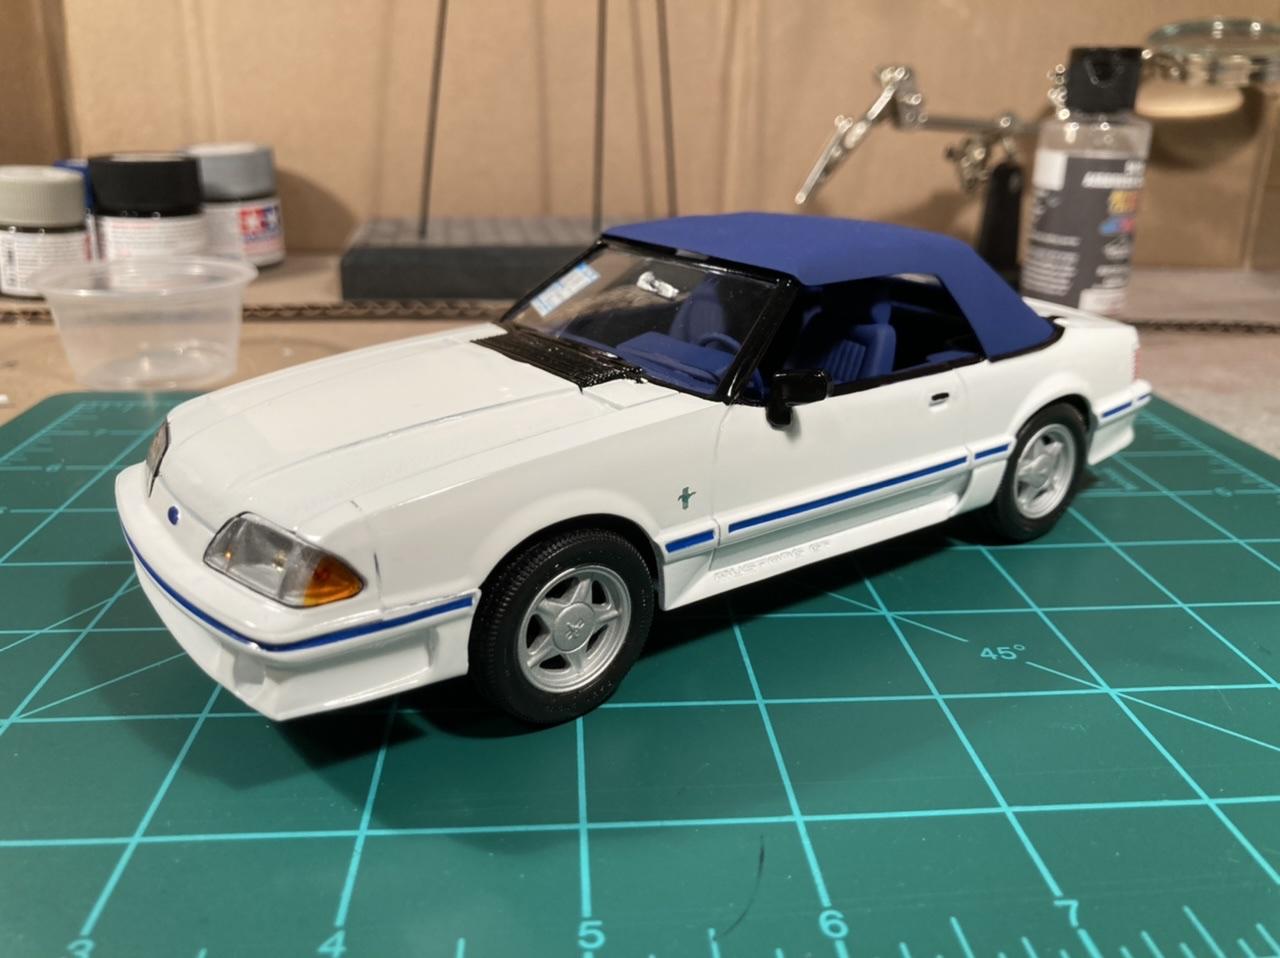
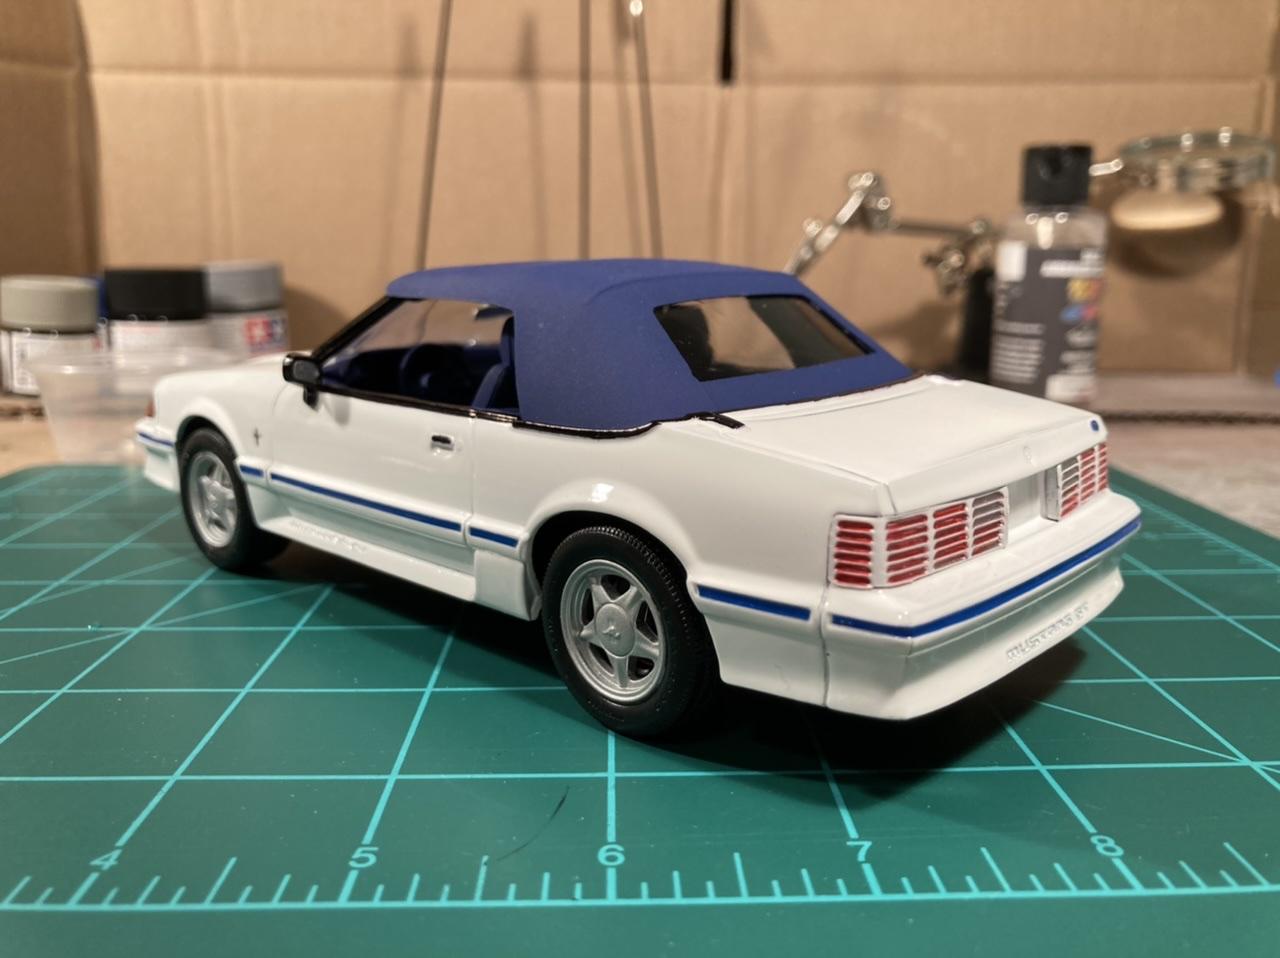
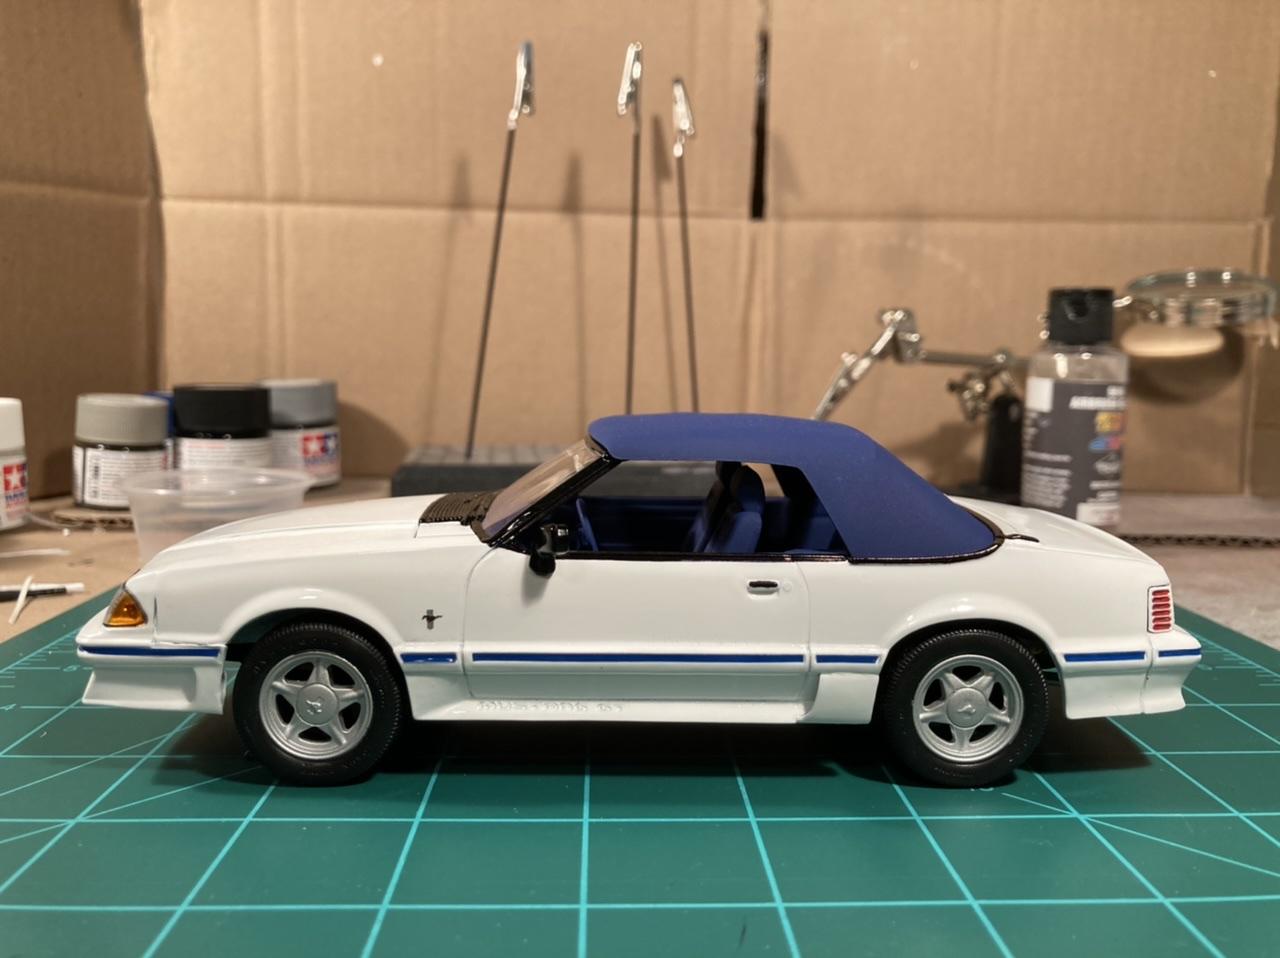
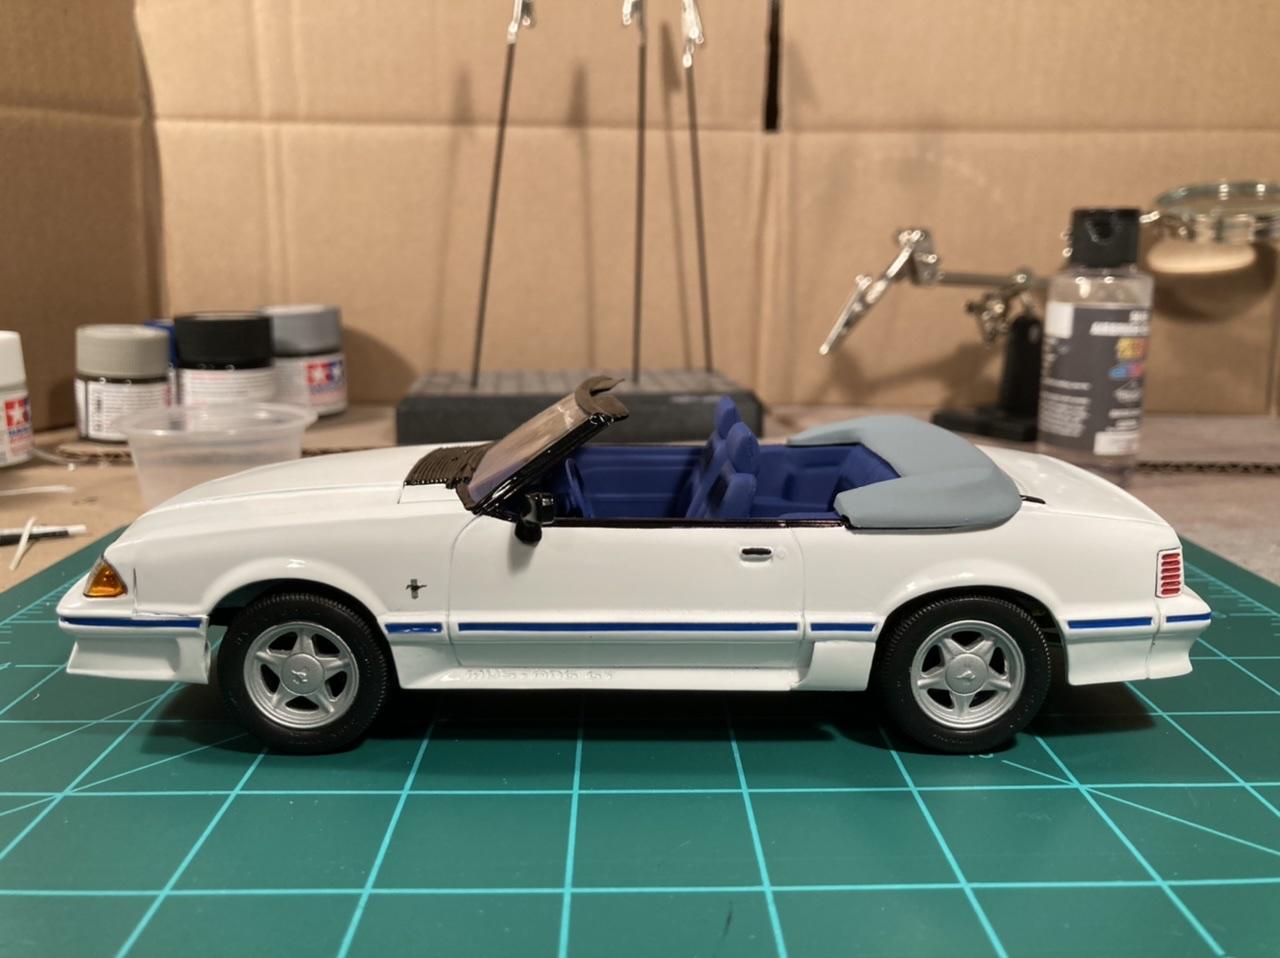
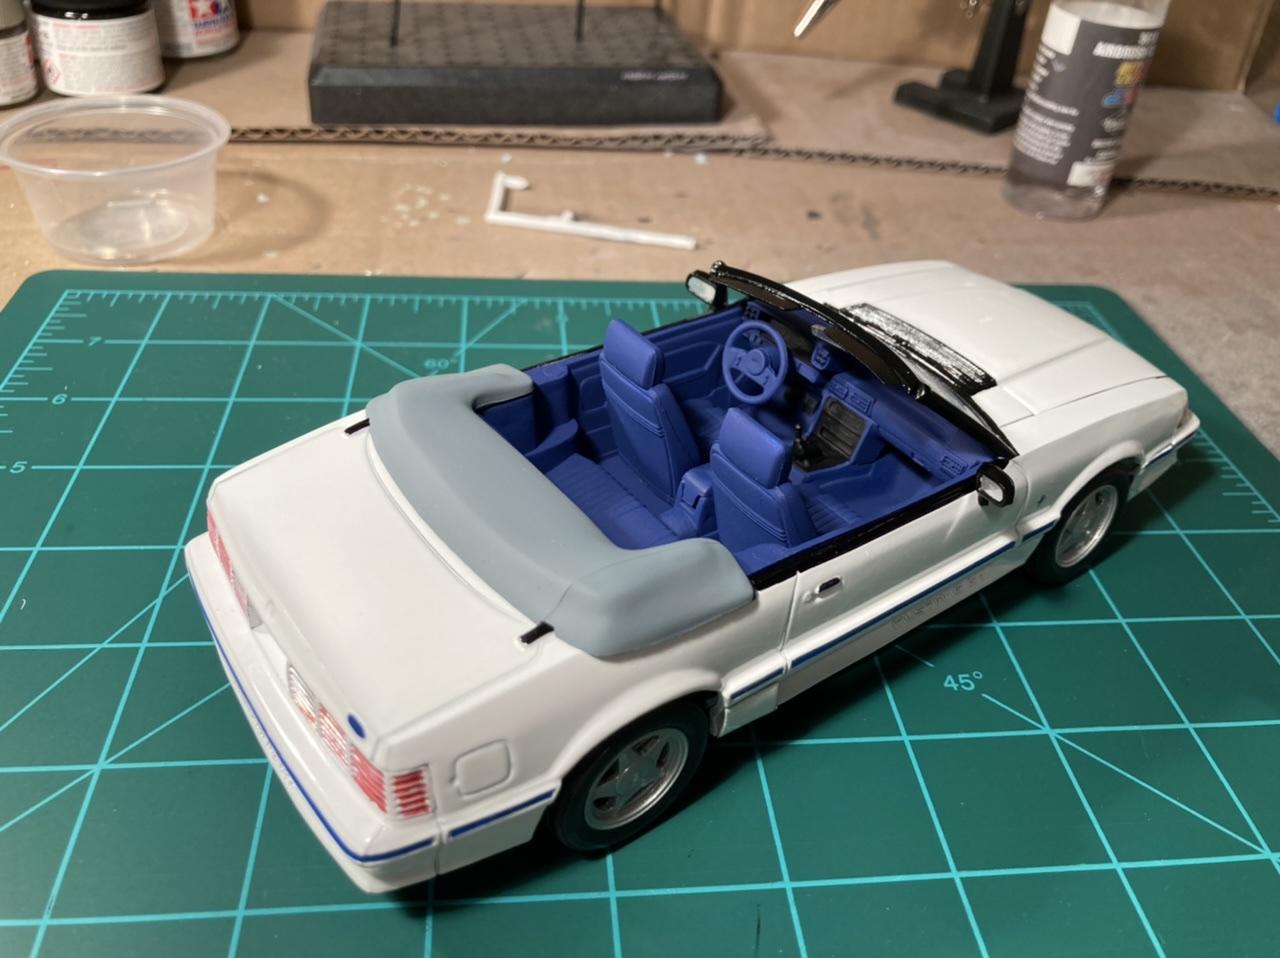
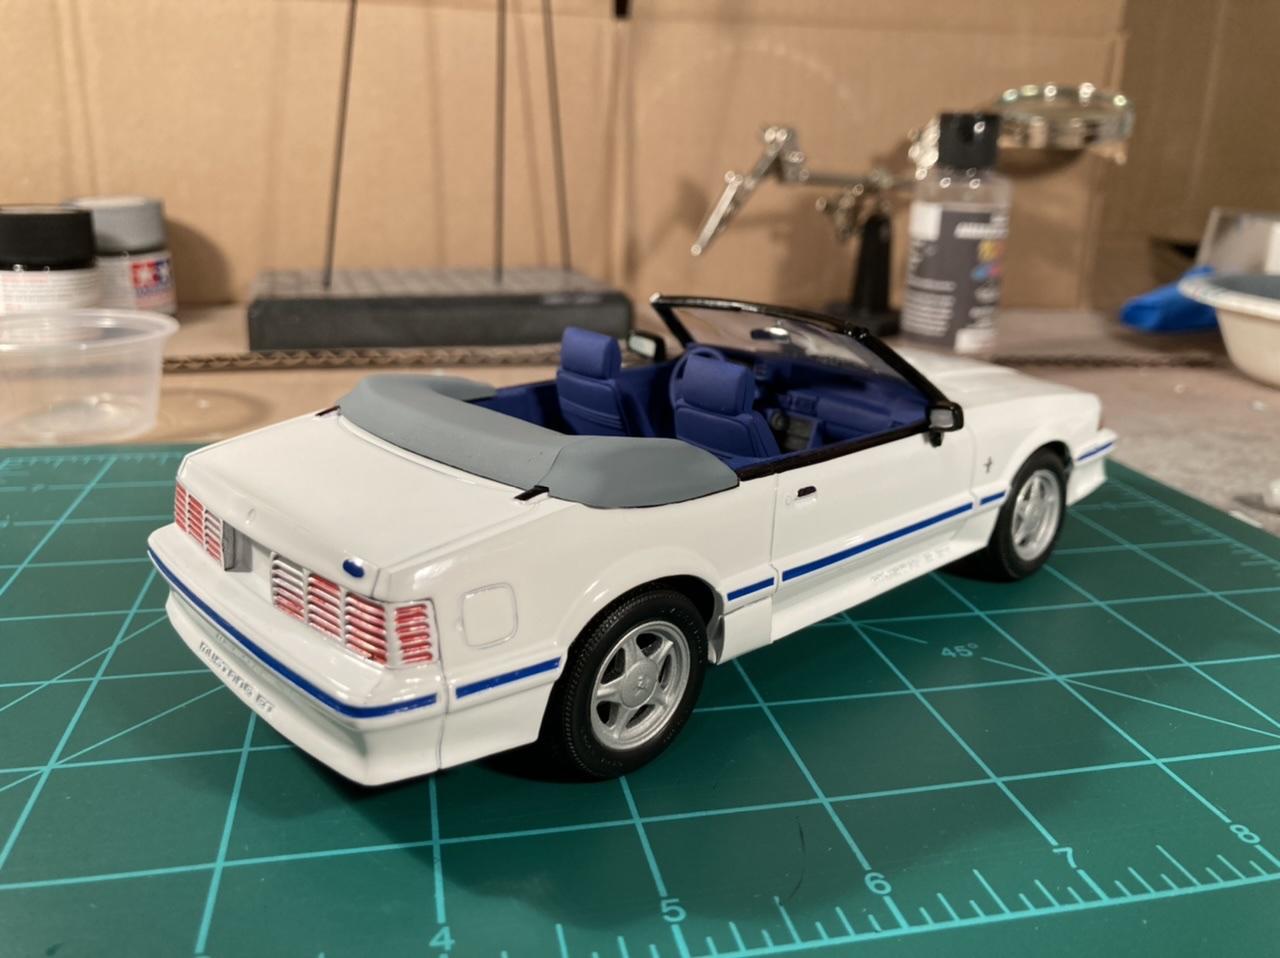
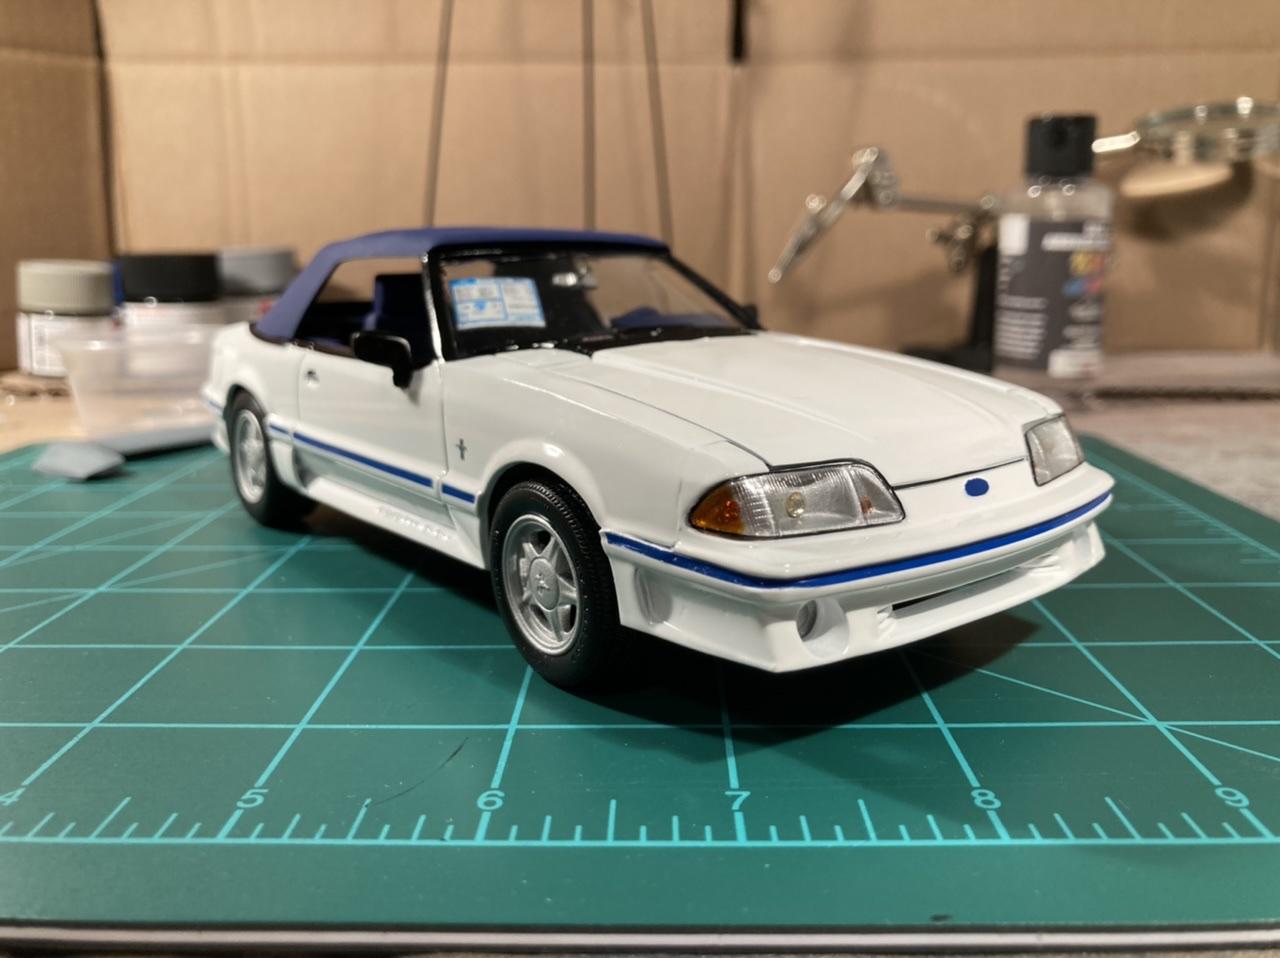
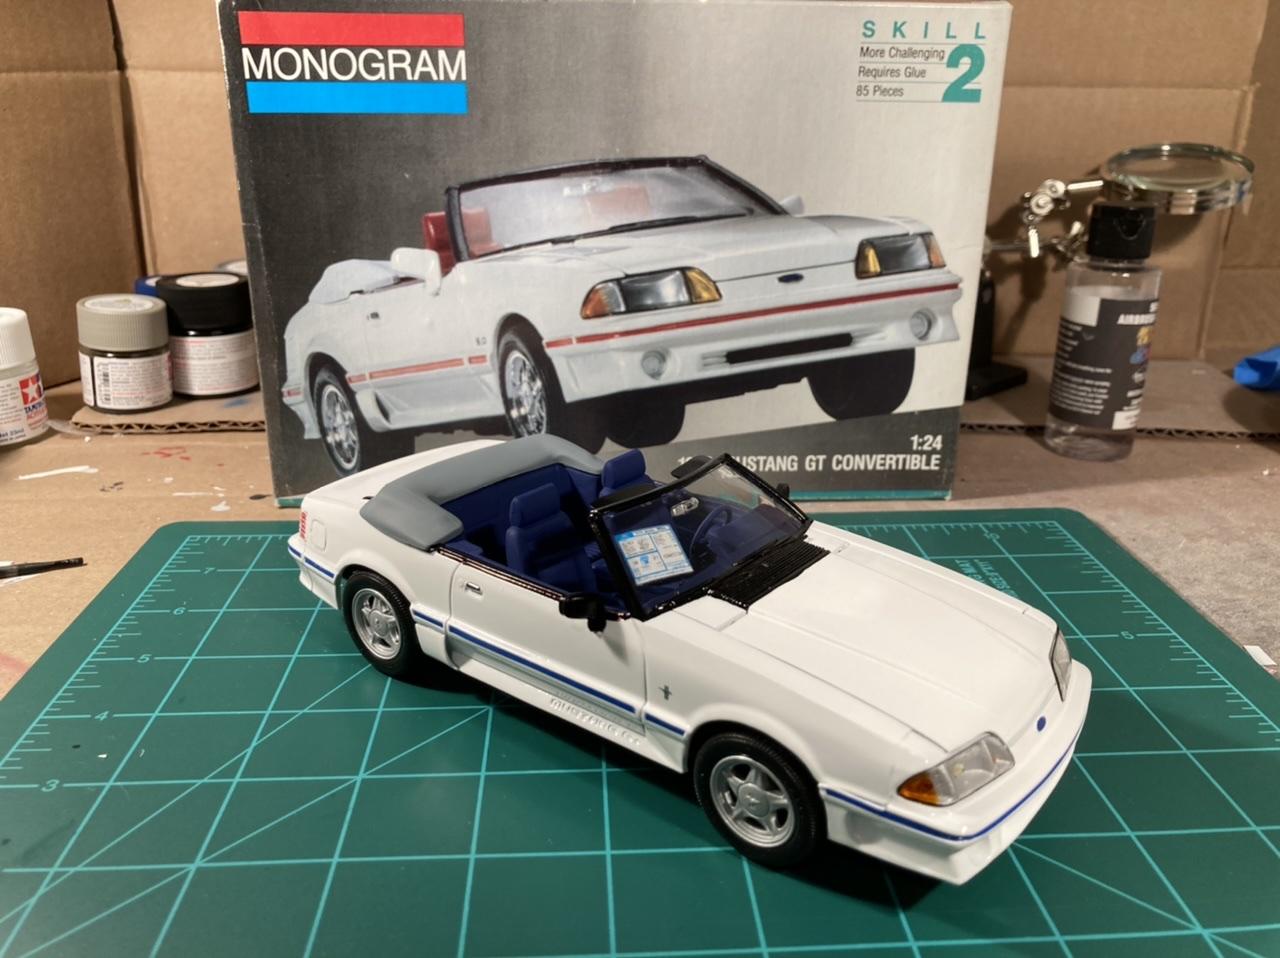
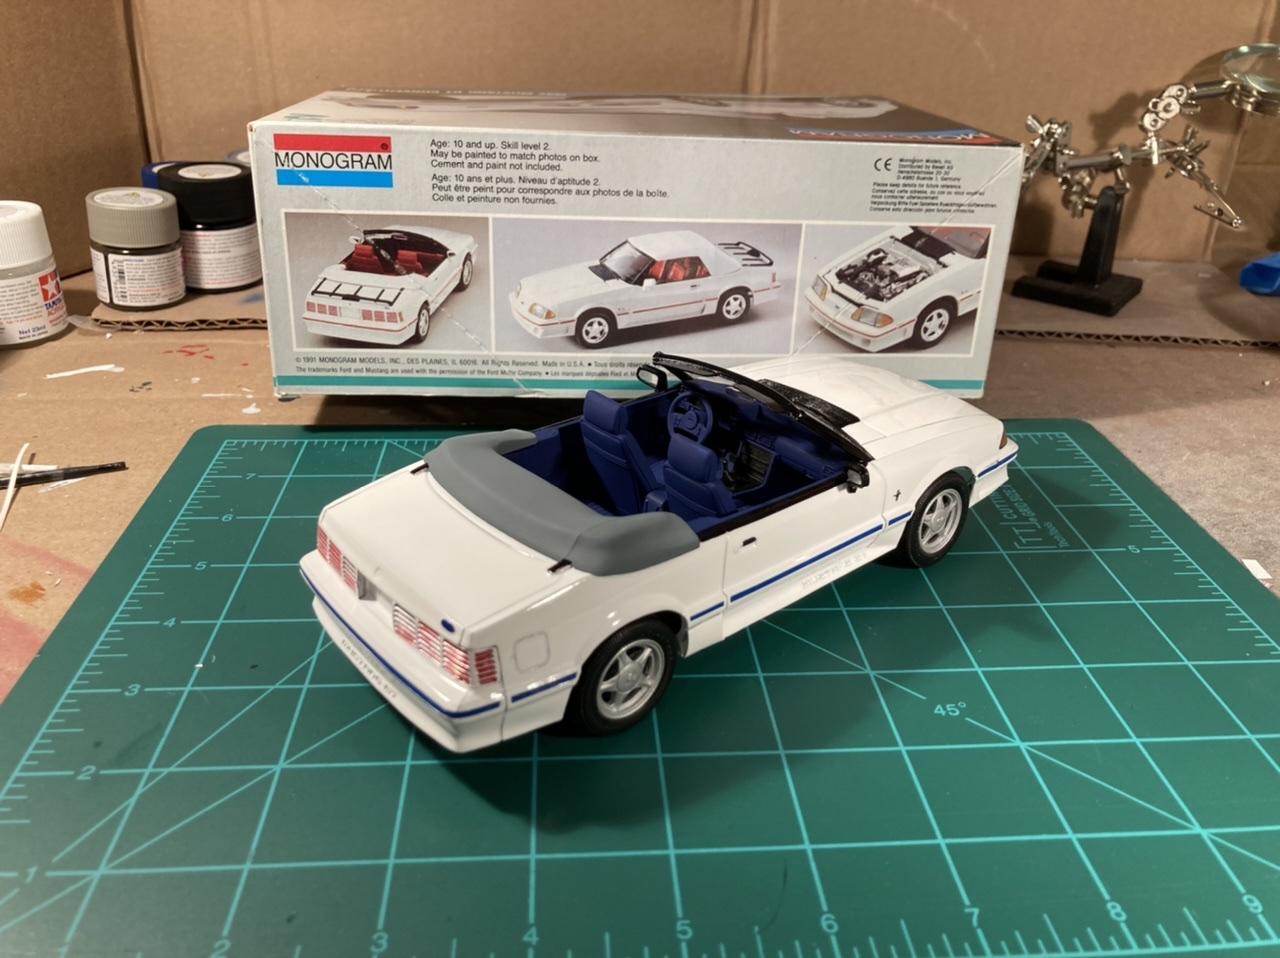
Here is my Monogram “1992” Mustang GT Convertible. I built this kit as a color scheme tribute to my 1:1 Mustang, a 1993 2.3 LX. My original idea was to kit bash this GT with an SVO or ‘83 GLX to create an LX ‘vert but all three of these kits are expensive on eBay today and I just don’t have the skills or stomach yet to cut up two $40-$60+ kits ?. So I settled for my car, but as a GT! I used Swarovski Crystals (meant for ladies’ custom nails) from Hobby Lobby to simulate the headlight and turn signal bulbs. And I used the actual belt line stripe tape left over from my 1:1, cut down for the 1:24 belt line stripe. To do those blasted cheese grater taillights, I painted them all white first, then used silver and red gel pens to color the lens sections. It’s a little sloppy but looks good enough. I messed up the clear coat on the hood too so I’ll have to repaint it at some point but it’s not that noticeable in these iPhone pictures ?. You’ll notice that the parade boot is grey when it probably should be white or blue. But my 1:1 came with a grey boot so I painted this to match! The previous owner also shaved the trunk luggage rack so I did the same here. I’m very pleased with this one and can’t wait for a nice day to photograph both cars together!
-
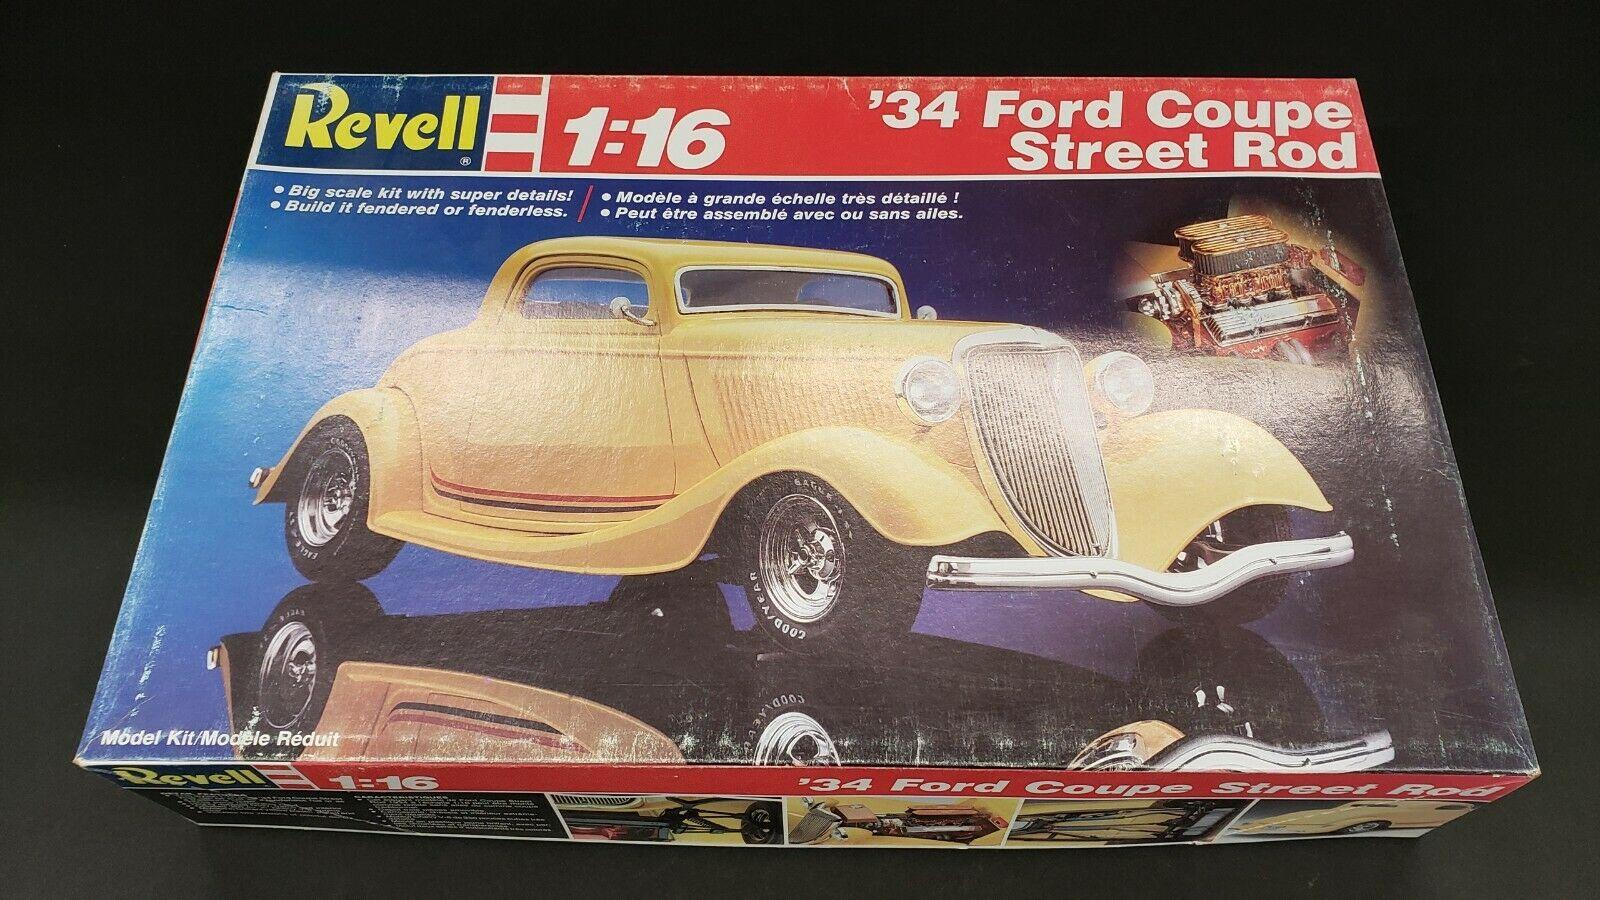
I just picked up one of the 1/16 Revell 34 Ford Street Rod kits (quite hard to find lately), and really want to build it in the billet rod fashion of the 80's/90's (the kit is a good start already). I'm going to build it mostly box stock, with the exception of different wheels, changing it to a manual, and changing the intake to a Camaro TPI intake (feels more indicative of that time period versus the intake offered in the kit). I'm sure there will be some other changes here and there as I go along. Speaking of wheels, here are the ones I've designed to fit the kit tires. They are meant to resemble Boyds Sport 6 wheels, and are a staggered 14"/15" combo. I've also chosen the main color, a very 90s teal courtesy of the Geo Tracker. I am going to complement it with some yellow and magenta as well.
-
 This is likely going to be an extended build but thought it would be fun to share the progress (or no progress as it may be) here with others. The goal is to build up a 1/25 scale of my actual 1969 Mustang Coupe that I've had since 1974. I finally have the car back on the road after way too long although it still needs details completed. I really should be working on the real one instead of this but I hope this will rebuild my motivation for the big car. I've messed with cutting up a kit to get the coupe roof line long ago but was never happy with what I could accomplish. Having run across the resin Grande coupe body some time ago I knew that was what I needed BUT the prices were over $100 on every auction and that was too much for me. Recently I received an alert from my ebay notices that there was a "69 Mustang Resin" for sale but figured it was another one of the decorations or 1/43 scale version. I checked it out anyhow and it had a very reasonable buy it now so I clicked it without any second thoughts. This is the resin kit pieces although I may use the CJ hood with the hole is the standard scoop will cover it. In any manner I want the air filter just peaking through the hood under the scoop like the real car does. Engine wise I want to match the 347 that I've built for the car as well which generally will not be a problem except for maybe the shorty Cobra filter that I've never seen anywhere else. The rest is pretty easy as the Cobra T pan is out there and covers and I found an intake that closely matches the old F4B I've kept on the car. I put a Mcleod scatter shield and TKO 3550 in the car and have found a close trans out of an early 90's Mustang kit. In fact, I bought the Mustang Cobra Combo kit to get not only the 1969 base parts but the rack and pinion to fit the rack I used in the real car and the fox body seats that I used as well. The Fox Cobra is 1/24 though so I may have to do some fitting on the seats as they already seem over sized. I plan on painting up / detailing the engine as close as I can to my actual build as well as the electric fuel pump setup, slapper traction bars, etc. I'm still debating on opening up the doors and trunk. It's a lot of work and sometimes doesn't actually add any value but then again I do not plan on building another one of these. One of the first things I had to do was remove the molded in battery from under the hood as mine is in the trunk. I'm thinking I'll rebuild the shock towers as well as the kit looks more like the Boss 429 laid back towers than my stock ones. The front suspension detail is so lacking on this kit as well so I may build up some custom shocks/springs and upper arms. I'm pretty familiar with the 1969 Mustang having put a passenger side shock tower and battery tray panel in the real car so I know how it should look :-) The other thing I have to do is remove the molded in power steering linkage as I'll be using a rack like the real car has. Little detail but I figure what the heck, I want to do this as close to the 1:1 that I can. Cool thing is I can always walk out to the garage and take pics, measurements, etc if I need to in order to validate the end results! Stephen
-
Last week I was looking at all the models I have in progress and decided I needed to get at least one more done this year. I picked the Tamiya TS-50 Mica blue painted Revell 70 Torino GT kit. Old kit started in April 2005 But when I started to work on it I discovered I was missing some vital components of the front suspension, like lower control arms, tie rod, and stabilizer bar. Then I realized I forgot to put the rear view mirrors on before I painted, and the paint job was not as good as it was 15 years ago. So, I started my new and improved version of this same kit. I painted this one Tamiya TS-54 light metallic blue and for this interior I decided to go with the black and white optional interior as opposed to the light blue interior of my original build. New kit started October 2020. I also started the Torino Cobra kit in April of 2005 and only got as far as painting the body. Originally I painted it with some type of Testors Auto Lacquer yellow but it did not turn out well. Into the purple pond it went and on went some Testors enamel grabber green. Well that came out pretty thick and ugly so into it's box it went to languish for 15 years. I broke it out the other day and gave it another bath in purple power then shot it with Tamiya TS-97 pearl yellow. I will put a black interior in this one along with the rear window slats. Tires and wheels will be kit supplied I think, unless I go for some chrome reverse. The kicker is, one of these two Torinos will be sporting a Boss 429. I used the basic block from the Revell kit with the heads, intake, and valve covers from the AMT 70 Galaxie police car to build my Boss 429. I have read from online sources that an early factory brochure stated that the boss 429 4v was available in the Cobra only. Of course there are no records to indicate one was ever built at the factory so this will be a fantasy build or a "what if" build. If you do a web search on 1970 Boss 429 Torinos there are a couple out there where people have performed this swap in real life. I suspect Ford specified the Torino Cobra for the Boss 429 because of hood clearance problems. Since I do not want to cut up the GT hood, if the Boss don't fit below that then into the Cobra he goes. Stay tuned for more :-) Since I can't get enough of a good thing, I just won another Revell 70 Torino Cobra from evil bay. This one has the decals to make it a twister special which I might do. I would need to get some stock hubcaps/trim rings from Fireball model works for it to be accurate. As far as the Calypso Coral orange paint, I think I can fake that by first shooting orange on the body then shooting clear red over that. I also have some Testors Hugger orange and maybe a can of hemi orange, not sure about that last one. MCW does not list Calypso Coral on their sight and I really don't want to spend $35 for a can of paint from auto touchup. Or I could just paint it red and put the decals in a box someplace. The original in progress build is back in it's box and when I run across the missing parts I'll put it together as well. Thanks for looking, all comments welcomed.
-
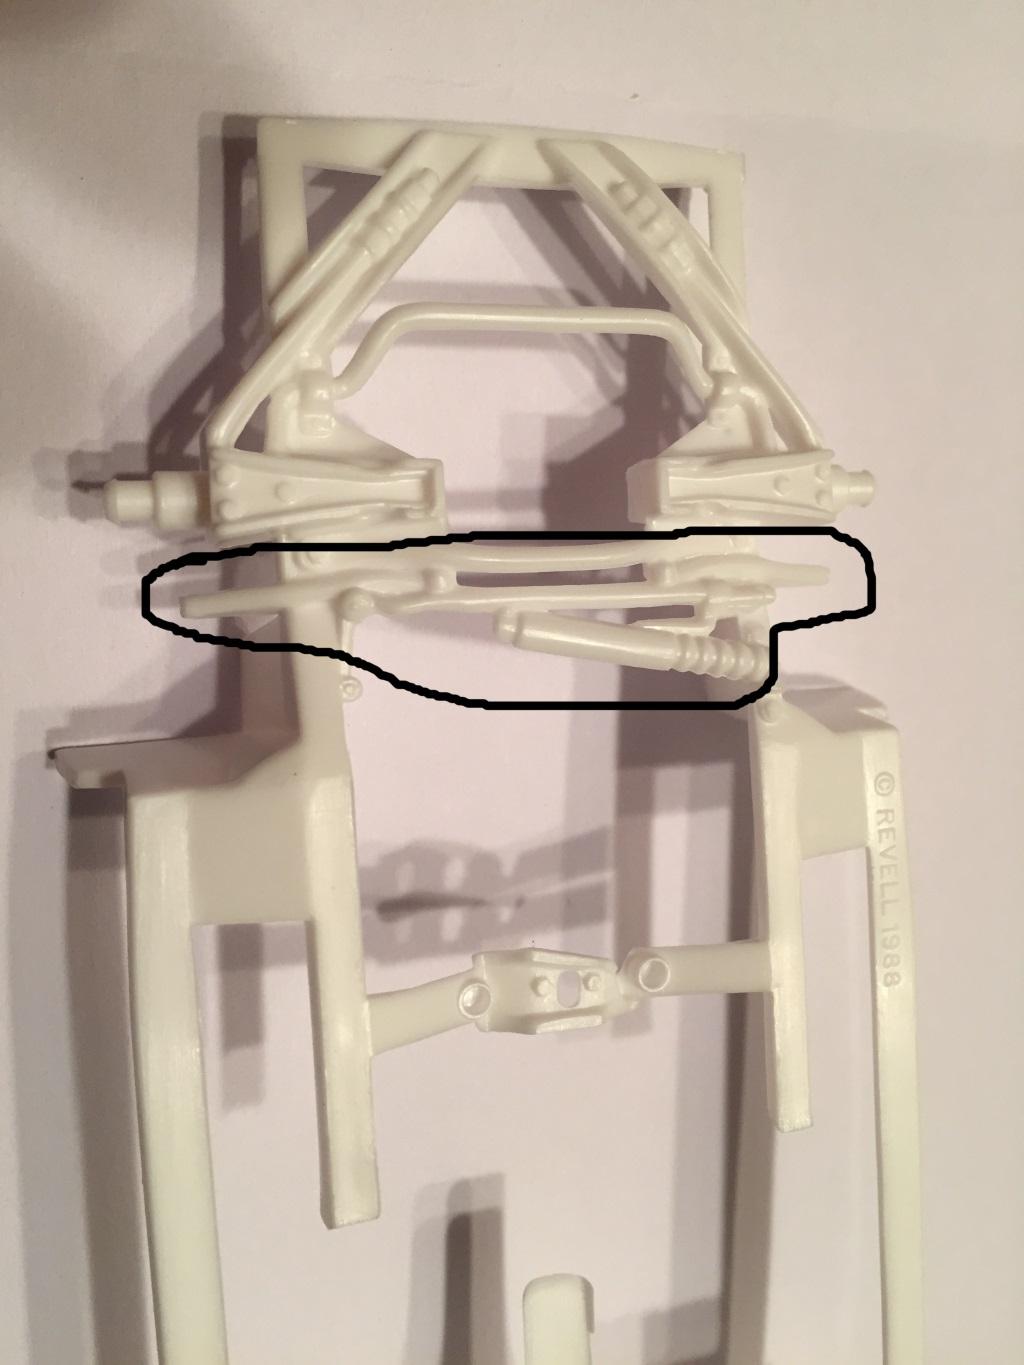
I got this kit years ago and have decided to give it a go. There was a lot of stuff to clean up on this one. This kit has a lot of problems, first off, the engine compartment is no where near accurate. The wheels only have lug nuts molded on one wheel, I think the interior rear seat is too shallow and the front seats are too small. I think the L60x15 tires are too big. The engine is a bit of a mess, the combined grille/bumper is wrong, plus we get chrome headlights and driving lights. The tail light section is all chromed as well. And finally the frame looks a bit generic. I can't tell you about the accuracy of the body though, but I think it captures the look of a 68 Shelby. This is the kit I am building. I fixed most of the kits short comings by getting an AMT67 Shelby and will be using the frame/engine compartment and running gear from it. I have an AMT 66 Mustang kit coming for better Shelby wheels. The kit tires/wheels. I will be using the tires from the 67 Shelby kit along with the Shelby wheels from the 66 Mustang kit. Even though the wheels from that 66 coupe kit are not as wide as they should be, they are worlds better than the ones that come in the kit These seats are too small when compared to the seats from the 67 Shelby. I think this back seat is way to shallow. Door panel is pretty flat and would be hard to detail. I am hoping the Revell 68 Mustang GT kit has better door panels and that I can graft them onto the 67 Shelby platform interior/frame section. I have ordered a Revell 68 Mustang GT kit for the seats & door panels and will use the AMT kit supplied dash and center console along with the center console arm rest. As a lot if you know, when AMT redid this kit they combined the grille and front bumper as one unit. I started to compare the 67 Shelby front bumper to the 68 front bumper and noticed the overall shape is identical. So I cut off the existing bumper from the 68 Shelby kit and will be using the bumper from the 67. All I will need to do is to remove the two bars that hang down below the bumper to have an accurate 68 Shelby bumper. After I cut off the original bumper from the grille. 67 bumper test fit on 68 Shelby. The two bumper teeth will need to be removed. I have the grille and rear tail light section soaking in Purple power to remove the chrome. I'll clean up the area around the grille where I removed the old bumper, glue it into the body and shoot it body color. Once that is done I will go around the outside with a Molotow pen to do the chrome stripe. The plastic grille section will be cut out and replaced with some black mesh I have. The 67 Shelby kit will donate the clear headlights and my parts box will supply the rectangular driving lights to replace the chromed ones that come in the kit. I am also thinking I want to substitute a different big block Ford engine for the one that comes in the kit. Maybe one from a 65 or 66 Galaxie. So, bottom line, I think I can make a pretty nice replica of a 68 Shelby GT 500 from this kit if I use parts from the AMT 66 Mustang Coupe, AMT 67 Shelby GT350, Revell 68 Mustang GT, and AMT 66 Ford Galaxie! Thanks for looking, all comments welcomed.
-
-
Been wanting one in the collection for awhile. The kit isn't bad. Still AMT puzzles me with their kits. You finally start to put side mirrors with the kit. Excellent. You also add decals that are more than lisence plates and race decals. Awesome! However, once placed on the model you can barely see the decal. Not cool. Also, you have headlight lenses for the custom kit, but not the stock version. WTF?! SAM_0089 by Eric Lucas, on Flickr SAM_0090 by Eric Lucas, on Flickr SAM_0091 by Eric Lucas, on Flickr SAM_0092 by Eric Lucas, on Flickr SAM_0093 by Eric Lucas, on Flickr
-
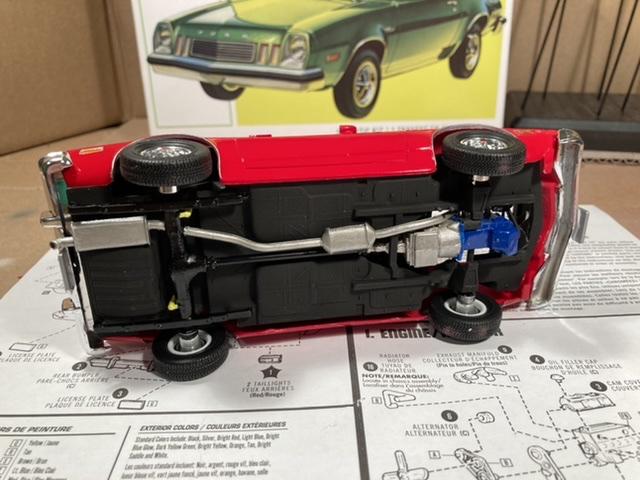
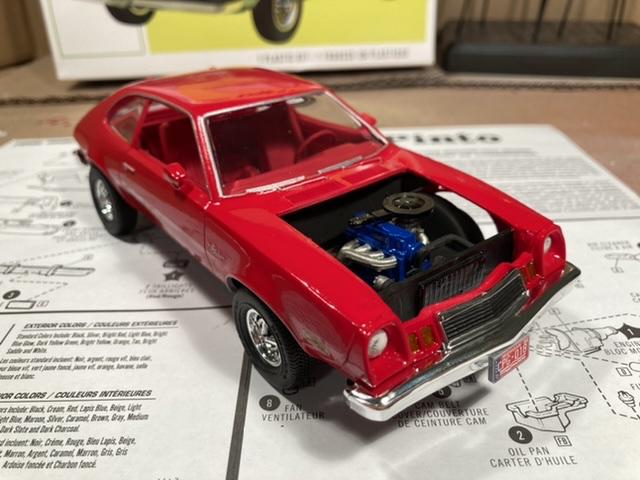
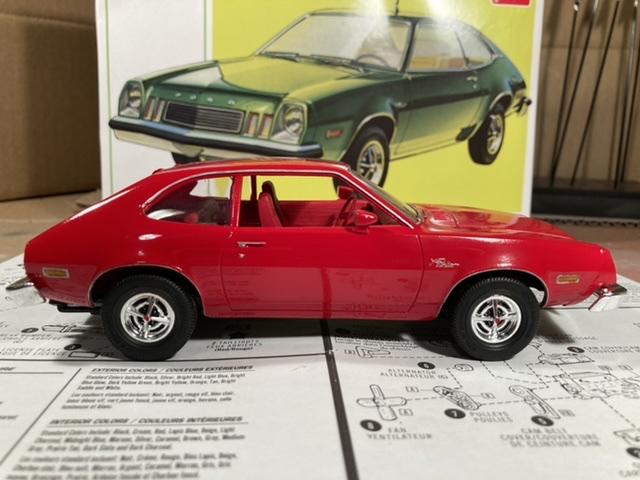
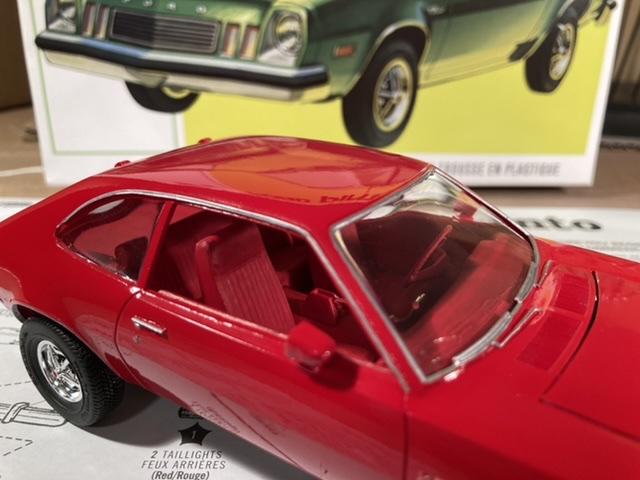
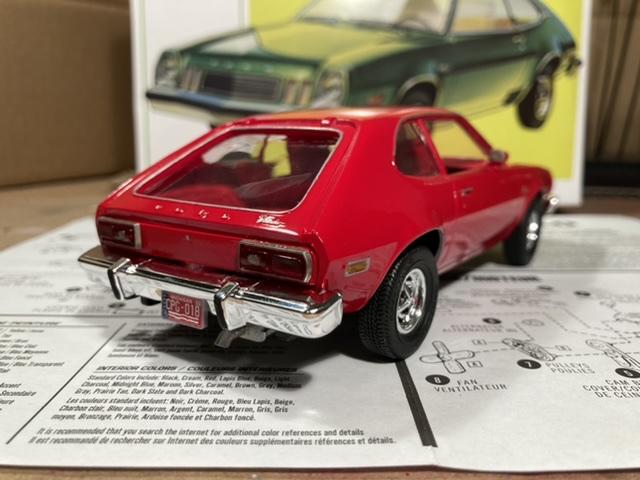
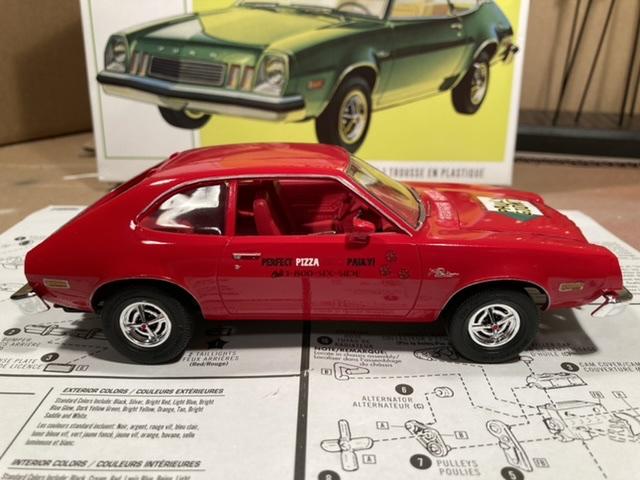
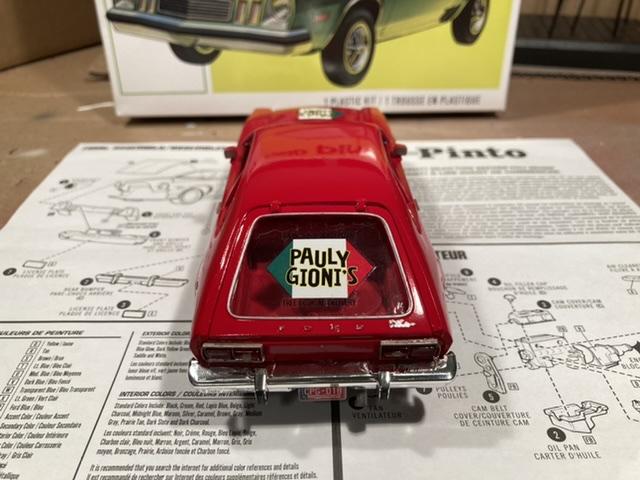
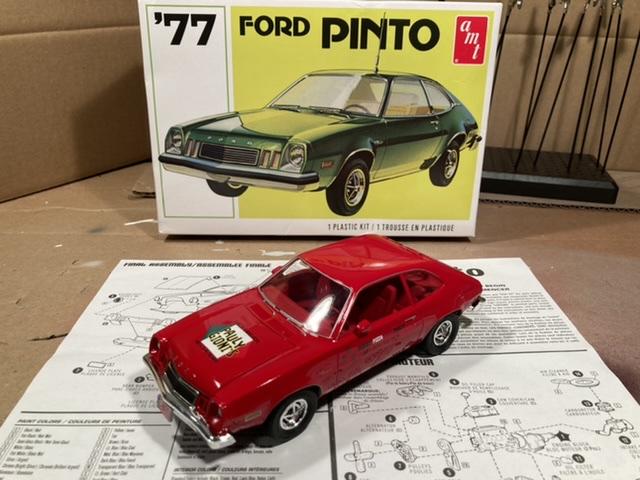
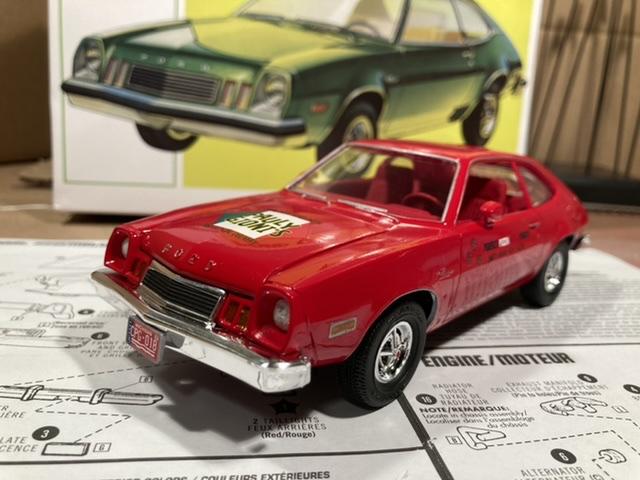
Here’s my AMT ‘77 Pinto! Painted Tamiya X-7 gloss red exterior with Folk Art Engine Red craft paint on the interior. This kit is pretty low in detail and the final fit and finish isn’t great, but it all comes together pretty good in the end. I’m definitely pleased with the final results!
-
 Yes, the wait for the 4x4 version is almost over. I have a '70 long bed on the workbench as a I write this. Photos of the 4x4 parts will be forthcoming, I'm waiting for Fotki to get back on line. Box art is already in the works. Also we're also getting a 65-66 F-100 based on the on the current kit. Dave got the go ahead just last weekend and I saw the 3D artwork at the NNL East. Test shots of the 65-66 kit may be ready by late this summer. Along with the short and long bed stylesides, we'll be getting a stepside for first time. -Steve
 -
So a few weeks ago I was getting ready to put my old build up for sale then a paint can can fell on it. This forced me to rebuild the car with the extra mclaren body I had, but I’m not going to sell it. I’m trying to step up my chassis skills with this build as long with the entire detail of the car.
-
Tamiya's Mazda Miata meets Ford Mustang 5.0 V8. I started this in 2001, been sitting in the box until this month. I made most of the difficult modifications long ago, but stalled when I needed to figure out how far to go for engine mounts, and filling in the matching points. I have photo-etch engine accessory parts, which I have never tried before, so hope to find a thread that shows what to do. Meanwhile, I've done the hood with hinges, really easy since the real car is so simple. I have the trunk hinged, with a latch and spring-loaded to stay open. Last night I made the Mustang wing operable as an air brake. So that's where I'm at today after joining this forum.
-
 All finished. 1\25
-
Good afternoon all. I recently received a shipment from Custom Squads resin after getting a message from blubaja that they were back in business after a long absence. I have never purchased from them before as I was not into this hobby back then, but I have only heard great things about this company and had seen some of their work in Terry Jessee's books. So I wanted to go ahead and share pictures of some of the items I got. You will have to excuse the quality but they were taken with my phone: First is the Caprice conversion set for the Revell 1994 Impala SS: Up next is one of the center console pieces also specifically designed for the Impala SS. With some adjusting, it should fit into any other vehicle: Then some 1/2-ton wheel covers that Ford used on their trucks/vans from the mid 80's to about the mid 90's: And finally some wheels for medium-duty trucks: Here is their website: http://www.customsquads.com/ They have a multitude of items listed and their service with me was great. I hope some of you find this helpful. Thank you
-
Got some color on the 'bird today, Tamiya TS-60 Pearl green Thanks for looking, all comments welcomed!
-
Painted Tamiya TS-75 Champagne Gold with TS-65 Pearl clear. Interior will be black. Thanks for looking, all comments welcomed.
-
Another annual review! The thing about these old annuals is, the box tops tend to get boring after awhile!! Have a safe Easter. Pictures of the box, box contents, and instructions here
-
Another one I just acquired. More pictures of the box, contents and instructions here Thanks for looking


.thumb.jpg.e0420fe52e683c60d19e843462316523.jpg)