Straightliner59
-
Posts
5,805 -
Joined
-
Last visited
Content Type
Profiles
Forums
Events
Gallery
Everything posted by Straightliner59
-
Hey, Tim! Nice to "see" you! No kidding about having to redo something after you were "sure" you had everything just right.🙄 Paint should be very close, now. Just a few minutes ago, I decided it was ready enough to wet sand with 3600 grit, to prepare for the next coat of primer. If that goes well, I'll tape the outside off, and shoot inside the body with satin black. I'll have to see if the paint I mixed for the body is still good. It's One-Shot enamel, and it's got a thick layer, on it, in the bottle. As long as there's liquid paint, underneath, it'll be fine! I just hope it's not solid. I guess I'll know, soon enough. Thanks for checking in, my friend.
-

Who doesn't love a mock-up? Let's see yours!
Straightliner59 replied to Belairconvertable's topic in WIP: Model Cars
Why, yes! Yes, it does!😃 -
I'm convinced, now, that it's bad adhesive. I hope they make it right, for you--I mean, they've been around, forever, and their reputation's good.
-
It's definitely getting there! I'm hoping to start with paint in the next few days, or so. With those decals, there's no way I'm leaving this in primer! I've been looking forward to seeing that, all together. That is probably true for all of us! There's some aspect of a project we don't look forward to. For me, that's definitely finish work! I, too, am looking forward to decal day! First comes painting day, however, once I'm satisfied the body's as good as i am going to get it. Thank you, my friend. Your comments are always appreciated! Not at all! I love primer, as well. My vision for this car, however, involves purple and gold leaf, so, I have to continue on!🙂 I does look cool, in primer, though! Thank you, Francis! I surely agree with that sentiment!
-
’72 Dodge Demon Drag Racer 1/25 scale
Straightliner59 replied to AmericanMuscleFan's topic in WIP: Drag Racing Models
Perhaps you started with no specific knowledge of machining, but, clearly you've acquired a pretty fair amount of it!🙂 I know exactly what you're talking about. I'm getting a little more comfortable with the mill, and with using the handwheels to locate holes, but, I'm still a bit more comfortable with "drawing" them on my stock, then drilling them. Anyway, your work is fantastic, and very inspiring, to me. I thank you, for that! -
That's pretty cool! Looks like a fun little project!
-
Can't seem to post to a thread?
Straightliner59 replied to Duddly01's topic in How To Use This Board
I think I was able to finally work around that by copying my text, then starting a reply, again, and pasting the text. -
I am wondering if it's not the adhesive. Since you applied them over polished paint, silvering shouldn't be an issue. I am thinking the adhesive didn't dry clear.
-
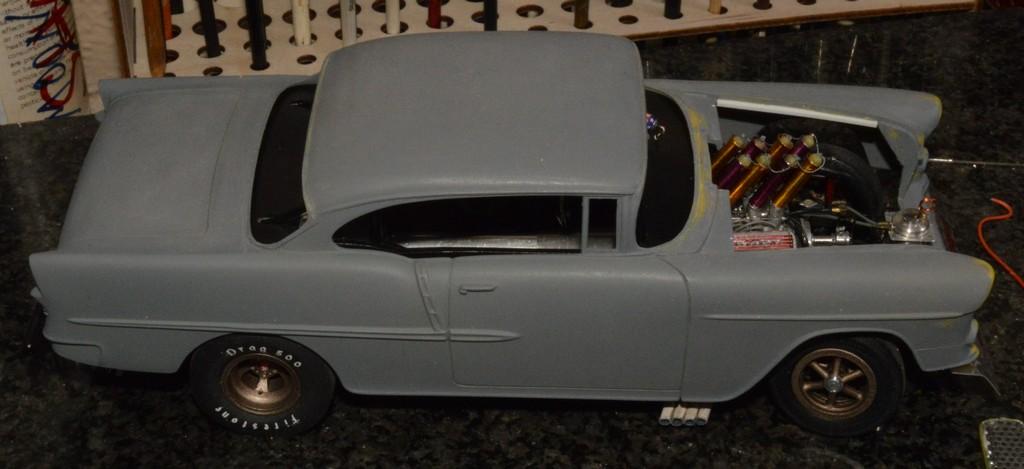
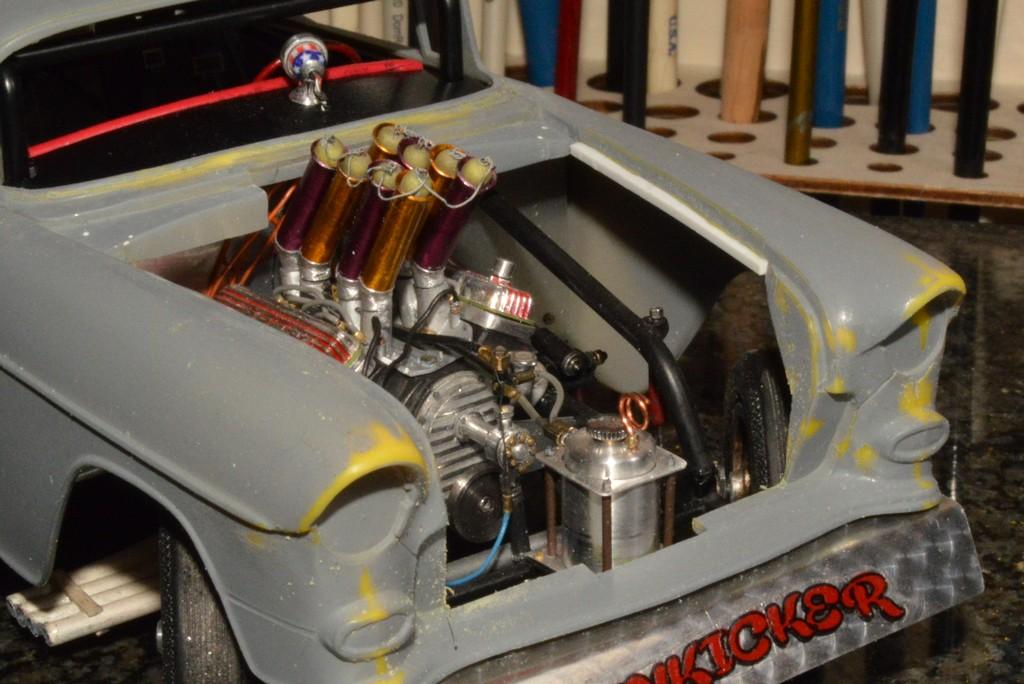
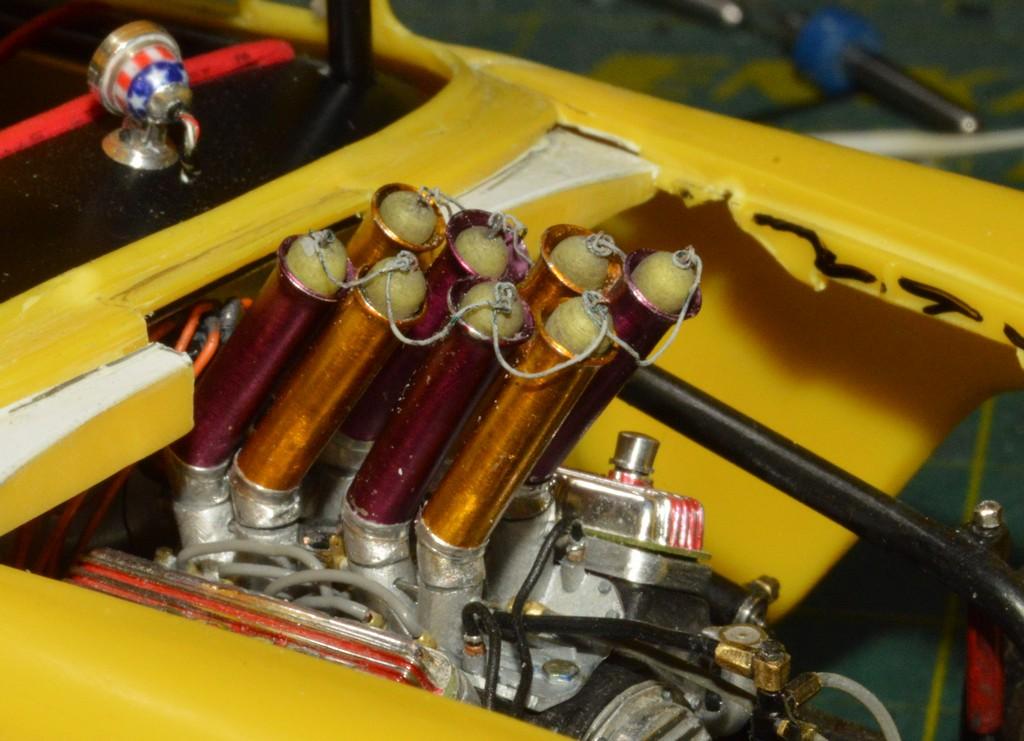
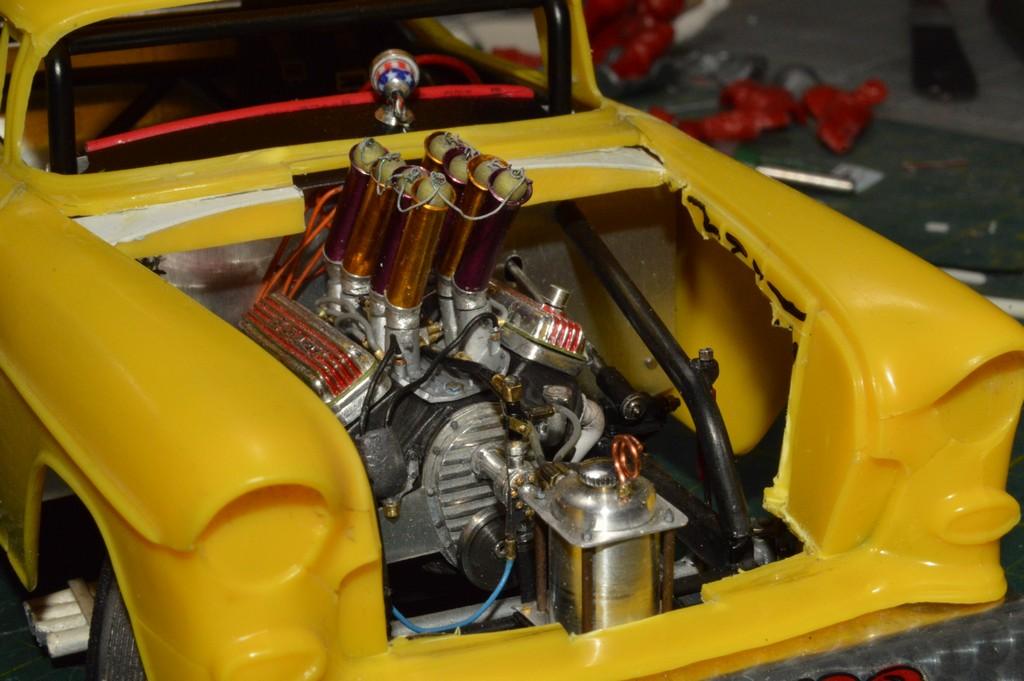
Thank you, my friend! I don't know why I can't just be happy with some injection setup that's already made, instead of scratchbuilding one, every time, it might help to simplify some of these things!😅 I'm not sure why that whole simple project thing never works out, either! I think that mag is one of the nicest models I've built. I am very happy with it! I'm glad you're enjoying this thread, and I'm glad to have you along--even if it's twenty more pages!😂 It shouldn't be twenty more pages, however. I shot some primer on the body, and have started fixing some of the flaws. Earlier in the project, I started re-scribing the door and trunk lines. It's a bit of a challenge on this thing, because the front, upper lines for both front doors are sort of non-existent. Those had to be laid out in pencil, then scribed using a photoetched template from Tri-Tool. I deepened the door and trunk lines, and also added some strip plastic to the inner, under edge of the fenders. and made a couple of filler panels for the area behind the grille. The panels are pictured with a scriber I made, based off NOBLNG's post from some time back. It's designed and used to scribe window trim, and it works great! I removed the wipers from the cowl, and "filled" that. This stuff is going slowly, because A: I don't enjoy bodywork. And, B: I'm not overly-confident in my bodywork skills. Finally, there's 😄 I really don't enjoy bodywork! I love primer, and if I didn't have a clear vision of what I want this to be, I'd leave it in primer. As always, your critiques, questions and comments are welcomed. Thanks for looking!

-
’72 Dodge Demon Drag Racer 1/25 scale
Straightliner59 replied to AmericanMuscleFan's topic in WIP: Drag Racing Models
As Brian said, it's an utter joy to watch you make these parts. You're a skilled machinist, to be sure! Something to aspire to! Thank you for sharing. -
Mercedes Benz SSK
Straightliner59 replied to Pierre Rivard's topic in WIP: Other Racing: Road Racing, Land Speed Racers
Always such beautiful fabrication, Pierre! Those headers on the 1:1 car look huge! -
I went to high school in Glendive, so I could feel that pain!
-
Colpar is still very good. Don't blame you for avoiding Denver. I think there's a Hobbytown, in Fort Collins, at least there was, last time I was up there. I haven't checked it out, as I was always running a route, at night. If Don's Hobbies was still in Greeley, that would have been worth the trip!
-
I had watched a few of the different segments. It's simply amazing! And beautiful.
-
Okay! Hoping to shoot a guide coat of primer, after work. A little cleanup sanding to do, but, I am very close!
-
Thanks, Steve!
-
Tinting Windshields for Gassers.
Straightliner59 replied to Horrorshow's topic in Model Building Questions and Answers
Tinted windshields, other than factory tinting were verboten, for Gassers. And pretty much any other drag car, too. -
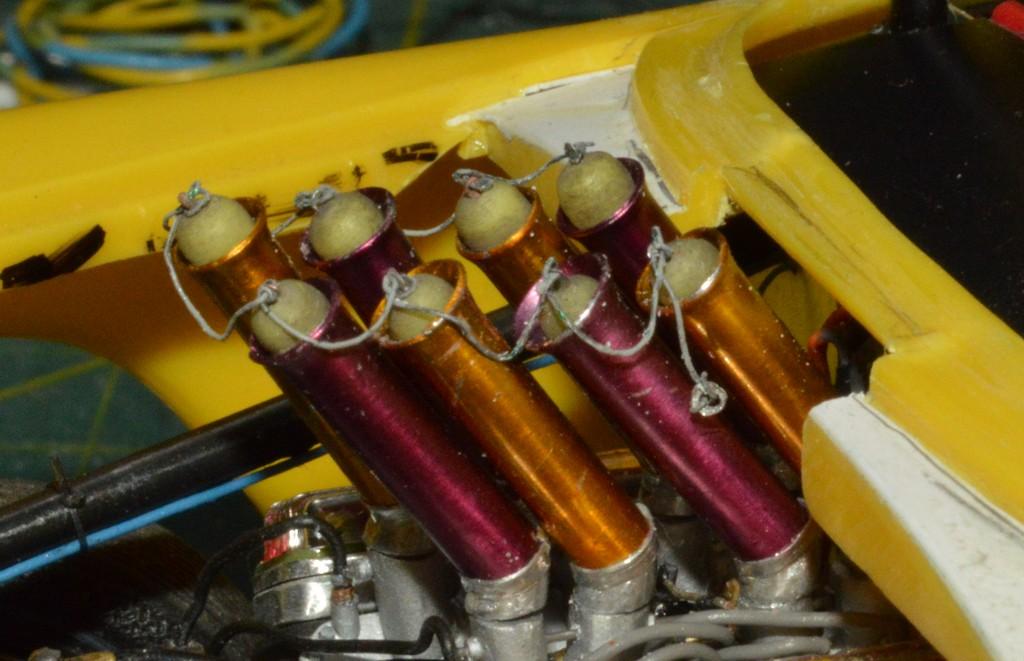
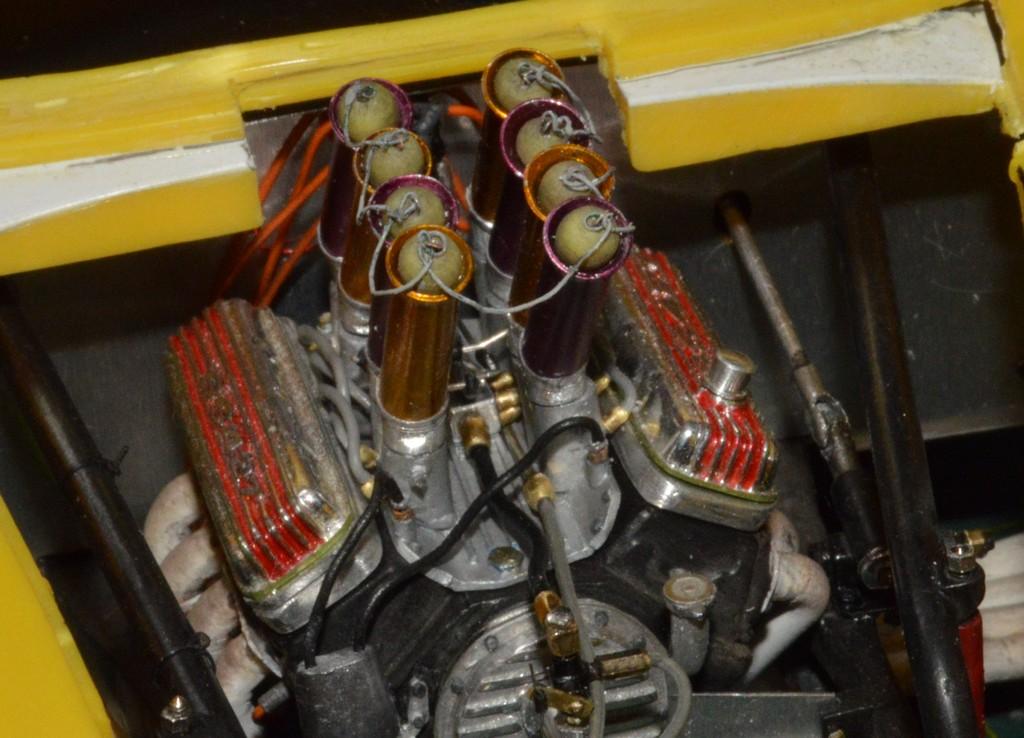
Thank you, David! Back when I was giving some thought to writing, one of my teachers told me that after I wrote something, I should put it aside for a couple of days, then revisit it. She said that my opinion of it may have changed--it may not be as good as I thought, or, it may not be as bad as I thought. Given a couple of days, now, I think they do look pretty decent! Besides, they're barely visible!😁 I think the injector stacks are going to look very cool, with the painted body. They came out quite nicely.
-
Mercedes Benz SSK
Straightliner59 replied to Pierre Rivard's topic in WIP: Other Racing: Road Racing, Land Speed Racers
Very, very nice! A scratchbuilder's delight! -
I wonder how UV activated resin would stand the test of time. It would certainly be clear and glass-slick, at the start. It might be worth a shot.
-
’72 Dodge Demon Drag Racer 1/25 scale
Straightliner59 replied to AmericanMuscleFan's topic in WIP: Drag Racing Models
I do appreciate that! I hope to reciprocate with all the guys who inspire and educate me, as well! I pretty highly value the relationships I've developed with a few of the other modelers, here! -
Thanks, Brian. I was surprised at how easily the wire went through! The wire I used bound a little, right as the loops were closing, but, I was able to get them tight enough, that they look okay, I think. But, feeding it through the eyes was easy as throwing a hotdog down a hallway!😃
-
Thanks, Scott! I appreciate that! I'm glad you're finding new stuff, each time, you look. I've always enjoyed people's models that are that way. I have always found that "interesting" for lack of a better word. Thanks again! Thank you, my friend! It's definitely important to at least attempt to keep things as close to scale, as possible. When they aren't, things can look cluttered, I think. Funnily, enough, the balls are bright yellow. They were quilting pins that I turned down. I debated leaving them as they were, because the finish looks very similar to a scale tennis ball--dull, and almost fuzzy-looking. Ultimately, I decided that they wouldn't stay bright yellow, for very long, hanging around pit areas, so I rubbed some pastels on them. And, you are correct, I am beginning the bodywork! I've re-scribed the door lines, and started getting the mold lines cleaned up. I need to do some research on the mouldings for the windshield and backlight, because they are very faint, on the model. Thank you for your kind words, my friend, and thanks for following along! Thank you, my friend! I'm pretty excited! I'm really looking forward to seeing it in paint!
-
Mercedes Benz SSK
Straightliner59 replied to Pierre Rivard's topic in WIP: Other Racing: Road Racing, Land Speed Racers
-
Tethered!