Straightliner59
-
Posts
5,805 -
Joined
-
Last visited
Content Type
Profiles
Forums
Events
Gallery
Everything posted by Straightliner59
-
I appreciate that, David! Thank you! Thank you, Kevin! I just wanted to be able to make as much as possible, in-house. I am always looking for materials that will allow me to make different stuff, more easily. That is really what is most fun, for me!
-
 Those wire dragster fronts are gorgeous. I bought a pair for my Junior Fuel dragster, to replace the scratchbuilt ones I had made.
- 39,066 replies
-
- 2
-

-
- johan
- glue bombs
- (and 1 more)
-
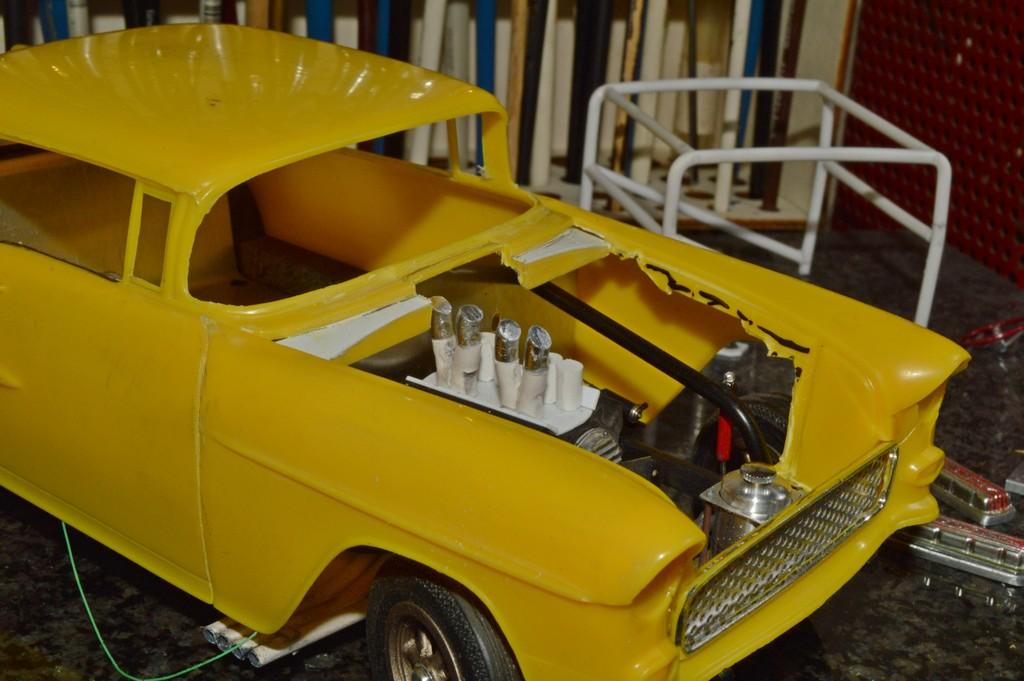
Here it is, all painted, and tacky-glued into its home. I'm still working on getting it fitted properly under the hump. A few thou, here; a few thou, there, and I'll have it! Thanks for looking!

-
Billy the Kid Demon Pro Stock
Straightliner59 replied to dragcarz's topic in WIP: Drag Racing Models
Looking good, Roger! Inner fenders fit very nicely! -
BMF is a pain, but, it can't be beaten, appearance-wise. Nice work, Kevin. Looks great! Especially for your first effort!
-
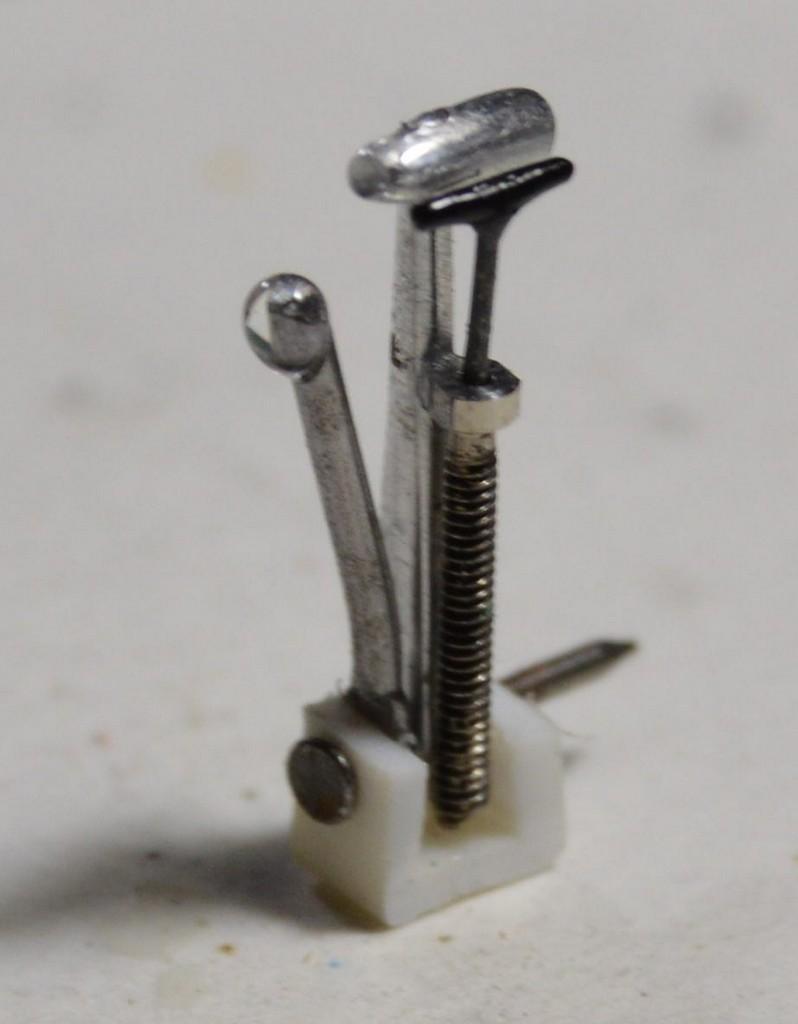
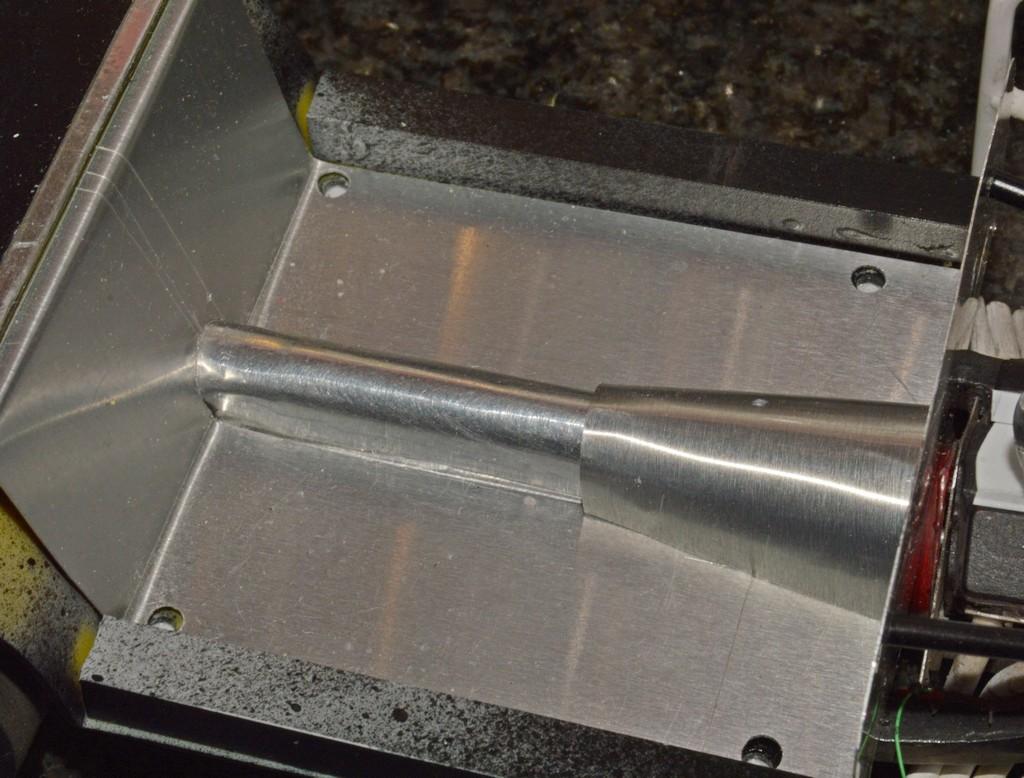
Well, you can't run a four-speed of this era without a proper vertical-gate shifter! I used some .042" dead-soft aluminum armature wire that was flattened in my bench vise, then hammered out a little thinner with a chasing hammer, on the anvil, to make the lever. Once it was about where I wanted it, thickness-wise, I finished shaping it with a bastard and some sanding/polishing sticks. I chucked a short length of the same material in the lathe, and used sanding and polishing sticks to taper the handle. I then stuck it in the mill vise, and drilled it to slip over the shift lever. Once it was cemented in place, and the cement had cured, I used a four-way polishing board, to "blend" the pieces together. The bottom end was then drilled for a mounting shaft. I used a threaded rod from a box of watch parts, to make the spring section of the small lockout(?) handle. The shaft had a collar machined on one end. I drilled the shaft longitudinally, through the collar, to accept the actuator rod and handle. I then milled off three sides of the collar, to make the stop for the spring (represented by the threads), and mounted it to the lever. The small t-handle is made of florists' wire, that I superglued together, because I wasn't having much luck getting the soldering iron to build enough heat in the fine brass wire to solder it, and decided the superglued wire would be sufficient, anyway. The handle was painted with Tamiya X-18 semi-gloss black. Next, I made the reverser handle from some soft steel wire I have a package of. It's about .020" in diameter. I used a punch, and a ballpeen hammer on the anvil to flatten one end, then drilled a hole through the now flattened, expanded end, for the mounting shaft. I concluded that some UV activated resin would work best to create a knob on the reverser handle. It worked, well. It's since been painted red with an old bottle of Pactra acrylic red paint. I made the base from Evergreen stock. I'm happy with the fit of the trans hump, but will open up the hole for the shifter, a bit more. If I can find my shifter spares box, I may try to mold one of the boots, then cast it in rubber. That's likely a fool's mission, but, a lot of the stuff I've learned over the years started out, in just such a way! The mounting base for the shifter will get some color of Testors metallizer slopped on it, just to be sure, in case it's somehow visible. Getting this assembly satisfactorily mounted will be a nice step forward! As always, questions, comments and critiques are always welcomed. Thanks for looking!
-
Look up "fusee chain" on Ebay (or, wherever you prefer).
-
1:24/25 Hood pins source?
Straightliner59 replied to W Humble's topic in Model Building Questions and Answers
I did these with sewing needles and aluminum duct tape. I don't have them, here, but beading needles make excellent-looking retainer cables for the wire clips. I have usually made those from fine wire. The Impala was built from one of the Hasegawa "American '65" series. Just a slammer. The closeup was taken with an old web cam, so, I apologize for its lack of clarity.
-
Tim, I would be interested in how you made the draincock. I've never got one to look that good.
-
Excellent work, Tim! That's a real beauty! Feel better, my friend.
-
So far, so good! I only use it for brass, with dissimilar materials. Brass-to-brass joints are usually soldered. I generally use the GS Hypo cement like contact cement. A little on each surface, then pressed together.
-
Thanks, David! It worked okay, but, I am working toward better! I did get some more fitting done to the trans hump. For many years, I used contact cement. The past few, I switched to GS Hypo cement. It's much easier to control. Thanks for your kind words!
-
It's been over a year, here in Colorado. They've switched to paper for a die, each. There's no end to the greed and stupidity of government. Everybody just govern yourself, properly, and we can tell these idiot-thieves to pack sand.
-
Billy the Kid Demon Pro Stock
Straightliner59 replied to dragcarz's topic in WIP: Drag Racing Models
I hear you, about the beginning to hate a project. On the positive, that means you're getting there! It's looking great, Roger! The paint and decals are beautiful! -
It's looking great, and really coming together. Nice work, Kevin!
-
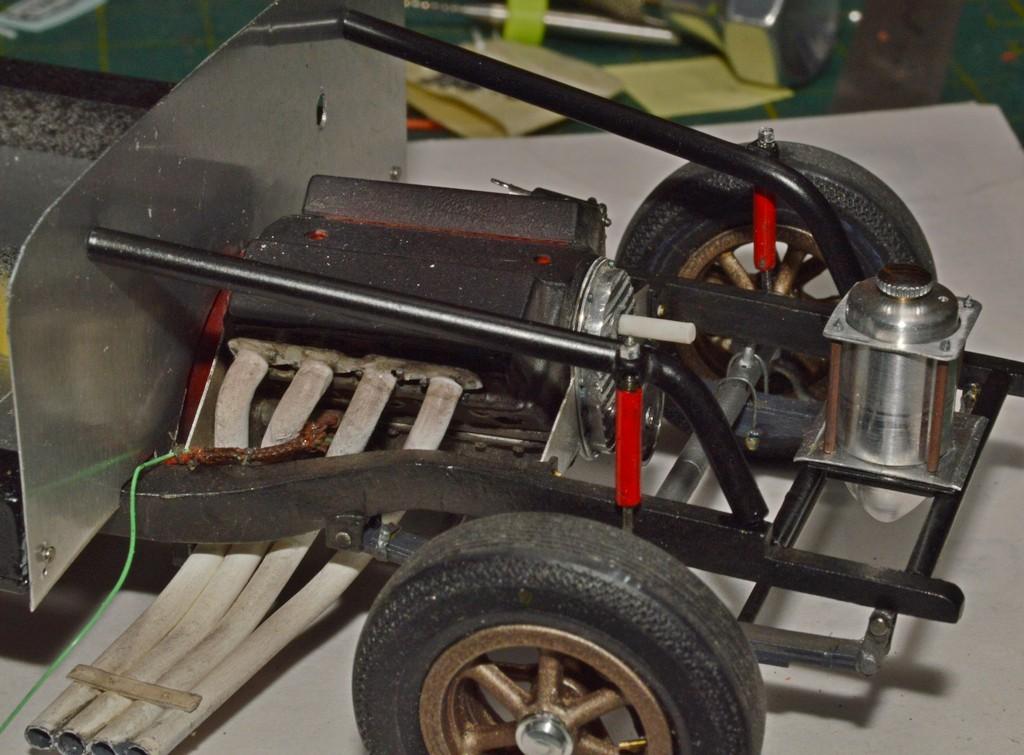
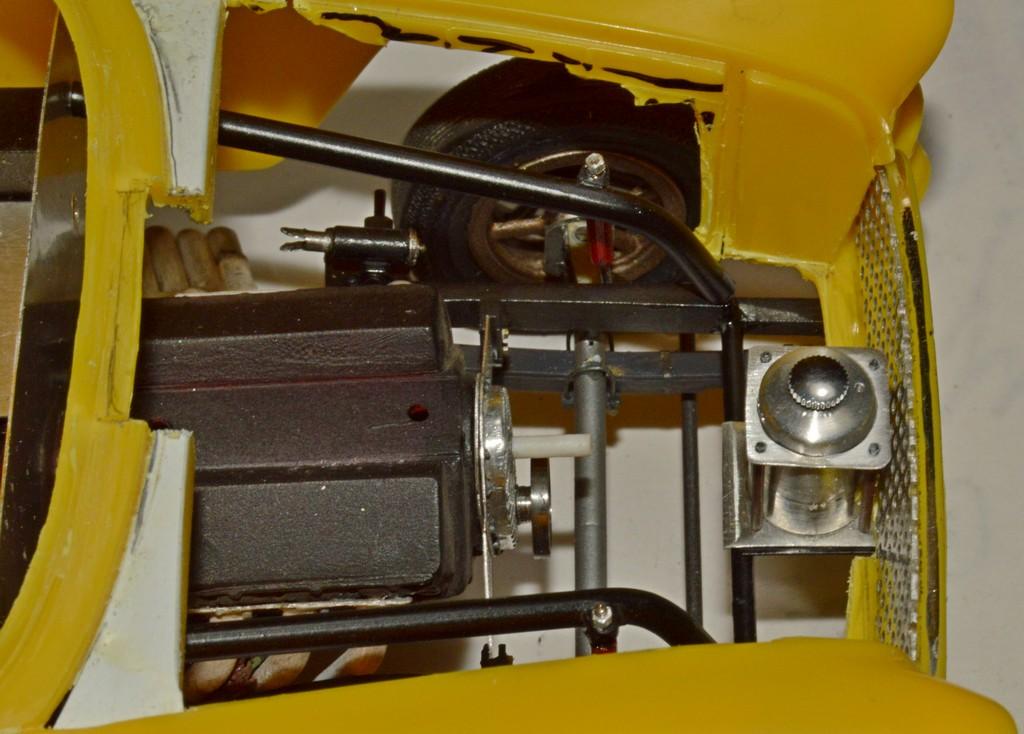
I truly appreciate that, David! I'm glad you're enjoying it! Thank you for your continued support and encouragement! I've been working out how I can make eight identical 45 degree elbows, for the injector stacks. I came up with a simple jig, and was able to make enough decent parts for the project, but, I plan to try to come up with something better. I also need to manufacture a method to make the injector bases for the manifold. I'd like all of this stuff to be uniform.? I'm using 1/8" dead-soft aluminum armature wire for the elbows. It's easy to bend, and there's no kinking or distortion. There's still the need to drill them for a place to insert the pins from the stacks, but, I plan to keep those at less than 1/16" long, so there won't be the need to drill too deeply. That way, I think I can use the lathe, to do that, without the risk of opening up enough length to reintroduce the risk of collapse. I've included a shot or two of the elbows on the manifold. They're not bad, but, I think I can do better! I also started on the trans/clutch cover part of the driveline hump. Still some fine-tuning to do, but, it's close! I'm searching for some thin, textured, self-adhesive vinyl. If I find some, I may use it to make a rubber mat to cover the floor. I have some smooth material (the vinyl that sign makers use), but, I think that, if I go with a floor mat, I want it to have some texture. As always, your critiques, comments and questions are welcomed. Thanks for looking!
-
Beautiful! "Well worn leather, hot metal and noise..."
-
I got a kick out of the ground clamp, too! That Swindahl chassis really is unique-looking. I'm going to guess that you're correct, in that nobody else has built one, in scale. It's a thing of beauty, my friend!
-
The small block turns 70
Straightliner59 replied to Richard Bartrop's topic in General Automotive Talk (Trucks and Cars)
It's drag racing's all-time winningest engine. Obviously, not in the pro classes, but, across the board. It led to more than a few drag racing fans referring to some classes as "AFC Racing." "Another BLAH-BLAH-BLAH Camaro"!? -
I installed the down tubes, and shocks. I still need to fill where they meet with the chassis, due to the required assembly sequence. Once that's done, I'll apply some wash and pastels to match the rest of the chassis. I made a couple of cuts in the body, to clear the tank then test-fitted everything. It all fits, beautifully! Questions, comments and critiques are always welcomed. Thanks for looking!
-
Mopar fendered kits
Straightliner59 replied to Lownslow's topic in General Automotive Talk (Trucks and Cars)
MPC did a '32(?) Chrysler. -
Shifter looks great!
-
Yep! Definitely Johan. I want to pick one up, when I find the right price.
- 39,066 replies
-
- 2
-
-

-
- johan
- glue bombs
- (and 1 more)
-
An affordable alternative for Anodized parts
Straightliner59 replied to TECHMAN's topic in Tips, Tricks, and Tutorials
Anybody else remember when we had to find glass stain, for our anodized parts? ? I think it was looking for that, that "hipped" me to just how much useful stuff was in a craft store. "Wow! You mean it's not all dollhouses, floral arrangement stuff, and fabric?!" -
Profiling side trim
Straightliner59 replied to Maindrian Pace's topic in Tips, Tricks, and Tutorials
This is an excellent tip! That you could custom shape your tool makes the possibilities pretty much limitless. Nice work, and thanks for sharing it!