peteski
-
Posts
9,227 -
Joined
-
Last visited
Content Type
Profiles
Forums
Events
Gallery
Everything posted by peteski
-
 You will have to let the decal maker know that you need metallic silver (not a light gray color). Are the airliner windows also metallic silver?
 -
Hello, my Name is Marcos (Tortuga Kustomz)
peteski replied to Tortuga Kustomz's topic in Welcome! Introduce Yourself
Looks like you already figured out how to put a link in your signature. Mike S. is also a member here (mrmike). He usually posts in WIP and Under Glass sections. -
Yes, pixel-by-pixel is how you often end up doing things in MS Paint. The decals you show in the photo are very nice. I bet it took many hours to draw that artwork. BTW, thanks for trimming the image when you quoted my reply. It makes for less scrolling and seeing the same image over and over. I wish more people would do that. Daniel: your decals look great too!
-
Wow! Impressive!
-
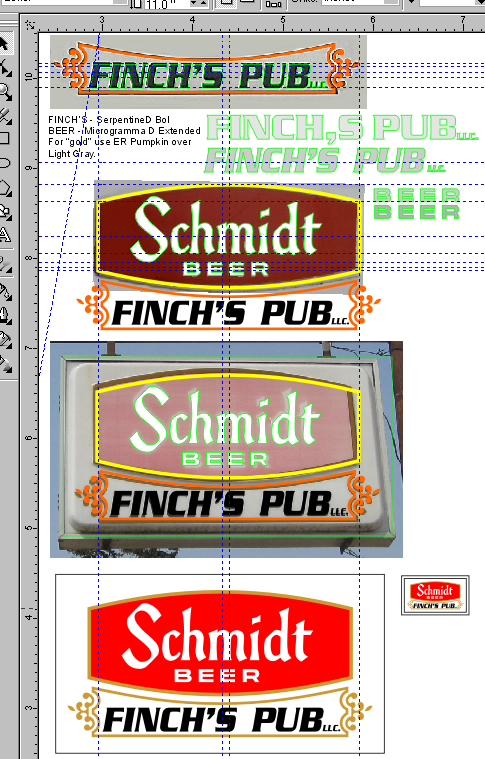
Yes Bill, MS paint works, but it is a hassle. And then you have to print at some unknown percentage to get the right size. Proper tools for the job not only allow you working in correct scale, they have lots of features that make drawing artwork easier. Rulers, guide-lines, ability to work in layers, all make the design process much easier. And such tools are free, and the learning curve is not that steep. You can start using Gimp similarly to MS Pain, then as you dive deeper into the program's features, you can start using all sorts of tools to make your job easier. You can first crawl before walking or then running. But I can guarantee that it will cut your design time, and will make it much easier than working in MS Paint. Here is a snippet of one of my designs. I took a photo of the real sign, then utilizing layers created the artwork for making a scale sign in N scale (1:160). The tiny sign on the lower right is drawn actual size for N scale. While this is Corel Draw, Photo Paint or the other free drawing programs all have similar capabilities. This drawing is a "scratchpad". For the final artwork I take the final design (in this case the small image on the lower rigth) and use that to make the print-ready artwork (in a separate file).

-
A question of curiosity (gluing windows)
peteski replied to Venom's topic in Model Building Questions and Answers
Most waterborne paints become waterproof once they set. I don't think epoxy, canopy glue or Bondic would cause it any harm. -
A question of curiosity (gluing windows)
peteski replied to Venom's topic in Model Building Questions and Answers
Josh, Most modelers have a set of #60-#80 drill bits in a standard drill index. See the following thread for some good info about drill bits. Don't get the cheap ones from Amazon or eBay. Get the more expensive drill set from a reputable industral tool supplier. More info below. Some sources are given there by Pete J. and others. The stainless steel fine silk pins I use are 0.021" in diameter. So for those bit #74 (0.0225") would work well. Melting the holes on plastic is not a good ideal. That would leave a berm around the hole. -
Ok, this looks silly, but still fun to build. The color of "food" parts looks a bit off. Needs some judicious airbrushing of more realistic colors.
-
I recall seeing the Arecibo radio telescope used in some move (don't remember which one). Could have been a TV series. It was very impressive looking! Too bad it was neglected. Isn't this type of equipment supported by volunteers, and financed by donations and/or government grants? It is not like these are for-profit ventures. As such, generating funds for the upkeep is probably difficult. It is at the mercy of politicians or donors.
-
A question of curiosity (gluing windows)
peteski replied to Venom's topic in Model Building Questions and Answers
I see. Couldn't you do it like on the 1:1 car and drill bunch of holes and use straight pins as simulated screws? No glue needed (at least on the window side). If not, if you could find some sort of glue applicator syringe with a hypodermic need. you could run a thin bead of either canopy glue, or epoxy on the inside corner of the window lip, then place the window in the opening and press it in. The glue in theory would evenly spread onto the lip. Another idea is to use Bondic (UV cured resin). It already has a hypodermic applicator in a squeeze tube. Run a thin bead of Bondic in the inside corner of the lip, then put the window in and push it in to spread Bondic evenly. Then set it with UV light. -
David, MS Paint was not designed as a precision drawing program. It has very limited capabilities. Trust me, it is much easier to use tools designed for the job. As others mentioned there is a good freeware vector-based program called Inkscape. But if you need to use bitmaps, there is a good freeware bitmap editor called Gimp. In Gimp you can save your drawing in any format, and it will preserve the actual dimensions. It also has rulers and guide lines you can set up to help you with the designs. I also agree that keeping track of dimensions is vital for precision modeling. As a long time modeler, and also as someone who has designed and printed many custom decals on my Alps printer, I understand that completely. That is exactly why I use tools such as Corel Draw and Corel PhotoPaint. If you are interested in getting good results, I highly recommend to ditch MS Paint, and use a better drawing program. They are not that difficult to learn. Even I only use a small percentage of Corel's capabilities, but trust me, it makes the design process so much easier. As for taking measurements, steel ruler is good, but even better is a digital caliper. I own few of those, and just like my drawing programs, I find the calipers indispensable in my hobby. Good luck with your project!
-
Hello, my Name is Marcos (Tortuga Kustomz)
peteski replied to Tortuga Kustomz's topic in Welcome! Introduce Yourself
Welcome to the forum Marcos! Don't sell yourself short - you are a superb and fastidious model builder, with a great eye for color and details. I know as I have seen your models in-person! If you got that good in just 4 years, I can't wait what your builds will look after 10 years of experience! I miss our club meetinigs - Zoom sessions and online forums are a poor substitute for "real" meetings. the Wiz -
MPC Schwinn Stingray....
peteski replied to cruz's topic in All The Rest: Motorcycles, Aviation, Military, Sci-Fi, Figures
Thanks Marcos, and you're welcome. -
Avoid JPG files like a plague - they manipulate the bitmap (produce all sorts of artifacts or compression) and make it harder to vectorize it. PNG is much better - it uses non-lossy compression, so the image is unmolested but the file size is smaller than TIF or BMP. Also keep in mind that even if you send a vector file to the same decal maker as before, the decals will still have that halftone "fishnet" pattern for their fill. That is because of the shade of color and the printing technique your decal person uses. With vector-based artwork you might find someone who uses advanced printing techniques with Alps to get the colors printed without the halftonning, and with real metallic silver ink. Alps is the only affordable consumer printer which can print metallic inks. Other than that, silk-screen printing is the other way to get that high quality decal done.
-
PNG is a non-lossy bitmap format (unlike JPG), so at least that was a good thing. Alps (which is what most cottage-industry decal makers use) is a 600dpi printer, so it makes sense to use 600dpi artwork. You mention "average Joe" skills, and yet the title of this thread mentions that you want "truly factory-quality decals"? We presented you some options on how to go about getting those high-quality results. If you are an average-Joe then you either have to pick up some skills, or hire someone who will do this for you (a paid service). As an average-Joe, using MS Paint, I doubt you will ever get factory-quality decals. But I could be wrong. Maybe someone else will chime in with some brilliant magical solution.
-
The wheels look better than I envisioned them. Very good!
-
There is a directory of custom decal producers on https://robdebie.home.xs4all.nl/models/decals.htm , plus a good tutorial on creating artwork for decals. Yes, for Alps printer, but the concept applies to artwork in general. Contact some of those people/companies and see if they will be willing to vectorize your artwork, and what type of bitmap artwork they would prefer. I would also recommend that you do your artwork in at least 600dpi.
-
He lived a long and very exciting life. May he rest in peace.
-
A question of curiosity (gluing windows)
peteski replied to Venom's topic in Model Building Questions and Answers
Canopy glue is not thin - it is similar in consistency to Elmer's glue. PVA just means PolyVinyl Acetate type of glue, and that encompasses several of those water-soluble glues. If some dried glue remains visible on the "glass"' you should be able to simply peel it off. It does not stick as well as CA glue. -
Home-made decals printed on ink jet are translucent, and will only work if applied to white surface. Well except black images - those are naturally opaque. You can print on white-film decal paper, but then you have to trim each image, so the white film does not show up.
-
Revell 1/24th scale Jaguar E-Type FHC: Test Shots
peteski replied to Justin Porter's topic in Car Kit News & Reviews
I can relate to Mark's frustration. Here we have a newly designed kit, likely designed using modern methods (CAD/CAM), with likely better level of detail than any older offerings. We get all excited about it (we can now leave all the older kits, with all their warts behind). We get all giggly about it, then the kit comes out and drats, there is a visible , and not easily correctable mistake in the body shape. It sure is disappointing. No, it is not life and death problem, but it is disappointing. Yes this is just a hobby, but many of us are quite passionate about it. Sure, some people build models that are just "good enough", but many of us take this to the next level. We enjoy doing that. However, most of us are not Mark D. Jones, who if some kit is inaccurate will just make his own accurate parts. Most of us depend on the kit parts being as accurate as possible. -
I also concur that top quality decals really should be done as vector graphics. MS paint is not optimal. As for the "fishnet" what you seeing is halftoning or dithering. It is an artifact of the limitations of the type of consumer printer used to print decals. Those printers only have 4 inks: Cyan, Magenta, Yellow, and Black (K), and they are called CYMK printers. Those printers use a grid of various size dots of those 4 inks to result in specific shades of colors. For a technical explanation see https://en.wikipedia.org/wiki/Halftone Those dots or grid is the undesirable effect of that type of printing. Depending on the resolution of the printer and type of halftoning it is capable of, the halftones might be from almost invisible to unacceptable. As a long time user of Alps MicroDry printers I'm reasonably sure that that those decals were printed on an Alps printer. It's halftone capability is rather poor (as you can see yourself). But Alps is also capable of printing really good quality decals, but that requires lots of extra work, and a know-how of the tricks that are needed for Alps to produce excellent results. Without going into too many details, basically the secret is spot color printing multiple layers of ink and capability to overlay inks. There now is a wide range of spot color ink cartridges available for Alps. Spot color printing is one of the "special" Alps features not available in other consumer color printers. Not every color can be printed that way, but there is a wide range of colors that can be printed without that "fishnet" halftonning. Ink jet printers use different halftonign technique and can print smaller dots than Alps, but unlike Alps they cannot print a base layer of white ink to make the colro images opaque, and their ink is water soluble. This is just a tip of the Alps iceberg. It is a hobby in itself. As for your decal, it looks like the person printing them just directly printed your artwork, as is (with maybe some small corrections). That usually is not good enough, but without vector-based artwork, that is all that can be done. The commercial printer Dave Van uses likely uses either spot-color printer, or a UV-cured Ink jet printers which have really fine halftones. But you have to pay for the quality.
-
MPC Schwinn Stingray....
peteski replied to cruz's topic in All The Rest: Motorcycles, Aviation, Military, Sci-Fi, Figures
That's what I suspected - thanks for the confirmation. I broke down and just ordered this kit. I really like to build it just like you did, but going by my past history, it will just be added to the pile of hundreds of unbuilt kits in their boxes waiting their turn on my workbench. It's an addiction! After cutting off the plastic spokes what did you touch up the chrome rim and hubs? Molotow chrome pen? Whatever you uses, it looks perfect in the photos. And if you ever look for a good source of hypodermic tubing, I recommend http://www.componentsupplycompany.com/ -
MPC Schwinn Stingray....
peteski replied to cruz's topic in All The Rest: Motorcycles, Aviation, Military, Sci-Fi, Figures
Wow! That is impressive. Mike Fifer on the forum also built that kit recently. He built it box stock, but you sure took it to the next level! Could you explain in more detail how you replaced the spokes? Also, what did you use for the spoke nipples? -
In my mid-teens I built bunch of Matchbox WWII fighter planes. I also fondly remember them, and the multi-color parts trees. Then on the bottom of the box was a painting diagram, and a clear window so you got a peek at the parts inside without having to open the box. I always thought that was very clever. Then was that cool clear display stand with the base shaped like letter "M" and a clear ball joint on the top, so you could position your "flying" model at any angle. Those models are long gone, but over the years, as an adult, I was able to pick up few unbuilt examples. I'm not sure if I'll even build them, or just keep them boxed for the memories.