stitchdup
-
Posts
7,139 -
Joined
-
Last visited
Content Type
Profiles
Forums
Events
Gallery
Everything posted by stitchdup
-
evergreen trees do not capture as much carbon as the large leaf variations of other species
-
 I just use the content feature in the profile section (top right corner). If you then click on show my activity it shows everything you have posted and will tell you if theres new posts or likes. it can be filtered between your threads and posts
 -
gleened de dindow said the window cleaner with the broken jaw
-
wipe it down before you tack it and lint wont be a problem. i use cheap kitchen towel or an old glasses cloth. you said you had 2 paint jobs in row where this happened so try a new tack rag as it will have contamination from the previous paints on it. If your spraying outside i would tend to think it could be cement dust contamination if there any construction nearby as theres al sorts of stuff that messes up paint in it. also, you if you wash it at the kitchen sink that could be the source of contamination. I tend to use the bathroom sink as it only has soap type products while the kitchen has all sorts of food oils
-
my standard answer to those people is along the lines of "i wouldn't care who you are if your face was printed on money" but not worded in a more scottish manner that would get me a ban, lol
-
Replacement for Model Master Metalizer
stitchdup replied to Straightliner59's topic in Tips, Tricks, and Tutorials
i was talking about the humbrol versions -
Jimmy Flintstone Bird Flu
stitchdup replied to Vampira's topic in Model Building Questions and Answers
I think i would try the camaro donor. if it uses the glass from it you might need to use the interior too so if the camaro fits i'd use it. you can always change the engine if you need a ford motor -
I honestly dont remember, i think i just did a google search and bought it from the first place that had both in stock. It very possibly came from out east as i went through a spell of getting stuff from indonesia and thailand last year cos the exchange rate worked in my favour
-
I dont think it is the gloves. there just isn't a pattern from handling in the fisheyes. If it was the gloves i would expect the fisheyes to be more concentrated where the model is being handled. do you have one of those plug in automatic air fresheners? it wouldn't have to be in the same room as it carries in the air and it can easily get on your clothes by walking past it.
-
i'll be trying it on the wheels for my opel soon. i'll be using the brush stuff over duplicolour gold on some printed wheels so theres some prep to be done first before any chrome goes on but it should be fairly soon
-
do you have places that do silvering? its the process of making glass into a mirror so the surface has to be right before its done. I saw it on an episode of wheeler dealers on an xjs headlight surround. its turned out good and it was a sprayed on finsh. I keep meaning to email the place and ask if they'd consider model parts
-
I would just use the decals. if you want them a little brighter you could try painting the place they go in gloss white and it might make them show better
-
the plastic can be more brittle than other kits but thats down to most of thems age, so if you get them take care when you're building them. The biggest plus for jo-han kits is the more obscure subject matter but other than that i dont feel theres much difference than other similar age kits.
-
I like it but maybe have the front fender stop at the bumper top, and pull the sides of the bumper out to meet them? it would match the back then
-
if its just over spray it might rub off the wheel with a soft cloth. the tyre i'd try washing with dish soap and a toothbrush then if that didn't work i'd use alcohol. since you used elmers (which i assume is just a brand name for pva/white glue) it should wash off too in warm soapy water.
-
hear essie speak next tuesday
-
guy sing (guising) is the name given when you dress up for halloween
-
Tool for adjusting 3d printed window openings
stitchdup replied to stitchdup's topic in Tips, Tricks, and Tutorials
2 different ways to do the same job. I like your trim scriber, probably going to make a copy of it since all the trim i'll be using it on is the same size so your idea will work better than an ordinary scriber and be less likely to wander -
autoquiz 598 - Finished
stitchdup replied to carsntrucks4you's topic in Real or Model? / Auto ID Quiz
honda badges and maybe a very slightly different grille/steering wheel to fit the badge onto -
Tool for adjusting 3d printed window openings
stitchdup replied to stitchdup's topic in Tips, Tricks, and Tutorials
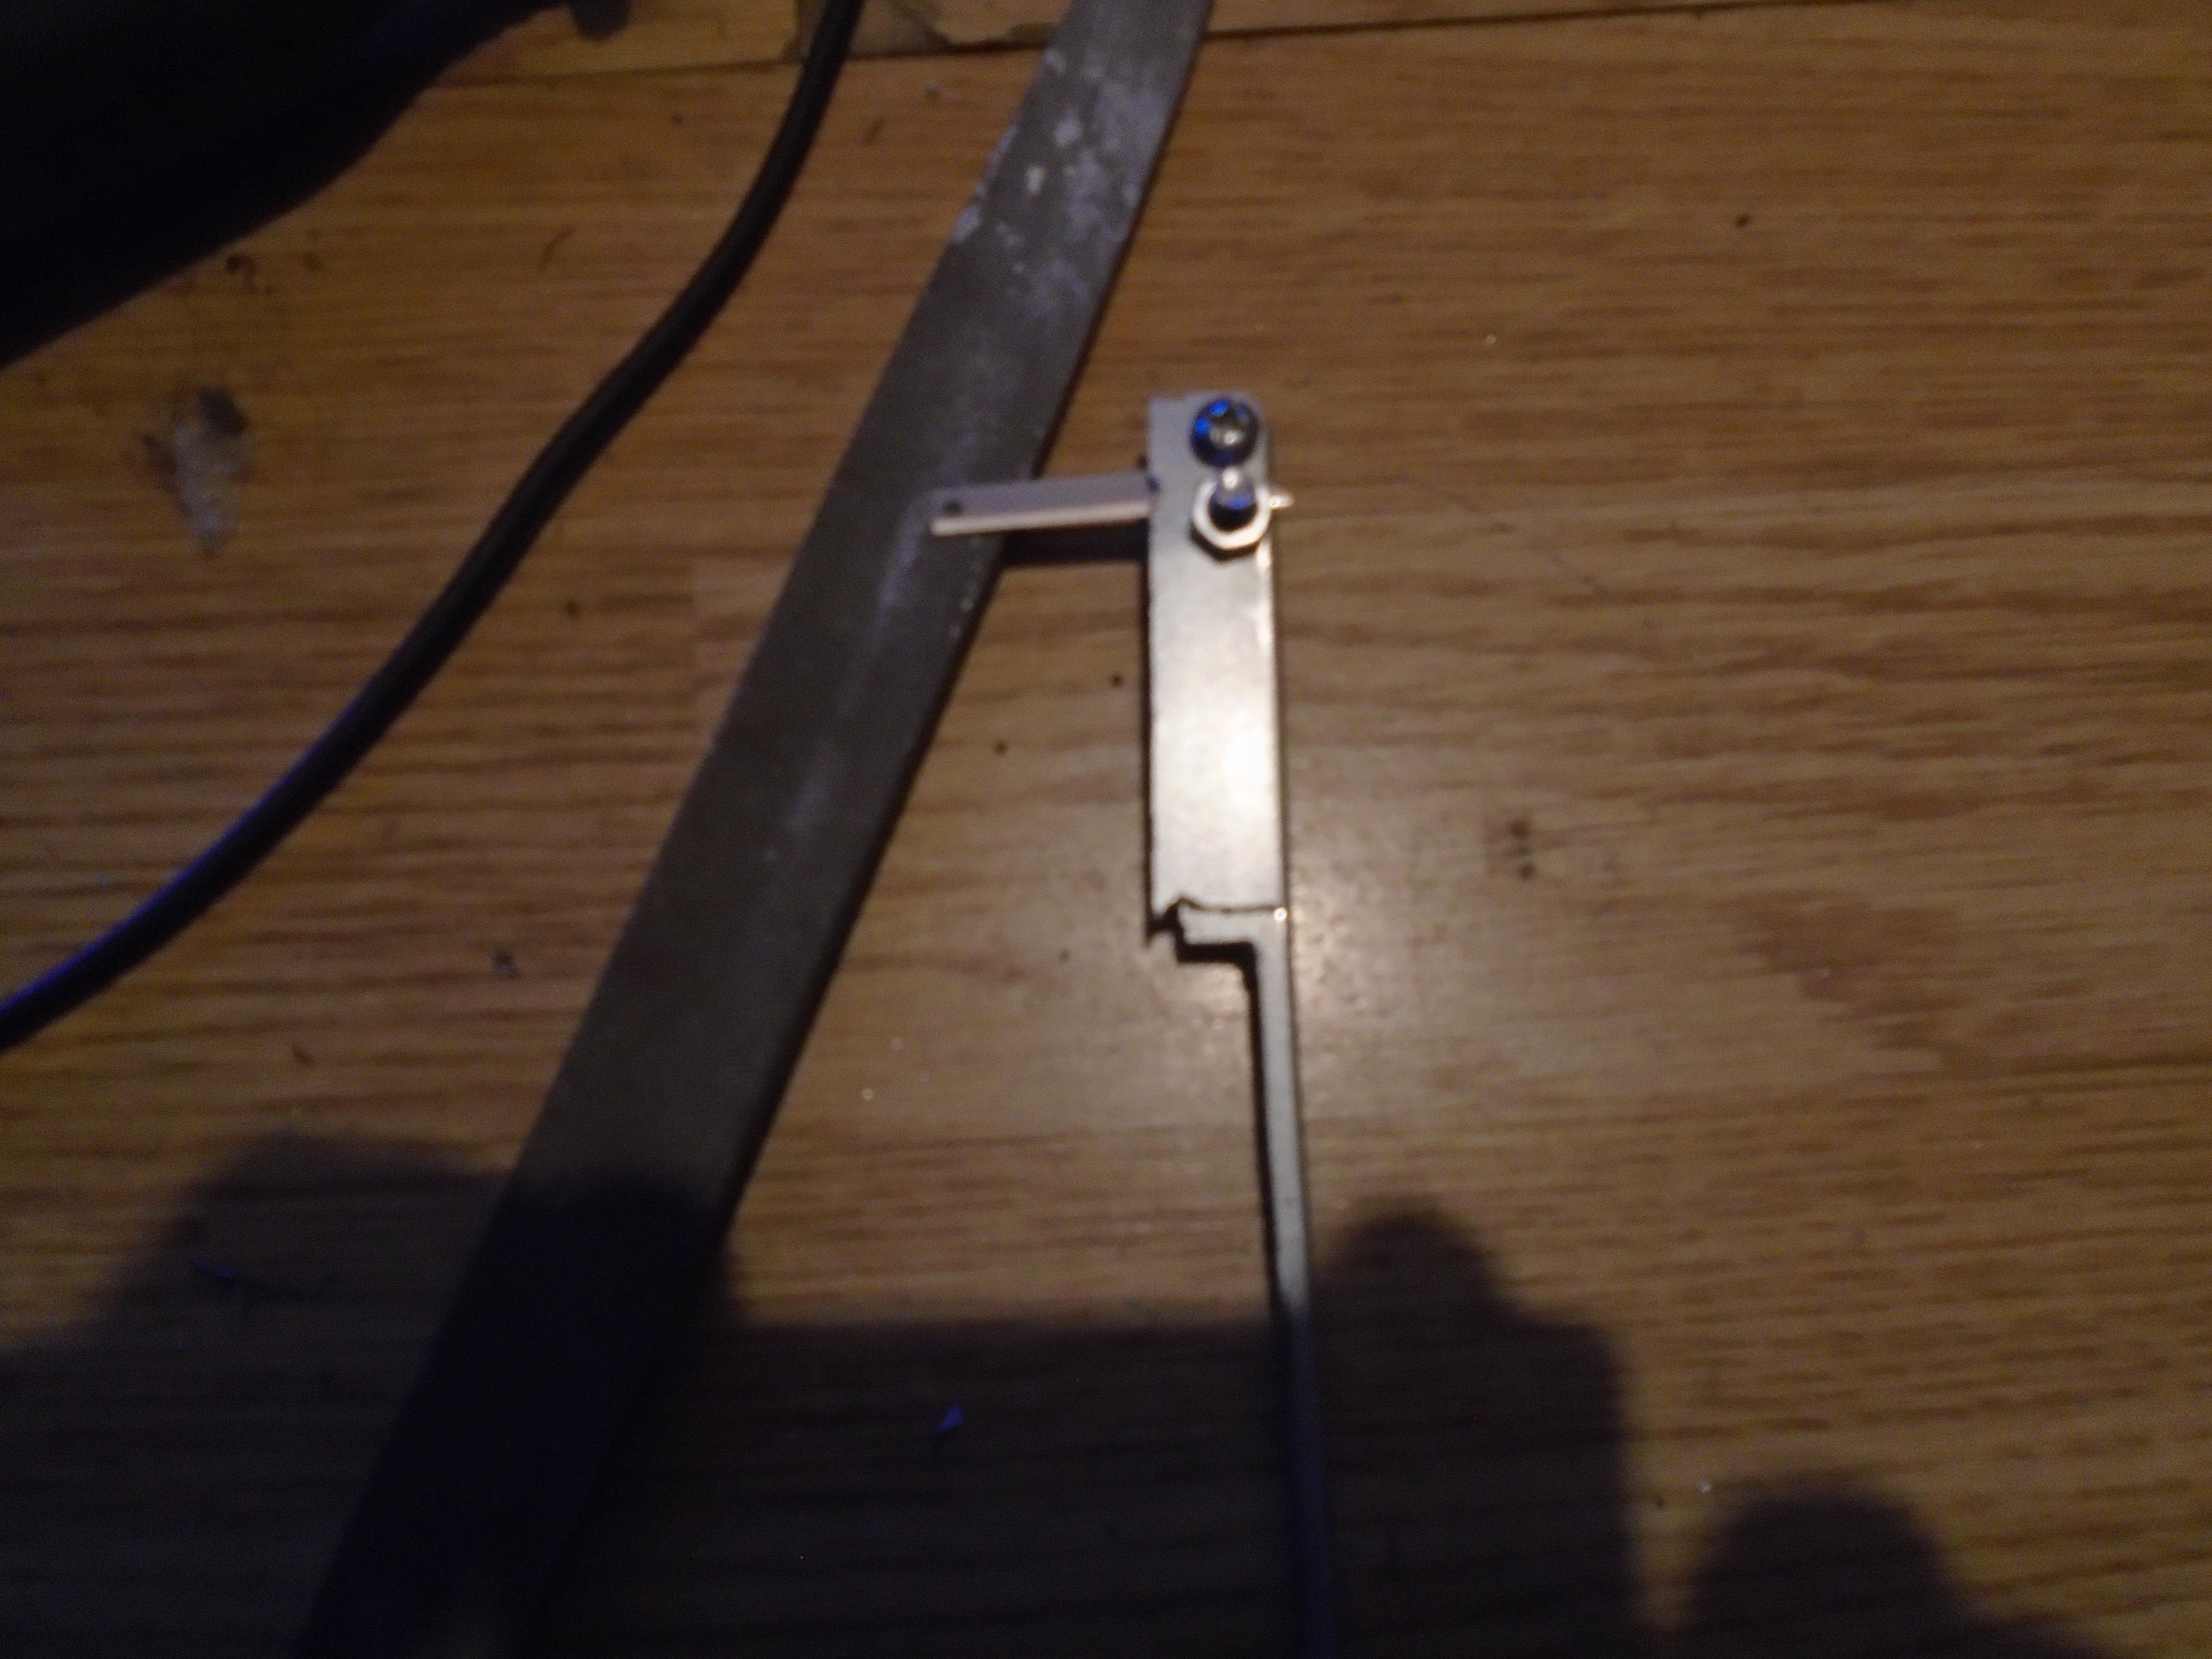
a quick test to see if my theory works out, so far it looks promising. I dont have any panel liner just now so i haven't done it on this, just the foil and inner edge. This is just a test using the painted variant but i will be going over the inner edges again, both to neaten them and to make them a little deeper. You can see the inside edge of the glass is painted rubber black and the foil cover both sides of the trim. since i have a good smooth edge on the glass the black shows up as the glass sitting in the rubber channel. I'll be redoing all the glass edges on this, and i'm confident i can fix them with out damaging the paint and because i made my tool adjustable, I can alter the angle at the end so the scraper blade does not go too deep and keeps a consistent depth. note, this body was modified with normal hand tools, but it also gave me the idea to make a tool as keeping a consistent depth was a challenge
-
I went back and reread your post. since you used the tamiya paint without primer why not use it as a base to start again. the tamiya paint lays down pretty thin so you would need 10 coats or more before you really need to strip it. obviously if you were using primer or auro paints it would be a lot less coats but the tamiya should be safe enough to try again over
-
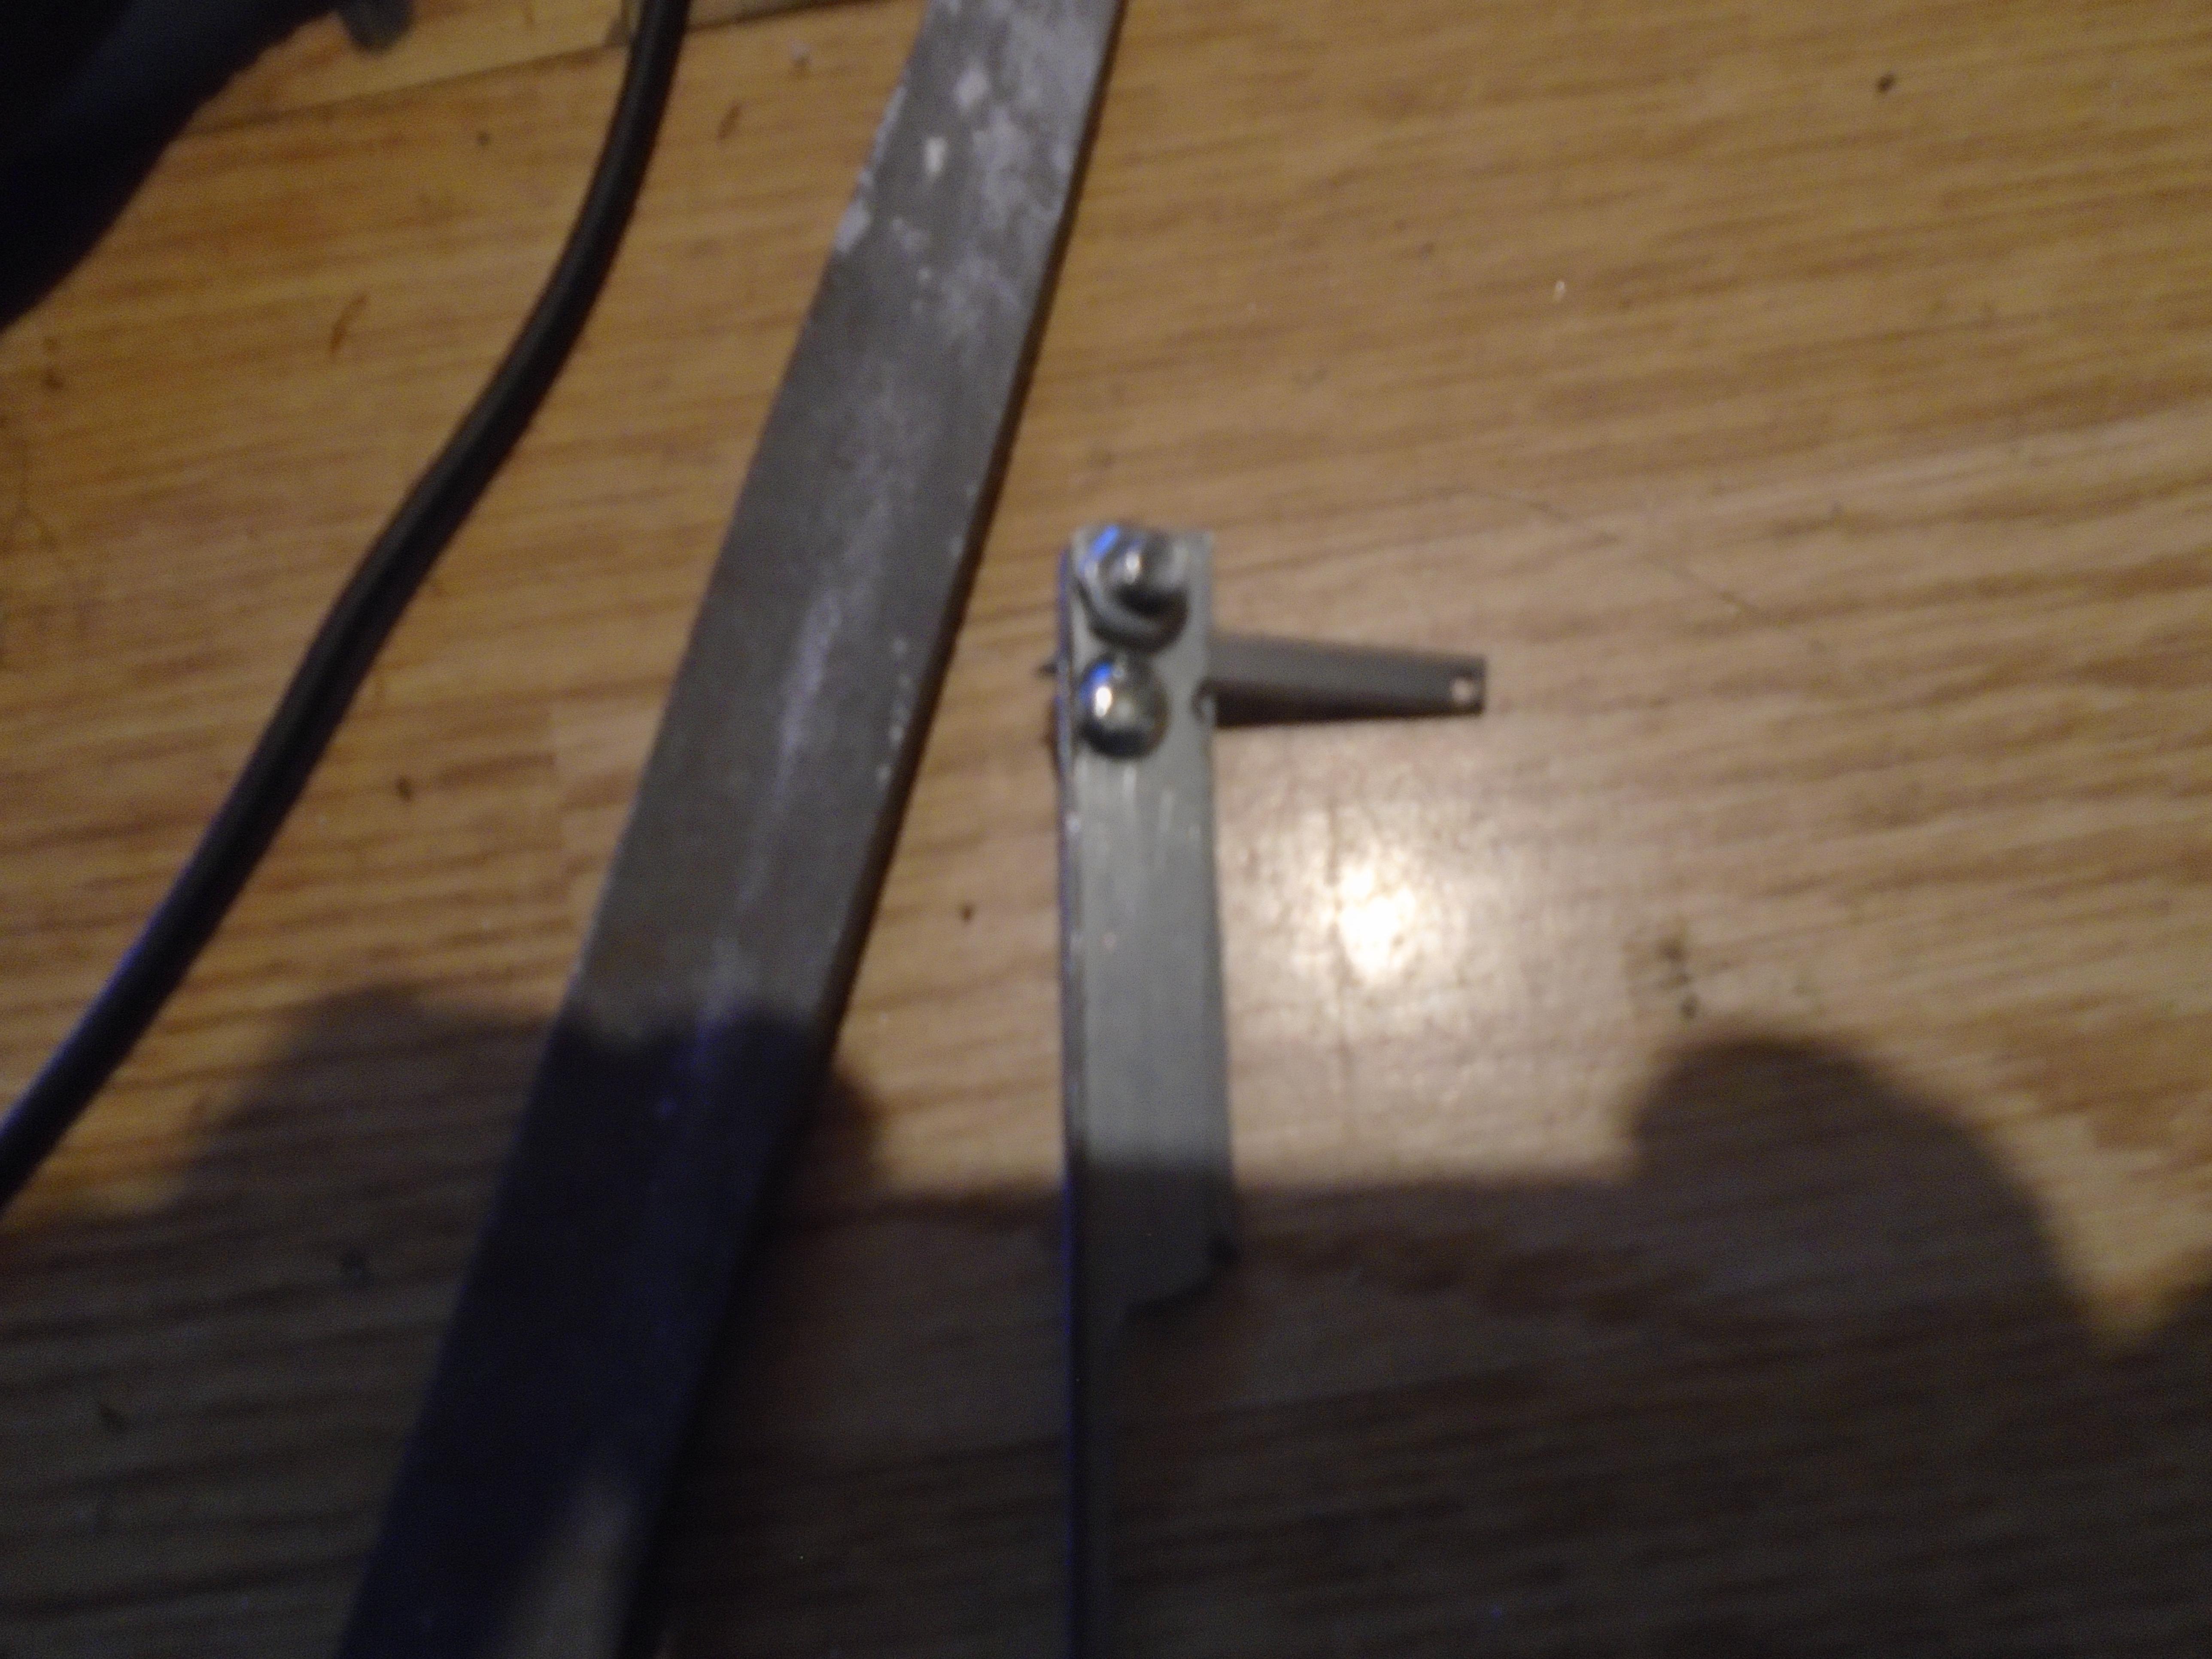
I've been having a little trouble with the glass on some 3d printed bodies so today I made a tool to make it easier. All you need is a length of firm metal and a couple of bolts. I used the corner from my printer packing (i knew i would find a use for it, lol). I drilled a couple of holes in the metal then cut another smaller piece and drilled it as well. I ovaled the holes afterwards to fit more sizes of blade but my initial holes were 7mm apart to suit the blade i have. I'll be using this to scrape away the inner edges on printed bodies so the glass will fit better. doing it this way means the inside edge for the glass will be deeper so the glass can be cut bigger and make gaps on the edge a thing of the past. Because i have a flat edge where the blade points out, i also have a surface to measure to it from. If i do the glass this way i can get that 1970s style rubber with chrome mounts. To get this my plan is to scribe the outside body chrome a little deeper then foil as normal. If i make sure the foil also does the inside of the trim, i can then paint the edge i scraped black to give me the right look, and to do the outside i will be able to use panel line accent. I think this will give me the correct look. here's the tool i made and while its not a neat and tidy job it will do everything i need it to do
-
I wouldn't use brake fluid. i've had a revell t3 camper body turn to crumbs after 5 hours in it and a after using it on a aoshima lexus none of my paints would stick. i scrubbed and sanded that thing i dont know how many times but nothing would stick to it. it did take the paint off though
-
Second wheel falls off airliner in a couple of months...
stitchdup replied to Ace-Garageguy's topic in The Off-Topic Lounge
I watch a lot of the aircrash investigation type shows and the thing that sticks out to me is its usually something insignificant that causes the crashes, from a badly installed screen to a loose nut. The nearest i've been to aircraft maintenance was cleaning the hanger for loganairs islanders. It wasn't that big a hanger (held 2 britten norman islanders of saab 340) but it was a twelve hour cleaning job twice a week. Its the only cleaning job i've had where i was told not to worry about the bogs or offices and just concentrate on the hanger. I was allowed to move things to clean under them, but only if the parts were clean, if they were dirty there was more chance that it was being worked with, but everything had to put back in the same place, no ifs, and or buts. But those guys had to be that way for their job, they are keeping 45 year old planes in daily use (also working with a welsh company to make them electric). I've cleaned in hospitals and the hanger was far more strict on standards. I had to sign my items down in a book when i took them into the hanger to be sure i took the same items out again. They also almost deafened me when they did a full run engine test and forgot i was in the hanger too but thats a whole other story, lol -
return of the mack was one of the most annoying songs of the 90s decade