stitchdup
-
Posts
7,139 -
Joined
-
Last visited
Content Type
Profiles
Forums
Events
Gallery
Everything posted by stitchdup
-

BRAIDED STEEL LINES (?)
stitchdup replied to CaddyDaddy's topic in General Automotive Talk (Trucks and Cars)
most of the earliest mention i've seen were mid 70s for street cars. seems they really took off in the mid 80s as thats when most companies seem to have set up shop. I imagine old bonneville cars would have been among the first to use them on cars for racing since there seemed to be a lot of aerospace gys involved with it. as for when they came about i would guess on aircraft they became most needed when jets were first starting out but that just a guess -
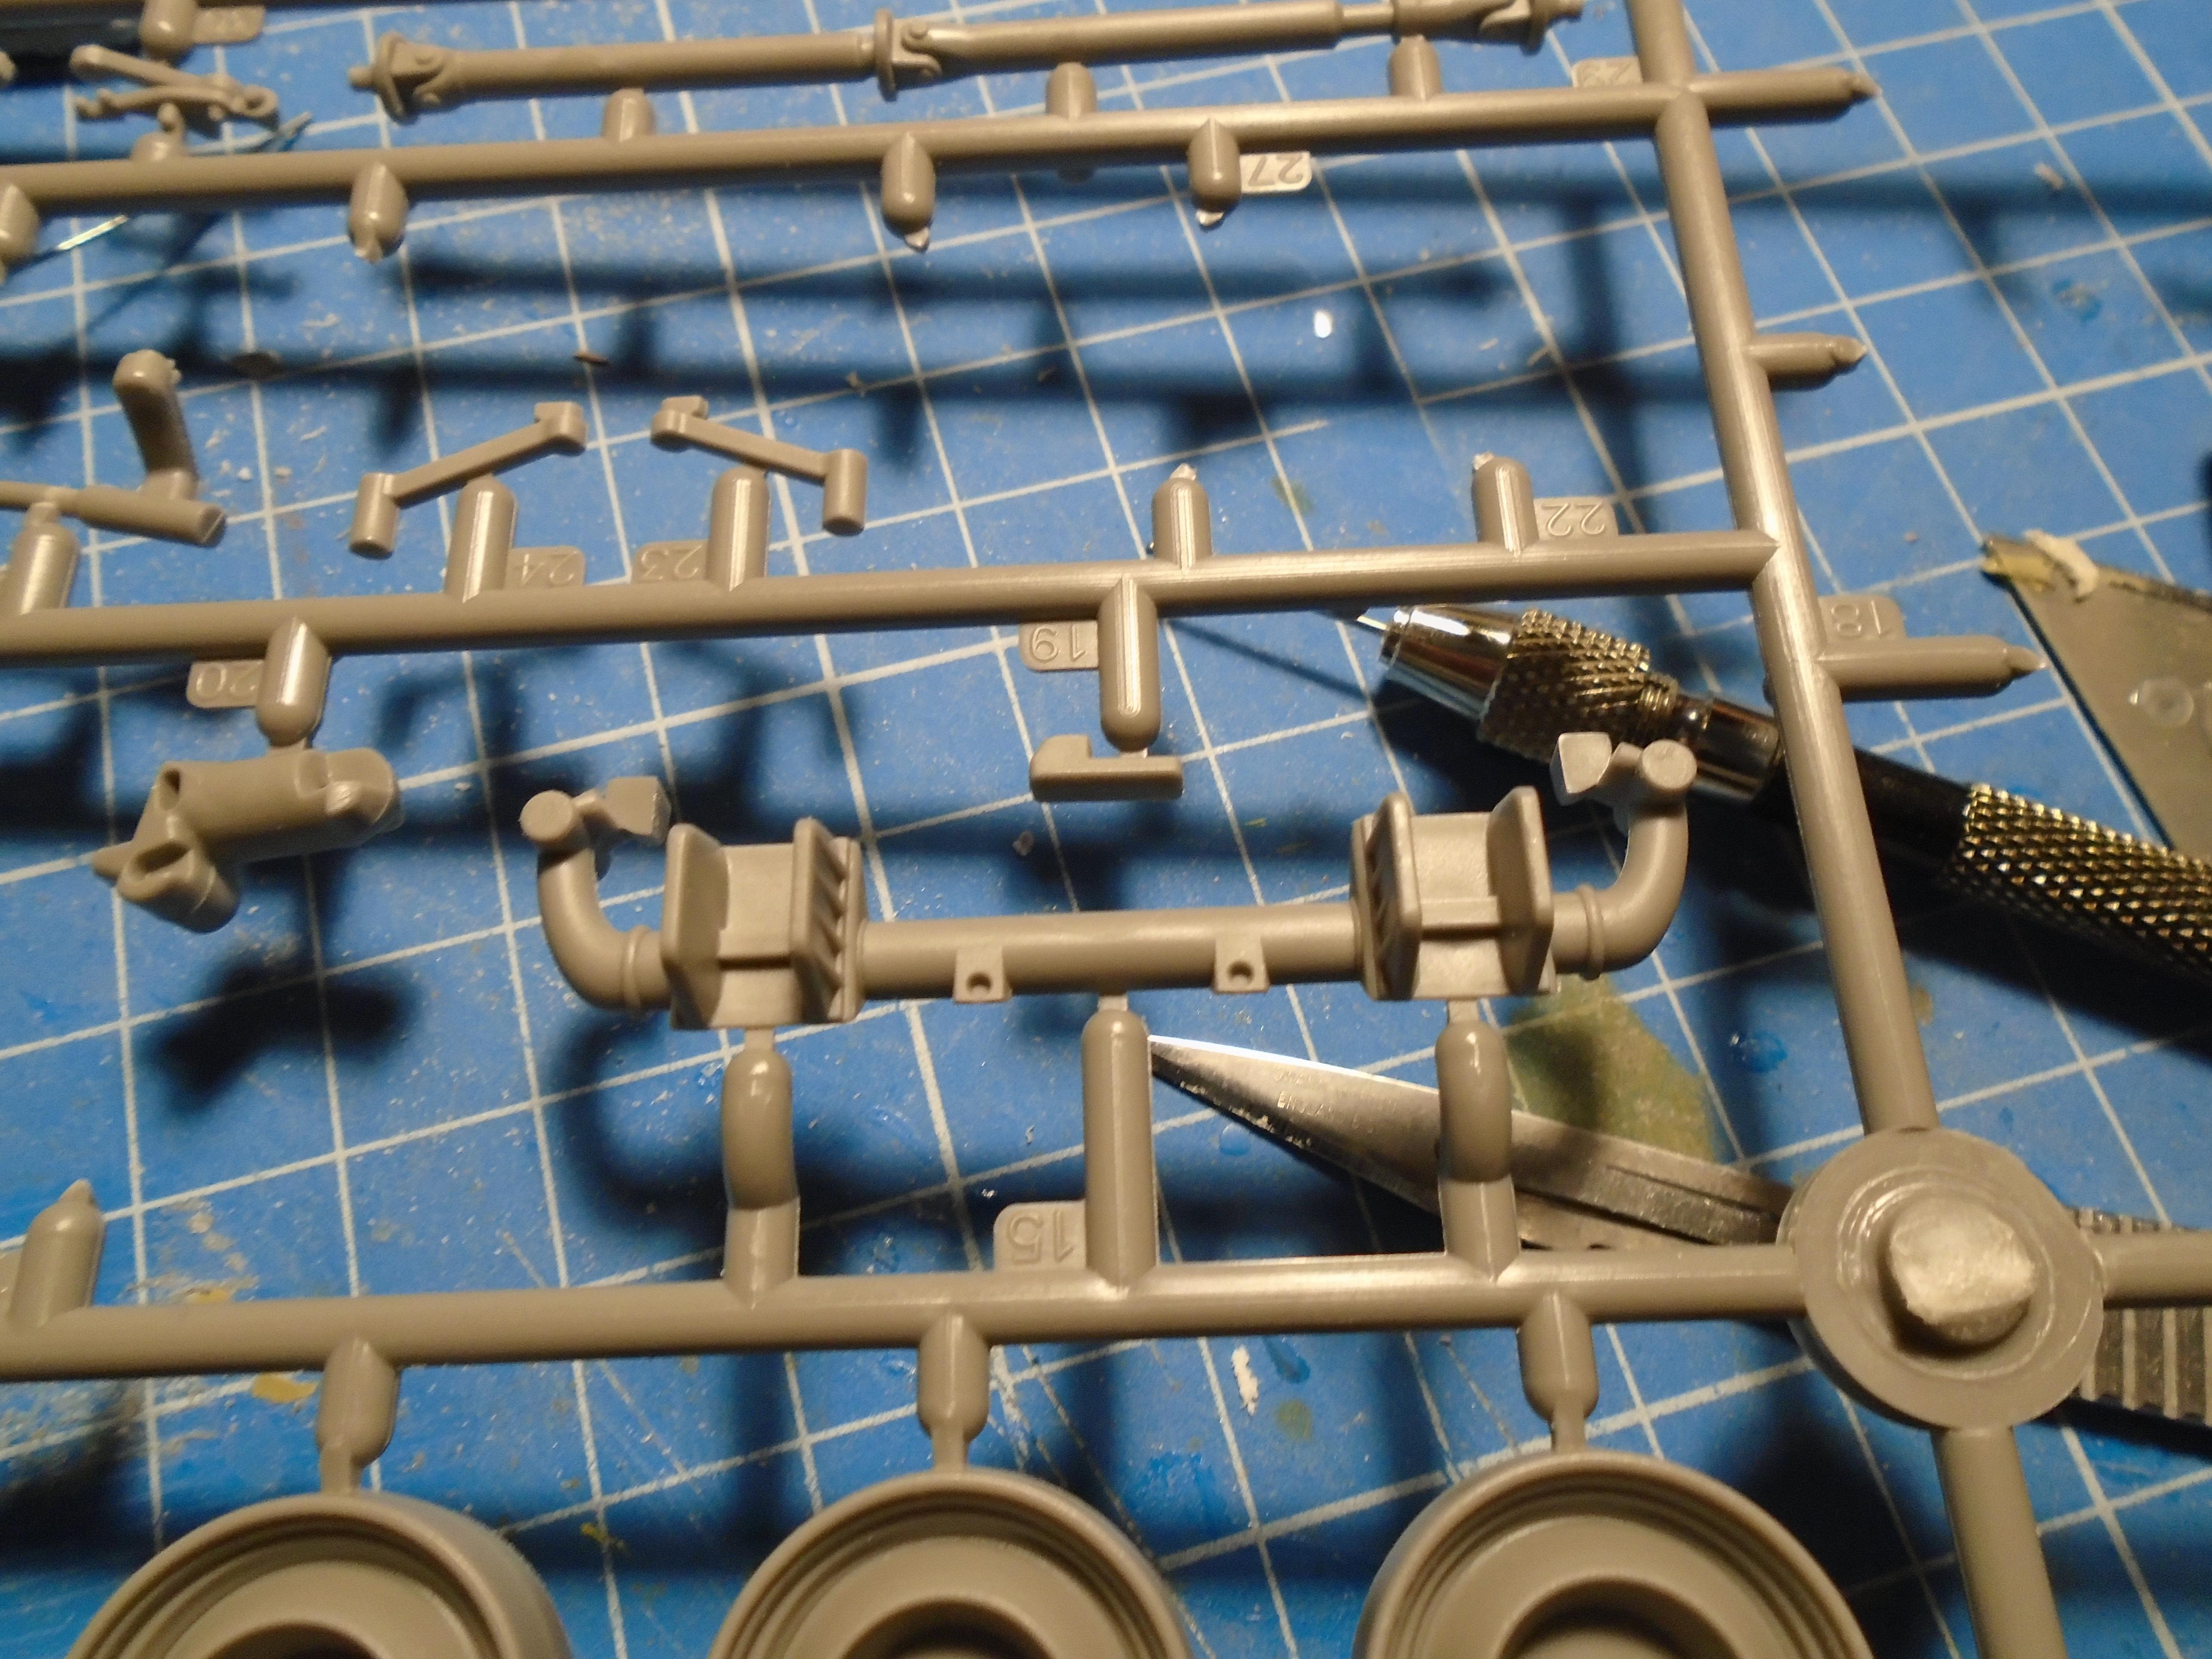
I got the engine and chassis mostly assembled this afternoon. I've left some parts off as the colour call outs are everything gloss black but I wont be following them. It would make for a pretty uninteresting engine bay and the engine itself is a nice enough piece to warrant some changes. I'll probably stick with mostly black but the finishes will be different and some parts will be chromed or maybe body colour. Before i do much more I'm going to read ahead in the instructions to see if i can fit the rest of the chassis pieces before painting. The rear suspension will be lowered with blocks but the front is a unusual looking piece and not the style i was expecting. I think to lower it I'm going to remove the ends on the outside of the brackets and drill them for pins so i can lower the suspension at the end. If i drill both parts it will give me a strong mount and keep the wheels centred. Speaking of the wheels, i might be able to use the stock ones as they fit the bomb look if i add a trim ring and white walls. I've been looking at the body too and i think I have a way to assemble it without the interior to make painting easier as otherwise i'll have an ugly seam across the front of the roof. I'll probably have to use the interior to keep it square while gluing but there will be some small tabs underneath to reinforce some edges as they are a butt join so wont hold without them. I have some 0.1 sheet ill layer for that as i need to be sure the interior will still mount. So far everything has fitted well but everyparts has needed more clean up than usual. The plastic is a little softer than usual too, being similar to heller car kit plastic. top and bottom views of front axle.

-
I've put my vw back in the box before i throw it at the wall. The glass for it is fighting me and to fix it i need to make a tool so until i can get hold of a very small tap and die set its on hold. So since verything else thats on my bench is held up for one reason or another i thought I'd make a start on this. Since I plan on doing it in a bomb lowrider style that should mean the only mod is slamming and wheels. I'm going to use a set of printed wheels from slowlysmodels and i might use a dropped axle from digitalsurface if its the correct width but the rest will just be paint and a few accesories. I got this kit cheap as it didn't include instructions and after getting help on here i contacted icm in ukraine and had a new set in 2 weeks and they would not take any money for them which was nice of them. I guess i should stop waffling now and open the box. I'm not looking forward to the 8 piece body but we'll see how it goes
-
Spraying decanted Duplicolor Filler Primer
stitchdup replied to 39restorod's topic in Model Building Questions and Answers
when i use the filler primer on small parts i dont decant. I drill the part to attach a peice of firm wire then i will spray the primer upwards while spinning the part in the cloud of primer. It works better than you might think -
when i worked in bodyshops we just used some new tights/nylons. I cant remember now what denier they were but we used to buy them by the case. we got about 30 strainers out of each leg. dont be tempted to use naural fabric ones, we need the men made ones to avoid fibres also, on this side of the pond blowing chunks means violent vomitting
-
American racing wheels 15"
stitchdup replied to hgbben's topic in Car Aftermarket / Resin / 3D Printed
theres some in the amt 62 bel air and a load of other kits. the ones in the bel air aren't chromed though -
Goodbye Hot Rod Magazine?
stitchdup replied to Rockford's topic in General Automotive Talk (Trucks and Cars)
are you sure its gone quarterly? it might just be sitting with issue 222 in a usps warehouse -
What interrupts your build time?
stitchdup replied to TopherMcGinnis's topic in General Automotive Talk (Trucks and Cars)
I'm currently unemployed so most of my time has been spent job hunting and wasting time on courses i've already done. I had more time to build when i was working but some of my lack of time has been taken up with health issues which has also affected the jobs i can do. None of the jos i have experience in are suitable now so trying to find something that is has been a hassle. There is a proper independent hobby shop opening sometime so i've been learning what i can about other crafts to help with applying for it. So mostly i've been training for a job i want but isn't even advertised yet as the building isn't finished but thats where my model buuilding time has gone. -
Looking For A Special Glue
stitchdup replied to oldcarfan's topic in Model Building Questions and Answers
would the resin on its own for glassfibre work? when i've worked with it it always seemed to stick to stuff it shouldn't -
A different approach to the AMT 41 Plymouth coupe.
stitchdup replied to Alan Barton's topic in WIP: Model Cars
Nice work, theres lots of good stuff happening and your tail lights idea might just have saved a stalled project of mine (same parts used different) so thanks for that too -
Round 2 Can We See The Chevette and stock Vega Again?
stitchdup replied to oldcarfan's topic in Car Kit News & Reviews
not models but heres a rough guide to different variations but it missed out a few. https://www.streetmachine.com.au/features/geminis-from-around-the-world -
Looking For A Special Glue
stitchdup replied to oldcarfan's topic in Model Building Questions and Answers
if the parts you want to use are fitted to the diecast using pegs or clips you could try copying those parts in styrene so you dont need to worry about glue. On the diecast i've taken apart most seem to be either pegs or slots for the smaller parts so if you got a good friction fit you should get away without glue. If its a screw on part the centre of where the screw goes should give you a decent enough area to glue keyed pegs to, even if the glue aint the best, if you really glob the glue in as it would be holding onto a ribbed area and in effect you've sorta made a screw out of glue. If all else fails theres always double sided tape for fixing cell phone screens, which i'm going to try on some alfa-model windshields. Its not cheap but if it holds a phone together in our pockets its should work for models. I got the 1mm black stuff but its available in clear too. I think I paid about £20 for 1 roll. The clear stuff is near invisible once its on phones. My friend that does phone repairs suggested it to me and said not to cheap out on it and to get the tena brand and to use it a warm area as it doesn't stick well when the parts are cold. It comes with decent free needle point tweezers too which i assume is to take the backing off -
Hoonitruck Ford F150
stitchdup replied to MarcelT4's topic in WIP: Model Trucks: Pickups, Vans, SUVs, Light Commercial
theres some 3d files on cults for some of the cars. there is body parts for the italeri mk2 escort and transkits for the focus and escort cosworth but the audi files are mostly just the body or body and basic interior. there might be decals to do his ordinary rally cars too as i've seen some of them built. -
there are 3d printers for making wax molds to cast from. I've been trying to see if the local jewellery factory will try making me some wheel rims since ali has a lower melting temp than the metals they use. They have one of the wax printers but they haven't given me a price yet. If they do give me a reasonable price i have an engine i'd like to try
-
"this time around thing were going to different" could be the opening to most hallmark/lifetime movies
-
still not in scotland either. it would normally be here christmas week
-
Hoonitruck Ford F150
stitchdup replied to MarcelT4's topic in WIP: Model Trucks: Pickups, Vans, SUVs, Light Commercial
Nicely built model sir, will the next build be another ken block car?- 67 replies
-
- 1
-

-
- hoonigan
- hoonitruck
- (and 2 more)
-
1:1 kitbash?
stitchdup replied to Earl Marischal's topic in General Automotive Talk (Trucks and Cars)
it just a living embodiment of the johny cash song but it was a cadillac -
Stash organization
stitchdup replied to atomicholiday's topic in General Automotive Talk (Trucks and Cars)
vw are mostly stacked on the floor in 3 roof height piles, porsche fills a shelf, bugatti, audi, seat skoda and other vw group are on another shelf. flat box pick ups and tractors have a shelf and larger trucks are under my paints. then theres a shelf for japanese and other euro cars and all my usa boxes are stacked on the other wall. parts are in various sizes of plastic drawers and my bottle paints are sorted by brand in a small drawer unit. then theres boxes of prints scattered among all this and 6 large and 12 small totes full of parts sorted by brand/type. and i have a few clear shoe boxes for putting german revell kits when i start to build them cos the boxes are garbage and never last until a build is finished -
WHATS GOING ON HERE?
stitchdup replied to CaddyDaddy's topic in General Automotive Talk (Trucks and Cars)
Just out of interest, but what was the last "pure" mechanical pick up or vehicle. By pure mechanical I mean it would run with out the computer or the engine is seperate from all the creature comforts. I think in europe it might be the volkswagen caddy or skoda rapide (which are mostly the same under the skin) and japan might be the mitsubishi b2200 but i have no idea about your trucks -
I was having problems with my sight recently which was making modelling fairly difficult. It was particulary bad doing foil and i was seeing 5 or 6 of the line i was trying to cut. Today i tried some 1.5 magnification reading glasses and the foil was a cinch. Unfortunately my prep before hand looks bad so the chrome look like it was fitted with a hammer but i dont actually mind that as i can just print another when it starts to bother me and i'll be able to see what i'm doing second time around.
-
What did you see on the road today?
stitchdup replied to Harry P.'s topic in General Automotive Talk (Trucks and Cars)
well you say that but there is an efficient network of electric vehicles that can pull a lot more than 9 cars and its been used by every auto manufacturer for over 100 years.
-
Does anyone have tips for printing clear parts. I will only be printing lights and small parts and not full screens. I can get them to print but its very hit and miss on the sucess rate. The problem I'm having is getting the parts to stay on the supports. I can get them to stay if i increase the support attachment to 1mm but that ruins the edges of the print. I'm using anycubic waterwashable clear resin with a 1.5 sec exposure time in a warm room. I dont mind them turning out slightly yellow'd as some time in the sun seems to fix it and print lines i get rid of by brushing on more clear resin before curing but i'd like to have a higher sucess rate. at the moment if i was printing light lenses i'd have to print 10 to get 2 decent enough to use.
-
Tilted wheels. Why?
stitchdup replied to Earl Marischal's topic in General Automotive Talk (Trucks and Cars)
When i did my mk3 golf ride quality had nothing to do with it. My biggest concern was where the wheel arch sat when the car was aired out. To get the rear wheels to look like they fitted standard arches took me and a friend months of work. We started with the stock rear axle and tried our hardest to get the 9s to fit but in the end we had to swap to a mk1 golf axle. This meant my friend spent most evening for 2 month layed on his back welding in the rear floor from the mk1 to the mk3. When that was done we had to use various parts from other vws to make more space. the brakes were from a lupo 3l as they were narrower than the others we tried. Then we found the wheels didn't sit in the centre of the arch when dropped (it happens on every low vw hatchback) so we had to get some custom drop plates made that moved the axle back on full drop. All this work so the wheel arch sat between the tyre and rim on full drop and yes it involved camber and stretched tyres. After all this the front was a piece of cake and just needed the offset changed on the wheels when they got banded. It was all about the look when it was parked and my reason for that was why should i care how it looked moving, i only saw it parked. It drove decently but it wasn't a car i would drive fast, not because it was unsafe but because i wanted it to be seen. If I had raised the floor a couple inches i could probably have driven it on good roads at full drop but as it was i drove it 50mm from the ground. My oilpan needed a bash guard and i went through bushings something rotten on the front but it looked cool to me so it was worth it. to look at the car you'd think it was just a lowered stocker but it was much more than that and i sorta enjoyed nobody really knowing how much work it was. I appreciate the look isn't for everyone but i wanted to explain some how i did it. but my cars were always the lowest. I got given an old peugeot 405 wagon that was pretty worn out so me and my mate used a citroen bx suspension for a dirt cheap hydraulic system. it was up to the job, lol -
Boeing's 737 problems continue...
stitchdup replied to Ace-Garageguy's topic in The Off-Topic Lounge
boeing, our thoughts and prayers hold the plane together