TarheelRick
-
Posts
4,045 -
Joined
-
Last visited
Content Type
Profiles
Forums
Events
Gallery
Everything posted by TarheelRick
-
Revell '55 Bel Air Box Art Tribute, Part I - Yellow Car
TarheelRick replied to Casey's topic in WIP: Model Cars
From the looks of the hood scoop going through the windshield, I would guess this is an early funny car and the driver is actually sitting in the middle of the back seat. -
Testors spray enamel
TarheelRick replied to RichCostello's topic in Model Building Questions and Answers
This is the perfect use for a food dehydrator. Do not use the one you use for food, find a good used one at a yard sale or flea market. It will still take some time and will need to be done in 30-45 minute segments (controls heat buildup), but it will dry much quicker and a bit harder finish. -
46 merc pickup
TarheelRick replied to damodelguy az's topic in Model Trucks: Pickups, Vans, SUVs, Light Commercial
Definitely a good job on the build. I think what is throwing me off is the front appears to be sticking out too far beyond the fenders. Looking at the 1:1 picture it looks as if the bottom of the front pan is flush with the bottom of the fender, and the resin body looks to be sticking out a scale 3-4 inches. -
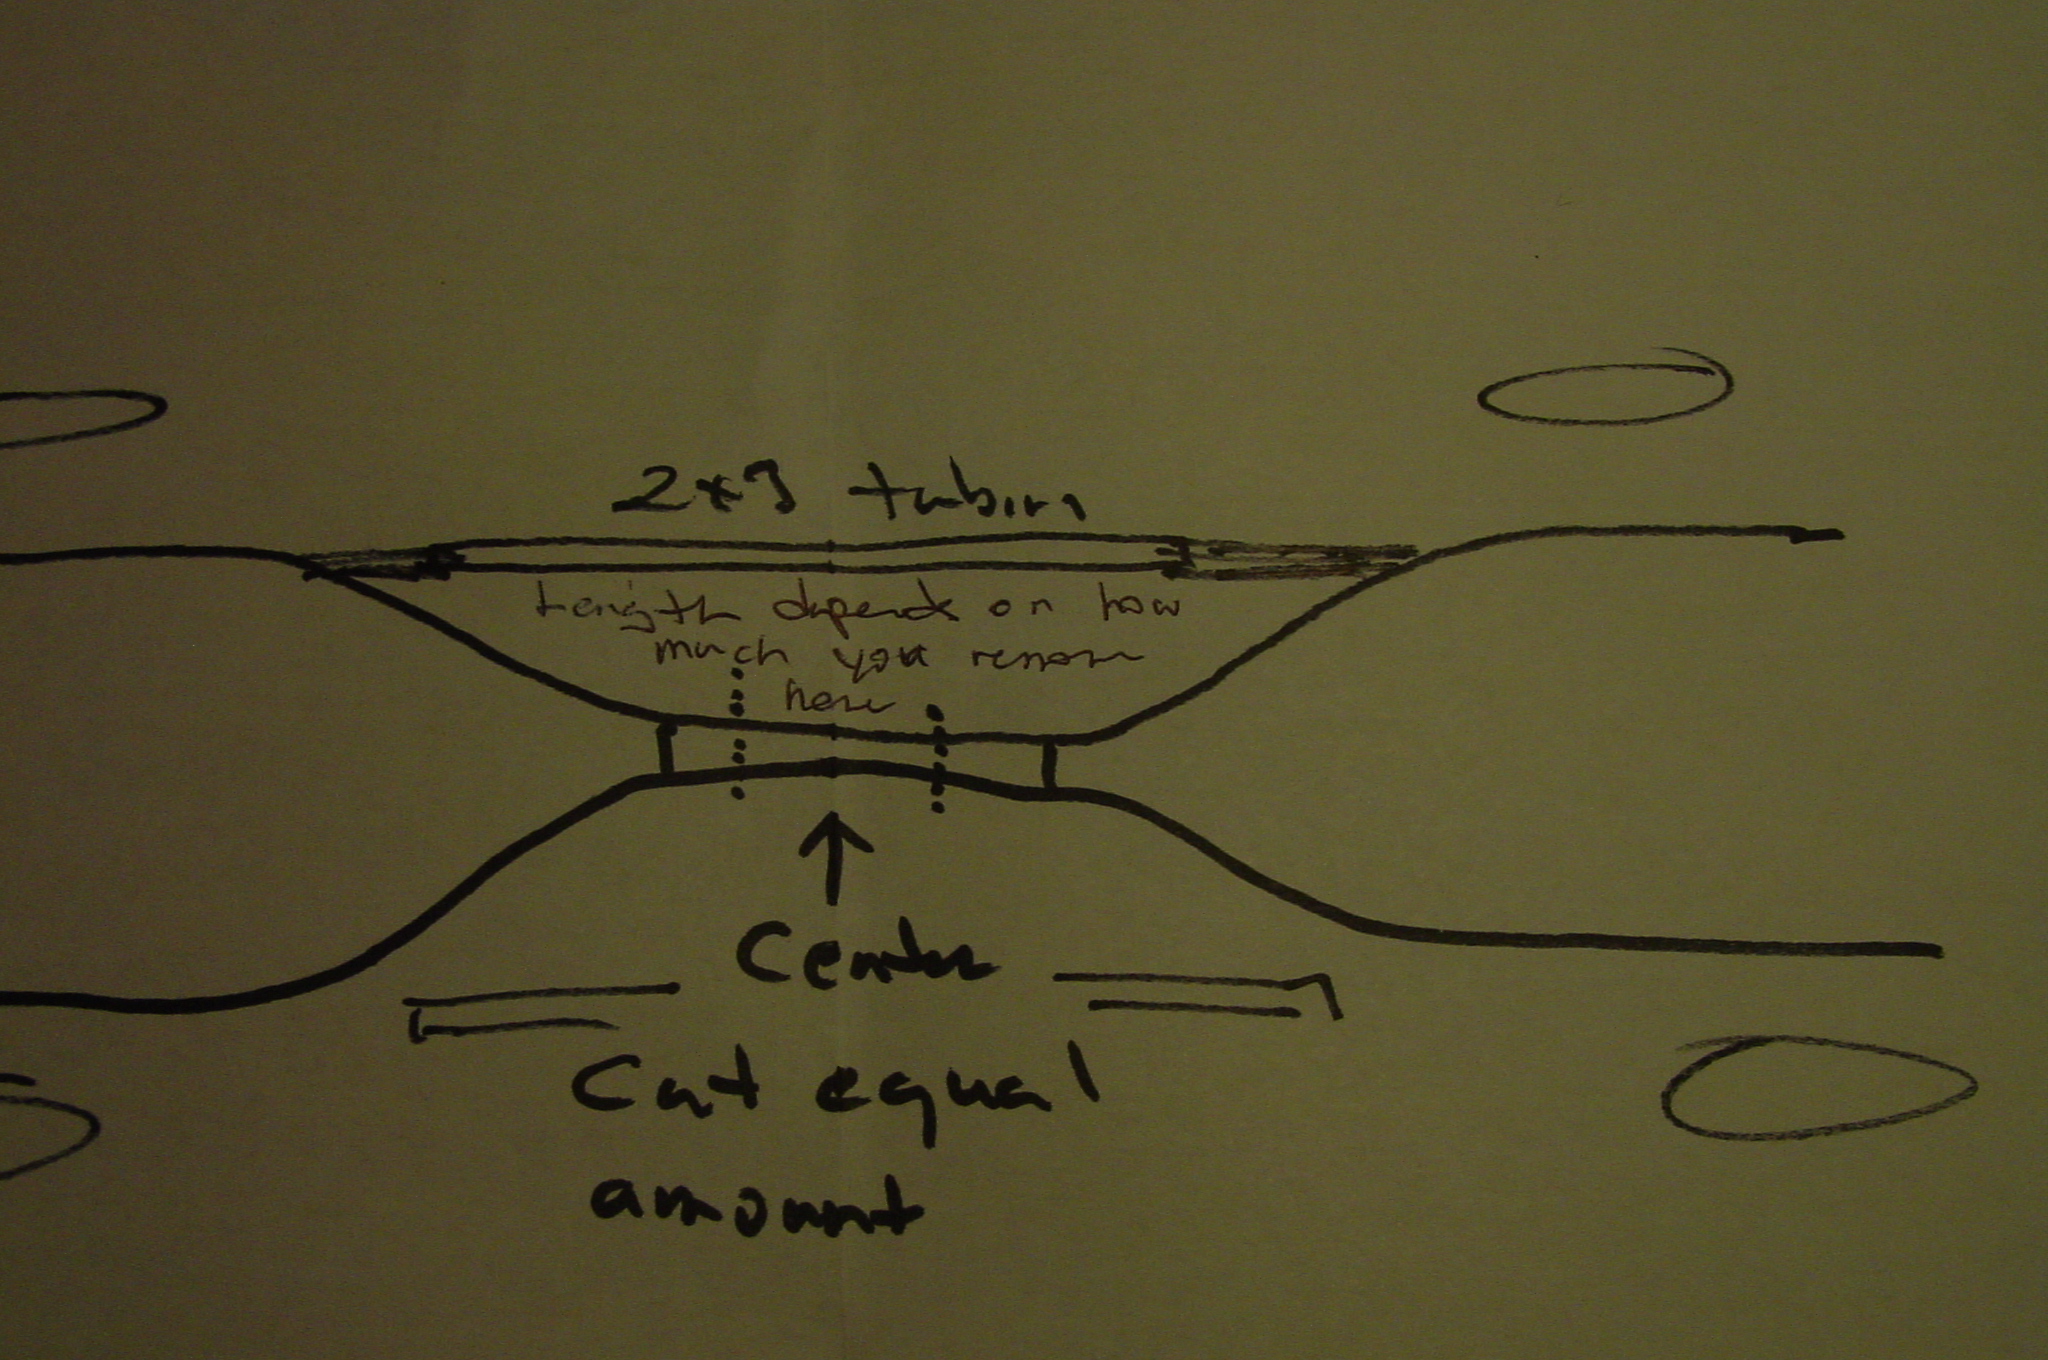
What I am suggesting is to find the center and cut an equal amount from front of center and rear of center, the X should then line up. Even if you have to remove the complete middle section you can you should still be able to shave from the front chassis section and back section to get the frame pieces to align. Here is a rough drawing of what I am suggesting. Now that I looked at your concept picture I am wondering how my suggestion will work with the front suspension being moved forward. Of course you could always clean off the IFS and replace it with a tube axle. Hope this helps.

-
Steve Kohler Star Models
TarheelRick replied to Whitman's topic in Car Aftermarket / Resin / 3D Printed
http://www.resinrealm.net AS others have said, good product, excellent service. -
Definitely looks doable, and as been mentioned someone, somewhere in a backyard garage probably did one. As for the X-frame you could bolster the stock frame by running "2X3 inch steel tubing" from the front to back just inside the body panels. You will also need to shorten the frame, my suggestion would be cutting the center of the X evenly front to rear to assist in realigning the frame members. Now dig out your X-Acto saw and start cutting.
-
Just completed a trade with junkyardjeff (Jeff Ogden) and am well satisfied with the result. Would be glad to trade again.
-
1975 Datsun 620
TarheelRick replied to martinfan5's topic in Model Trucks: Pickups, Vans, SUVs, Light Commercial
Beautiful build. Really love those style trucks. I owned a 74, drove it until some lady caught me in a glancing head-on on a divided four lane, yeah, she was a bit influenced. Put a California Step-side on it, drove it for awhile then traded it for a 78 King Cab, that one was my favorite. -
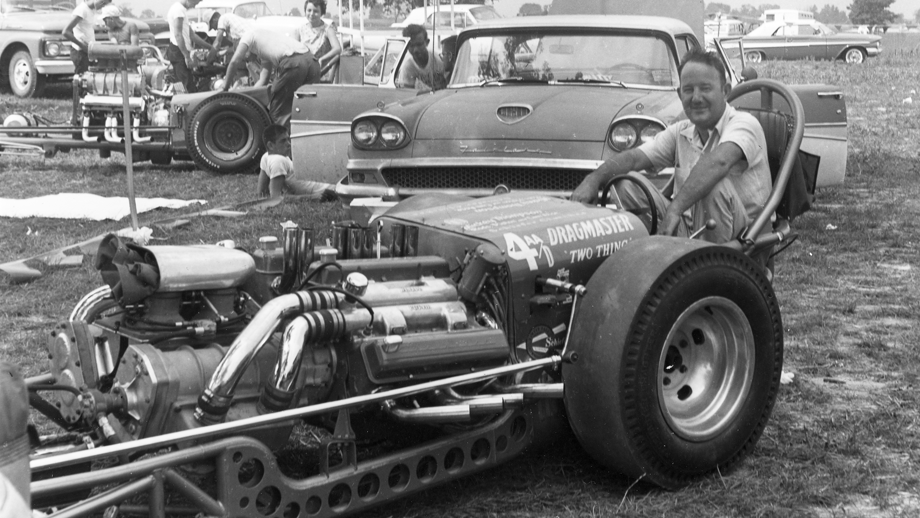
Even from the initial release of AMT's Double Dragster I have wondered about the inspiration of the side-by-side dragster. Today I found this photo of Dode Martin's dragster.
-
Gluing Different Types of Plastic Together
TarheelRick replied to Miatatom's topic in Model Building Questions and Answers
Not really sure, but the only thing that might work is to get some of the PVC glue where you bought the caps. I also have this set-up for a paint shaker and I use plain blue painter's tape wrapped around the bottle and clamp to hold it in place. -
That paint and decal work is outstanding. Love the looks of this one. Still waiting to see what you are going to use for" motor"vation.
-
I also have this set, and with their 20% coupon it is even less. In case you are not a "frequent flyer' of HF, they almost always have an ad w/coupon in many of the automotive magazines.
-
My first suggestion would be to get a good water filter/trap for it; it will save a lot of frustration. Then collect some milk jugs or other plastic pieces and start practicing. Most people suggest mixing to the viscosity of milk, which can be a bit suggestive, but is a good starting point. Different types of paint will require different mix ratios and air pressures to attain good results. As you practice it may be helpful to keep a journal of what you have done, that way you will not have to "re-invent" your technique with each paint job.
-
A high school friend bought one just like this brand new, he immediately blew the engine. The local dealer replaced it, within a few weeks he blew it again. The dealer replaced it, but with a warning. You guessed it, it didn't take long before he blew it again. This time he replaced it with a 427 at his expense. In a few weeks he wrapped it around a tree, some cuts, bruises, and a broken arm but a lesson learned. Now back to your build. To me the 65/66 Impala/Chevelle SS's in Marina Blue were some of the prettiest cars from GM. Your rendition is just as beautiful. Great job.
-
Cool idea and wise use of a leaning tower. However, I don't know about a 3000 mile road trip in something that small.
-
Maybe you could build an N-scale dragstrip and use those for timing towers and press booths. JK, wish I had kept my N-scale stuff.
-
Autoquiz 360 - Finished
TarheelRick replied to carsntrucks4you's topic in Real or Model? / Auto ID Quiz
I don't know what that is, but IMHO it is hideous. -
Made a huge mistake!!!
TarheelRick replied to Jeff31293's topic in General Automotive Talk (Trucks and Cars)
Or if there is an A. C. Moore nearby, get their "app" on your telephone and you will have a 55% off coupon, plus if you are a veteran they will give another 10%. Makes models almost affordable again, if they had a decent selection. -
As the others have said you have accomplished some excellent work. I especially like the skin tones you have used, they are so realistic. Very well detailed build, thank you for sharing it with us.
-
Those are some mighty "low-profile" tires on the back.
-
TARHEEL basketball, Duke basketball,, moonshine, and a quickly growing Yankee immigration.
-
Received my part of the trade from iamsuperdan. Very well pleased. Would trade again and would recommend him for a reliable trading partner.
-
Tutorial on using a mold made from another car
TarheelRick replied to 59 Impala's topic in Tips, Tricks, and Tutorials
I was attempting to fill the roof and cowl flaps on a NASCAR kit. I would get it sanded smooth, primered, put into the dehydrator and it came out with a really rough texture and raised above the roof level. I sanded it down again, primered, into the dehydrator and got the same results. Guess I am slow to learn, but it took me three tries before I finally realized the problem was the dehydrator. It appears the heat will cause this stuff to swell and from what I can discern it will swell indefinitely, well, that may be a stretch, but it is a real pain. -
Tutorial on using a mold made from another car
TarheelRick replied to 59 Impala's topic in Tips, Tricks, and Tutorials
One other caution about using acrylic nail filler, other than the odor issue. Do not put a model with this filler into a dehydrator. For some reason the heat will cause the filler to swell - ask me how I know. -
Beginning to really take shape, looking forward to updates. One word on using the acrylic nail filler, do not put the finished model in a dehydrator, the filler will swell up - ask me how I know.