Chariots of Fire
-
Posts
2,781 -
Joined
-
Last visited
Content Type
Profiles
Forums
Events
Gallery
Everything posted by Chariots of Fire
-
 That is outstanding work! The subtle way you have done the faded paint on the trailers is really great. A job well done!
 -
Anyone make a resin 1 ton dump bed
Chariots of Fire replied to fordf-100's topic in Truck Aftermarket / Resin / 3D Printed
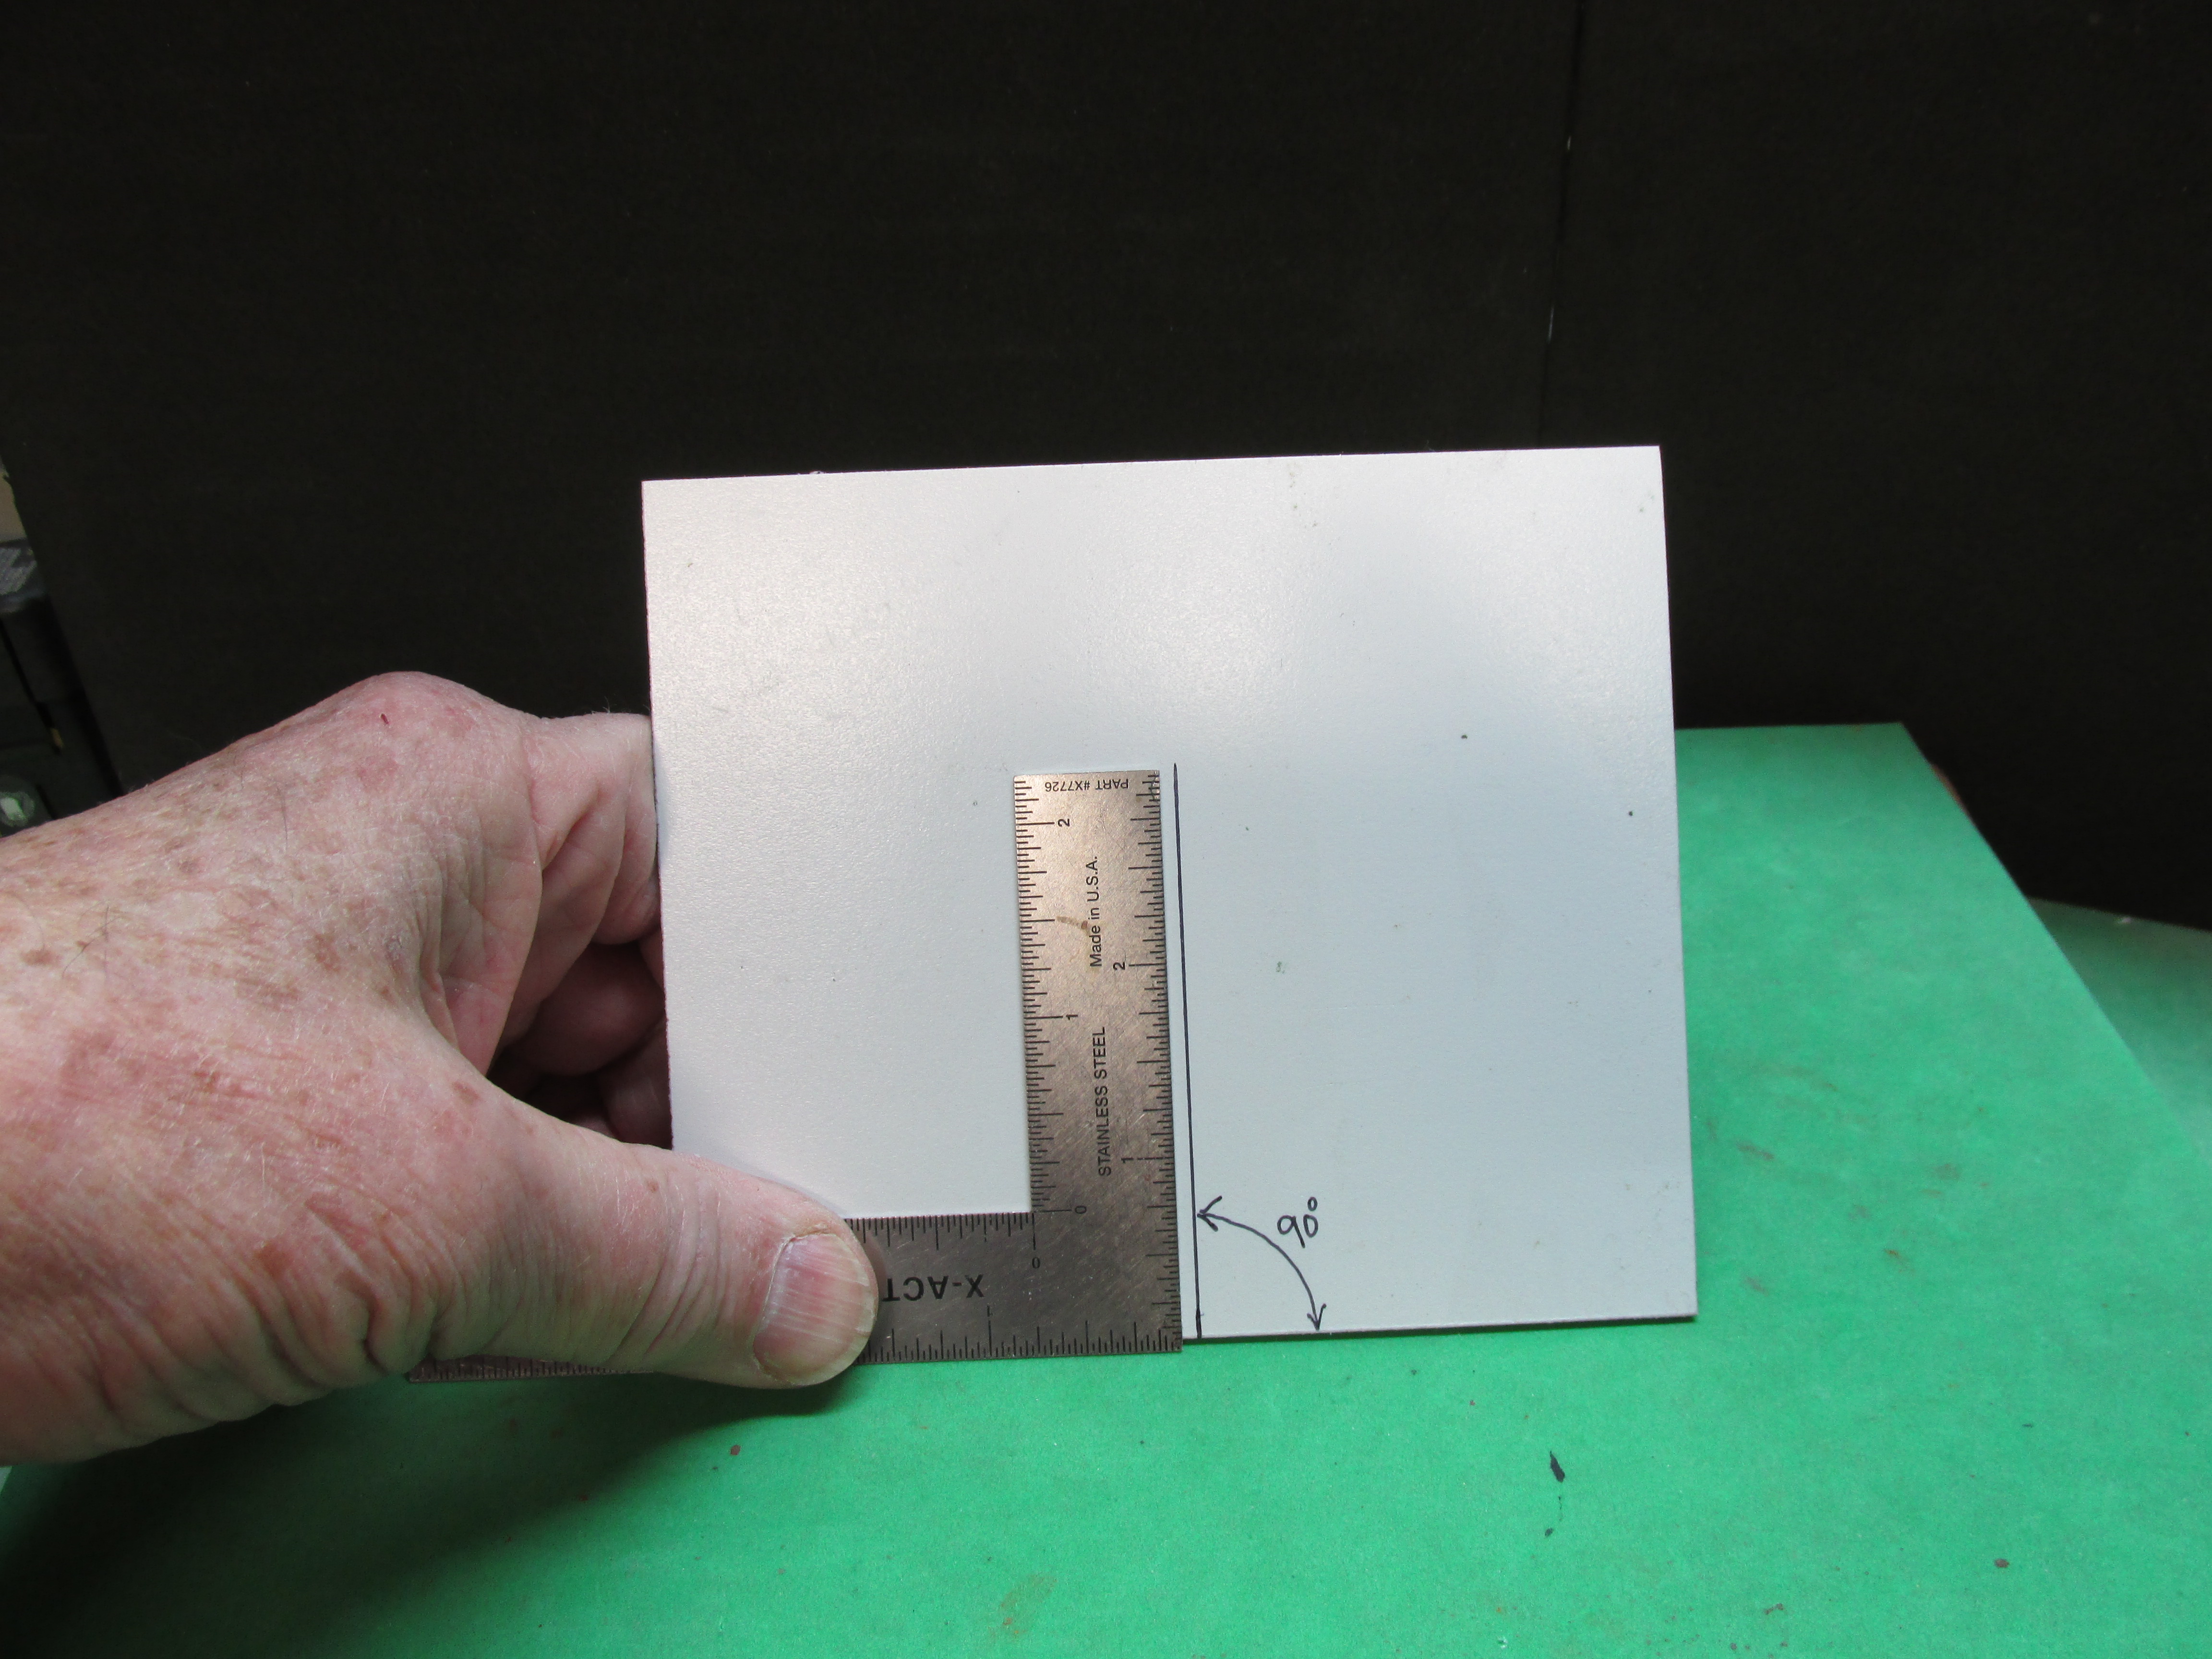
By all means shorten it up, lower the sides and the piece over the cab. If you indent the sides of the body and use some stiffeners along the sides it won't look quite as boxy or wide. I have some photos of one I built if they would be of any help. In the meantime here are a couple of pix on squaring up the sheet stock. In the first one I've used a large machinists block on a glass plate. Just run some superglue along the joint and let it set up. The main thing is to have square pieces to start with and then make sure that both sit flush on the glass place otherwise you will have to add some putty to clean up the edge. Just another way of doing it. I placed two machinist blocks at right angles to each other so you can glue up the joint the same way. You can imagine the bottom of a dump body sitting on the glass plate with a side and rear vertical pieces to be glued up this way.
-
Loadstar Brush Truck
Chariots of Fire replied to Chariots of Fire's topic in WIP: Model Trucks: Big Rigs and Heavy Equipment
Today the upper bar work was finished up and painted. I made up some rear view mirrors of brass wire, sheet stock and polished aluminum flashing. I bent the wire in a long rectangle, soldered it to the brass sheet and then cut it free. The edges were filed smooth. The aluminum has pretty good reflectiveness and fits just inside the wire perimeter of each mirror. I added some wire to the back of the mirrors just to enhance the look a bit. Just under the cab protection I added some scene lights to the front and sides. I found some clear IH fender lights and painted the backs white and the outside black. I left the front clear. The strobe lights are just printed on some glossy paper and clear coated. Thanks to another fire apparatus modeler for that tip! He made up a bunch and sent them to me to try. They look pretty nice.
-
mack valueliner
Chariots of Fire replied to jacobus's topic in WIP: Model Trucks: Big Rigs and Heavy Equipment
That is a huge rig! A lot of truck to drive around! Very nice work. Hope your back gets better. No fun, is it? -
Loadstar Brush Truck
Chariots of Fire replied to Chariots of Fire's topic in WIP: Model Trucks: Big Rigs and Heavy Equipment
Work continues. The braces between the top bar and bumper have been completed and painted. With that done I went to work on building the upper braces that protect the hood, windshield and cab top. They are made of 3/64 brass rod. The ends of the rods were turned down to form a projecting pin that I could insert into pre-drilled holes in the bars. The main pieces were done first making the bend and then connecting each piece with the brace that is between them above the windshield. I put a piece of paper towel over the cab and hood to prevent solder from dropping on the paint. Using a minimum of solder on the iron tip helped prevent any mishaps. After the main braces were in place the smaller side pieces and additional inside pieces were soldered in position. Last was to solder a piece of 0.010 brass sheet stock to the upper windshield brace. With all of this done I could lift the entire assembly away in order to clean up the joints and get rid of the flux paste. It is nearly ready to be spray painted and then it can be glued back into position. If you look closely you can see where the ends of the brass rods were ground down to a pin sized projection to fit the holes in the bars. With the brass cleaned up this is what it looks like in place. Don Mills Models "D" door latches have been added to the side compartment doors and additional ones were added to the rear. They were drilled out and clear lenses were inserted and glued. The upper ones are backup lights left clear but with a piece of clear white plastic sheet glued in behind. The tail lights were painted with Tamiya clear red.
-
Anyone make a resin 1 ton dump bed
Chariots of Fire replied to fordf-100's topic in Truck Aftermarket / Resin / 3D Printed
For those interested in how to make square corners when gluing two pieces of flat sheet together there are some neat tools out there for doing that. Micro-Mark carries a special jig/frame for making square corners and they also have a set of machinist's blocks that you can lay pieces up against for gluing. That's what I use and will show some pix of how it's done. -
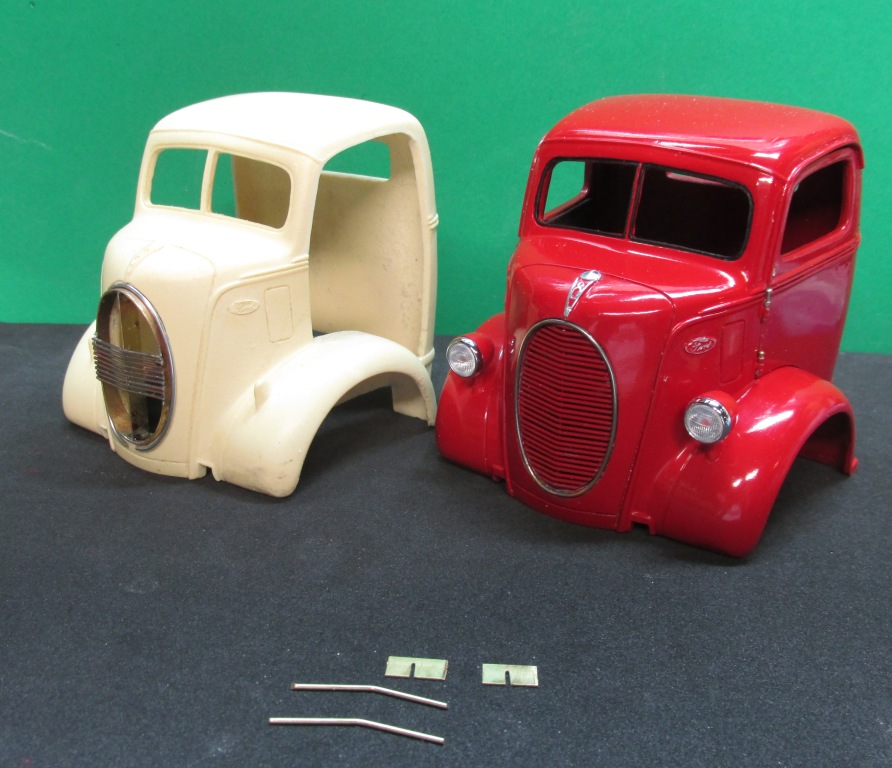
Mill City Replicas does the 38-39 Ford COE. Only problem is with the grill which was real bad. So I made a new one out of brass for the cab at right. To the left is a similar one with the grill partially made so you can see how it was done. The headlights on the finished cab came from a Yat Ming '38 Ford open cab fire truck.
-
Anyone make a resin 1 ton dump bed
Chariots of Fire replied to fordf-100's topic in Truck Aftermarket / Resin / 3D Printed
To get a straight cut use a straightedge and the back side of an Xacto blade. Draw the Xacto blade across the line to be cut with several even strokes that will scribe a little of the plastic away a bit at a time. Once you are most of the way through you should be able to snap the pieces apart easily. Then just touch up the edge with a sanding stick (not just sandpaper). The sanding stick will help keep the cut edge straight. I'll post some pics on how to glue up pieces squarely and with very little glue. -
Anyone make a resin 1 ton dump bed
Chariots of Fire replied to fordf-100's topic in Truck Aftermarket / Resin / 3D Printed
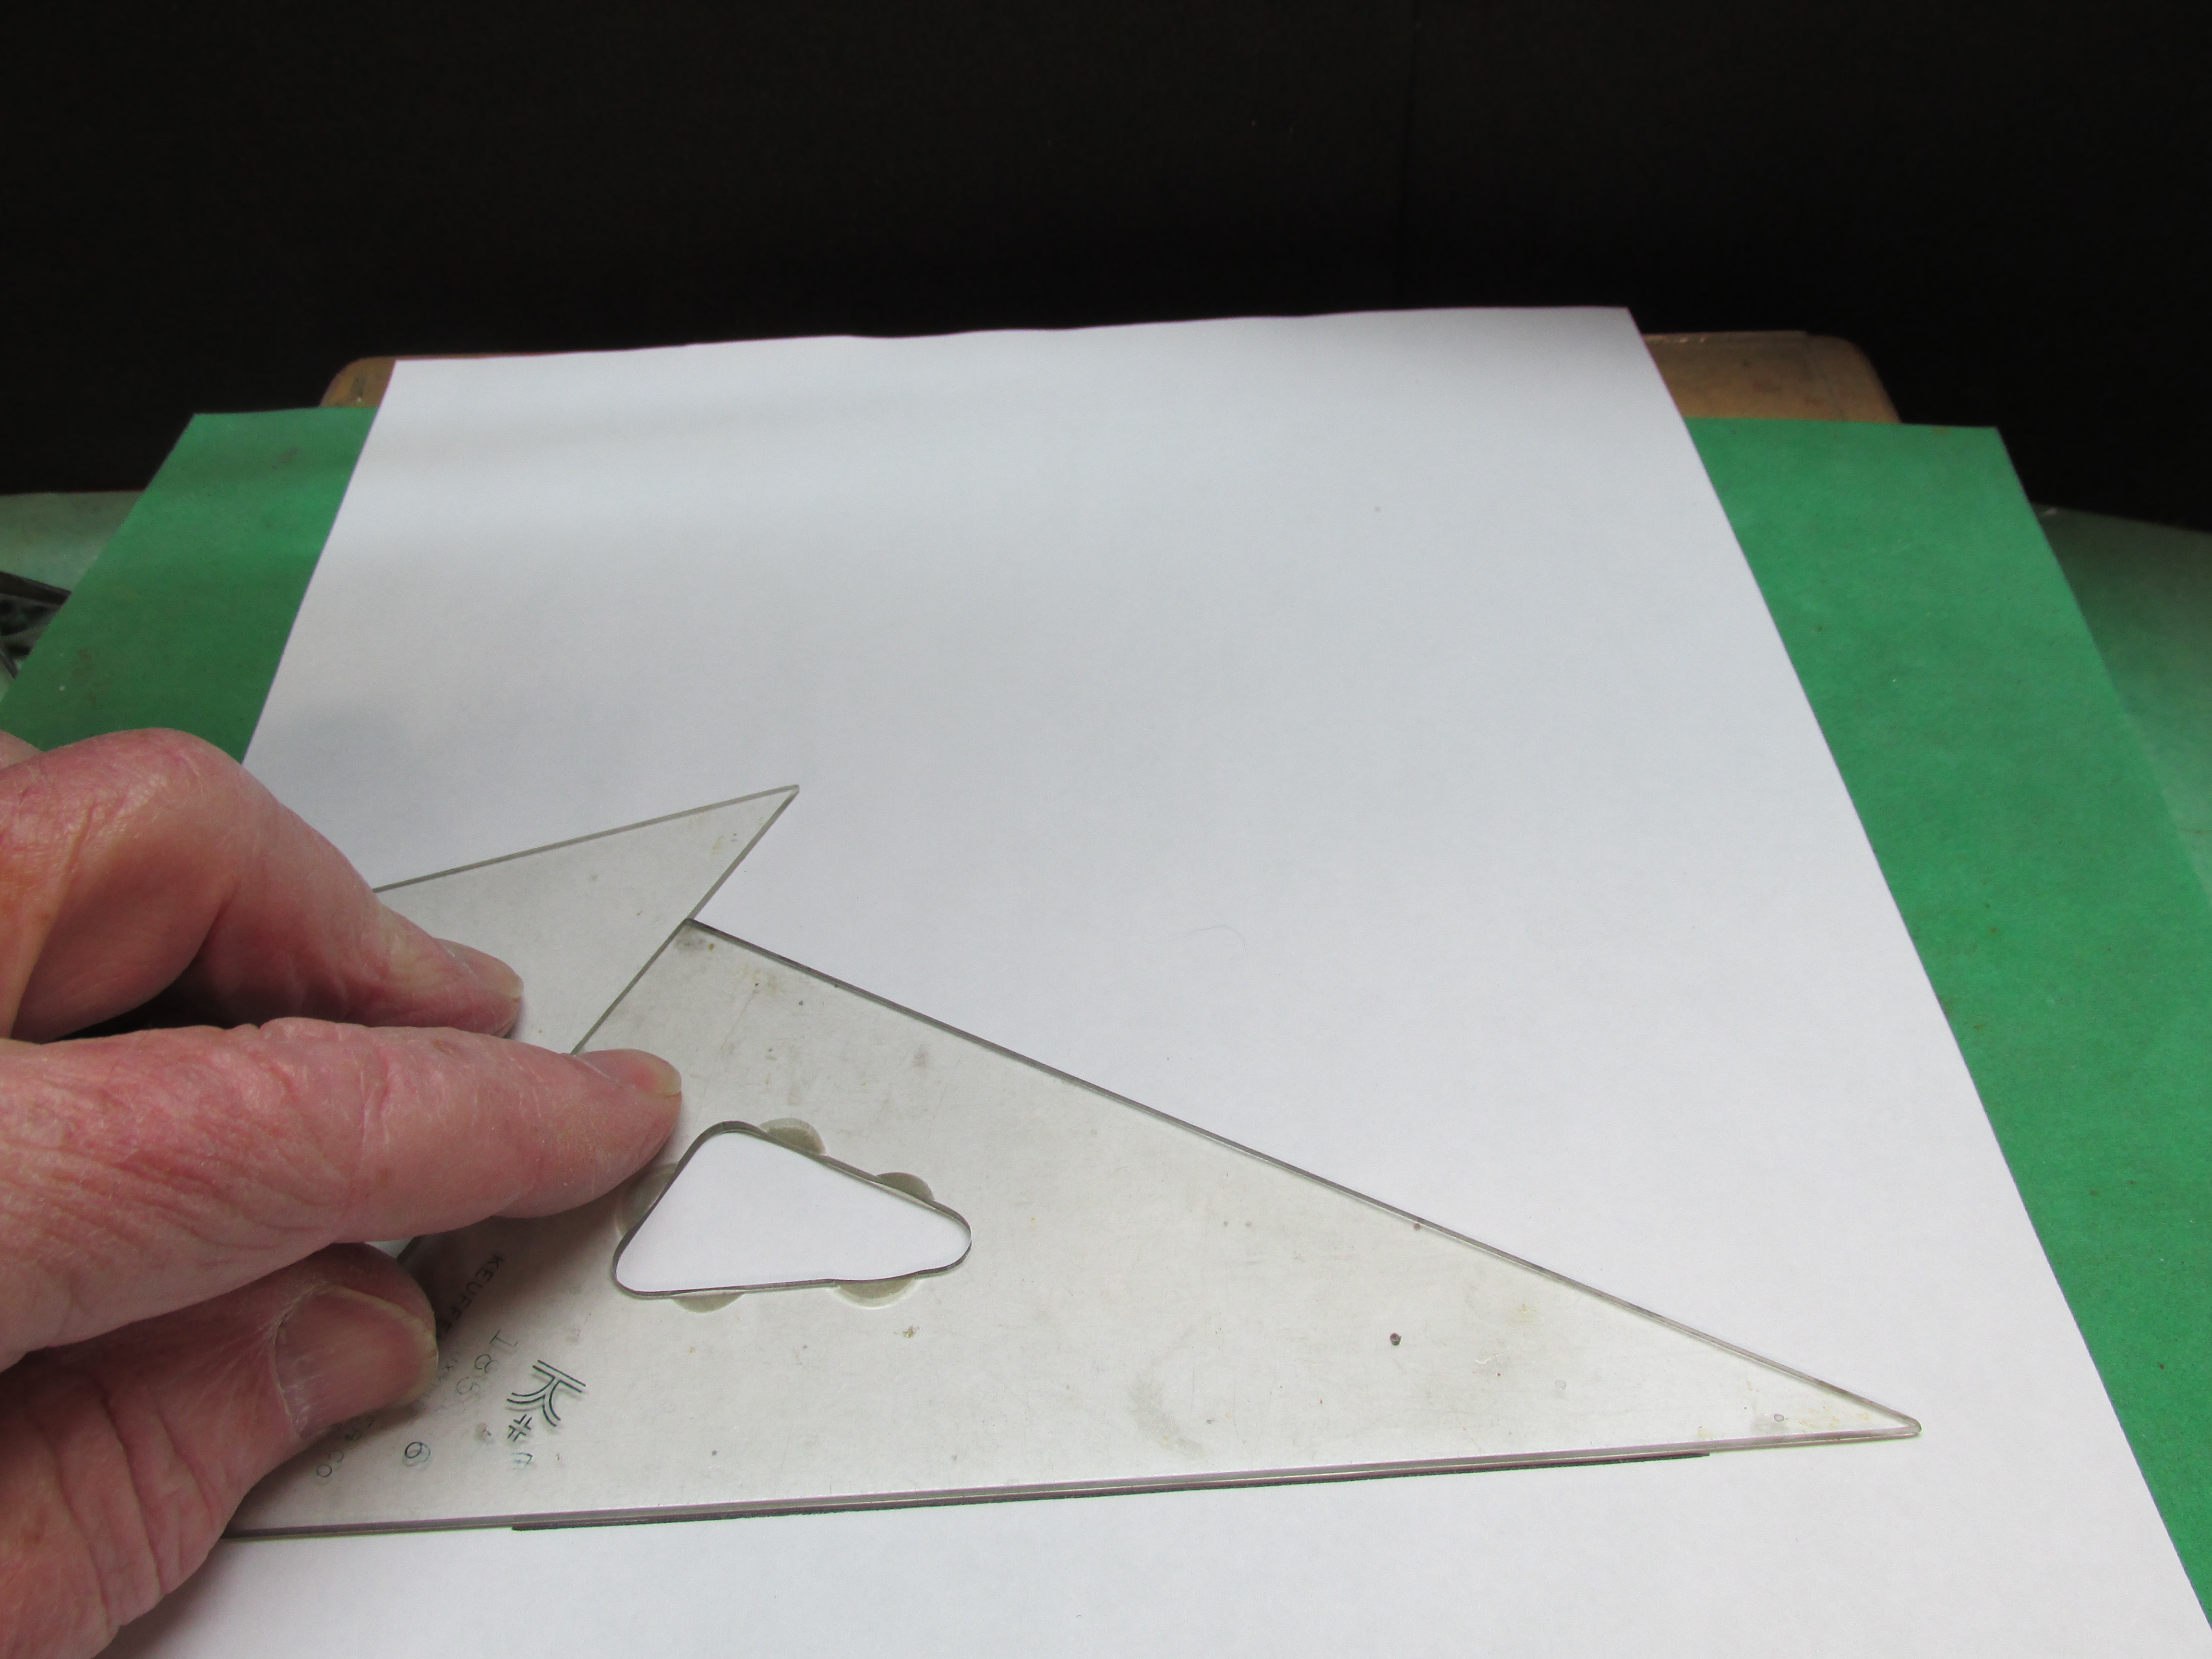
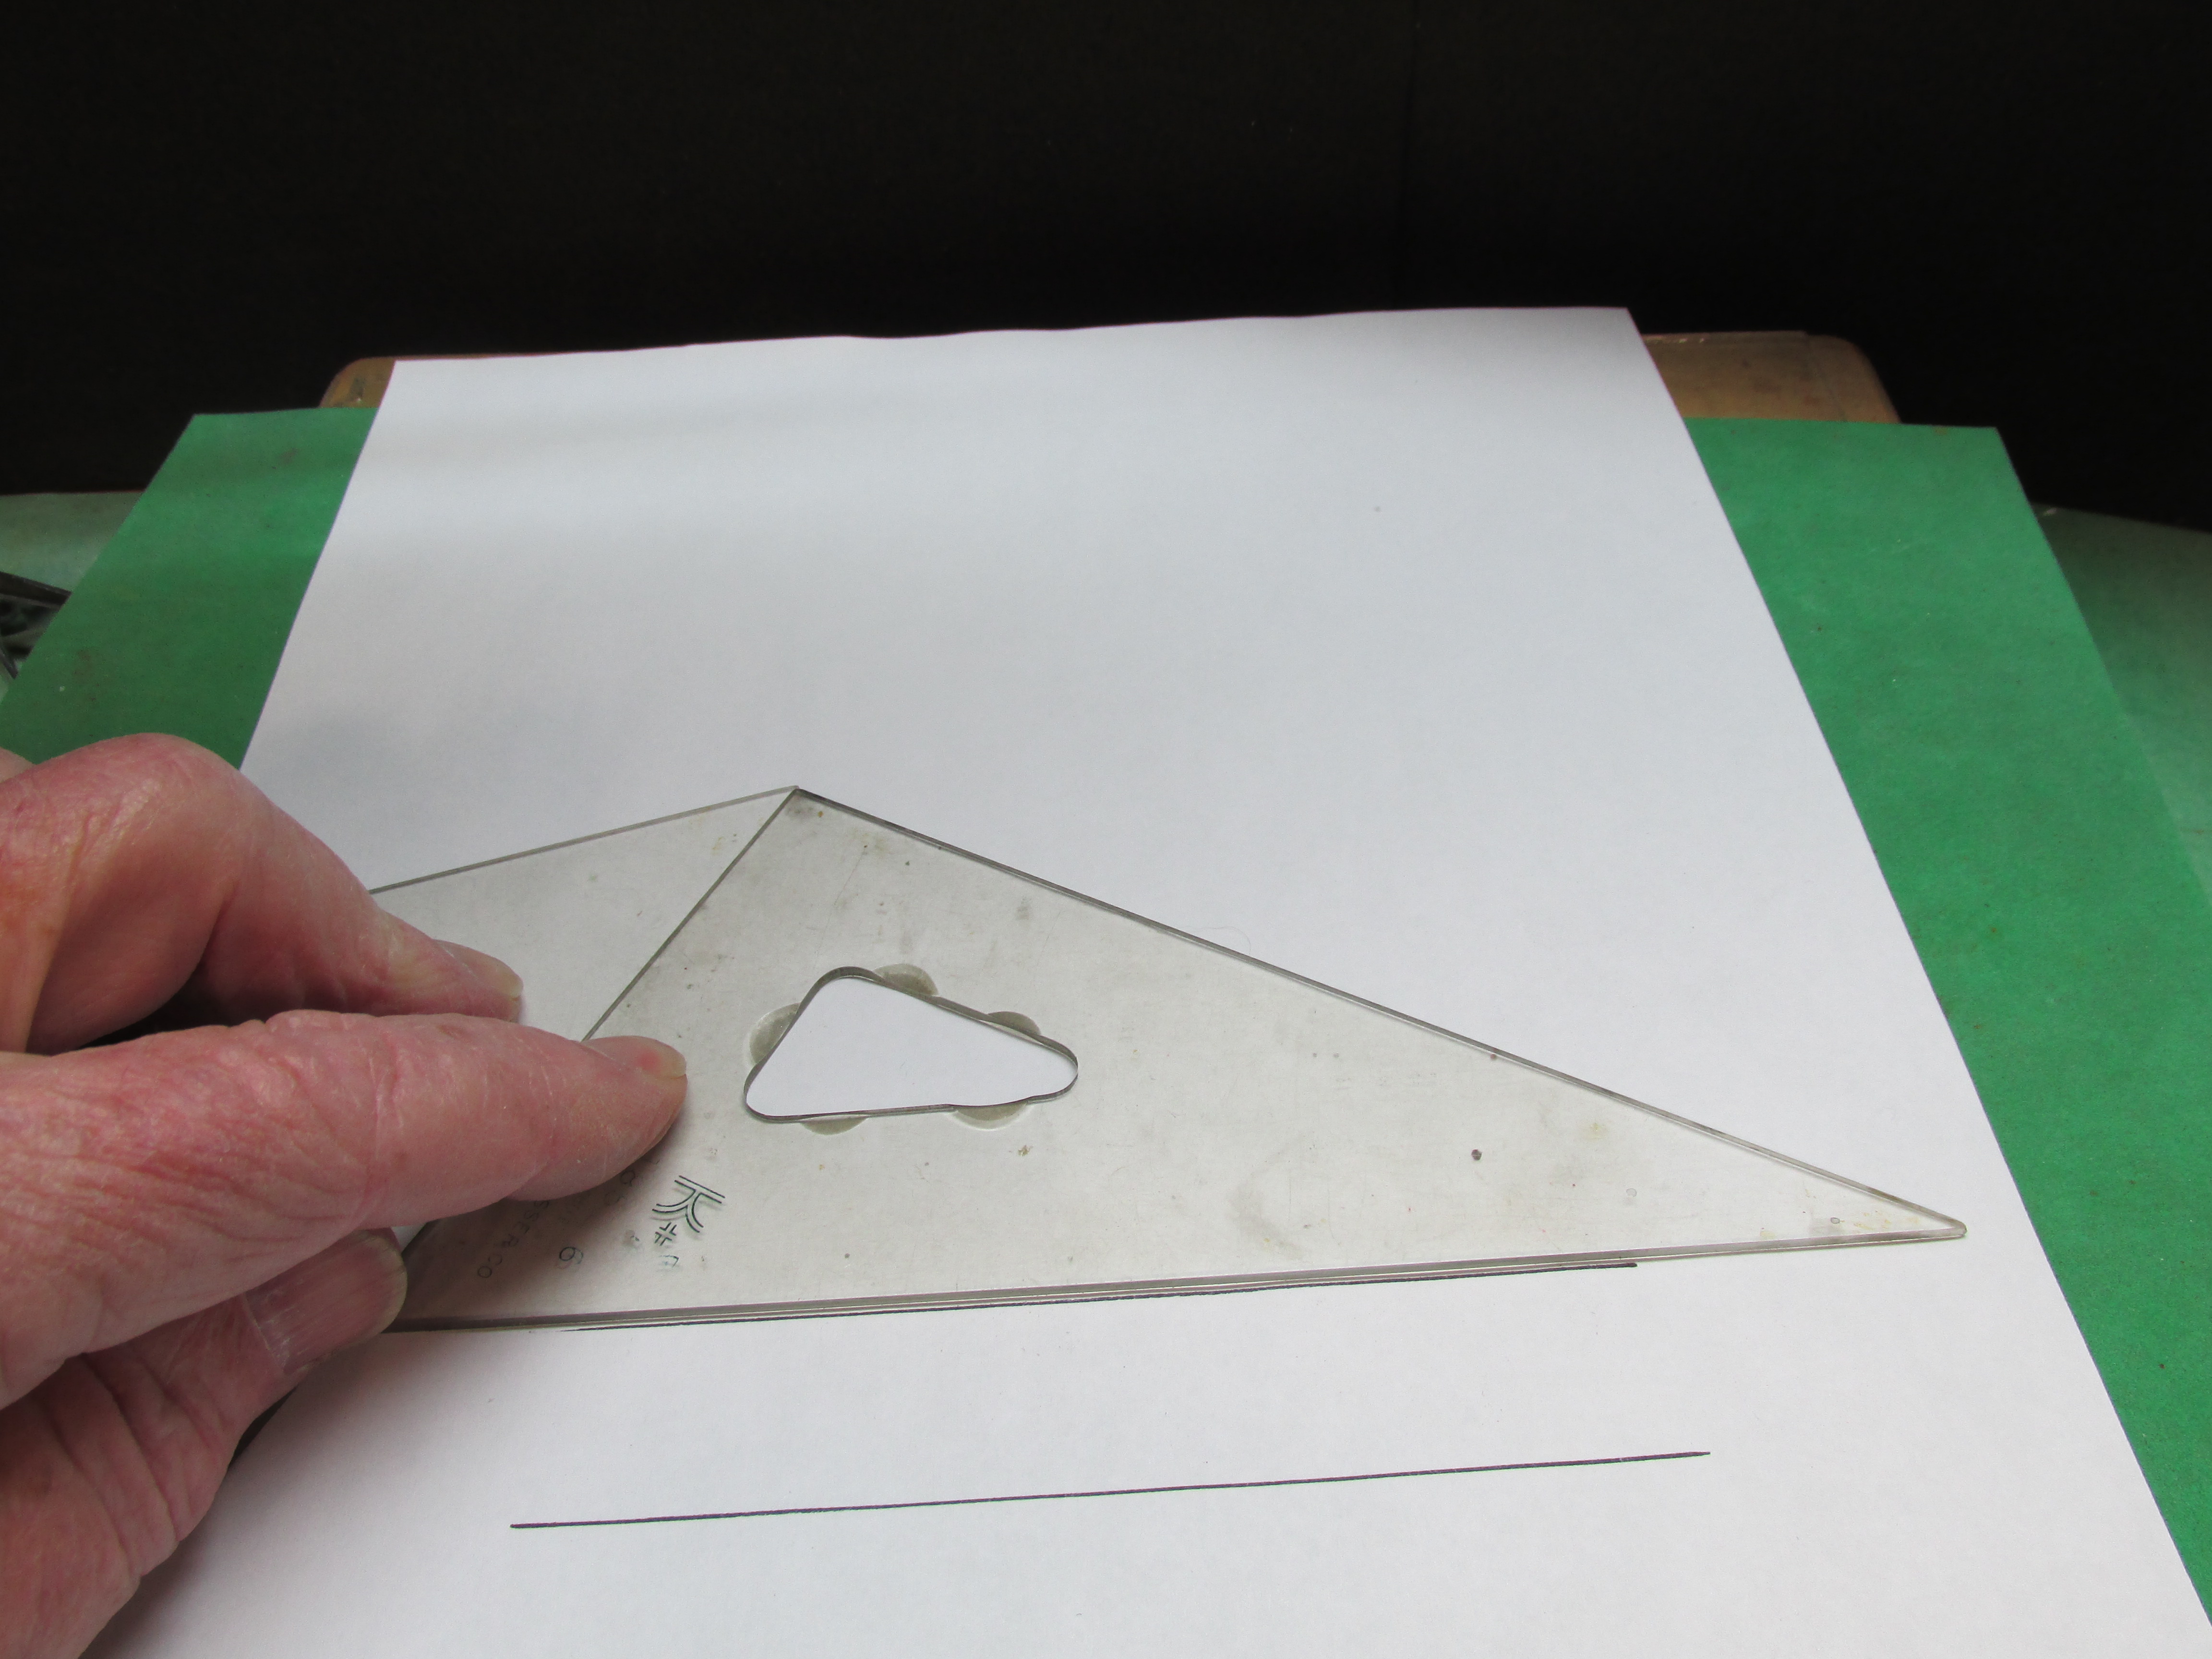
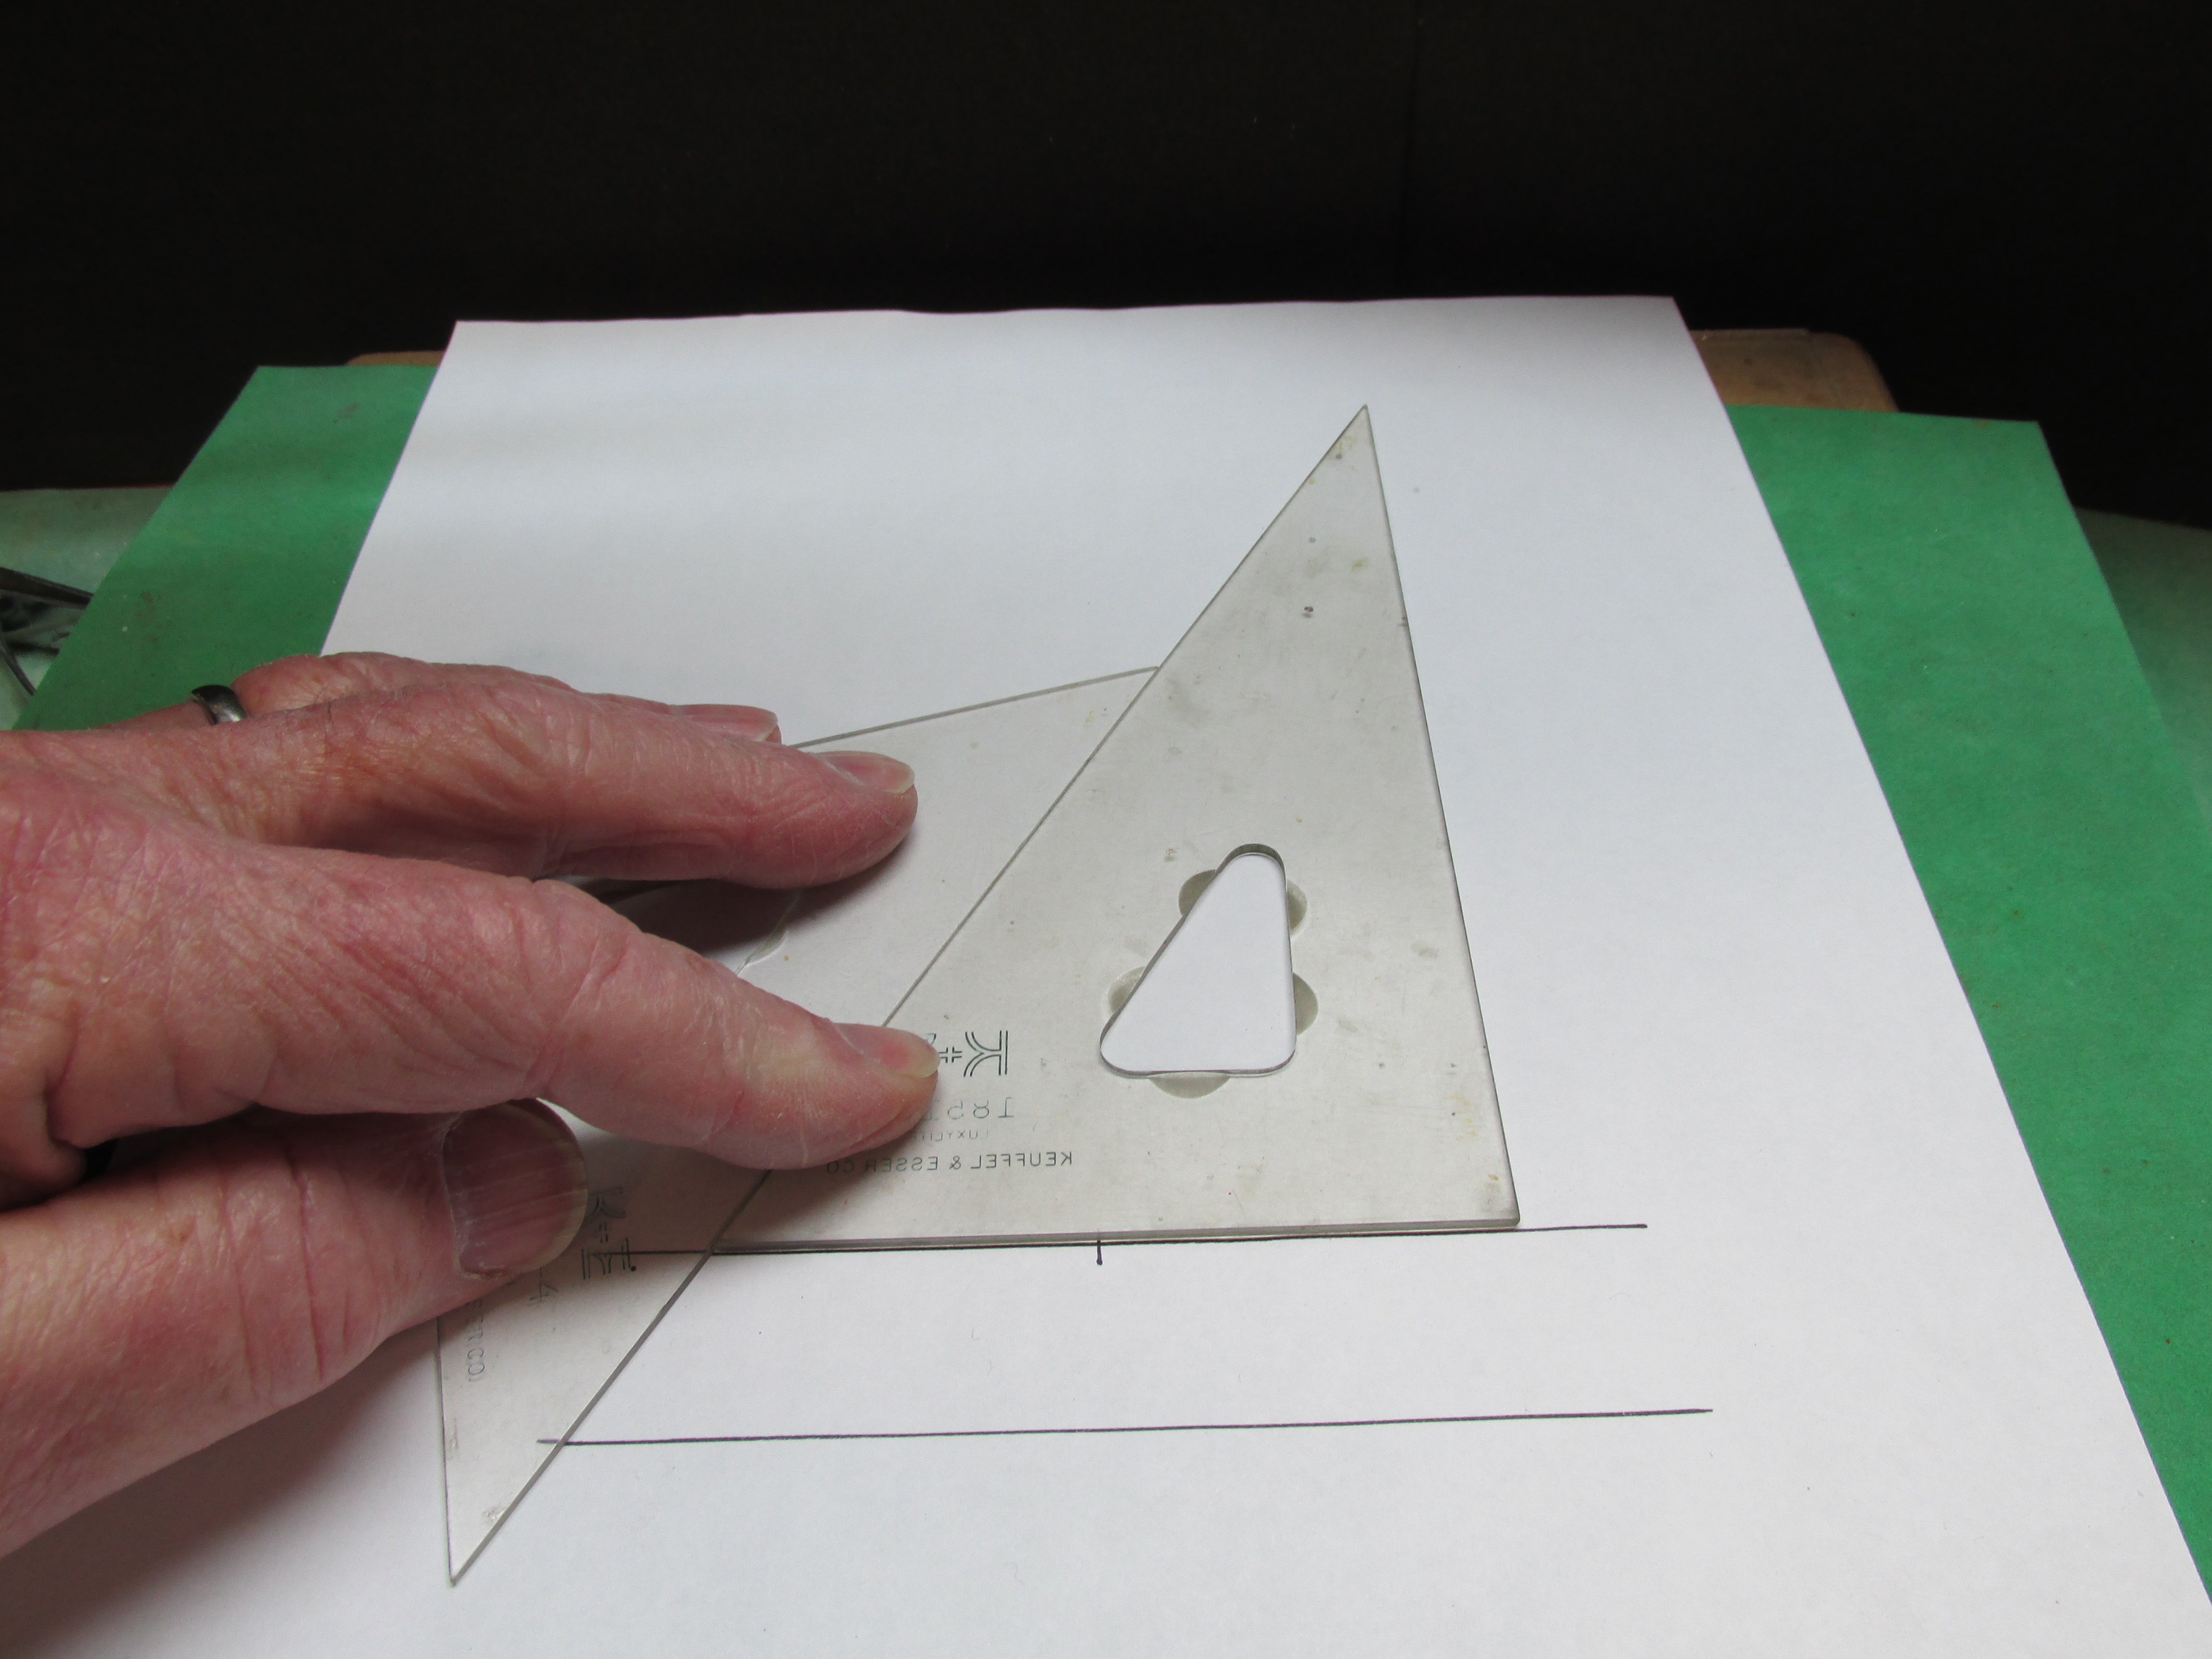
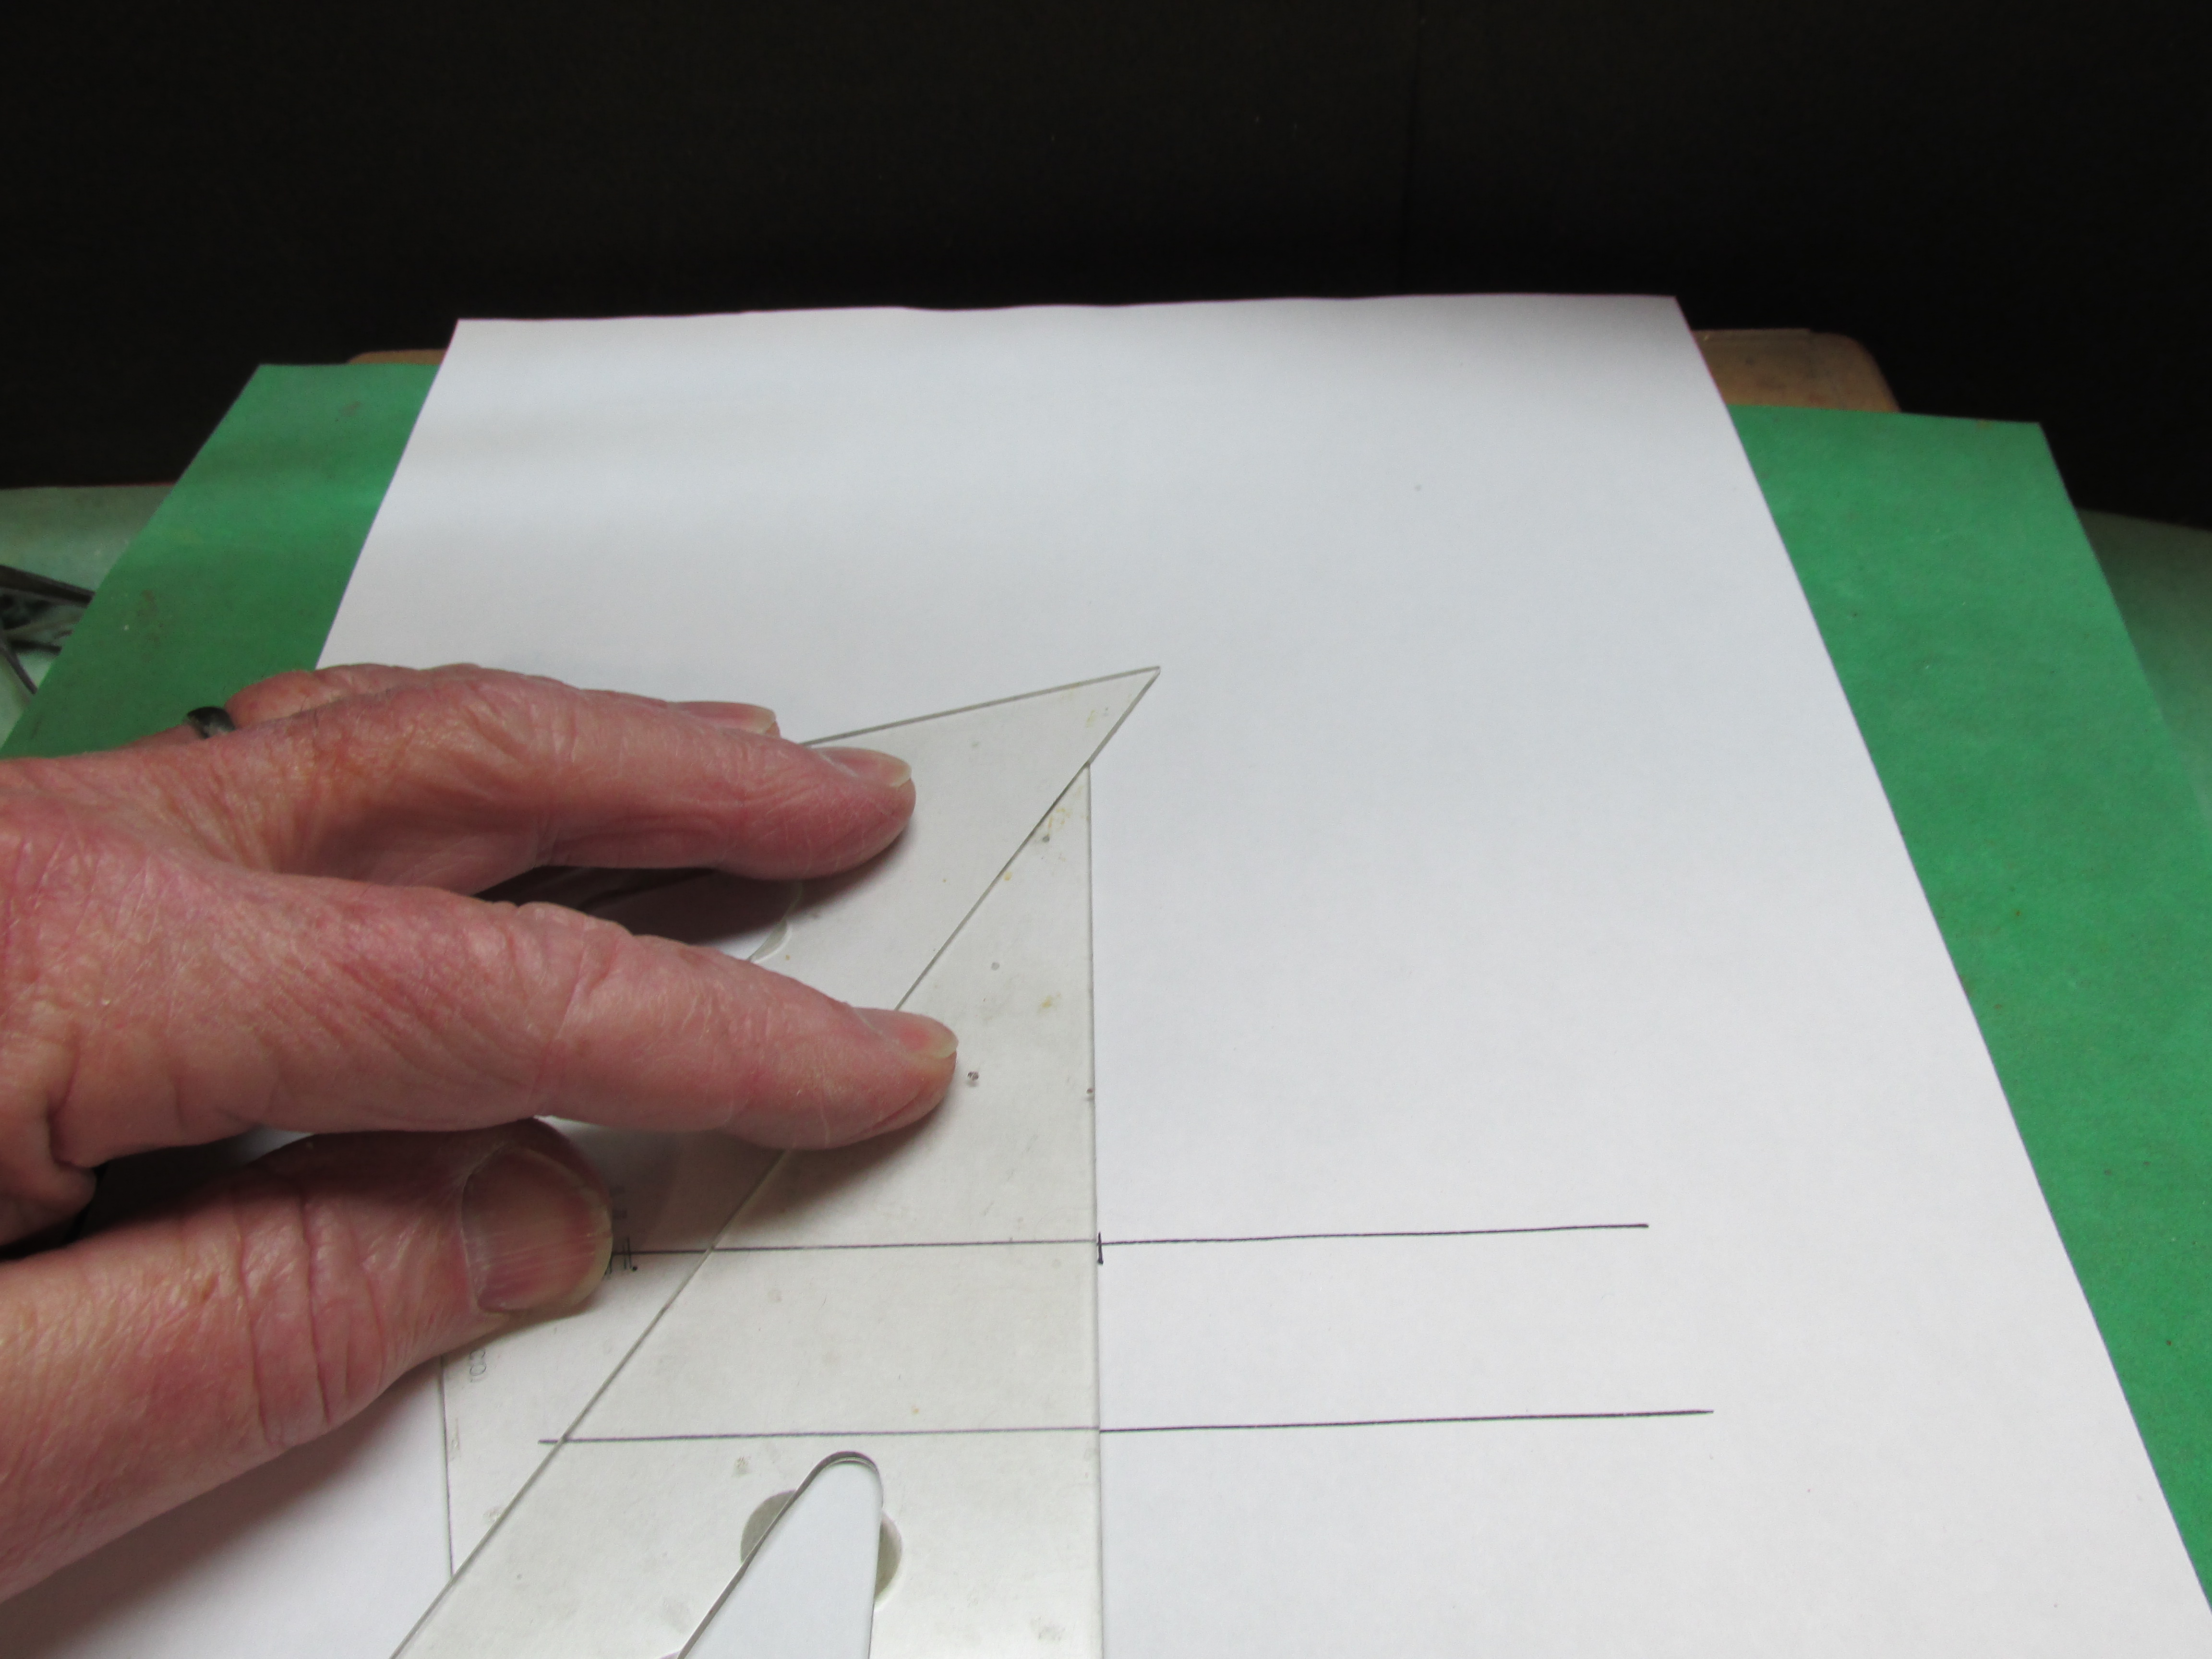
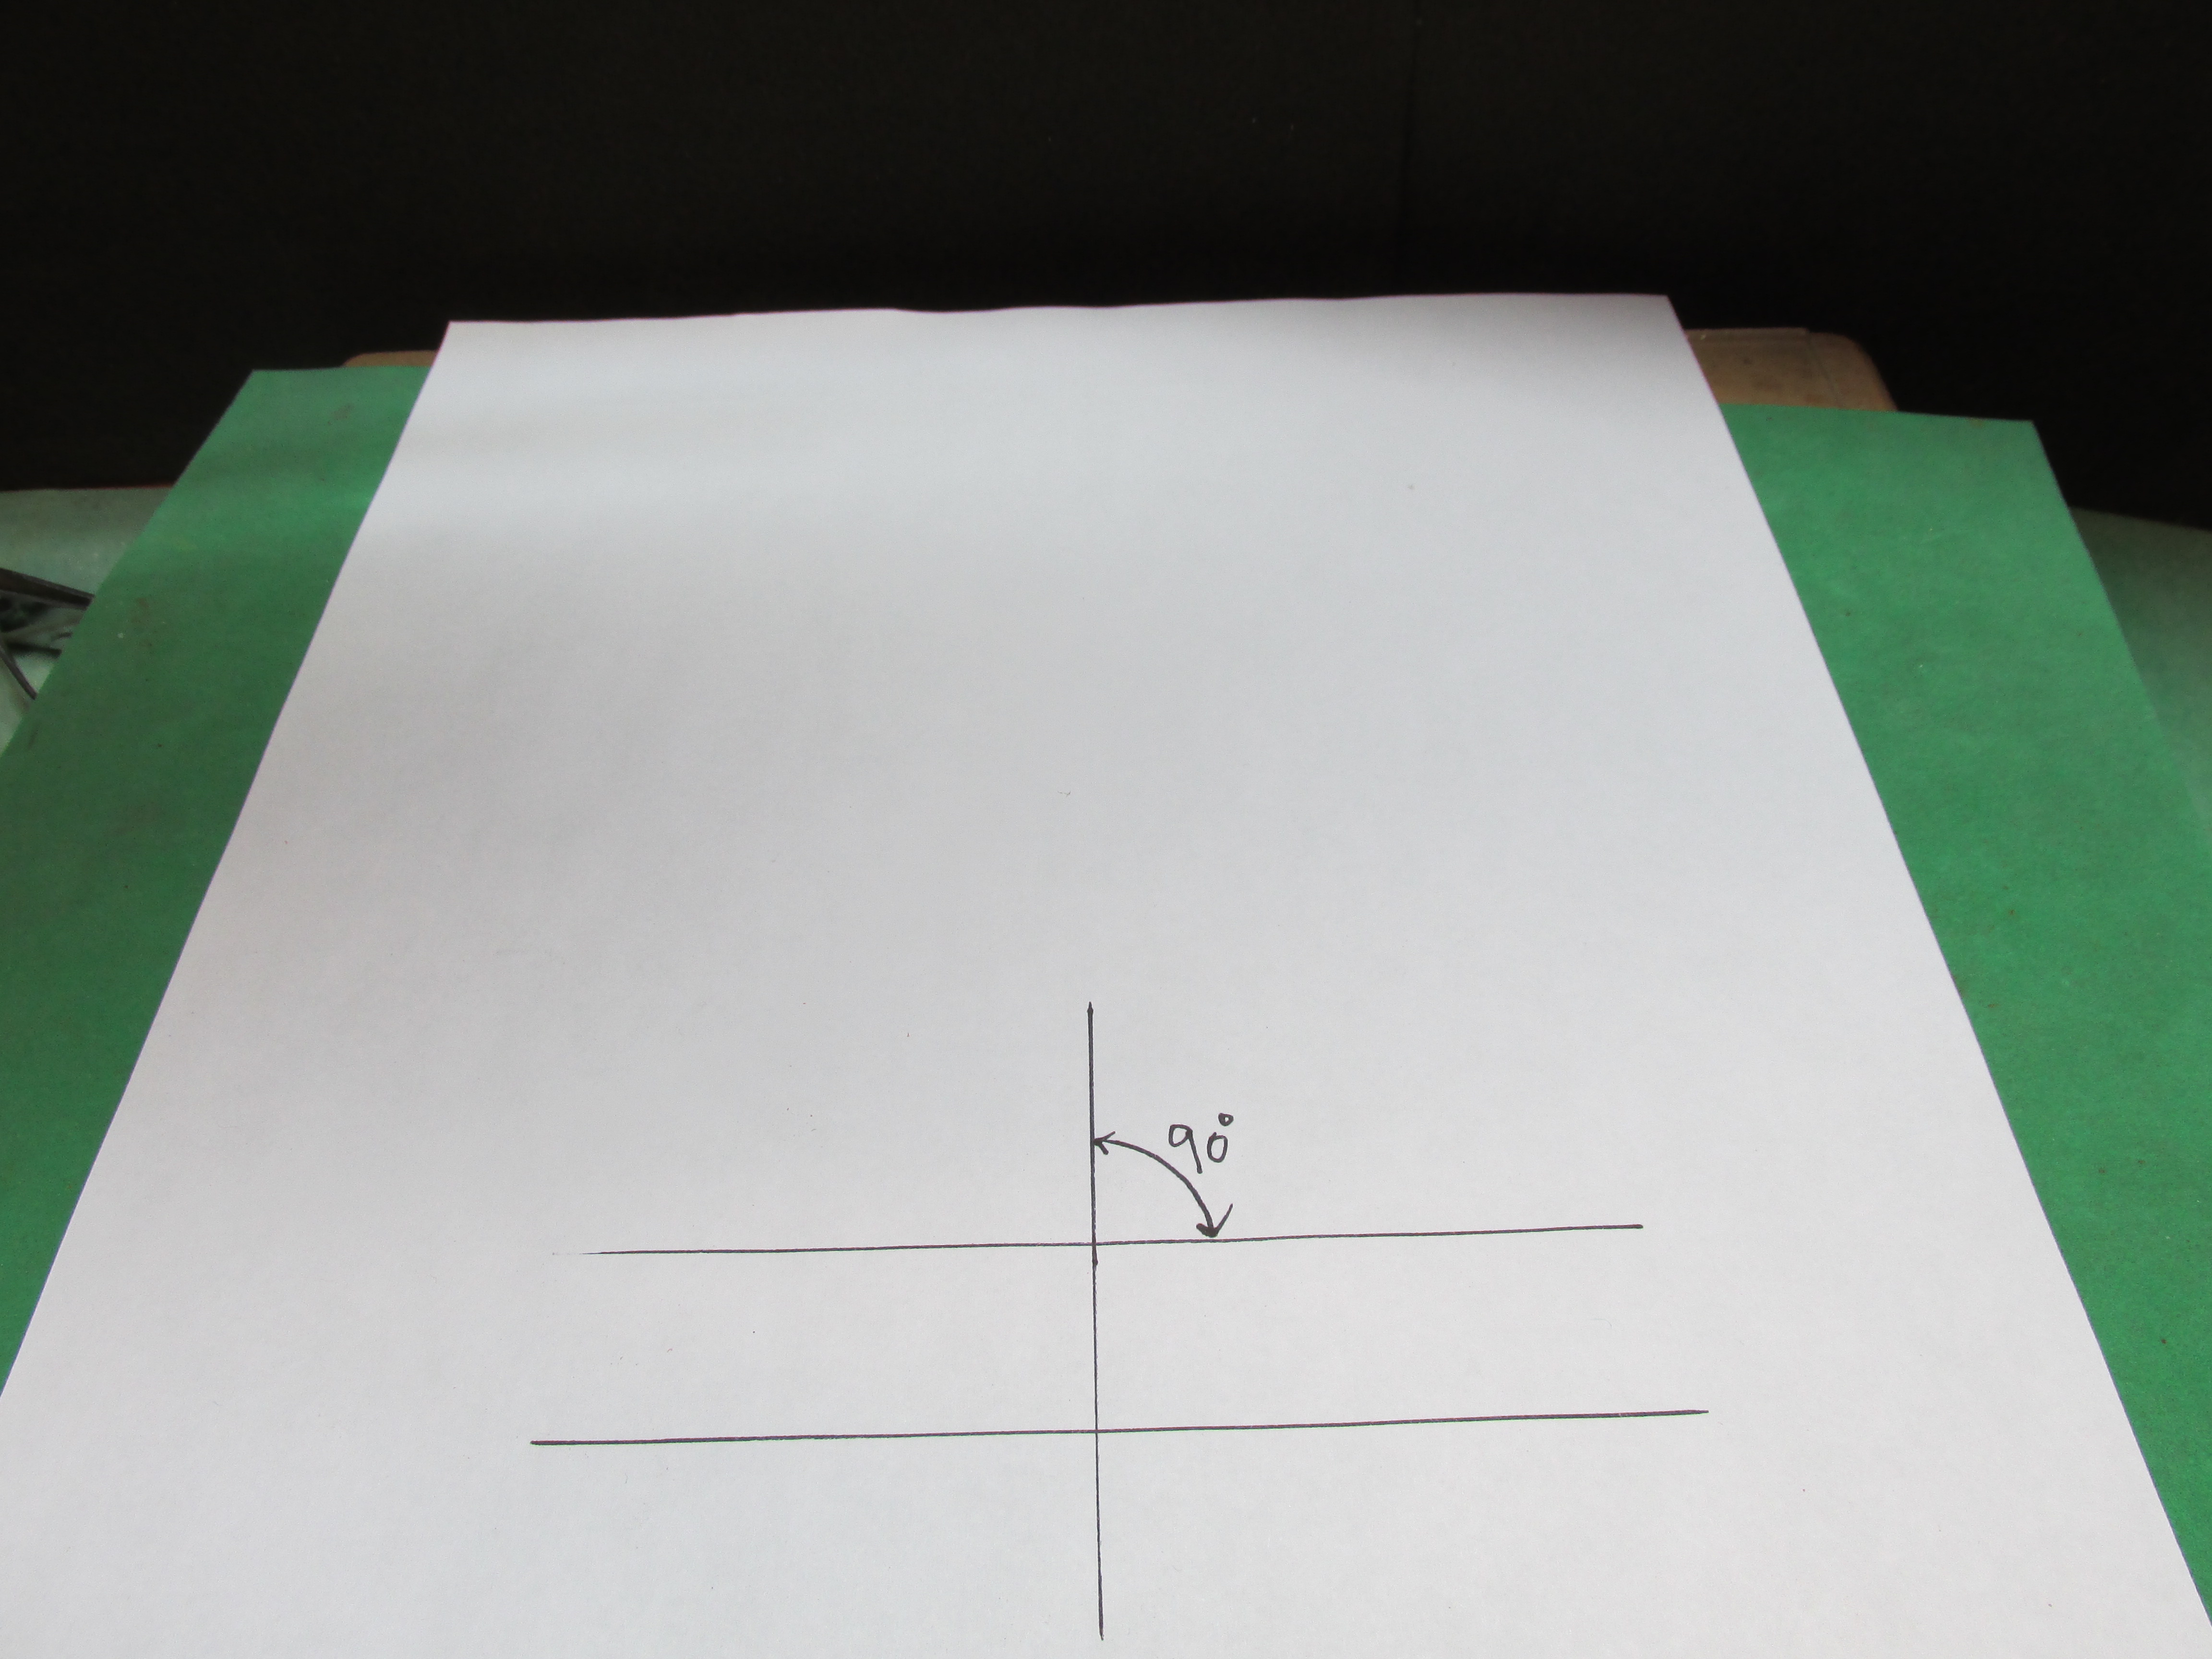
Get your measurements of the length x width of the body floor. Square that up. Do you know how to use a couple of drafting triangles to get good right angles? Same technique for the back and sides. Photo 1 shows how to get right angles using a simple square. Photo 2 and 3 shows how to get parallel lines. First you place the bottom triangle on the line you have just drawn. Hold firm and place the second triangle up against it on an adjacent side. Next you hold the left triangle firm and slide the first triangle along it until you get to the point where you want to draw the parallel line. Want to make a line perpendicular to the two parallel lines? Choose a point like in the next photo and place the edge of the right hand triangle up against the line with the point on it. Now hold the left triangle firm and slice the right hand triangle down until the right edge is at the point in the next photo. Draw a line against the far right edge of the right hand triangle and it will be at 90 degrees to the two parallel lines. NOTE: The two edges of the triangle you are using are at right angles to each other so that is why it works. Use this technique to make the bottom, sides and back of the body. All you have to do is choose your dimensions. If you are working in 1/25 scale get a metric ruler that measures in millimeters. If you measure the real body in real inches there is no conversion necessary. For example a body length of 108" would be 4.32" in 1/25 scale. Since there are 25.4 mm in one inch there is an insignificant difference so that 108" would be 4.25". The difference is only 0.07"! Can't hardly mark that with a pencil! So just mark off 108 mm and there you have it!
-
Loadstar Brush Truck
Chariots of Fire replied to Chariots of Fire's topic in WIP: Model Trucks: Big Rigs and Heavy Equipment
The white stripes are actual reflective tape. I got some from a friend who worked at a municipal maintenance shop. I need to do the same thing across the bottom of the cab doors. -
Loadstar Brush Truck
Chariots of Fire replied to Chariots of Fire's topic in WIP: Model Trucks: Big Rigs and Heavy Equipment
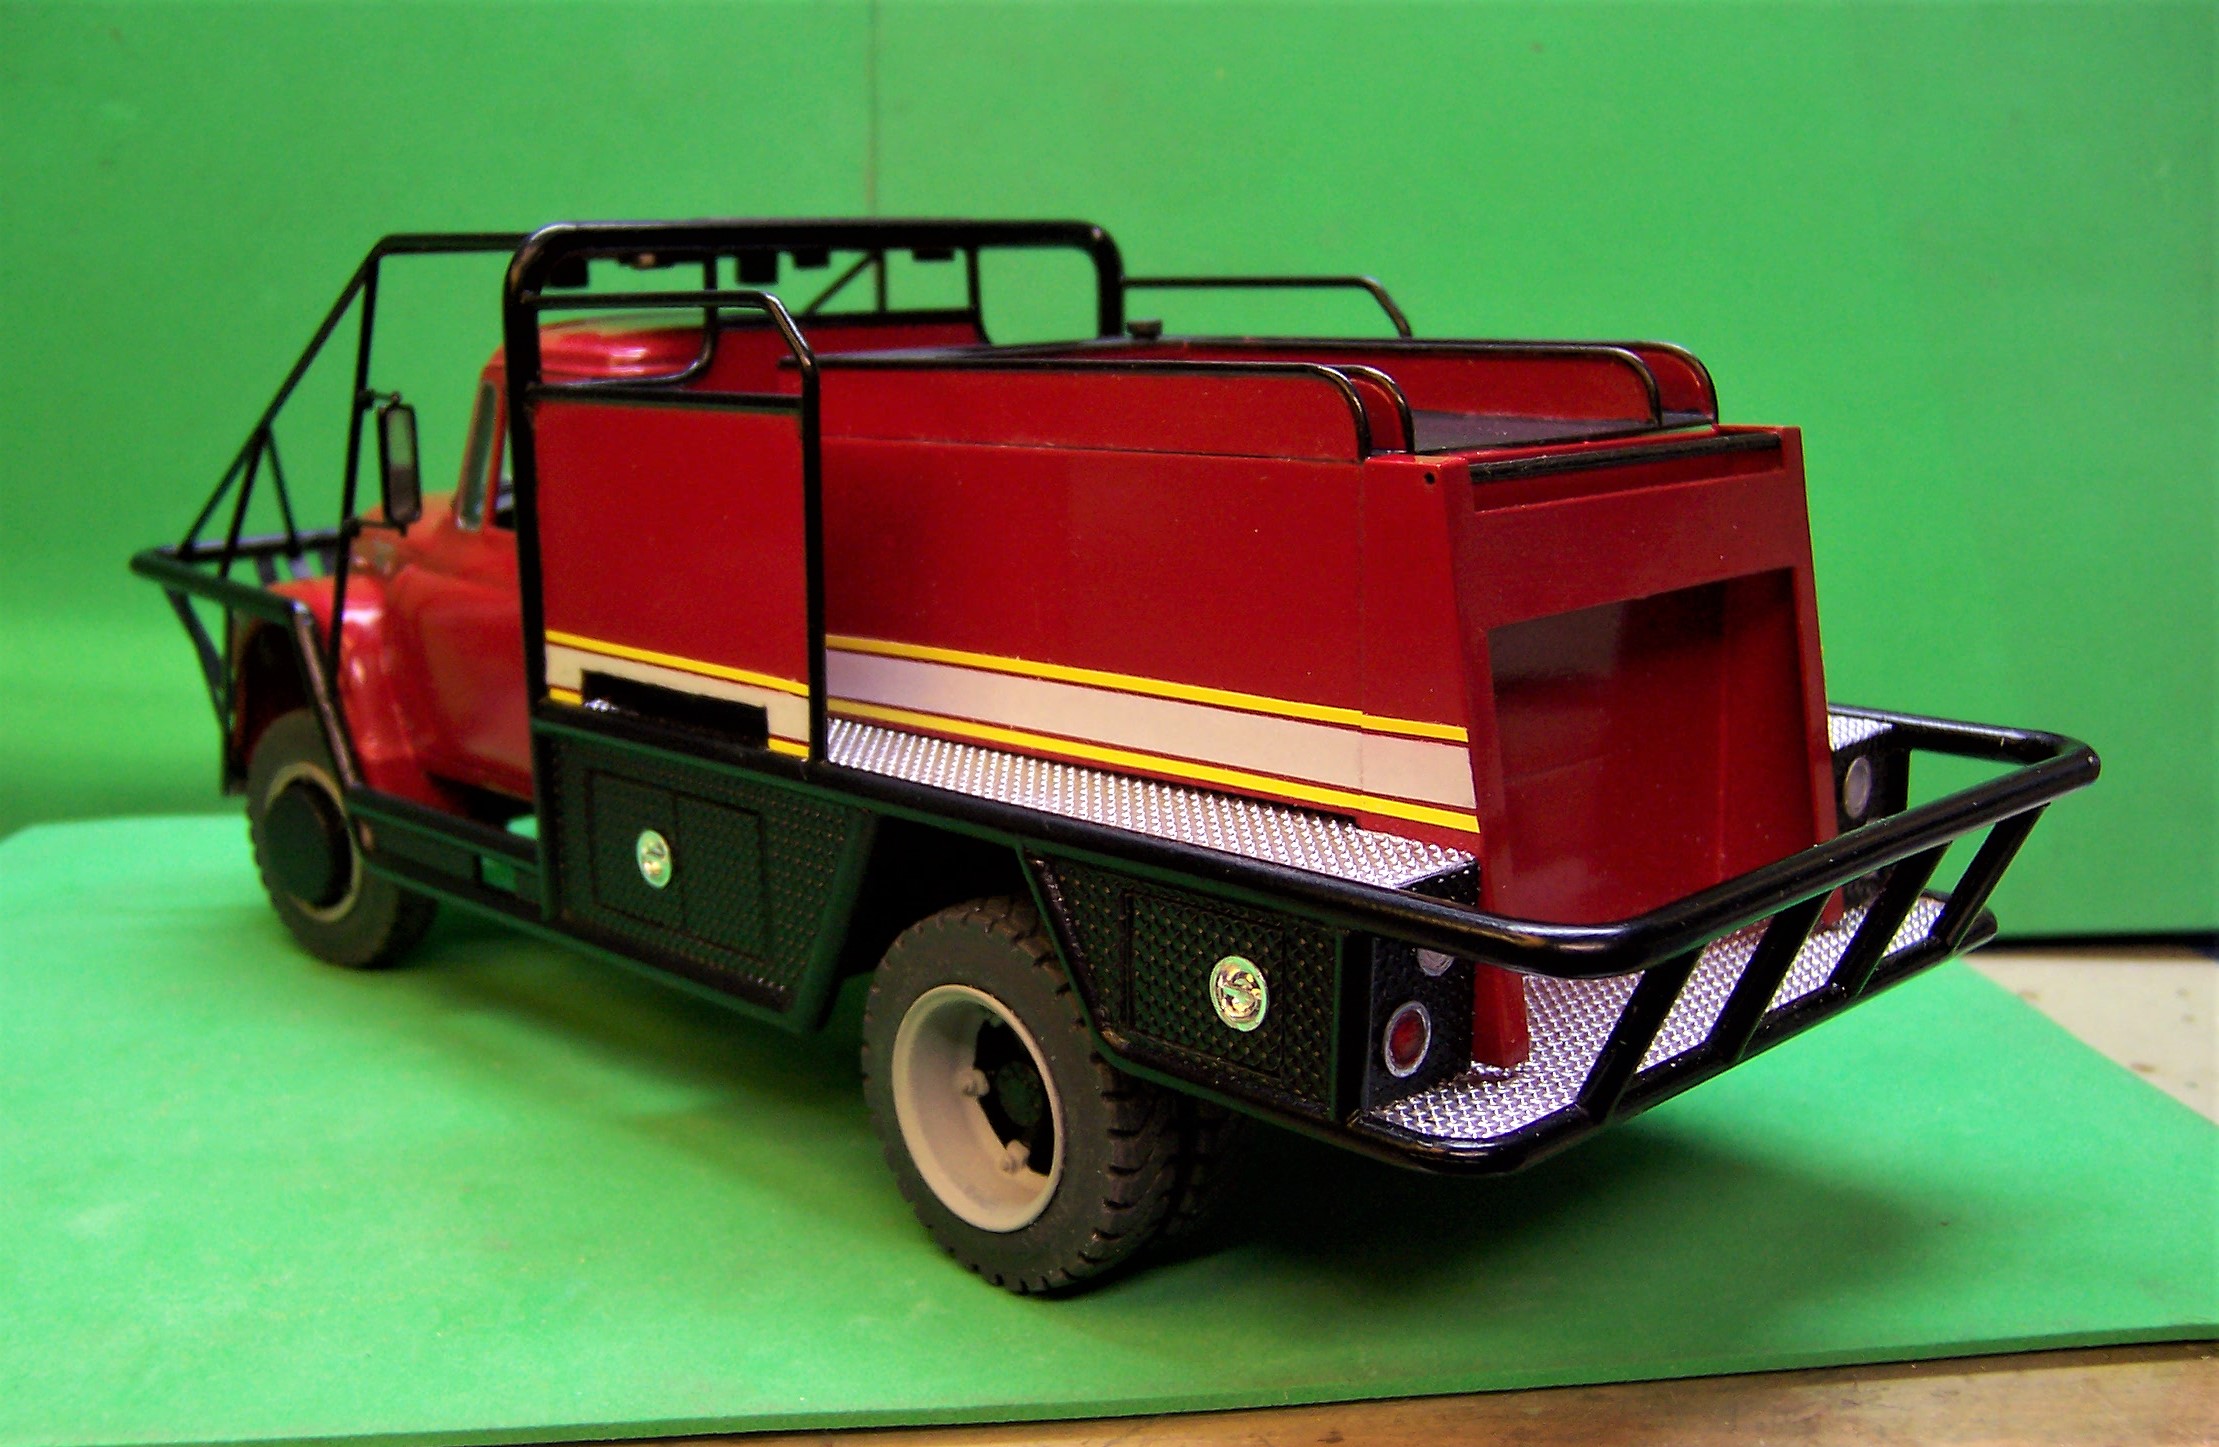
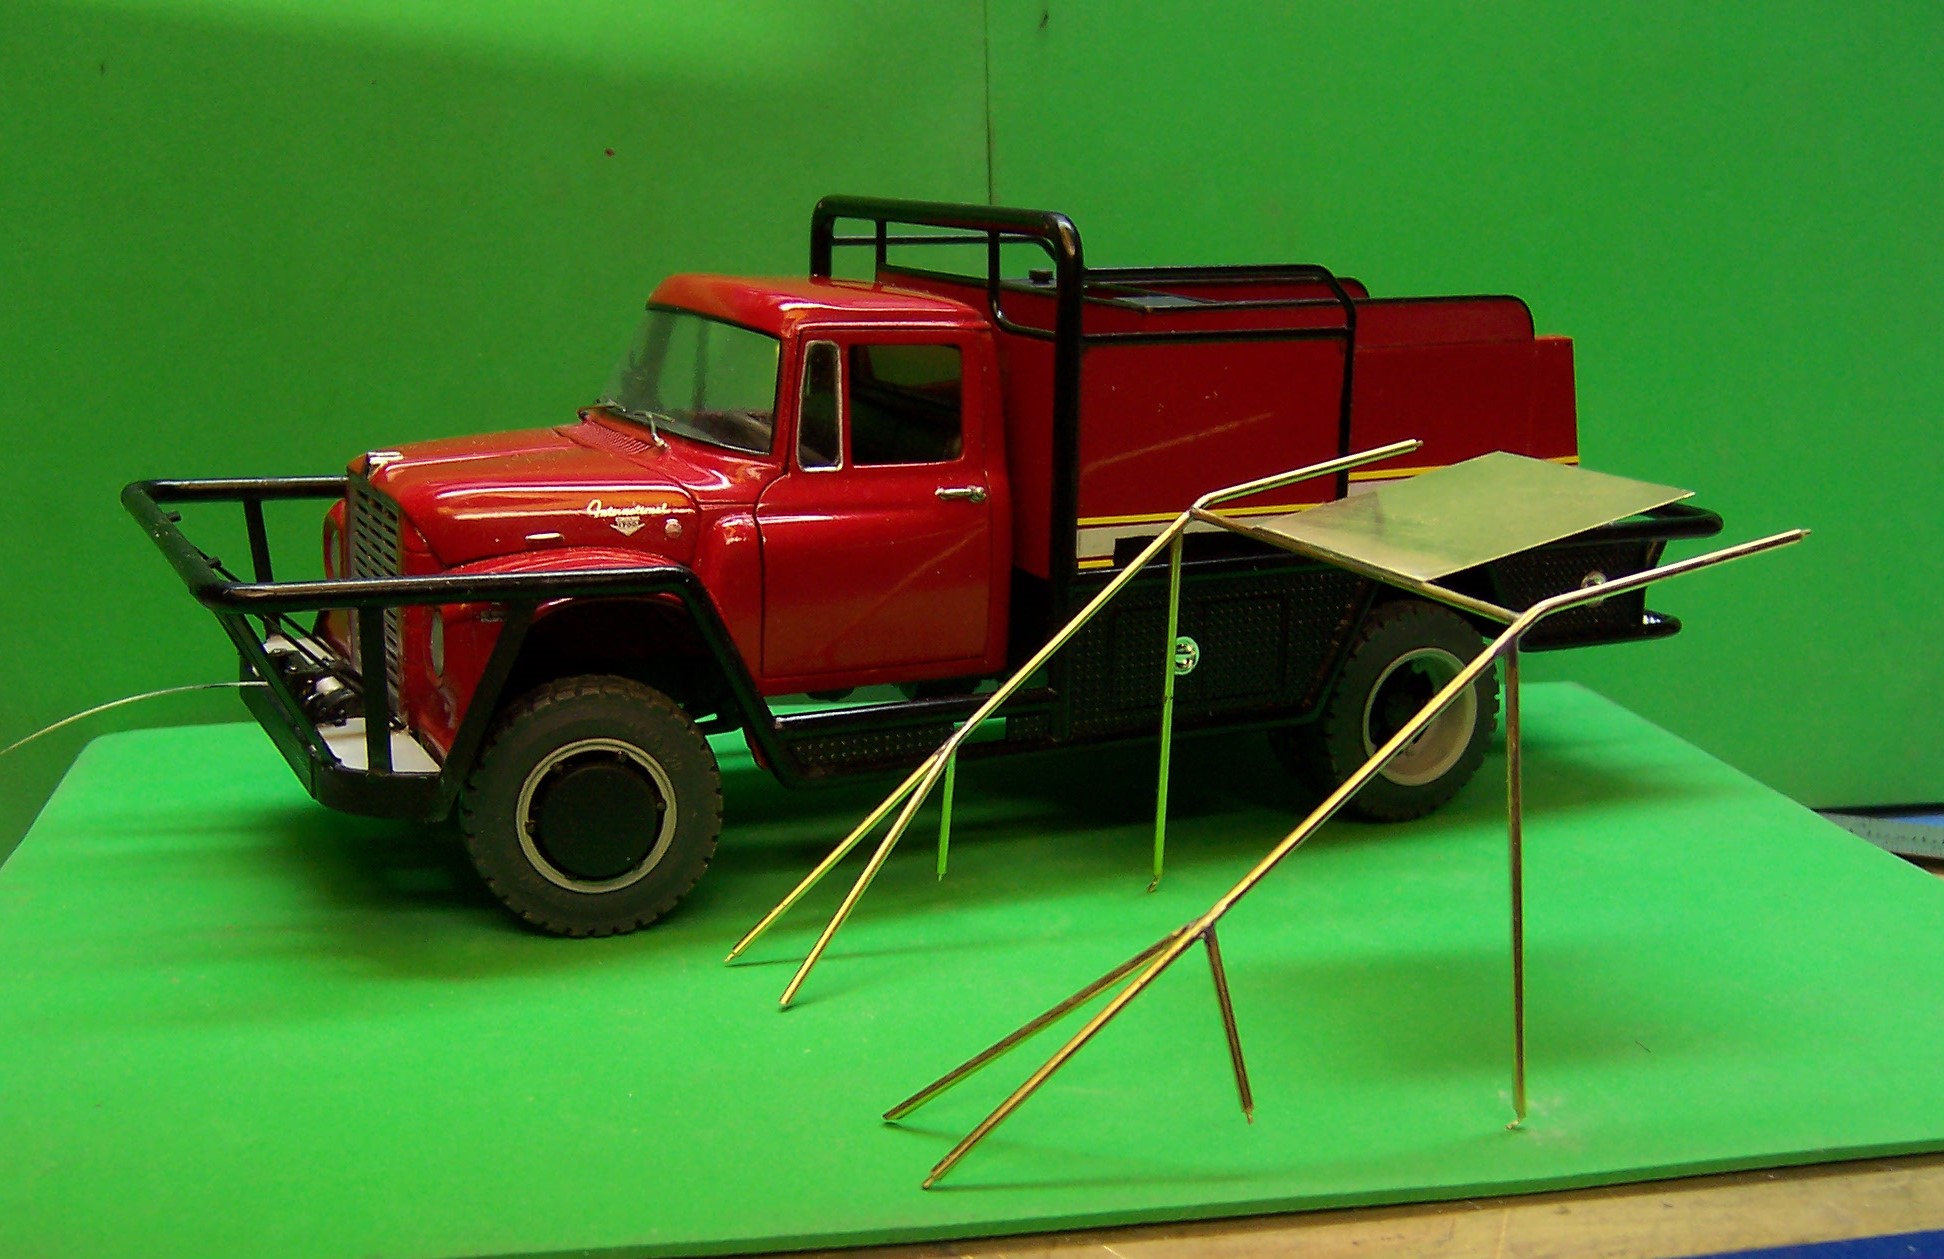
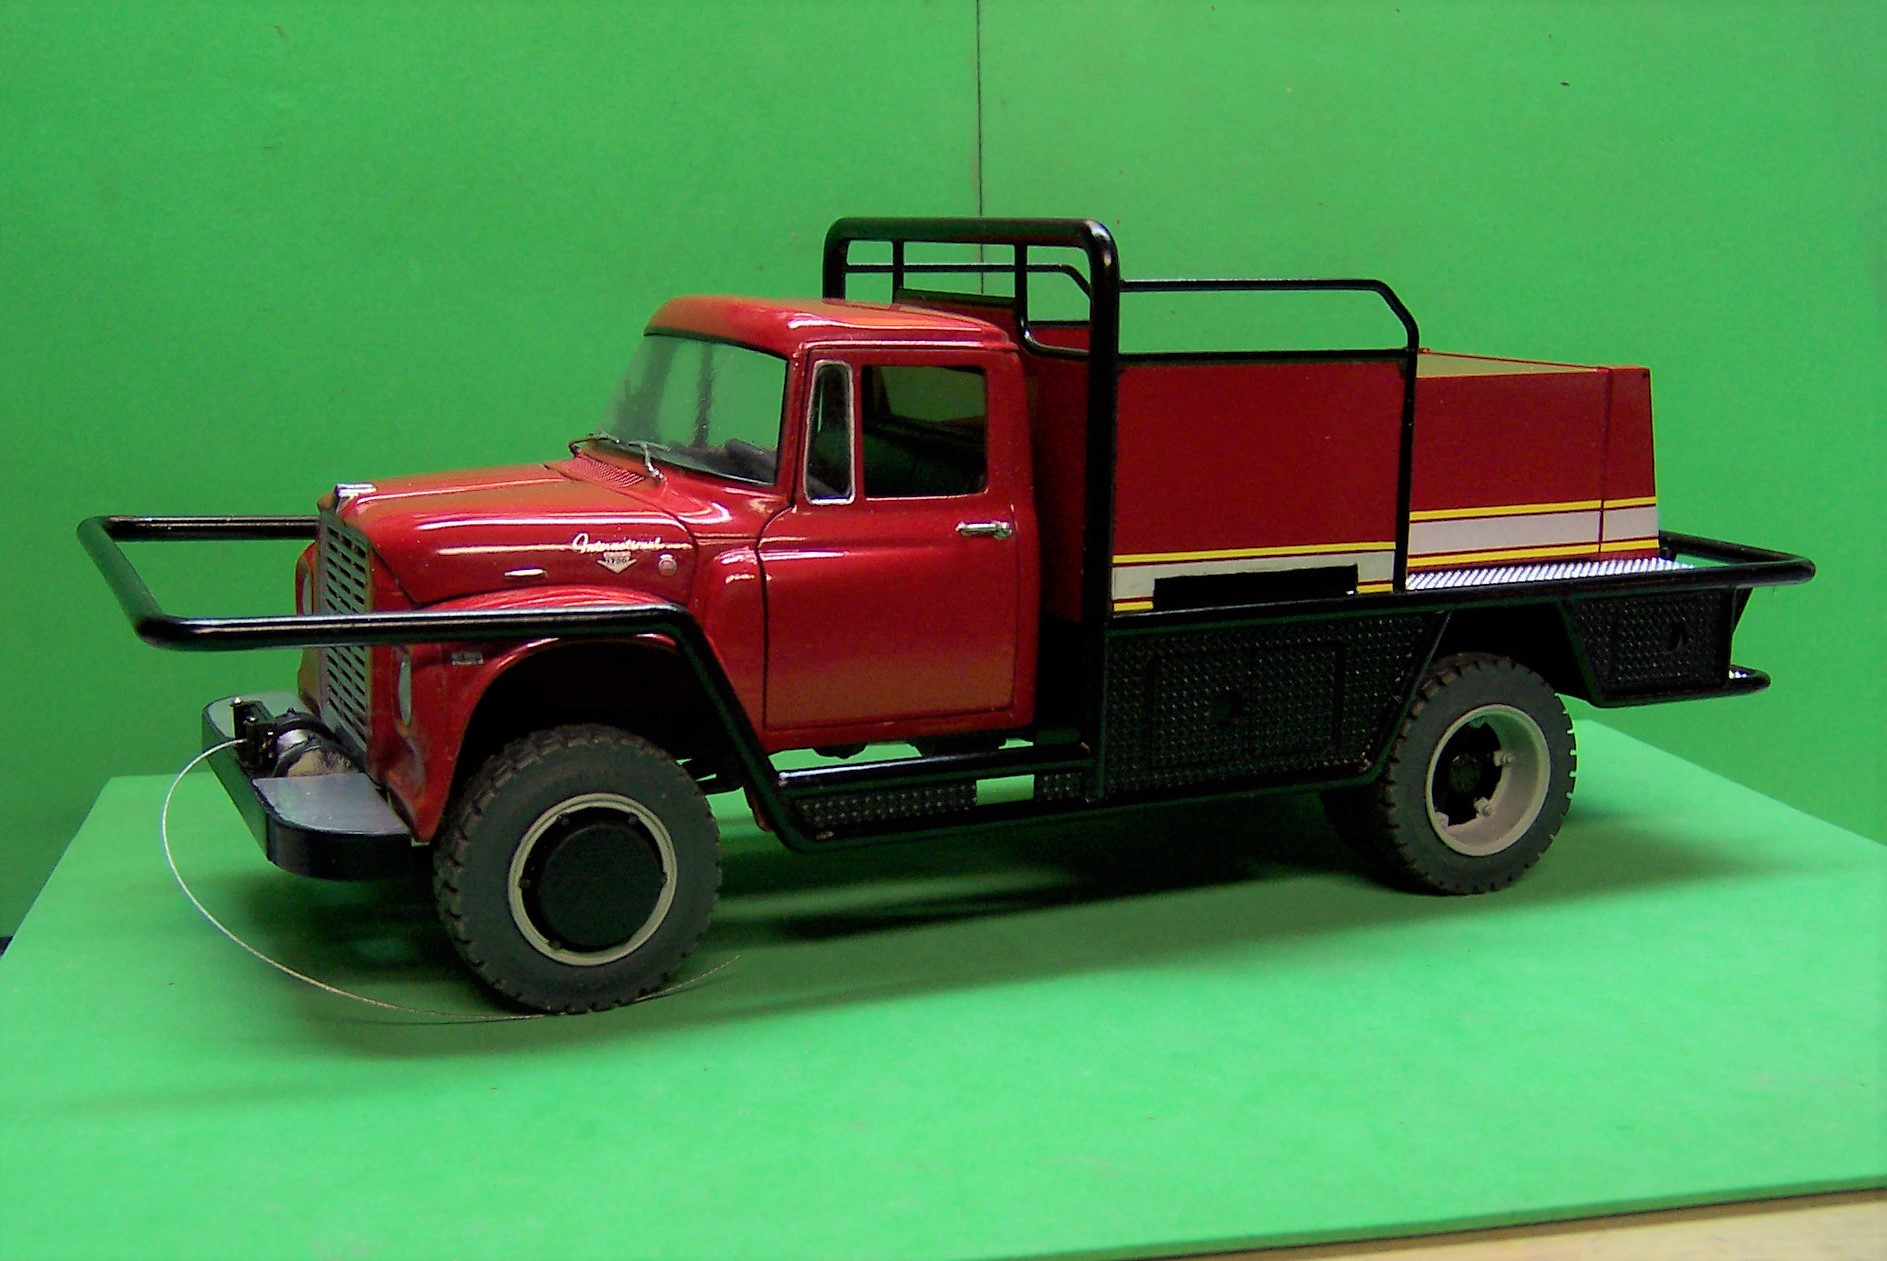
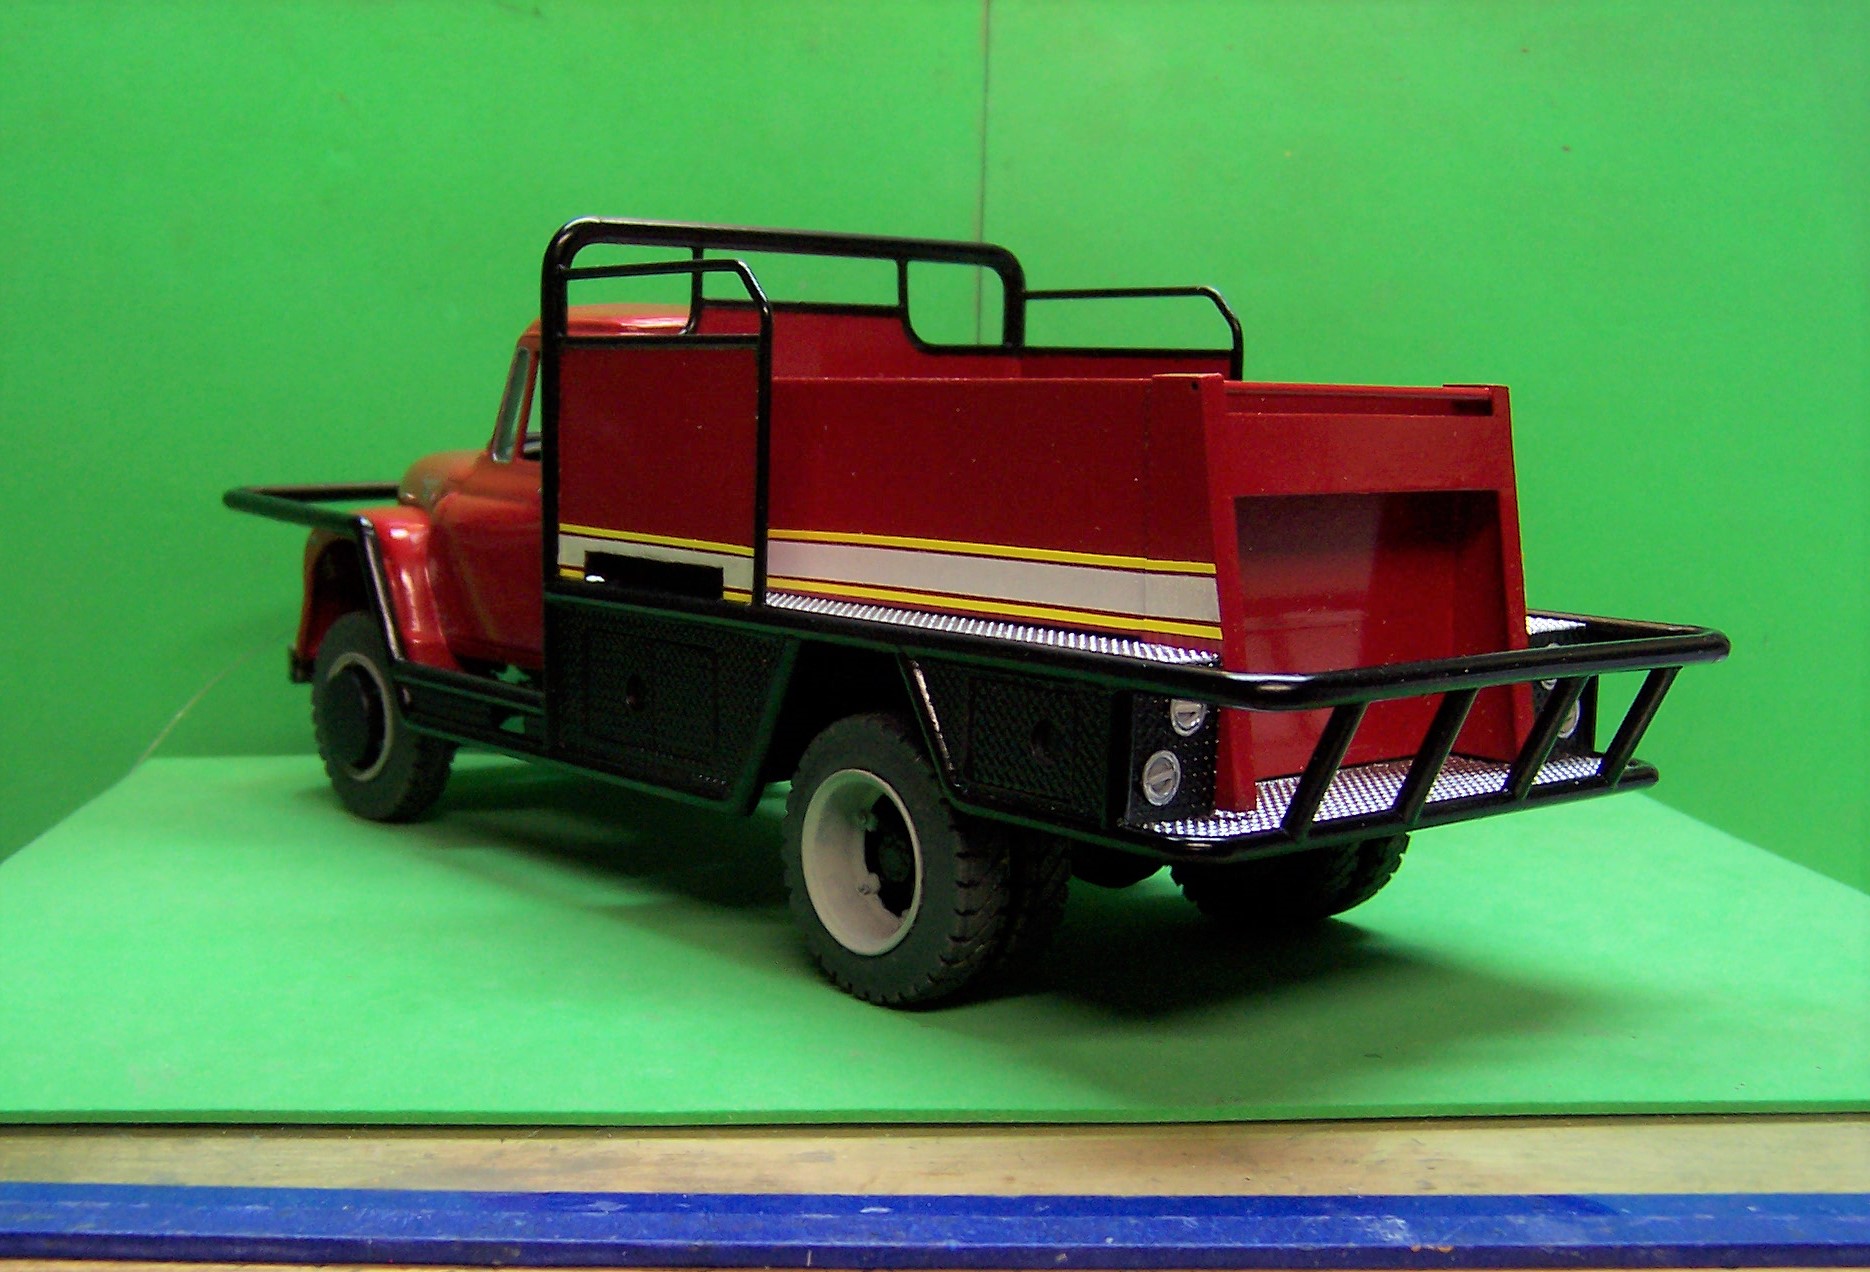
This weekend provided some time to get some additional work done on the Loadstar. The tank and body are still separate pieces which made painting them much easier. The tank was painted first and set aside. Then the front and side panels of the body were painted red. After the red was dry it was masked off and the rest was painted with engine black, a semi-gloss. Finally the treadplate deck was painted with chrome silver. I added the trim rings to the rear tail lights and now have to drill them out for the lenses. Next up will be to finish the front bar work that is still hanging out in space. In the top photo the winch cable is just hanging for now. It will be set in place once the bar work is done.
-
Anyone make a resin 1 ton dump bed
Chariots of Fire replied to fordf-100's topic in Truck Aftermarket / Resin / 3D Printed
Why not scratch build one? There are plenty of images you can find on line for that sort of thing. And they are a dime a dozen out on the streets so they could be photographed and measured up. A bunch of rectangular pieces for the most part. -
That's going to be a LOT of truck!
-
Loadstar Brush Truck
Chariots of Fire replied to Chariots of Fire's topic in WIP: Model Trucks: Big Rigs and Heavy Equipment
Hi, Tom. I think they are Howe/Coleman front ends. And yes they were tough trucks. Several towns around here had them as brush trucks. They graduated from Loadstars to the "S" series and now to the Workstar series of IH rigs. -
Loadstar Brush Truck
Chariots of Fire replied to Chariots of Fire's topic in WIP: Model Trucks: Big Rigs and Heavy Equipment
Body work continues to progress with side panels completed and the rub rails nearly completed. I did some drawings based on the measurements and photos of the actual truck and printed them out for each side, reversing the image so that it would be the same. This gave me templates from which to work. Even with that, there were some minor adjustments to be made. Things never work out exactly as expected but so long as things are within reason, certain changes can be made. Tubing is never the exact diameter as the real thing and it is not easy to get measurements along tubing that is bending in all sorts of directions. Nevertheless things are taking shape. The front bar is hanging out in space for now. The front bumper needs to be constructed and set in place In order to make the connections between the two surfaces. I'm thinking another trip to see the real truck is in order because there is a winch that needs to be built to size for the bumper. Treadplate has been glued along the sides between the rub rails. They are solid for now. Eventually they will be opened up as compartments with "D" locks. I'll use the same "D" locks from Don Mills Models for the tail lights also. If you drill out the centers and replace the center with a piece of red clear and white clear you have lights with nice round trim rings. The treadplate will be drilled out for the lights and the locks for a flat fit. The hose bed goes on top of the tank. There is also a filler for water and one for foam. I used 1/16" diameter rods for the upper grab rails. This not only adds some stiffness but some strength also which will resist the chance for these small rails to break. Similar rods will be used over the top of the cab and to the upper bar at front. At each end of the rod I ground it down to a smaller diameter using my Dremel with a cutting wheel. I rotated each end of the rod until I got a pin like end and then drilled holes in the mounting points to insert the pins in. The rods are now pretty secure and have nice neat connections. The body has been built up as one piece, making it easier for painting. The tank is still separate making it easier to get a nice paint job on it as well. Between the tank and the back step is where the pump/engine will be set together with all of the plumbing for the hose lines. Here's a look a the underside. The compartments have not been boxed in yet.
-
Peterbilt 353 Off-Road Dumper
Chariots of Fire replied to Ack! Ack-ack!'s topic in Model Trucks: Big Rigs and Heavy Equipment
What they all said! Pretty nice! Color is outstanding and the execution of the build is first class. -
Loadstar Brush Truck
Chariots of Fire replied to Chariots of Fire's topic in WIP: Model Trucks: Big Rigs and Heavy Equipment
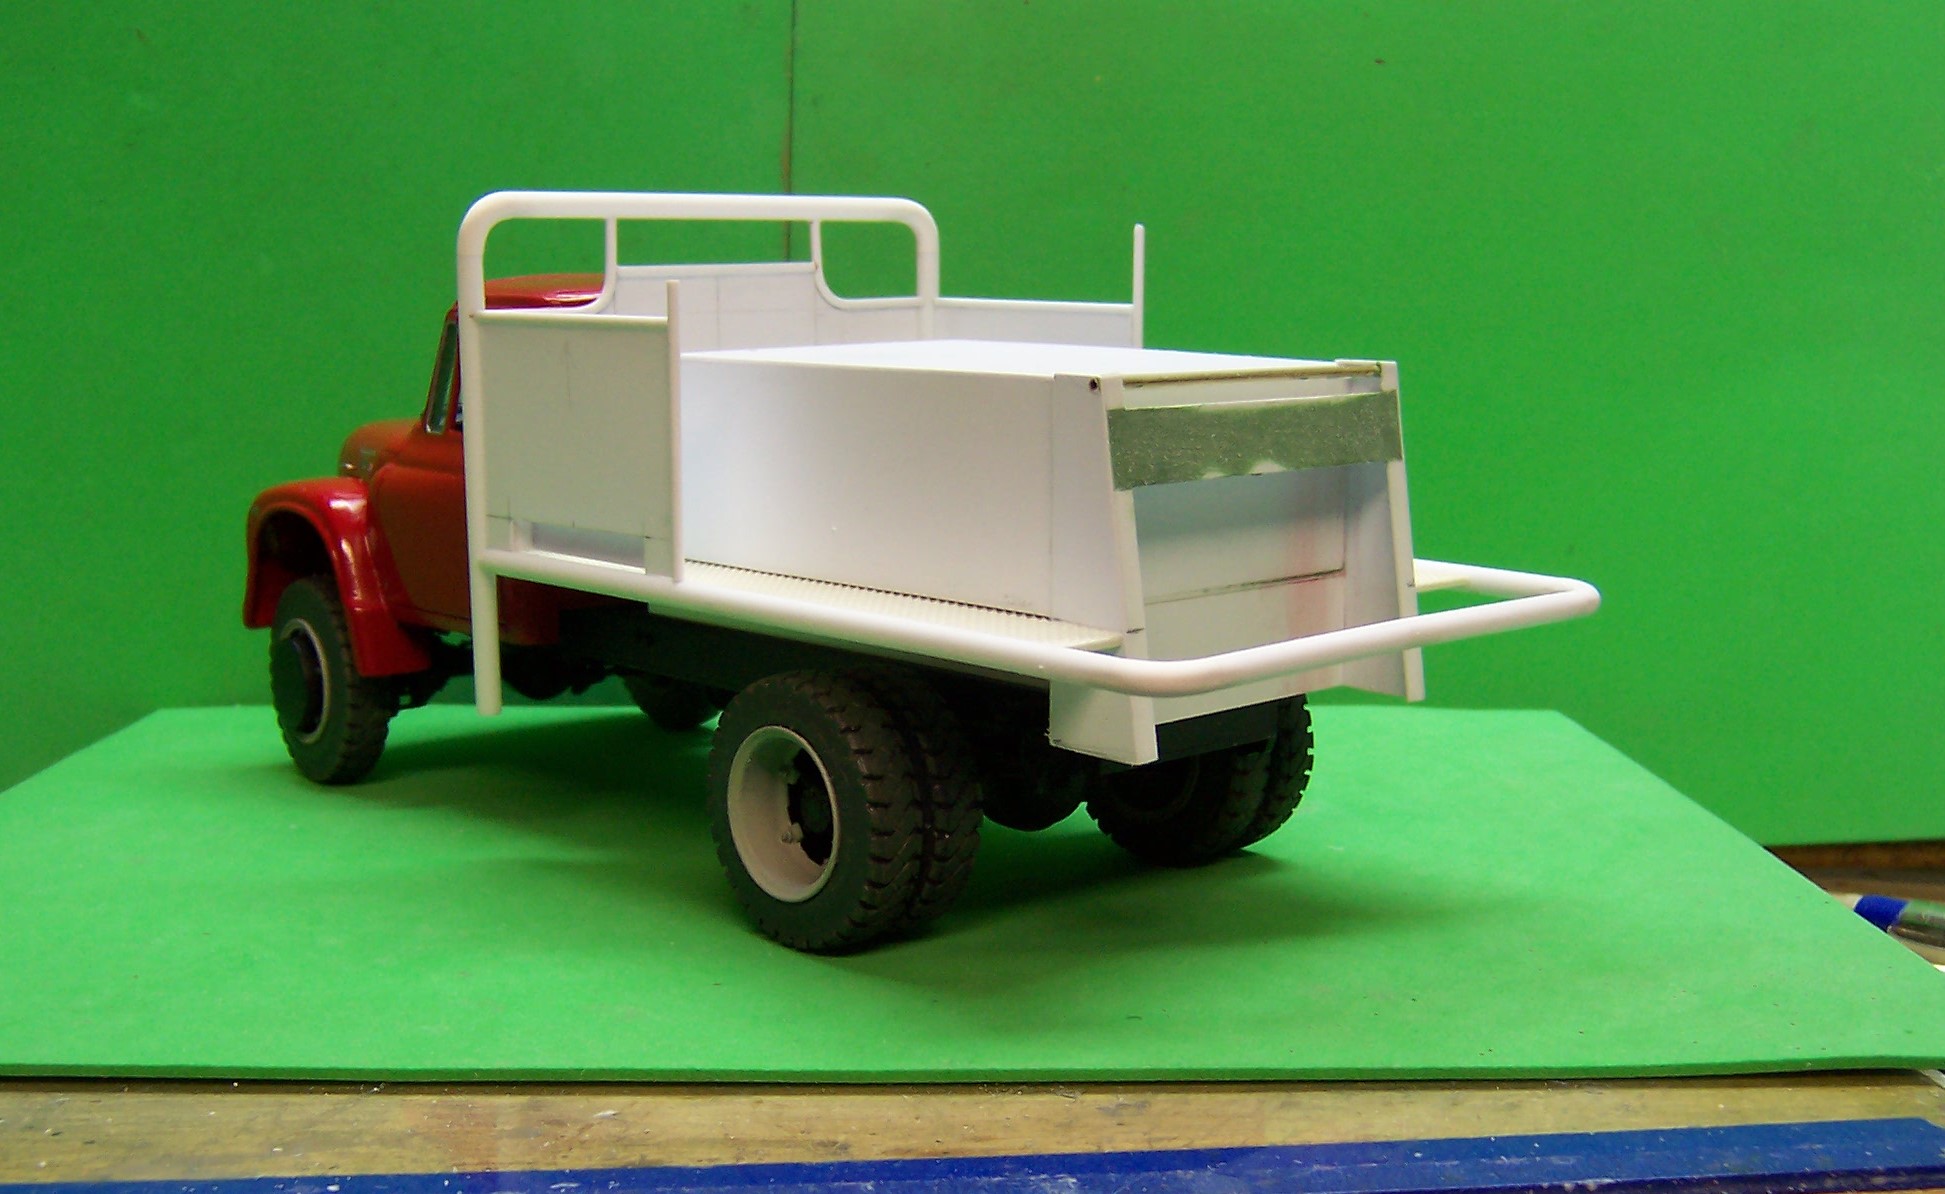
With the cab and chassis done I began the body buildup. So far it is made in three pieces that can be painted separately before assembly. With all of the ins and outs of the body pieces it would be impossible to get the paint in all the right places if it was assembled first. The sides will be built of treadplate with additional 1/8" diameter tubing along the bottom. Compartments for equipment are part of that assembly. Getting the fit right on each of these three pieces was important so that when they are finally put together the will look as if they were painted together. The tank will have a hose body above it along with the water fill and foam fill. Behind and below the tank will be the pump/engine for pump and roll capabilities. Lots of plumbing will be needed as well. Next up will be the front bumper. It may look a bit odd with the rest of the bar work as it is a left over piece of construction when the truck was first constructed by Maxim Motors of Middleboro, MA. When the truck was rebuilt a few years ago the bumper was retained but all of the rest of the bar work was made new.
-
See my avatar to the left? That is a 1928 Pierce Arrow 7 ton dump. The real one is in New Jersey. I modeled it when it was still at a truck museum in Connecticut. Here is the model in front of a photo of the real truck at the museum. The truck in the photo above is probably a much earlier version around 1918 or so but they carried many of the same features forward. The plate on the side of the hood says Pierce Arrow.
-
Question about AITM
Chariots of Fire replied to Rusty92's topic in Truck Aftermarket / Resin / 3D Printed
Hi, JB: Dave Natale is a great guy to deal with. He is apparently really jammed up with projects right now. If you place an order with him he will do all that he can to fill it in a reasonable time. I did the IH Loadstar master for him and when I e-mailed him to find out how things were going that is when he said he is real busy. The Loadstars were actually out of stock as well so be a little patient and I'm sure he will follow through with an order for you. AITM always had a spot in the vendors room at NNLEast and it is always busy with customers. -
Loadstar Brush Truck
Chariots of Fire replied to Chariots of Fire's topic in WIP: Model Trucks: Big Rigs and Heavy Equipment
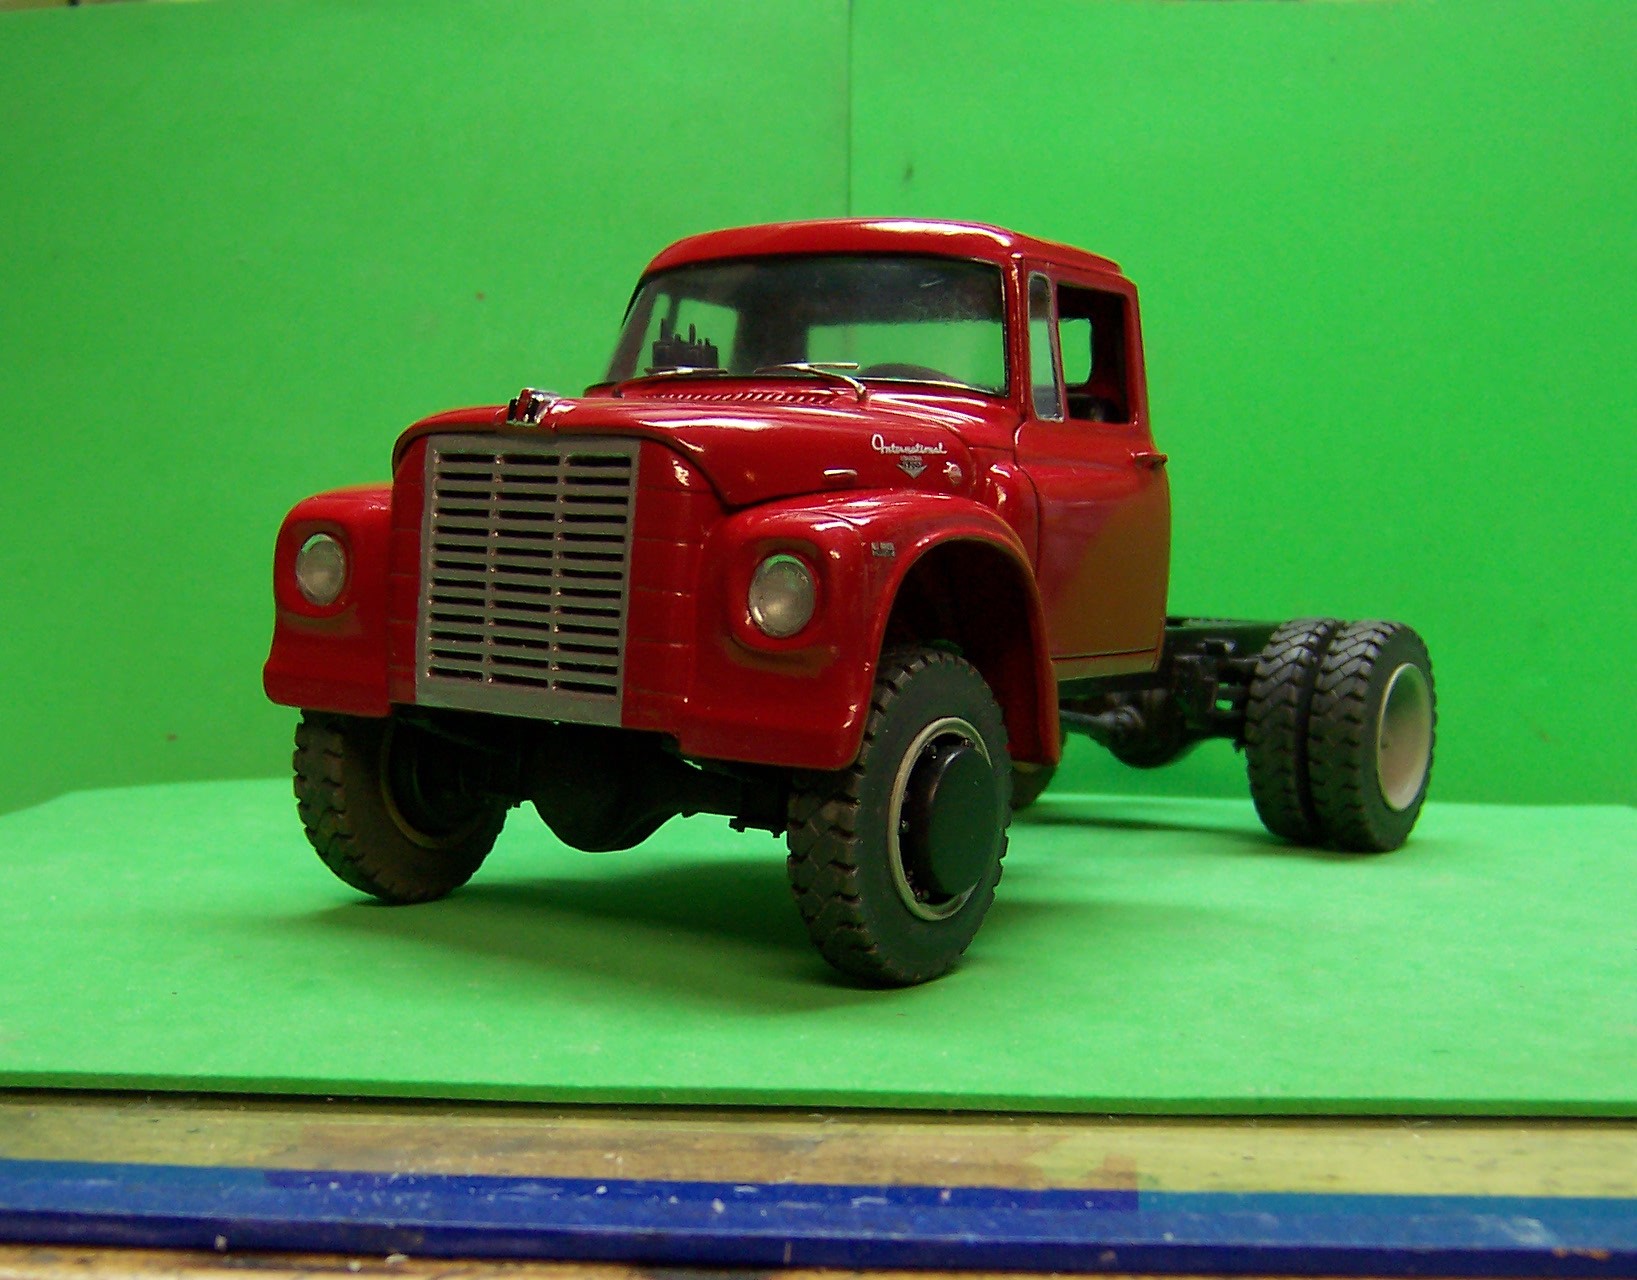
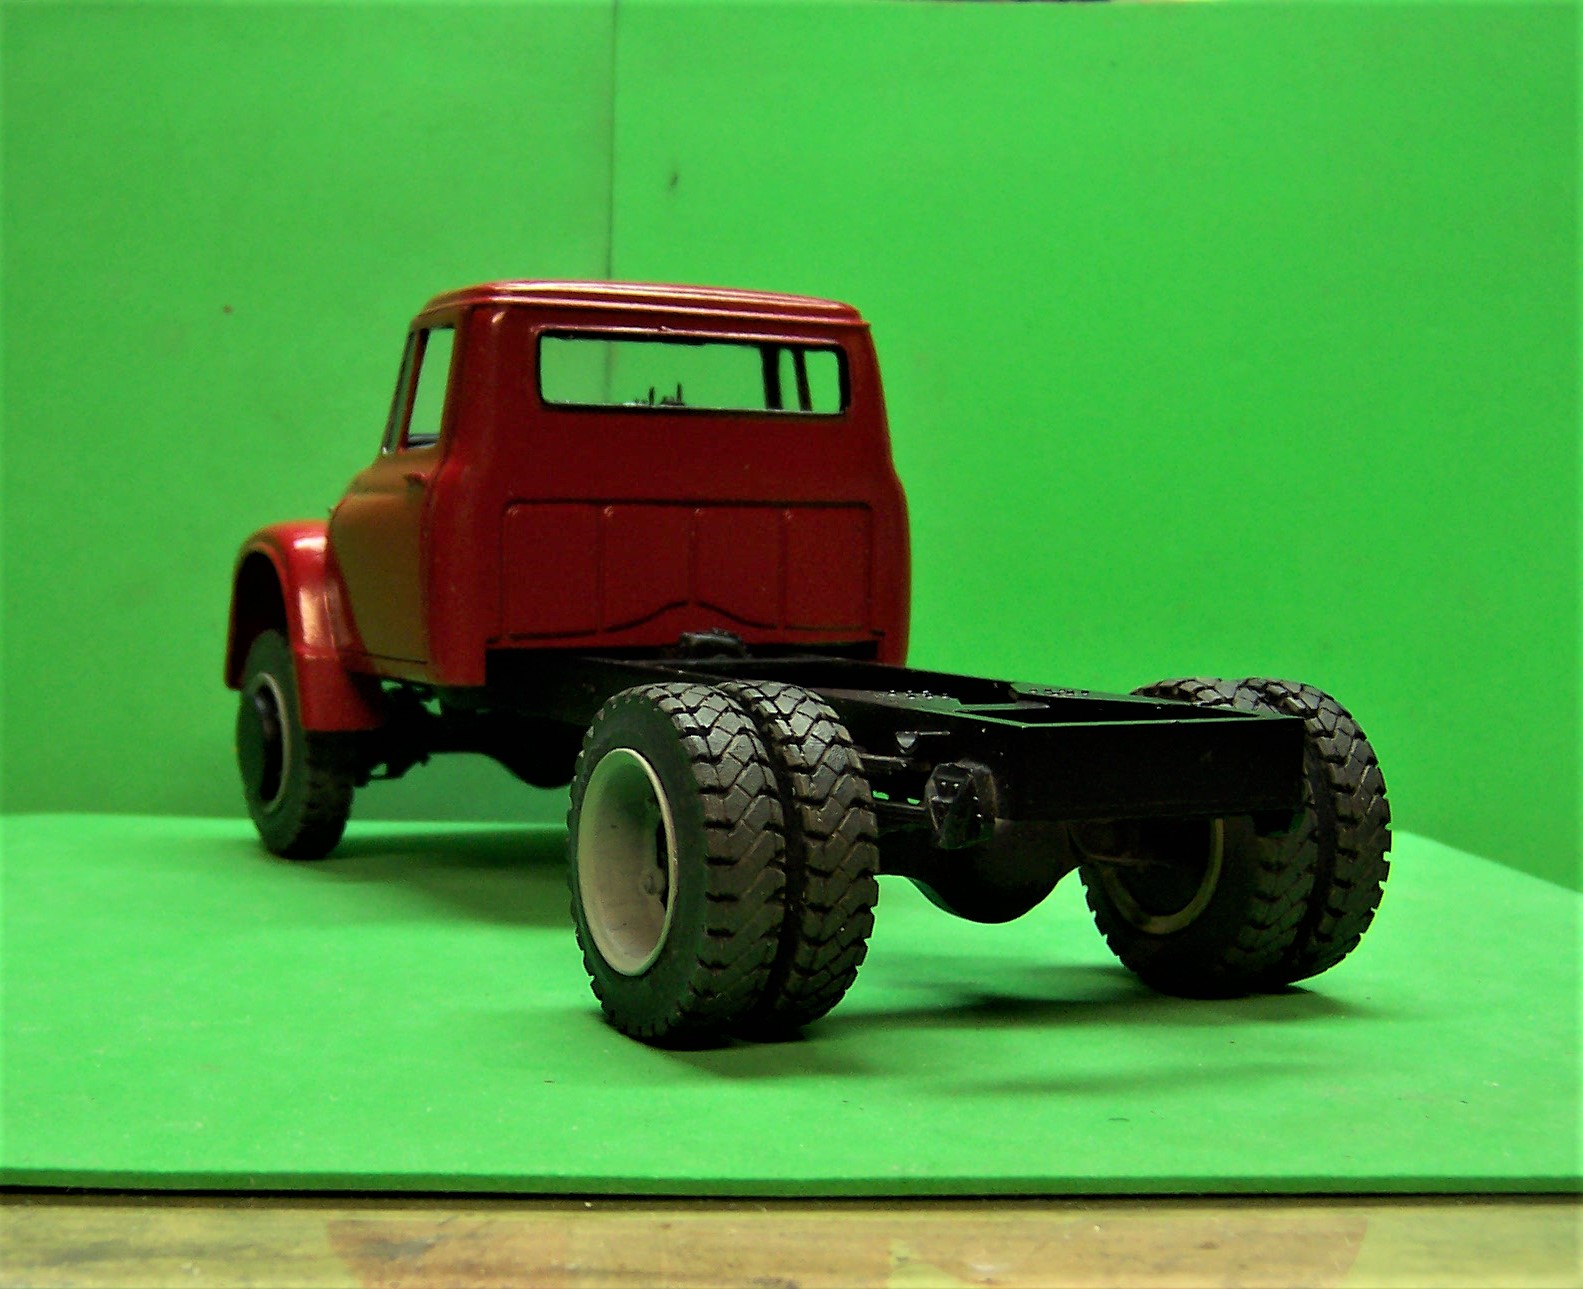
The IH Loadstar cab and chassis are done. I paid a visit to the local firehouse where the real rig is located and got some measurements of the body and bar work. The side view is drawn up. Now I need to get the right tubing for the bars. The body will be built up in sections. There is the platform that the tank sits on together with the forward protection for the crew, the poly tank and the hose bed that sits on top of that. In the rear is a separate panel that hides some of the plumbing. On the sides are compartments that sit between the top and bottom side rails. The side plates and compartment doors will be treadplate. In the meantime here are some photos of the completed cab and chassis.
-
Random Things Going On
Chariots of Fire replied to Casey429's topic in WIP: Model Trucks: Big Rigs and Heavy Equipment
I like the S series kits too. You are right. Frames are way too long for most uses. -
Loadstar Brush Truck
Chariots of Fire replied to Chariots of Fire's topic in WIP: Model Trucks: Big Rigs and Heavy Equipment
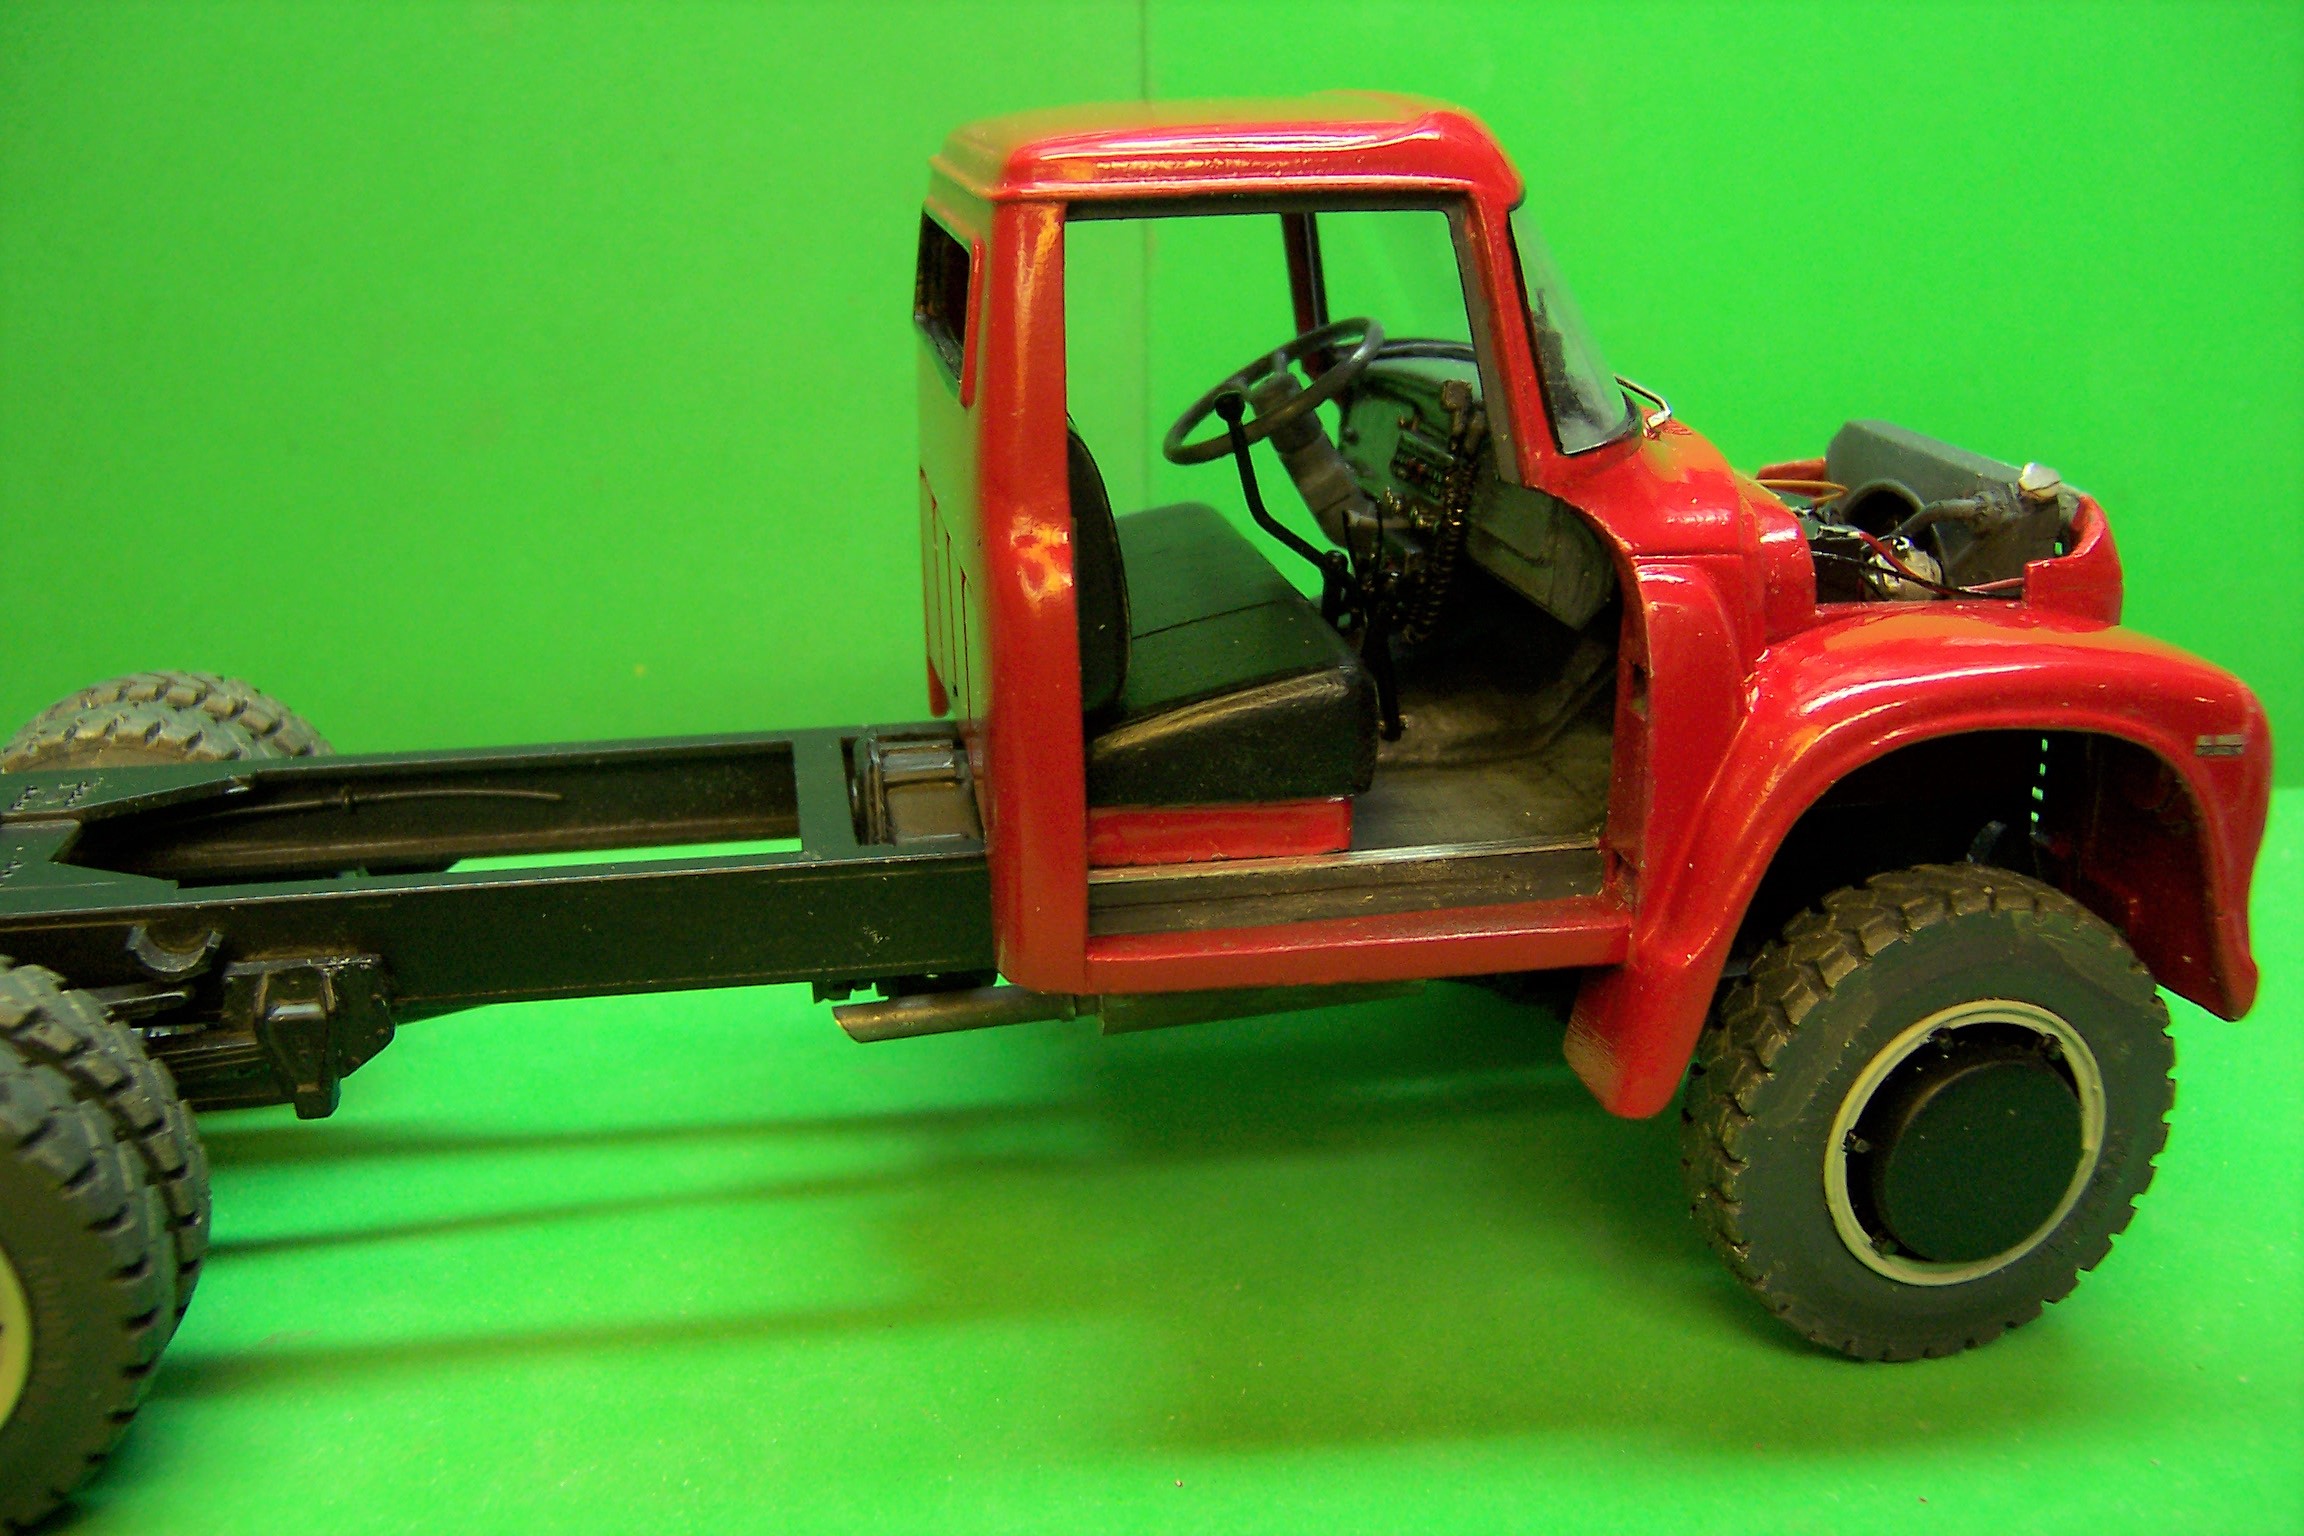
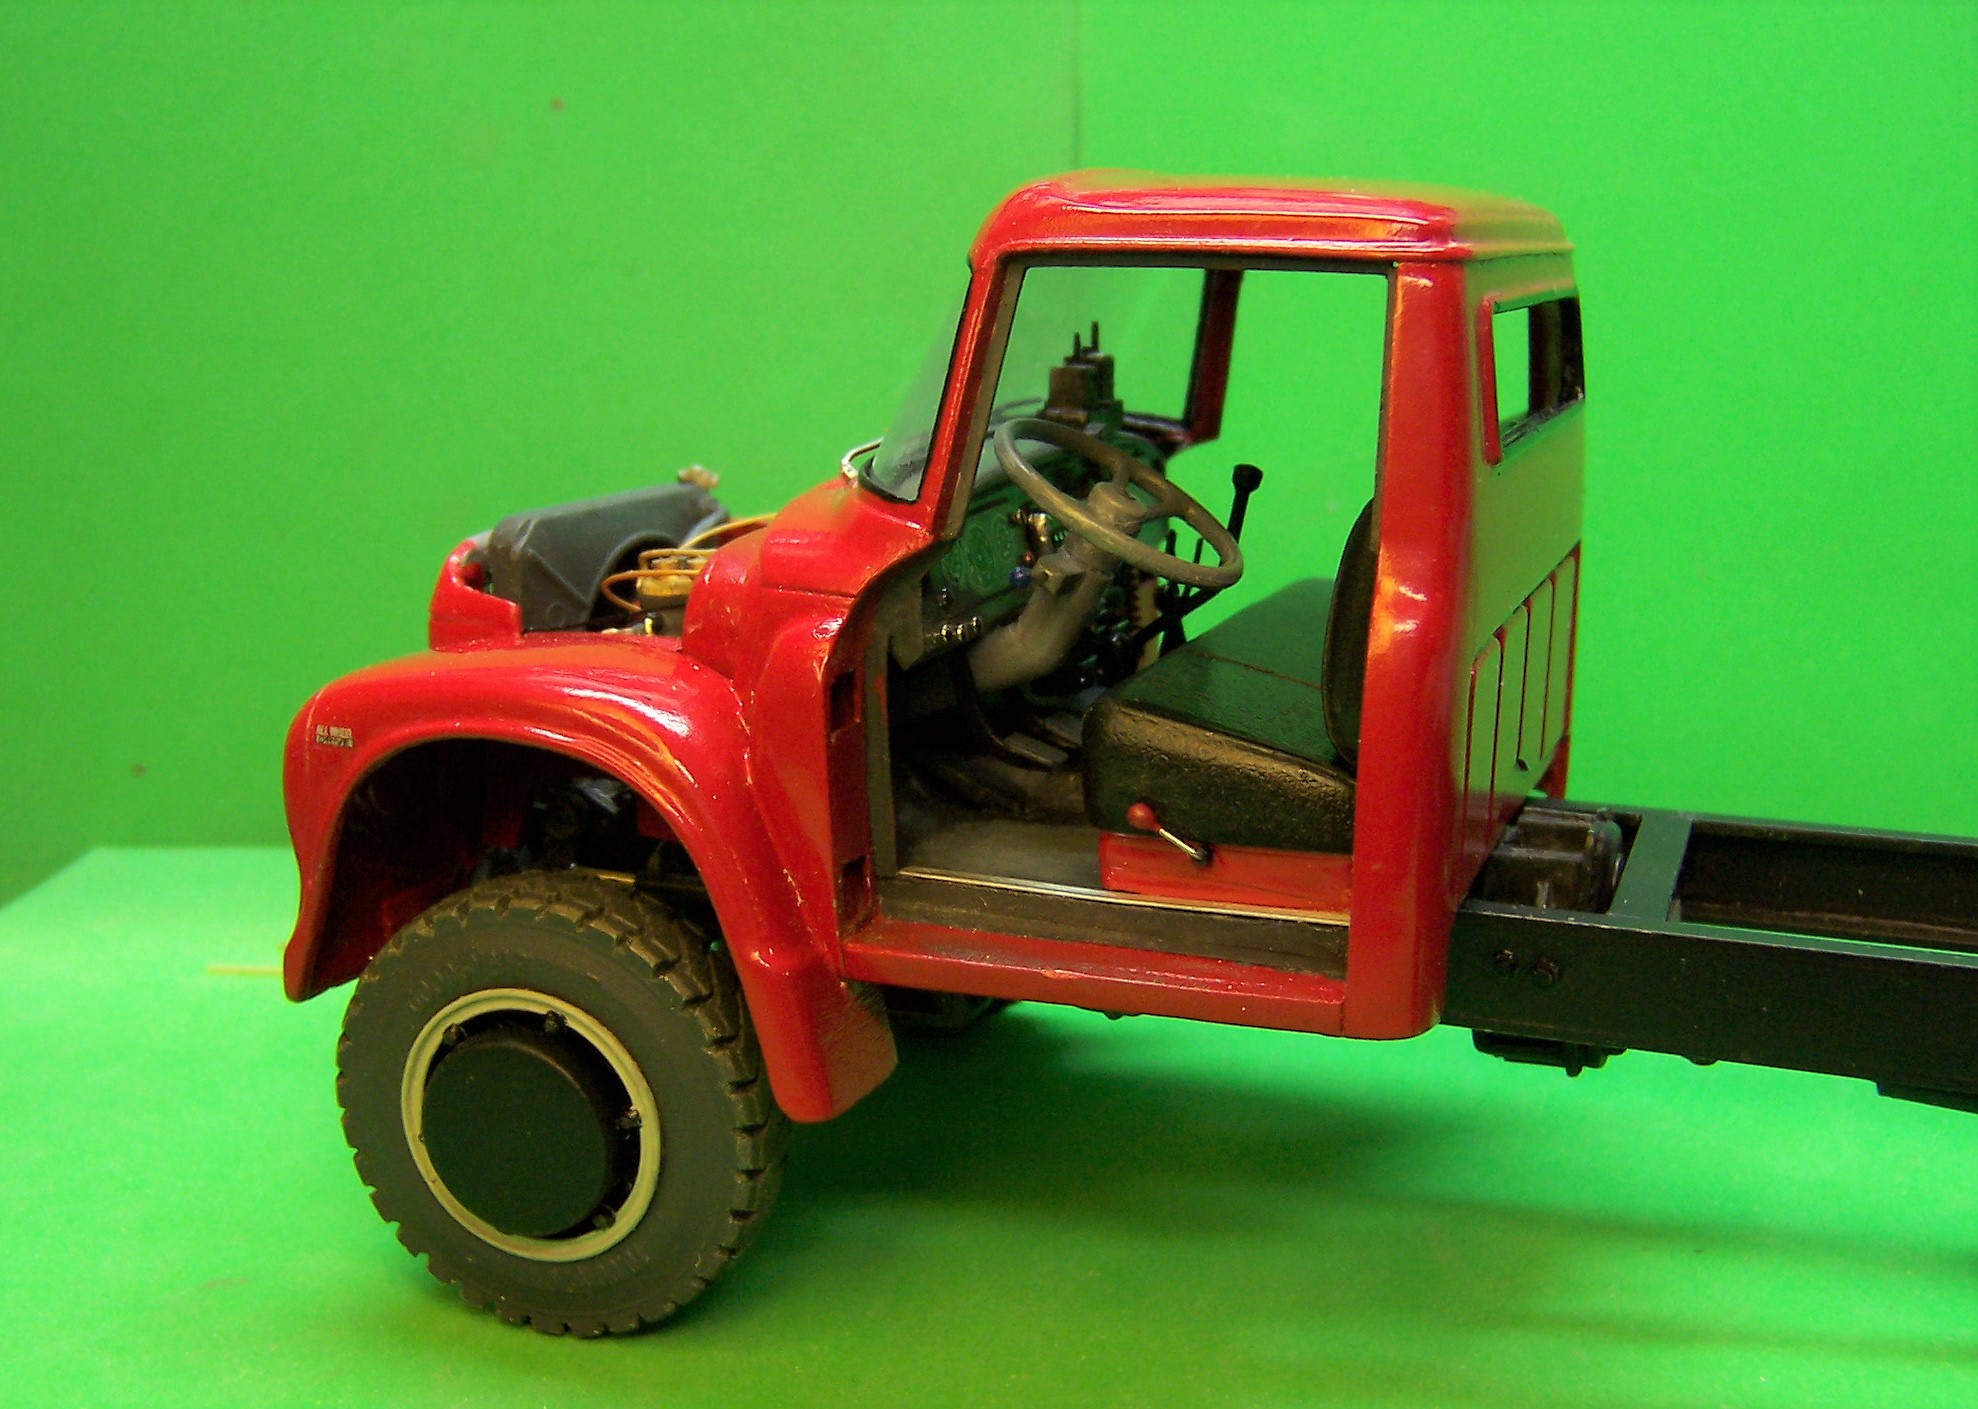
Work continues. Engine compartment is now done. Once the hood goes on much of this will be hard to see. Cab interior is finished as well except for the rear window. That's next. And here is the underside. That will get partially covered as well once the skid plates get installed. They are put on front and rear to protect the radiator, oil pan and differential. Stuff in the middle is pretty high off the ground so it rarely gets covered. Once in a while the exhaust system gets ripped off but that is easily fixed.
-
HI, Dave. Interesting you are working on that! I have a 1/25 scale workstar grill that was made up by Shapeways. I've not used it yet as I am still contemplating the hood that would be needed. Looks like you might beat me to it!
-
Loadstar Brush Truck
Chariots of Fire replied to Chariots of Fire's topic in WIP: Model Trucks: Big Rigs and Heavy Equipment
It's got paint! I think that for every rig I have done there comes a point where you say enough already! Time to paint! So that is what happened this weekend (with no Pats game to watch) There will be this coming weekend, though! Ok, enough of that, too! I've used Duplicolor gray primer on the parts and Duplicolor #398 bright red for the color coat. I like this paint as it is a very fine pigment and goes on nice and smooth. Since it is so fine, several light coats are necessary to bring out the full color. It is also very easy to polish out. I used a #2 Molotow chrome pen for the headlight trim rings. Interior of the bucket is just Model Master silver. After the paint is really dry I'll use some two part epoxy to set the headlights themselves. The windshield wipers are just bent pins soldered together. I used some of those little fusion beads as a nut at the base of the wiper. There are still some decals to put on the hood and on the front of the fenders. I also need to trim the edges of the dash just a little so that the doors will close without binding. Always a small fit issue when opening doors and setting them on hinges. The hood is hinged. Once it is secured I will be able to open the sides butterfly style and hold them up with rod that is on the cowl.
-
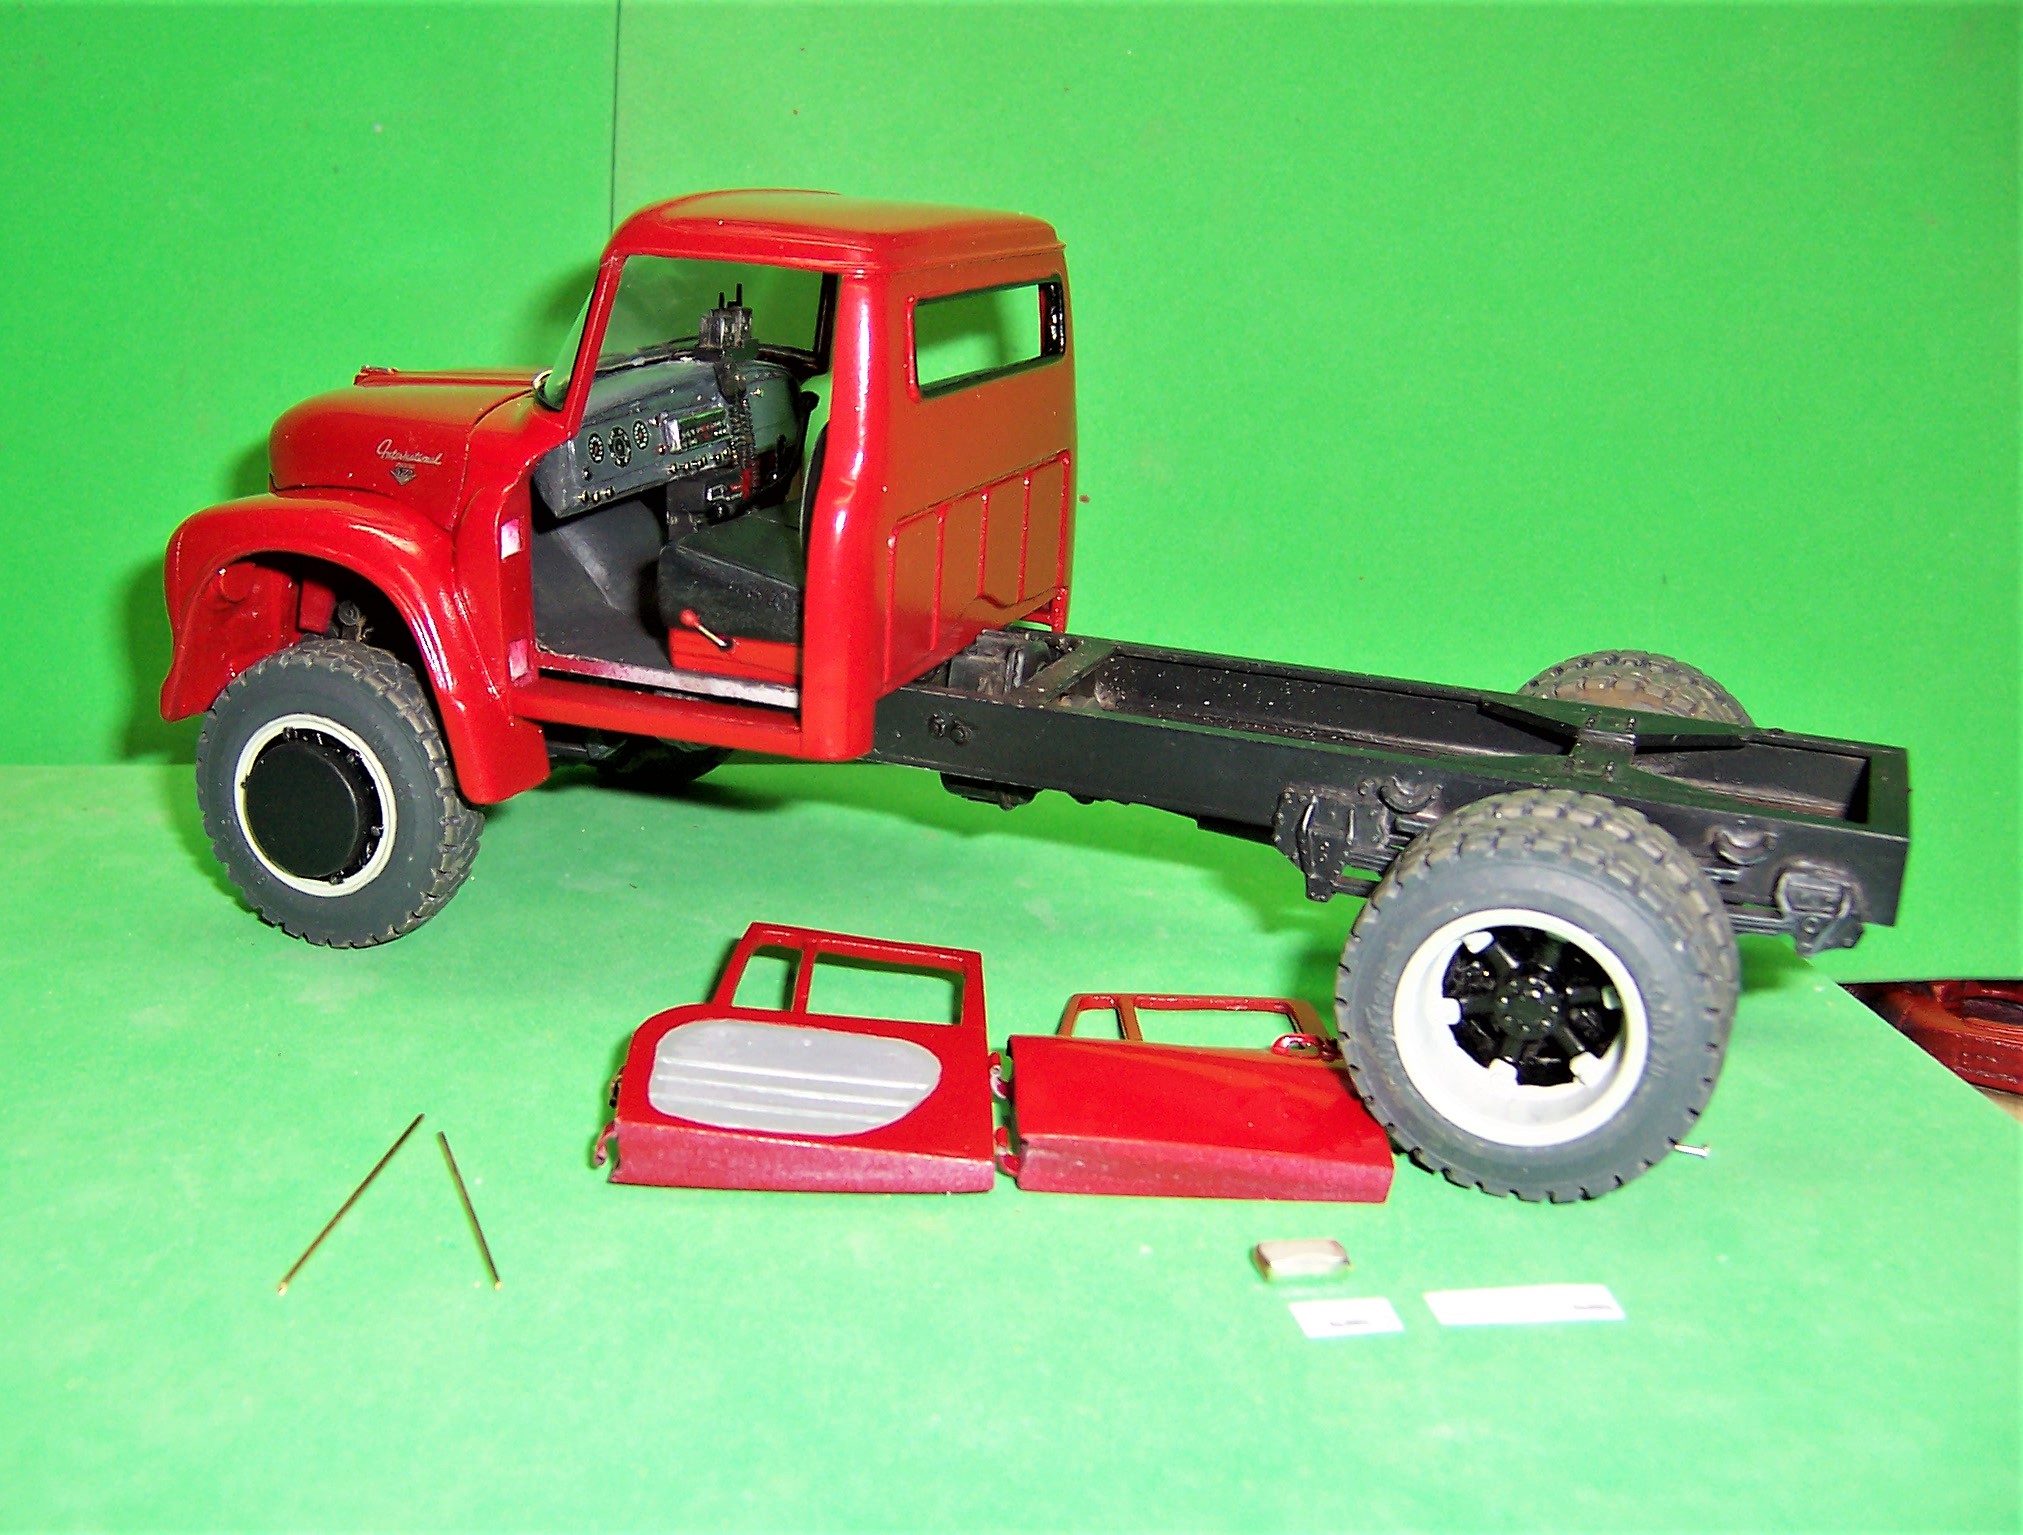
Loadstar Brush Truck
Chariots of Fire replied to Chariots of Fire's topic in WIP: Model Trucks: Big Rigs and Heavy Equipment
Still making some progress. The doors have been done and are now prepped for paint. They fit well into the cab door openings. The top hole for the pin has been filled in on each side. The dashboard and seat are now complete and the floorboards now have the gear shift, handbrake, all wheel drive and winch levers in place.