Chariots of Fire
-
Posts
2,781 -
Joined
-
Last visited
Content Type
Profiles
Forums
Events
Gallery
Everything posted by Chariots of Fire
-

Loadstar Brush Truck
Chariots of Fire replied to Chariots of Fire's topic in WIP: Model Trucks: Big Rigs and Heavy Equipment
Thanks, Rick. Believe it or not most of the front axle components are just from pieces picked up in the parts box and used to advantage based on photos of the actual truck. I did make the steering tie rod out of brass stock and drilled out the ends for pinning. The axles themselves are from the Ertl ALF kit, modified to fit this project. The front one was rebuilt so that the pumpkin would be off set. The steering parts are a combination of plastic for the steering box and brass tubing for the connecting arms, etc. The front axle steering knuckles themselves are also brass. I showed them in some of the photos posted earlier. U-bolts are brass wire along with a piece of plastic stock drilled for the u-bolt ends. -
Loadstar Brush Truck
Chariots of Fire replied to Chariots of Fire's topic in WIP: Model Trucks: Big Rigs and Heavy Equipment
Work continues. The firewall/floorboard piece is ready for installation. Been attaching some details to it so that I can make sure it all fits under the hood. Space is really limited. Hood pieces have been given an initial coat of paint but are in need of sanding and more coats. Chassis work is complete and some light wearing/weathering has been done on the underside. Will post a pic of that later. I also found some nice detailing stuff on line. Fusion beads are tiny hex head open detail pieces that are great for wiring connections and fuel lines. They cannot be crimped and actually shatter if you try it. But you can get a couple hundred of them for cheap money and they will last a lifetime. They are hard to see in the photo but when all is said and done they do add some extra pizzaz to the detail process. The wire pieces in the foreground I found at Michaels craft store. Great for spark plug wires and other things. I have some holes in the firewall where some of this wiring will go. Adding fusion beads right at the firewall completes the look. So far the battery, brake master cylinder and an electrical box have been added to the firewall. There are also two arms that when extended will hold the hood sides open.
-
IH Cargostar Cab - 3D Printed
Chariots of Fire replied to Casey's topic in Truck Aftermarket / Resin / 3D Printed
I agree, Jacobus. I have had some tires and other small things printed by 3D and it is fine because of the texture of a real tire is not perfectly smooth. I think we will have to wait a bit for the process to be perfected to the point where things like cabs will be printed smoothly or without a lot of preparation. The smaller the layers of material put down, the better the surface but that increases the time for printing and raises the cost of the work. As for me I will stick with kits and scratch built resin castings for now. -
Loadstar Brush Truck
Chariots of Fire replied to Chariots of Fire's topic in WIP: Model Trucks: Big Rigs and Heavy Equipment
Shapeways U-joints came in today. Now I can get the driveshafts completed and installed. -
1930's-40's Ford Commercial Wheels
Chariots of Fire replied to Aaron_F's topic in Truck Aftermarket / Resin / 3D Printed
The Yat Ming '38 Ford fire truck had these tires and wheels as well. -
Loadstar Brush Truck
Chariots of Fire replied to Chariots of Fire's topic in WIP: Model Trucks: Big Rigs and Heavy Equipment
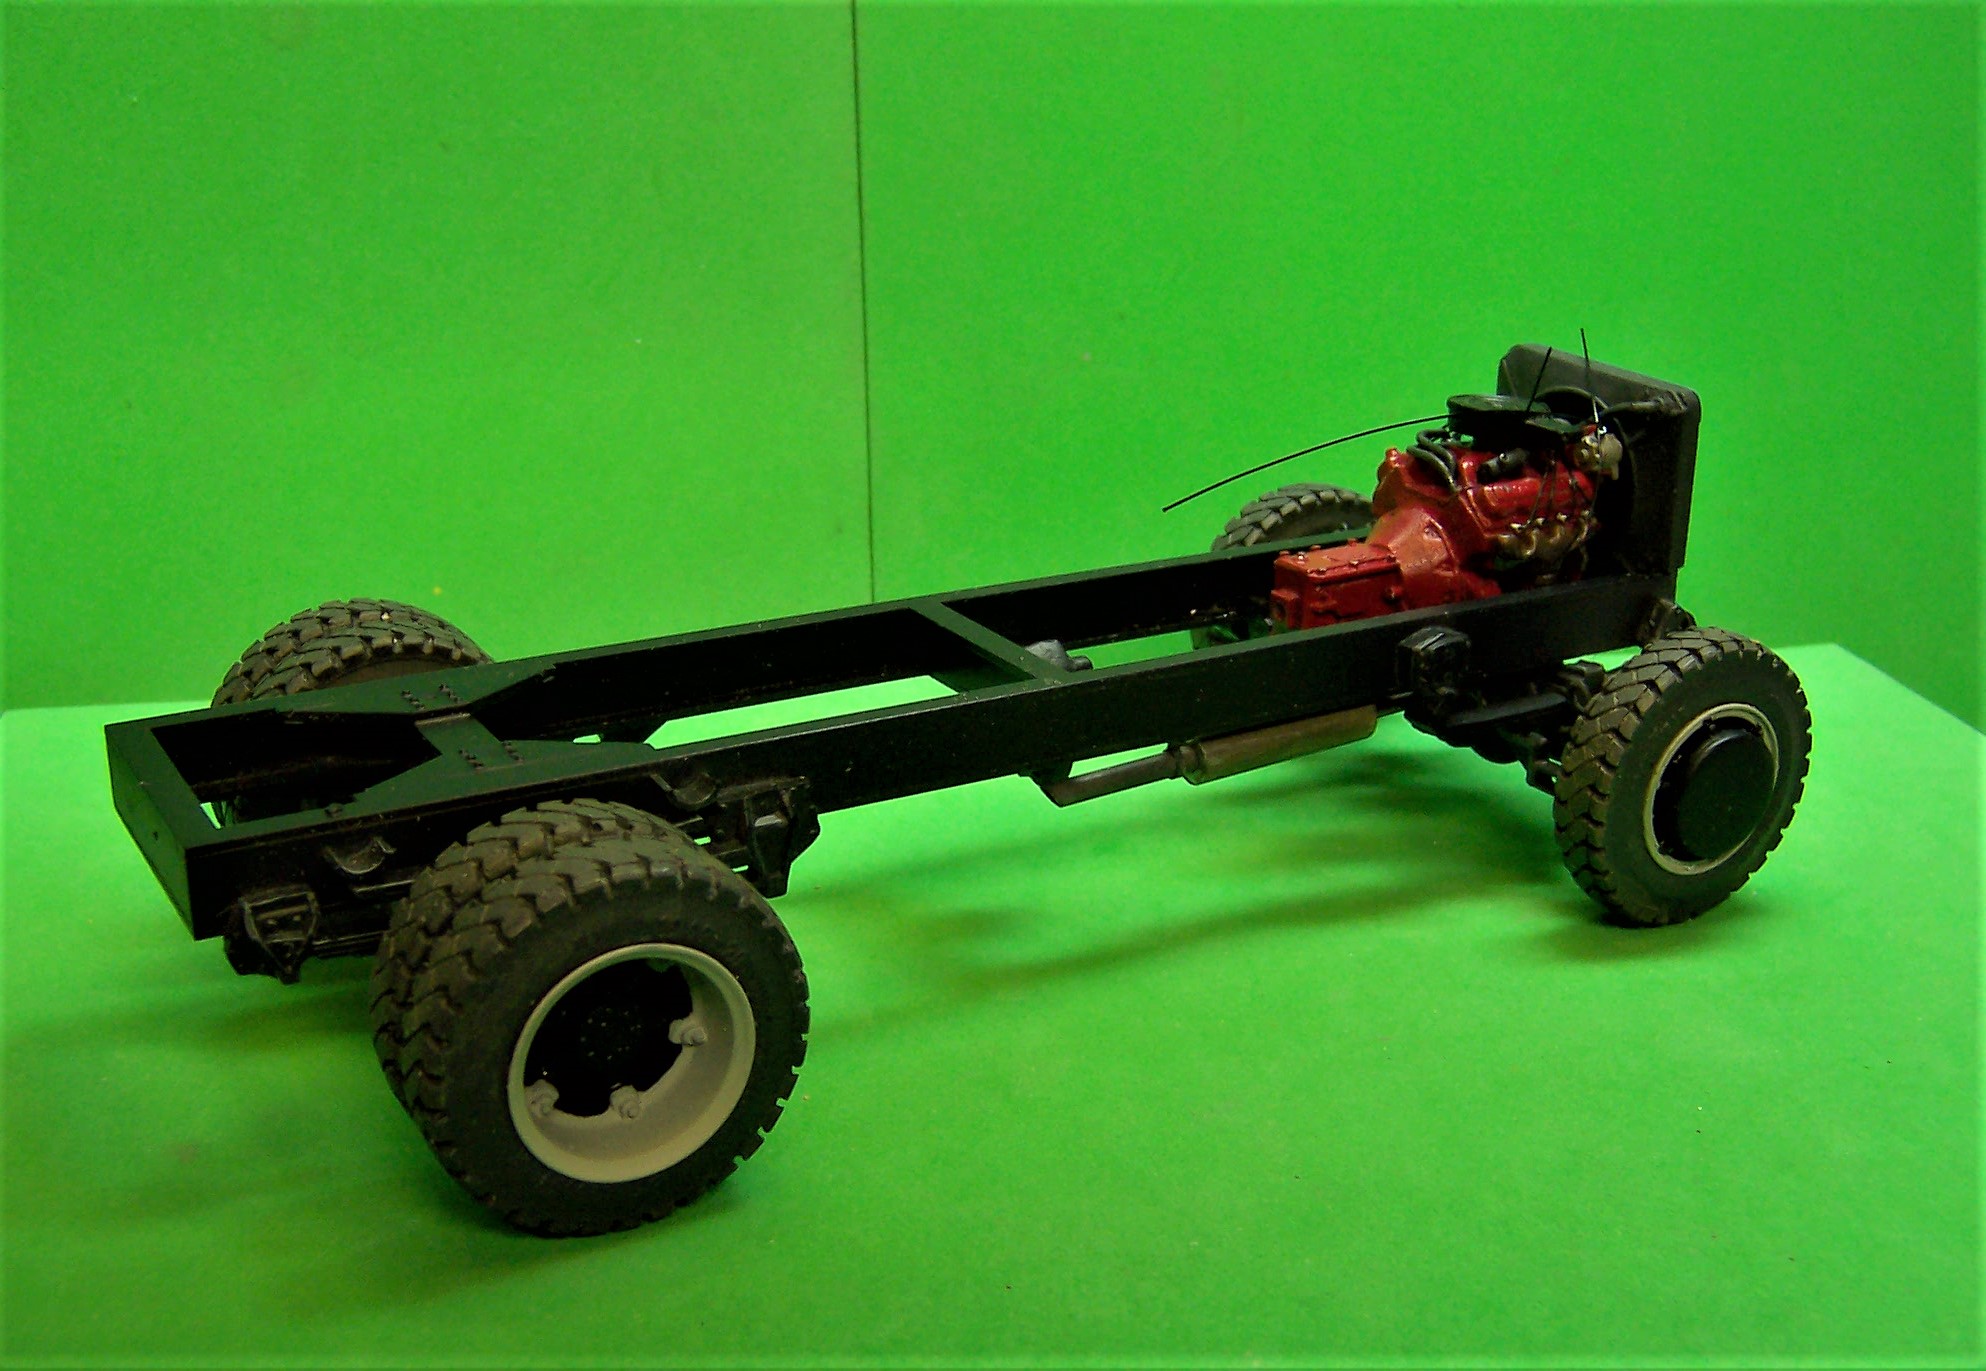
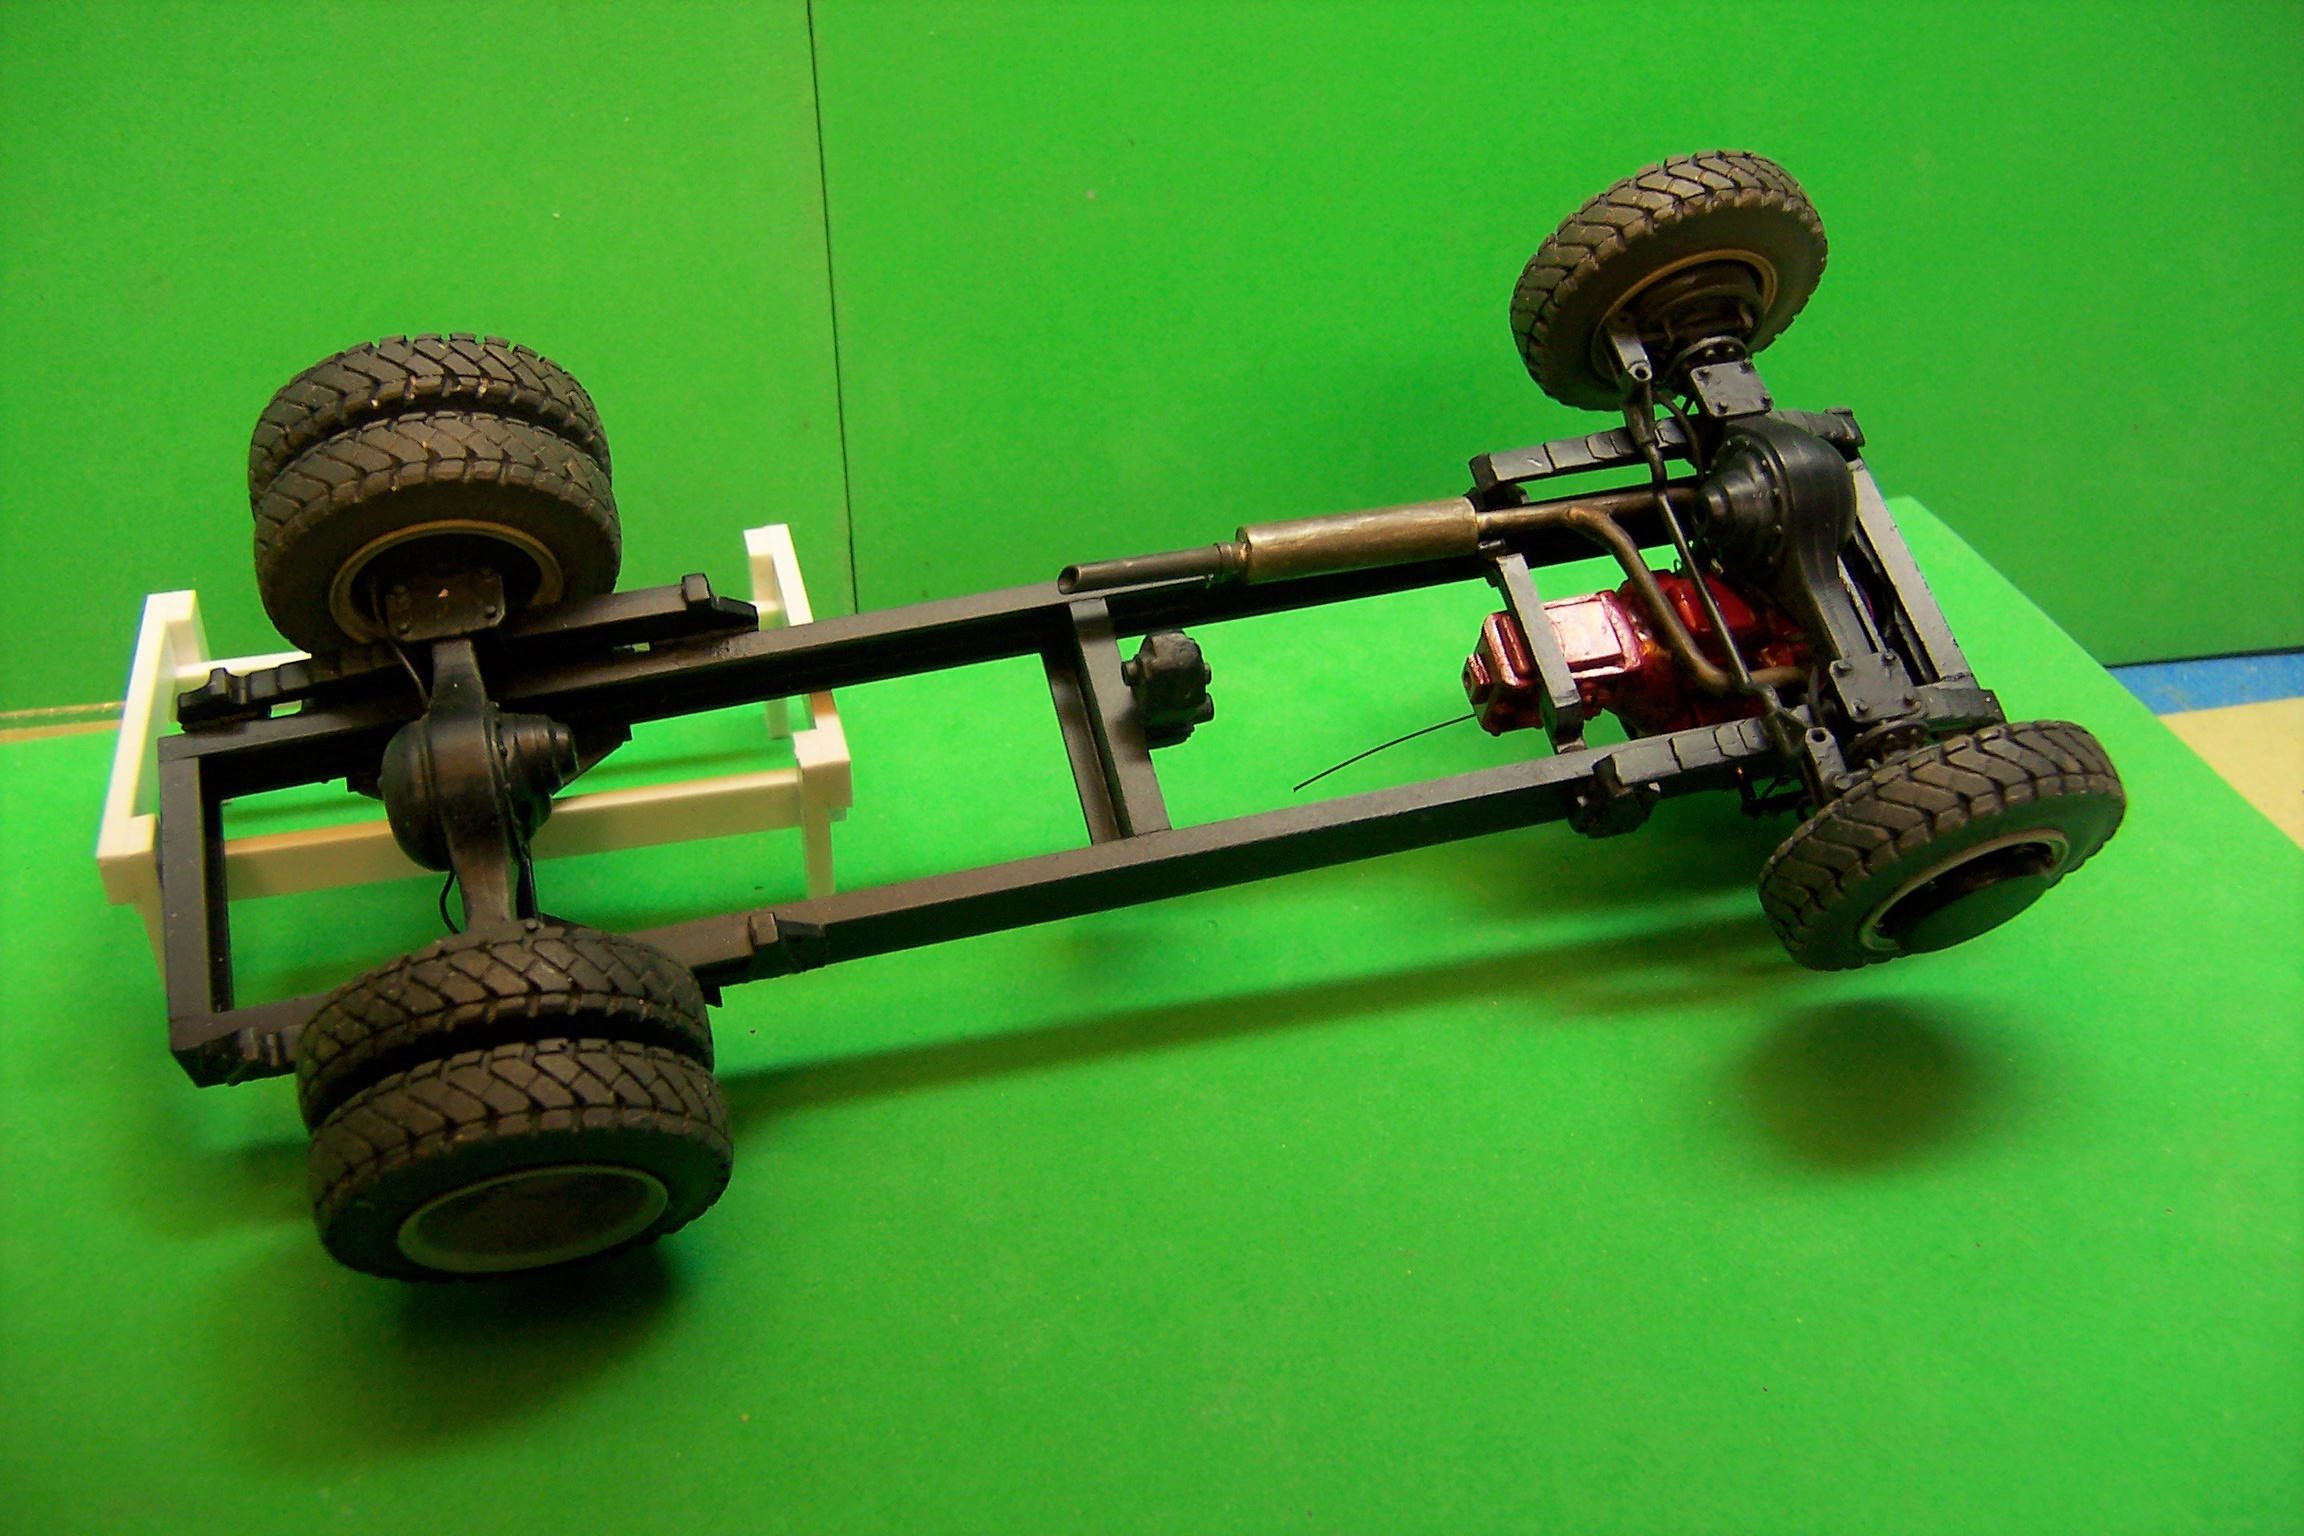
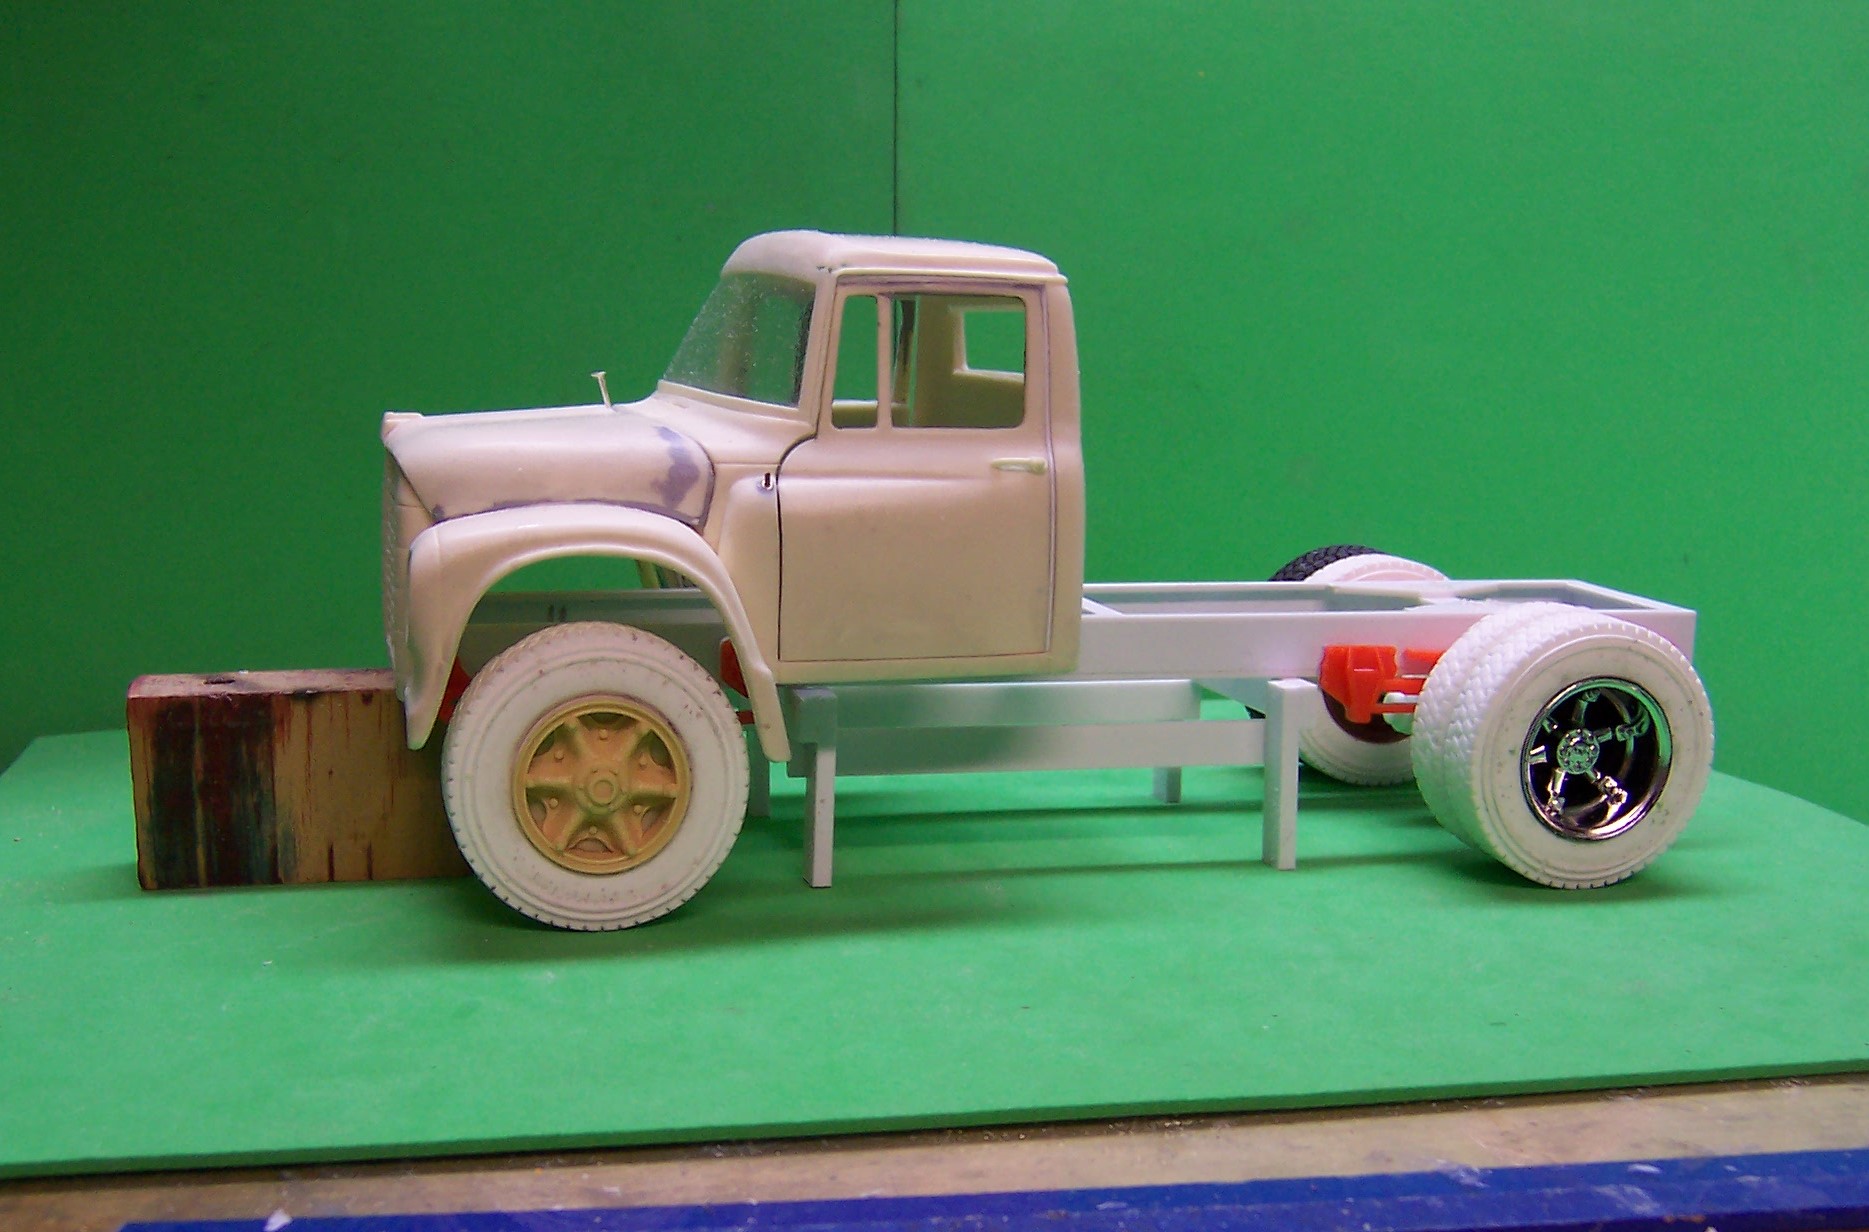
More work on the Loadstar project. The frame is now done except for the driveshafts. I'm waiting on some 3D printed U-joints for the shafts and as soon as they arrive I can complete that portion of the drive train. Engine is complete with the exception of tying in some of those "wires" that are sticking up in the air. They will be run back to the firewall eventually. The front end is steerable and the drag link moves back and forth. The rig also has power steering and that linkage is included. The cab can be set in position with the floorboard/firewall temporarily taped in. It's a tight fit for the engine and fan but it's there. Even in the real rigs the fit was tight.
-
Loadstar Brush Truck
Chariots of Fire replied to Chariots of Fire's topic in WIP: Model Trucks: Big Rigs and Heavy Equipment
It helps in making sure that the frame sits level when the axles are attached. -
Loadstar Brush Truck
Chariots of Fire replied to Chariots of Fire's topic in WIP: Model Trucks: Big Rigs and Heavy Equipment
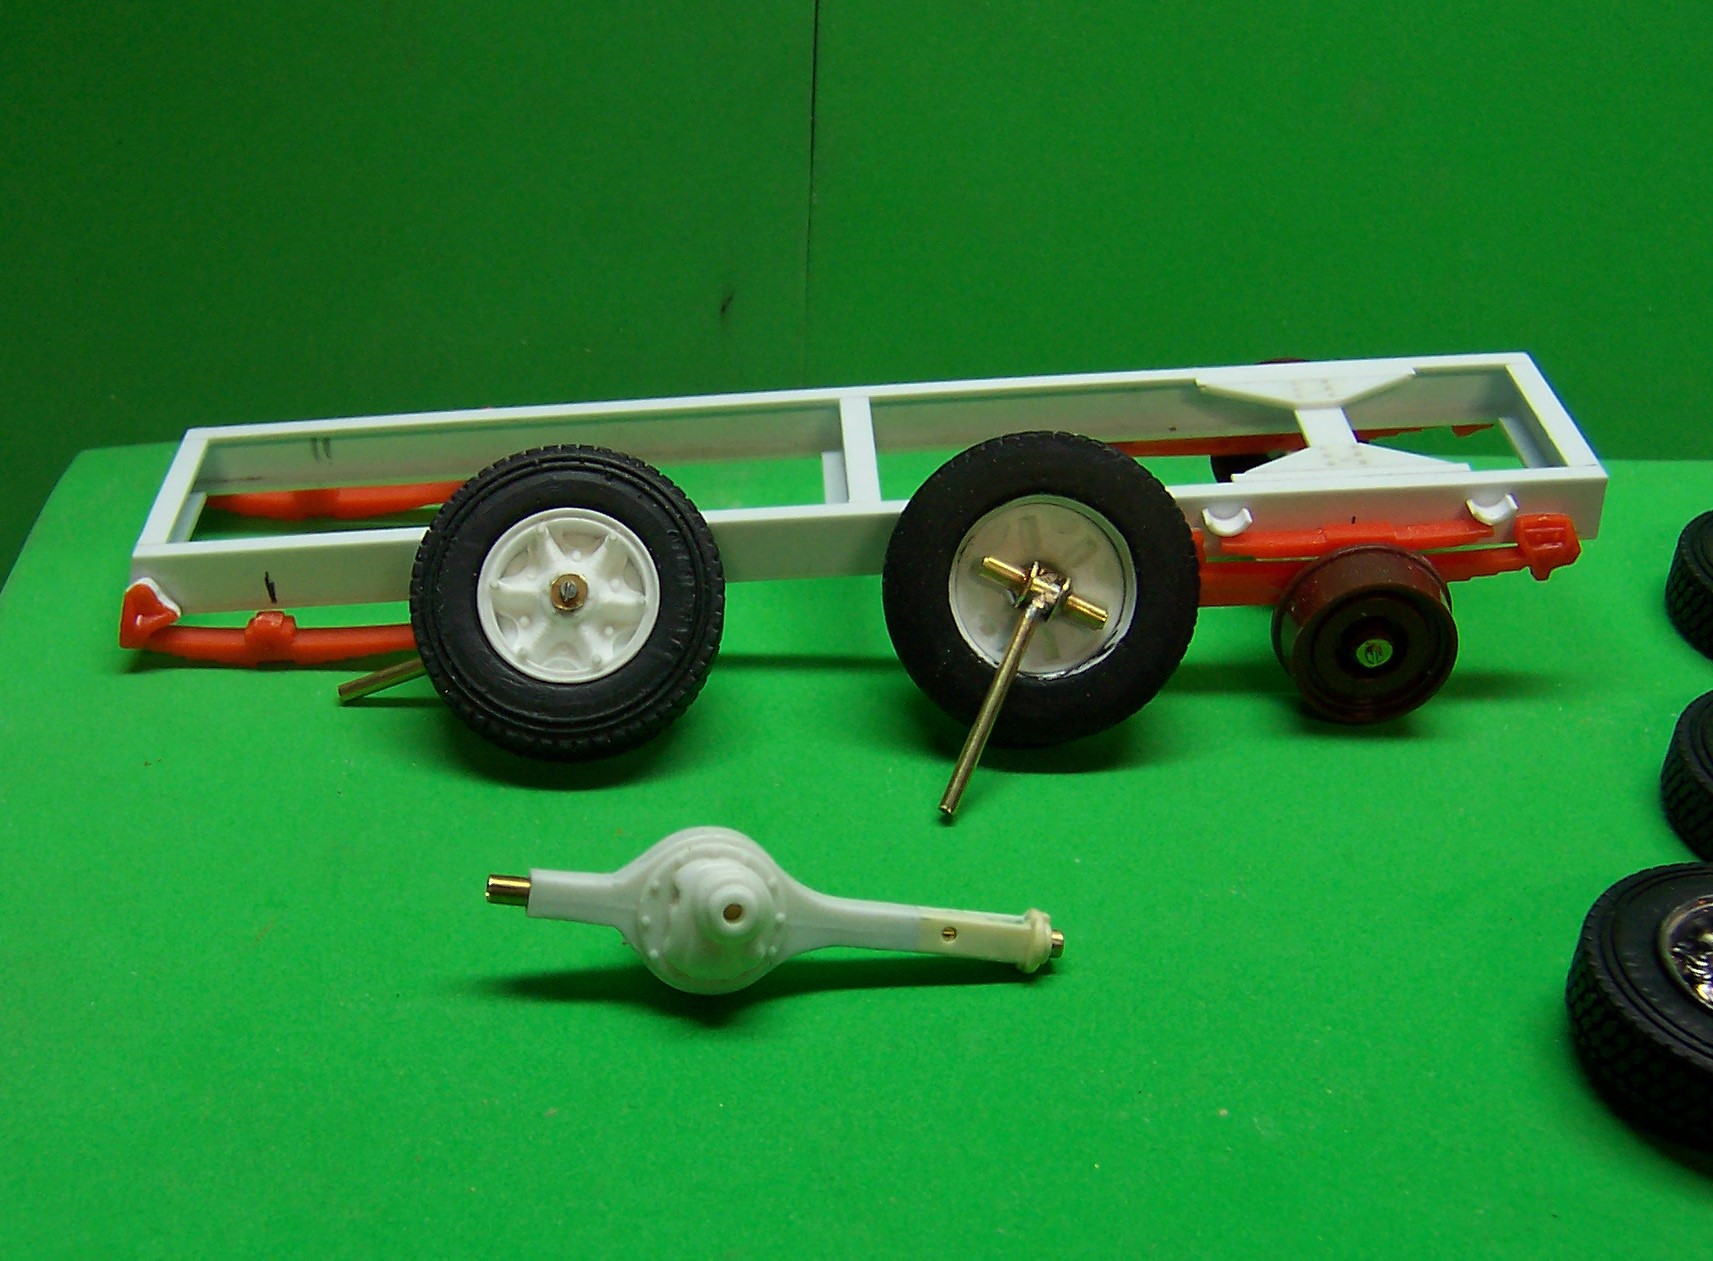
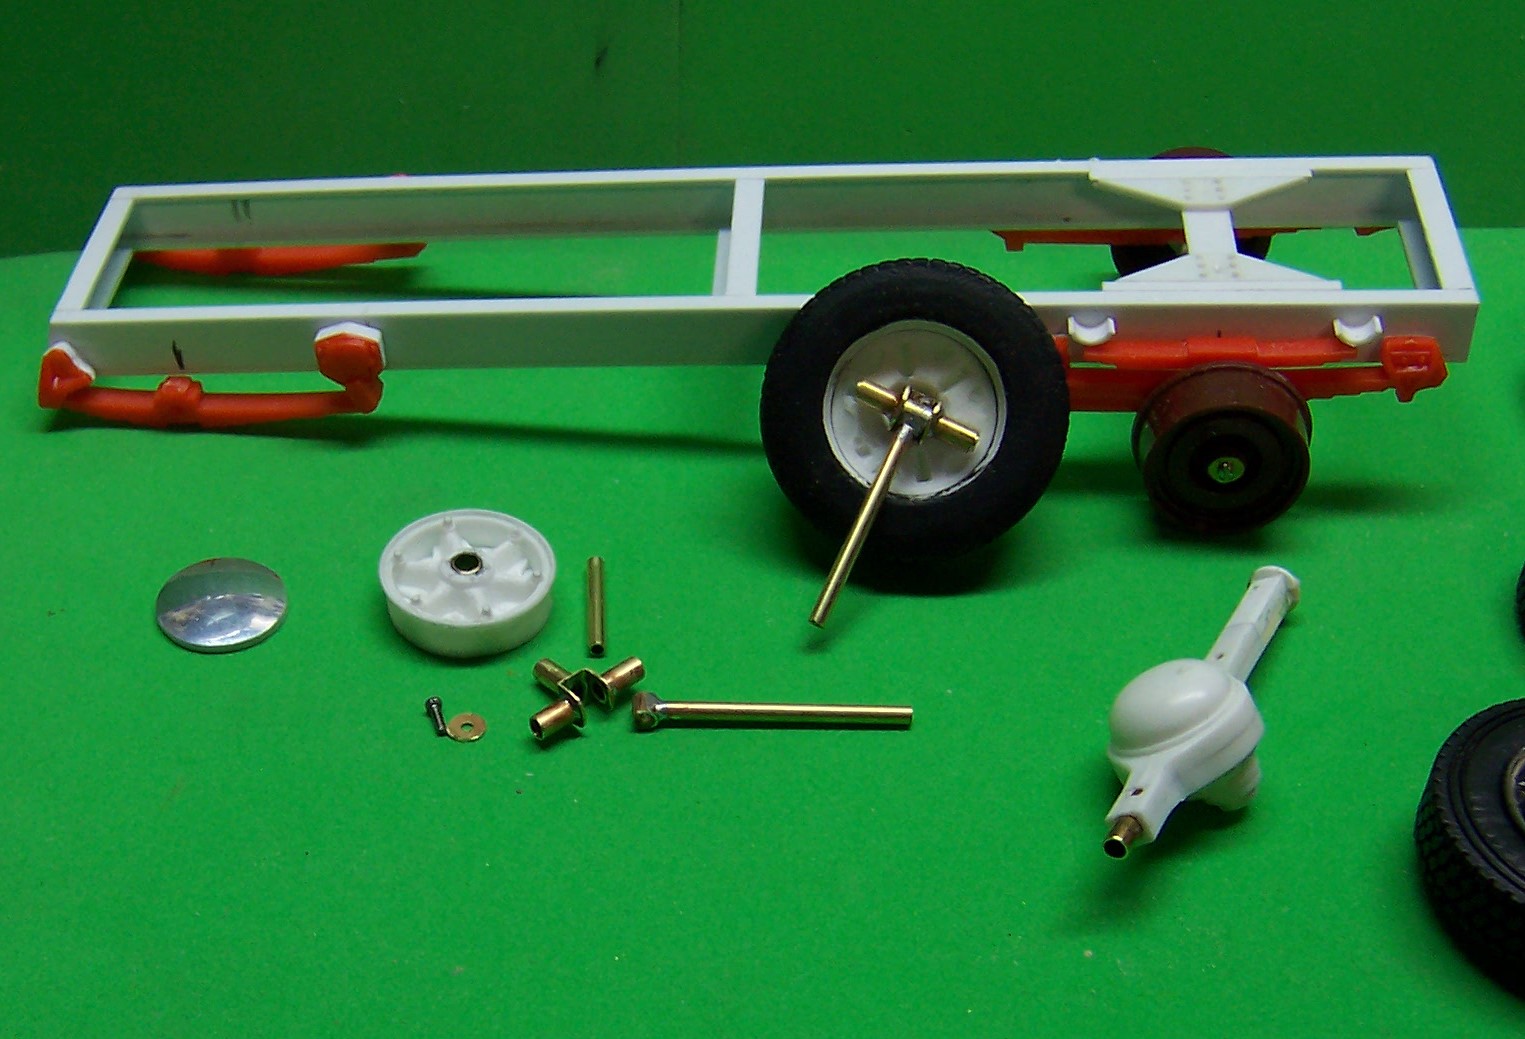
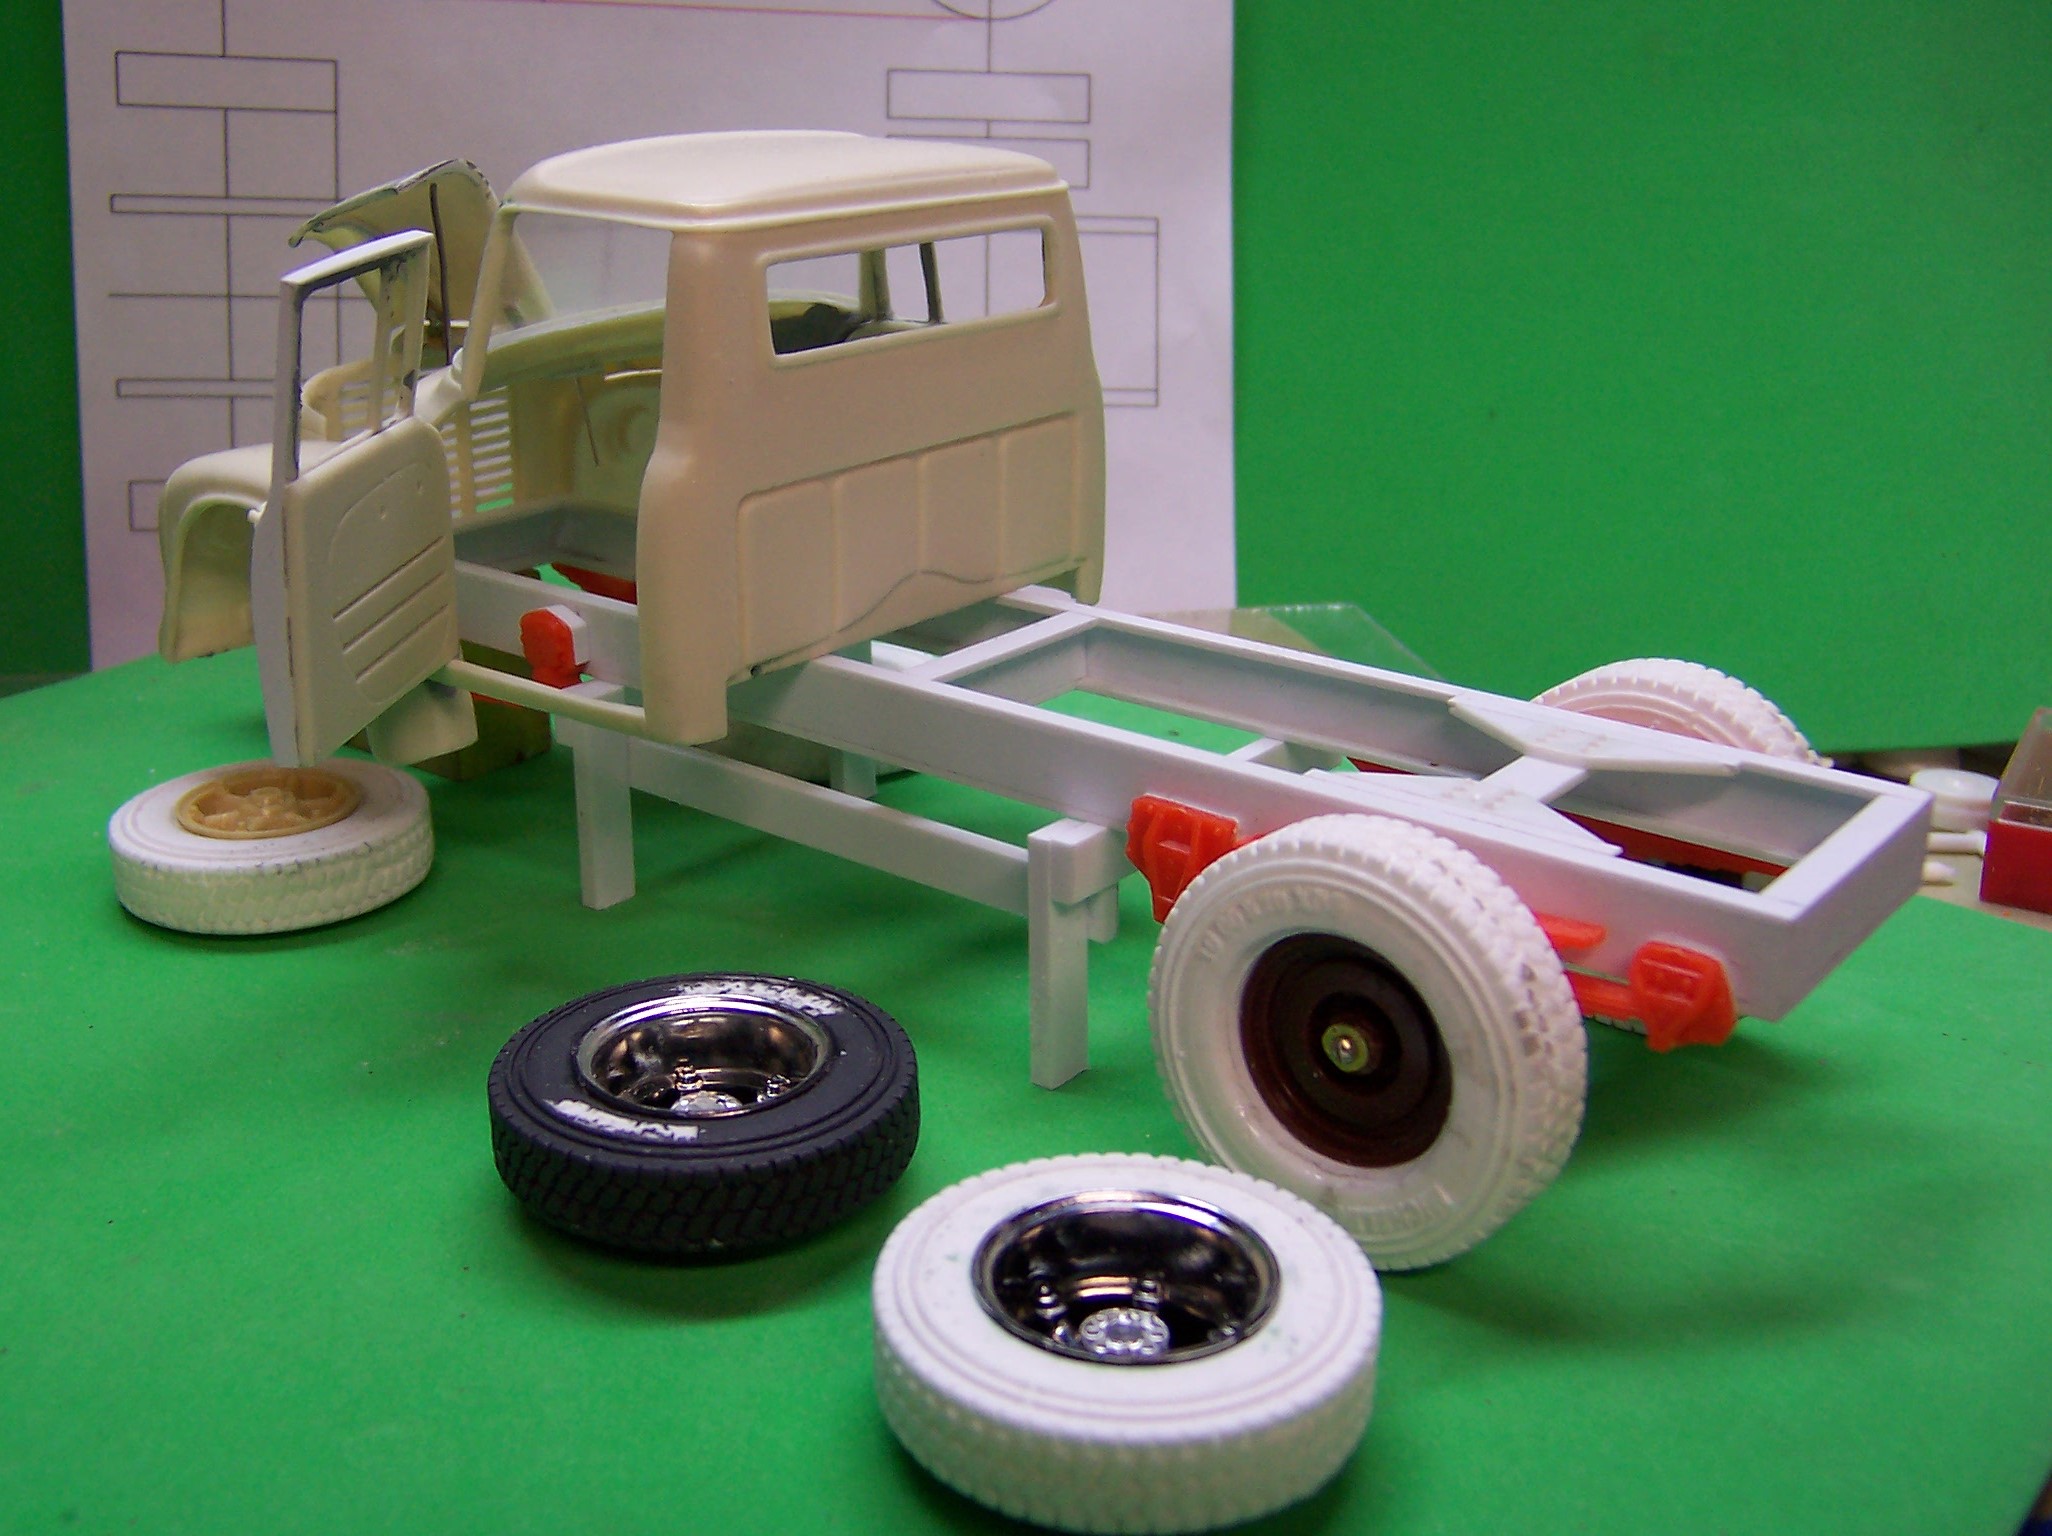
Work continues on the front end. The front axle has been secured to the springs with U bolts and plates. The hubs have been secured to the axle housing and brake drums have been added along with the tie rod and connections. The Tie rod ends are made up of brass tubing and some square stock. A few days ago I got some mud/snow tires from Shapeways that I had ordered. They are a scale 38" outside diameter and with a 21" inner diameter. Having ordered two, I made up a mold and cast a set of 6 for the truck. Goodyear and 10.00x20 are raised on the sidewalls. I used Micro-Mark two part mold rubber and two part resin to cast the tires.
-
All of the AMT Ertl ALF kits have them. Chimneyville used to have them and Don Mills Models used to carry them. Not sure if he still does. What did you have in mind?
-
It's snowing down in Dixie...
Chariots of Fire replied to Ace-Garageguy's topic in The Off-Topic Lounge
This was our house back in 2009!.
-
You must have two of those Ford cabs!!
-
Loadstar Brush Truck
Chariots of Fire replied to Chariots of Fire's topic in WIP: Model Trucks: Big Rigs and Heavy Equipment
Brian: for that 3-sided piece of the knuckle I drilled the square stock out on each side to accept 1/8" diameter tubing. I slid a single piece through the two opposite holes and soldered it in place on the outside of the "C". Then the interior part of the 1/8" diameter tubing was removed with a Dremel and cutting wheel. that way the pieces that were left were in alignment. I soldered the other 1/8" tubing in place making sure it was at 90 degrees to the "C". Only after all of this was done did I cut the "C:" to its final dimensions. If you do the cutting of all the pieces very slowly with the cutting wheel you will not heat the pieces enough to melt the solder. The interior surfaces of the finished "C" must be smooth so that the part that fits into the axle will move without jamming. Hope this helps with your build. -
Loadstar Brush Truck
Chariots of Fire replied to Chariots of Fire's topic in WIP: Model Trucks: Big Rigs and Heavy Equipment
Now that I have the front axle prepped, I started work on the front spindles that will allow the wheels to rotate and turn. To do so I used some round brass tubing in three sizes and a piece of square tubing on which to mount some of the round stock. I used 1/16", 1/8" and 5/32" tubing. The square stock was 1/4". A look at the front wheels and axle. The pumpkin is offset in the front to allow for clearance to the engine oil pan. The axle came from an Ertl ALF kit. The center was drilled out and a section of 1/8" diameter tubing was inserted inside. This helps to strengthen the axle while at the same time providing a positive placement of the brass spindle portion that will fit inside. On the left is the outside of the front wheel showing the 6 spokes and the small brass screw and washer that holds the wheel on the axle spindle. To the right is the inner spindle that will be secured to the main part of the axle and which allows the wheel to turn. The wheel on the left has the same arrangement behind it. The spindle parts are taken apart in this view. The disk type covering for the outer portion of the wheel is at left. To its right is the wheel that shows the brass bushing that the wheel spins on. Next to it is the pin that holds the other two parts together. The long piece with the short piece of tubing soldered at right angles to it fits inside the three sided part and the pin is inserted into the assembly. The screw is threaded into the short end of the three sided piece and secures the wheel to the spindle. I have a set of small taps and dies for cutting threads. The screws came from Micro-Mark a long time ago in a multi-compartment tray that holds different size screws. They still show it in their catalog. The tap and die set was a good investment from M-M as well. The long piece of brass fits inside the tubing to the right in the plastic part of the axle housing. All of that will be held together with a tie rod and connections along with the steering arm and other linkage. Silver bearing solder was used to hold the brass parts together. A simple 25 watt soldering iron did the work.
-
Project: International Durastar
Chariots of Fire replied to ranma's topic in WIP: Model Trucks: Big Rigs and Heavy Equipment
How's the cab scale out size wise for 1/25? -
A trailer for the GMC - DONE
Chariots of Fire replied to landman's topic in WIP: Model Trucks: Big Rigs and Heavy Equipment
Any more photos of the Gimmy?? -
Loadstar Brush Truck
Chariots of Fire replied to Chariots of Fire's topic in WIP: Model Trucks: Big Rigs and Heavy Equipment
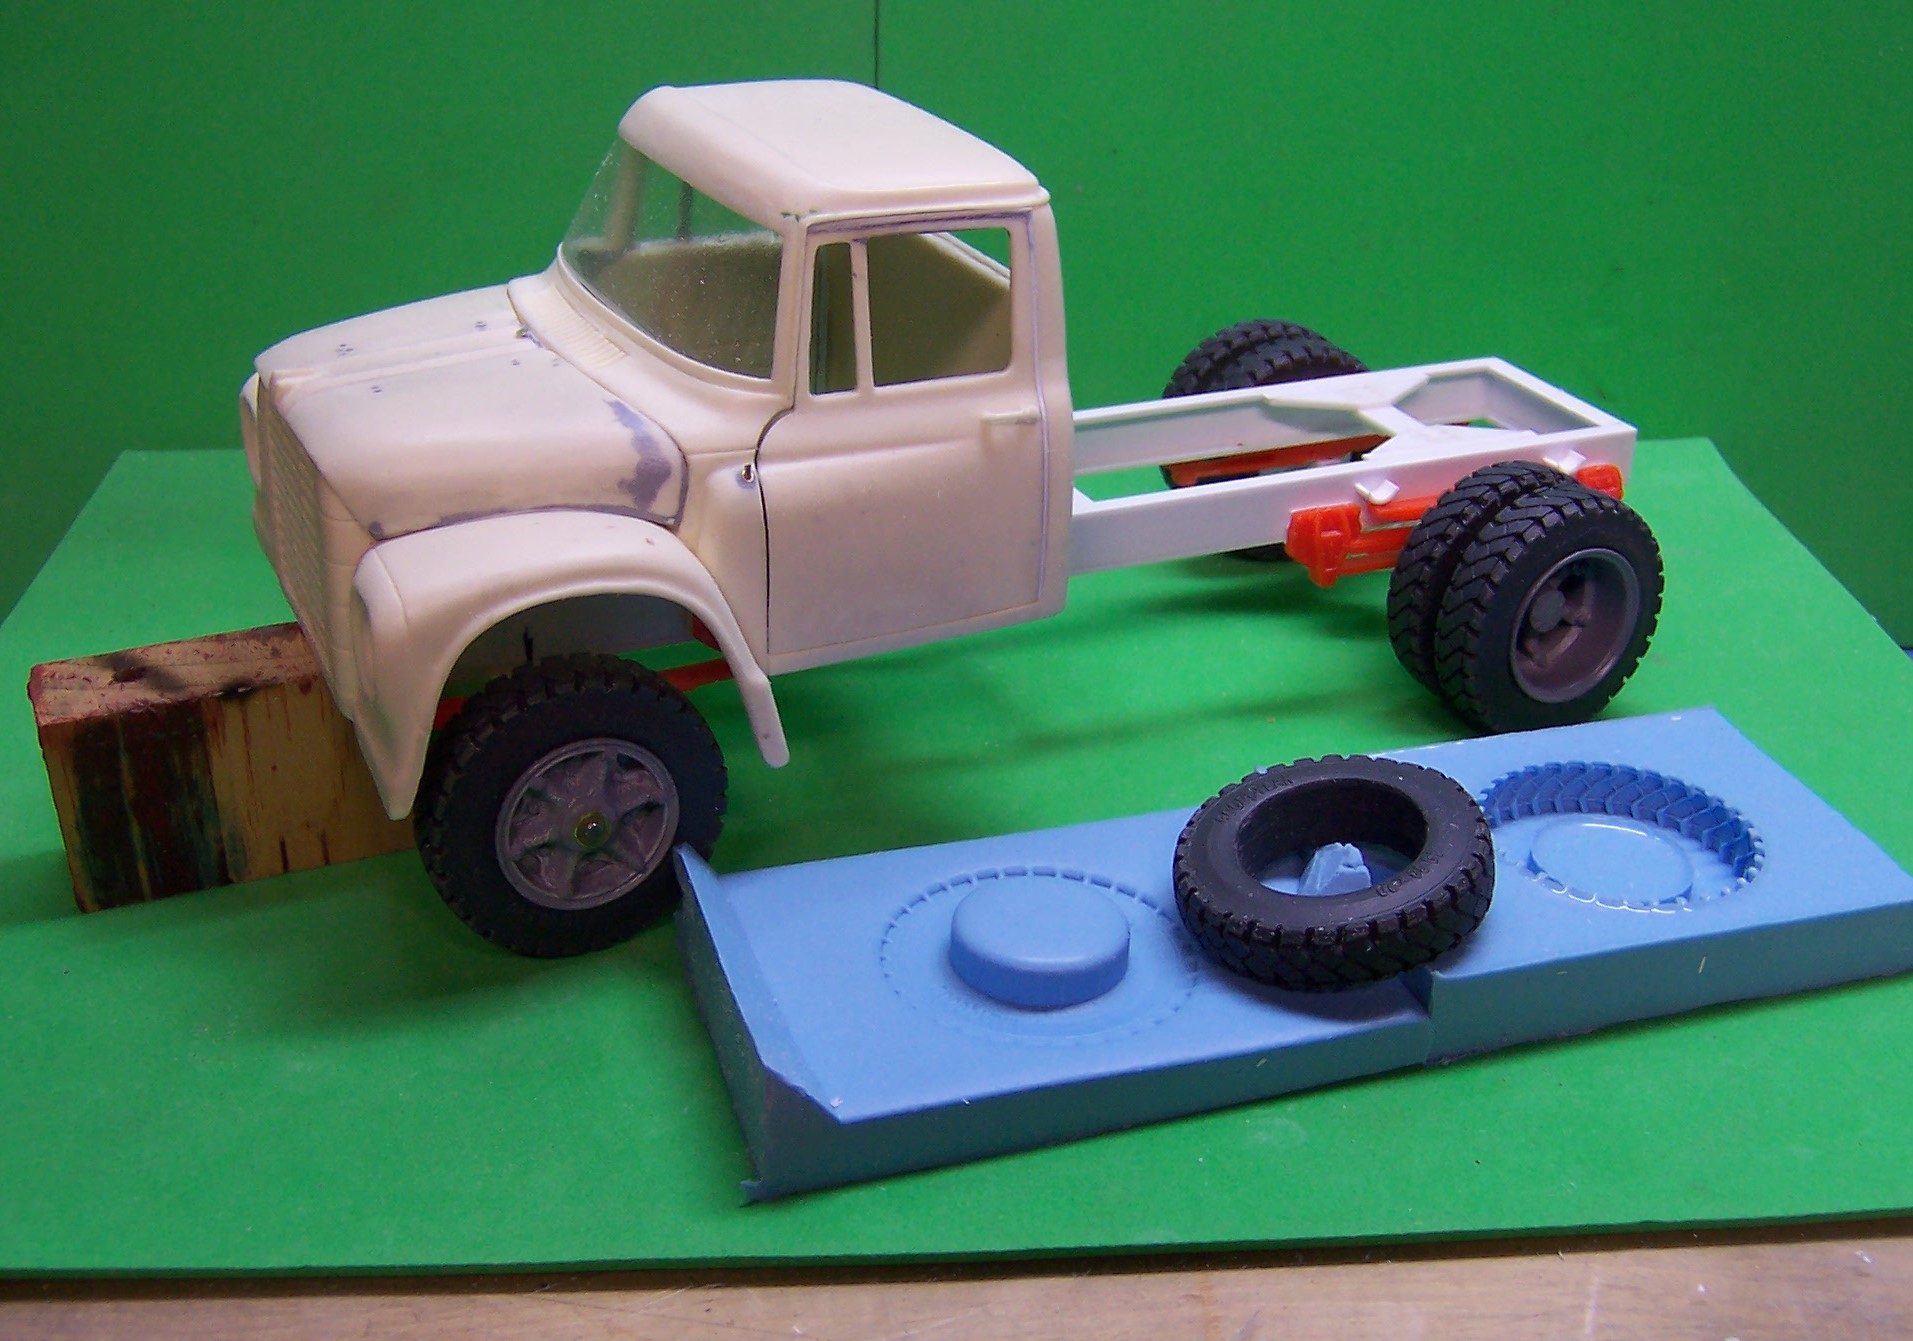
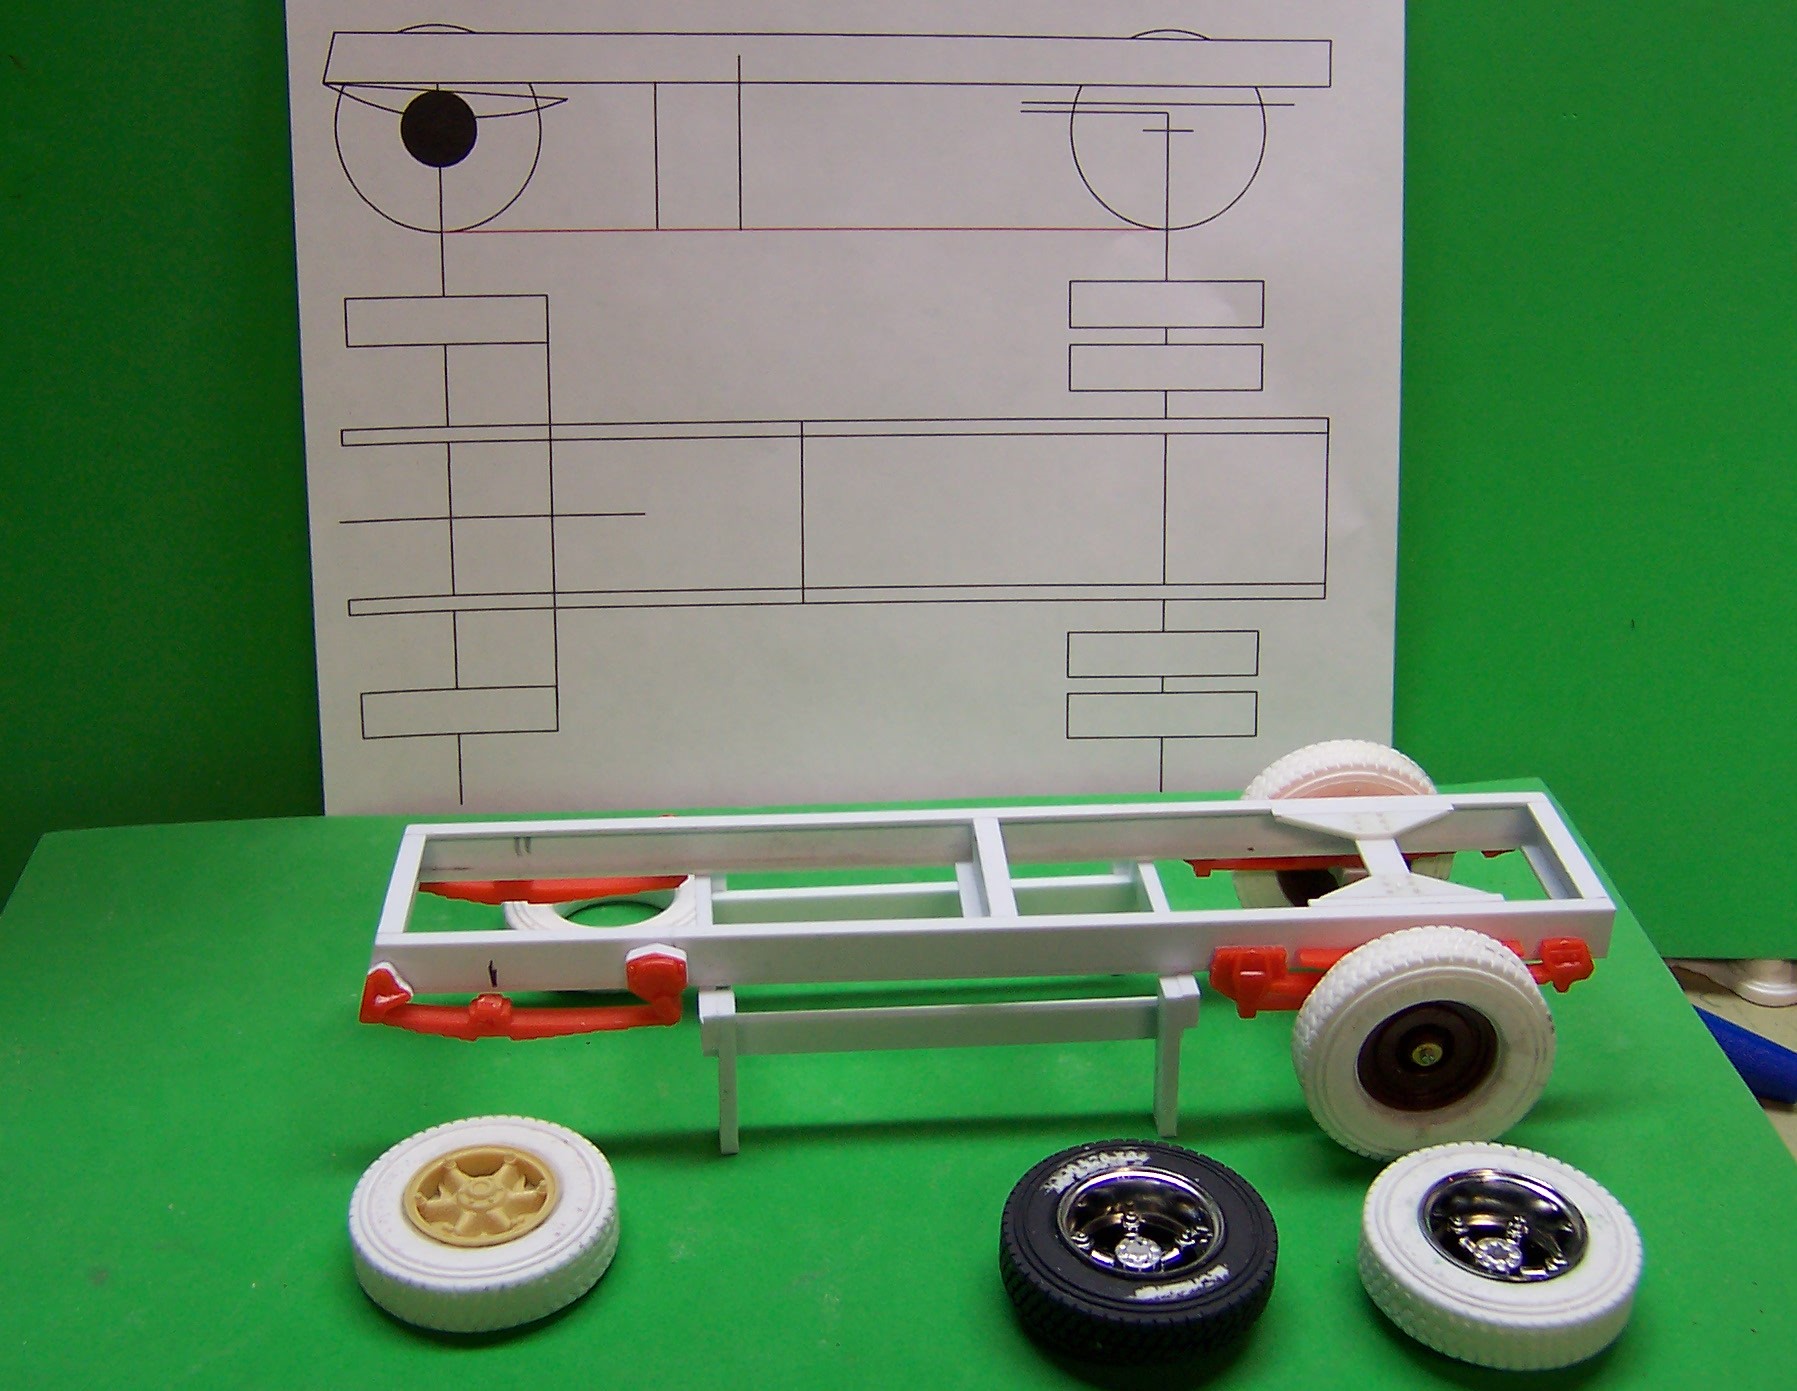
After a brief hiatus from modeling I'm back at it, working on the frame and axles for the Loadstar. Last Saturday I paid a visit to the fire station next town over and got some photos and measurements that were needed to build up the frame and get the wheel base set. With that information I drew up a frame drawing to use as a template. The frame pieces were made of 0.030" thick sheet stock for the web and 0.040" x 0125" strip stock for the flanges. In this instance the frame is deep enough and short enough to use plastic rather than brass. The springs came from the AMT Ford snow plow kit. They had to be modified for length and position to get the height correct. Measuring the height of the frame off the floor is critical to getting the springs and tires right so that everything sits as it should. I made a jig for the frame to sit on so I can be sure and get the front and rear axles in the right position. With that done I concentrated on the rear axle. I used an AMT ALF rear axle and drilled it out to fit a 1/8" diameter brass sleeve inside. Inside that I will slip in the next size smaller tubing for attaching the wheels. I used the wheels from an IH Ertl kit and modified them to fit some resin cast tires. They are held in place by a small screw and washer threaded into the inner axle tubing. The outer rear wheels will be glued to the inner ones at final assembly. The front axle is not built yet so a block of wood supports the front of the cab where it sits on the frame. The front wheels will be made to turn with some brass tubing. When I get them made up I will post photos of the inner workings. Doors and hood are now fully hinged. The hinge pin for the doors can be pulled out from under the bottom of the fenders. After painting, the hole in the fender will be sealed up with the pin inside. The hole in the cowl can be filled and smoothed over now. The front wheels will be covered to enclose the inner workings. Not sure if this rig has a Howe Coleman front end but it looks a lot like one.
-
Good solution to the tilting hood problem!
-
1/25 Jeep Gladiator
Chariots of Fire replied to Casey's topic in WIP: Model Trucks: Pickups, Vans, SUVs, Light Commercial
I hope that this kit gets reissued pretty soon! -
Kalmar Ottawa Yard Tractor
Chariots of Fire replied to hct728(Bob)'s topic in WIP: Model Trucks: Big Rigs and Heavy Equipment
Hey, Bob: You need some license plates for that rig. HCT-728 would be good, eh? -
Loadstar Brush Truck
Chariots of Fire replied to Chariots of Fire's topic in WIP: Model Trucks: Big Rigs and Heavy Equipment
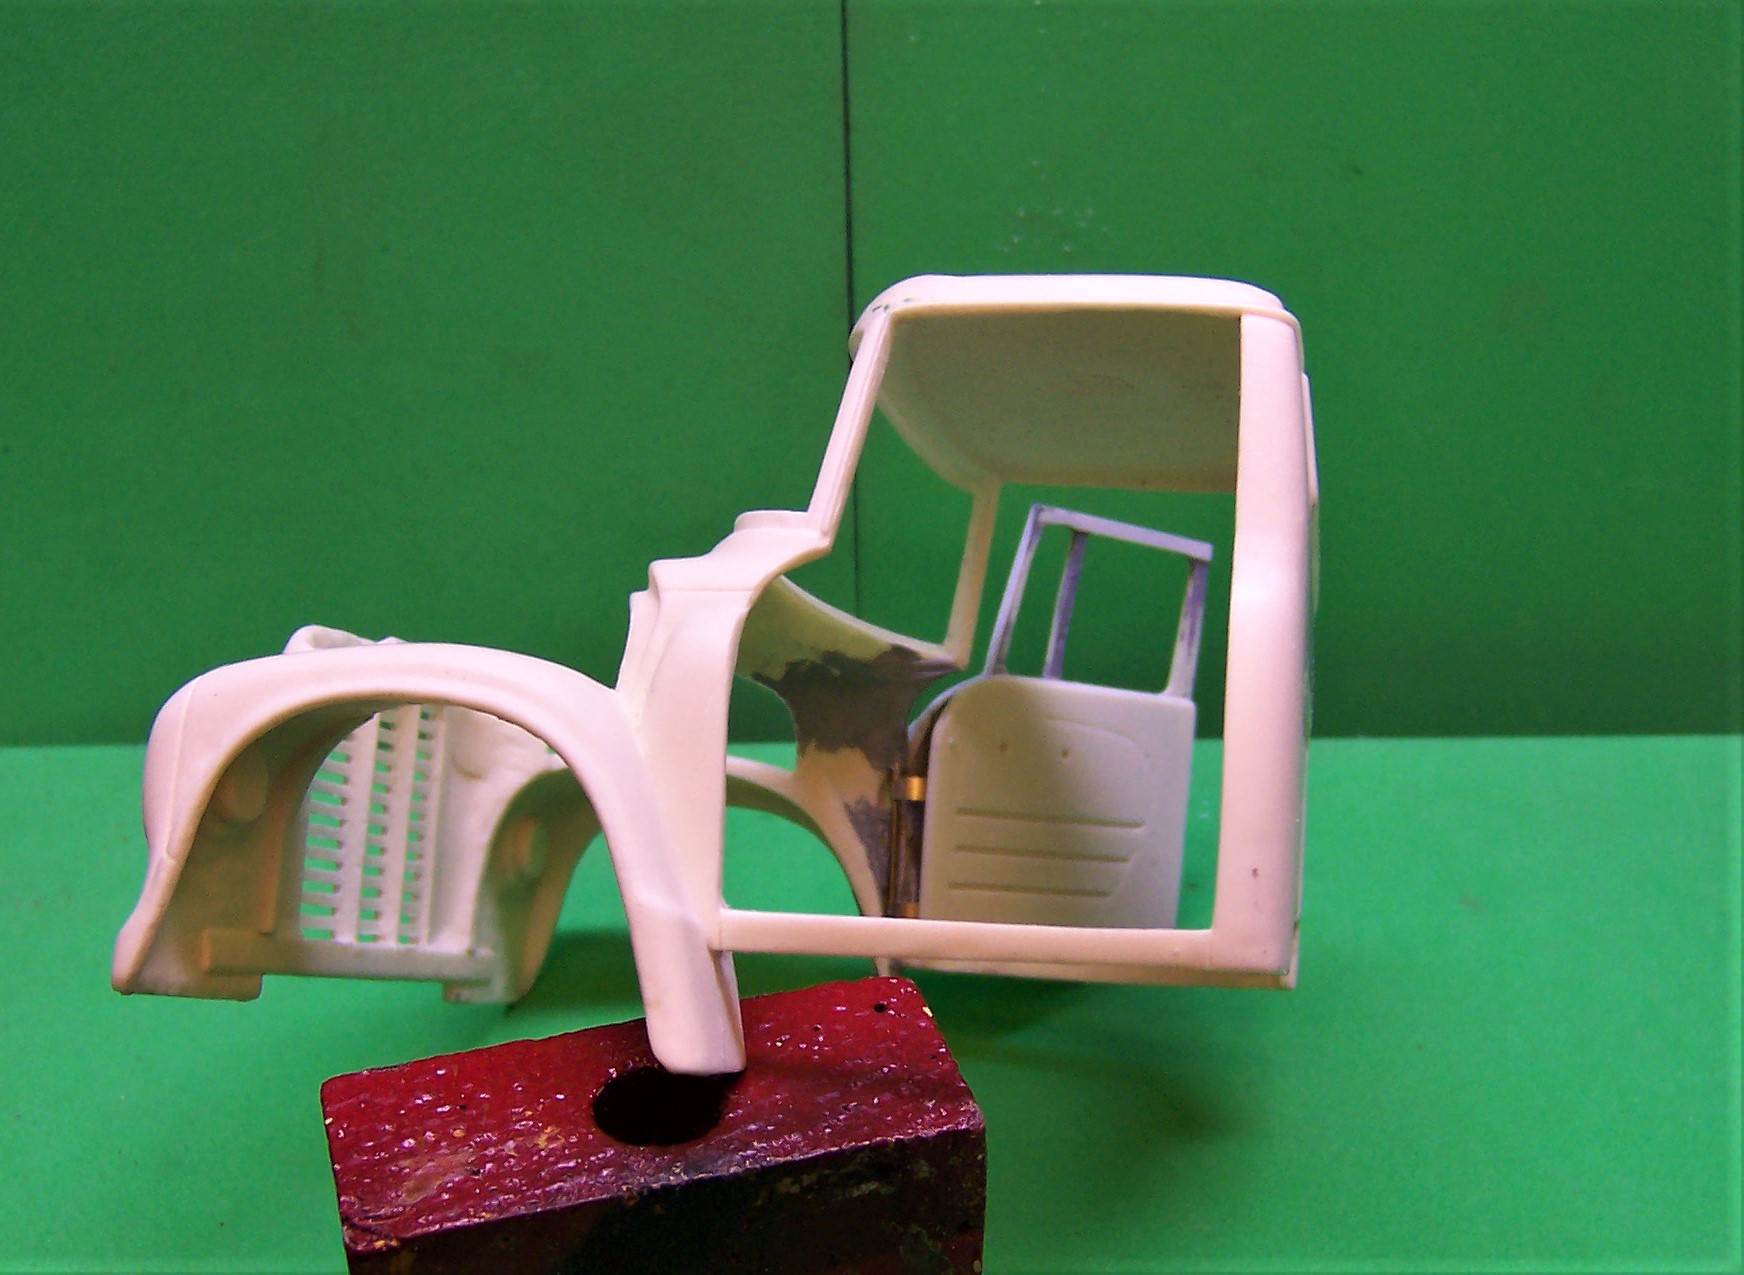
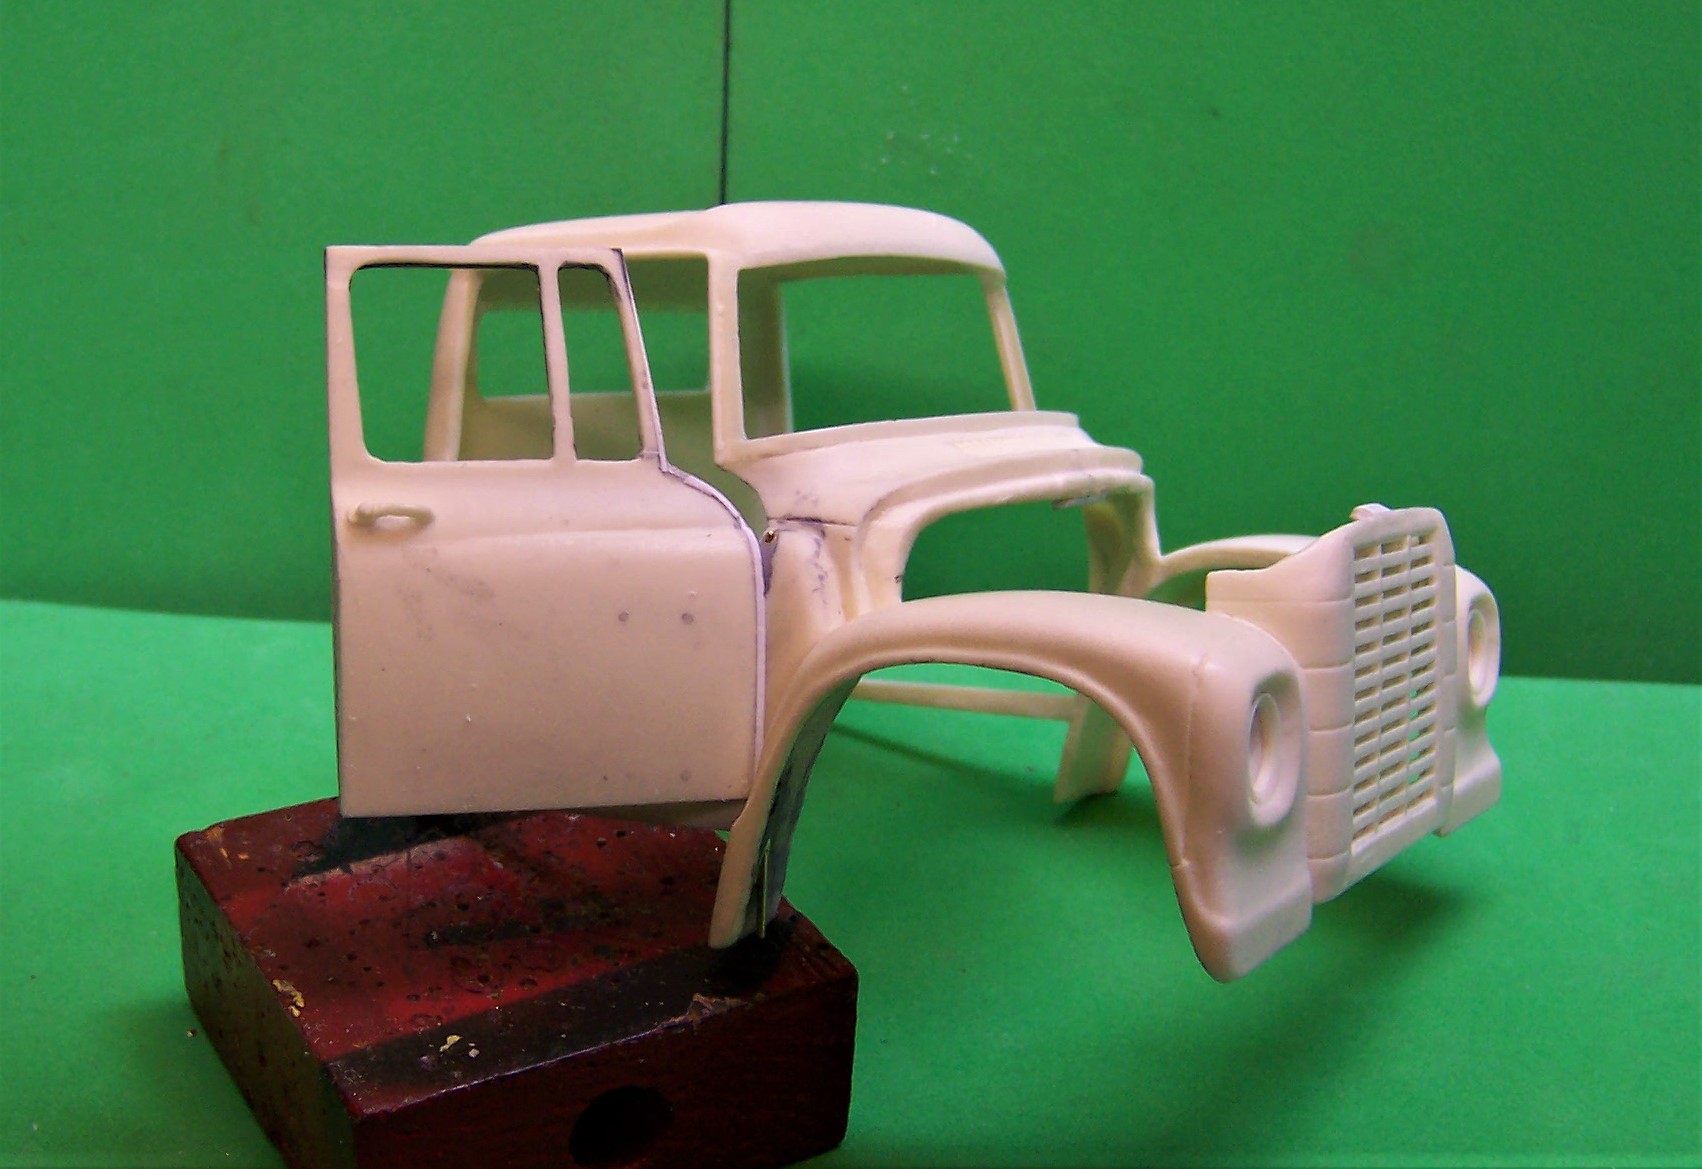
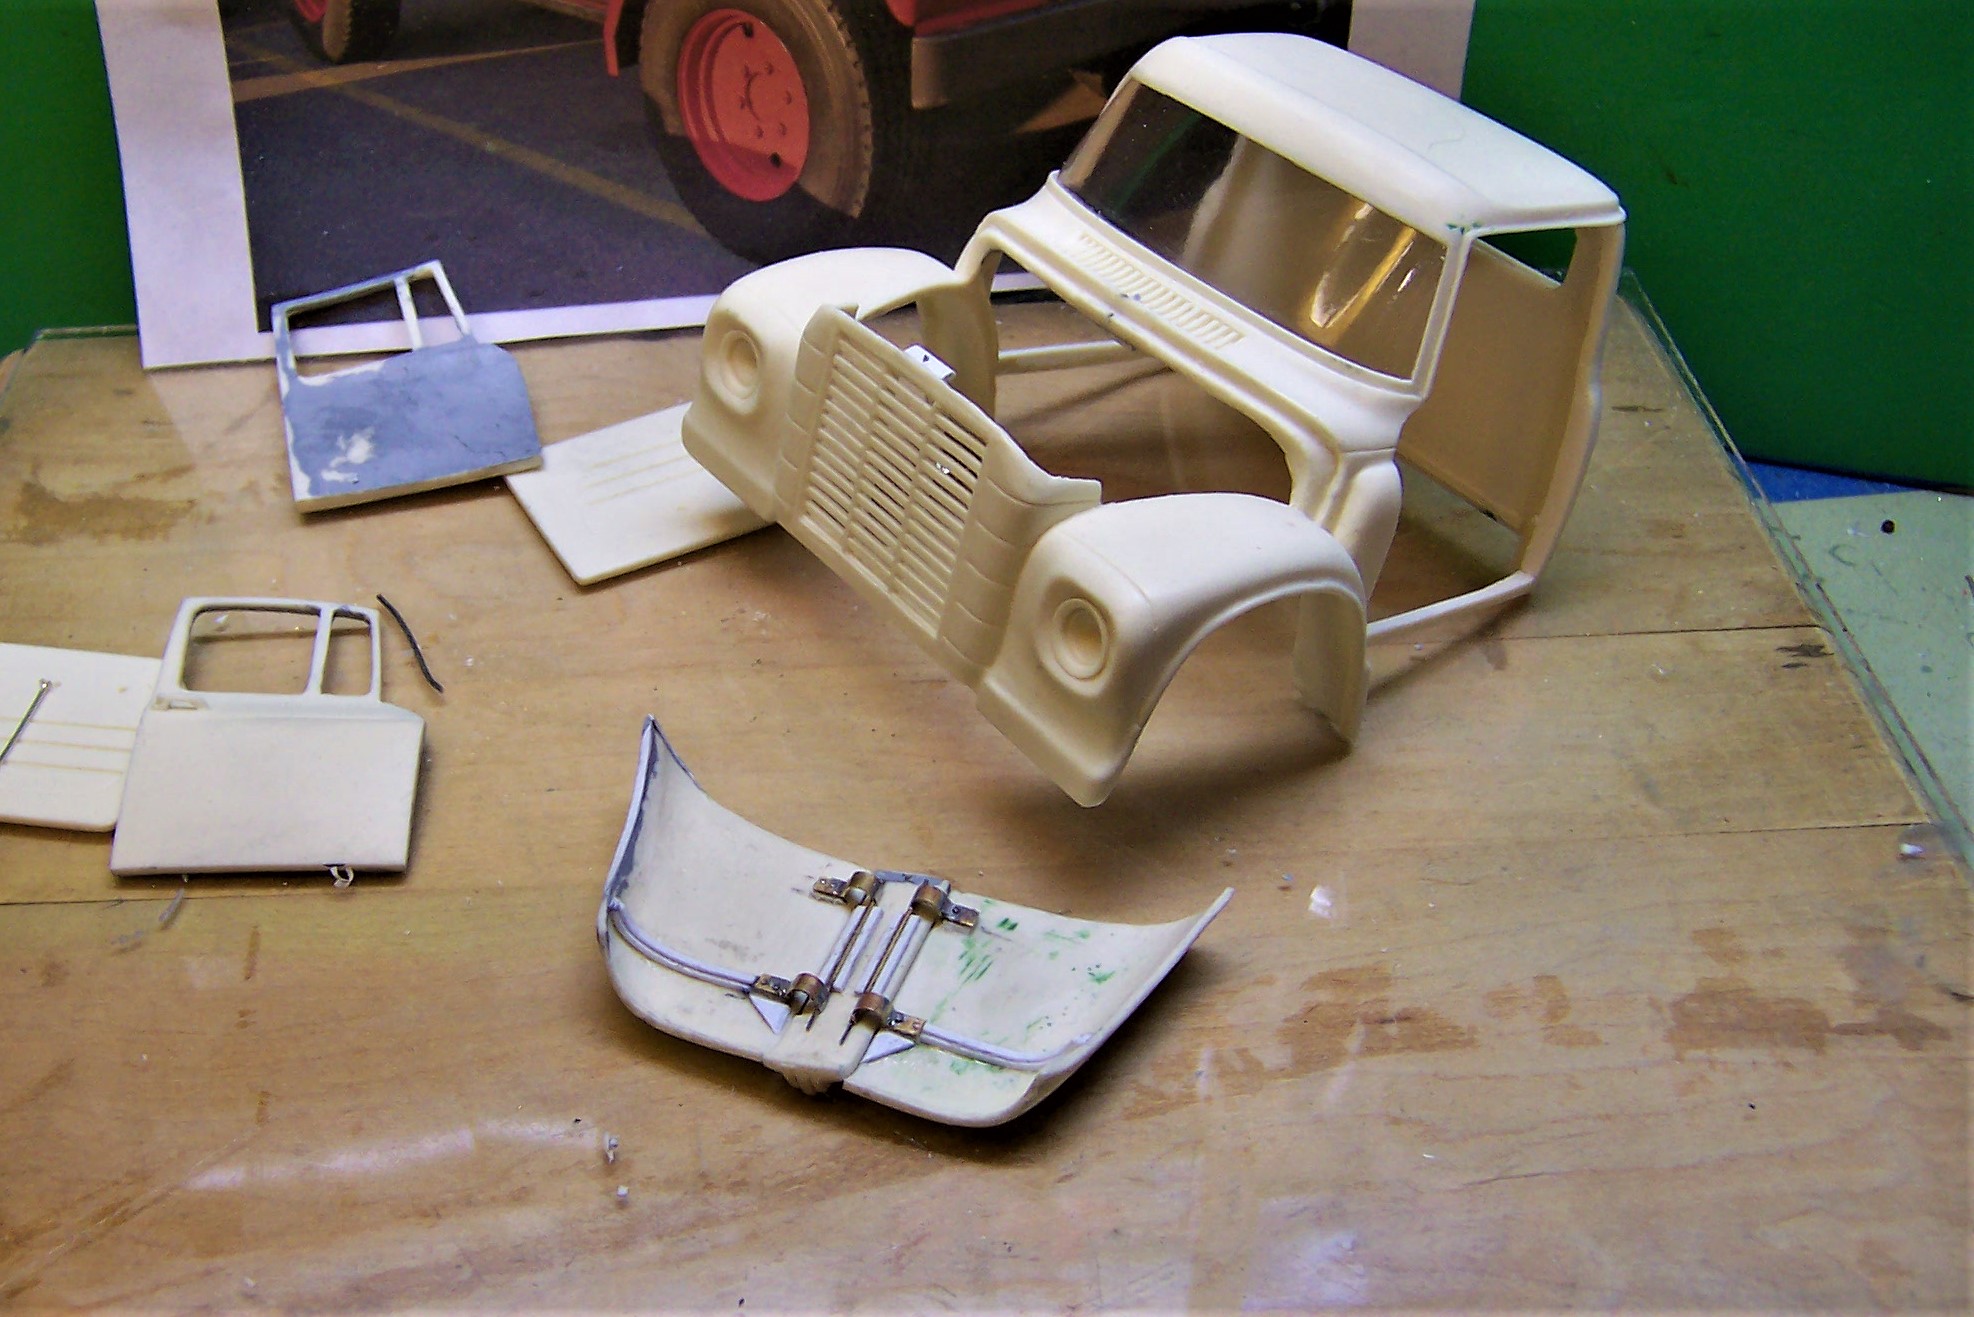
Here are the basics of making the hinges for the IH cab doors. Three pieces make up each hinge: a half round section of brass tubing, a piece of brass flat stock and small brass tubing for the hinge points. These three pieces get soldered together as shown above. An even smaller piece of tubing joins the two hinges together so that they will operate in unison once they are mounted. The completed hinge is mounted inside the door and against the inside of the cowl at the door jam. The interior door piece now covers the flat section of each hinge piece. That ultimately will be finished off so that the only thing visible will be the hinges themselves. In the photo above there is a piece of tubing visible in the edge of the cab with some putty underneath it. A hole was cut in the cab here and in the lower part of the fender so that a piece of tubing the same diameter as that used on the end of the hinge pieces could be inserted. They line up with the door hinges when all is in place as shown in the cab interior closeup you see above. When all is said and done this hole will be closed up and sealed. The hole in the fender below has been trimmed to the shape of the fender. The small hinge pin goes inside this tubing, up through the jam and into the tubing in the cowl. When all is completed the pin will be inserted and then sealed off with superglue so it will not fall out. A bit of touchup will make the hole all but invisible. The door in the closed position with the hinge pin protruding through the tubing. The pin would be cut off below the top of the brass tubing and will not be seen after final assembly. You can also see a piece of plastic strip stock on the leading edge of the door. A similar piece is needed at the top of the door to fill in the gap there . A small piece of strip stock glued to the inside of the cab will give the door something to close on and will keep the opening closed up with the doors are in place. The door opened on the hinges. The leading edge of the door is trimmed very thin to allow it to move past the edge of the jam. A bit of trial and error is needed here but when the door and jam are finished off the clearance will be sufficient. Now for the second door! Always fun when you have to do the same procedure a second time but in the opposite hand!
-
Loadstar Brush Truck
Chariots of Fire replied to Chariots of Fire's topic in WIP: Model Trucks: Big Rigs and Heavy Equipment
Working on the door hinges right now. Got one side done so I will take some photos and post them with a description of how it was done. Door hinges are very similar although I used a larger piece of tubing for them. How to get them in place and get the door to open and close at the same time was a challenge but I'll go through it. -
Very nice work, Jan. I especially like the Autocar logging rig.
-
1929 Ford Tow Truck
Chariots of Fire replied to Michael Kröger's topic in Model Trucks: Big Rigs and Heavy Equipment
Yes, that is exceptional work. Nice and neat and not overly done. Great weathering techniques. Wonderful series of photos. -
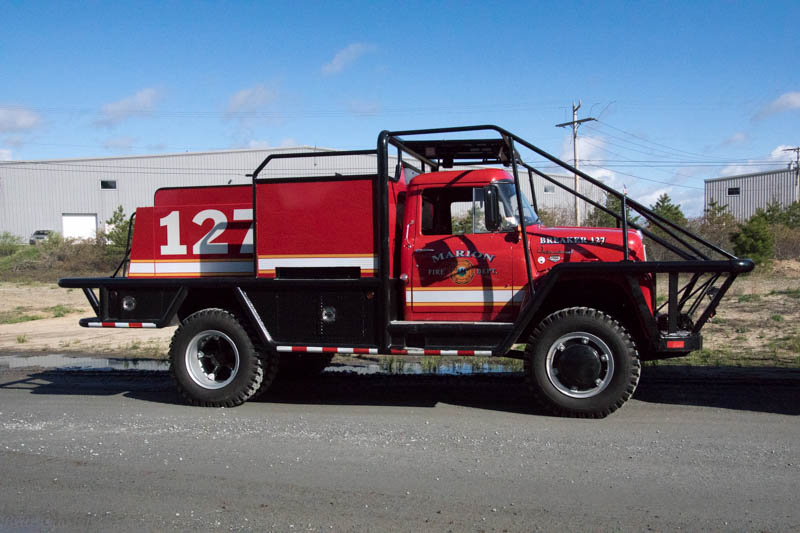
Note: This is now a new topic in the "On the Workbench". The build of the brush truck will continue there.
-
Now that the Loadstar dump truck is finished work has begun on a second Loadstar, this time as a brush truck. There is still one in service in the next town over so getting measurements and photos will be easy. I will be posting photos and information on the build as I go along. Here are some beginning photos of the work to cut open the cab and create working hood sides. This rig was originally built by Maxim Motor Co. of Middleboro, MA back in the early 1970's. It was recently rebuilt with a new poly tank and a reconfiguration of the body. Short rigs like this work easily in our type of wooded terrain. Here's the beginning of the build. The doors were cut from the cab by patiently scribing the lines with the back of an Xacto knife and a small razor saw. They will have to be cleaned up and the edges brought back to fill in the door opening. The hood was cut into three pieces with the center section to be permanently secured to the cowl and grill. The hood sides open butterfly style. Hinges were made for the hood sides using slices of brass tubing that were soldered to some flat stock. On the opposite end of the tubing small tubing (0.018" diameter) was soldered for the moving part of the hinge. Inside the hinge is stainless steel wire that connects all of the hinge pieces together. The hood sections had to be trimmed to thin sections where they move against the center piece in order for them to clear it. In order to be sure that the hood placement is right, centering holes were drilled down through the back of the center piece into the cowl. A similar hole was drilled into a piece of strip stock that is glued to the inside of the grill and up into the center piece from below. With locator pins in place the center section is locked in and adjustments to the hood sides can be done. The right side is pretty good as is but the left side needed some tweaking at the back and along the bottom to make the fit against the cowl and fender.