jaymcminn
-
Posts
1,762 -
Joined
-
Last visited
Content Type
Profiles
Forums
Events
Gallery
Everything posted by jaymcminn
-
I currently have a part for my Miata from Treasure Coast Miata making a grand tour of Florida. I chose "Priority Mail" at checkout. It went from Hobe Sound (North of the Palm Beach area, East coast) to Opa-Locka (South of Miami) to Ft.Myers (half an hour away from my house) then back to Opa-Locka, and now Ybor City (Tampa, 2.5 hours from me). All in the span of 24 hours. I'm supposed to get it Saturday, which means it has plenty of time to check out the Panhandle and catch a sunset in Key West. Should have chosen FedEx...
-
Great idea on updating that avatar... it's been a while. A lot of my old pics, including the Porsche that is my current avatar, were taken with my old Panasonic Lumix non-DSLR. It took a really nice picture but unfortunately did not survive my idiot cat knocking over the tripod a few years back.
-
Thanks Eric. the two biggest challenges are going to be changing the NA6 interior to the later NA8 interior (especially the '95M low buckets) and finding a set of 15" BBS RZ wheels. Aoshima makes 17" RG's in 1/24 but they're just too big. Thanks man. I have some plans for the roadster... I'm leaning toward a resto-mod type of thing with painted wire wheels, racing seats and a triple-Weber setup.
-
Playing with my new camera setup today and decided to get some pictures of old builds with it. Camera is a Canon Rebel T7 with a 17-7 mm Sigma macro lens. Pics were shot at 22-29f aperture with auto ISO. Lighting is two softboxes with 400w equivalent 5500k fluorescent bulbs. Background is plain white paper. Fujimi Enthusiast 356 Speedster... Italeri Ferrari 250 California... Tamiya La Ferrari... Fujimi Enthusiast Daytona Spyder... Revell '49 Merc... Hasegawa Ferrari 250 TR... 1:12 Tamiya Datsun 240zg... 1:12 Trumpeter GT40... 1:12 Italeri Alfa 8c... ...Aaaaand that's how I spent my afternoon!

-
Photo do-over time... I decided if I'm going to step up my photography I need a camera that wasn't built during the Bush presidency... the original pics were shot on a 15-year-old Canon Rebel XTI that just couldn't handle what I was asking it to do. Today I bought a Rebel T7. This is one of the cheapest DSLRs out there, but it has an excellent sensor for the price and accepts the lenses from my old Canon in addition to having a decent lens bundled with the camera. These new pics were taken at f29 with auto ISO and, other than some cropping, are exactly as they came off of the SD card. The color in these pics is EXACTLY how the model appears in real life.
-
I like a BRG Miata. Yours turned out really well!
-
So awesome. I wish we got the mk1 Escort over here. One of my favorite cars.
-
A few shots with black background. Base is black granite tile.
-
Thanks everybody, I'm trying to get away from smartphone photos for my completed builds and have broken out the old Canon Rebel DSLR I inherited from my dad. Being able to shoot with higher depth of field (f22/29) keeps everything in focus and helps make my subjects look a lot more like the real thing. I shoot using two large "soft box" lights, each with 400w equivalent daylight fluorescent bulbs, and a Speedlite flash. The high depth of field does tend to render my shots a bit dark even with the lighting setup, so I have to lighten the images a little after the fact. There's a pretty significant learning curve and I'm still somewhere near the bottom!
-
This is my build of the new-tool Jaguar E-Type coupe by Revell. I wanted an easy project after my 1:12 Fiat Mefistofele build and I've always loved E-Types, so I figured this would be perfect. It's a pretty decent kit, but it's not without its issues... the wheels and tires are pretty poor, so I substituted a set of RMCM Dunlop wheels and Tamiya Dunlop tires. The bonnet fit is challenging to say the least. I was able to coax the warp out of the bonnet with hot water, but during final assembly I could not get the bonnet to sit flat, despite repeated test-fitting during mockup. I eventually had to do away with the bonnet hinge points at the front of the chassis. The paint is my attempt to replicate Jaguar's Opalescent Maroon, my favorite color for early E-Types. It's Tamiya Maroon followed by three coats of Mica red as a "toner" under TS-13 clear. I came across the color combination while doing spoon tests to replicate the "Merlot Mica" paint color of my 1:1 Miata for an upcoming build. Overall I was pleasantly surprised with the new Revell kit. It's beautifully detailed, well-engineered, and other than the bonnet fit went together nicely. On to the pics! Just realized I need to clean up where I trimmed those hood hinge points...
-

Tamiya TS65 Pearl Clear questions
jaymcminn replied to bh1701's topic in Model Building Questions and Answers
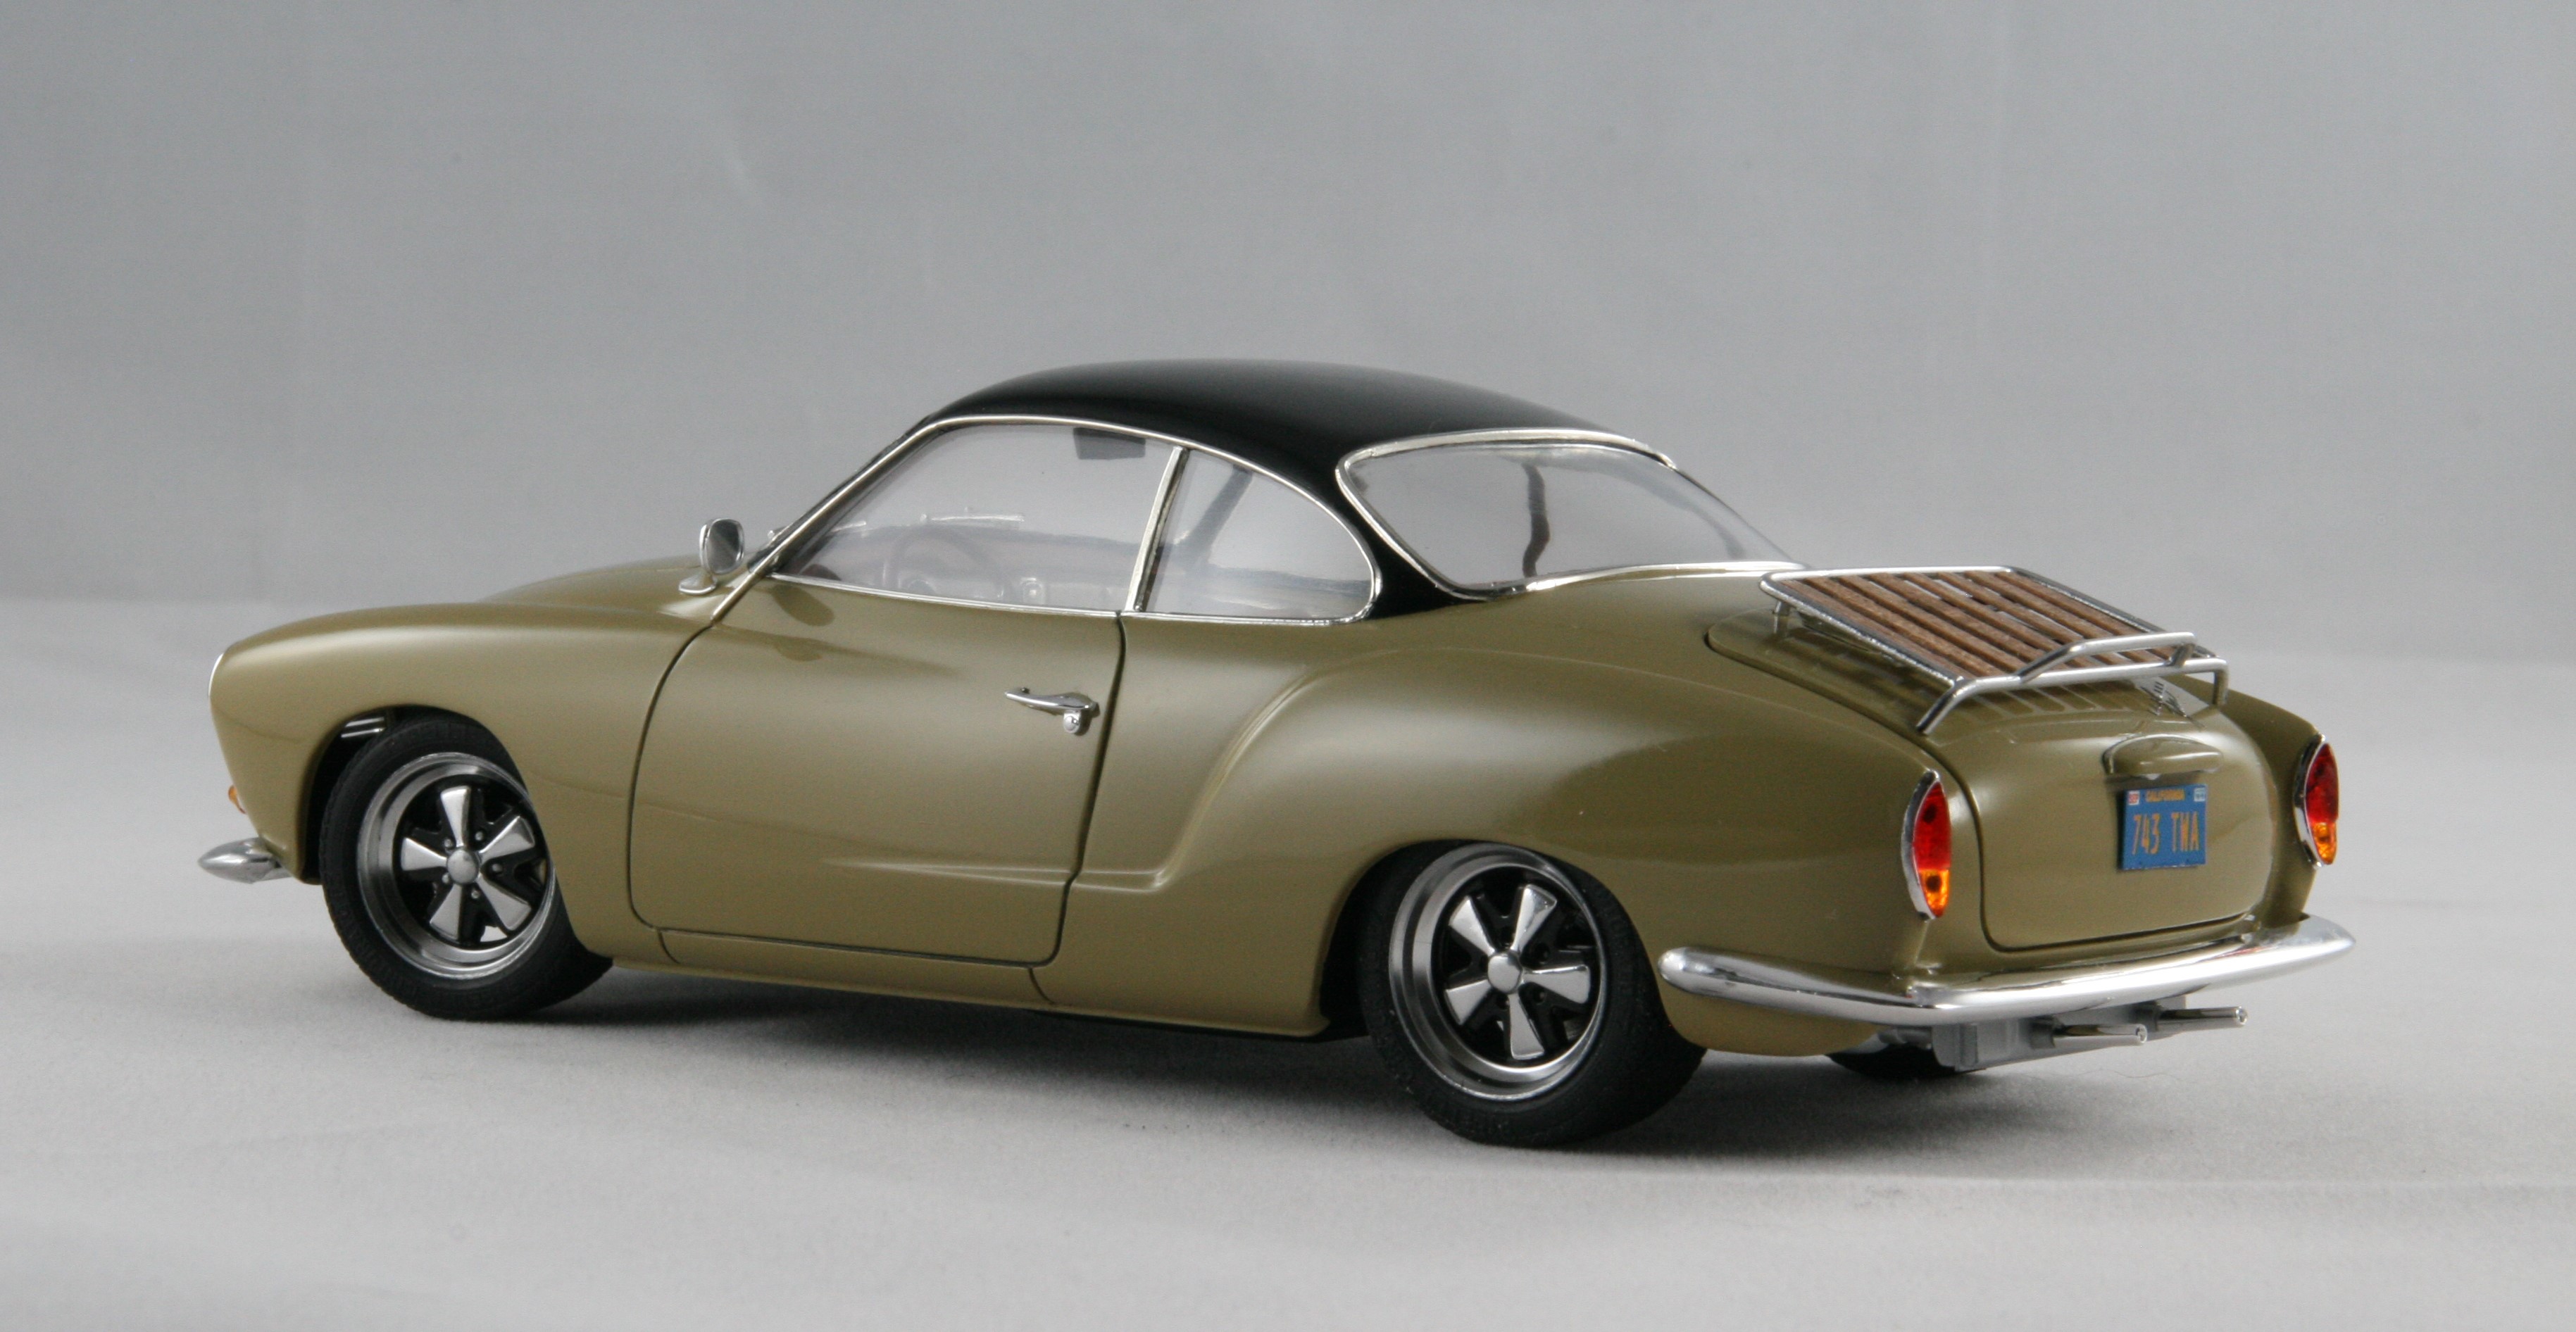
No photos of pearl clear over TS3, but I did this Tamiya Karmann Ghia in TS13 over TS3. The flat TS colors make a great base color under clear coats.
-
Information on Monogram's Exotics Series
jaymcminn replied to oldcarfan's topic in Car Kit News & Reviews
Well, thanks to this thread I have a Monogram Porsche 924 Turbo on the way. I scored one for $14 plus shipping on the 'Bay. Thinking two-tone Champagne Gold over Light Gunmetal with the saddle over brown interior combo. Should make for a fun quick project. -
Alfa Romeo P2 - MFH 1/12
jaymcminn replied to primabaleron's topic in Other Racing: Road Racing, Salt Flat Racers
That is beautiful. Nothing like a properly weathered vintage racer. -
Good news for a change...
jaymcminn replied to tim boyd's topic in General Automotive Talk (Trucks and Cars)
East coast sucks for hobby shops anymore. I remember Orange Blossom Hobbies and the sad day my buddy and I drove over there to find the doors shut. I'm guessing the blank stares you're experiencing are from the guys at Micro Macro Mundo? I've tried conversing with them in Spanish as well and discovered that bad customer service transcends the language barrier. They do have a nice shop, though. I'm fortunate to have a great one here in Naples (Family Hobby Center, 55 years old and counting, run by the same family for 3 generations) and a really good one an hour away in Port Charlotte (K&K Hobbies). Family Hobby does consistently good business and Cary, the owner, is a great guy despite not selling me the Pocher Fiat f2 he has in his private stash...I was kidding with him that the only reason he still had it was because nobody wanted it in the '70s! -
So far I've built the Episode IV X-Wing and Y-Wing. Agreed that the detail and assembly are incredible on these Bandai kits. You did amazing work on this.
-
1989 Australia Rally Toyota
jaymcminn replied to MarcoTJ's topic in Other Racing: Road Racing, Salt Flat Racers
Clean build, great weathering and nice pics. The weathering hasn't been overdone, so it doesn't take away from the cleanliness of your work or the detail of the model. -
Very nice!
-
New From Aoshima, 1969 Toyota 2000GT MF10
jaymcminn replied to martinfan5's topic in Car Kit News & Reviews
That Aoshima kit looks crisp. I have the Hasegawa full-detail version waiting to be built, and it just might be getting a sibling. At least I can justify the purchase because this is a late version. -
The sheet I recently ordered had the adhesive "issue". It refused to stick whatsoever. Had to use the last of the sheet I bought a few years ago for my Jaguar E-Type project. Despite being at least two years old, it stuck perfectly. If BMF can't produce a decent product anymore I'll look for alternatives... I use Molotow pens a lot for small details but it's too fragile for surfaces like exterior trim that might be handled or polished. Fortunately most of the stuff I build isn't heavy on the chrome trim. If I had to foil a '59 Caddy with the new stuff I wouldn't be happy.
-
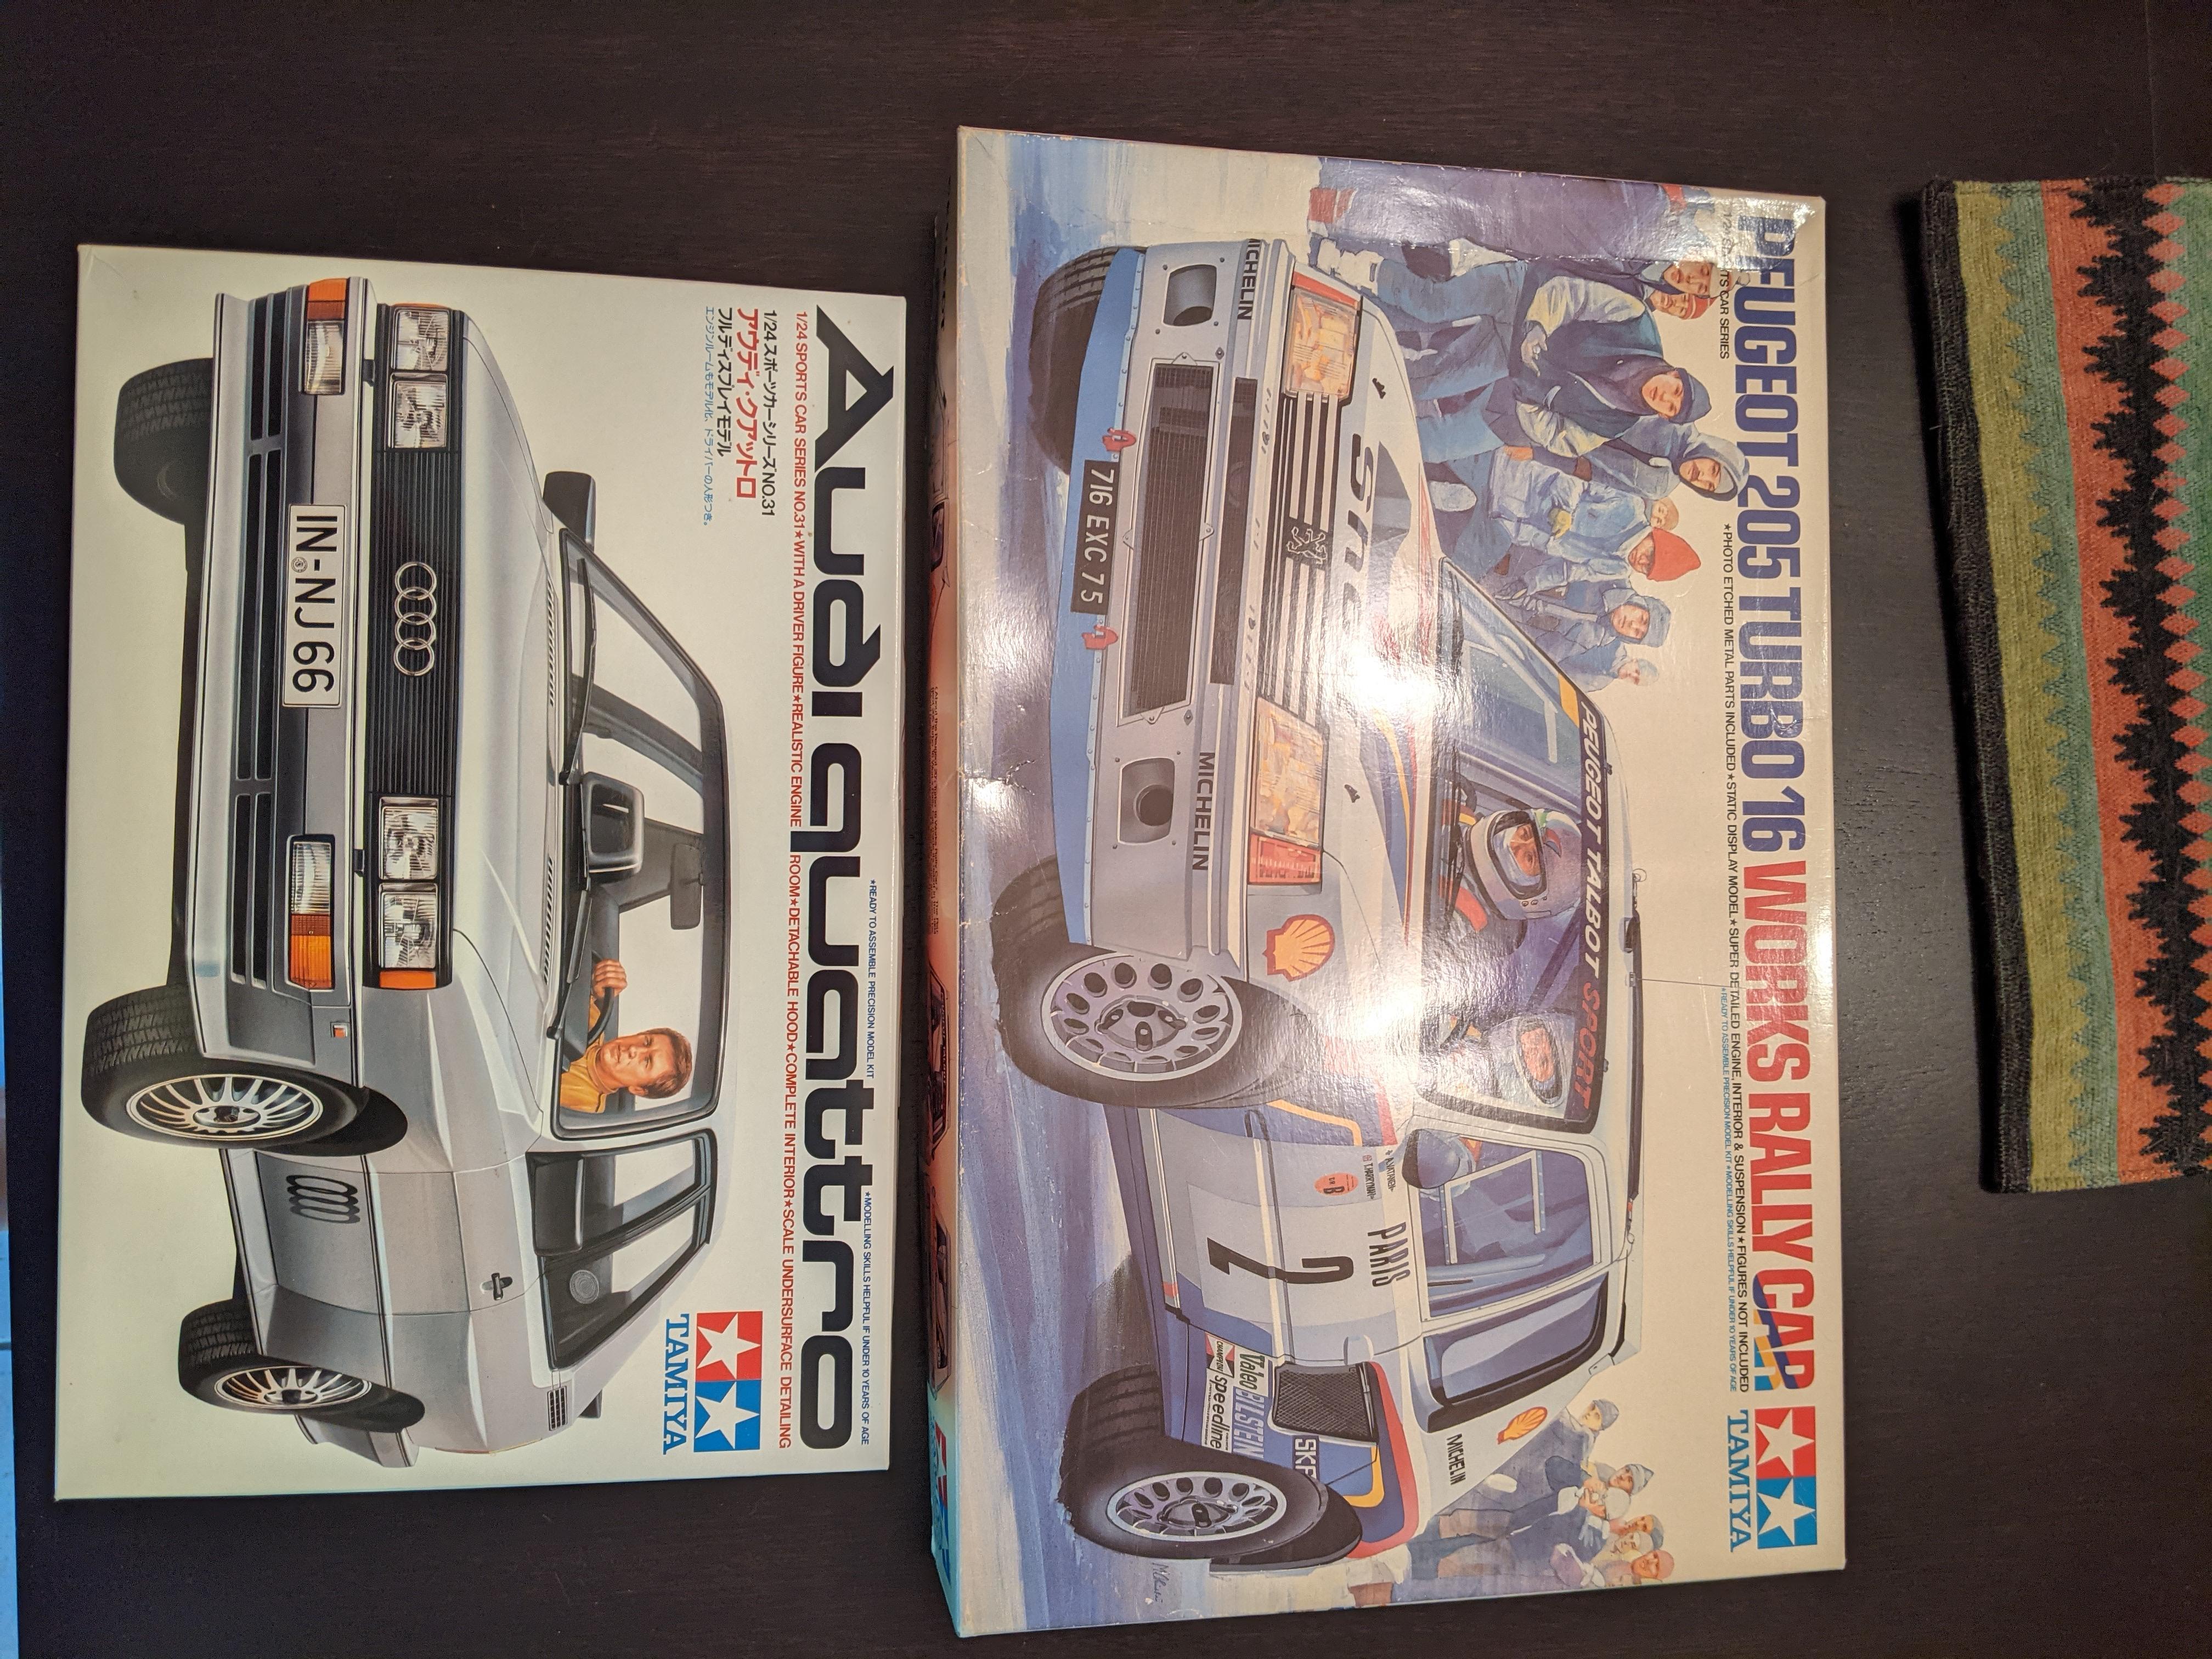
At the Largo, FL show on Saturday I picked these up. The Ferrari and Audi are original issues that were still in plastic (not anymore!). I never even knew the Peugeot existed and I jumped on it when I saw it.
- 39,274 replies
-
- 1
-

-
- johan
- glue bombs
- (and 1 more)
-
Southlandz Model Car Swap Meet & Contest Nov. 13 Largo, FL
jaymcminn replied to RSchnell's topic in Contests and Shows
Hey, the Fiat Mefistofele and the Karmann Ghia are mine! I took home best large scale and best engine for the Fiat. It was an awesome show and I had a fantastic time talking to the other modelers and checking out some really great builds... that VW camper combo was insane. I blew waaay too much money at the swap meet and came home with some great ideas and great kits. Agreed that the venue is a bit tight. More vendor tables is a good thing, but it was tough navigating the crowds at times. -
Revell's Series 1 pretty specifically represents a late 1961 or 1962 car. 1961 cars had flat interior floors, external bonnet latches and welded bonnet louvers. 1962 cars had dropped floor pans for more legroom, bonnet latches relocated to the inner sills and stamped louvers, all of which are present on the Revell kit. By 1963 the shiny aluminum center console surface was replaced by vinyl and the "tombstone" seats had been replaced by seats with vertical pleats. The chrome trim was there to disguise the seam between the bonnet sides and top. To my knowledge all E-types had the fender trim from the factory.
-
Dude, it's not hitting a dime from a thousand yards. It's hitting a truck body from 8 inches away. Get over yourself, shoot some paint (badly, as ALL beginners do), decide this hobby isn't for you and move on with your life. I have never discouraged anyone from continuing in this hobby but you are temperamentally unsuited for it.
-
Hey, that's not fair. Walter White actually made meth.
-
Which Jaguar XKEs Are Better?
jaymcminn replied to Miatatom's topic in Model Building Questions and Answers
I just finished the Revell coupe and will get some pics up soon (no WIP pix, though). The parts breakdown is nice, the underhood detail is really good (if a little clunky around the front suspension) and it's a really decent kit. The tires are not great...I used RMCM Dunlop wheels and Tamiya tires. Getting the body over the interior and frame is a cheek-clenching process, but I'll take that over a big obvious seam any day. The chrome isn't great, but most parts are molded so attachment points are hidden. The decals are fantastic. Everything, and I mean EVERYTHING, is on that decal sheet and things like the instrument decals have no carrier film to trim. The windshield height is noticeable if you're really familiar with these cars but not a deal breaker. I can't wait to build the roadster!
.JPG.22c8c0f10e436cea47a58b0794116841.JPG)
.JPG.c4162b00049feec6498955a6c691d996.JPG)
.JPG.539d9f7f7c2faf953ab1ed30e59b21d4.JPG)
.JPG.446b94864d2af032a4832d2c590689fe.JPG)
.JPG.064edfc803e2651a41feb12fbc7bba09.JPG)
.JPG.0035a54c8a139b0066c80e13fb42a945.JPG)
.JPG.1898484bf923dd3339d57a544ef78d90.JPG)
.JPG.df1a420ca948639c86ea508983d9cca1.JPG)
.JPG.fda3becb634f489c71900efb9d7de0bb.JPG)
.JPG.a7468e12d003810a5d12b4857b4b82a6.JPG)
.JPG.c07ea43117393327fc2b616f502f0f05.JPG)
.JPG.7fa854090cb98e1149134513fa6ef09a.JPG)
.JPG.66c6196886a3252deed3383348845a5e.JPG)
.JPG.e48f1100138f2d9e6269268457a38efb.JPG)
.JPG.425712e362b18d19875b501a24f25f70.JPG)
.JPG.8171f210cee52e843ca9f2dc1d596401.JPG)
.JPG.4cbec4bea706807e4151480014bd27bc.JPG)
.JPG.4446c7e26621d2cceedc7ea34c4a5a55.JPG)
.JPG.47fba8eb734bdf9974df9d9c15790ec5.JPG)
.JPG.1721e661a3d5adcb19cb024e780a3605.JPG)


.JPG.2fa64689d51debe5683826c63065f97a.JPG)


.JPG.28dcff239909cbe93b8b67fbe60d4005.JPG)
.JPG.128e2d87acde1f1cdf4d54703b9a36e9.JPG)
.JPG.f96b730565bcd4ab618f1e1166067693.JPG)
.JPG.5e209c7c809eb3c2093f0f1d55efa84c.JPG)
.JPG.7887ecde4a8966a2d3d521638473be41.JPG)
.JPG.2fc9410bb0327b817526f3e792639133.JPG)
.JPG.6273599a845986cd49c23329c1343c55.JPG)
.JPG.0c1cfd8ab708529129a12296686c07bb.JPG)
.JPG.1ed8e19f867c08c17fae0103bbca15ea.JPG)
.JPG.1440de0d03e02cbe0f2969bfddb8f409.JPG)
.JPG.d8c1b743e9ab2a849ffc6d61a84486db.JPG)
.JPG.f4549bdf238da57c5987457cbfa04c20.JPG)
.JPG.a00817b49f63a8eb849d9ffed9c6f484.JPG)
.JPG.cc32ff14bfb7562ddd4d360215d23c27.JPG)