Rich Chernosky
-
Posts
2,107 -
Joined
-
Last visited
Content Type
Profiles
Forums
Events
Gallery
Everything posted by Rich Chernosky
-
V-E-R-Y cool. The masking on that paint job is incredible. Luv the steering wheels...is that one of your modifications...well done.
-
Helmut...despite all your trials and tribulations you managed to turn out a very respectable model. Well done. Helpful hint..if I may. Next time you need a thin parting line stripe lay a piece of appropriate color vinyl tape on a piece of glass. Cut it the width you want with a sharp blade and metal straight edge. Apply like tape where you want it. You can even adjust it when its on the model with a toothpick or similar. Much easier than trying to paint it although you still did a great job.
-
Bandai 1/16 scale Ford GT40
Rich Chernosky replied to Ace-Garageguy's topic in Model Building Questions and Answers
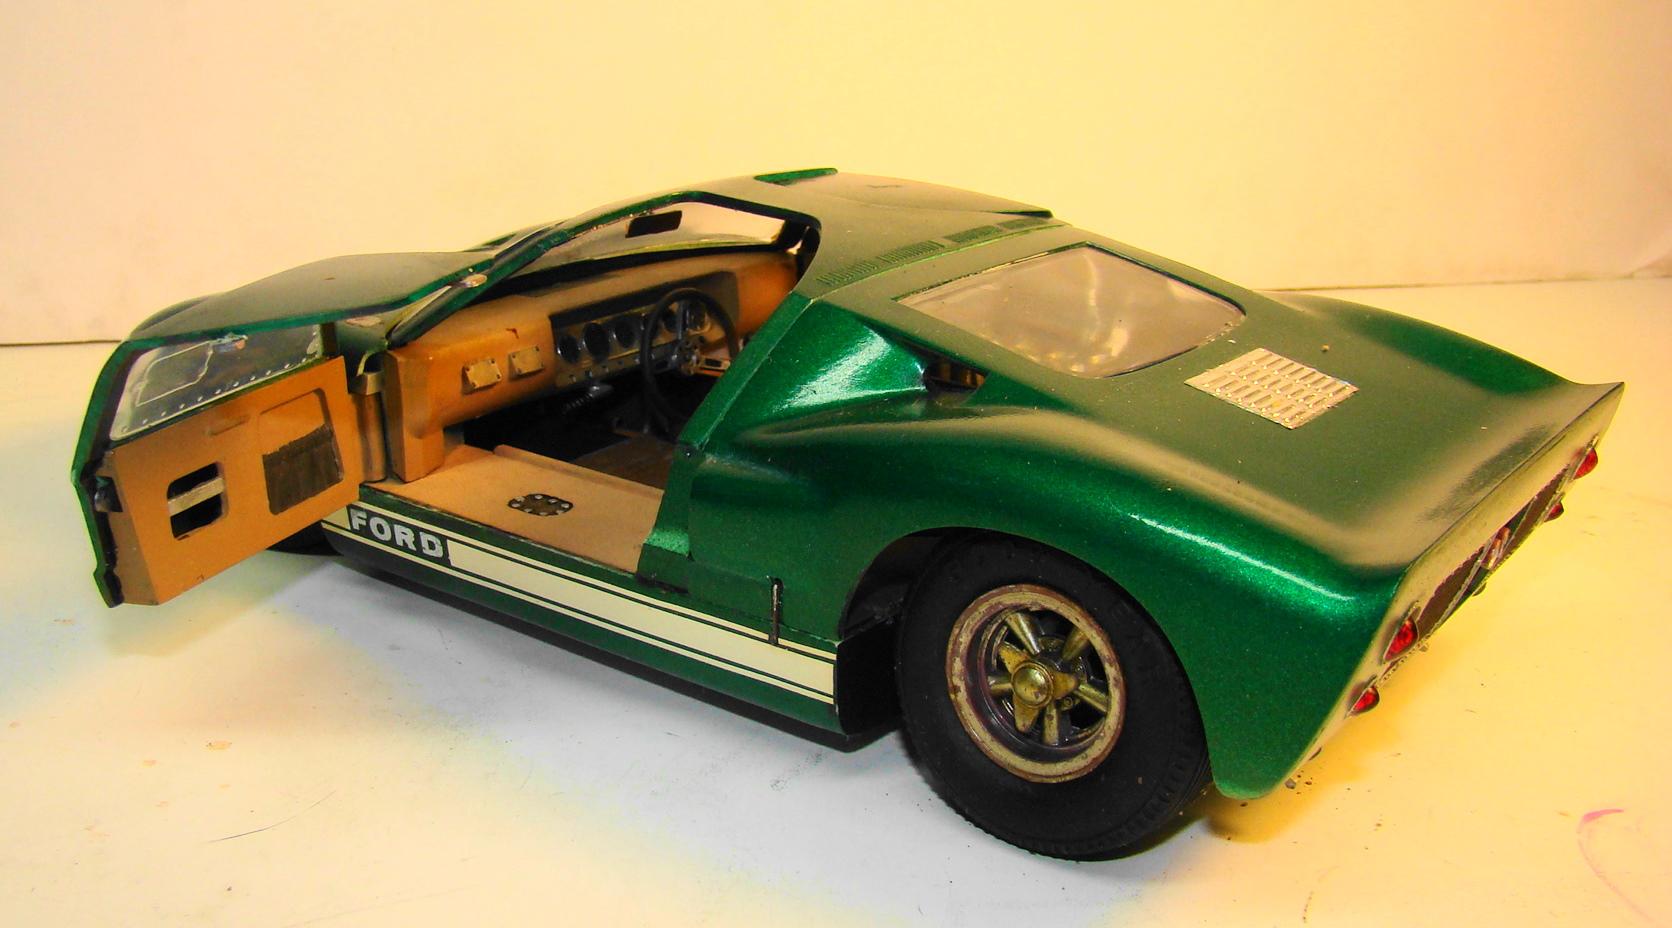
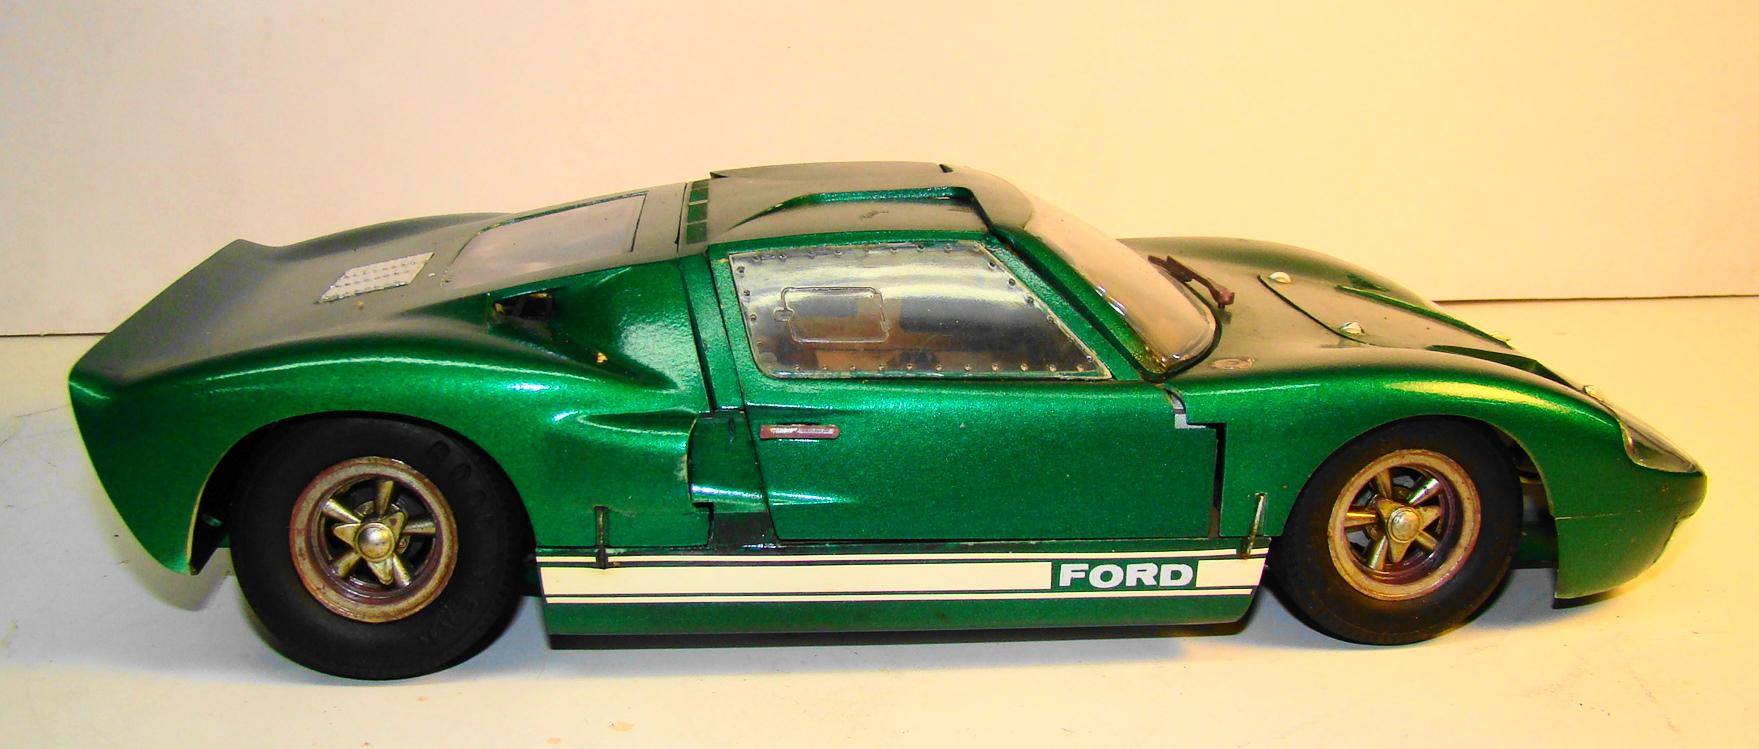
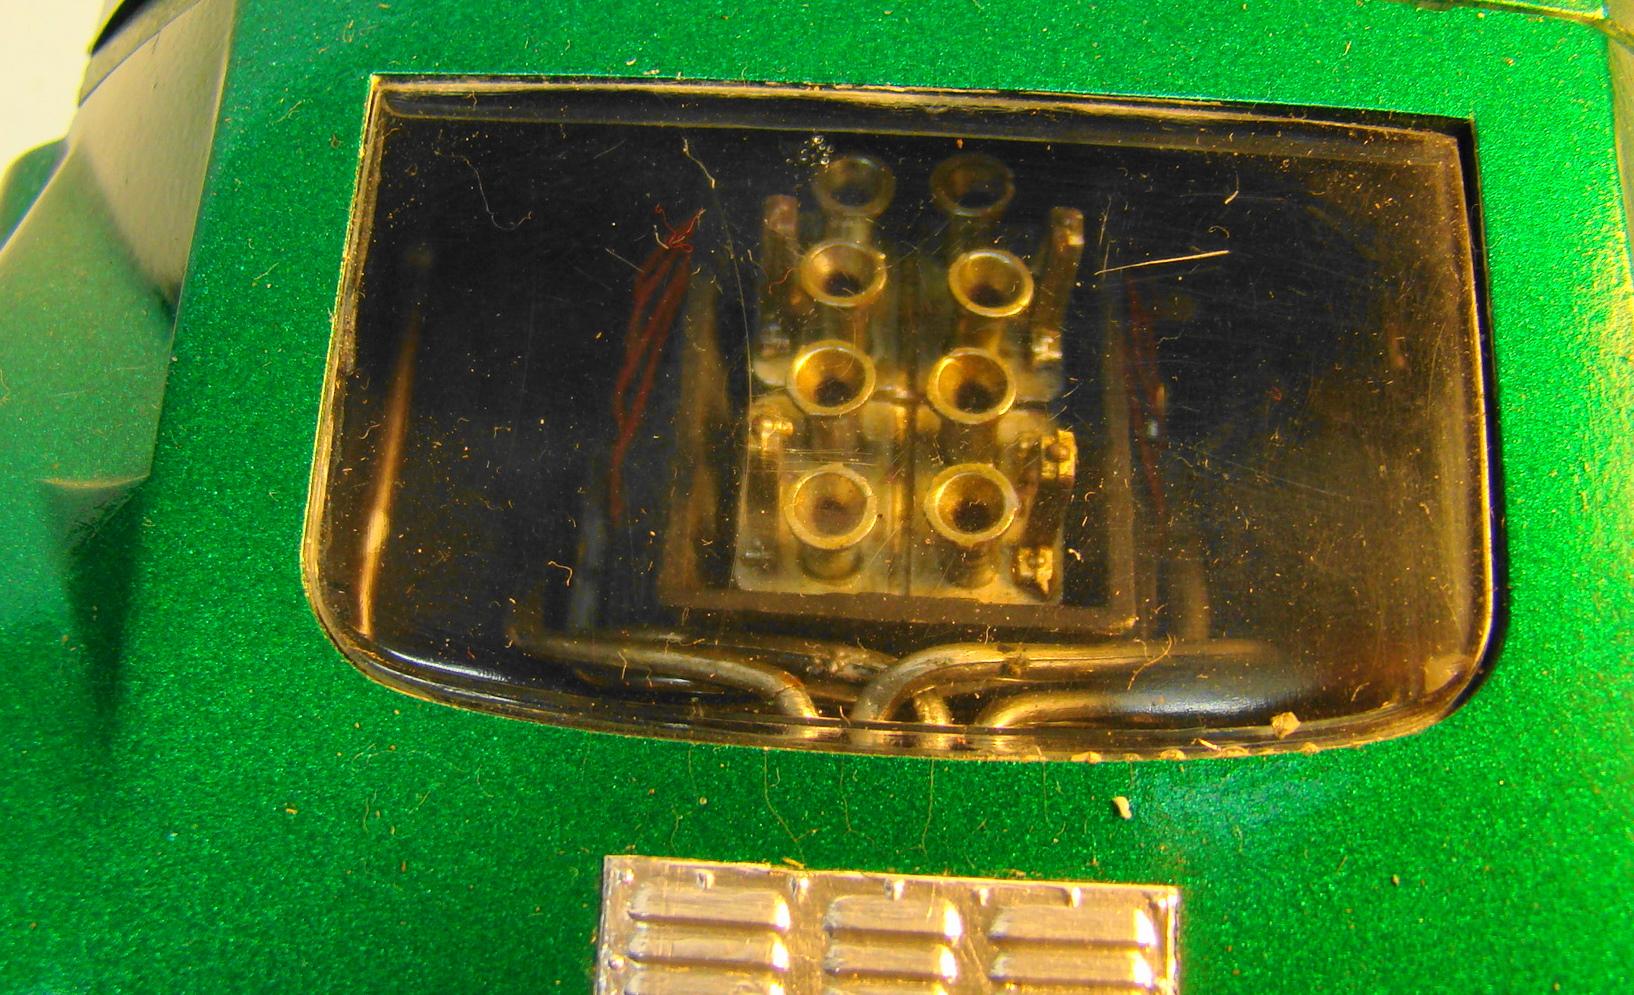
Bill...here are 4 shots of the completed model out of my collection. This kit was done sometime in the late 70's early 80's. My goal then was to do a street version of the car. My focus was on the working components of which there are many. Like the door latches really work. And yes, the wheels and tires are really horrible. This has sat at the back of my case forever as I was never really happy with the results. But because it was built mostly box stock it should give you a good idea of what you are asking for. I have left some additional comments in the picture captions. If I can be of further assistence you need only ask. The lines on the body are not too bad however you be the judge. If I recall the box art was way better than the kit. Still have it somwhere. Interior , particularly seats, could probably use some help. Never liked the way the steering wheel looked either. One thing I would definetly do something about is the fit of all the body panels. Doors in particular. I made some metal clips to hold the body down, a necessity back then. Didn't want to take them out for pictures but can if you want. Everything opens on this kit. Engine from here looks OK but I think this kit was motorized as was typical of Japanese kits then. I mad the suspension work on this kit because it was what I lioked to do then. (still do to some extent now) So the car sits a little lower than normal. Tires were hollow rubber thingies and may have collapsed a little too. I have since learned to fill them with urethane foam. Hope all this helps you. Would like to see what you do with this kit.
-
Ebbro Brabham F2
Rich Chernosky replied to Andrew McD's topic in Other Racing: Road Racing, Salt Flat Racers
Andrew...a very nice job on this kit. Brings back fond memories for me as it was one of my very first posts on this forum. Have since done more Ebbro kits. You will enjoy them as they make very handsome models. -
What a great job Pierre. Your first resin experience turned out spectacular. Can't wait to see what you turn out next.
-
Andy, this is such a cool post. Being a great F-1 fan and Ferrari to boot. That kit is such a treasure. I would kill to have one of your rare F-1 kits.....oh wait..!!!!
-
Corvette C7R LeMans 2015
Rich Chernosky replied to Rich Chernosky's topic in Other Racing: Road Racing, Salt Flat Racers
-
Inspiring for sure. Engine detail is way over the top. Makes me want to dig into mine. Thank you Louis for posting this. great job.
-
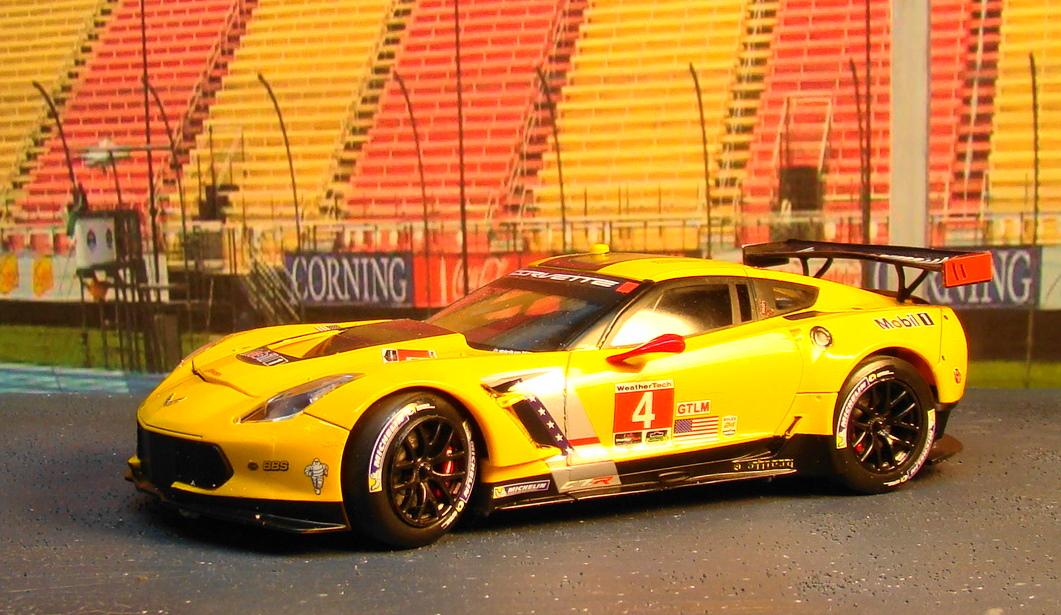
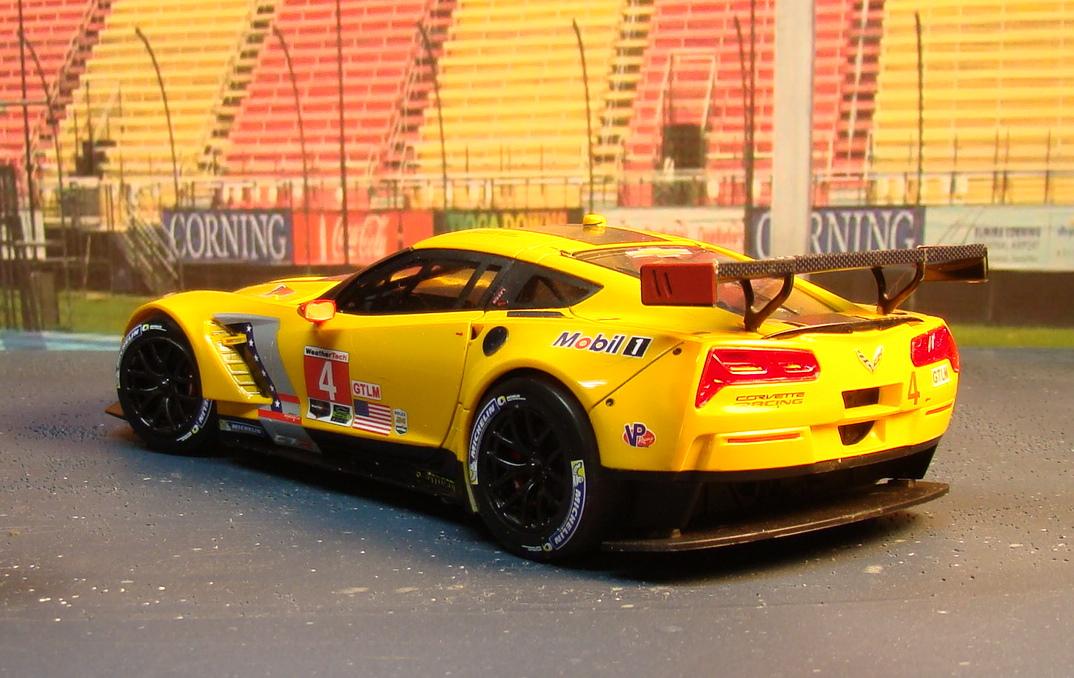
1/24 recently finished Corvette C7R by Revell. This model represents the class winning Corvette at the Lemans 2015 race. Kit was finished in Tamiya TS34 Camel Yellow and was mostly box stock with only a few revisions and additions. More info on this build in the picture captions. Comments welcome and thanks for looking. The moment of truth. Body ready to mate to chassis. I had fitted four small pins to each corner of the body during construction. These required some delicaqte drilling and are what hold the body in place. It all worked. Seartbelts and a few other details out of the extra parts bins. Completed car on its wheels. Must say this kit was a joy. Exhaust, windows and many other parts all fit without fuss. Business end of the Vette. Lots of nice detail back here. Wing fit like a charm and the decals were nice too. Overall fit of this model when finished was better than expected. Paint was done to match two other Corvettes in my collection. Wheels are painted a combination of Dark Iron, Metallic and gloss black. The poseable wheels are a modification and was reasonably easy on this kit. Engine all snuggled in place. This had a very nicely detailed engine but was all covered by the air inlets. That colour is Tamiya Gunmetal out of their LS line.
-
Audi R8 LMS GT3
Rich Chernosky replied to harti20's topic in Other Racing: Road Racing, Salt Flat Racers
Lots of nice ,crisp detail , exceptional decal and paint work. Great job. -
Nice little kit Mark...you are doing it some serious justice.
-
Clearing over decals?????
Rich Chernosky replied to WillyBilly's topic in Tips, Tricks, and Tutorials
You can go either way on this...up to you. As a general rule, nice new decals on glossy surface stick like crazy when cured (a couple of days) If the decals are slightly shiny with nice register, I would not clear coat them. If this is a race car that's how the big boys do it. You will have to use your judgement and do what looks best to you. -
Helmut..I am amazed at how good this build is considering its age and the technique you used. You had a lot of talent back then and even more so now. Thanks for sharing.
-
That's really cool Paul, great job.
-
John...great looking model ...followed your WIP and the results were well worth your effort. Didn't realize that Fujimi cut so many corners when I built mine. The F355 was never at the top of my most beautiful Ferrari list but I would put this one in my collection fer sure.
-
As a big F-1 and Ferrari fan I can really appreciate this build. The engine is great.
-
-
Very nice job..this is not an easy kit to get right. You did it.
-
-
Nice job, crisp detail. I've built a lot of Tamiya kits...know what ya mean.
-
That cleaned up and finished real nice Mark. I have lots of projects like this and it feels real good to finally get them done.
-
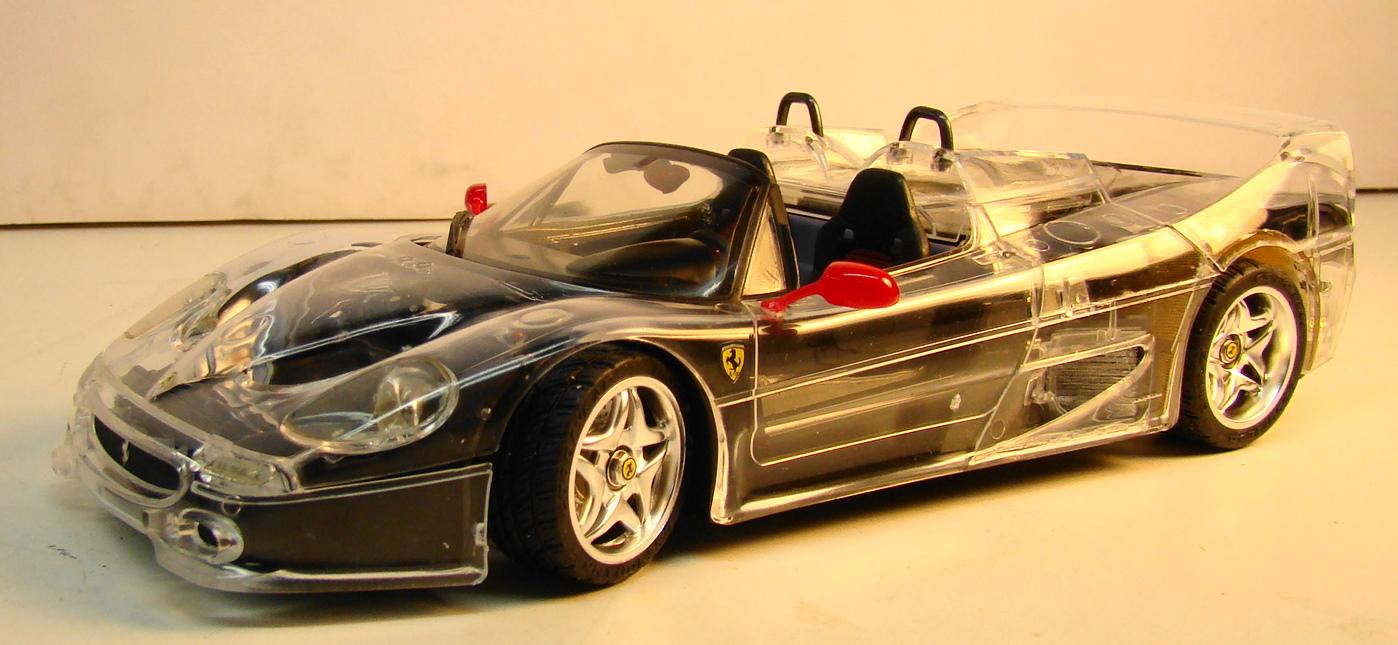
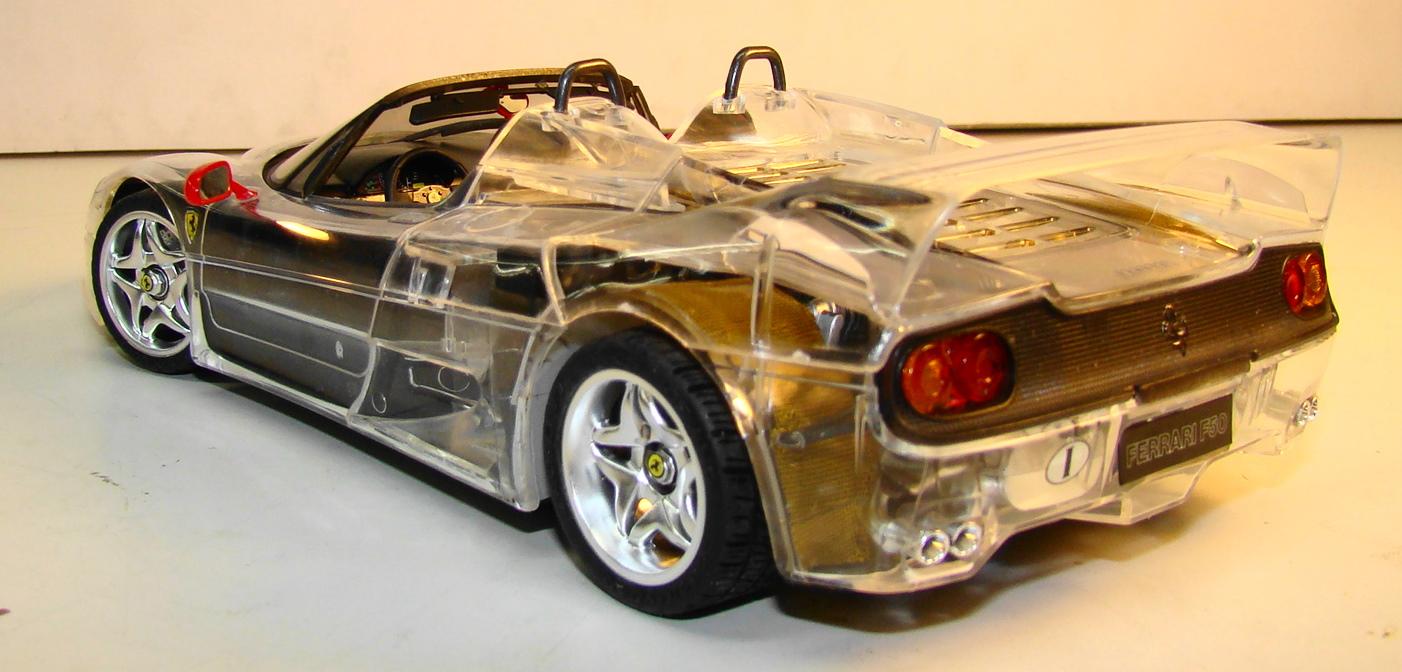
My local hobby shop is running a clear body challenge. Everyone in our group has some kind of clear body model. Had this Tamiya 1/24 Ferrari in the stash and already had its painted body counterpart done. Kit went together well (except some decals) but special care had to be taken assembling the body. Mostly clear type glues were used and they don't have a tremendous amount of strength. But assembly went well and it has stayed together. More info below pictures. Only the mirrors were painted red. Mr Color #5. Chassis slipped into the body fairly easy...whew! Rear view is where most of the detail is. Metal emblems were included in the kit...a nice touch. Side view with the optional berlinetta top. It replaces the headrests in the previous picture. Lots and lot of engine detail so I didn't bother to add much more. Interesting feature of this kit is that the engine assembly attaches to the upper body instead of the chassis. Once I figured out how it slipped in (goes in fully assembled BTW) it was pretty slick and stayed in place. Tried as hard as I could but those wrinkles just wouldn't come out of the decals. Rear deck opens but you don't notice them with it closed. Had to take a picture of the whole tribe. Back two are 1/18 Maisto diecast, berlinetta hardtop is the Tamiya version of this kit, spyder is a Revell, two smaller diecast are both Hot wheels. Thanks for looking and comments welcome.
-
-
Fiat 806 Fran Prix....Italeri 1/12scale
Rich Chernosky replied to louis Carabott's topic in Model Cars
Another masterpiece from you Louis. The detailing and weathering is way over the top...world class. -