Slick Shifter
-
Posts
95 -
Joined
-
Last visited
Content Type
Profiles
Forums
Events
Gallery
Everything posted by Slick Shifter
-
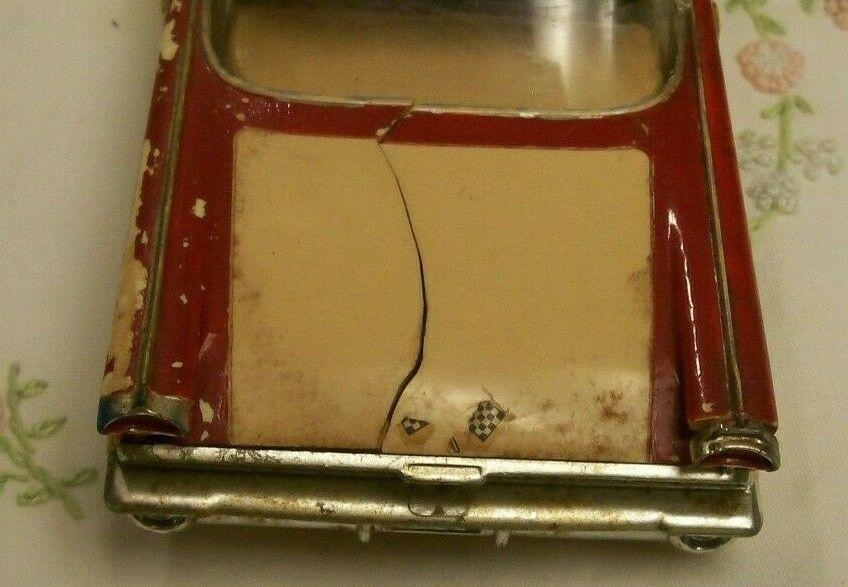
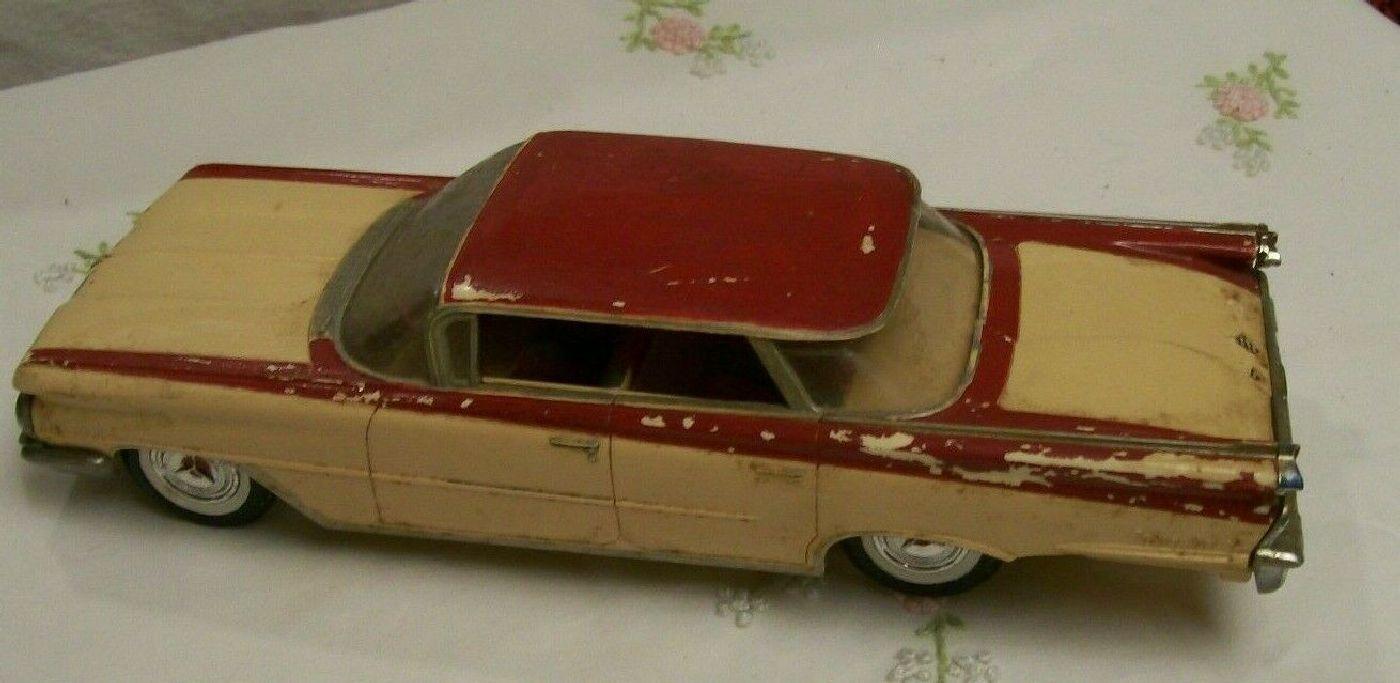
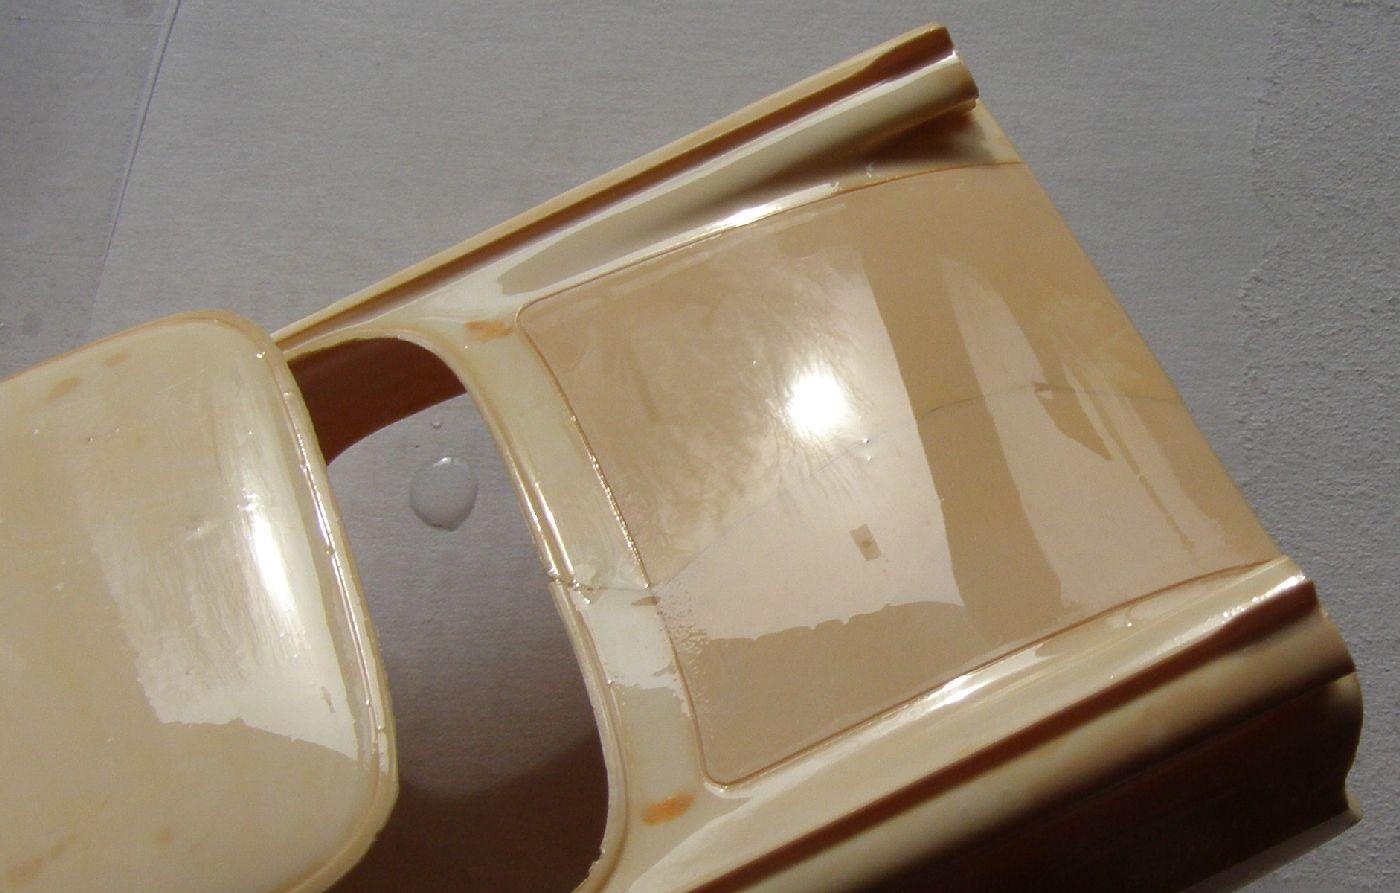
This adventure began about 10 years ago when the Donor fell into my lap out of an eBay junk box buy. It had the door handles and other fine details already carved off. Then began a 9 year search to find an affordable twin to fix. This one popped up about a year ago. Trunk lid broken all the way through, a piece behind the left rear wheel missing from the body. Between the two of them, enough to make one, with leftovers! The Perfect Candidate! -------------------------------------------------------------------------------------------------------------------------------------- While stripping the 60 years old paint The Plan was formulated. Make a template of the underneath side of the Donor trunklid, using those big ejector pin marks as a guide line. Then superglue HALF of the template to HALF of the Patient's trunklid. Once the glue set for a few days, a soupy mix of Testors Red and Testors Liquid was applied to both halves of the trunklid crack. Then superglue applied to the other HALF of the template and then the template was pressed into the trunklid while the other hand pressed the upper quarter panels together. This took a solid 5 minutes on the digital clock. After letting go, i saw that both ends of the crack were slightly out of flush so i quickly made 2 more bridges and superglued them to hold those edges in position. The intent, of course, was to avoid using filler to correct a broken trunklid that was curved in both directions. This is what it looked like: -------------------------------------------------------------------------------------------------------------------------------------- After a few months for the Testors to harden, little bridges were contoured slightly, with heat, to match the curve of the trunklid underside and glued in place with more Testors. Why not superglue? It's way too brittle for something like this. The blob at the trailing edge of the crack is a piece of fat sprue that was heated up and pushed in to deform and match that spot. Then it was pulled off and glued into place. After 5 patches were allowed to set up, the template was ground away and the 6th bridge piece was glued into place. About the same time, the break line in the quarter panel was straightened and squared up. Then a patch cut from the Donor, finessed and glued into place. It still needs some reinforcing on the inside. -------------------------------------------------------------------------------------------------------------------------------------- After several more months for the patches to set, the surplus glue on the topside of the trunklid was carved off then block-sanded. It took only a few minutes. It came out pretty good, IMHO. BTW, that's soapy water.

-
INSTA-CURE super thin CA warning
Slick Shifter replied to Flat32's topic in Tips, Tricks, and Tutorials
You have it all figured out! I buy 12-packs of the little Duro tubes from Zoro after i discovered that the similar little tubes at Harbor Freight had only a few drops of material inside. The little tubes never go bad until a month or 2 after they have been pierced, right! Much less annoying to throw away a tiny tube of superglue than to toss a 2-4oz bottle that set up while mostly full. Now, i'm gonna check the WalMart price for the same thing .................Alrighty, then. This product beats the Duro brand by a LOT https://www.walmart.com/ip/2-Pack-Permatex-4-Pack-Super-Glue-75187/229331071?selected=true unless maybe you're taking advantage of Zoro's fairly common 20% discount and free shipping. -
That mold is all of 50 years old. It's been modified and reworked more times than probably every other model car mold in history.
-
Looks like a Blue Ribbon Show Winner to me!
-
The color names are Commercial Red & Bombay Ivory. Lots of pics of plain 1955 pickups painted in either color on Google Images. I saw nothing on the Tamiya chart that could pass for the Ivory but there are a few possibilities for the Red. Commercial Red is non-metallic. Krylon makes a couple different Gloss Ivorys that oughta getcha pretty close.
-
Foyt Laguna .
Slick Shifter replied to Silver Foxx's topic in WIP: Stock Cars (NASCAR, Super Stock, Late Model, etc.)
Shovel-nose Lagunas are always cool! Nice work! -
Remember when those 2 knuckleheads at 2006 Barrett-Jackson got into a bid war over this car and the winner ended up paying $1,150,000 for it? Winner auctioned it and took a HUGE bath on it 3 years later when it sold at auction for $264,000 ?
-
It's easy to remember for future reference that: oil fill caps and PCV holes, etc are always located on the high side of valve covers to minimize oil leakage.
-
Revell 1968 Corvette Roadster. Done for box stock build-off
Slick Shifter replied to Dragonhawk1066's topic in Model Cars
Very nice work! The body paint seems to represent Corvette Bronze, which was also available on 1968 Camaros. BTW, the little rectangles below the rear bumpers are backup lamps. They have narrow shiny bezels. -
Nice work detailing the instrument panel. I'm thinkin' both the valve covers might be 180° off but other than that, it looks real nice!
-
THAT is the Greatest attitude! BRAVO!
-
AMT making a big bet by cutting mold sections for all these new parts for a 4-Door - body, glass, interior, front grille unit, etc. Hope it works out for them!
-
How to repair this?
Slick Shifter replied to SCRWDRVR's topic in Model Building Questions and Answers
(sigh) -
How to repair this?
Slick Shifter replied to SCRWDRVR's topic in Model Building Questions and Answers
The box on top of the left-hand inner fender is the W/S washer reservoir. The coolant reservoir and the radiator nipple that connects to it is on the right-hand side. That outcropping near the right-hand headlight is the battery location. The coolant reservoir is right next to the battery, towards the firewall. -
Jim Pace wheels a Lola T70 Spyder on Youtube. If you want to see, go there and search 'Jim Pace Lola T70' If you want bigger thrills, search 'Jim Pace McLaren' ....... in at least one of them he drives Oscar Kovelski's McLaren M6B. Who's that? ? For the biggest thrill, search 'Jim Pace Walter Mitty'. The video not that great but the sound of the mighty, injected Big Block Chevy and upshifts without the clutch will bring tears to your eyes on the last 2 laps ? A road rocket if there ever was one ? This guy gets to drive some really cool, old racecars. Search 'Jim Pace' to see more.
-
'68 Olds Chassis Finish?
Slick Shifter replied to StevenGuthmiller's topic in Model Building Questions and Answers
The black floors on the silver-painted 1968 Cutlass S are totally incorrect. And frames were never painted. They were dipped in Chassis Black and stored outdoors in stacks at the assembly plant, after they came from the frame plant, until they were trucked indoors to load onto the line. Chassis Black is not paint. It is an oily product like runny undercoating meant to keep the frames looking decent for a few months in spite of the outdoor storage. The frame coating already looks too thin and shiny on the 1968 S. As for the rest of the misinformation here from the 'experts' who have never owned a 1960s or newer GM product, i'm just gonna watch and grin. BTW, 'chassis' actually refers to the frame and everything attached to it before the body drop. Floor pans are part of the body. -
It looks like a direct-drive bellhousing for a vintage dragster that commonly connects straight to the rear axle assembly. There's no transmission in there. Only a clutch. The cone-shaped section with the ribs would have a bearing in the middle at the far right end to support the output shaft which runs thru the clutch disc and it supported at the other end by a bearing or bushing in the end of the crankshaft.
-
About a million years ago the kid next door brought home a '69 442 in these same exterior colors. Sadly the 400/4-Speed combo had already been switched out for an inline Chevy 6 and a 3-Speed manual.? Pretty sure the colors on the headliner and package shelf in this model should be reversed.
-
If anyone else is interested there are also some 1968-69 W-30 pieces in the AMT 1969 Buick Wildcat kit, of all things.
-
Slightly warped resin hood
Slick Shifter replied to cobraman's topic in Model Building Questions and Answers
I am no fan of rosin at all. That said: Rosin typically cannot bend metal. I reckon that you can figger out the rest. -
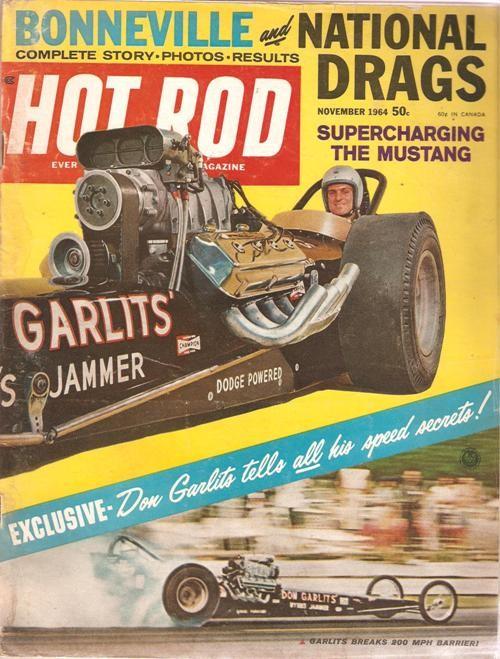
1/25 AMT Don Garlits' Wynn's Jammer Fuel Dragster
Slick Shifter replied to Casey's topic in Car Kit News & Reviews
Not seeing the red outline around 'Wynn's Jammer' on the Hot Rod cover and it's missing the 1964 United States Drag Team decal & 'Garlits' above it.. The fonts are also 2 sizes here. It appears that the US Drag Team decals were short-lived.
-
Not until 1968.
-
It has Caprice wheelcovers and a Caprice badge on the sail panel.
-
Yep, that's the only difference on the show side. Either way, the detail on the reissue Dart Sport Honeycombs is more correct. There is no raised ring on the outer edge of real Honeycomb trim rings.
-
That doesn't make a lot of sense to cut that mold section twice when MPC was already in the habit of moving wheel sections around from mold to mold. So i just looked at the Honeys on a Monza tree and compared them side-by-side to the Honeys in the most recent reissue of the 1975 Dart Sport. What do you say is so much better about the Honeys in the Monza kit?