Steve H
-
Posts
2,535 -
Joined
-
Last visited
Content Type
Profiles
Forums
Events
Gallery
Everything posted by Steve H
-
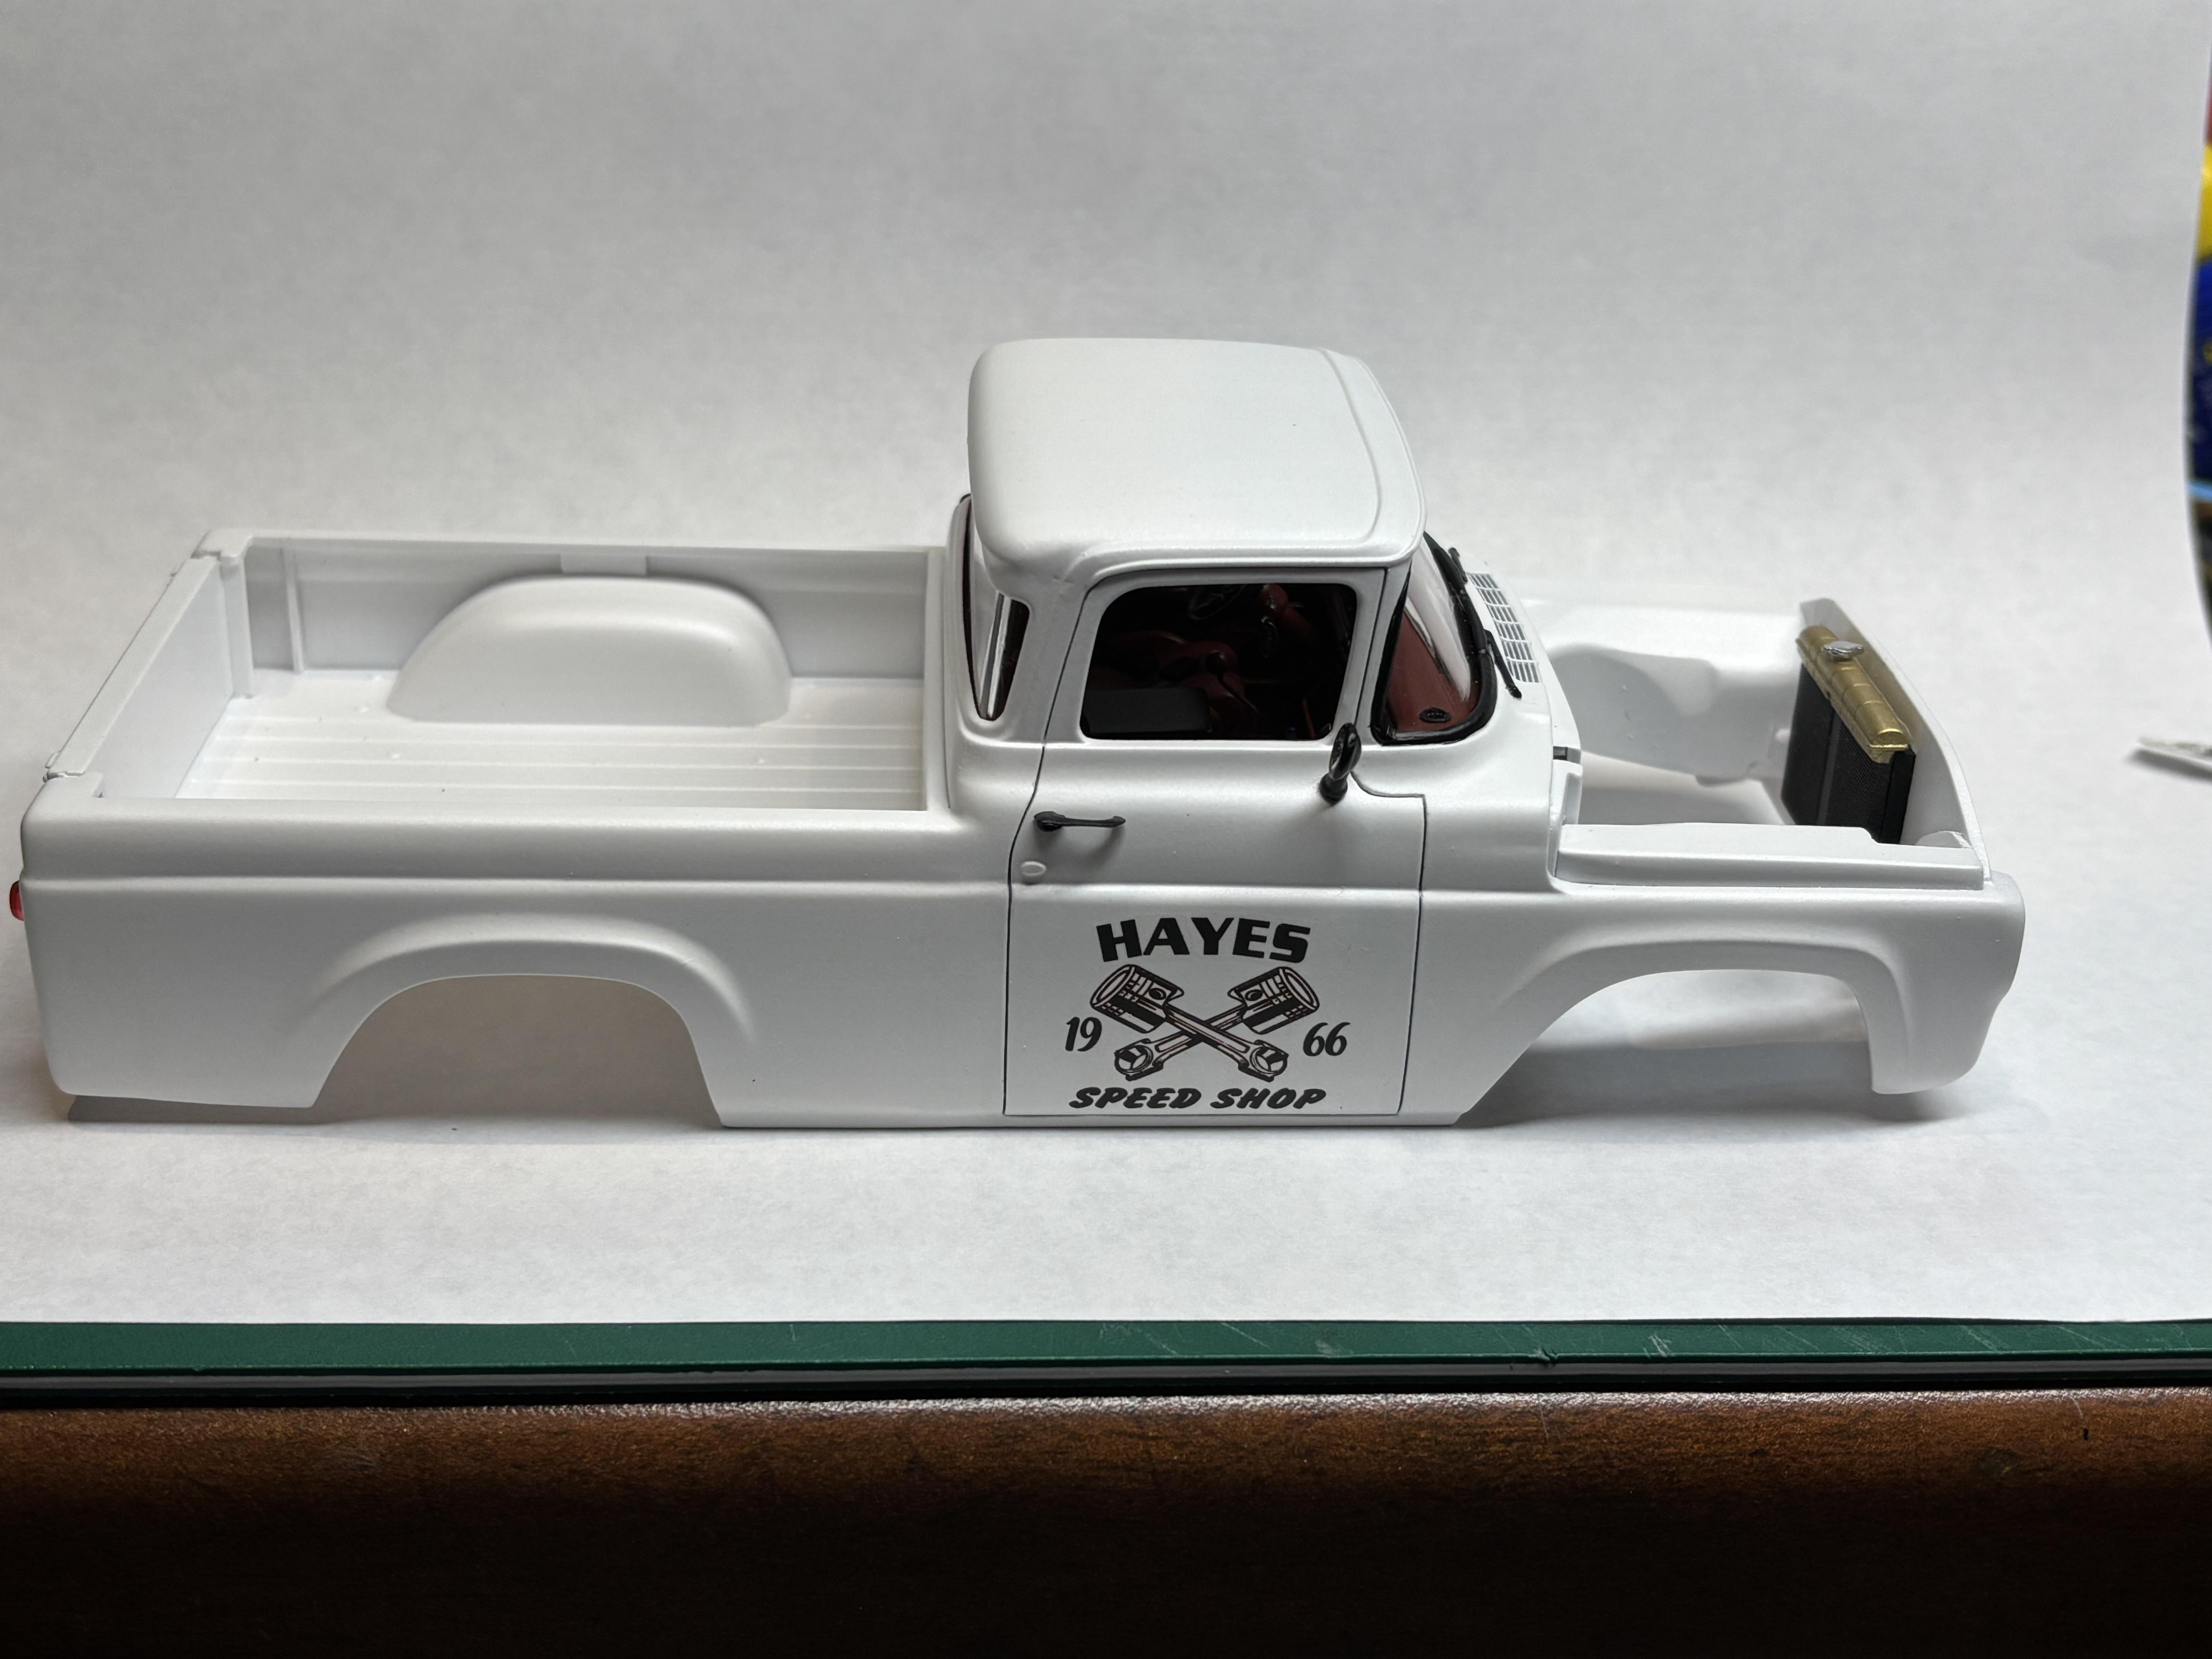
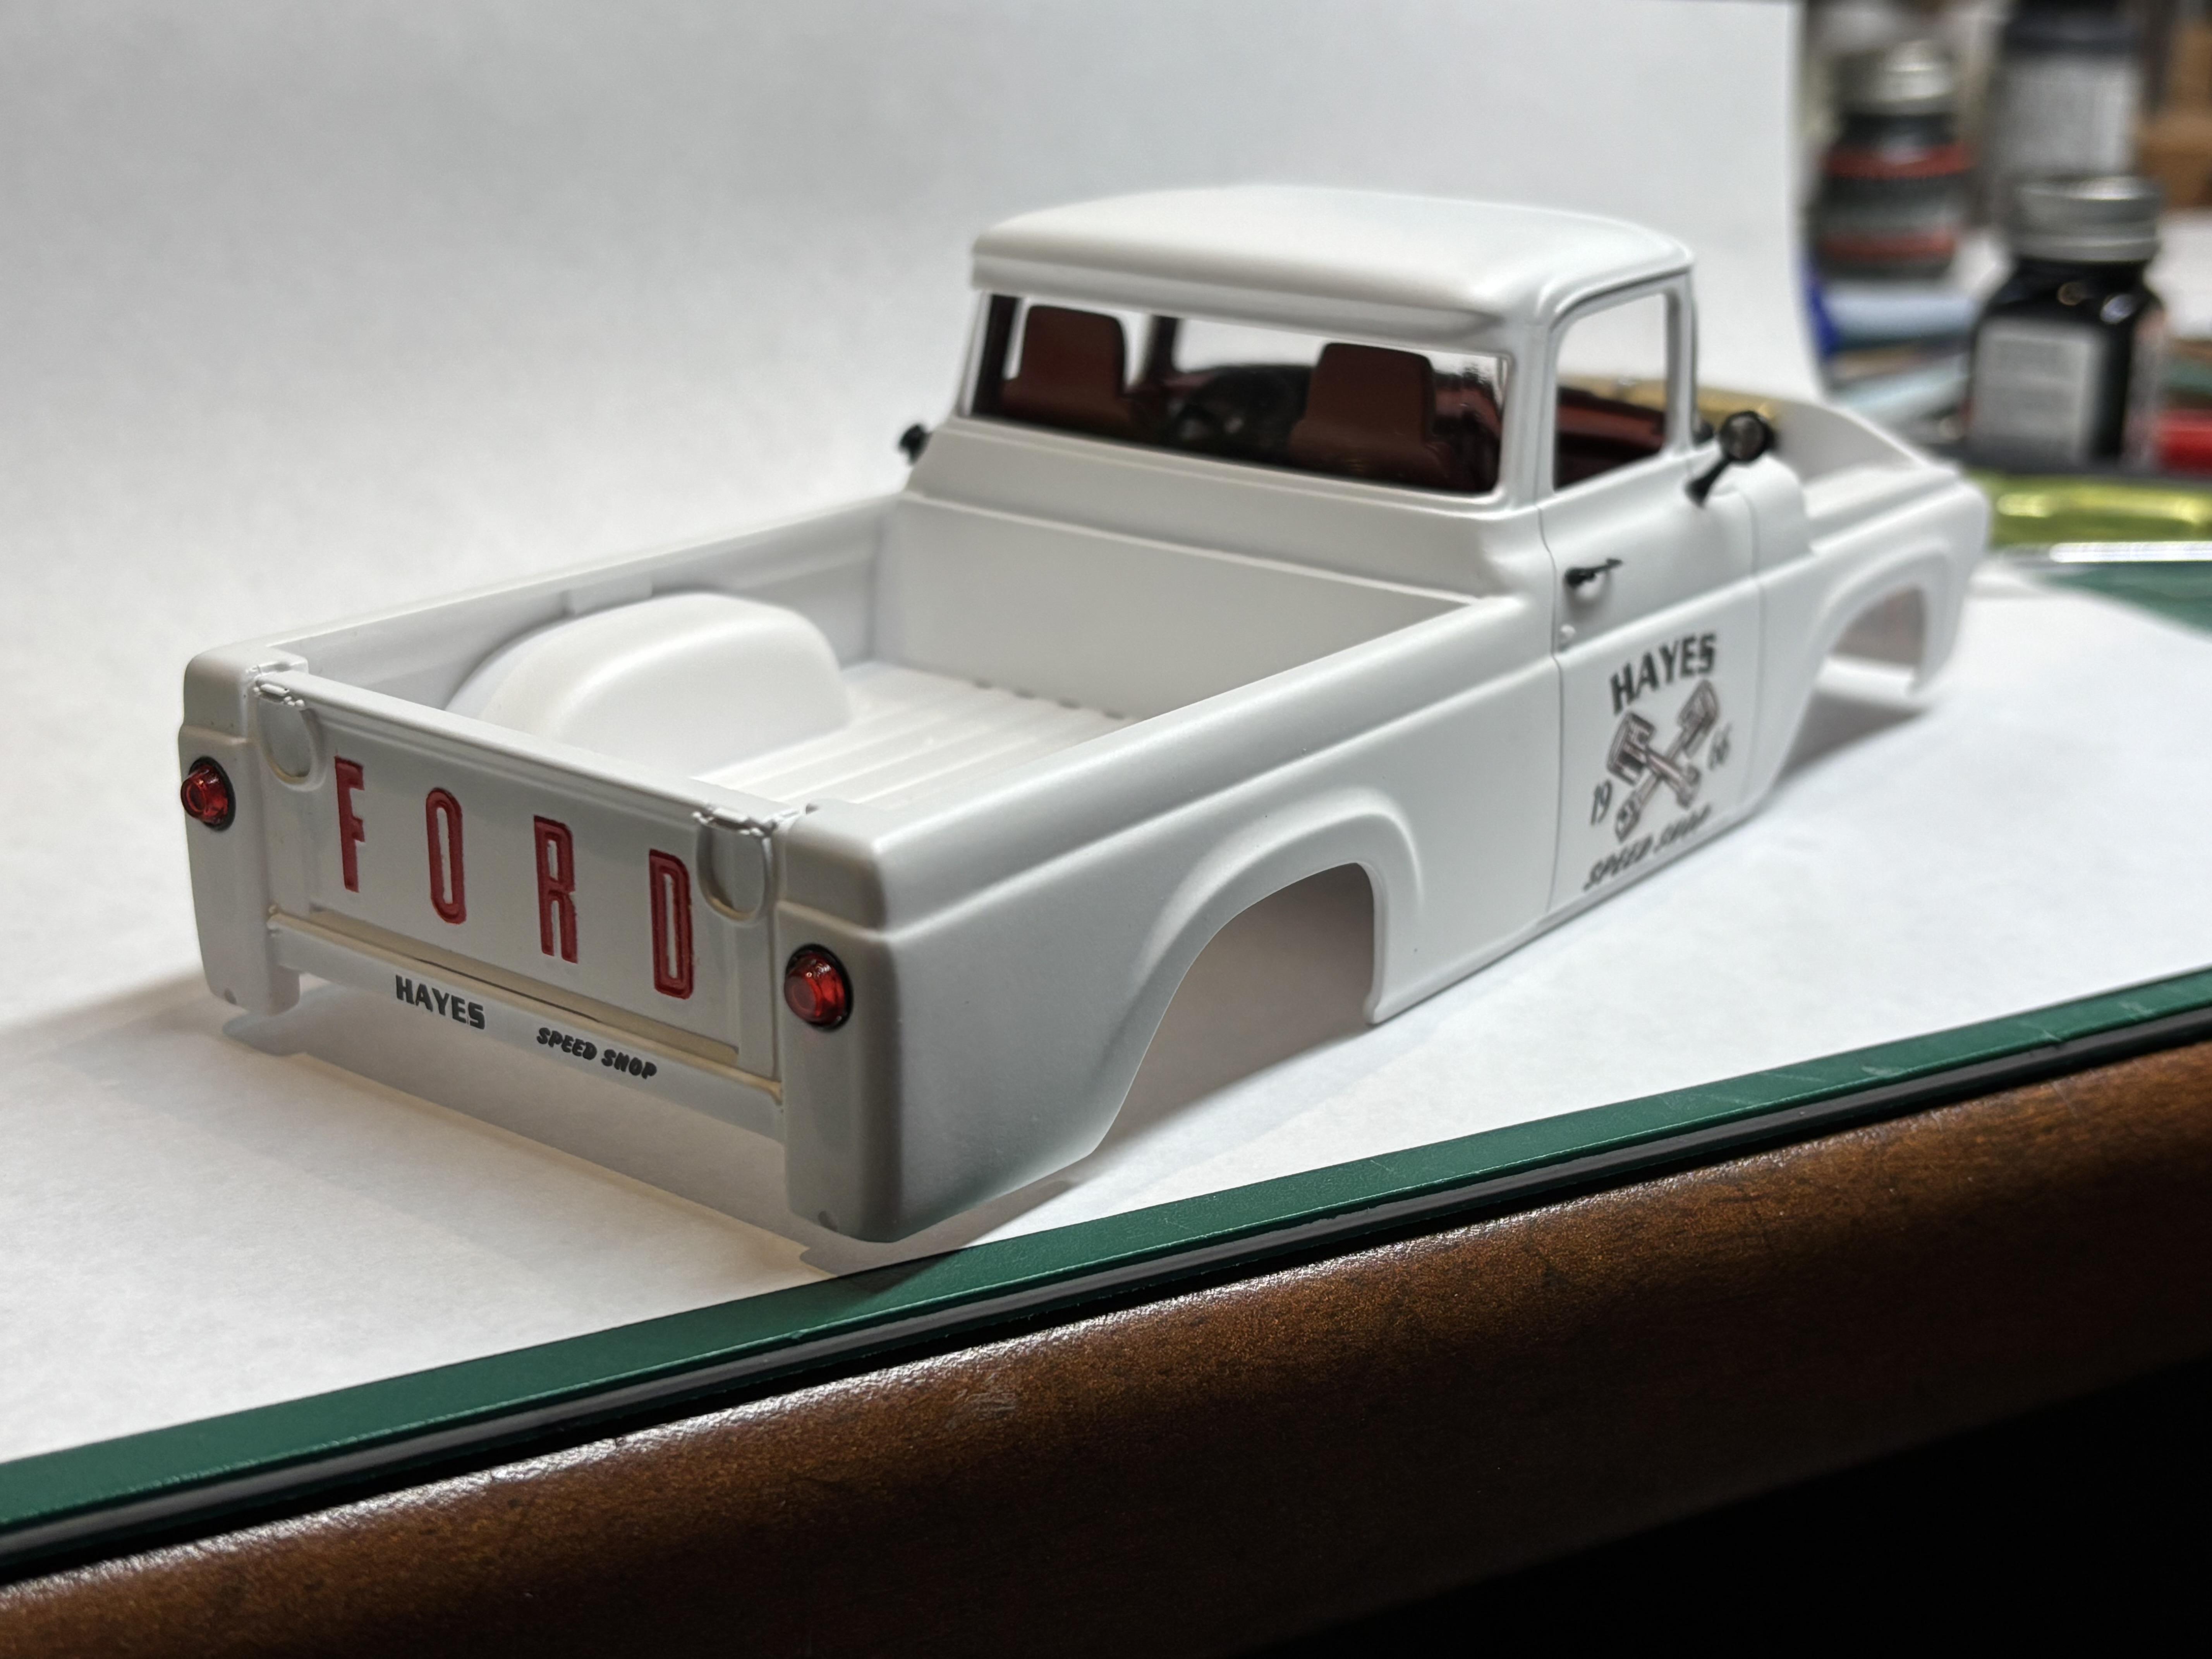
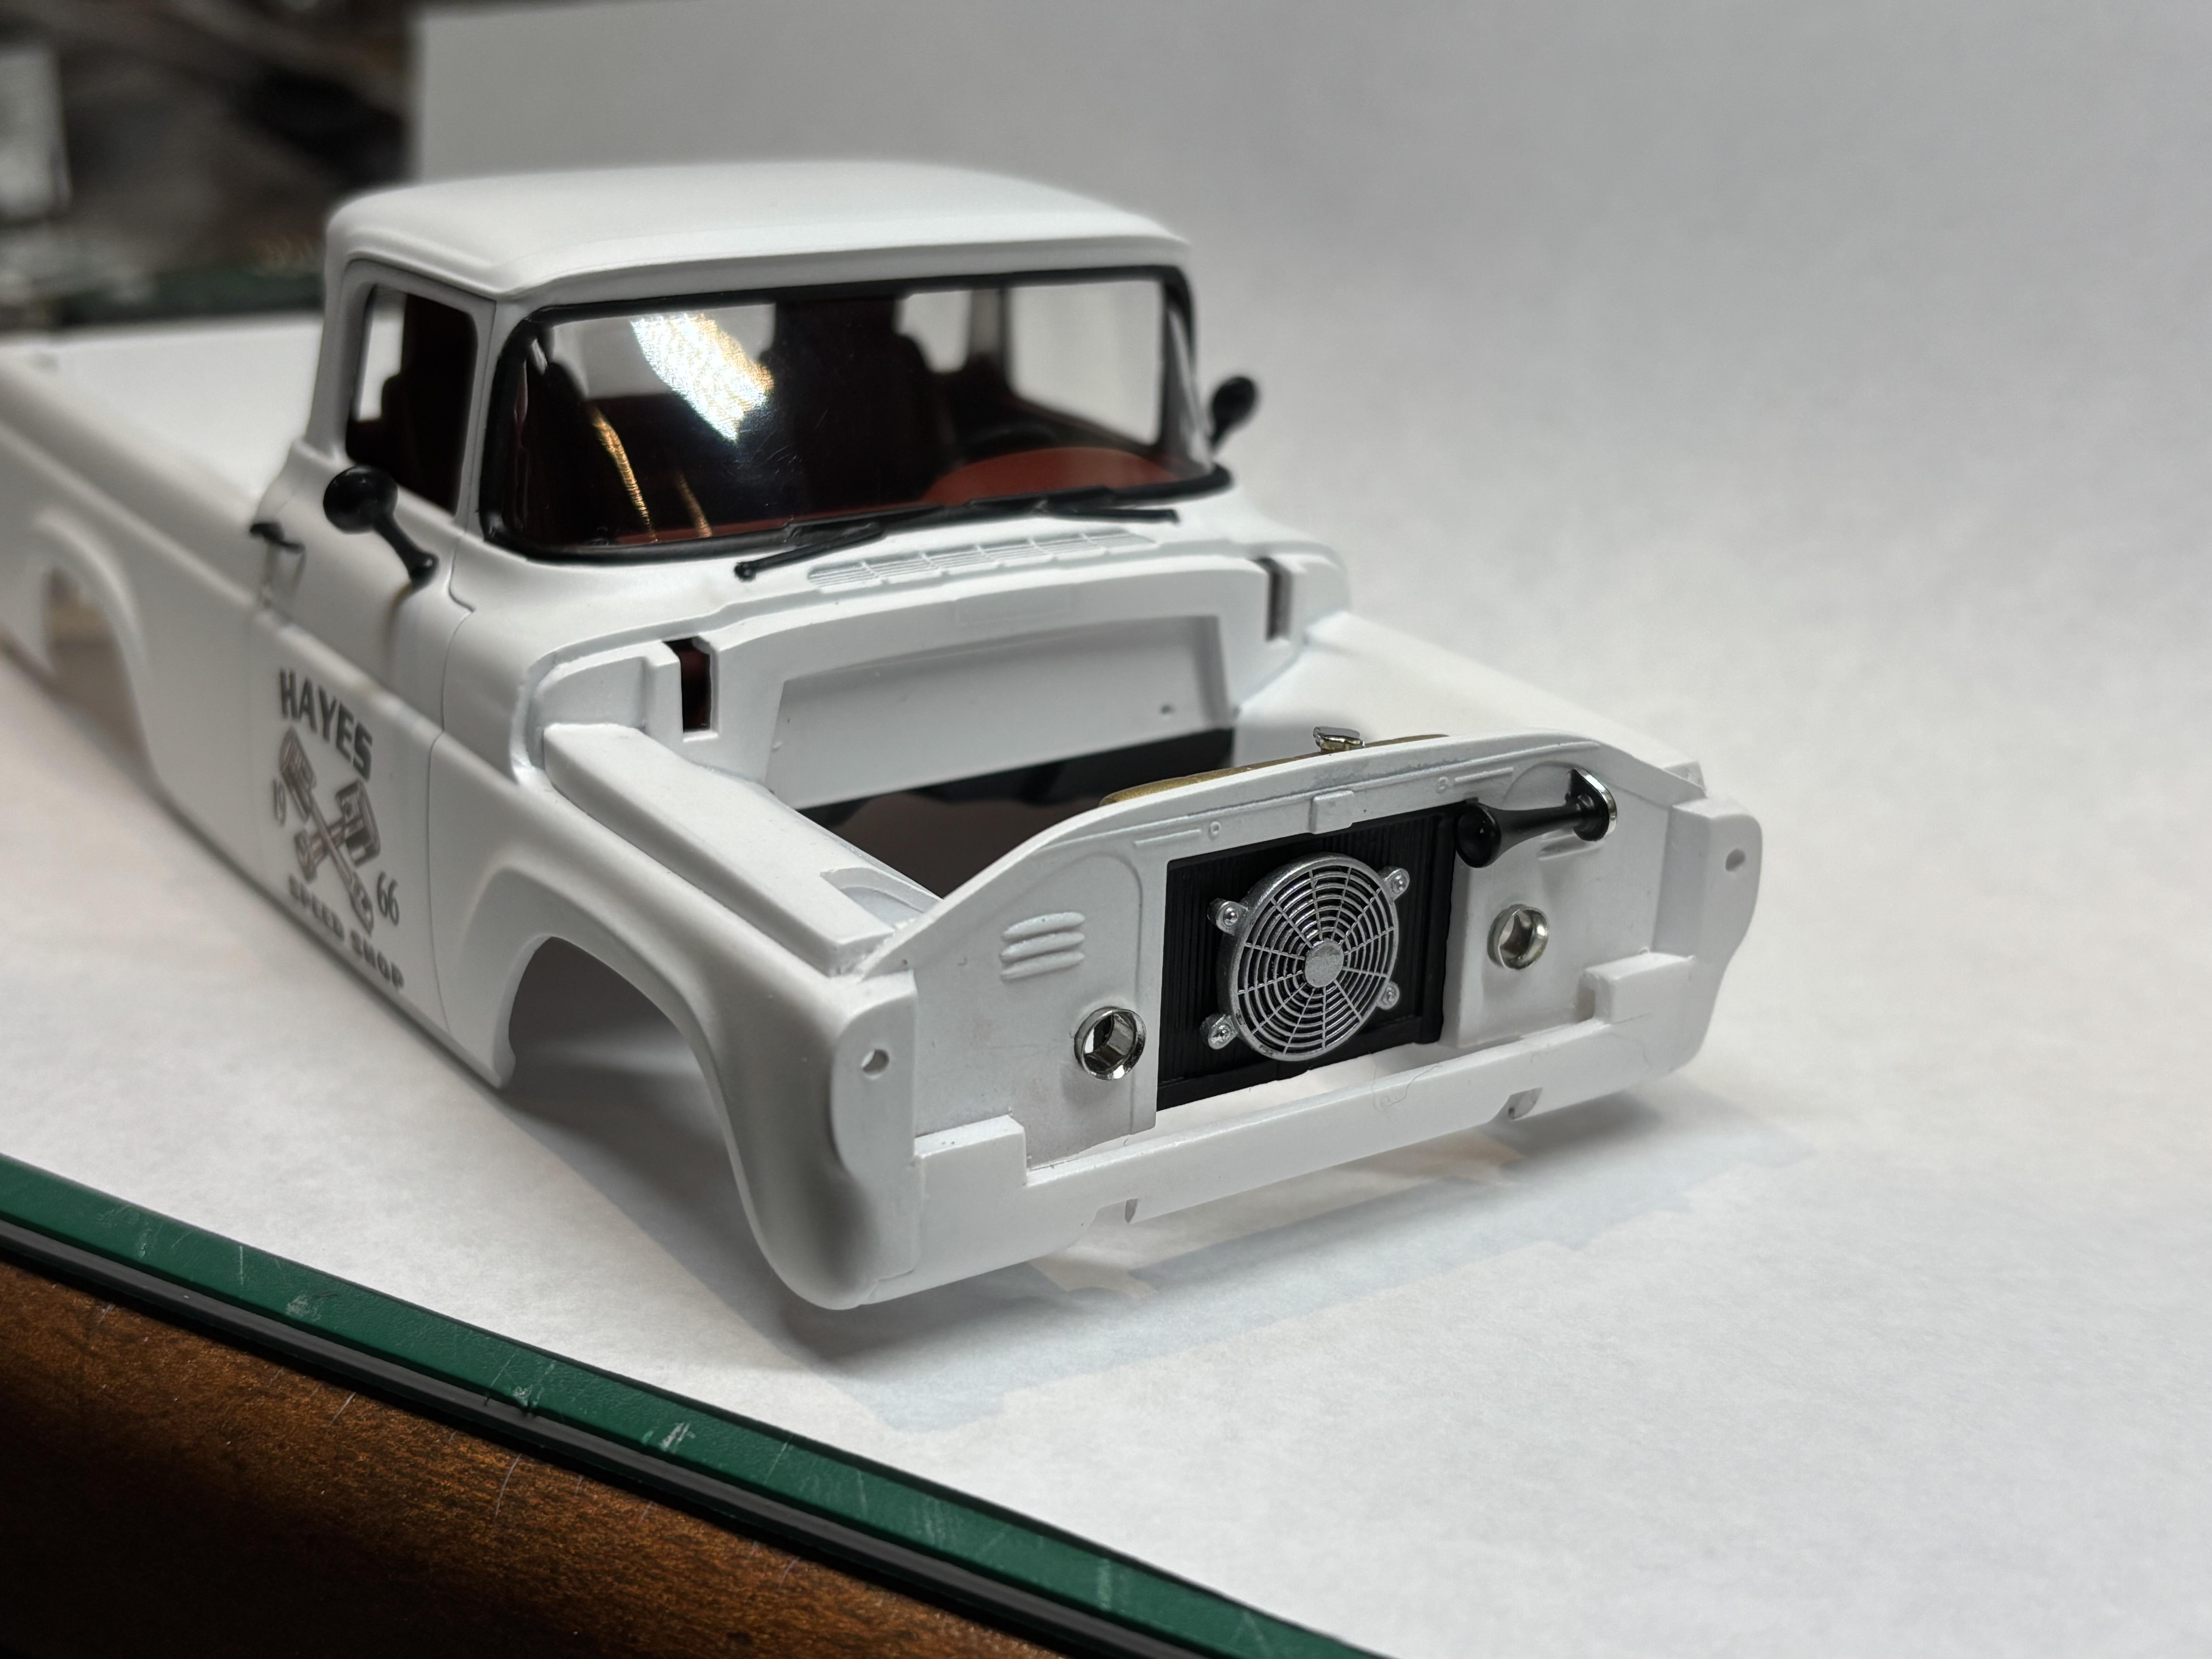
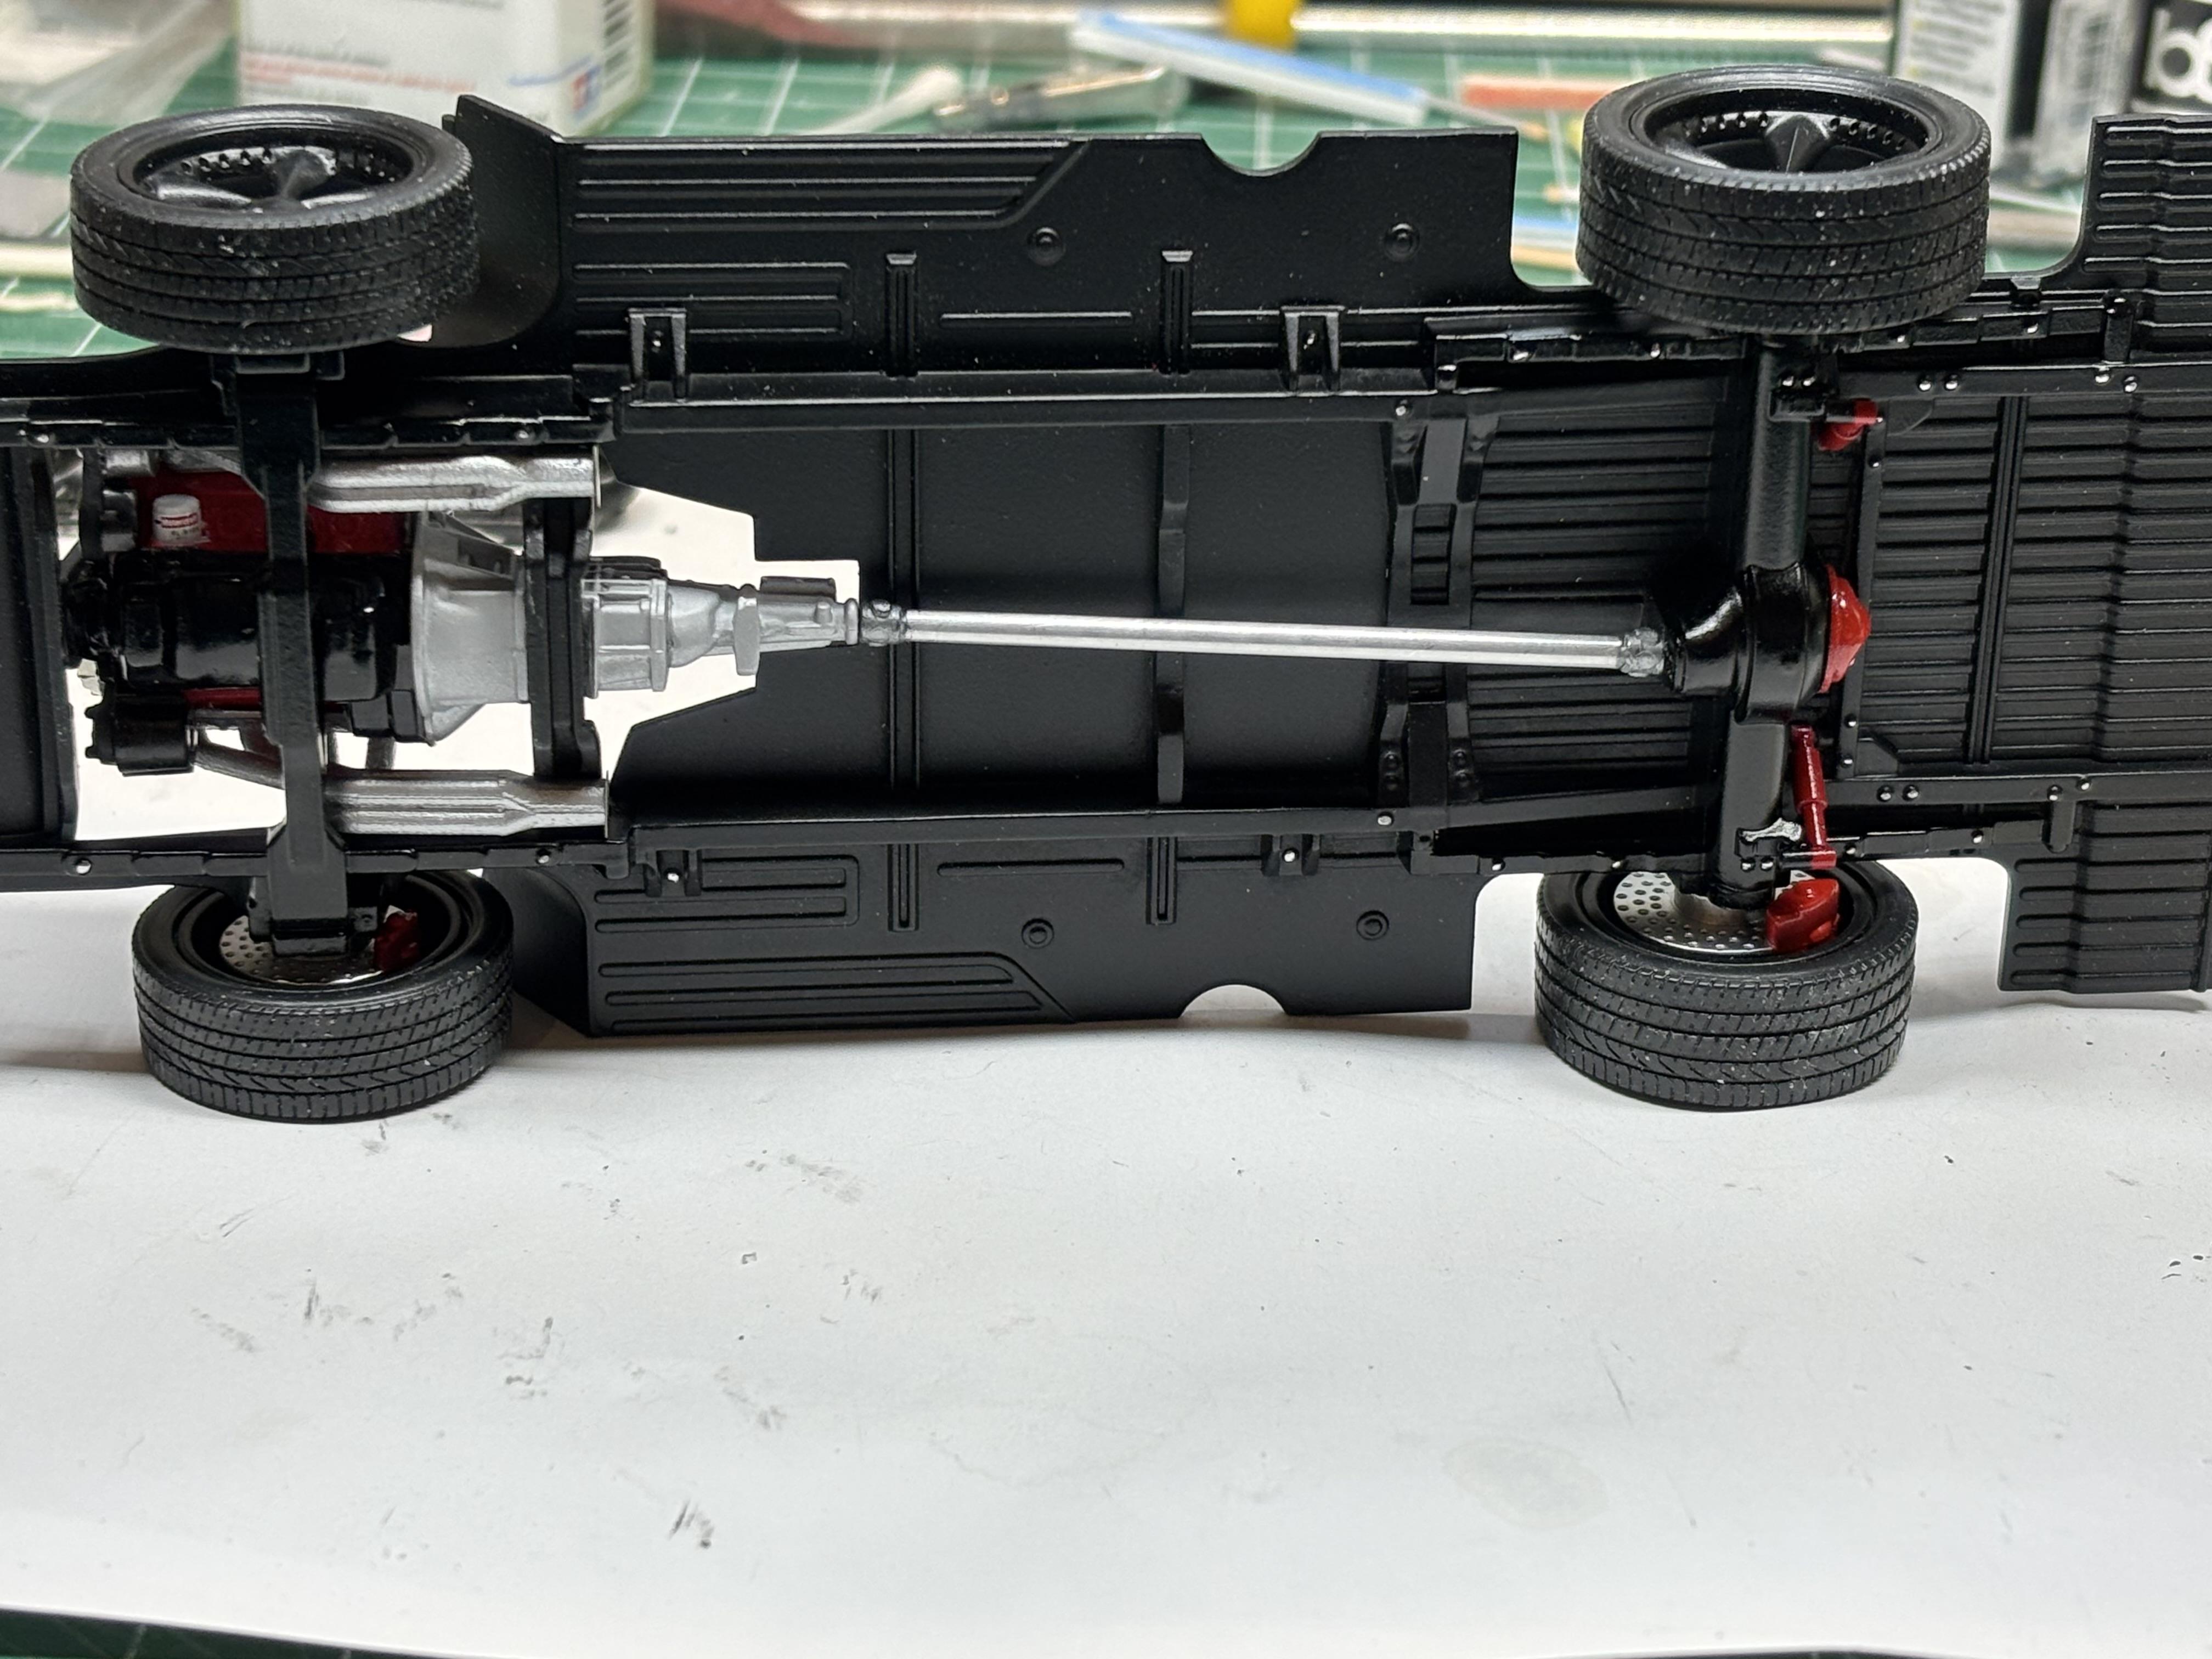
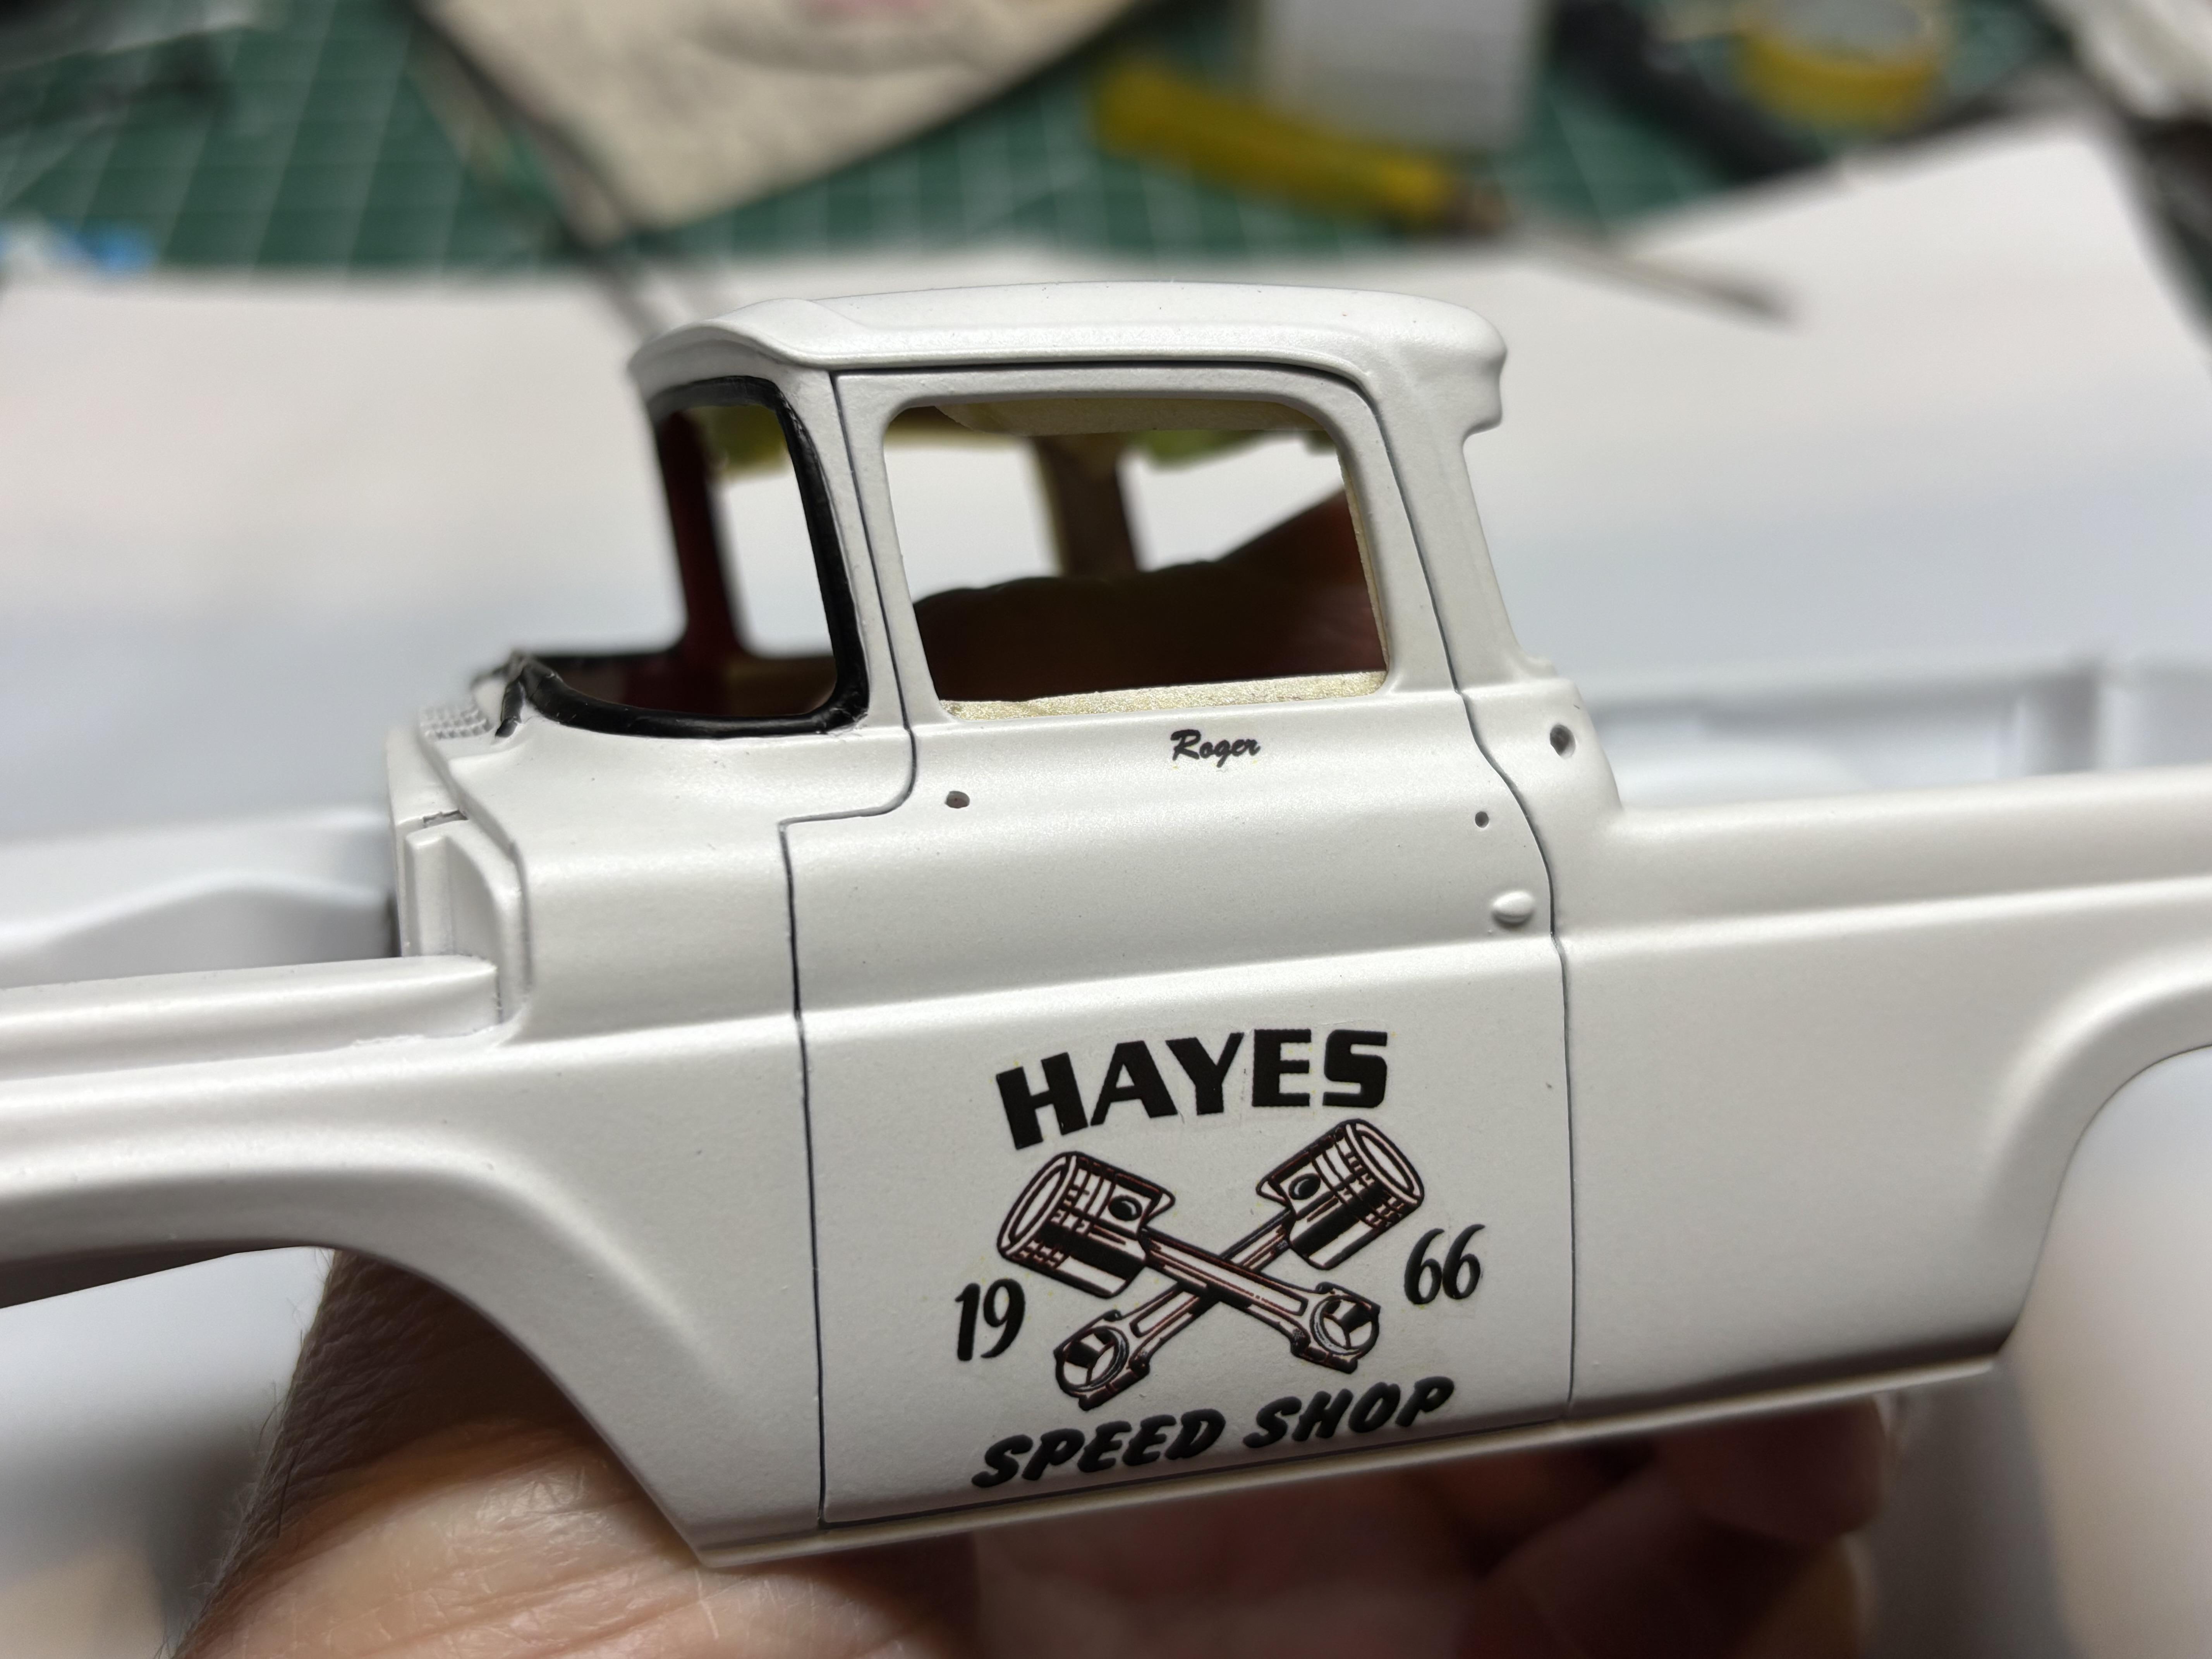
 More progress, Got the glass, and trim pieces added to the body, then attached the interior tub. The rad support has air intake trumpets which is where the blower intake pipes will connect. Also modified the kit air horn, and mounted it on the rad support as well, also added an electric fan. The door handles are actually GM units from fireball model works. I initially had “Tyner KY” decals at the back below the tailgate. Unfortunately the decals were old, a bit yellowed, and did not like the clearcoat. So those were carefully removed, and the Hayes speed shop decals added. Still have a few small details to add, such as painting the tailgate chains, and door locks. The chassis has a few lines added, and is ready for installation. Inching closer to completion…
- 187 replies
-
- 10
-

-

-
- plowboy
- roger hayes
- (and 1 more)
-
Welcome Lily, from the “wet” coast. Another Canuck from Vancouver Island.
-
Thanks Carl!!
-
Aoshima Suzuki Carry Overlander
Steve H replied to oldcarfan's topic in Model Trucks: Pickups, Vans, SUVs, Light Commercial
Excellent build Gary. This one made me smile. Lots of great little details throughout this build. -
1967 Ford F350 Ramp Truck
Steve H replied to Chuck Most's topic in Model Trucks: Pickups, Vans, SUVs, Light Commercial
Another great story, and another beautifully weathered truck. Thanks for sharing Chuck. -
41 Chevy P/U hot rod
Steve H replied to Steve H's topic in Model Trucks: Pickups, Vans, SUVs, Light Commercial
Thank you Larry, much appreciated. Thanks David, I will be building another one of these trucks this fall, I love these trucks. It will be similar, but definitely different. Hi Brian! This is a bit of an older build, maybe 2017ish. As mentioned above, I will be building another one of these later this year, and hope to improve on it. Thanks for the kind words sir. -
Post your truck mockups.
Steve H replied to Mike C.'s topic in WIP: Model Trucks: Pickups, Vans, SUVs, Light Commercial
Oh yeah…. Very cool Paul. That is ALOT of motor shoehorned in there! -
Thank you Anton. I’m getting close to the finish line on this one. Thanks David, I would like to take credit for the engine, but… well, it’s just a beautiful looking engine. Something I “TRY” to do on my builds, is tie together a few colours with some sort of continuity. The small hits of chrome here and there are consistent as well. Just a little chrome tho. Roger was much better with colour than I am, but I still think he would approve. Hello Brian. Just a dab of Molotow on the carriage bolts. It really is a fantastic looking engine, I still can’t believe I didn’t use it on another build at some point. Glad it was still available for this build! Thanks for sharing your thoughts guys, much appreciated. Hoping to get this wrapped up soon. Having said that, this has been a really enjoyable build thread. So grateful for all of the sharing here.
-
Haha!! Excellent. So…. there is smooth paint, and then there is this 👆. Smoother than glass? Fantastic Luke, and I believe possibly your smoothest paint job yet. Looks great with the red interior mate.
-
’72 Dodge Demon Drag Racer 1/25 scale
Steve H replied to AmericanMuscleFan's topic in WIP: Drag Racing Models
Absolutely spectacular. The battery, and all the associated components made me smile. First class as always Francis. It really is a treat to pop in here and catch up on your latest creations. Thanks for sharing the process. -
Thanks Spike, I’ve been enjoying this build.
-
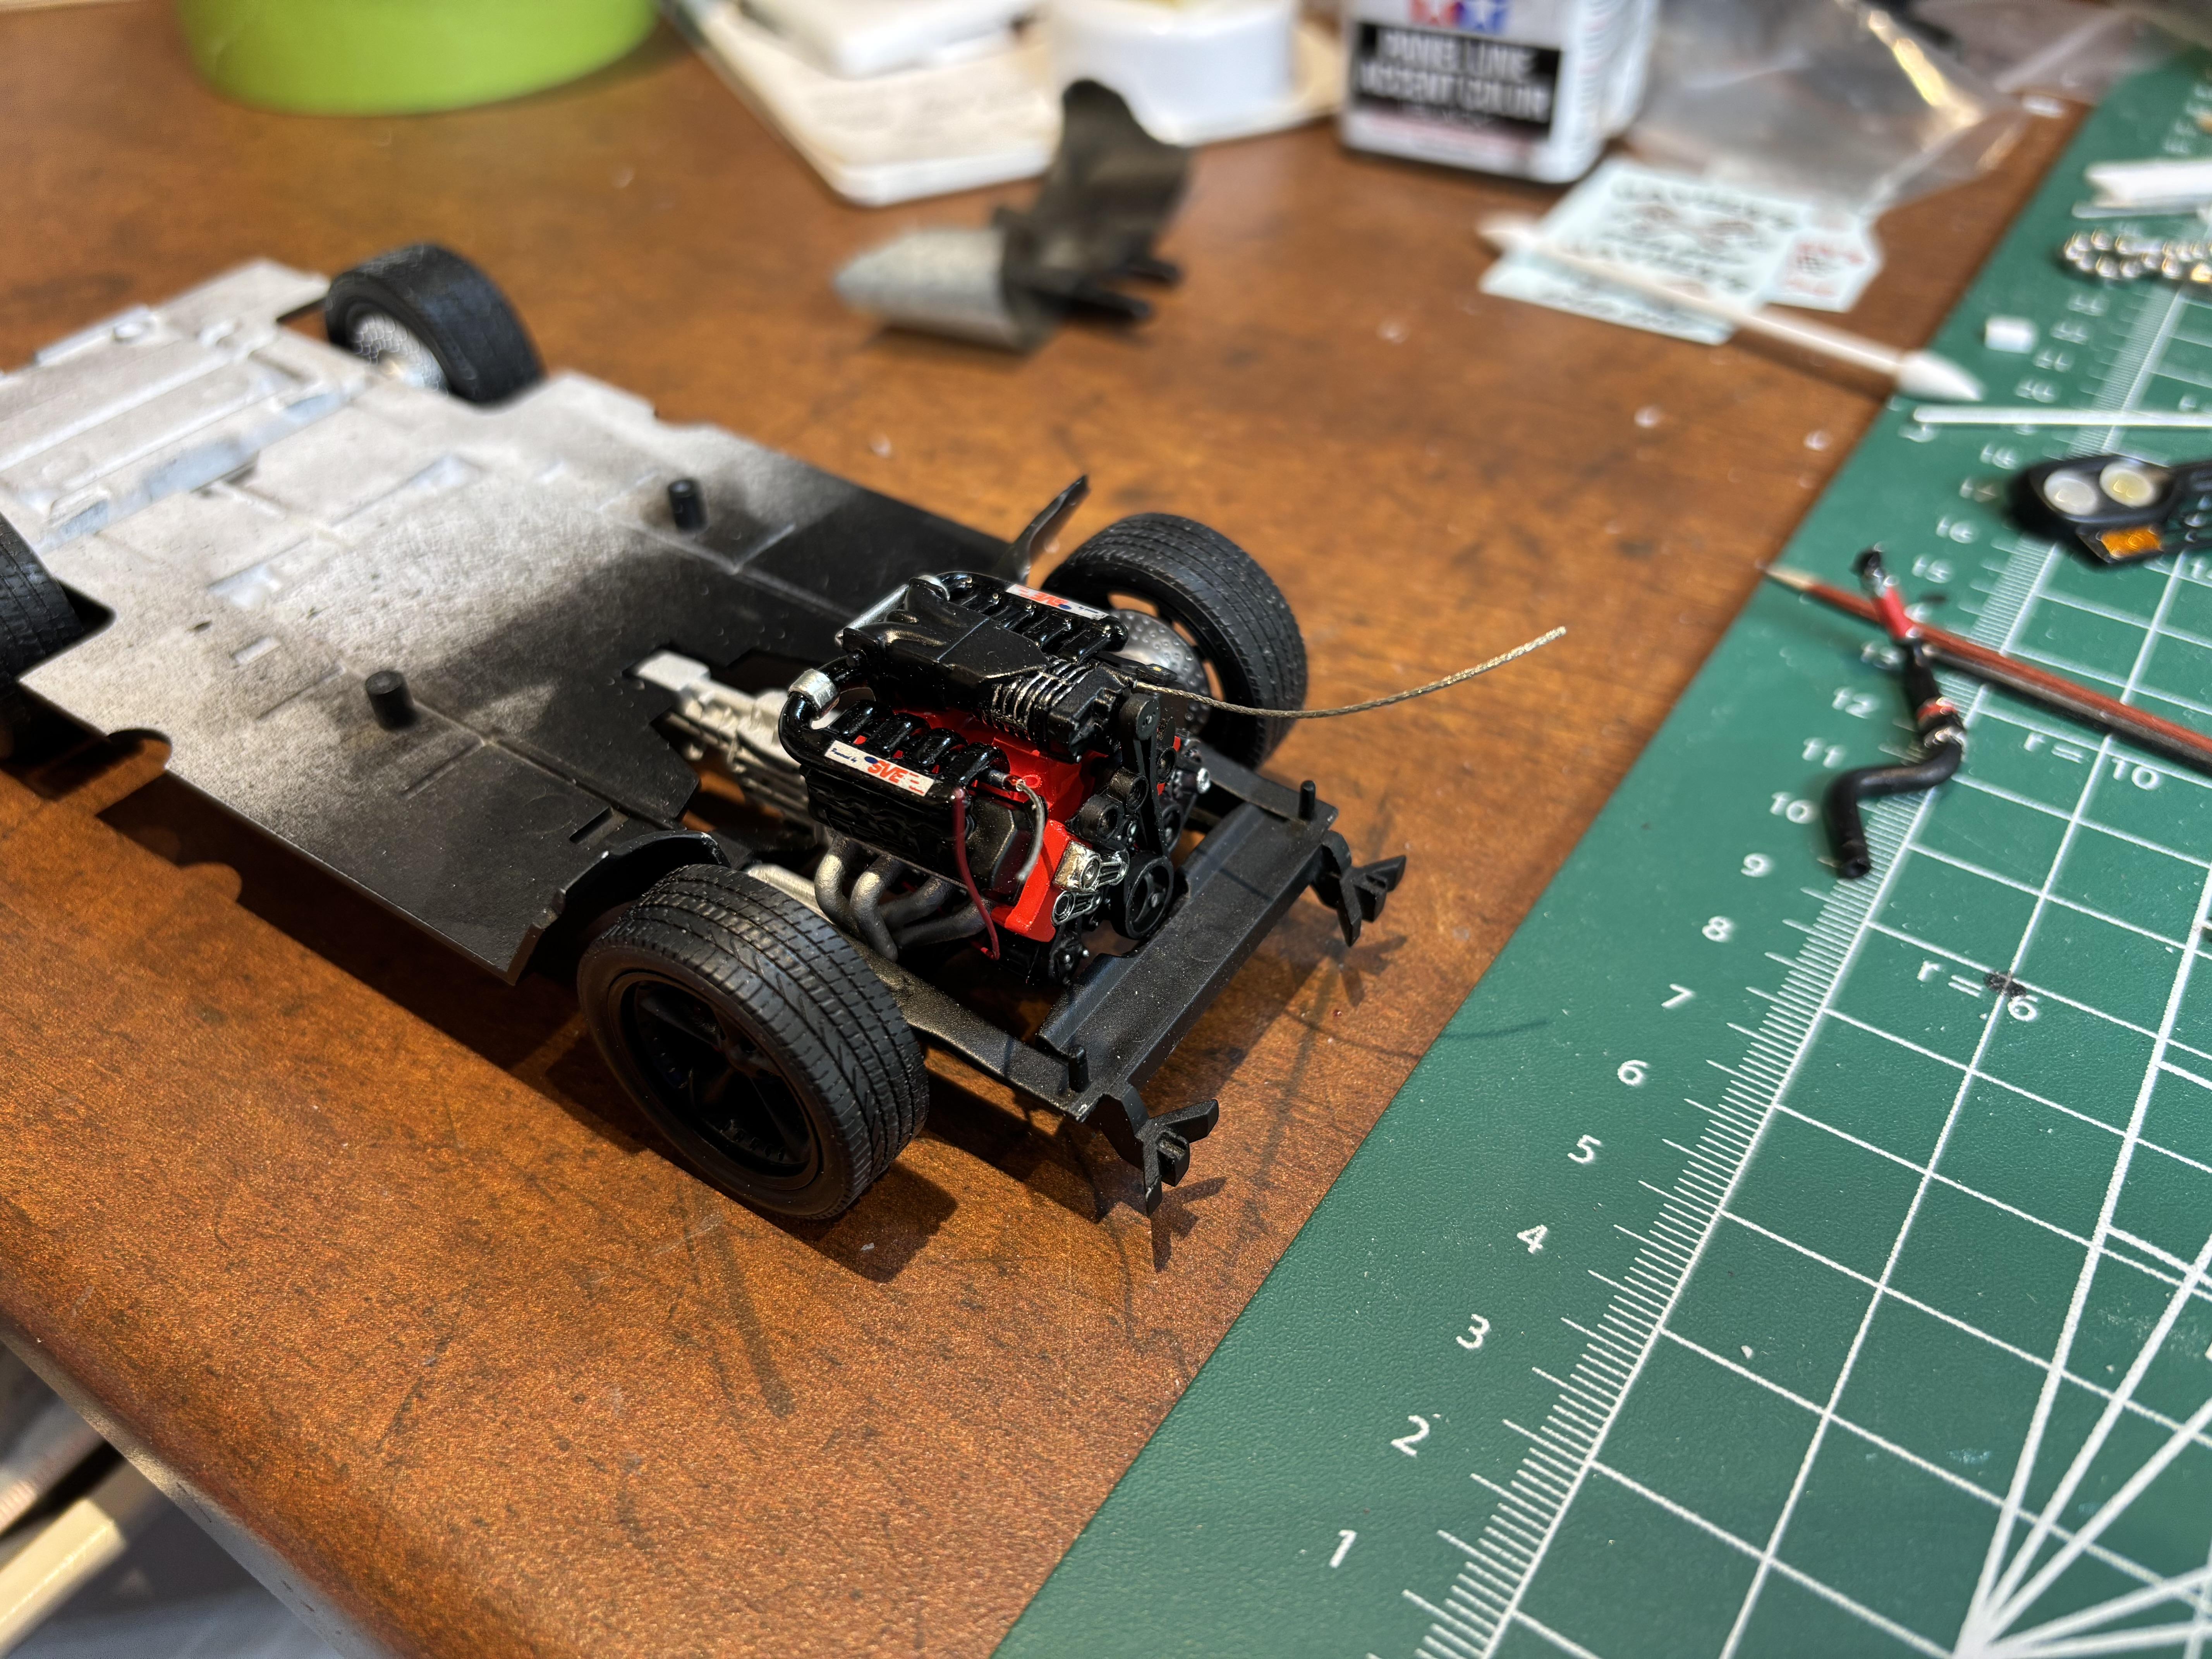
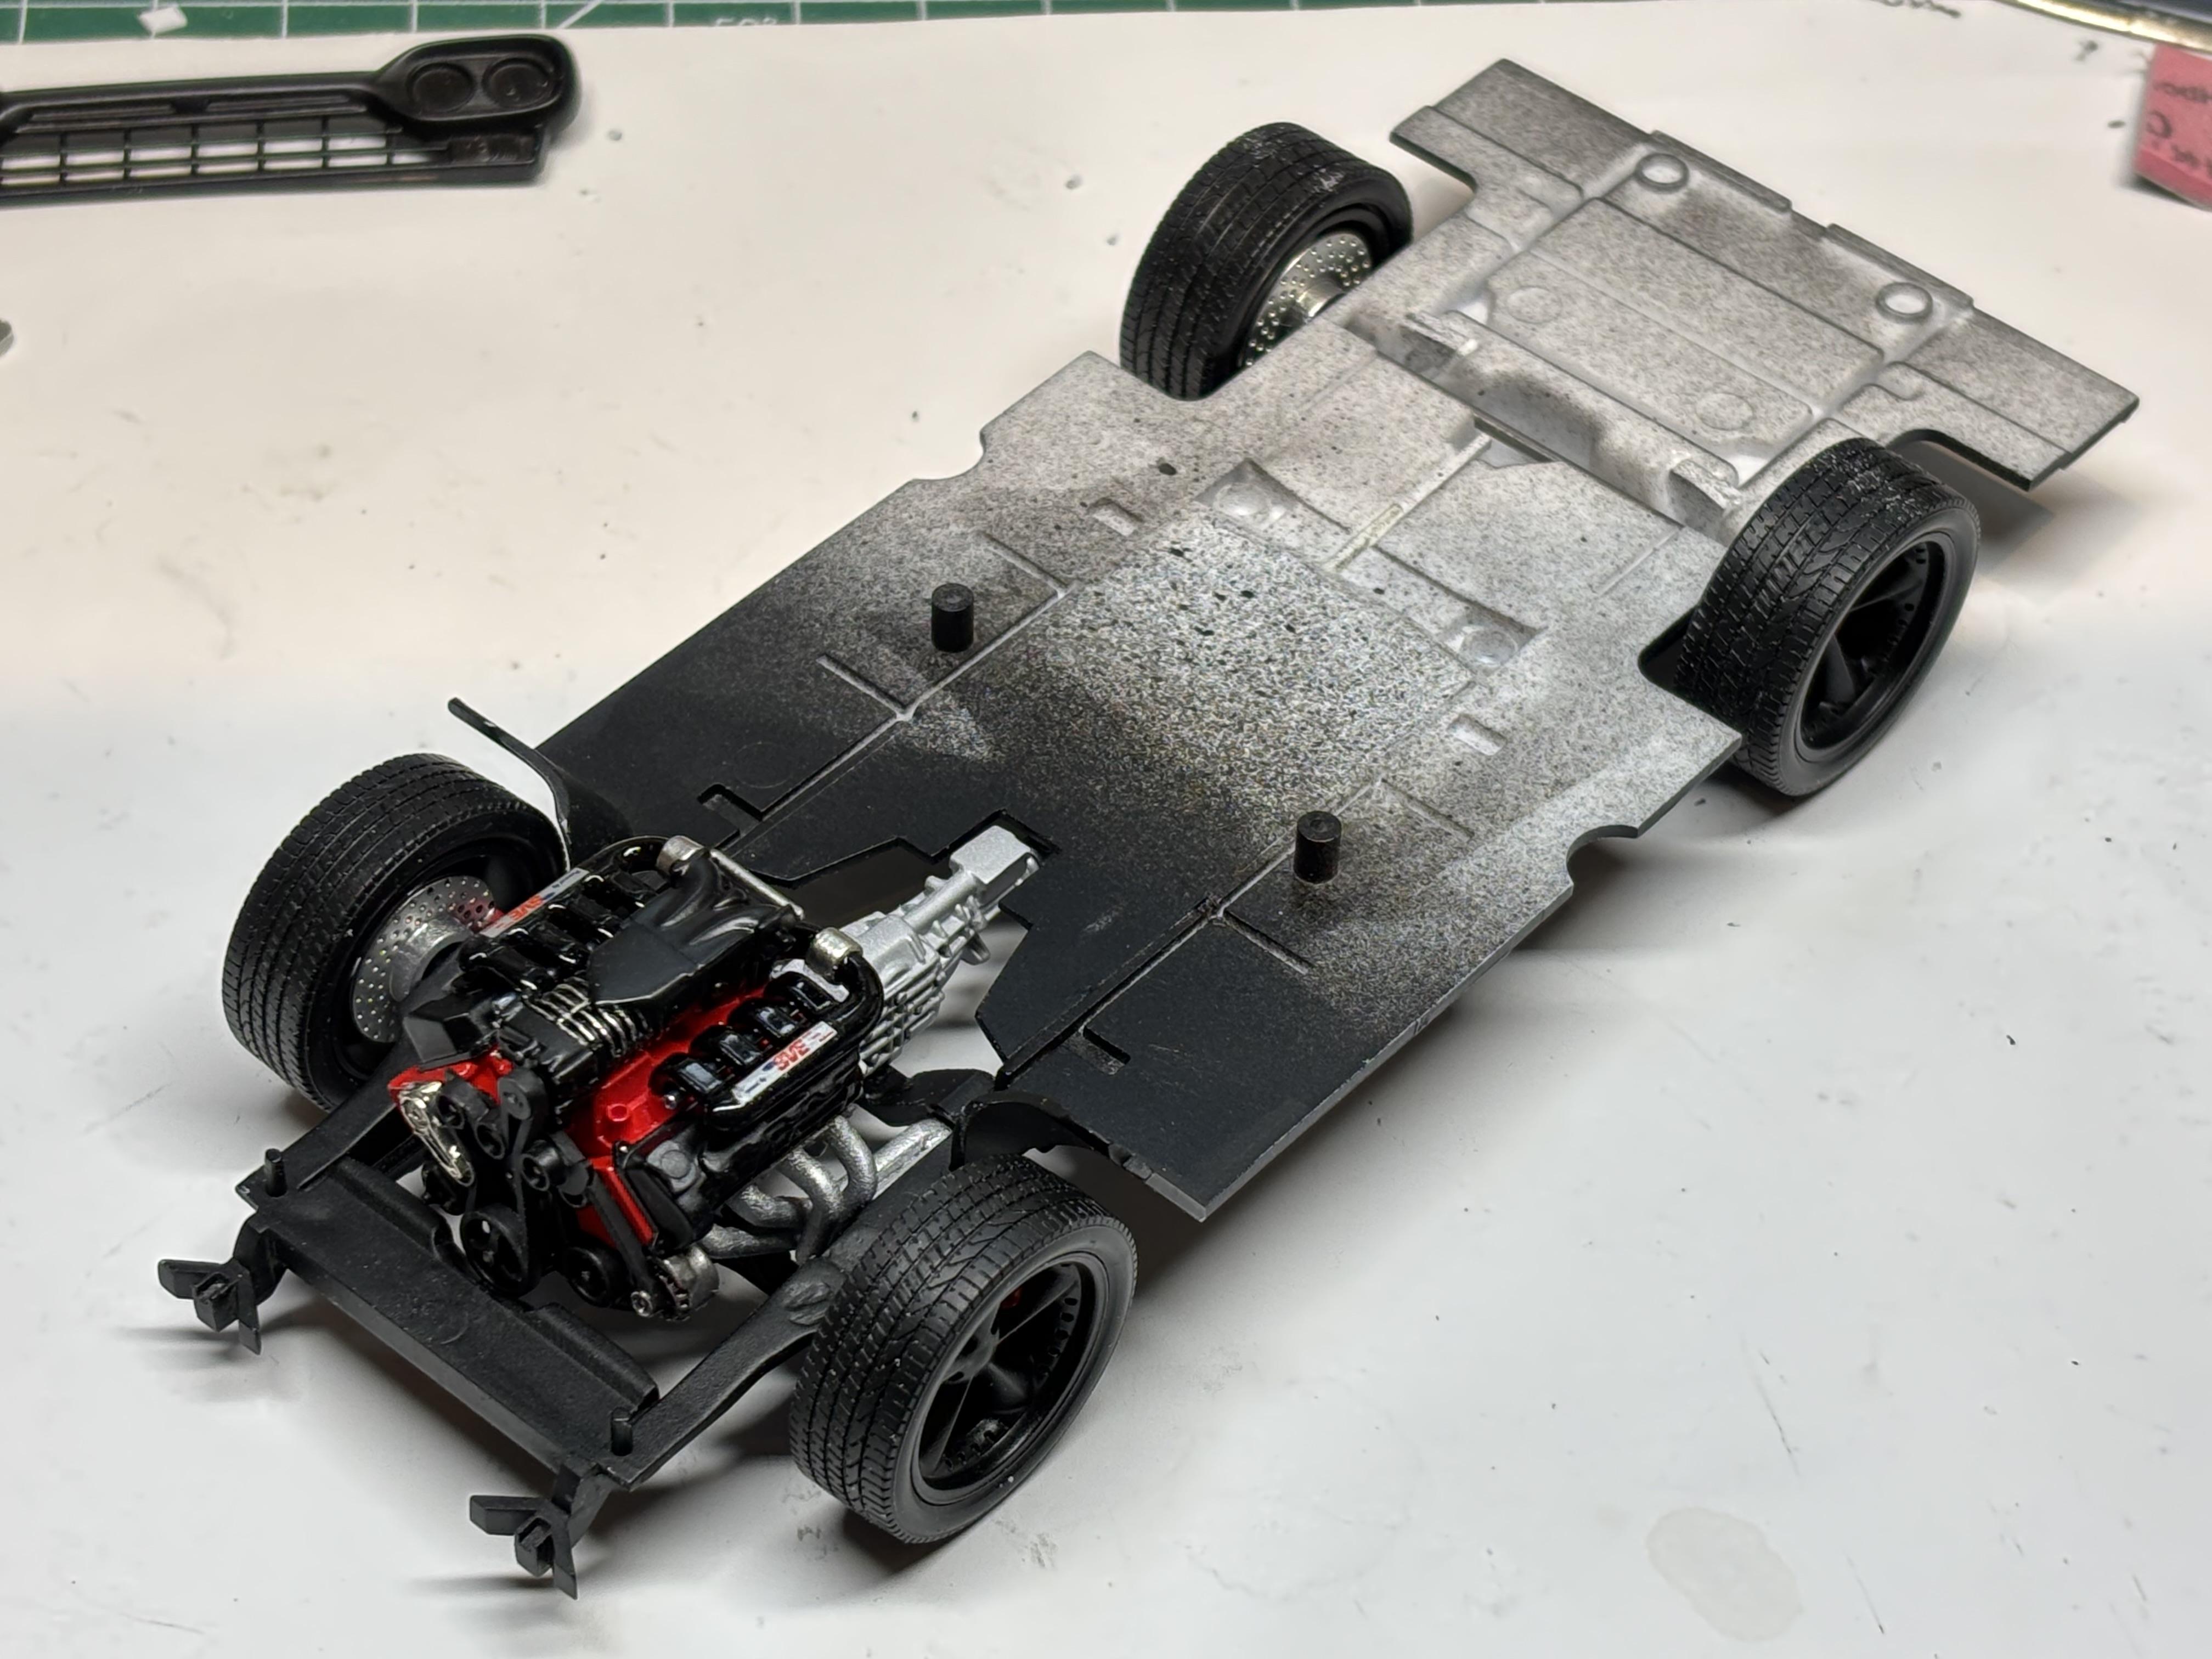
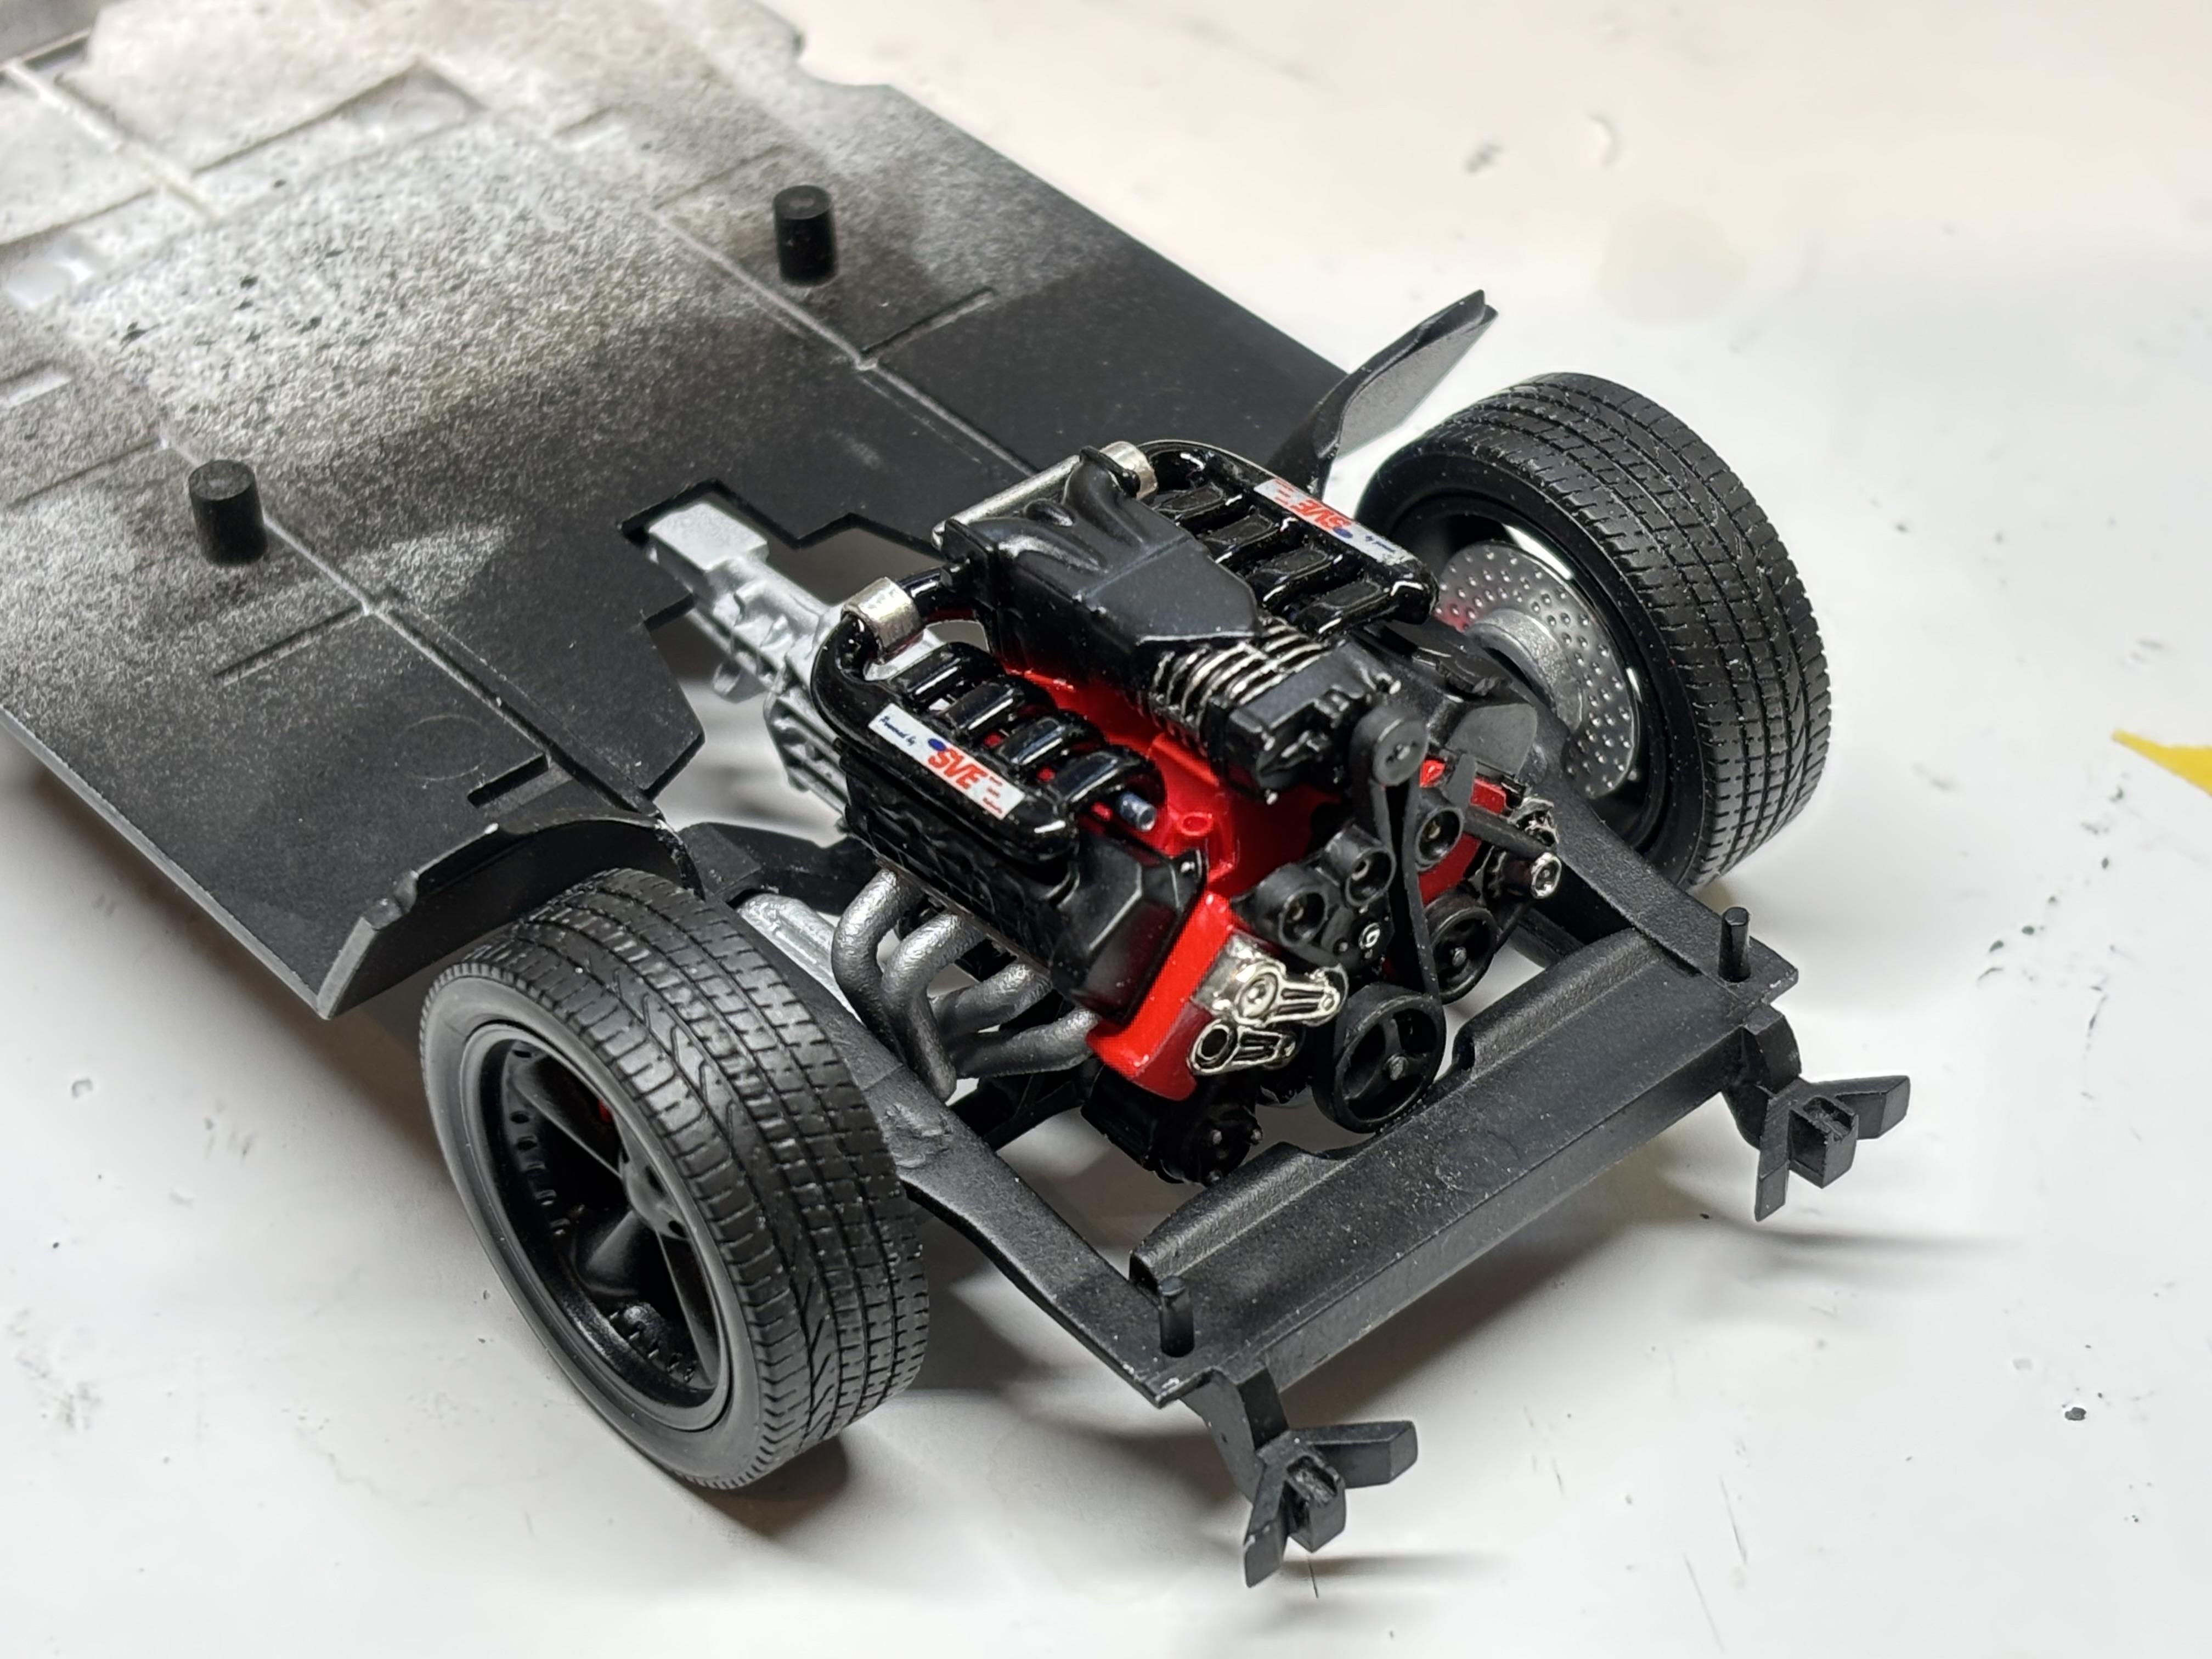
Another update, The chassis is now finished, or at least close. I’ll add a few more small details but it’s close. Kinda nice seeing the engine in its new home. I made some rear shocks from aluminum tubing and styrene rod. Nothing fancy, but better than the “LEGO” blocks. Driveshaft is aluminum tubing. Obviously still need exhaust, but that will happen once the body and chassis become one for the final time. I feel like I must be getting close…
- 187 replies
-
- 10
-
-
- plowboy
- roger hayes
- (and 1 more)
-
Hi Scott, and thank you. Roger was indeed a fantastic builder. Thanks Rooster. Thank you David, I struggle a bit with making interiors interesting, but hopefully not too busy.
- 187 replies
-
- 1
-
-
- plowboy
- roger hayes
- (and 1 more)
-
Thanks John. Wasn’t sure about the decal, but it looks decent I think, and ties everything together.
- 187 replies
-
- 1
-
-
- plowboy
- roger hayes
- (and 1 more)
-
Hi Greg, the keys are photoetch units from model car garage, or possibly detail master…🤔 They might both make them. The water bottle is from Meng. I got a set of multiple bottles in different scales many years ago, not sure of availability now.
- 187 replies
-
- 2
-
-
- plowboy
- roger hayes
- (and 1 more)
-
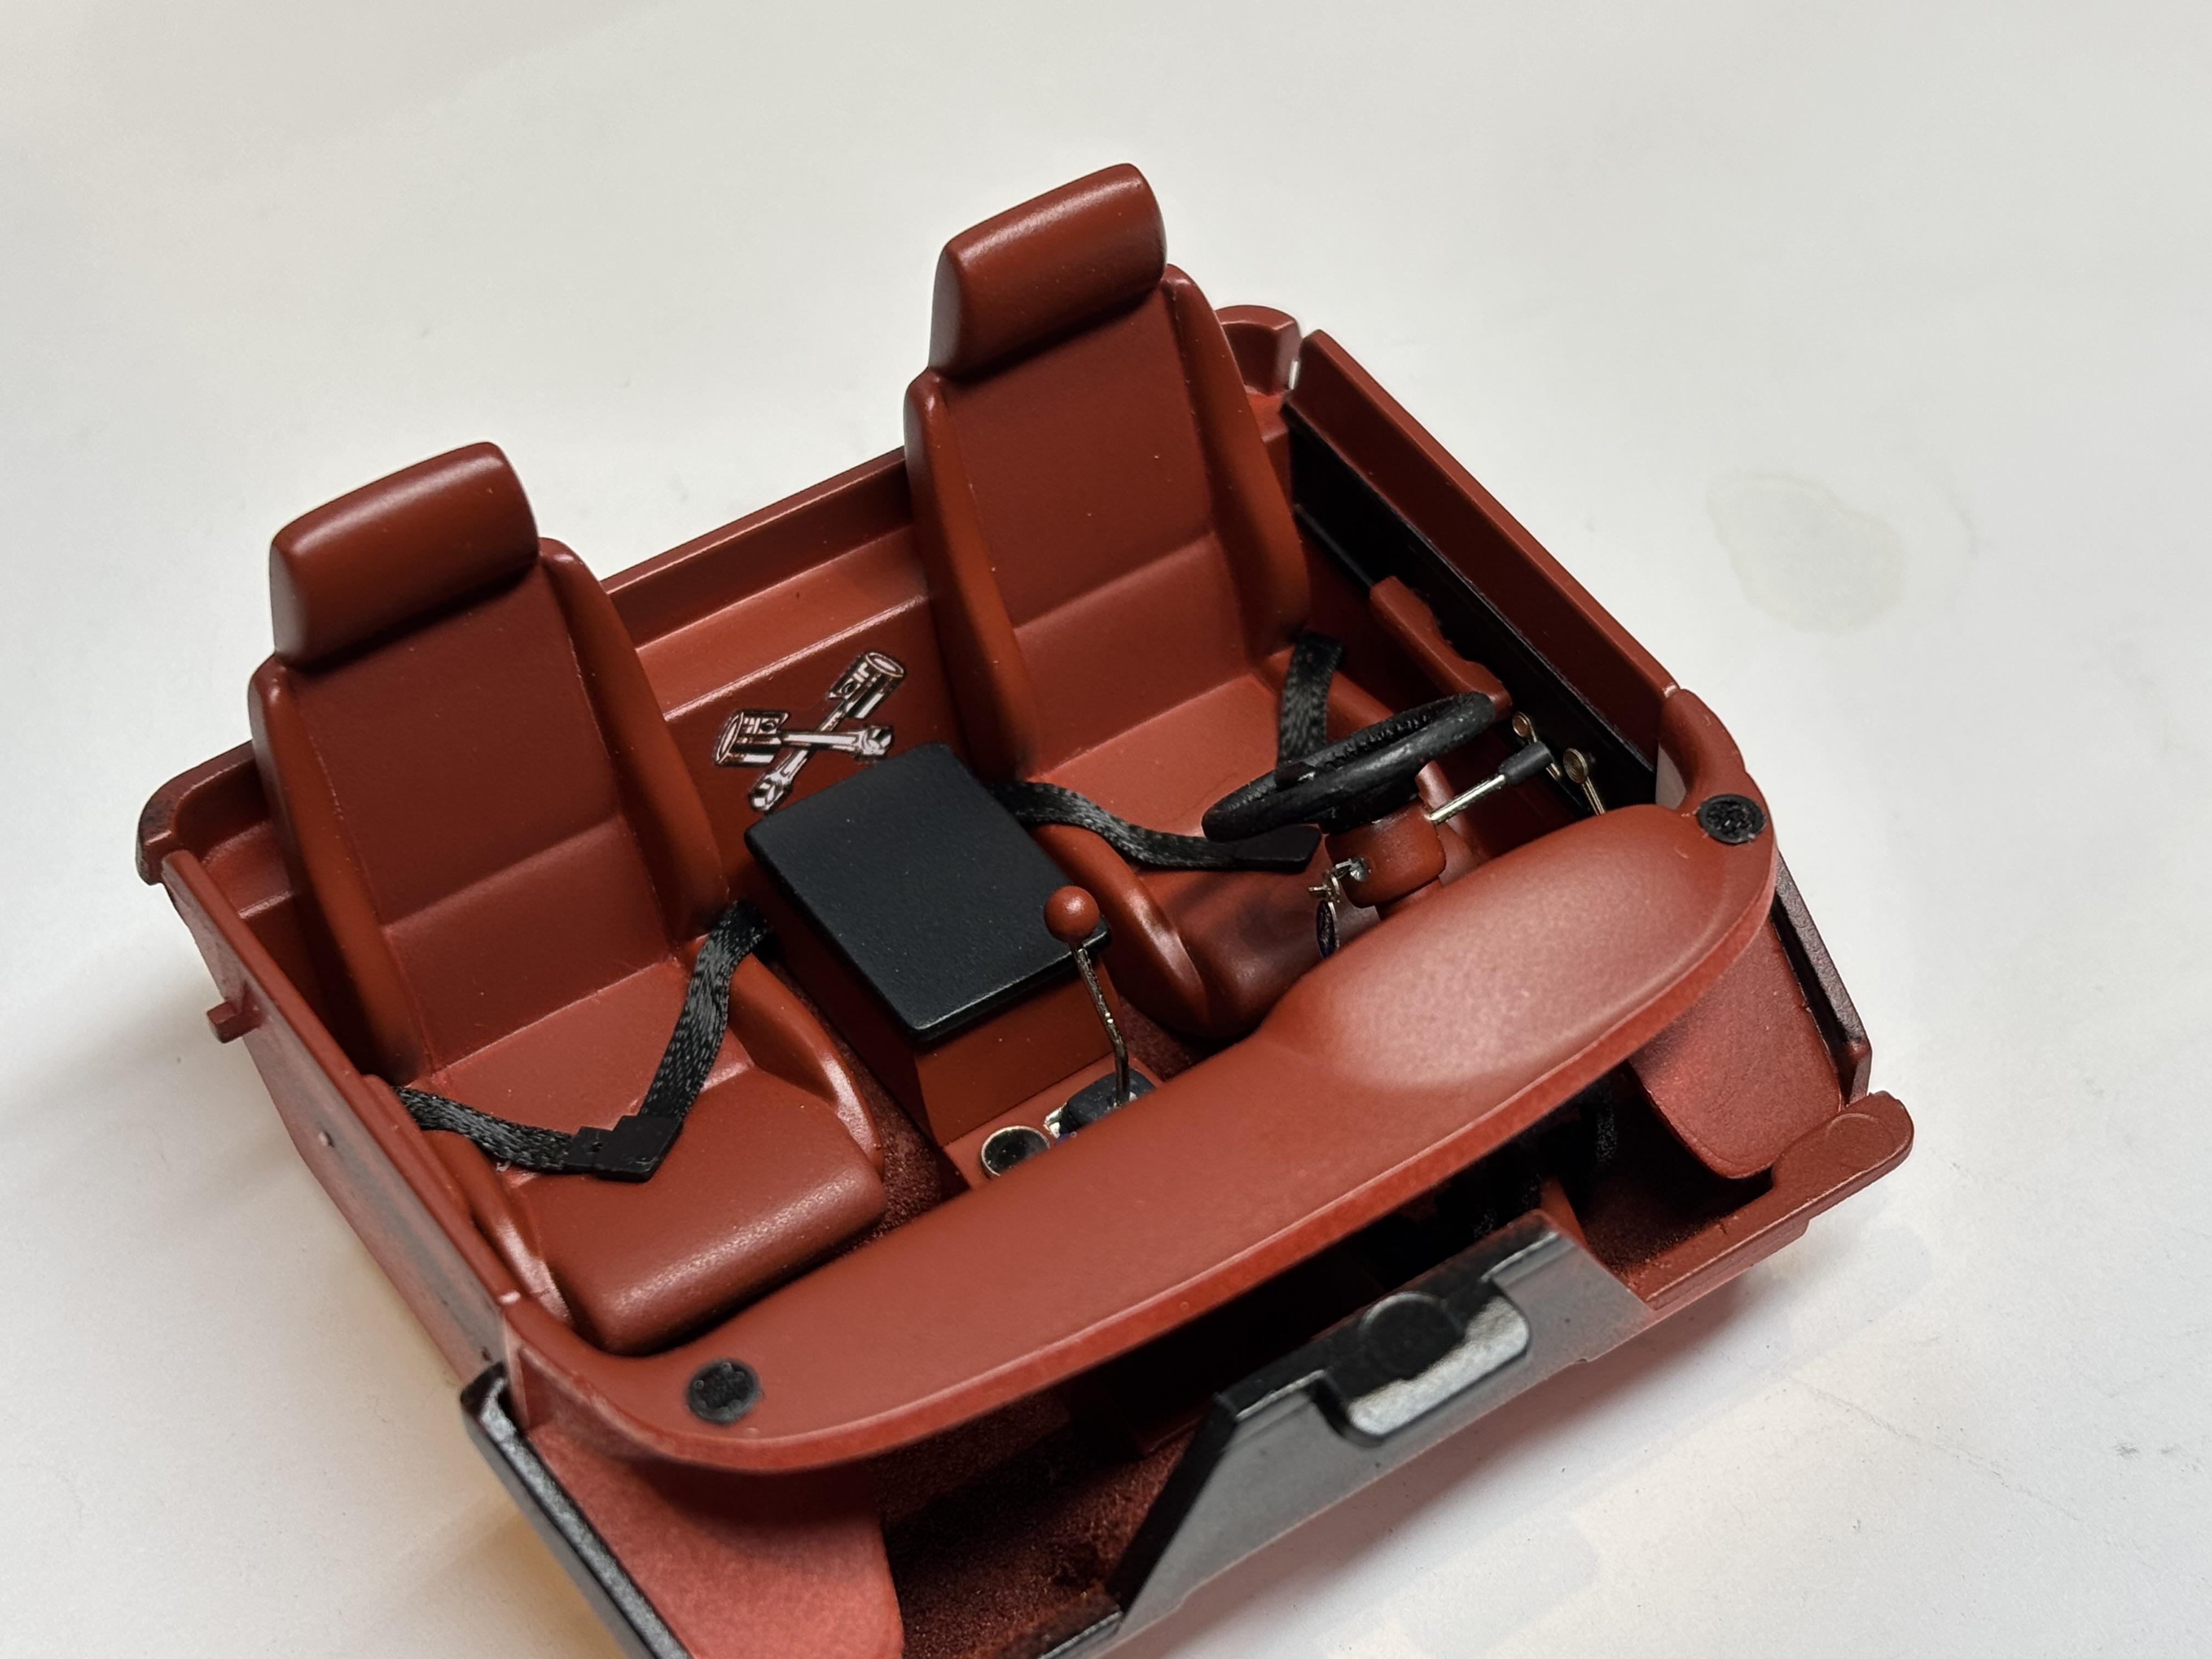
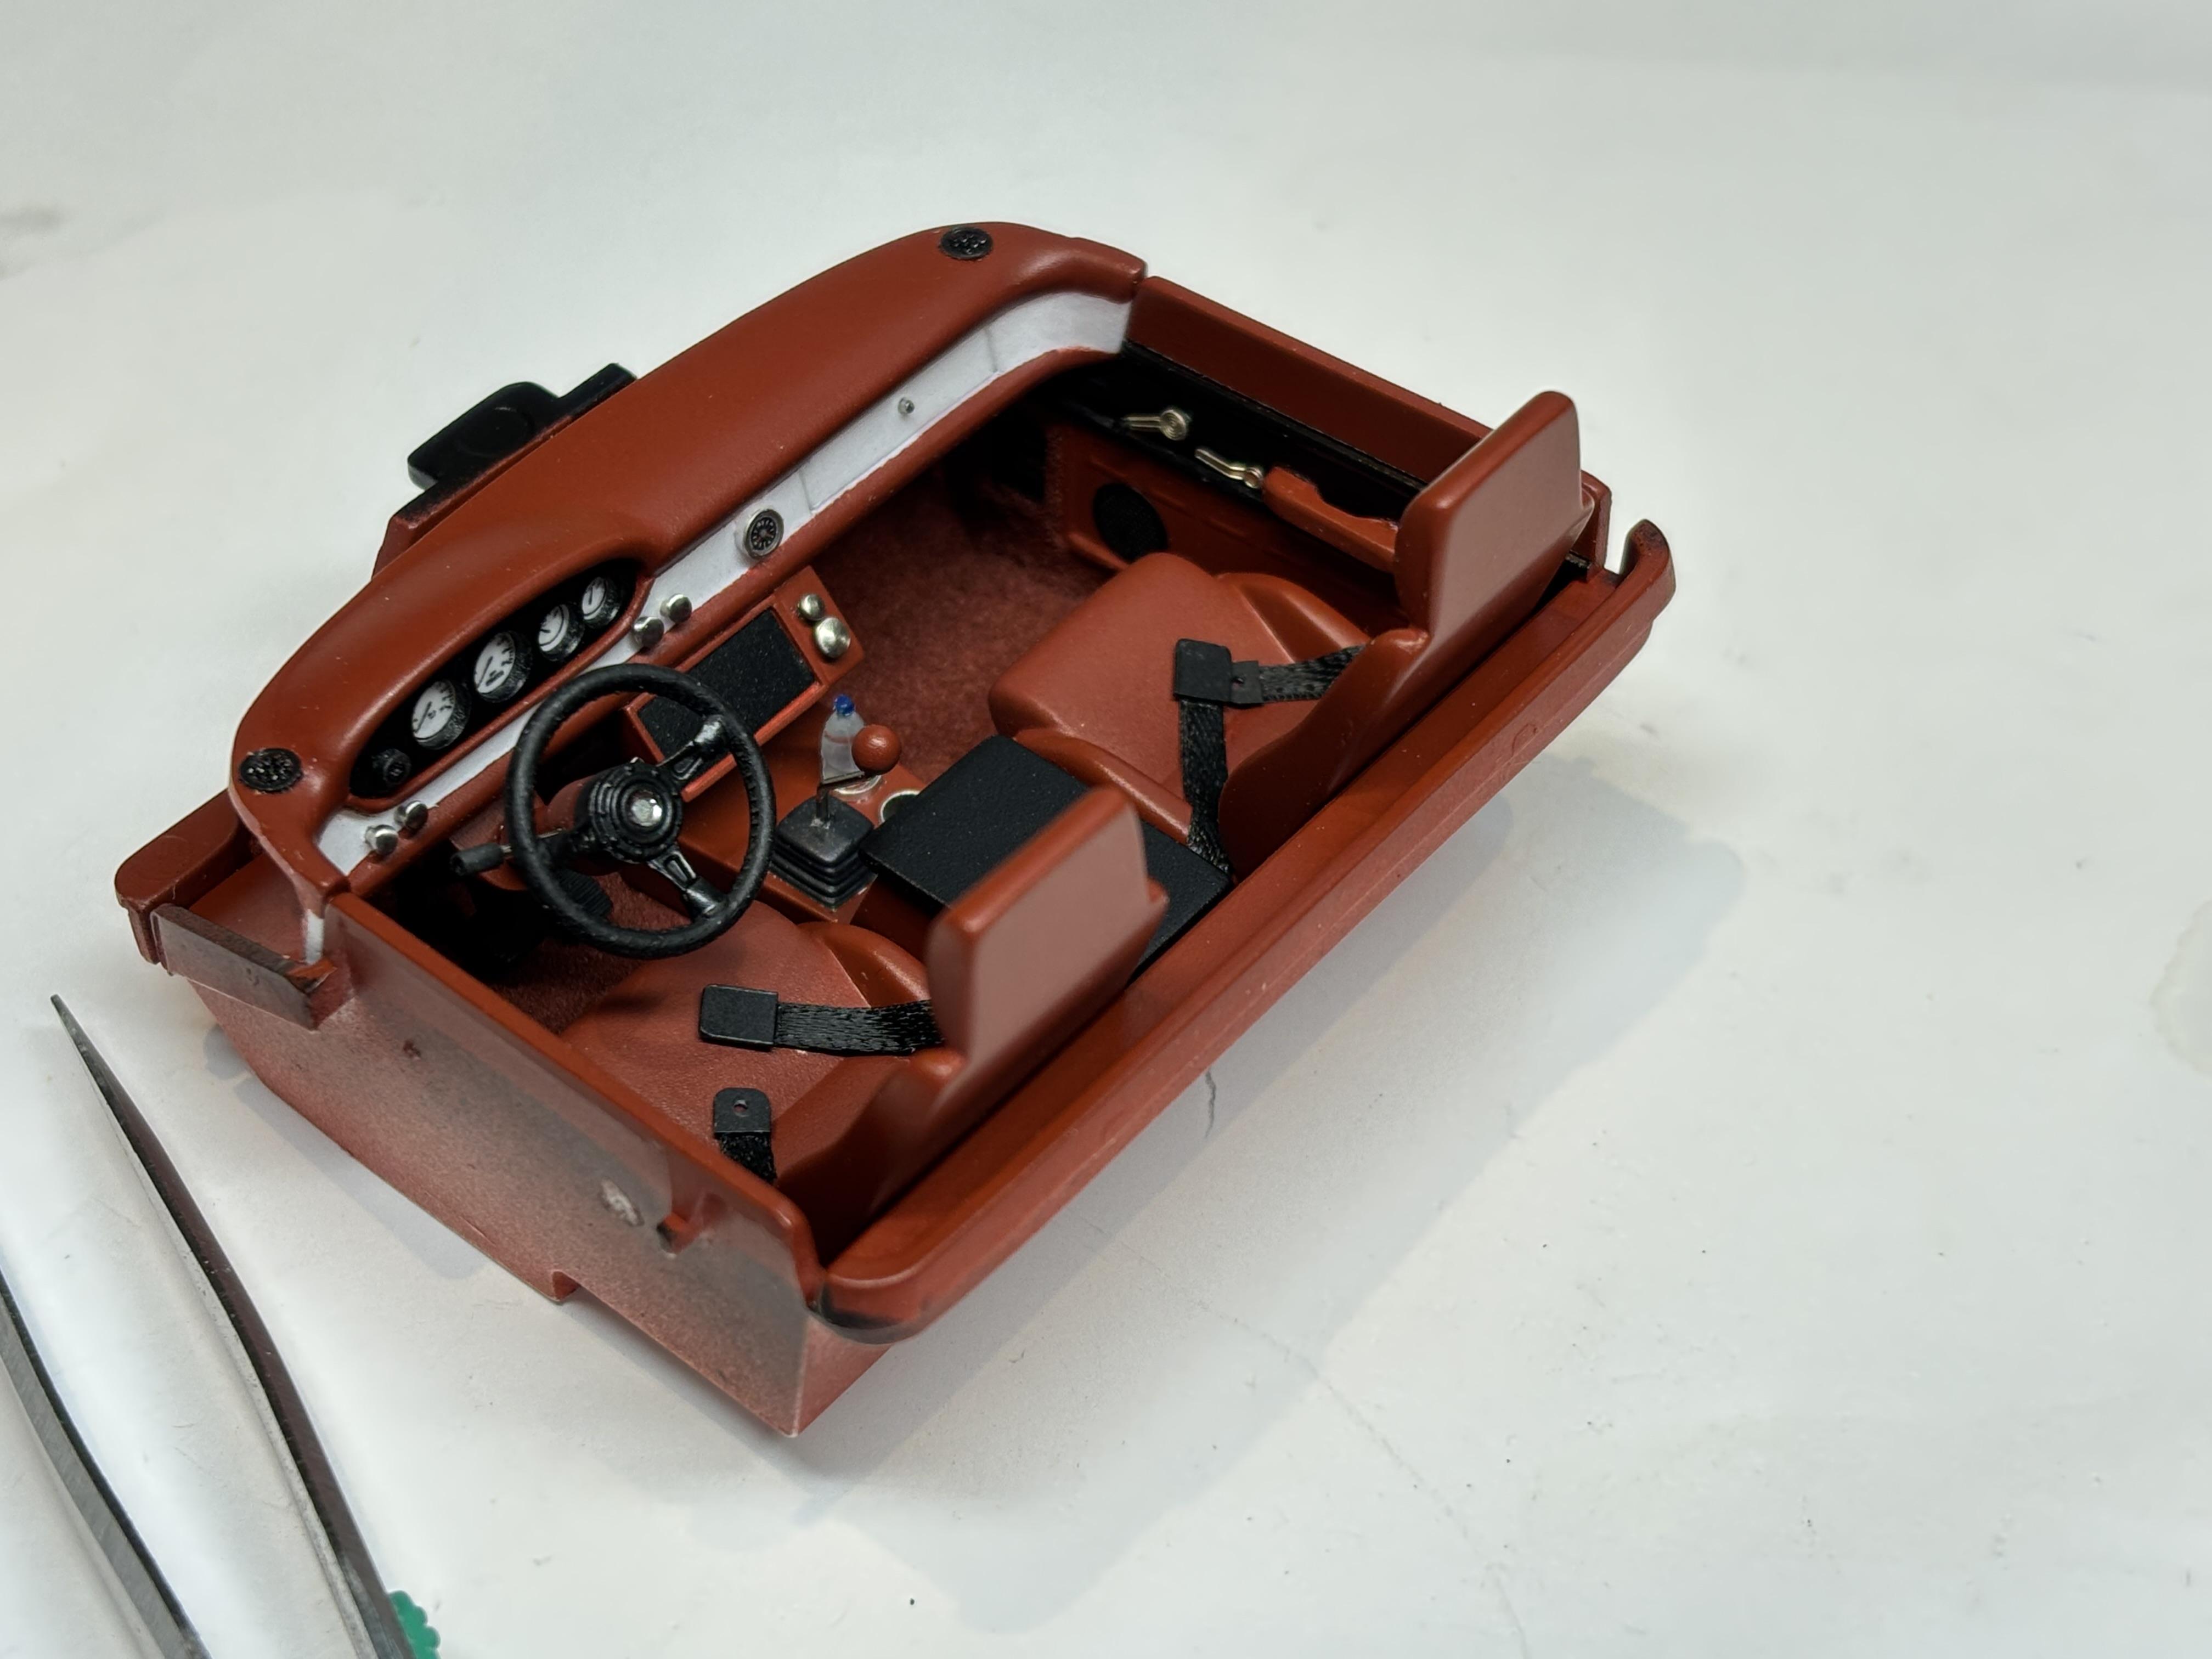
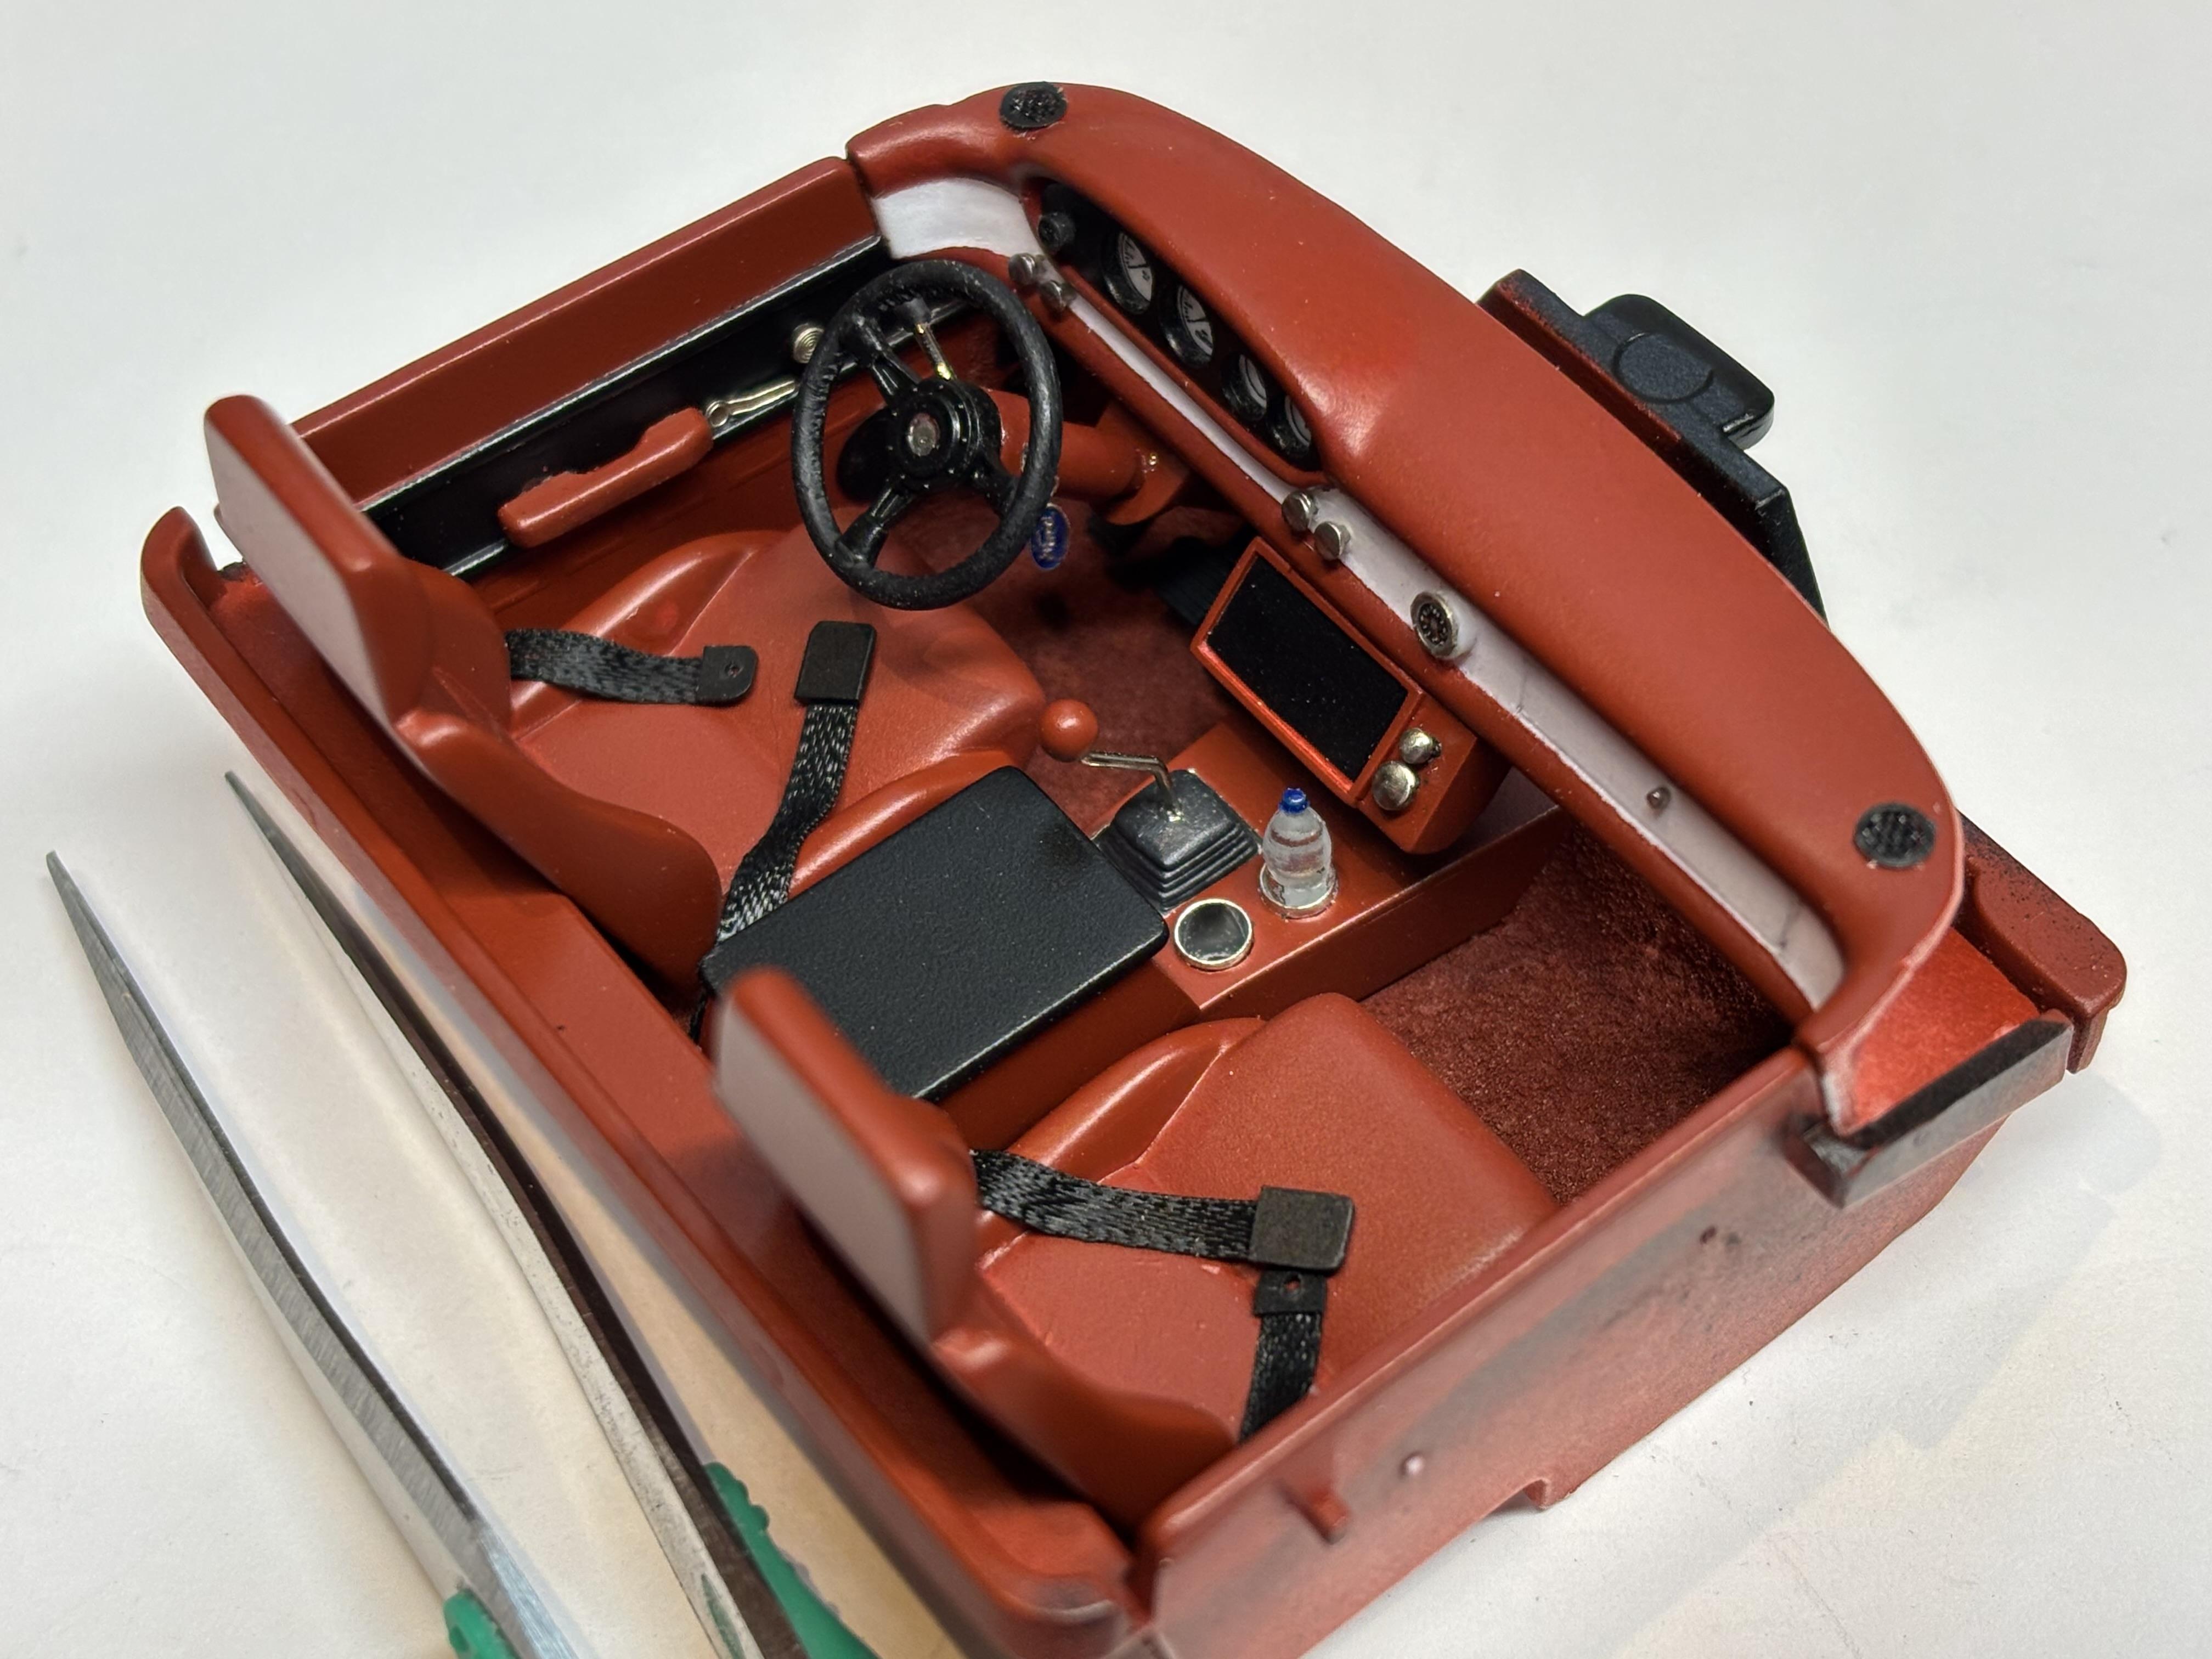
More progress, Interior is complete, and body has been painted. I modified some custom decals to create the logos for this build.
-
Finished the interior for my “Plowboy” (Roger Hayes) tribute build.
-
Great looking 442 Scott
-
Sauber Mercedes C9
Steve H replied to kensar's topic in WIP: Other Racing: Road Racing, Land Speed Racers
Nice, clean work here Ken. I really like your brake duct solution, clever, and looks great. -
Very cool project Brian! I love phantom Rancheros and Elky’s. The T-bird roof is a big improvement, and captures the overall look much better. Personally, I’ve always liked the fatter “B” pillars on Rancheros and Elkys. The “inset” rear glass is also a nice touch. I’ll be following…
-
A tool I made to light car interiors in photos
Steve H replied to bh1701's topic in Tips, Tricks, and Tutorials
Thanks for sharing this Bart. I have some appropriate led’s, so i think i may make one of these. Great idea. Wondering about maybe using some thin but rigid wire (guitar string), which might be easier to “hide” in the photos…🤔 -
41 Chevy P/U hot rod
Steve H replied to Steve H's topic in Model Trucks: Pickups, Vans, SUVs, Light Commercial
Thanks Mark, nice to hear from you sir. On a side note, I’m finishing up a shop truck build soon, then I’ll be starting a pro street build, hope you’ll check in once I get going, should be an interesting build. Hi Bob! Well, I know you like your fat fendered rides, with blown big blocks, so I figured this would appeal to you. Love your Willy’s build. Thank you very much Keith. I always appreciate your kind words. I will be building another 41 Chevy truck as a shop truck, HOPEFULLY, in the fall. If all goes well, it should be an improvement over this one. Thanks Chris! Hi Al, much appreciated. Thanks John, nice to hear from you. -
Interior complete! Well… I MIGHT add interior door locks. For the dash, I used pin heads for the “knobs”, they were scuffed with a sanding cloth to knock a bit of the shine off. Added a water bottle for interest, keys with “Ford” keychain in the ignition. I know that the ignition was located on the dash, not the column from the factory. Clock in the centre of the dash, a pin for the glove box “button”, and you can now see the dash mount tweeters a bit better. Seat belts also added, and the turn signal lever, which is a pin with some wire insulation. Hoping to get some chassis work done tomorrow. Also aiming to get some of the trim attached to the body. I really appreciate hearing from those of you following along. It has been very rewarding finally, actually building this thing! It’s been rattling around my brain for 2 years.
- 187 replies
-
- 4
-
-
- plowboy
- roger hayes
- (and 1 more)
-
Thanks Brian. Kit shifters are almost always out of scale, so trying to improve upon that. Hi David, thank you for the kind words. The gauges are, (I think), from model car garage. I feel like Roger would have liked this build, not sure he’d have been impressed tho. Hello Francis! Nice to have you following along sir. Trying to improve on my interiors. This isn’t my best work, but I am satisfied with how it looks. I do think it was one of my better embossing powder carpet jobs though.
-
What an awesome fleet Phil. I’ve seen most of these, but I don’t recall seeing #10. Very cool. Duece days is coming…