Steve H
-
Posts
2,535 -
Joined
-
Last visited
Content Type
Profiles
Forums
Events
Gallery
Everything posted by Steve H
-
 Wow! That missed by a fair bit... Colours look great together Ray. I always really enjoy the unusual subjects. Cheers, Steve
 -
Hi Chaz, thanks for having a look. The wheels are Pegasus “Holli’s” , 19” up front, 23” in the rear. There are knock off centre caps that will go on in final assembly. Cheers, Steve
-
Thanks for the encouraging words guys, I will try not to disappoint !! Steve
-
Alfa Romeo 155 V6 Ti Martini
Steve H replied to Rich Chernosky's topic in Other Racing: Road Racing, Salt Flat Racers
Thanks for the tips! -
Hi Francis, all paint is lacquer sir. Tamiya primer, Tamiya gloss black, Dupli Colour auto touch up lacquer for colour coats. The interior is two different greys from Tamiya as well. Oldsmobile had a similar(ish) factory colour on the Cutlass, for me it was the obvious colour choice, as I said above, I think it will really show the lines of the body. Always nice to hear from you sir!
-
Hello Claude, as the photos shows, I had a less than stellar result this time too. I shot it from the can. I believe the problem was not getting the paint warm enough this time. Usually it lays down nice in thin coats, but it can be a bit hit and miss. Thanks for checking in sir! Cheers, Steve
-
Thanks Sam, I think it will show the lines of the car well. Should look even better when smooth and shiny! Thanks Greg! I feel like I’m getting close to the finish line, although still a bunch of fiddly stuff to do. Cheers, Steve
-
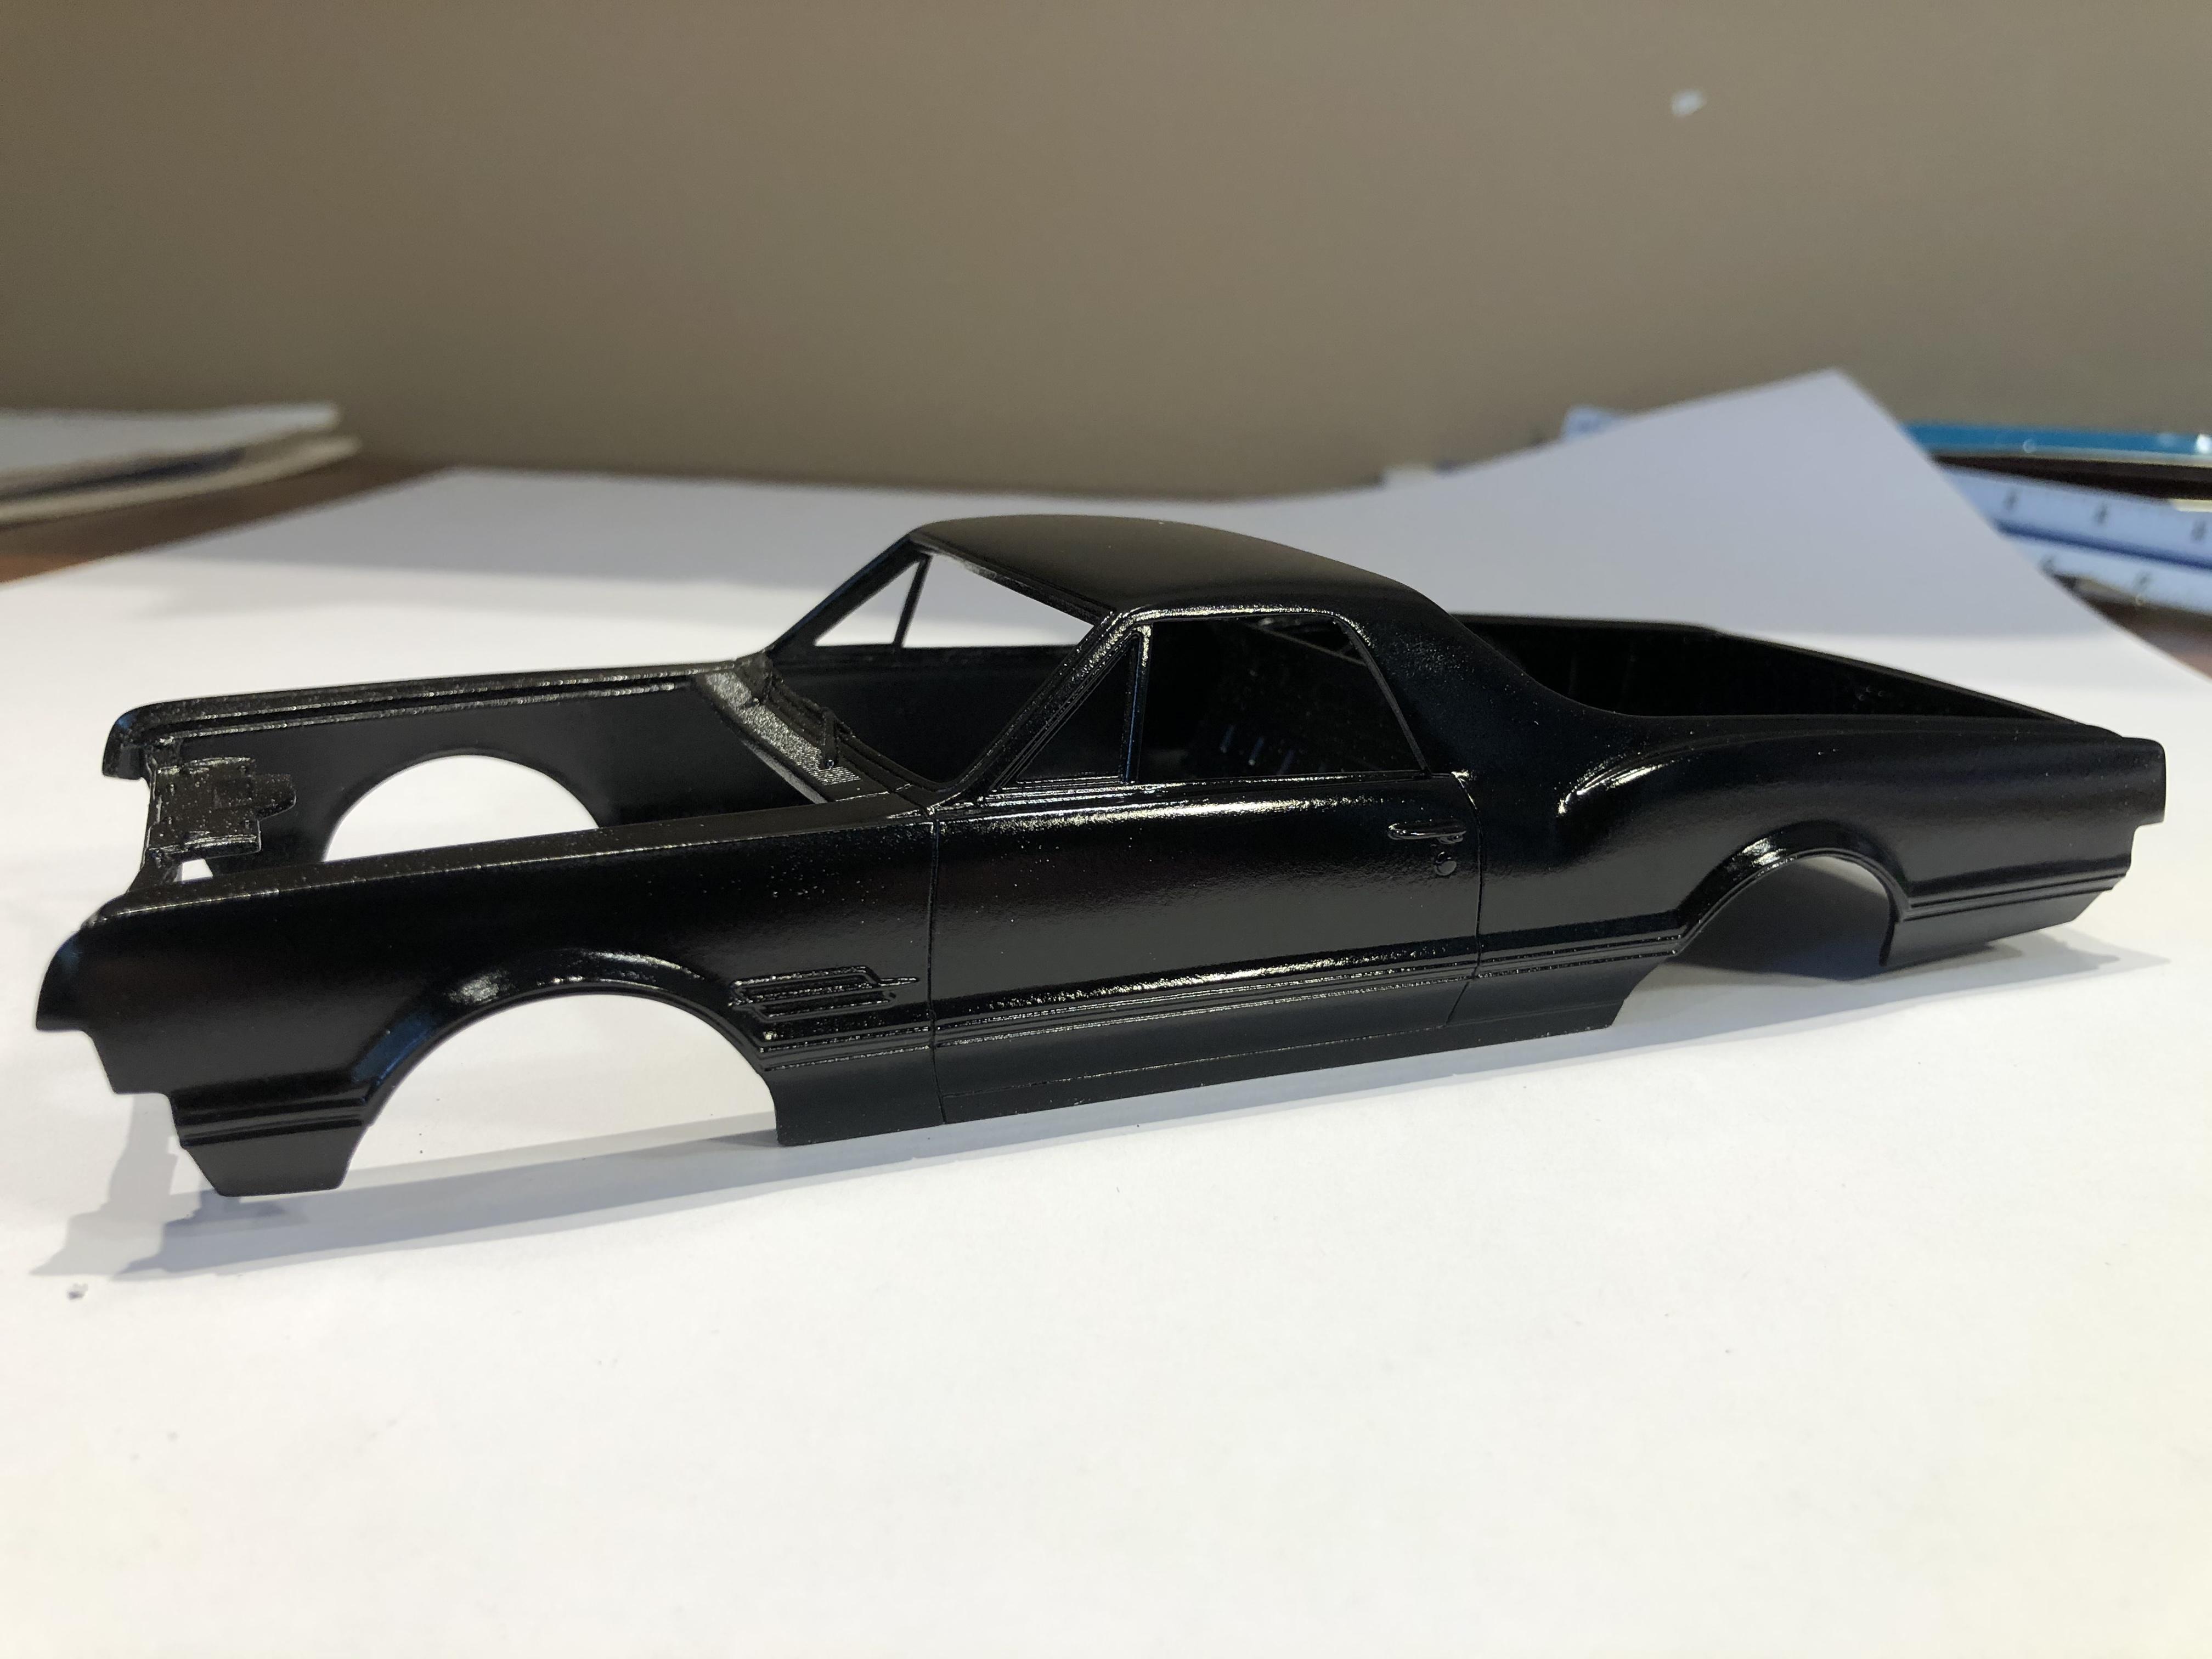
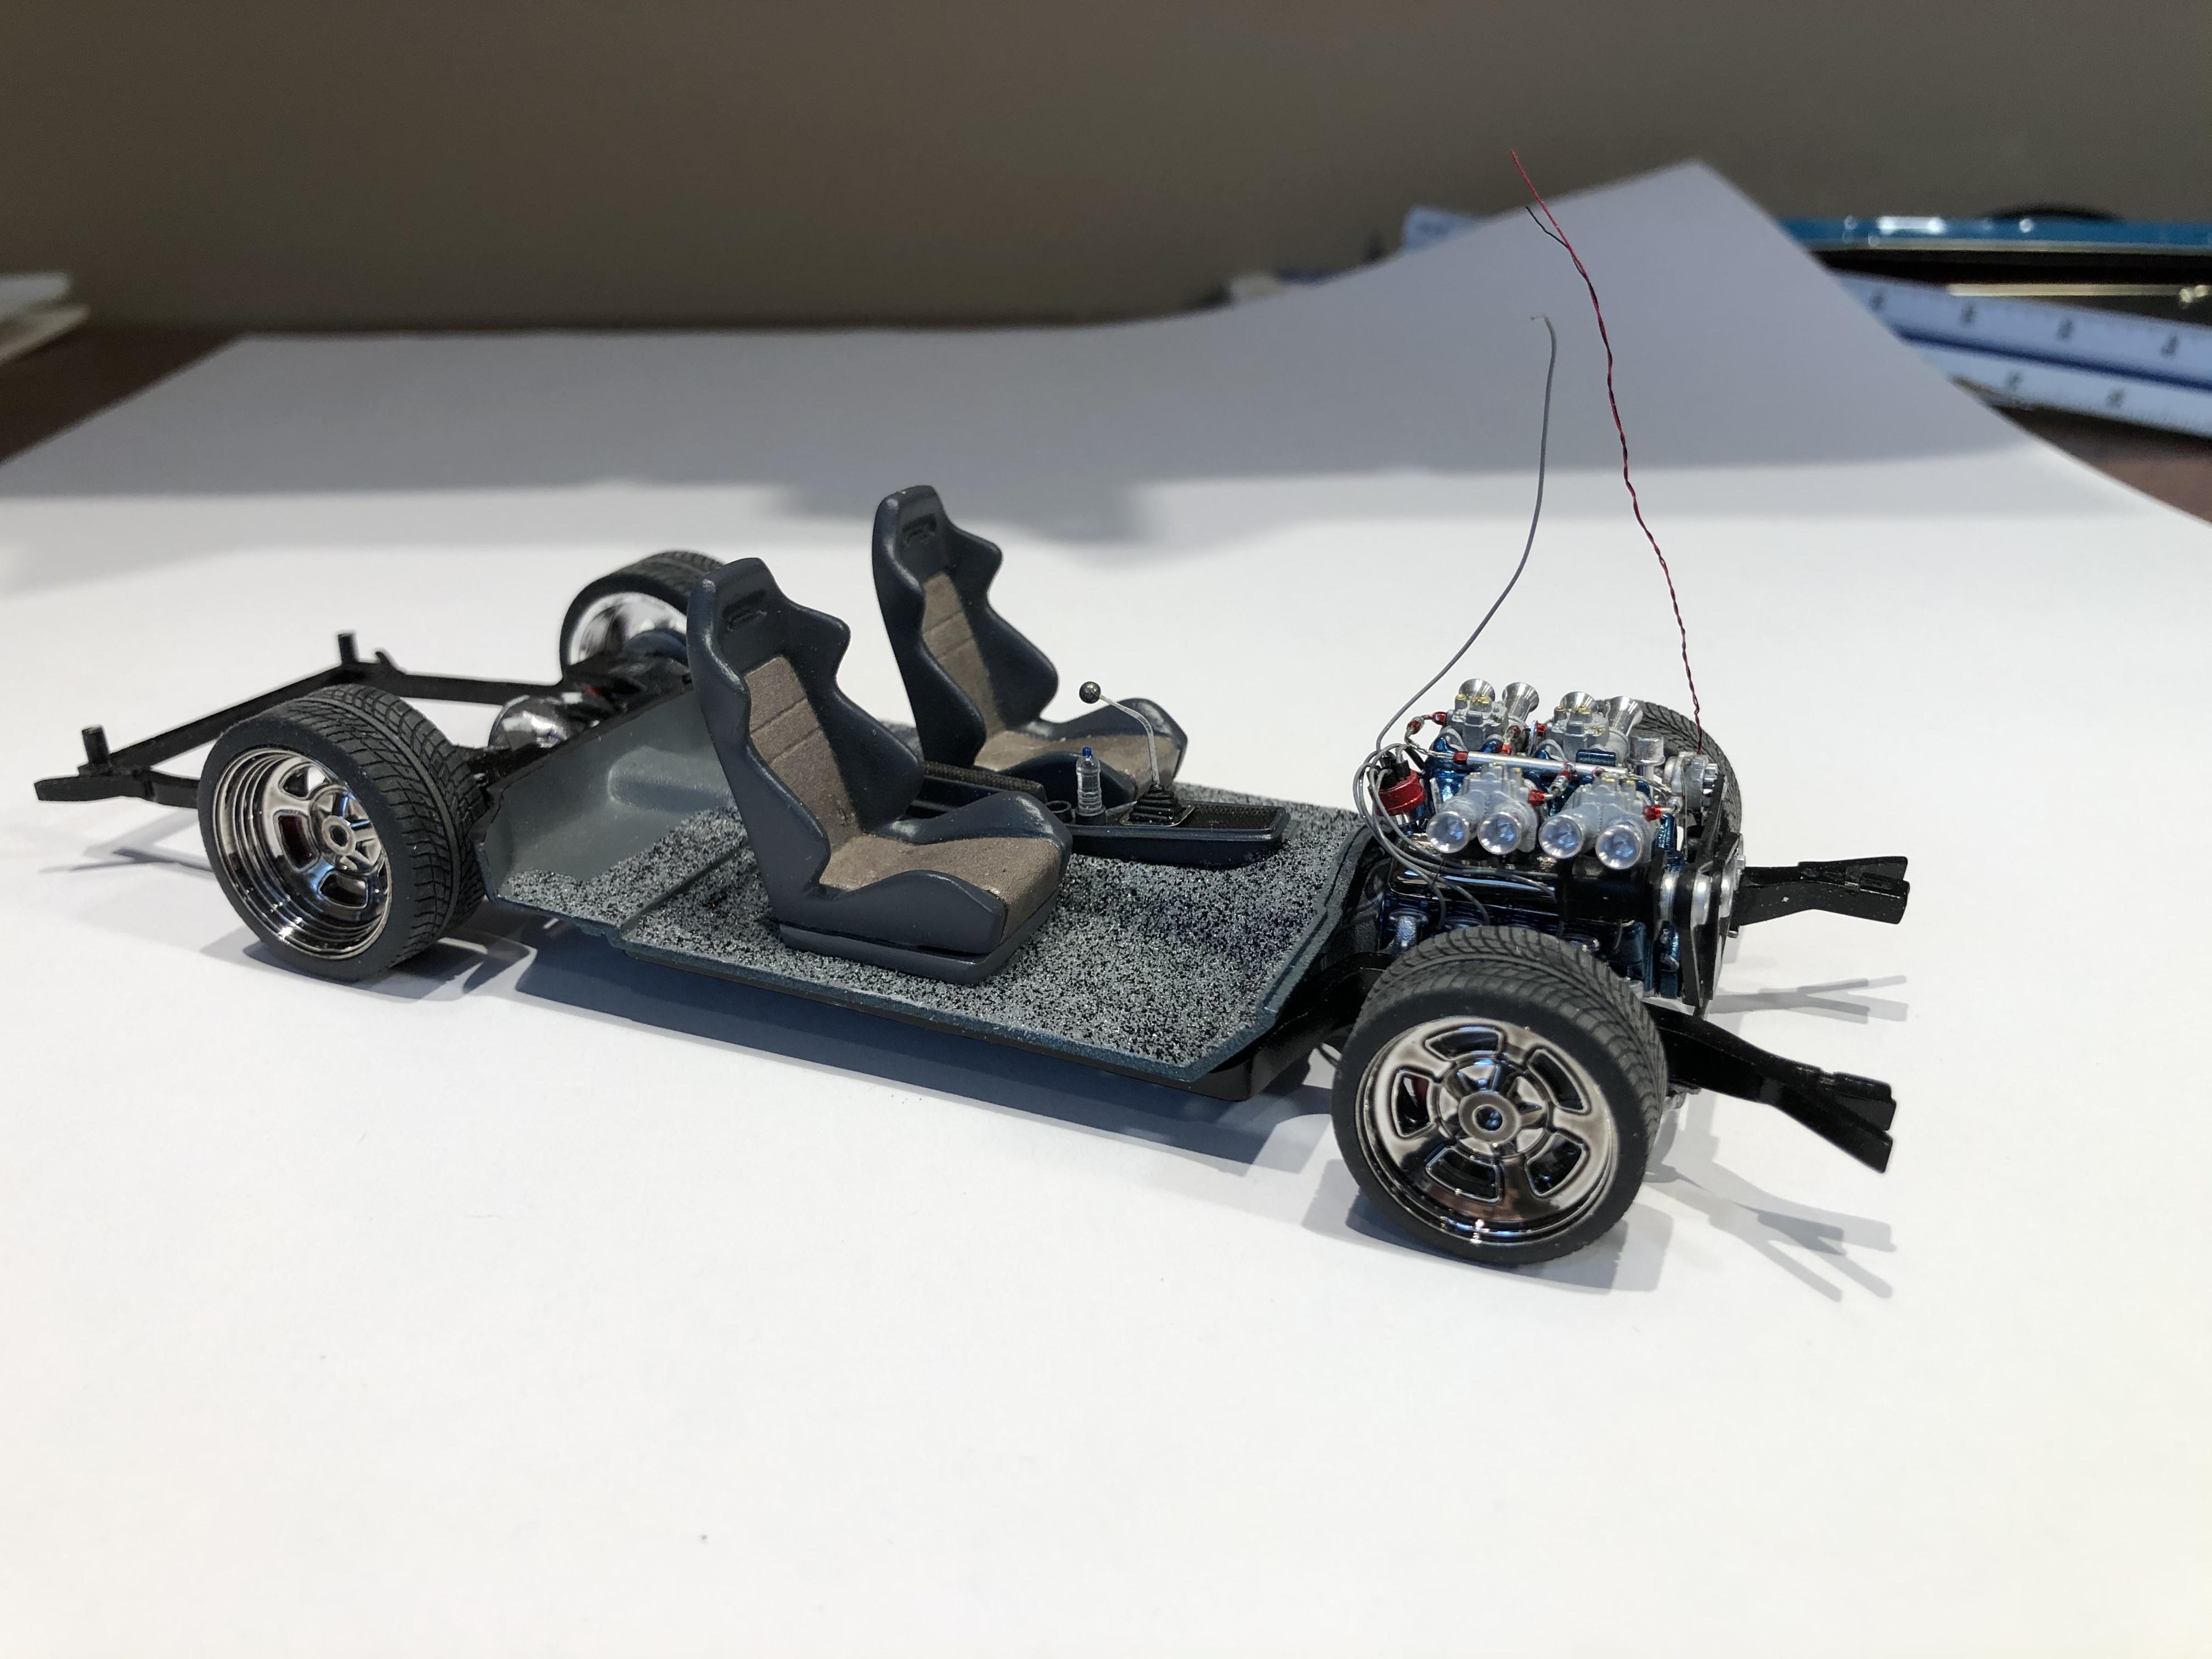
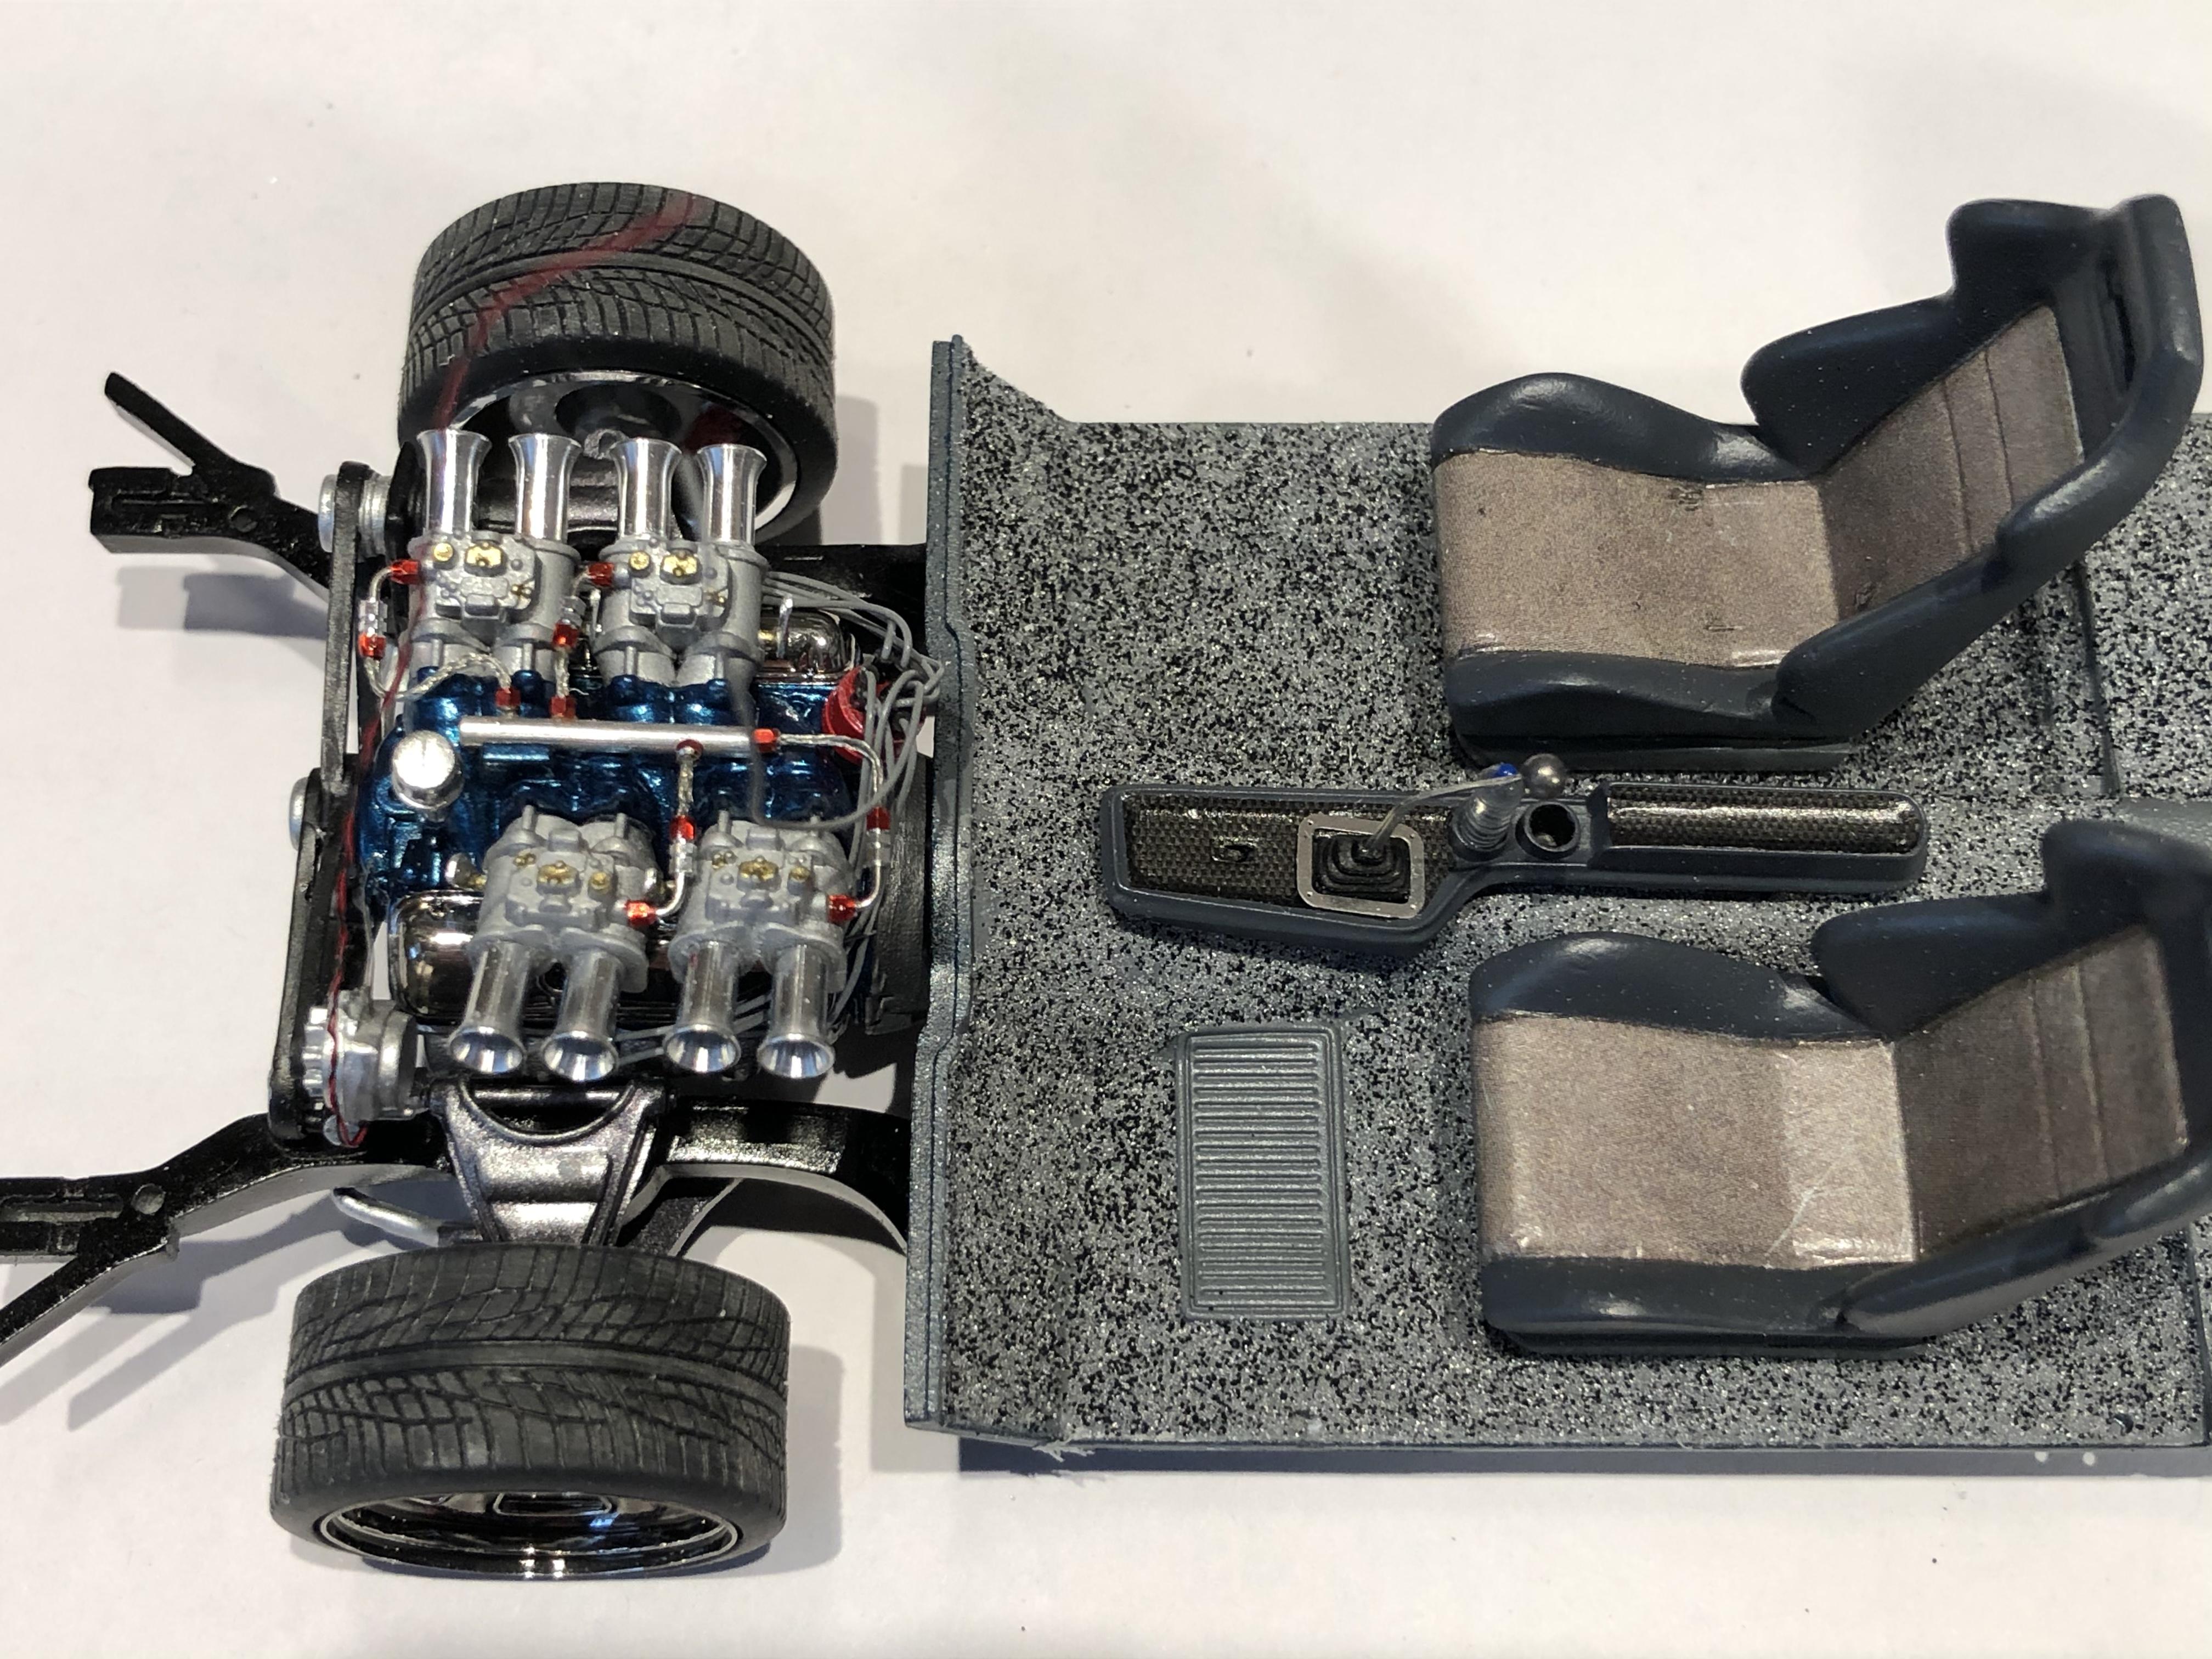
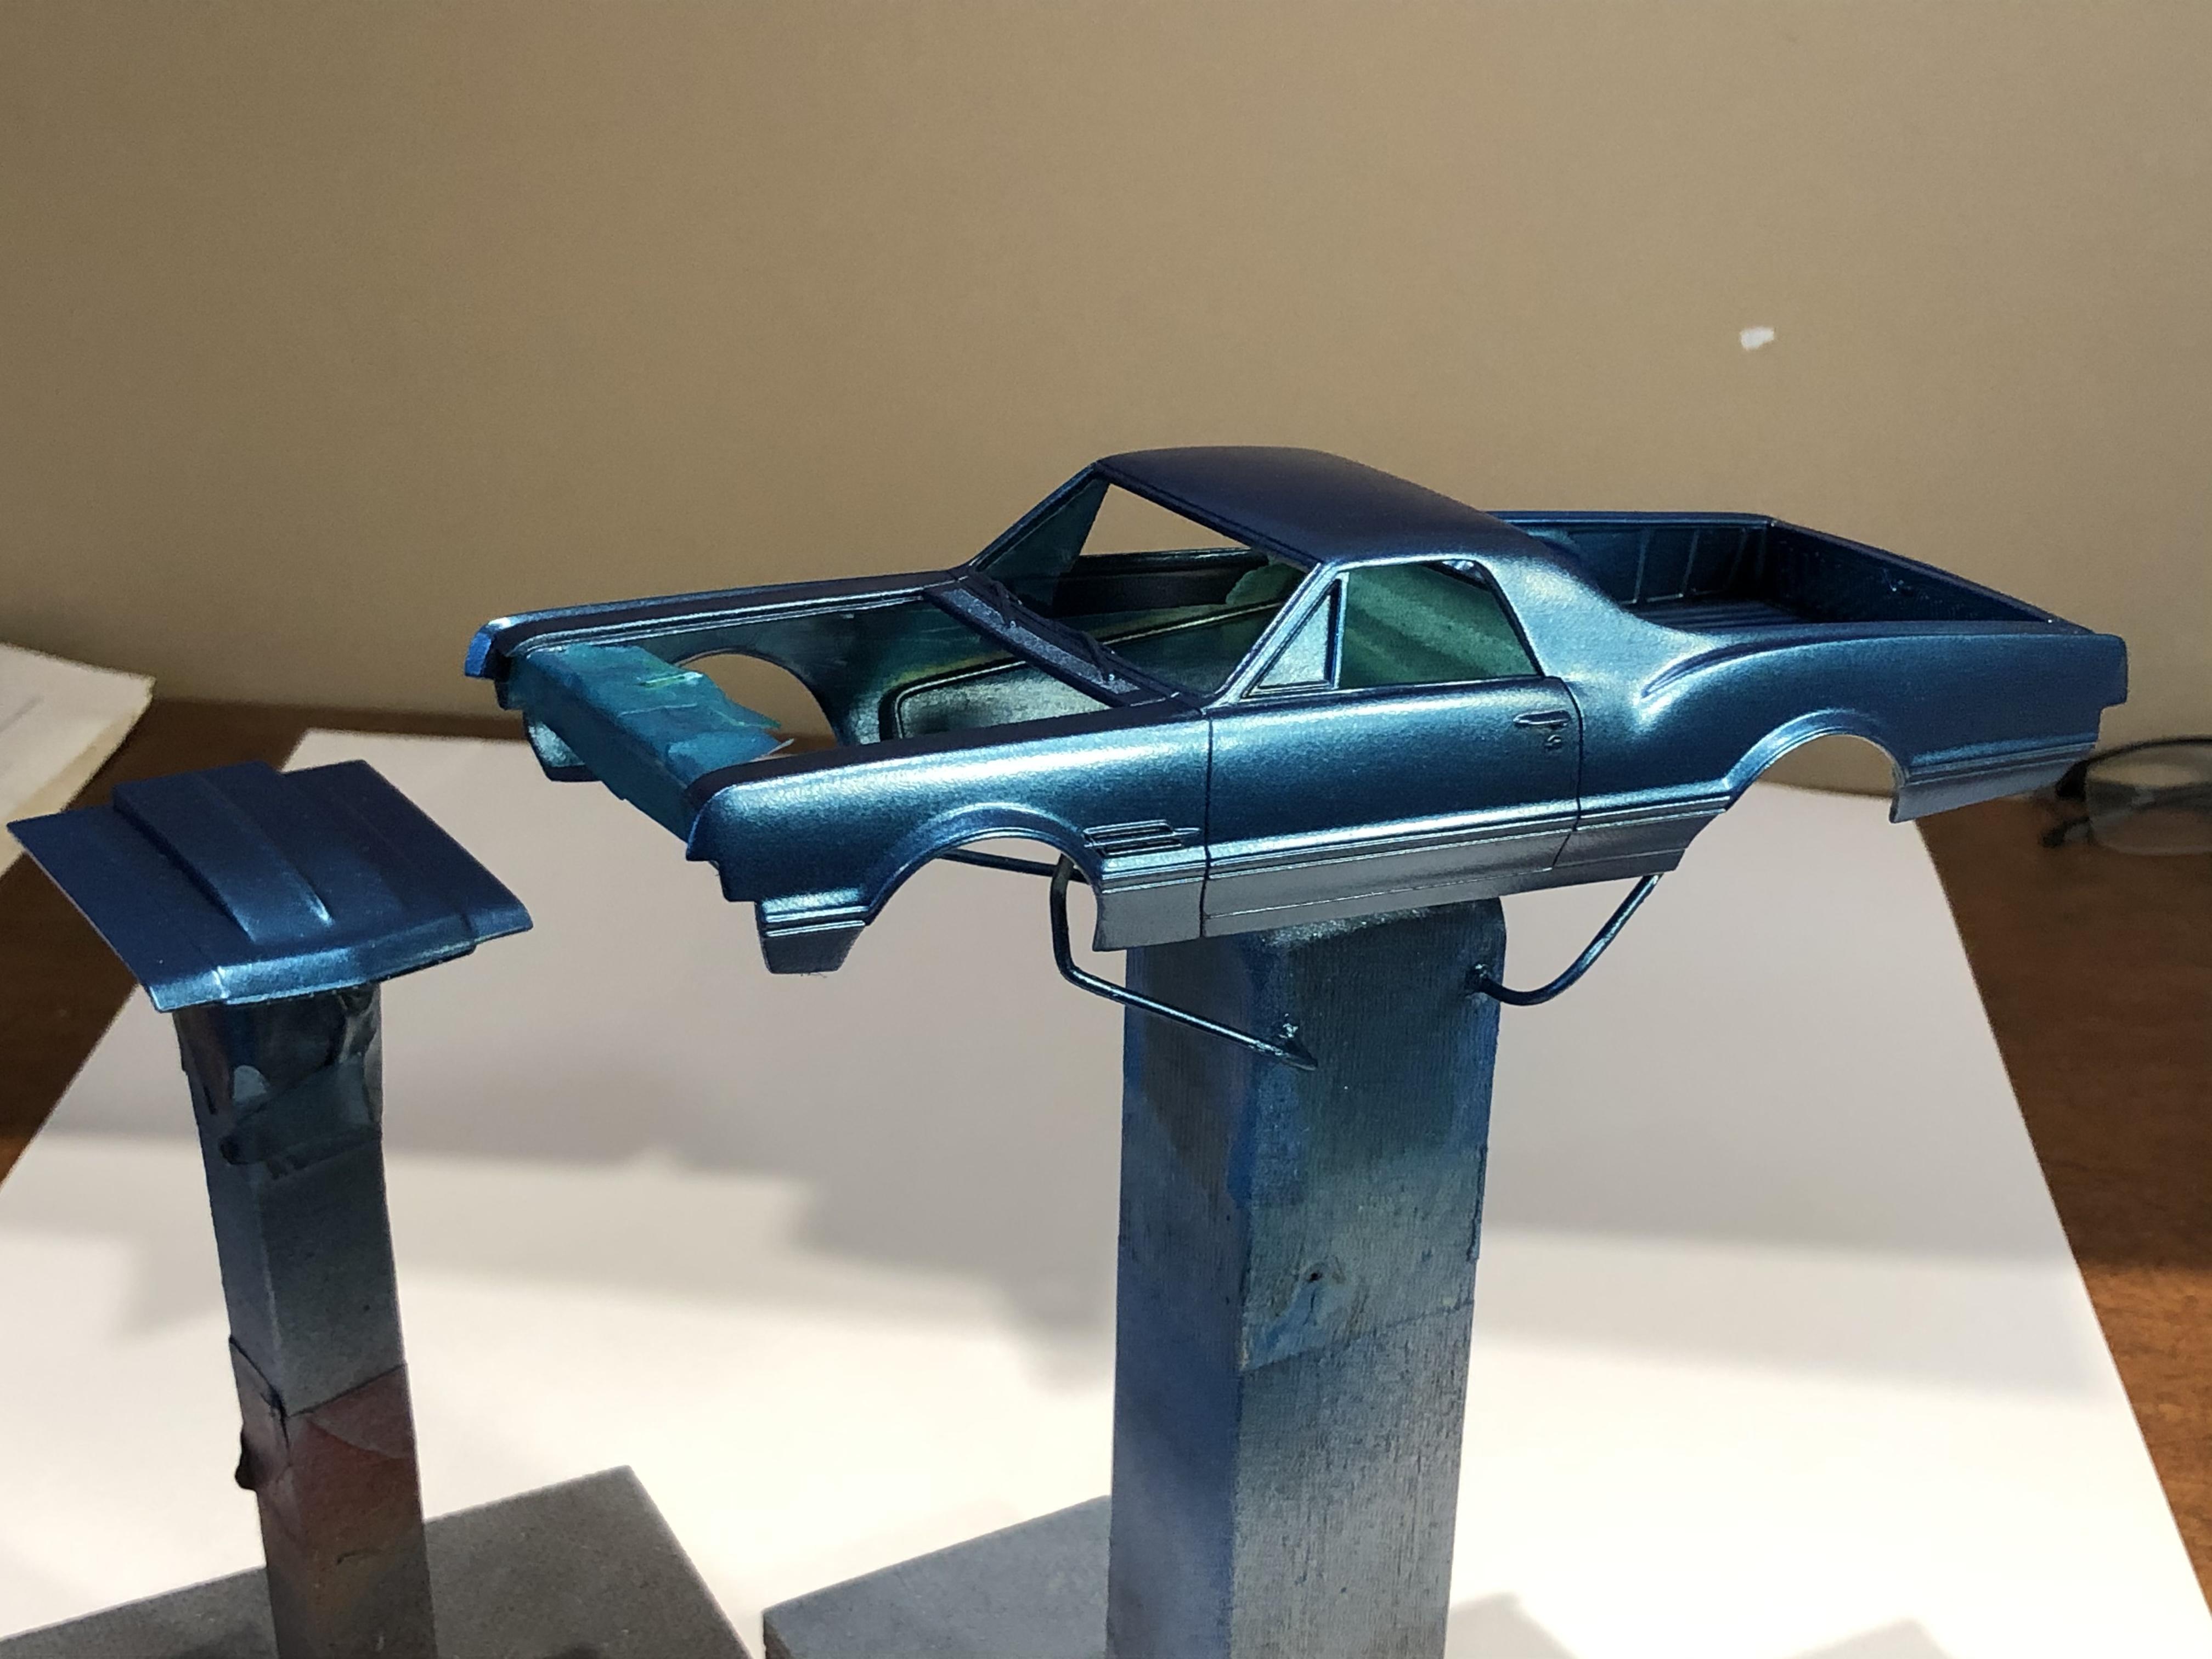
Hi guys, time for an update. Managed a fair bit of desk time this week. I got the body base coated in black. I now have a rolling chassis. Most of the interior is complete, there is still a gauge to install in front of the shifter. The photo etch Hurst shifter is pretty cool, first time using one of those. I mixed two colours of embossing powder to get the carpet colour. It looks a bit “disco” in bright light, but it is more subdued looking in dimmer light. Also put a couple of coats of smoke on the wheels. Door panels are now finished, I added photo etch window cranks, flocked the bottom, and added door locks. I knew I was going to have to make a rear window, but I also had to make a windshield. For some reason it just wouldn’t sit right, so I modified an old windshield from the parts box and polished it. The vent windows were cut from the kit windshield to be used. This afternoon managed to get some colour on it. Very pleased with how things look. I will give it a light sanding then do final colour coat, foil, clear and polish. Almost all the parts are in colour, a few little detail pieces to paint still. Thanks for looking, all comments welcome. Cheers, Steve

-
BRBO2021
Steve H replied to JerseeJerry55's topic in WIP: Model Trucks: Big Rigs and Heavy Equipment
Hi Jeff, I might join in if it’s not too late. Haven’t built a rig since I was about 11-12 years old, 40ish years ago! Is the deadline in June? Not sure I can pull that off.... Steve -
Cobra Brew Works! Ray, you are on quite a JF tear. Loving seeing all these unique builds. I have a Divco milk truck, you are getting me inspired sir! I definitely think you should consider making your own decals for this one, maybe a patina paint job? Definitely low!! Whatever treatment you give it, I’m certain it will be cool. Cheers, Steve
-
Alfa Romeo 155 V6 Ti Martini
Steve H replied to Rich Chernosky's topic in Other Racing: Road Racing, Salt Flat Racers
Hi Rich, beautiful builds sir. Very nice work on the carbon decals. I consider myself a fairly experienced builder with average ability, but man, those decals give me fits every time I use them.... Cheers, Steve -
ZZ 41: If Billy Gibbons dreamed of a 41 Lincoln Kustom
Steve H replied to Claude Thibodeau's topic in Model Cars
Claude! Another masterpiece, as others said above, the flawless execution of your styrene imagination is just awesome. Very creative, what do you put in your coffee! Cheers, Steve -
Hello Claude, the good news is, that I believe after A LOT of fiddling, the motor is JUST.... going to fit under the hood. It’s been difficult to do an exact accurate mock up, but I think it will fit. Fingers are still crossed. The motor definitely fills the engine compartment, I love it. Thanks for checking in sir. Oh, keep that cold weather to yourself... sheesh, we had snow today!! Stay warm and safe my friend. Cheers, Steve Hi Dennis, thank you very much for the kind words. Hoping to get the base black on the body tomorrow.
-
Hi Bil, thanks for the compliment sir! The engine comes in the Accurate Miniatures gran sport Corvettes. Not sure what I will do with the rest of the kit yet, time will tell.
-
64 Chevrolet El-Camino
Steve H replied to Cool Hand's topic in WIP: Model Trucks: Pickups, Vans, SUVs, Light Commercial
Ohhh yaaaa...... this will be cool. -
82 Chevrolet El-Camino
Steve H replied to Cool Hand's topic in WIP: Model Trucks: Pickups, Vans, SUVs, Light Commercial
Hi Luke, this speaks to me. I’m working on a El Co build now too. Love the stance as I tend to like things low! I think this is the only generation of Elky I don’t have yet, but it’s on the list. I like Rogers idea for the motor. One of the kits I’m using in my kit bash has that motor and it’s awesome. I used the block, but went with different induction, however the blower will be used in a future build for sure. I’m watching... Cheers, Steve -
Stuck on this truck! 66 F100
Steve H replied to Ben269's topic in WIP: Model Trucks: Pickups, Vans, SUVs, Light Commercial
Hi Ben, the other option would be doing a weather beaten interior. I did one years ago, used scotch tape painted silver to replicate duct tape on the seats, and some “dirt” on the floor using grunge from our built in vacuum canister (can’t believe I just admitted that in public!), it’s actually quite fun, let your imagination run wild. Consider doing some windshield wiper marks on the windshield? That’s my 2 cents. What you have done so far looks great. Cheers, Steve -
Hi Roger, as you know, I am a big fan of your builds. This is another beauty, you have a real knack for choosing the perfect colour for your subjects. Perfect stance, excellent wheel/tire choice. Cheers, Steve
-
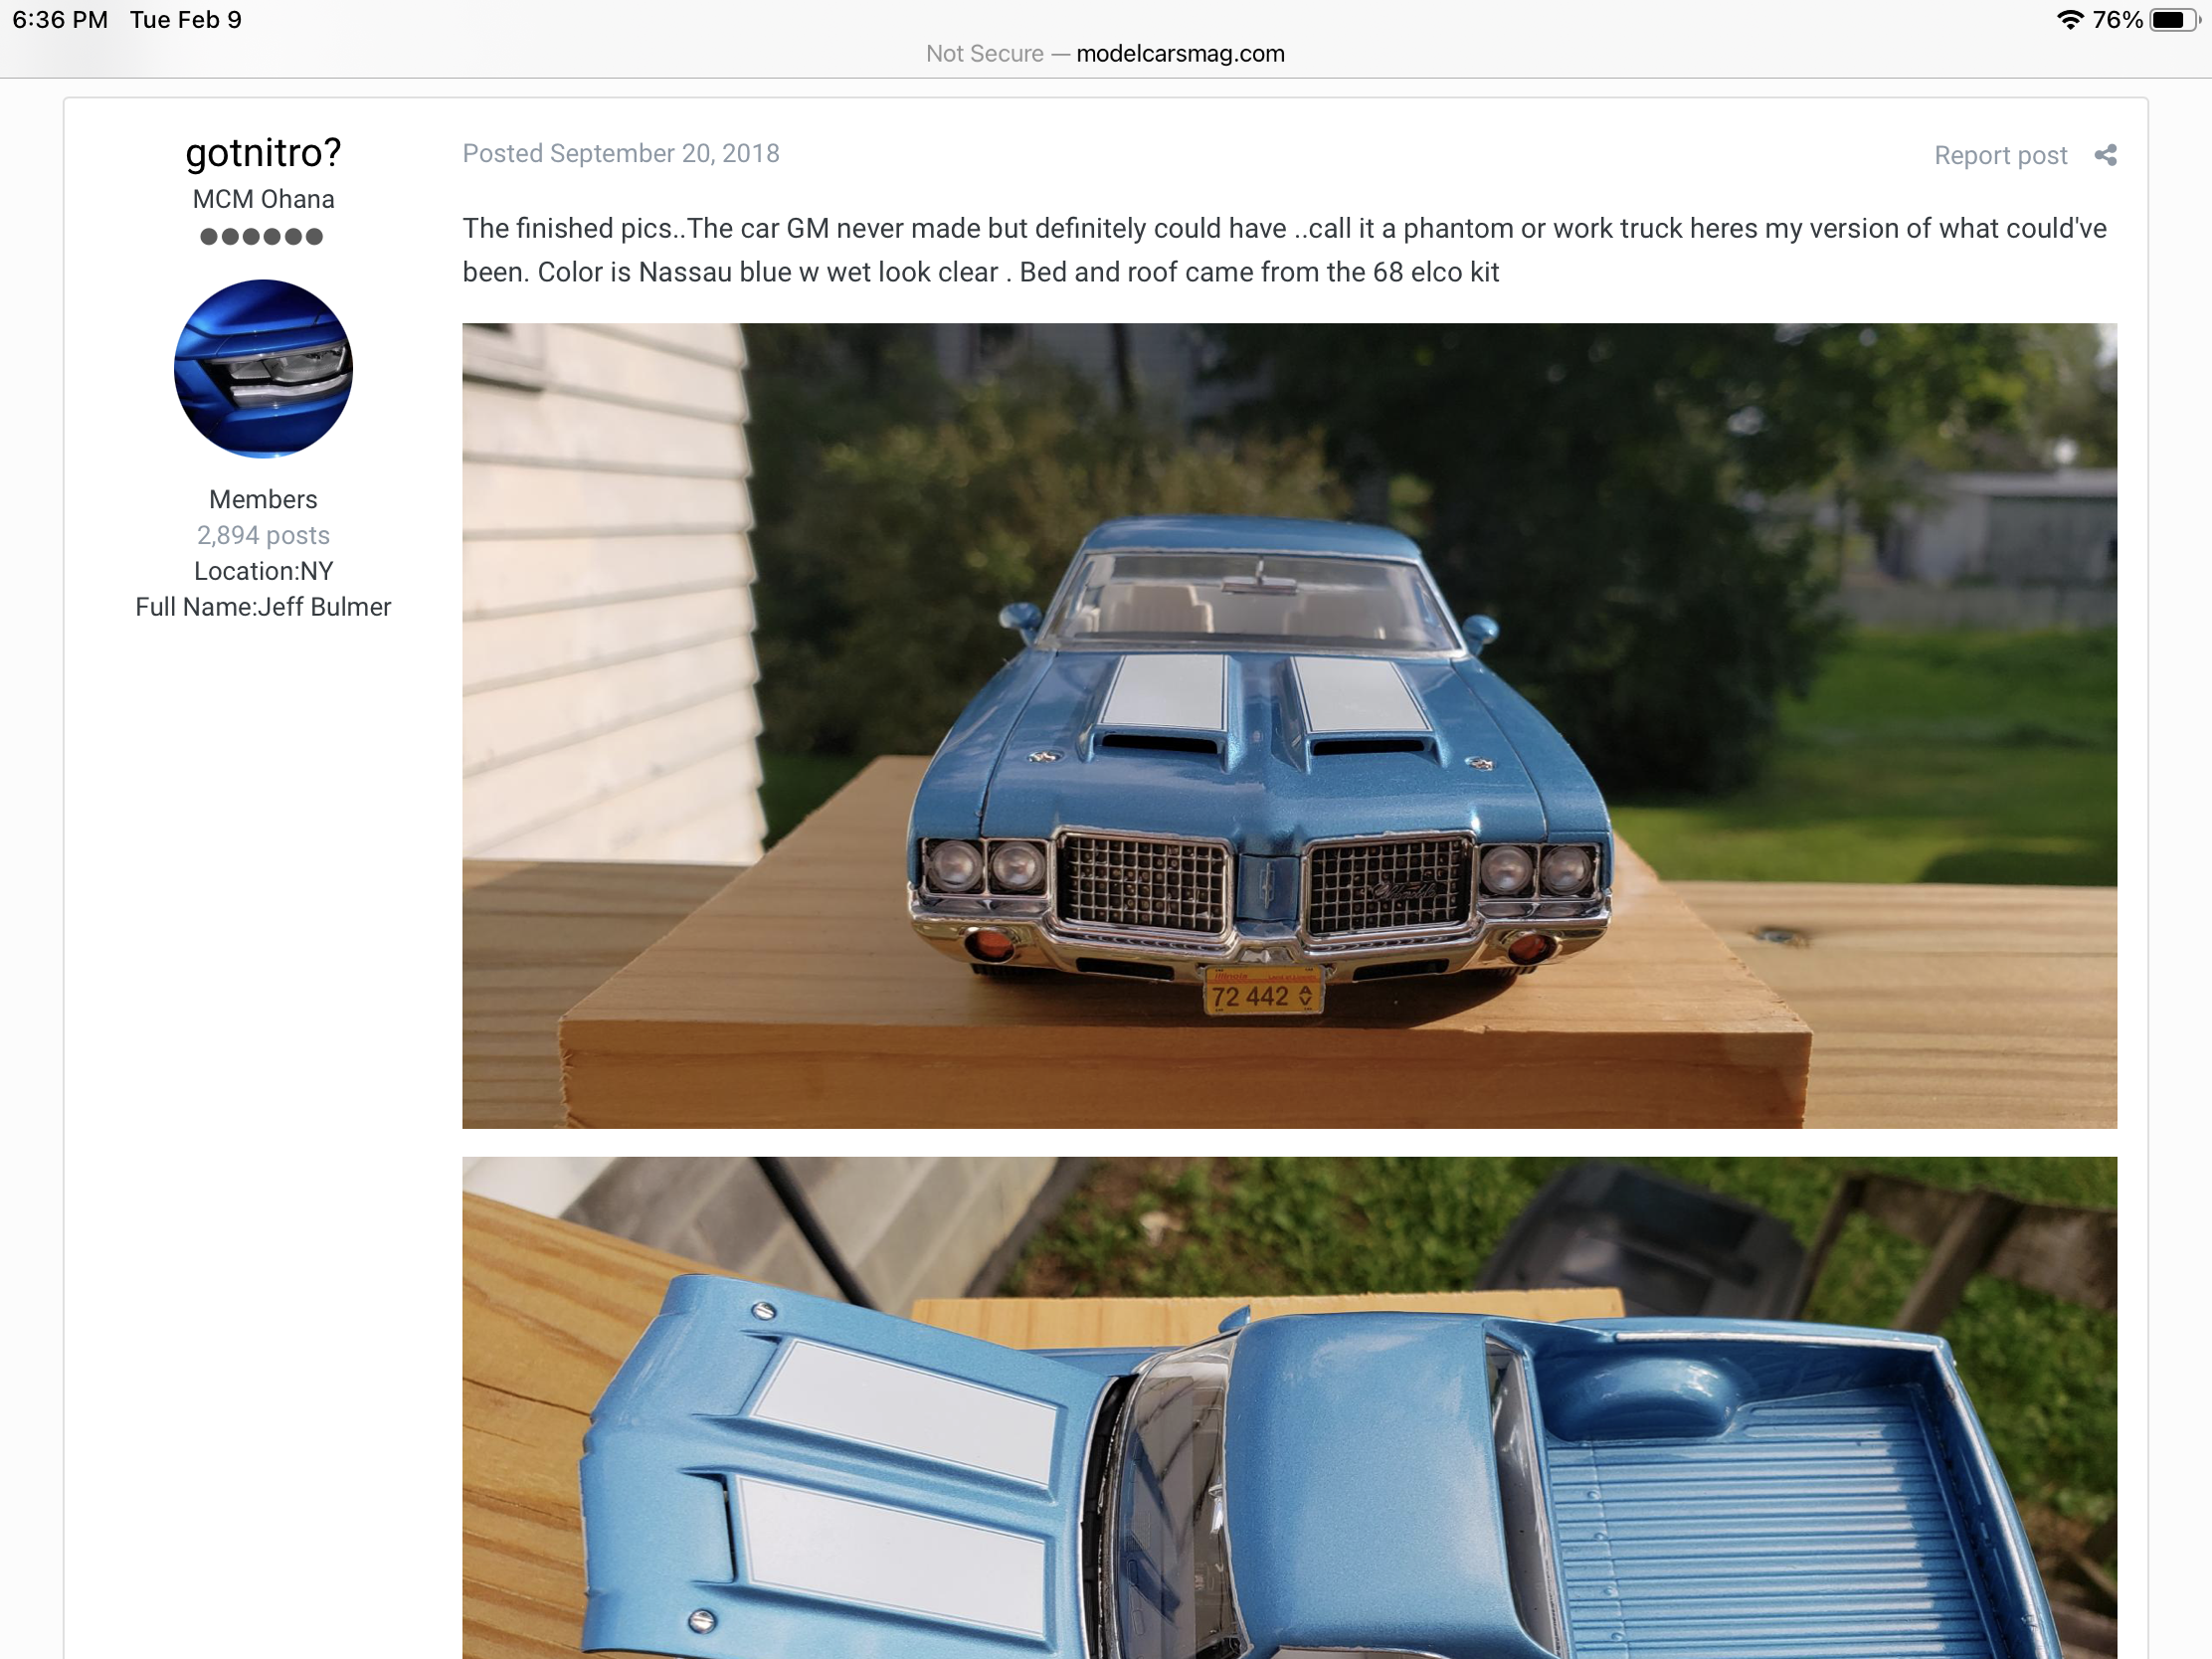
This is long overdue! Finally did my search to find one of my inspirations for this project. Big thanks to Jeff Bulmer for his WIP thread which helped me plan how to tackle this build. Not sure mine will measure up to his beautiful build, but I will put my twist on it. A big thanks to Jeff!! I think he did an amazing job on this build.
-
Oh believe me, there are some faults... Doing my best to disguise them. Thanks for having a look, nice to hear from you Nigel. Cheers, Steve
-
Hi Ray, looks awesome. I love the big exhaust tip too! I tend to put those on all my builds. Whether it was “lazy” or not I really think the tinted windows are cool. Would have been an enormous amount of work to build the interior. A unique build that turned out great, I will watch for it under glass sir. Cheers, Steve
-
Thank you Ron! Wish me luck would you please. It will be really snug under there, but I really want to keep the cowl hood I have. The carbs are huge! Hoping to do a mock up tonight.... Cheers, Steve
-
Thank you Francis, I think it may be my “cleanest” engine, but my favourite is the one in my 67 Chevelle. You sir are too kind, hoping for a drama free paint job!
-
Thanks Bill ! Hi Greg, I have wanted to drop one of these engines in a kit for years. Finally bought a kit with the engine last year. It’s a great fit for the Ol Comino. Thanks for checking in.
-
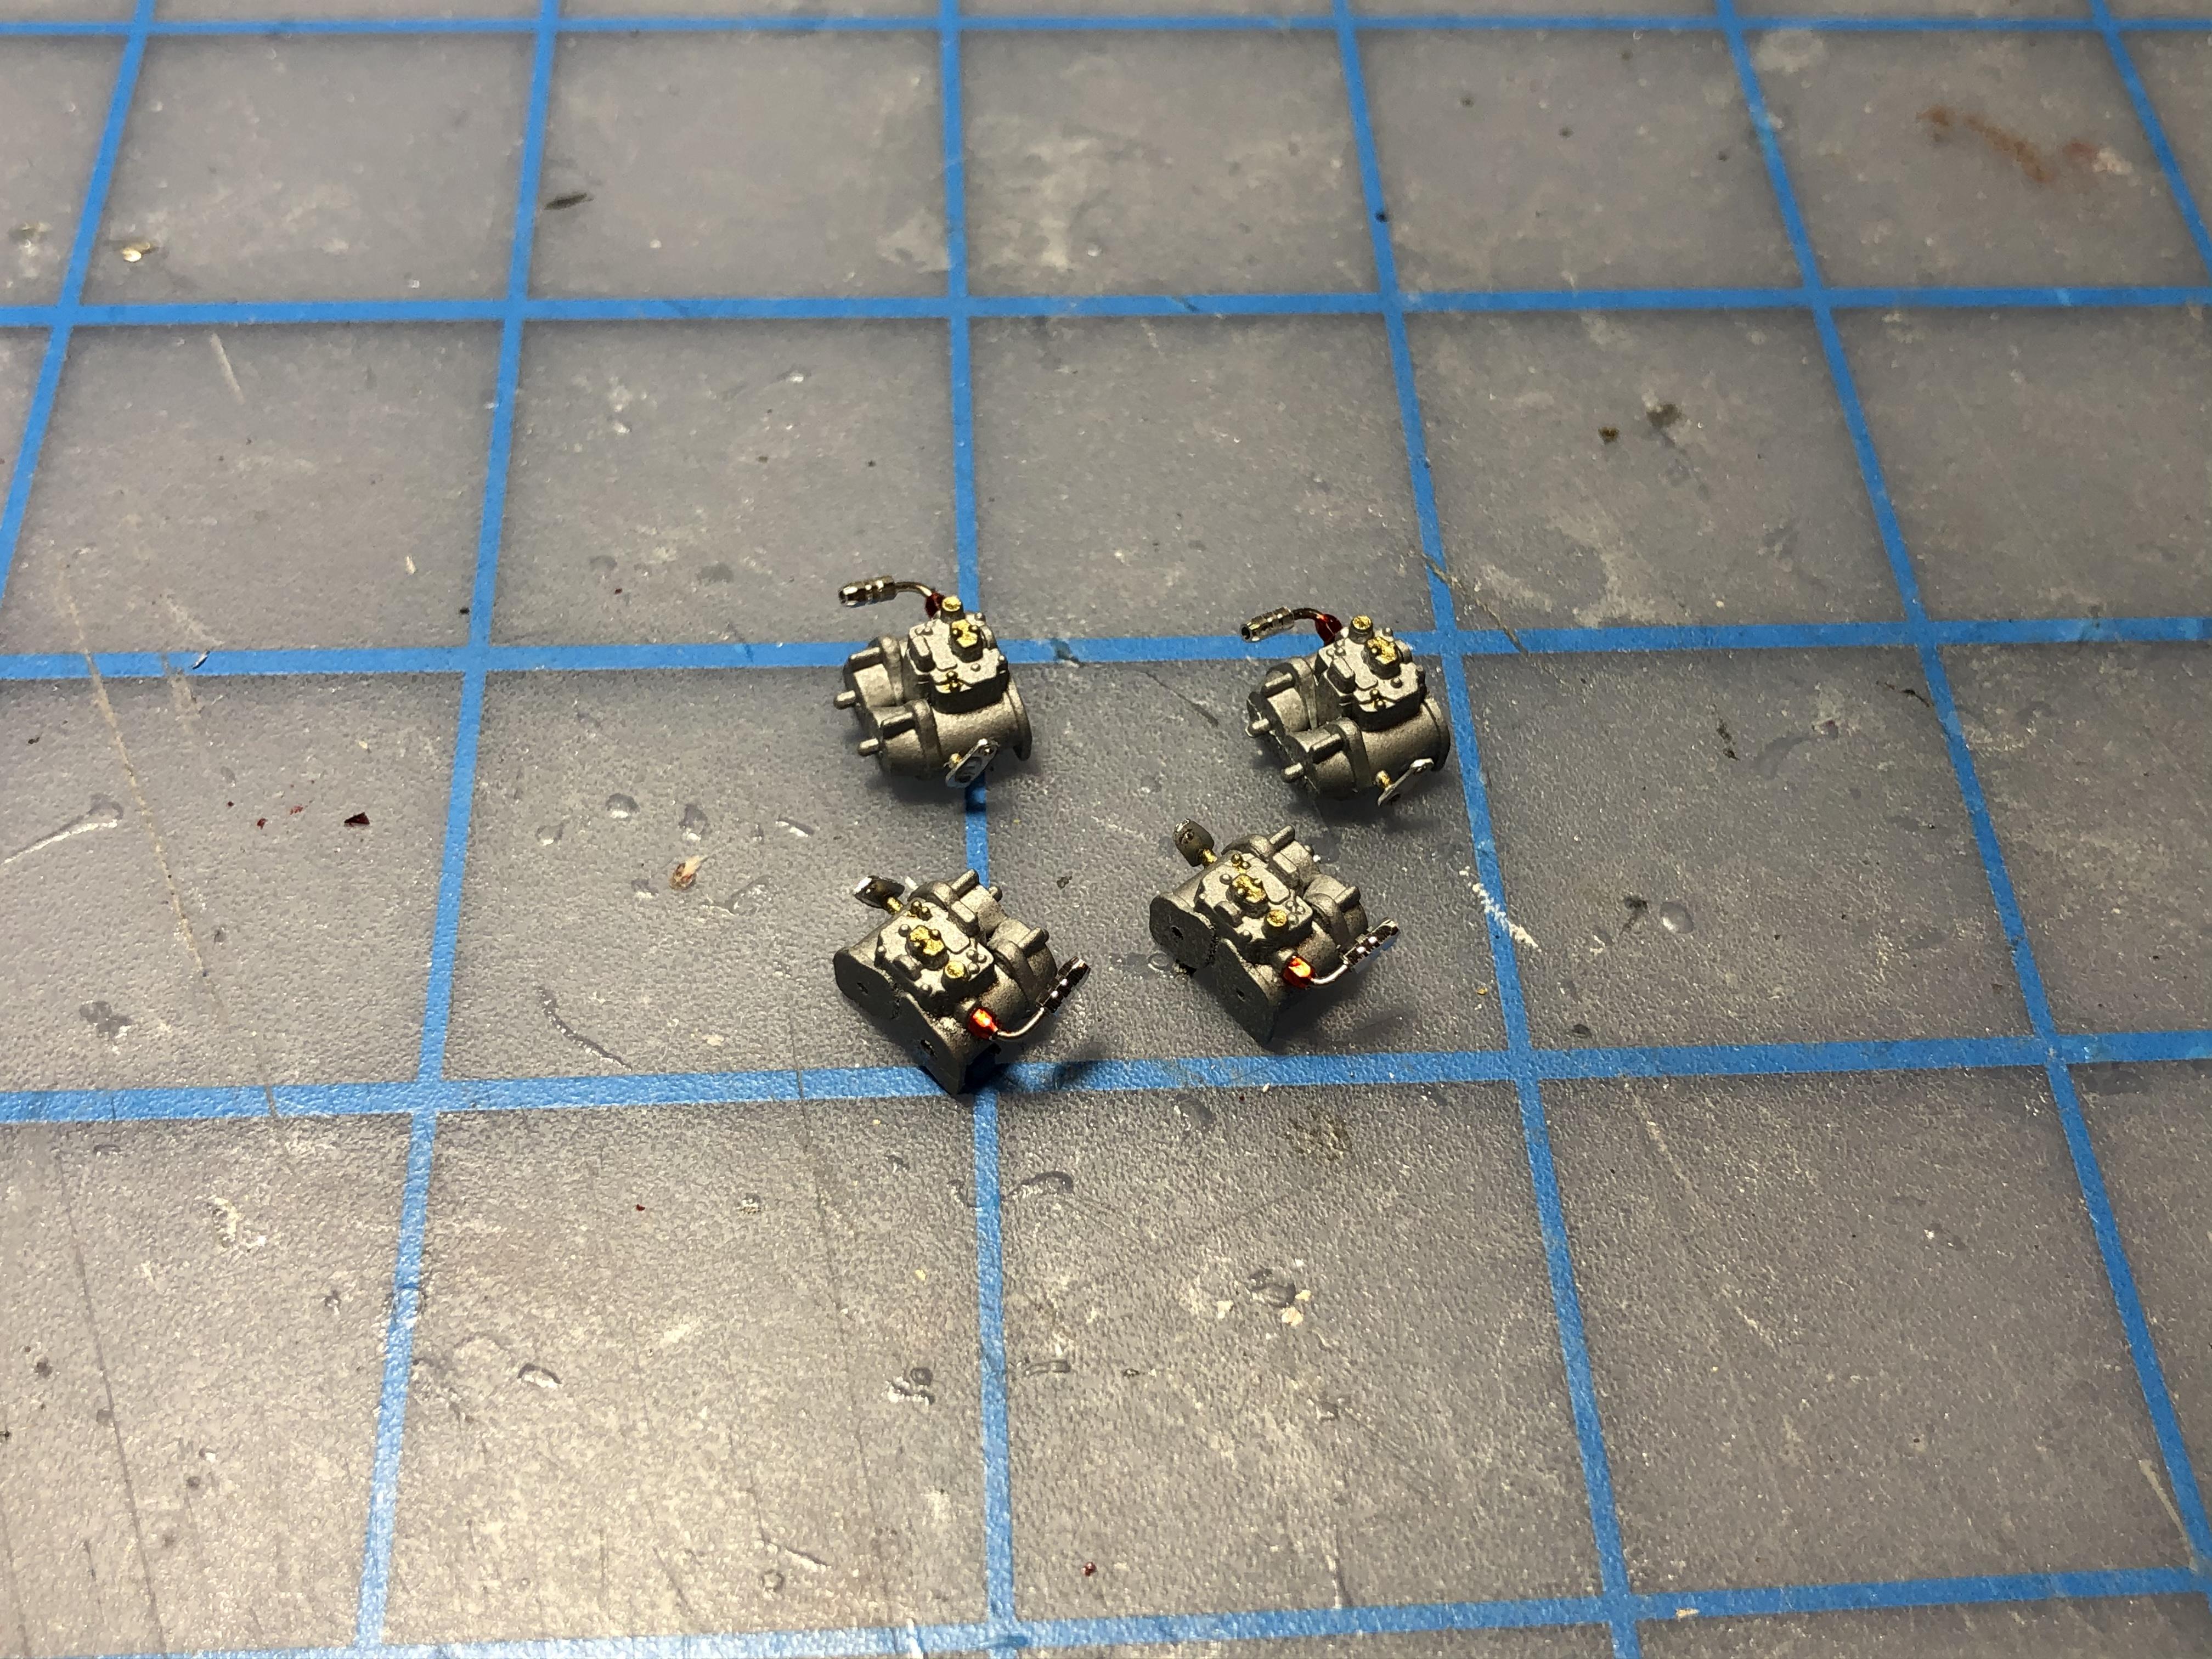
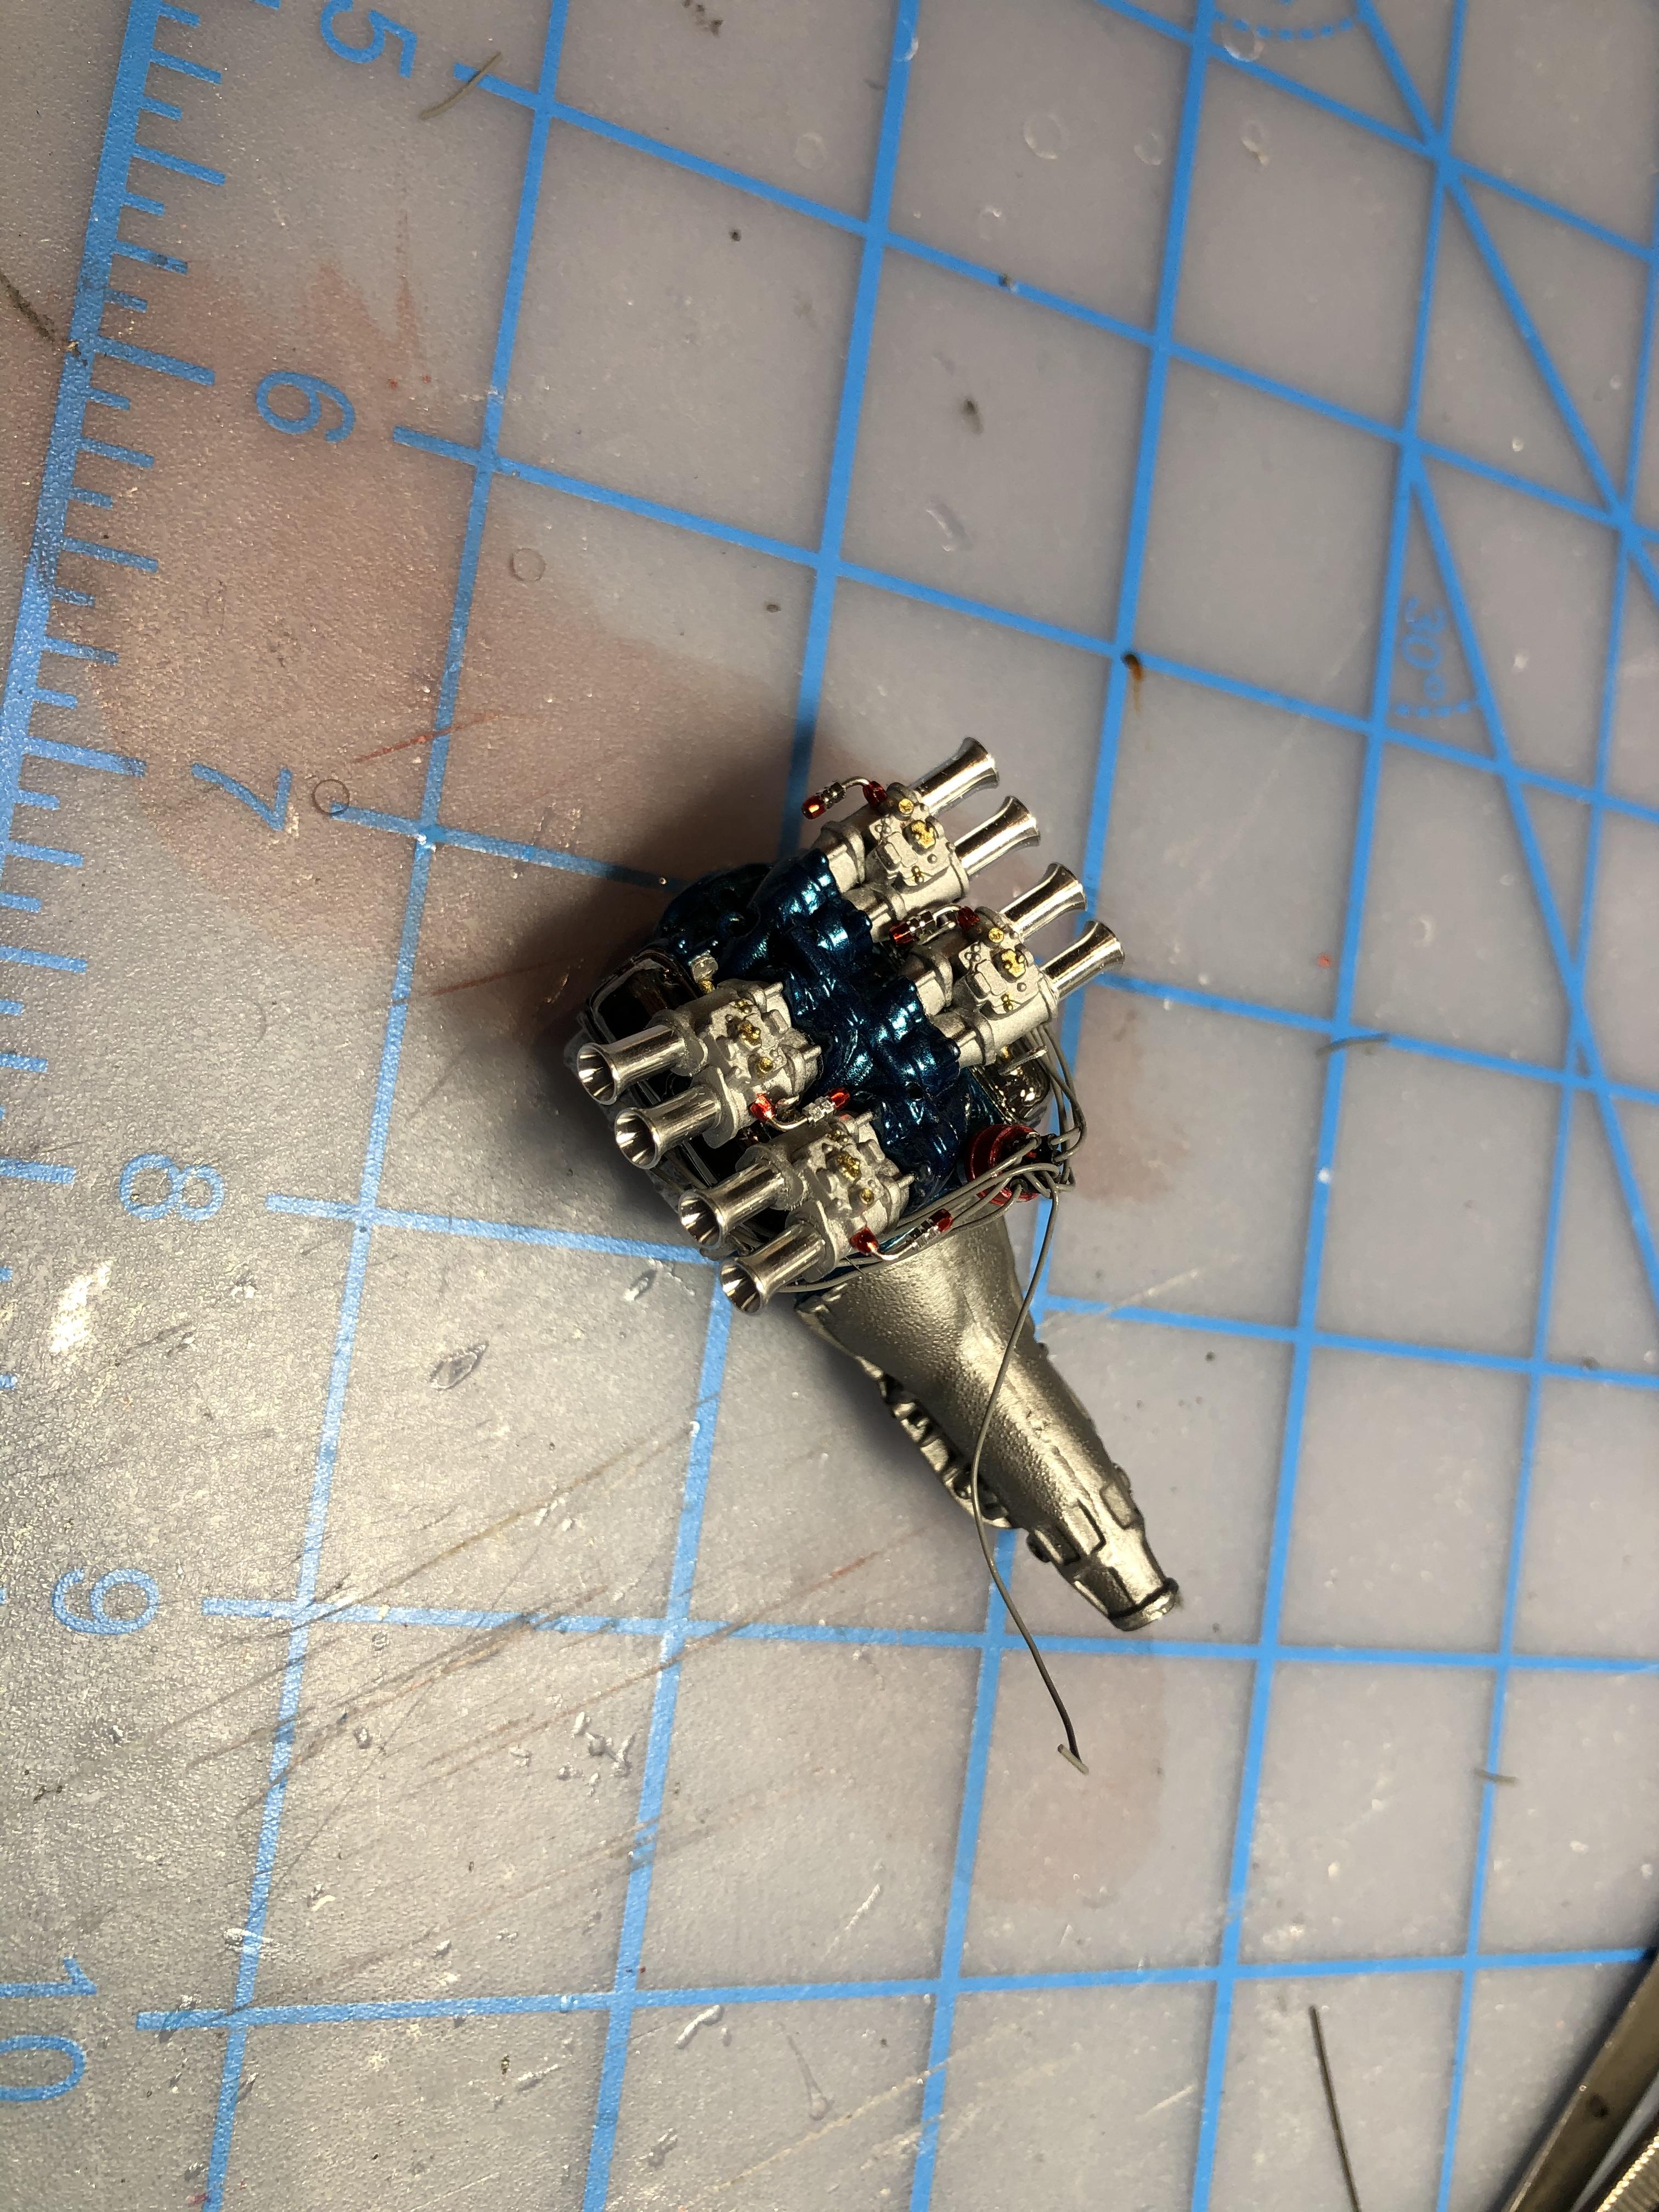
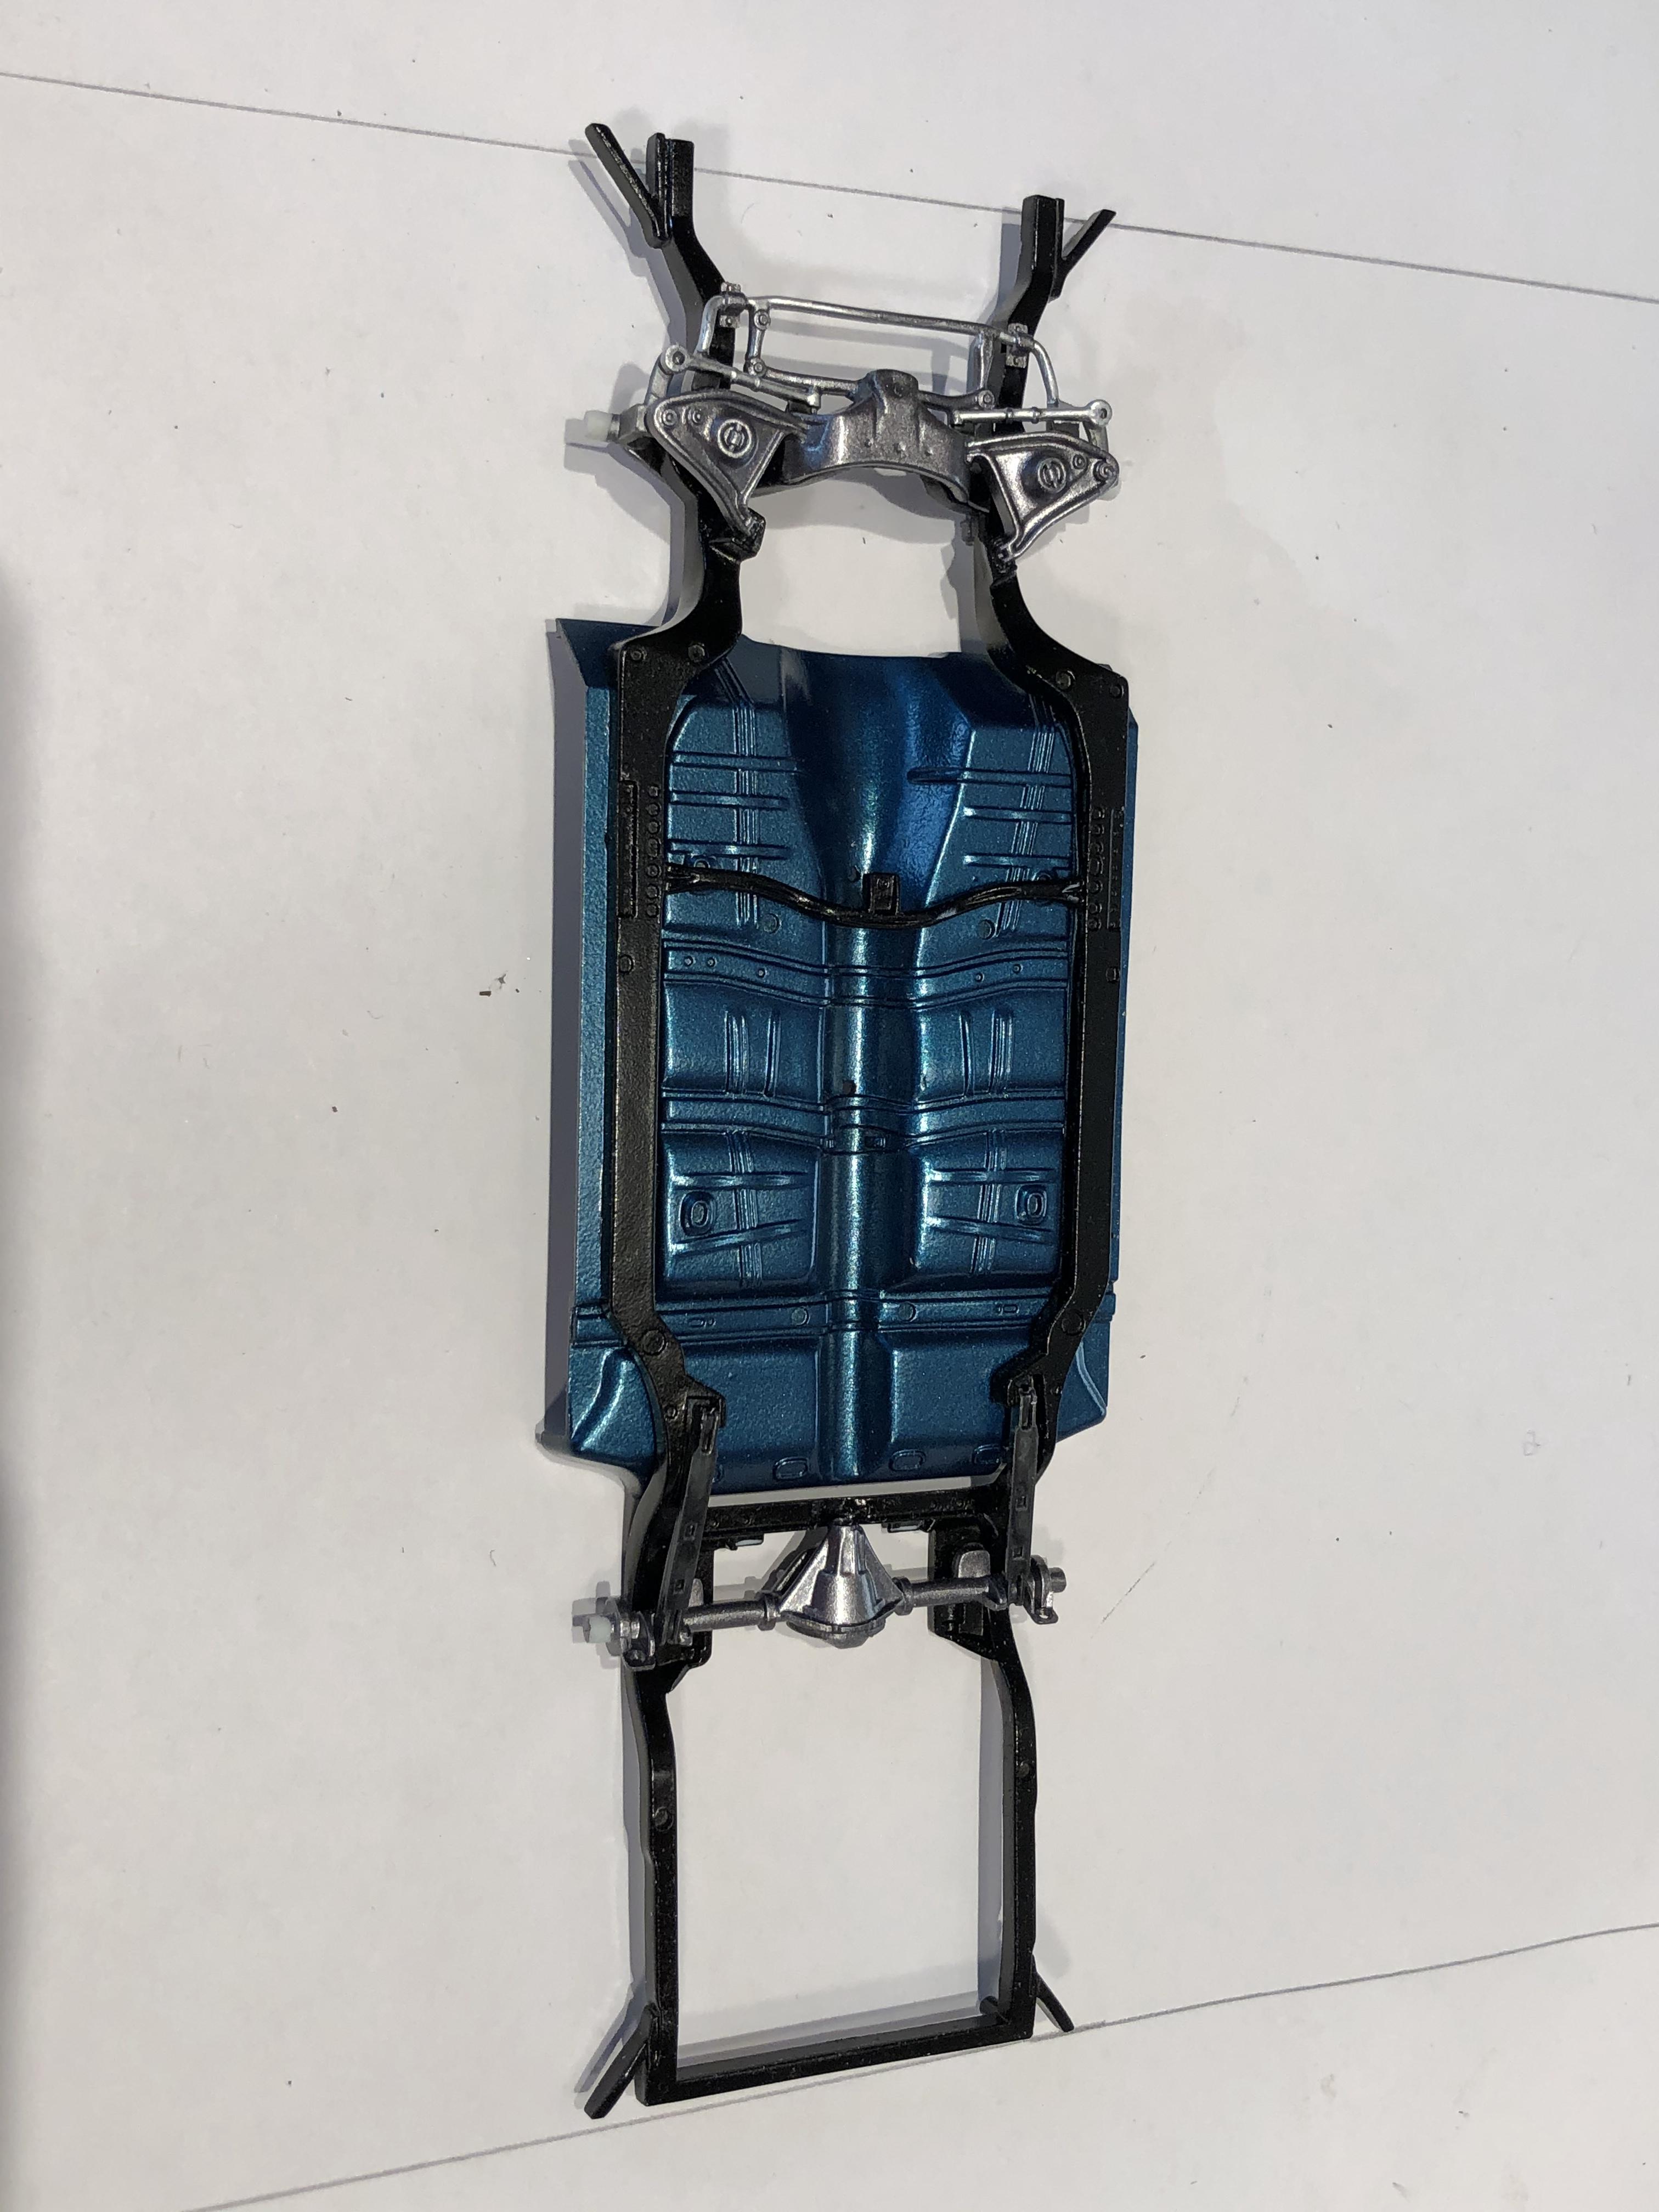
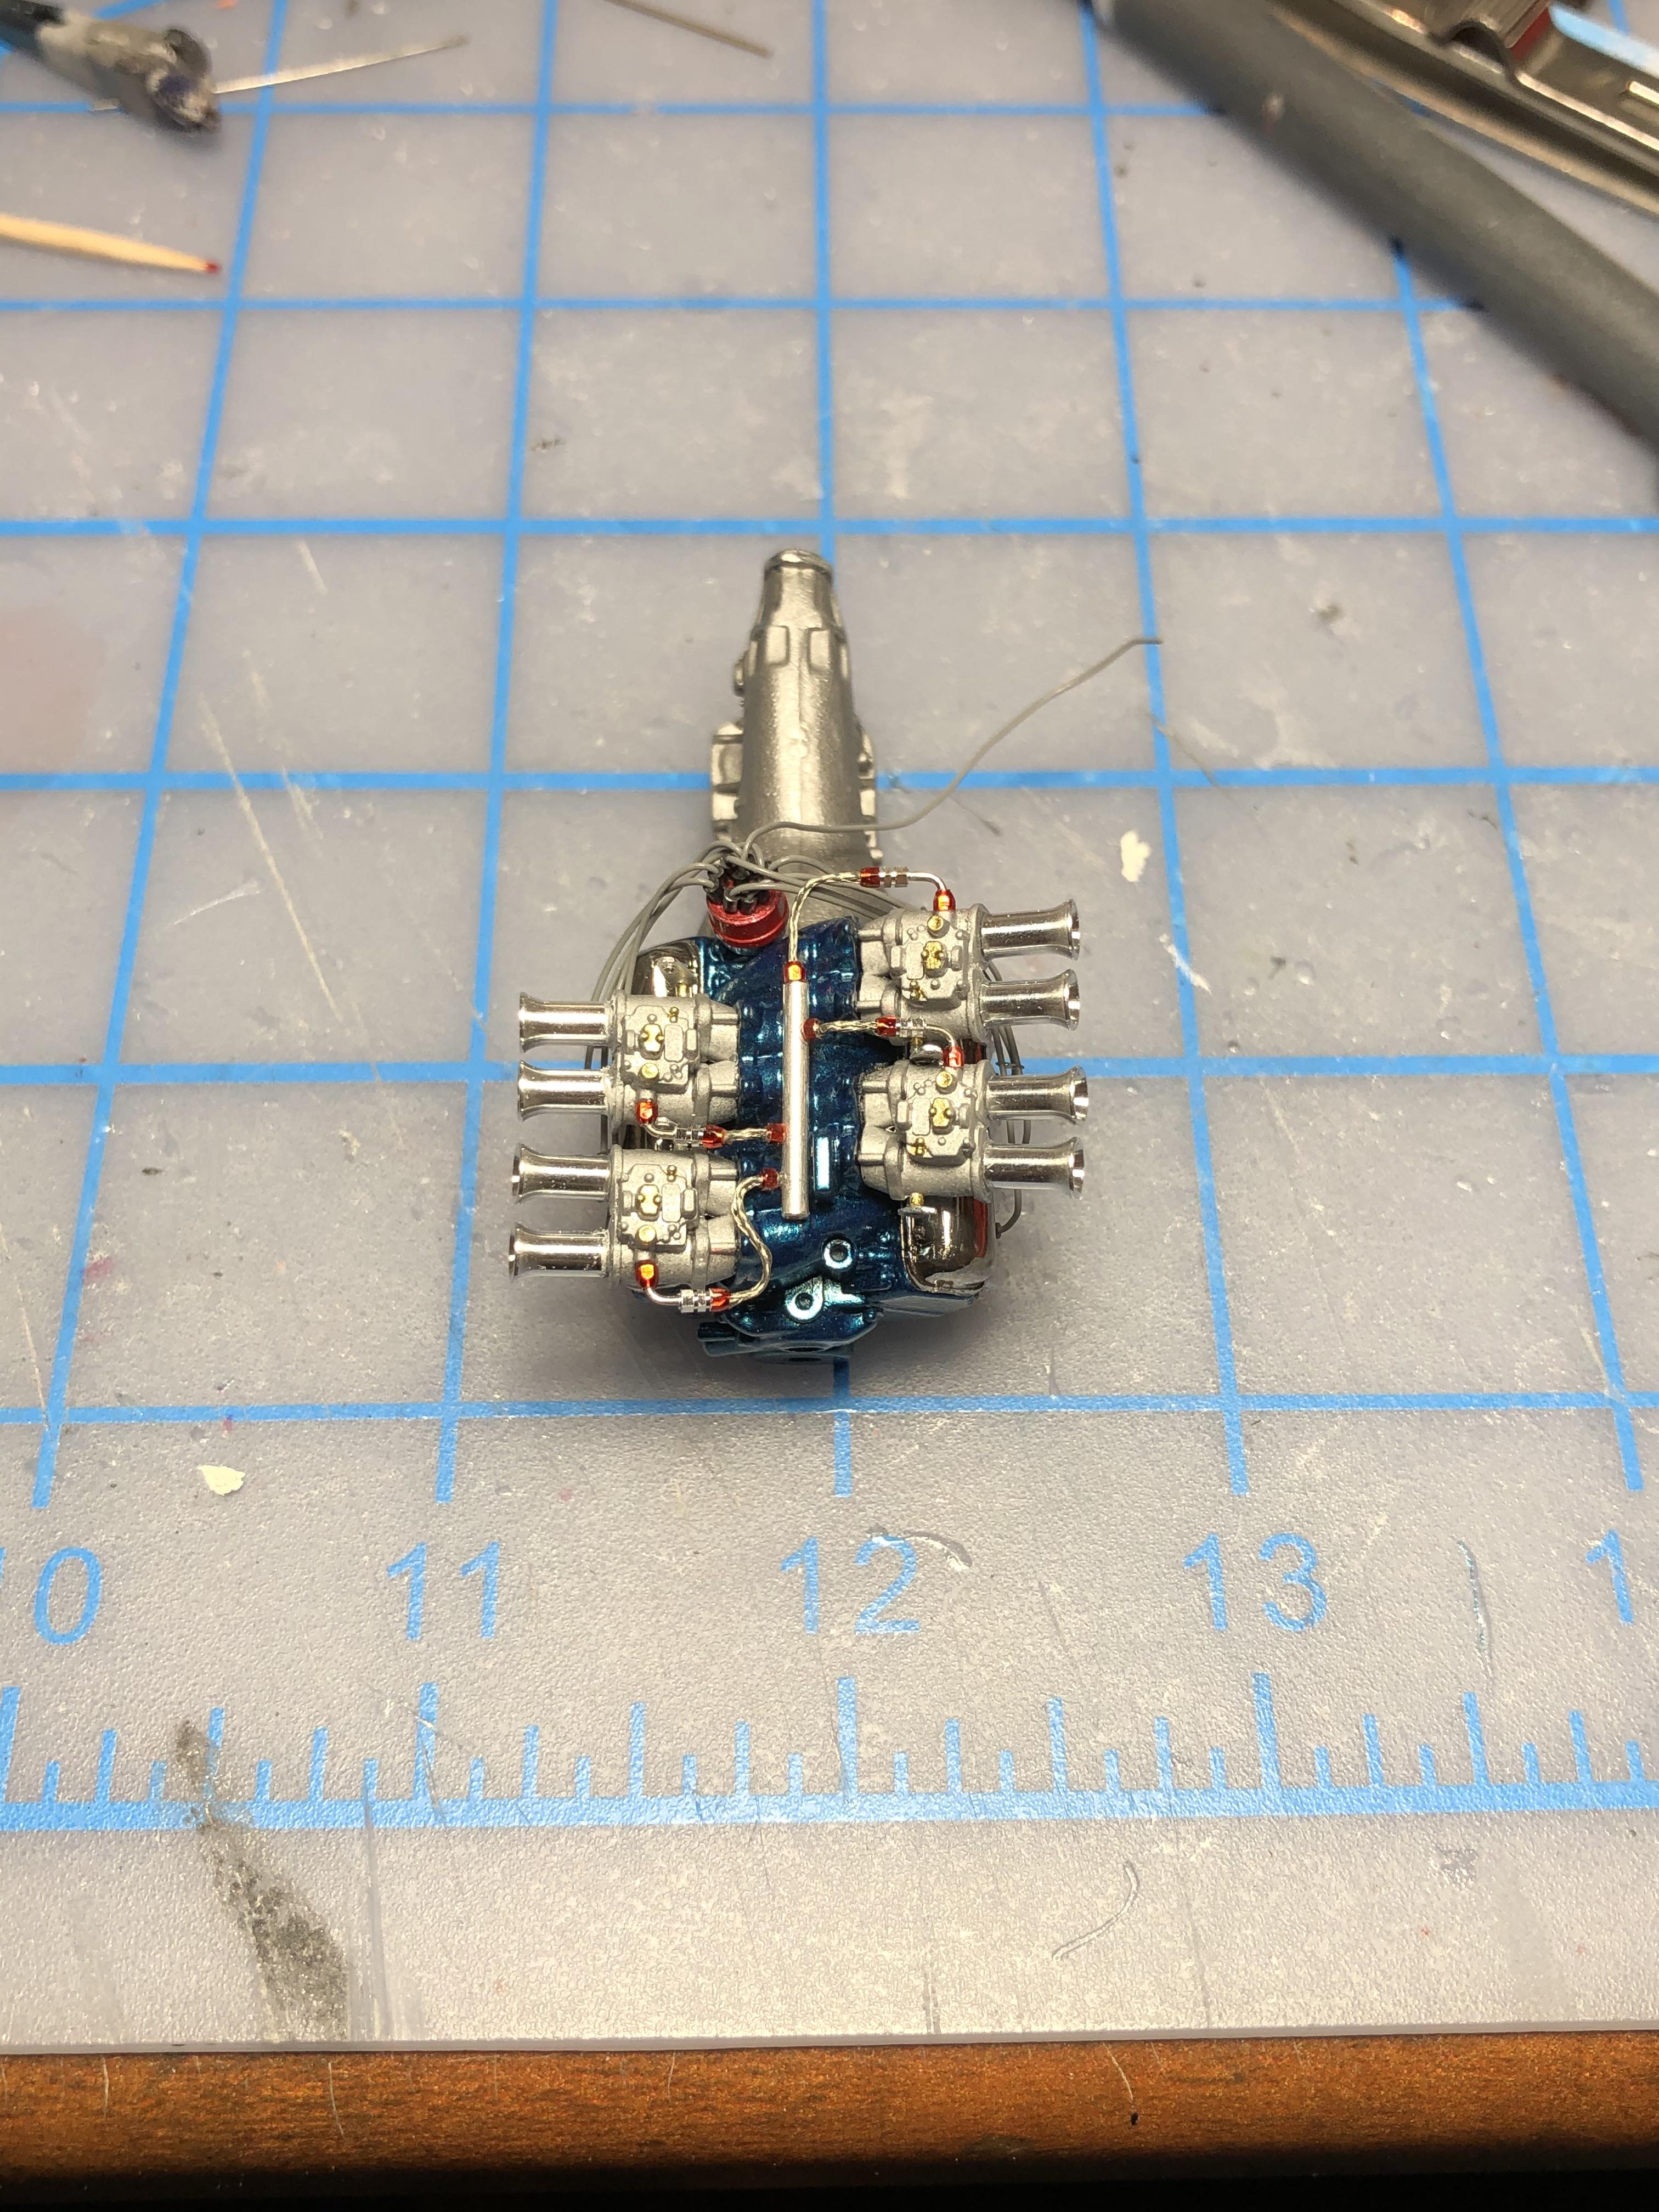
Hi guys, Time for an update. I spent some time getting the chassis “adjusted” and assembled, I will do a bit more touch up painting at final assembly. I may also add a fuel line. I also spent a fair bit of time on the motor. The carbs were modified a bit. Removed the intake trumpets, and added partial throttle linkage and fuel lines. I got the carbs mounted, and installed aluminum intake trumpets... The fuel rail is a piece of aluminum tubing, I will add a line to the fuel pump later. Oh, and ignition wires with looms and “boots”. I don’t plan on doing all the carb linkage on this one, I feel like it would be a bit too busy. As I had hoped, the body colour on the motor is now mostly disguised under all the parts, but still adds a splash of colour. Hoping to get the base coat on the body this week, colour coat next weekend. Still waiting for a couple of “bits” to arrive for the interior. Now that the motor is assembled, I need to mock up to see if it all fits under the hood!! Fingers crossed ? Thanks for looking