Dennis Lacy
-
Posts
2,487 -
Joined
-
Last visited
Content Type
Profiles
Forums
Events
Gallery
Everything posted by Dennis Lacy
-
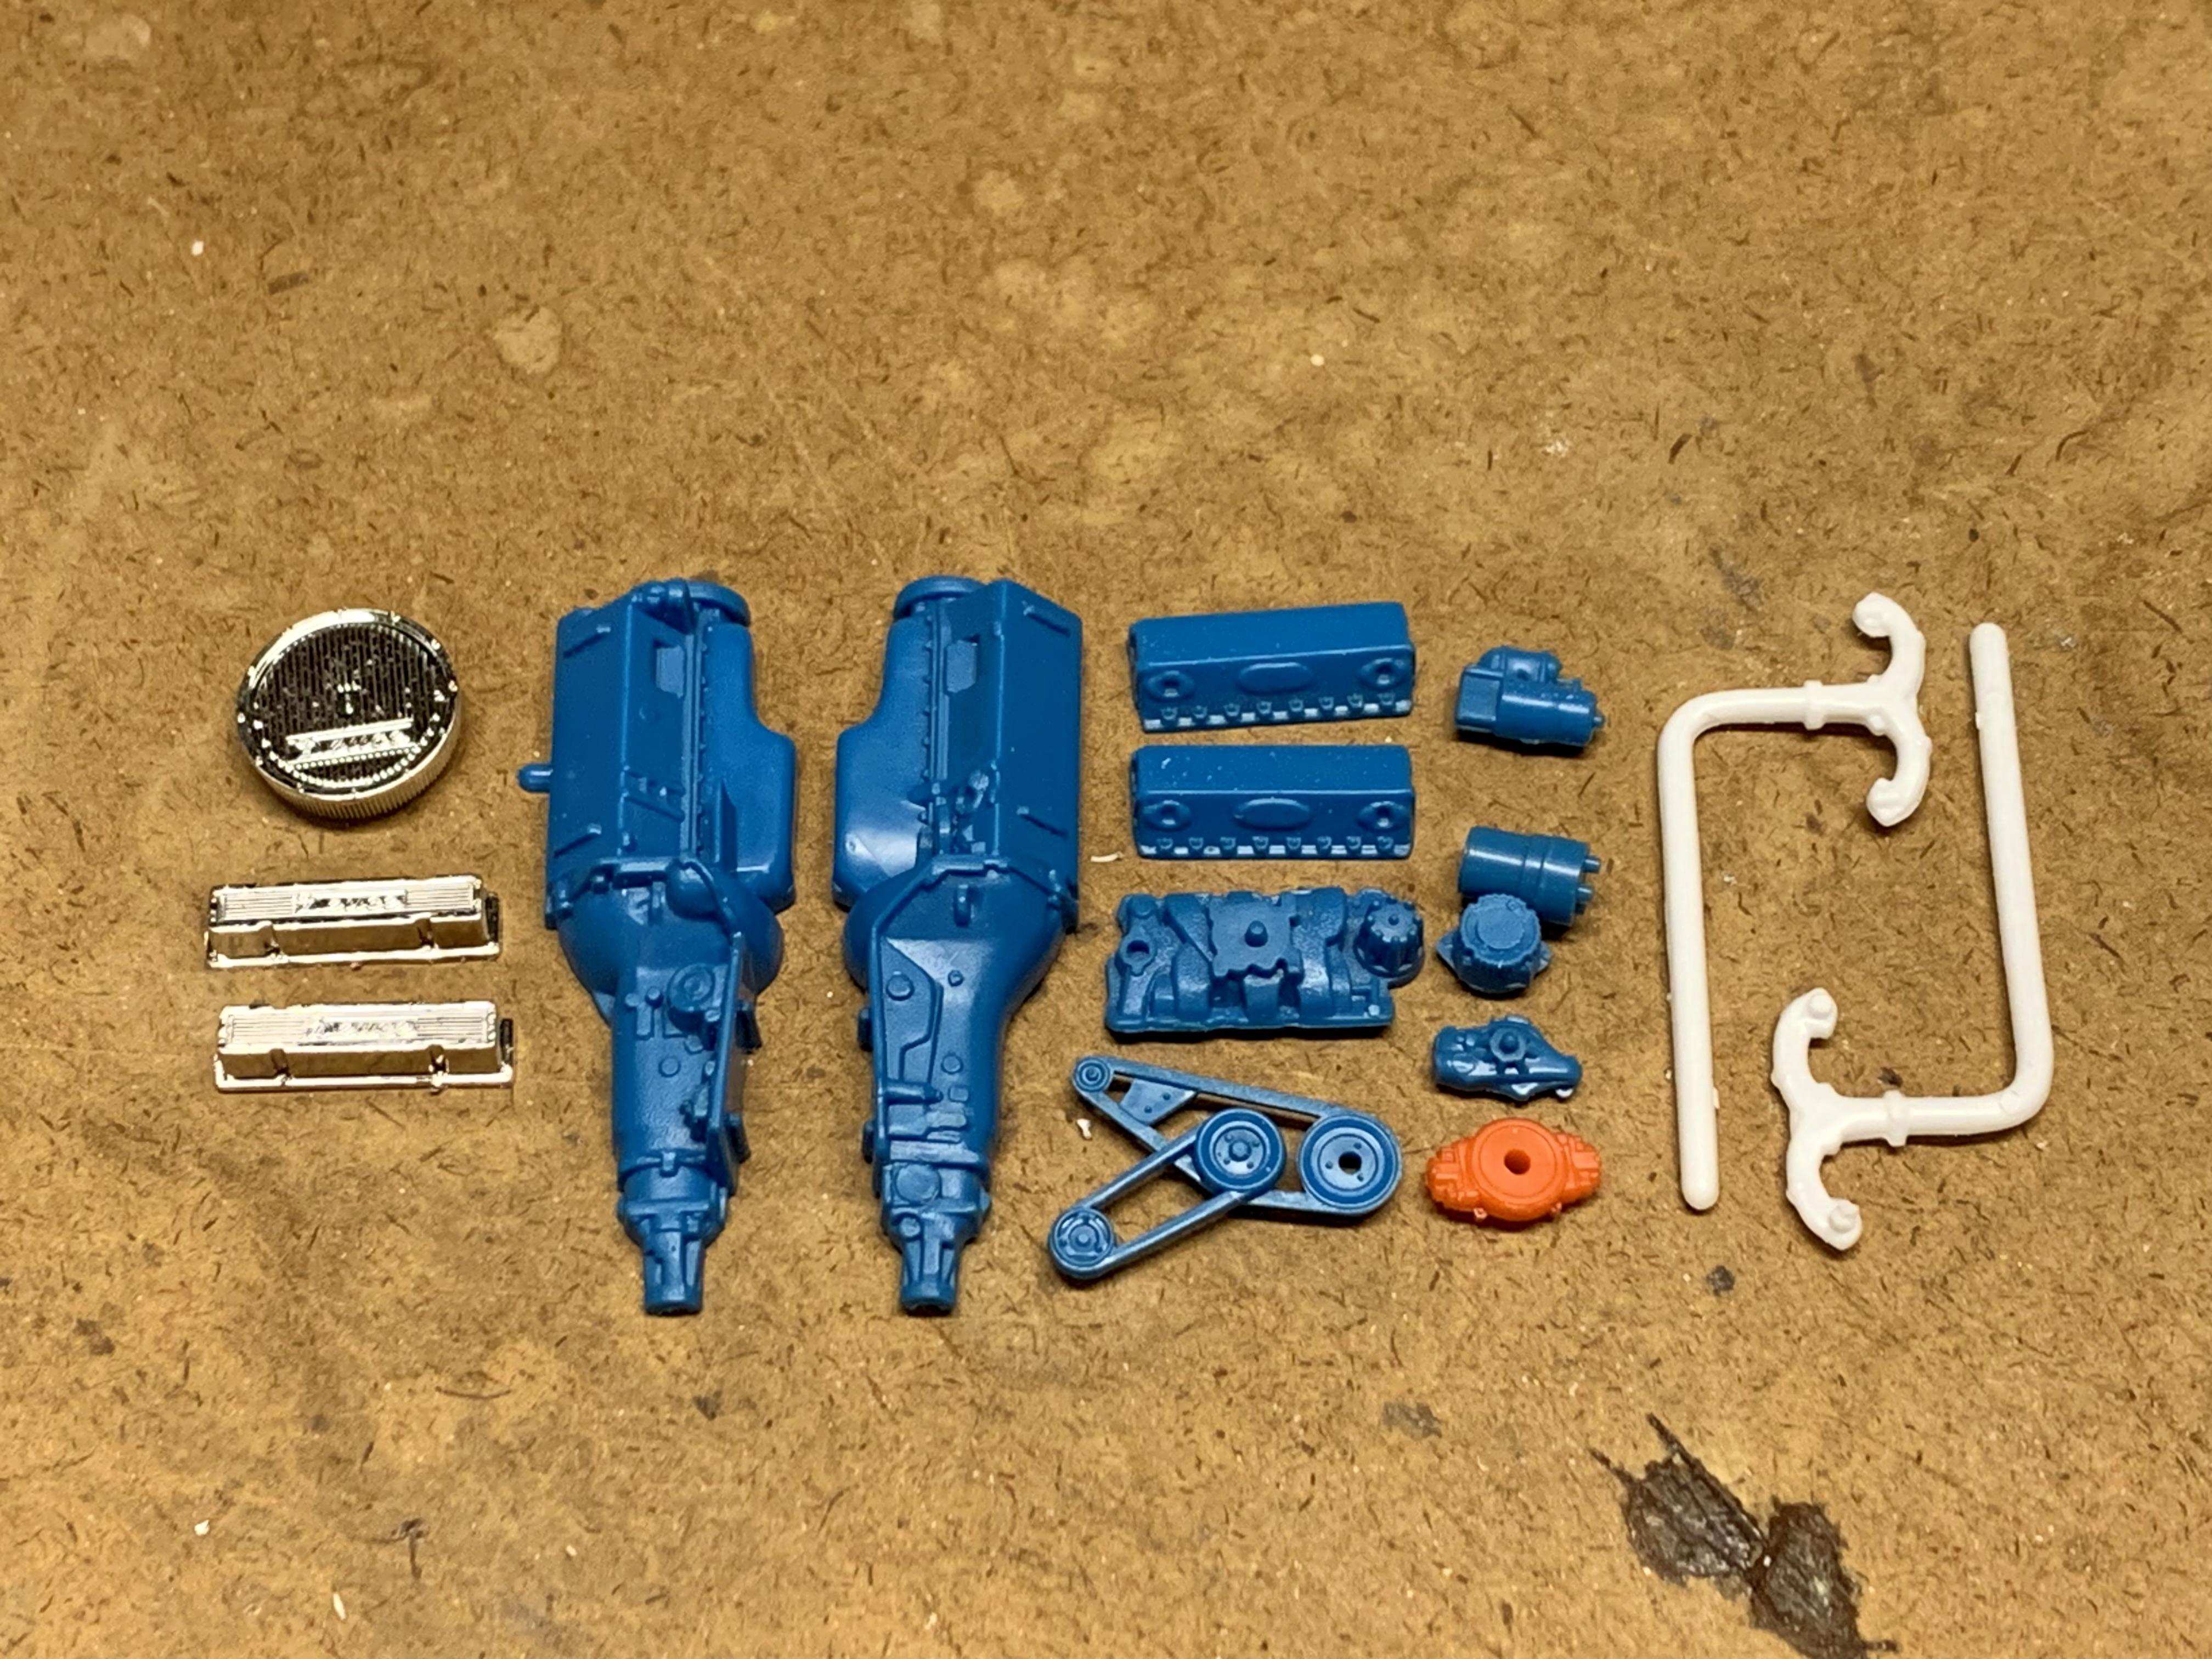
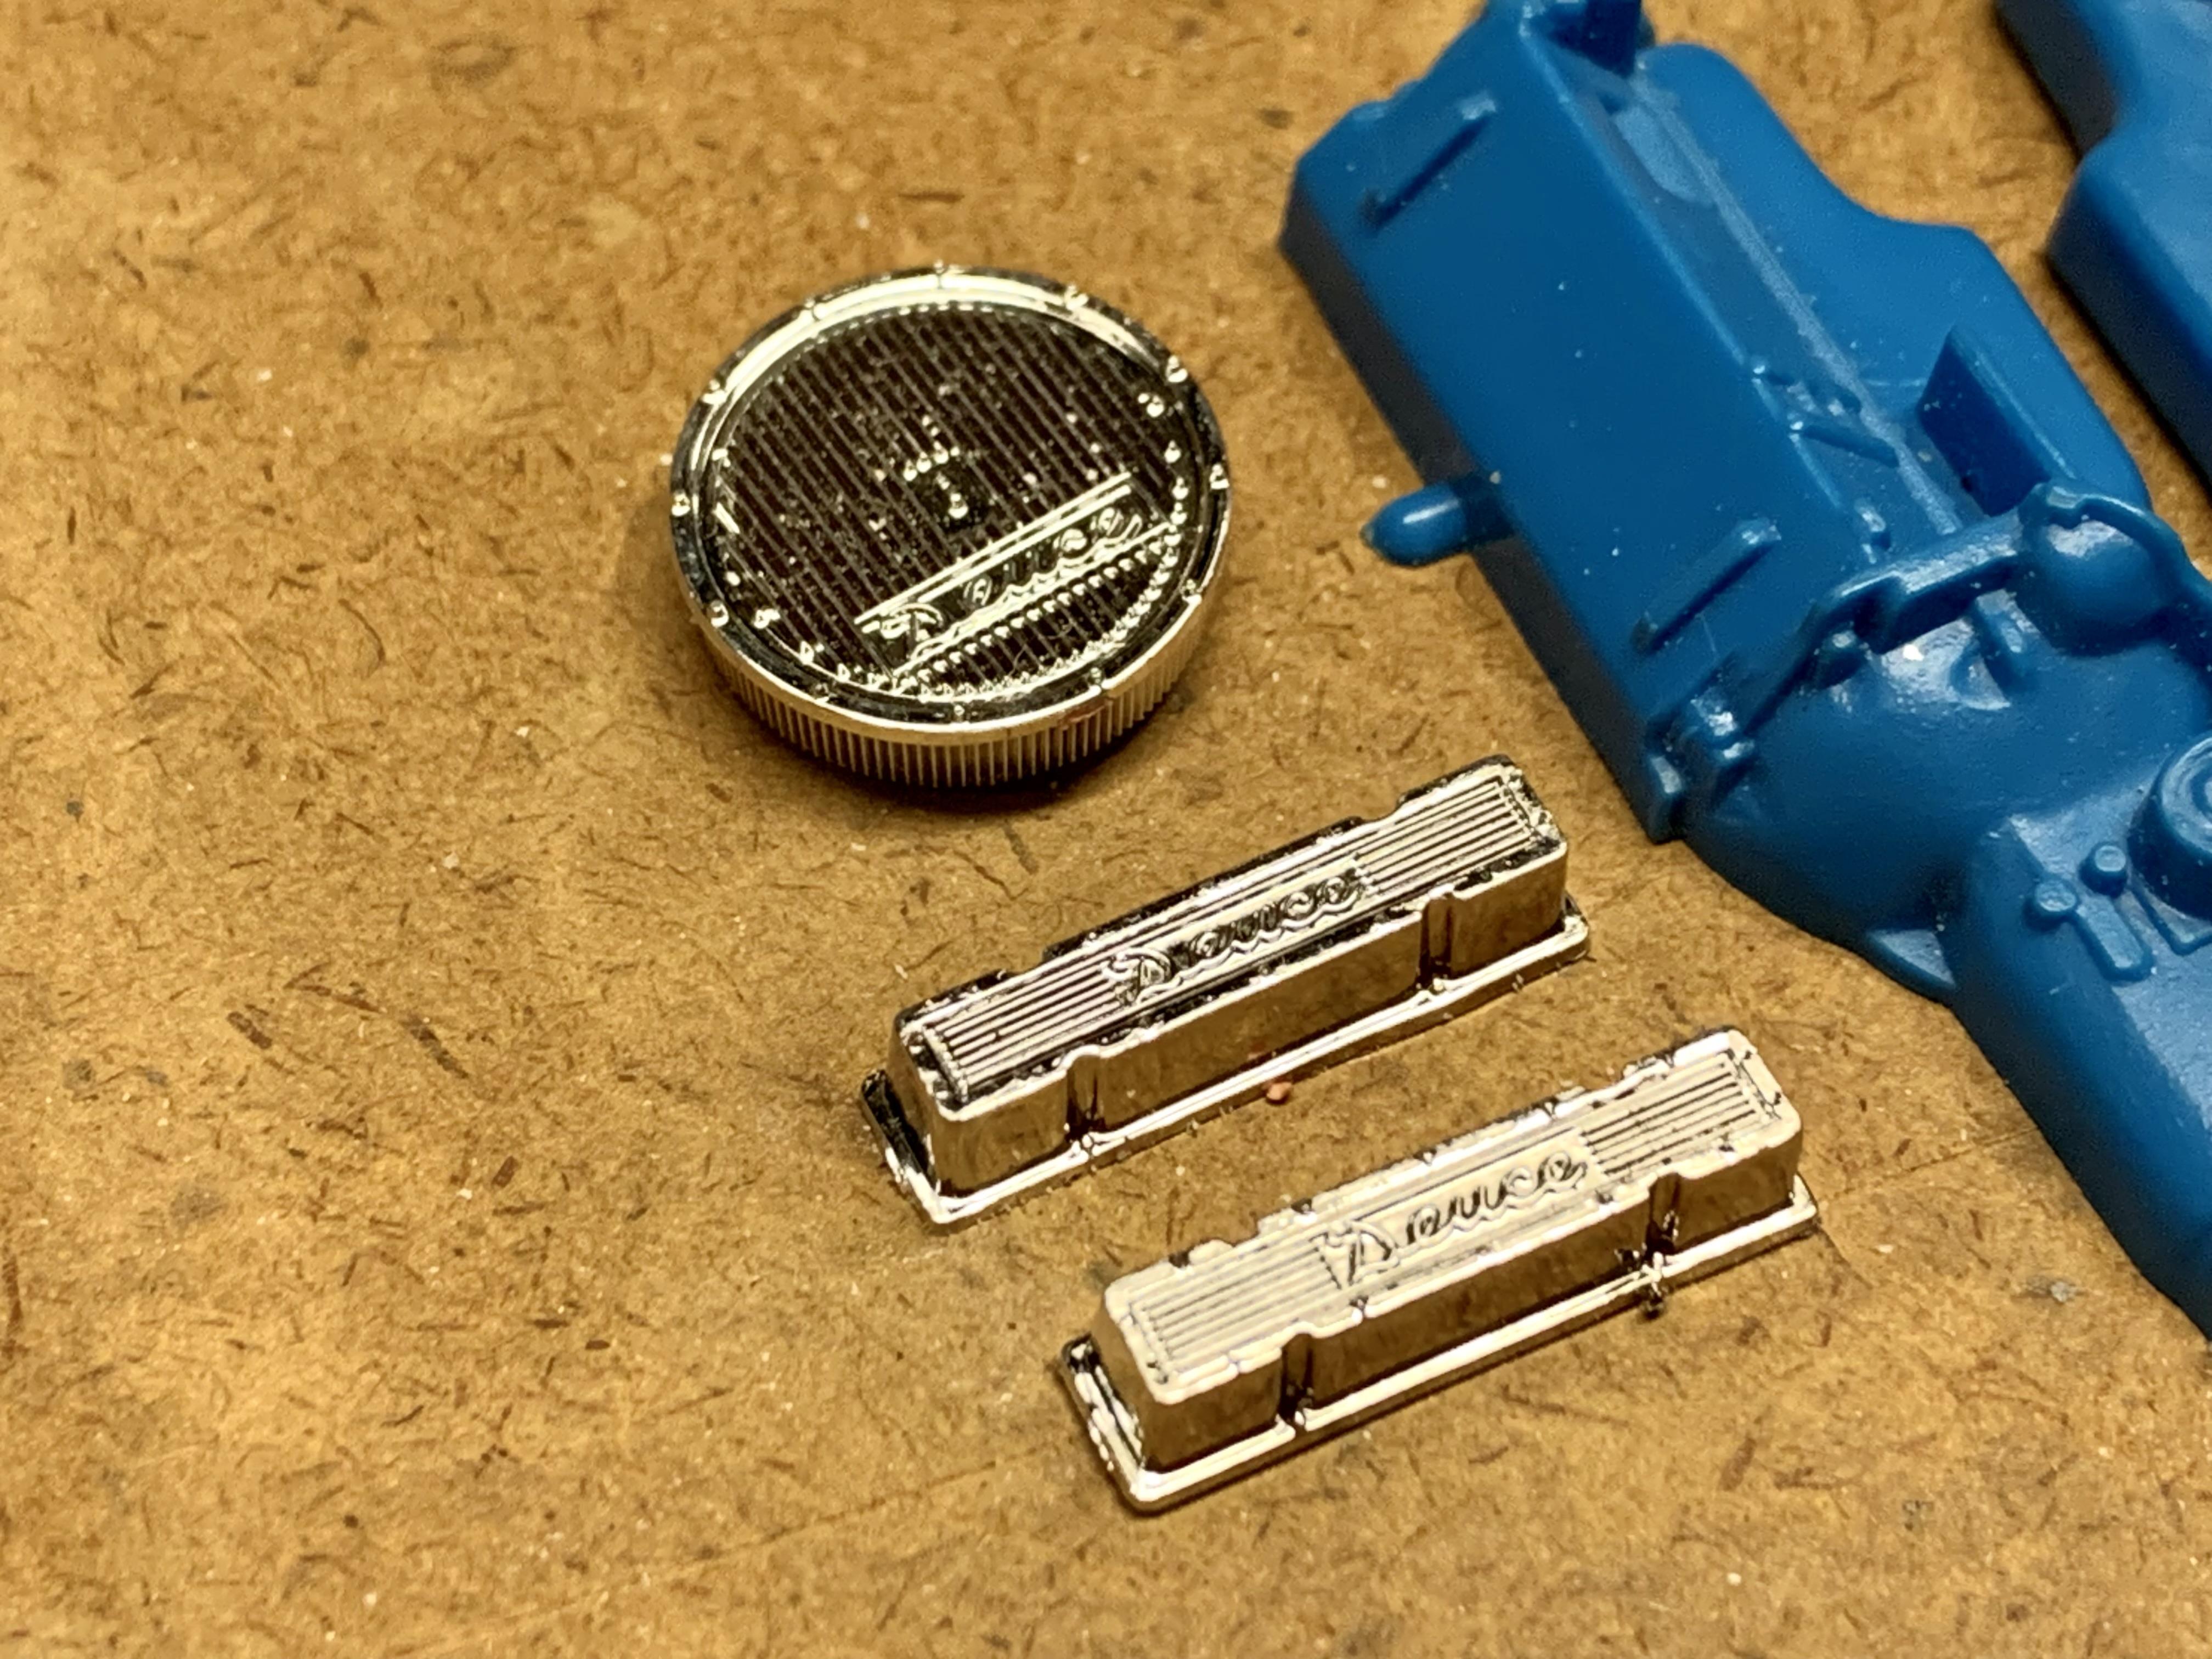
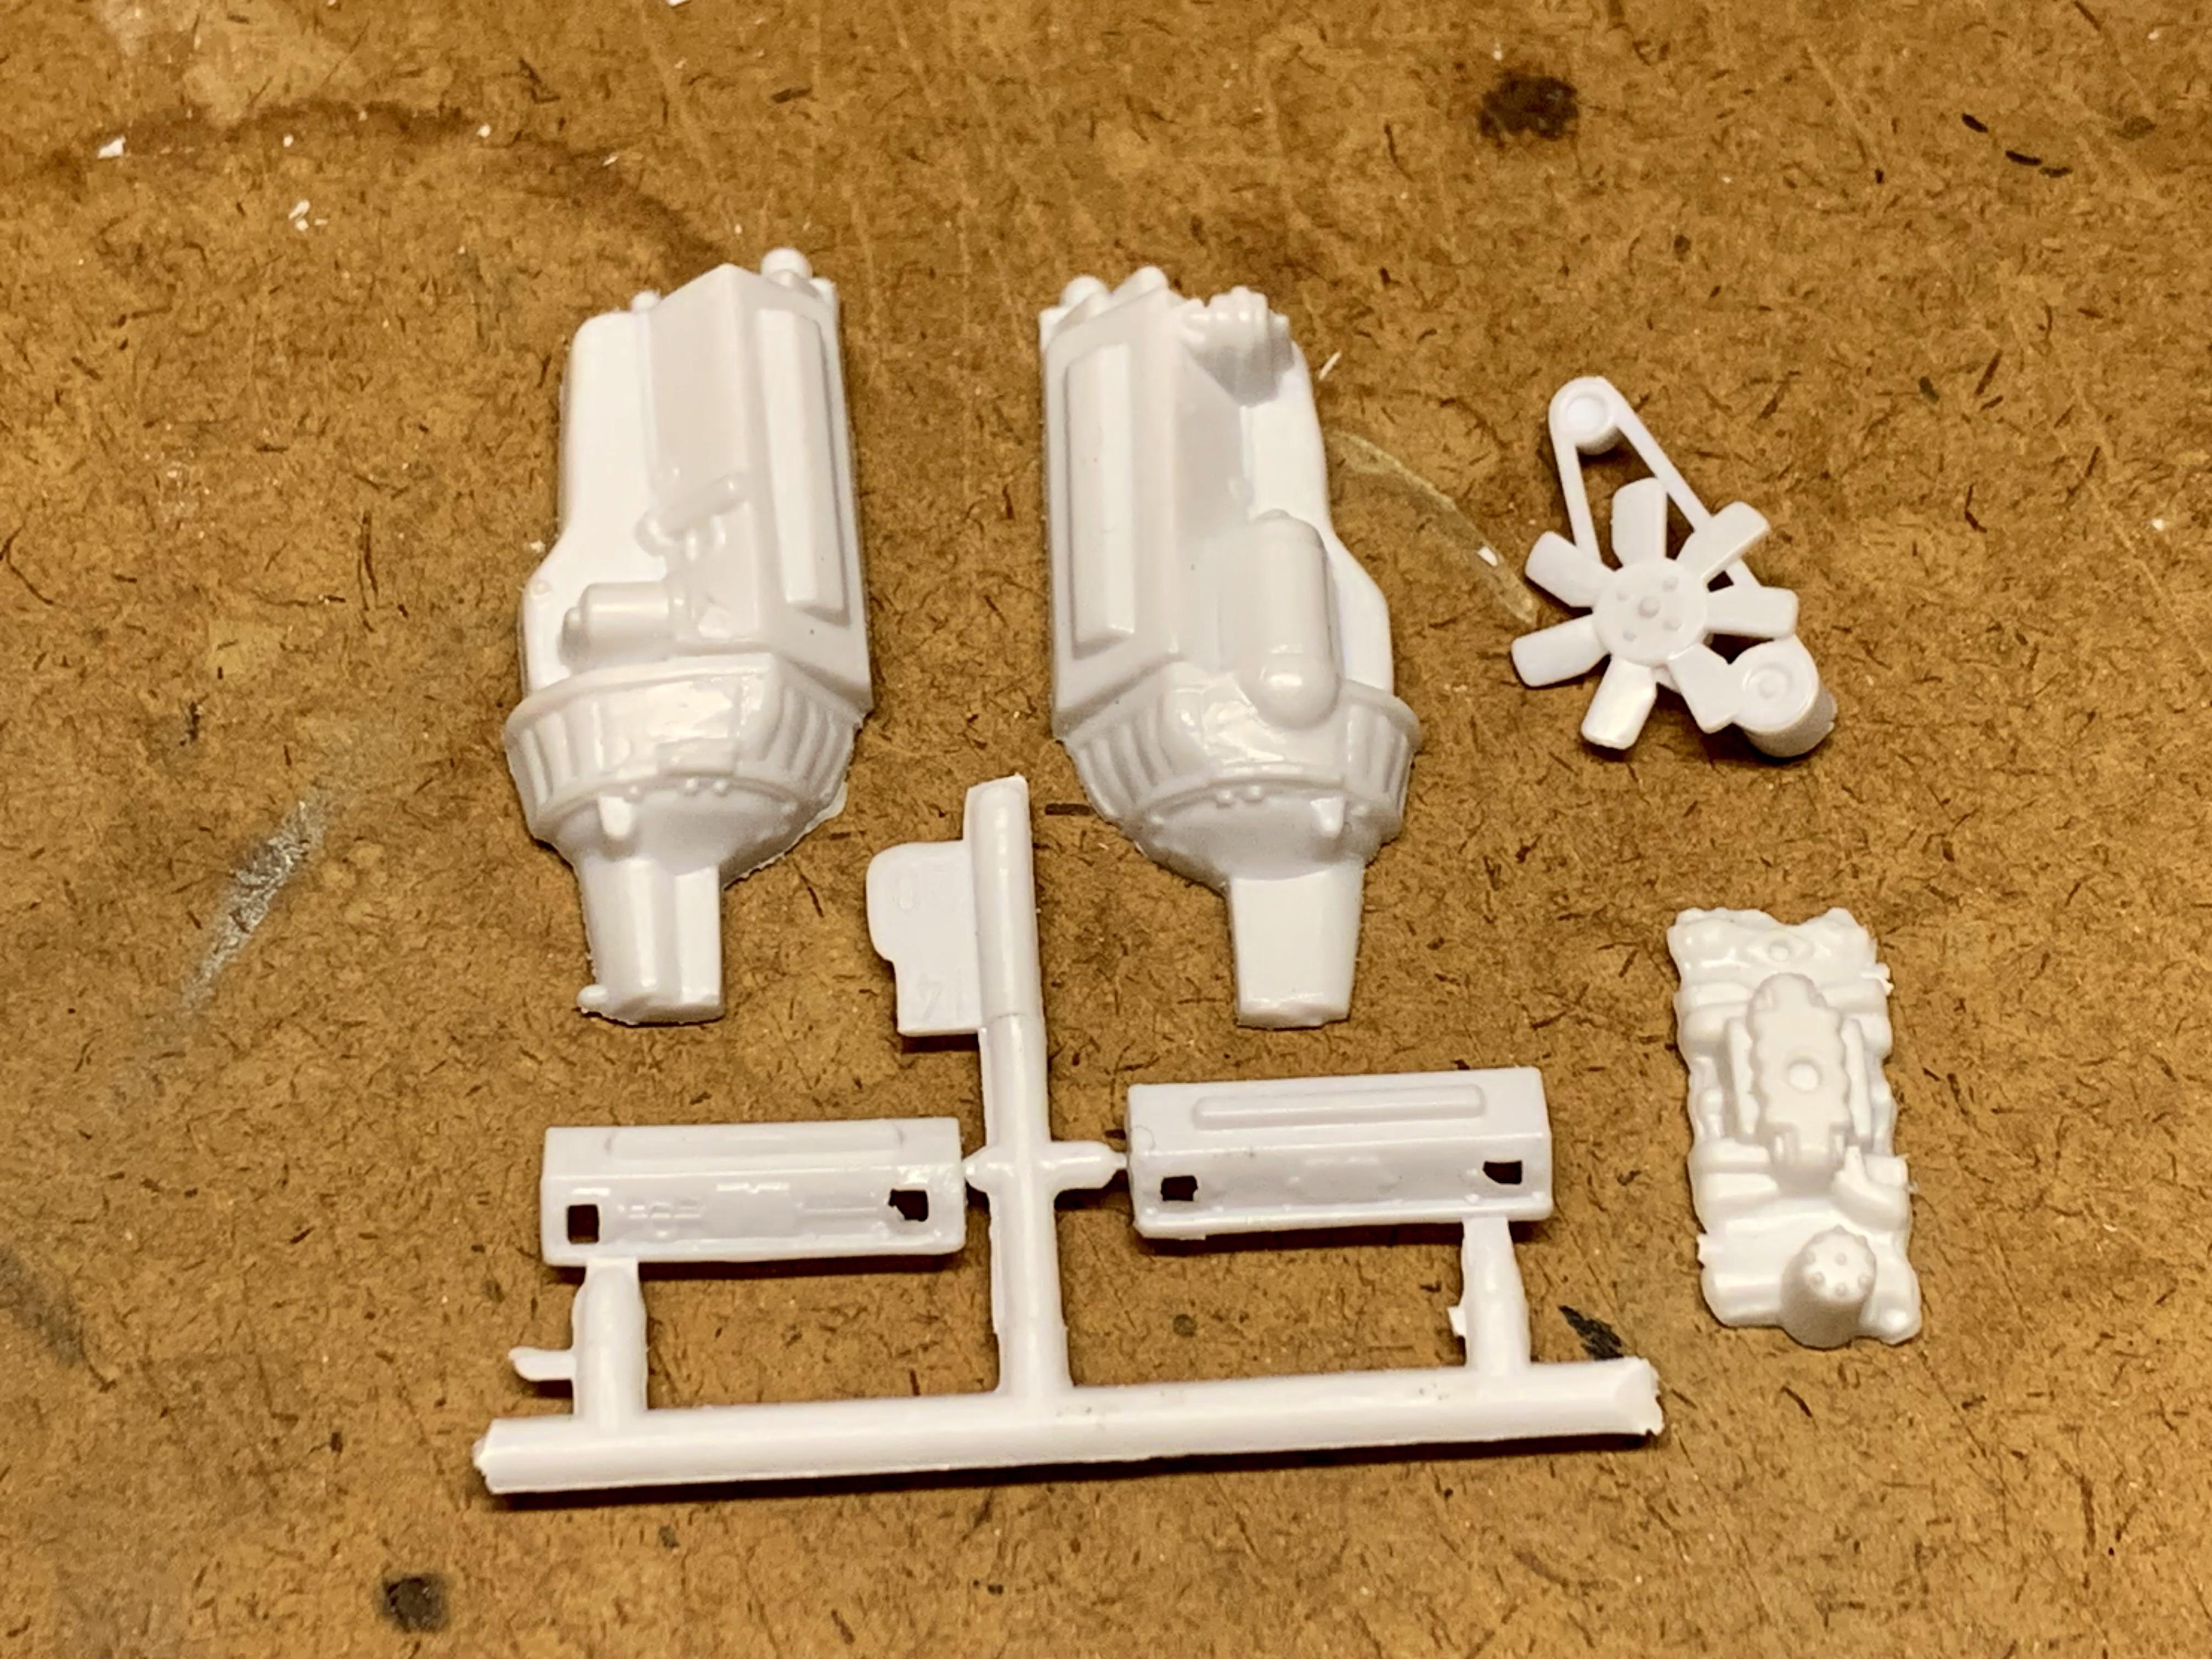
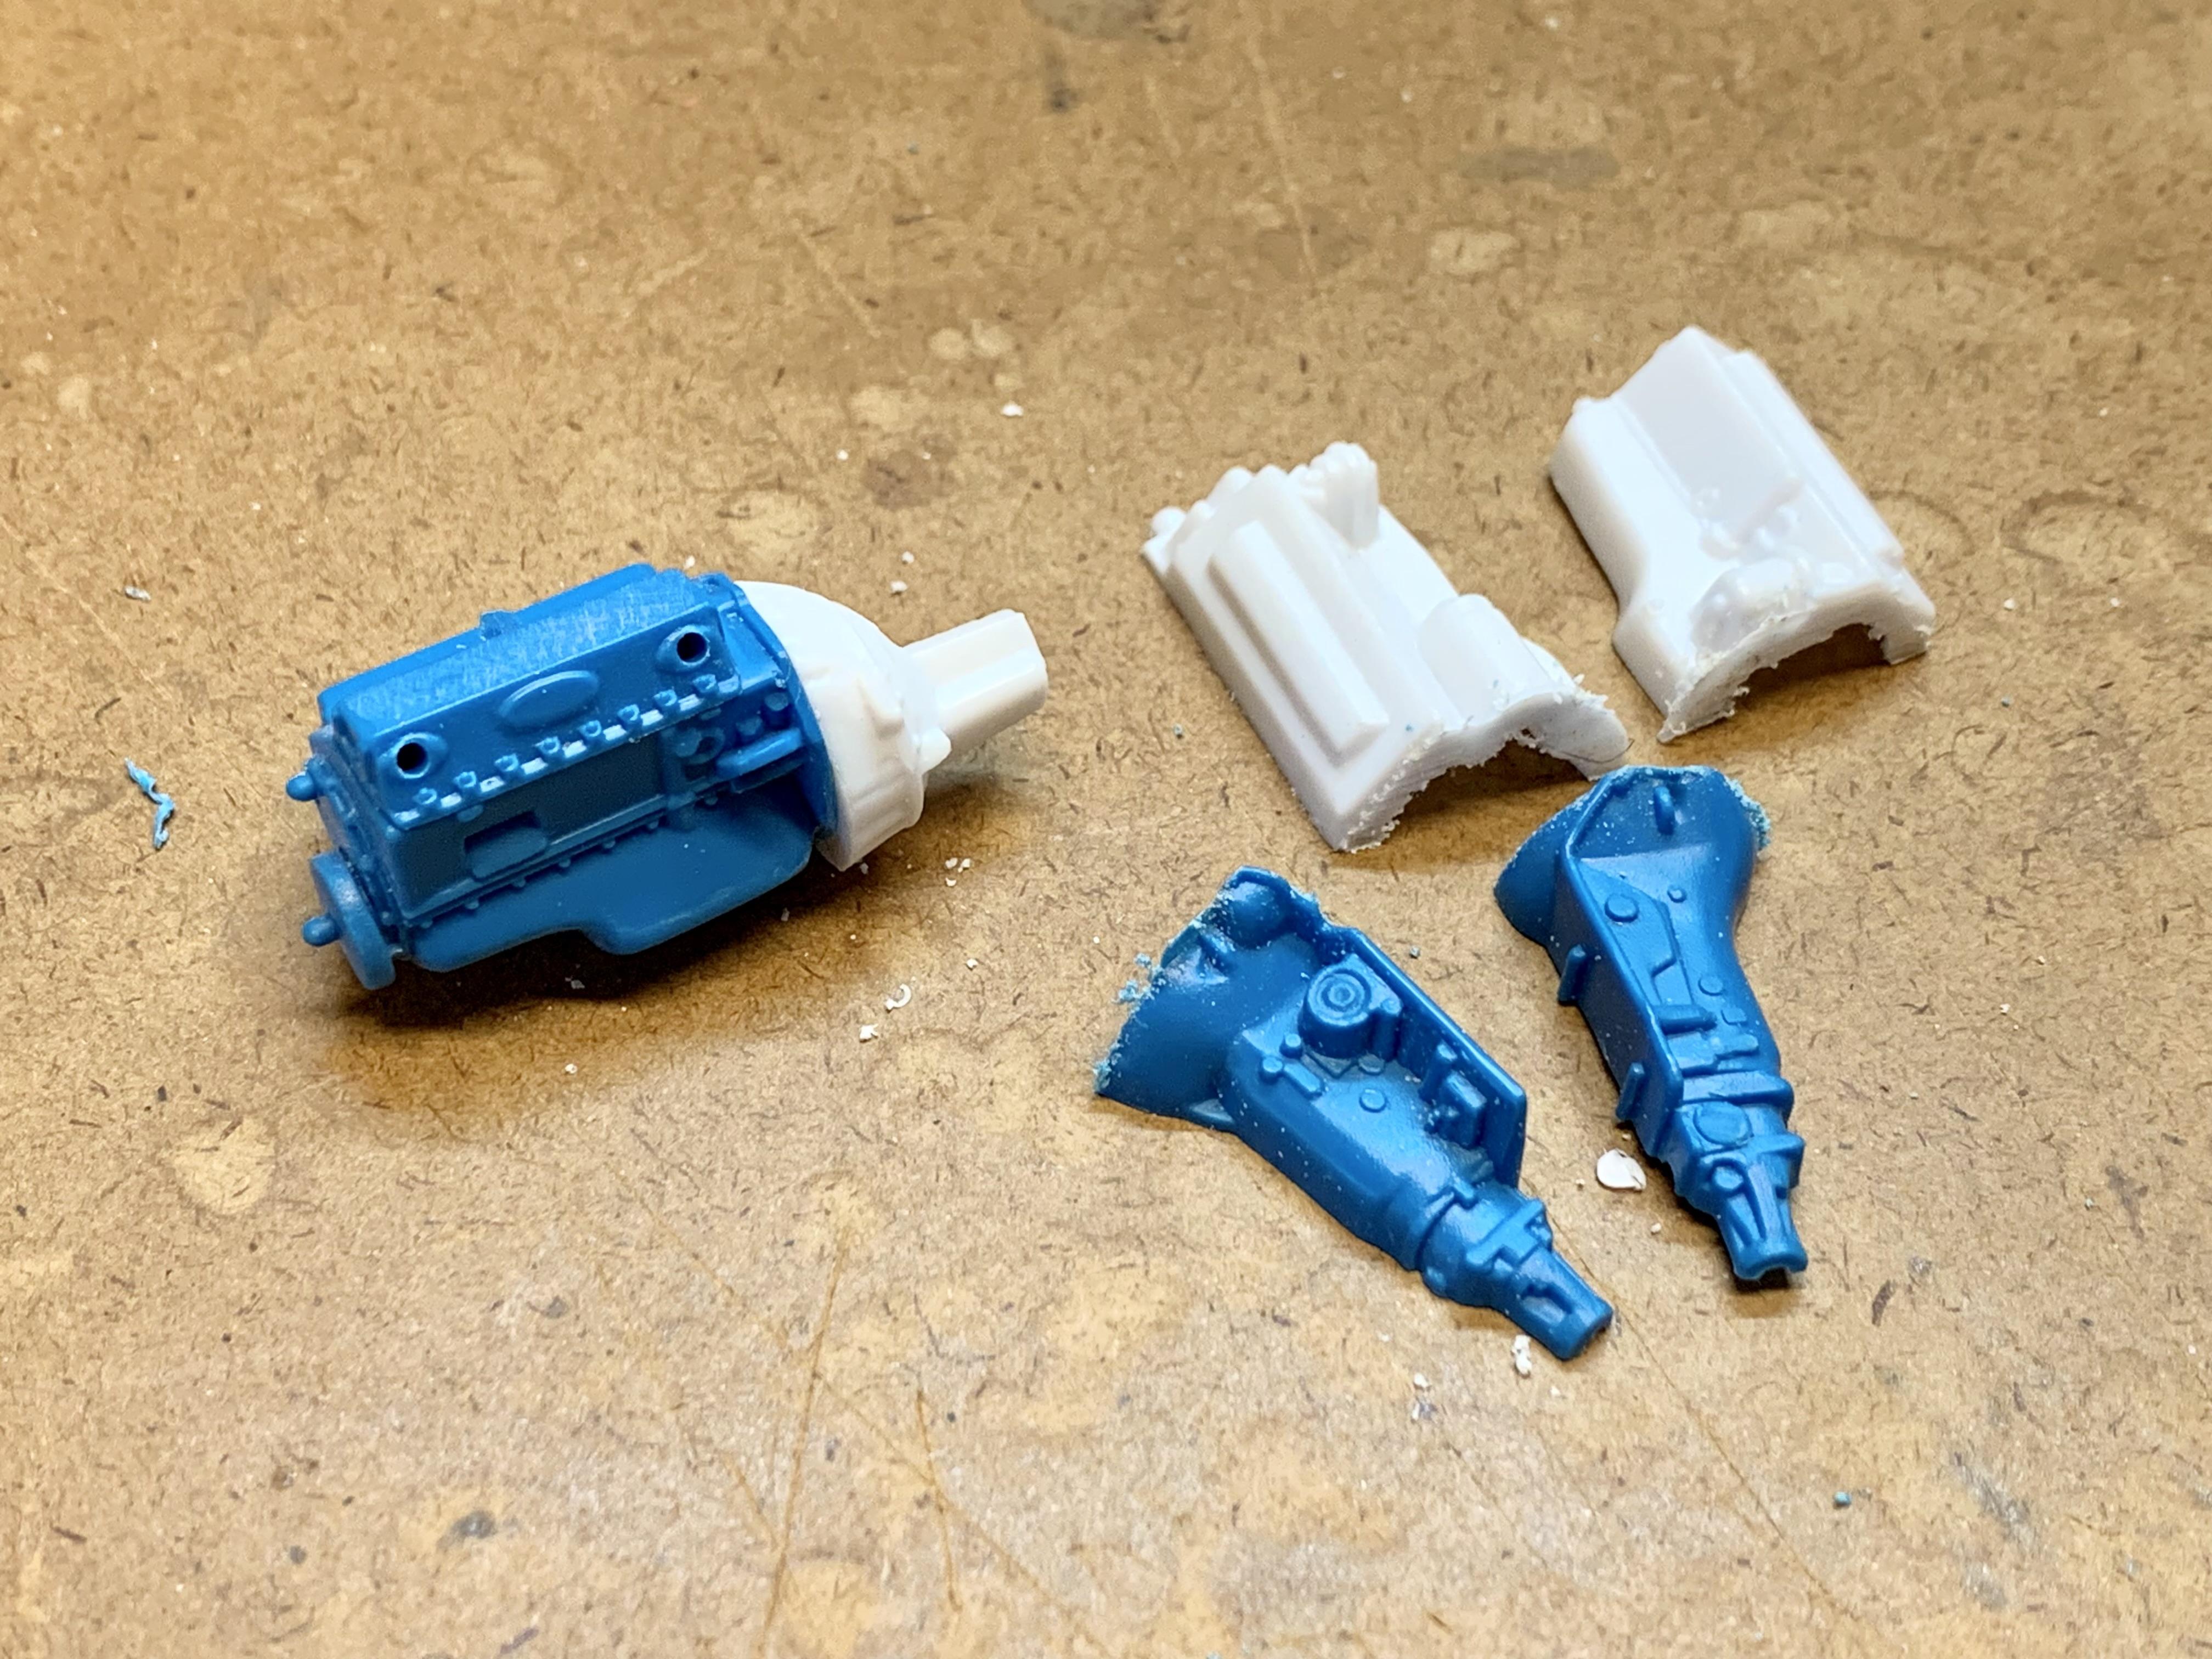
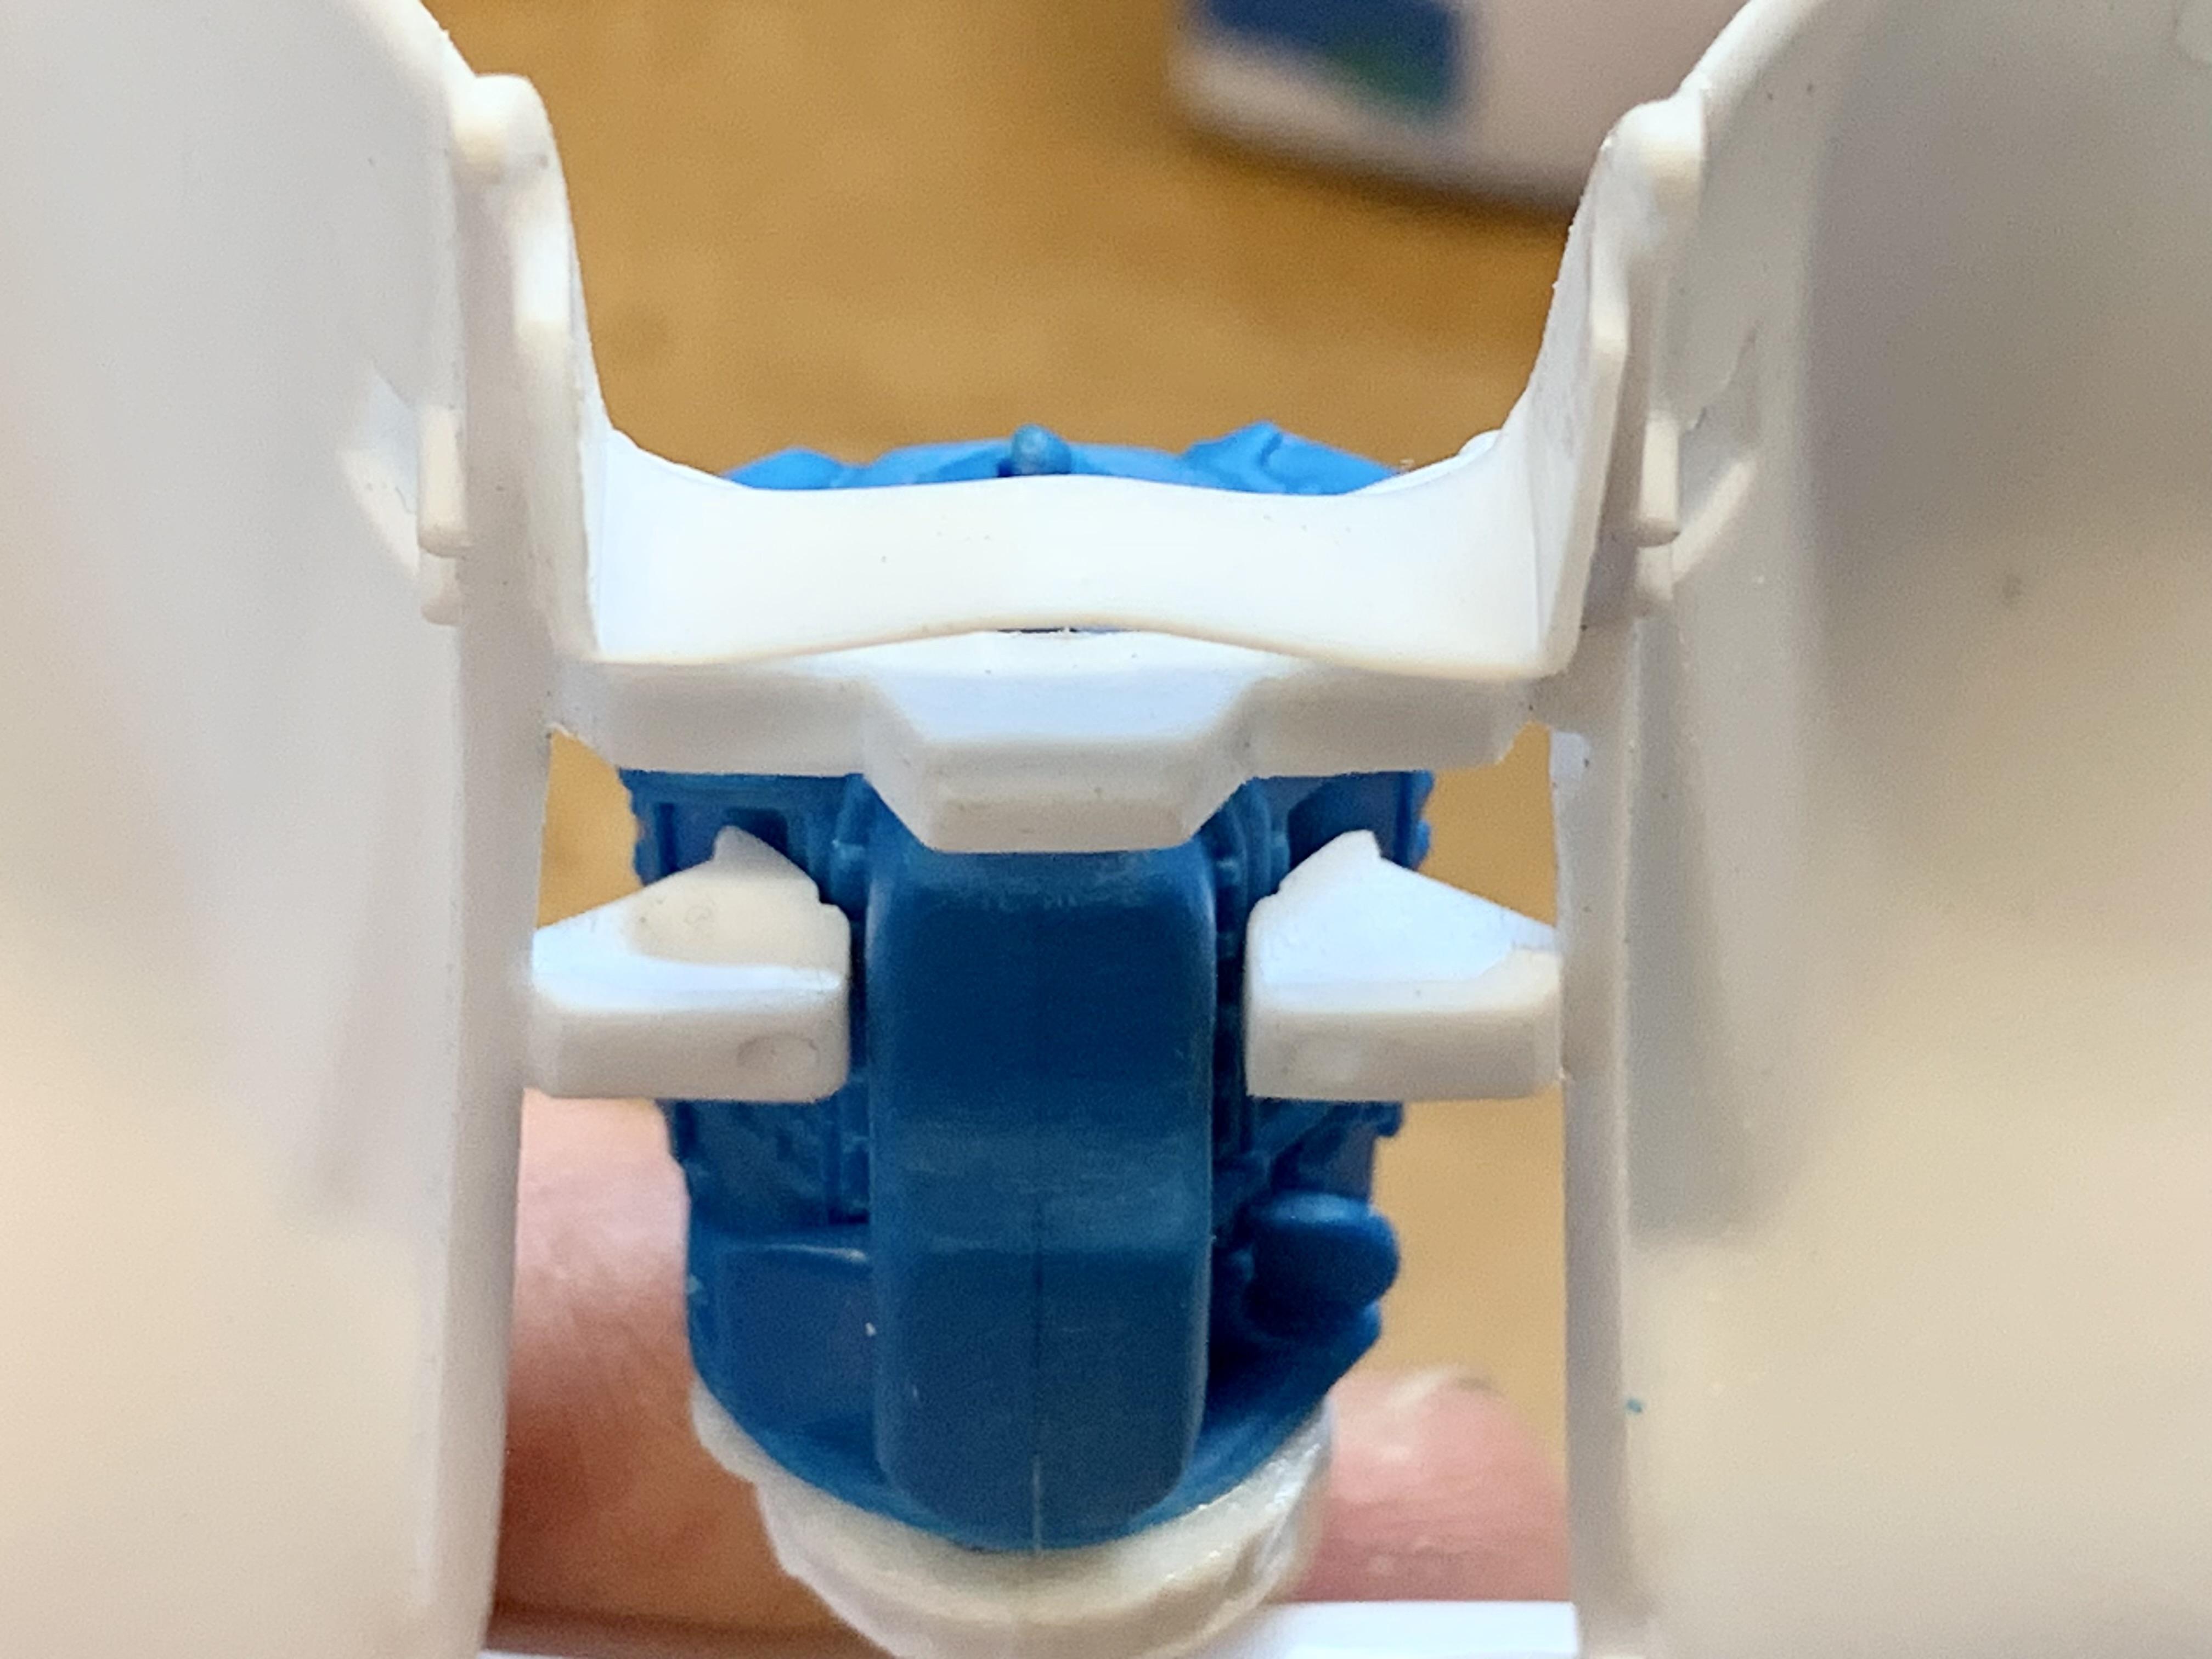
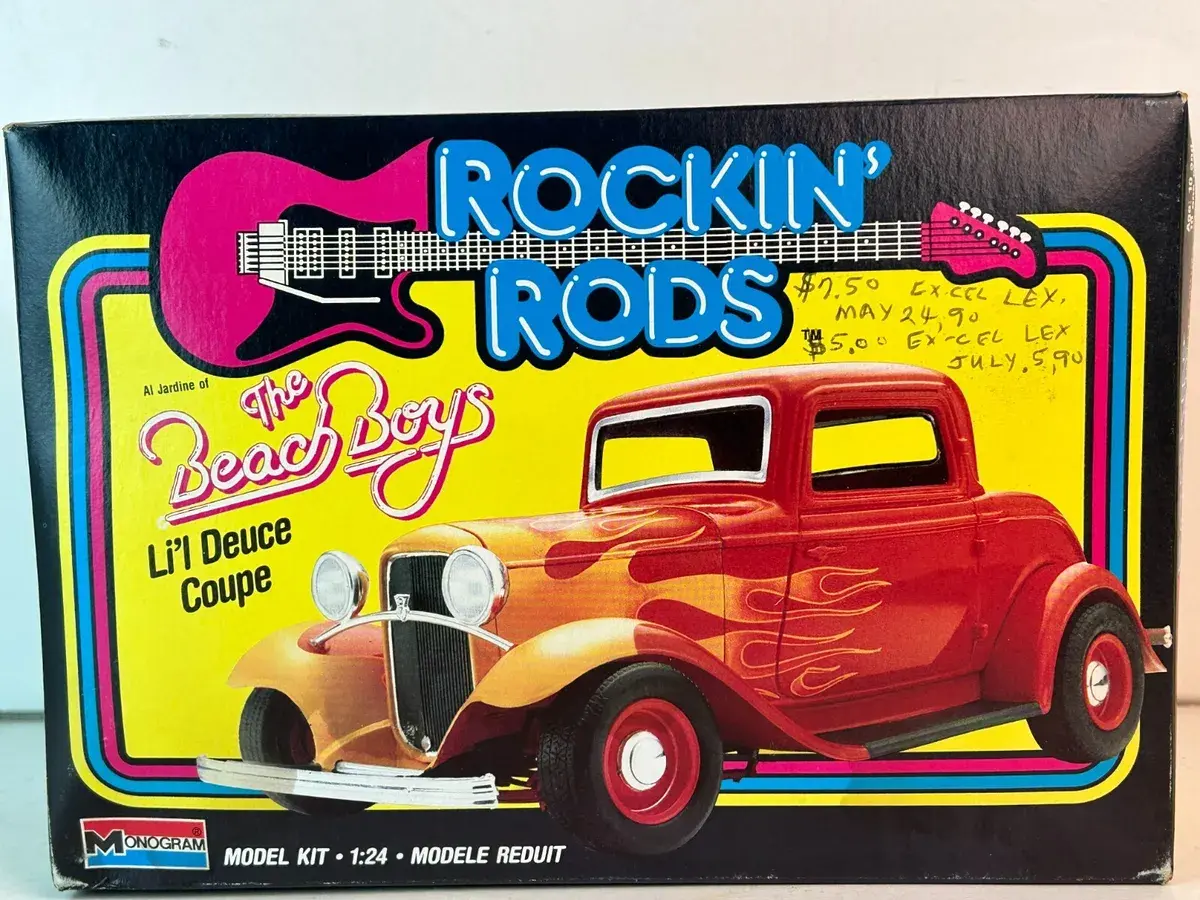
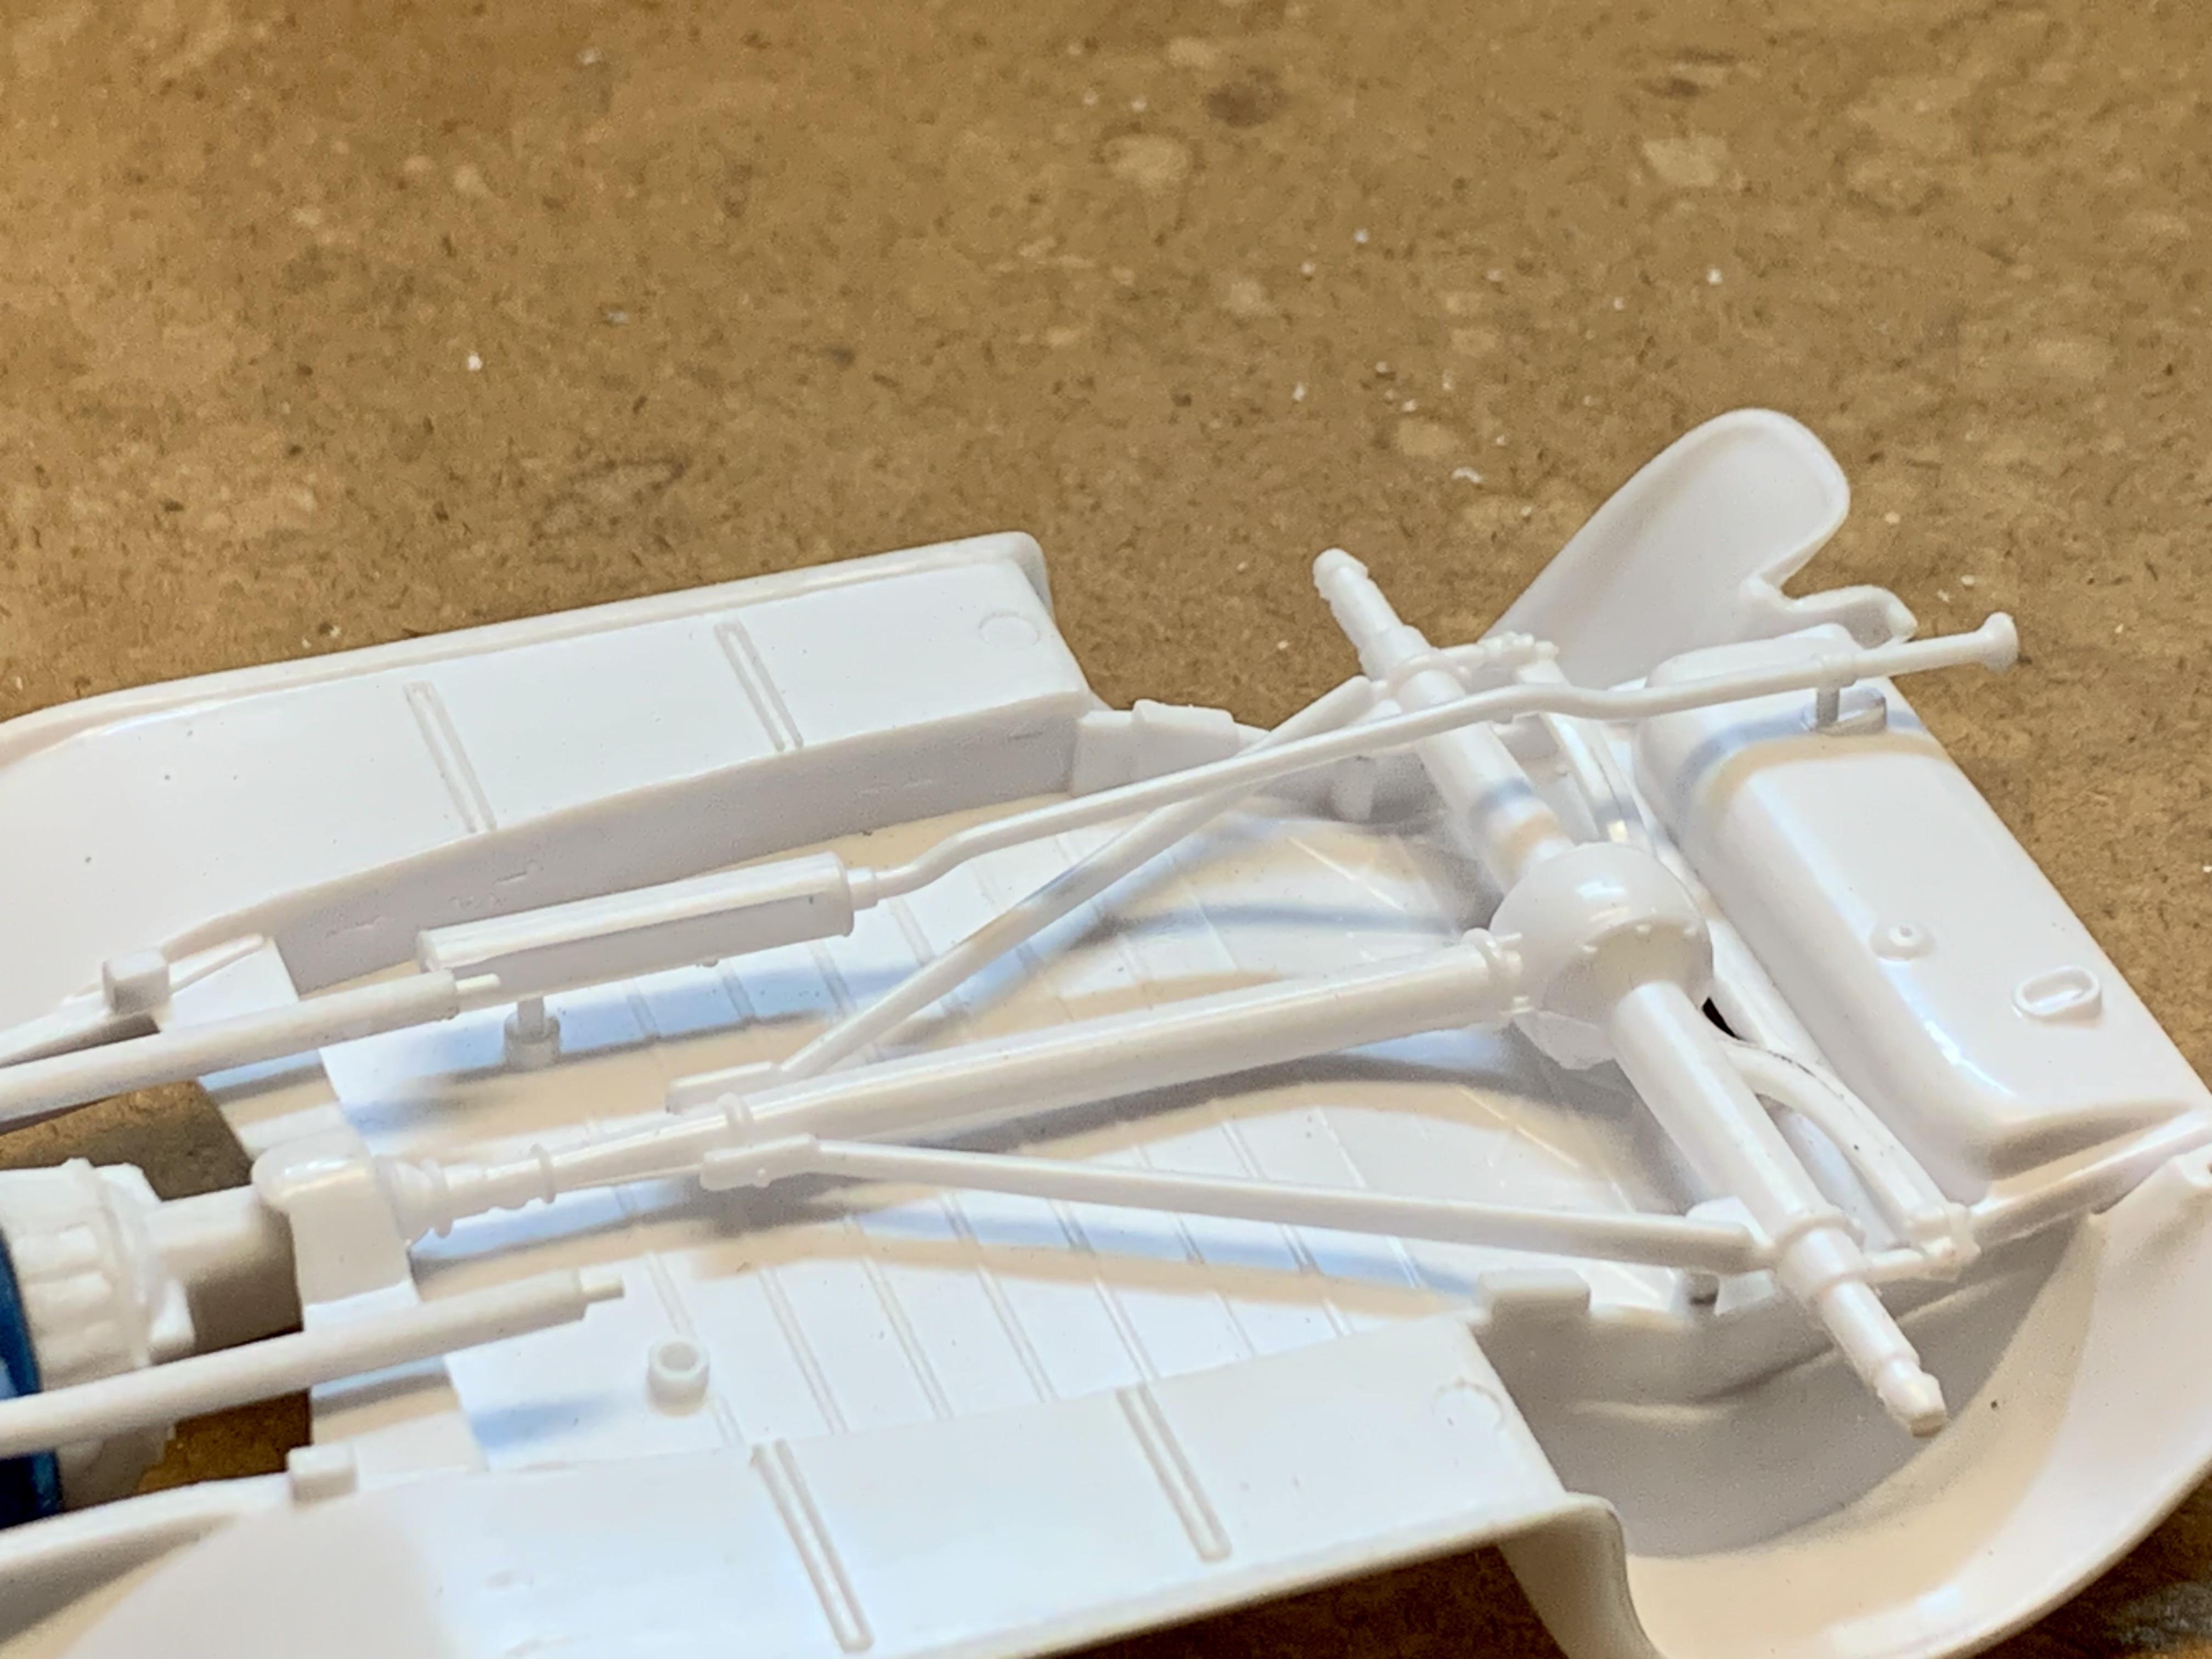
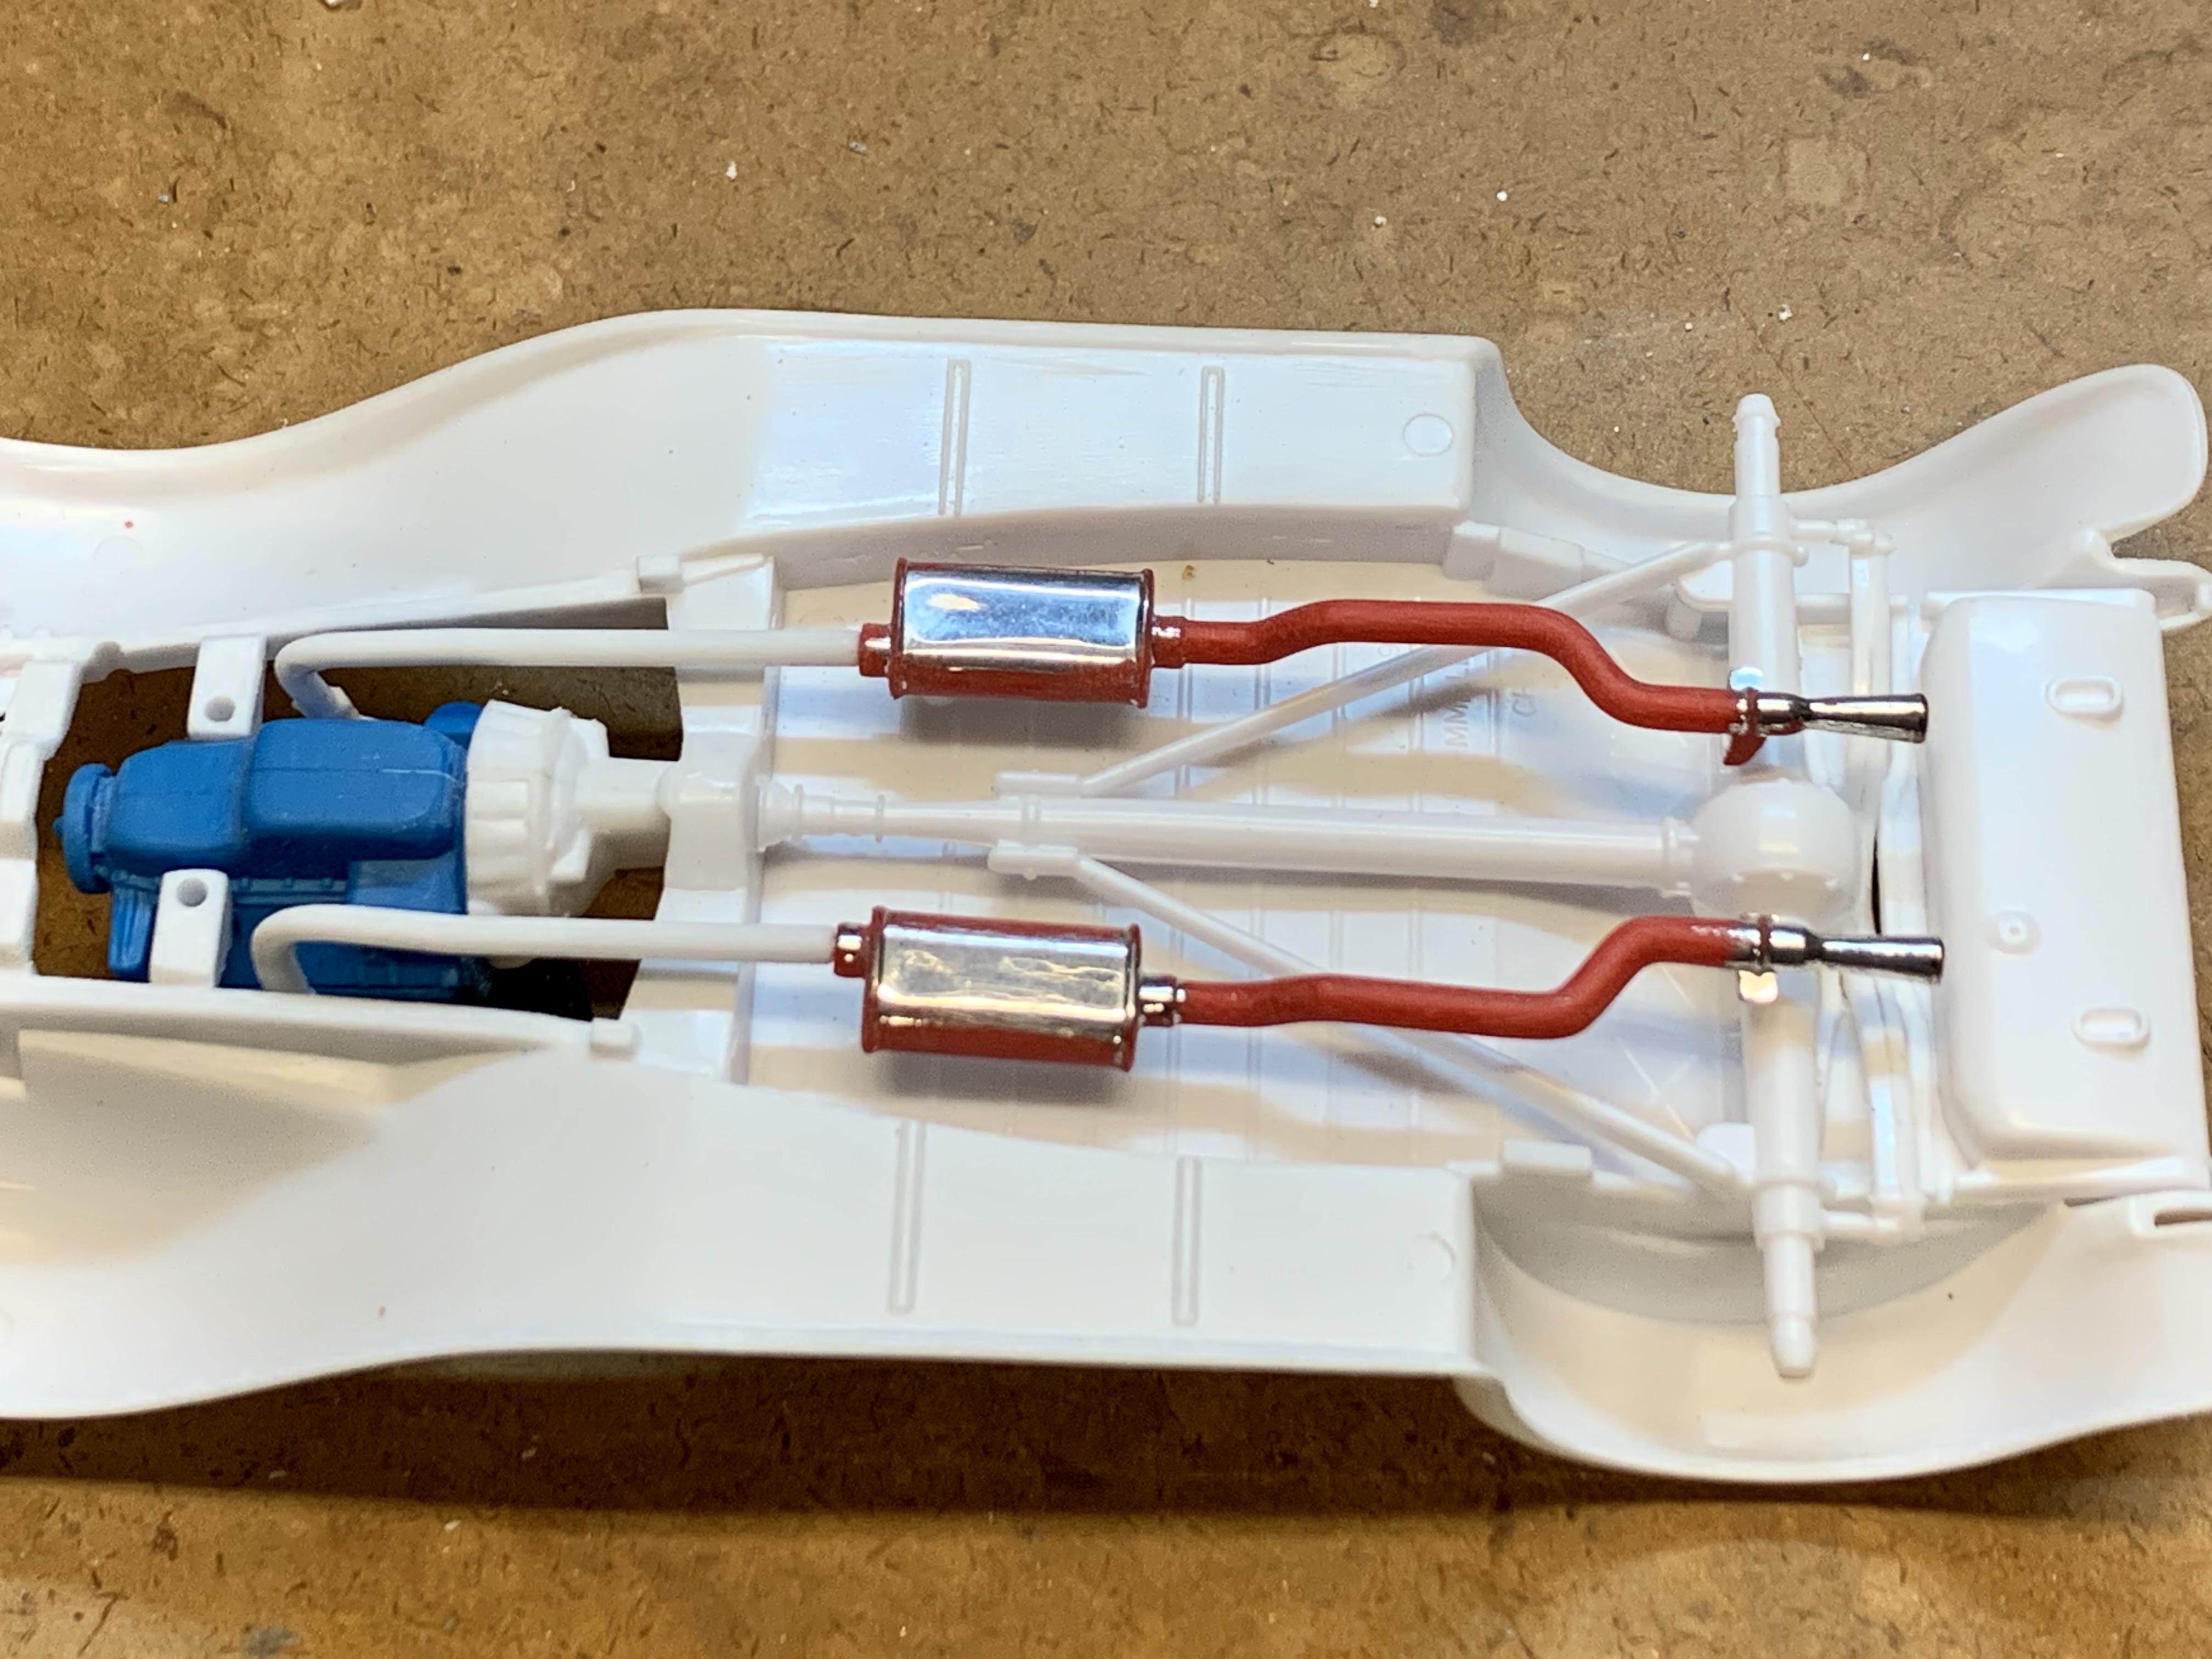
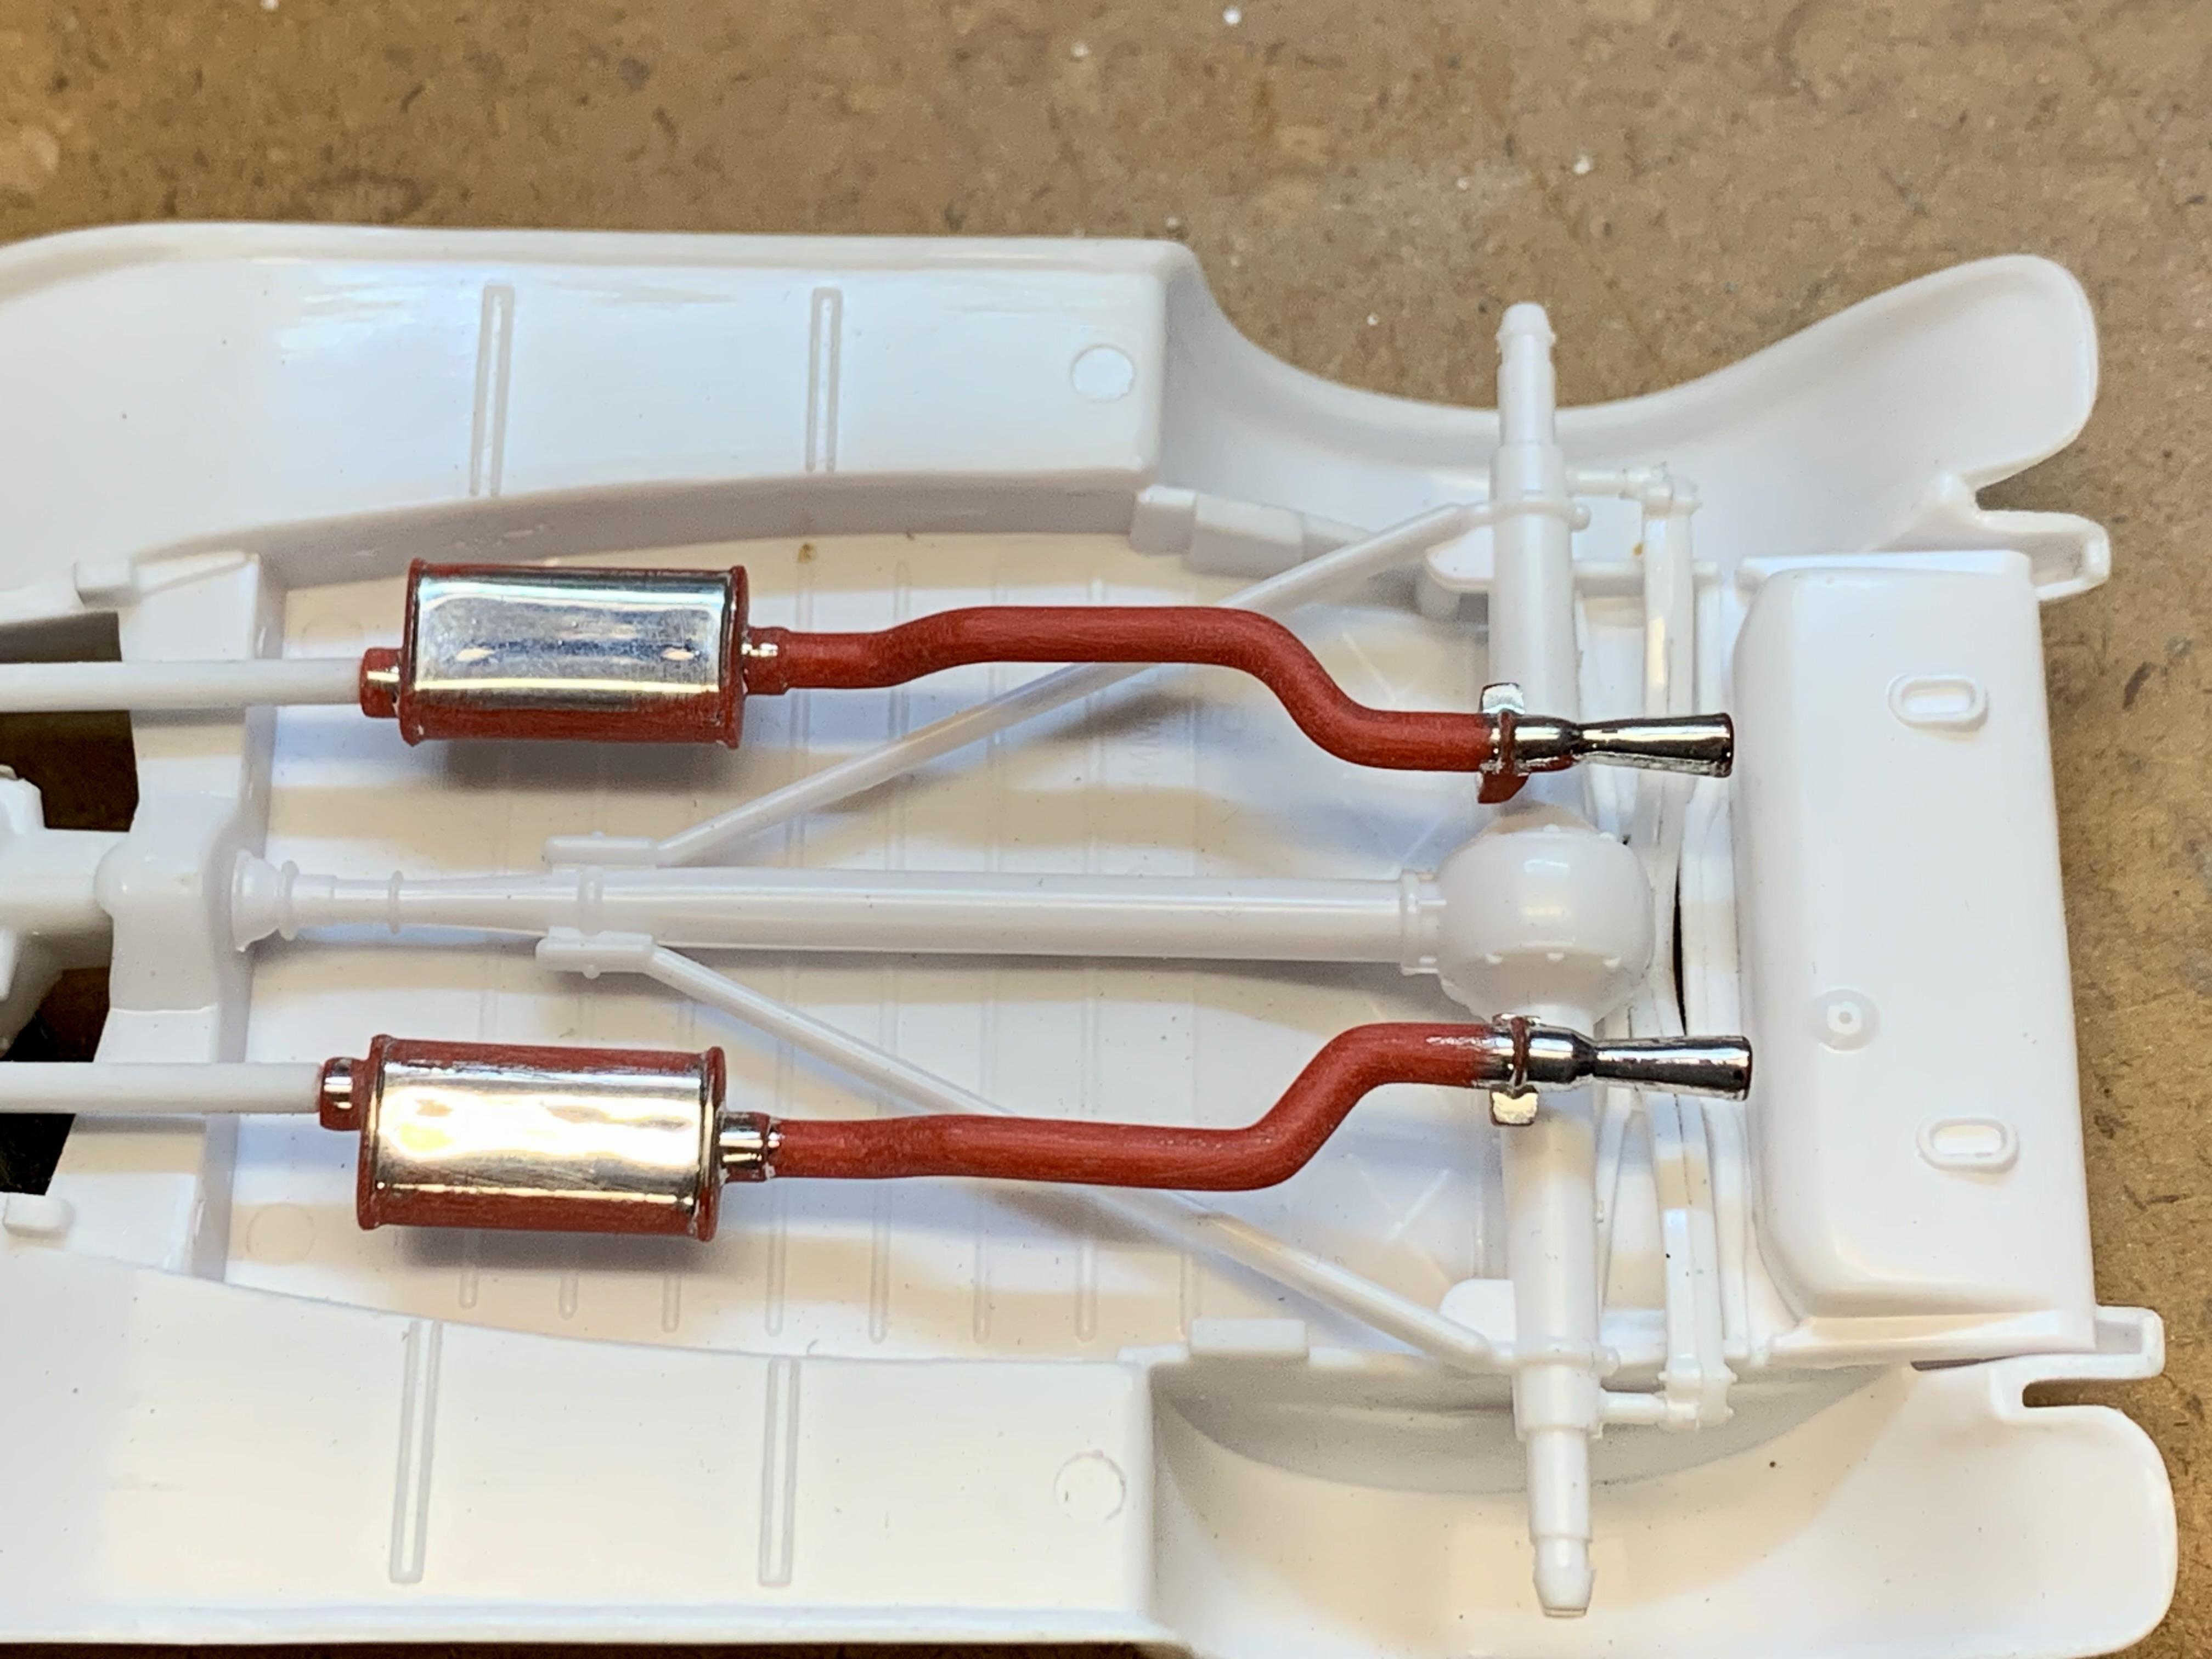
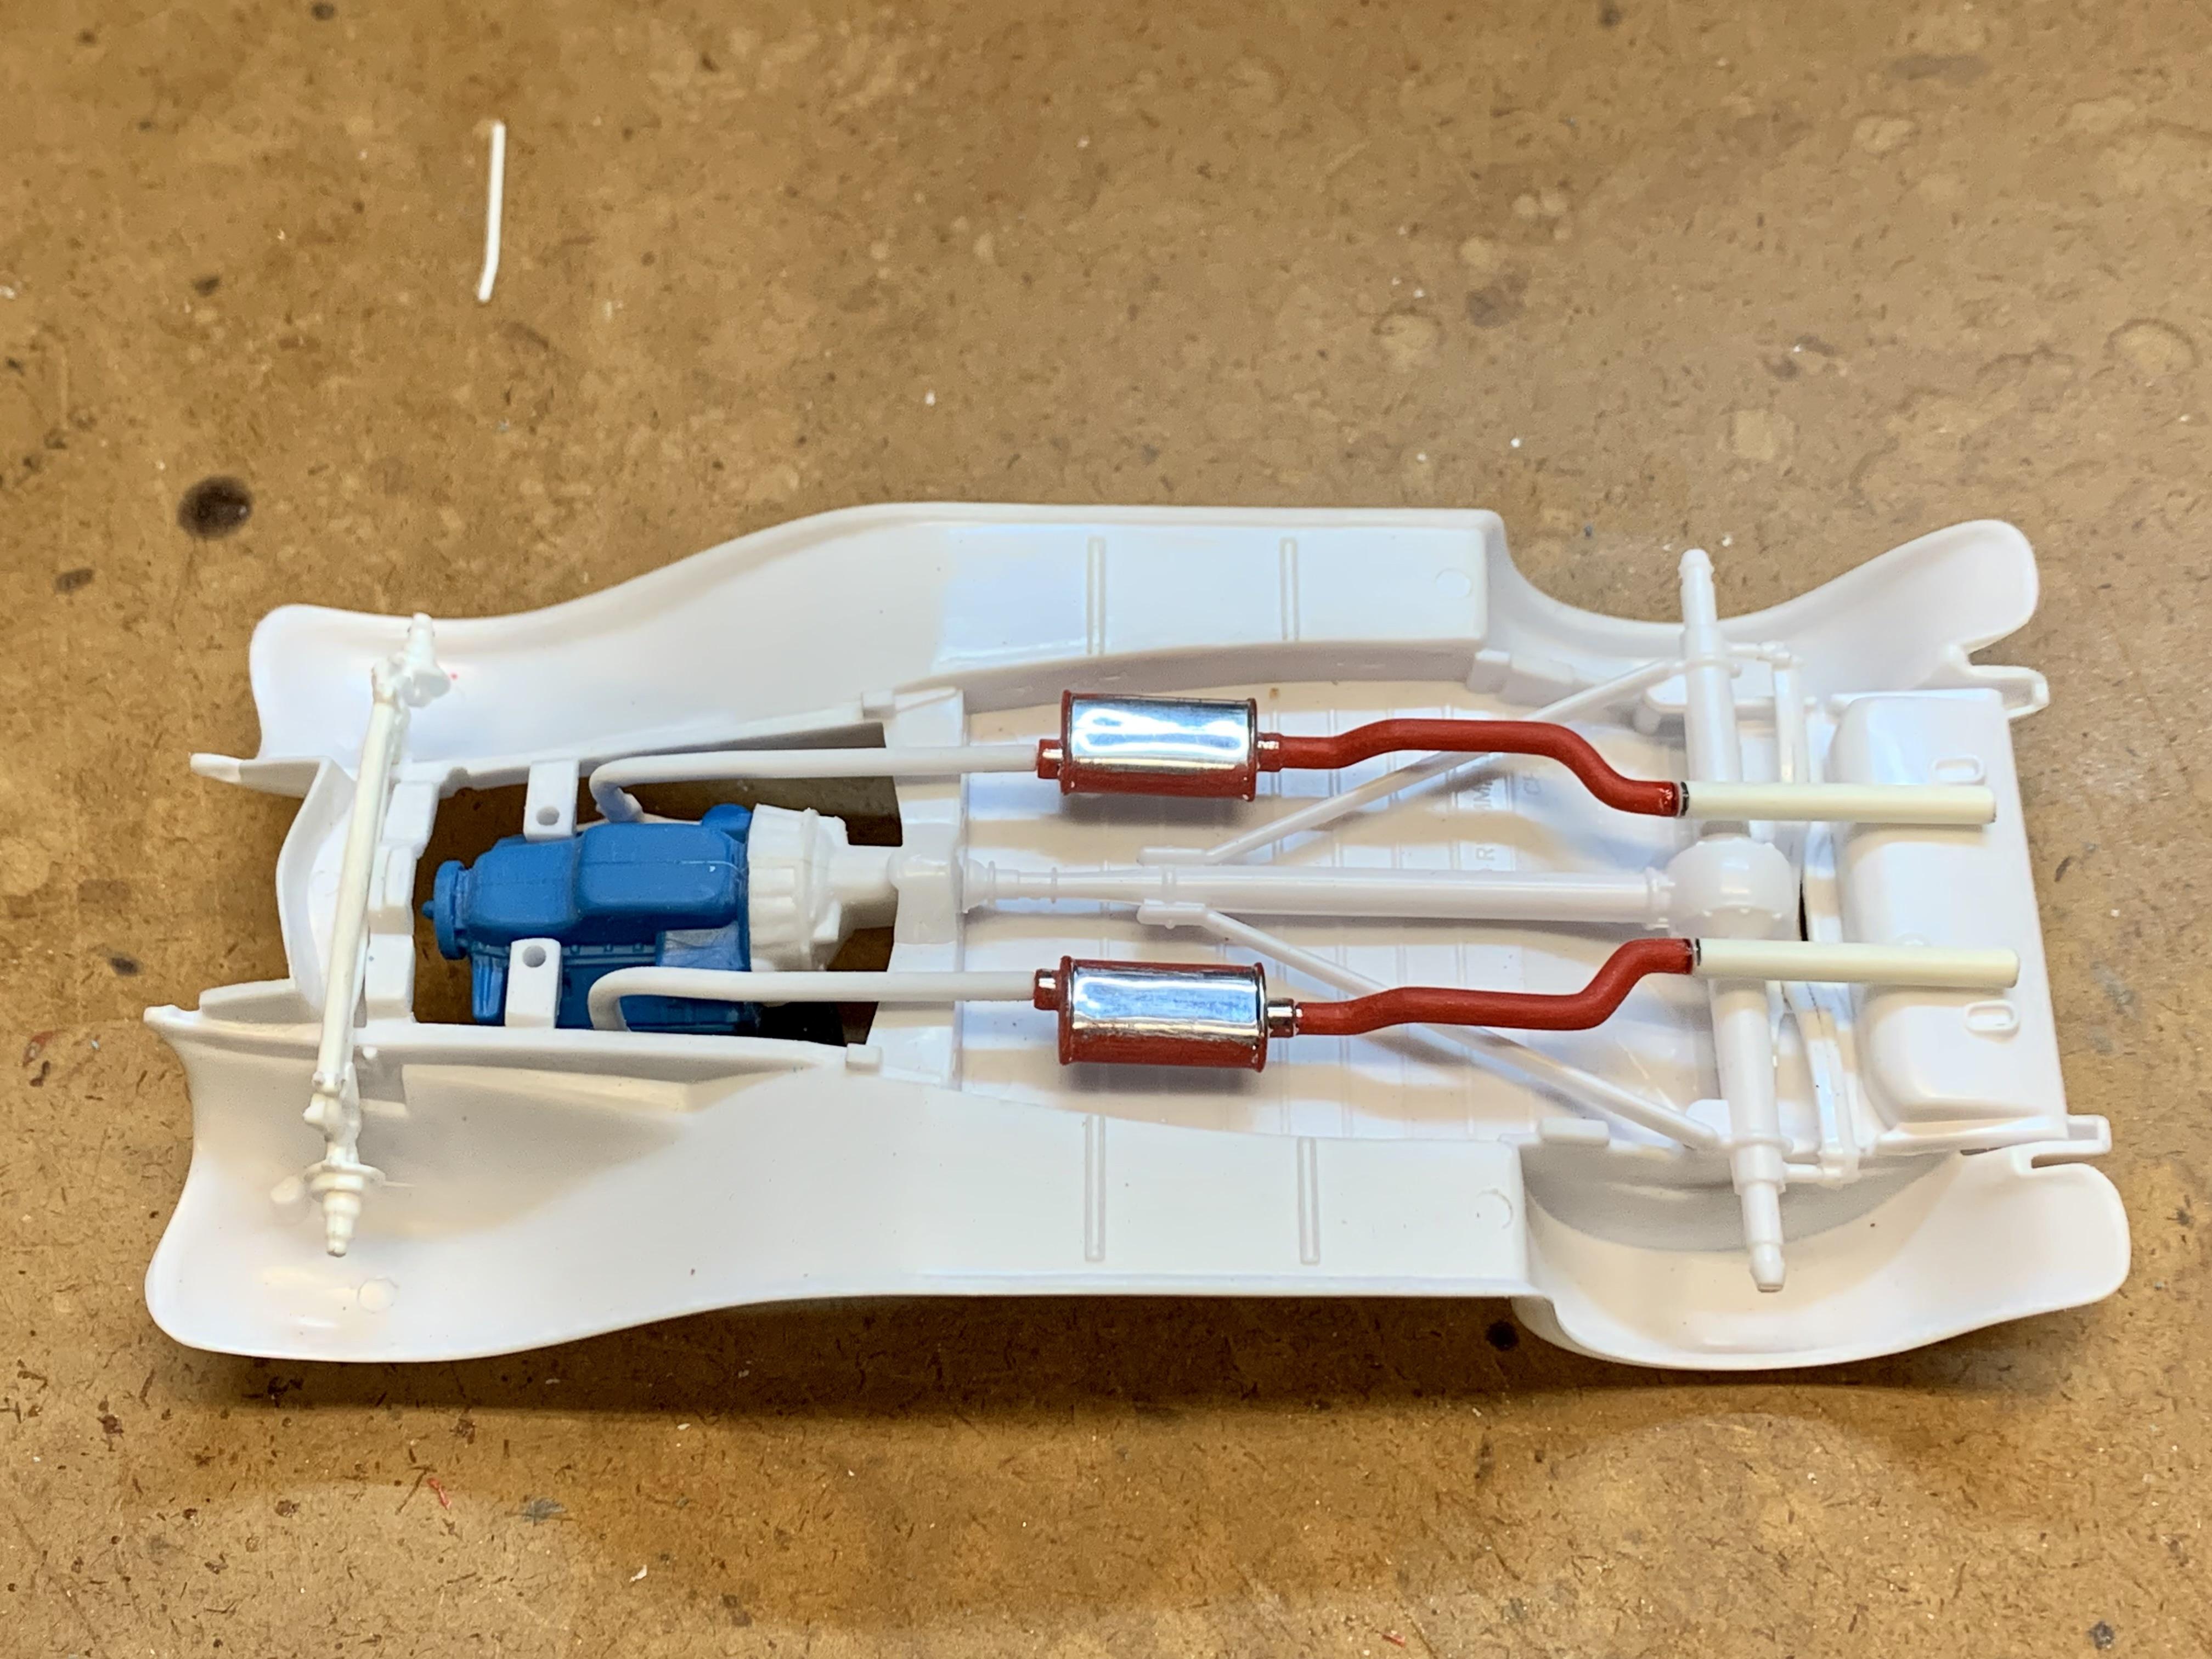
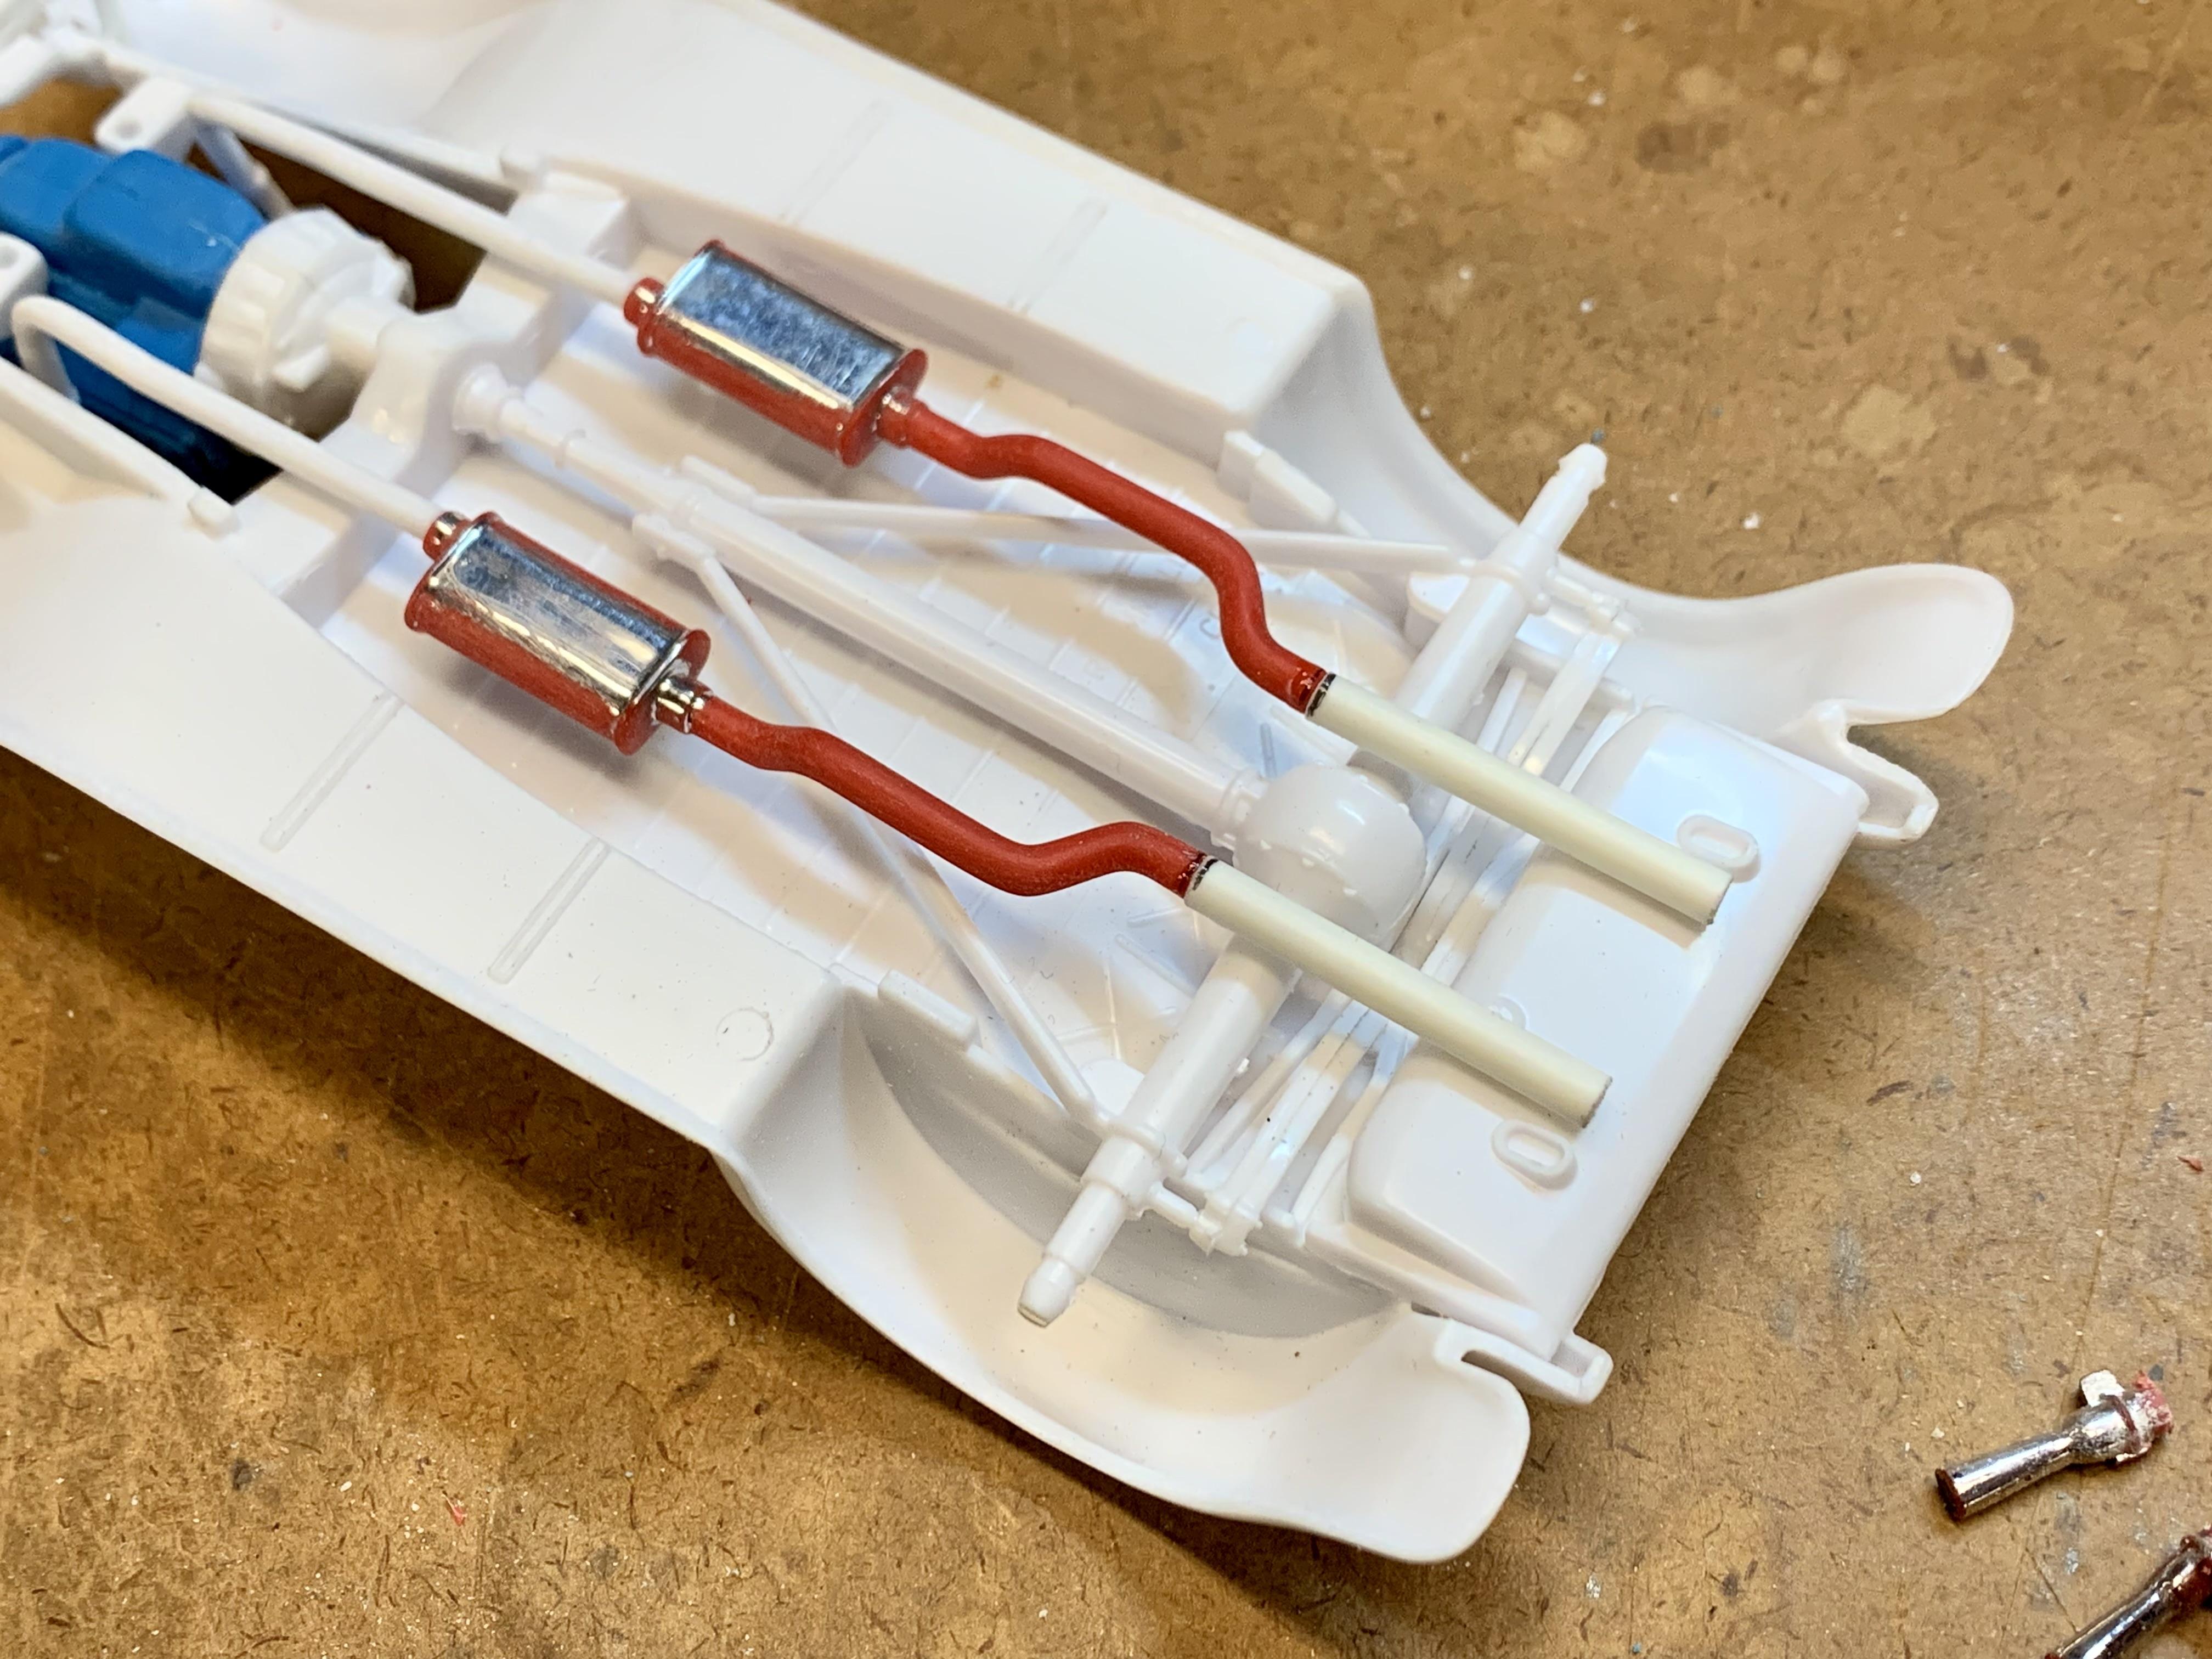
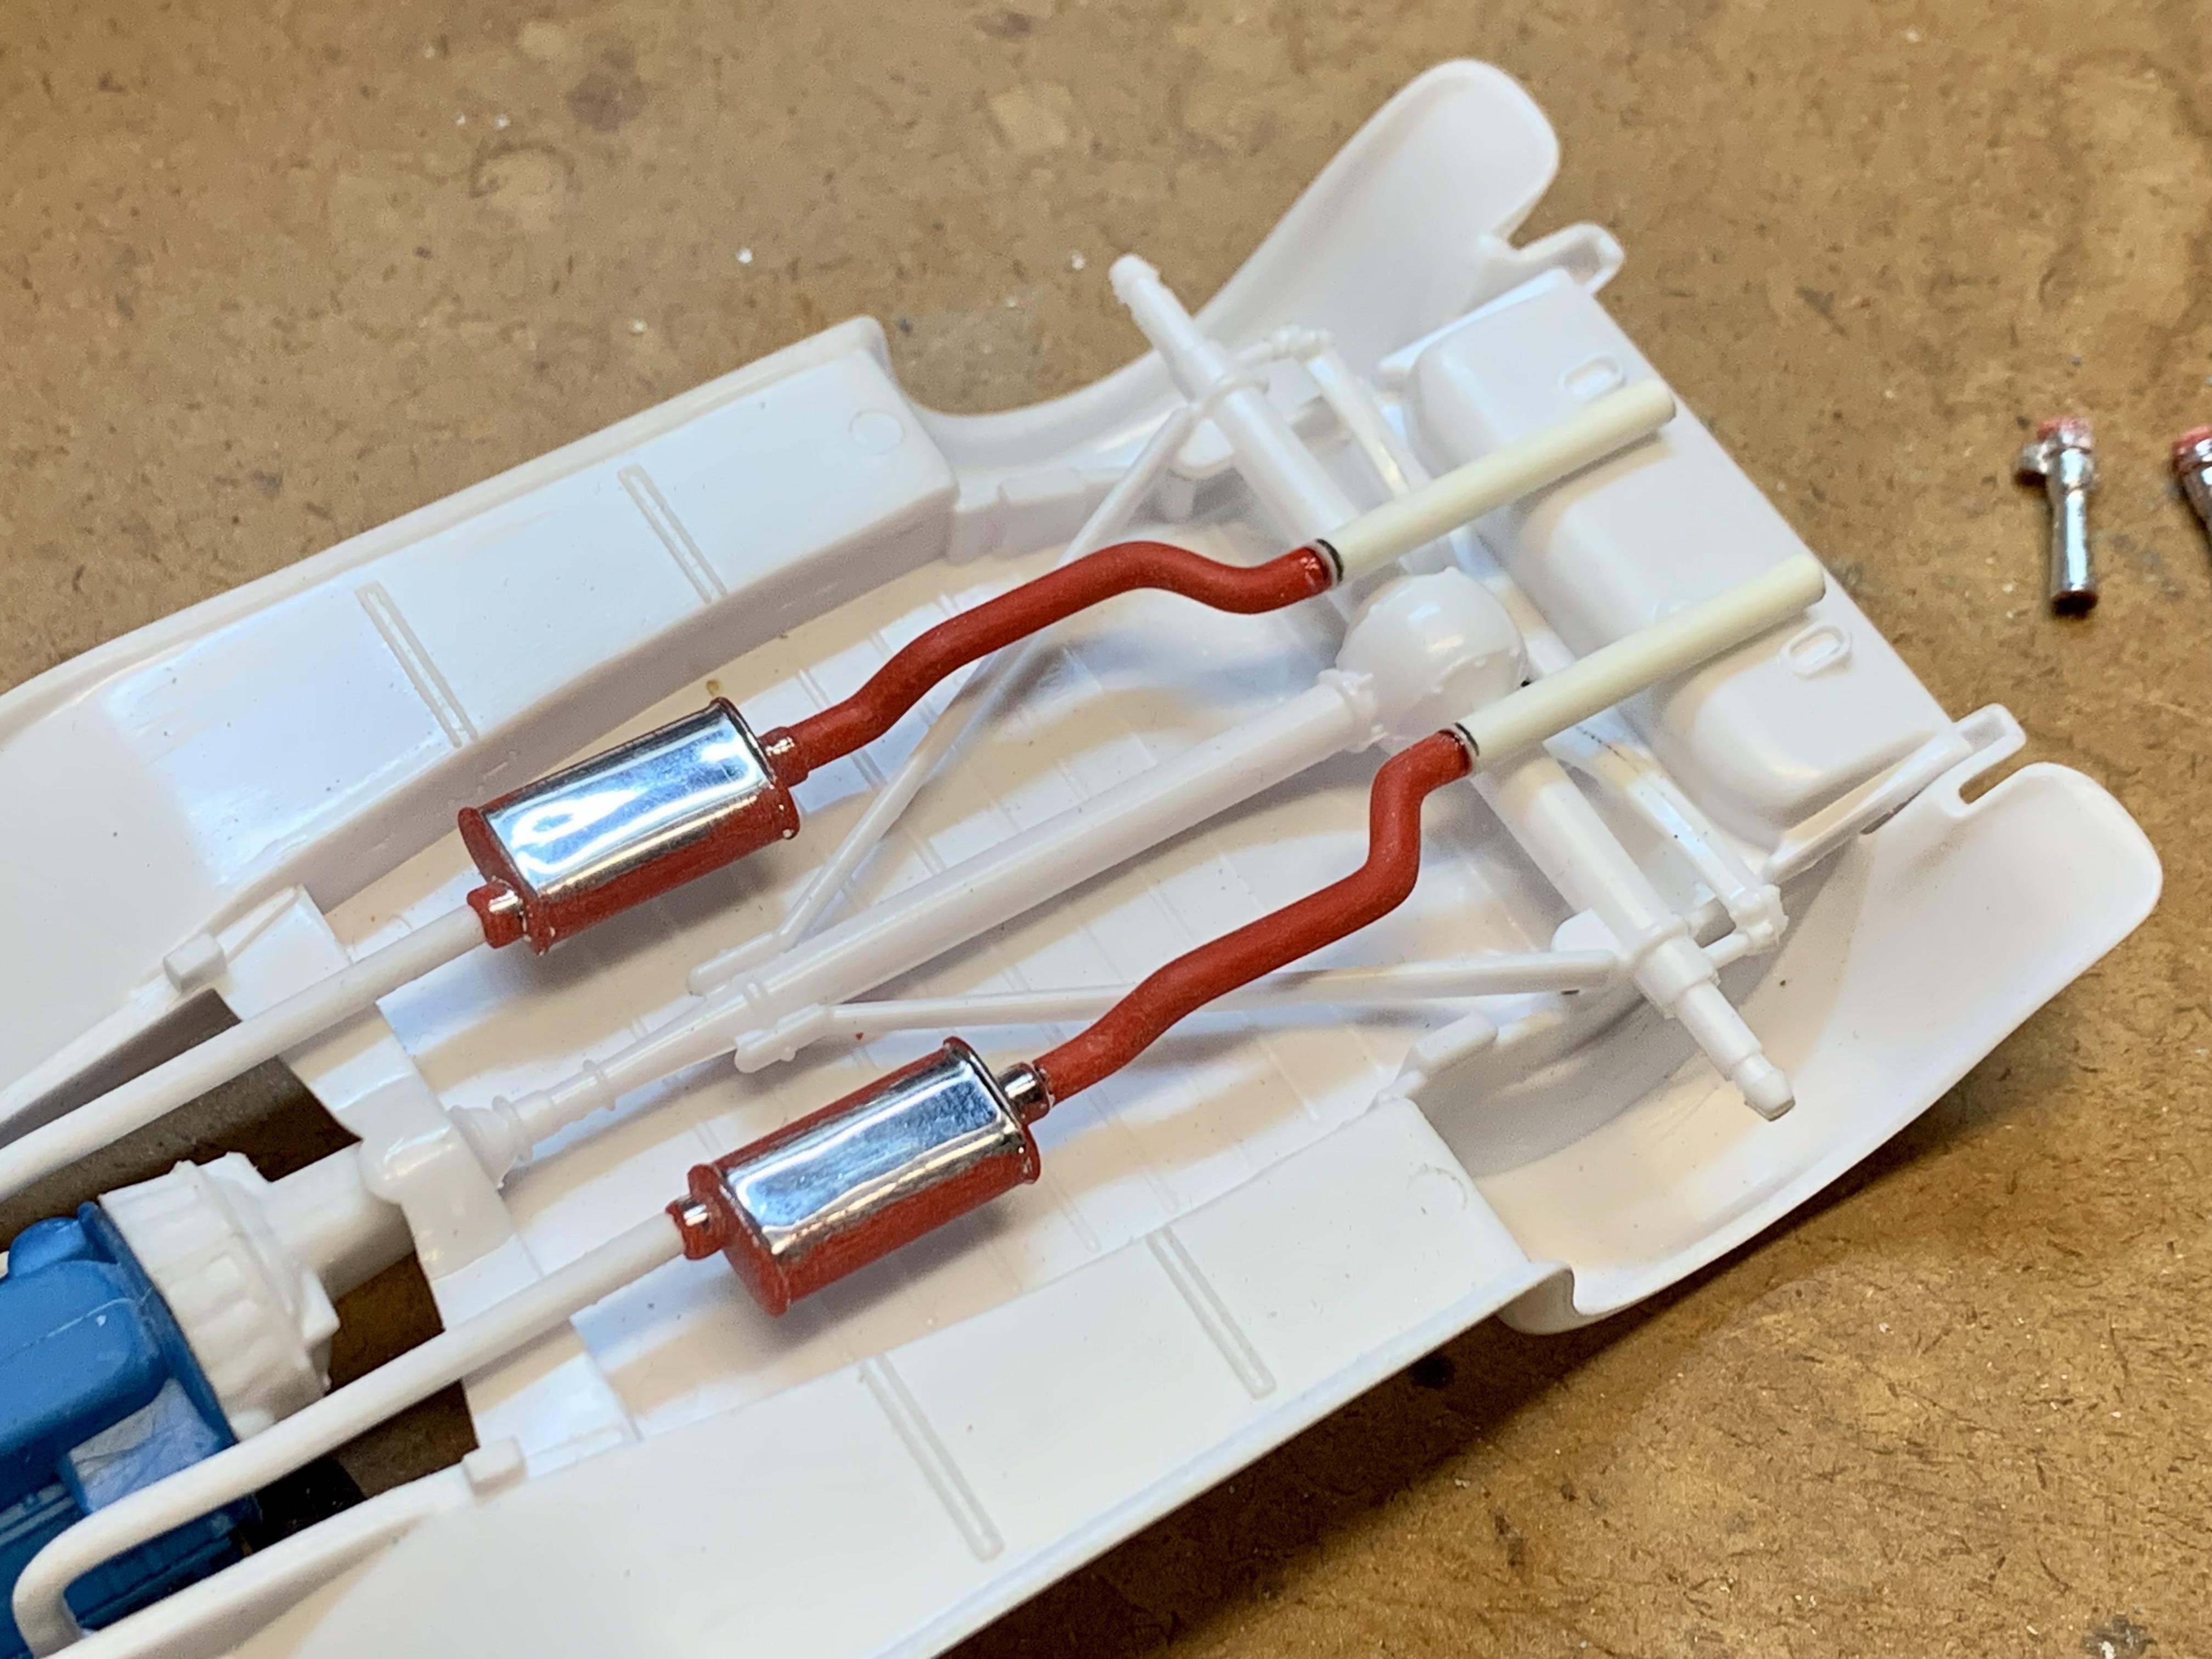
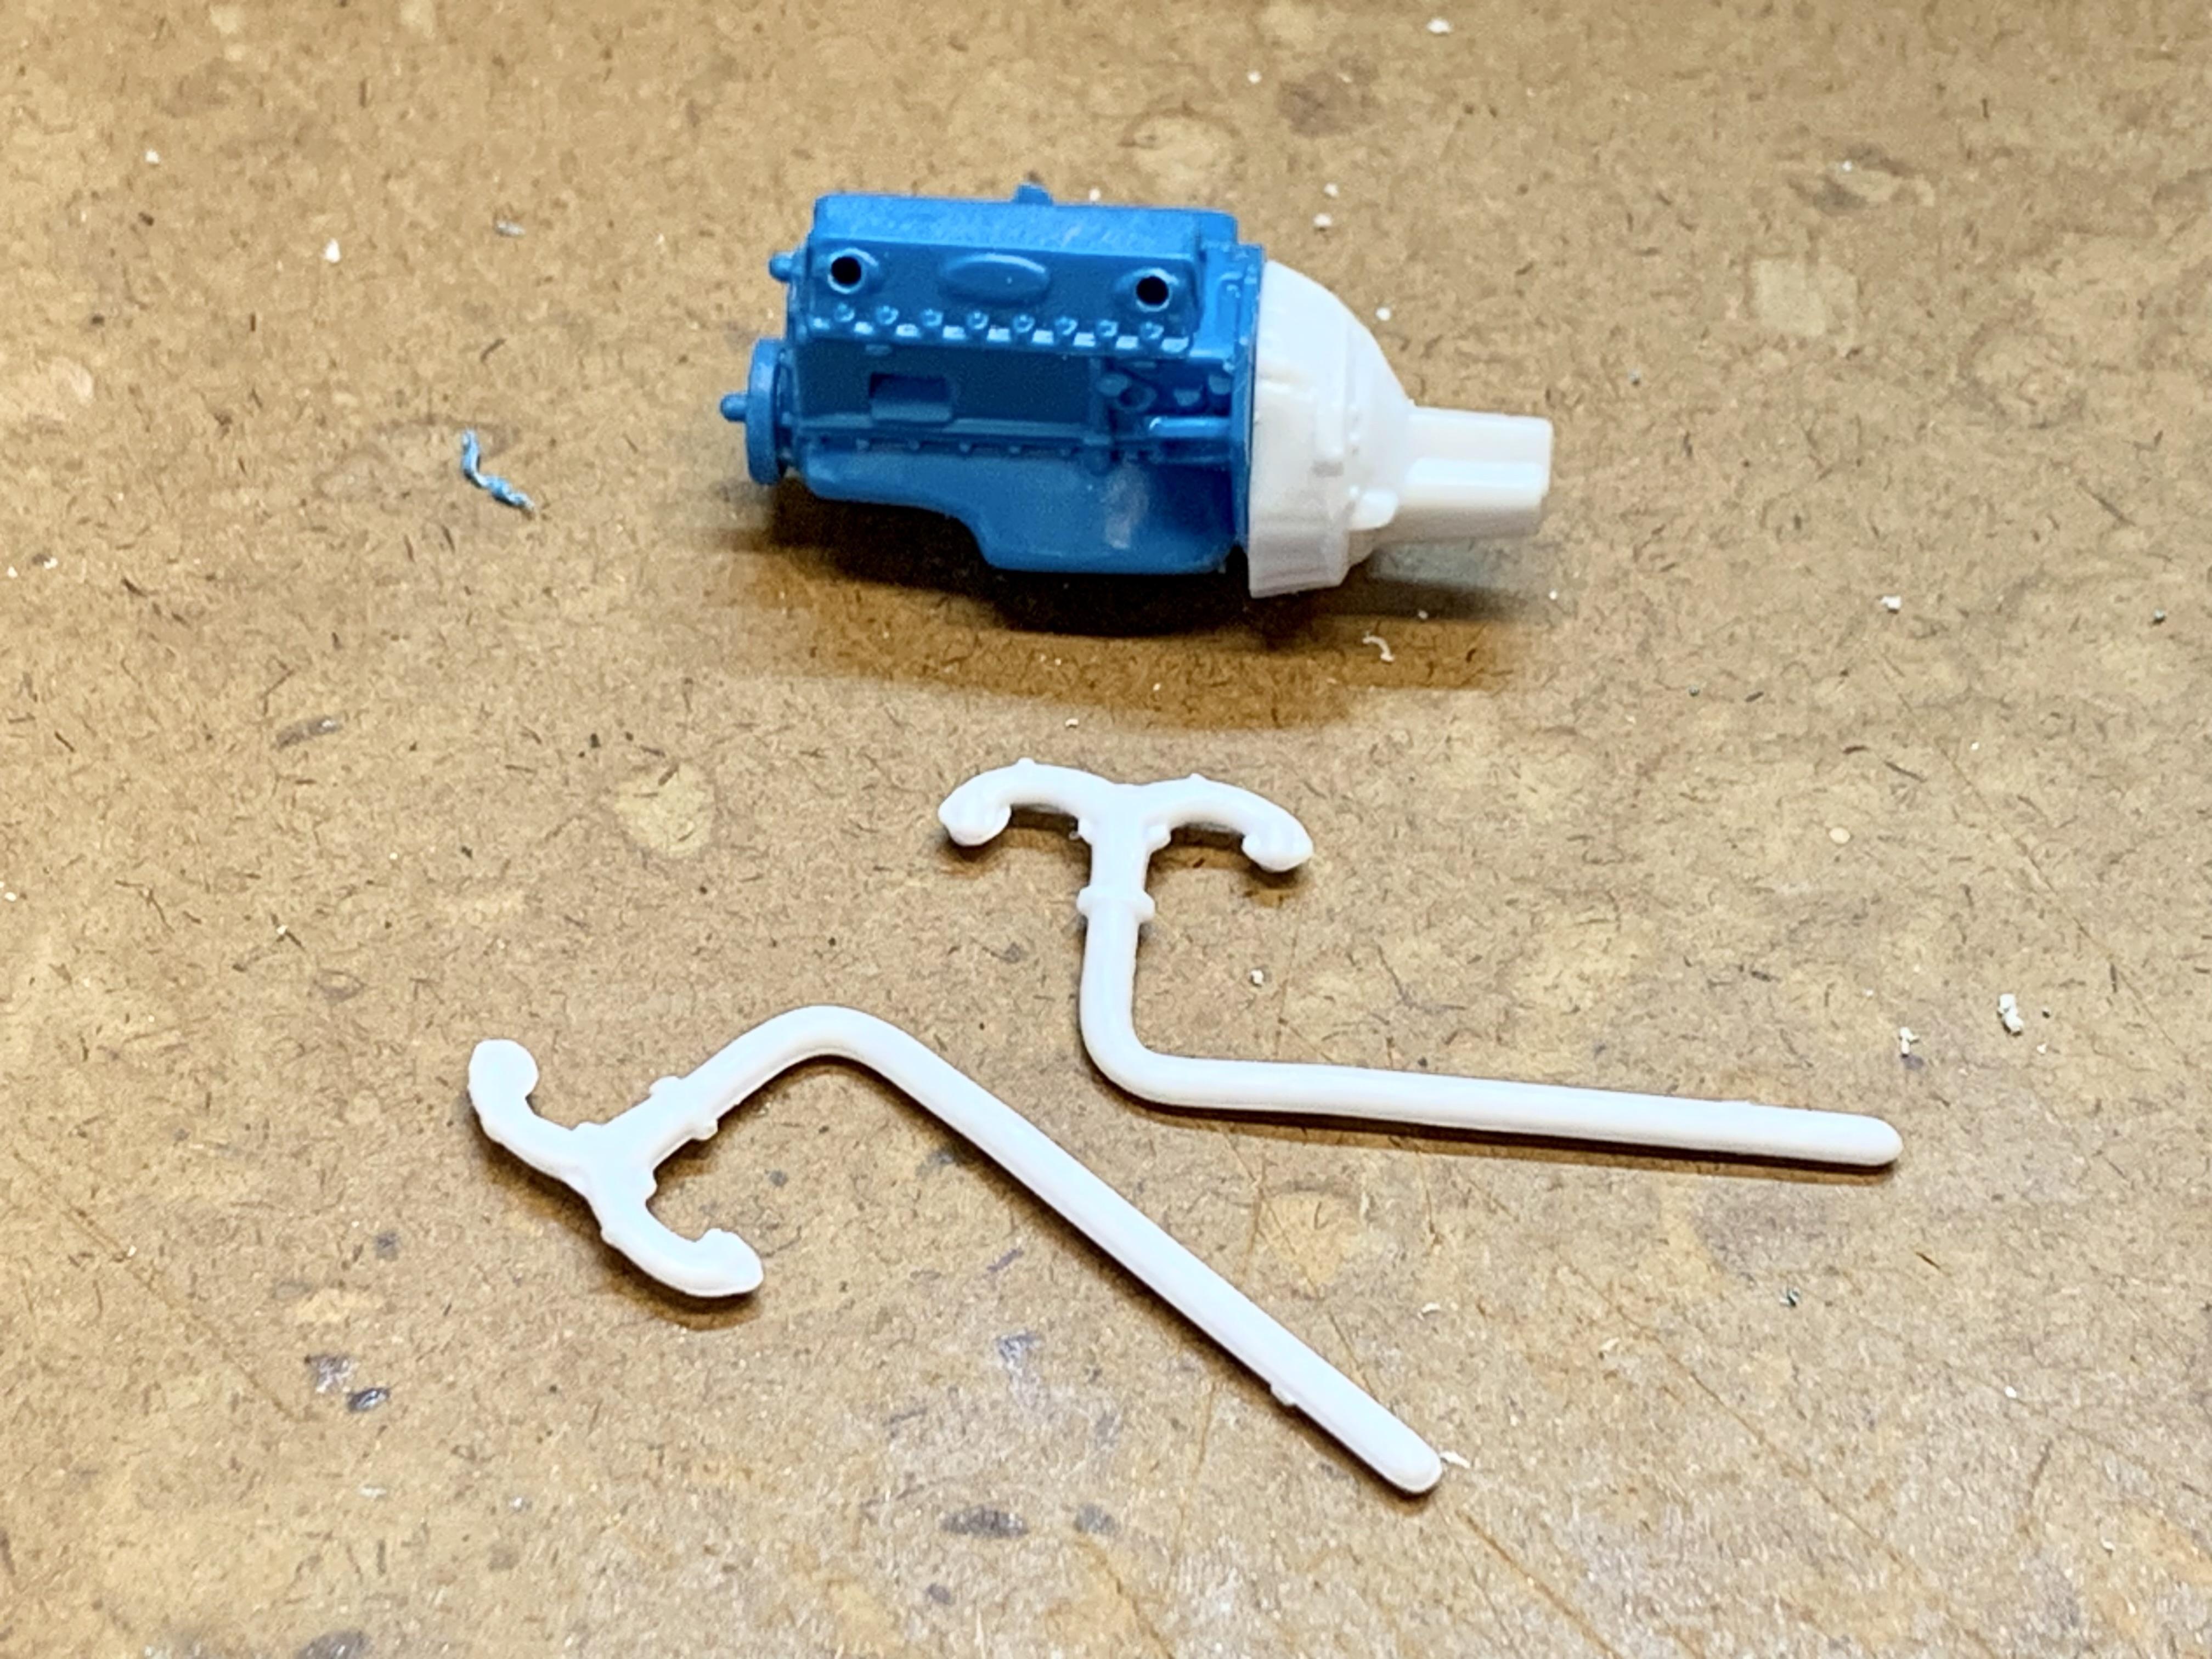
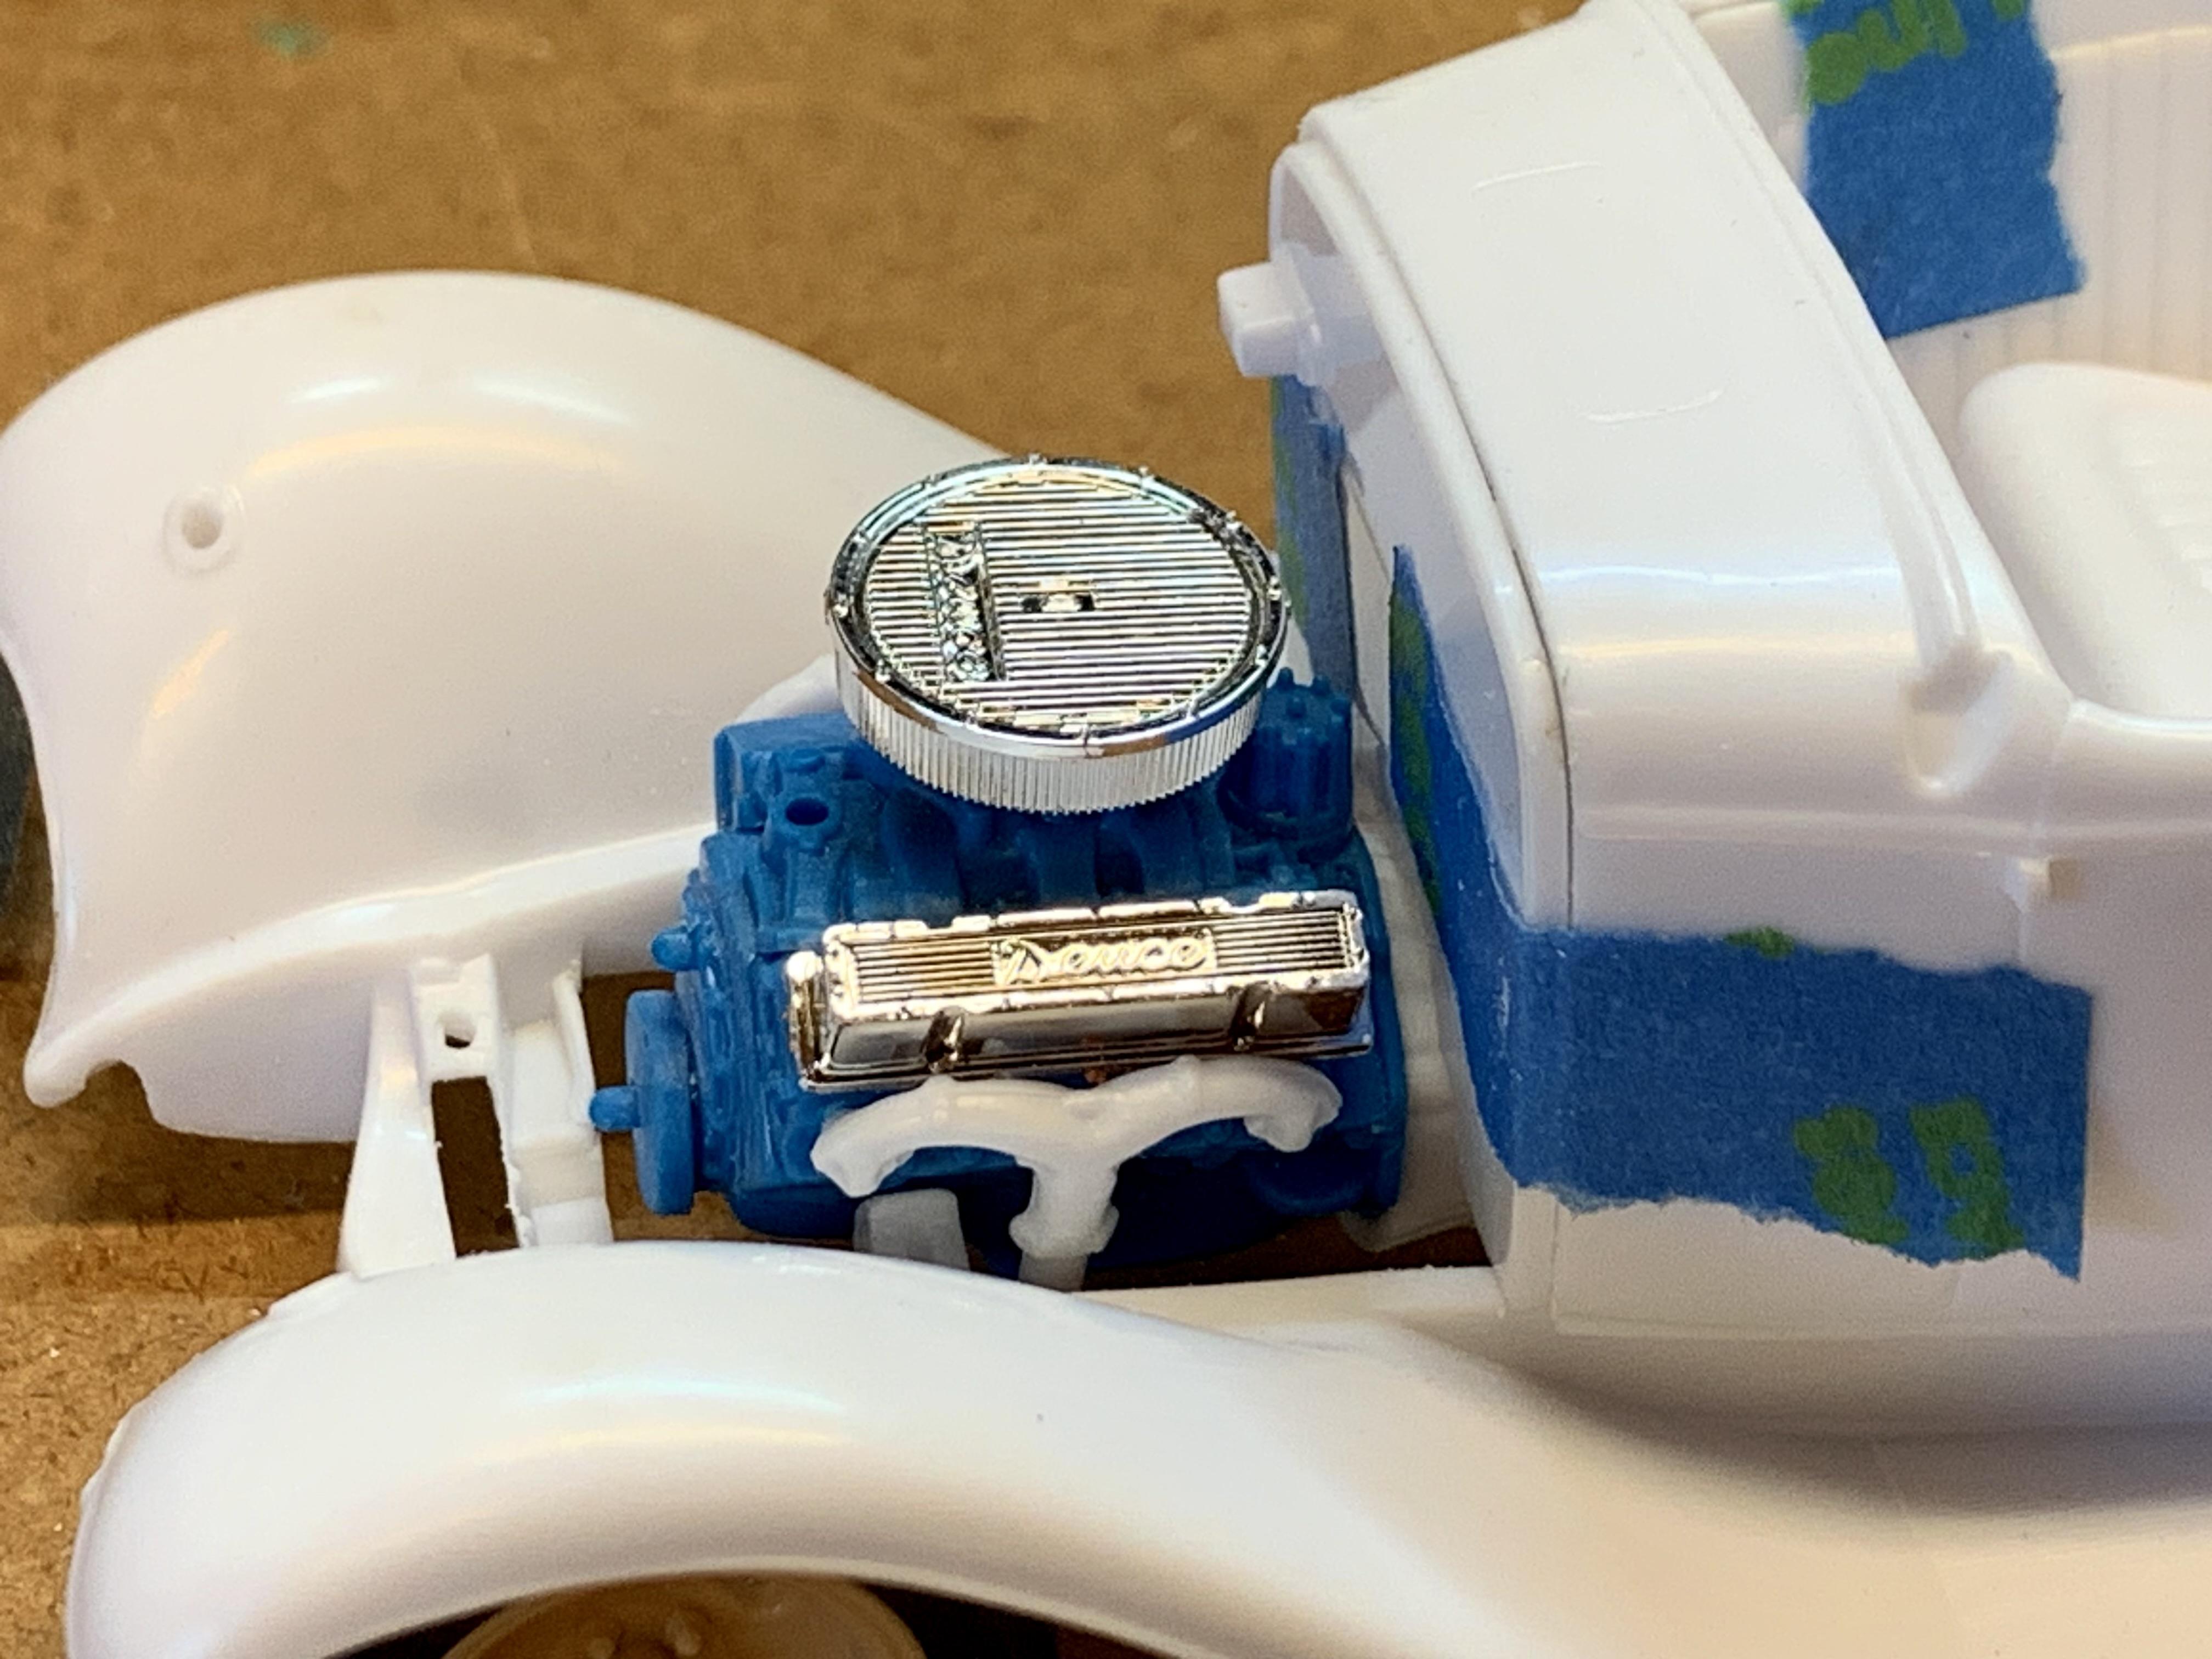
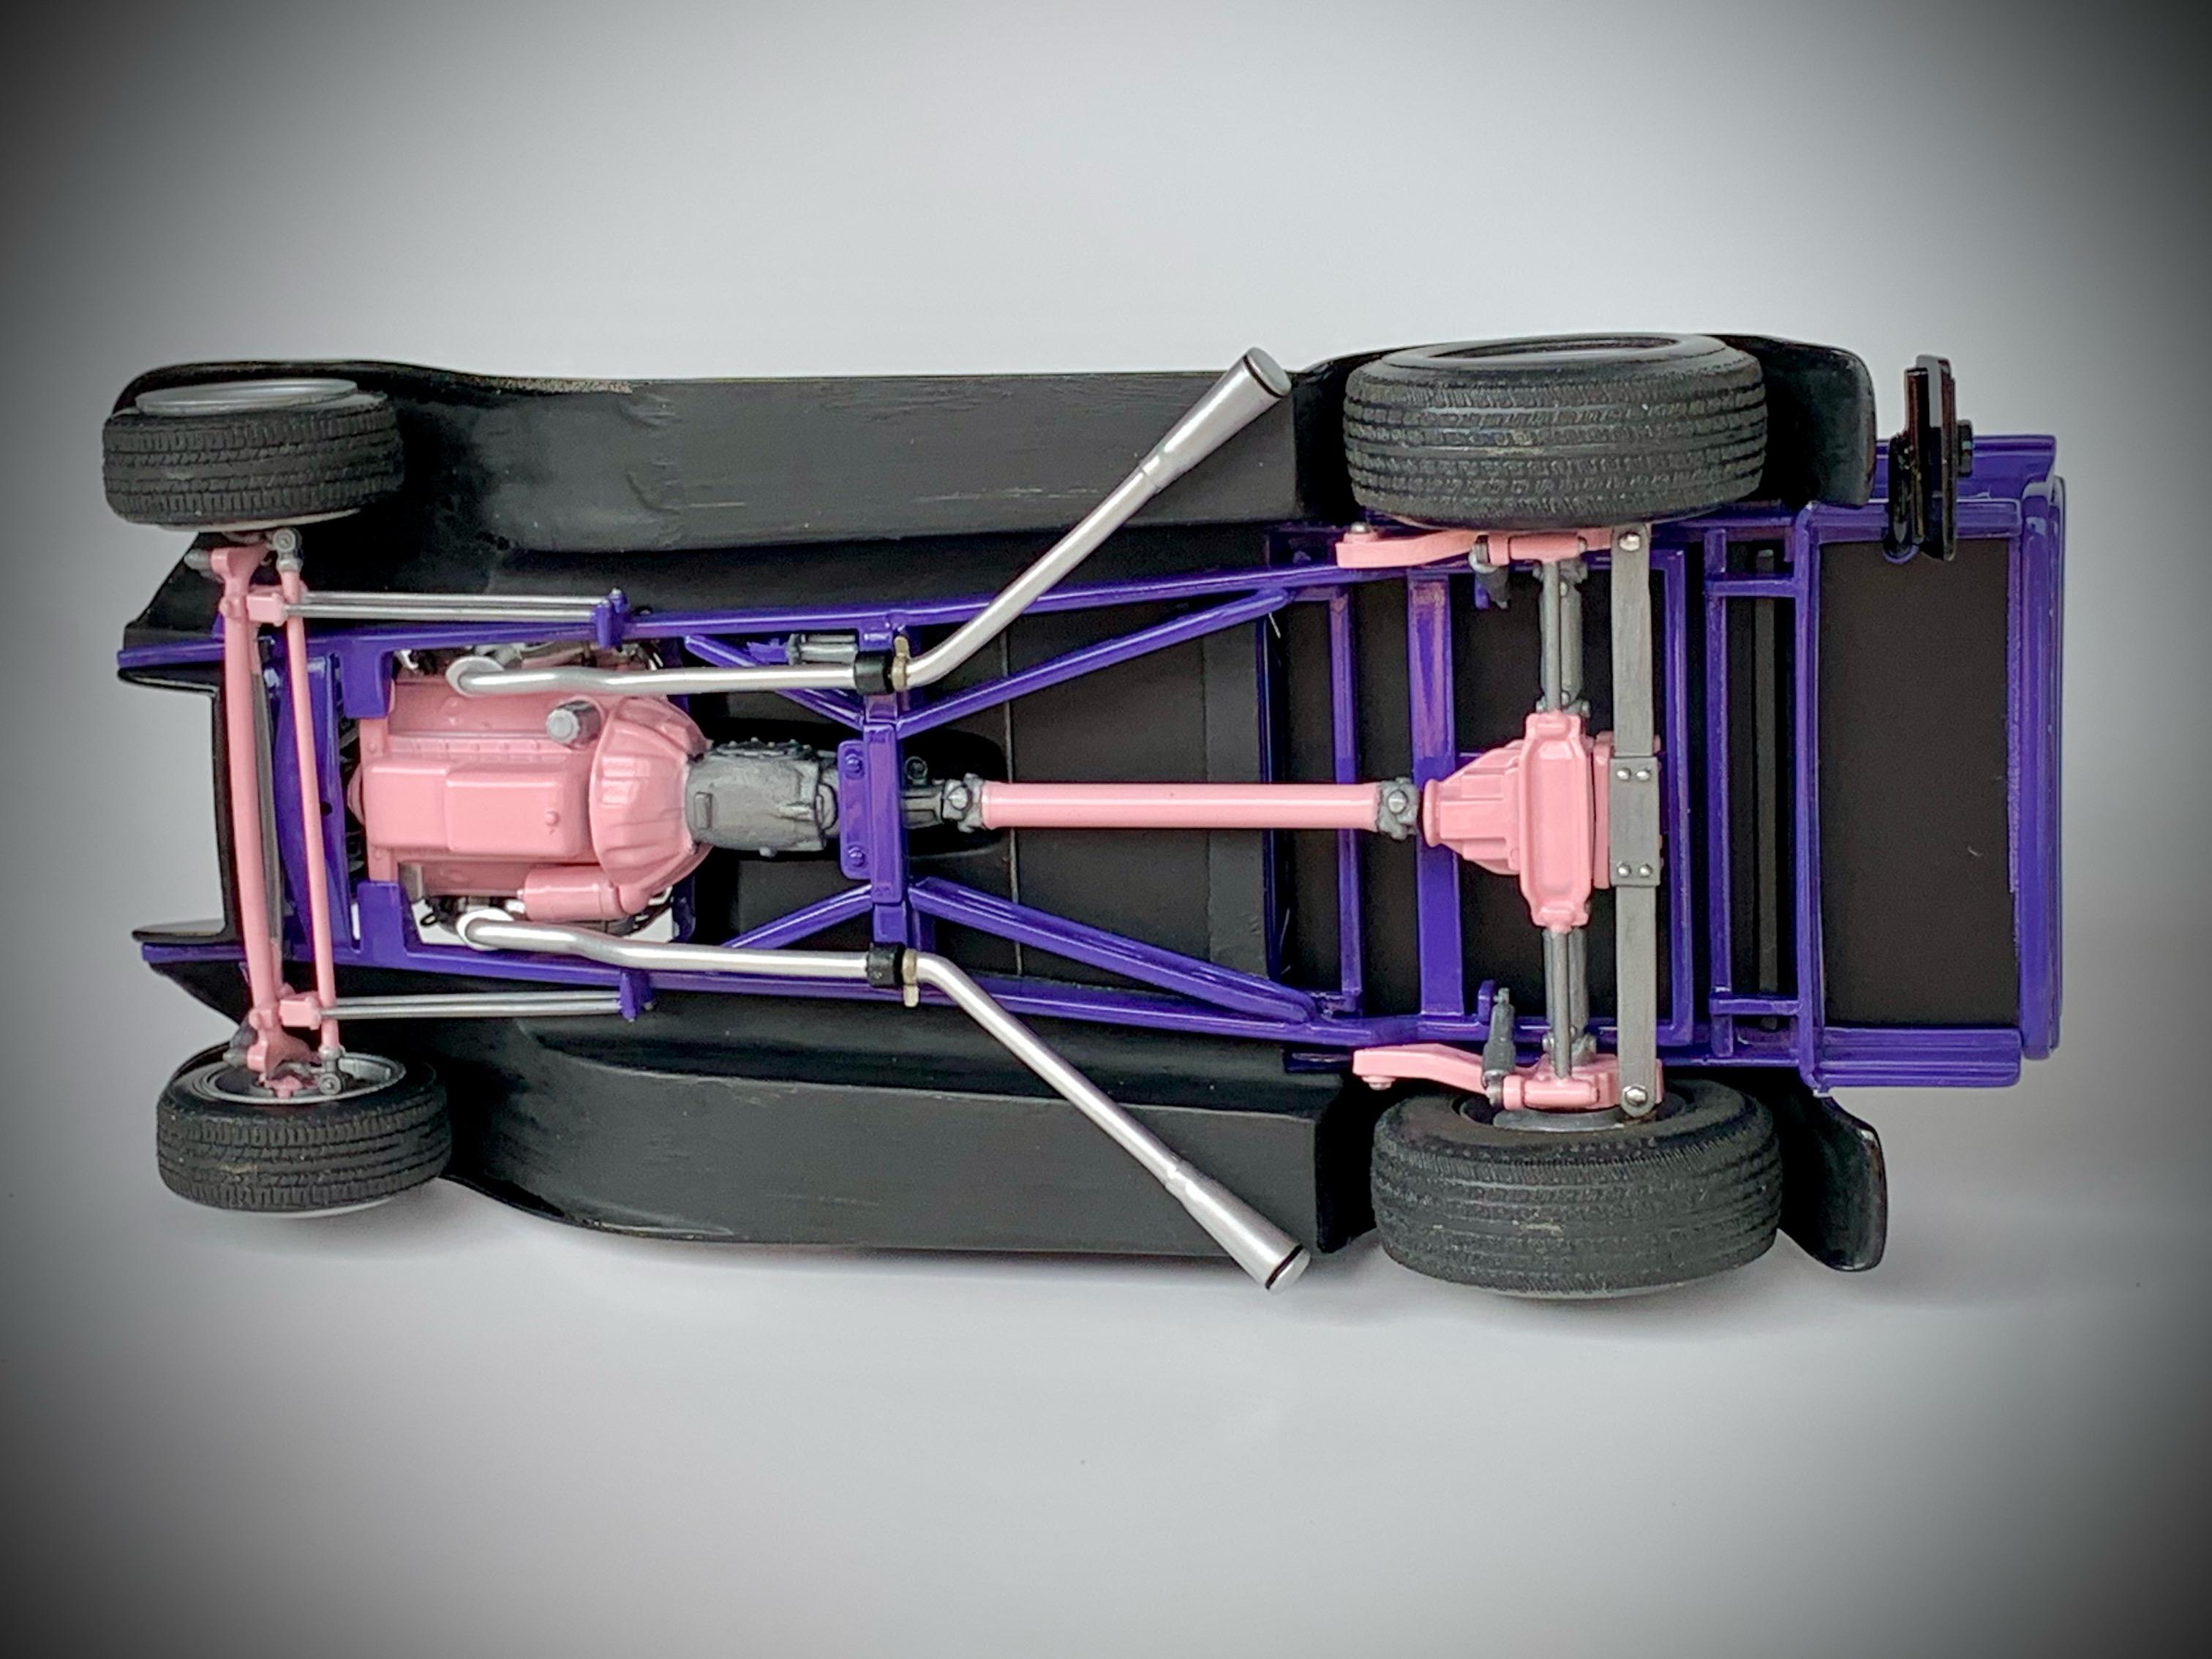
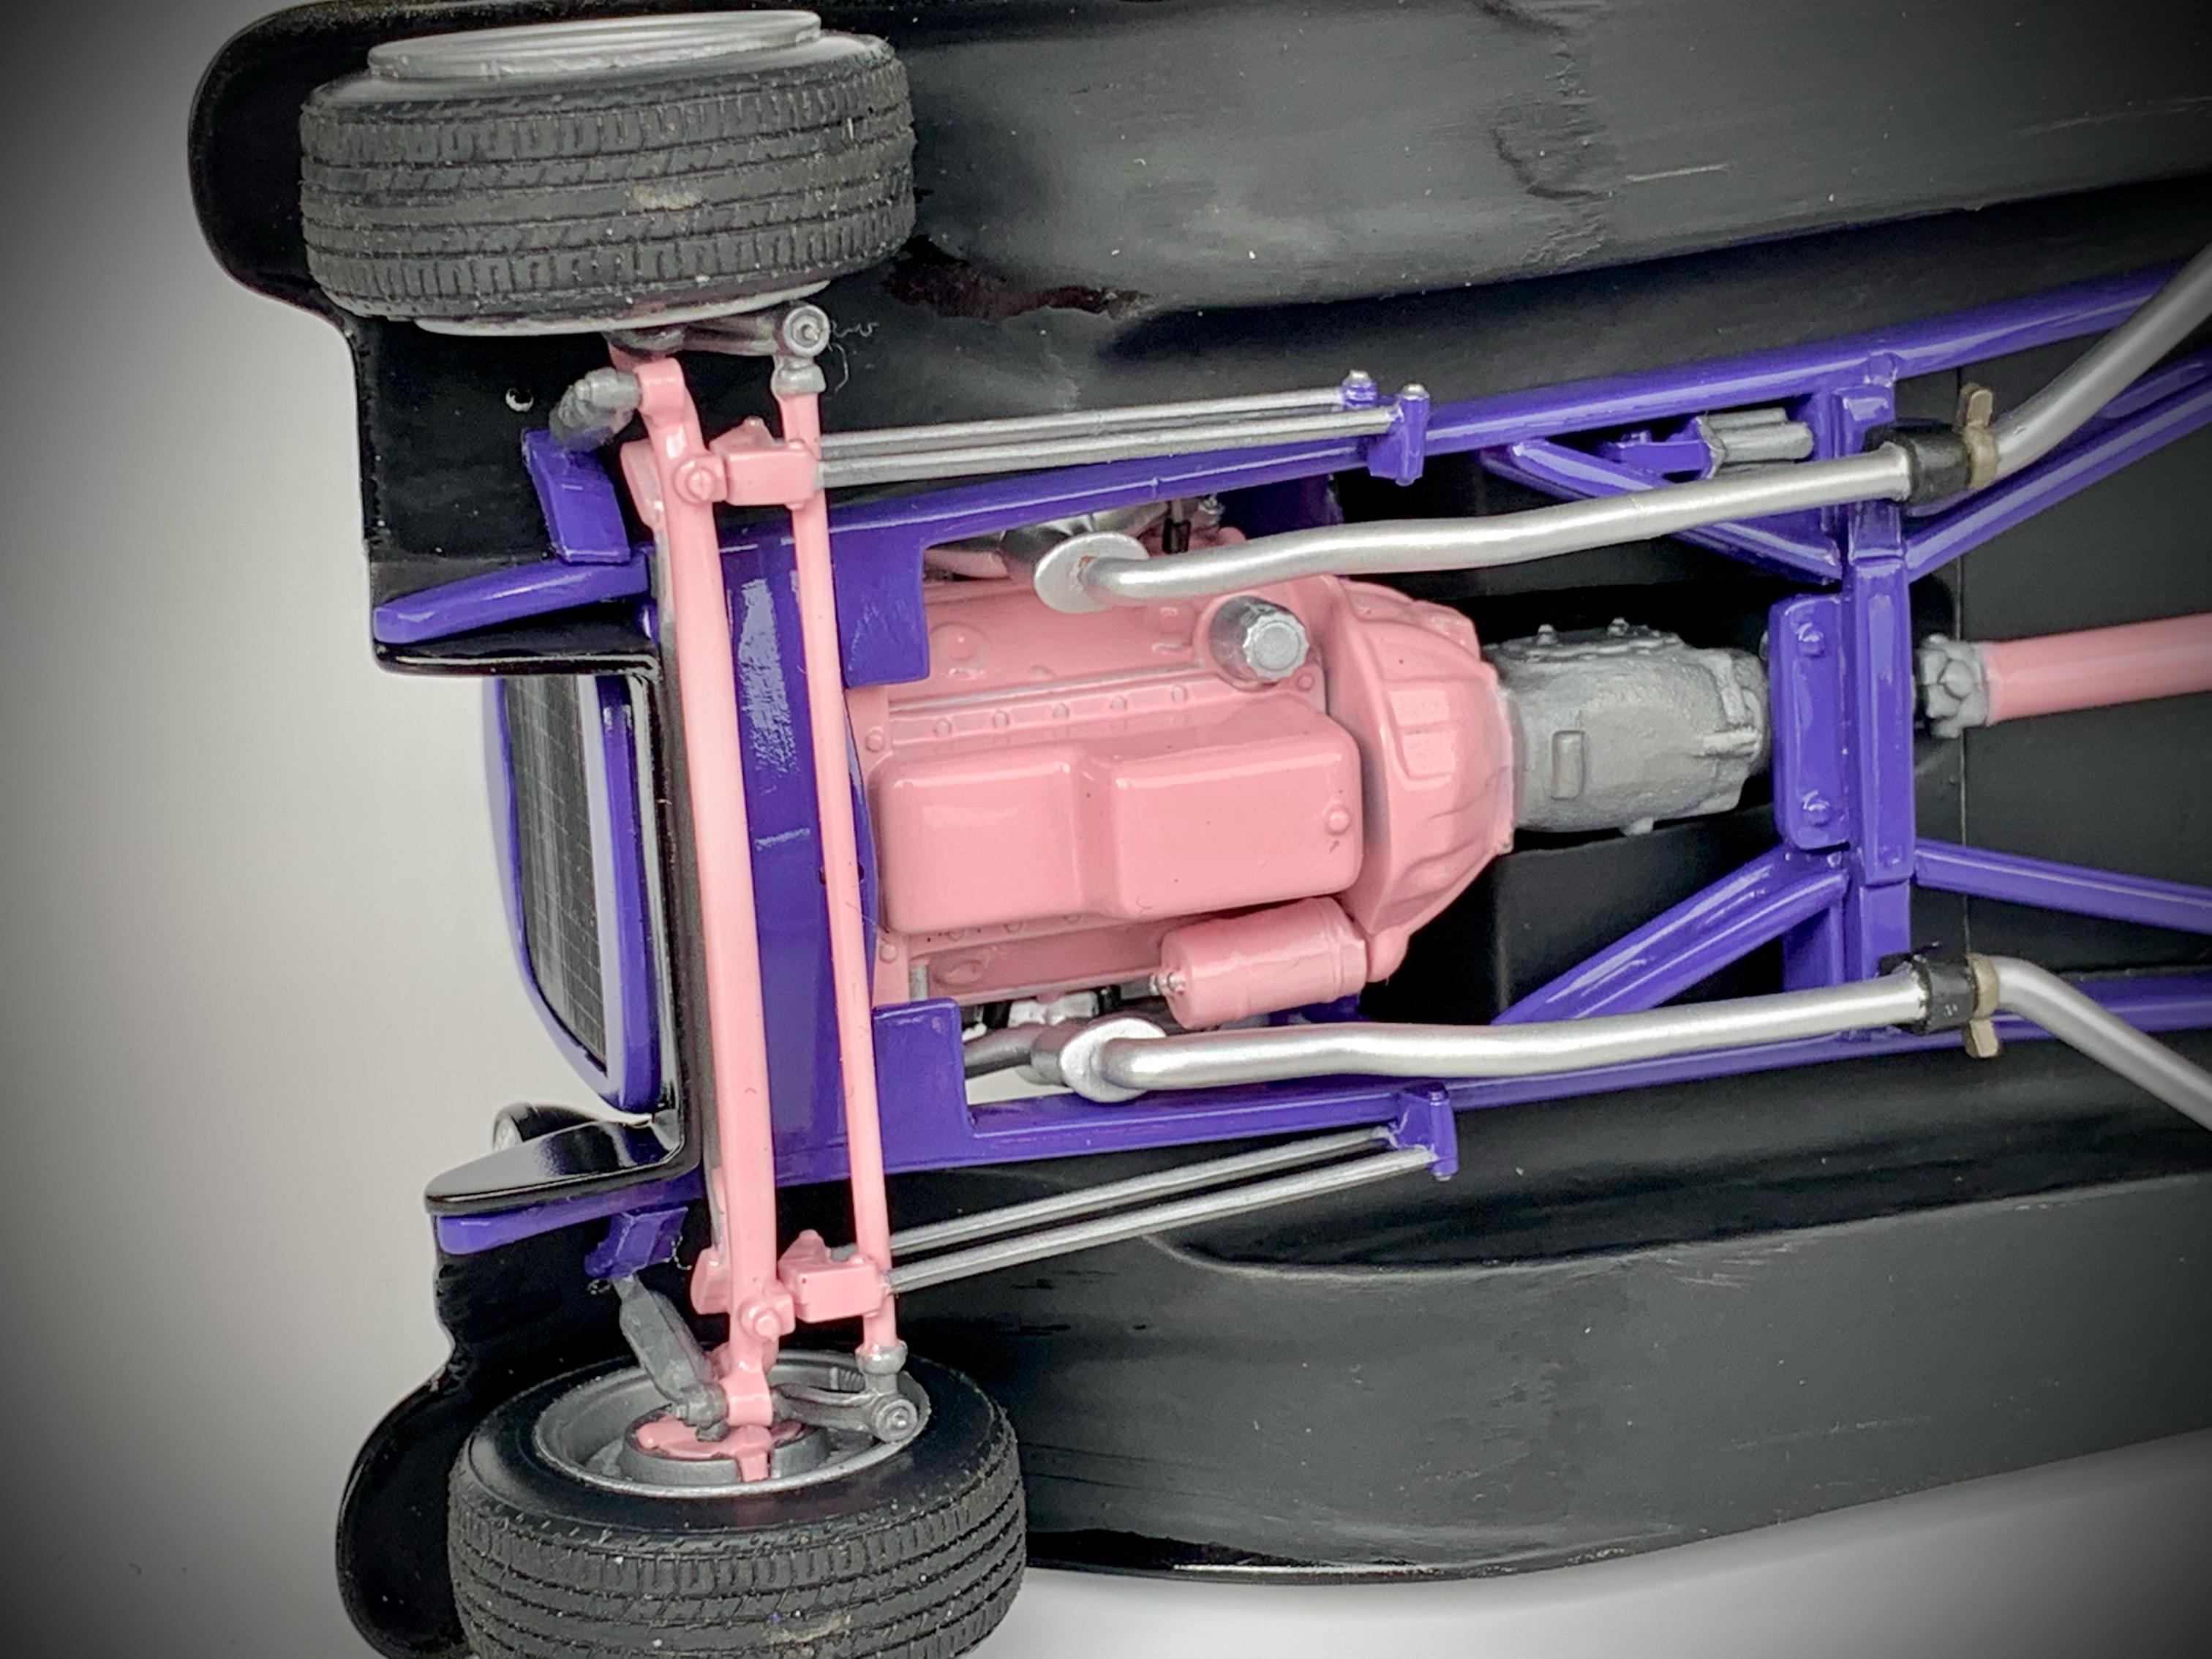
Thanks for the comments, everyone! Looks like there’s a few people that are fond of the old Monogram 32 Roadster. Very cool. Had some bench time this afternoon and decided to get moving on the engine. Below is the lump of a small block included in the kit. Minus the chrome dress parts it’s a whopping four pieces! Even though I’m on a mission to keep this model simple I’d really like a better detailed engine. Probably the best 1:24 hot rod kit Chevy small block of the 80’s & 90’s is from the Monogram 1937 Ford’s, this one being from the blue molded Convertible with Trailer. And while this engine comes with a very nice pair of Sanderson block-hugger headers I’m going to use the Roadster kit manifolds and head pipes. For dress up parts I’ve chosen the Edelbrock Elite-style air filter and valve covers with custom “Deuce” script taken from the maligned Monogram Beach Boys Lil’ Deuce Coupe kit of the late 80’s, which is actually the Roadster kit with a poorly rendered 3-Window body and some other updated parts (notably a Corvette IRS, 4-wheel disc brakes and the introduction of the chrome steel wheels & caps found in the last few reissues of the Roadster.) The blue engine has a big automatic transmission which obviously wouldn’t fit the Roadster without a bunch of surgery. The Roadster kits small block is rendered with an adapter to a 30’s Ford 3-speed trans so I chopped both transmissions off and mated the 3-speed to the blue small block The blue engine is a bit wider than the kit engine (more accurate) so the molded motor mounts needed some relief work to make room for it. With the new engine fit the kits exhaust manifolds and head pipes were adapted easily by drilling holes in the cylinder heads for the mounting studs on the manifolds. The improved small block in situ with induction and valve cover mocked up. The Roadster kits mufflers and tail pipes have always been my least favorite part of the kit. The mufflers are open to the inside and the tailpipes are dinky little things and look weird compared to the big head pipes. It’s like dropping from 2.5” to 1” pipes. Making exhaust systems can get tedious but sometimes you get lucky and find a set of pipes that are an easy fit. After digging through my Ziplock back of exhaust pipes I found a partial set of mufflers and pipes from an old Monogram ZZ Top Eliminator kit. Upon offering them up they were a great fit other than the tailpipes being a bit short. What I like so much is that they are thick like the head pipes. I trimmed the head pipes evenly then drilled and inserted .040” pins in the ends with matching holes in the mufflers. Happy with the look and fit I trimmed the tailpipe tips off and extended the pipes 1” using Evergreen tube of similar size. Still have some fine tuning to do but I’ll take it. Thats as far as I got today. So far, so good!

-
Funny, I had the same thought as I sat staring at the mock-up from all angles last Sunday. It looks right-on. The modern Revell 32 Roadsters are more technically accurate but the Monogram just has The Look. Perhaps that’s part of what drew me to it so strongly as a kid? As for this kit: I don’t think that many people are aware of the unique changes to it aside from the obvious severe chop and wheels. This kit post-dates the changes made to the old Monogram tool when it was modified in the early 80’s for the ZZ Top Eliminator. It shares the same interior and Pontiac engine with its attempted disguise as a Chevy small block as the ZZ Top kit but also features the front axle / suspension already shown above, molded stock exhaust pipes deleted and a 9” rear axle with coil overs and disc brakes, similar in appearance to the Revell ‘32 Ford’s. I was really hoping that when the ZZ Top Eliminator was reissued a few years ago that these updates would stay as they are actually a more accurate for the full-scale car but alas, the same old axles and suspension found it’s way back. The only of the Cabriolets upgrades that stuck was frame with molded exhaust deleted.
-
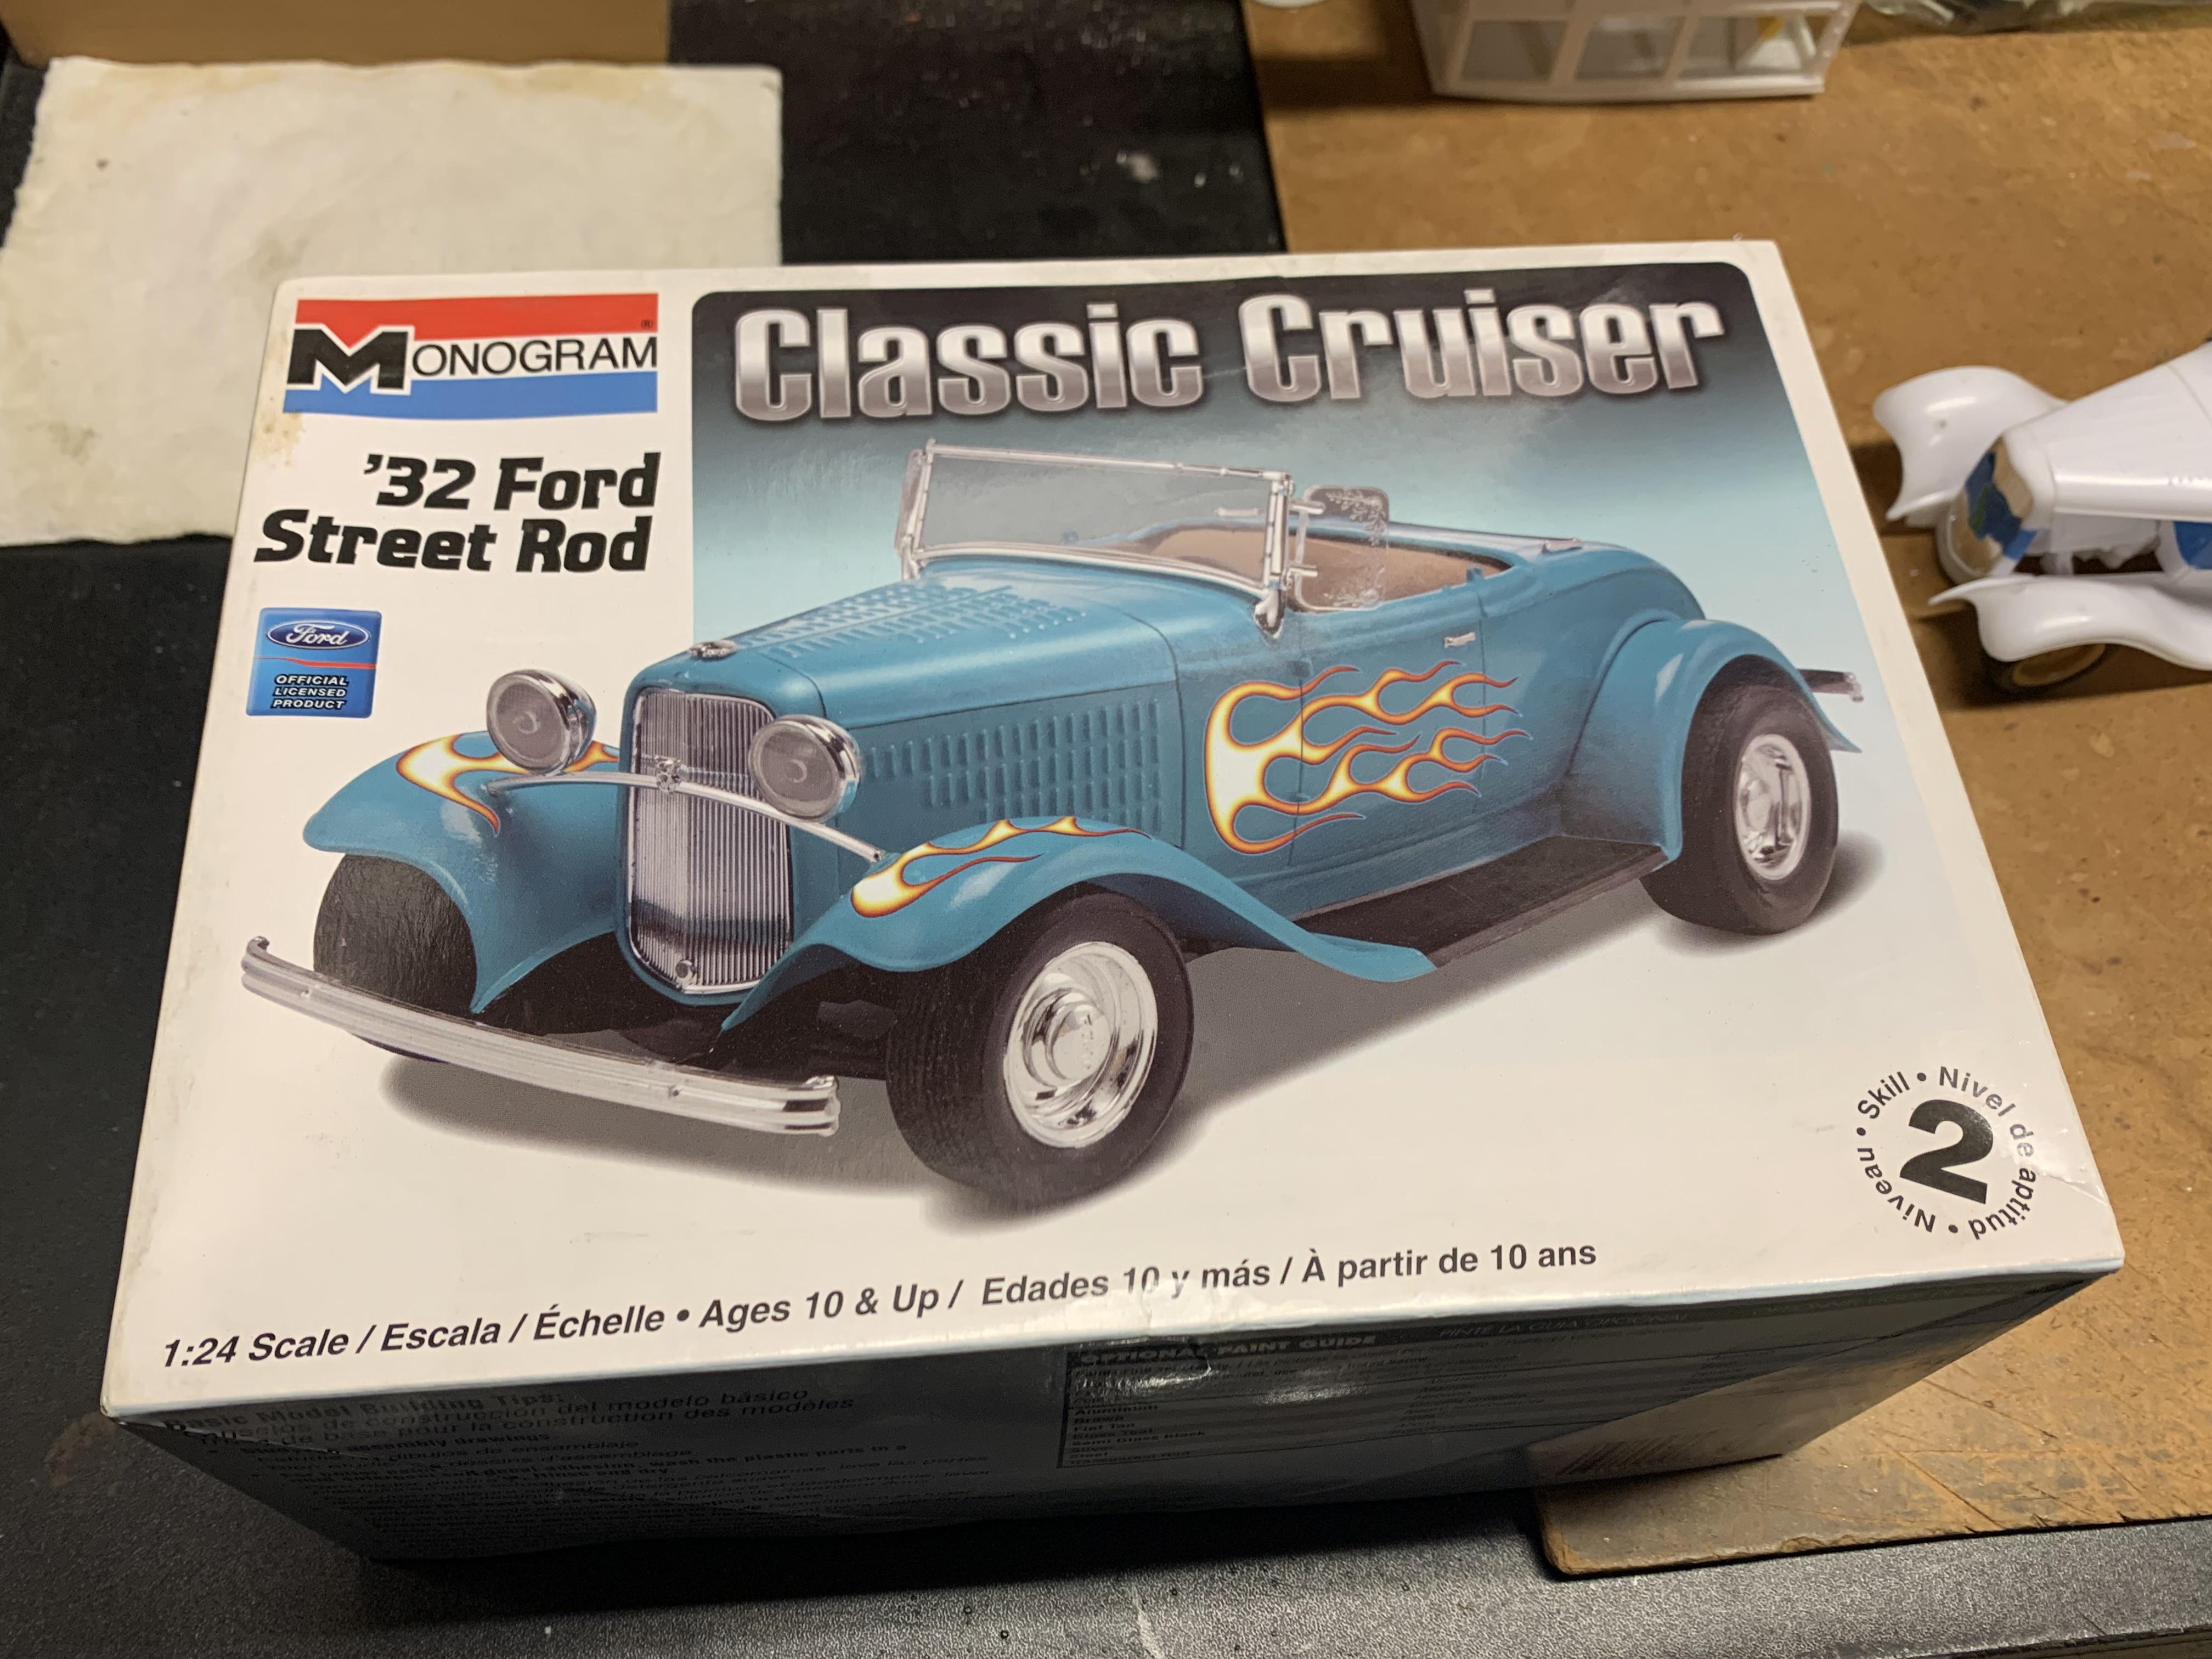
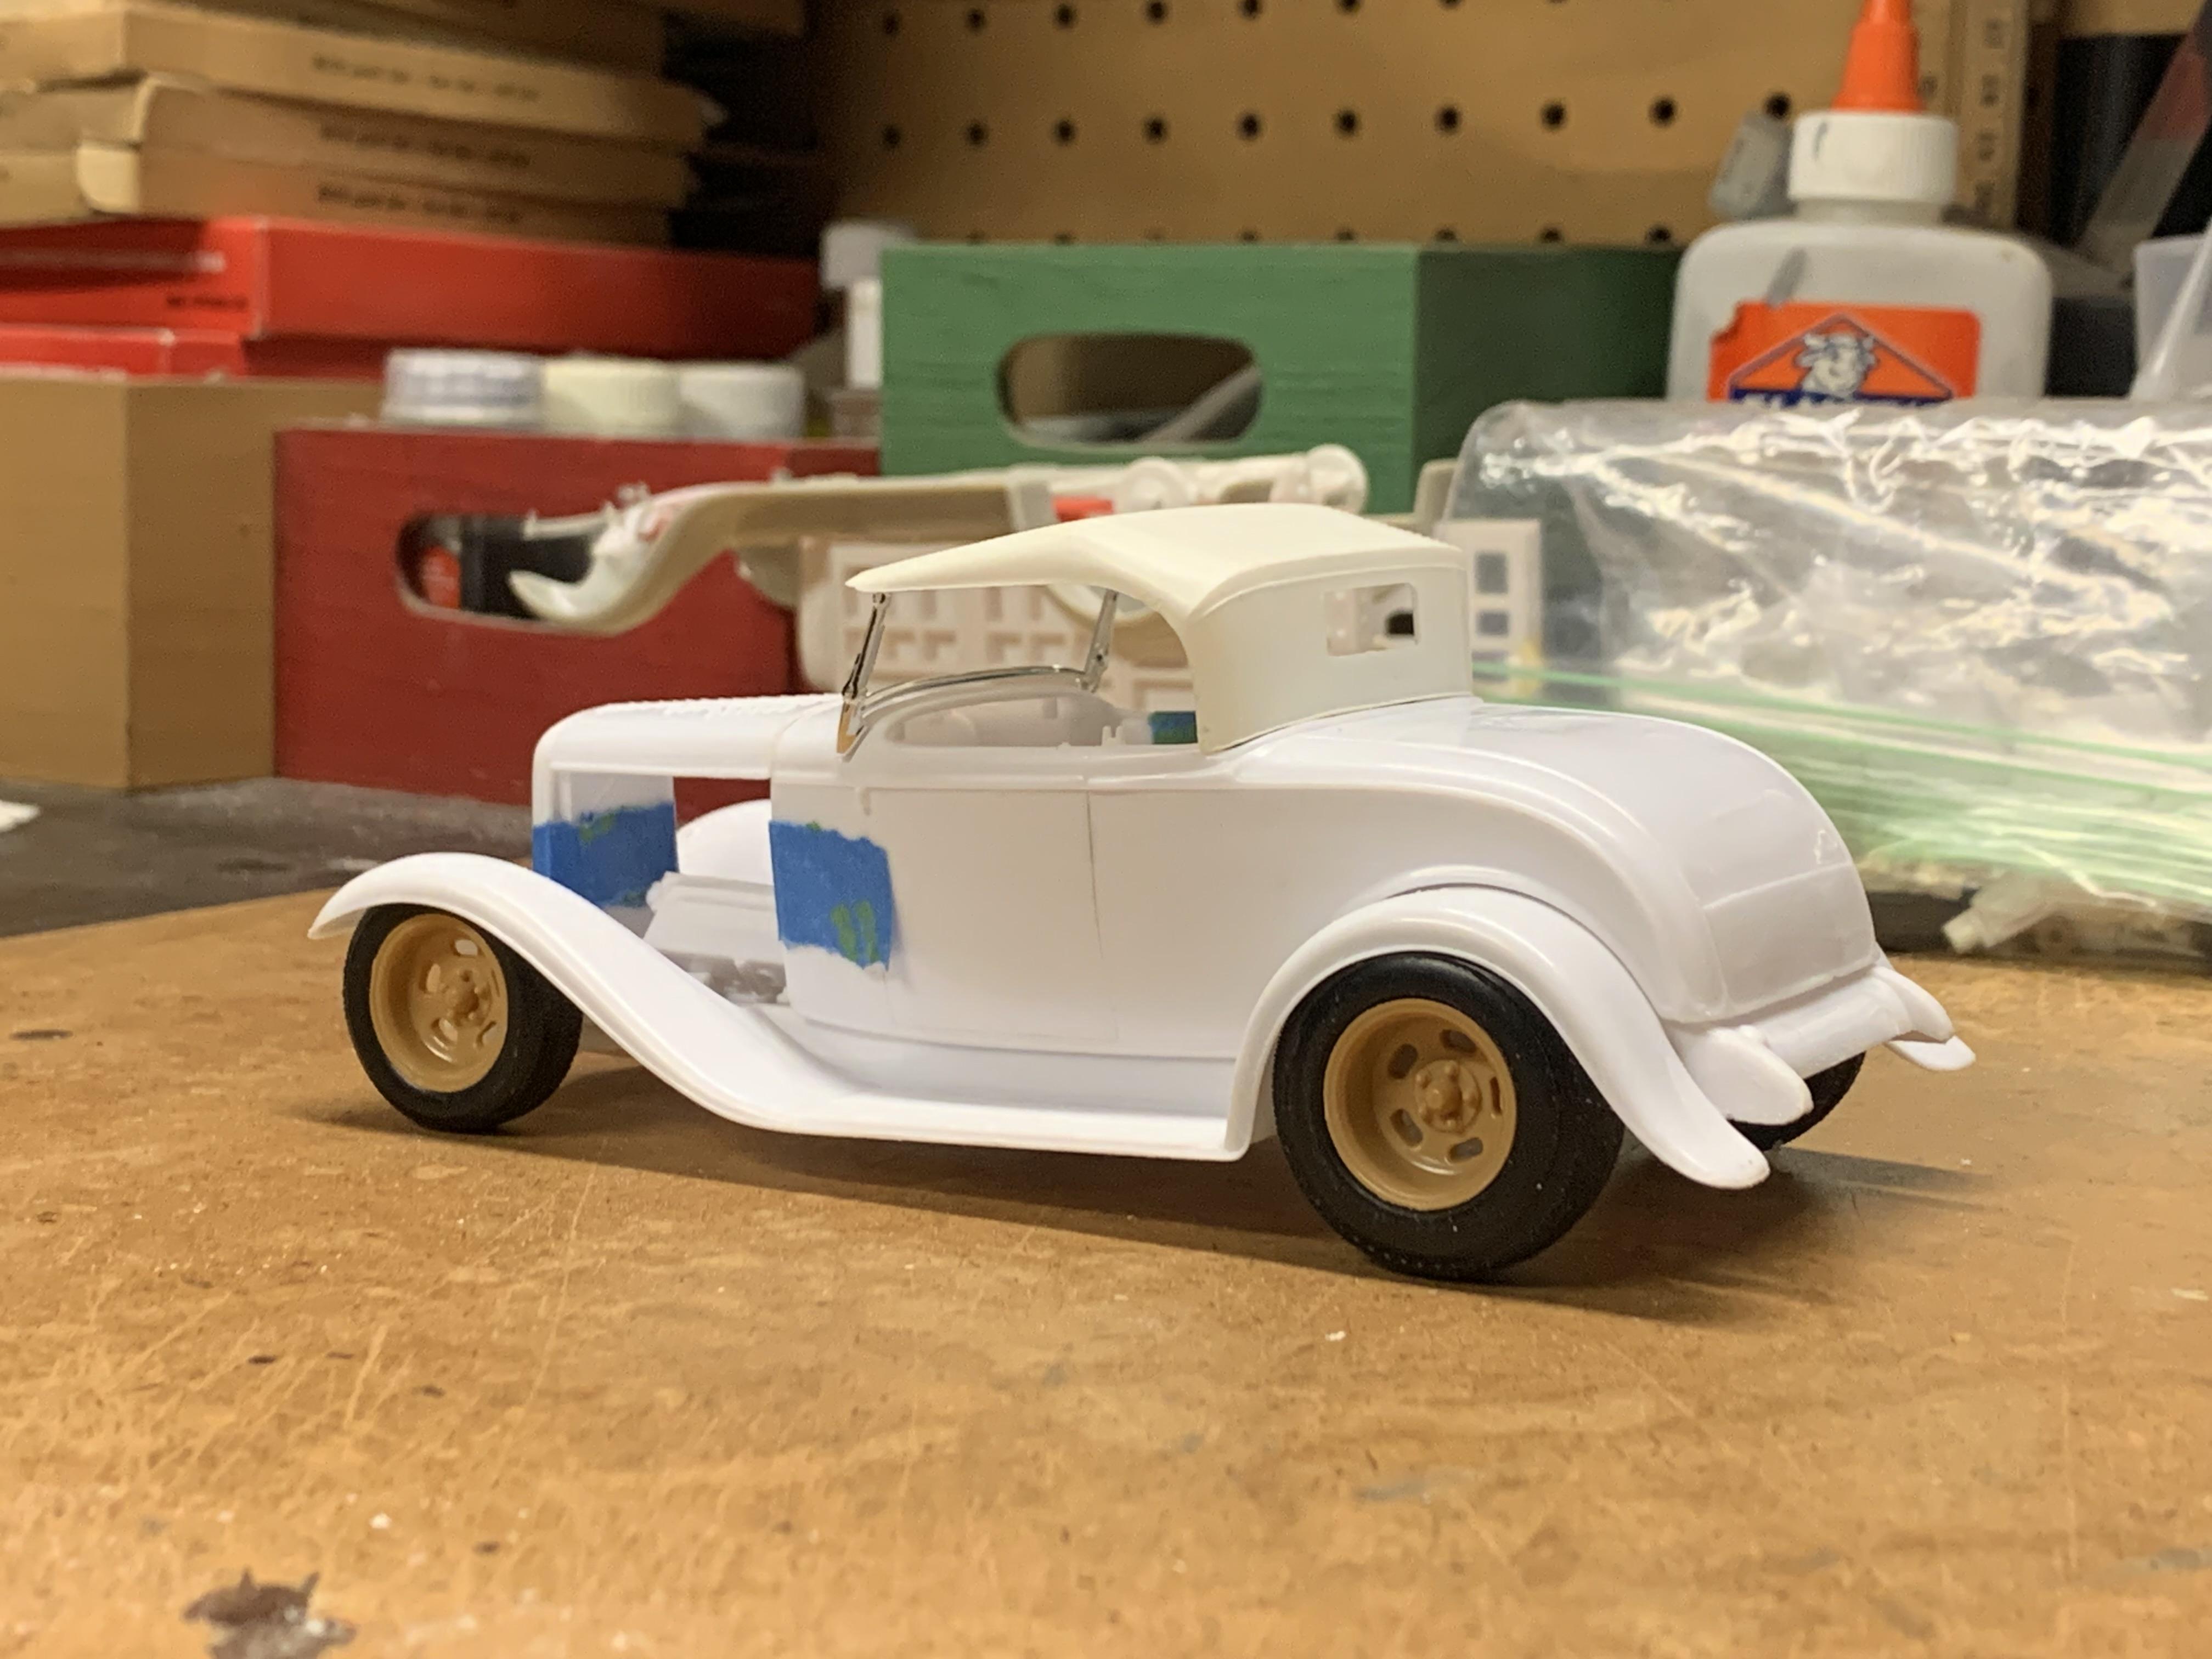
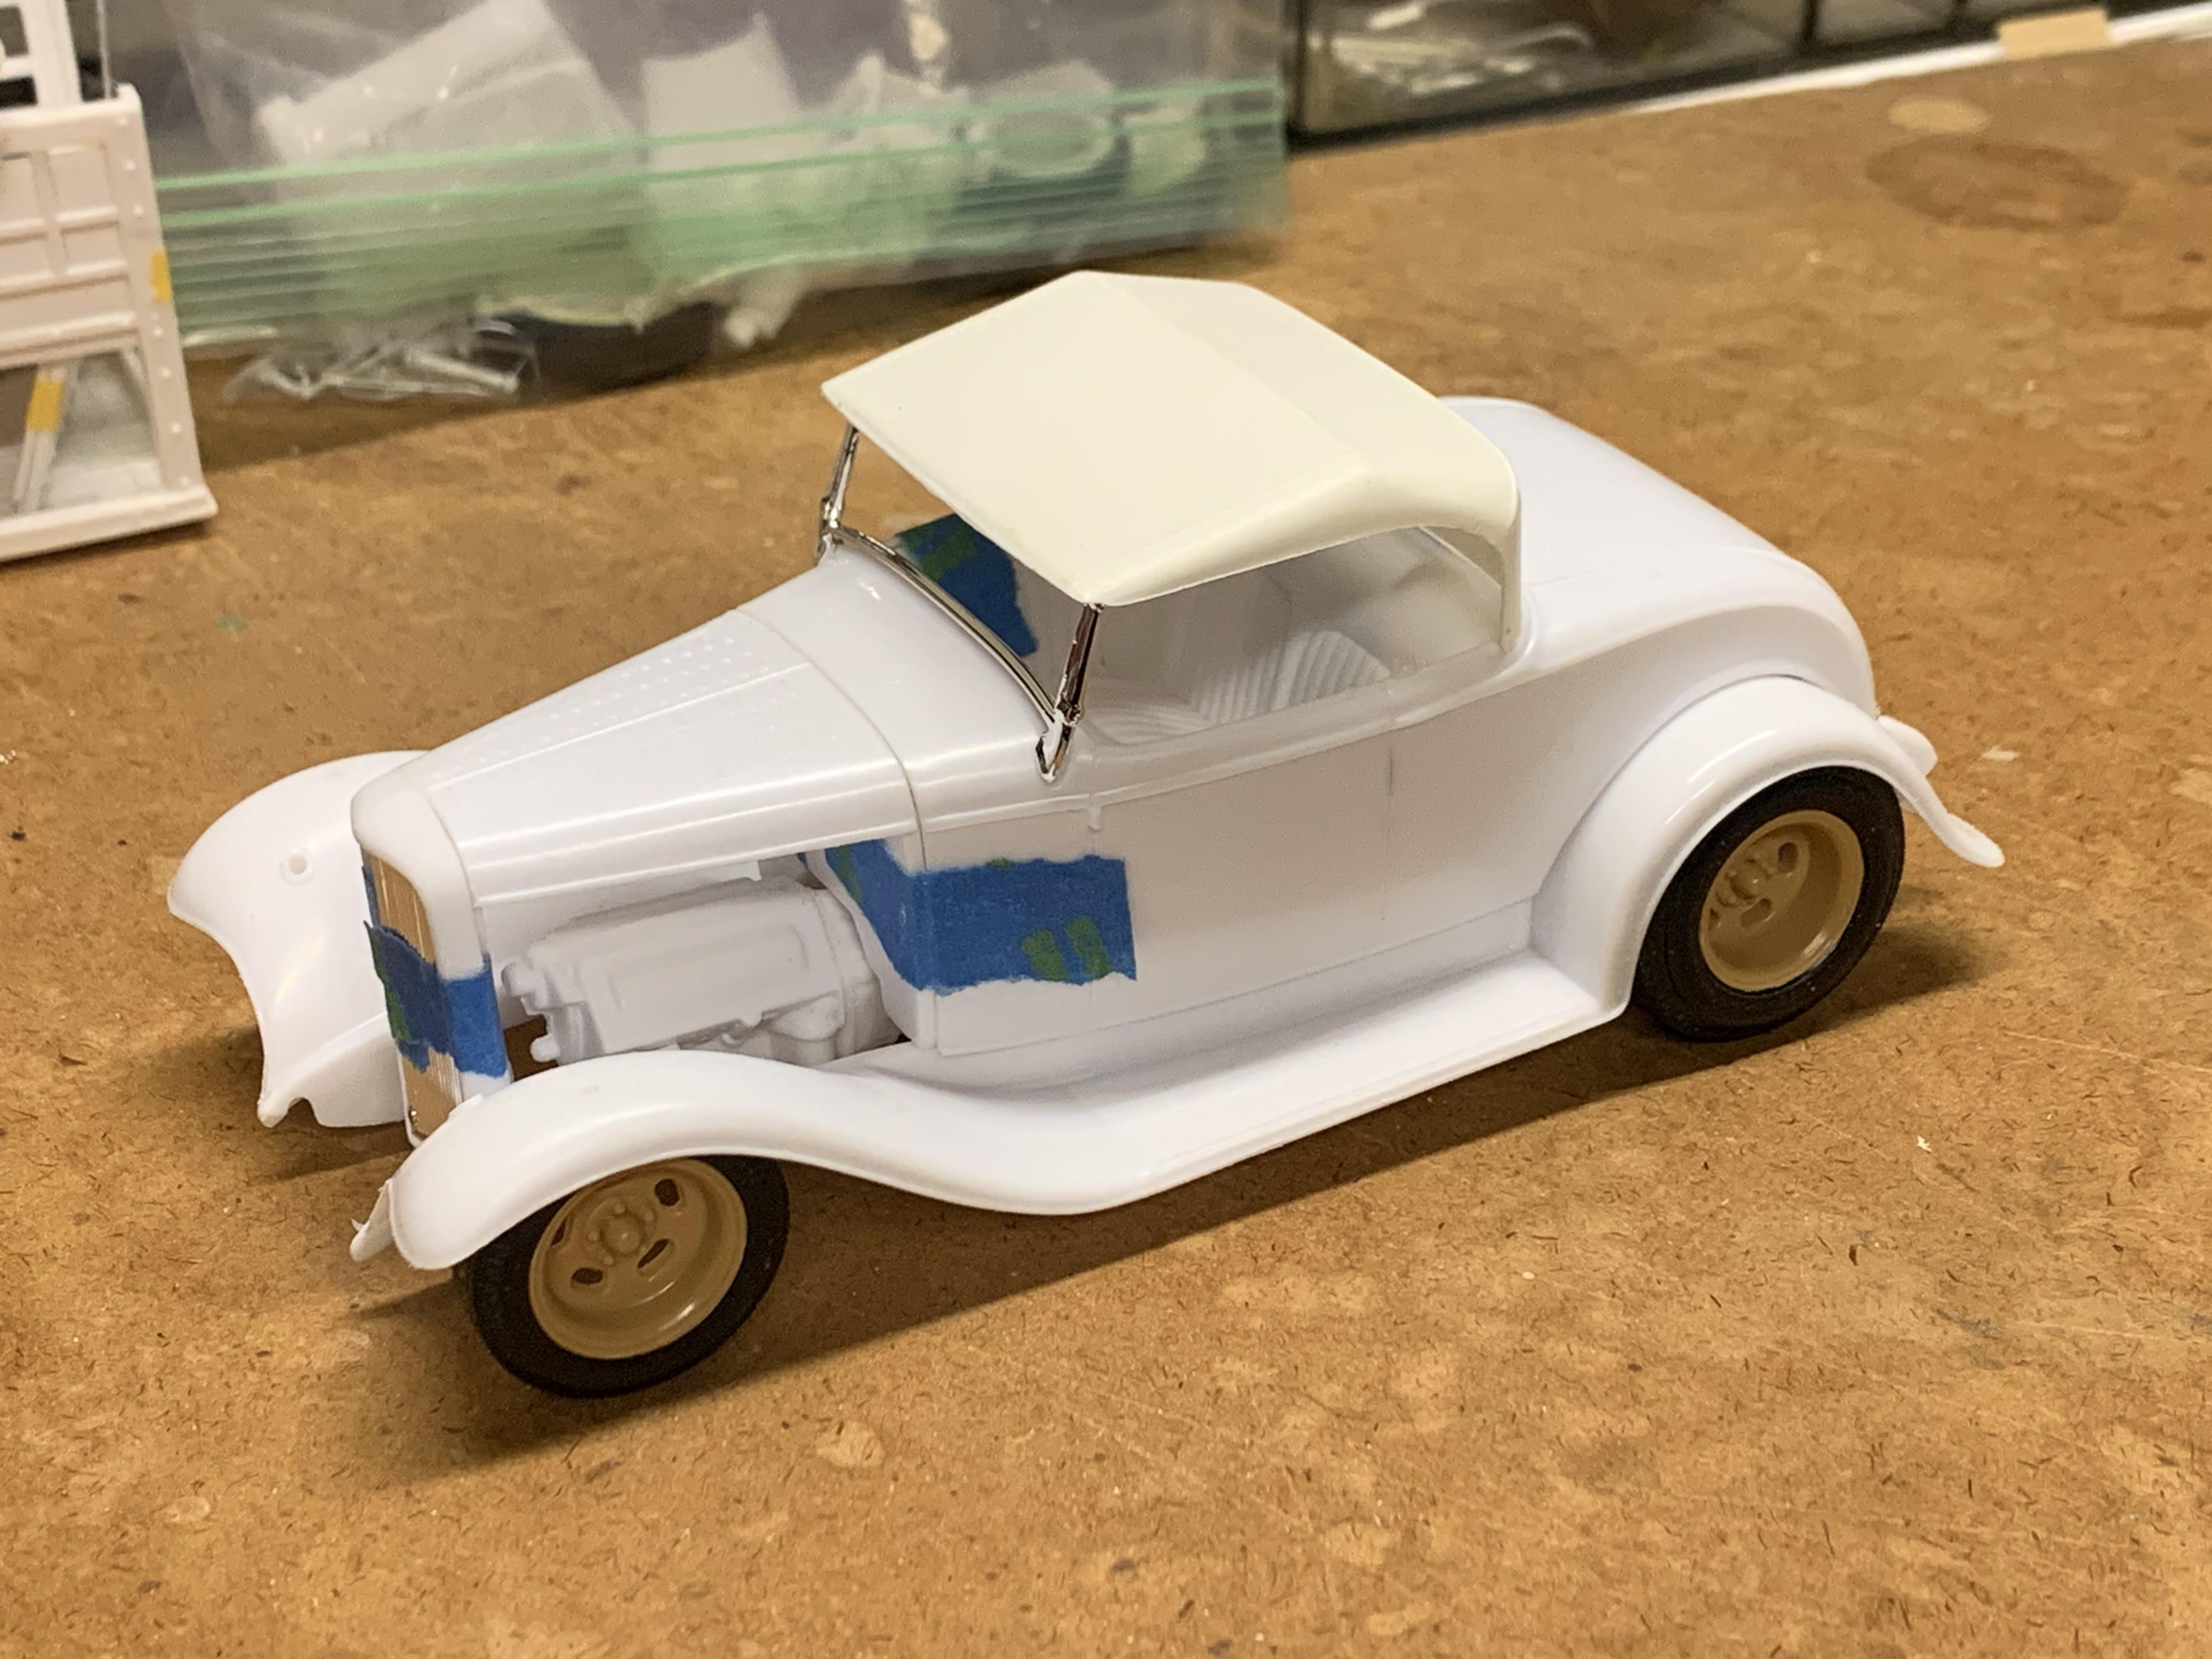
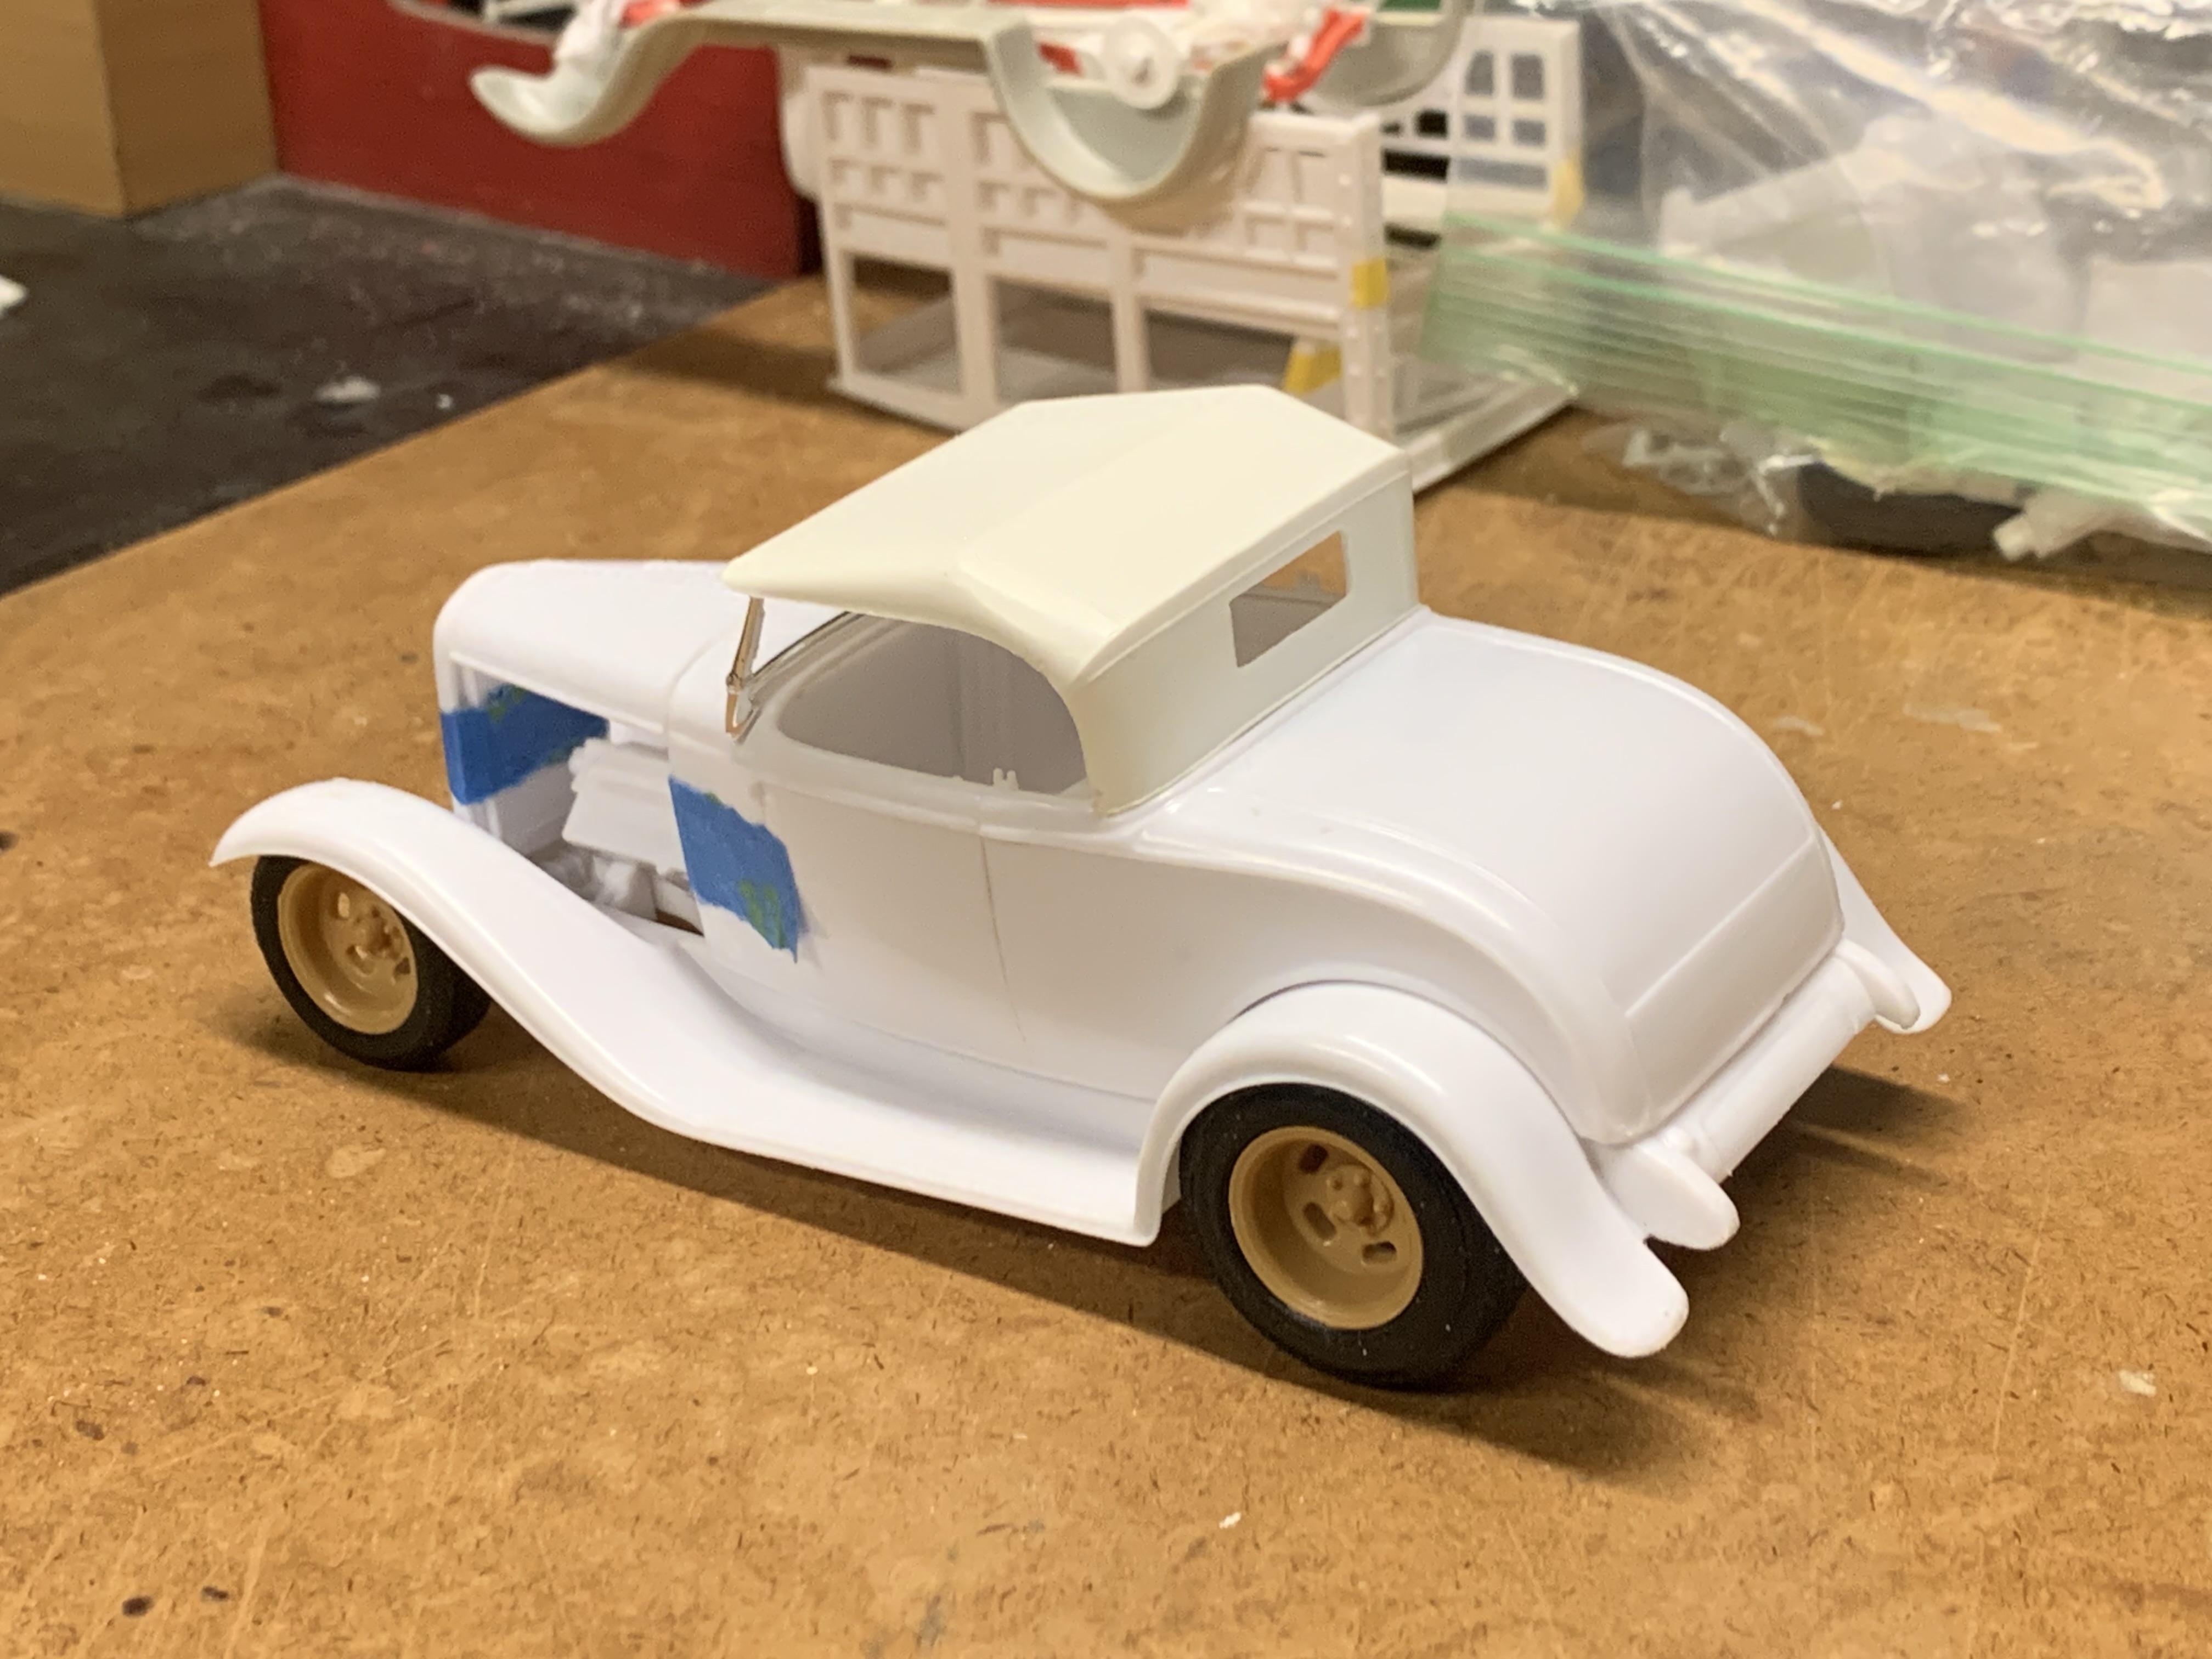
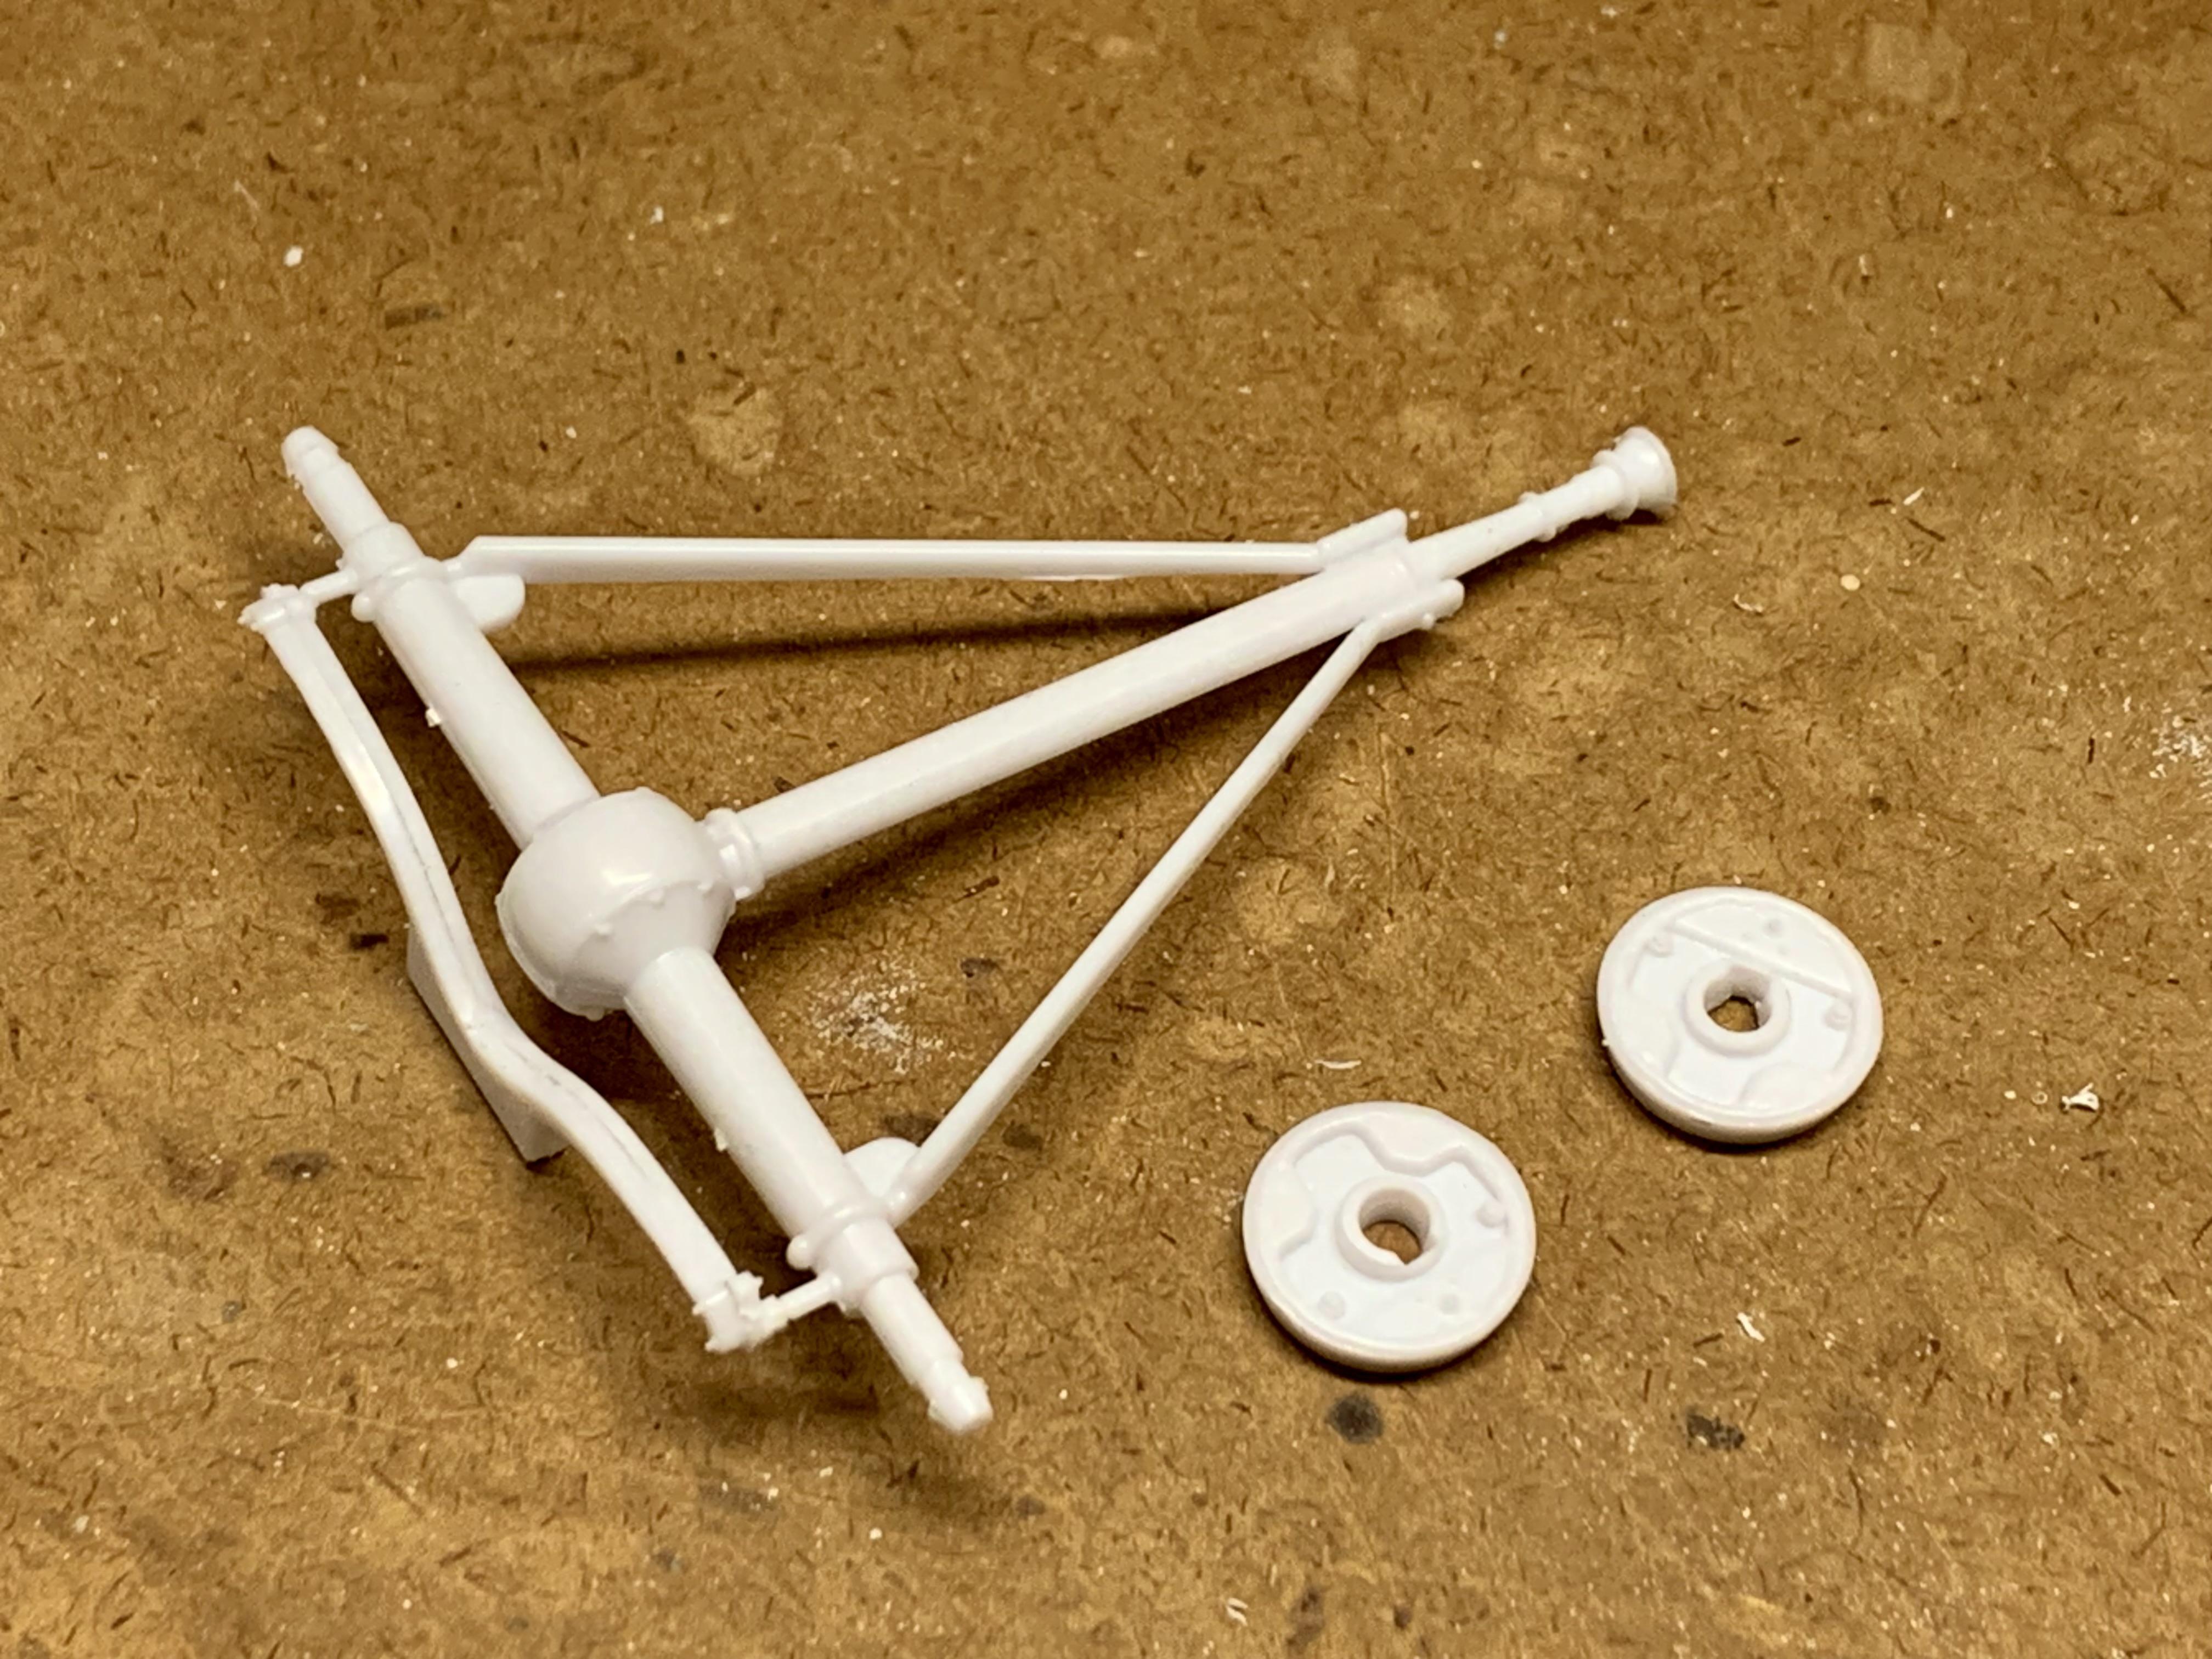
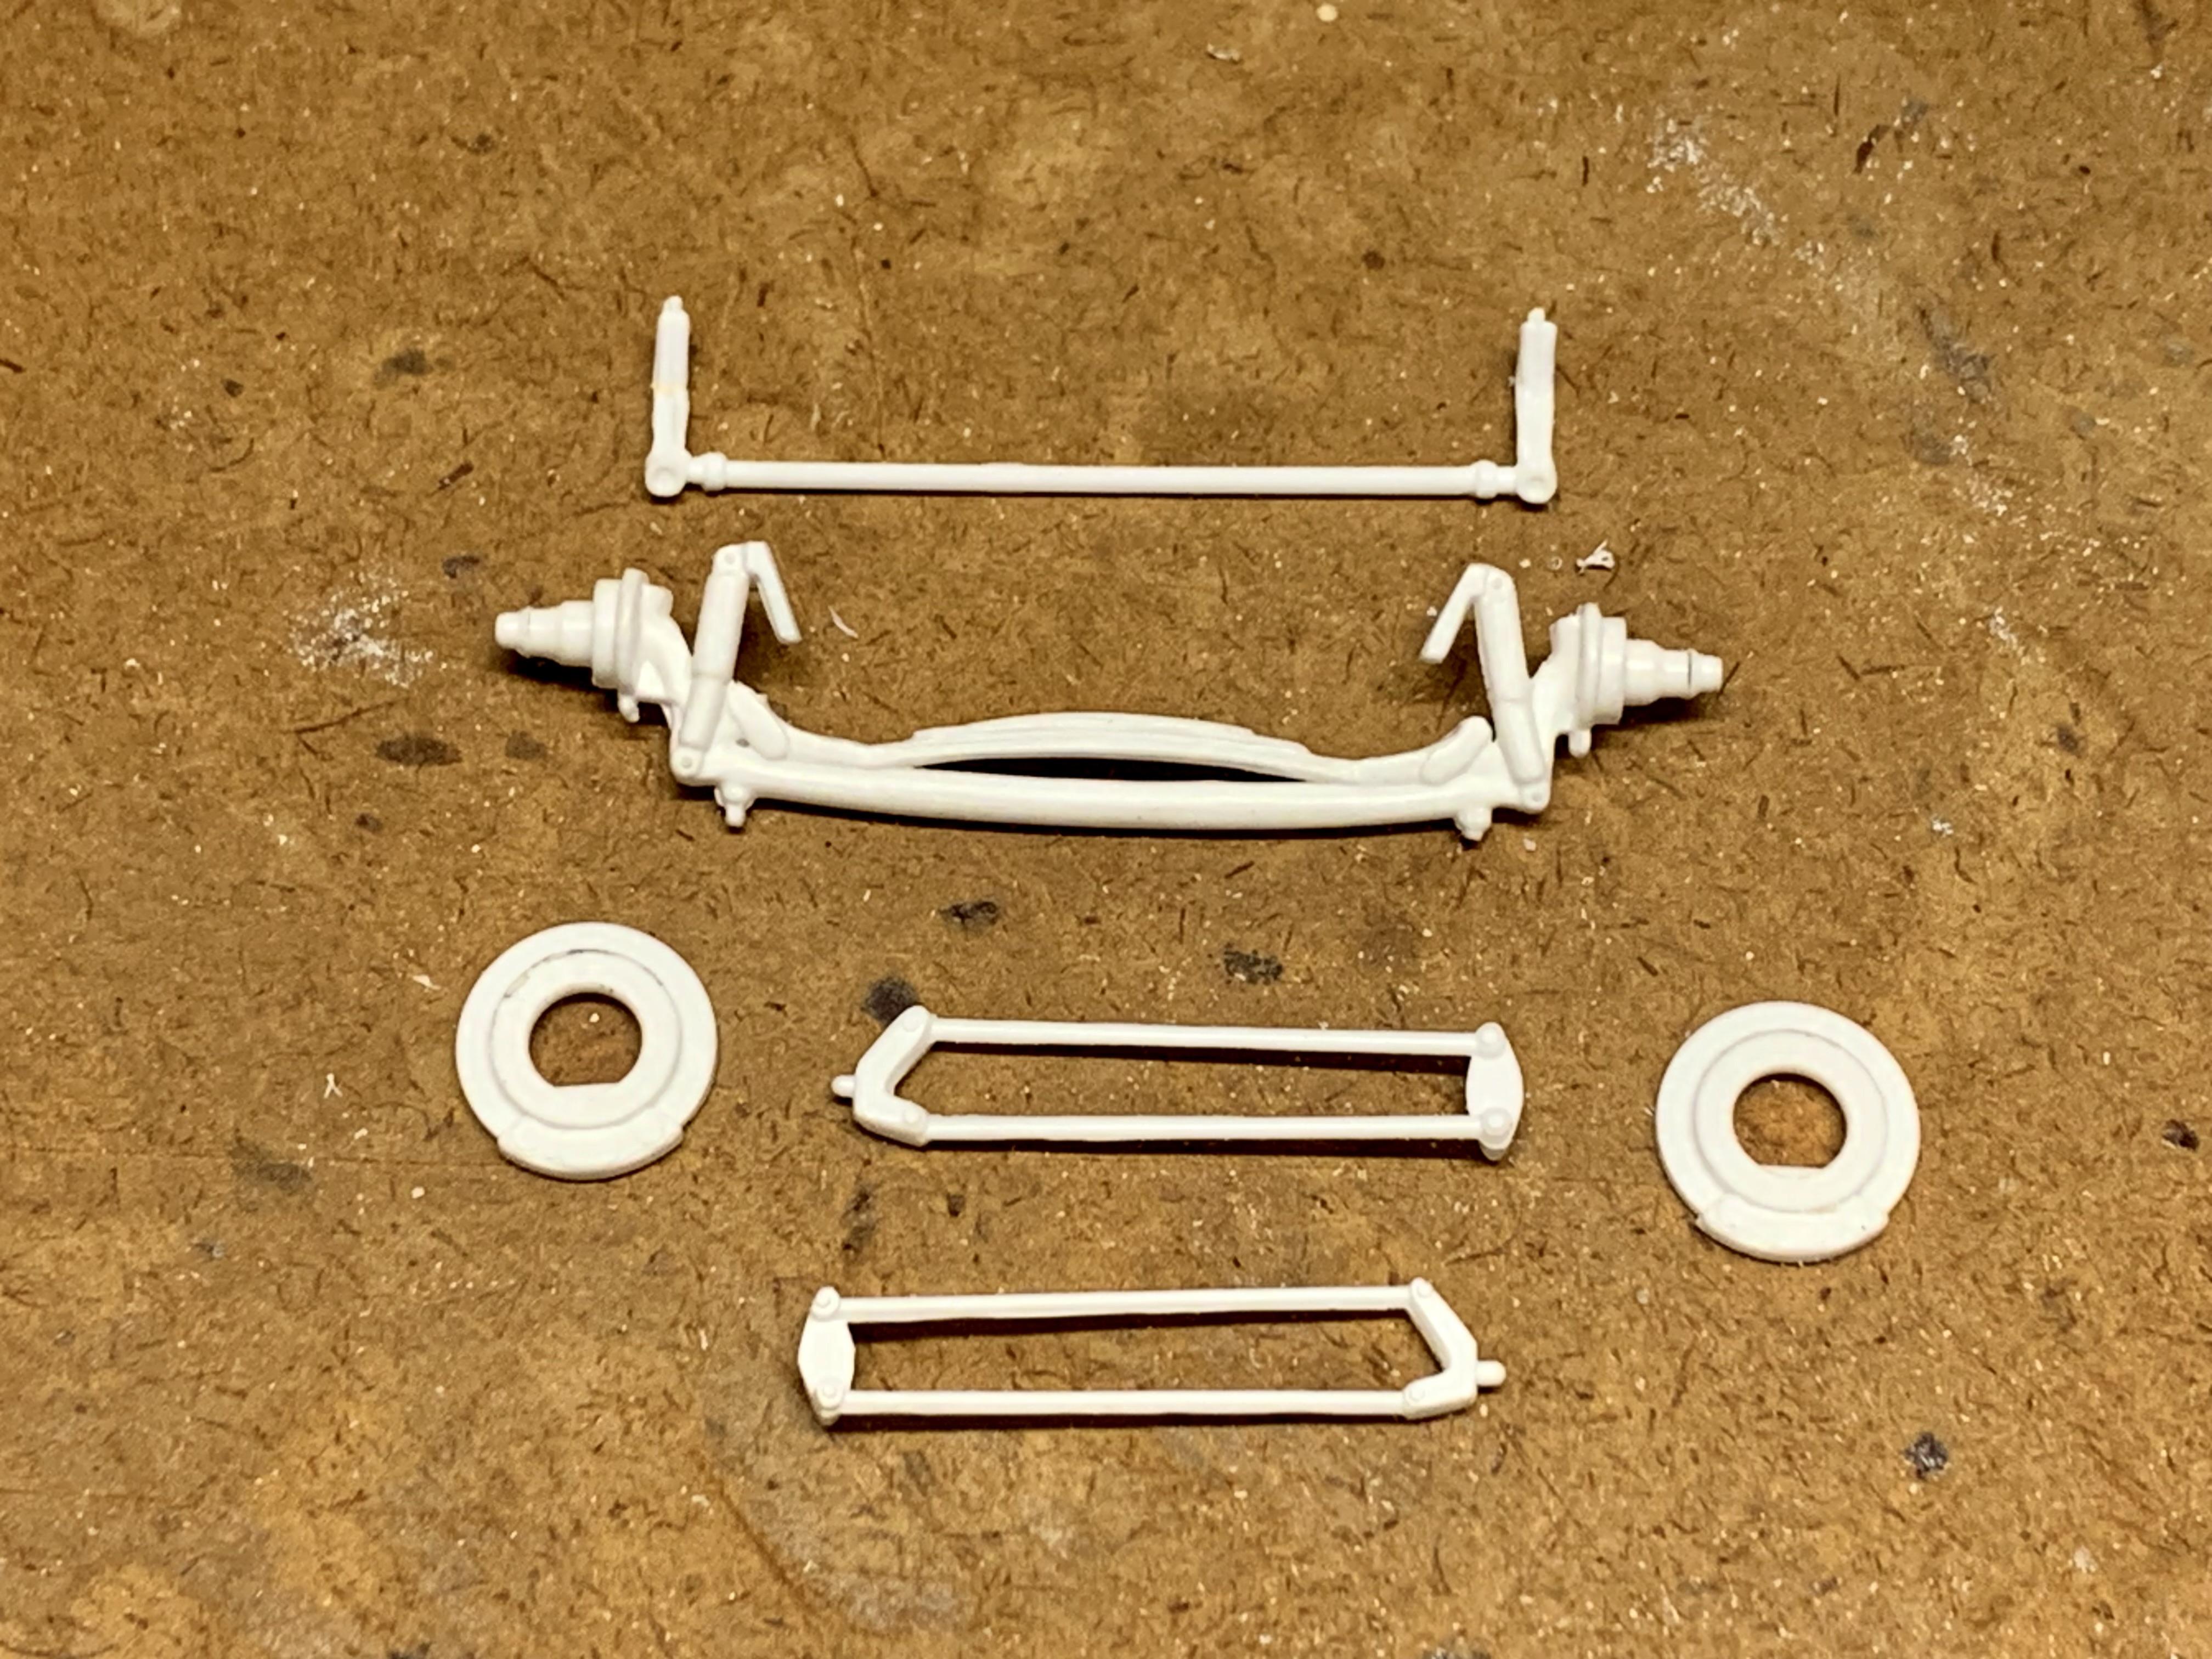
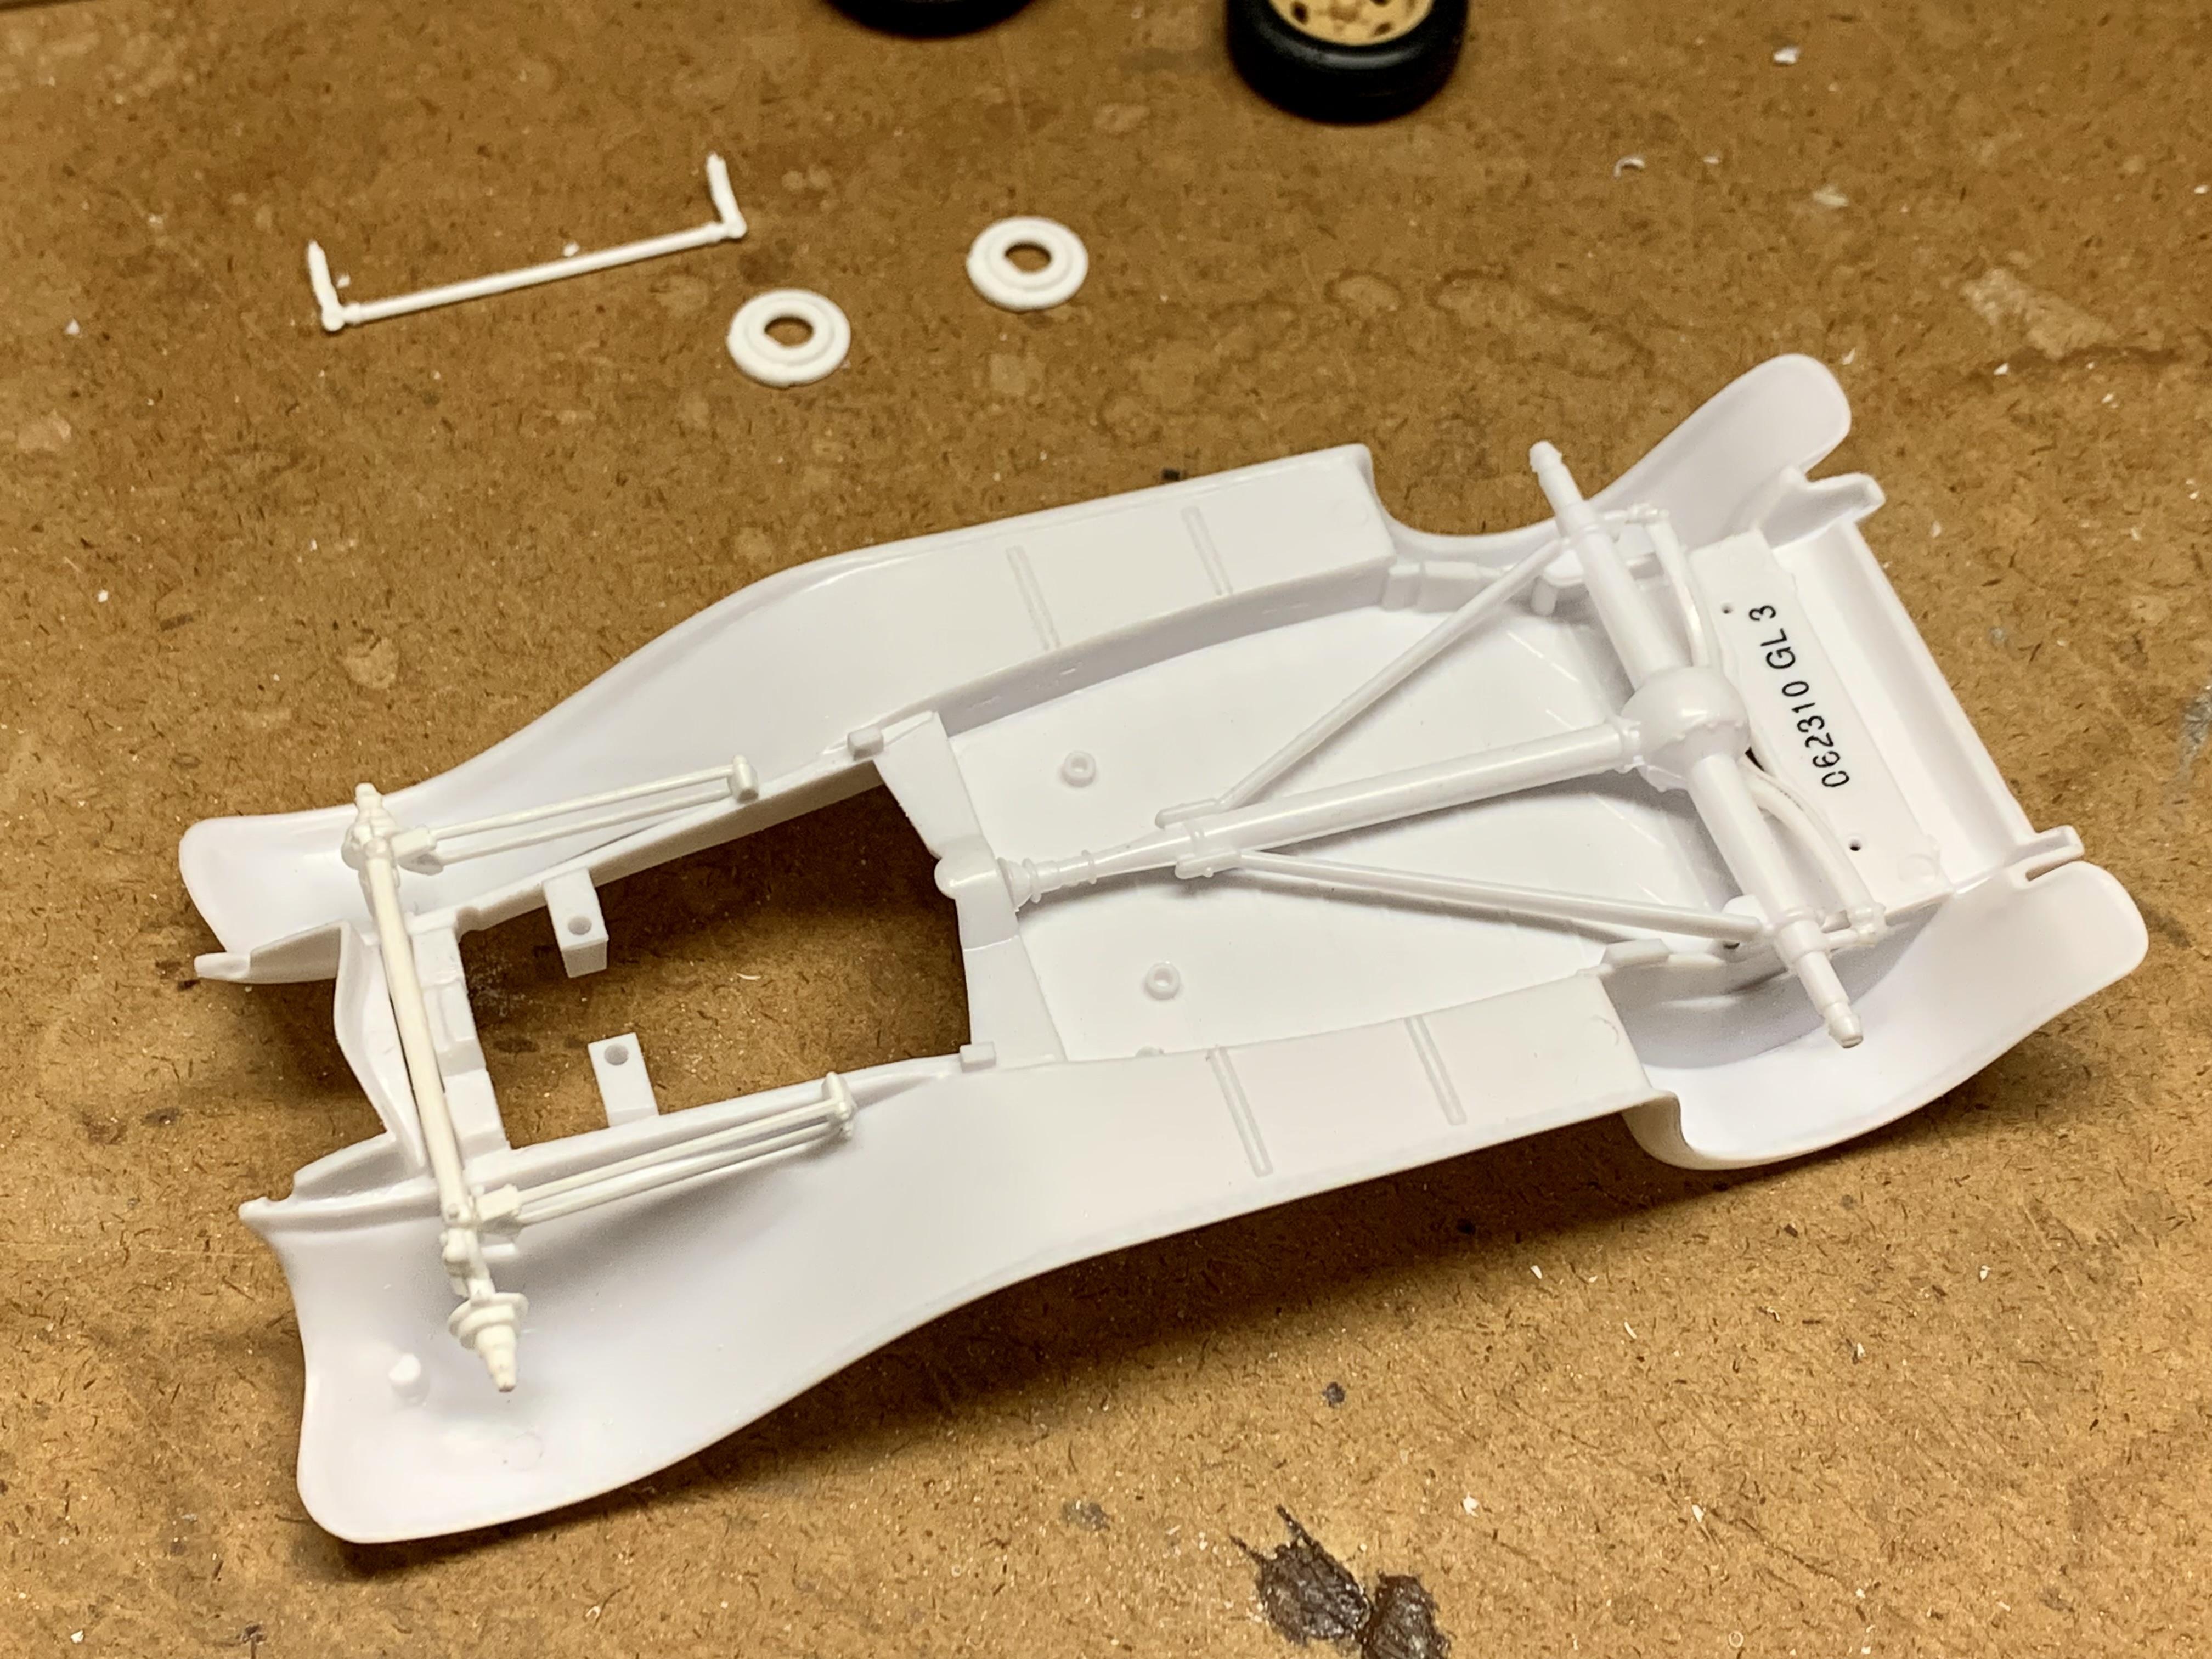
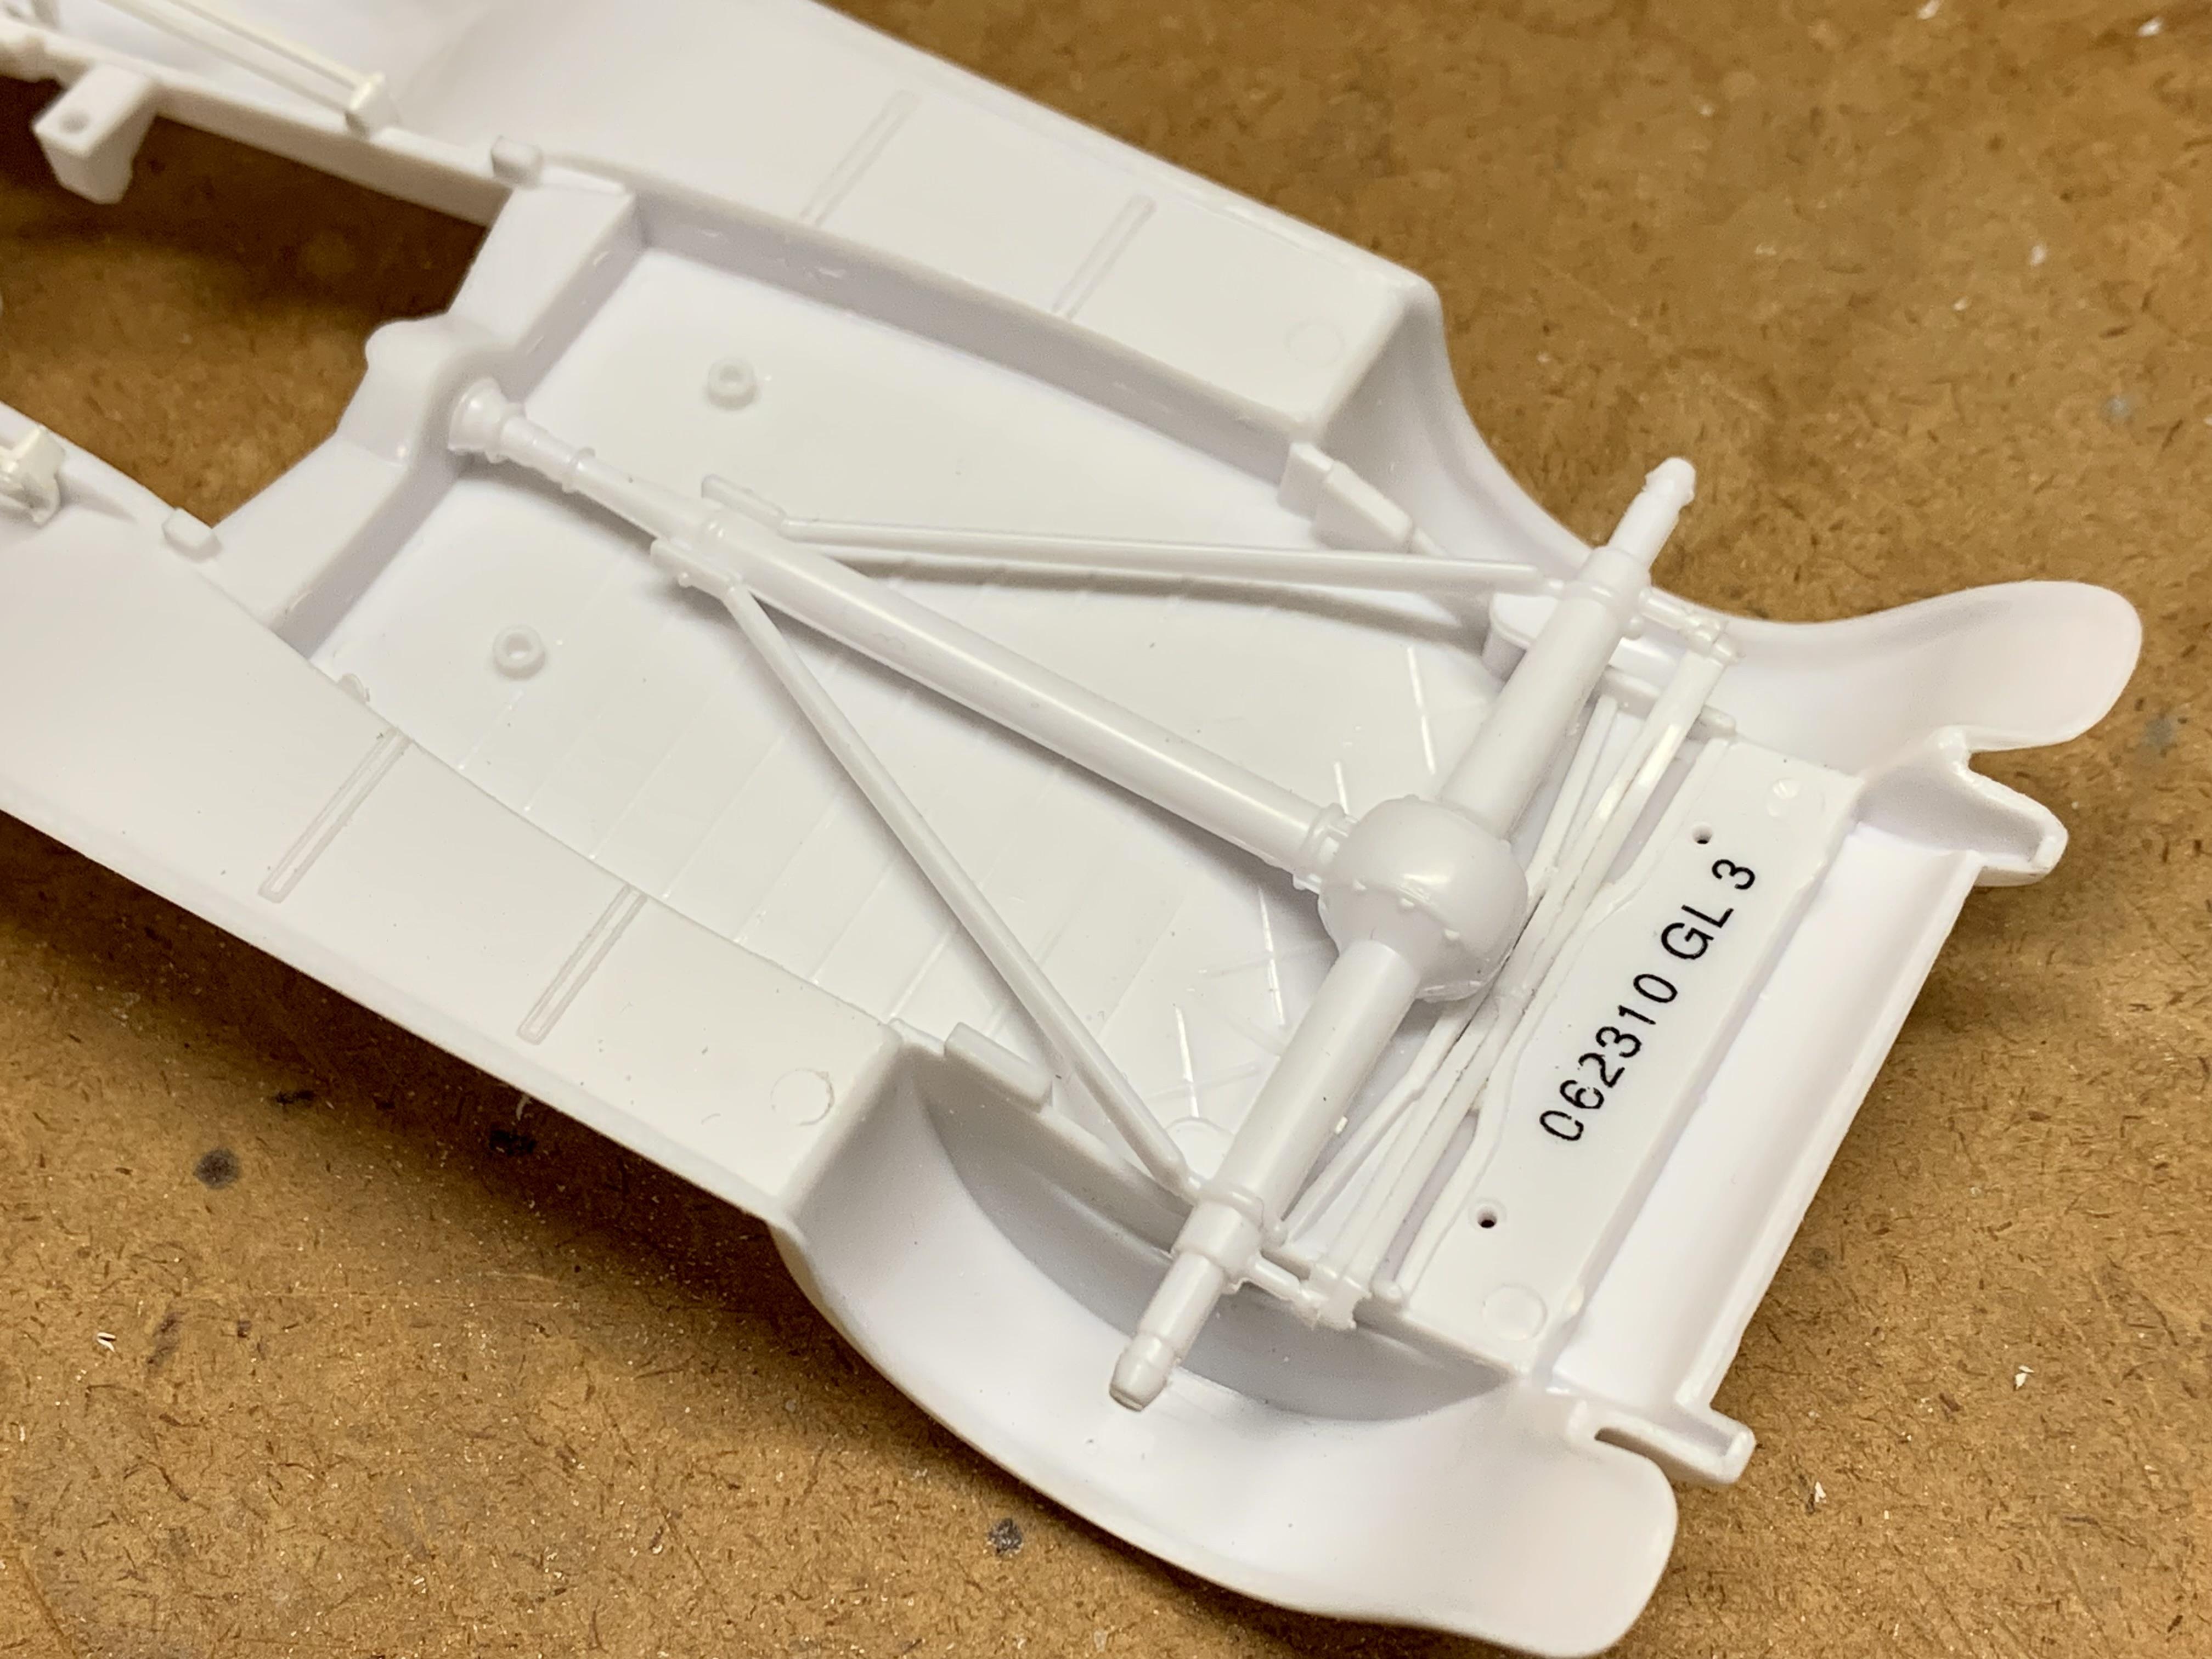
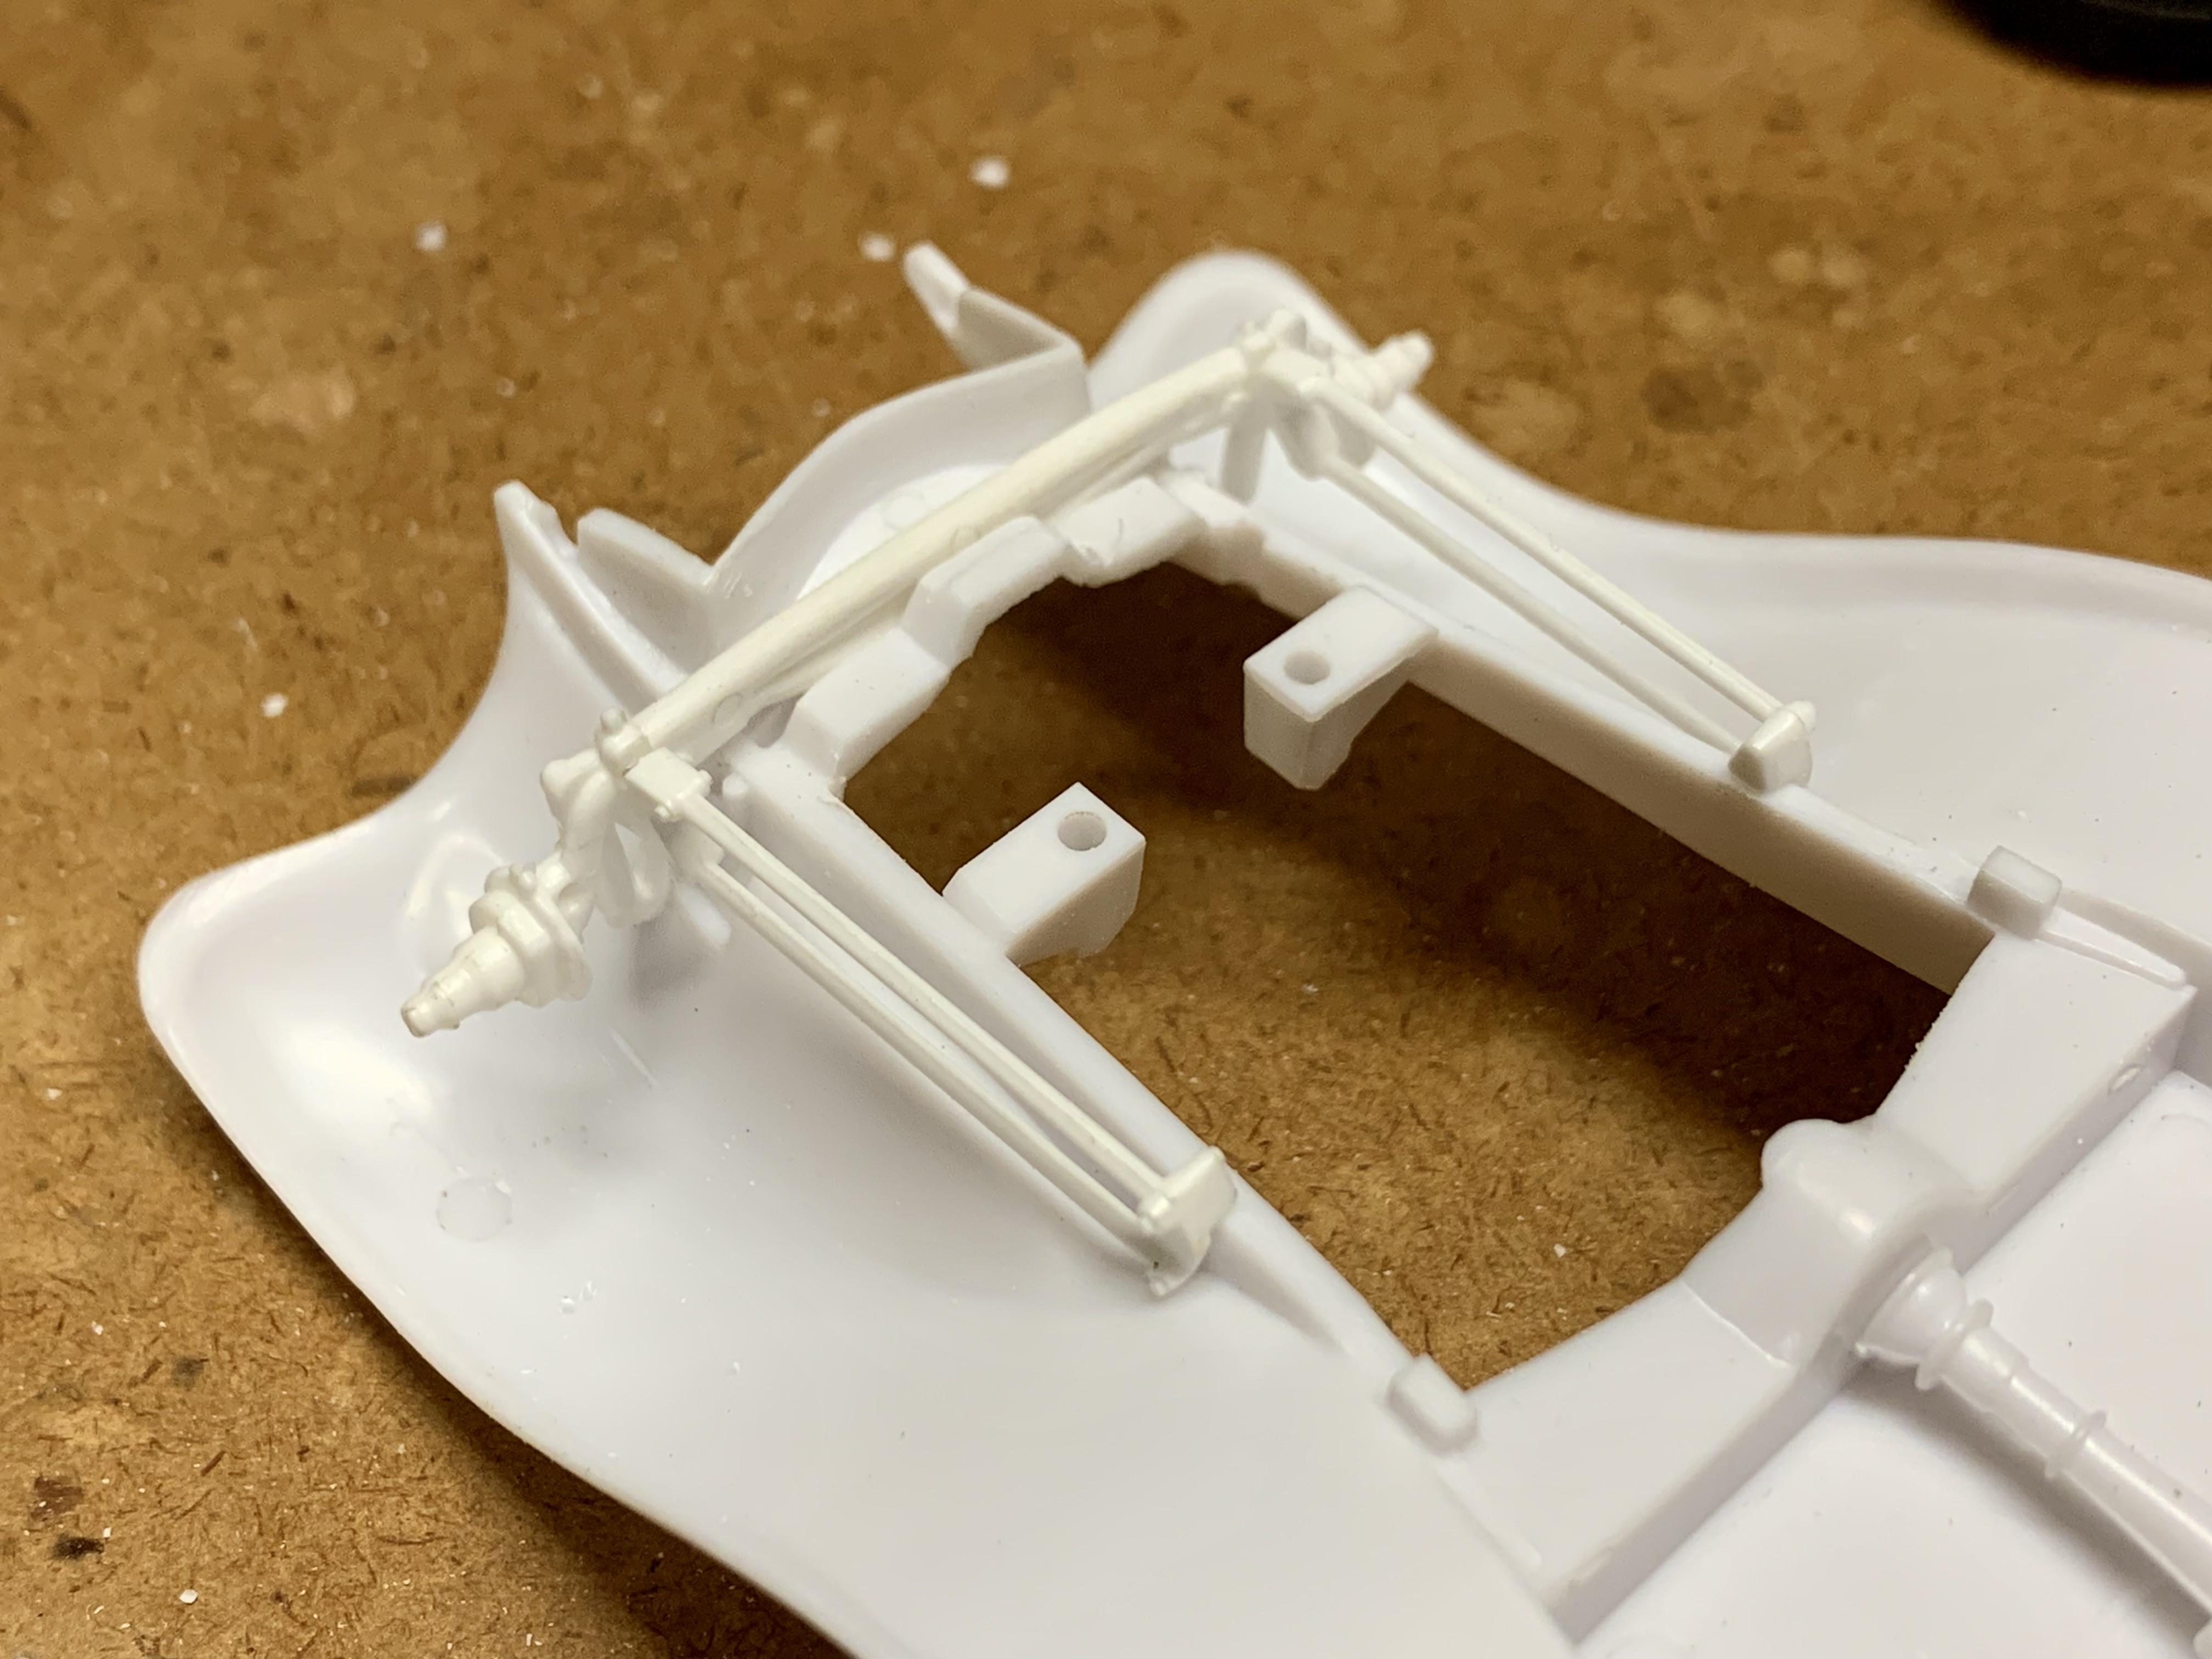
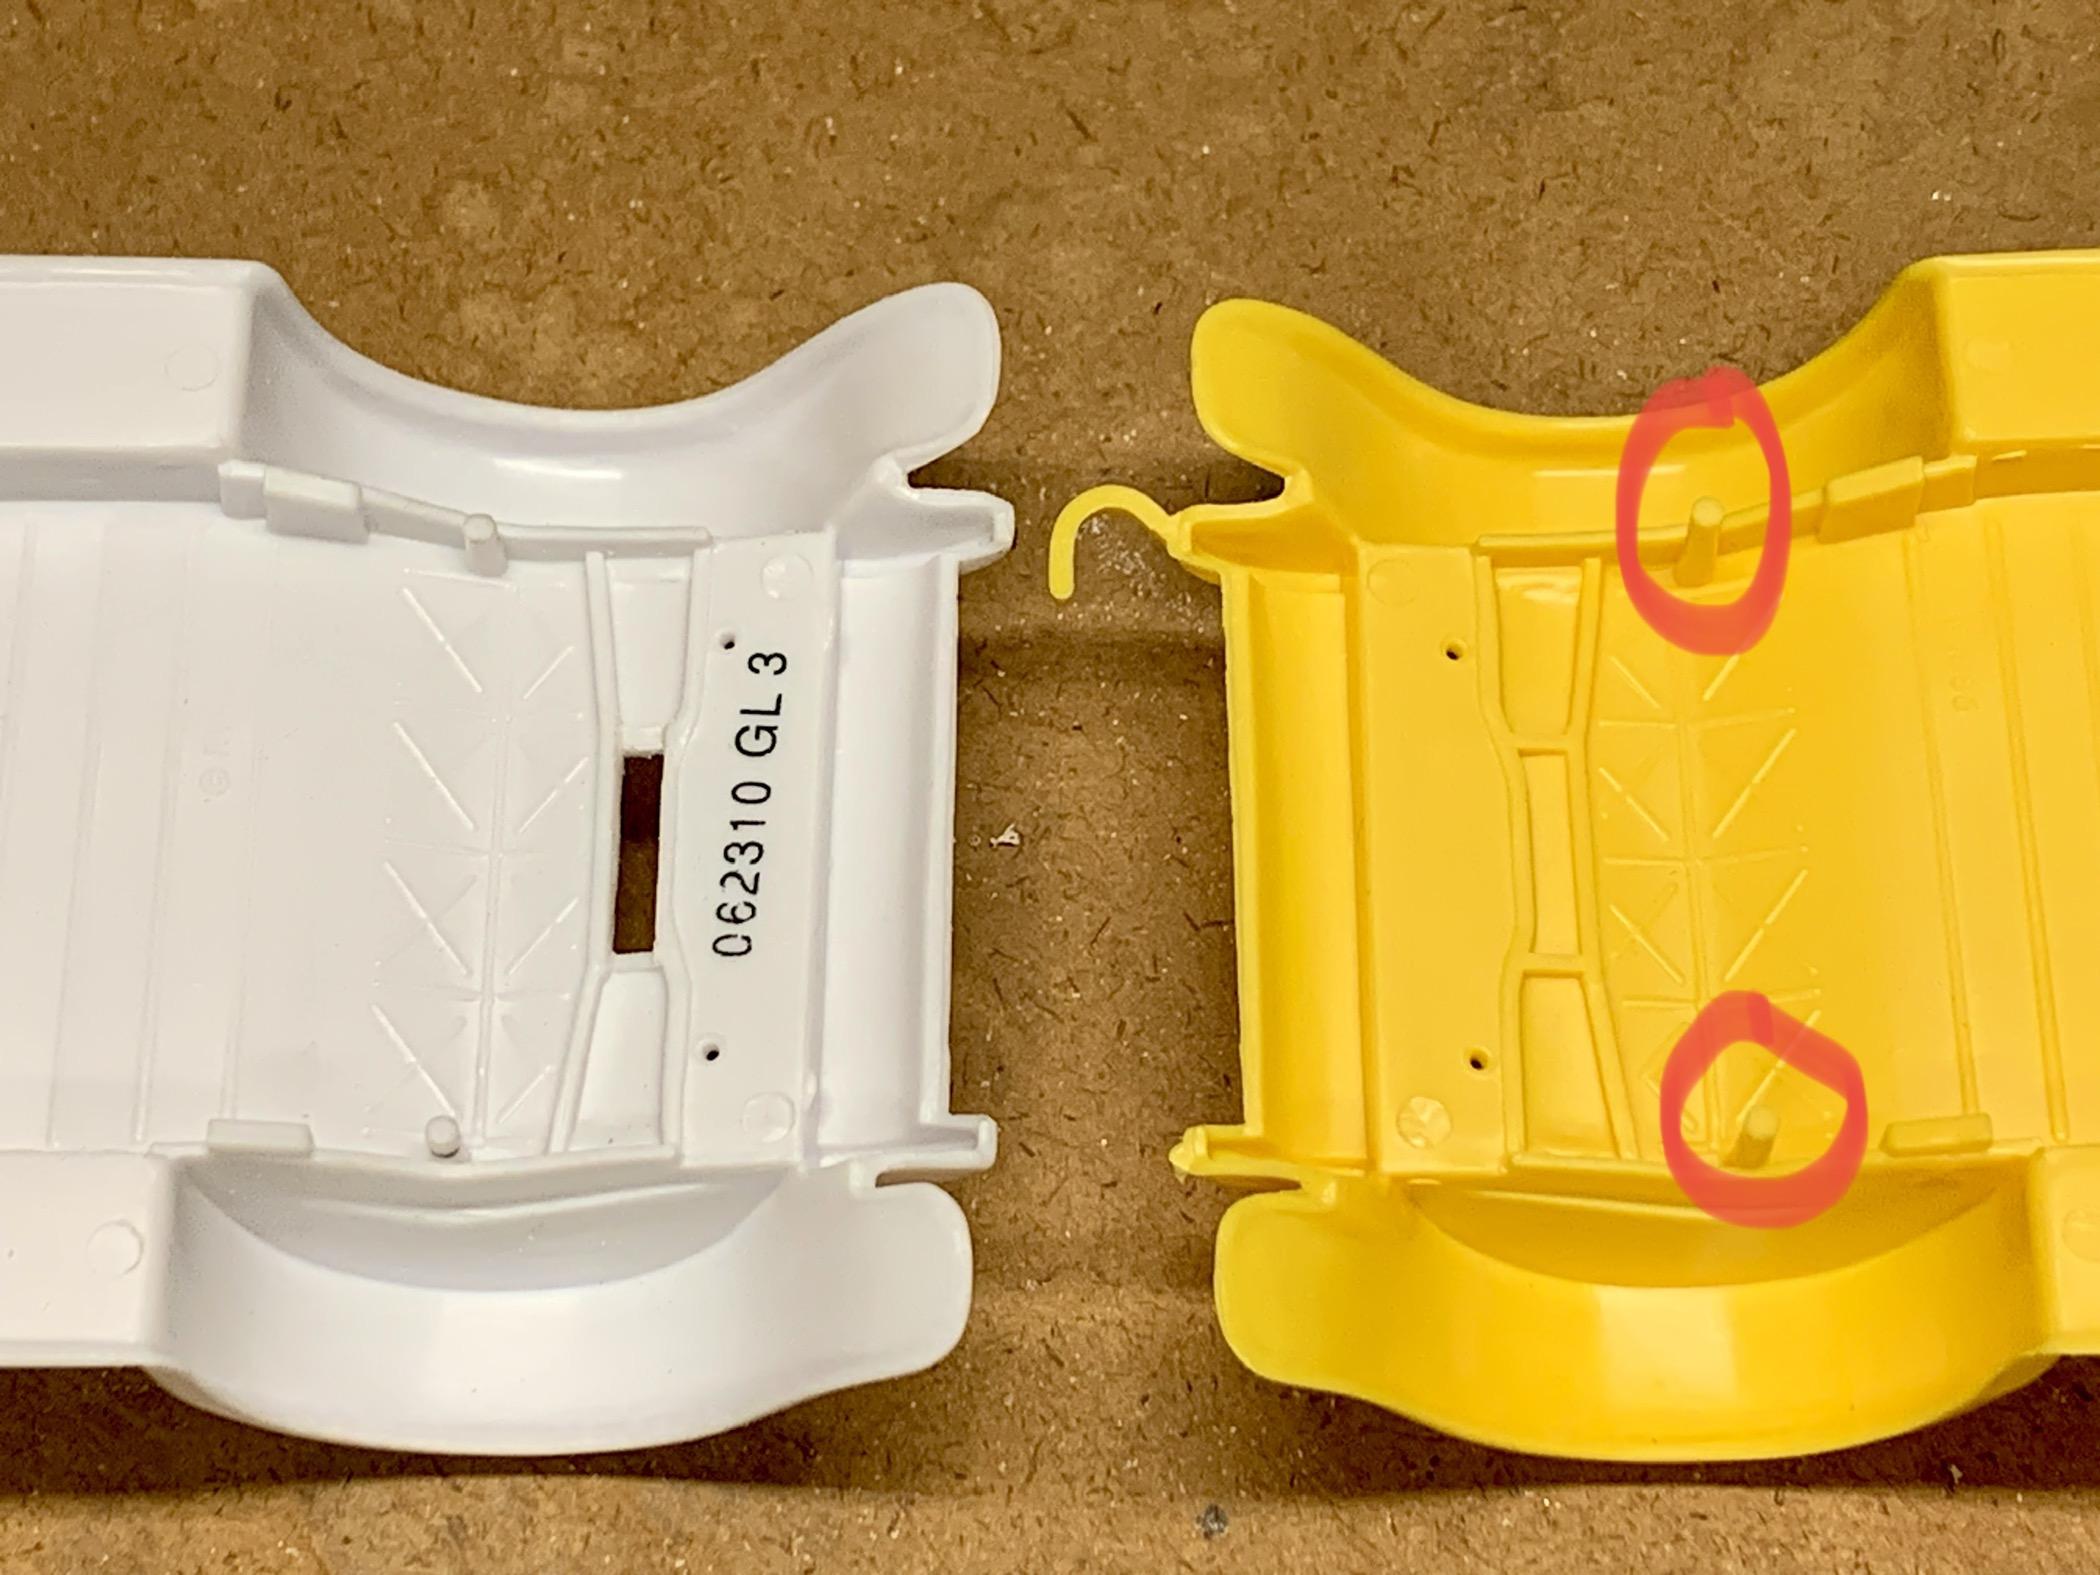
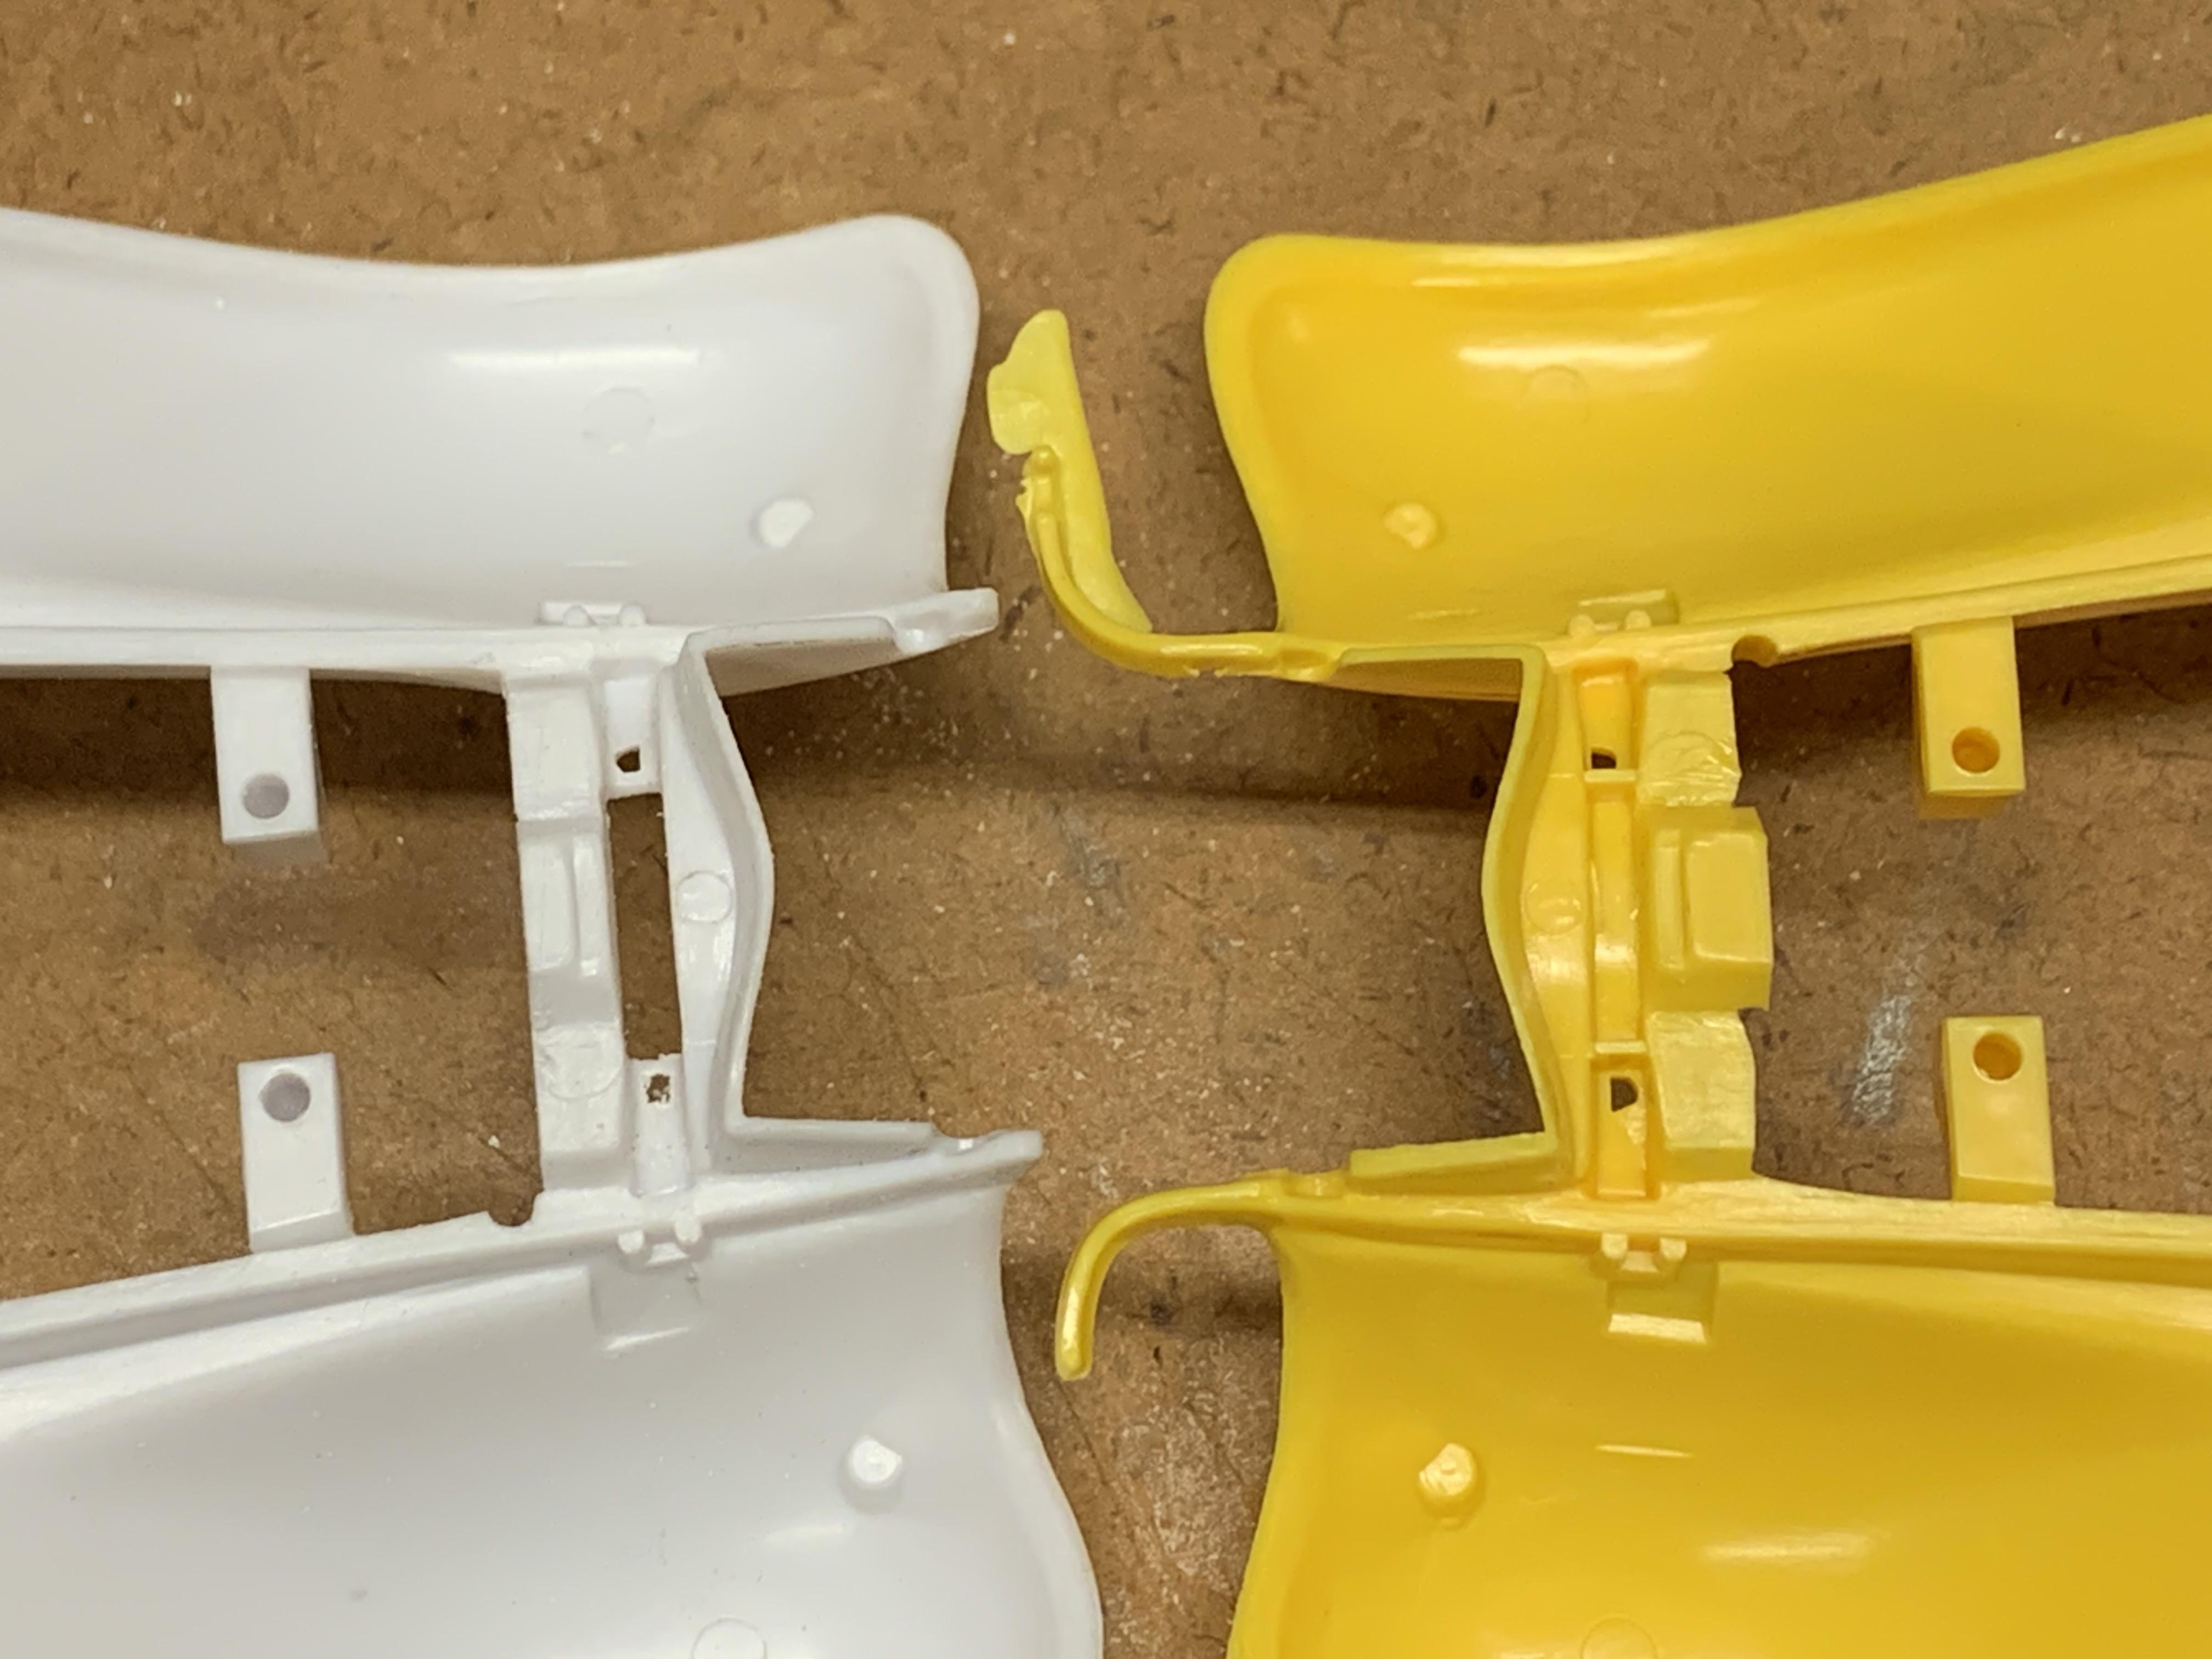
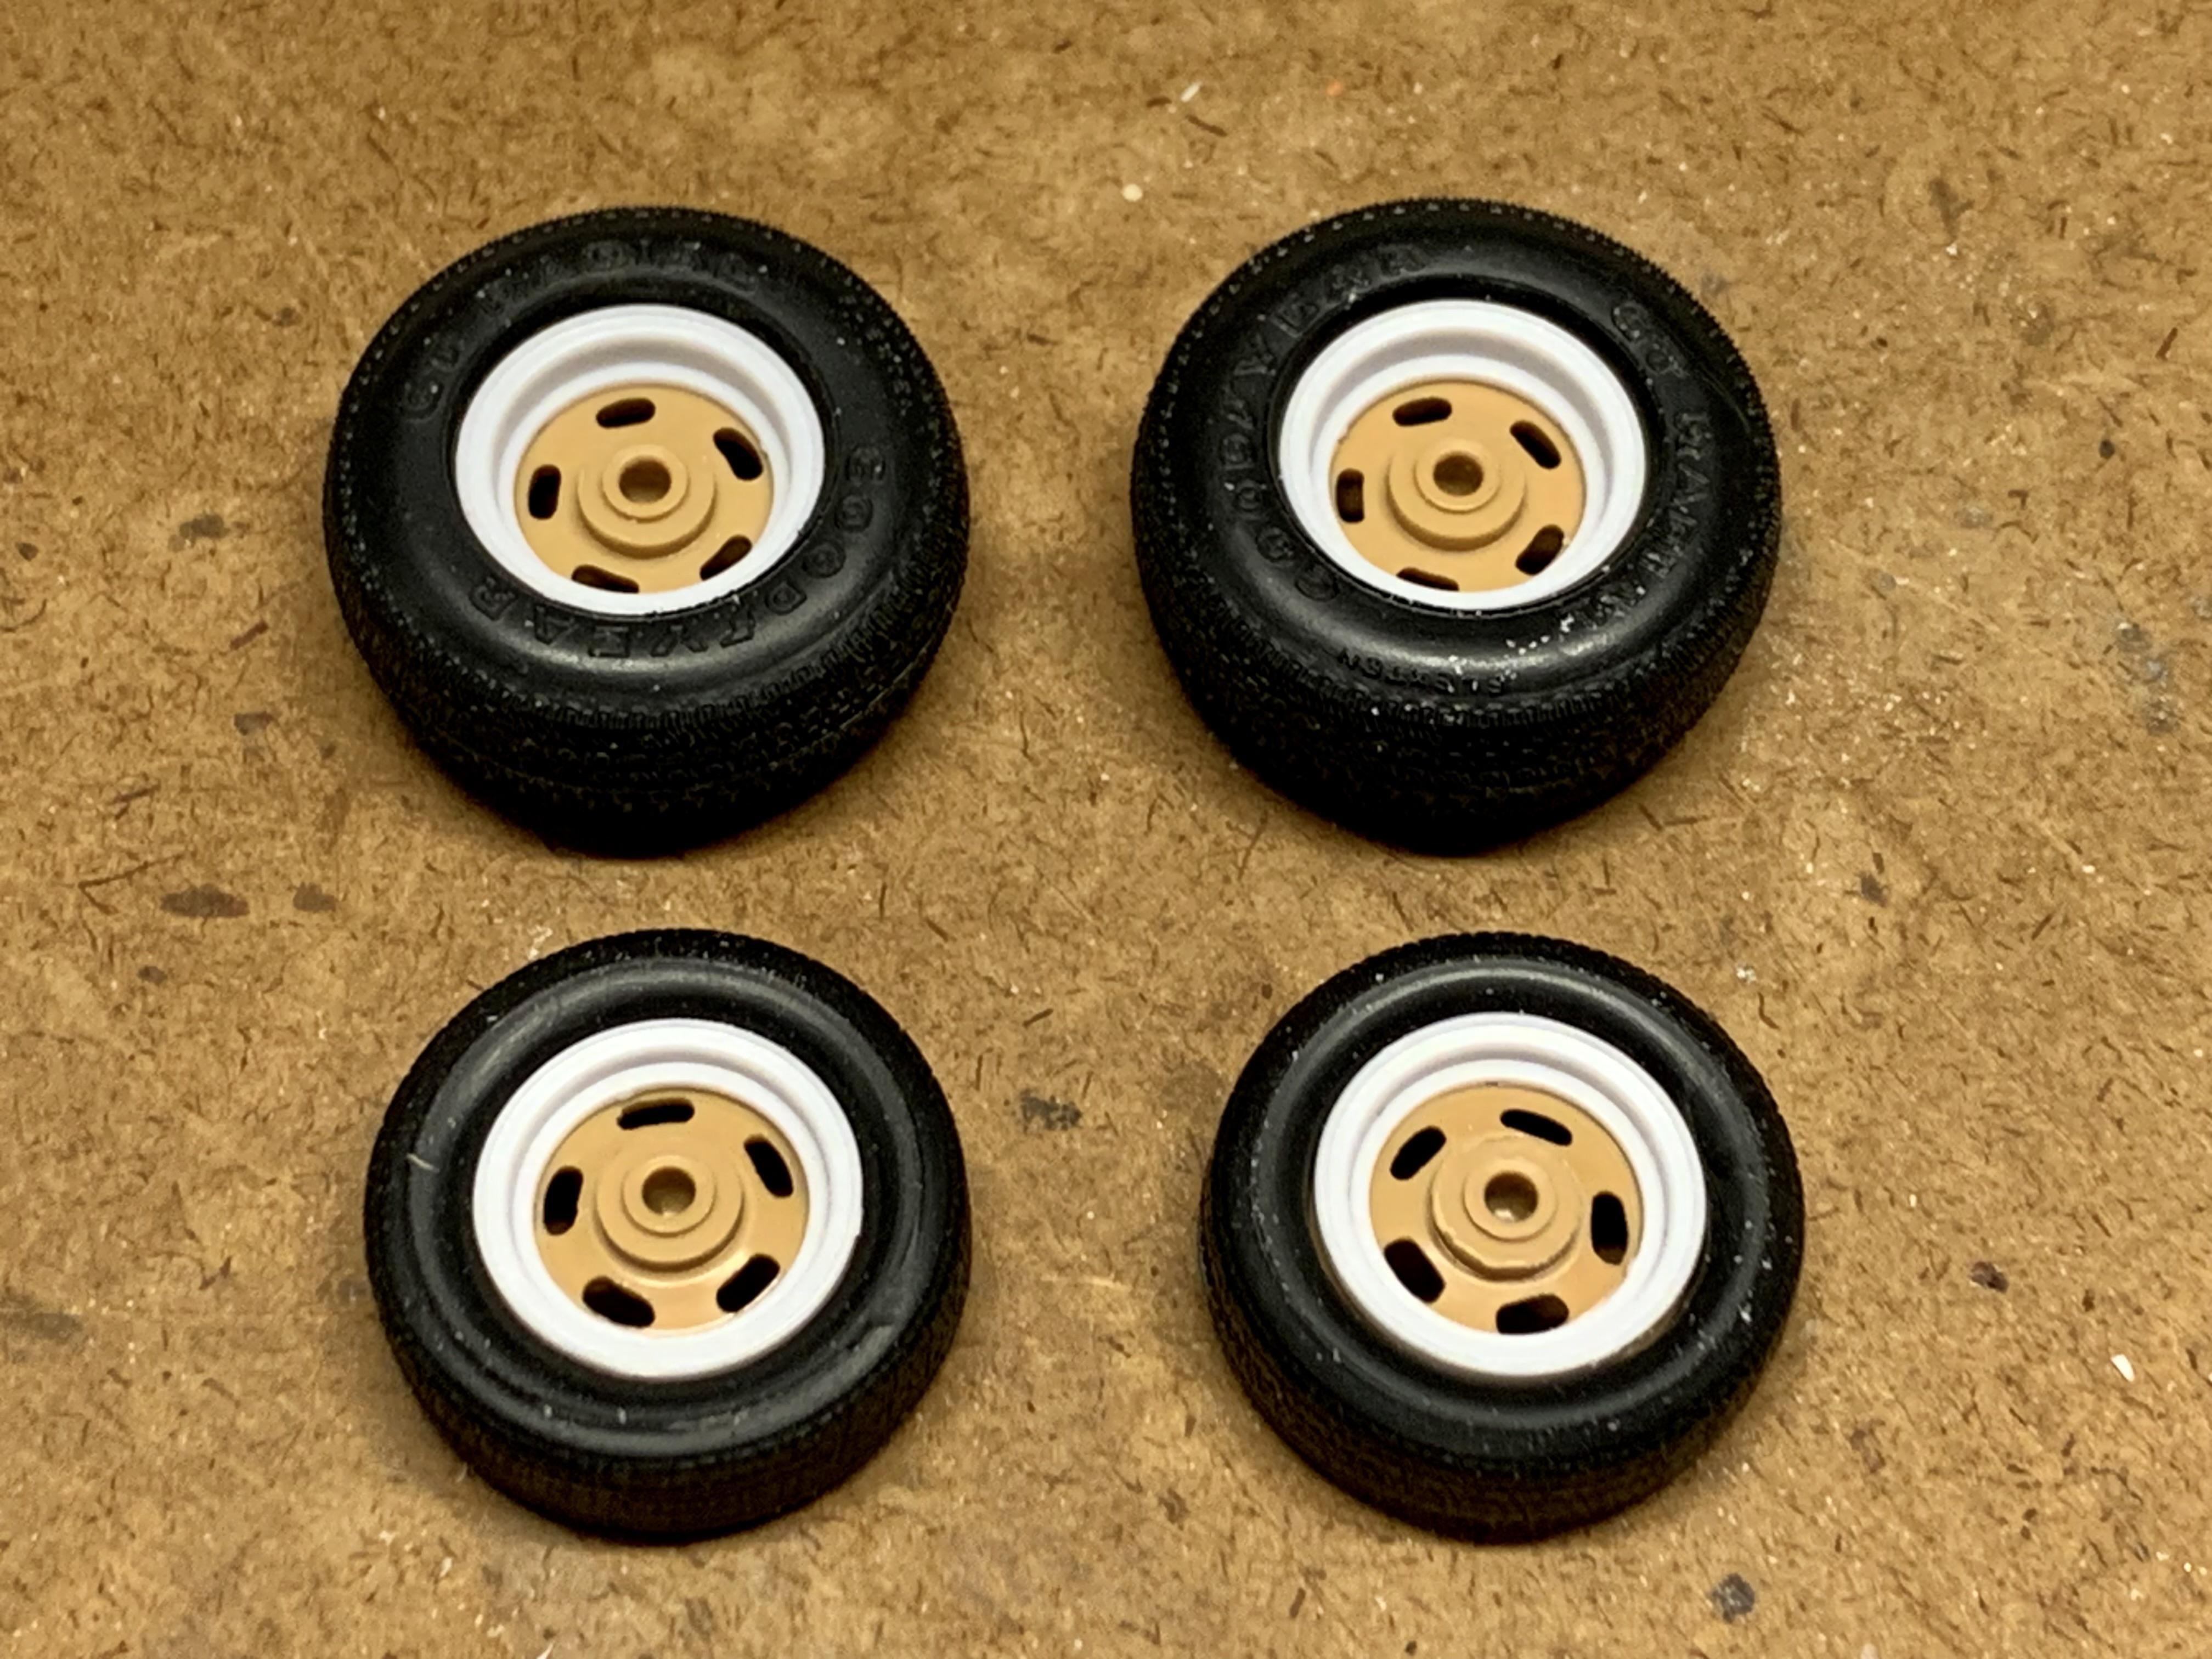
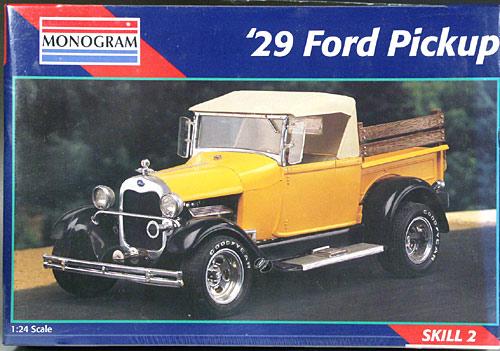
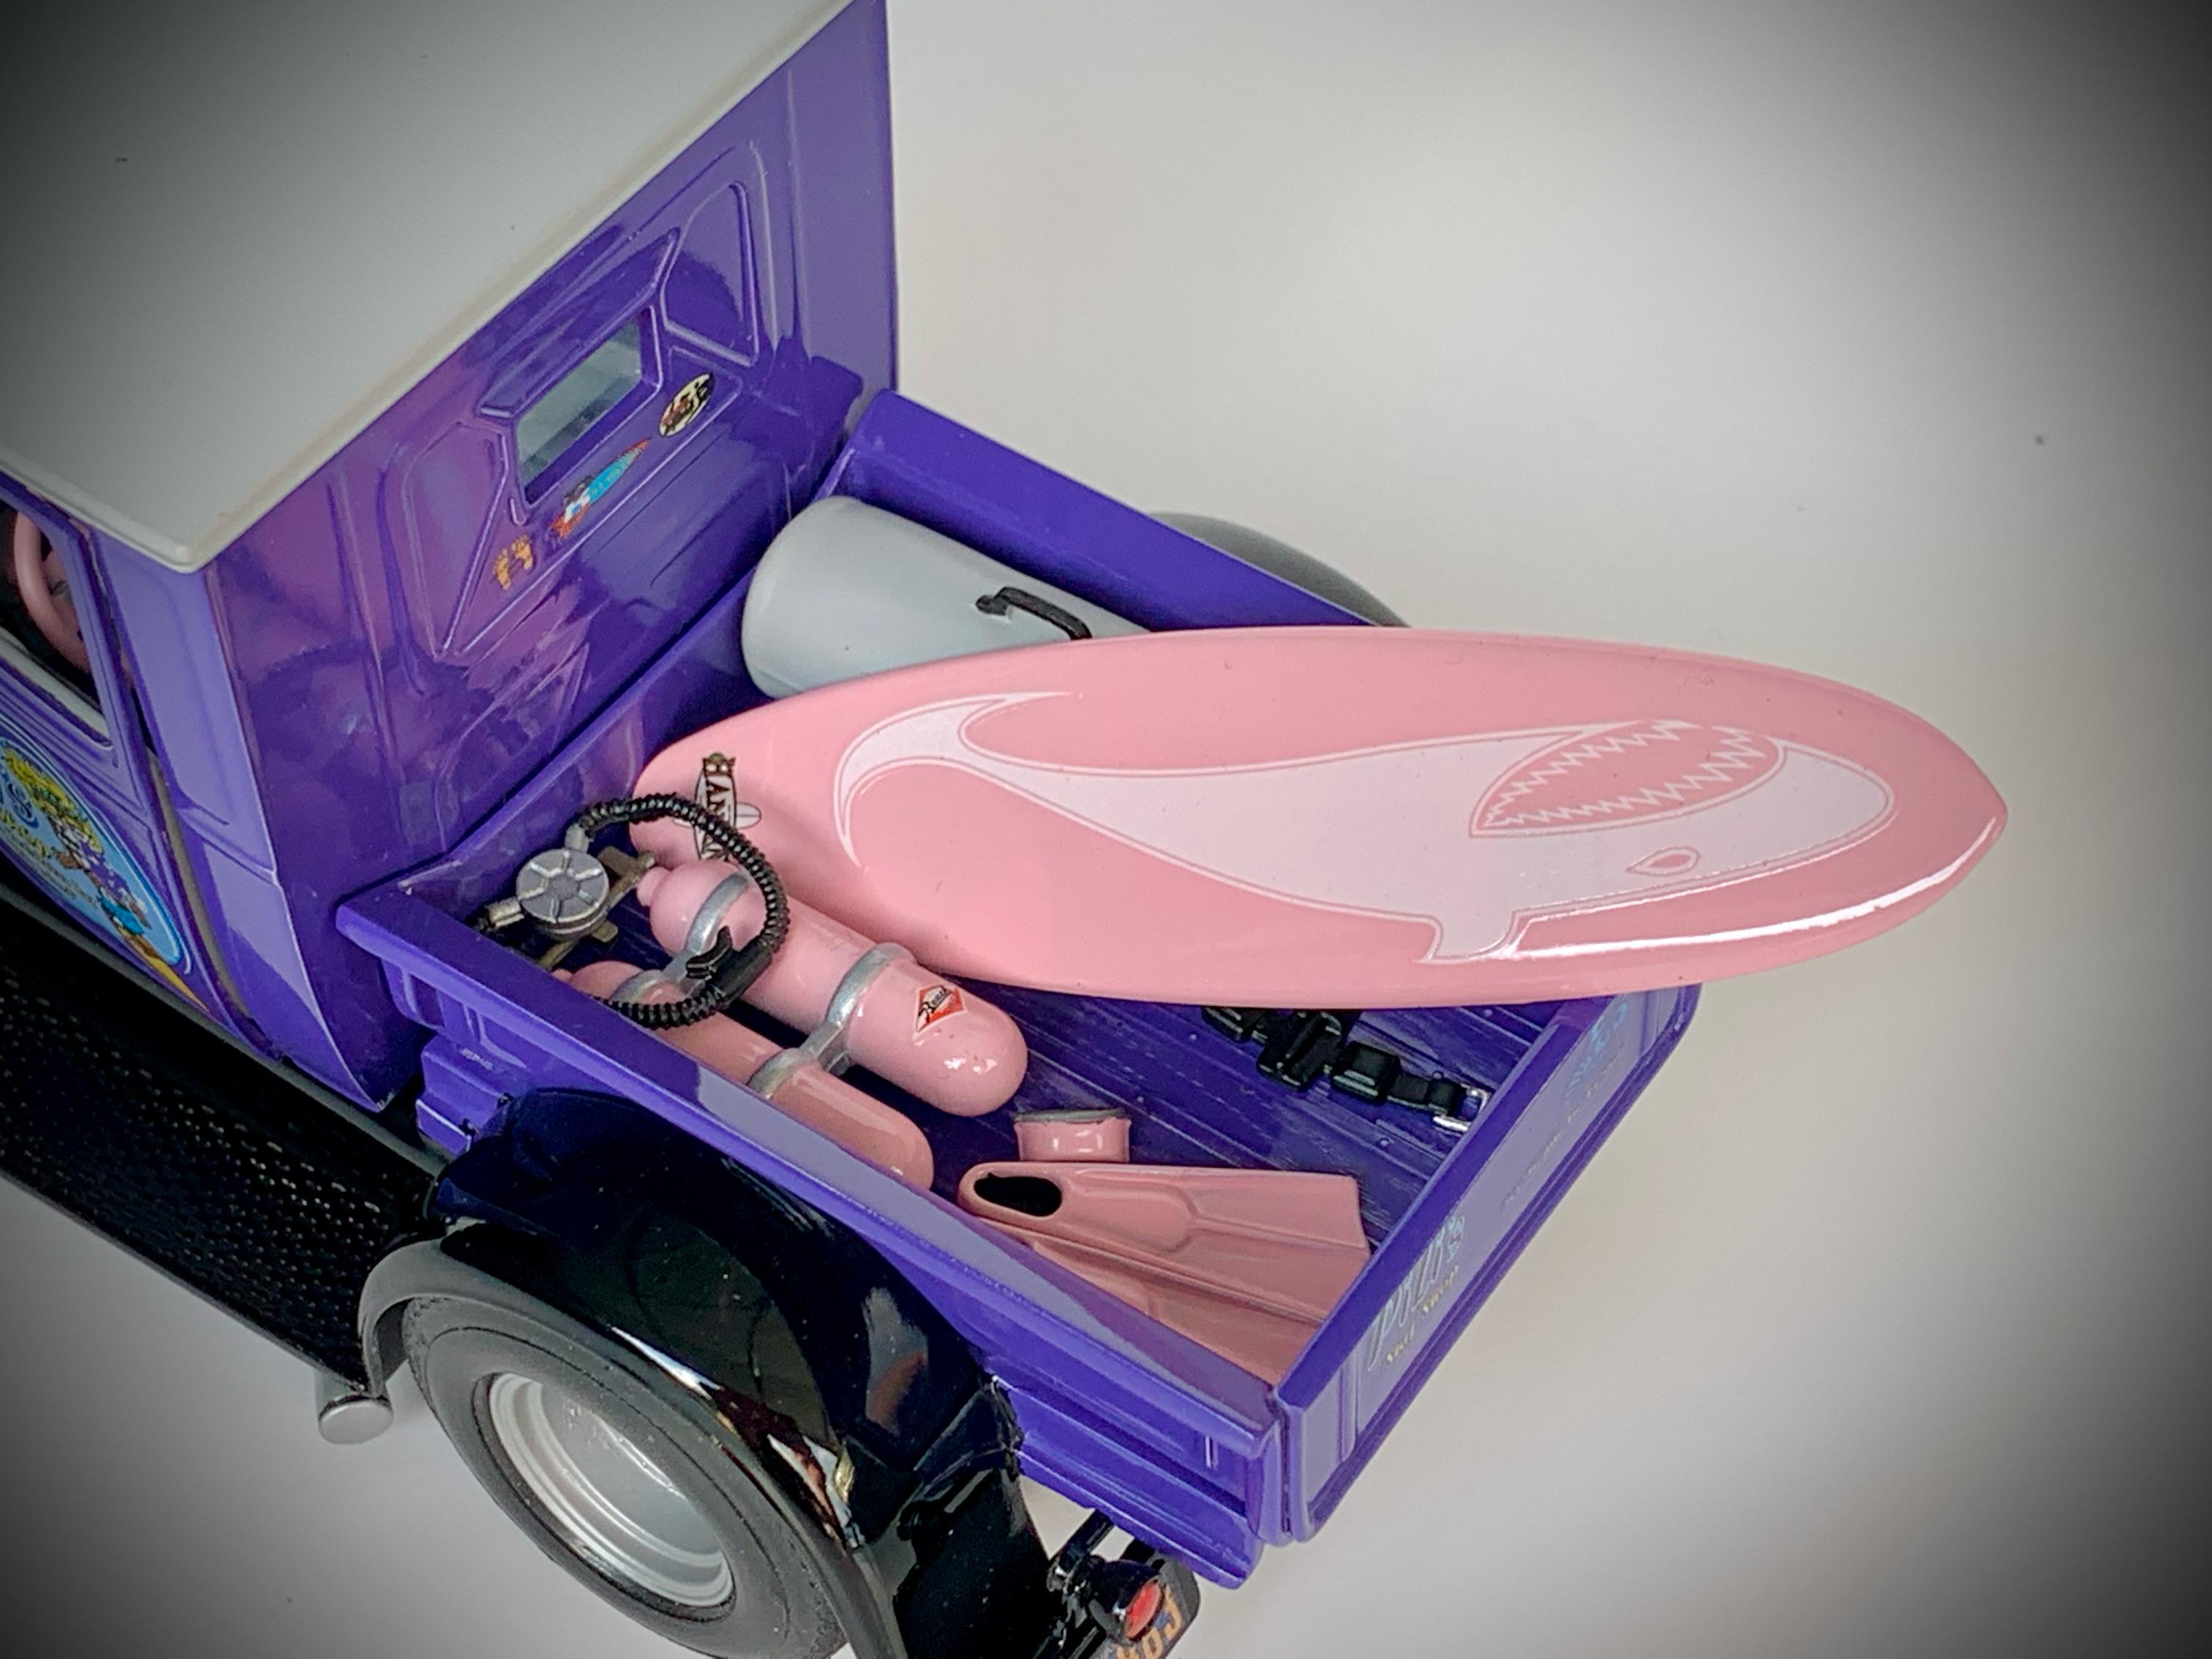
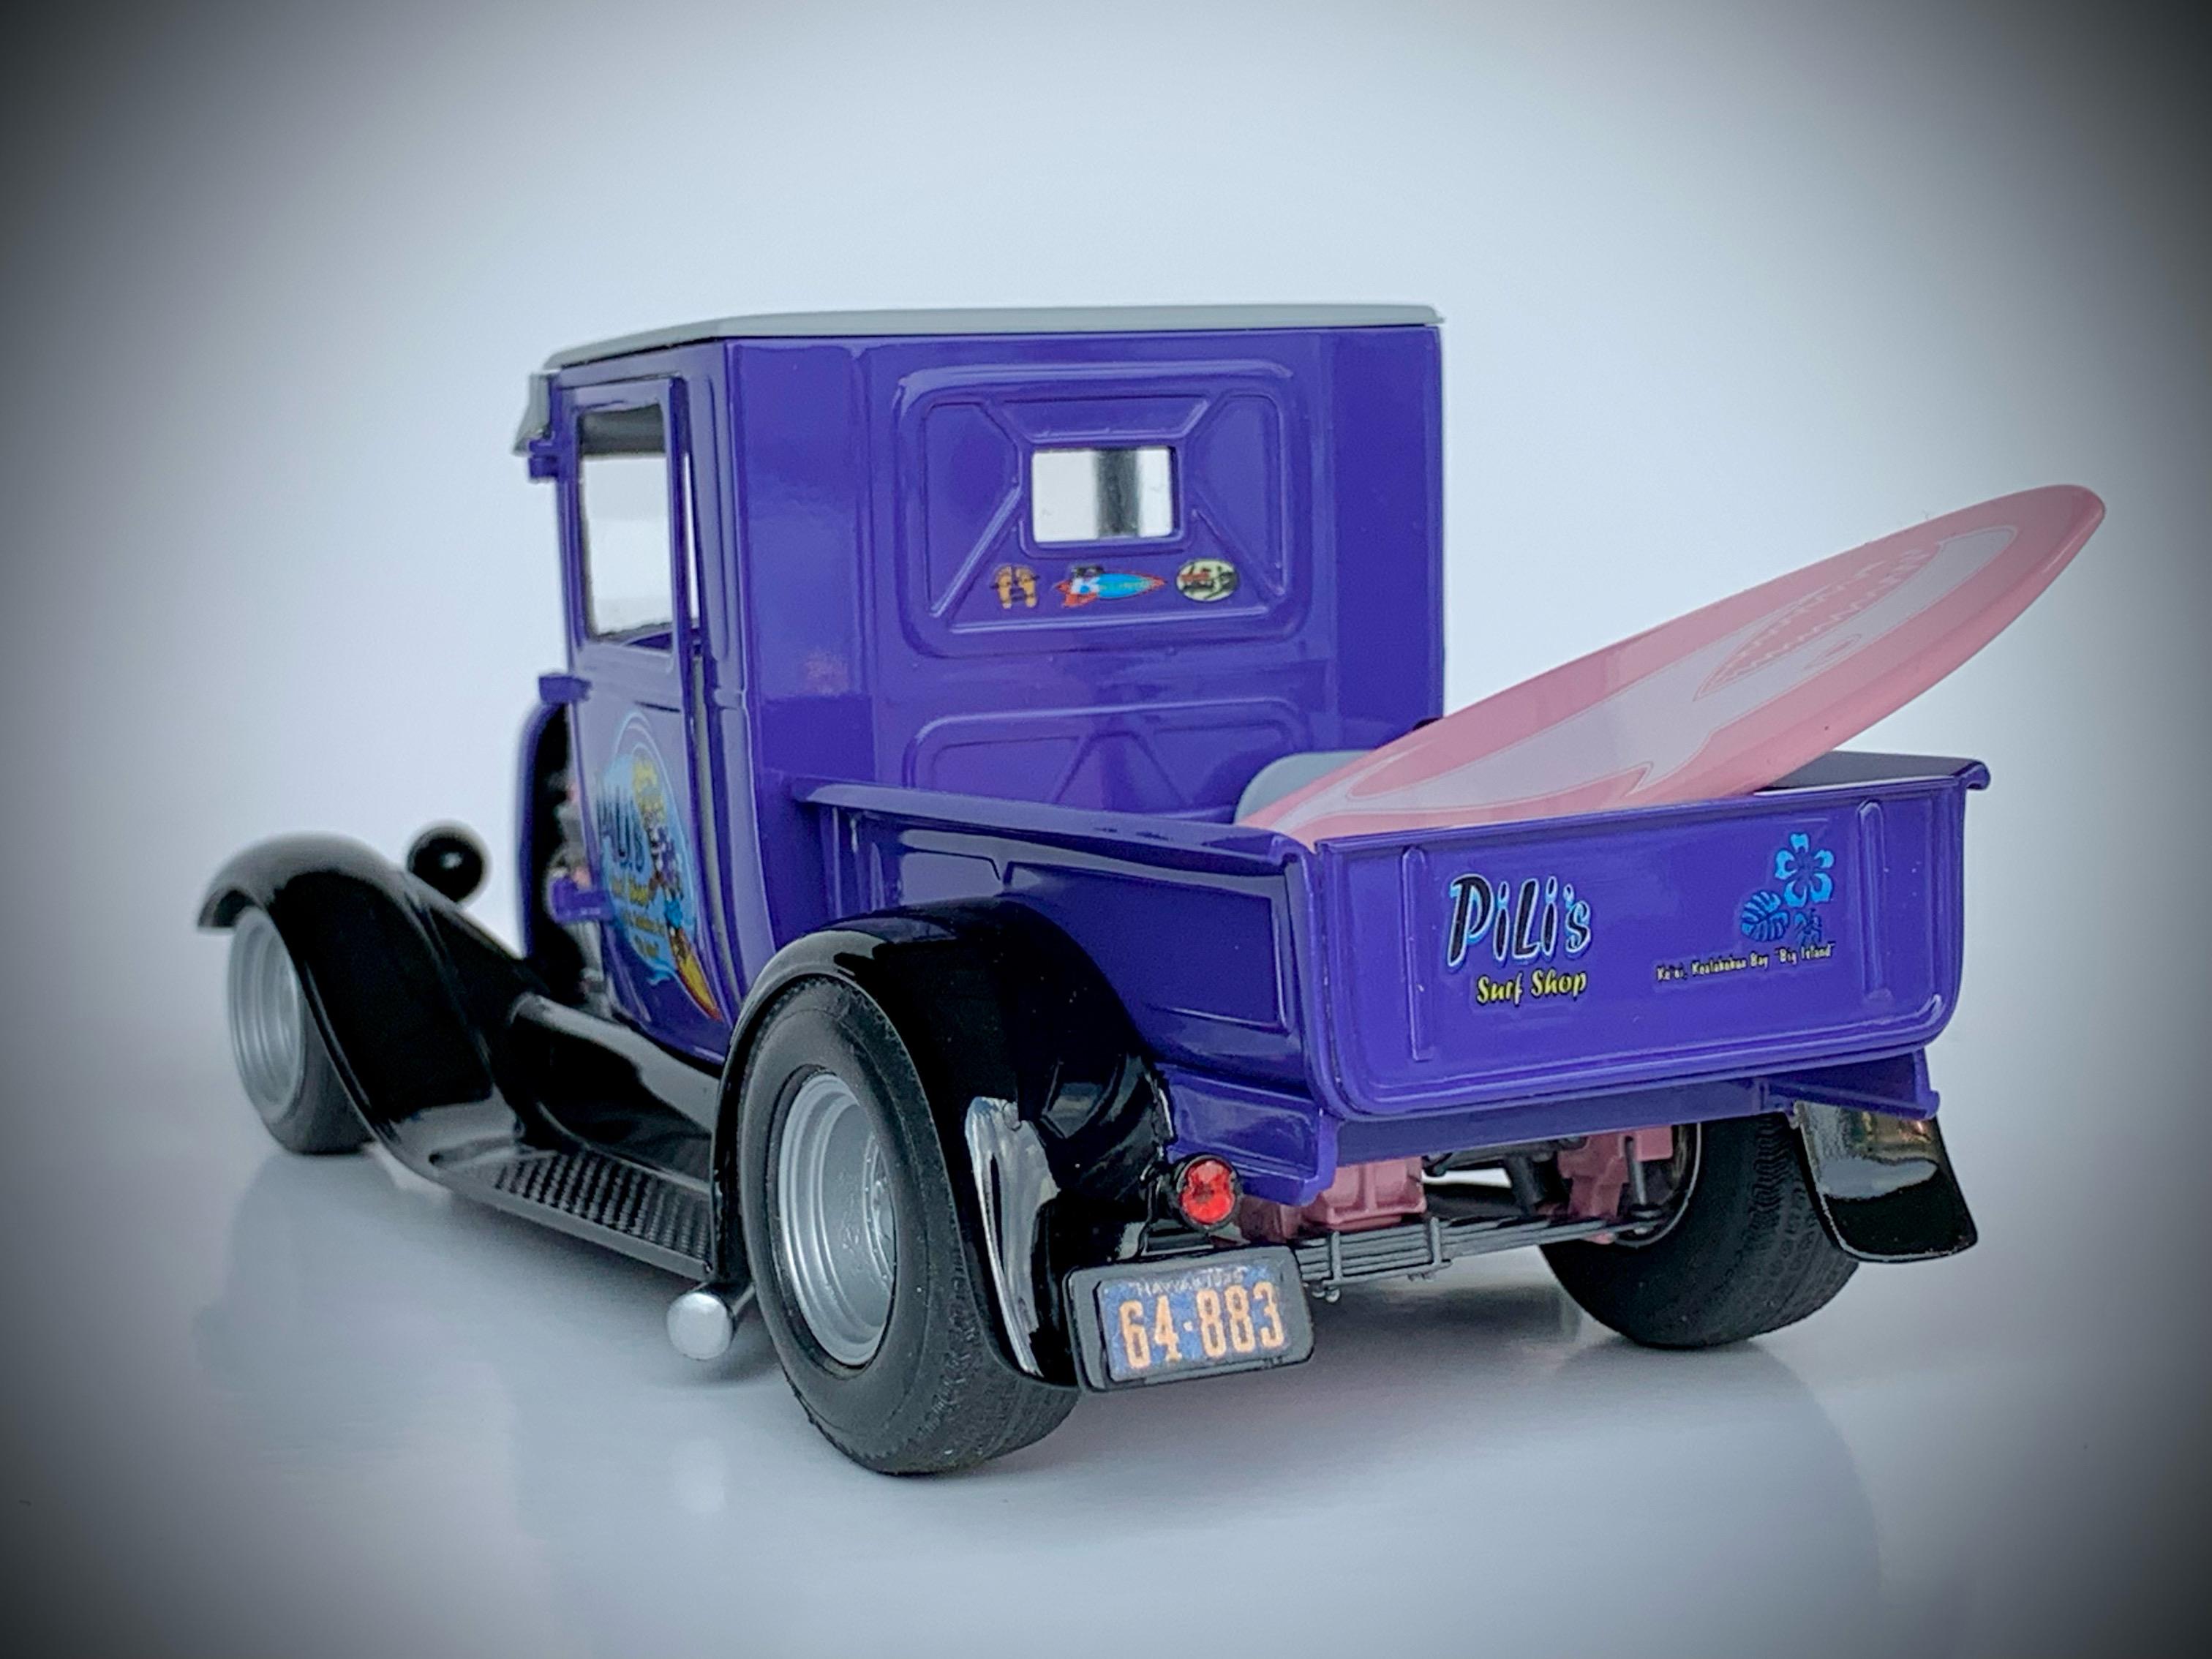
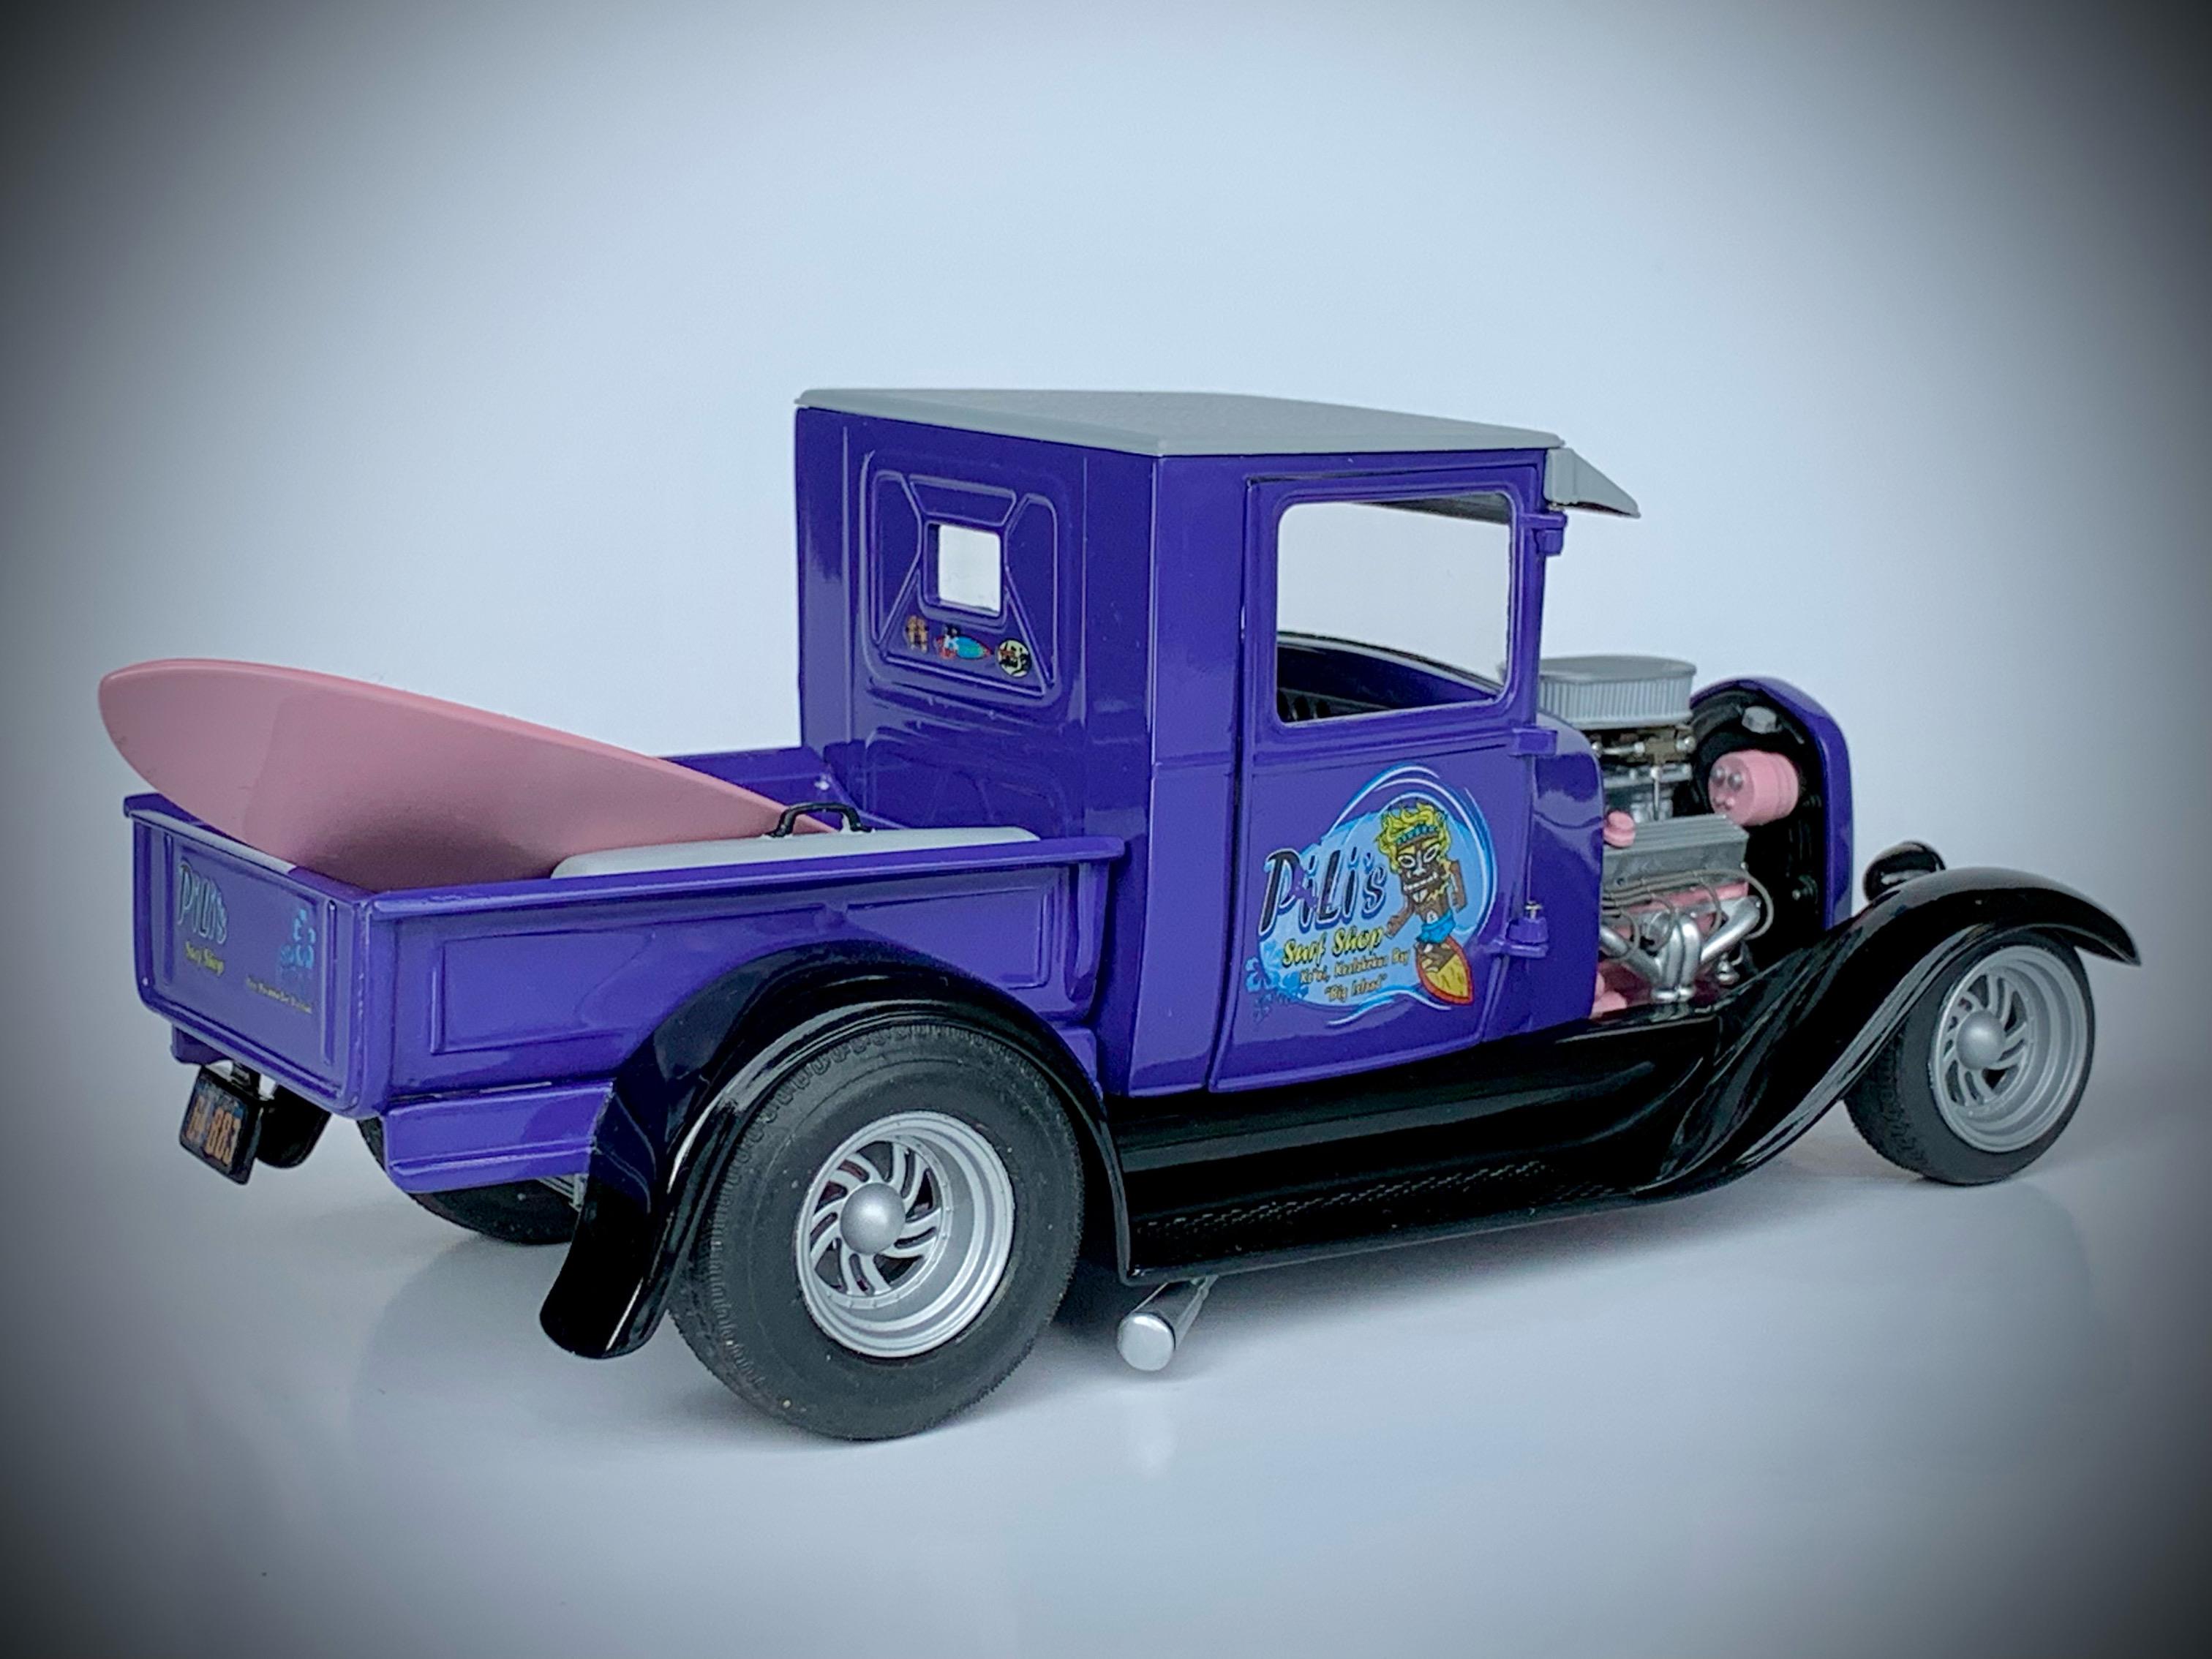
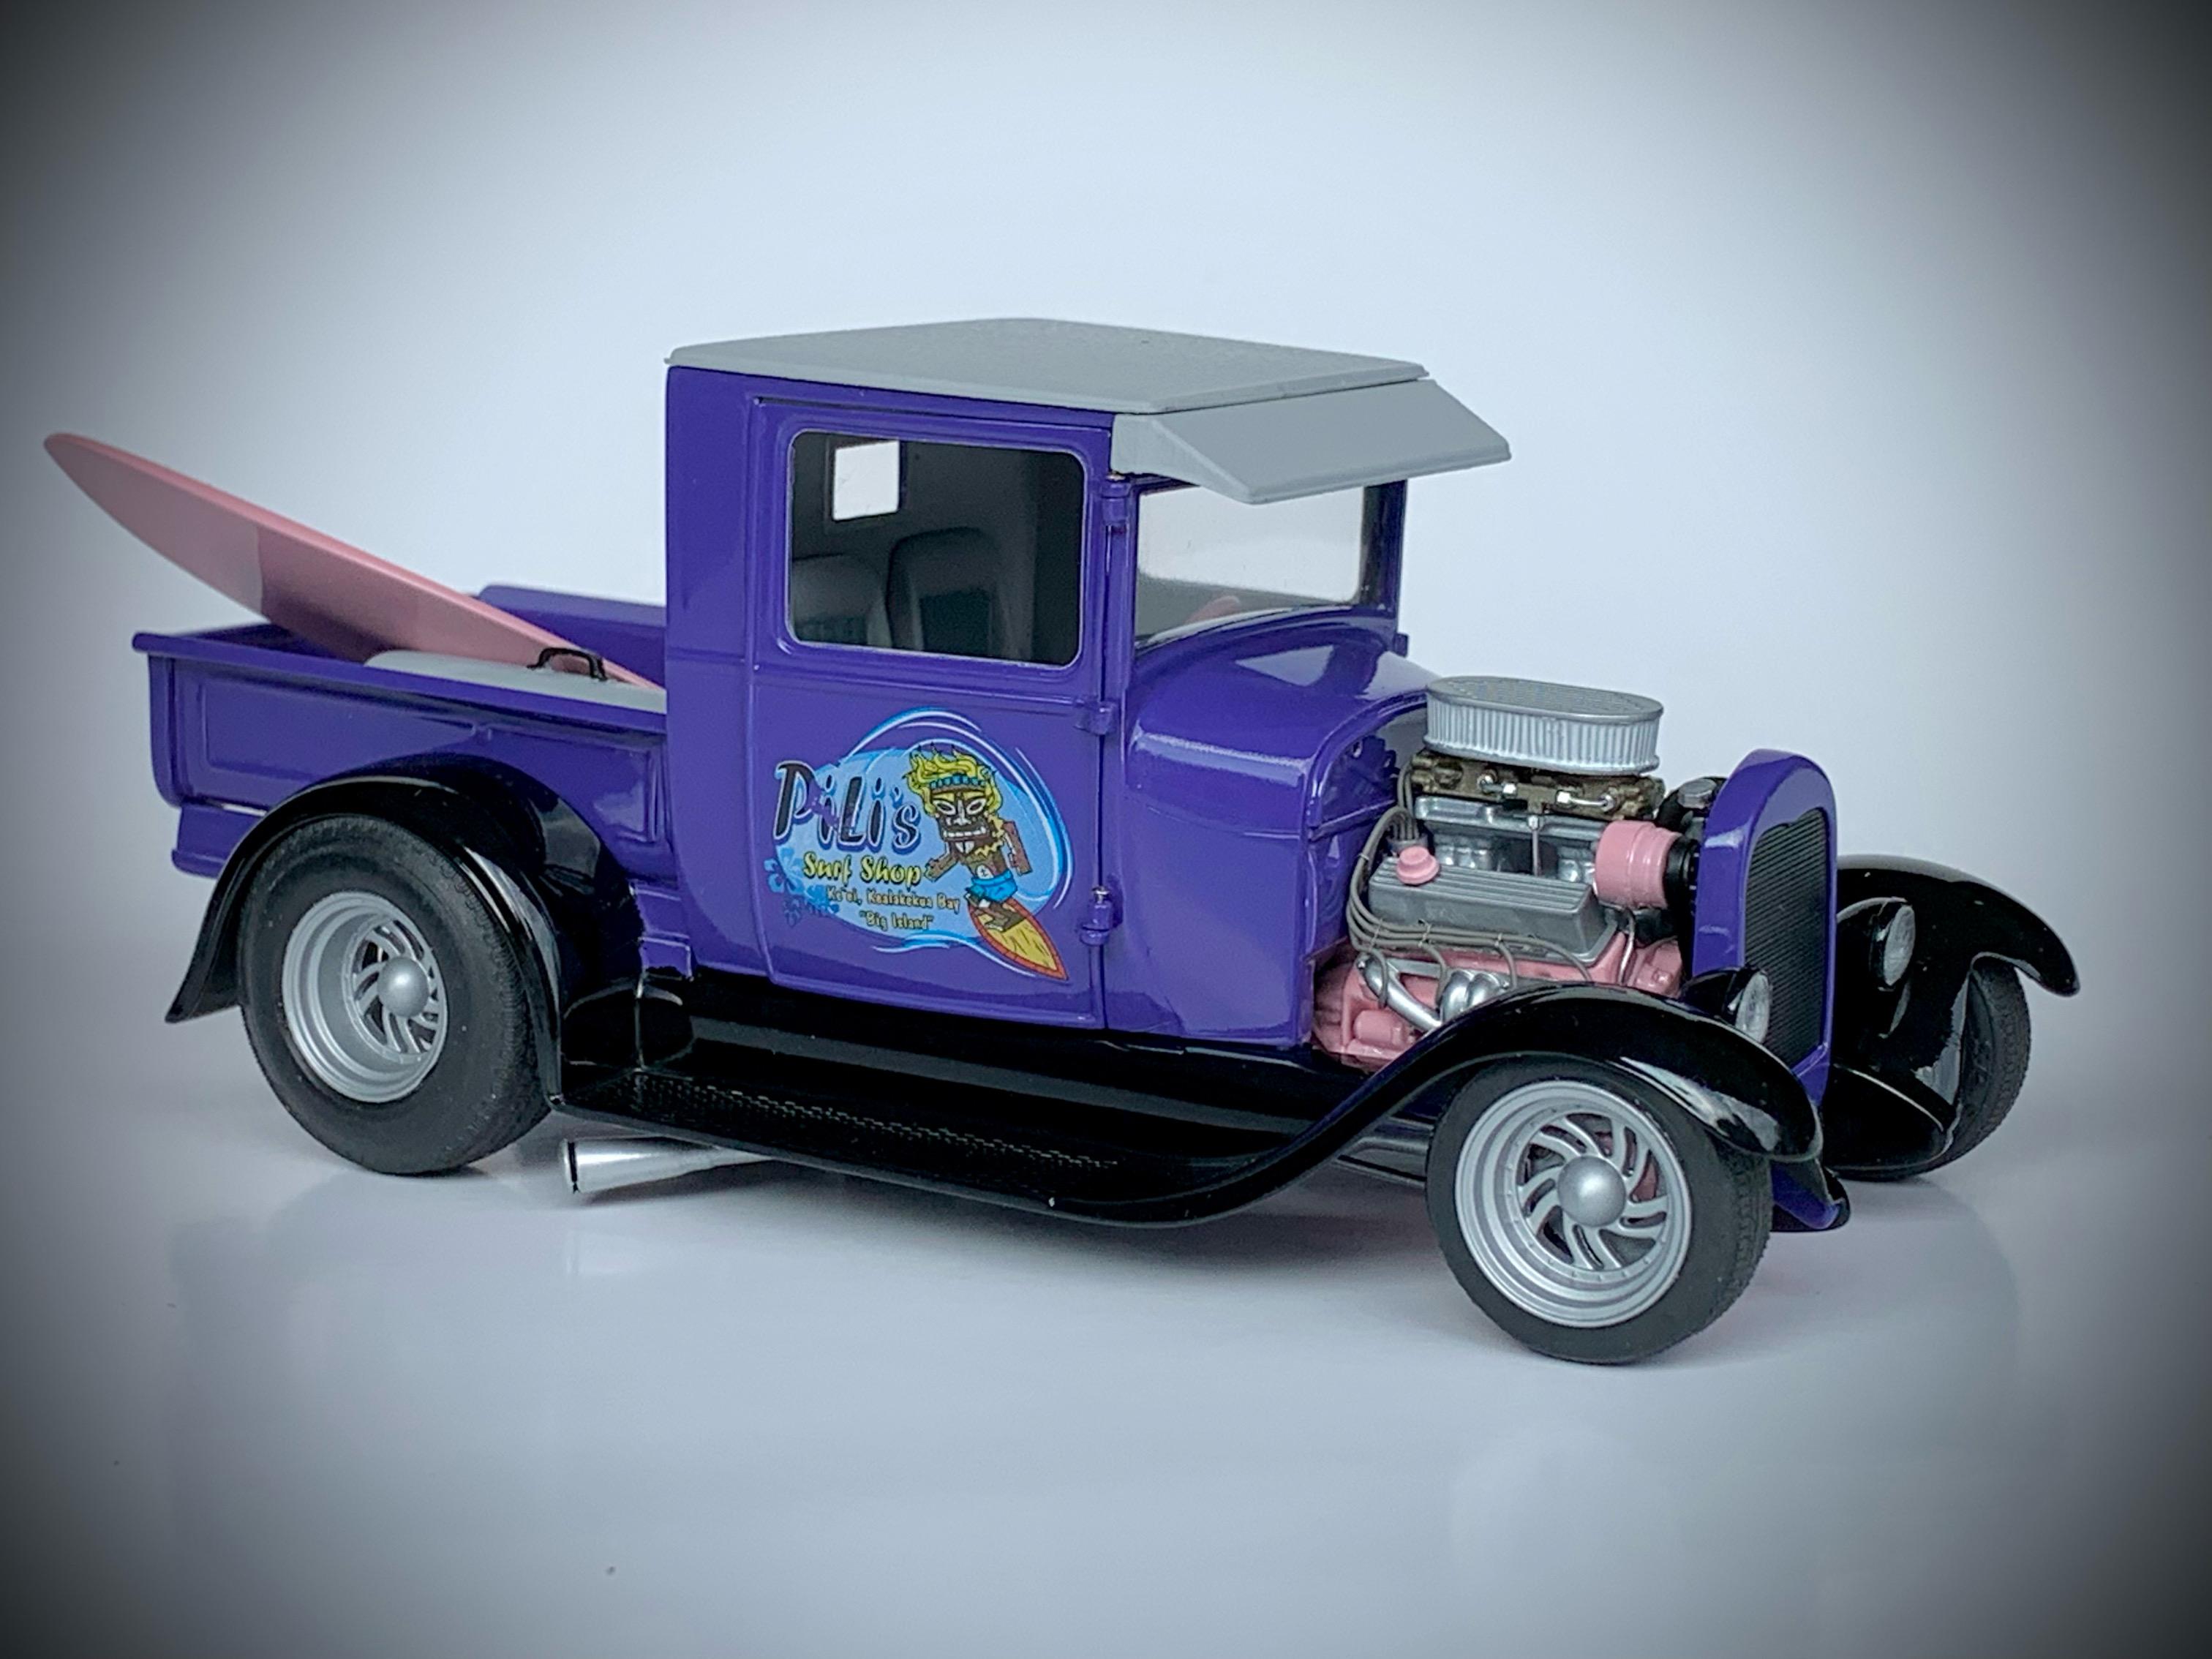
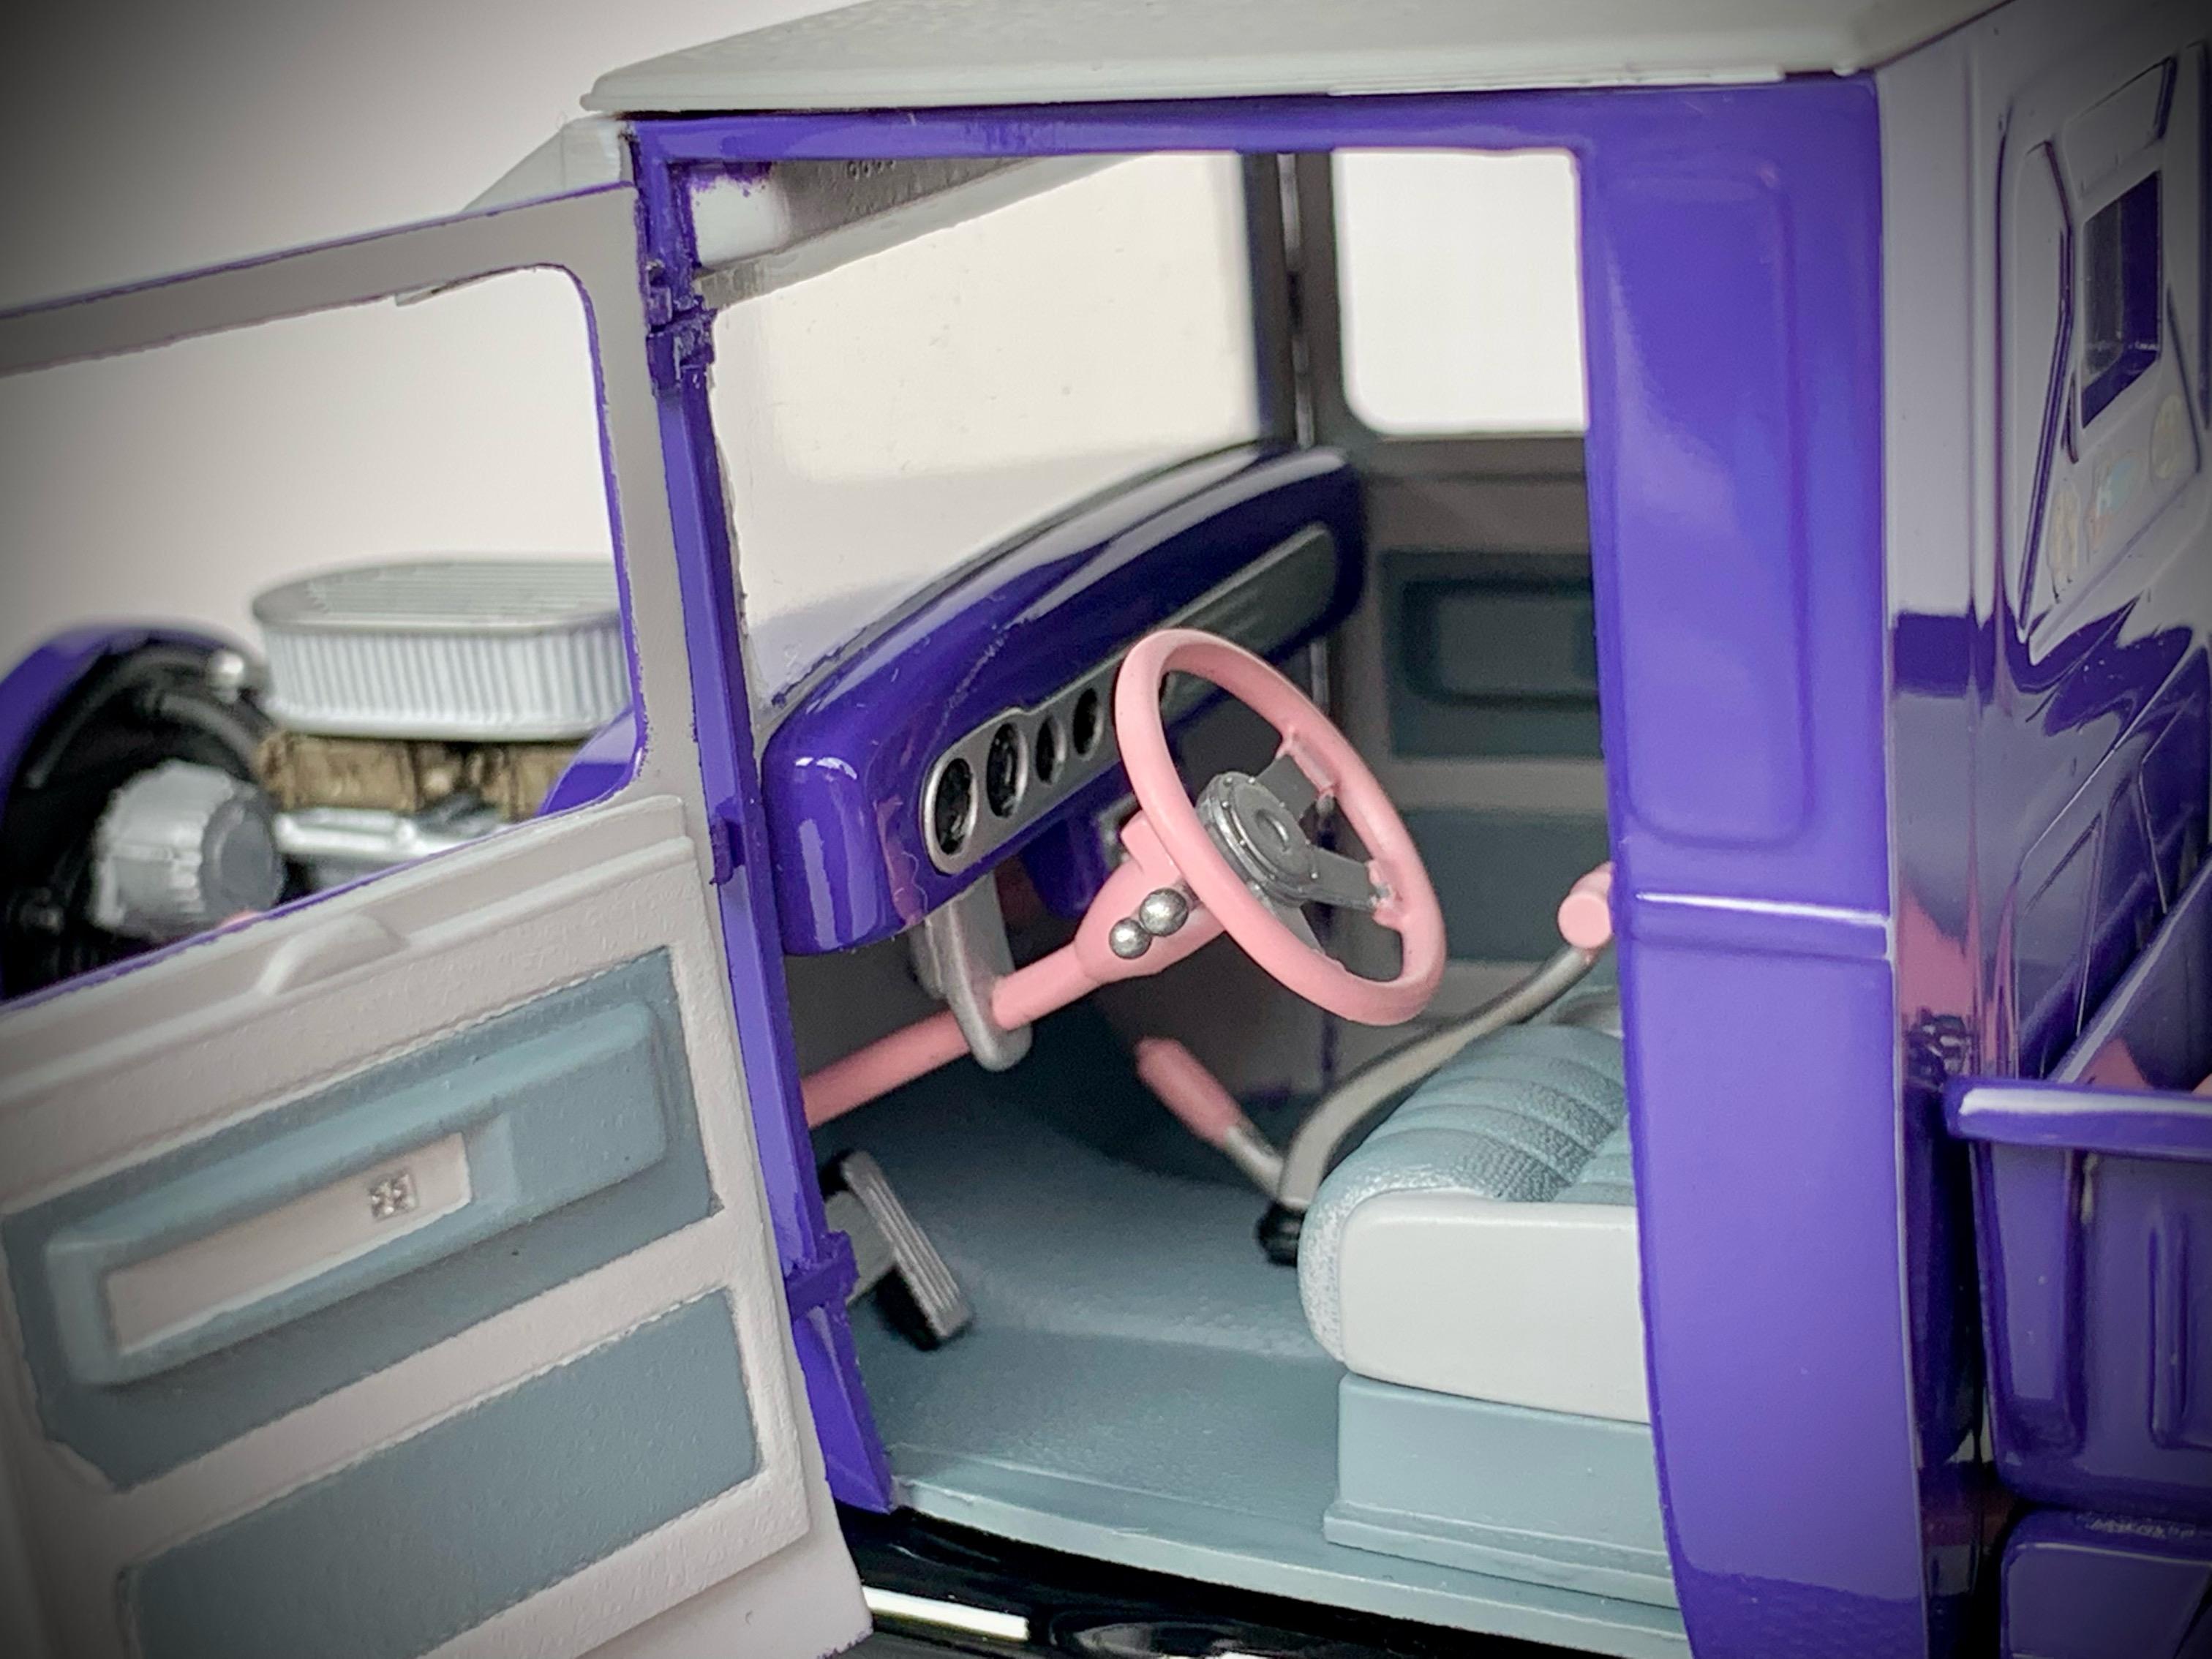
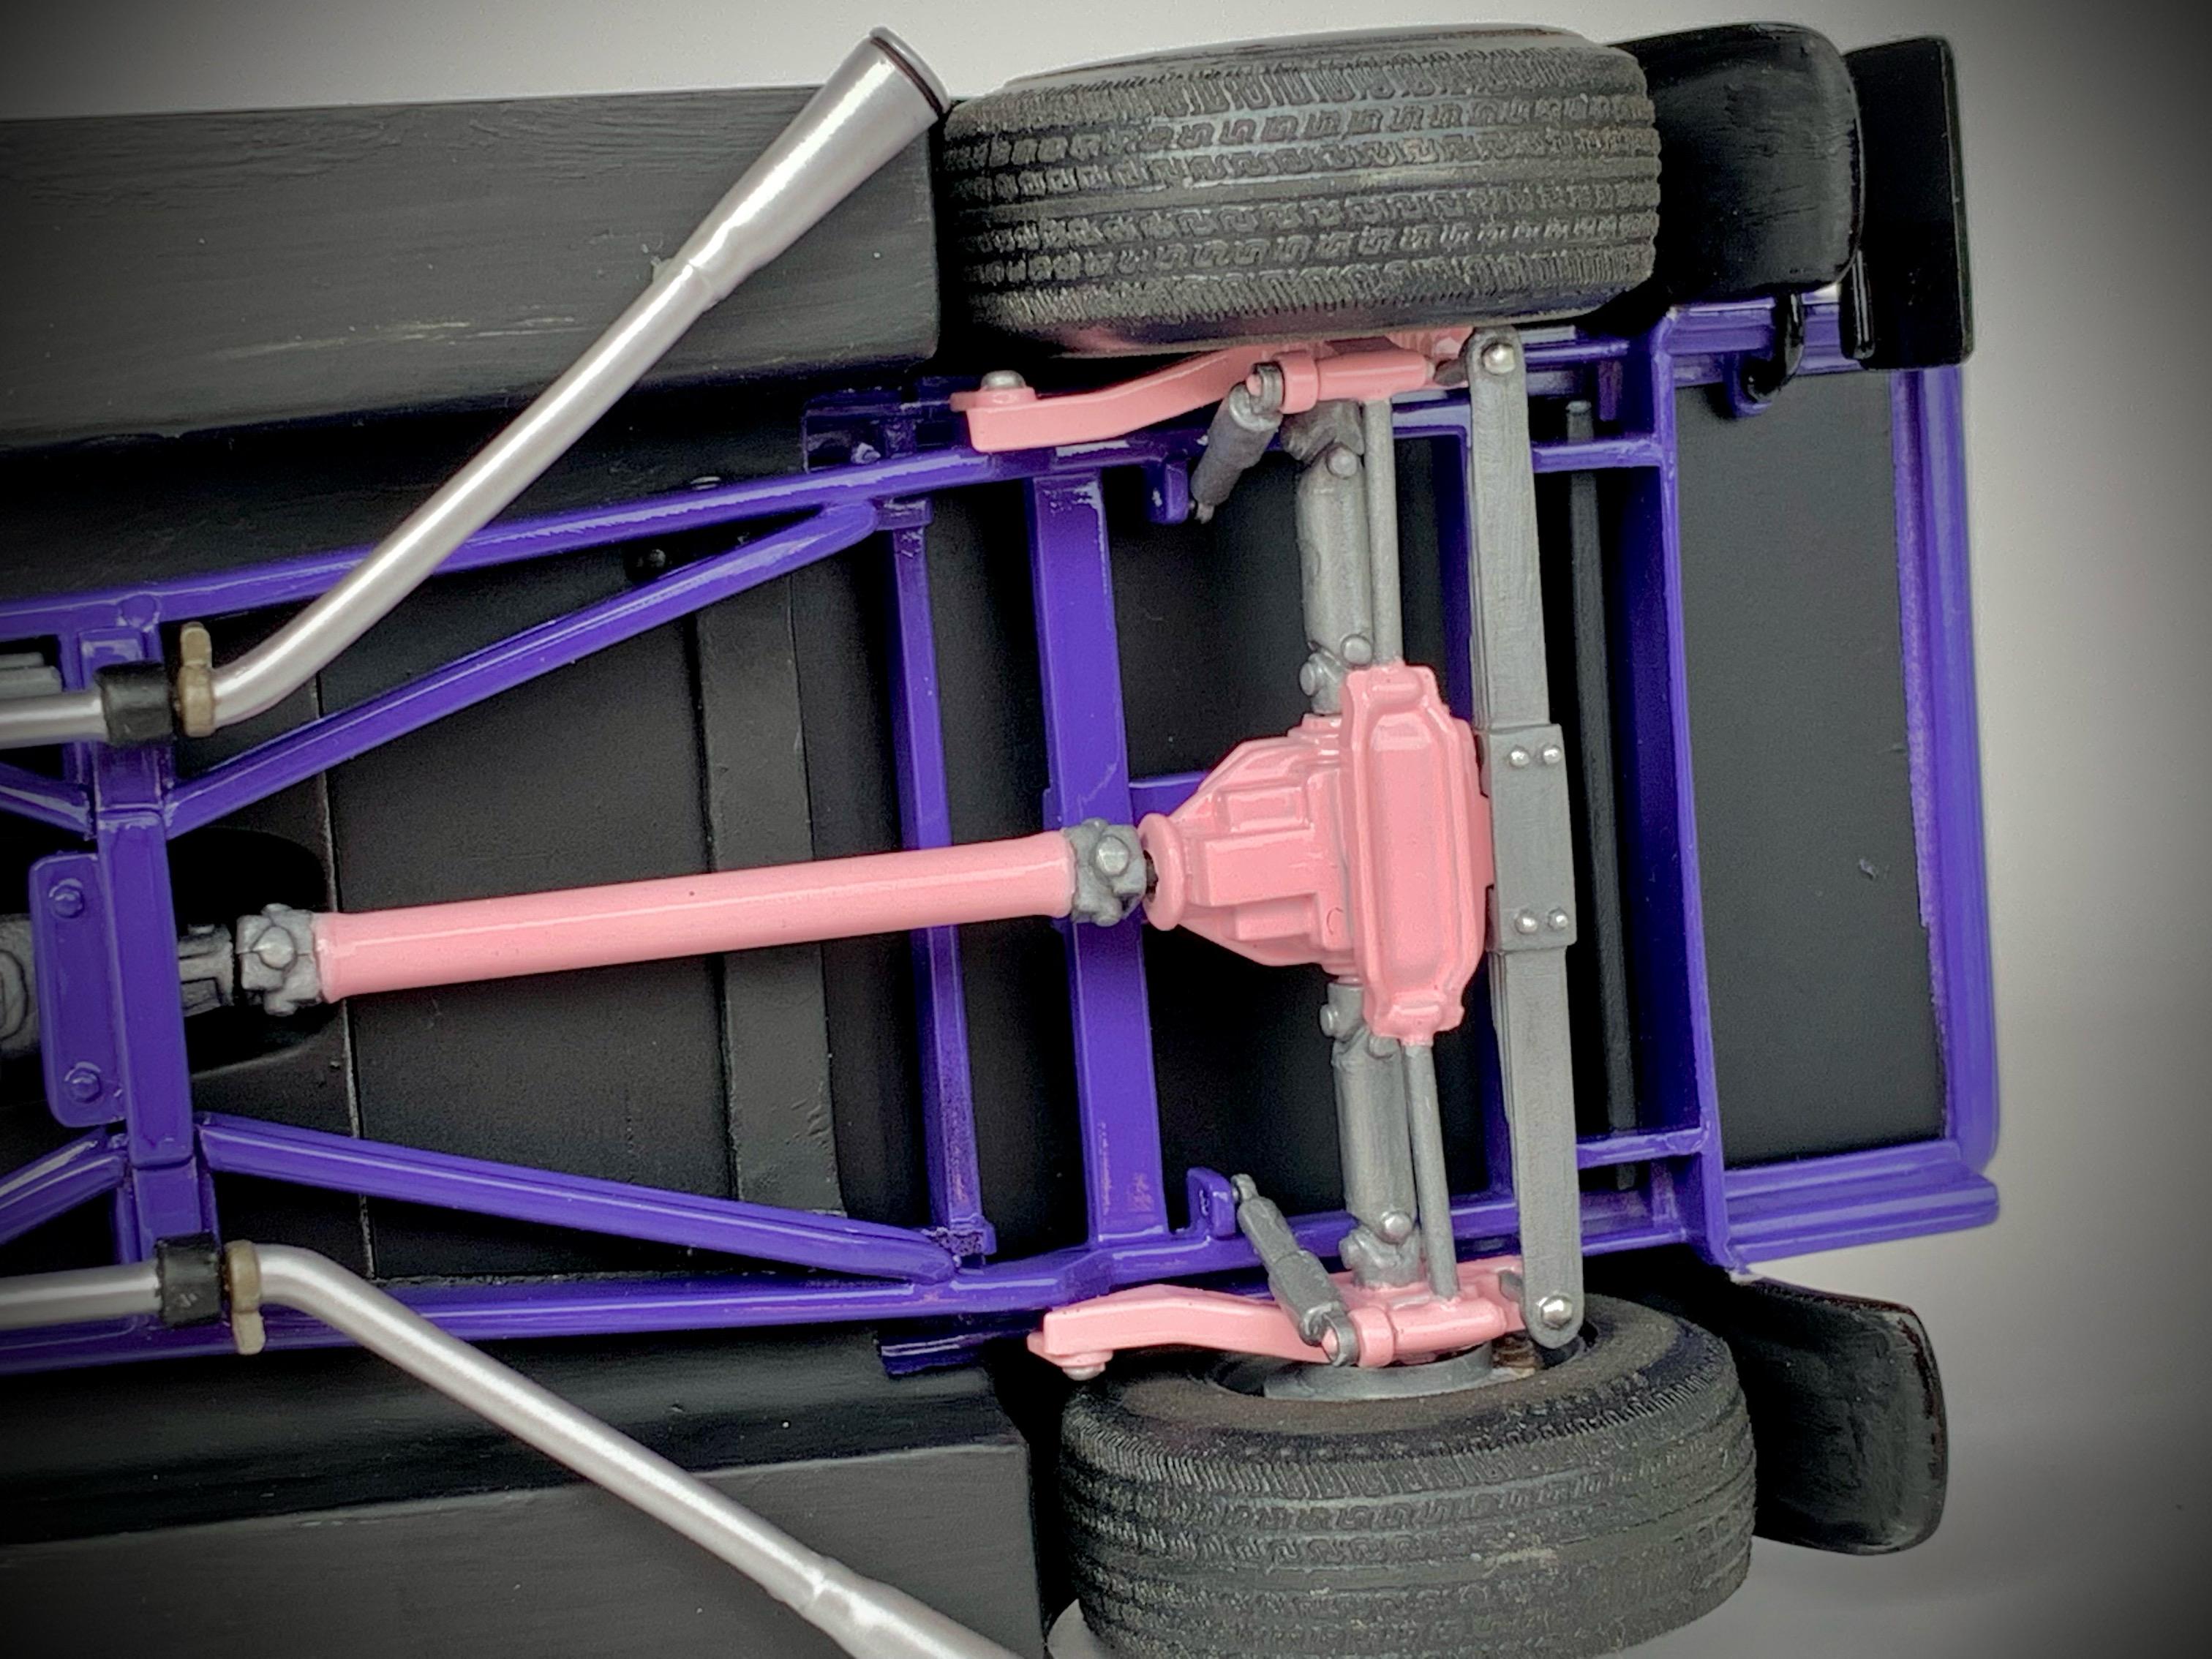
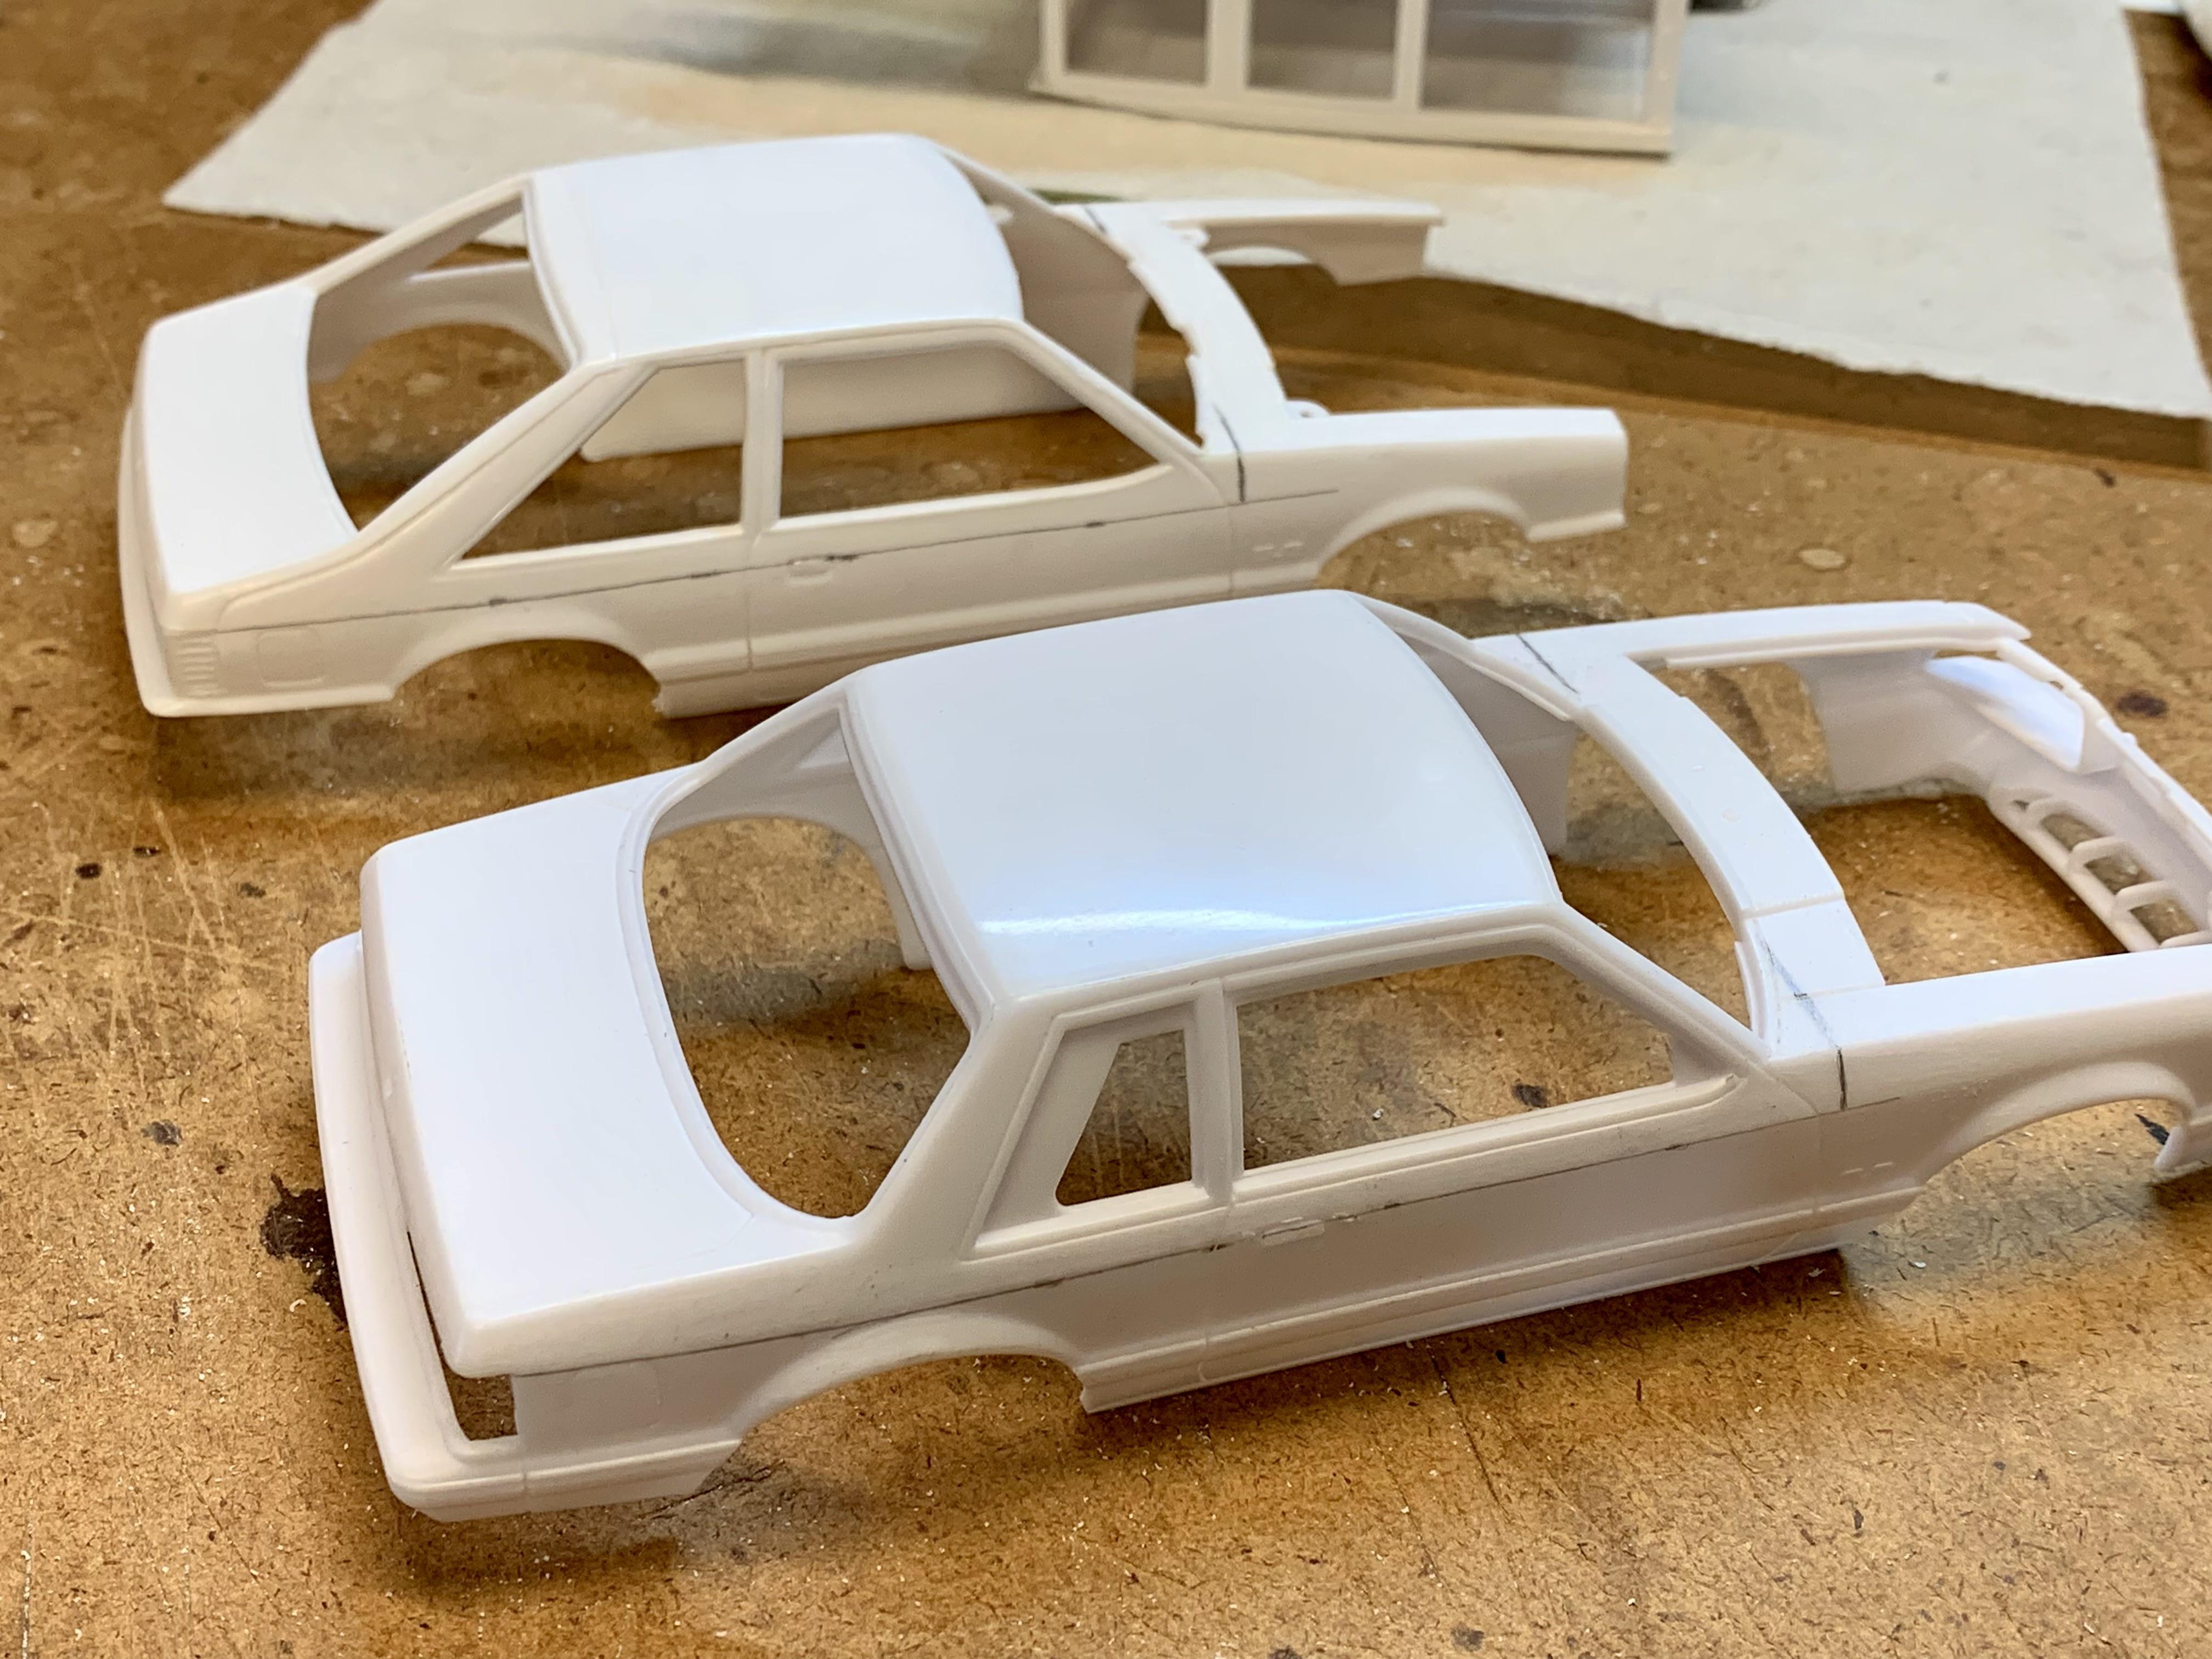
For the first time in forever I’ve found myself in a model building slump that’s gone on for about 6 months now. Not so much for lack of desire, mostly because life decided it hadn’t been busy enough and said, “Hold my beer!” While I have several good existing projects to choose from I thought it would be nice to do something simple to get the juices flowing again compared to my usual heavy kit-bashing, fabricating and detailing. As a kid and teen in the 80’s and 90’s some of my favorite kits to build were the Monogram 1:24 hot rods. They tend to be lower in parts count and softer on fine detail but with a little tweaking they always look good put together. For those reasons I shy away from them as an adult model builder but lately I’ve been feeling nostalgic about the good ol’ days. I am about to turn 44 so it must be a mid-life thing, hahaha. Of those Monogram 1:24 kits the ‘32 Roadster was my very favorite and I built 4 of them over the years with one still surviving. I pulled one from the pile and tore the wrap off it. While my fond memories are of the 80’s release molded in rock-hard yellow I opted to start with the most recent issue molded in softer, easier to work with white. Then I came up with a simple plan which was easier said than done, fighting my overwhelming usual tendency to reengineer the whole thing. What I’ve landed on is a stance and wheel adjustment along with some basic hot rod body mods such as shaving the bumpers, grill trim and door handles. The wheels are the aluminum slots from the Monogram Early Iron ‘29 Roadster Pickup. Front tires are from the kit but had to be relieved to fit the slightly larger diameter wheels. Rear tires are one size larger than the kit rears (found in many Monogram/Revell kits) and also had to be relieved to fit the wheels. The roadster top is not included in this issue but can be found older issues. The rear axle / suspension will be straight from the kit, representing a 1942-1948 Ford banjo axle, Model A spring and 1939-1948 brake plates. The front axle & suspension come from Revell’s Thom Taylor 1934 Cabriolet which was a 90’s styling update to Monogram’s original 1:24 1934 Coupe/Cabriolet kit from the 60’s. It represents a Super Bell dropped tube axle with Pete & Jakes 4-links, tube shocks and disc brakes and was only available in that issue. To lower the ride height I’ll be using the age-old trick for this kit which is to trim the cross members to sink the springs up into them. Out back the center of the rear “cross member” was cut out to allow the spring tab to sink in along with trimming down the 2 support studs circled in red. Up front the center of the front cross member was similarly trimmed and the back edge of the cross member filed down for tie rod clearance. The end results: Here are the wheels and tires fit together after relieving the inside diameter of the tires. As luck would have it, the kit inner wheel halves will work as is. Also, I’ve included a picture of the source kit for the wheels. Next steps are to fit the wheels to the axles and finalize the engine details. More to come…
- 107 replies
-
- 10
-

-
Sometimes a simple, near out of the box project is what we need. Turned out awesome. Love the color choice!
-
I’ve seen quite a few Tweedy Pie’s built over the years and this one might be the nicest yet. Beautifully done!
-
 I already gushed over this in my YouTube comment but I had to show it some love here, too! I absolutely LOVE it as Tim’s 29 Woody is one of my other all-time favorites of his magazine how-to hot rods. Not only did you nail it front to back but it’s also VERY cleanly built.
 -
Nice job on this! With the black fenders, cream wire wheels and big headlights it looks like the quintessential Resto-Rod.
-
I think that’s everyone! It sure is awesome having them all together in one spot. @tim boyd Thanks for not only sharing all those great modern pictures of your truck but also some insight in how that issue of Street Rodder came to be. I think I failed to mention that aspect before. It’s funny that the extended model car coverage would light so many fires in people especially considering a large number of the subscribers no doubt grew up in the 60’s and 70’s heyday of model cars. @Rocking Rodney Rat Thanks for not only sharing your current day Boyd truck but also taking the time to take pictures and share your original Boyd inspired truck. I love the stereo equipment in the bed and overall color scheme. @Kit Karson and @Speedpro To say your collaboration turned out stellar would be an understatement. The truck itself came out next level nice and then there’s the killer matching trailer and cart. Absolutely killer! @alan barton I love your truck. Not only is it in keeping with Tim’s original, the extended cab and V6 engine are also very period correct. There were ton of guys doing both in the 80’s and I’m so glad you thought to go there. The Mullins trailer and street rod pedal car are a awesome, too! @bill-e-boy Awesome that you were able to get your truck done! The extended John Buttera chassis makes for a perfect modern foundation and I dig the Champ 500 wheels. They were incredibly popular back in the 80’s.
-
So cool to see the old AMT Willys done as a Street Rod. Nice work on the suspension and stance!
-
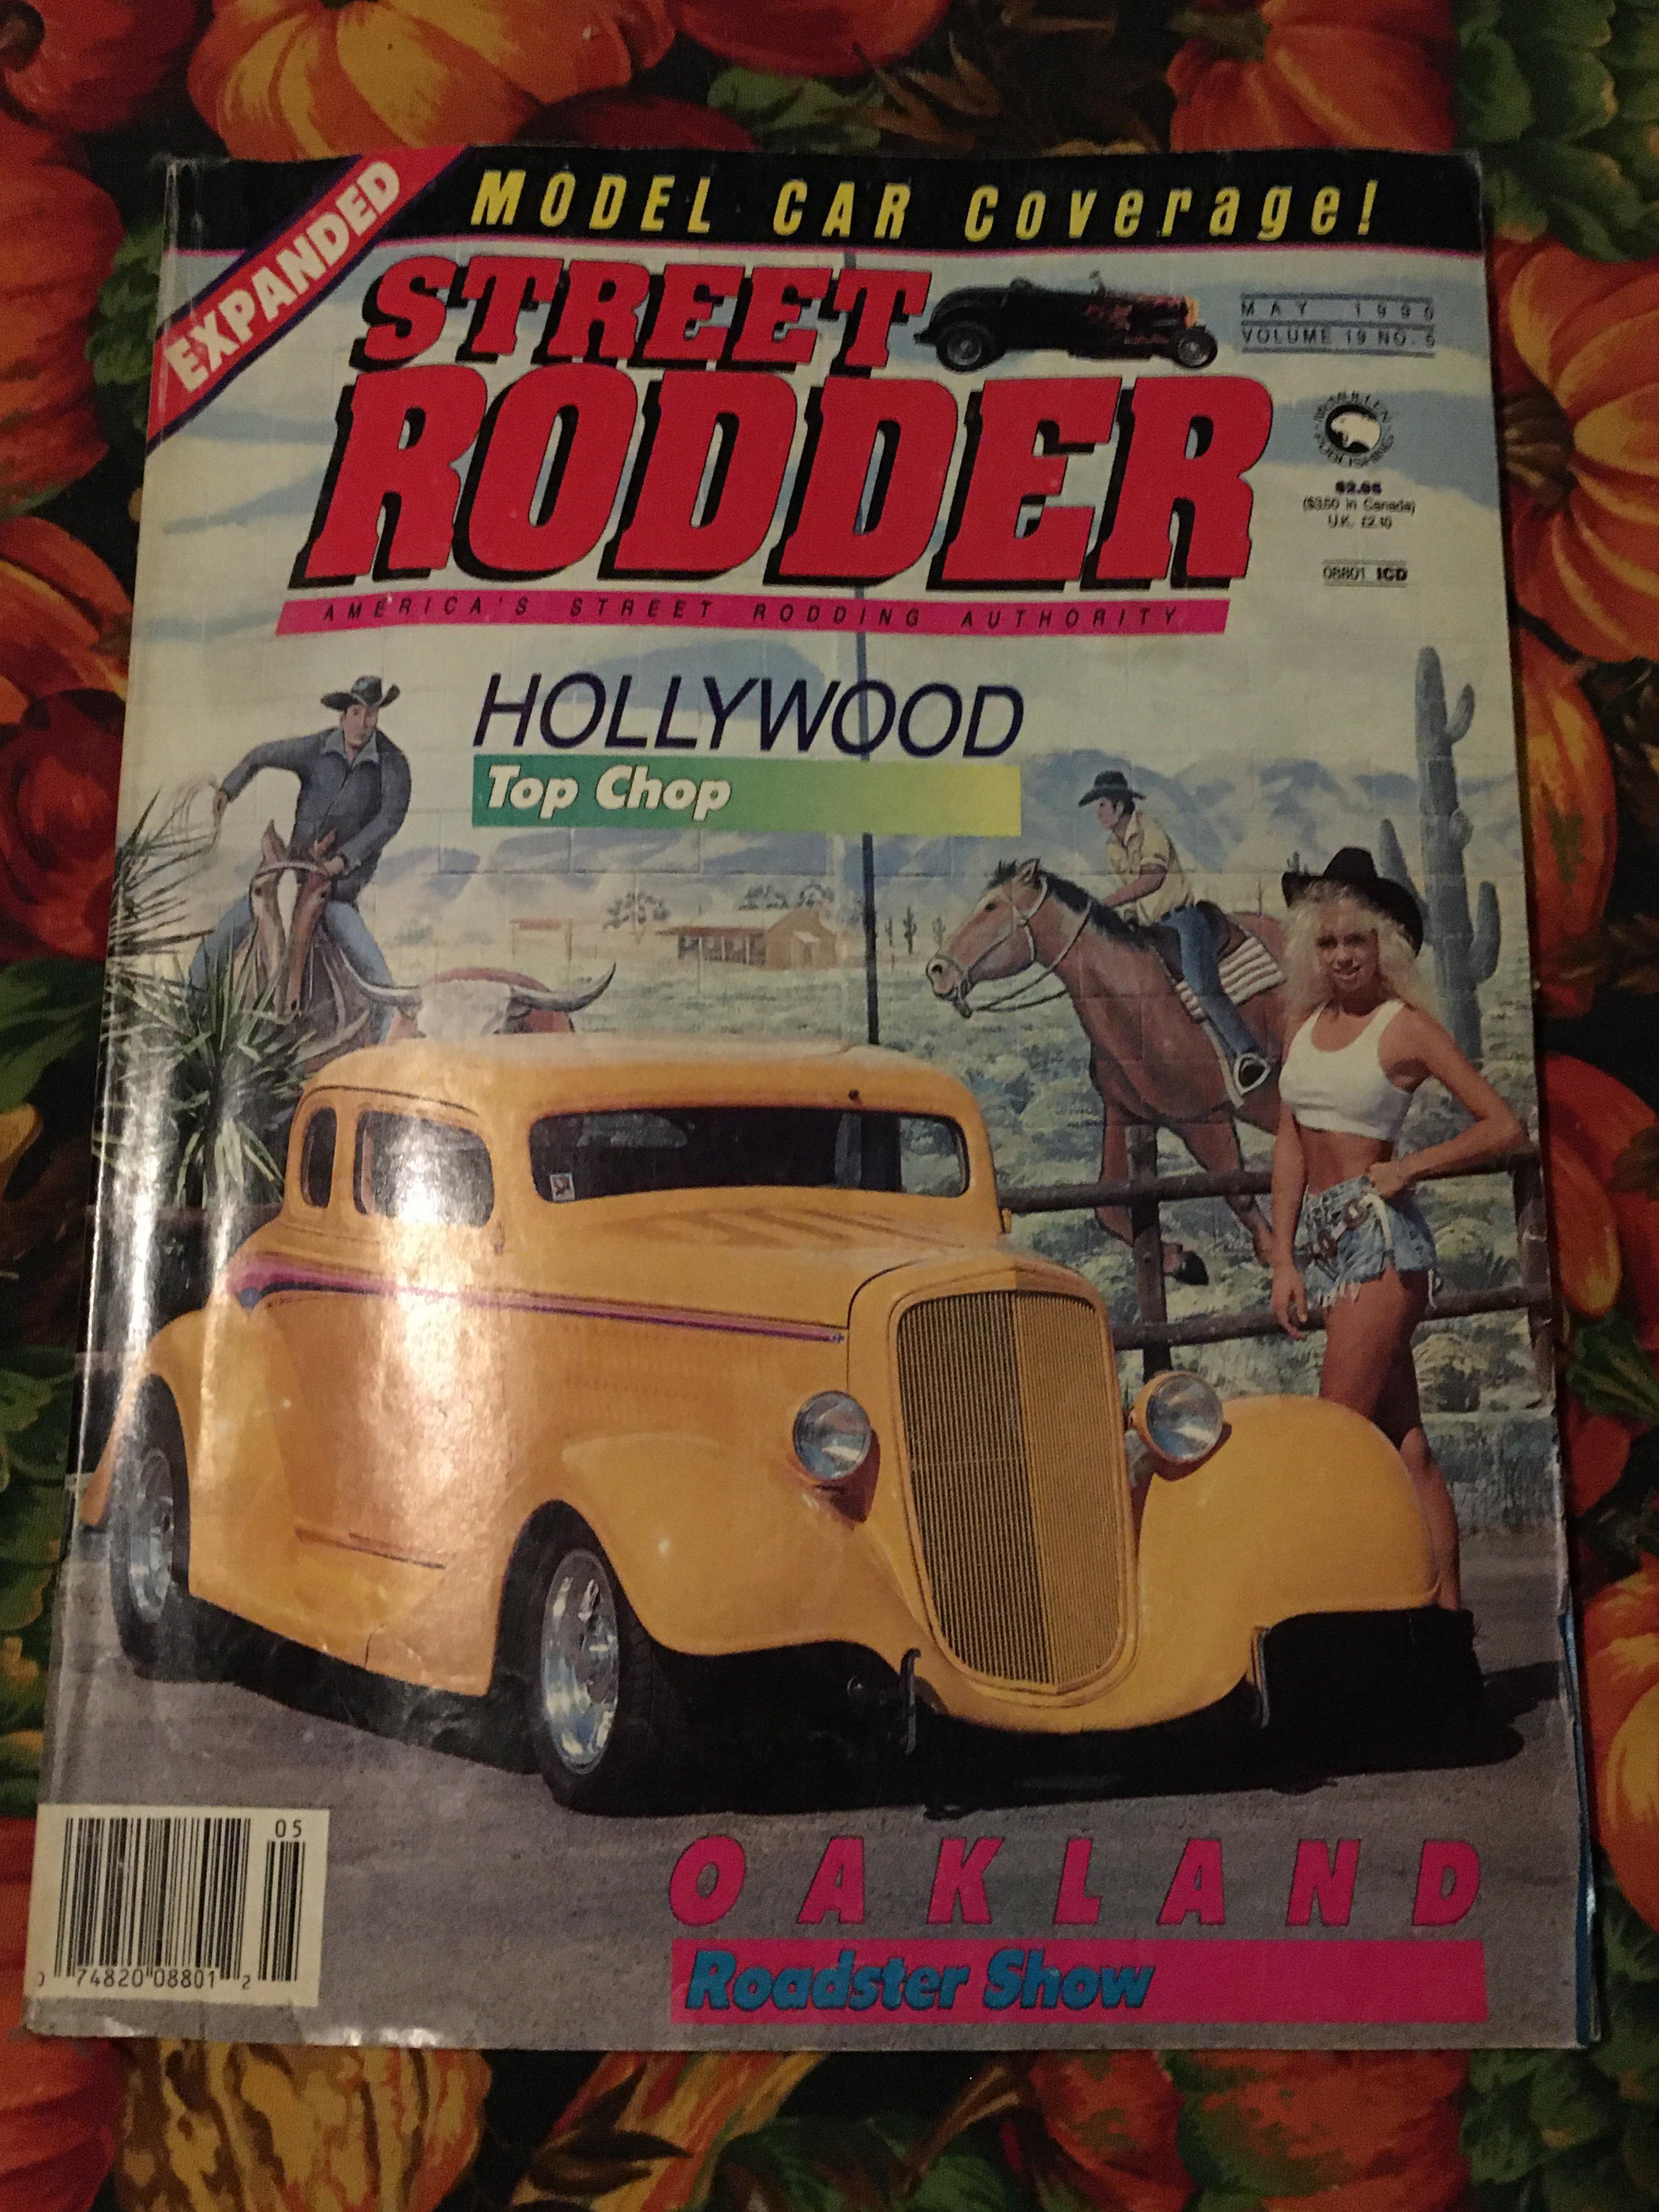
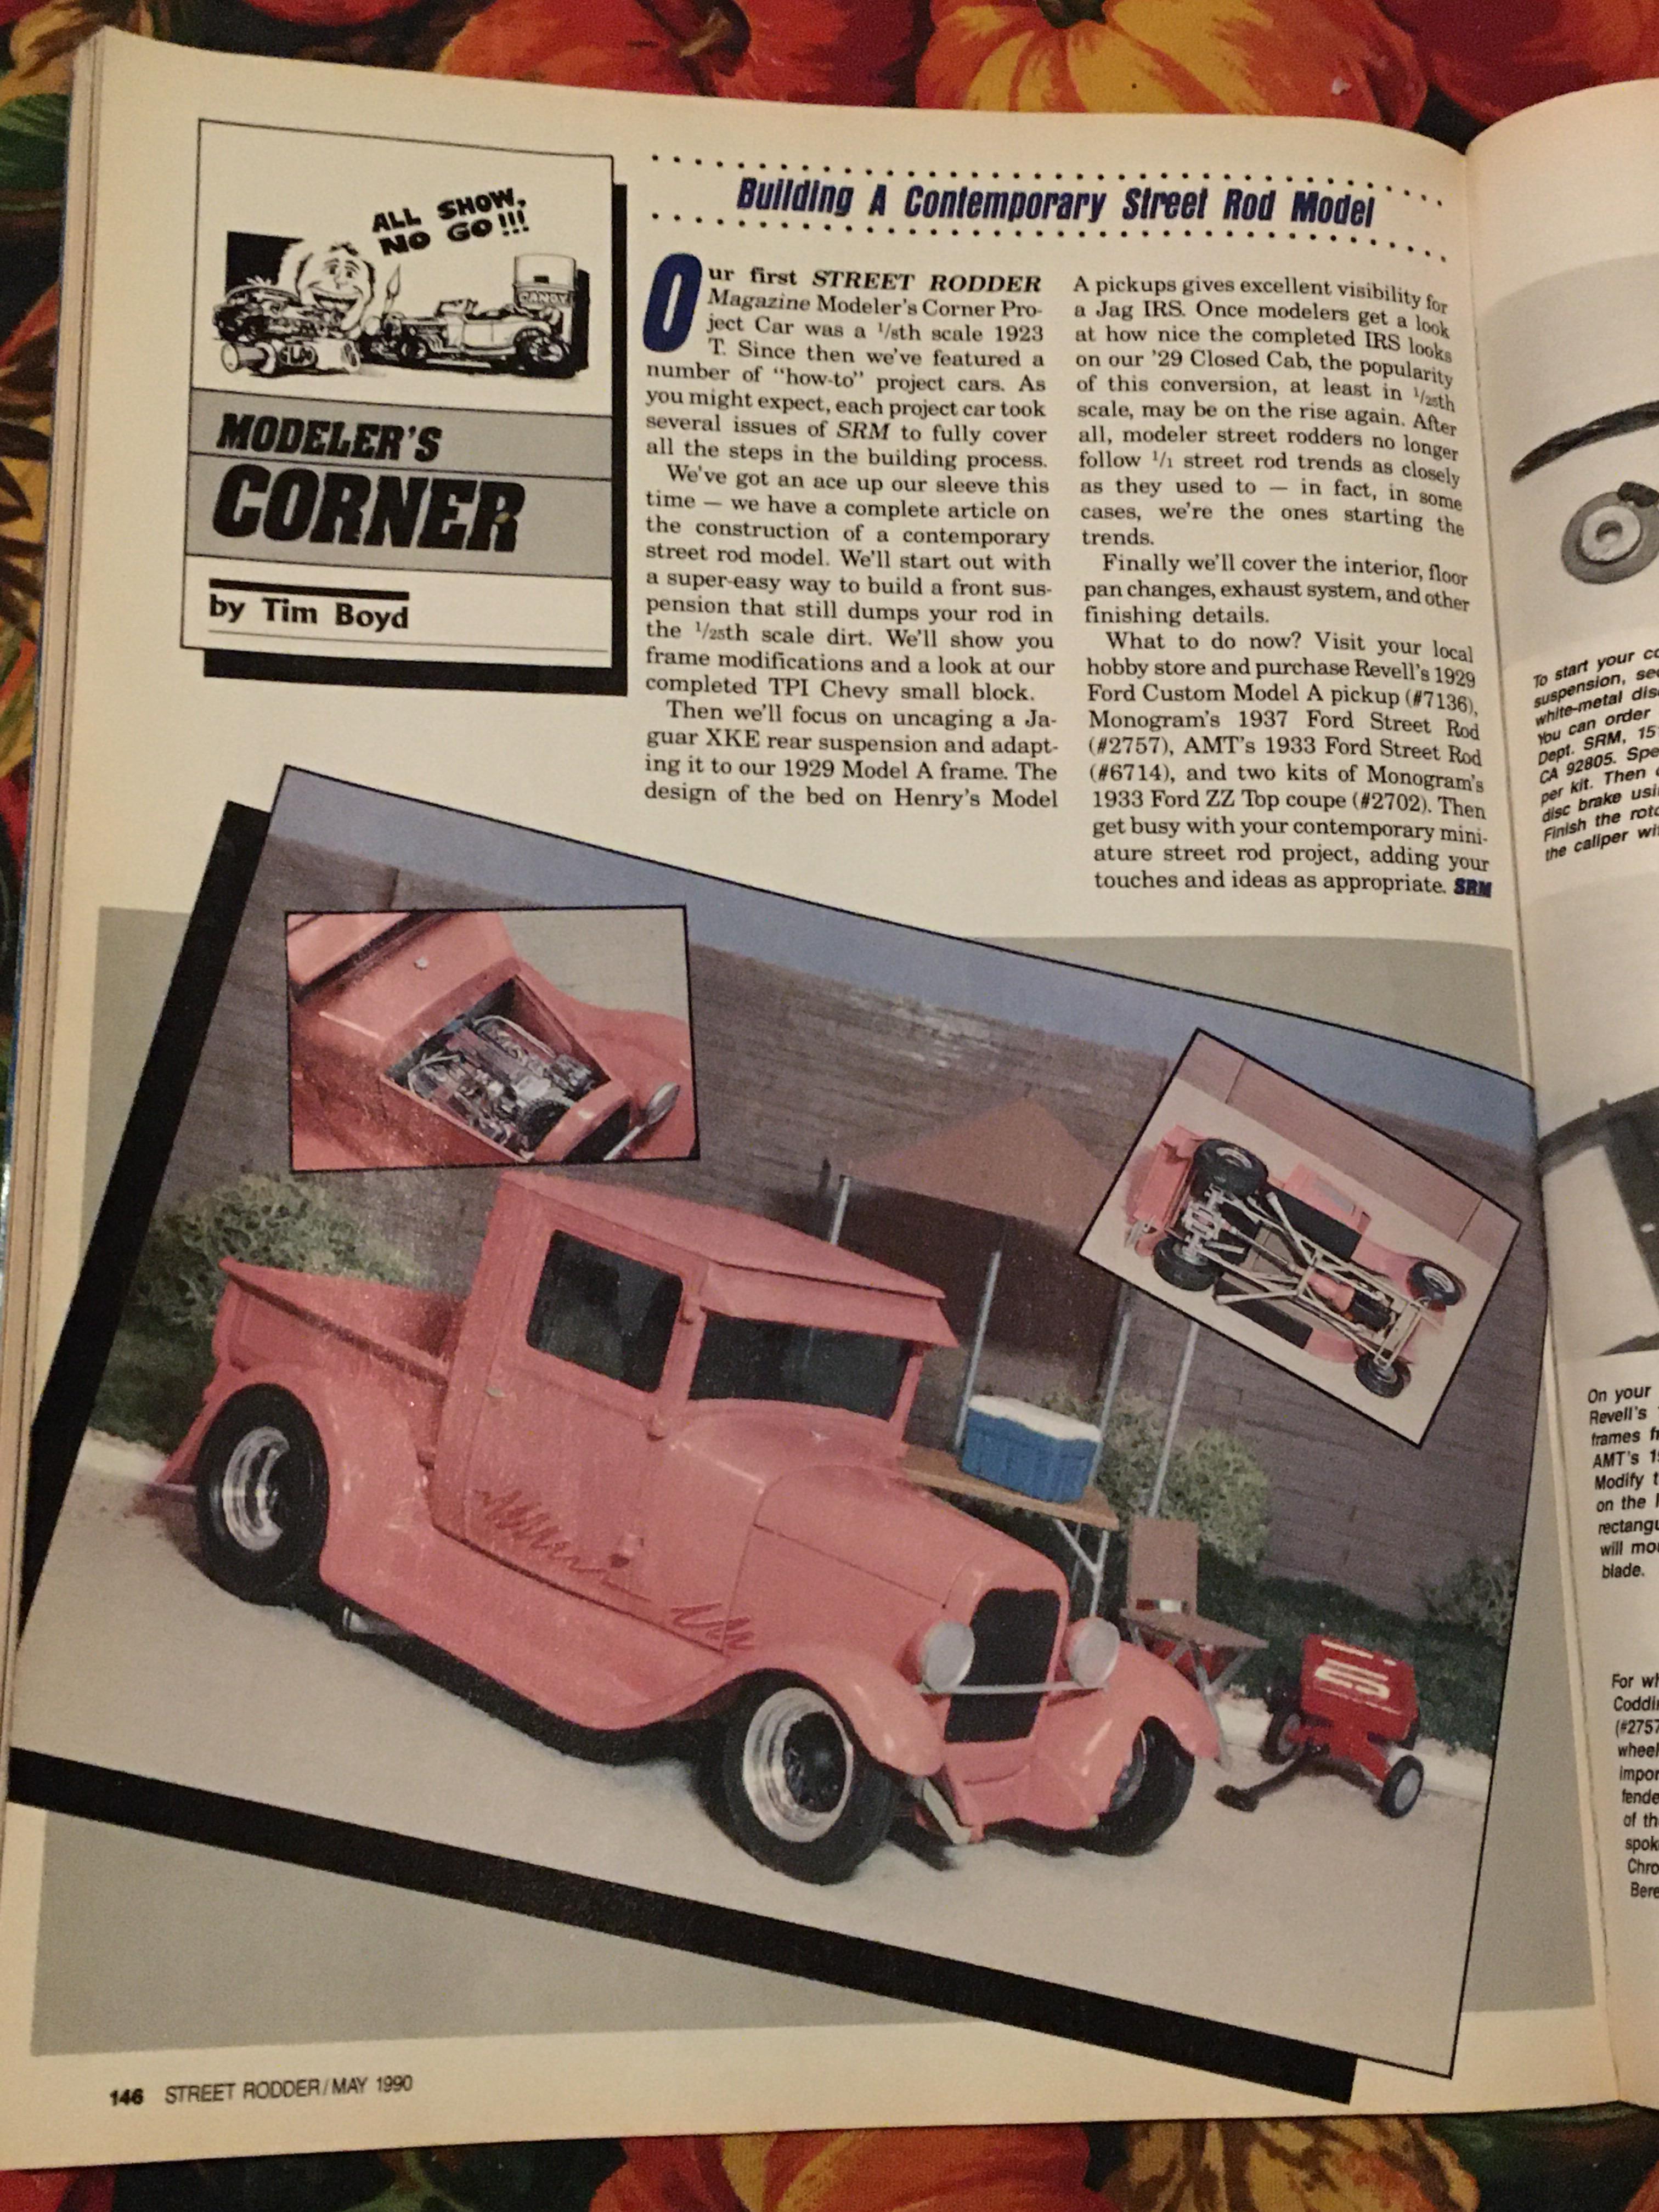
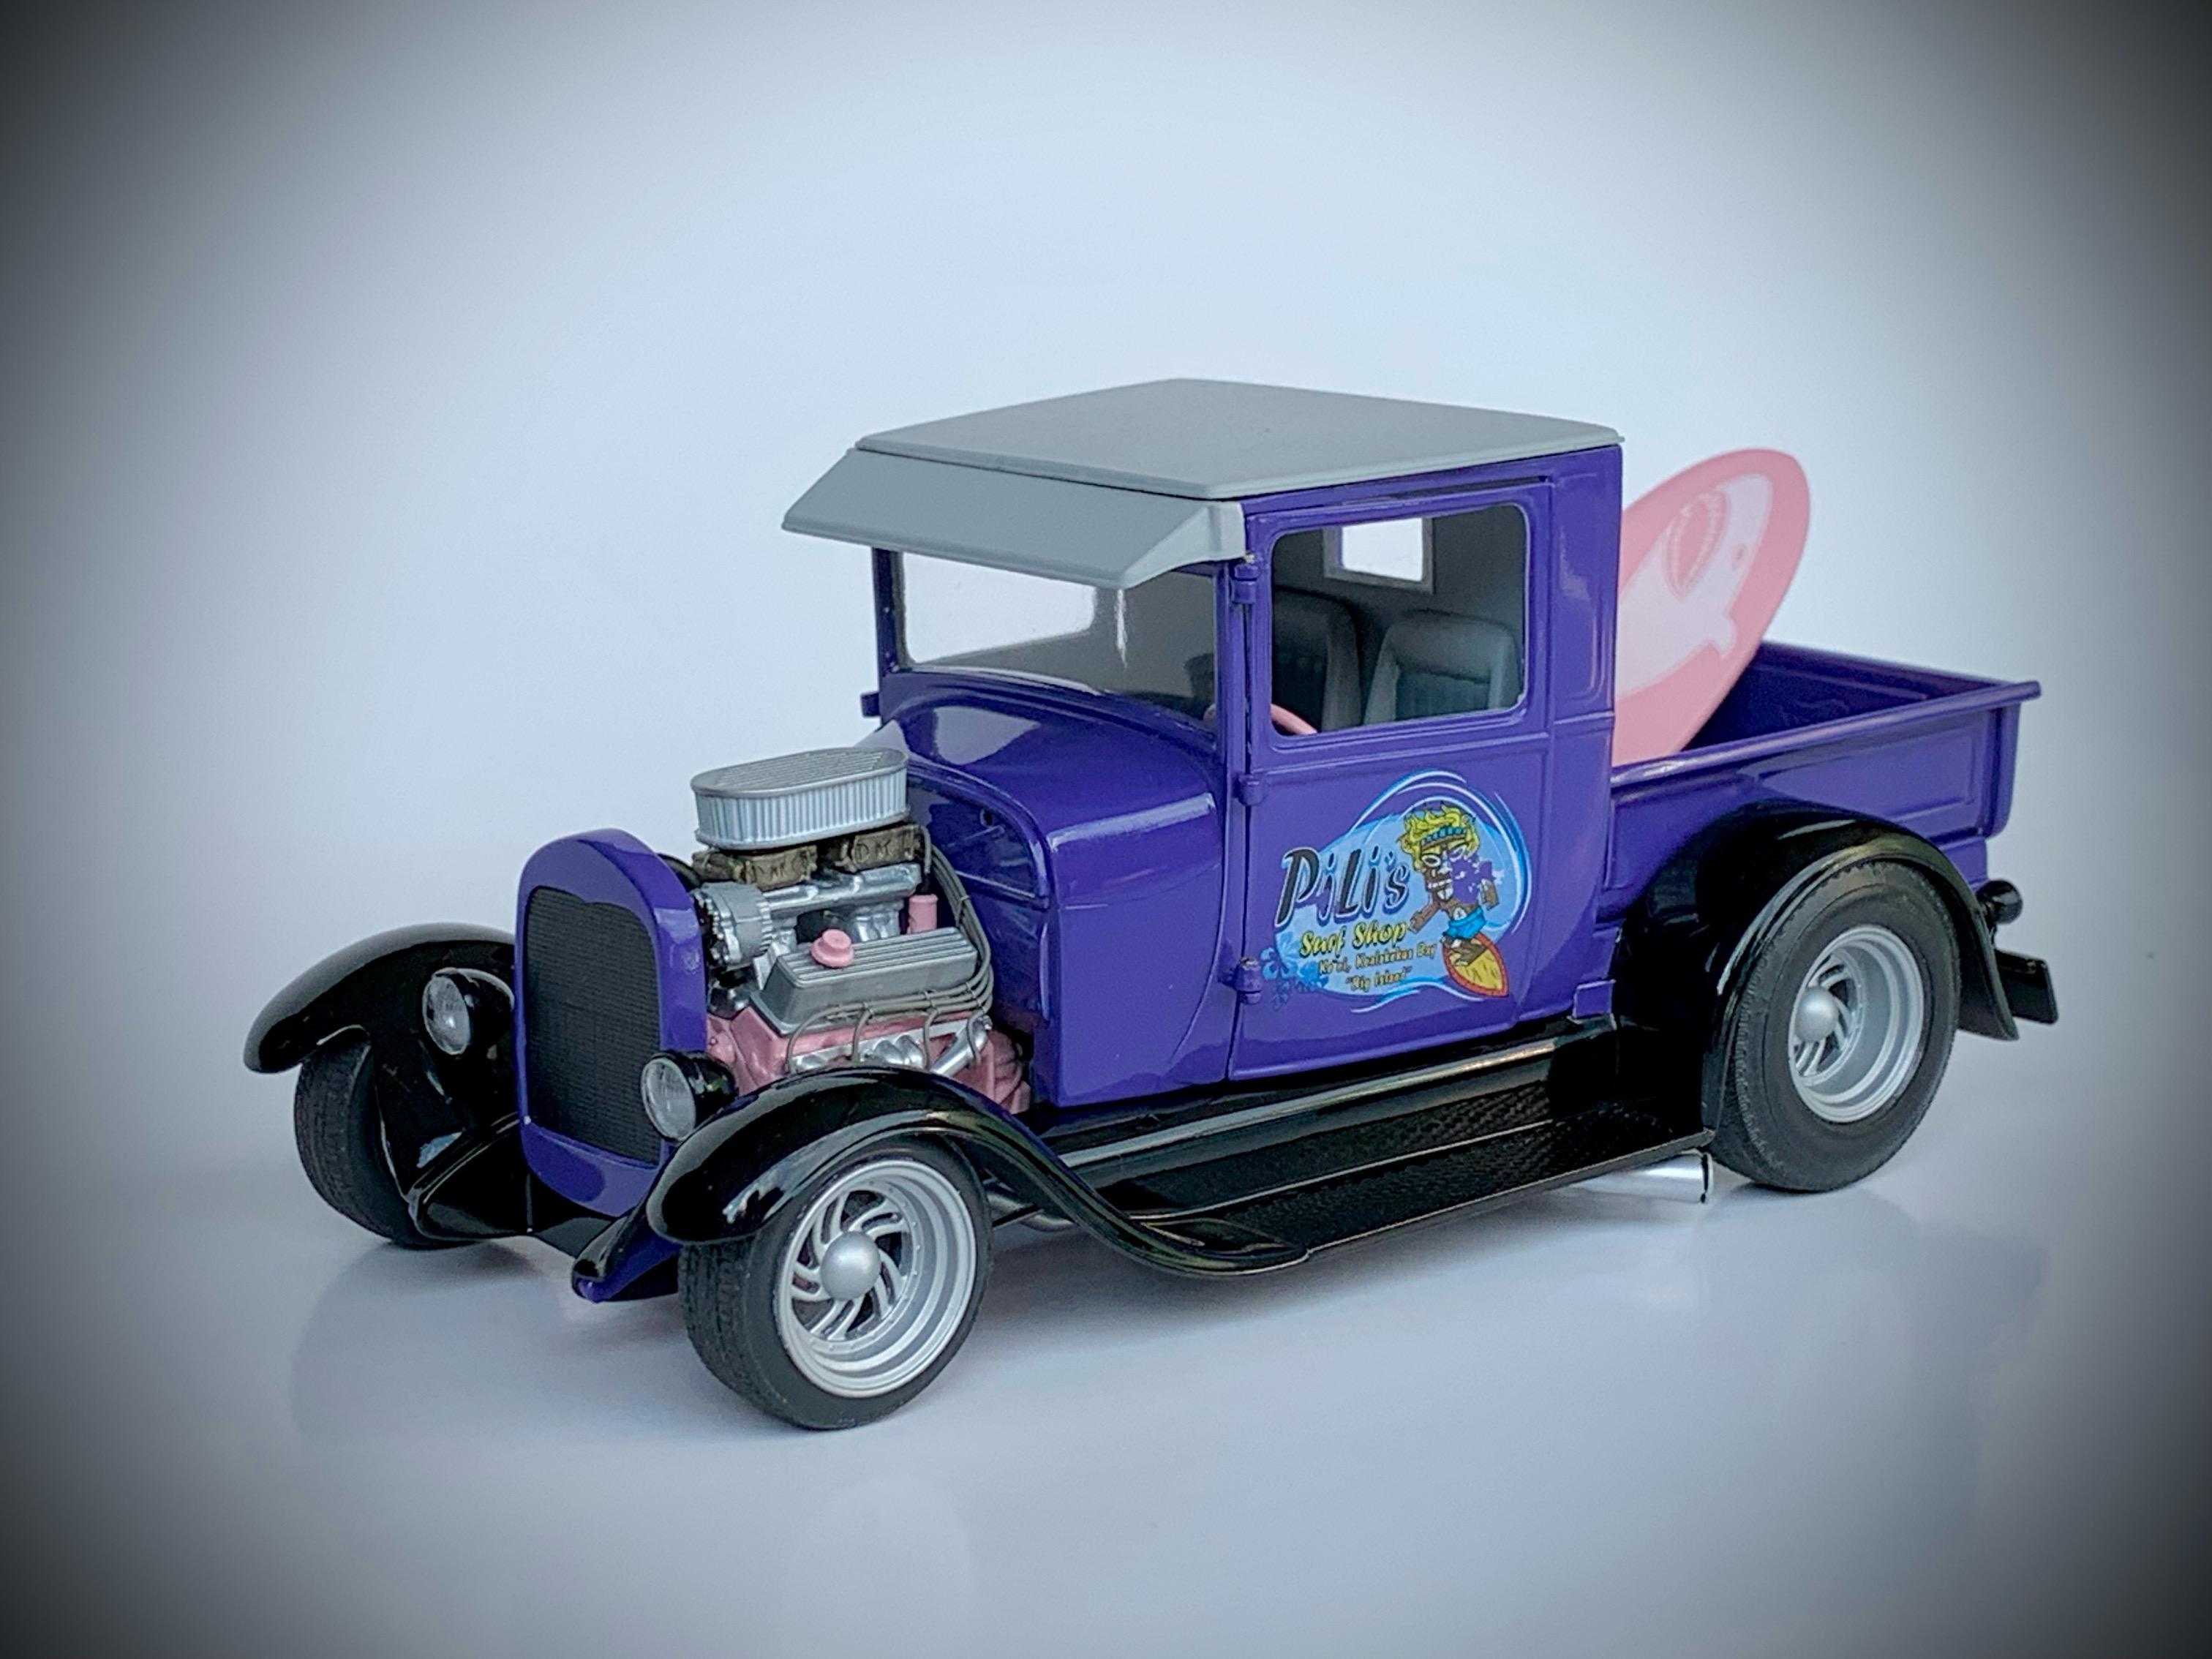
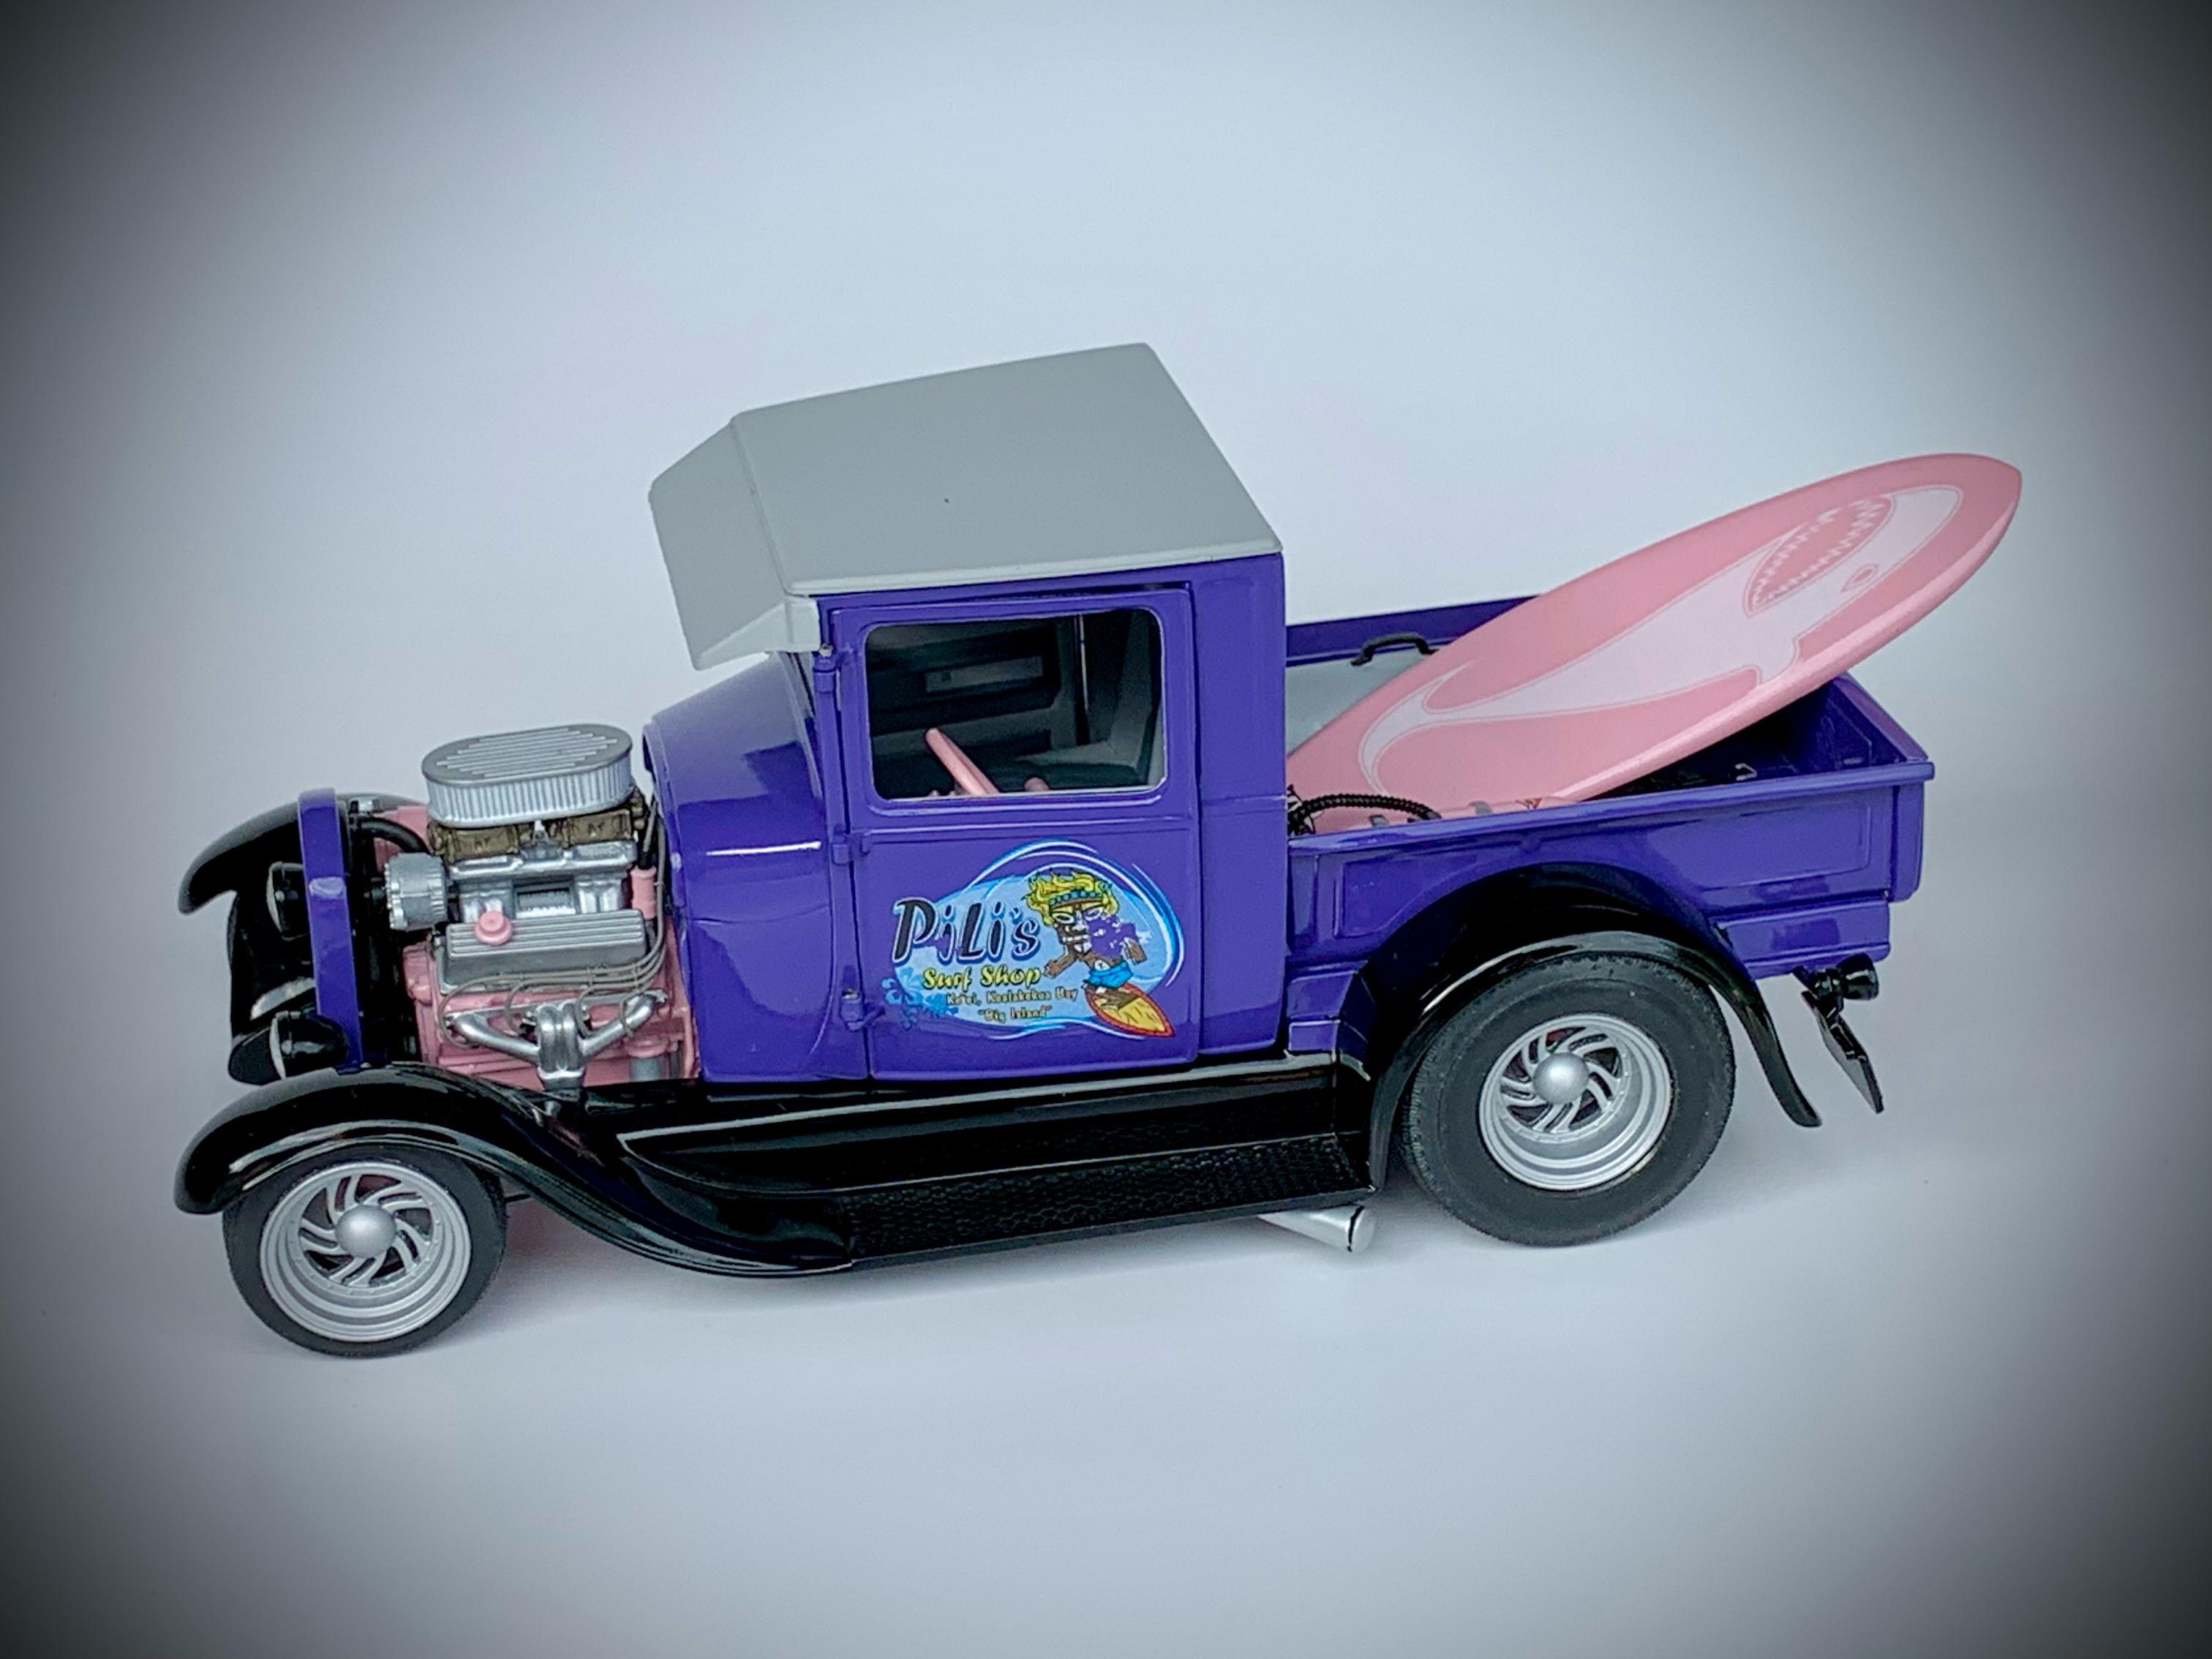
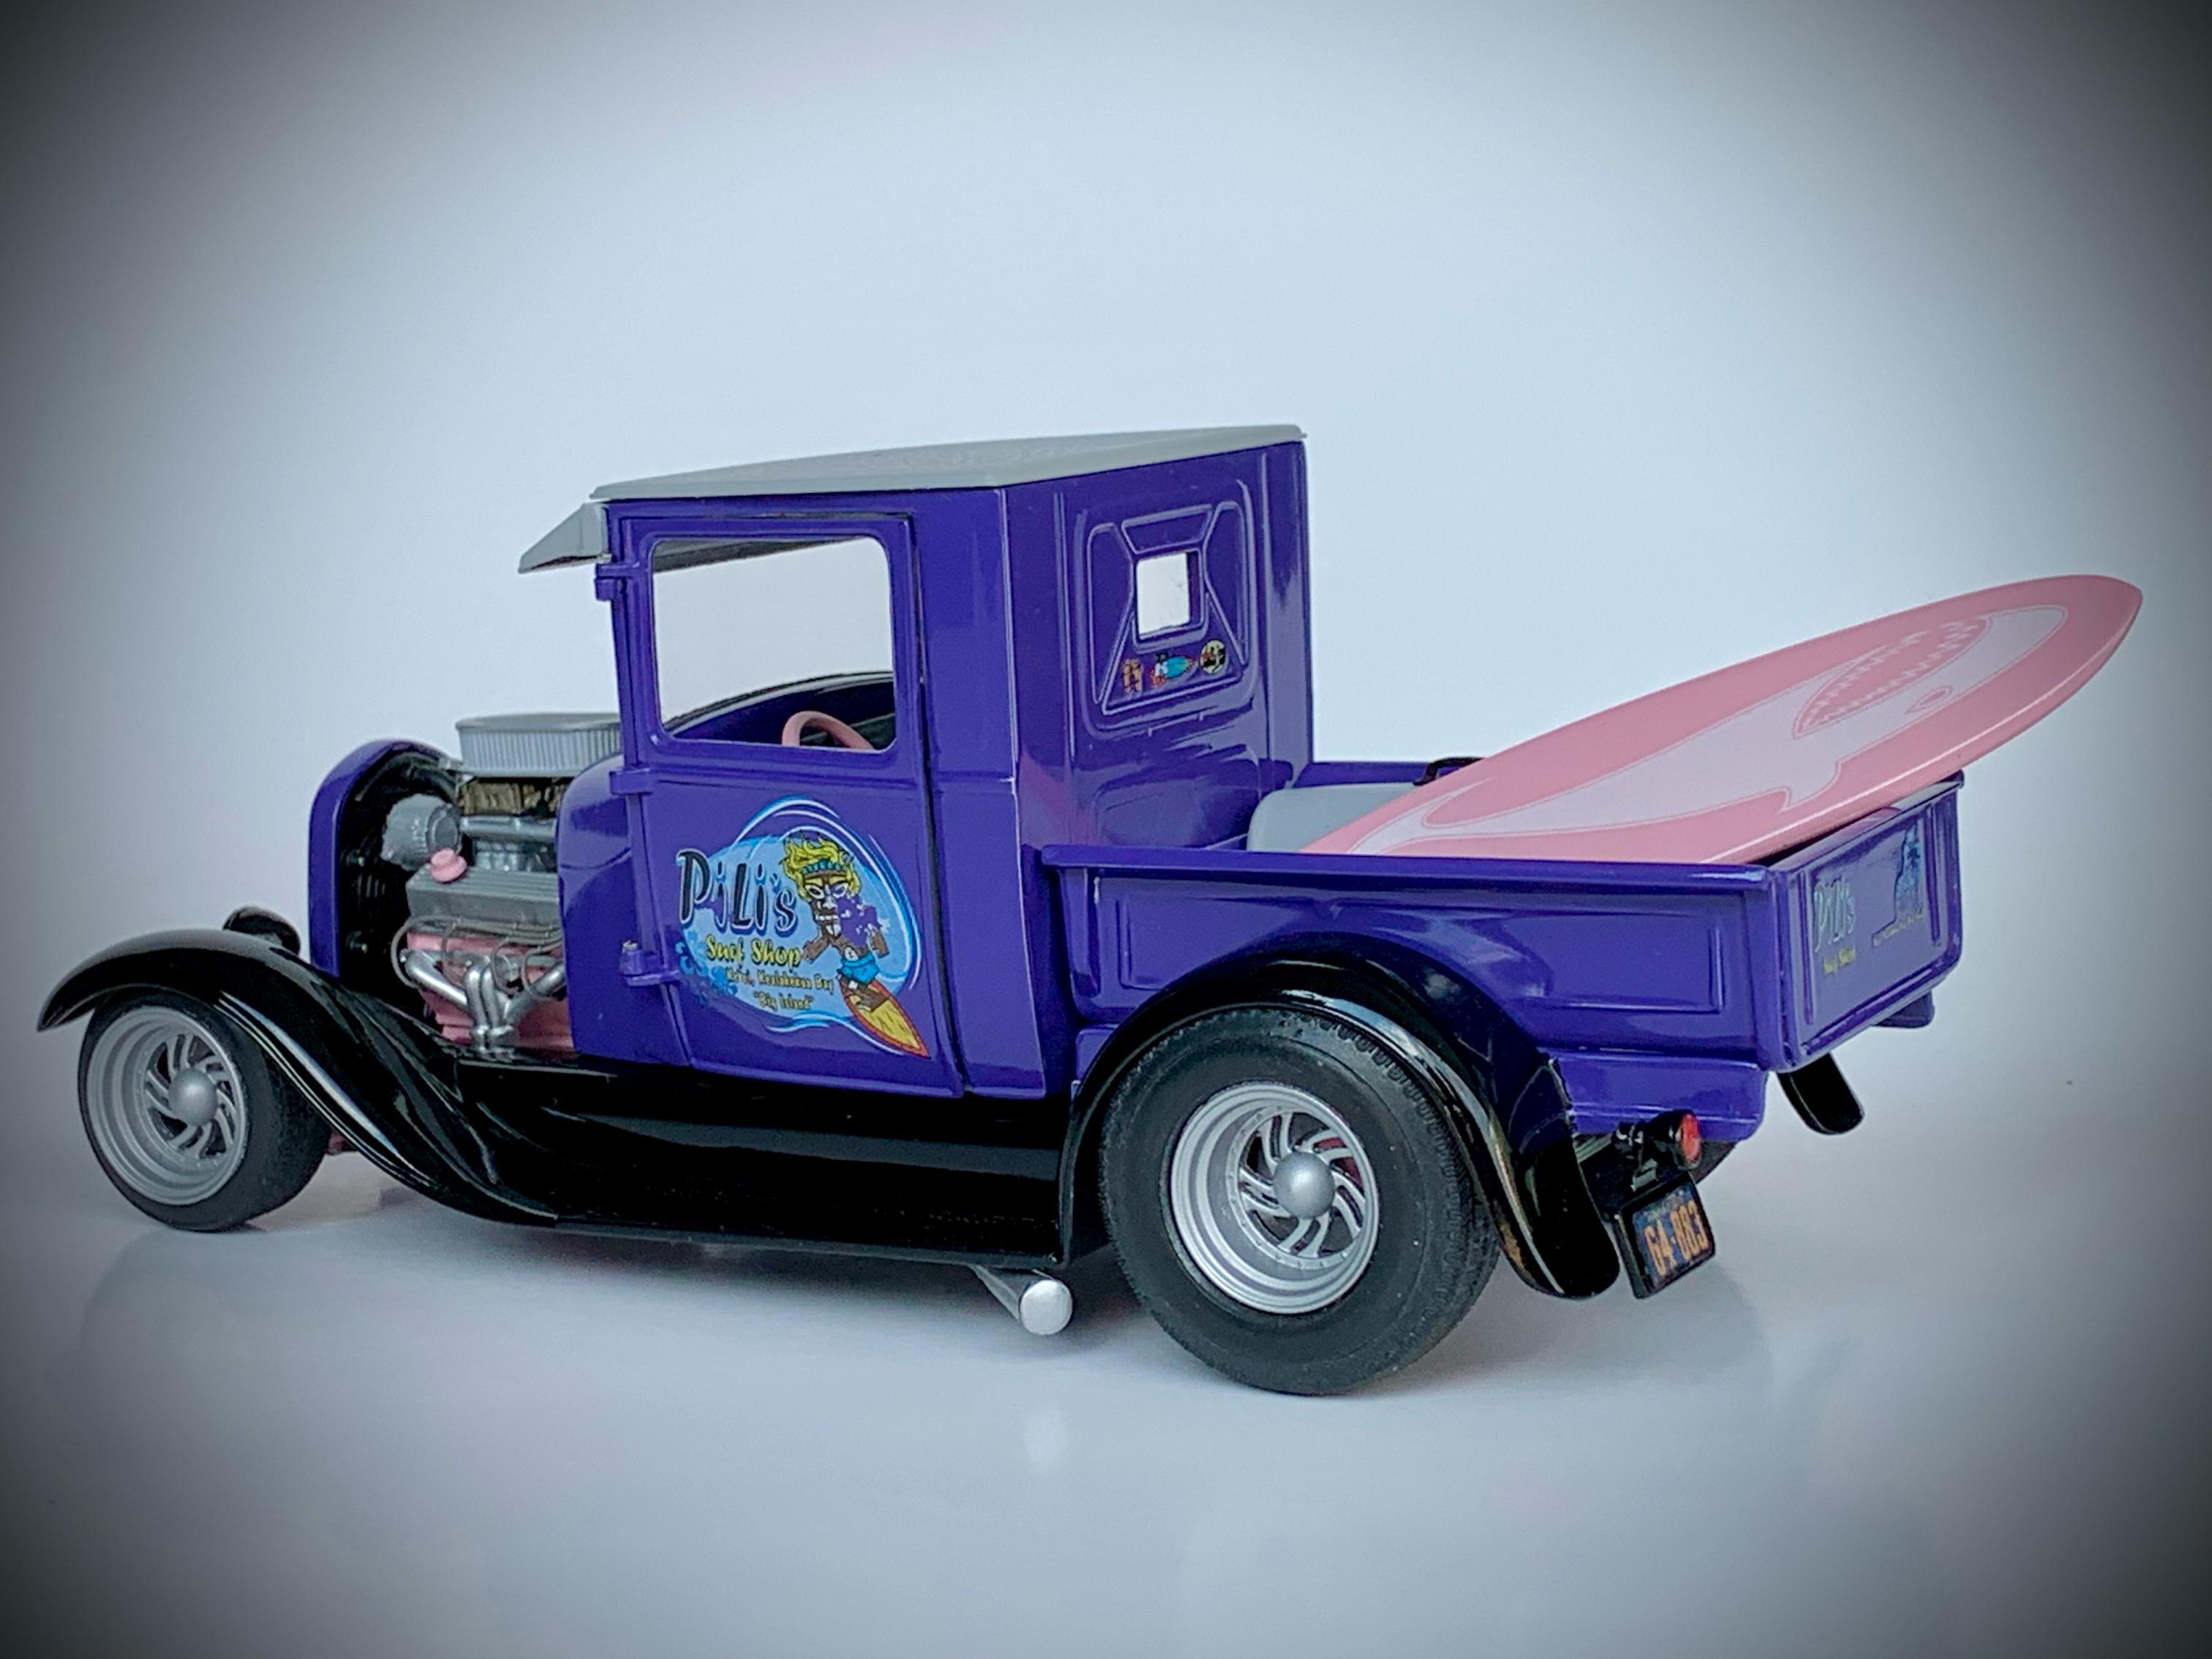
Back in September 2020 (yes, THAT 2020) I started a thread in the Light Truck workbench forum here on MCM to cover the process of building a 1929 Ford Pickup Street Rod in tribute to my model hero, Tim Boyd, and a 29 Pickup he built for a How-To article for his monthly Modelers Corner column in Street Rodder Magazine which was published in its entirety in the May 1990 issue. While I put my own spin on the truck I made sure to use a good number of the same parts and techniques as Tim so that the truck would be immediately recognizable to anyone who might remember his old article. As I progressed with my project it gained a decent size following and soon other modelers were commenting that they had become inspired to build their own version. Rather than everyone start their own threads I invited everyone to join in on mine in the hopes of creating one large tribute to Tim. I never anticipated it would grow to the size that it did, currently sitting at a staggering 714 posts and 66.3 thousand views! What’s more, Model Cars Magazine has recently expressed an interest in running an article covering the Tim Boyd Tribute phenomena and with that prospect on the horizon I thought it only proper to create a thread where everyone who built a 29 Pickup Street Rod in tribute to Tim can share them together. I also know that @tim boyd original 29 Pickup still exists in beautiful condition and that he has nice modern photos of it. Tim, would you please join in and share your truck and perhaps some comments about it? The following folks have finished trucks and I ask that you all please take some nice pictures and share them here. I hope I didn’t forget anyone. @Rocking Rodney Rat @Kit Karson @foghorn62 @alan barton @bill-e-boy
- 39 replies
-
- 13
-
-
Looks awesome! Really cool to see you get it finished. I will be creating the Under Glass group thread by the end of this week. I will tag everyone who has a finished truck so you guys can add yours to it.
-
Traditional 1929 Ford Woody Wagon Hot Rod
Dennis Lacy replied to Dennis Lacy's topic in WIP: Model Cars
Thanks for chiming in, Tim! More than half the models I’ve built start with a wheel & tire combo then I come up with a car to put them on. And, I totally agree with you on wires & woodys going hand in hand. Sadly the work on the front shocks (July 12) is the last time I’ve been to the bench to date and it’s not for lack of interest. Downside to working in the garage. Plenty of days I could have but the weather made it downright uncomfortable. That said, I’ll be redoing the upper mounts and I have a plan. Stay tuned… -
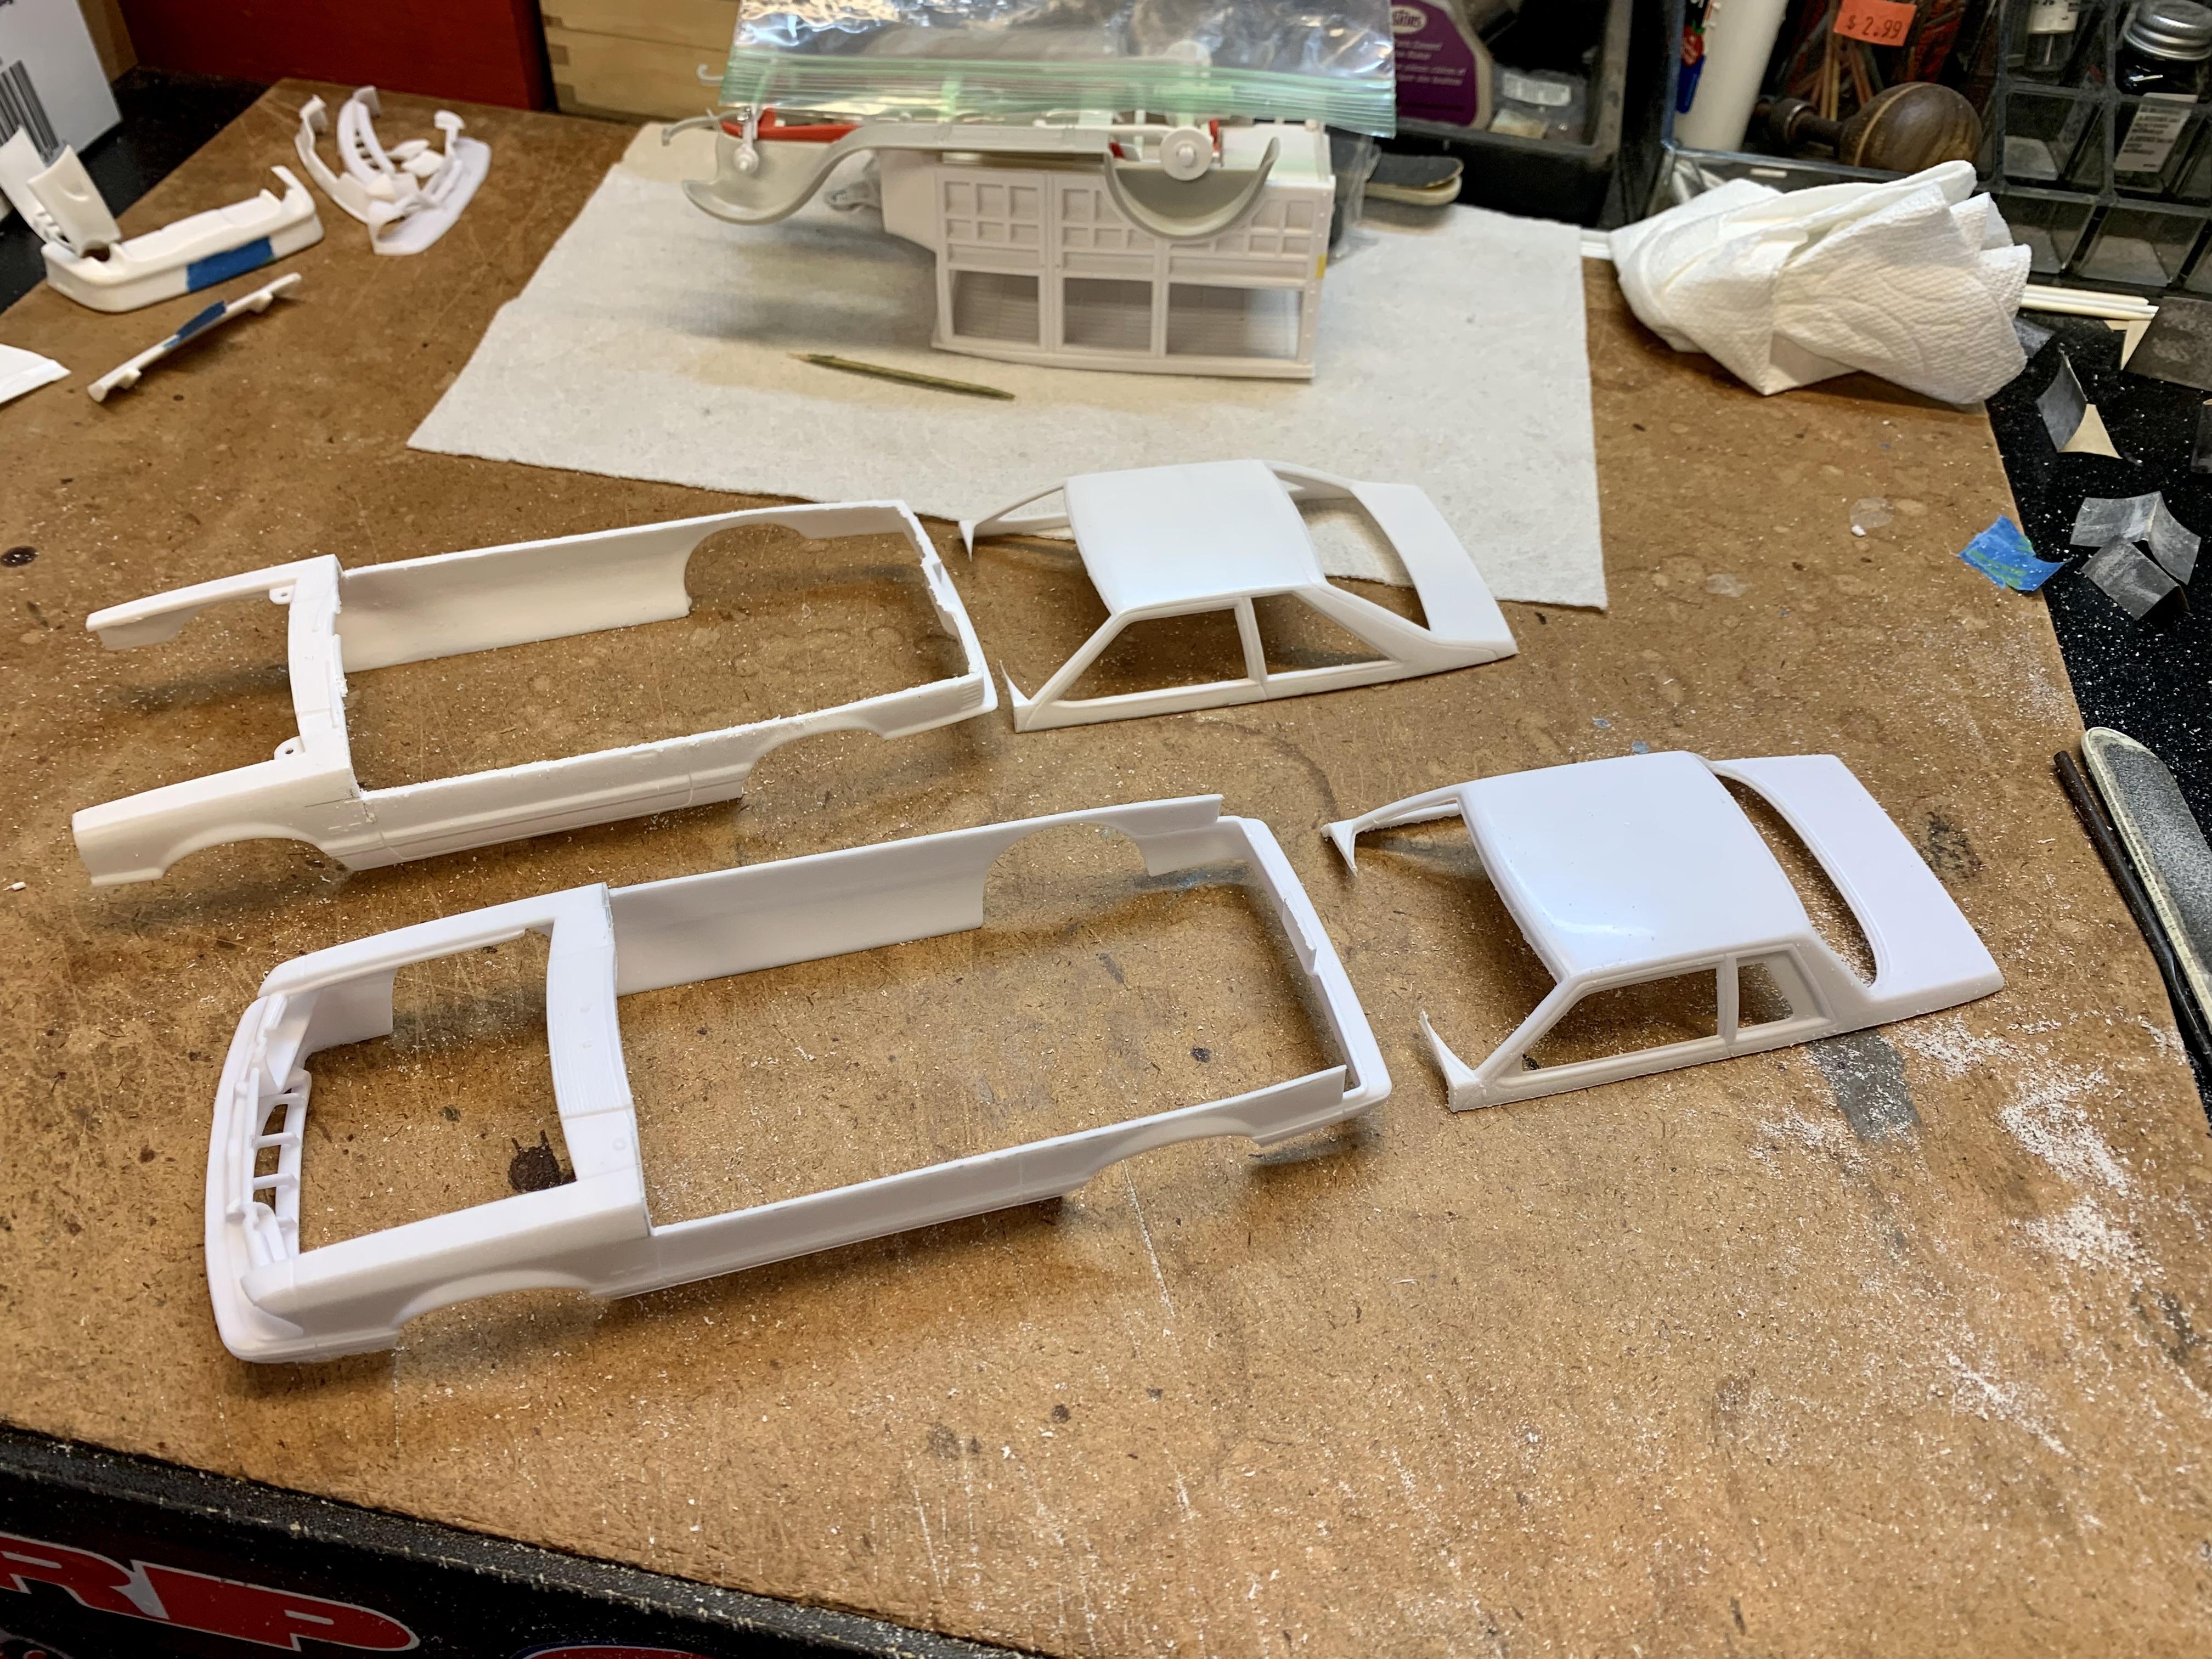
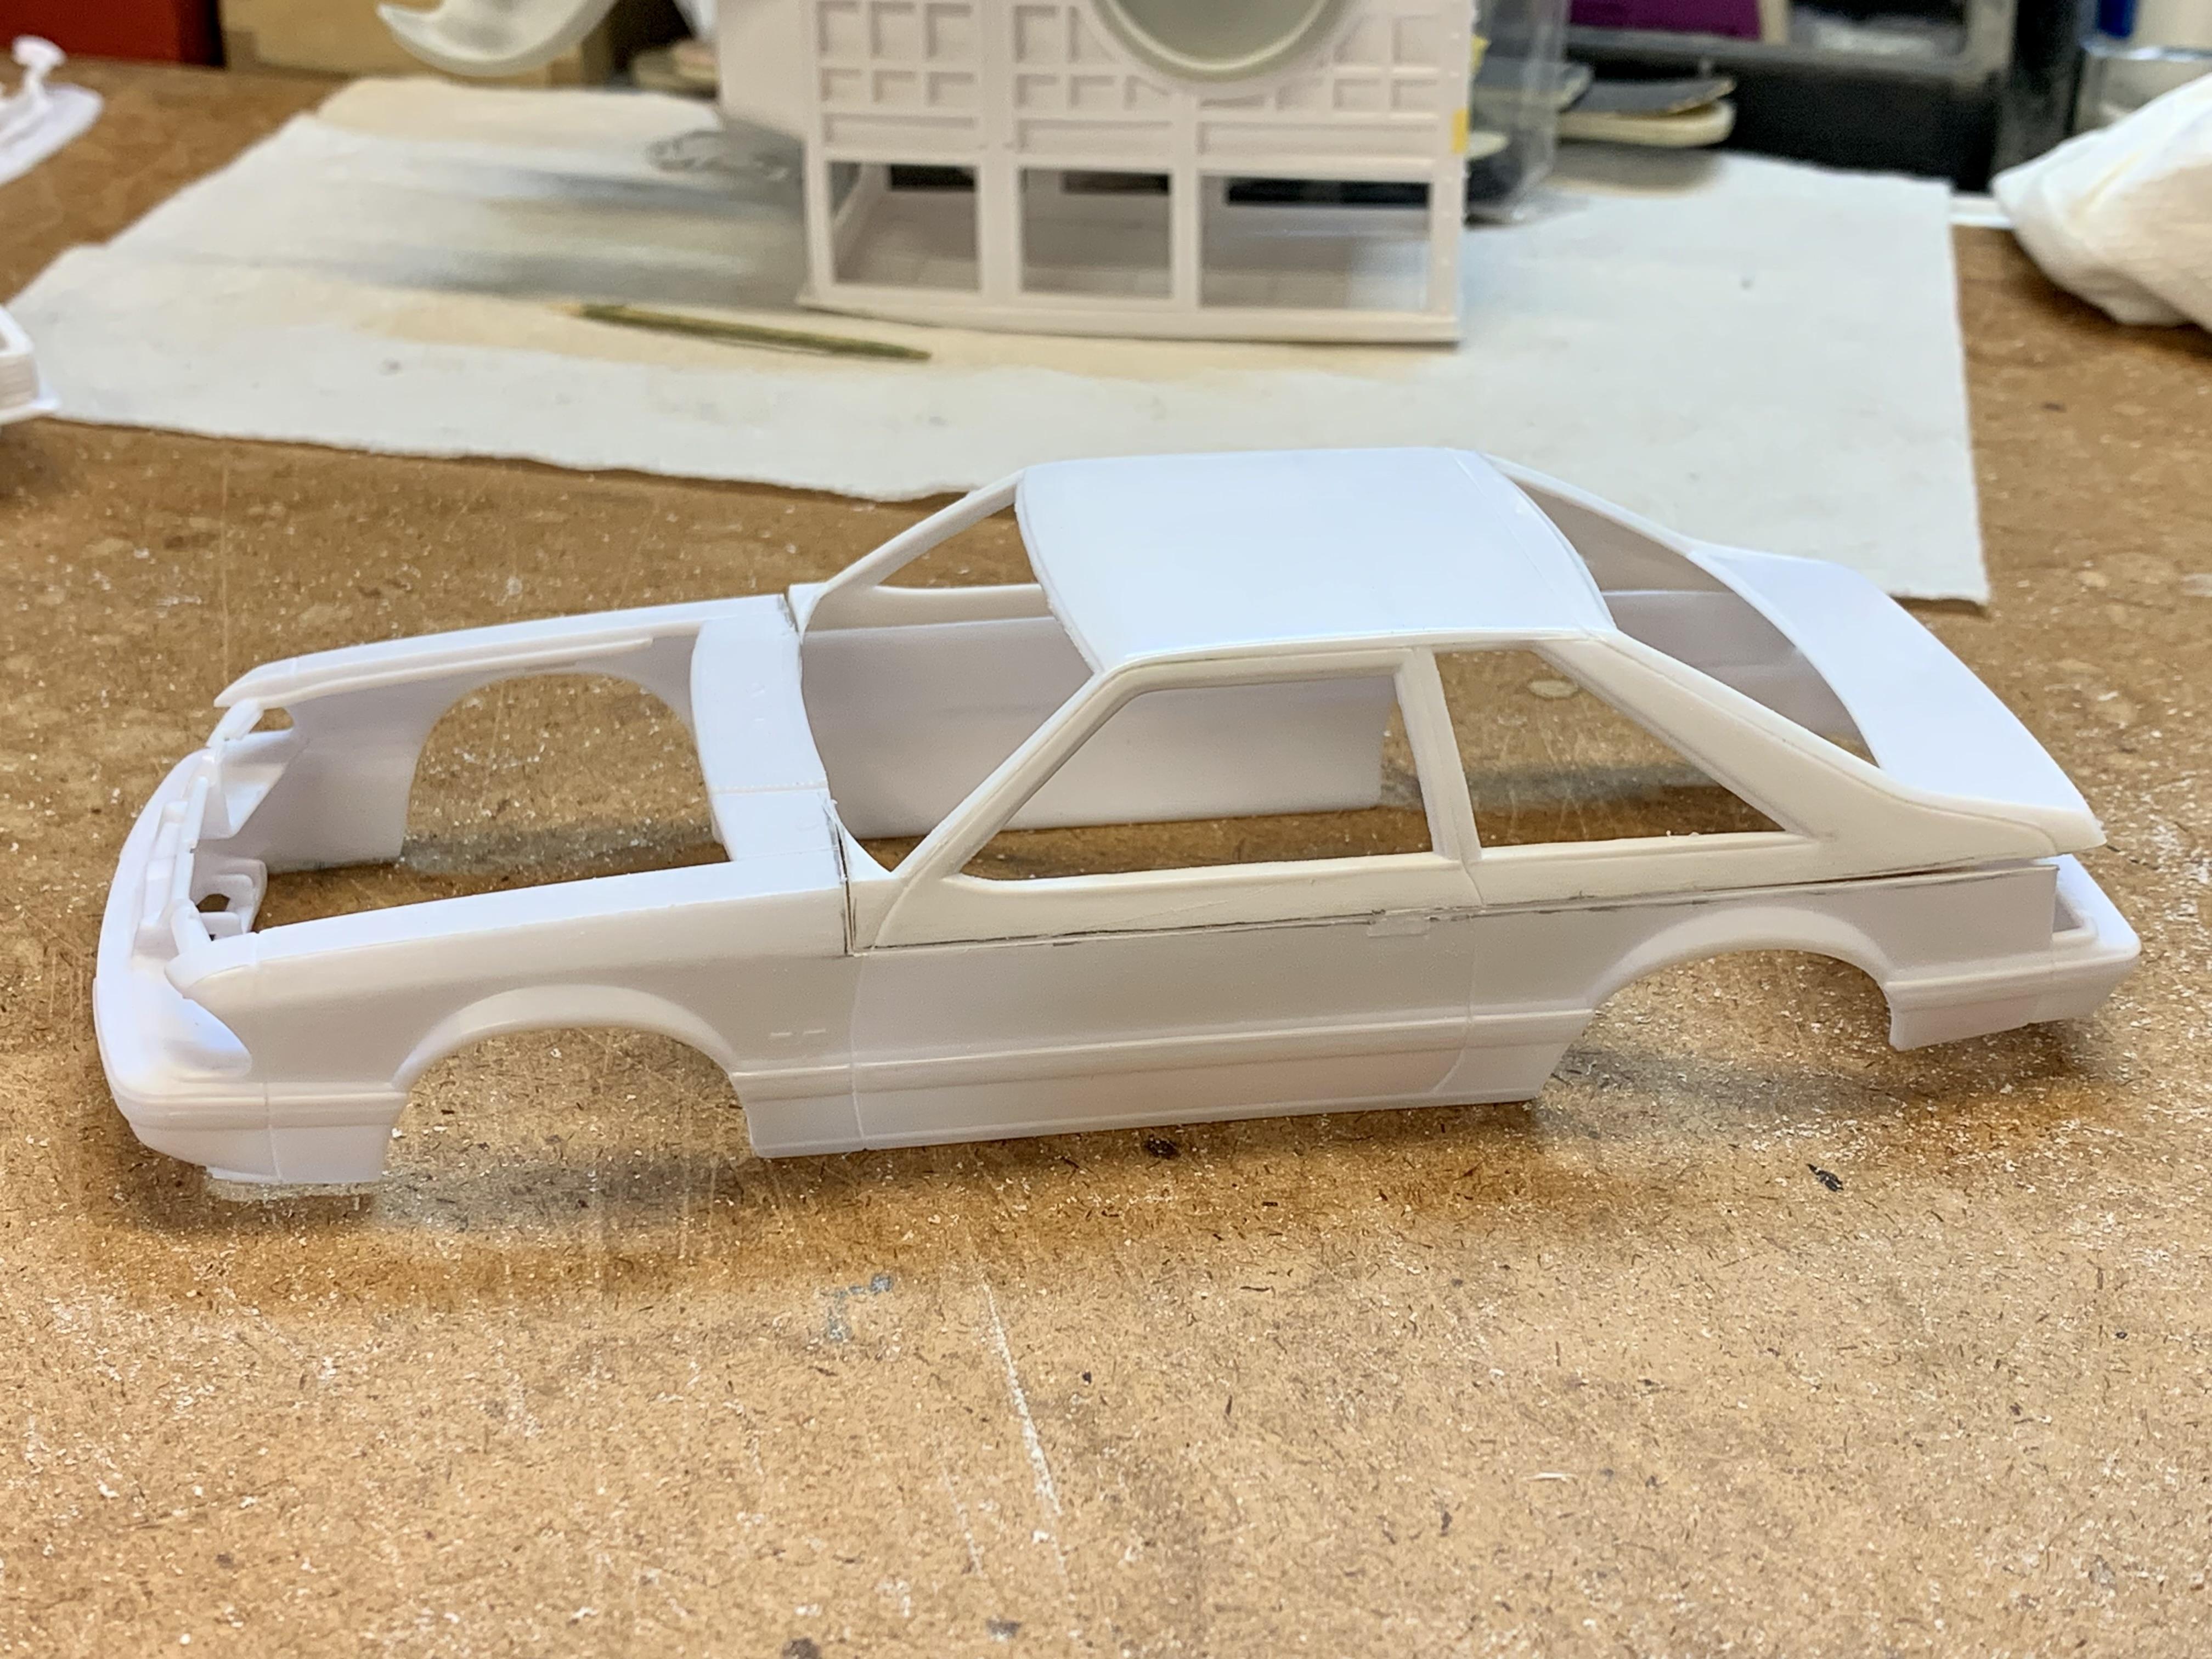
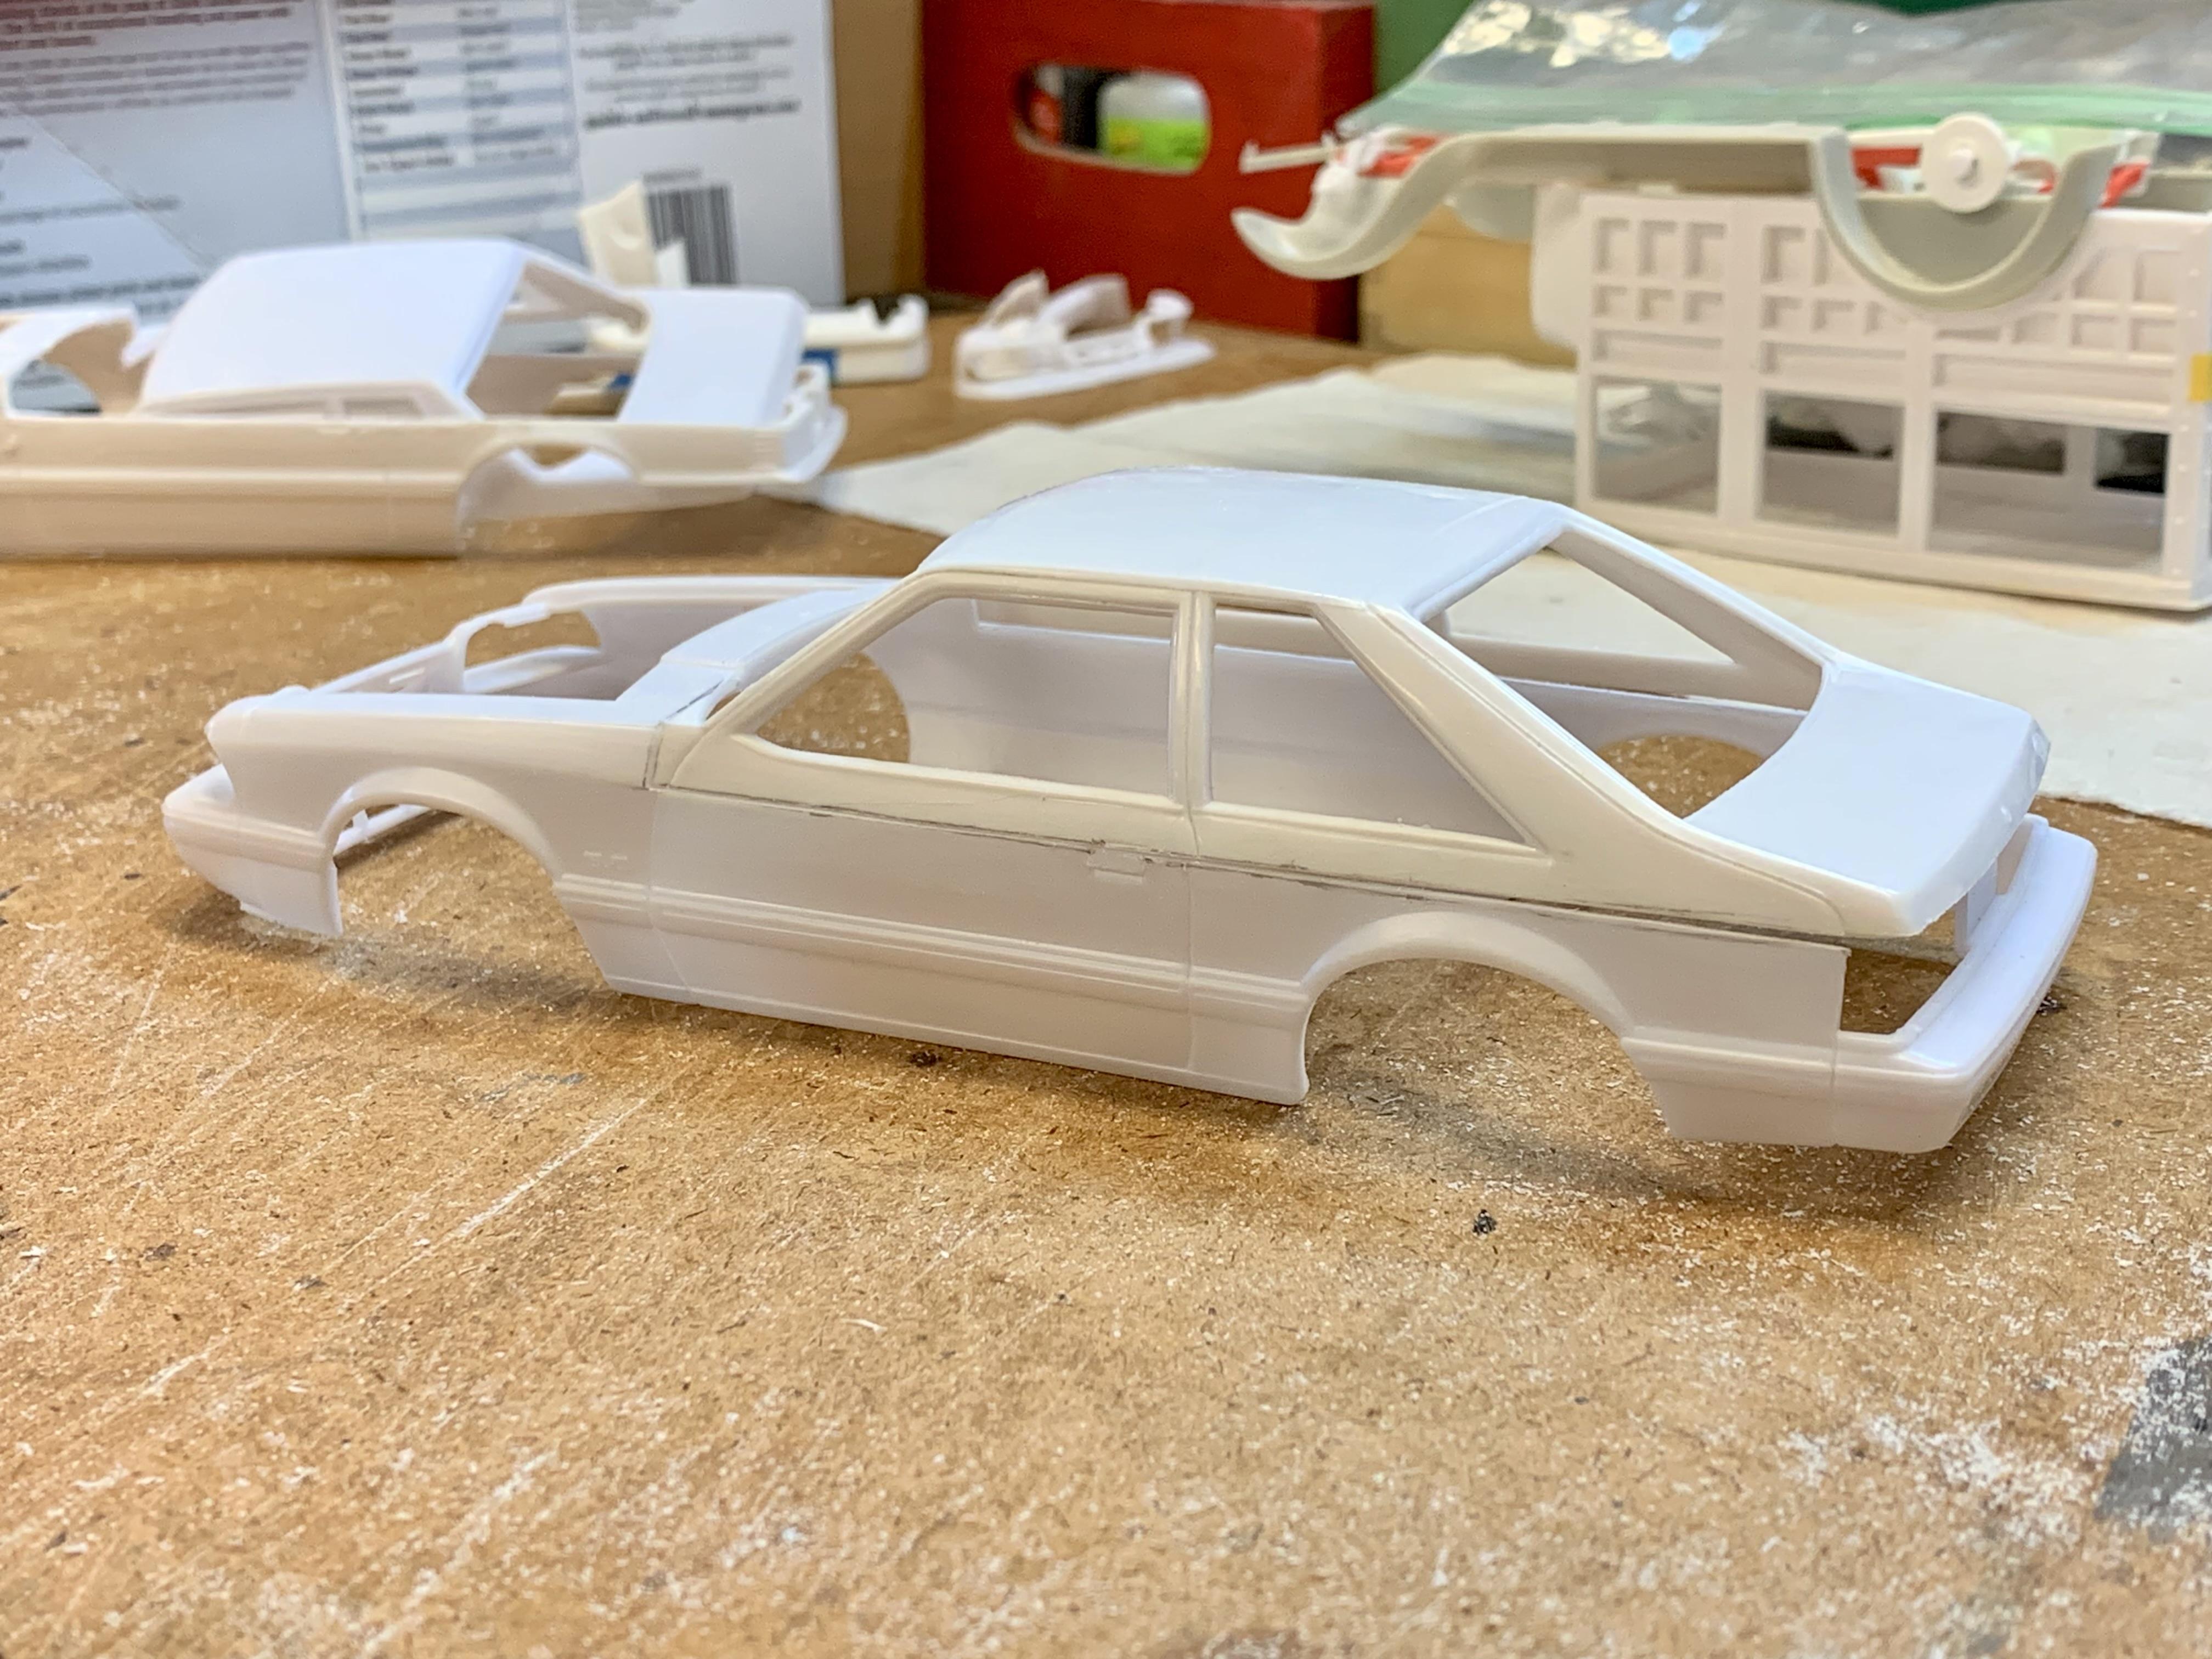
As the owner of a 1987 GT Hatchback the MPC/AMT kit is an EPIC disappointment. The whole thing is basically inaccurate and even aside from that, just poorly done. In contemplating how to create a more accurate aero-nose hatchback (and not necessarily a GT) I realized the best approach was to take the roof from the hatchback and graft it onto the Revell 90 LX body shell. The 90 LX, while an excellent kit, has a mis-proportioned roof so you’re doing it a favor. Keep in mind I have only made the rough cuts so far and the fit needs to be fine-tuned but they will mate up seamlessly when done. I haven’t approached the interior yet but this gets you the excellent Revell 90 chassis, engine and the front, more visible part of the interior. Note: If one desired to use the upper half of the Revell 90 front bumper to upgrade the vomit inducing ? 87/88 GT MPC headlights be aware that the 90 bumper is about an 1/8” wider so it will require some additional planning.
-
Absolutely LOVE this! A full-scale version should be built immediately. ?
-
1953 Ford F100 Hot Rod
Dennis Lacy replied to Dennis Lacy's topic in WIP: Model Trucks: Pickups, Vans, SUVs, Light Commercial
The double line tires are from one of AMT’s parts packs that I think was fairly new at the time. You get 4 tires and 4 cheater slicks. -
It’s been a minute since I’ve seen one of these pop up here as a project but it always makes me smile when they do. Looking forward to following along!
-
Monogram Corvette C4 Roadster (Geiger Widebody style)
Dennis Lacy replied to camaro69's topic in WIP: Model Cars
This is phenomenally bad ass! Awesome scratch building creating the body panels!! -
This is EXCELLENT! Incredibly realistic. Love all of the accurate inner body and floor subframe structure.
-
This is friggin’ awesome, Steve! Builds like this are what I love about models. Pro Street EVERYTHING! ?
-
One of my favorite kits growing up. Very cleanly built!
-
Traditional 1929 Ford Woody Wagon Hot Rod
Dennis Lacy replied to Dennis Lacy's topic in WIP: Model Cars
UPDATE I did get to the workbench this past Sunday but it wasn’t the most productive. The creative juices just weren’t flowing. I did manage to get the front shocks set up but I’m not entirely happy with them. With the front axle tucked tight to the frame with sanded down spring the molded in shock mount holes weren’t working out so I ended up cutting the lower shock mounts off of the axle from the Revell 29 Roadster/ 30 Coupe and transferring them to axle I’m using. This not only moved them down below the original shock mounts, it’s more realistic looking, too. The bottom axle is the one I moved the shock mounts to from the top axle. The middle axle is what the bottom axle looked like before I changed the shock mounts. I then tweaked a pair of Revell 32 Ford series front shocks and brackets to fit. This is what I’m not sure I like. I may build my own upper mounts on the frame and mount separate shocks. So that’s all I accomplished and it doesn’t feel like a complete accomplishment. Hopefully my next day at the bench goes better. ?
-
Looks killer! Love the weathering and mismatched body panels making it look pieced together.
-
Traditional 1929 Ford Woody Wagon Hot Rod
Dennis Lacy replied to Dennis Lacy's topic in WIP: Model Cars
UPDATE! Okay folks, back on this one. Where I left off the back half of the exhaust system had been roughed-in with the front section from the headers to the trans cross member needing to be figured out. A bit of an obstacle course with the headers tucking in and the oil filter hanging down. After some thinking and staring I got an idea. I trimmed off the bottoms from a pair of block hugger headers from a Revell ‘37 Ford and attached them to the bottoms of the Hedman Headers. This makes a nice transition from the two pipes and rectangle flange down to one pipe with a 90 degree turn and some neat flange & bolt detail. Then I found a couple of offset pipe sections cut from the pipes in any of Revell’s 1932 Ford series which get around the oil filter can perfectly. From there is was a matter of finding two more offset sections to cut in and connect with the rear pipes at the cross member. After that I went ahead and final glued all of joints then sanded all of the seams and mold lines. I also added the flared ends to the tips from a Revell ‘40 Ford so that I can use the chrome tips from the same. I also made a driveshaft using some Revell ‘32 kit u-joints and Evergreen tube. Decided to set the chassis on the fenders for a look. Getting the exhaust system built is always a huge relief. Here’s a close up holding one of the chrome tips on with a pair of tweezers for those unfamiliar with what they are. Just a few more chassis detail’s remaining. Need to install a steering box and shocks.
-
Step by Step box-stock build of the Monogram Uncertain T:
Dennis Lacy replied to tim boyd's topic in WIP: Model Cars
This is absolutely EXCELLENT, Tim. Thanks for sharing! And very nicely built. Some people love it, some people hate. I definitely appreciate it. Would have been interesting to stand within earshot at its debut show and listen to people’s comments. -
Your models are always so incredibly creative and so cleanly executed. I love it!