astroracer
-
Posts
451 -
Joined
-
Last visited
Content Type
Profiles
Forums
Events
Gallery
Everything posted by astroracer
-
Need help with track width on cabovers
astroracer replied to Goodwrench3's topic in General Automotive Talk (Trucks and Cars)
The rear width will depend on frame and suspension widths, gage by that, not the front track. Usually a wider rear track will help with stability on a tall box. I wouldn't worry about it, really not an issue. Mark -
"plastic" pin-striping tape, makes curves easy
astroracer replied to fiatboy's topic in Model Building Questions and Answers
3M Fine Line. Light green is good, blue is better. Get it at a local auto paint supply store. It does go around curves better then regular masking tape but it will still have issues with very small radius curves. Also, be careful when applying as too much stretching will cause it to curl or shrink back once it's been on for a few minutes. Mark -
Electric Conversion?
astroracer replied to Joe Handley's topic in General Automotive Talk (Trucks and Cars)
Check out this site. All kinds of info here. http://www.nedra.com/ This one has a few pics. http://www.greencarreports.com/news/1098780_ford-mustang-electric-drag-car-does-0-to-60-mph-under-2-seconds-targets-200-mph Mark -
Hey Kevin, make them. You have the full size parts and it's easy to measure them and scale them down to fit your model. Just make them exactly like the ones you have. Post up some pics of the real ones and we can get you started, scratch building is not that hard. Mark
-
Hey Eric, do a search. The button is in the upper rh corner, under your user name. There are a LOT of discussions on the site about 3D Printing. The 3D printed parts are no different then regular molded plastic parts in how they except paint. The biggest issue is getting them smoothed enough to look good under the paint. I do a lot of 3D modeling and have had many parts 3D printed thru Shapeways. A cheap desktop printer is not going to have the resolution needed to print a good quality part in 1/25th scale. Using the high end printers at Shapeways is the most cost affective way to get the parts printed in a quality good enough to finish for a model part. The other problem is, if you don't have 3D modeling software, is getting the exact part you want replicated in 3D. In order to print a part you have to have a 3D model to pull the STL files from the printer uses. The files don't grow on trees and that is what most people seem to forget when looking into getting a printer. If you can't model it, you can't print it. Mark
-
Welcome Eric, where 'bouts in MI. are you? I'm west of Flint a bit. Mark
-
Fabric covered spark plug wires in 1:25th scale
astroracer replied to Impalow's topic in Model Building Questions and Answers
Yup, head to Meijer or gander mountain and check out the fly fishing line. Mark -
Thinning ratio for car paint.
astroracer replied to om617's topic in Model Building Questions and Answers
As far as I know "most" touch-up style paints are acrylic lacquer. I would suggest experimenting a bit but, you can probably start with a 2:1 ratio, thinner to paint. try to find a mid-temp thinner that shoots best between 65 and 85 degrees Mark. -
You need to put this show on your schedule for next year. The show was excellent! I was there most of the day Friday and all day Saturday. Lots of spectators and the vendors were great! I hooked up with Flint Auto Upholstery to have them install a new headliner in the wagon and talked to a bunch of people about their cars. Had a good time and I expect next year will be even better! The Flint Area Auto Modelers had a nice display also with three tables of models for people to look at. We are trying to turn the "display" into a contest. The Flint area has been lacking in the way of model car contests for quite a while. This would be a good venue to start up a new one. Here are a few pics from the big & small car shows. Mark
-
Black braided hose question
astroracer replied to MeatMan's topic in Model Building Questions and Answers
Look for "dial cord" at your local electronics or radio/TV repair. I've used that stuff for many years. Pull out the inner thread and it is very flexible. The fishing line is great stuff also. It will be for fly fishing or spin casting. Mark -
You'll find it at any autobody/paint shop. It comes in a big tube and is a LOT more then you will ever need for model car work. I have it because I work on the big stuff also. Go to your autobody store and ask them for a 2 part polyester filler in a smaller tube or can. Evercoat and a few others also make similar products but I have no idea how they are packaged, quantity wise. Do not let them sell you a 1 part "glazing" or "spot" putty. These are usually lacquer based and will shrink dramatically when used in thicker amounts. Mark
-
Right, that doesn't look that great, huh? Like Daniel was saying above you will need to have the hubcap modeled in 3D before it can be printed. I can model it for you AND have it printed. Any of the small desk top printers out there are not going to have the resolution needed to print that hubcap with any detail or smoothness. I send all of my stuff to Shapeways. they have the equipment to do a nice job with your part. if you want to pursue this PM me. Mark
-
Clean it with hot water and a bit of Dawn dish soap. Don't soak it, just scrub it with the hot water and ScotchBrite. Once it's clean and scuffed a bit, shoot on a couple of medium wet coats of DuPont sandable grey primer/surfacer. let that set up then start wet sanding with 220 grit paper. Take that to a point where most of the primer is gone then re-prime and finish out with 320 and 400 grit. That should get you to a pretty smooth surface, ready for paint. mark
-
If you have the kit wheel covers you can just set them in a bigger wheel and get the "look". There are a lot of bigger rims out there or you could have some custom rims turned out of aluminum to fit the stock hubcap. Mark
-
Hi drew, I would be hesitant to use it on resin. I tried using Testor's one part putty back in the day when I was doing master work for R&R and it would simply peel out with any sanding. A good 2 part polyester putty like USC's Icing is my go to filler for everything now-a-days. It sets up quick, is very easy to sand and does not shrink and takes any type of paint you want to throw on it. It works especially well with resin. Mark
-
Just be careful with heavy layers. It's a one part so, as it cures, it is going to shrink. Small scratches, pinholes, etc. will probably see good results but anything more then that will shrink and create ghost images under the paint. As mentioned, if you use the DuPont or PlastiKote lacquer primers, test it first. Mark
-
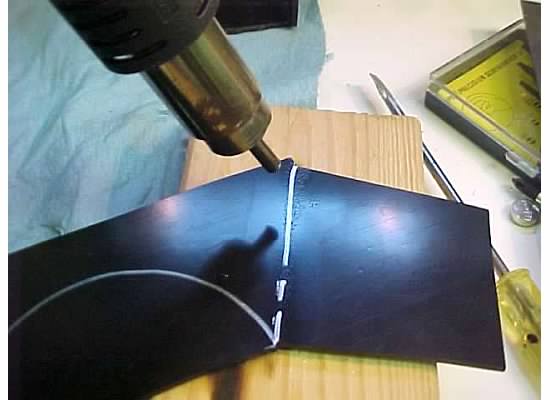
Curving styrene sheet with a heat gun
astroracer replied to misterNNL's topic in Model Building Questions and Answers
I've been using this soldering station for a number of years. It has this heat gun as part of the station. It goes up to 480 degrees and makes real quick work of bending and forming 1/8th inch ABS panels. I used it to bend parts for some cup holders I added to a shifter console in my '56. it is fully adjustable from 0 to all out and works well on thinner material also. Just sneak up on the temp. Once you've used it a while you will know what the plastic likes and doesn't like. Mark
-
Curving styrene sheet with a heat gun
astroracer replied to misterNNL's topic in Model Building Questions and Answers
Hi Tom, What thickness are you using? Most anything up to .020 can be bent by hand over a 1/2" radius. I have bent .010 and .020 thou sheet with just the heat of friction from rubbing the material. A heat gun would work fine for larger panels such as you are working with. Go slow and increase the heat until the panel starts to droop. Remove the heat and roll the sheet to the angle you need and hold it there for a bit until it cools. Should keep the shape just fine. Mark -
What you are changing, in your photo shopped pic, are the "proportions" of the car. It's not that it's bad or your idea isn't valid but it throws off the proportions and makes the car look "funny". Stretching the front is similar to the mid 30's Mercedes-Benz 500K. If you compare that car to your rendering you will notice the cross-section is much lower which helps lengthen the car and draw your eye away from the tall grill and short top that grabs all of your attention in your pic. 90% of a good design is getting the proportions correct. If you take the grille and top down 6 or 8 inches it will look better. Mark
-
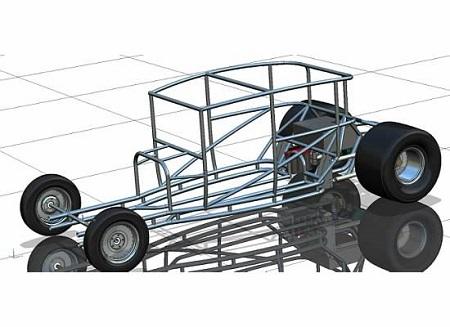
Looks to me like you nailed it! Excellent work! Mark
-
What KIND of supercharger are you looking for? Post a picture of what you are thinking and we can help you. There are a dozen different styles of superchargers out there. We need to know what you want.. Mark
-
This is your other thread asking the same question... Asking another question is not going to change the answers Do a search under "3D Printers"... http://www.modelcarsmag.com/forums/search/?q=3D+printing This question gets asked every other day on this site. There are a ton of threads available for you to read thru. Do that, then come back with any questions you may have... Mark
-
Take my ramblings as you will. I have a few thoughts on model cars and "accuracy". I always ask myself these questions when looking to purchase a "questionable" kit. The 1st thing you need to ask is: How accurate does it have to be? The 2nd question is: How many other kits are available for this particular model? 3rd question is: If this is the only kit out there, will you not buy it because it is inaccurate? 4th question: How many other people, other then myself, will notice the inaccuracies once it is built? And, question 5: If the inaccuracies are small can they be fixed while building the kit? Mark
-
Yea... Allen pretty much nailed it. You are not going to get any kind of quality out of a 300 dollar desktop printer. ESPECIALLY in 1/24th-1/25th scale. AND, if you have no way to model parts in 3D, you are not going to print anything anyway. The part files do not grow on trees or out of the Ethernet. You have to be able to model them first, before they can be printed. if you do a search you will see about a dozen threads on this subject reiterating the exact same problems I just mentioned... Mark
-
Like Bill said. What "kind" of supercharger and what engine? If you are looking for a roots style blower all you need is an intake manifold for your V6. The blowers are all, basically, the same case. the intake manifold is what designates the application. The intake is easy to scratch build using the stock intake and some sheet plastic. If the stock car had a carb or TBI just cut a piece of sheet plastic to fit the base of your supercharger and glue it onto the carb mounting surface. Mark