Tom Geiger
-
Posts
18,967 -
Joined
-
Last visited
Content Type
Profiles
Forums
Events
Gallery
Everything posted by Tom Geiger
-
 Yes! It’s in the scrapbooking paper aisle.. all kinds of paper with different treatments.. embossed, flocked, different colors etc.
 -
And thick bondo
-
Then jump in! Read my comments above.. it’s not a contest, but a personal challenge! People take on projects of varying complexity as a personal goal. It’s fun! There have been guys who don’t get that. Every so often we have someone post that they’re done after just a few hours. And they want to know if they get a prize for finishing first! Um no! They never return. Somewhere around the 18 hour mark, the cars start coming over the finish line. Those completions only fuel the rest of us to get it done! Over 100 people signed up last I looked! https://m.facebook.com/groups/2490663337730074/?ref=m_notif¬if_t=group_comment
-
Hear it rusting!
-
St John Jeep
Tom Geiger replied to Tom Geiger's topic in WIP: Model Trucks: Pickups, Vans, SUVs, Light Commercial
You are so right my friend! Every time I see that photo it just screamed, “Build me!” I guess we can credit Covid with giving me the time to do so! I am enjoying this project, I build a bit every day and it keeps my head straight as the world goes crazy outside my cocoon! -
To a horse ?
-
St John Jeep
Tom Geiger replied to Tom Geiger's topic in WIP: Model Trucks: Pickups, Vans, SUVs, Light Commercial
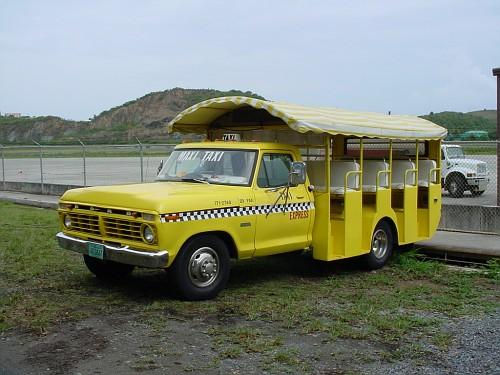
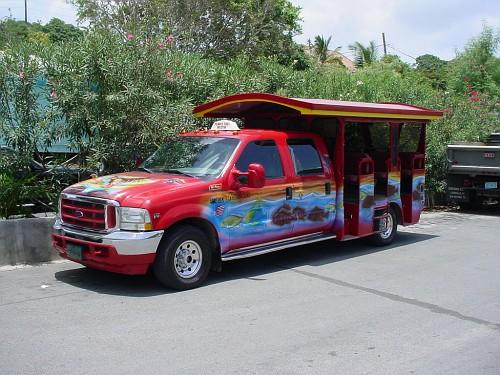
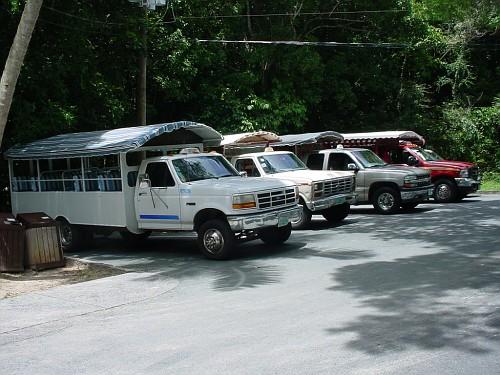
Thanks! I don’t know the origin but either home built or from one of the back alley fabrication shops all over the islands. I saw a few with new Jitneys like these in progress.. These were the inspiration for my 1950 Ford Jitney.
-
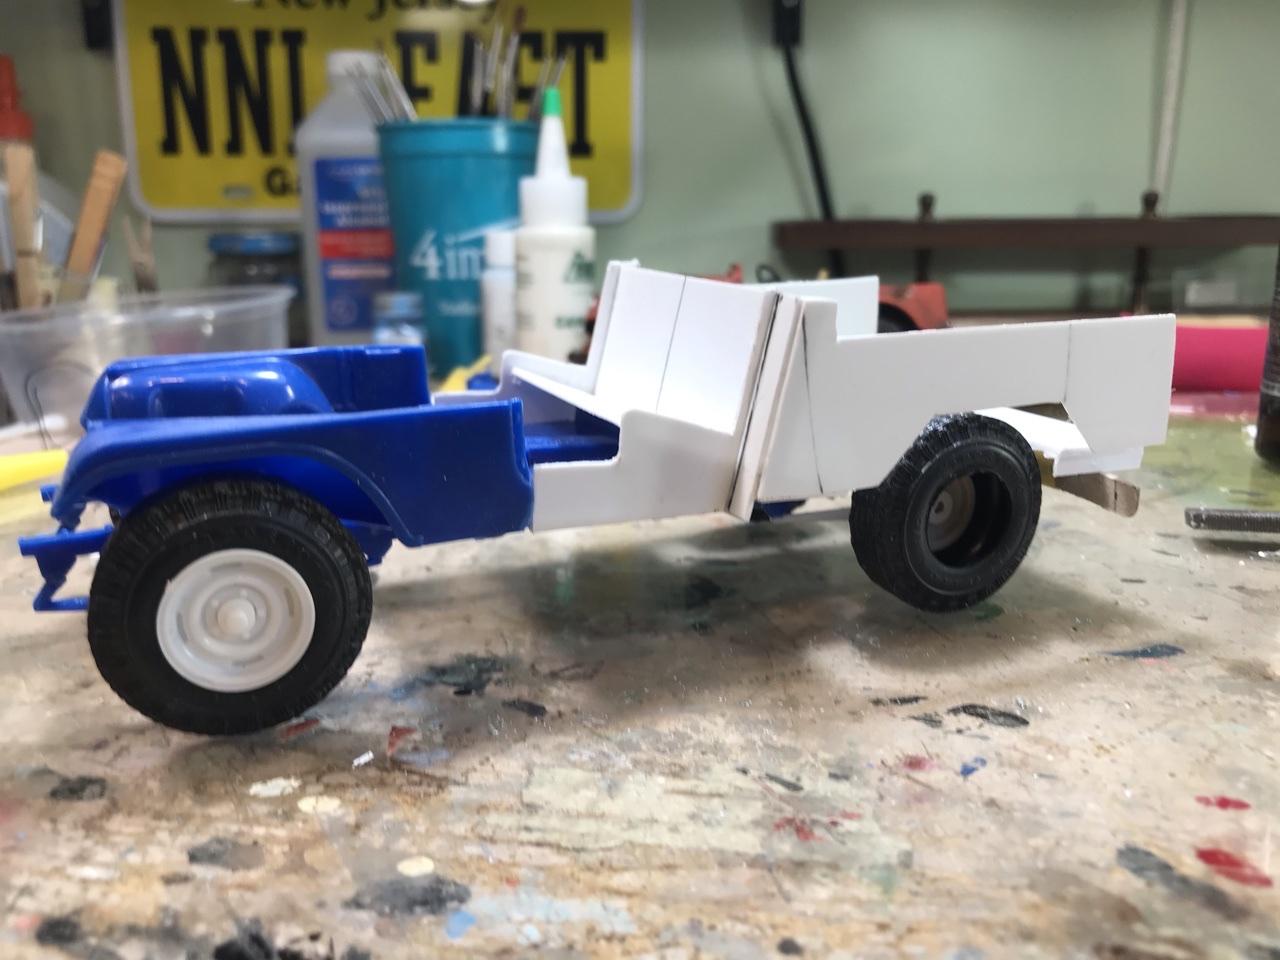
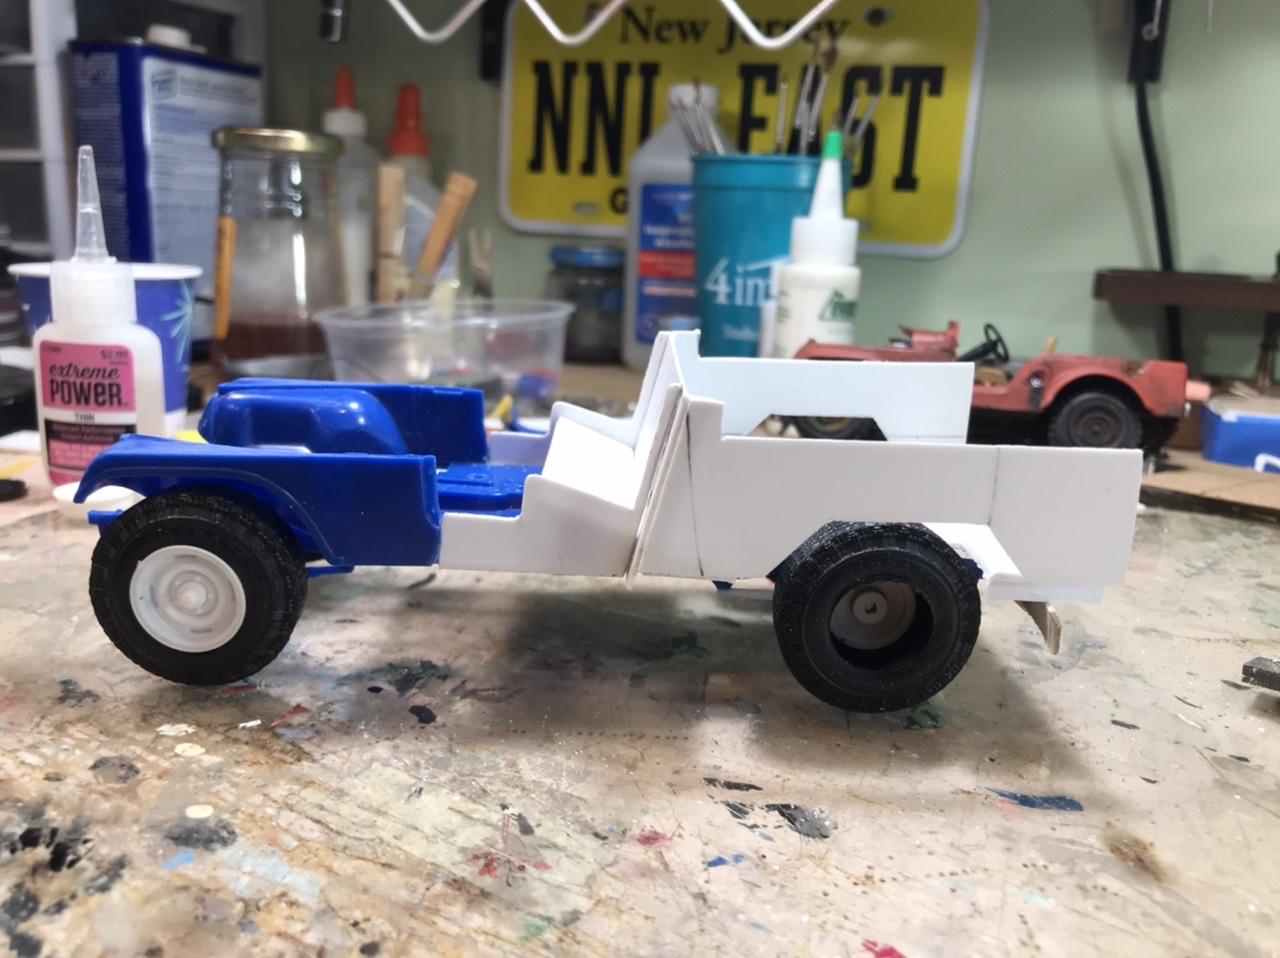
A bit more work on the St John’s Island Jeep.. I have a step by step build thread going for folks who want to see how a body gets scratch built.
-
Scares the horses
-
Neat build! Where was Norristown Ford? I live close to Norristown Pennsylvania and there was once a Norristown Ford there.
-
Offers a Trabant
-
amt 1202 1/25 AMT 1963 Chevy II Nova Station Wagon - Craftsman Plus
Tom Geiger replied to Casey's topic in Car Kit News & Reviews
I think we all have stories.. back when I was 16, my friend Mark was 17, then the driving age in NJ. He got a hand me down car from his sister, a 1962 Chevy II (note that they weren’t yet called Nova until 1963) 2 door sedan. This was 1975 and the car seemed ancient to us, even though it was only 13 years old. But it was beat! Floors rusted through, his sister had brush painted it white. The back seat bottom had been replaced due to a smoking fire, with one that didn’t fit and wasn’t attached to anything. But we tore ass all over the place getting into trouble as young guys do. One time we got pulled over with beer in the car, and we pulled back the floor mat, and put the beer on the ground through the rust holes! Mark saved some money and bought a similarly beat up 66 Mustang coupe to replace it. Poor Chevy II went to the junk yard. -
For demo derby
-
St John Jeep
Tom Geiger replied to Tom Geiger's topic in WIP: Model Trucks: Pickups, Vans, SUVs, Light Commercial
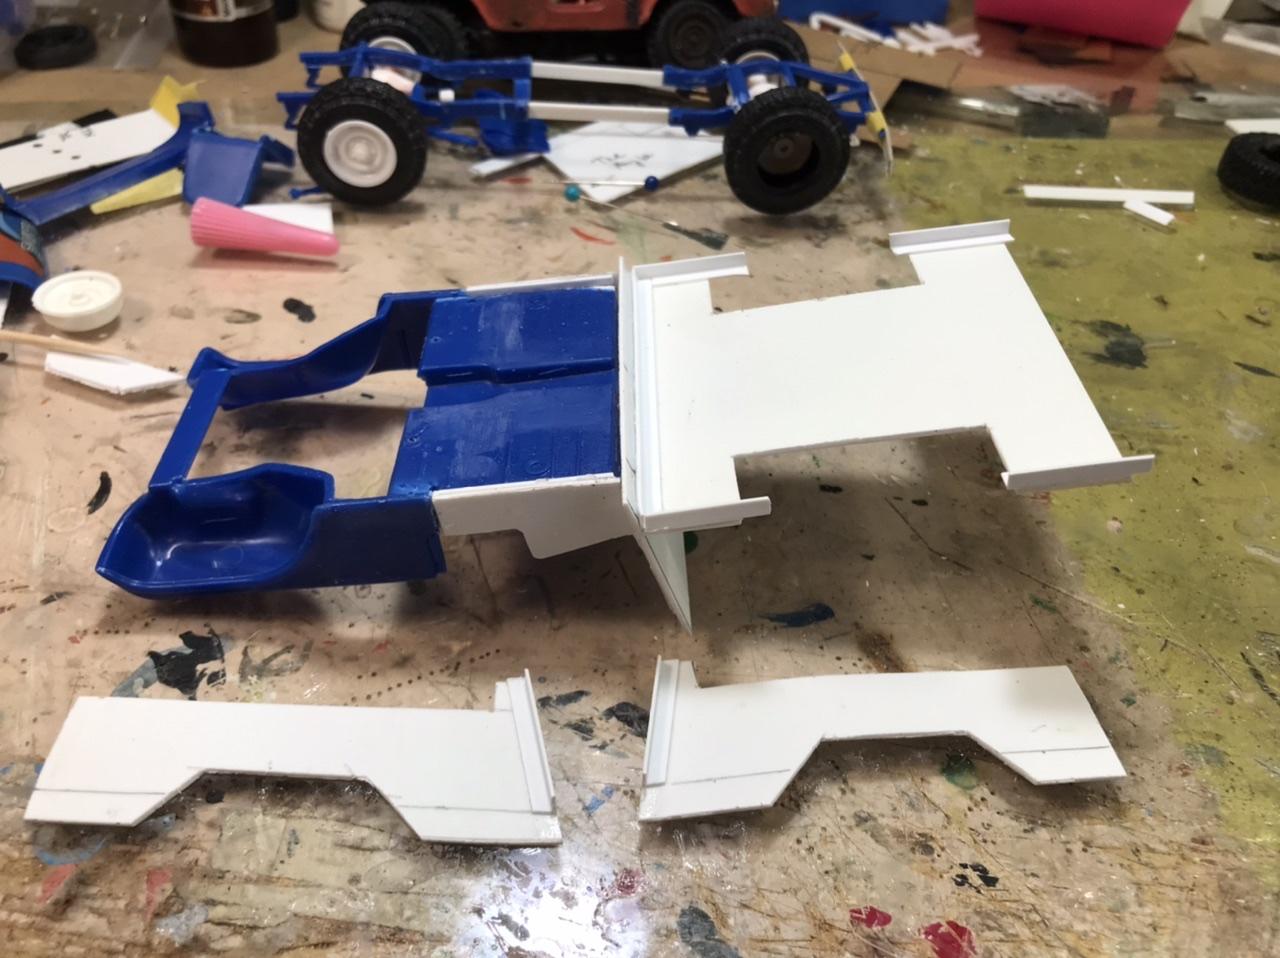
Well another day’s worth of progress. It’s been 24 hrs without any comments so I’m not sure anyone’s interested in this work.. If you look closely at the above photo you will see the Evergreen plastic angle I’m using to true the corners. The .040” plastic is thick enough to glue securely, but I’ve added the extra strength of the angles, which may be visible in some spots, thinking the little welding shop in the islands may have fabbed it that way. Here we have angle plastic glued, and we are ready to mount the sides.. the moment of truth where we see if our calculations and cuts were correct! I first glued only the critical edge at the front angle since that’s the most important match point.. so far so good. And we seem to be okay! Wheel wells are in correct position. Time to glue the rest of the body sides to the floor. Next step is to make the inner wheel wells. Here’s a shot of one mocked in place. I’ll let them dry overnight before I sand down the matching edges, and make sure the bottoms are flat and true to the bed floor and side. And that’s where we have landed today. Next time I get to the bench I will be cutting out the non critical pieces that make up the visual total of the body. I have a roll bar to work with, and will be making the side rails.
-
New GM car!
-
of the game
-
MPC 1982 Dodge Van "Bad Company"
Tom Geiger replied to Jordan White's topic in Truck Kit News & Reviews
Duh! I should have remembered that! Not only do I have that kit.. but I owned a 1:1 of it! I have shortened one just for giggles. Not as easy as it looks! I agree that the older round headlight versions are nicer looking. The nose on the Bad Company van is actually the high end treatment. The lowly work vans had a single round headlight, almost like the ambulance version. -
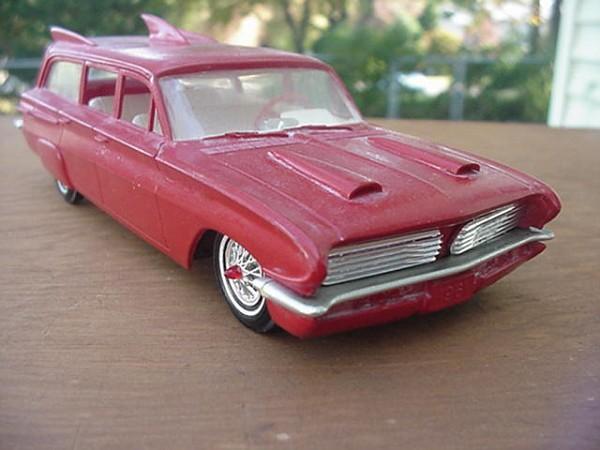
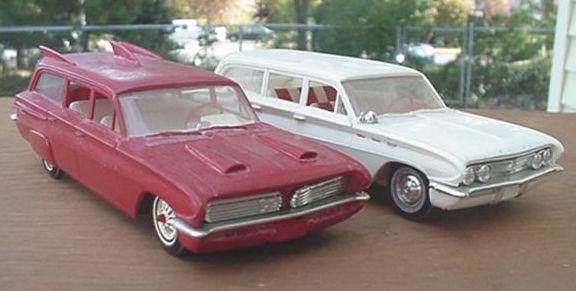
Thank you everyone! I realize the old relics aren’t everyone’s cup-o-tea! In years past as I pulled them from junk boxes at shows, dealers would nearly apologize, “that one’s too far gone to restore to stock!”. Since people enjoyed this post, here’s a bonus! Another one I own.. I’ve also had this one a long while.. I believe it came from eBay pretty much as you see it. Every one of these Buick wagons I find are either missing tail lights or used the custom pieces! I don’t think I’ve ever even seen a stock pair! Here is the stock built up I also have.. unpainted body, but check out that interior!
-
amt 1202 1/25 AMT 1963 Chevy II Nova Station Wagon - Craftsman Plus
Tom Geiger replied to Casey's topic in Car Kit News & Reviews
No apology needed! You asked a question without any malice. -
He’s a senator
-
MPC 1982 Dodge Van "Bad Company"
Tom Geiger replied to Jordan White's topic in Truck Kit News & Reviews
Gold Rush is the only version of the MPC Dodge vans that doesn’t include stock parts. I do agree with Adam that it’s a great celebration of MPC banning era excesses! MPC updated the van each year and included changes such as the pattern of roof ribbing. I pulled out my collection of kits, built ups and junkers and every one was different! The only question in my mind was why they did this as a long wheelbase van while most of the custom vans were short. Here’s my album of what I believe to be all the versions. Anyone, please let me know if you know of any I’m missing: https://public.fotki.com/ModelCitizen/model_cars/my_model_car_box/dodge_van_kits/ -
I used a spray can.. I think brushing will leave strokes. I’m not sure how long this will take to dry. On mine I just did the bumpers, as it is on my 1:1
-
Had no cause
-
Chased poor Jimmy
-
Ha! Gifts! I had a neighborhood cat that would sit on my front door mat. I’d pet it and it left me a headless mouse!