Ramfins59
-
Posts
5,918 -
Joined
-
Last visited
Content Type
Profiles
Forums
Events
Gallery
Everything posted by Ramfins59
-
 I finished my latest build of a 1955 Mercury resin kit... It's in "Under Glass".
 -
That looks fabulous Steve.
-
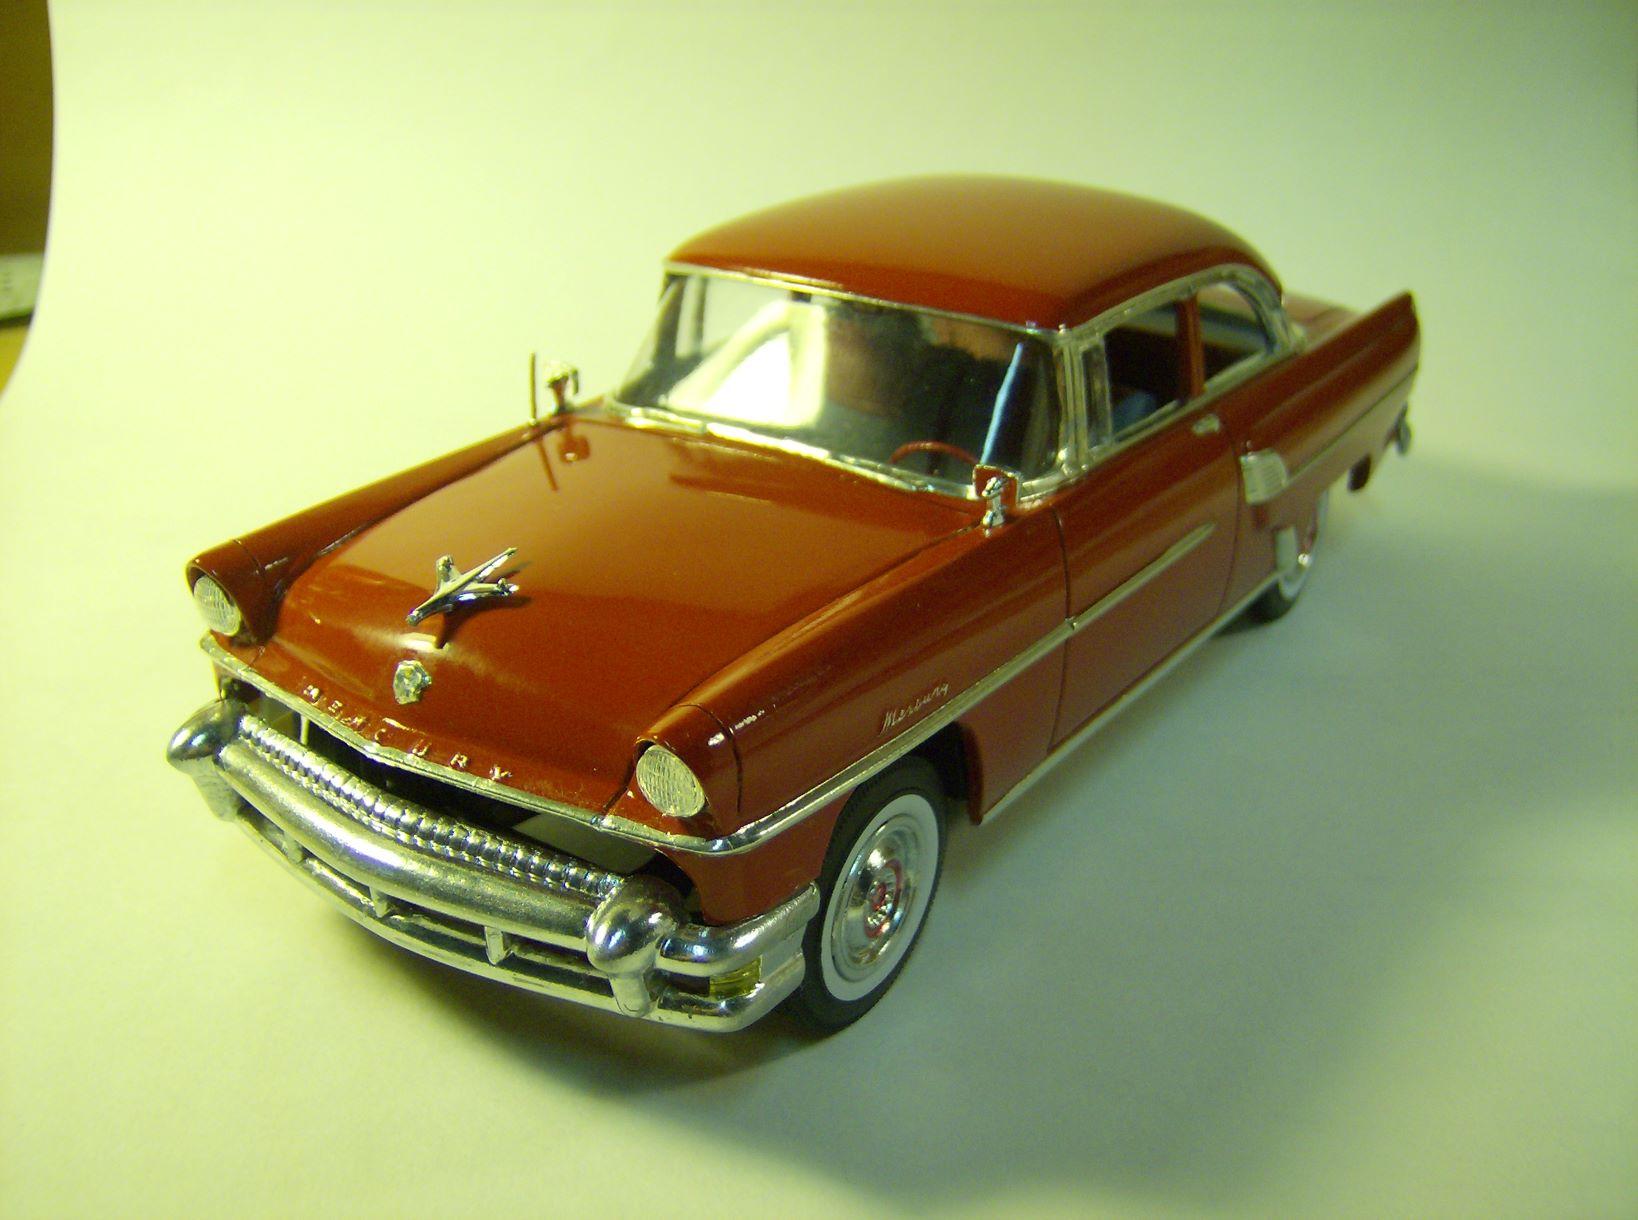
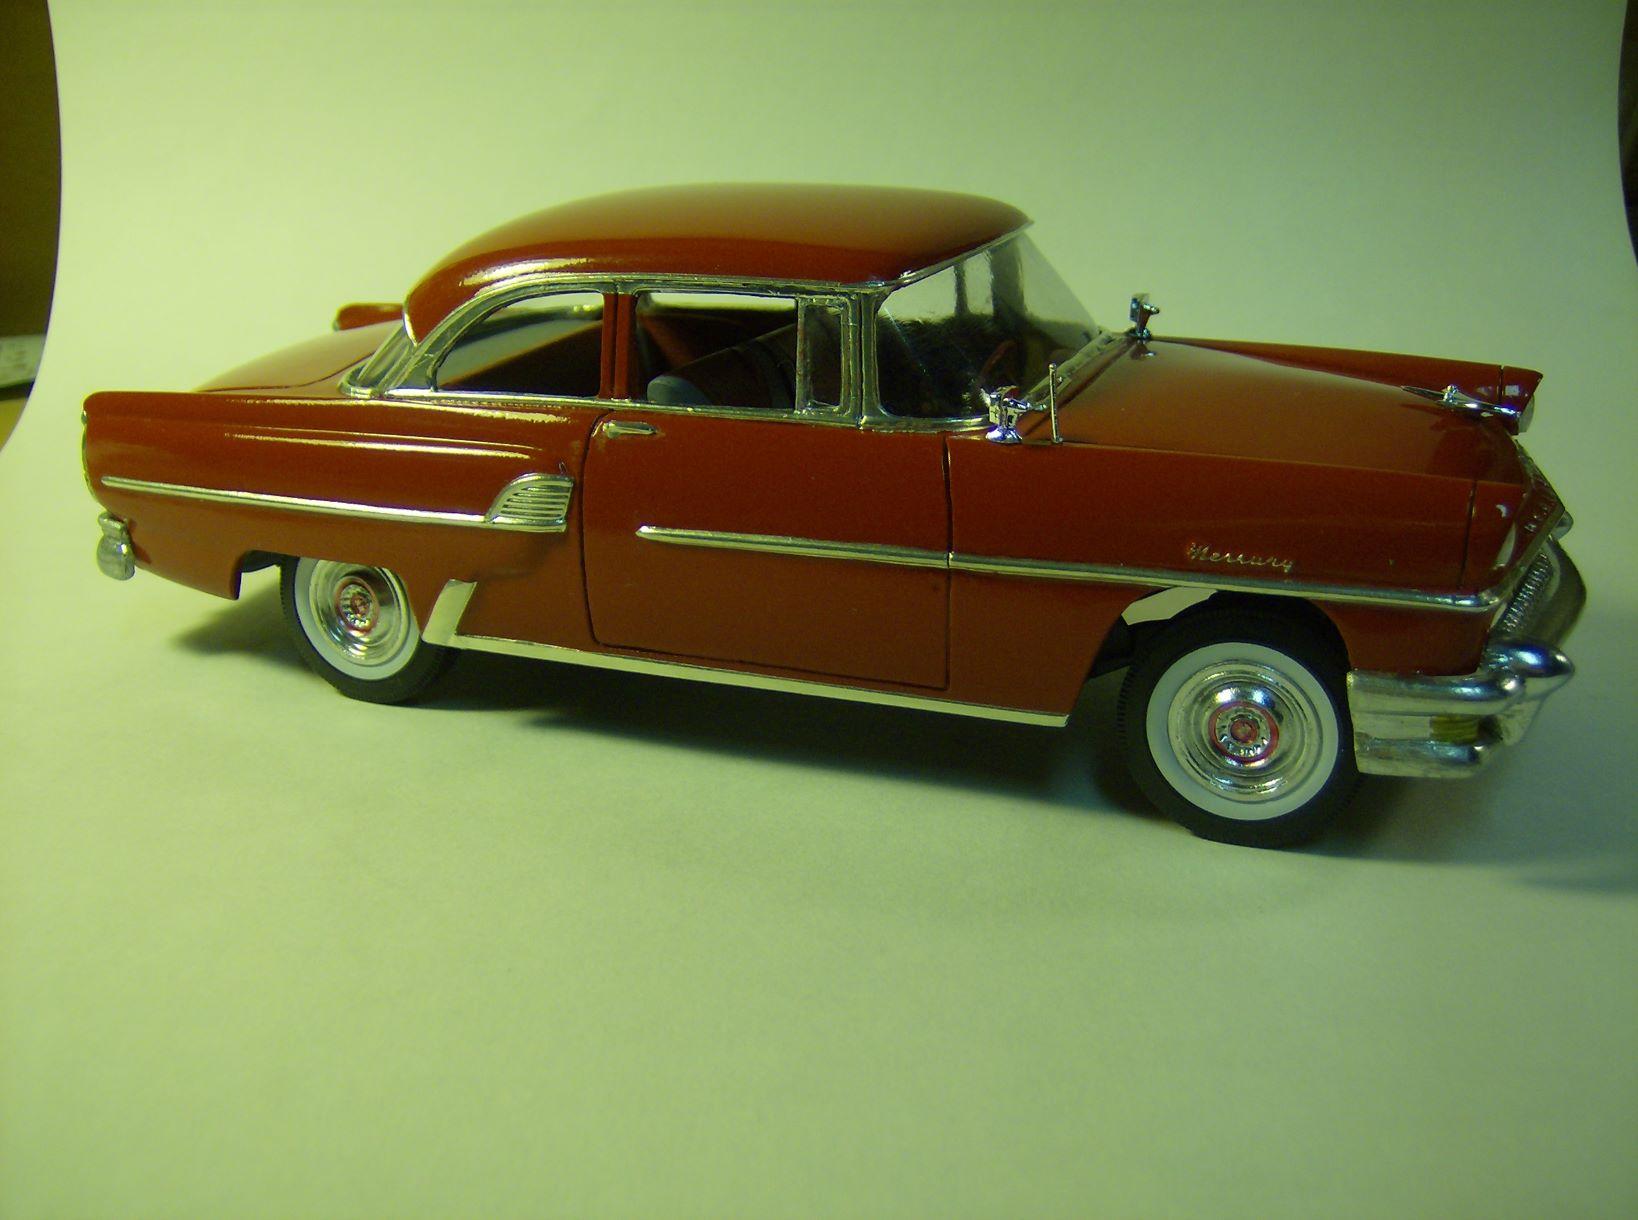
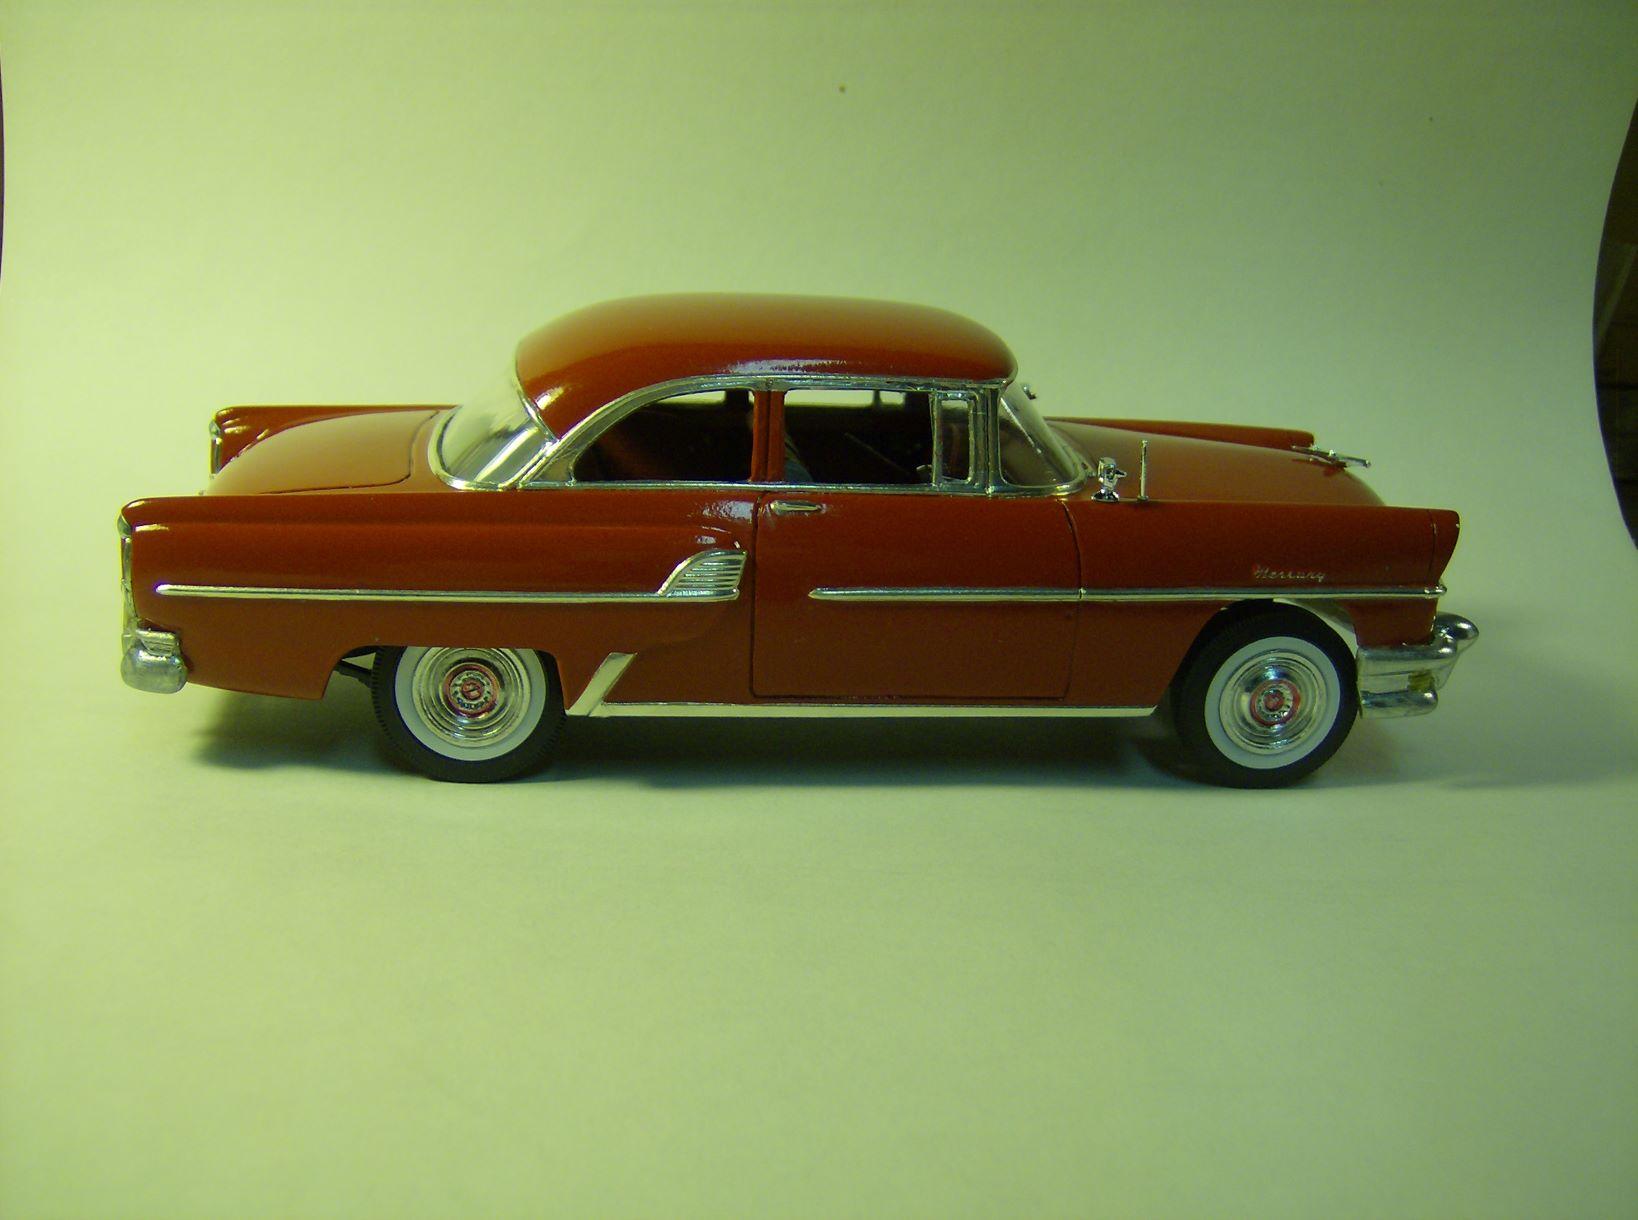
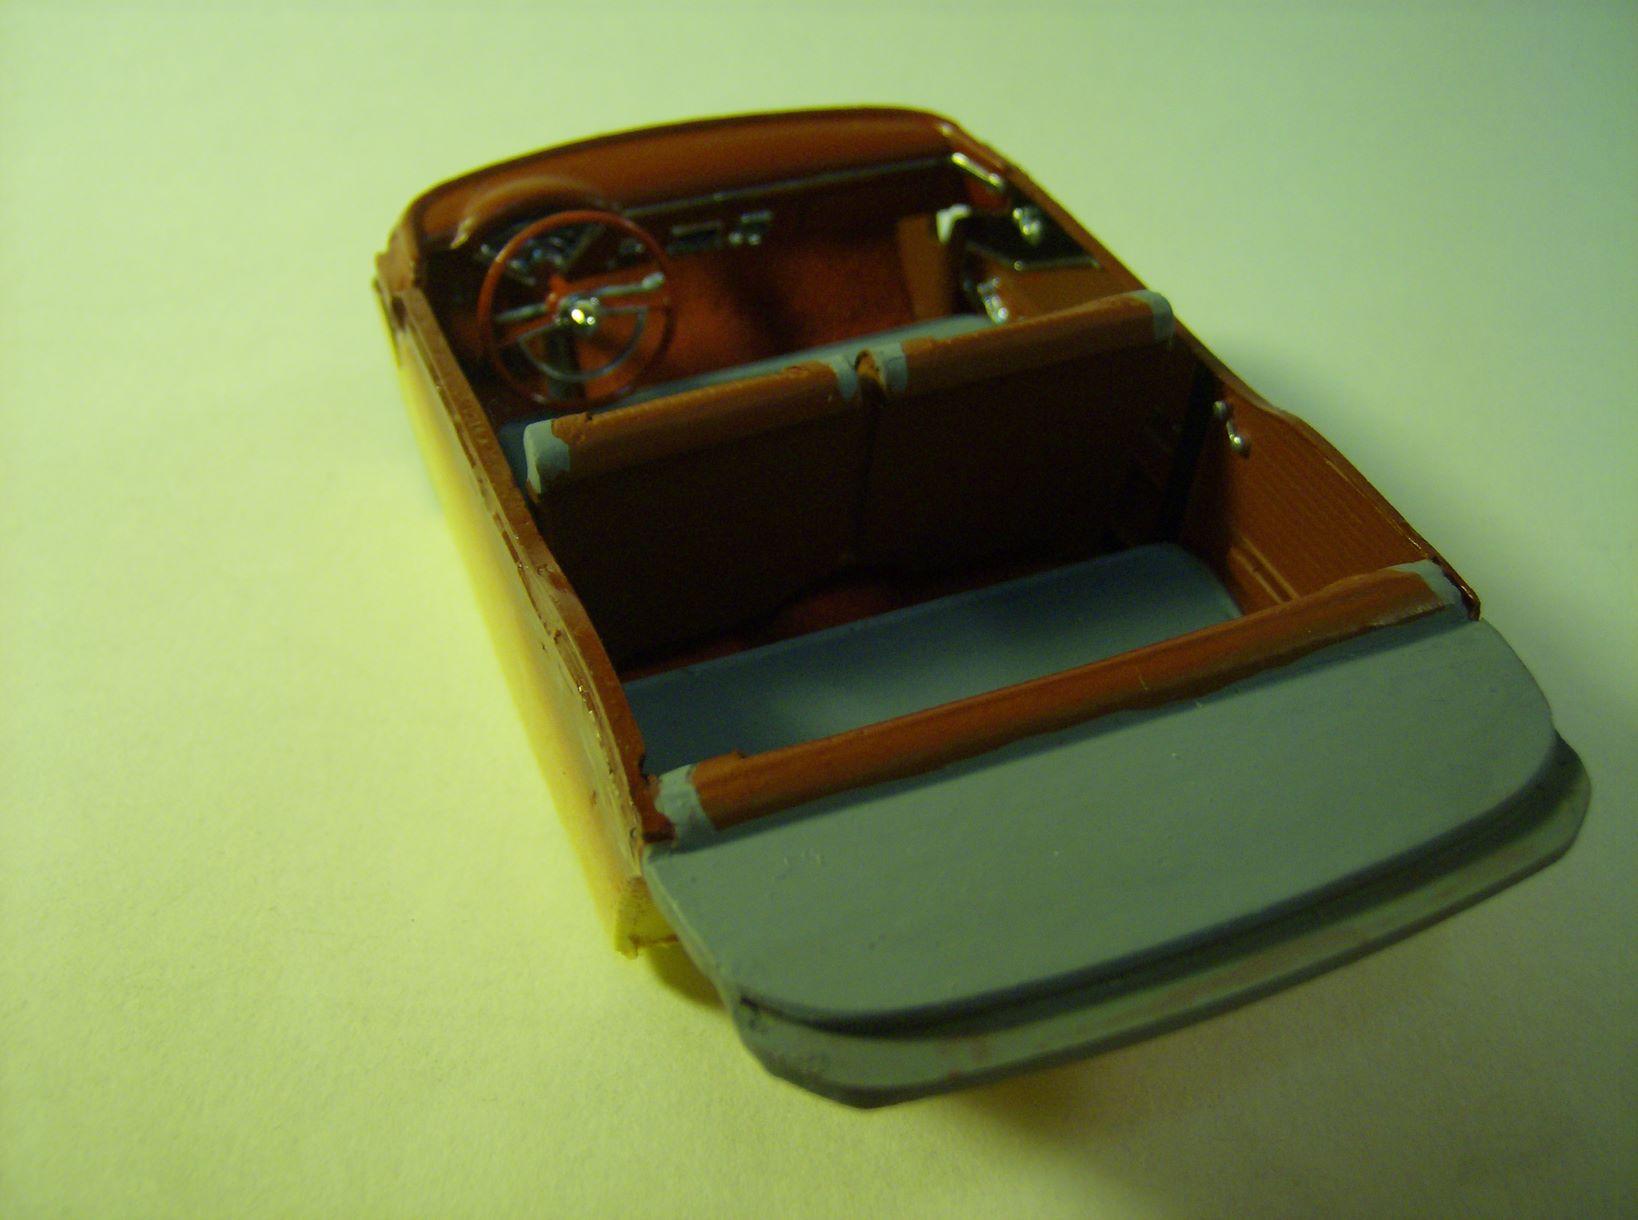
Hey there fellow modelers. Here is the car I finished up this evening. It is a curbside resin kit of a 1955 Mercury. I bought this kit back in 2017 from a guy named Jerry Koszut who did resin casting for an outfit called Mason City Miniatures in Ainsworth, Nebraska. He was quitting the resin casting work due to age, and health issues related to working with resin for many years. This was the last casting that he had of this car and fortunately I was able to get it. The casting was very clean needing hardly any cleanup. The color is Duplicolor Flame Red and what seemed like feet of BMF. An AMT '56 Ford kit contributed the chassis, steering wheel and headlight lenses. The whitewall tires, mirrors, antenna and license plate came from my parts stash. The bumpers, grille and taillights did not come chromed and I used Molotow markers to chrome them. The interior is painted with various red paints, metallic black and BMF trim on the side panels, gray painted seat inserts and red embossing powder for "carpet". The dashboard is painted body color with BMF & Molotow trim. I also added an interior mirror, visors and a dome light. This will most likely be the last model I will have finished for a while, depending, of course, on how well and fast I can recuperate and recover from my Bypass surgery next Wednesday. I don't know how well I'll be able to navigate up & down the 13 steps to my basement model area. I plan on bringing several kits upstairs to do some prep work on either at my dining room table, or sitting in my recliner. Enjoy the pictures, and feel free to comment, good or bad.... and...... Please all stay very well. Rich

-
That really looks great Jason.
-
I've used several techniques to "polish" the paint on a model, always after a couple of good coats of clear first. Once the paint and clearcoats have fully dried and cured (at least 2 full days for lacquer paints), I have used; Novus 2 Plastic Polish - Squirt or pour some either onto the part of the car you want to work on, or, onto a piece of soft cloth like flannel or an old T-shirt, and rub... rub...rub... wiping off the polish after awhile to check how smooth the finish on the clearcoat is getting. Continue doing this until you achieve the desired "smoothness" or finish that you are looking for. MicroMesh Polishing Kit - This is a series of very fine grades of polishing cloths, from 2400 grit to 12,000 grit. Depending on how rough your initial paint finish is, you'll usually start with the lowest grit cloth and sand away until you have an even "dull" finish where you're working. This may seem counterproductive to be dulling the finish that you're trying to make shiny and smooth, but keep on... Move to the next grade of cloth and do it all over again. What that second sheet is doing is removing the scratches that the first sheet made. That's why you should always apply several good coats of clear, because the polishing cloths are removing some of the clearcoat. Continue moving on to the higher grades of polishing cloths until you finish with the final 12,000 grit. Now you should have a pretty much "perfectly" polished paint finish. Stay away from high points and raised edges with the cloths or you'll go completely through the clearcoats and paint. Once done completely you can wax. Good luck.
-
Thanks again guys for your great comments.
-
Pittsburgh Pa Area Contest & Vendors 3-29-2020
Ramfins59 replied to DPNM's topic in Contests and Shows
I hope to be able to attend and participate in this show. It all depends on how well I recover from Bypass Surgery on February 26th. I have several newly built models to bring if I do. -
Welcome to our plastic playground Jeffro.
-
Welcome to our plastic playground Ben.
-
Thank you all so very much for your very encouraging and kind comments. They keep me motivated.
-
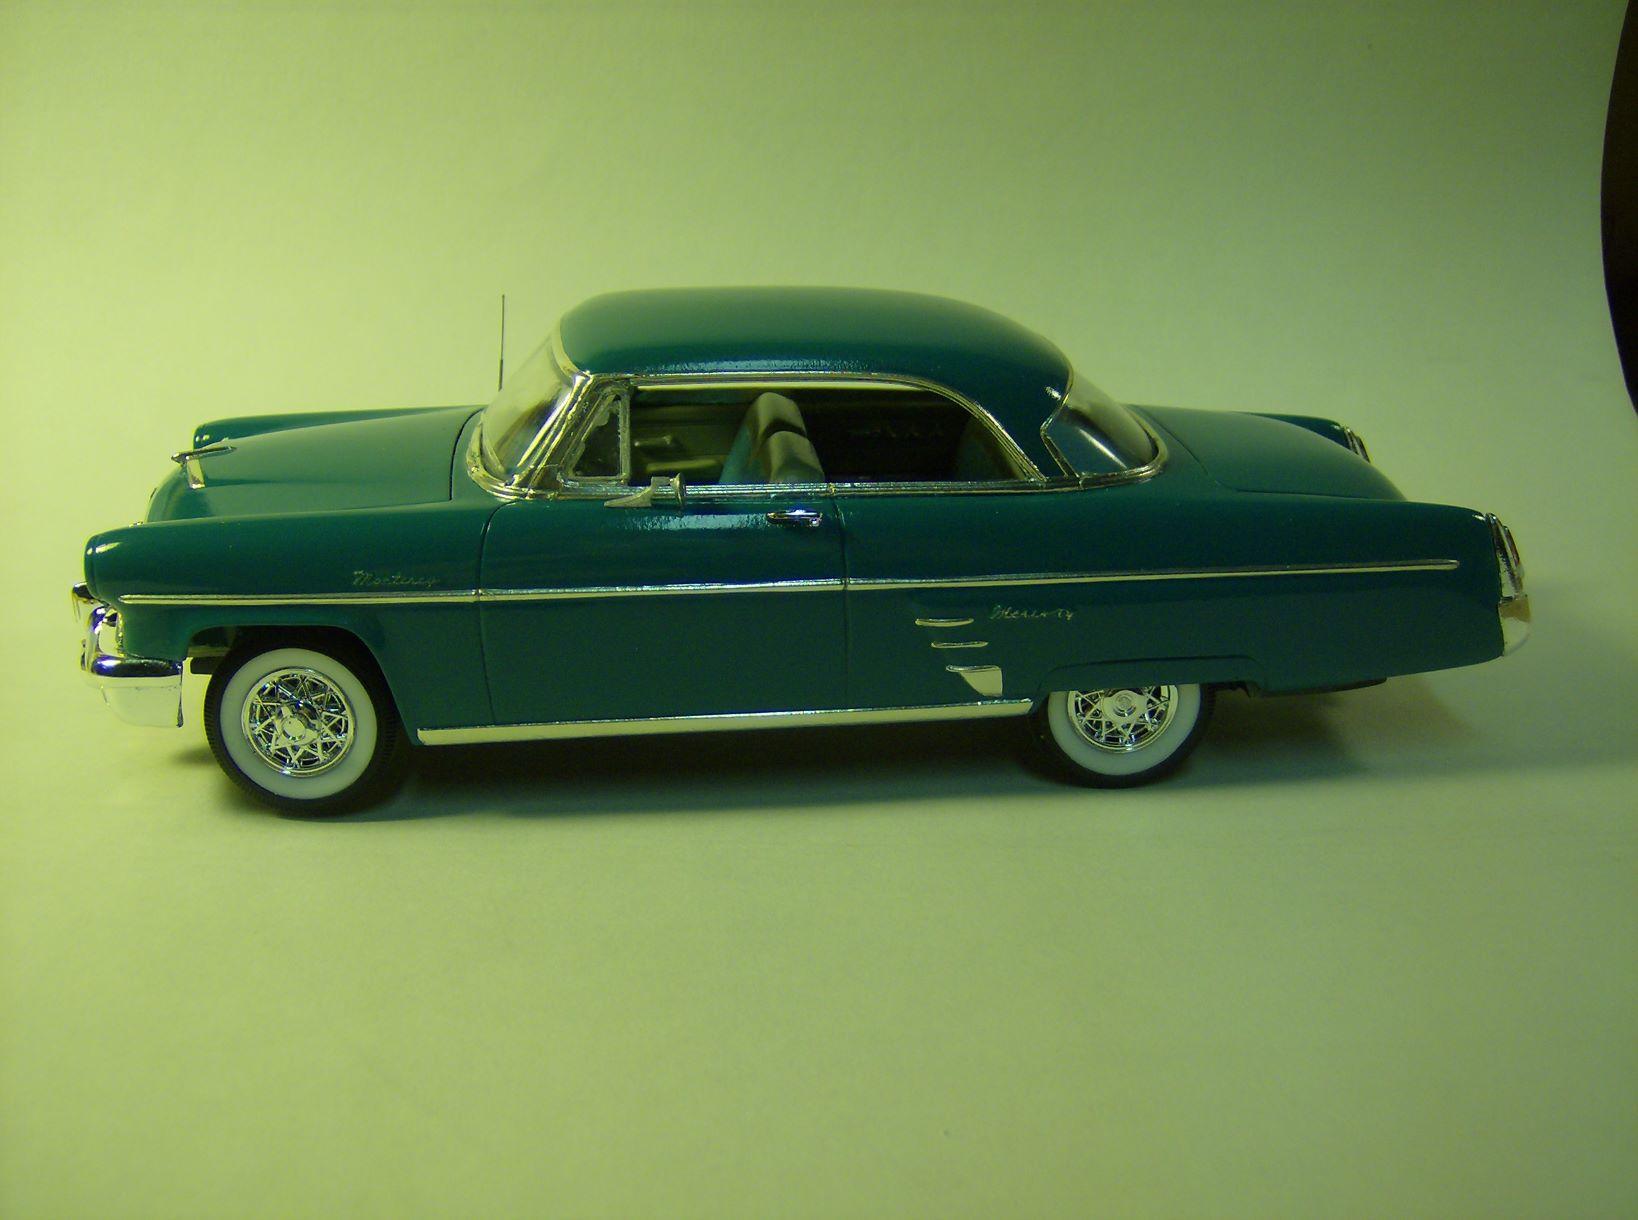
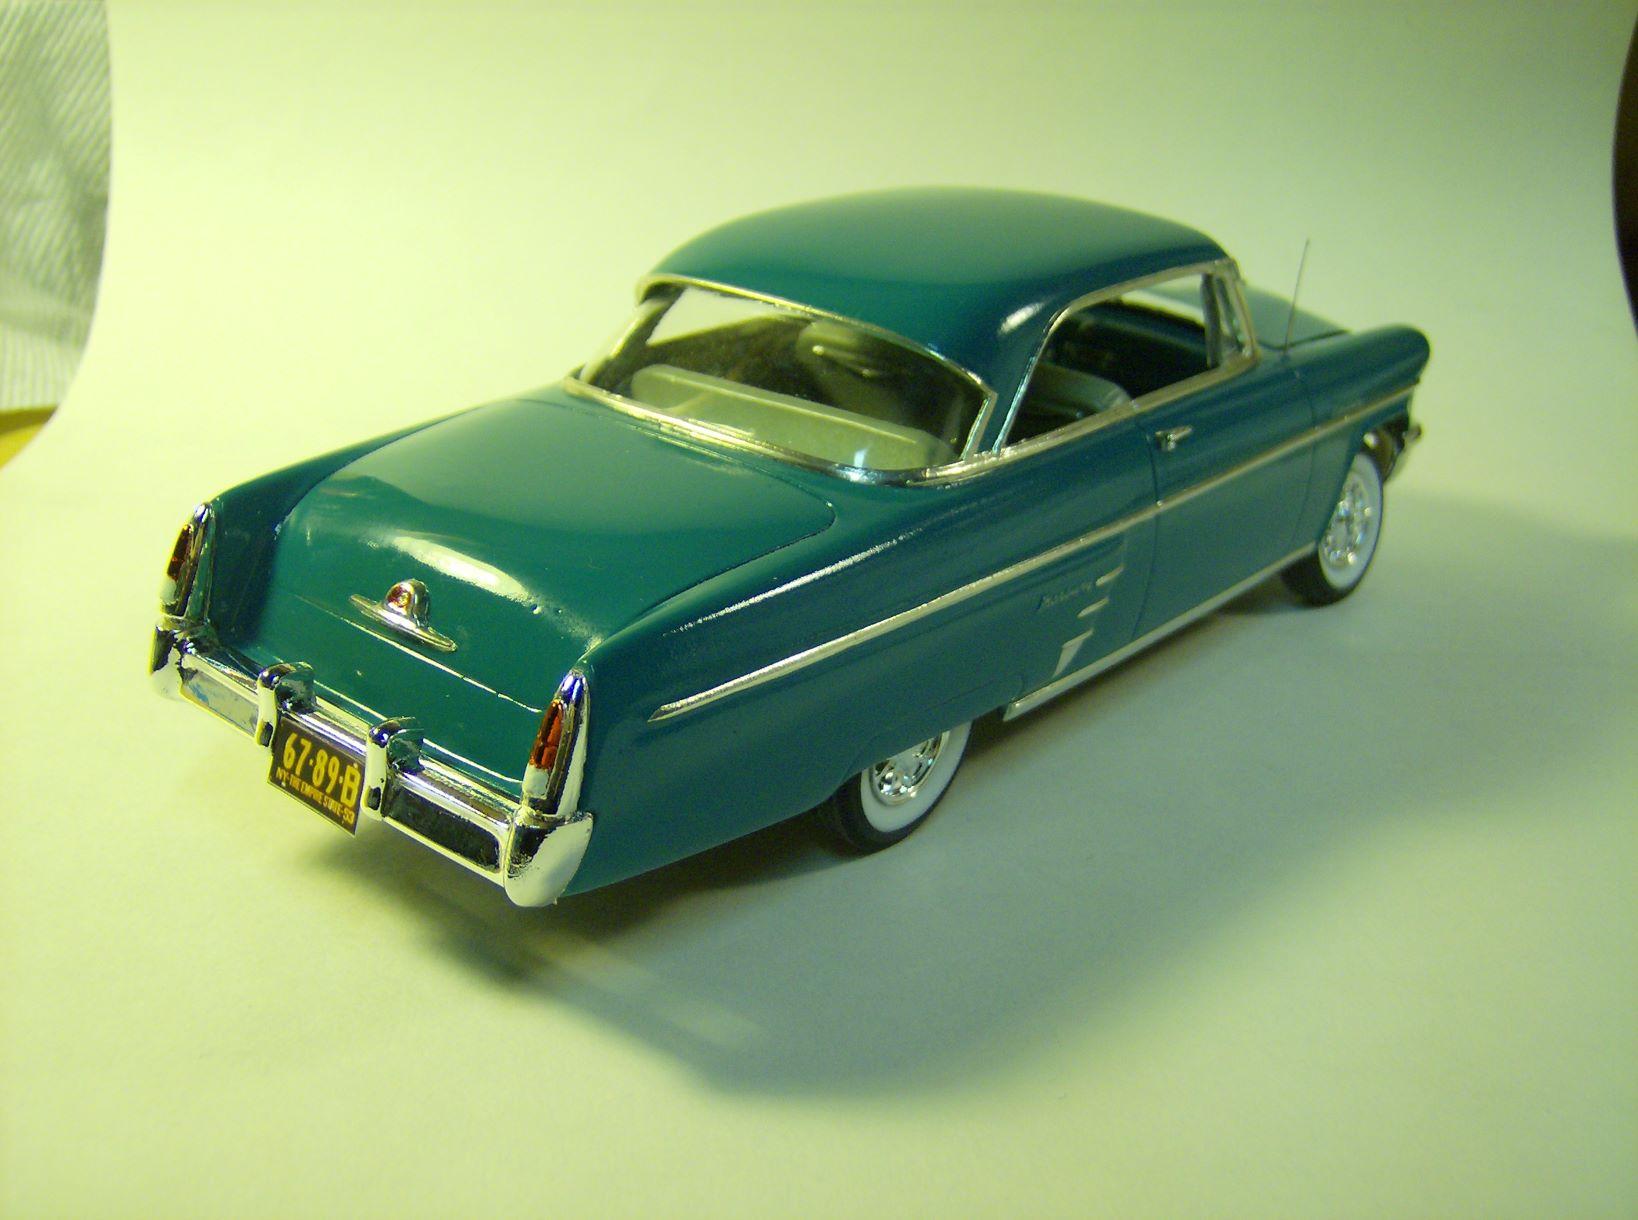
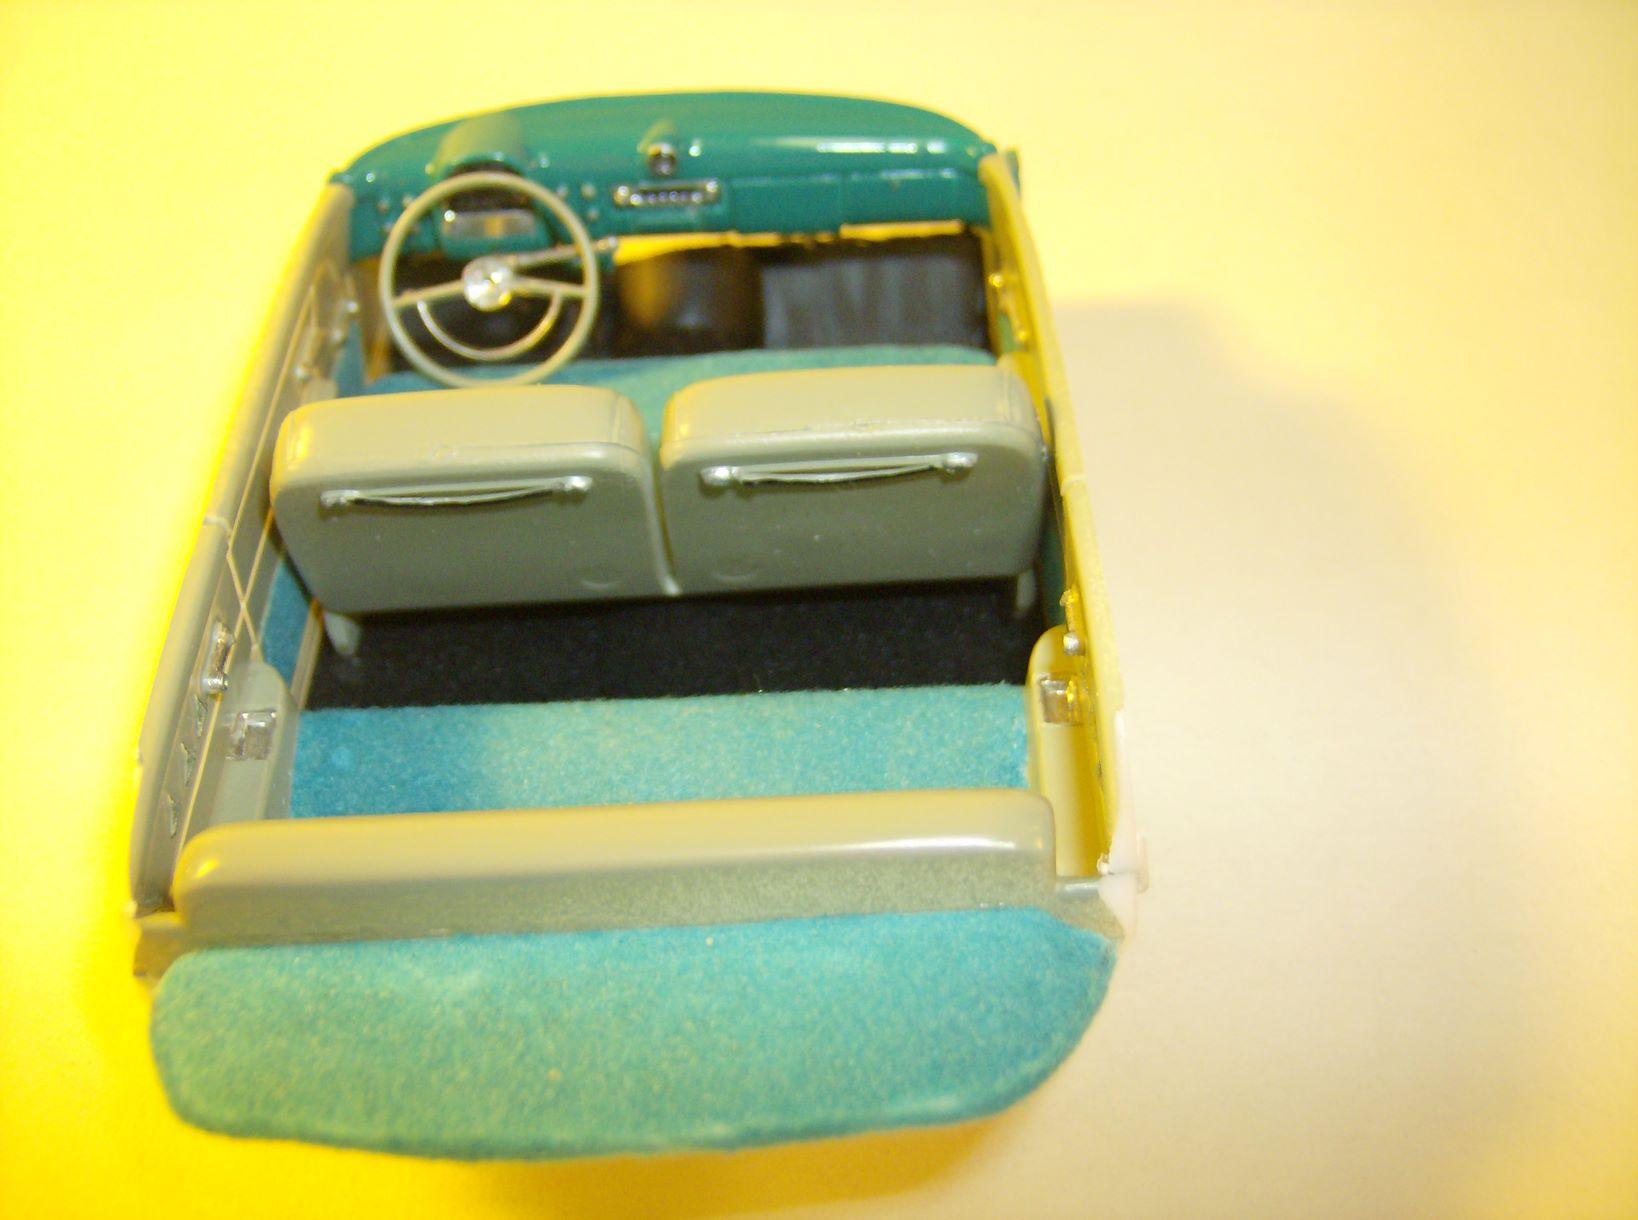
Hi gang. This evening I finished up a 1953 Mercury... something I guess we rarely, if ever see in a model. I picked up this resin kit by R & R on EBAY a little over a year ago. The body was a surprisingly good casting that only needed a minimal amount of cleanup. I glued the hood on to make it a curbside model. The interior was trash, so I wound up using the interior, chassis & the wheels & tires from a 1953 Ford kit. The front glass, outside door handles & mirror are also from the Ford kit. The color is Tamiya Cobalt Green with a lot of BMF. The interior was sprayed with Tamiya gray green and then I applied turquoise flocking to the seats, door panels & package tray. The door panels have Molotow chrome trim. The dashboard was painted body color with Molotow chrome accents & the "carpet" was done with black embossing powder. It's not the best model I've ever built, but it makes a great and unusual 5th addition to my "Class of '53" collection. Thanks for looking in on this. Any and all comments are welcomed and appreciated. Please all stay very well. Rich
-
Welcome to our plastic playground Blake. Very sound advice from Tom and Steve in response to your questions. Take your time, and treat each part and.or subassembly as if it was a model itself.... then when you put all of those parts together you should have a very good looking model in total.
-
Welcome to our plastic playground Brad.
-
That's an absolutely gorgeous Ford Mark.
-
That is a beautiful looking Buick Guy.
-
Welcome to our plastic playground Bob.
-
That's a beautiful car Tim.
-
Thank you very much for your information and reference pictures to show the differences between the '49 & '50 Mercurys. Obviously MPC mislabeled their snap kit. I knew that the '50 had rectangular front parking lights.
-
Thanks again to everyone for your very kind comments.
-
Thanks Larry. Model Car Garage makes photo-etched metal flame tips to wrap around exhaust pipe tips. I cut small pieces off and CA glued them to the back of the lake pipe end caps.
-
I finished the BMF work on the resin body of a 1953 Mercury from R & R that I got on EBAY last year. It's actually not a bad casting (surprisingly). The interior was trash so I'm using the interior, chassis & wheels from a '53 Ford kit. Should have it finished soon to go Under Glass.
-
There's not much to have to fit in this snap kit. It's a one piece body with separate headlights, taillights, grille & bumpers. The interior is 4 pieces that fit together well. I'm thinking the same thing Steve, although from pictures the front parking lights are in a round bezel on the '49 and on the '50 they appear to be in a more or less rectangular bezel in some pictures. Other than that, they appear pretty much the same..
-
That's a great looking Falcon Roger.
-
Thank you all very much for your very encouraging comments. It is greatly appreciated.
-
Welcome to our plastic playground Brandon.