Search the Community
Showing results for tags '1/25'.
-
Hi guys, I'm a new member here, although almost 4 decades in this hobby. I don't fancy my self as some supa-dupa (this is some Aussie lingo for ya) detailed modeler, but I definitively enjoy this hobby to the max. I'm into 50's, 60's and early 70's sport and racing cars. If I can't have them all in 1:1, at least I can make them as scale models. From time to time, I'm reading forums on this site with a great interest, but the special reason to join just now, was to reach one of the members through messages, although it seems that I scarred him? Anyway, maybe someone else can help me? Same as so many of you, I have models that I bought even 30+ years ago and they are still waiting for all those more important things in life to finally happen so I can start putting them together. One of those models is Heller Porsche 908 for which, during last 25 years in my possession, I unfortunately managed to lose the instruction manual. As I just finished 906 and 910, I though it would be good to continue with 908 too, before doing 917, to stick to chronological order of Porsche development. I tried various modelers instructions data banks on internet, I even contacted Heller in France directly and all to no avail. Heller customer department advised that they don't keep instruction for old models. What?!? So, dear brothers in hobby, if anyone has this model, can I, please ask him to trouble himself and run instruction sheets trough scanner and send them to me. As I'm new here, I hope I didn't broke any golden rule of this site by asking this and if I did, dear moderators, feel free to teach me how to avoid that in future. Cheers, Vukan
-
Pics of what you get straight from the box.
-
Hi All, Didn't build a lot this year, but I'm glad to have finished this, This is done box stock, except for the color and the decals. Basicly, I bought the kit for the decals. They fought me al the way though ... All in all I'm pretty happy with the outcome.

-
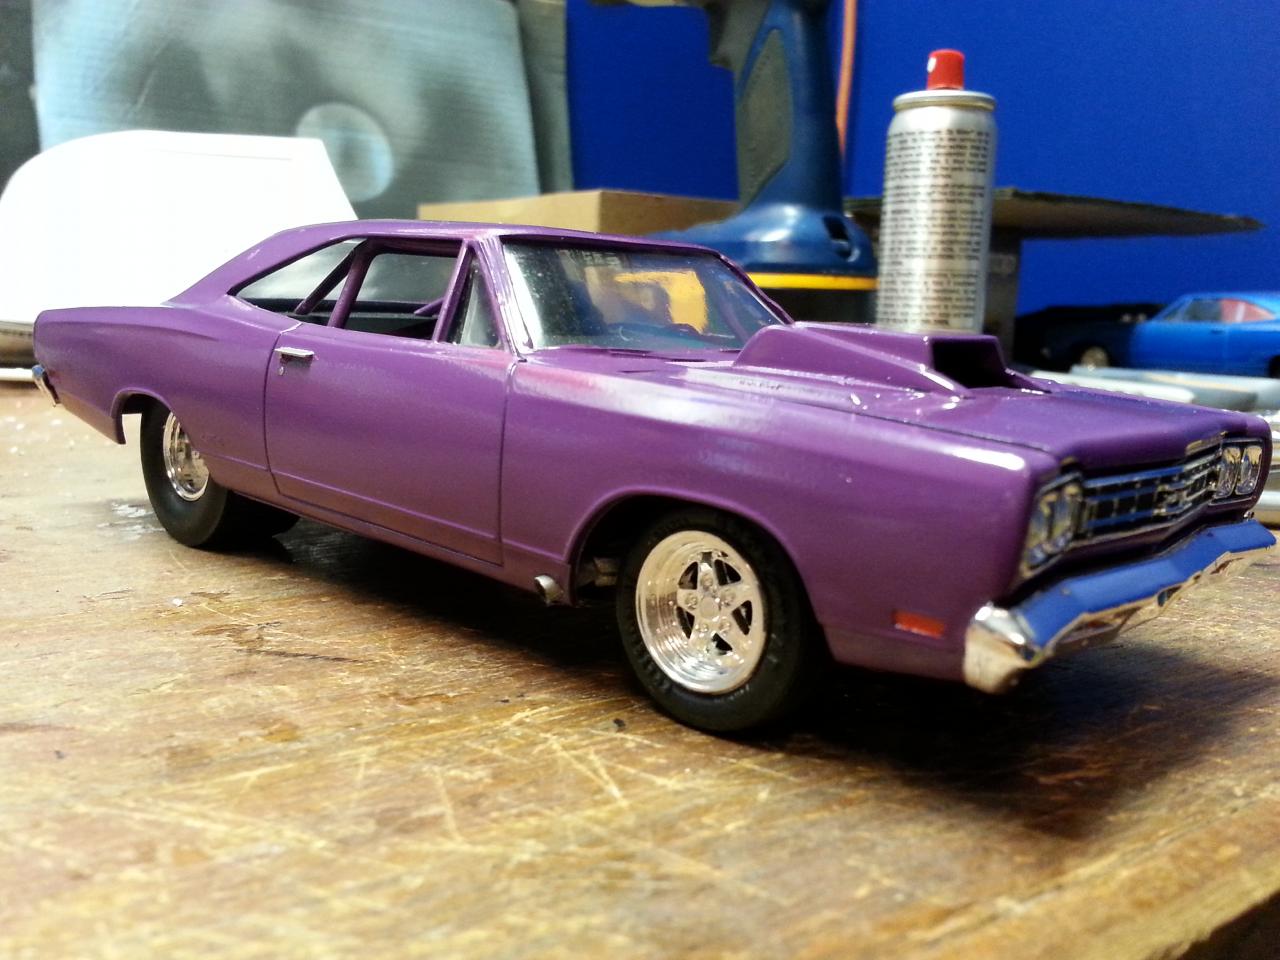
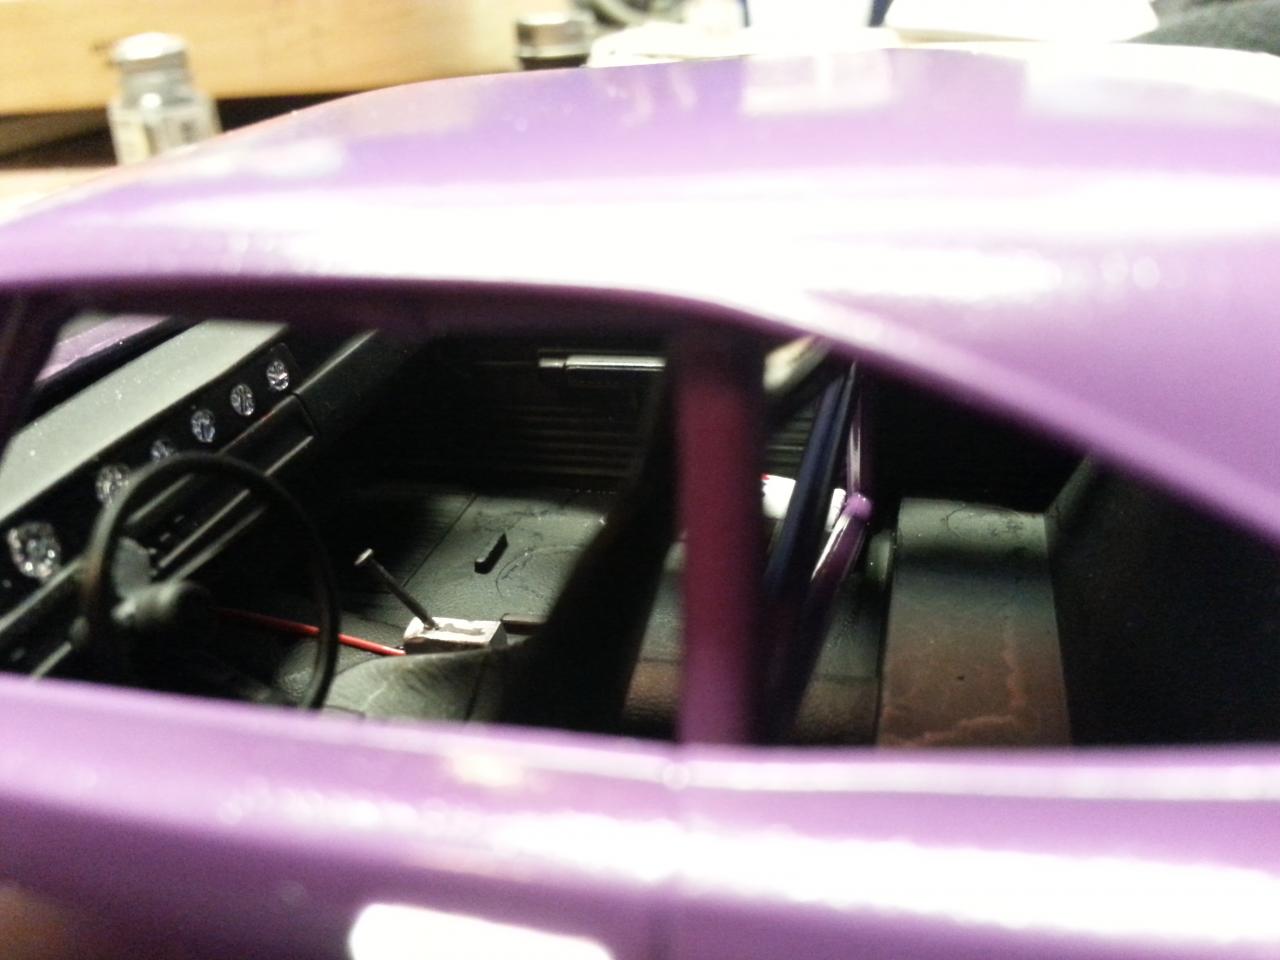
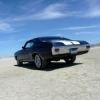
1969 prostreet gtx
-
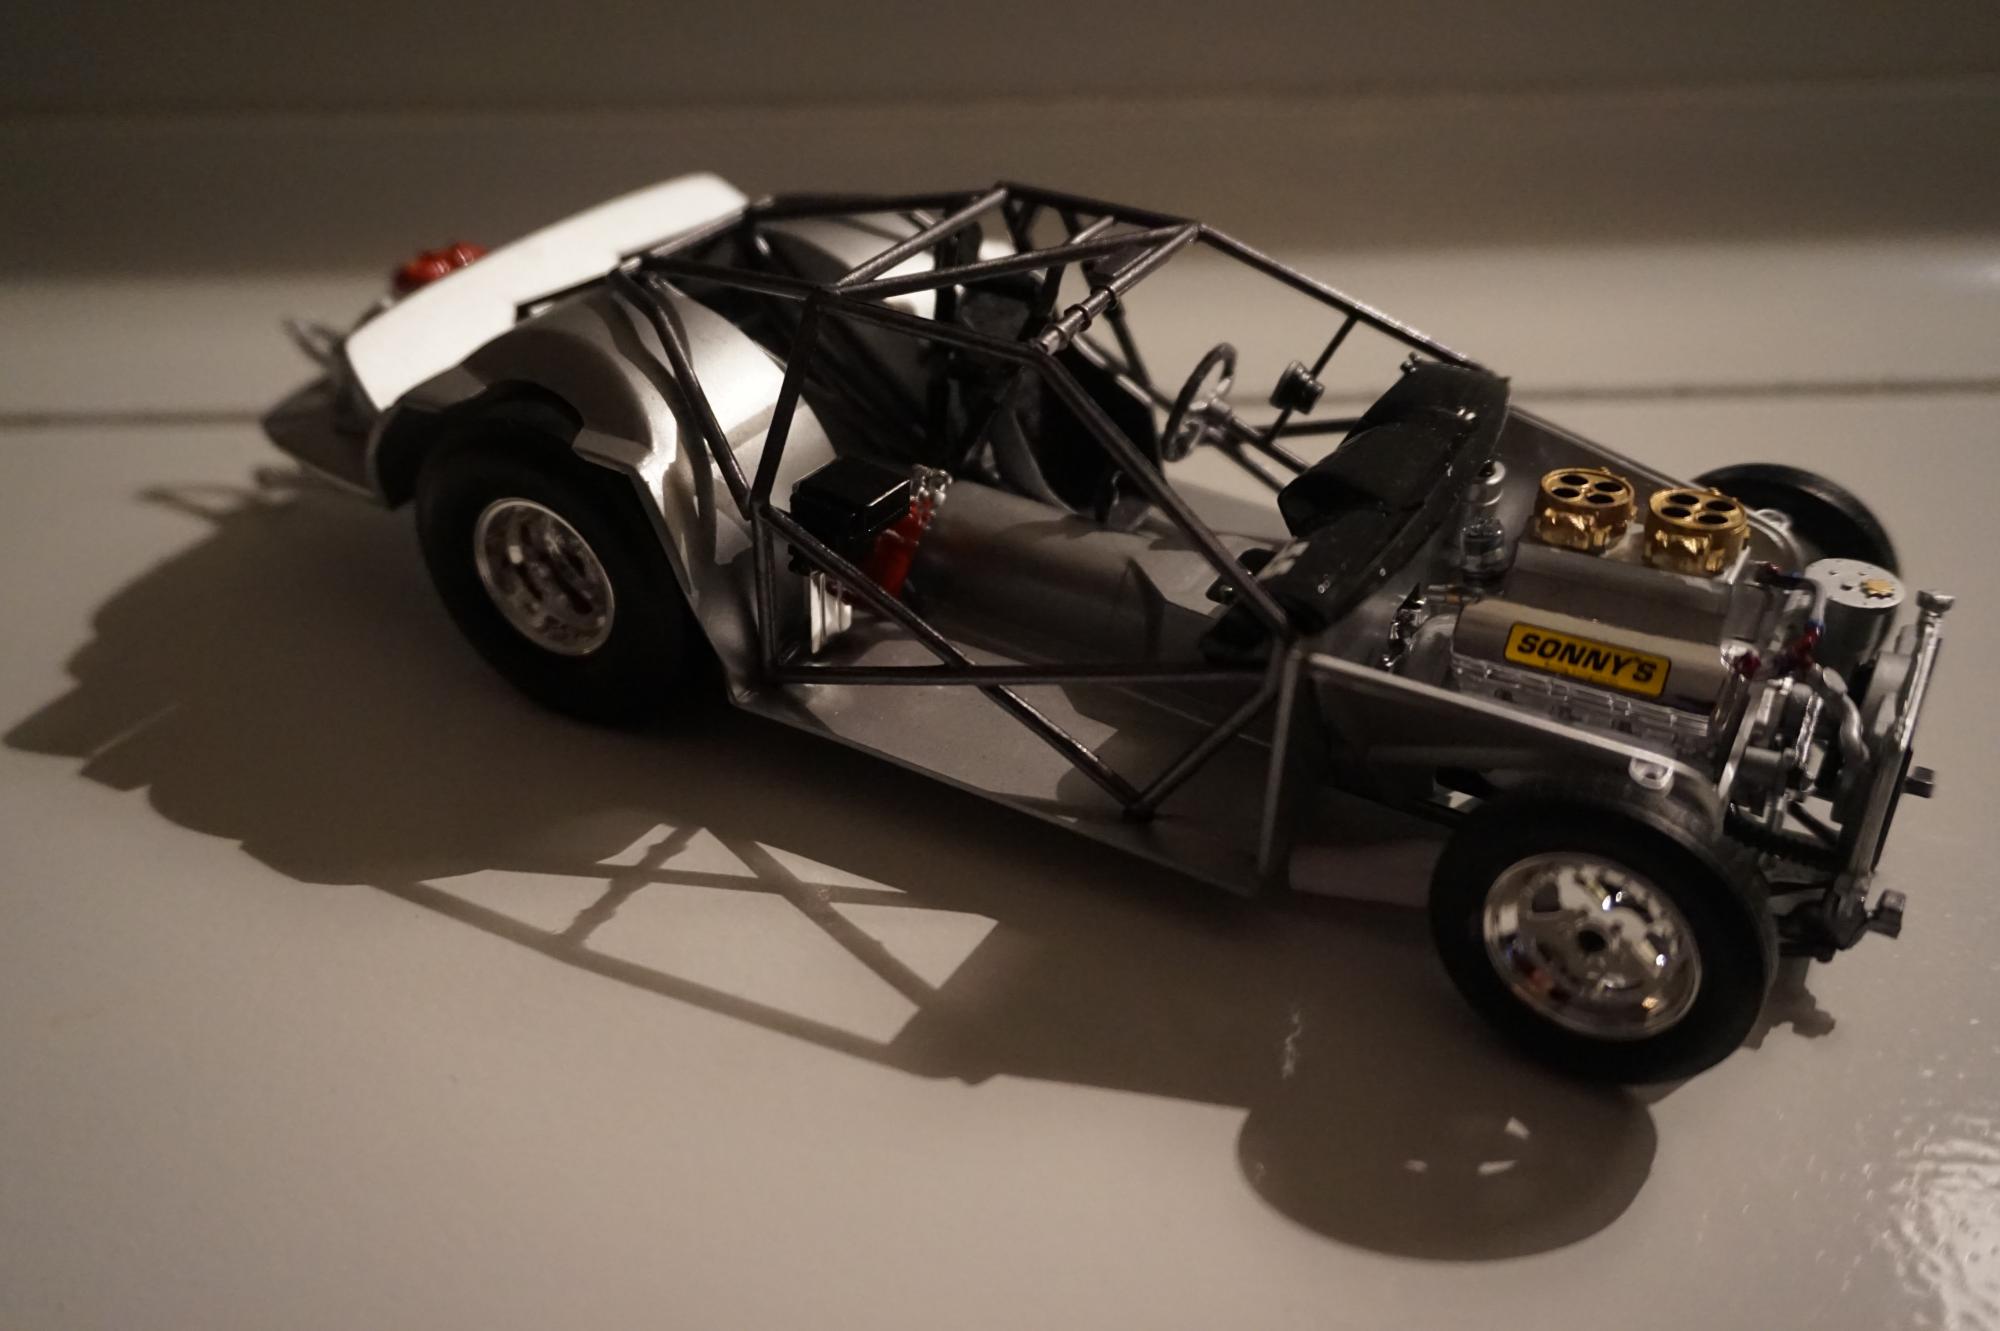
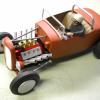
Hi there: I picked this kit up at the local Hobby Lobby for just under $15. This kit is not new and has been around for some time appearing to have its origins in the old "Little-Red Wagon" of 1960's fame. I bought that kit when it first came out and I always liked it. I have been eyeing this thing for some time now and today seemed like a good day so here we go... The box art reflects the contents, an A-100 Dodge COE pick-up in Coca Cola livery. The box contains that truck but also all of the parts needed for the drag version of Little Red Wagon (no LRW decals though). The body is reasonably well done and captures the look of the real truck. If you are a fan of this genre you may want to check the dimensions and overall casting accuracy more closely but it looks good to me. The body is also equipped with opening doors and hinges that are bit large looking. However, I suspect most reasonably skilled modelers will change those out for better looking scratch built items. The glass is clear and smooth and reasonably thin. The decal sheet provides the various Coca Cola scripts and that's it. Nothing else. The frame and bed insert are well done but rudimentary. My only complaint here is that the bed insert has very deep grooves for cutting the engine bay for the Little Red Wagon and time has taken its toll. The groves are so deep in spots that there are holes into the bed area. You can see this clearly in the picture below. The wheels and tires are a set of vinyl no name items (five of them - so you have a real spare!!!) a set of huge Goodyear slicks with brand names and a well done set of period mags in chrome. You also get dog dish hubcaps and a set of steelie wheels!!! That is really nice..I think so any way!!! The chrome tree is well done and has a ton of neat parts on it for the engine and exterior. The engines (there are TWO in this kit) are nicely done multi-piece affairs. The stock engine is about 17 pieces. The custom engine is greatly simplified but has about 25 pieces and an automatic transmission. The higher parts count for the custom engine is a result of eight velocity stacks and eight plugs. Both have separate oil pans so no seams here! The only problem I see with the engines is that they look to be on the small side. This is a 1/24 th scale kit. This is primarily based on looking at the chrome vale covers, base and Hemi. They just look too small. If you cmpare them to the fuel tank parts on the same tree you can see that they appear to be too small and the tank way too large. Overall, this is small potatoes but you can decide on that one. It's not the first kit to have an out of scale engine. The frame and running gear / suspension are all simplified separate pieces that are well done. The steering wheels can be built poseable but you will want to either glue them in permanently or rework the snap in spindles and axle to be more accurate / substantial. The extra frame box for the Little Red Wagon is present too. The rear end is "FULLY CAST" (yippee!!!). The interior reflects a stock truck and is basic but well done. It includes a dash, seat belts, two part seats, a nice steering wheel, steeering column and shift lever turn signal combo and door panels with cast on details. You also get a push button automatic option as well. THAT is going in my build up for sure!!!! Only the gas pedal from the LRW is included so you will need to add parts here especially since the doors can be opened. Again the drag accessories are included i.e. a full roll bar set up. Overall this is an interesting kit of a really different subject. The simplicity (and age) is clearly reflected in the price. You can easily build up a stock truck with dog dish hubcaps or the Little Red Wagon or some other over the top variant and I am sure many of you already have some wild ideas about where to take this. (I am thinking about a mild custom lowered tow vehicle for the old Revell midget trailer in my junked kits stash.) Go get this kit…the price is right, there are plenty of extra parts and only your imagination and your parts box content will hold you back on this one. Have fun! Regards Bill (Duntov)
-
-
Here is a Revell vw bus I completed for a friend. Easy build. Did the in side with tie-dye, has a home made table. With a reel to reel tape deck, tamyia paint an clear, custom decals. Detailed rims. Came out decent , hope u like it,
-
Hi there ! I'll post here some pictures of my actual building, a 1957 Ford Fairlane 500, for my junkyard diorama. This car is from an AMT kit. I like that one because doors are openable. I've done some scratches and holes on the body : I've put an Iron base paint, before painting. I often do that to see the rust come from under the paint
-
Hey. I got this promo in a package deal a while back and I couldn't just let it go to waste. There was a big crack in the roof, no chrome (other than the headlights), missing pillars and it had no chassis. Thanks to The Modelhaus, my parts box, and my wife's nail polish collection, I was able to give it a new lease on life. It has a '69 front bumper/grille but I can live with it; I covered the rear "1969" license plate with a custom plate. Thanks for lookin'. I'll post more pictures later. Before... After...
-
Fellas, Anything new on the possible reissue of the old MPC "Young American" Fueler ?
-
Hi buddies, here is my last built in 2011 - completed in November. My Dodge A-100 Delivery Van: It based on the old IMC-Kit and a Resinbody (i think you know it) from Jimmy Flintstone To this body i will say, that it fixed perfect! The quality was really good and so i had only cut a little bit on the front and backframe. Also the windows and Doorpanels fixed perfect. Well done Jimmy! That was a easy and funny built. Enought of words, here are some pics - enjoy it ...more coming up... ... ...for a look inside the van...
-
Here's the AMT 1953 Studebaker Starliner kit that I modified. It received the most votes in the jalopyjournal.com H.A.M.B. online salt flats racer model contest ending on January 14, 2011. The mechanics of the car loosely follows the SanChez '53 Stude racer from the early '60s. The color is a coral orange color that I mixed from Accu-Flex model railroad water-based paint then used their clear gloss and a lot of polishing. The kit's headlight covers, custom front pan and chopped top were used. Most of the trim was removed/filled and a B pillar was added along with door panel scribing on the roof. The engine is the kit's optional 392 Hemi with a front-driven blower and related parts from the ex-Aurora Carl Casper Undertaker dragster kit. Inside, the basics of the Stude kit's roll cage was augmented with additional styrene rod. An Early Years Resin seat and the '53 Stude's steering wheel adorn the kit's tub that got a new styrene floor and had most of the molded-in detail removed. The chassis is from the '53 kit with the floor boards between the frame rails replaced with sheet styrene and new pieces added for engine mounts. I Z'd the front frame rails while the rear has lowering blocks between the springs and the axle tubes. The Halibrand rear end and race tires are Early Years Resin pieces, the headers are from the Revell '69 Landy Dodge Charger (OK, they're from a 426 Hemi, so shoot me) and the exhaust pipes are aluminum tubing. The moon discs are real aluminum pieces from Scale Repro's Plus with three spots of dark grey paint on each one to simulate mounting screws.
-
The stock 1960 Starliner by 70mach1 here on the Under Glass forum is gorgeous! Here's a different take on the same kit. I built this for the H.A.M.B. jalopyjournal.com (website for pre-'64 traditional hot rods and customs) custom model contest in 2011. It came in a distant second place in the radical custom class online voting by the mostly 1:1 forum members. The AMT '60 Ford kit body was pie-cut to create a wedge shape, as seen from above, but in such a way that that the front and rear of the car did not become V shaped. The bubble top and interior are from the Revell "Big Daddy" Roth Beatnik Bandit. My idea was to build something that might have been a Ford concept car in about 1957 to see how the public would respond to some of the 1960 styling cues. Paint is a custom mix of House of Color silver-white pearl and Trueblue pearl with several clear coats of Pledge (Future) floor finish. Here are some views of the body during construction. It's a curbside model but this shows the basics. I later removed the engine and only attached the air cleaner to the body. To see the other entries in the H.A.M.B. contest, go to http://www.jalopyjournal.com/forum/showthread.php?t=596428 -- mine is the Radical Custom #8 entry.
-
Hallo Buddies, today, i will show you a 8-Day-built. I think, the last one this year. Bought this revell Kit built in this condition: ...stripped it... ...and mad some little work on it. It took only eight evenings (less then 20 hours!) to get the result better that i thought. Take a look, what could happen, while my fingers tickle to make something new: Will start with the engine before mounting... ...and now here it is installed... ... wait a minute for the overall view...
-
Here it is - my 1996 1994 ( ) Impala SS. I like this fullsize, always remember to copcars, when i see one. I built it stock and made only some wiring. I know, that the Chromtrim on the sidepanel is not chromed original. But, why dont show, what kind of engine is working under the hood? Enjoy:
-
Hallo everybody, now it is finished. The first Hudson from overseas. The built was in peaces easy, some things i will do better on the next one. And sure - there will follow the one or other Enjoy the pictures - i love it: ... Not perfect, but as close i could do it. Comments, critism always welcome.
-
More good news for AMC fans from John Greczula ...... http://wwwboard.spotlighthobbies.com/index.pl?read=1704010 -Steve
-
Hi everybody, a short new topic. Last year, my brother and i built on different places of germany (distance about 275 miles) the same model. Same color. How could this happend? I dont know...perhaps...we are twins and some days the same thoughts? On christmas, we had the chance, to take pictures of bouth. Many pictures following... Take a look - the darkblue is mine. Can you find the difference? ...
-
Hi everybody, here is my 66 Riviera - to make three, in this section this week, complete. After a failed paintjob for a cool Lowrider, a missing enginebay in the kit, i had "no other chance" to safe him not to throw in the trash. Take a look at my Lowrider... stay a while for the pics inside...
-
Hi everybody, today a old build, didn't know, in wich year i made it. Long time ago. The only things i know are, that i used no internet for research details, BareMetalFoil was foreign word, also wiring the engine...but i remember, that the amt-kit was very easy to buid. All fixed well together and is detailed well. Some Pics: Perhaps, when i get this kit again, i would build it again with my knowledge from today... Comments are always welcome
-
Hi everybody, today i want to show you my 57 BelAir. On this kit i made some more technics to weather all parts of it. Like interieur, exterieur and Decals. I built it in June this year, based on the first issue of the Revellkit. The History of Belair: The Chevy has come on in years and has a wild youth behind. The current owner has taken care of him. He is currently at the stage when he left the front damage repaired with used parts front and rear wheel arch on the left has been de-rusted and primed. The trapper damage, the rust on the rear and right are still so when he bought it in pitiful condition - for which he cares little by little. Inside, he has had more luck. The inventory lists a broken window on the right, worn seat cover, headliner loose and dirty panels / rear seat, the rear parcel shelf has been cracked by the sun - everything is possible. Well, the side windows are renewed. The owner can not waive his or her means. So he must always carry out the work so that he comes to the job every day. What happens to the engine? Additionally, he is still at odds ... Therefore: "Rolling Restoration": And now? Photos (a little more than usual) around the outside at irregular times. Have fun;) ...
-
Ho everybody, here i show you a fast build. Also this kit has a story: it was the first Kit, my brother build loooong time ago and i became one simular kit for less in june this year. Only the wheels where missing and i took wheels from a 66 Chevelle Station "California Wheels". To make it complete, i took some brakedisc from a Ford Focus for a real look Take a look. Interieur and engine is all stock. simple and nice look, i think. Thanks for your attention,
-
One more today, becaus i have time this T-Bird was a bad try to remove paint. From the beginning. i wanted to make this old monogram kit with opening doors in a color like biscuit. I think, that i have always bad luck with red plastic. after more than three color layers, always red will come thru the paint. "What doing, little Dominik?" I ask my self. straight in a bath of oven cleaner to remove the paint and wait 24 hours, there was the result: in places departed paint down to the primer. Bad, bad result. so i took my gun and painted like van Gogh a rusty, old look. Some dust and paint for rust and - ready.Put some new wheels and windshields in, new licenceplates and up for it on the track. It is tooo heavy i think, looks like a old ship in the ship graveyard...but it was a experiment and has also a place in my showcase. What do you think about? ...
-
Hallo everybody, today i want to show you a two-week-built from February this year. In times, when i built too much details, i need a simple kit to relax. Based on the amt kit (#6062) with the camper inside, i tested on this car, how to weather decals and to brush street dust on it. Take a look: ...
-

Ford F100 Wrecker
Dominik posted a topic in WIP: Model Trucks: Pickups, Vans, SUVs, Light Commercial
Hallo everybody, today i will show you my version of the Midnitecowboy, that i built in March 2010. I didn't like the Base from the kit. So my choice was a classic Ford F100 from the shelf - to give him a better style. Sure, this classic Ford is often in my collection... What was my intention for this Built? I wanted a Wrecker that - if you see it behind you in the mirror - shouts out: "Get out of my way!" I took the Kabine and Interior from the Ford, the wrecker and frame from the Kit. Also a engine from a 70 "Heavy Chevelle". There were many changes, till the parts fit together. Some working on the body, made a real heavy bumper. At last, i tried weathering on it and garnished it with some gimmicks, that i tried the first time too.. Alright, you want some pictures - enough of words: ... "Get out of may way!!" the engine: hmmm...the interior needs a clean up... ...think, the driver lives in his wrecker... ...and had even not eaten his pizza! Thats it! Some gimmicks that had stolen my time - if you want, you can go on the search in the pics... Helmet and gloves, wooden blocks, cover, remains of pizza, hemp rope, maps, empty aluminum cans, oil can 1-liter, hand oilers, starter cables, some tool, soda can, broom, fire extinguisher, colored booklet, jumper cables, beer bottles, wire, ceiling crowbar. I think I've not forgotten anything. Maybe the rag in the filler neck? The hammer, wheel crosses or battery? Missing beacon, perhaps? Fuelcan? No - all aboard Thanks for your patience - its your turn