Muncie
-
Posts
1,215 -
Joined
-
Last visited
Content Type
Profiles
Forums
Events
Gallery
Everything posted by Muncie
-
"Mystery" Ford Panel Van
Muncie replied to 1972coronet's topic in General Automotive Talk (Trucks and Cars)
Back before the government stepped in, a dealer could use the year a vehicle was sold for the model year on the title. A vehicle manufactured in 1939 could be titled and sold as a 1941 model year. I'm not sure if that is what happened here - and I'm not that familiar with the Fords in the question... You could be looking at something that Ford built with a different model year than how it's licensed. -
same here - clicking on the dot or the star goes to the last unread post, clicking on the title goes back to the first post in a topic. A rough idea of the subject that the topic is posted in is helpful; but I'm not fussy if its in the "wrong" place.
-
Looks like I'm in for a couple of the AAR's - the 1970 'Cuda is one of my favorite cars due to a family preference for Plymouth station wagons when I was growing up. I can't build stock out of the box. It looks like everything that I need to kit bash this one except wheels and tires is already in the box.
-
Hey Alan, That's looking great - love it. Good to see it back. I like the transparent top and your other modifications. Well done. Just two cents - The original kit had staggered tire sizes front to rear. The rear bigs were the old thumbprint Firestone slicks. The front littles were the old implement style drag tires which were much smaller diameter than the slick or most of what we have available now. It was a natural rubber rake, or in this case the chassis came out level with the straight tube axle. The Willys gasser in the double kit also had these tires. Replicas and miniatures has them available. The whitewalls are a big improvement so I think a dropped axle would be appropriate - maybe something like the chrome axle in the AMT '40 Ford as an alternative to smaller front tires.
-
Race car generic number decals?
Muncie replied to 89AKurt's topic in Model Building Questions and Answers
Slixx and Gofer have some generic letter and number decals - but probably not the font for these. The railroad section of the local hobby shop may have something closer in the railroad section - or the internet, google model railroad letter decals or http://www.microscale.com/Merchant2/merchant.mvc?Screen=CTGY&Category_Code=ALPHA oh for those long gone days and lost fonts of Chartpak and Letraset rub on letters... so many fonts. -
The finished product looks so good that it makes it look like everything fits like it was made to - checking the build photos shows it is far from it. lots of work well done
-
Slixx also has decals for the Mickey Thompson Maverick funny car
-
Extended cab Fl Coe.
Muncie replied to clayton's topic in WIP: Model Trucks: Big Rigs and Heavy Equipment
It's looking good. the front 3/4 inch of the BBC is the bumper location ahead of the cab - so you're good - 3-3/4" x 25 equals 93.75", add .75 and it's so close to 96" that it's right on in scale. (At least within in the tolerance that some of the cabs were built) I'm looking forward to see what you do on this one. -
Extended cab Fl Coe.
Muncie replied to clayton's topic in WIP: Model Trucks: Big Rigs and Heavy Equipment
The AMT kit is a 61 series raised cab with 86"BBC. Freightliner also built 96" and a very small number of104" cabs and that was about the limit of the hydraulic tilt rams. With aftermarket modifications, the cab could be any BBC. -
That's exactly it. When the Surface Transportation Assistance Act became effective in 1982, the size and weight regulation changed, and the truck market went to conventionals almost overnight. The old size and weight rules were state regulations mostly based on the overall length of the combination tractor and trailer. The Feds changed the rules on the Interstate and designated highways so length is based on just the length of the trailer(s) - the length of the tractor is not included. States had to change their regulations to get federal highway money. Drivers preferred conventionals for more space in the cab (no engine tunnel), better ride, and easier to get into. Fleets changed over to conventionals to retain drivers. edited - rephrased a couple of things for clarity
-
Although the tins are different around the roll cage, that appears to be it.
-
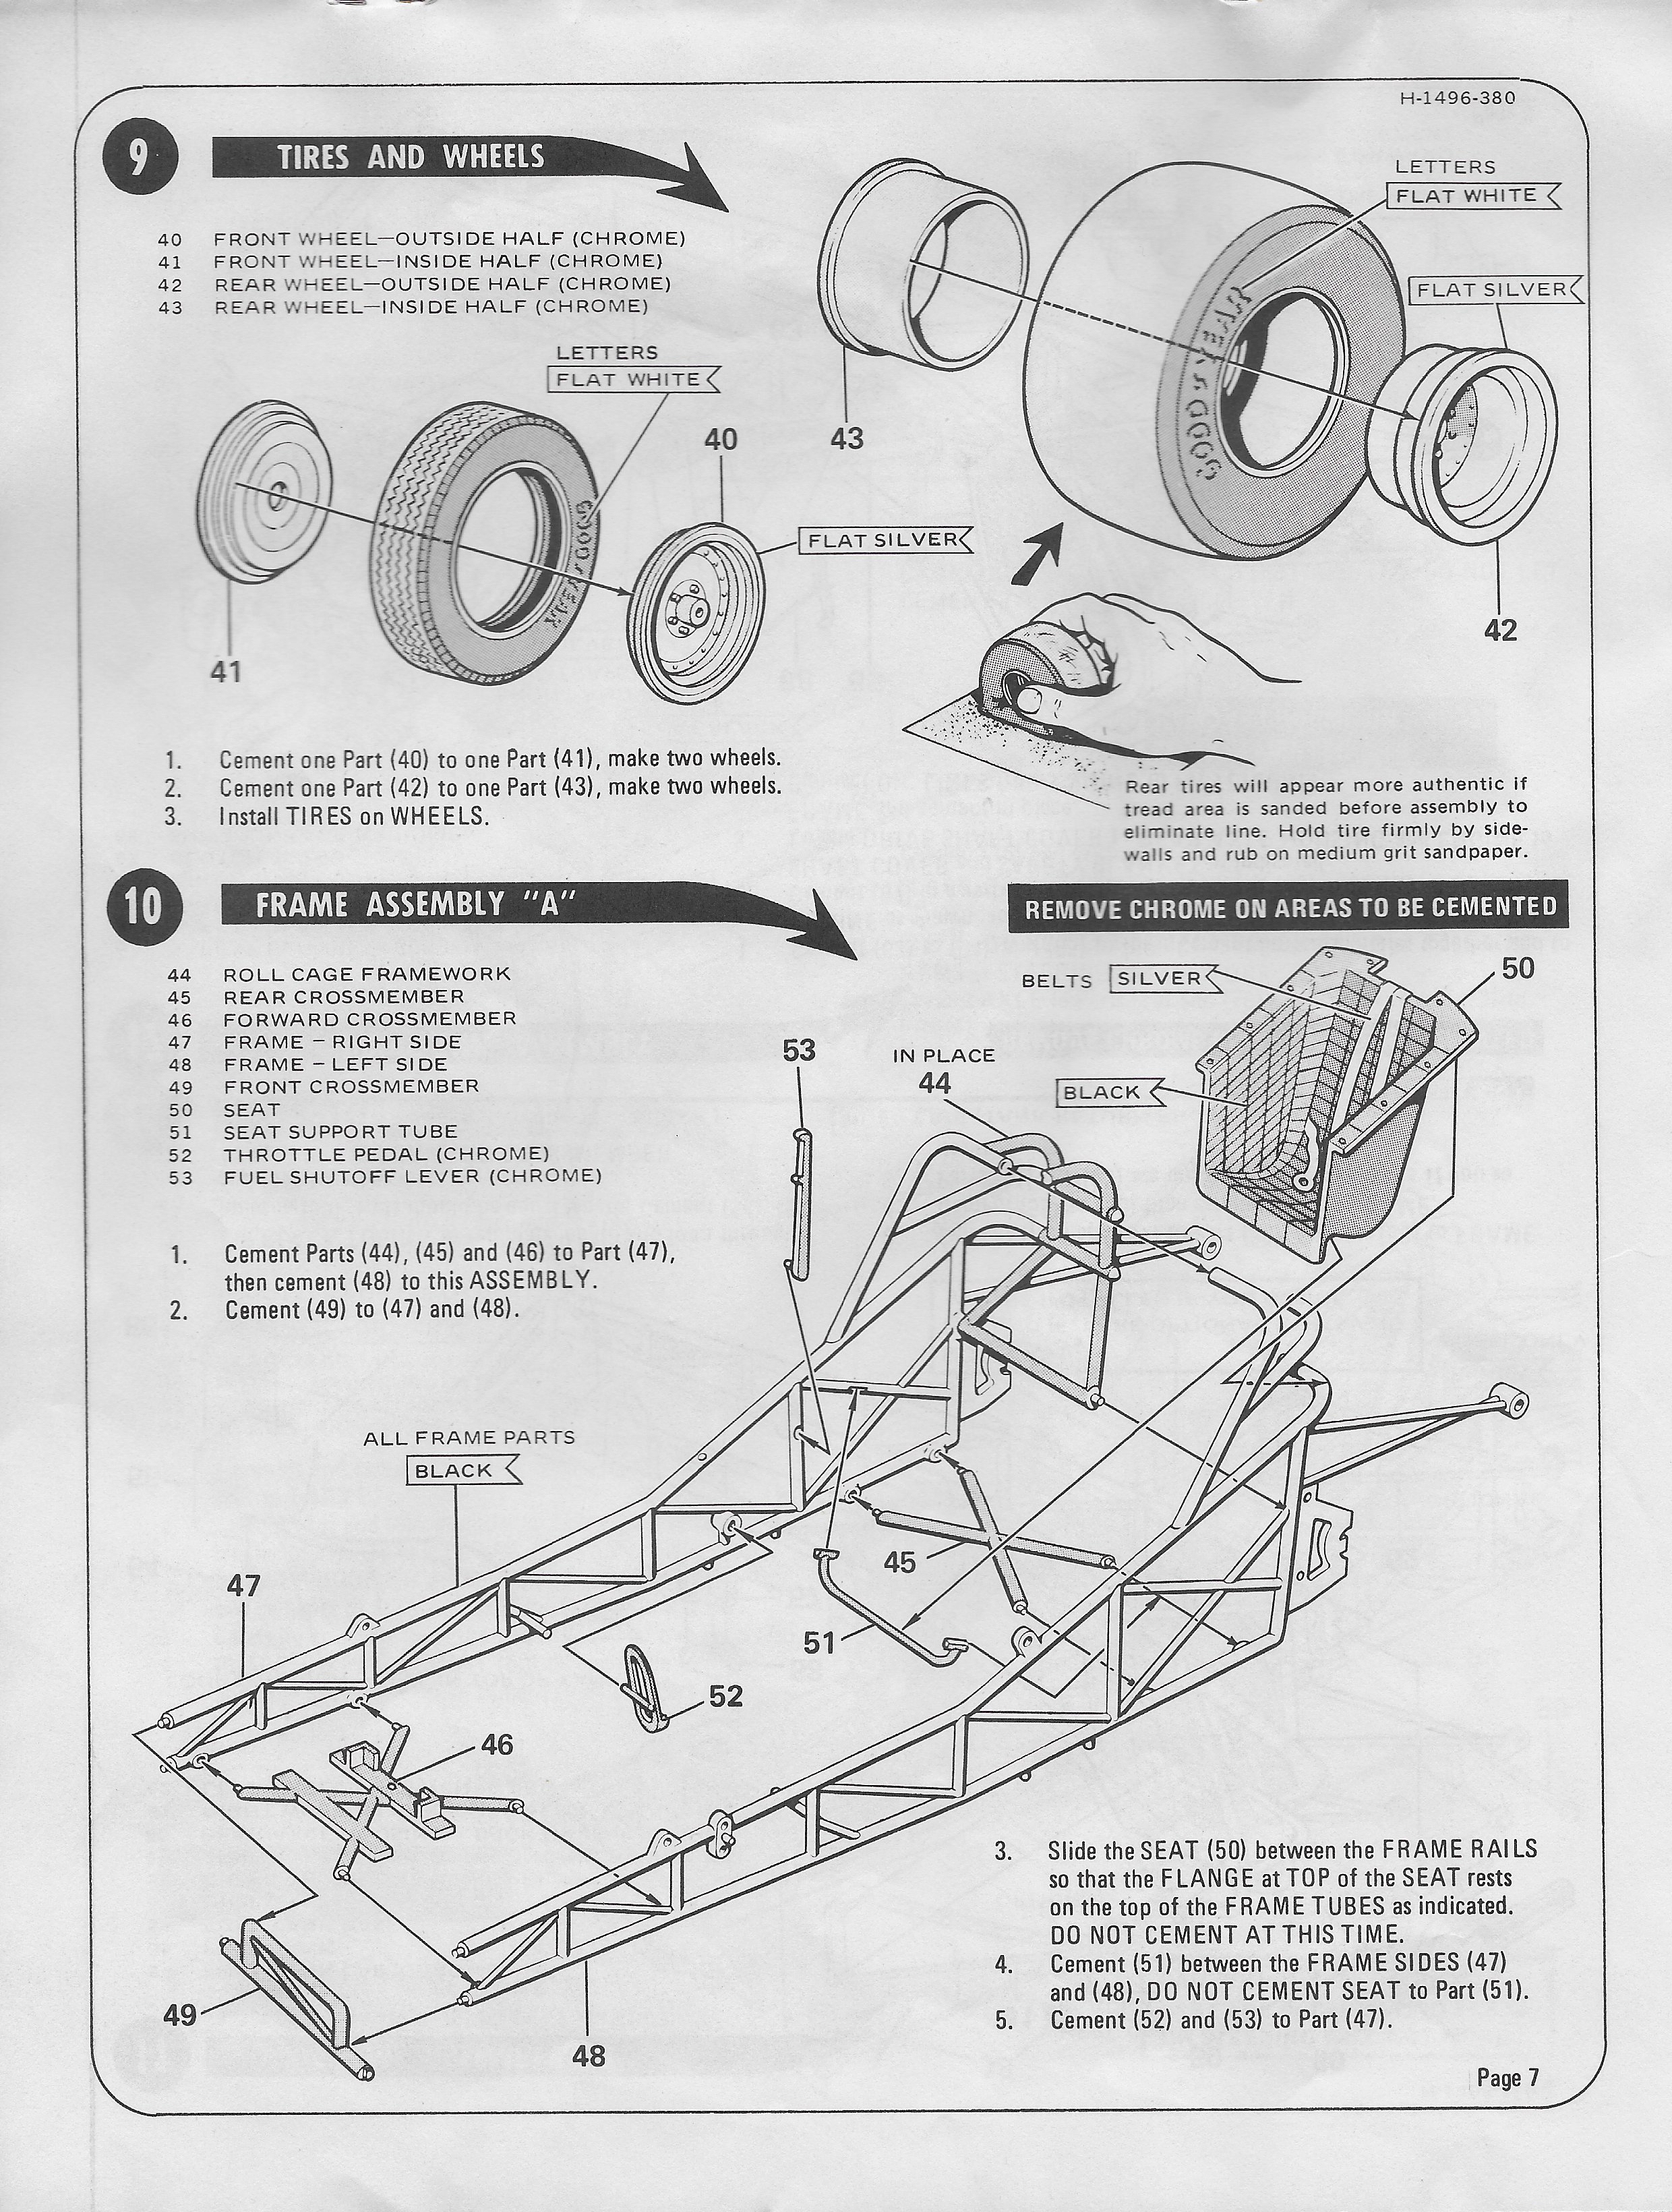
I think the Revell chassis is kind of generic from around 1972 to 1974. They used it in a lot of kits and continued it past 1974 when the real thing started using chassis that were extended with the fuel tank ahead of the front axle. If it's anything, it is the chassis from the Whipple and McCulloch's Duster Revellution Demon which was Revell's first funny car. Car Craft, March 1972, says it is "Woody" (Race Car Engineering) chassis but other chassis builders used a similar design.
-
pages 9 thru 12

-
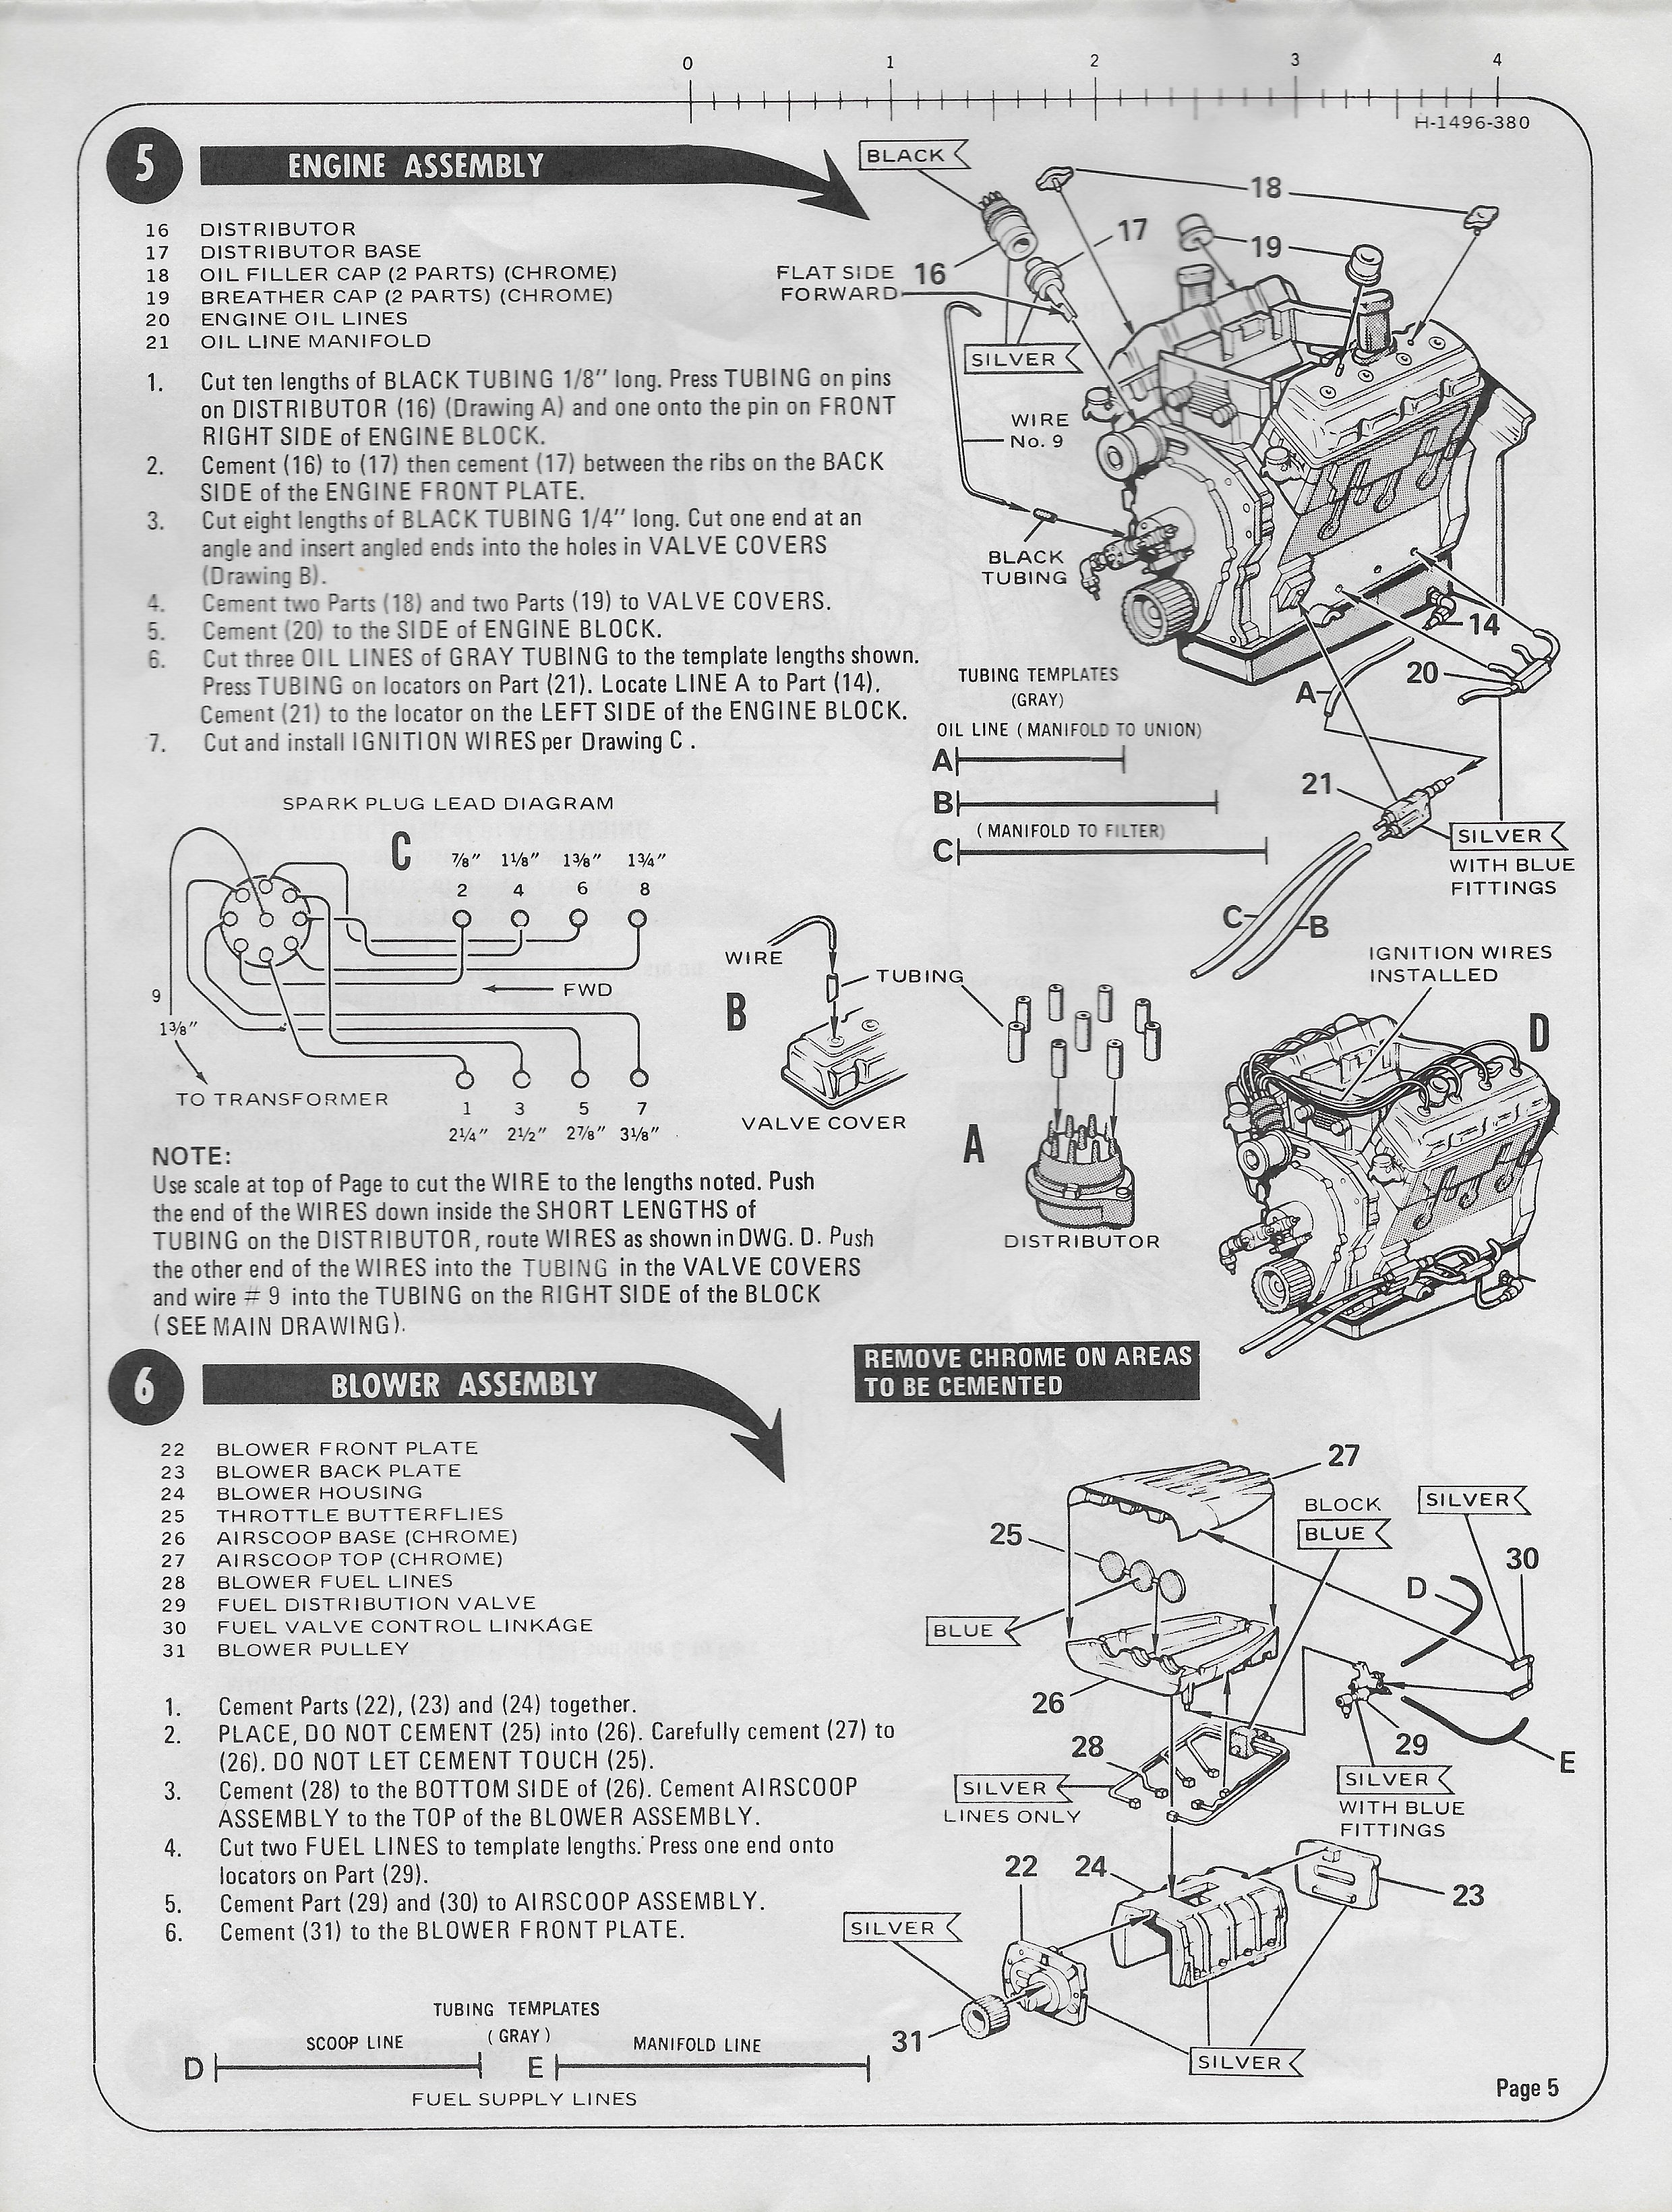
pages 5 thru 8
-
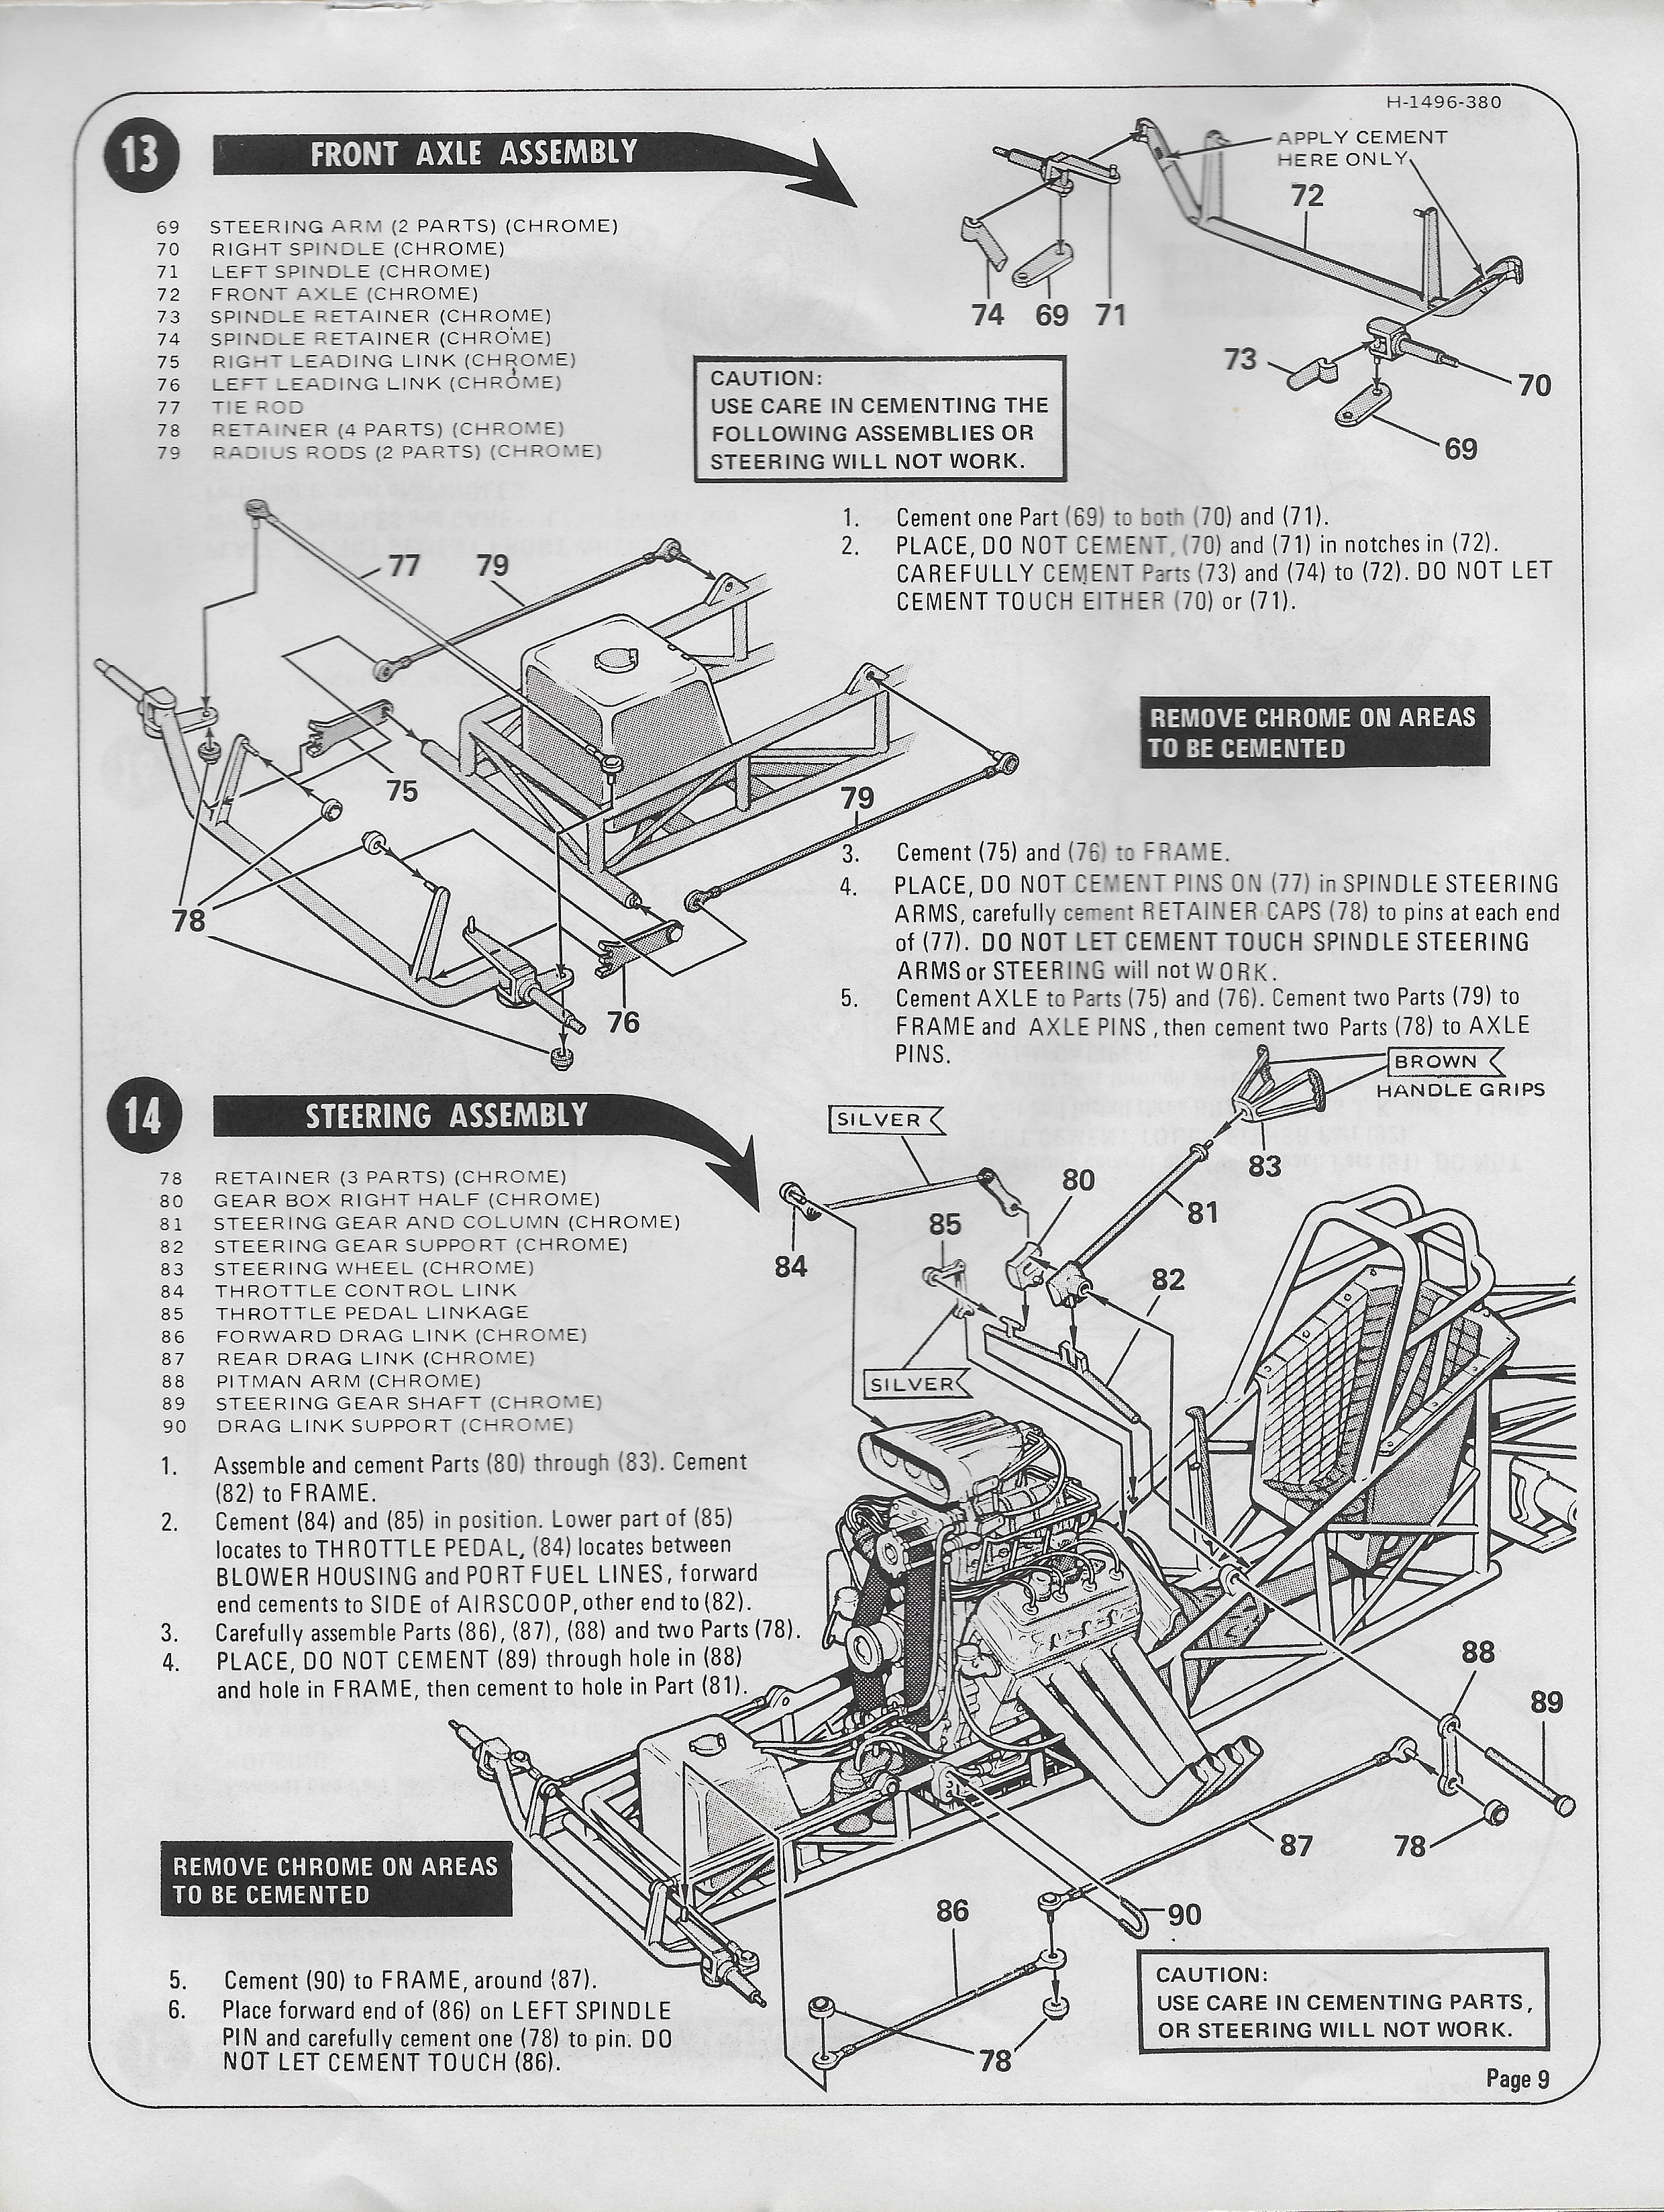
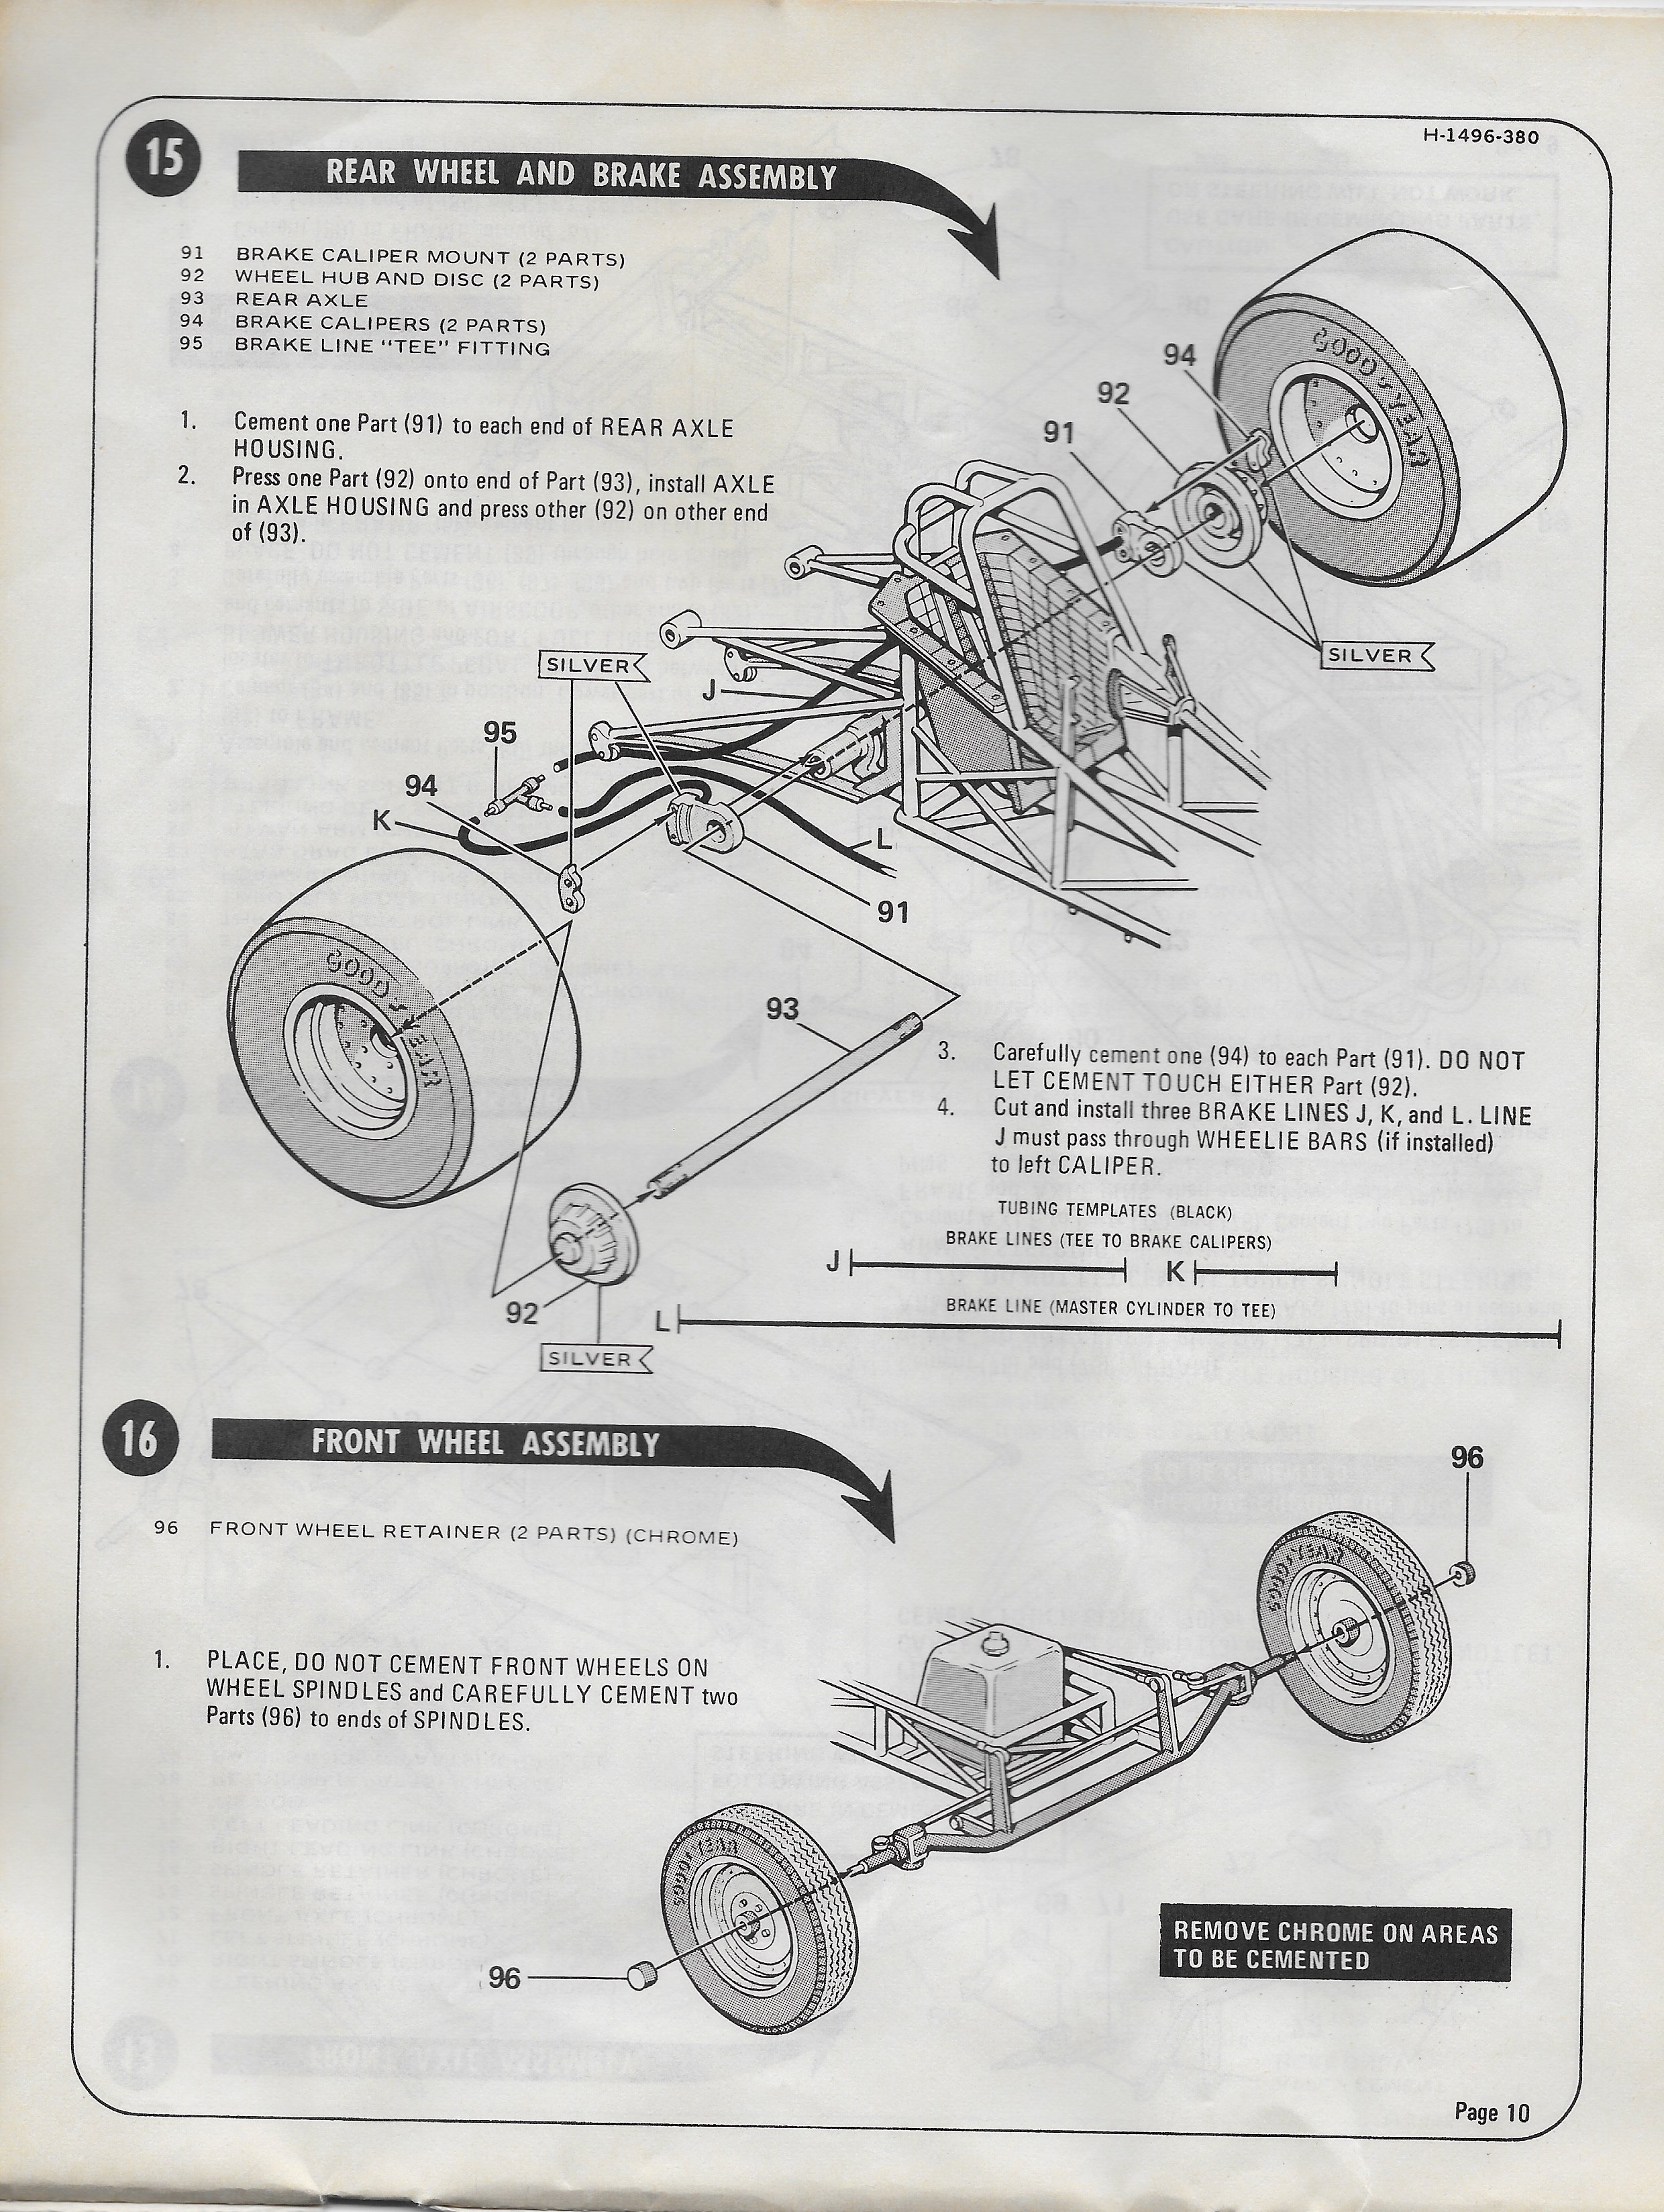
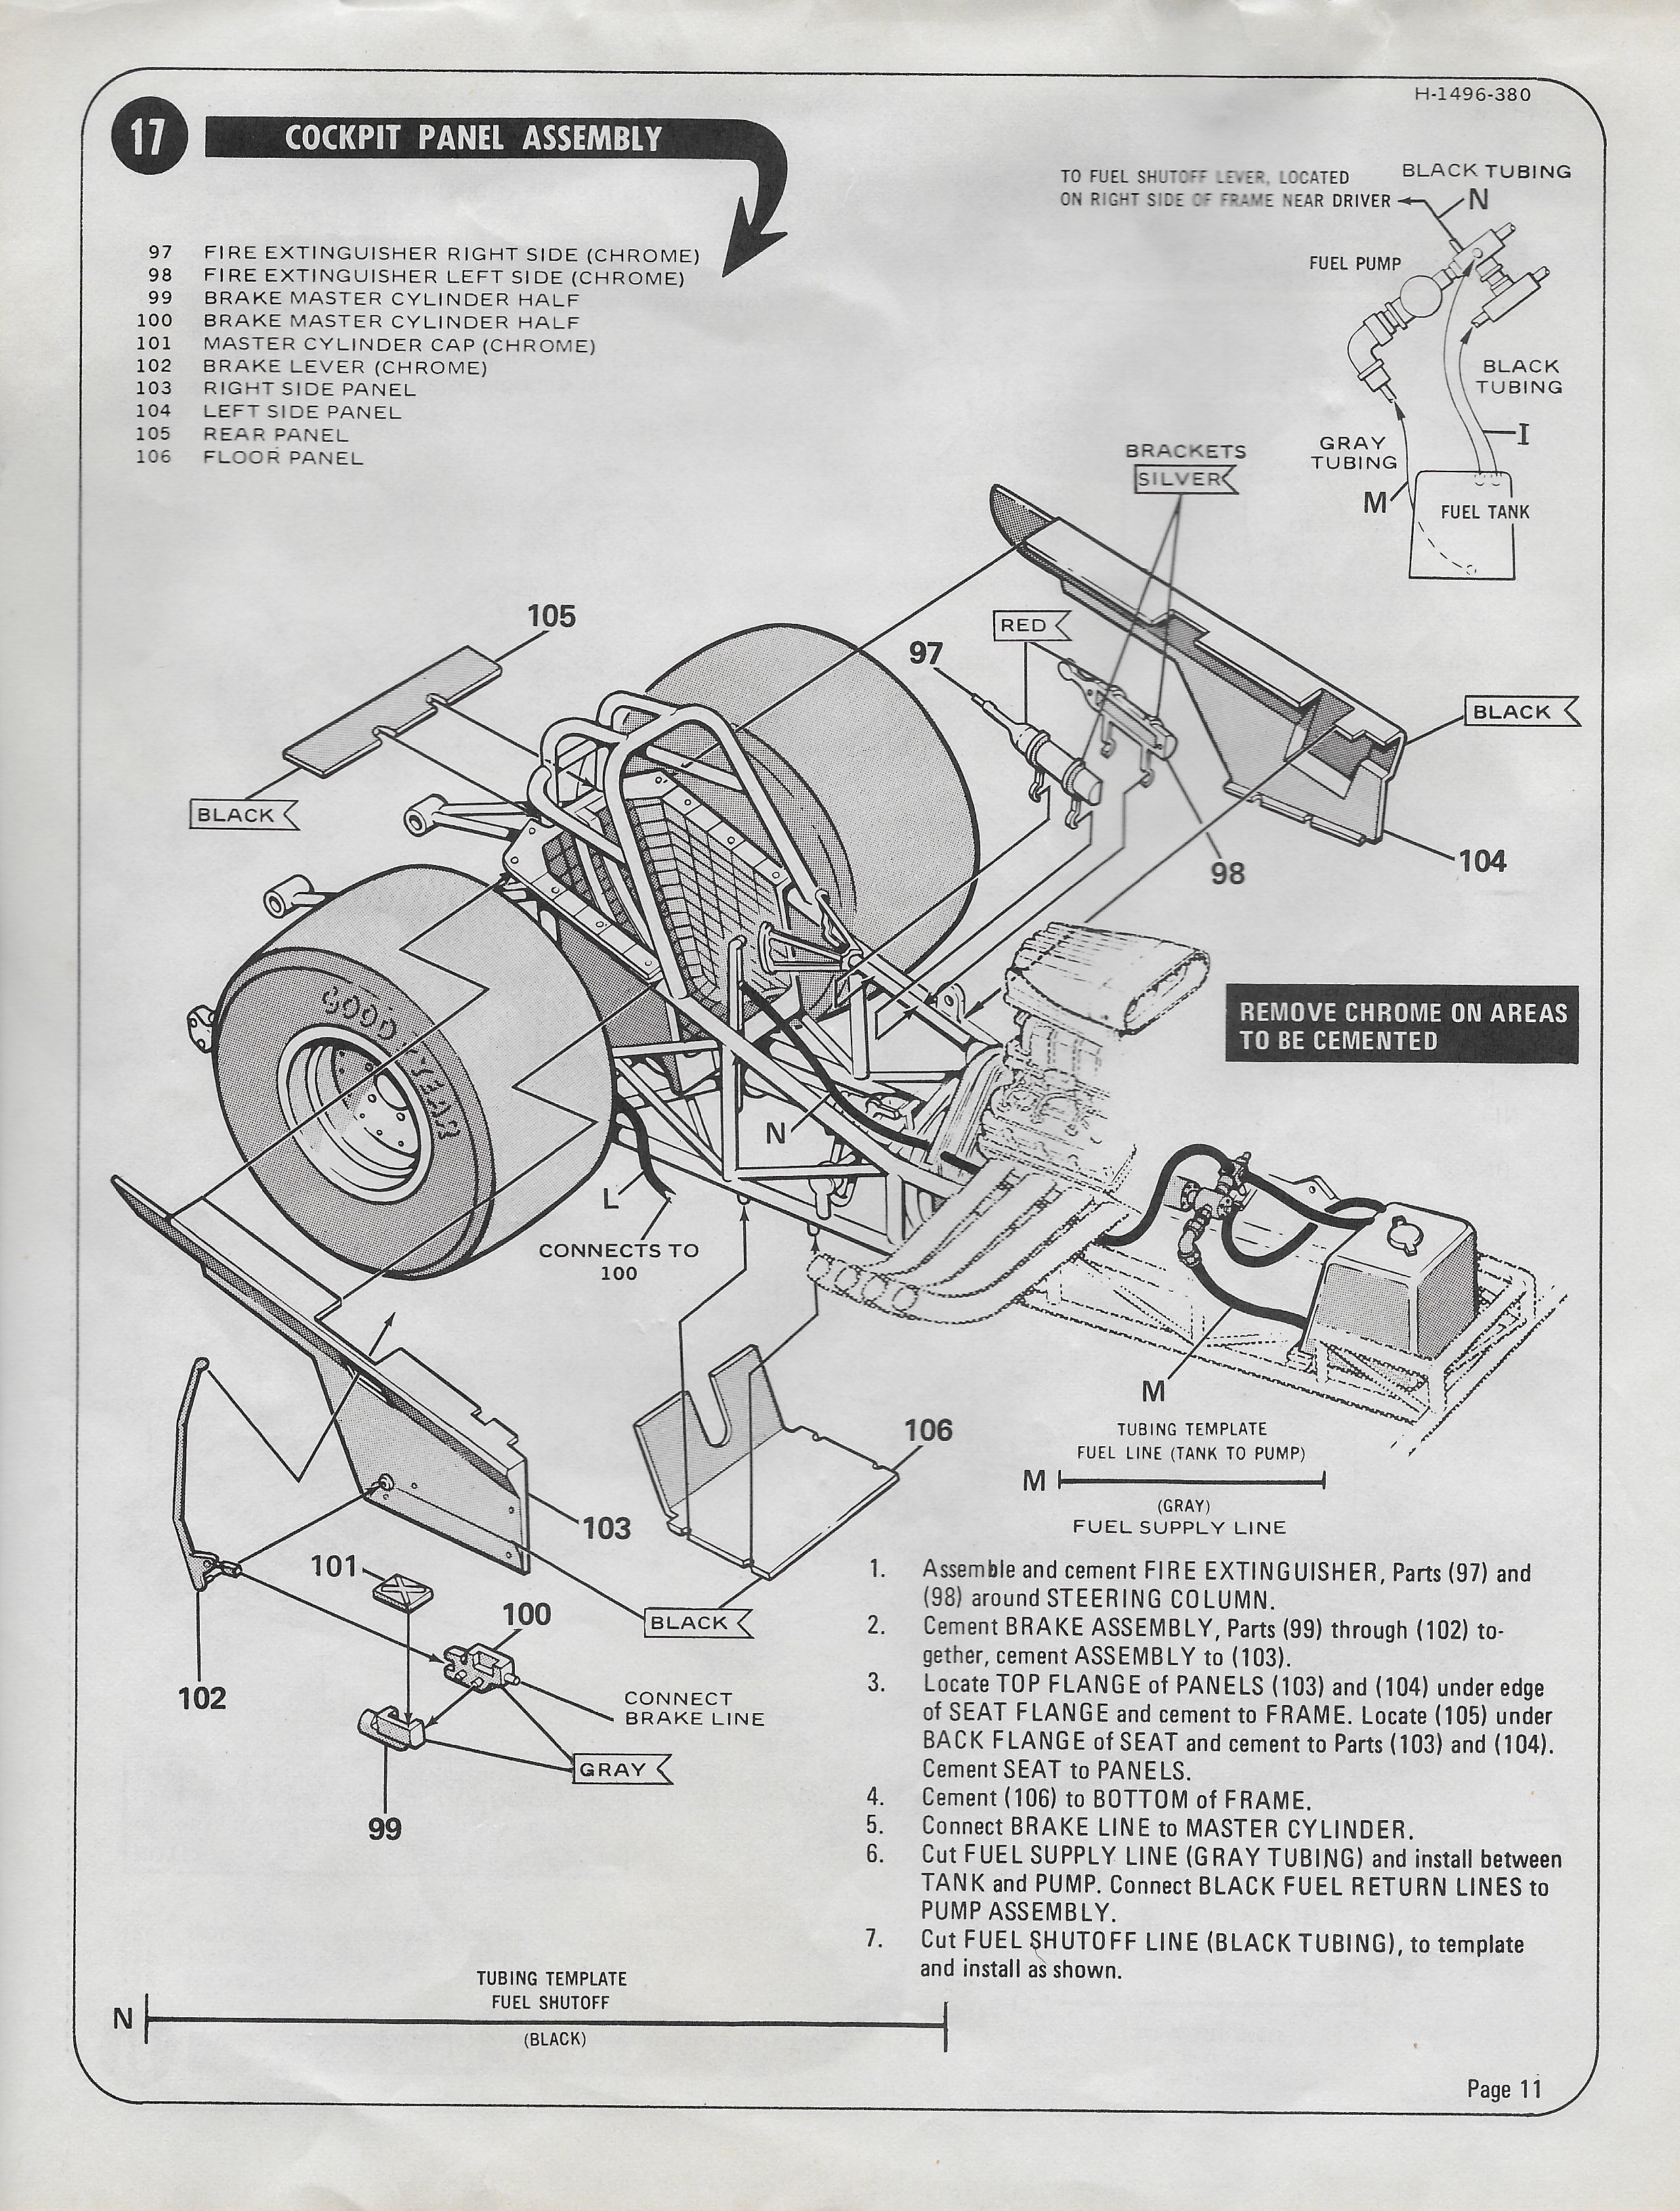
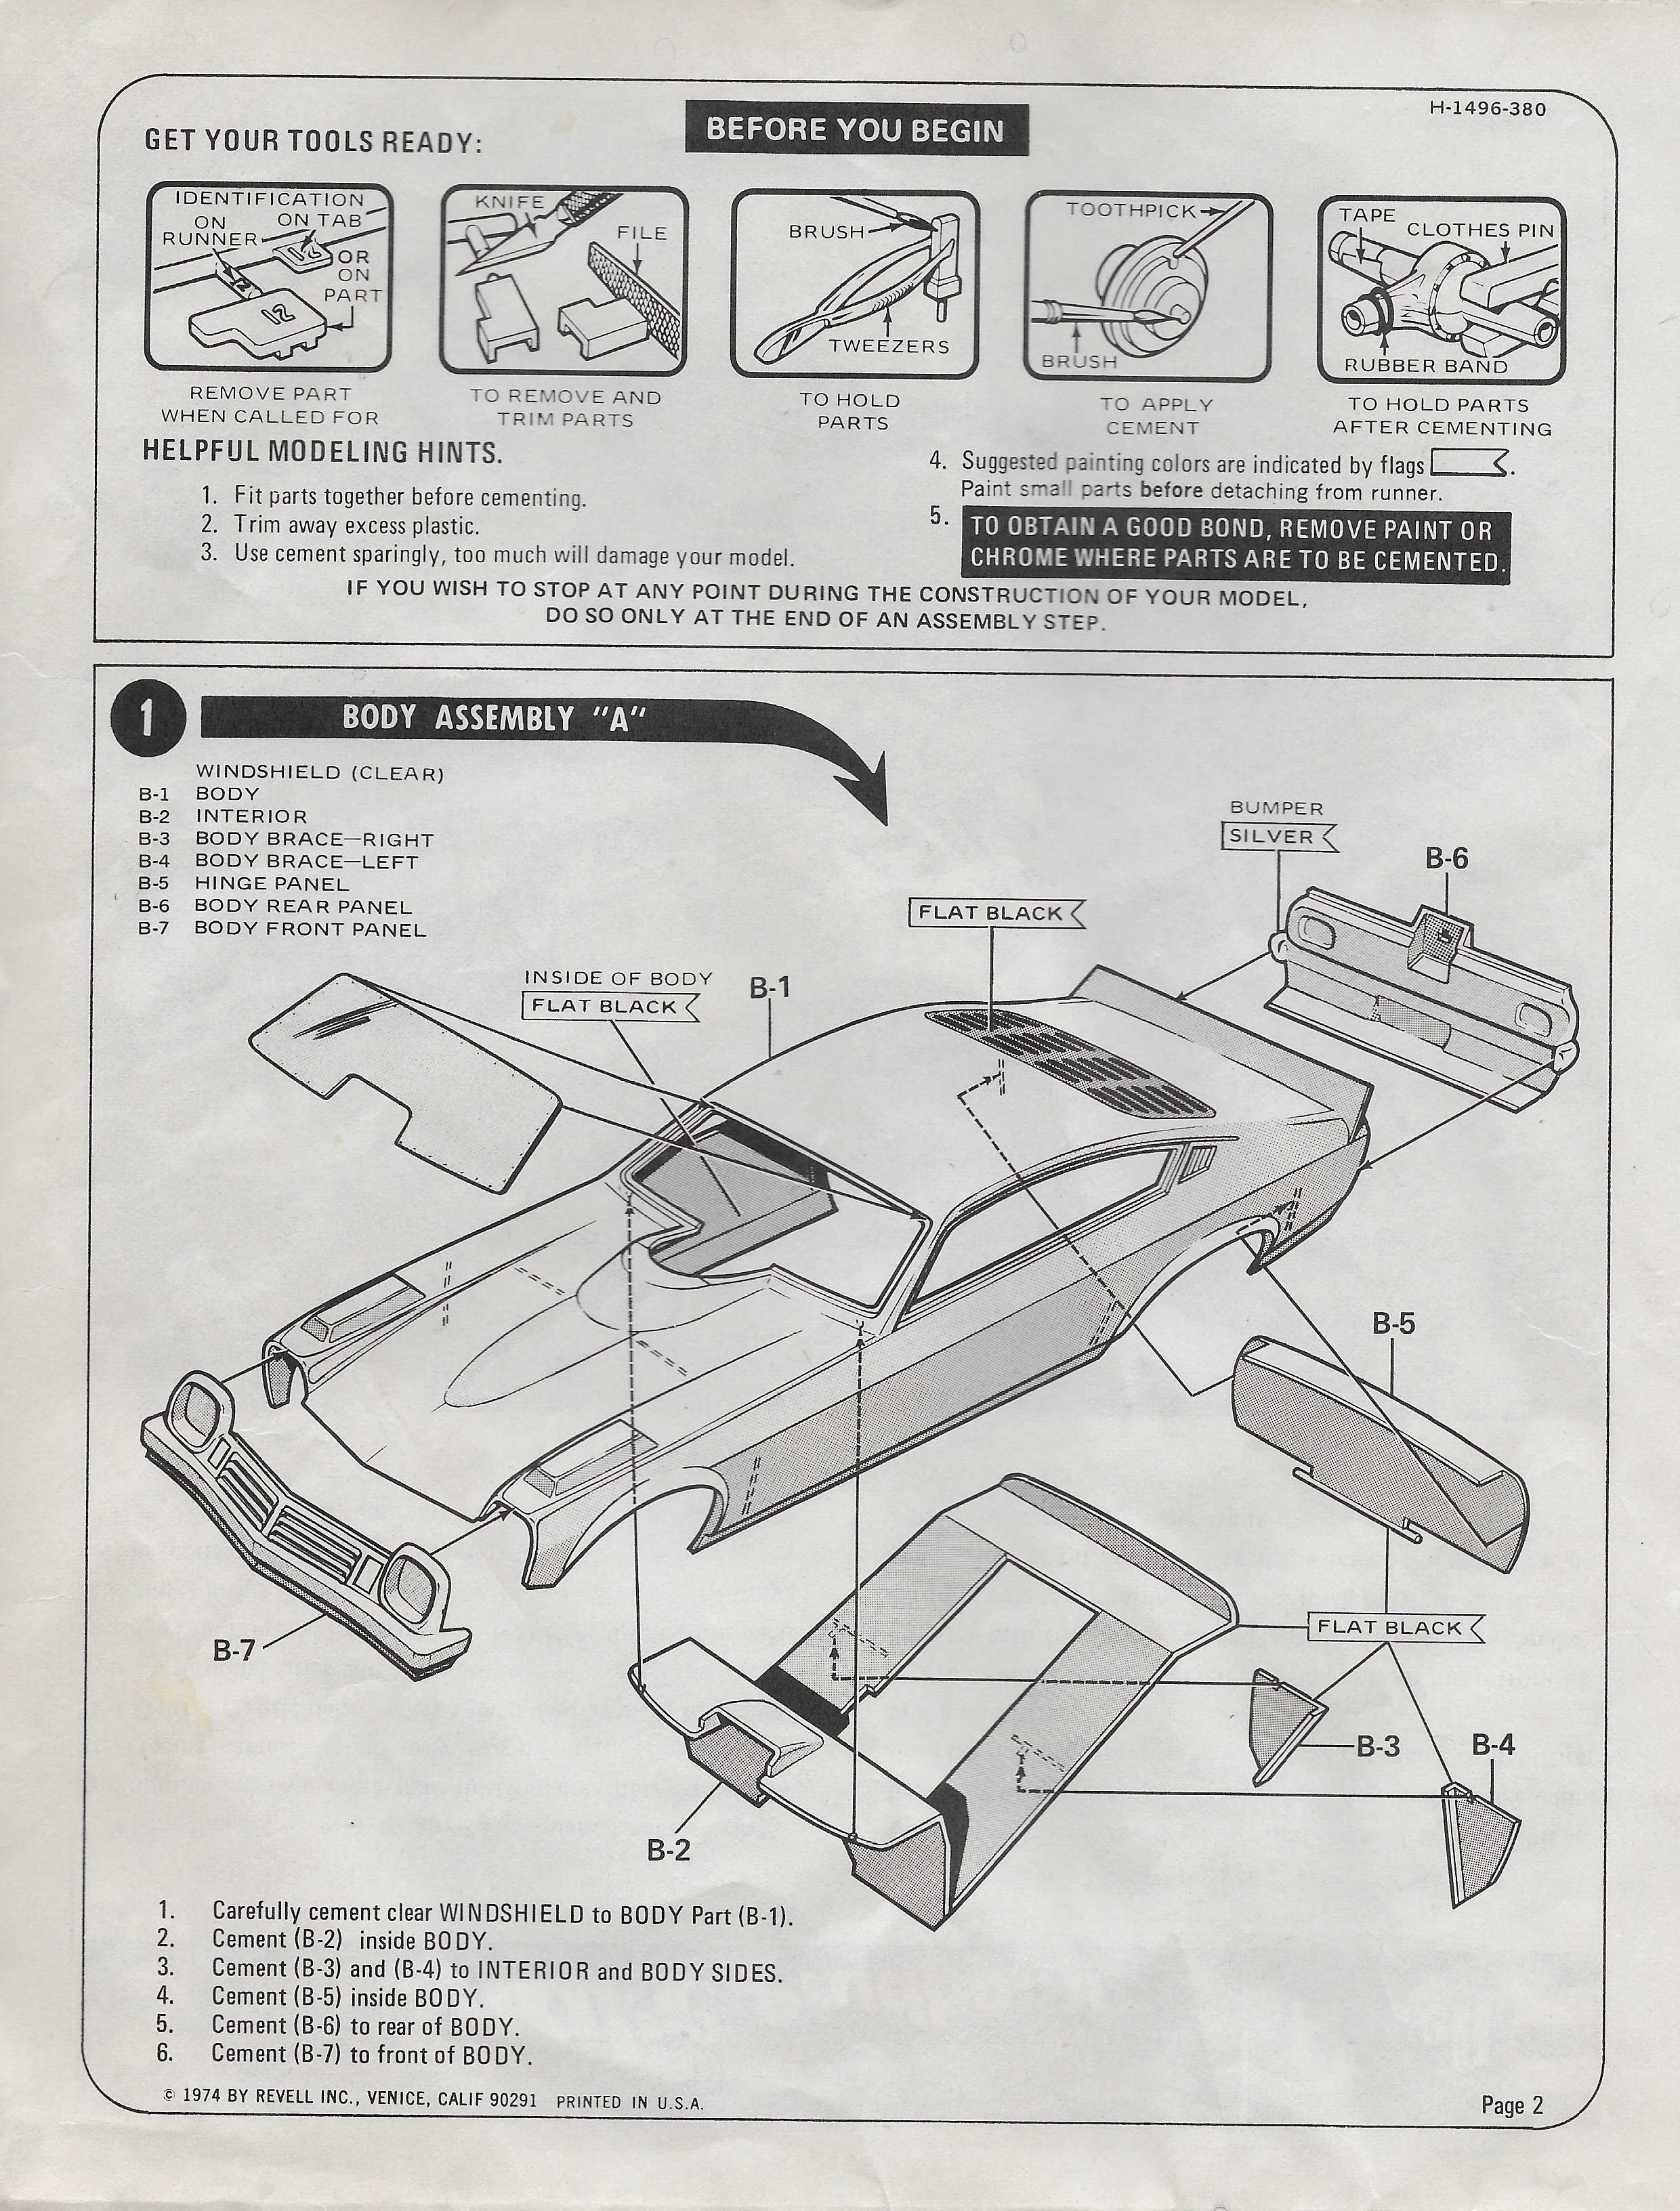
well, here goes. Anybody else have a better idea how to post these, let me know. not a Logghe chassis, but the plumbing details still apply. Please, Please, Please don't quote this post in a new post, let me know if you don't see anything. Revell 1/16 funny car instructions
-
Oh my… great information, thank you for posting. Love the restoration pictures
-
JC, Tom West's X-ray drawings are beautiful! Your link for the 1/25 instruction has all of the detail that is on the 1/16 instruction sheets. Good to know. It's interesting that the 1/25 sheet that I just checked didn't have any ignition or plumbing detail. Must be some do, some don't.
-
I think it has been posted around here - there is a good set of Tom West's early 1970's funny car reference photos from the old Straightliner model builders forum - excellent detail shots from a model builders perspective. They were from the time that he was working on the 1/16 Aurora kit projects. Googling his cutaway drawings will also provide a lot of information. The Revell 1/16 scale instruction sheets have good ignition wiring and plumbing details that weren't included in the 1/25 scale kits. The Aurora 1/16 instruction sheets are probably just as good, A Google image search for Enderle injector diagrams will have lots of information on the fuel system plumbing - in the '70's, it wasn't as complicated as it looks. hope this helps
-
We live in an area where everybody knows everybody so stopping to talk in the grocery store is part of life. People leave room for other shoppers. About 6 months ago, the grocery store finished the first remodel in about 12 years. That will mess up your grocery shopping. It used to be a very efficient organized layout. Now it's an agonizing experience. The new aisles are all unequal width, some very narrow with displays in the middle on both sides, some wide or open space for no reason. Add a couple of vendors stocking bread in the aisle and just plan to get bread next week. Things are no longer in logical places, there are fewer items, vegetables aren't as fresh, and they are out of stock more often. Went for my favorite coffee yesterday, nope, hundreds of kinds of coffee, lot s of new ones, but don't have that one any more. I hope the person that designed the remodel has to shop there. The biggest new roadblock now is all the big carts from the employees pulling groceries for customer pickup. These carts take longer to bag and bin the groceries in the aisle The employees do their best but the carts are unavoidable. I'm starting to shop other places
-
yeah, probably worth doing a search here and checking out the Perry's history... sorry to hear that it sounds like he's up to his old stuff.
-
Superglue and Baking soda
Muncie replied to Pat Minarick's topic in Model Building Questions and Answers
Pat, is this plastic or diecast? It looks like it might be a chemical reaction with baking soda and the base material. -
Before anyone starts cutting new door lines - Five window coupe and roadster have the same door opening dimension and the shorter doors. Three window coupe, cabriolet and 2-door sedan have the same door opening dimension and the longer doors. I believe the door opening dimension is at the beltline. The perceived door length is affected by the angle of the car in the most photographs. Back to the source, Reference Ford literature from 1936... Door opening dimension: Tudor Sedan 40 inches Cabriolet 40 inches Three-Window Coupe 40 inches Five-Window coupe 34-1/4" Roadster 34-1/4"
-
Paystar 5000 question
Muncie replied to landman's topic in General Automotive Talk (Trucks and Cars)
wow, that's really vague in the instructions - one of the cylinders (the one on the rh side) on the radiator support could be/is probably the receiver dryer for the air conditioner system. -
B.R.B.O. Freightliner FLC update 2/7
Muncie replied to k100's topic in WIP: Model Trucks: Big Rigs and Heavy Equipment
decal artwork looks great! maybe a little too tall... Freightliner offered three sleeper heights - standard = height of the cab, raised roof = closer to the top of a van trailer, and mid-roof = could almost stand up inside but lower roof for operations with flatbed or tank trailers. Your 1:1 photo is a mid roof. Maybe lower the top until there is about 6 feet of standing headroom inside. I wish I had the actual sleeper dimensions... The sleeper roof in the kit is a custom top manufactured and installed by Sloan's. Not installed by Freightliner, but you could get a new truck delivered to Sloan's for a sleeper roof, upholstery and custom paint before it went to the dealer. -
Best to strip anything primed with the Rustoleum so the Duplicolor goes directly on the plastic. Duplicolor makes a couple of different flavors of primers and different builders have different preferences. Some primers are made to spray on thicker so they can fill sand scratches and other problems - but they also fill in molded detail. The 1699 primer-sealer comes out a little thinner, less sanding after primer. A sealer is intended to be a barrier and block anything under the sealer from showing thru the top coats and to also prevent the top coats from attacking anything below. Light coats to start and then start building up layers. I've never been a fan of Rustoleum but that doesn't mean it won't work over another primer. There is a much better chance that Rustoleum paint (not bonds to plastic) will work over Duplicolor primer than the other way around. I'll admit that I'm probably biased, but my opinion is that any of the hardware store paints that say bonds to plastic are meant for plastic shelving and other utility plastics, not the fine work that we do. My rule of thumb for paint advise is that if you have 15 model builders in a room that can all do great paint, there will be at least 15 different methods and none of then will work for anybody else. Experiment, find what works, and that's what you do.