Muncie
-
Posts
1,215 -
Joined
-
Last visited
Content Type
Profiles
Forums
Events
Gallery
Everything posted by Muncie
-
70's tires called Formula 1's?
Muncie replied to Fat Brian's topic in General Automotive Talk (Trucks and Cars)
Fireball Modelworks has the white letter tire decals - http://www.fireballmodels.info/ -
The Dupli-Color sealer primer 1699 also goes on very thin and is compatible with the kit plastics that I've used it on. Beat to test on a kit part that your not using. I'm not sure about the Tamiya primer under the Dupli-Color top coats.
-
Looks good. The wood grain makes it. Love it!
-
In general, I'm going with the ten year recommendation, but it could be less under certain conditions - Just took a tire in for a flat repair - ten years old and two tires shops that I trust wouldn't touch it - nothing over ten years old. One checked for leaks where the nail was and no leak there. The other, where I bought the tire, checked the whole tire and found nothing, but it had been losing air for some time. They mentioned sidewall leaks - which could mean the tire materials were breaking down. The car sits outside, that tire had the most exposure to sunlight on a hot driveway, and it doesn't get used much. Fortunately it was a good time to replace tires. Glad I did, the new tires are much better than the old ones ever were. so, my list of thoughts - - ten year old tires not only have the deterioration of age, heat, ozone, oxygen, - they were made from the best technology at least ten years ago. Twenty year old tires... Thirty years old - same math. - if a tire keeps losing air with no apparent damage, the materials have started to break down - at some point a catastrophic failure will occur. - http://car-storage.com/article/tire-dry-rot/ a good summary on the causes of tire aging and it includes a reference link to a 2007 NHTSA report to Congress on tire aging
-
Round 2 AMT Advertising Suggestions
Muncie replied to regular guy's topic in General Automotive Talk (Trucks and Cars)
I think I see the same thing - the Round 2 website doesn't have a lot of information about what is in the box. It's been a long time since I've looked there because it doesn't tell me very much and isn't easy to use. There are 352 instruction sheets on the support tab - all in kit number order - They are difficult to find by kit subject. It's not a user friendly web site. Round 2 could try a little more. Some of the small hobby shops around here have gone to a "we'll order it for you" system. They are keeping very little model car inventory so there is no box to look at. -
Replicas & Miniatures Company of Maryland
Muncie replied to Jimmy Wilson's topic in Car Aftermarket / Resin / 3D Printed
but you mention it over and over and over - we get it... -
Replicas & Miniatures Company of Maryland
Muncie replied to Jimmy Wilson's topic in Car Aftermarket / Resin / 3D Printed
judging by the price, that is an old package on a model car, they would work fine, no loss in performance... -
Replicas & Miniatures Company of Maryland
Muncie replied to Jimmy Wilson's topic in Car Aftermarket / Resin / 3D Printed
The Replicas catalog from May 2017 shows: RM-114 1/25 Weber carbs and manifold for small block Ford - in my hands, it has the correct 48IDA down draft carbs P-11A 1/25 Weber carbs - DCOE side draft type - perhaps somebody can comment about them... P-11B 1/25 Weber Carbs - IDA down draft type - same carbs as RM-114 P-133 4 cylinder hop-up kit - for the AMT Meyers Manx - these are also correct down draft type I've bought parts from Norm for let's say 30 years - always great resin and a fun guy to work with - he'll always call if there is a question. The only thing I don't like is that he's on the other coast and I probably won't get a chance to meet him in person. -
Awesome - great pictures and lots of them! thanks for the posting a rare opportunity to see the show on move in day
-
Will adding clear lighten House Of Kolor Kandys?
Muncie replied to crowe-t's topic in Model Building Questions and Answers
I can't answer your question with any confidence but here are a couple of thoughts. - best to do a spray out on test part to see if the color comes out the way you want. - Candy paint is somewhat transparent. The color of the base coat will have more affect than adding clear. If you can get a look at a copy of the House of Color paint chip book at the paint store - it will show the Kandy colors over different base coats - the difference in color is amazing - some are much lighter over the white base coat. Not sure if this is an approved application but the only experience I've had adding clear to a color is for the final color coat before the clear. Adding a bit of clear brings out a bit of depth to the final finish - the clear has to be the same type of paint hope this helps -
sorry if this derails the serious discussion but it seems like a real kit opportunity - imagine four or five kits in a box...
-
Revell '55 Bel Air Box Art Tribute, Part I - Yellow Car
Muncie replied to Casey's topic in WIP: Model Cars
looking good! Actually, your core support is pretty close as it is - Stock, V-8's had the radiator mounted aft of the core support and inline 6's had the radiator mounted ahead of the core support. It's a simple swap to change the core support and radiator for more engine clearance. -
Facebook will give you enough access to see contact information along with the annoying pop-ups to join Facebook - the M&S email used to be there, but I see Facebook is forcing the Facebook messaging center as well. Marc is a good guy and will take care of your concerns. I hope you ordered the P/E detail set as well.
-
Bernard, check their facebook page - there is contact information there. But give them time, he will get back to you. turn on your PM -
-
Drag Question about funny car tin work ?
Muncie replied to Mr mopar's topic in WIP: Drag Racing Models
Funny car on a stick sad to say, this is what happened to the Satellite body for Twig Zeigler's Pizza Haven Funny car from https://bangshift.com/general-news/roadside-find-funny-car-on-a-stick-the-muffler-hut-funny-car-sign-in-centralia-Washington/ -
Drag Question about funny car tin work ?
Muncie replied to Mr mopar's topic in WIP: Drag Racing Models
A couple of ideas to go with the good information that has been posted. 1. The Satellite roof is a little lower and further forward than the Revell funny car bodies - the real thing is the same. - you may want to take a cut our of the roll cage, 1/16" to lower the body a bit. Wayne's chassis lowering trick is also a good idea. 2. Cut the donor tin into two pieces at the bottom of the vertical firewall to separate the firewall from the rest of the tin that mates up to the chassis around the driver - cut and trim the pieces to fit the body mocking up with the chassis as you go. Eventually, the mock ups will tell you where the panels will line up and if you need to do some scratch building with sheet plastic. Shouldn't have to replace the whole thing. 3. some of the Satellites had the engine mounted forward of the engine location in the early Revell chassis - I like that look and it may make fitting the tins easier. -
Carburetor position?
Muncie replied to 426 pack's topic in General Automotive Talk (Trucks and Cars)
two Holley carbs end to end won't fit on the Edelbrock C26 manifold for small block Chevy in the top picture - there is not enough space between the carbs and the Holley float bowls interfere. The manifold is made to fit with AFB carbs. The primary carb (AFB)(with choke and opens first) is the rear carb. Somebody made the Holleys fit with carb adapters to rotate the carbs but on a dual plane dual quad manifold, cross mounted carbs are bad news for distribution in the manifold. However, on a tunnel ram manifold with an open plenum for racing, I believe the top picture is still the preferred orientation for the carbs. -
'68 Shortbox Chevy pickup.
Muncie replied to Can-Con's topic in Model Trucks: Pickups, Vans, SUVs, Light Commercial
Man, that's cool - very well done -
He will be missed - we've all seen his drag racing photography, x-ray illustrations and his work in the model car industry - including the Aurora 1/16 funny car chassis from the NHRA Insider archive - https://www.nhra.com/news/2013/man-x-ray-eyes https://www.nhra.com/news/2013/man-x-ray-eyes-part-2 Tom West posted reference material over at the Straightline Modelers website when it was active - the archive of what's' left is here - http://web.archive.org/web/20110622053842/http://straightlinemodeler.org/ (credit to Brett Barrow for the link)
-
same here - that's where I'm at...
-
These are 1965 Chevelle and Olds F-85 altered wheelbase fronts - there may be others, but I don't think so.
-
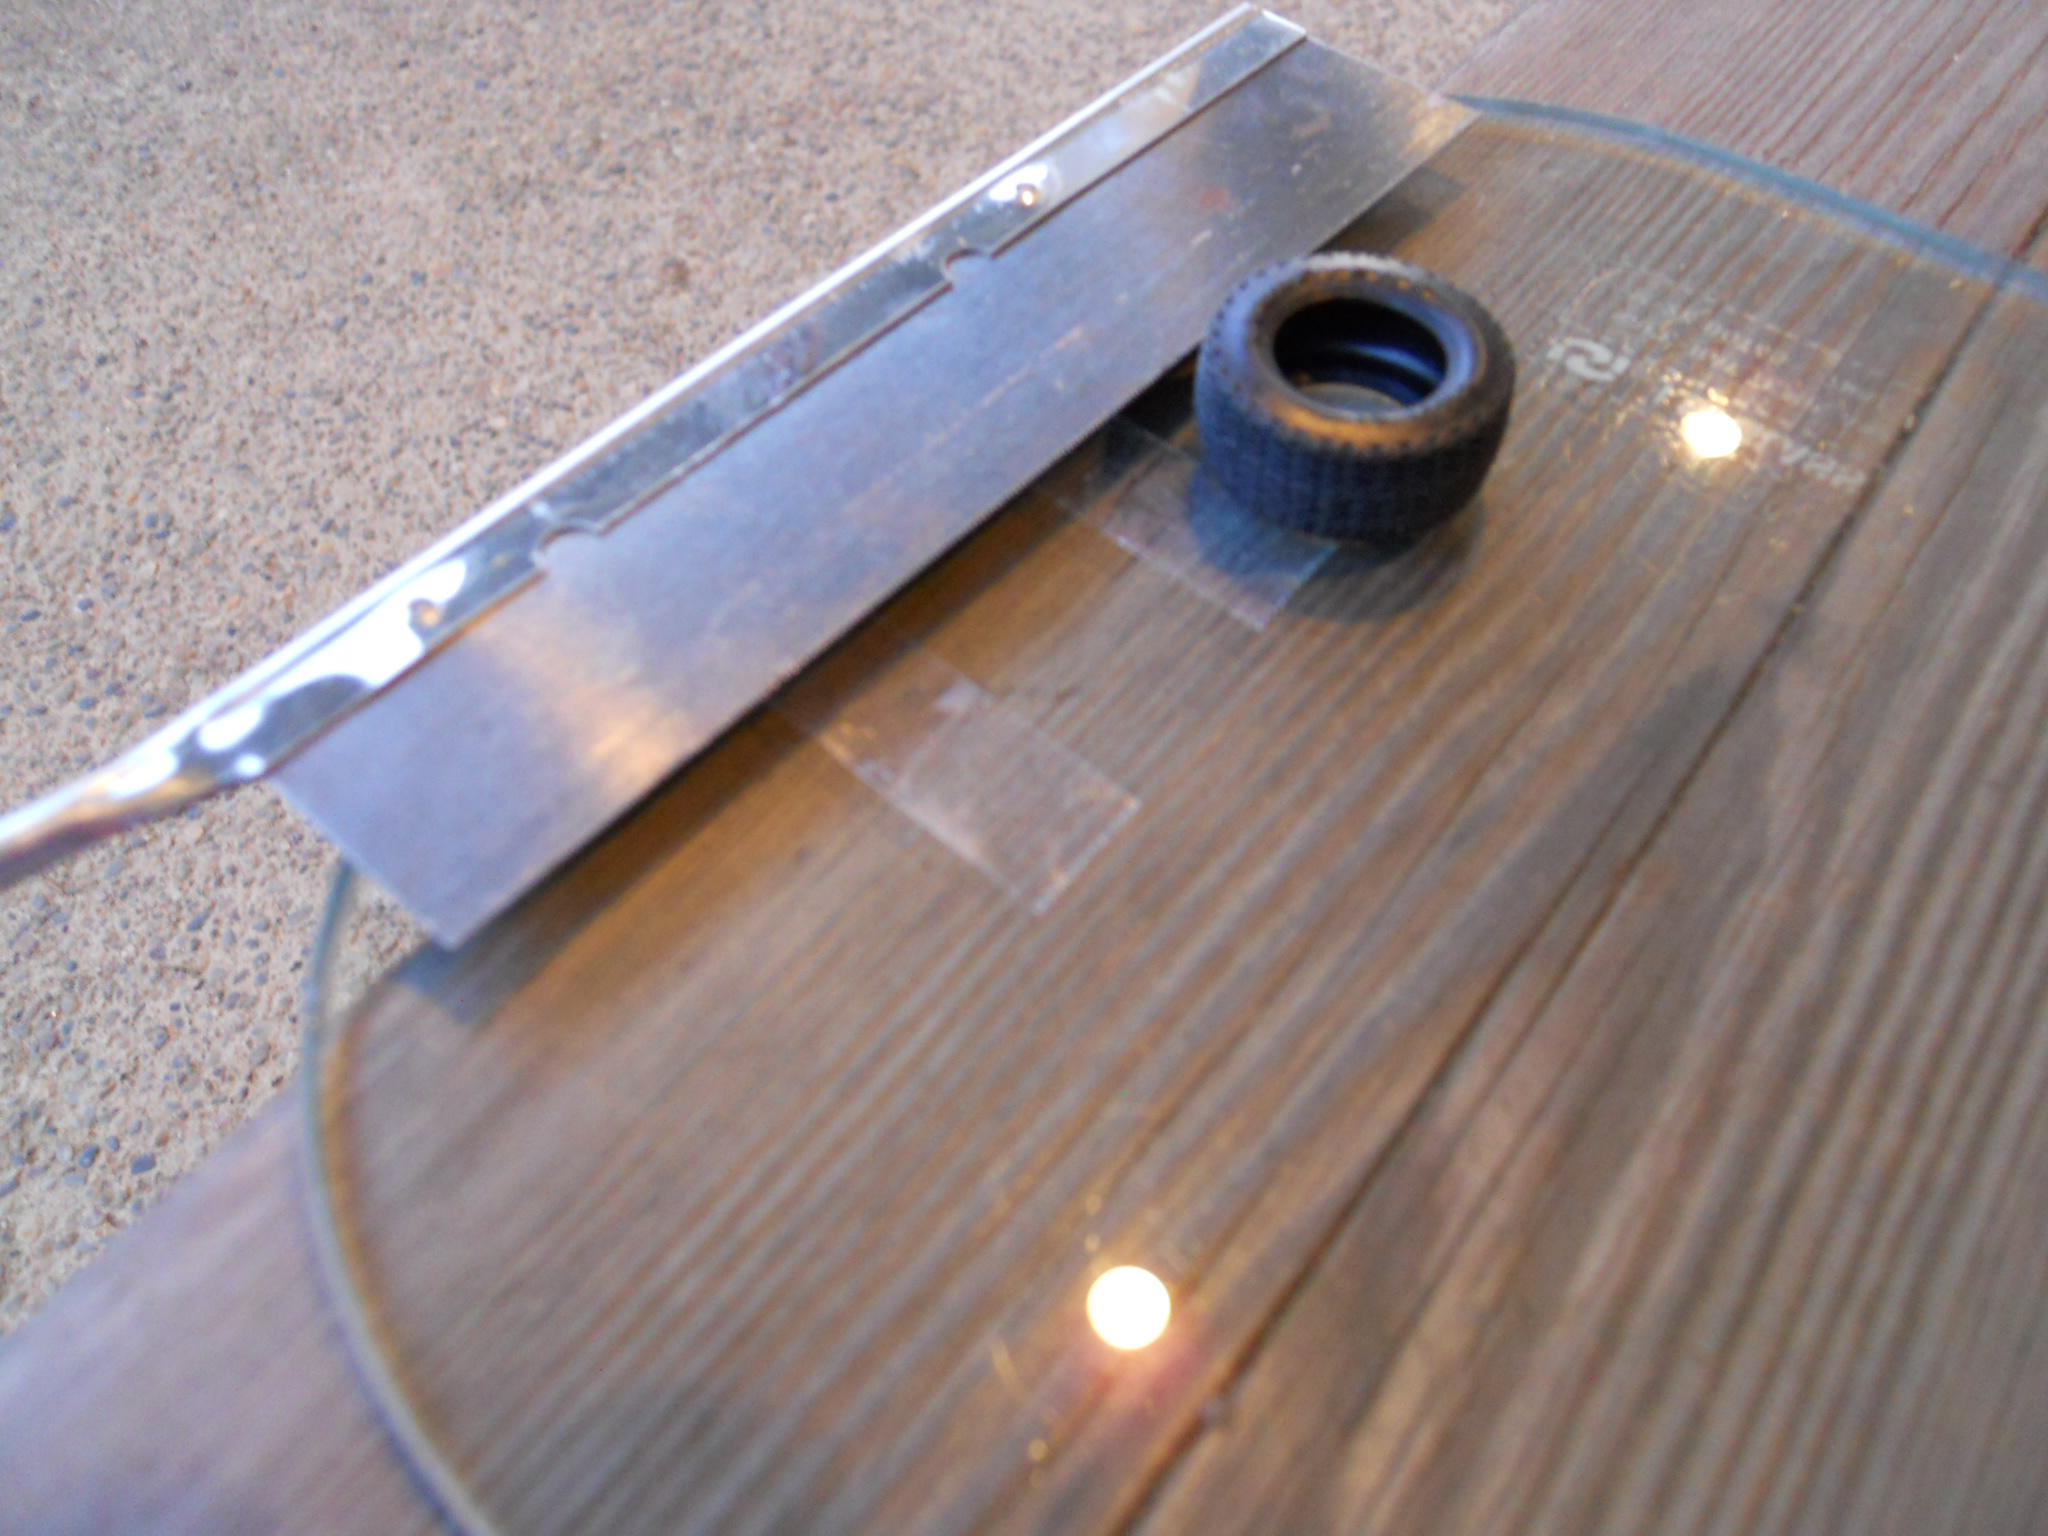
Cutting Rubber Tires Cleanly
Muncie replied to Chris1992's topic in Model Building Questions and Answers
another method - this has worked for me - makes good parallel, smooth cuts tools: flat surface, wide blade fine tooth hobby saw blade, spacer to fit and align the saw parallel to flat surface, double stick tape 1. determine spacer thickness and identify an available material 2. Layout some strips of tape on the flat surface to attach the spacer 3. place saw blade on the spacer and tire on flat surface - it may be easier to cut the tire by drawing the saw toward you instead of pushing it. 4. cut one groove part way thru, turn the tire over to make the second cut. After two grooves are cut, finish separating the parts of the tire. 5. on hollow tires, the center tread section can be trimmed and glued inside the tire to reinforce the glued joint in the tread. hope this helps -
-
Is there a source for this decal set
Muncie replied to STYRENE-SURFER's topic in Car Aftermarket / Resin / 3D Printed
Slixx has several Jungle Jim decals sheets - #1271 Camaro sheet looks close but is missing Briggs Chevrolet. - http://www.slixx.com/s1271.htm?id=491 -
New 3d Printed 32 Deuce Top
Muncie replied to mnagatani's topic in Car Aftermarket / Resin / 3D Printed
Mike - it's a great top - the changes make it better -
'32 Phanton -Foose build -update 2/11/18
Muncie replied to Rocking Rodney Rat's topic in WIP: Model Cars
RRR - That looks real good - I saw the prototype in bare metal and wanted to build one in scale. My project was held up by a case of knowing too much and that brain blocked looking at the other available scale options... All of the metal is sections from tooling for existing Brookville bodies - If I remember correctly, the rear of the body is from a roadster pickup cab - which is not available in scale. The roadster quarters that were used on the prototype extend past the wheel openings - could see where it was welded in bare metal. I like your solution, it's looking great. will be watching.