peteski
-
Posts
9,229 -
Joined
-
Last visited
Content Type
Profiles
Forums
Events
Gallery
Everything posted by peteski
-
Yes, a digital caliper is one of indispensable modeling tools if you do anything more than just glue kits together. I prefer the metal (stainless) version. Mine also came from Harbor Freight and I think I paid $20 (about 20 years ago). I couldn't' model without it.
-
I believe you have to go to your "messages" section (click on the envelope icon next to your name on the upper right of the page). That will open up a menu. On the bottom select "Go to Inbox". The Inbox page shows you the space usage (on the right side). Also, If you have any PMs, they will show up on the left, under the word "Inbox". There is also "Disable my messenger" link in there, a little lower on the left. I suspect that yours might say "Enable my messenger". Click on that to receive PMs.
-
Is that a photo of the model, or 1:1 vehicle? Seriously - I thought I was looking at 1:1 scale. Only after I started looking more carefully at things like the wiper arm, the cowl vents, and the shape of the water pump, I realized it is a model.
-
Thanks John. I use wide range of adhesives (for general repairs and for model building. I think I'll have to pick up a tube and give it a try. I ask about its flexibility to compare it to the E6000 adhesive I use in certain instances. It is clear and remains fairly flexible after drying As for the flammability, I was disputing your statement "Super glues have flammable solvent . . ." CA glue doesn't have any solvent since it sets by chemical reaction (not by solvers evaporation, like solvent-based glues do).
-

Revell Acrylic Spray Paints
peteski replied to DiscoRover007's topic in General Automotive Talk (Trucks and Cars)
Thanks! -
I think that the designers are using some "artisitc license" while designing these models, making them look more like toys than scale models. Too bad that they aren't more serious about the design.
-
I have a roll of 3M "adhesive only" tape. Basically it is a brown backing paper with a thin layer of adhesive (similar to what is used on regular clear Scotch tape). I take a bit of that adhesive and apply it to the end of a toothpick. Instant parts picker!
-
Guitar string "springs", even from the thinnest strings are IMO a bit too heavy looking for realistic return spring. Unless it is a large scale model. Light bulb filament sounds like a more in-scale idea.
-
Revell Acrylic Spray Paints
peteski replied to DiscoRover007's topic in General Automotive Talk (Trucks and Cars)
I just hate the word acrylic being used generically to describe paint. Is the Revell stuff water-based acrylic enamel, or solvent-based acrylic enamel or lacquer? -
And of course you are right Ace, as far as Hydrogen goes.
-
Well, CA is a type of acrylic (plasitc), so yes, if you actually light it on fire, it will burn (just like any other plastic). But show me any CA glue label that states that it is flammable (like the warning label on that fix-all stuff). If you find one, or I'll eat my keyboard, one key at a time.
-
I was just being cautious. Thank you John. But super-glues (Cyanoacrylates) have no solvent (flammable or otherwise). Those harden by chemical reaction, not by solvent evaporation. Same goes for 2-part epoxies. Does Fix-All dry hard (as hard as styrene iteslf, CA glue, or epoxy) or does it remain somewhat flexible?
-
Nice model! Friend of mine owns the 1:1 Europa, and it is also metallic blue. The 1:1 car is really small!
-
Regardless what substance is being burned in an internal combustion engine, it burns up inside the cylinder, and emits carbon dioxide.
-
Thanks John!
-
I guess this depends on a person's perception and personal l taste, just like those modelers in another thread in the forum, wanting to dull the model car's chrome to make it look more realistic (in their eyes).
-
Thanks Bodnarus. One of these days I'll post more photos in a separate thread. I don't want to hijack your thread. The color is a nail polish. Those louvers were a pain and they didn't come out perfectly even, but it was my first attempt, and it is a small scale model too.
-
My recommendation is to learn airbrushing paint without orange peel. That way you don't have to worry about sanding or waxing. That's what I do. Orange peel is caused by the partially dry paint hitting the model surface. That partially dry paint can't flow out and create a smooth surface. Airbrush allows much finer control of the paint viscosity, volume, and air pressure. Much better than a spray can. You need to learn how to airbrush the paint on wet enough to be able to flow and level out on the model. Then kiss the sandpaper and waxes goodbye! Here are some examples of my models where I have not sanded or waxed them - just airbrushed (paint and clear coat). No orange peel

-
I'm with you John. To me model chrome should be as bright and shiny as on the 1:1 vehicles. Sure, if someone is modeling old, dirty/weathered vehicle, the chrome parts will not be as shiny as on a new car, but even on those weathered vehicles, chrome usually seems to stand out and shine. This dulling-down of chrome sort of reminds me (in an opposite way) of what military aircraft models often do - they grossly exaggerate the panel lines all over the aircraft. They make them dark and deep. The panel lines on 1:1 aircraft are barely visible. They don't look like black 1/4" gaps between panels.
-
How durable is that water-based paint on a rubber or vinyl tire? Will it rub off easily?
-
Not sure why you have problems making straight cuts using a (metal) straight edge (ruler) and a hobby knife (or I prefer a single-edge razor blade). Just follow the edge of the ruler making few passes, then snap the pieces. Mine are perfectly straight. If you have problems. maybe on of those rotary-cutter paper cutters would work for you? I have one, but have not tried it on styrene.
-
I agree 100%. But the question was about "something like say .100 x .188" (I assume styrene). In my experience, at that thickness, the blade will likely deflect.
-
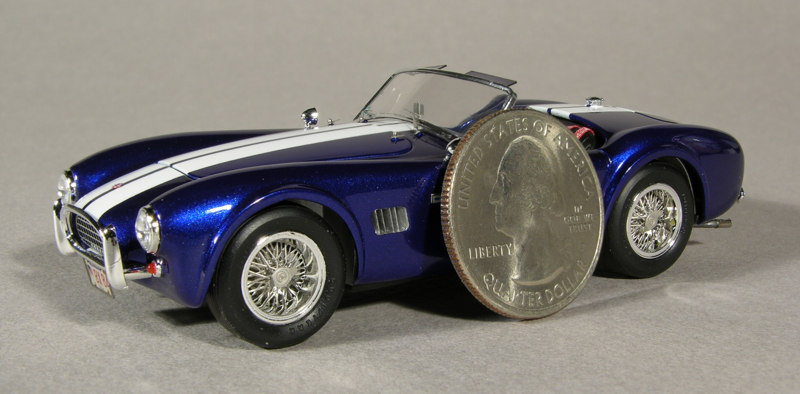
Thanks! But bananas are not really very good for size reference. They themselves vary from about 3'' (baby) to about 8". A quarter (or any coin) always has the same size.
-
Since we are showing off our giant 25 cent coins, here is mine. I hope you don't mind.
-
A 1:25 engine would fit in a 1:24 model with plenty of room to spare. If it was the other way, it would be a tight fit.