Chariots of Fire
-
Posts
2,783 -
Joined
-
Last visited
Content Type
Profiles
Forums
Events
Gallery
Everything posted by Chariots of Fire
-
 I've still got one of the Jordan Ahrens Fox's and a ladder truck. The ladder was pulled by an AC Mack. They also made a Model A woodie all in HO scale. Perhaps there were others.
 -
Question about Dupli-Color
Chariots of Fire replied to El Roberto's topic in Model Building Questions and Answers
Most likely humidity. No problem, really. Wait until it sets up good and then polish the dullness away. It will be fine. -
1944 Diamond T 6x6
Chariots of Fire replied to Chariots of Fire's topic in WIP: Model Trucks: Big Rigs and Heavy Equipment
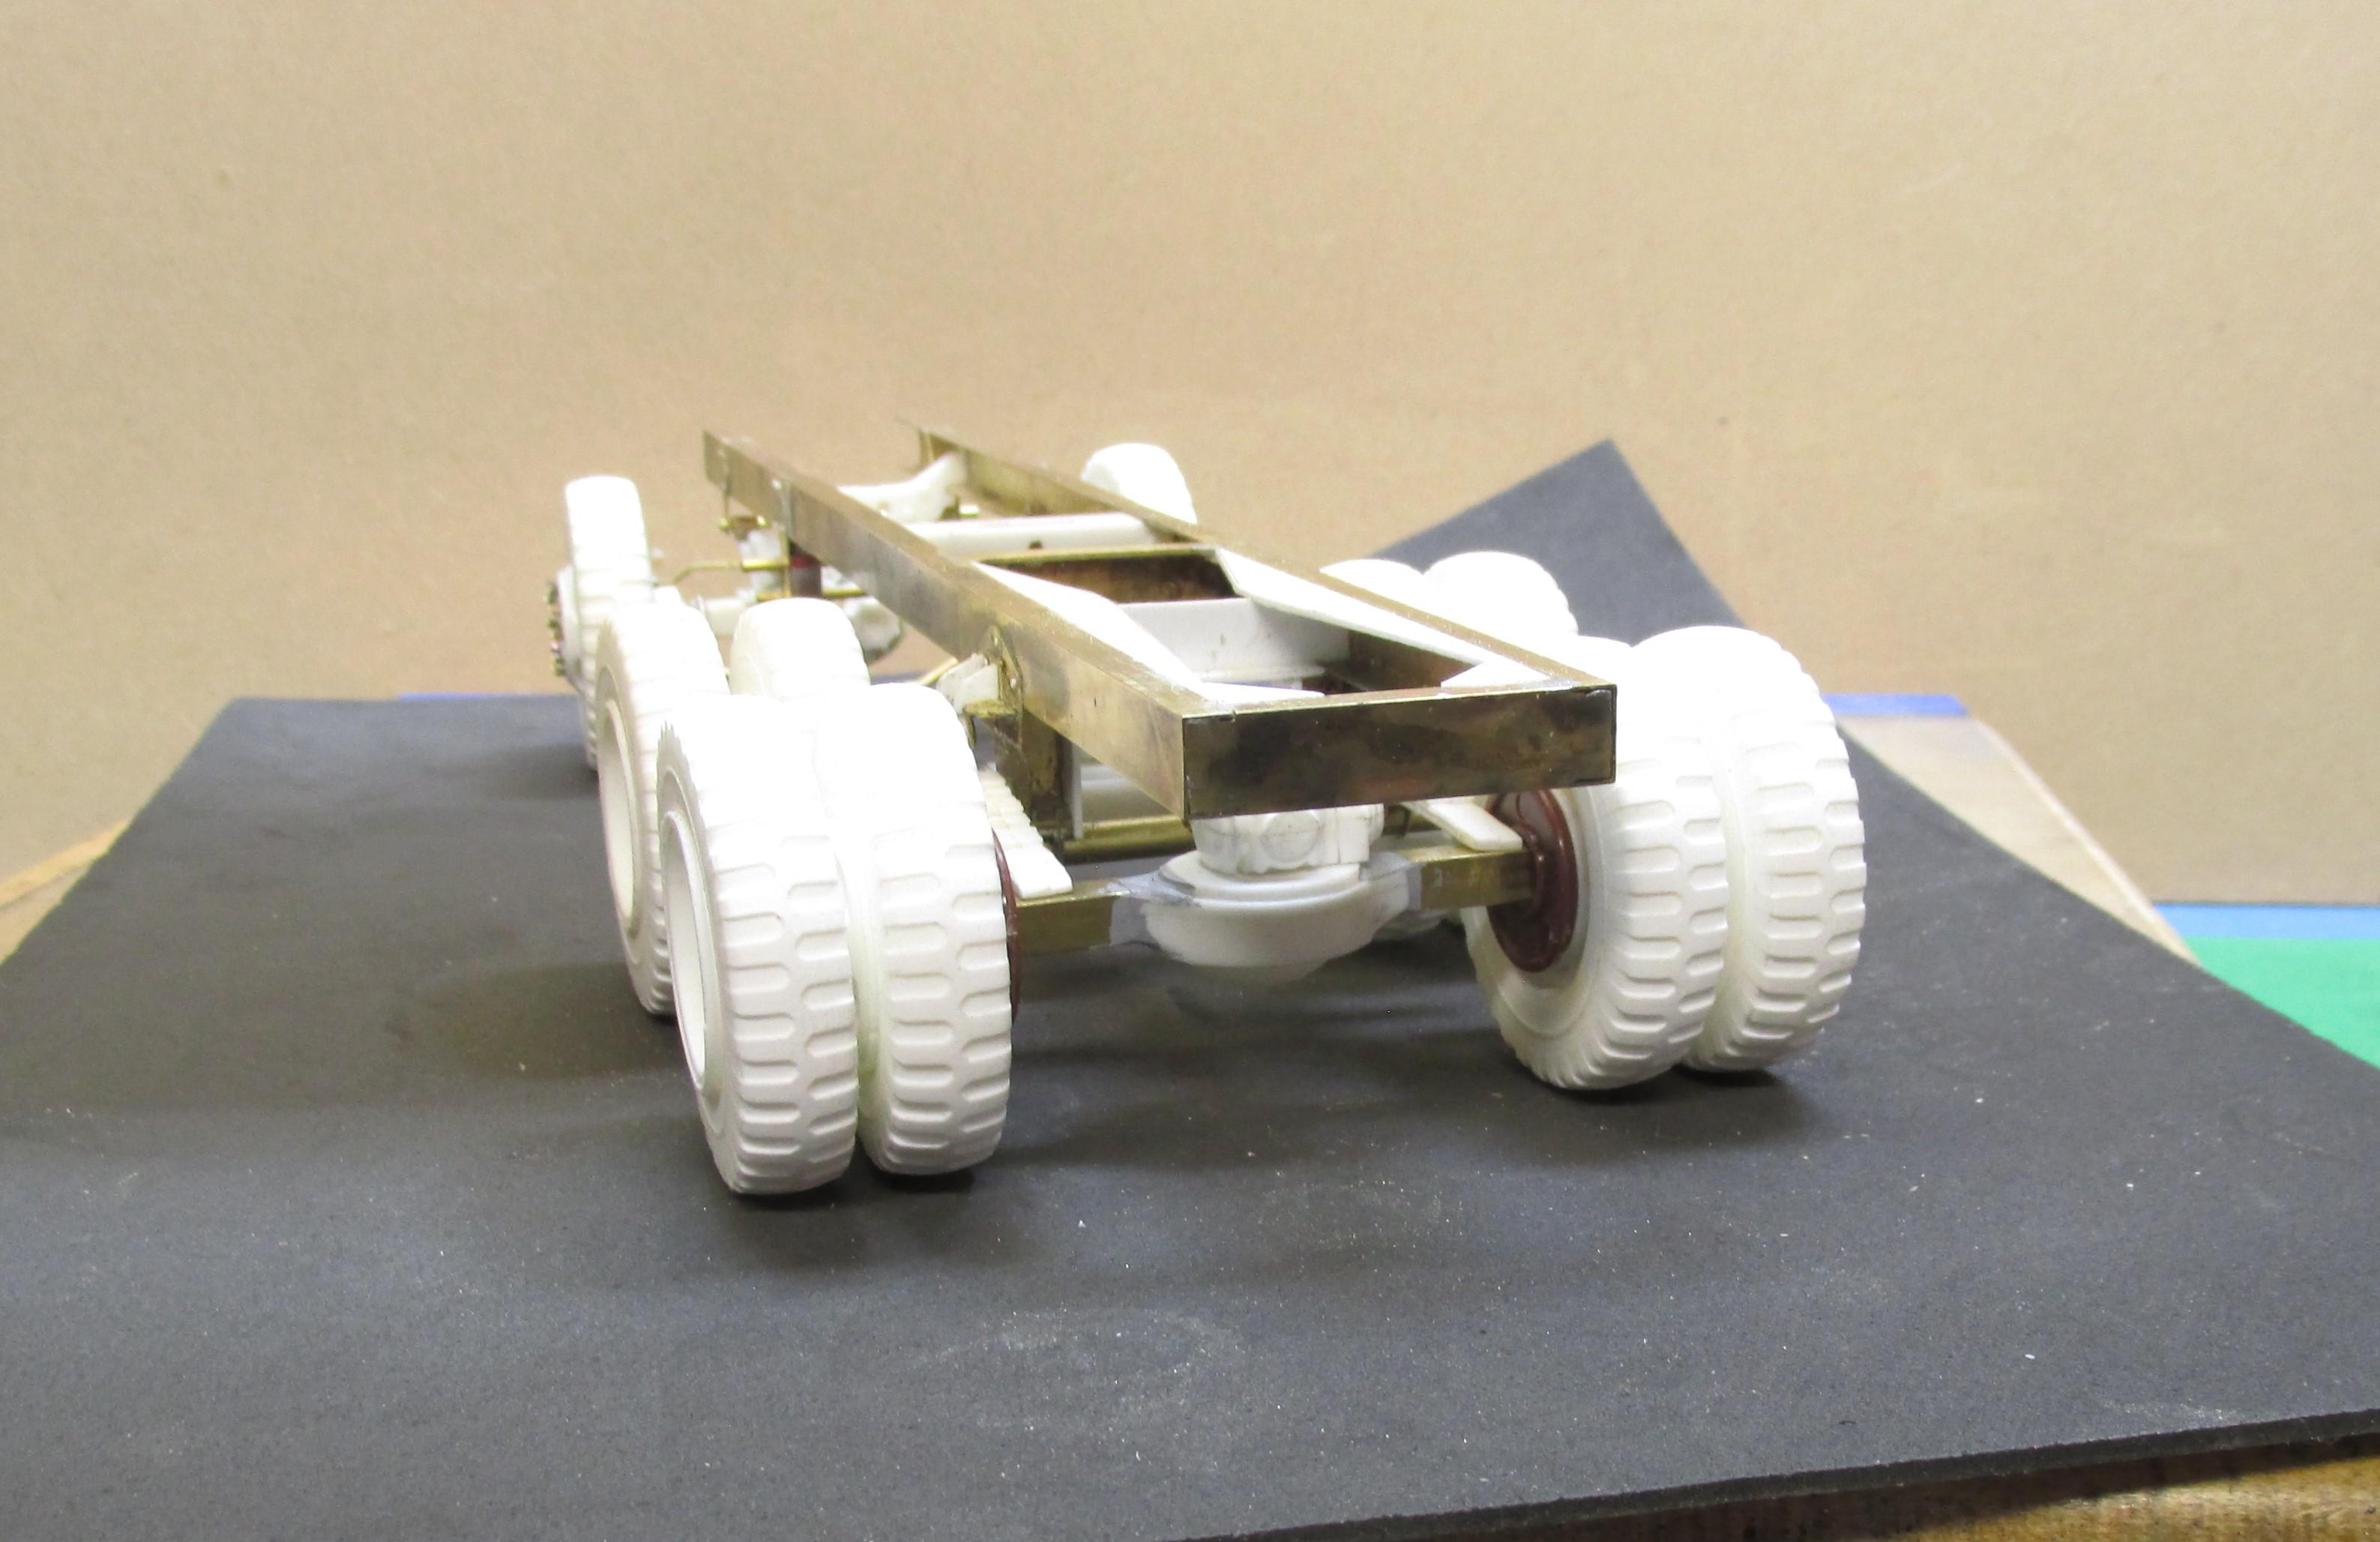
Up on all 10's. Well, almost. Things are just sitting in position with no permanent connections. The front axle and wheels are mounted but the axle is not connected to the springs yet. Same for the rear axles. The wheel hubs are now attached with tubing plugged with plastic rod and then drilled out for the small screws and washers that hold them in place. Pretty solid but turn smoothly. Now it's on to the torque rods and their connections that will hold the rear axles in position with the springs floating on top.
-
I did a short tutorial on making hydraulic cylinders a while back. They may be still in the how to's.
-
1944 Diamond T 6x6
Chariots of Fire replied to Chariots of Fire's topic in WIP: Model Trucks: Big Rigs and Heavy Equipment
Been working on the frame and axles of the Diamond T. Slow progress but it's there. No time limit on this one. Axles are done as far as basics are concerned. Working now on the steering for the front end. They are made of soldered C section and tubing. Wheels have been given the Fusion bead treatment up front. The front axle has mounting points and the wire U-bolts are ready. Next up will the the finished axle with the steering knuckles in place, steering arm and tie rod done.
-
Wish I could, Vince. I only took one completed photo of the rig when it was built several years ago for the son of a paramedic who worked at the hospital. The only labor involved, David, was for the one I did it for. He was slightly challenged, and it was a gift.
-
This was built a few years ago from photos of the real truck. Added fender trim, bug shield, push bar,light bars, scratch built body, Don Mills slam locks, aluminum foil trim, and home made decals.
-
Source for tiny metal nuts, bolts & etc?
Chariots of Fire replied to Monty's topic in Model Building Questions and Answers
If all you need are the bolt heads you can make your own with some hex rod and a chopper tool. Just adjust the blade and stop on the tool for the thickness you want the bolt head to be and chop away. Hex rod comes in a variety of sizes. Smallest I have by Plastruct is 1mm but I can make hundreds of them. Another alternative is to use wire and ceramic hex beads. #15 ceramic beads by Fusion Beads. Drill a hole, slip in a section of wire, drop the ceramic bead over the wire and superglue them together. Snip off the wire and you have the look of a lug nut for a wheel. -
My '29 custom pu!
Chariots of Fire replied to TIP-TOP's topic in Model Trucks: Pickups, Vans, SUVs, Light Commercial
Exceptional! Nicely done!! -
Ford LT9000 Dump
Chariots of Fire replied to DRIPTROIT 71's topic in WIP: Model Trucks: Big Rigs and Heavy Equipment
That looks good to me, Brian. Hard to see the slight difference in color. Nice work! -
Just a suggestion: Take a piece of brass tubing with the inside diameter the size you want for the disc. File or grind the outside edge so that it forms a sharp inner edge and use it as a punch. You will probably have to "sharpen" the edge as you use it as it tends to roll over when you tap it on a hard surface. But it works!
-
Agreed! That Interior is well done indeed! I like the color as well. Nice job.
-
Vacuum forming windshield using PETG
Chariots of Fire replied to Len Woodruff's topic in Model Building Questions and Answers
I have a vacuu-form machine as well. I would sit the buck for the windshield right down on the grill so that when the softened sheet drops over it the rest of it gets pulled down evenly all around. Having the buck raised off the grill may be your problem. -
1937 Ford Tow Truck
Chariots of Fire replied to Nosferatu's topic in Model Trucks: Pickups, Vans, SUVs, Light Commercial
I like it too! Nice color combination. Larger tires and wheels make a nice difference. -
Ford LT9000 Dump
Chariots of Fire replied to DRIPTROIT 71's topic in WIP: Model Trucks: Big Rigs and Heavy Equipment
Same number of coats on the cab and hood? That happened to me on a small build recently. I should have painted both with the same number of coats on each one. I doubt that the resin has anything to do with it if they were both primed the same and had the same basic starting surfaces. It's looking good though, in spite of the slight shade difference. -
That looks nice, though. Are you going to cut through the decal at the door line? Use a fresh blade and then hit it again with Micro-sol.
-
Try Micro-sol under the decal before you lay it down. It might help with the wrinkle problem. Another bit of it on top afterward is ok too.
-
1944 Diamond T 6x6
Chariots of Fire replied to Chariots of Fire's topic in WIP: Model Trucks: Big Rigs and Heavy Equipment
Well, "Leaf", those would make ideal images for creating them in 1/25 scale via 3D printing. The only thing you would need to change would be the tire size from 10.00-22 to 9.00-20 for this build. -
1944 Diamond T 6x6
Chariots of Fire replied to Chariots of Fire's topic in WIP: Model Trucks: Big Rigs and Heavy Equipment
Progress has been slow on this build but that is ok. I'm in no hurry. It has been somewhat of a challenge, especially for coming up with appropriate springs because of the lack of brass strips of the right size. I have some 1/8" x 1/64 strip stock on order for the fronts but the 5/32 stock just is not available so plan B went into affect. The springs came from another truck kit but have been modified to fit this build. For the front springs I added a short strip of brass with tubing soldered on the ends. That way I can set them in the spring brackets with some strength. The rears will sit on a bracket that is mounted on the center pivot point and with the flat portion of the springs sitting on each axle. Now it's on to the axles themselves. Those "b" shaped brass pieces next to the rear springs are what the torque rods will attach to once they are mounted on each axle.
-
1944 Diamond T 6x6
Chariots of Fire replied to Chariots of Fire's topic in WIP: Model Trucks: Big Rigs and Heavy Equipment
I have a 1/35 scale kit of a Diamond T tank hauler pulling a trailer. Lots of parts, great tire assortment and all. But I'm sort of stuck on doing one in 1/25 scale!? -
1944 Diamond T 6x6
Chariots of Fire replied to Chariots of Fire's topic in WIP: Model Trucks: Big Rigs and Heavy Equipment
Would be nice if it was, Brian! Wish I had a stretch machine that would go from 1/35 to 1/25 scale!! -
1944 Diamond T 6x6
Chariots of Fire replied to Chariots of Fire's topic in WIP: Model Trucks: Big Rigs and Heavy Equipment
Maybe I'll build one body of each and switch them off now and then!!? -
I've had that problem. Totally depends on the number of coats of paint that are applied. Losing count or leaving parts to paint on another day can result in different shades. So painting the hood with the body makes sense.
-
Been fiddling around long enough with some small stuff. It's time to get back into something a bit more substantial. This one has been on my mind for a while now and the modeling juices have begun to flow once again. The only question left is whether it will be the wrecker version or another dump truck to fill out the line. There are 5 dumps in the display case and this one would be a unique addition. The frame has been started using brass stock. I had some rectangular tubing that was the correct height for an 8" frame but one side needed to be cut open to form a channel section. That was done with a Dremel and cutting disk. Cross members are a combination of brass and plastic that came from the parts box and seemed to fit the particular need.
-
He's working in that "other" scale. ?