Chariots of Fire
-
Posts
2,783 -
Joined
-
Last visited
Content Type
Profiles
Forums
Events
Gallery
Everything posted by Chariots of Fire
-
Have not used it. Duplicolor filler primer or Rustoleum gray primer is pretty good and both dry quickly and are sandable to a smooth finish.
-

How to make a tire mold?
Chariots of Fire replied to Fat Brian's topic in Model Building Questions and Answers
Here's the 3D printed tire that I copied in resin. You can make out both the Goodyear and tire size in the photo. It's been painted over with weathered black acrylic.
-
How to make a tire mold?
Chariots of Fire replied to Fat Brian's topic in Model Building Questions and Answers
I'll try and post a pic of the tire so you can see the results. -
How to make a tire mold?
Chariots of Fire replied to Fat Brian's topic in Model Building Questions and Answers
I asked a 3D designer to do a tire with Goodyear and with winged foot on the sidewall and the tire size opposite on a truck tire. Both came out great and were not exaggerated at all. When painted up it was visible but not overly so. -
How to make a tire mold?
Chariots of Fire replied to Fat Brian's topic in Model Building Questions and Answers
Go ahead and get a tire (with an extra just in case) with your preferred tread design from Shapeways. There are plenty to choose from. Then use your RTV mold and some resin to get copies! It works! -
How to make a tire mold?
Chariots of Fire replied to Fat Brian's topic in Model Building Questions and Answers
There is no way you can beat purchasing some mold material and casting resin for duplicating tires. 3D printed sets will cost $$$$$$$$$$$$! It costs about $35 for RTV mold rubber that be used for many molds than just for the tires. And casting resin costs about the same. Again it can be used for many more types of castings. Been doing it for a long time with good results. Hoods, fenders, engine halves, tires, wheels, pump housings, and a lot of little stuff that otherwise would have to come out of a new kit. And for making duplicates it can't be beat either. One and two piece molds are not that difficult to do and are an additional tool in the modeling tool box! -
How to make a tire mold?
Chariots of Fire replied to Fat Brian's topic in Model Building Questions and Answers
A three part rubber mold is the best way to go. I've done several different tires this way. 1. Prepare a mold box and mix up enough rubber mold material to cover the bottom and let it set on a flat surface. After the mold material has cured mix up a second batch, pour in enough to cover the top of the first cure and place the tire master flat making sure that there is uncured mold material all around the bottom. 2. Weight down the tire so that only a small amount of mold material goes into the center portion of the tire. Pour the rest of the mold material all around the outside, in your case, up to the center point of the tire and stop. Let this second batch of the mold rubber cure. Include some randomly placed plugs that just protrude out of the second pour. This will insure alignment of the two halfs of the mold after it is broken apart. After it has cured coat the entire inside of the mold box, the tire master and the surface of the cured mold with mold release. Do it a couple of times to make sure all of the surfaces are covered. 3. Now mix up the last batch of mold material and pour it into the mold box. Cover the rest of the tire master including the inside. (If the tire is hollow, fill it with modeling clay first to prevent mold material from going inside). Pour the remaining mold material over the tire, the plugs and up to the top of the mold box or at least 1/2" above the surface of the tire. After the last pour has cured, break apart the mold box and separate the top half of the mold from the bottom half and pull out the tire master. You will have two perfectly aligned mold sections into which you can pour two part resin. I found that in almost all cases you can get a good casting with no air pockets by filling the bottom half of the mold first and them pouring the resin over the inside top half of the mold and let it begin to gel just a little. Quickly place the top half of the mold over the bottom and squeeze out excess resin. Put a weight on the top of the mold until the resin cures. Here's a look at some of the tires I have cast using this process. In the mold below I filled the bottom half of the mold to the edge of the tire so that any flash could easily be sanded away. There was no flash at all in the middle of the casting. The top half of the mold in in back showing the holes where the plugs align and the part of the mold that plunges into the center of the tire to keep it open. In this case I also bored a small air release hole in the center of the top to make sure air pockets did not form.
-
Cutting round wheel wells in a body
Chariots of Fire replied to Len Woodruff's topic in Model Building Questions and Answers
Same here. Get the opening to the shape it will be and then grind the opening until it meets the new lines. Go easy with the Dremel and it can be done in no time. Final finishing with oval files. -
Pin vice question
Chariots of Fire replied to bigfatforty's topic in Model Building Questions and Answers
I have a double ended pin vise that I use for most all bits except for the smallest (#80) and it only works up to 1/16" for the larger bits. So I have a pin vise I bought for my wife years ago when she was doing some miniature furniture. It has two collets that are double ended. It takes from a 5/64" bit down to #80. I bought a similar one from a model show dealer a few years back that was pretty much a knock off but it was junk. Doesn't hold the bits firmly to the point that I almost have to use pliers to tighten up around the collet. Whatever you get, get a good one! -
Agreed, Peter. But I have found that even in purchasing several of the same size bit from supposedly the same lot, some seem to be somewhat less sharp than others. I can tell that when drilling through sheet brass stock. Some bits really bite while others seem to take forever to get through the same thickness. Still I haven't found anything much better to work with.
-
Just making comments in "general".? No specific kit in mind. Just a bit of experience talking.
-
If fit is a problem that's some good advice from Harvey. Nothing says you have to put everything exactly where the instructions say. Cut or relocate as necessary to get the fit and stance right. It makes all the difference in the world to a successful build. If holding parts together is a problem, try pinning the parts together along with the glue. Check for warping as well. Especially the frames when they are glued up. Very easy for the siderails to not be parallel unless there is constant checking of crossmembers.
-
Logging Truck Project
Chariots of Fire replied to PHPaul's topic in WIP: Model Trucks: Big Rigs and Heavy Equipment
Nice work, Paul! When we had our home near Oxford we saw some of those logging rigs. Probably not as many as up north of there but they were around. What kind of CAD program are you using in your 3D work? -
Mini Carbide Drill Bits
Chariots of Fire replied to bluestringer's topic in Tips, Tricks, and Tutorials
Wow! Never thought an item like drill bits would garner so much attention!? Drilled a bunch of #71 holes in some bass wood the other day with no problems. Used a pin vise as I always do. My fingers are too thick and old to just hold the bits by hand. -
Looks like O Gauge or possibly O27 which would be 1:48 scale judging from the 3 rail track.
-
Cat D8H Dozer
Chariots of Fire replied to Warren D's topic in WIP: Model Trucks: Big Rigs and Heavy Equipment
I have one of those to build also. Biggest complaint over the years has been the tracks. Way to clunky. One of these days I just may get it out and do something with it. -
Mini Carbide Drill Bits
Chariots of Fire replied to bluestringer's topic in Tips, Tricks, and Tutorials
I've had them break even in a mill with too much pressure on a small size bit. Nevertheless working with them in a mill, drill press or in a pin vise is possible if one is careful. I don't know what I would do without them. I work with #71 size all the time as it is about the same size as a common pin or #24 gauge wire. -
I think he has seriously gone mad!! Those details are not of this world!?
-
Mini Carbide Drill Bits
Chariots of Fire replied to bluestringer's topic in Tips, Tricks, and Tutorials
Try Drill Bits Unlimited on line. All kinds available at reasonable prices. -
Hi, Bill. What is your opinion of the quality of printing on the finished body? How close to some of the better plastic kits is it? Just curious with more and more 3D printing coming into the modeling world.
-
Mini Carbide Drill Bits
Chariots of Fire replied to bluestringer's topic in Tips, Tricks, and Tutorials
Pete is right. They will snap in a pin vise if any kind of sideways pressure is put in them. This is especially true if the hole you are drilling is in thick material. That having been said, I don't know what I would do without them and I use them in a pin vise all the time. Best thing since sliced bread in my opinion. -
Autocar A64B
Chariots of Fire replied to yura1961's topic in Model Trucks: Big Rigs and Heavy Equipment
Great job on construction, neat and clean. The color combination is just right! Well Done!!? -
Windshield washer nozzles??
Chariots of Fire replied to Hawk5.0's topic in Tips, Tricks, and Tutorials
Try some fusion beads. I use the #15 size for all sorts of things. They are ceramic, hexagonal in shape and are about 1mm in height. -
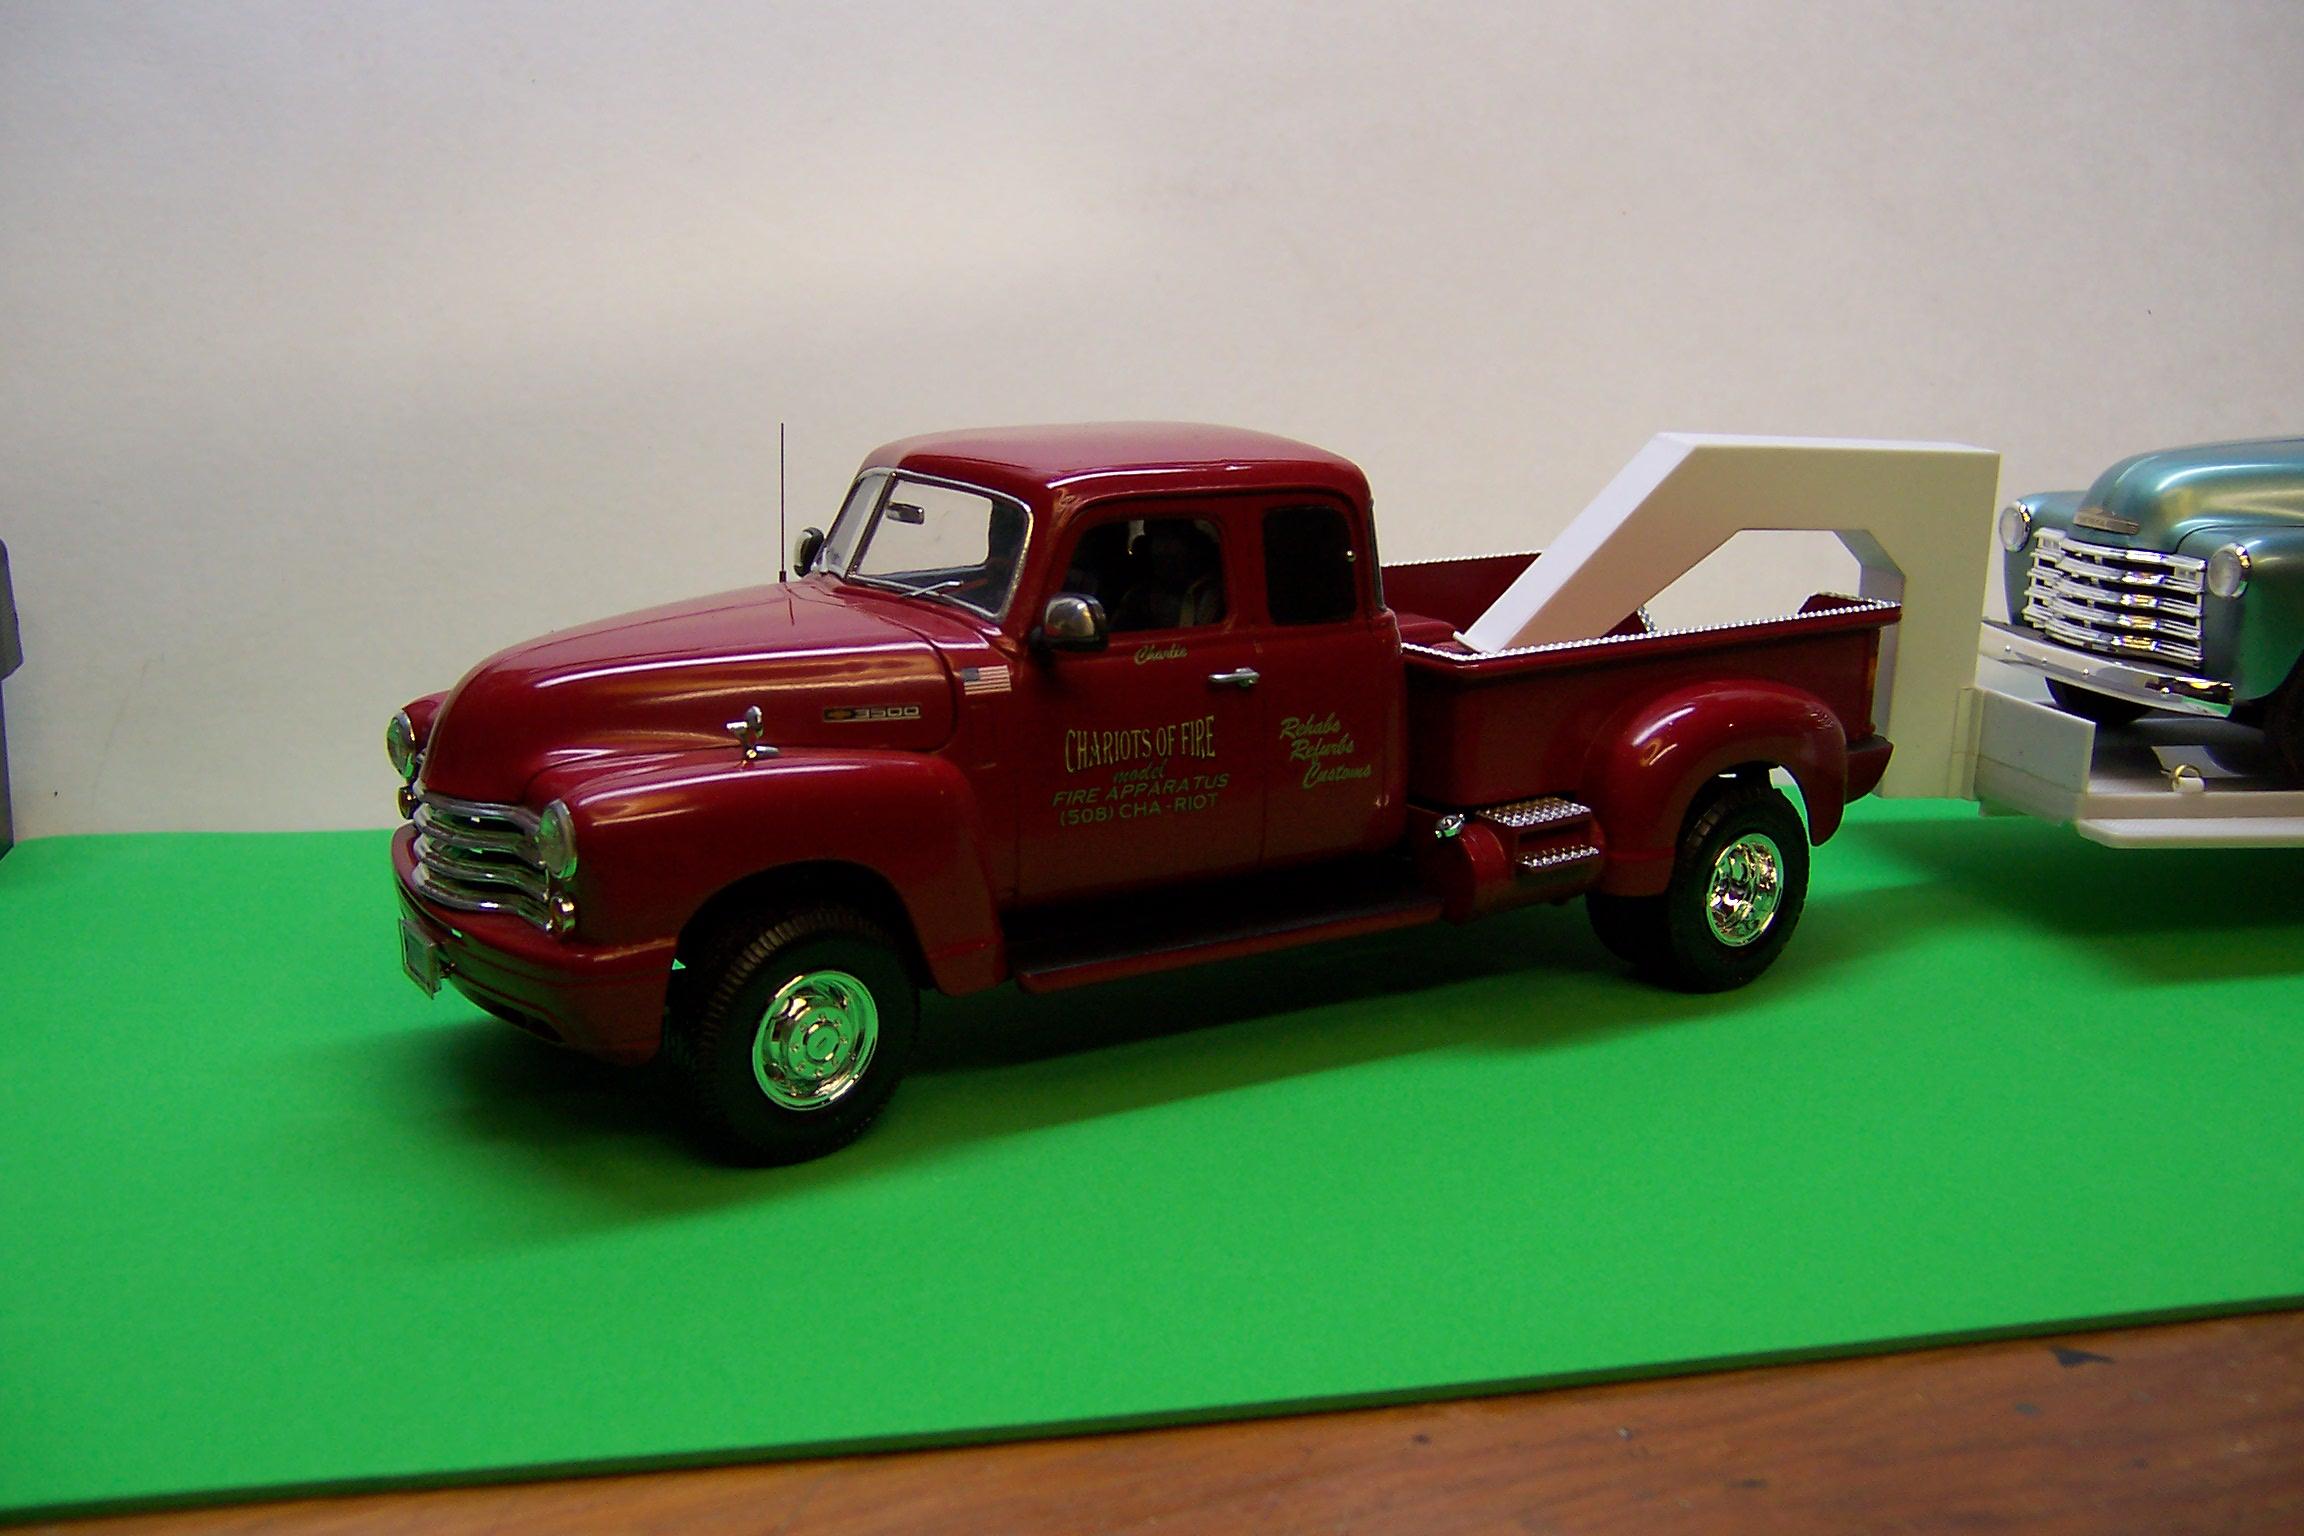
Not exactly the same but I used that same cab to build this dualie a few years ago. Made it an extended cab version as well.
-
That's pretty close, Scott. Nice job.