NOBLNG
-
Posts
10,231 -
Joined
-
Last visited
Content Type
Profiles
Forums
Events
Gallery
Everything posted by NOBLNG
-

Moebius '71 Ranger
NOBLNG replied to samdiego's topic in WIP: Model Trucks: Pickups, Vans, SUVs, Light Commercial
That looks great! -
Moebius 1970 Ford F-250
NOBLNG replied to cruz's topic in Model Trucks: Pickups, Vans, SUVs, Light Commercial
Very nicely done! -
Spray cans may be simpler, but it’s not the airbrush’s fault. I believe it is a compatibility issue. There is definitely a learning curve though!
-
You could drill the post out and glue in a plug of styrene or sprue. Then re- drill for the screw? You could also make up some “sprue-glue” . Put some on the screw, install it and wait for it to dry. I don’t know if that would permanently glue the screw in? Maybe very lightly coat the screw with a grease or oil first?
-
I’ve never used photo etch, but it looks like the etched grill piece has quite a different radius at the bottom than the kit has.
-
The issues with scratch building
NOBLNG replied to IbuildScaleModels's topic in Tips, Tricks, and Tutorials
Charles and Pete...what scale are those beauties? Awesome work!? -
Over the years I've built some strange stuff........
NOBLNG replied to Pete J.'s topic in The Off-Topic Lounge
Wow!!! That Man’s builds are truely AWESOME! -
Looking mighty fine!
-
Good sources for coil springs
NOBLNG replied to OldNYJim's topic in Model Building Questions and Answers
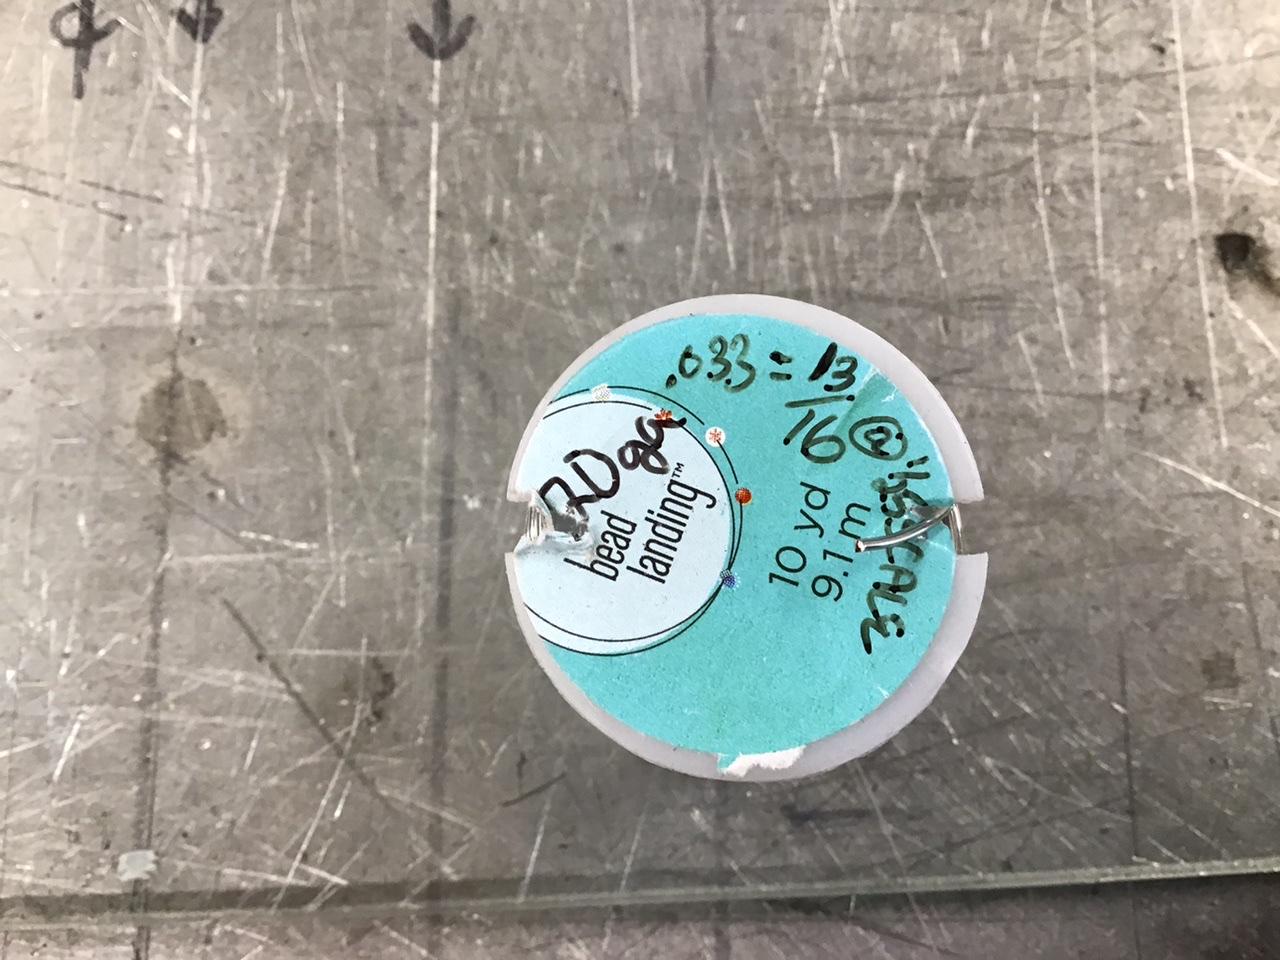
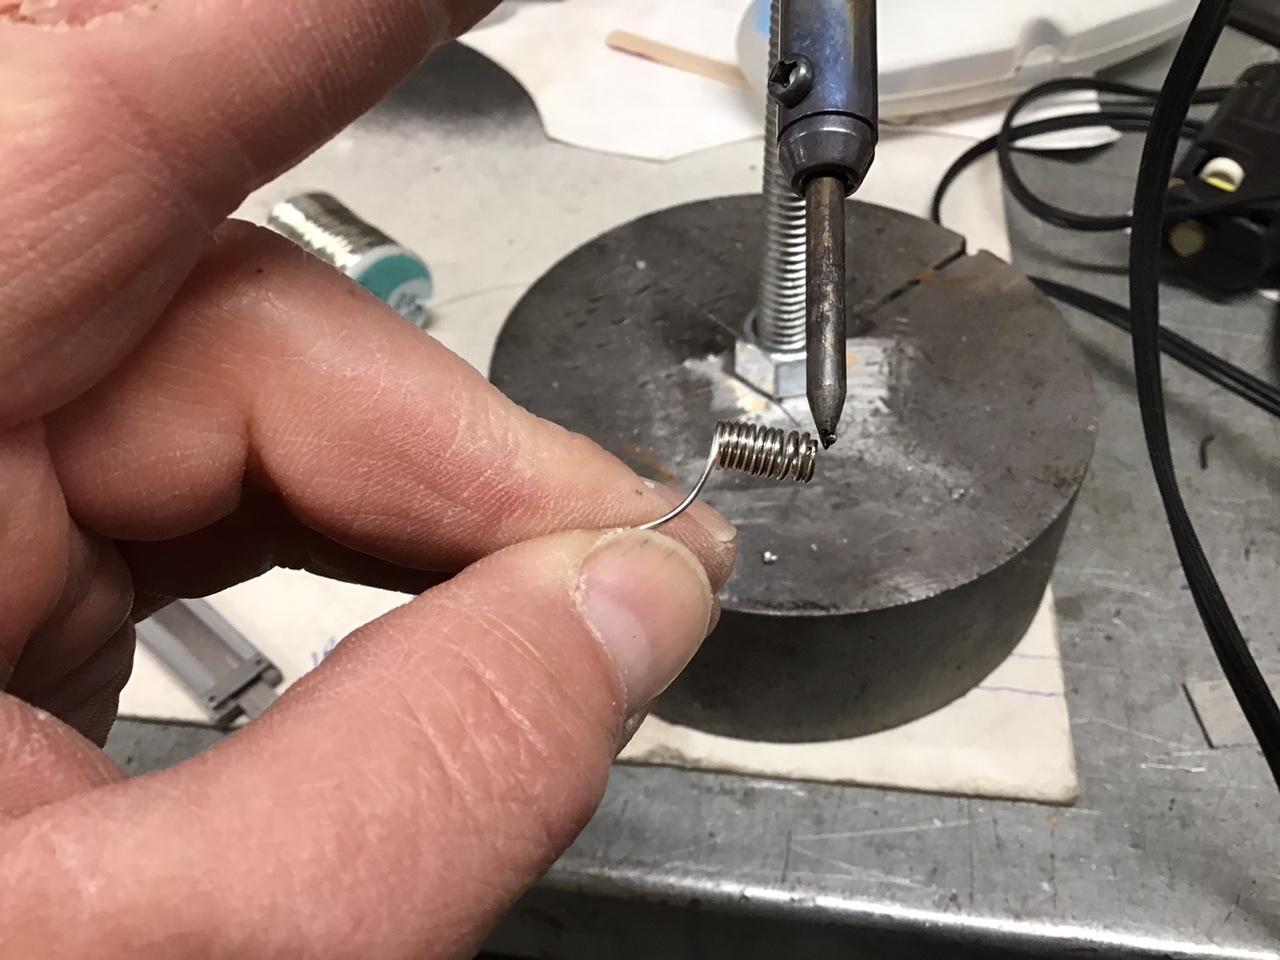
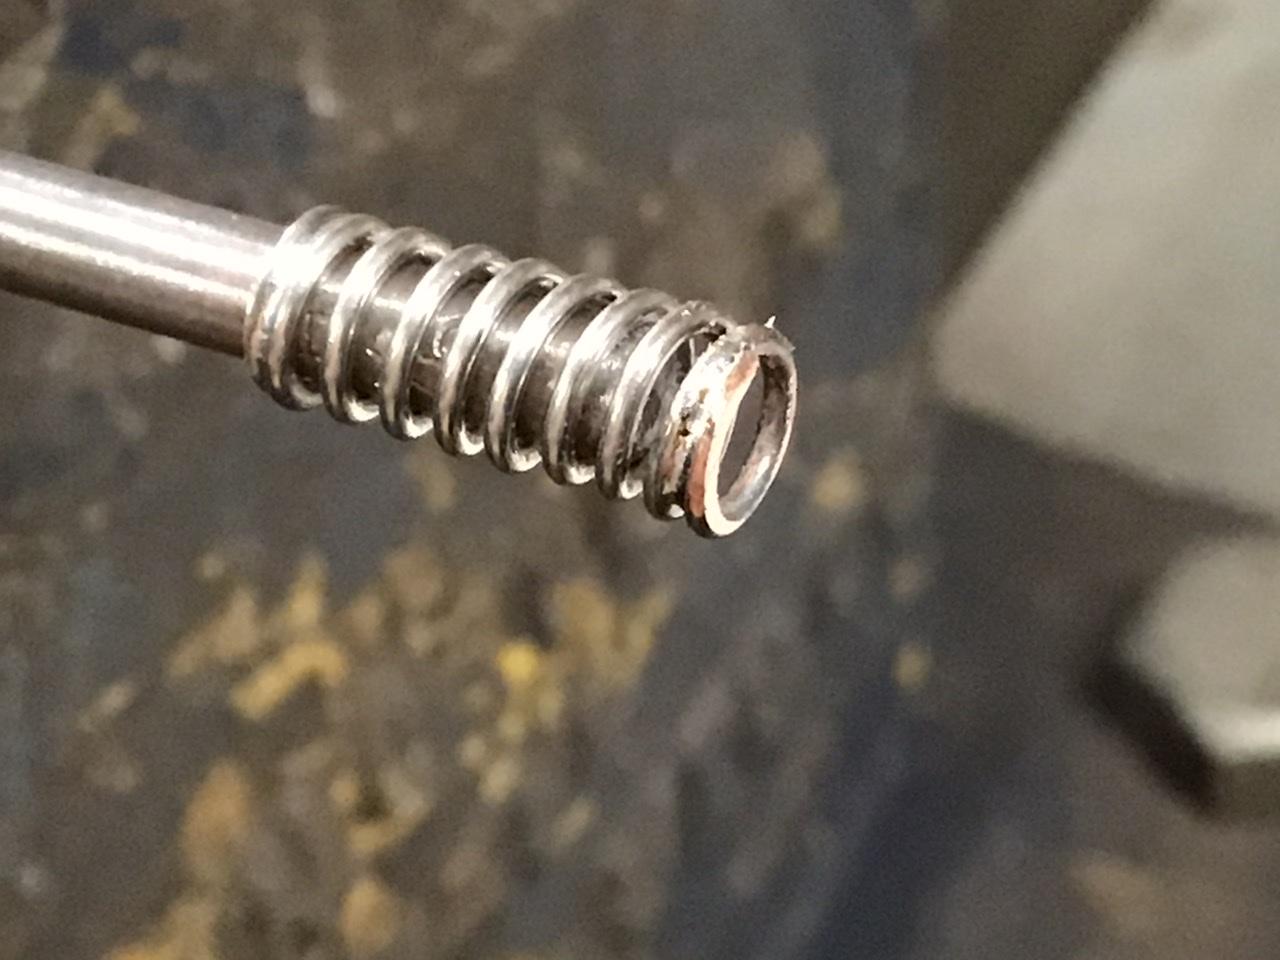
This is how I am making them now. I used 20 ga. Copper wire, which is .033” diameter. At 1/25th scale this works out to 13/16” diameter in 1-1 scale. As described above, I wrapped it tightly around a drill bit. Then, starting one full wrap in I spread the coils by rolling it along a putty knife as a spacer. Then I soldered the cut tip to the next full wrap. Slide it back on the drill bit and file the end flat. Decide how many coils you need, cut and repeat the soldering and filing. Then length can be fine tuned by stretching or squashing it.
-
Transmission for LS1 Swap
NOBLNG replied to Perspect Scale Modelworks's topic in Model Building Questions and Answers
Yeah, it’s only a two speed. It can be built bullet proof though. -
The issues with scratch building
NOBLNG replied to IbuildScaleModels's topic in Tips, Tricks, and Tutorials
I agree. I am just delving into scratch building and have no intention of buying a lathe. My only thought is to stack the pieces and shape them as one. I have done it with 4 layers of .020” clamped together. If you can drill a pilot hole through all pieces and keep the drill bit or an anchor pin in place, it helps to keep them aligned. -
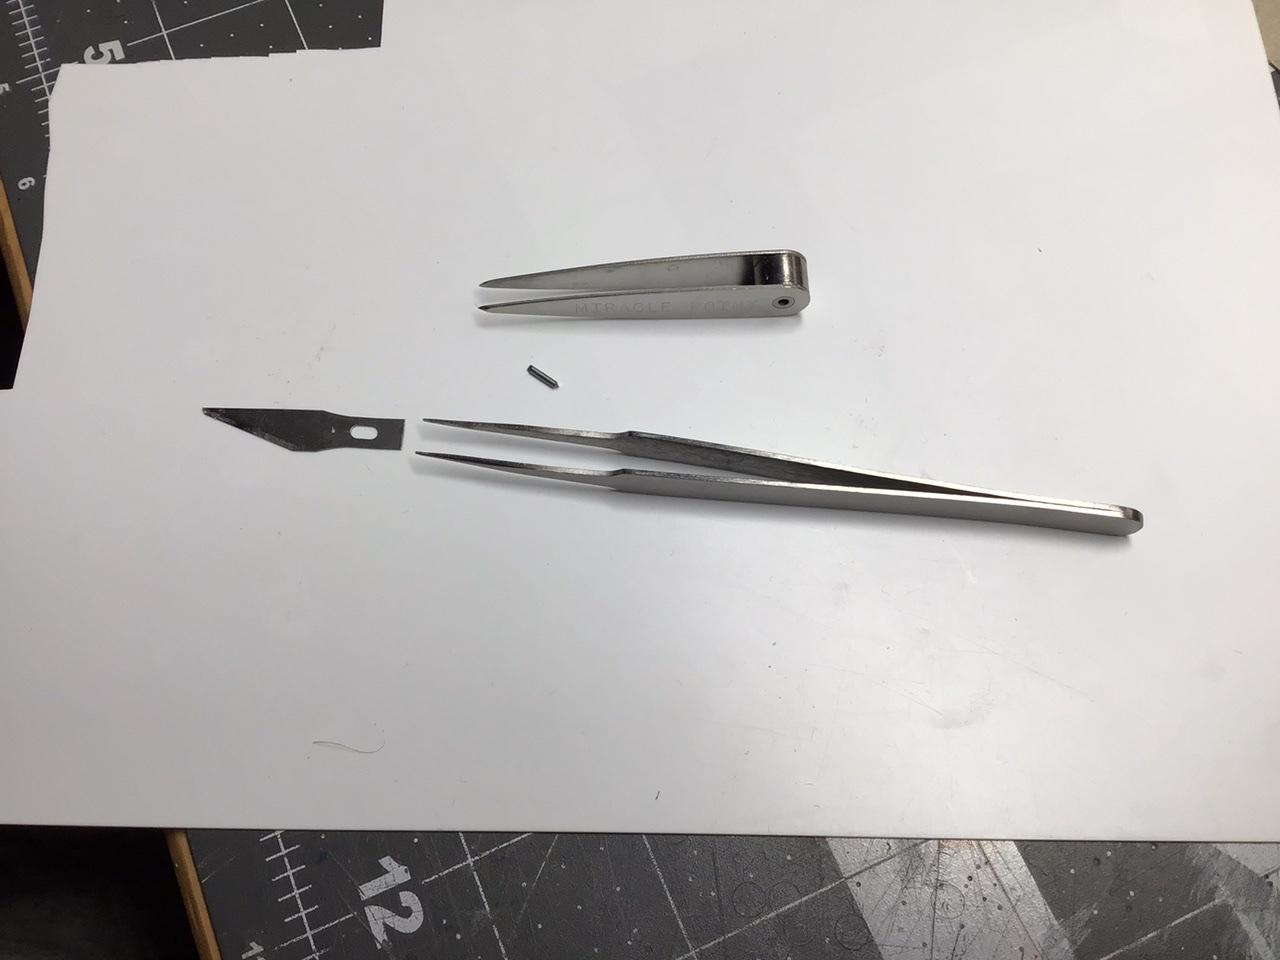
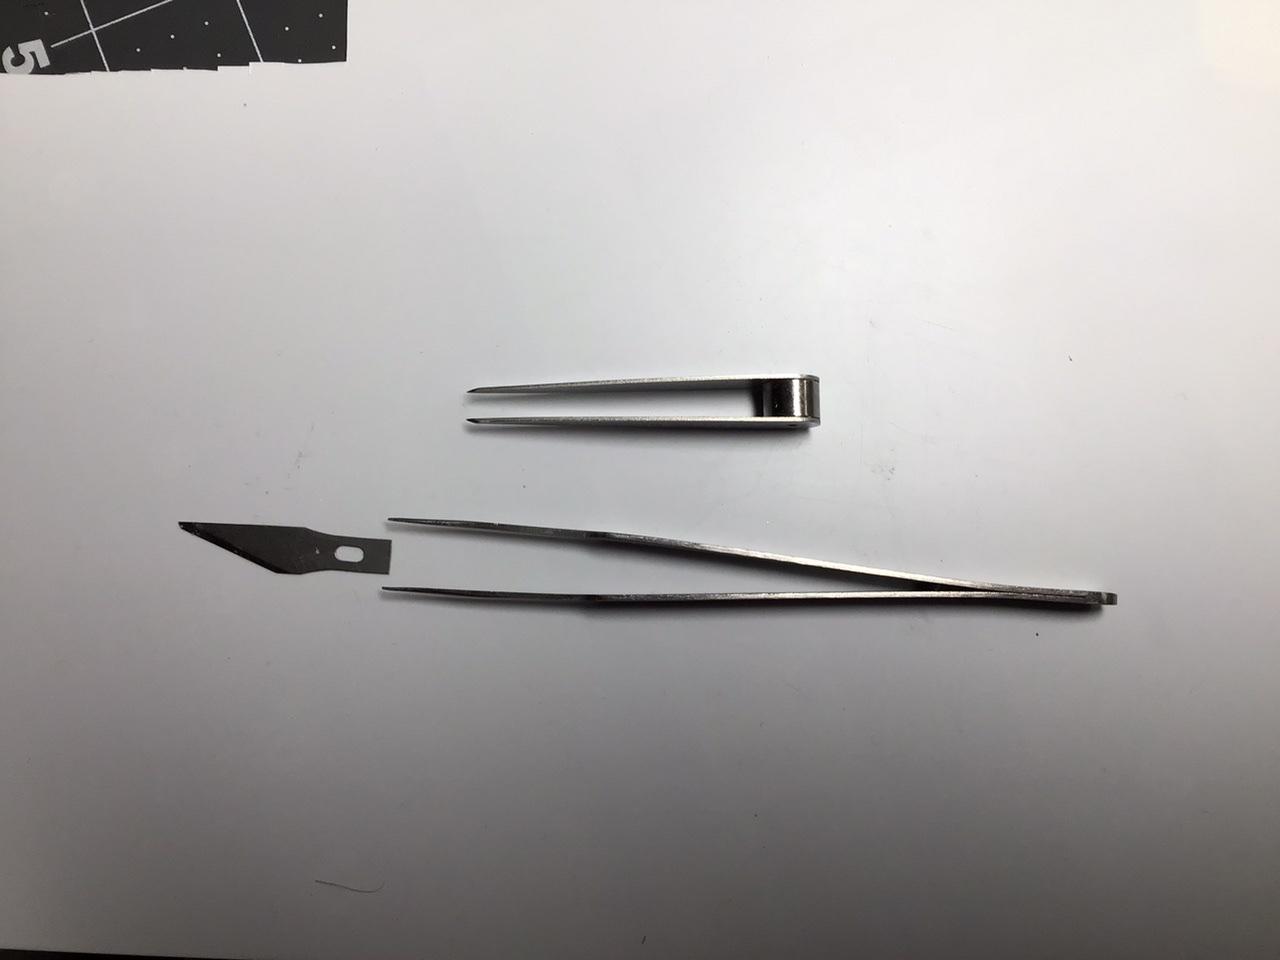
I can just pop the wire out if I need more delicacy....although having twenty pairs would be an advantage, since I am always looking for mine.? I like that “crows foot” pair you have.
-
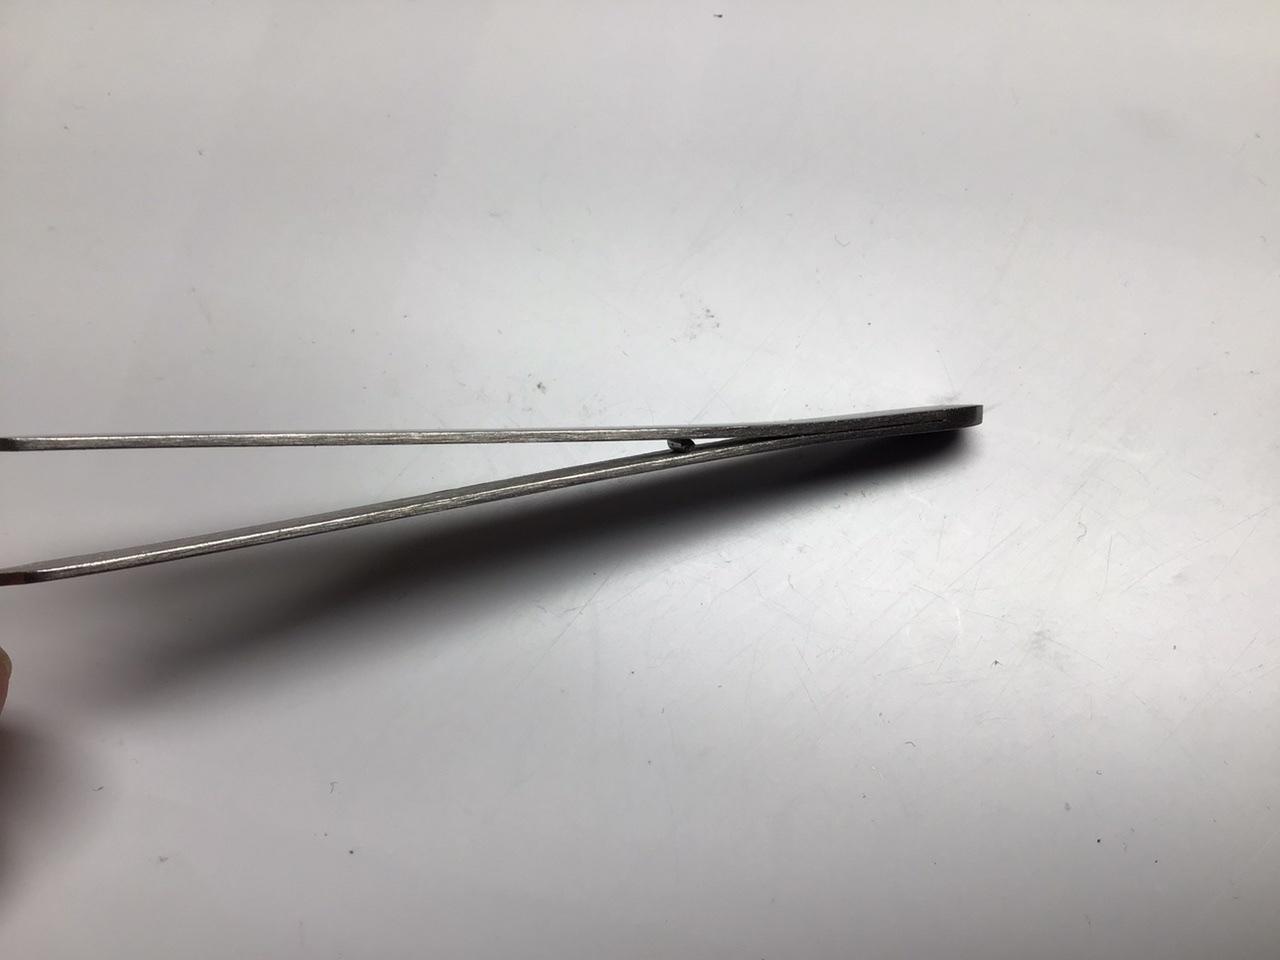
I have two favourite tweezers that I use all the time. The longer ones don’t open as far as I would like. I tried spreading them slightly, but I was afraid they would snap before staying put. So I took a short piece of wire and rolled it down in the crotch of the tweezers. It holds them open and the spring of the tweezers holds it in place.?
-
Ford F100 service truck
NOBLNG replied to Chuckyg1's topic in Model Trucks: Pickups, Vans, SUVs, Light Commercial
Nicely done. I like all the scratch built accessories too, very realistic looking! -
I have on a few occasions tried to curve thin strip around a curve, eg: .020”x.030” strip as a chrome trim divider for a vinyl roof. If the curve is too sharp, the second I touch the extra thin cement to it, it will snap. I have also recently tried curving a .020”x.125” strip around a 1/4” diameter circle. I managed this after about 10 attempts by wrapping it around a drill bit and carefully heating it with a lighter so it would retain the approximate shape before glueing. Any hints on this? CA may work better than the Tamiya cement since it wouldn’t “melt” the styrene, but I really hate the stuff.
-
Wow this really looks great. Amazing considering what you Started with! Great job.
-
TJeepster
NOBLNG replied to NOBLNG's topic in WIP: Model Trucks: Pickups, Vans, SUVs, Light Commercial
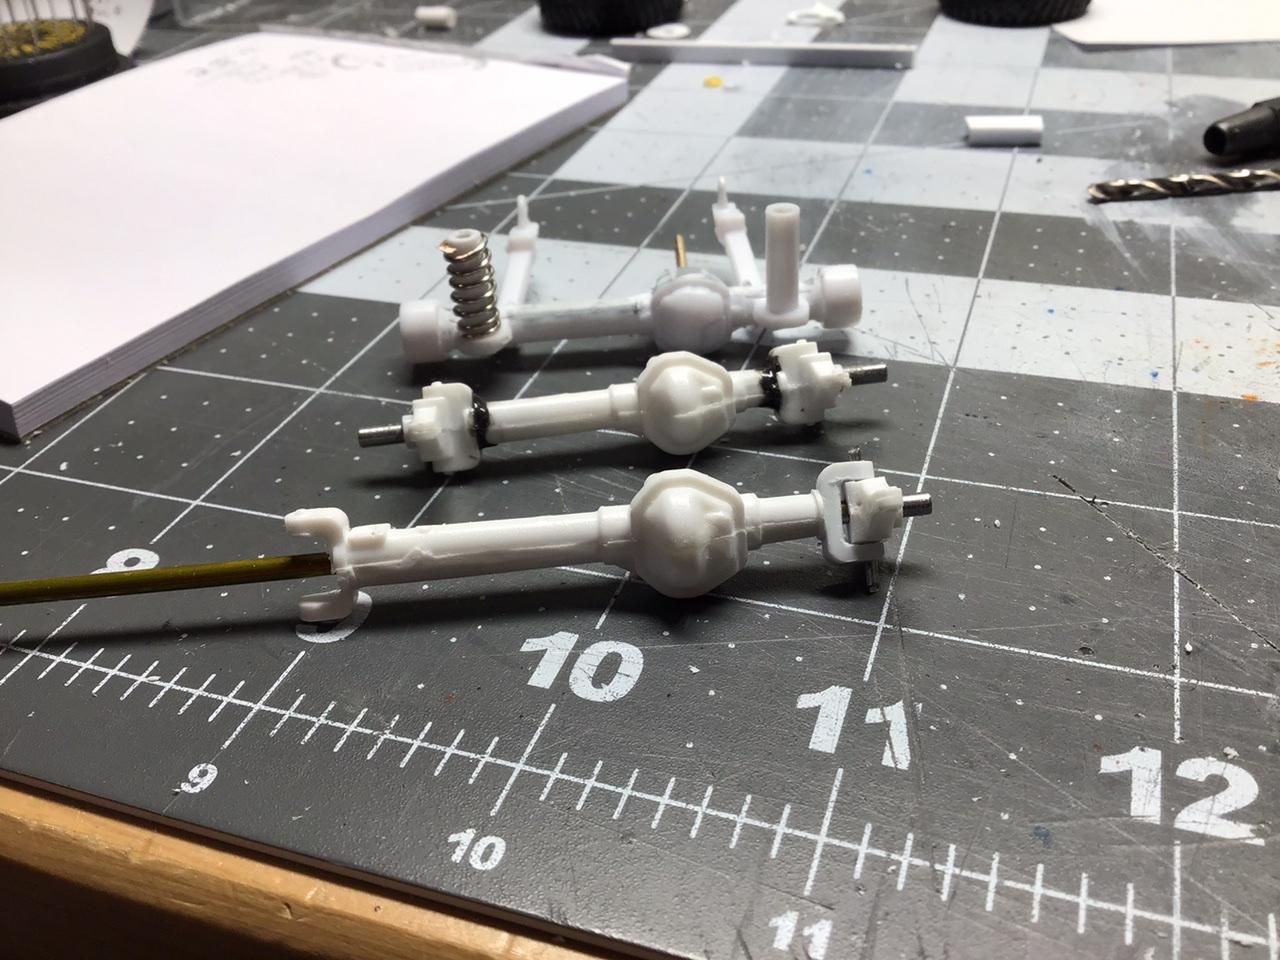
I am also giving the rear the same treatment using the resin Center section of the Ford 9” rear. I drilled straight through it and pressed in a brass tube and covered that with styrene tube. A little sanding and some J.B. Weld, and it looks a lot better than the original piece I think.?
-
TJeepster
NOBLNG replied to NOBLNG's topic in WIP: Model Trucks: Pickups, Vans, SUVs, Light Commercial
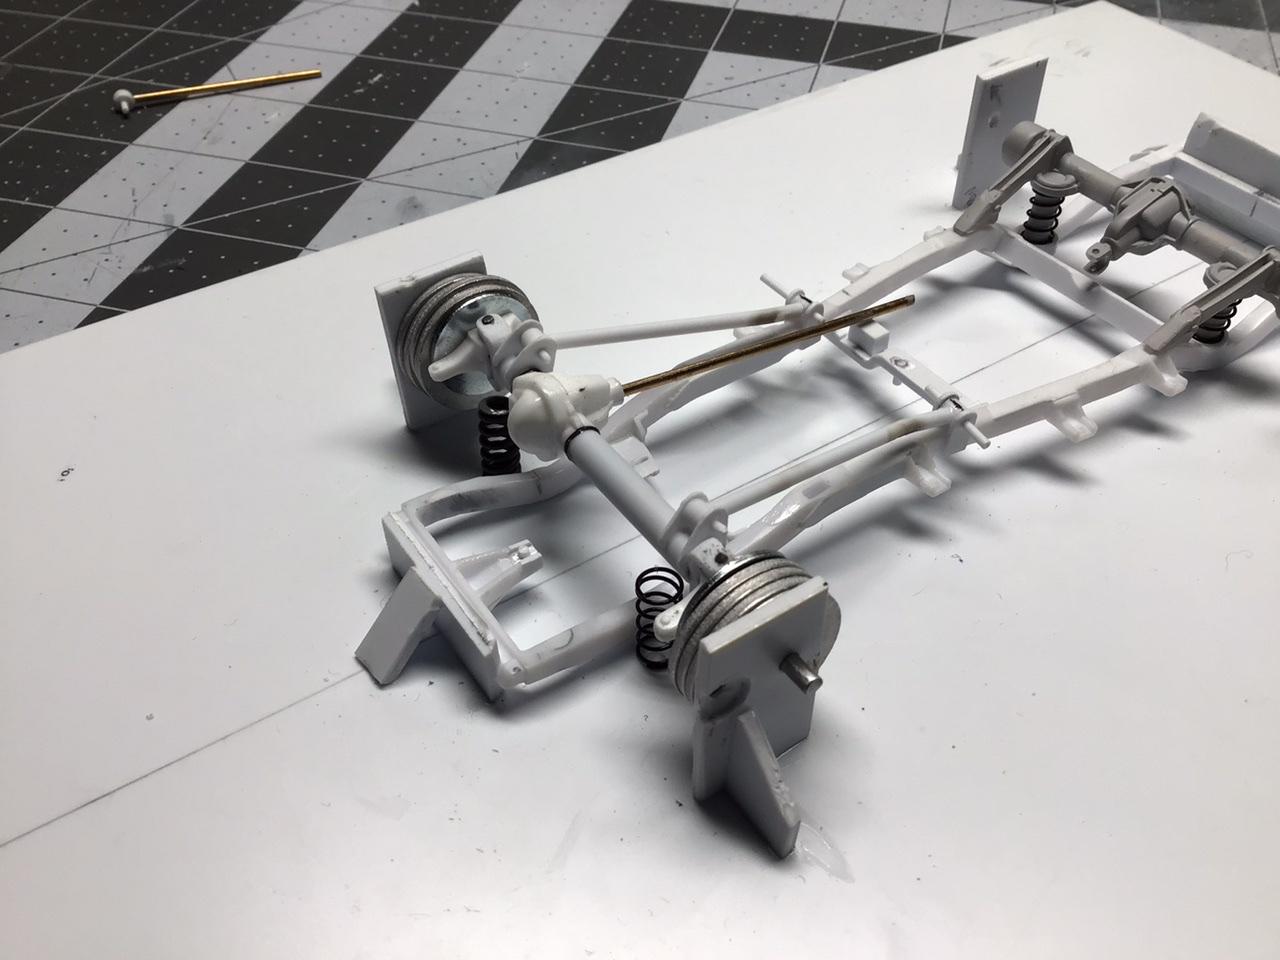
Thanks, Guys! I wanted to put some better looking steering gear on this thing. So I started by cutting all that nonsense off the kit piece. However the springs being mounted so far out in front of the axle, would interfere with any semi-accurate steering setup. I figured the best thing to do was swap in a d-44 resin copy of the Mobius F-100 unit. After fumbling about with it for awhile, I came up with what I think is a workable solution. Since I am starting with bare axle tubes, I decided to upgrade the suspension to a long arm setup. I still have to fab the upper links and the new spring pads, but I think I have a handle on it now. I’ll be making new springs also from mechanics wire, since the kit pieces are way too flimsy to support the new engine! ?
-
"Bombs Away!" The Mod Coupe -AKA: The Rivet Counter Special
NOBLNG replied to Rocking Rodney Rat's topic in Model Cars
Nice and different! Well done. -
65 El Camino 4x4 camper
NOBLNG replied to Kruzn's topic in WIP: Model Trucks: Pickups, Vans, SUVs, Light Commercial
Looks like a very worthwhile project! -
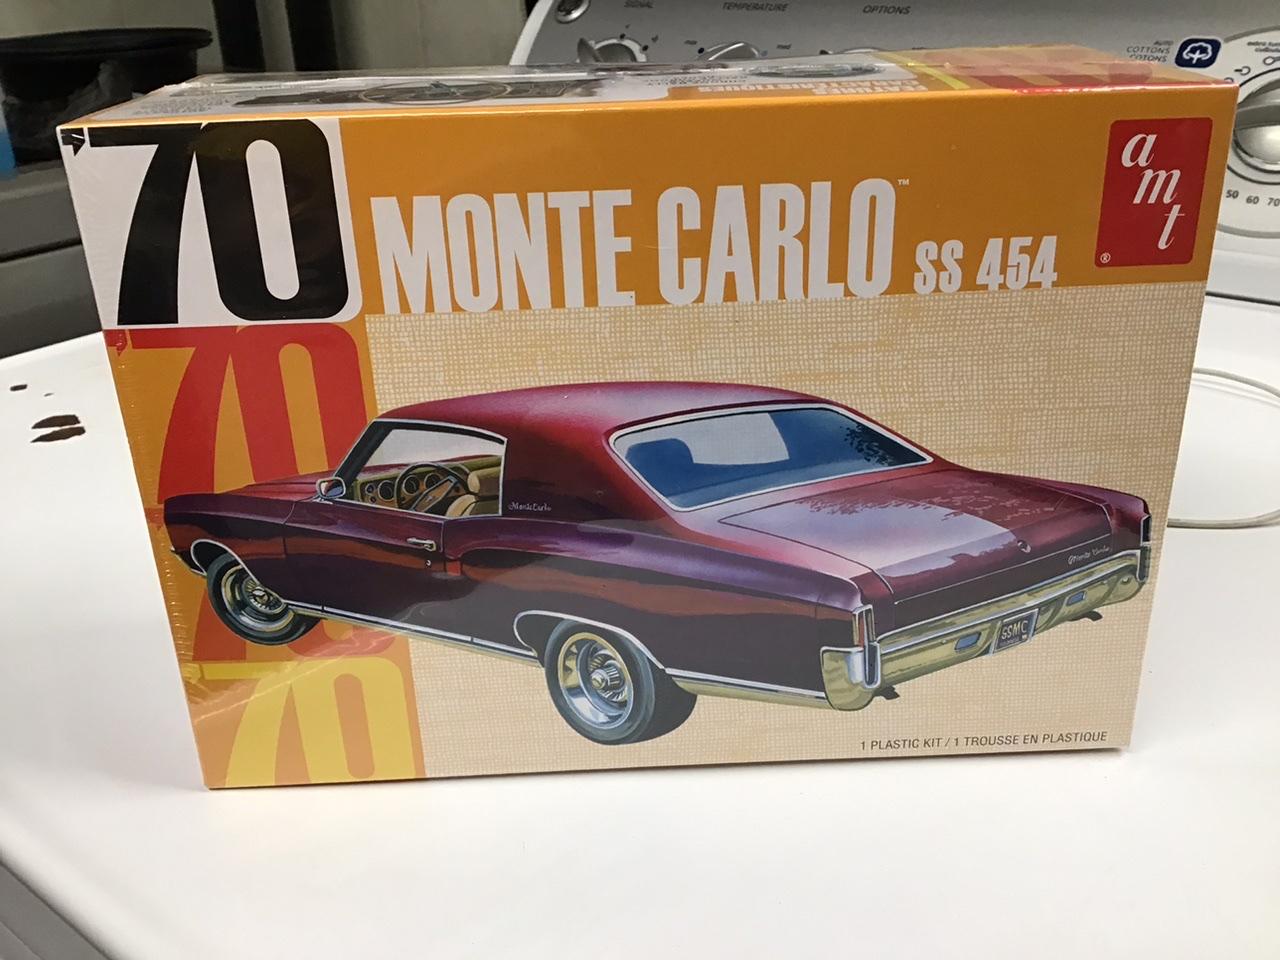
I bought this mainly for the engine, although I do plan to build it stock. I really like the lines of these cars and in my mind they are WAY nicer than any later version. This I think is one of the most under-rated sleepers, with that 454 under the hood!
-
Ok? Ok? It looks fantastic! That black paint job gleams.
-
Parts Mounting Tips (for painting)
NOBLNG replied to JollySipper's topic in Tips, Tricks, and Tutorials
Make sure it doesn’t have catnip in it! These ones I made are about 4” square and I can put a few of them in my dehydrator. -
1948 Chevrolet COE Cannonball
NOBLNG replied to 89AKurt's topic in Model Trucks: Pickups, Vans, SUVs, Light Commercial
Very nice work. I never noticed the shadow effect until I saw the frontal shot. Now I can’t un-see it. Well done! -
This is one I enjoy watching.? Language warning! https://www.youtube.com/watch?v=Y16ObVRvgOE&list=RDCMUCbS8lAzGFBRyHYC8ibwcyyQ&start_radio=1&t=1