AmericanMuscleFan
-
Posts
3,058 -
Joined
-
Last visited
Content Type
Profiles
Forums
Events
Gallery
Everything posted by AmericanMuscleFan
-

72 Plymouth Roadrunner 426 HEMI 8 Pack
AmericanMuscleFan replied to AmericanMuscleFan's topic in WIP: Drag Racing Models
Thanks for your kind comments Brandon! However, I did not open the doors so the driver will have to enter through the driver's window...lol. Take care, Francis Thanks Jimmy, I really appreciate it! Take care, Francis Thanks for the kind words Bill ! Take care, Francis Thanks Guido! Take care, Francis Thanks Daniel, but I feel a little embarrassed that I don't have more image of the construction process to share but it is what it is...? Take care, Francis -
Hello Everyone! As promised and for those who are interested, I am posting some pics of another of my previous completed build. I didn't want to overload the site with all the same photos on 2 threads so you can see all the photos that were posted in the VIP section using the following link: Take care, Francis

-
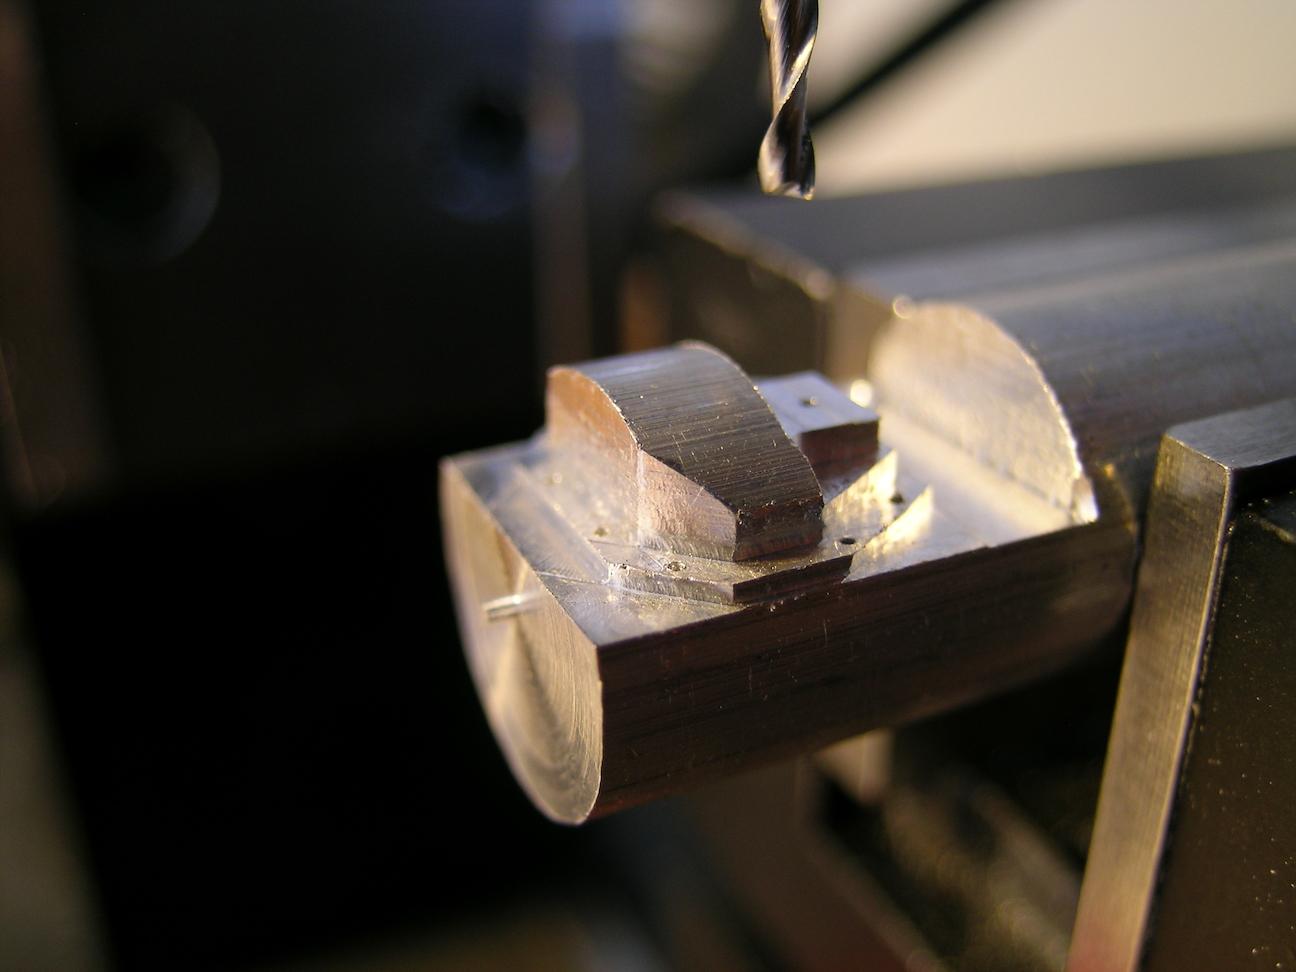
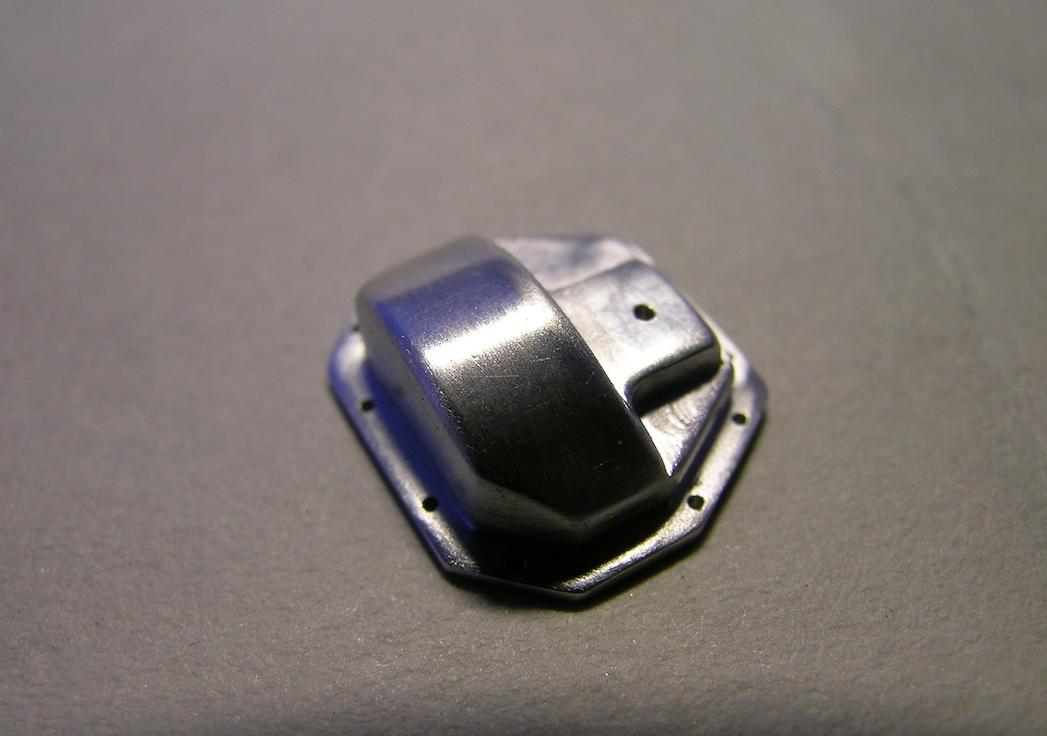
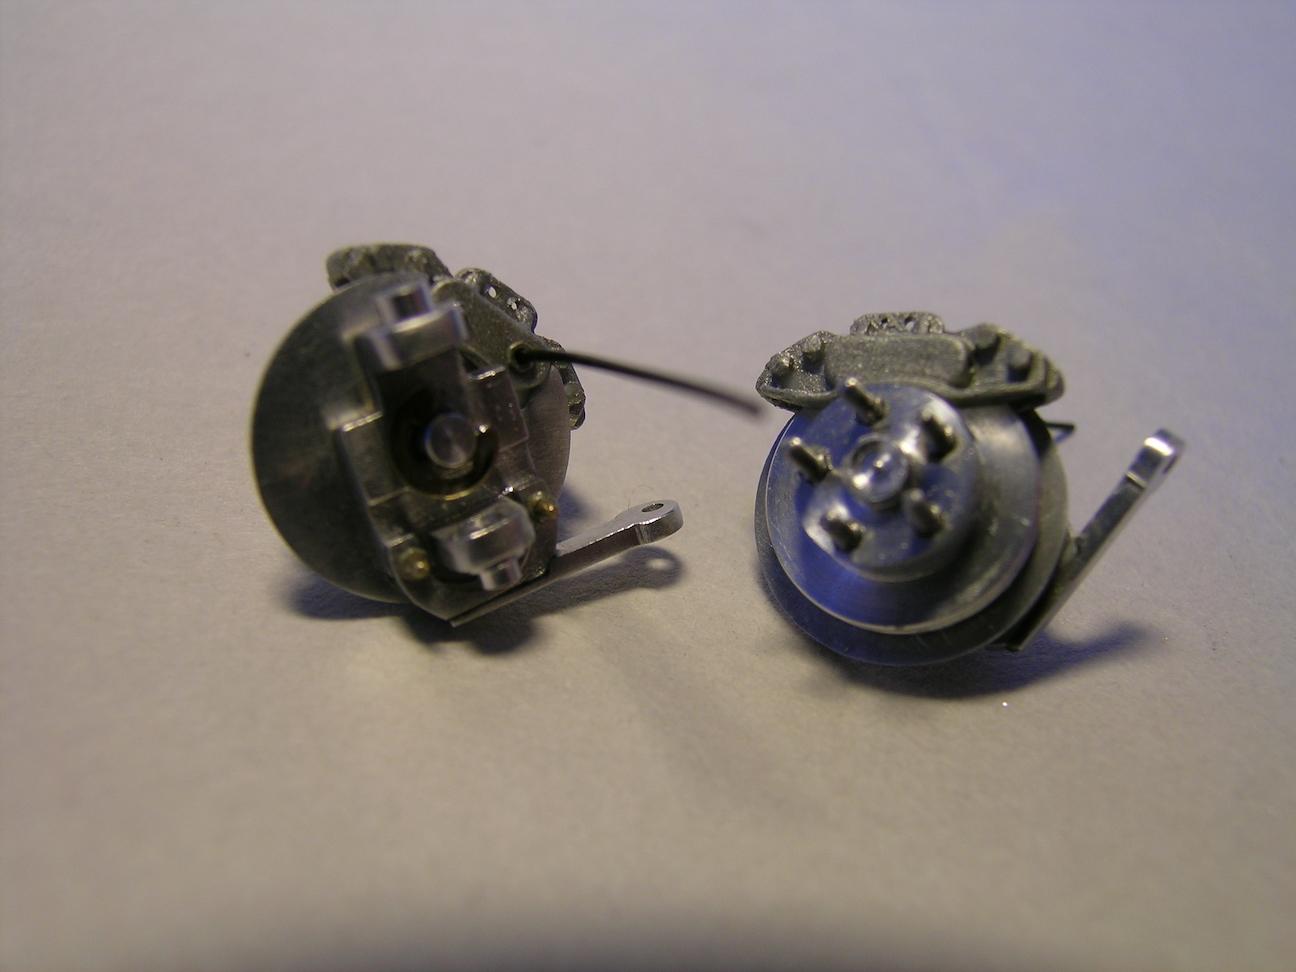
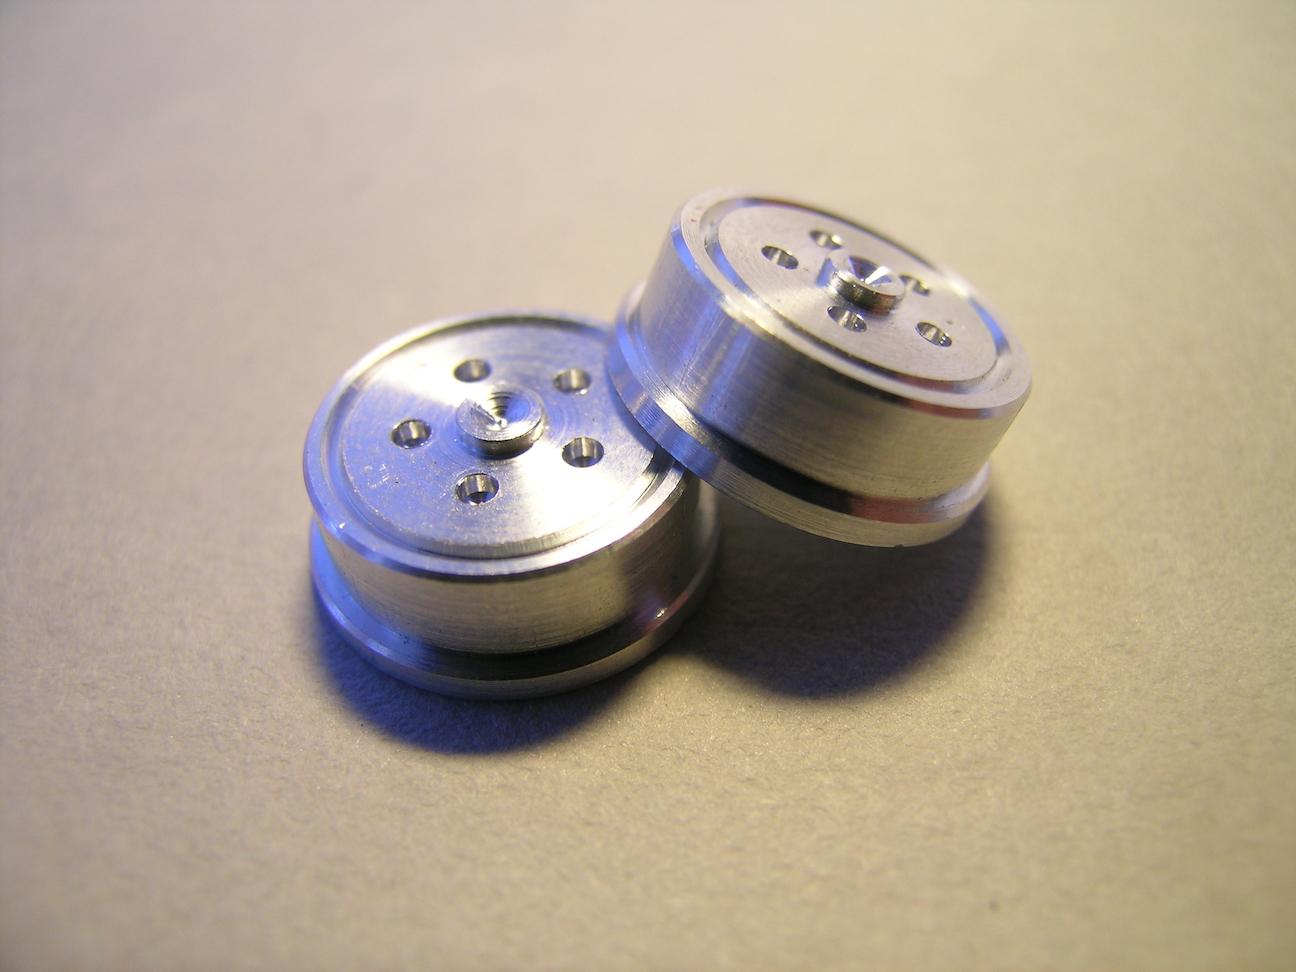
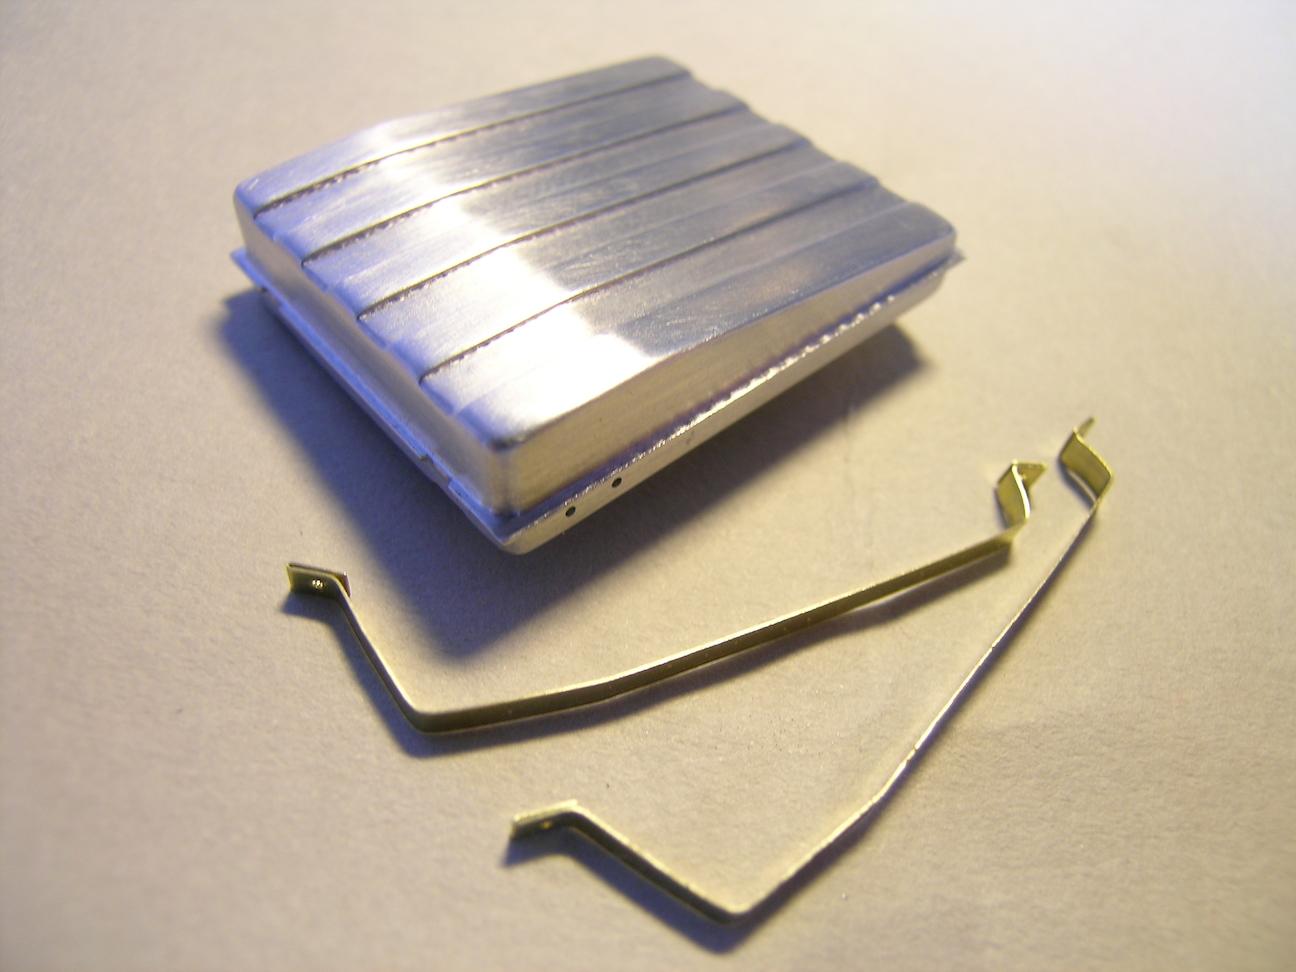
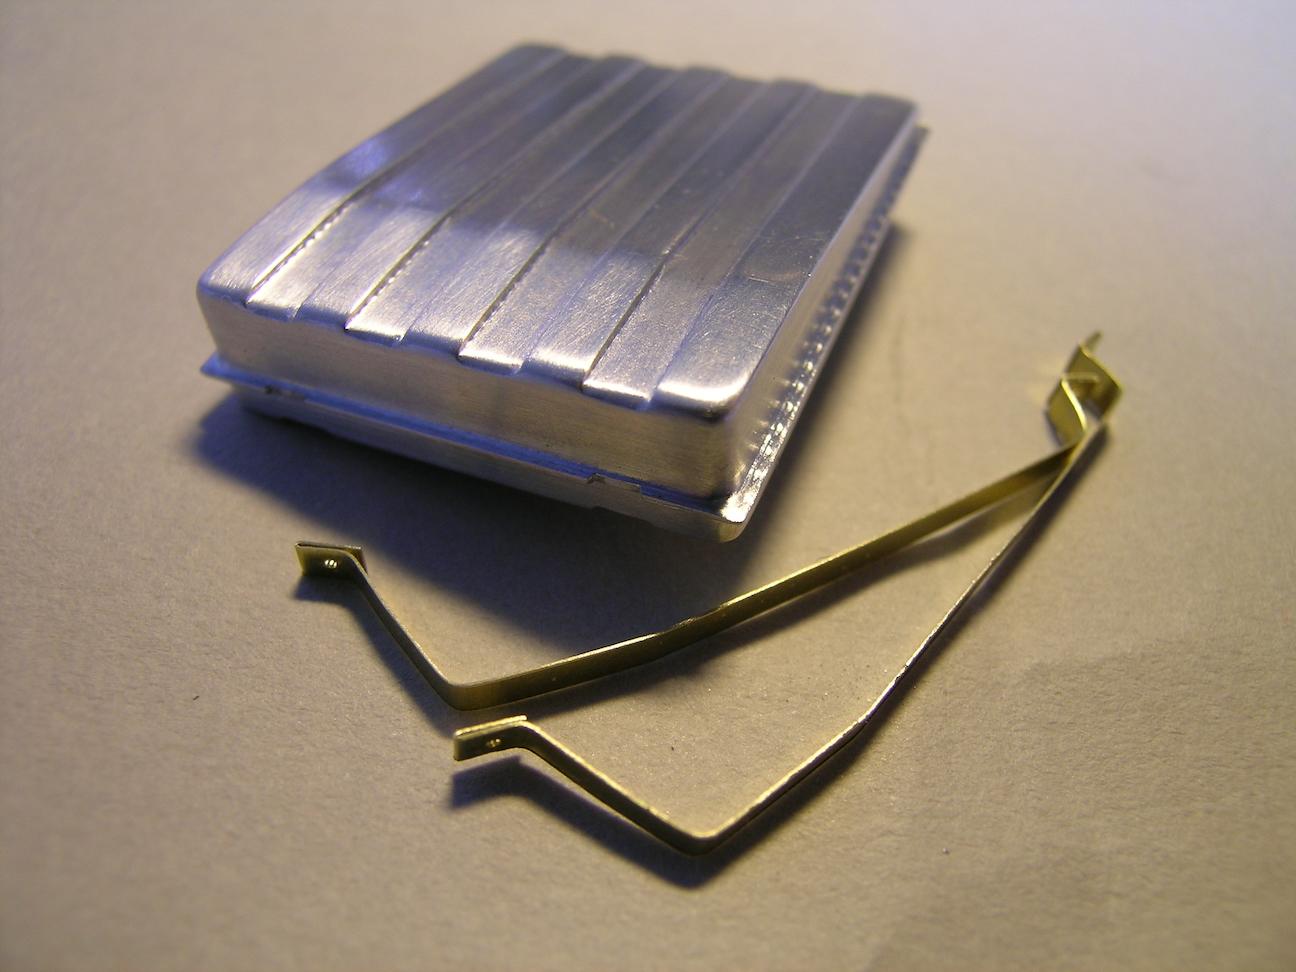
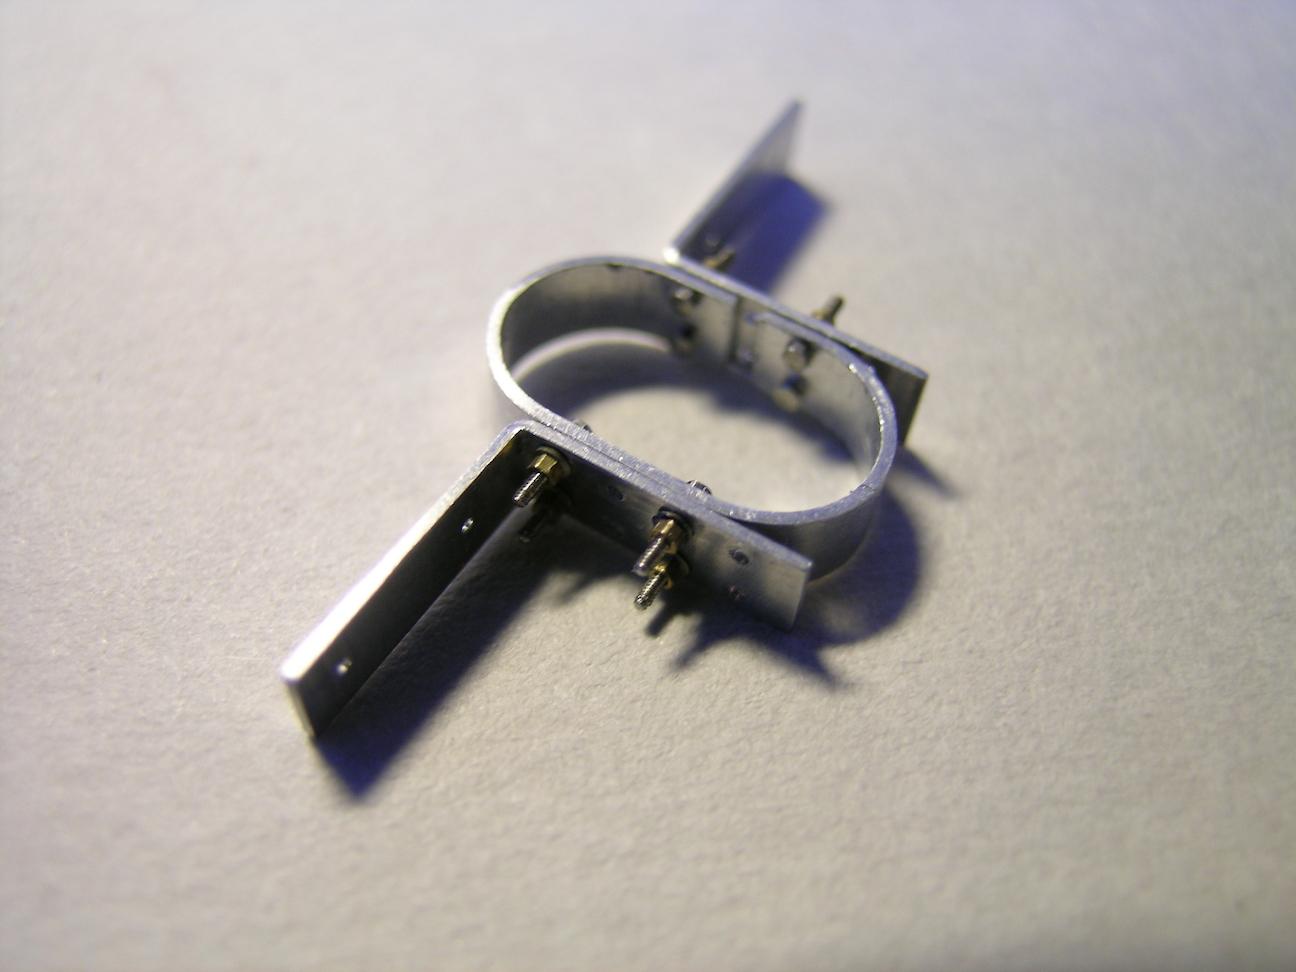
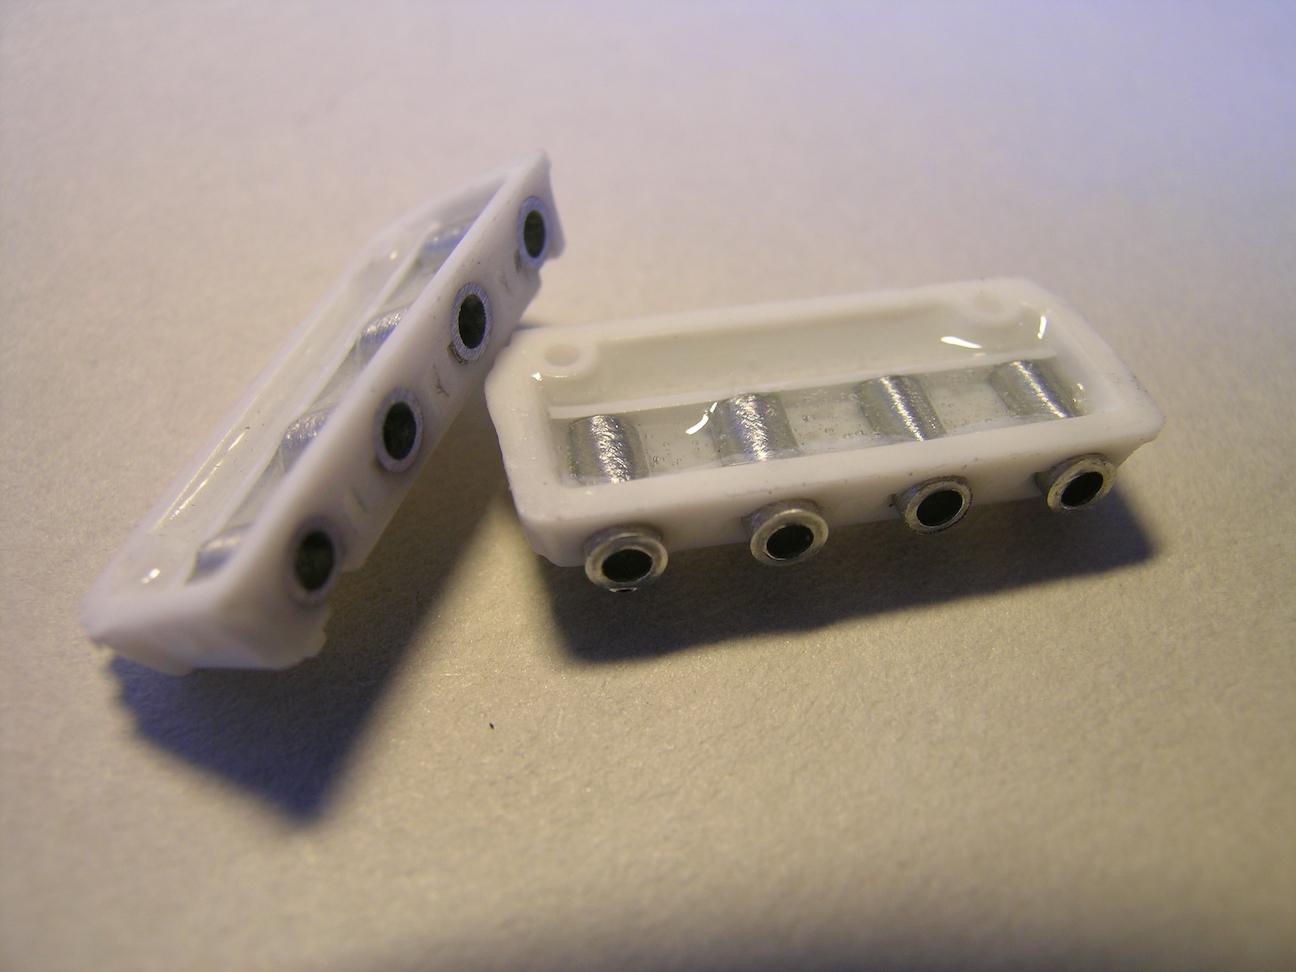
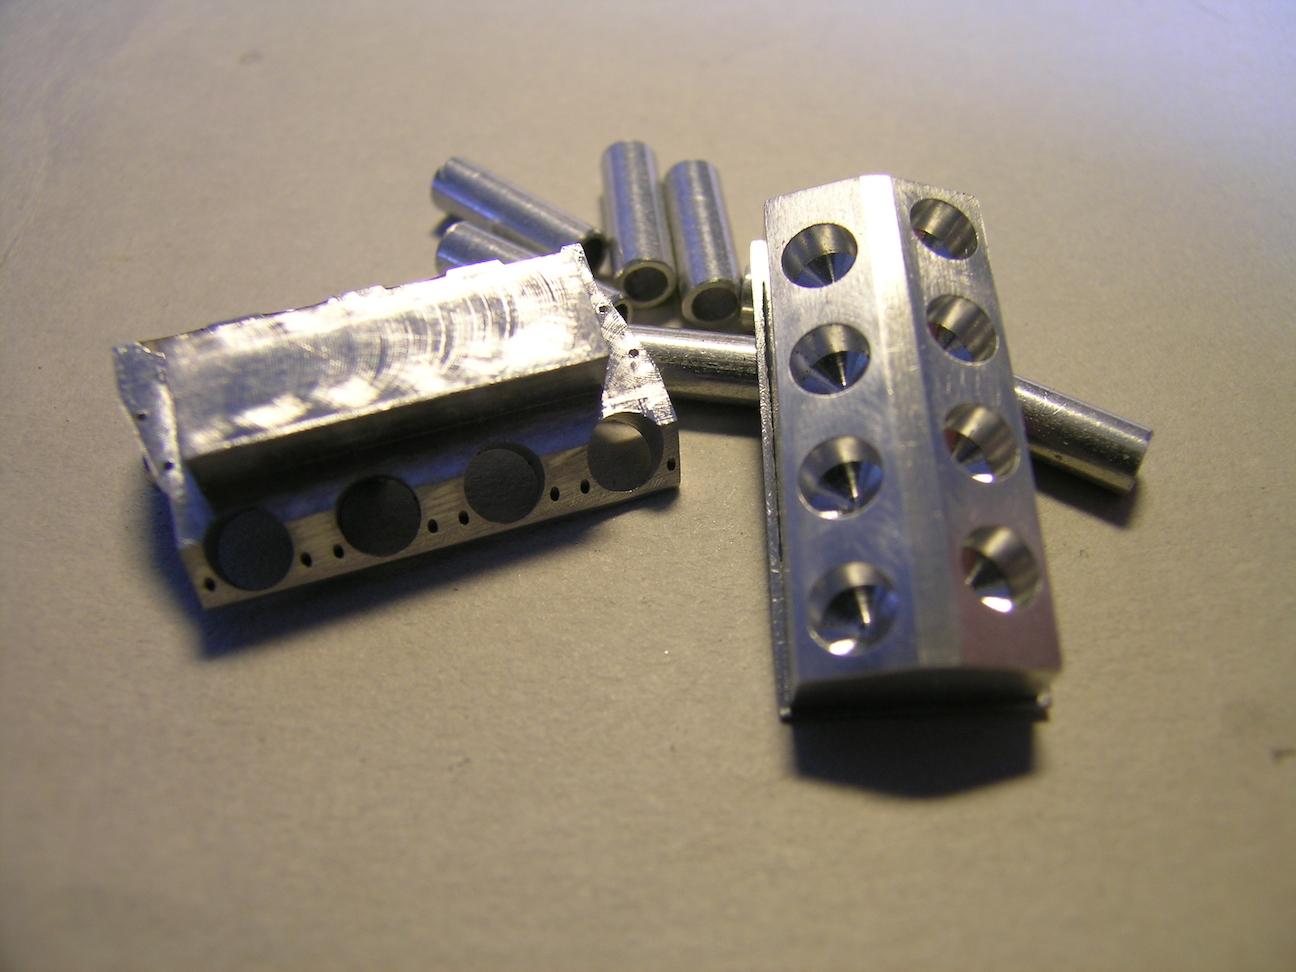
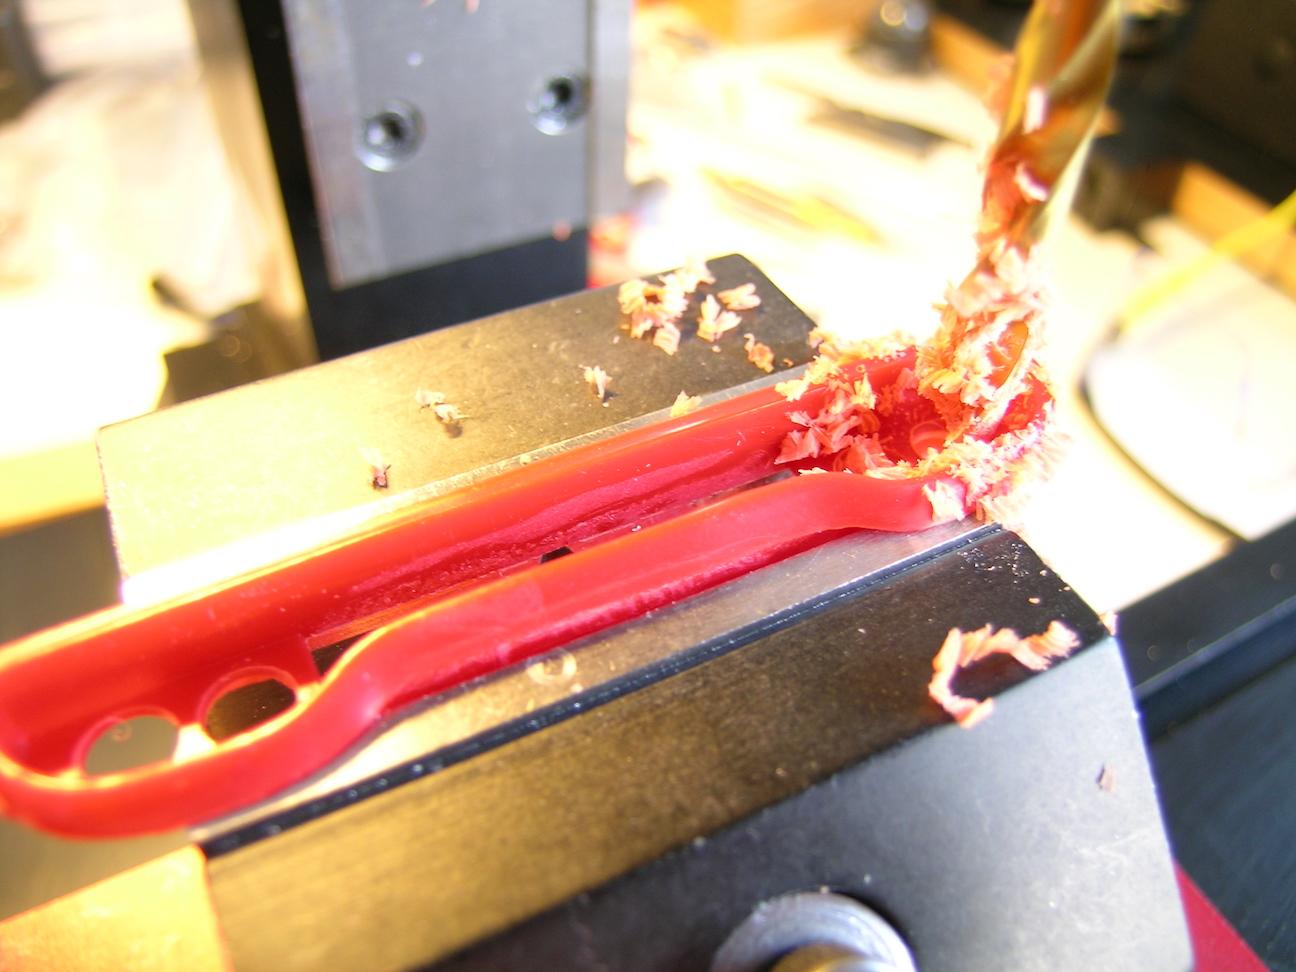
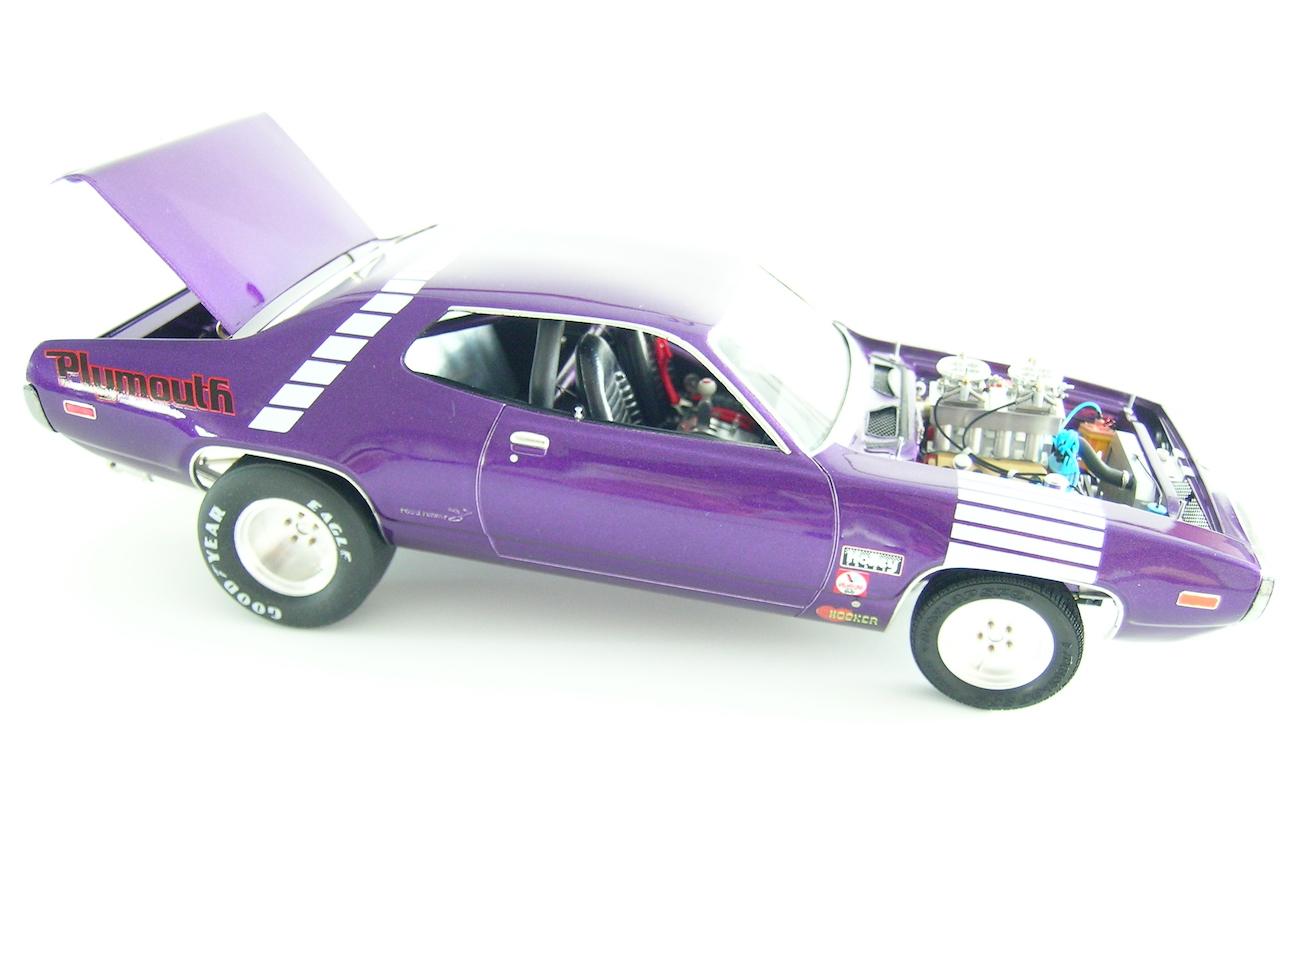
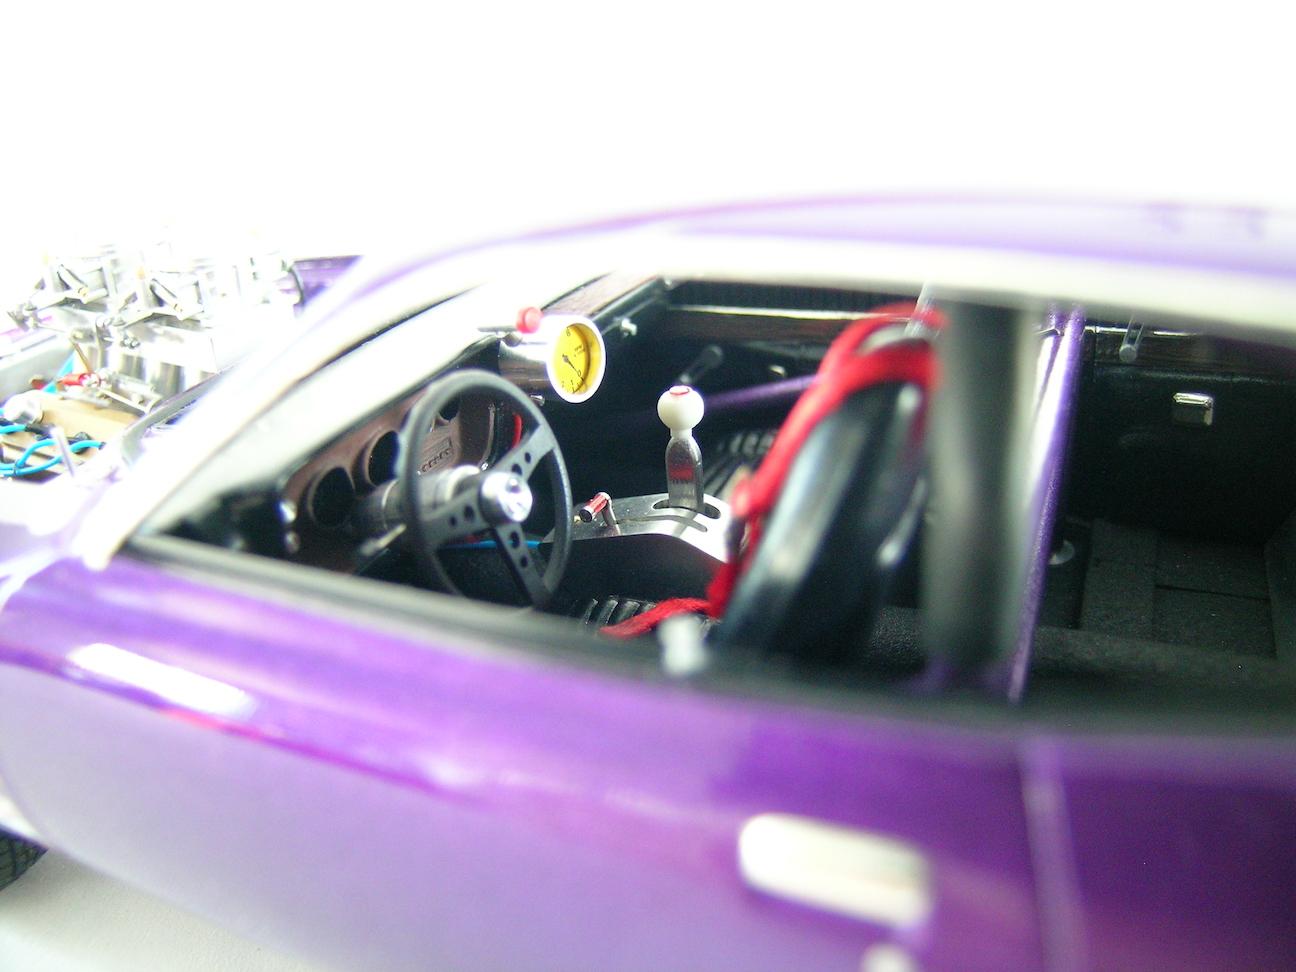
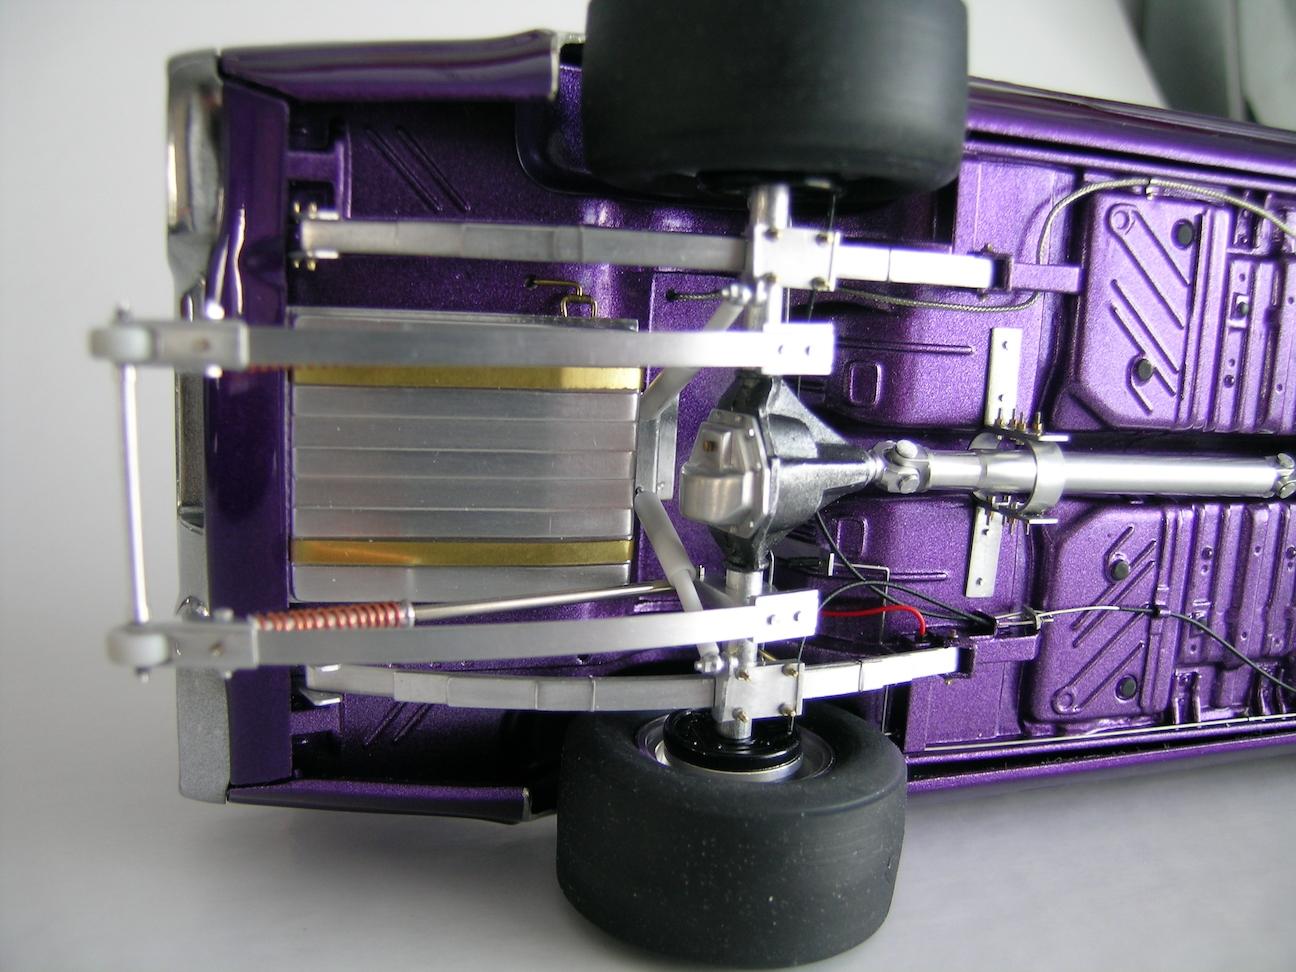
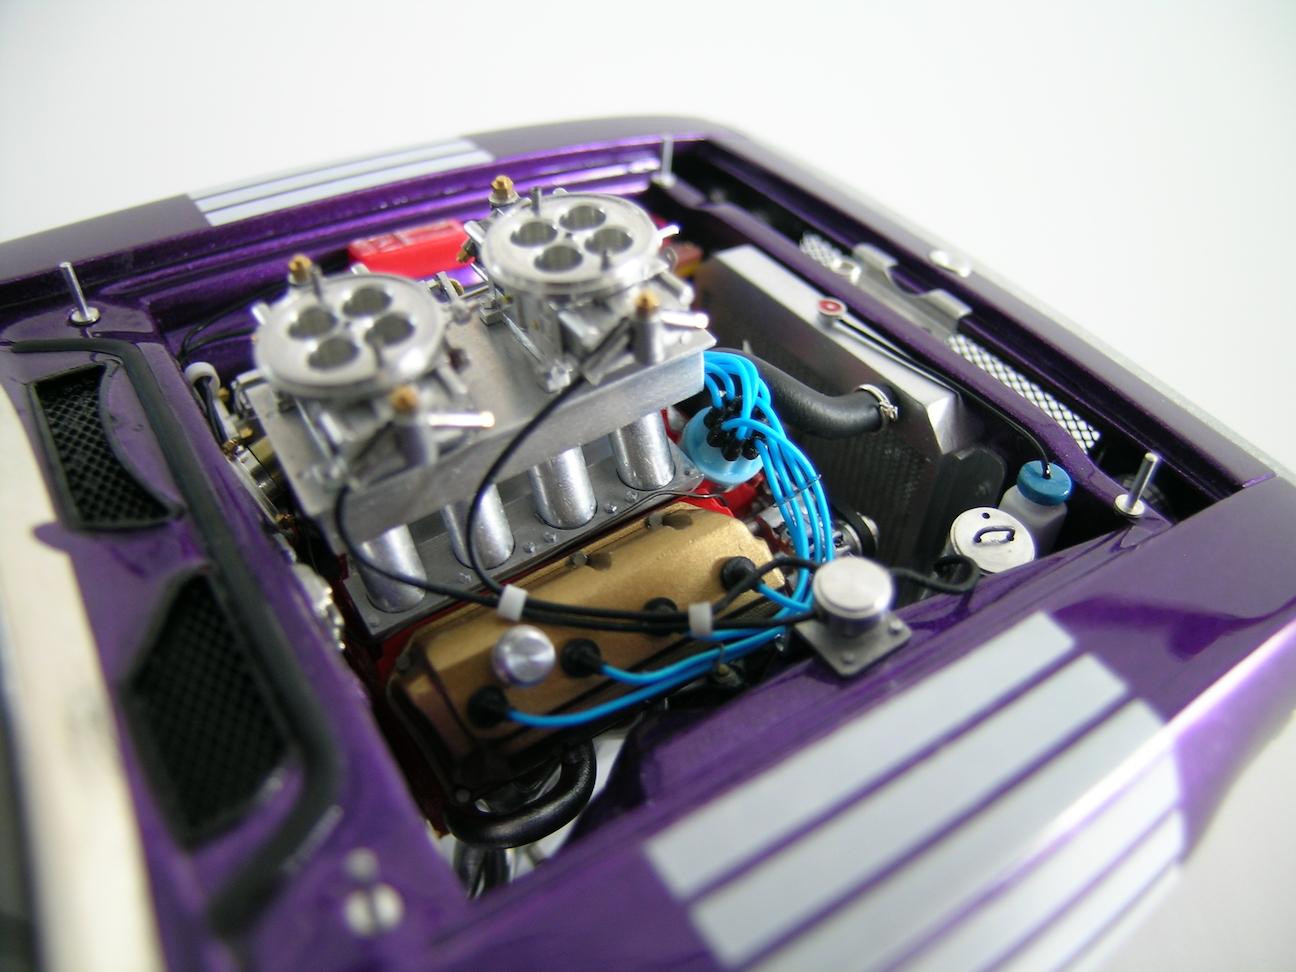
Hello Everyone! As promised and for those who are interested, I am posting some pics of another of my previous completed build. On this thread you will see my drag racing version of a HEMI 1972 Plymouth Roadrunner 1/25 scale. The production of the 426 HEMI ended in 1971 and was obviously not available for the 1972 model year but since it’s a drag car and not any kind of tribute build I decided to implant the elephant under the hood… Like for my ’70 Dart Swinger, this build is also less detailed than the ’70 Plymouth GTX (my last completed build) and it was done with more plastic components but still pretty well detailled for a model car that I built roughly 10 years ago. Some of the machined parts are less elaborate than my most recent versions but still decent with all the final details added. As you know, we all have to start somewhere and gain experience to do better... As with my other older builds, I can't remember if I took a lot of picss during the build process, but I can't find more than what is posted in this thread. Some photos are blurry or overexposed so I will try to take new ones with a better-lit environment when the weather and time permit. The body shell is an original annual MPC kit that I bought on ebay several year prior the build. The car was already built but unpainted so I had to dismantle it to save the body shell. I used the floor pan and engine bay from the latest AMT version of the 71 Dodge Charger as a donor for this project. The engine block and transmission are from the ’69 Dodge Charger Revell/Monogram Pro Modeler kit that was also used as a donor on various of my builds. The body is painted FC7 Plum Crazy using Model Master lacquer topped with 6 coats of Tamiya gloss coat and polished with Detail Master polishing cloths starting with 3600 thru 12000 grit. Novus 2 stage polishing compound and Meguiar’s Carnauba wax were used to complete the job. Strobe stripes are from Keith Marks. I spent countless hours (I had not done precise follow-up) over a 15 month period working on this build from the beginning of January 2010 to late March 2011. Comments and questions are welcome, so don't hesitate to ask if you would like more information! Take care, Francis Trunk floor engraving. Transmission support in milling vise. Piece of frame made with styrene. Dana cover in milling vise. Front spindle with brake disc and resin caliper. Brake drum in the rotary table. Aluminum machined Centerline mags. Machined gas tank with brass straps. Aluminum leafsprings. Rear end components. Driveshaft Safety Loop. Hemi heads progress. Aluminum machined tunnel ram Intake Holley carbs (pretty crude design). Modified front grille. Scratch built B&M shifter. Completed model pics with hood. Without hood. Front view with brass grille and Alclad painted bumper. Back view showing modified bumper and gas cap. Side view (sorry for the overexposed pic). Interior. Trunk details Underside view I know, I know, the safety loop is not properly positioned... Underhood, the elephant!
-
64 Dodge D100 Pickup Pro Street
AmericanMuscleFan replied to AmericanMuscleFan's topic in WIP: Drag Racing Models
Thanks for your kind comments guys! Mike, I don't understand why your post is between the last one I replied but I think I have a little idea... Thank you for the mark of trust but regarding suing, I guarantee you that I'm not that kind of person! By the way, I'm glad to have some news from you sir!!! Claude, I must admit that I am not the greatest globetrotter in the world but you are certainly the best of all the ambassadors! With all these superlatives, you set the bar so high my friend, I'm afraid to disappoint some potential visitors... As they say beauty is in the eye of the beholder! As a beholder myself, I must say that your builds are pure beauty!!! Brad, I would love to meet you (and other fellow members) in person but I'm not sure if all the planets will line up for this must-see meeting of model car enthusiasts... we can still hope... In the meantime, I will try to gather some pics of another of my previous build and start a new thread, hope you will like it! Take care, Francis -
Nice job Steve! Very elegant and fast car for the very last ride for the car lovers... The Grim Reaper has never had a better saddle!!!
-
Heavy Haul Project
AmericanMuscleFan replied to Mopar - D's topic in WIP: Model Trucks: Big Rigs and Heavy Equipment
Nice work Dan, this truck is a real beast! Give it an anchor and it could pull the moon out of its orbit!!! Very nice project, keep doing your great job! -
AMT Pete 352 Day Cab
AmericanMuscleFan replied to Straightliner59's topic in WIP: Model Trucks: Big Rigs and Heavy Equipment
Nice details all around the engine Daniel, truly well done and accurate. By adding the oil pump, you deserve to be seen as more detail-oriented than the model car maker itself (AMT). Nice touch sir you are very resourceful!!! -
64 Dodge D100 Pickup Pro Street
AmericanMuscleFan replied to AmericanMuscleFan's topic in WIP: Drag Racing Models
Thanks for the kind comments Claude! I will try to drop the engine in its final resting place (engine bay) with the headers already mounted on the heads so it should save my knuckles... Thank you for caring so much for my well-being my friend, I really appreciate!? Take care, Francis -
41 Chev P/U street rod
AmericanMuscleFan replied to Steve H's topic in Model Trucks: Pickups, Vans, SUVs, Light Commercial
Hard decision you made Steve but a good one IMHO! Matte and semi-gloss finishes are very trendy lately and it produces a very special look, I really love it. Thanks for the advices by the way! -
Ray, it will be cool to see a Corvair built as a drag car, there aren't a lot of those cars around and anything drag racing related is my favorite no matter the brand!!!
-
Jim, glad to see that the good old Testor clear enamel saved the day, it would have been a shame to see a clear coat ruining this magnificent ultra shiny red!!!
-
What more can I say that hasn't been said dozens of times? You're in a class of its own sir... If I hadn't checked this thread all along I would say you posted pictures of the real car that you want to pass off as a scale model. Simply amazing, another masterpiece done in a record time!!! ?
-
AMT 50 Chevy patina truck
AmericanMuscleFan replied to Jantrix's topic in Model Trucks: Pickups, Vans, SUVs, Light Commercial
That's a superb and impressive build Rob! Very nice and well dcrafted from bumper to bumper in a very short time (only 4 months... WOW !?). You can be proud of it sir!!! -
41 Chev P/U street rod
AmericanMuscleFan replied to Steve H's topic in Model Trucks: Pickups, Vans, SUVs, Light Commercial
Beautiful little pickup Steve! You did a great job on the engine and the flat red color is fantastic, I love it!!! Did you used a silver base for the paint or the metallic red has been applied directly over the primer? -
64 Dodge D100 Pickup Pro Street
AmericanMuscleFan replied to AmericanMuscleFan's topic in WIP: Drag Racing Models
Thanks for the kind words Glenn! Take care, Francis Thanks John, I really appreciate your comments sir! If I could build a little bit faster... I don't know how you can achieve that level of quality in your build in so little time? I still have a lot to learn from you sir!!! Take care, Francis -
1959 " Wild Cad" finished "Outside" pictures 8/8/20
AmericanMuscleFan replied to John Teresi's topic in Model Cars
John, you are nothing less than the king to replicate these extreme custom cars! Another of your masterpiece that can be mistaken with the real car! I LOVE it!!! -
JAG XK120 Kompressor : as a ProTouring concept
AmericanMuscleFan replied to Claude Thibodeau's topic in Model Cars
Well Claude, let's say that 2020 was not all wasted and a good year for you on the bench! I know nothing about this nice European car but I can see your personal touch in it and the substitution by the big Hemi engine is certainly the most obvious to me! Clean and sober build, another hit on your record my friend... -
Chad Hiltz : "Green Goblin" Finished "Outside" Pictures 8/7/20
AmericanMuscleFan replied to John Teresi's topic in Model Cars
Tell me John, you were certainly in close contact with the builder or the real car to be able to recreate it with this level of precision!? Your rendition (or tribute) is simply fabulous and the level of craftsmanship you show us in the WIP thread is simply OUT OF THIS WORLD!!! I will check back the WIP thread in order to digest all the great work done... I take my hat off to you sir! ? -
The color is fantastic Jim, I also thought it was an enamel so if it's the case, it might take at least 1 month of drying time before any kind of polish based on my previous experiences.
-
1971 'Cuda Pro Stock--New Photos August 6
AmericanMuscleFan replied to Straightliner59's topic in Drag Racing
Nice to see this Pro Stock Cuda still straight and very attractive Daniel. All those years haven't done too much damage on it and the engine bay is very well detailed. This Johan kit is timeless and still a nice one to build when we can afford one... Funny thing, I remember these kits were molded in different colors back then so you were lucky if yours was molded in white. Cuda, HEMI, Pro Stock, everything I love!!! -
1955 IH RDTC Highbinder
AmericanMuscleFan replied to DRIPTROIT 71's topic in Model Trucks: Big Rigs and Heavy Equipment
That's FANTASTIC Brian!!! Obviously I have not seen all your jewelry since I have been a member of this forum for a few months but I must say that you have the magic touch! You are in your element my friend, to be mistaken for a real one! -
International 4300 Eagle
AmericanMuscleFan replied to landman's topic in Model Trucks: Big Rigs and Heavy Equipment
Very nice family photo Pat! Your International 4300 came-out beautiful and I do love the yellow Caterpillar engine, very convincing build from bumper to bumper. Well done sir! -
64 Dodge D100 Pickup Pro Street
AmericanMuscleFan replied to AmericanMuscleFan's topic in WIP: Drag Racing Models
You are welcome Brad! I'm sure you understand the principle so don't bother with the angle mentioned in my explanation, by putting more angle you will shorten the transition (the funnel effect) and by decreasing it you will lengthen it. Happy machining, Francis -
This is fabulous Mark! The extreme weathering looks so real, I do love the green oxidation on the radiator, very nice detail. You have the magic touch sir!!!
-
64 Dodge D100 Pickup Pro Street
AmericanMuscleFan replied to AmericanMuscleFan's topic in WIP: Drag Racing Models
Thanks for the kind words Brad and Doug! Sorry guys but I forgot to takes pictures of that operation on the milling. Basically, I used the rotary table mounted on the angle table at 7.5 degrees and made 2 cuts at 90 degrees from each other. I wasn't sure how successful the parts were before I soldered them, this was my first time trying this so it was kind of trial and error that ended up pretty well I would say... It is not intended that I don't take pictures of everything I do but rather to save a little time because all these parts take me a long time to machine and I try to photograph only the essentials (sometimes I forget however...). Please feel free to send me a PM if you have any specific questions, I will try to help you as much I can. Take care, Francis