Spottedlaurel
-
Posts
1,980 -
Joined
-
Last visited
Content Type
Profiles
Forums
Events
Gallery
Everything posted by Spottedlaurel
-
Very nicely done, looks like you had a lot of fun building that one and great photos too! Despite being snap-fix this is a great kit, I enjoyed building one last year. Would be good if they'd reissue it.
-
Thanks Carl and Chaz! It has to be said that it was a bit of a slog carrying on with this one today - it would have been much productive and pleasant if I'd swapped over to some other builds, but I'm sure there'll be a sense of satisfaction when I've got this one across the line. 1:25 AMT Chevrolet Impala kit by Spottedlaurel, on Flickr The wheel detailing went well. A tiny bit left to do, but I'm glad I made the effort. The suspension was a struggle, all I can say is that I got there in the end with all four wheels touching the ground. I think my problem still goes back to the original fitment issue, the suspension components went together pretty well. Swapping the front spindles worked out OK. 1:25 AMT Chevrolet Impala kit by Spottedlaurel, on Flickr 1:25 AMT Chevrolet Impala kit by Spottedlaurel, on Flickr Getting the LT5 fitted and the Corvette's radiator and fan set-up in place was somewhat more satisfying. The radiator was a good fit between the front chassis rails, I drilled and glued a couple of pins to secure it in position. The bottom edge is just visible below the front bumper and the air intake joined-up to the manifold. I'll try and fit as many of the ancillary components that I can, to give it a vaguely plausible look. 1:25 AMT Chevrolet Impala kit by Spottedlaurel, on Flickr 1:25 AMT Chevrolet Impala kit by Spottedlaurel, on Flickr
-
I don't know if others do the same, but I quite enjoy buying slightly random colours, doing a bit of research on what used them at 1:1 then seeing what ideas come to mind with what I have in the stash.
-
What a wonderful build! Great colour choice inside and out, and the vinyl roof suits it perfectly.
-
You've given it a great period look, nicely done! Goes really well with the van and pizza delivery car.
-
Slowly grinding to a conclusion on this one. 1:25 AMT Chevrolet Impala kit by Spottedlaurel, on Flickr Even with yet more shaving of the interior I'm still getting a fitment issue. So I'm not just relying on glue to keep it together I added a bent paperclip tie each side to link the chassis and front inner wings. 1:25 AMT Chevrolet Impala kit by Spottedlaurel, on Flickr Most of yesterday's time on the bench was spent fiddling with the suspension. I cut the rear springs, but because the chassis hasn't fitted perfectly into the bodyshell I ended up with a slight ride height discrepancy and had to shim one side back up again. To get the front end lower I'm simply going to swap the uprights from side to side - I'll lose the steering arm connection, but that's no bad thing as it gives me the option of turning the wheels. Must remember to attach the exhaust before getting carried away and fixing the rear axle in place! Has it worked?........... 1:25 AMT Chevrolet Impala kit by Spottedlaurel, on Flickr 1:25 AMT Chevrolet Impala kit by Spottedlaurel, on Flickr 1:25 AMT Chevrolet Impala kit by Spottedlaurel, on Flickr I'm happy with that. Just about to go and detail the Keystone Klassics.......
-
Trying to avoid buying more kits at present, I have plenty to keep me going for the next decade or so. But supplies are needed to build them...... I've been having good results recently with Halfords automotive paints. These colours were all on clearance at £3 a can, they all seem to be late 1980s/1990s colours so are ideal for many of the kits in my stash and some will suit older stuff. The Kingfisher Blue is one of those classic '90s turquoise colours that sometimes looked a bit inappropriate on the 1:1 1980s throwbacks they offered it on.

-
Very nice. The badges worked out well and the interior looks just right with very sharp detailing.
-
Looks great, I like the smooth rear end without a spoiler.
-
Thanks JC, that was an enjoyable and very informative pre-breakfast read. Some amazing work there and a few things I've picked up for mine. Something that's puzzled me is the purpose of the scoops in front of the rear wheels - on some cars they're open with an extra bit of black plastic, on others they're smoothed over. I'd imagine they provide air to the rear brakes and/or diff? Even on the cutaway drawings it's not entirely clear.
-
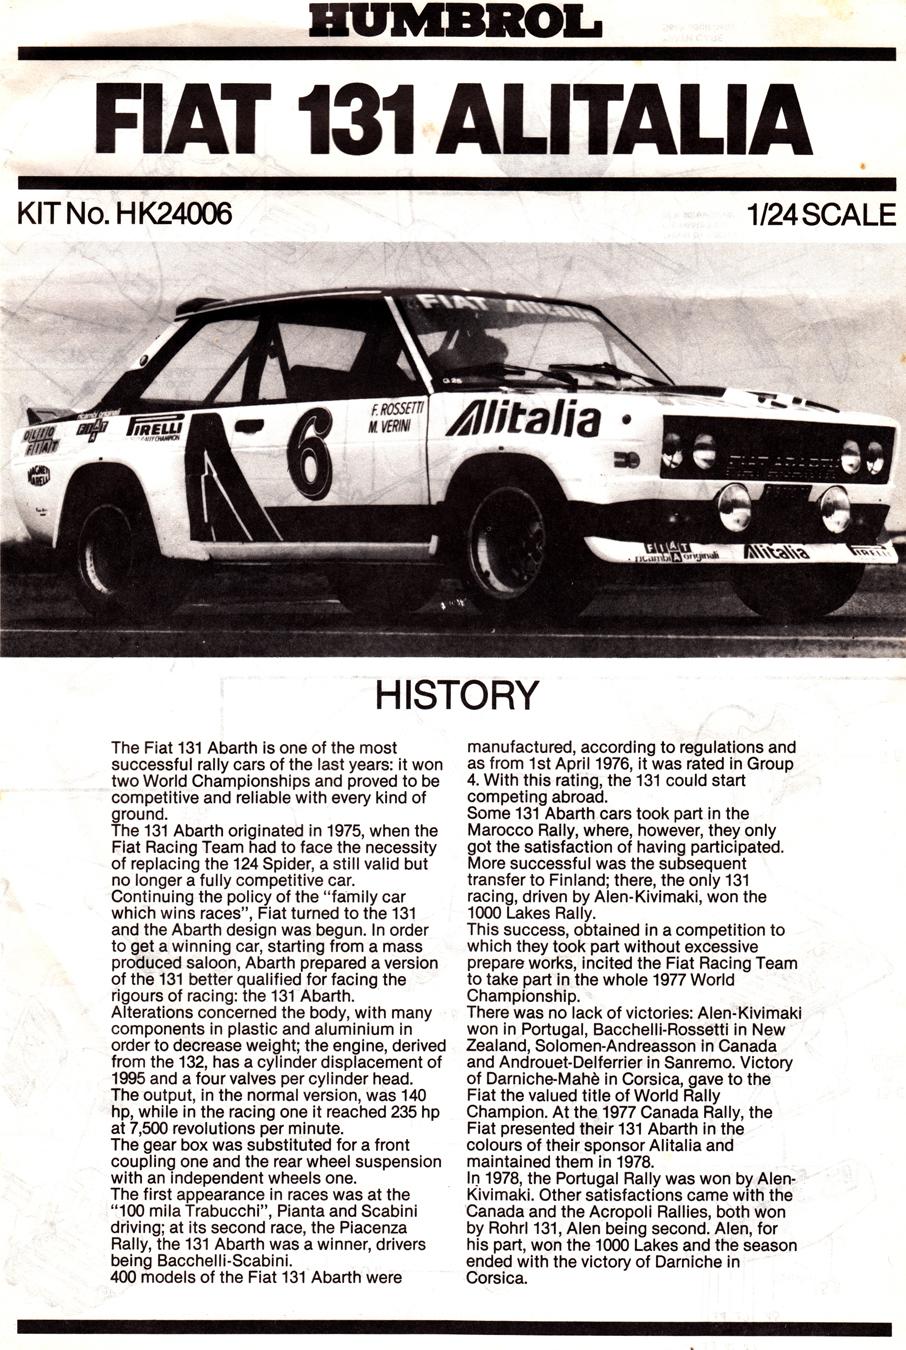
I remembered someone on here was doing one, have you got a WIP thread for either of them? I shan't be trying to make this one super-accurate, but it'll be good to have it on display again. Thanks Pete, I'll do my best. More about the wheels in a moment.... I'l try and make it worthwhile Geoff. Did Seat make their own version of the 131? This must have been the one I built, I vaguely recall the box art: Scalemates suggests there were several Esci versions before this issue came along in 1981. I don't know if Humbrol did much more than put in their box and reprint the instructions, from the decals I used it seems they came straight from Esci. Luckily I kept the instructions, as I have done for virtually every kit I've ever built: Thanks guys! The wheel choice came from this image, which my son found the other day by chance in a random assortment of old racing/rallying photos I bought a few years ago: As soon as I saw the front rims I realised the Hayashis I had were very, very similar. The gold treatment was common and will look good against the dark blue. Somewhat confusingly, they weren't actually made by Cromadora, but they're Campagnalo instead (style 40802). A company called Group 4 Wheels now make a 1:1 replica, if you have deep enough pockets. 1:24 copies are also available.
-
That's excellent, your dad obviously gave you a good starting point as the finished result looks really good. The chromed headlight surrounds look much better than the box art.
-
I enjoyed seeing it come together in the WIP thread. Great to see it completed, the finished result looks fantastic. Super-smooth job done on the rear bodywork.
-
/\ Looks good. As well making a start on the Fiat I made useful progress on these over the weekend: Chevrolet, Toyota and Honda kits by Spottedlaurel, on Flickr The Impala looks more complete than it is, as it has no suspension. Still not 100% happy with how it's fitting together around the front screen/interior/dashboard interface, more trimming required. Chevrolet, Toyota and Honda kits by Spottedlaurel, on Flickr Quite a size difference between the three of them.
-
I needed to do something that wasn't Japanese or American and this one ended up being my choice. First built it when I was 12-13, so nearly 40 years ago now. The shell was unpainted and everything else was done by brush. Then, as now, I didn't enjoy doing large decals so I built it as a rallycross car with some random decals and dry transfer numbers. After a few years it ended up in the scrap box, and for some reason got a squirt of yellow paint (maybe I was testing it out for another build?). As he did with several other older kits, my son was rummaging through the parts box and assembled enough of it to make me realise I could put it back together again. Luckily I don't throw much away. 1:24 Humbrol Fiat 131 Abarth kit by Spottedlaurel, on Flickr 1:24 Humbrol Fiat 131 Abarth kit by Spottedlaurel, on Flickr 1:24 Humbrol Fiat 131 Abarth kit by Spottedlaurel, on Flickr How come I've got a spare sprue with the engine, suspension and wheels? I had an issue when I first built it and wrote to Humbrol asking if they could send me some replacement parts. A while later I got a package from Italy containing five of that sprue! Although mine was the Humbrol issue it started life as as Esci kit and I presume they had the spares available. Ideal for this rebuild and I'll have a few twin-cam engines for future projects. Job number one was to try and clean up the glass. The yellow paint on the side doesn't want to budge but the front and rear screens have come up well after some wet sanding, Micromesh sheets then coarse, medium and fine Zero Paints polishing compounds. I'll carefully cut the sides out and replace them with flat sheet. 1:24 Humbrol Fiat 131 Abarth kit by Spottedlaurel, on Flickr I've got a clear look in mind, built as a hi-po road car in dark metallic blue with these wheels which are pretty close to a style I've seen on some of the works rally cars. They'll be painted gold, which with the dark blue paint will be reminiscent of the Olio Fiat-sponsored blue and yellow rally cars. 1:24 Humbrol Fiat 131 Abarth kit by Spottedlaurel, on Flickr 1:24 Humbrol Fiat 131 Abarth kit by Spottedlaurel, on Flickr 1:24 Humbrol Fiat 131 Abarth kit by Spottedlaurel, on Flickr As it'll be a road car I'll get it sitting lower than this. I've given it a couple of quick coats of primer to see what work is needed. I'll probably fill the fuel filler in the bootlid and open up the scoop in front of the rear wheel. It's not something I'll be rushing to finish, I want to take my time over it and get it looking half-decent. It'll sit well alongside my Audi Quattro and Renault 5 Turbo.
-
That worked-out nicely, must remember that. I have one or two kits with standard panel lines so shallow it would be worthwhile doing when I deepen them, let alone scribing new ones.
-
Did more on this one than I was expecting during the week and today: RH inner wong not perfect but better than it was now the hoses have been removed. BMF commenced. 1:25 AMT Chevrolet Impala kit by Spottedlaurel, on Flickr 1:25 AMT Chevrolet Impala kit by Spottedlaurel, on Flickr Most of the BMF done, I think just the door handles to go. Glass is fitted, panel lines and front scuttle vents given a wash. 1:25 AMT Chevrolet Impala kit by Spottedlaurel, on Flickr Rear lights/bumper assembly detailed with a wash of thinned matt black, might need a touch more but it's almost there. Rather than mess around with white glue I taped the rear lights in place with a large piece of BMF. Also trial-fitted the Corvette's radiator, with some 'adjustment' of the Impala chassis I've got it fitting in a place where the air intake will work out OK. From this point onwards I'm going to assemble it in a slightly odd order, putting the body and chassis together then carefully fitting the suspension. That way I can adjust it as necessary and be confident that I get the ride hieght and wheel position just how I want.
-
Nice job, that colour looks just right on it.
-
I had to do exactly the same thing when I fitted the axle first!
-
If the Skyline is like the older Fujimi issue I have then it looks slightly odd around the front end, and the bumpers are moulded-in as part of the bodyshell so need to be chromed or painted somehow.
-
What a day Tom! Let me know if you want a LHD dashboard for the Celica, I have one spare from my Hasegawa kit. Is the Skyine 4dr by Fujimi or Aoshima?
-
Nice progress! All the best Chevelle wagons are yellow......... 1:25 Revell 1966 Chevelle Wagon kit by Spottedlaurel, on Flickr
-
Nice one Tom. It's a shame you don't know who the original builder was, but I'm sure they'd be very pleased to see it resurrected and enjoyed by a new audience. Look forward to seeing what else you get.
-
Nice work - sympathetically done, nothing too radical, but those little tweaks and improvements have been effective.
-
Revell 1961 Jaguar XKE - British Racing Green.
Spottedlaurel replied to RandyB.'s topic in Model Cars
Very nicely done, the detailing is great.