Spottedlaurel
-
Posts
1,980 -
Joined
-
Last visited
Content Type
Profiles
Forums
Events
Gallery
Everything posted by Spottedlaurel
-
Thanks everyone! I'm not entirely sure where the beige paint idea came from - although it's close to Capri Cream that's not a colour I knew about beforehand, and the 1:1 Impala I saw was white. I think it was just the ability for the beige to give it the sleeper look. I'm really pleased I found these Keystones, just wish I had another set or two!
-
1970-72 Toyota Celica 1600 GT by Hasegawa
Spottedlaurel replied to Spottedlaurel's topic in WIP: Model Cars
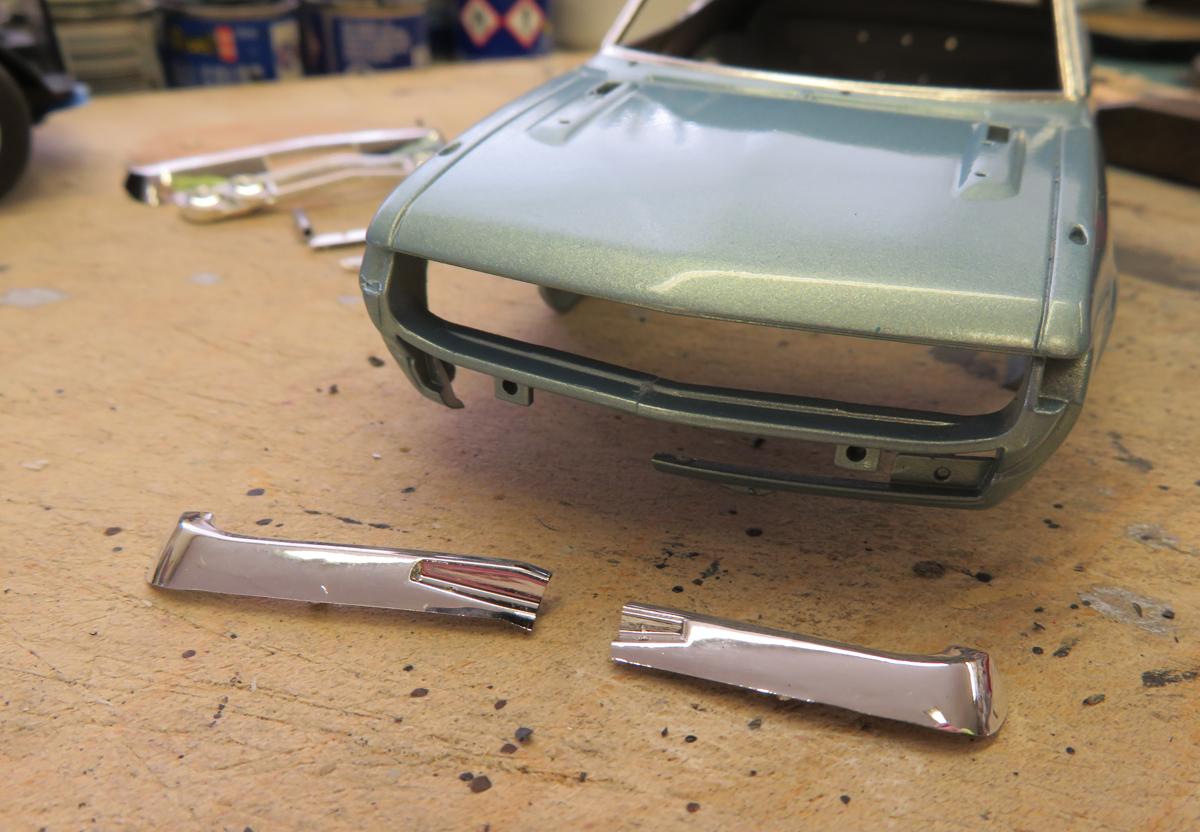
Thank you Steve. Funny thing about the stance is that I actually had to raise the rear up a touch since I took those photos in my last post - it looked like it was dropping slighty at the back end, and the wheels were just a bit too tight in the arches. I'd very much like to build my next Celica as an early '80s street machine, jacked-up at the back with slotmags, sidepipes and perhaps a small block Chevy under the bonnet? Must finish this one first, and I shold be on course for that over the Easter weekend........ Having already broken the front part of the bodyshell I then managed to snap the front bumper in half. Maybe it was the plating process, but the chrome sprue did seem to be unusually brittle. It's a clean break, I'm just going to carefully glue it back together (and the front plate will hide some if the join). 1:24 Hasegawa Toyota Celica 1600 GT kit by Spottedlaurel, on Flickr I've been chipping away at the foilwork. In the week I decided that to accentuate the pillarless coupe styling I needed to open-up the side windows. All of the glass was a one-piece moulding, so that meant some careful and nerve-wracking cutting without wanting to break something else on this nice kit. 1:24 Hasegawa Toyota Celica 1600 GT kit by Spottedlaurel, on Flickr Pretty much everything prepped and painted for final assembly. 1:24 Hasegawa Toyota Celica 1600 GT kit by Spottedlaurel, on Flickr 1:24 Hasegawa Toyota Celica 1600 GT kit by Spottedlaurel, on Flickr First look at it on the finalised suspension height. 1:24 Hasegawa Toyota Celica 1600 GT kit by Spottedlaurel, on Flickr I managed to glue in the broken piece of front valance . Also started to add the nicely-moulded brightwork which have really started to bring it together. I'm pleased with how it's going, musn't rush this final stage and break anything else.........
-
Nice one Gareth. You certainly got a great shine on the paintwork.
-
"Bring Out Your Dead" Completion Build--ROUND 2 Is On!
Spottedlaurel replied to Snake45's topic in WIP: Model Cars
Go for it! I joined my first one last one summer and I've since managed to get something completed in all three rounds since then. All of them were started back in the 1990s, long overdue........ I'm going to have to skip at least the next round as I've run out of longstanding WIPs. Hopefully enough people sign up, I'll keep dropping by to see progress. -
Thanks David, I hope you didn't mind me dropping a couple of photos of mine here. My version was pretty crude, much of the work was done in the '90s and it was only when I got replacement glass last year that I was able to get on with it again. For the interior I simply choppd the back off and replaced it with a piece of varnished plywood. I glued it in place at the line formed by the underside of the windows. As much as anything, I added the roof rack to break up the big expanse of plain black bodywork complete with my less-than-perfect filling. Also it was an enjoyable little exercise to see if I could scratchbuild something and make it look vaguely realistic. I'm in the happy position of not having had to attend too many funerals so it's not something I've sen in person, but occasionally the rack is used for flowers (we don't tend to have separate flower cars here). I also wonder if it's to add an extra air of formality? Seems to have been a feature on old and newer hearses: Humber Hearse by Spottedlaurel, on Flickr Ford Granada Mk2 Hearse (Duffy?) by Spottedlaurel, on Flickr 1996 Vauxhall Omega Hearse, P34MLA by Spottedlaurel, on Flickr Some of the really swoopy modern ones I looked at when I did a search seem to be doing without it.
-
"Bring Out Your Dead" Completion Build--ROUND 2 Is On!
Spottedlaurel replied to Snake45's topic in WIP: Model Cars
Nice work Snake! Glad you got the push you needed to get it finished. How strange to come on an American forum and see a photo posted by someone from NZ of a car that was built and is run by a local garage that I take my Datsuns to! I haven't see it running on the track but it's always a treat to see it (or their other toys) when I take my cars their for work. I'll have to mention that it's been of inspiration to you. -
"Bring Out Your Dead" Completion Build--ROUND 2 Is On!
Spottedlaurel replied to Snake45's topic in WIP: Model Cars
Great to see some more projects making their way to the finish line! -
Great to see this thread David. I like what you've done so far, good luck with getting it finished this time around. It took me over 25 years between starting and finishing my Ecto-1A to hearse conversion, and mine was nowhere near as thorough as yours! I kept mine super-simple by using the original chassis, front seats, bumpers etc as I didn't have the Monogram donor, and I started it in pre-internet days so had very limited reference. I built mine with rear side windows, as that's how hearses tend to be here. 1:25 AMT 1959 Cadillac Hearse kit by Spottedlaurel, on Flickr 1:25 AMT 1959 Cadillac Hearse kit by Spottedlaurel, on Flickr The racks inside and out were made from brass rod and boat fittings. I look forward to seeing yours progress.
-
Looks really good Pete! The extra detailing and scratchbuilding really makes it. Do like the deeper dished alloys too.
-
I'm meant to have forgotten about as it's going to be a birthday present, but I've got something similar coming to me soon. The flat roof extension is great for outside shots of finished builds, but there are times when it's not ideal to be getting the ladder out and climbing up there......
-
That's a great kit, I enjoyed building one back in the '90s. I actually ended up with two as the first one had a warped hood, I was lucky to find the second one for something silly like £6 at an autojumble! You've reminded me of the reshell project I need to finish.......
-
1978 El Camino
Spottedlaurel replied to YBlock292's topic in Model Trucks: Pickups, Vans, SUVs, Light Commercial
That looks great, the caramel-coloured interior is just right for the period. -
Great to see it finished, an inventive and very well-executed build. You're brave to go with the black trim against the white paintwork, no margin for error there!
-
Thanks everyone for the kind words! The colour I chose was fairly close to Capri Cream, I saw a really nice example of the Impala in that shade online and I liked the subtle appearance, even if it might have looked sharper in a metallic. I thought it gave more of a sleeper look. I wanted something that was a step back from Pro Touring, keeping the period look but giving it modern(ish) performance and reliability. I wonder how it would go with an LT5? Swapped into something as big and heavy as an Impala might take the edge off its outright performance, and doubtless a period big block could be tuned to give the same power but it might not be as driveable? The LT5 and long gearing would make it into a rather nice long distance cruiser perhaps? I can daydream about using it to cruise around on the USA/Canada road trip I'll probably never take, visiting a few shows, swapmeets etc.......
-
Chang, another stunner from you there! Super-clean build, fantastic paintwork and a great colour choice inside and out.
-
What did you screw-up today??
Spottedlaurel replied to TransAmMike's topic in General Automotive Talk (Trucks and Cars)
Having already snapped and broken the front of the Celica's bodyshell....... I then managed to break the front bumper in half when I was gently trimming off the sprue attachments. Sigh.
-
Thta's going to look great Gareth, look forward to seeing it come together. Lots of careful detail painting required on the interior I imagine, especially with it being a convertible?
-
A great rescue job you're doing here, it's coming together very nicely.
-
Moving on nicely Steve. I vote for those new wheels too.
-
Most Involved Part of Building?
Spottedlaurel replied to JollySipper's topic in General Automotive Talk (Trucks and Cars)
The job I put off most is painting black window trims on the inside of glass fitted to stuff from the '80s onwards. Sometimes I mask them, but that's not something I enjoy either, so usually it's 'just' a case of painstakingly brush painting them in. Sometimes I'll chose to start something older so I don't have to do that, trouble is there are a lot of 1980s/90s cars that I like and have in the stash. Wheel detailing can be a chore as well, getting one done is satisfying but then having to plough through another three is rather repetitive. -
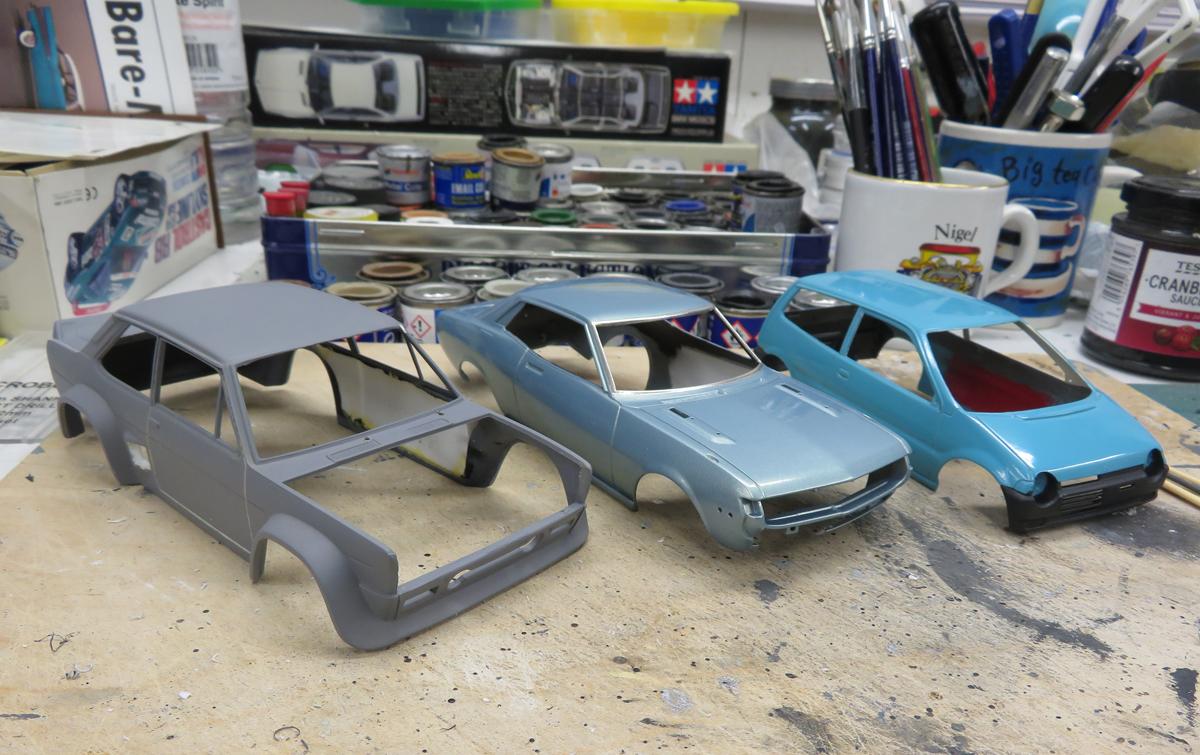
With my Impala finished I could jump back onto some other projects: Scribed panel lines and started opening-up scoops etc on the Fiat, commenced BMF work on the Celica and made a start on the Honda bumper painting - it's a little car, but there's a lot of detailing and window trims to deal with.
-
Lamborghini Silhouette by (Gunze - Sangyo) Testors
Spottedlaurel replied to 89AKurt's topic in Model Cars
Great to see it finished Kurt, I think you've more than done it justice - looks very good. -
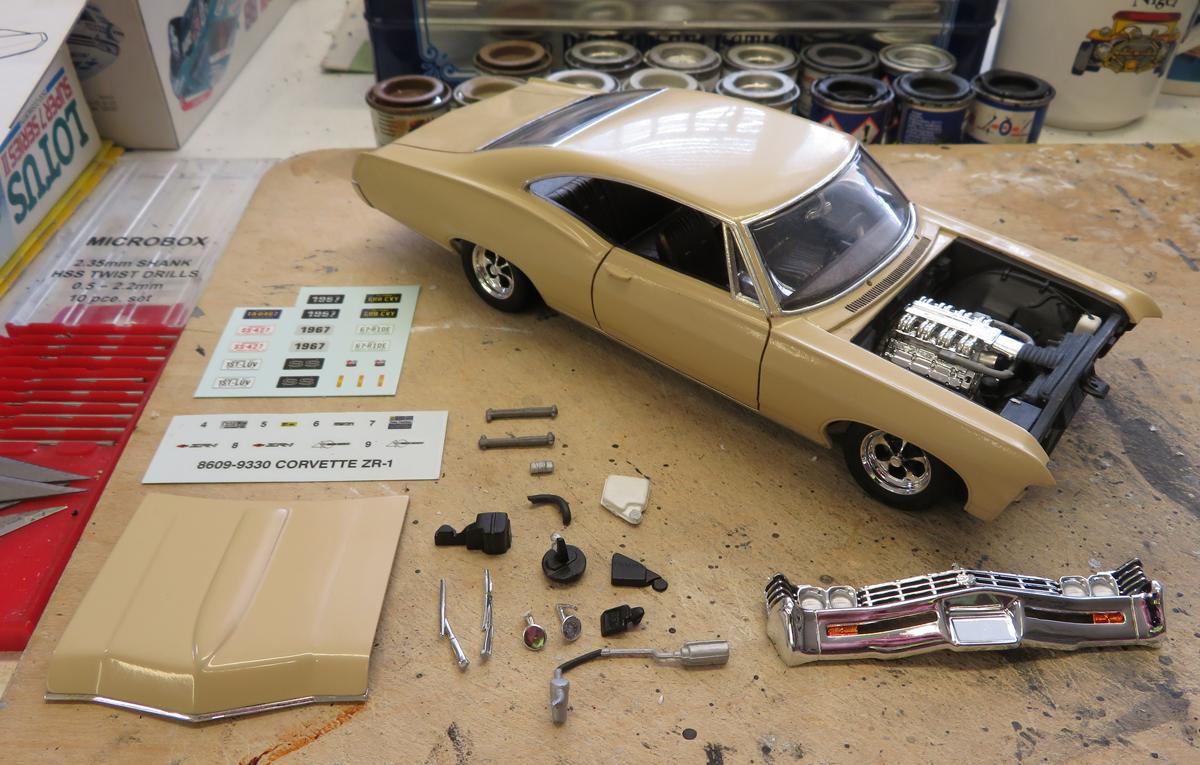
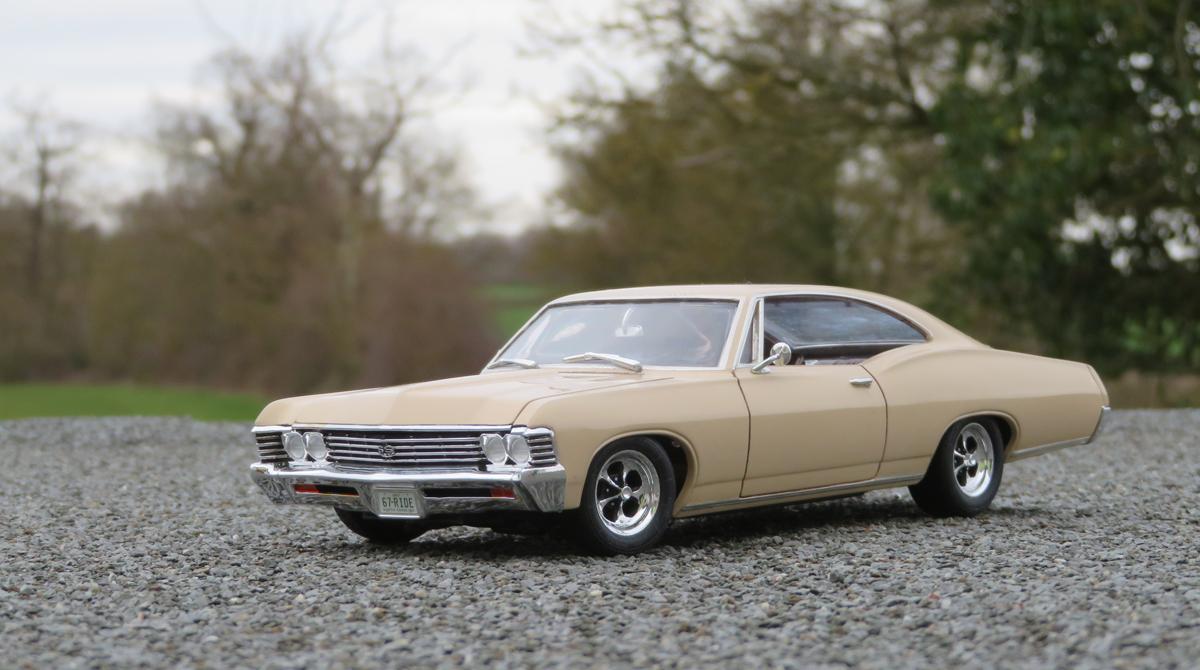
Latest completion: AMT 1967 Chevrolet Impala kit by Spottedlaurel, on Flickr WIP thread here: I started with this circa 2015 issue picked up off eBay: AMT 1967 Chevrolet Impala kit by Spottedlaurel, on Flickr It jumped the queue somewhat after I got a can of Rover Sandalwood Beige paintwork and I had an image in my mind after seeing a 1:1 '68 Impala at a show in 2019. Straight bodywork, period colour, stock interior and older-style wheels to keep it subtle(ish), but lowered and fitted with an LT5 from an AMT Corvette ZR-1. Thus turned out to be a much easier swap than when I dropped an LT5 into a '65 Corvette. Wheels are MRC Keystone Klassics with Revell #9 detail painting, fitted with big-and-little tyres from an unknown Japanese kit (probably Fujimi) as I preferred them to the MRC Firestone Wide Ovals. AMT 1967 Chevrolet Impala kit by Spottedlaurel, on Flickr I filled the hood vent and shaved the badges to give it a slightly smoother look, otherwise the body is stock. Panel lines were scribed and given a wash of thinned brown enamel paint. AMT 1967 Chevrolet Impala kit by Spottedlaurel, on Flickr This shot makes it look like the rear wheel is a little too far back. I didn't think that was an issue, but after the hassle I had getting it to sit right if that's the worst fault that's apparent then I can live with that. I had a chassis fitment issue which I never fully corrected even after much shaving and trimming of the interior and glass. I lowered it by chopping a scale 2-3" out of the rear coils and swapping the front uprights from side-to-side, which was easy and worked well, accepting that I've lost the connection to the steering arms (but it gives posable steering). AMT 1967 Chevrolet Impala kit by Spottedlaurel, on Flickr AMT 1967 Chevrolet Impala kit by Spottedlaurel, on Flickr AMT 1967 Chevrolet Impala kit by Spottedlaurel, on Flickr AMT 1967 Chevrolet Impala kit by Spottedlaurel, on Flickr I went for a tidy, restored look underneath rather than factory primer and overspray. Yes, some of the exhaust system is missing. Getting some material in and learning how to make up/modify a system is something I need to do...... 1:25 AMT 1967 Chevrolet Impala kit by Spottedlaurel, on Flickr 1:25 AMT 1967 Chevrolet Impala kit by Spottedlaurel, on Flickr Interior was painted with an automotive can of metallic bronze. AMT 1967 Chevrolet Impala kit by Spottedlaurel, on Flickr The LT5 swap was so easy and there was plenty of room for it, if anything it looks a bit lost in there so I made more effort to use the Corvette's air-con etc. I've fitted the latter's radiator and twin electric fan set-up. If I was doing it again I'd shave all of the moulded-in wires, hoses etc off the inner wings. AMT 1967 Chevrolet Impala kit by Spottedlaurel, on Flickr Comparison with the Monogram/Monogram LT5 conversion I did last year. AMT 1967 Chevrolet Impala kit by Spottedlaurel, on Flickr And a shot with the now-curbside AMT donor kit. It's a real shame I struggled with the fitment issue - I trial-fitted lots of times, but I just couldn't work out where I was getting the problem. Main source of it seemed to be the front glass, as it was fine up to that point, but it's possible I got the interior side panels in the wrong place before then. Thanks for looking.
-
That's great to, you've done a really nice job on it. This basic range of Monogram kits build up surprisingly well. Like Sonny I'm another one who did the yellow TR7 a long time ago, and would also like to be able to build one again someday but current prices prevent that......
-
Thanks Craig! Thank you Tom. Just a bit of thinned Revell enamel, brown in this case so it goes with the beige bodywork. The LT5 fitted so well it's like it was meant to be. The sump is the right way round and even the mounting hole matched up. Thanks Steve and Bill. By coincidence I saw an early Keystone ad and back then it didn't apear to have the familiar detail painting - definitely looks better with it done. This is where I started with it today. Got it finished at last after a relatively straightforward final assembly session, trying to get as many of the Corvette's ancilliary parts fitted as I could. More to follow in the "Under Glass" section later this weekend.